1
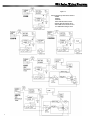
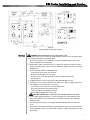
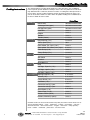
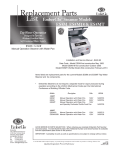
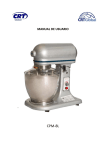
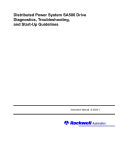
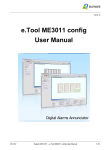
Installation Service
Manual
ES5 Food Steamers
ES5TS:
ES5M:
Timer Operation with Water Pan
Manual Operation with
Water Pan
ES5PBS: Manual Operation with Push
Button and Water Pan
ES5PB: Direct Connect with Push Button
ES5T:
Direct Connect with Timer
ES5PTS: Fixed Timer Operation with
Water Pan with Push Button
Designed to Operate without
Distilled Water
Model ES5PB
Warranty
Midco International Inc Warranty Policy
Exclusions Terms, Customer Requirements and Instructions
Only Authorized Service Providers are authorized to provide Warranty service on
all EmberGlo, a Division of Micdo International Inc., food equipment as described
under and Midco® International Warranty Policy. A list of providers can be found on
our web site: www.emberglo.com
Provisions:
In lieu of an implied warranty, all repairs and replacement parts furnished under
our Warranty shall be f.o.b. point of distribution, but the owner must pay the
necessary freight, delivery and labor costs involved when required. Any Federal,
State or Local taxes are also extra. This Warranty is effective for a period of 90
days from the date of original installation. EmberGlo® Electric Food Preparation
Equipment manufactured by Midco International, sold under the EmberGlo
trademark, are guaranteed to be free from defect in material and workmanship
under normal use and service for a period of 1 (one) year from the date of original
installation or for 1 (one) year when the registration card is returned within a
reasonable time after the date of original installation. Midco's obligation under this
Warranty Policy shall be limited to repairing or replacing, at our option, any part of
said equipment which Midco examination shall disclose to its satisfaction to be
thus defective.
Exclusions:
This Warranty Policy does not apply to damages resulting from accident, misuse,
abuse or alteration, nor does it apply to limed steam generators, nor does it apply
to any consequential damages. Most geographical areas require the use of
distilled or demineralized water. Tap water is permissible only with ES Series
Steamers. Midco's obligation will be the replacement of the product or parts
removed.
Terms:
Under the terms of this Warranty Policy, models considered portable (devices with
cords and plug caps such as EmberGlo Steamers) must be taken or returned to
the nearest service provider, transportation prepaid, returned transportation
collect. Non-portable units with permanent wiring will be serviced on the
customer's premises. Under these terms, Midco agrees, within the terms of this
Warranty period, to make all repairs at no charge by the authorized service
provider. Labor and mileage charges submitted by any other provider not
authorized will be the responsibility of the customer.
Customer Requirements:
All charges related to repairs made after the one (1) year, when the registration
card is returned within a reasonable time after the date of original installation,
during the Warranty period will be the responsibility of the customer unless the
registration card has been properly filled out and returned to Midco International
Inc. The product registration information is located on the product I.D. plate.
If a part is defective due to workmanship or materials and is removed from the product
within the applicable warranty period and returned to Midco in accordance with the
following procedure described, Midco will, at its option, either repair or replace the part.
Call the factory for Instructions on returned goods.
No equipment may be returned without written
authorization from MIDCO. Returned goods must be
shipped prepaid to the factory.
WARNING: Improper installation and use of this
product could result in personal or property injury.
SAFETY INFORMATION TERMS: The following terms are used to identify hazards, safety precautions or
EmberGlo
A Division of Midco International Inc.
4140 West Victoria Street
Chicago, Illinois 60646
tel 773.604.8700
fax 773.604.4070
web www.emberglo.com
special notations and have standard meanings throughout this manual. When you see the safety alert symbol
and one of the safety information terms, as shown below, be aware of the hazard potential.
DANGER: Identifies the most serious hazards which will result in sever personal injury or death.
WARNING: Signifies hazards that could result in personal injury or death.
CAUTION: Identifies unsafe practices which would result in minor personal injury or product and
property damage.
Quality Designed for Proven Performance
110
8449-96
Printed in USA
ES5 Series Installation and Service
Installation
Operation
In the United States, wiring must conform to local codes, or in the absence of local codes,
to the National Electrical code ANSI/NFPA No. 70-latest edition. In Canada, wiring must
conform to local codes, or in the absence of local codes, to Canadian Electrical
Code Part 1, CSA Standard C22.1.
1. All Models: Locate on level surface and plug power cord into 120 volt, single phase
60 Hz. grounded outlet.
2. ES5M, ES5TS, ES5PTS & ES5PBS: Fill water pan by pulling water pan out to stop position
and fill with cold water to top of baffles, then close drawer.
3. ES5PB & ES5T: Connect water hose assembly to water supply system. The supply
end has 1/8” female pipe fitting and should be attached down stream to a shut-off
valve. Steamer end of hose has a quick connect fitting which snaps onto mating fitting
on steamer. This fitting has an automatic shut-off valve that allows steamer to be
disconnected without shutting off water supply. After connecting, turn on water and
check for leaks.
4. EmberGlo Steamers do not require a separate hood for vapor produced during
operation according to the Uniform Mechanical Codes per the International
Conference of Building Officials Code. And there are no requirements in
NSF Standard 4 (2006e) for steamers to have ventilation.
_____________________________________________
General Instructions for Operation. For operation tips and recommendations see below.
1. Push power switch to ON position (light on) and allow approximately 15-20 minutes to
reach operating temperature.
2. Test to make sure unit will generate steam.
3. Open lid, place food on grid and close lid.
4. ES5M: Rotate pump handle clockwise until it stops - then release. See Heating and Cooking
Guide for suggested number of operations or “shots” (a shot is one rotation of pump handle).
ES5PB & ES5PBS: Push round button momentarily for each operation. Do not hold button
more than one second.
ES5PTS: Operates the same as the ES5PB, as stated above. Unit will automatically deliver
three shots per minute. At the end of cooking time, the ready light will come ON.
Note: After installation, operate several times until the water hose fills with water.
ES5T & ES5TS: Operate the same as ES5PB above, or follow directions on label on
front of unit which will automatically deliver three shots per minute for time set. At end
of cooking time, READY light will come ON and signal will sound. Turn toggle switch to
OFF to silence signal.
5. Open lid and remove food.
6. For efficiency and safety purposes, keep lid closed when not in use. This keeps the food pan
hot and reduces condensation in the steam chamber.
7. To shut off, push power switch to OFF position.
IMPORTANT: KEEP LID CLOSED WHEN NOT IN USE. This keeps the food pan hot and
reduces condensation in the steam chamber. When steamer is first installed, or when
reconnecting water hose, operate STEAM button several times to purge air from lines.
General Tips and Recommendations for Operation.
To sustain optimum cooking performance: It is important to maintain the correct amount of steam
generated. Either holding the manual pump (ES5M) or pressing the button (ES5PB or ES5PBS)
too long will flood the generator with too much water. On the other hand not holding the pump
(ES5M) or pressing the button (ES5PB & ES5PBS) long enough and not spraying enough water
will not produce enough steam on the generator to properly cook the food in the desired time.
2
Recommended pumping and button pressing times for proper water levels in the generator:
ES5M - It is recommended that the user pump the handle two to three times every 20 to 30
seconds. If it is pumped more times or if the user does not wait long enough between pumps,
the generator will flood. Also, if it is pumped only once every minute there will not be
enough water in the generator to produce the correct amount of steam to sustain optimal
cooking performance.
ES5 Series Installation and Service
ES5PB & ES5PBS - It is important to hold the button in for 3 seconds of time. If the button is
held too long, the generator will flood. If the button is held too short of a time, not enough water
will be sprayed onto the generator to create enough cooking steam. See below (next paragraph)
for recommendations on how to know this.
Recommended Procedure for Understanding the Amount of Steam Generated in both the Manual
and Push Button Types of Steamers:
1. On a cool steamer take the food rack and food pan out of the steamer so that the generator
And water nozzle can be seen.
2. Warm up the unit for 10 to 15 minutes.
3. ES5M - Push the manual lever two to three times
ES5PB &ES5PBS - Push the button long enough to spray water on the generator surface.
4. Watch the water turn into steam. All of the water should evaporate in approximately 20 to
30 seconds.
By pumping the manual lever (ES5M) or pushing the button (ES5PB & ES5PBS) and watching
the time it takes to evaporate the water, the user will learn how to reach the optimal cooking
results, whether by pushing the button in or pumping the manual lever.
Timer Type of Steamers - (ES5TS & ES5T) - this timing is internally set by the manufacture to
obtain the optimum cooking steam cycle.
_____________________________________________
Maintenance
As Required
Maintenance
Daily
Food Pan and Grid on all models should be removed and washed with a detergent or run
Through a dishwasher.
WARNING: Under no circumstances should the entire steamer be run through a
dishwasher. If any of the switches or components get wet they can malfunction. Never try
to use a device that has been wet— replace it.
WARNING: Perform all maintenance when the unit is cool.
Exterior of unit should be wiped with a damp cloth or cleaned with a stainless steel cleaner.
Water Pan on ES5M, ES5TS, ES5PTS & ES5PBS may be removed for cleaning by pulling out to
stop position; lift front of steamer about 3" to clear pump and pull pan all the way out. To replace,
lift front of steamer about 3", slide pan in pan track until it is about 2" from closed position, then
lower steamer front and push pan completely in.
_____________________________________________
Generator: The cavity in the generator may accumulate lime and is cleaned by scraping or wire
brushing. Do not remove all of this deposit since a thin coating improves steaming.
Water Nozzle: The water nozzle, the round cap in front center of generator, may be pulled out for
cleaning. Clean small holes and inside of tube with spring clip provided in the tube.
Water Inlet: If the tube through generator is limed, remove plug at bottom and push lime out with
a wire or small rod.
Strainers:
ES5M: Strainer is in bottom of pump. Remove wire ring, then strainer wash and replace.
ES5TS, ES5PTS & ES5PBS: Strainer is located in front center of bottom. Slip strainer off
Tube, wash and replace.
ES5PB & ES5T: To wash strainer located in hose:
1. Remove hose.
2. Remove quick connect fitting.
3. Reverse hose (connect steamer end to supply valve). Drain into sink or bucket.
4. Run water through hose to clean.
5. Return to original connections.
There is a strainer in inlet of solenoid valve that normally does not require cleaning but
Under extreme conditions may have to be removed and cleaned.
_____________________________________________
3
ES5 Series Wiring Diagrams
*
Figure 1a
Wiring Diagrams for ES5 Series Steamers
ES5M
ES5PB
ES5PBS
ES5T with Mechanical Timer
ES5TS with Mechanical Timer
*ES5 1800 Series Steamers have
an 1800 watt heating element
4
ES5 Series Installation and Service
Figure 1b
Wiring Diagrams for ES5 Series Steamers
Service
DANGER: Before attempting service, unplug power cord.
We recommend any service be done by qualified service personnel. Refer to separate Parts
List for parts identification and assembly guide.
1. All electrical components are contained in enclosure behind switch panel. For access,
remove sloping front and switch panel.
2. ES5M pump is easily removed for service or replacement. Disconnect water line (under
steamer) from pump, open electric enclosure, disconnect linkage and remove two screws
holding pump.
3. To remove ES5TS, ES5PTS & ES5PBS pump:
A. Disconnect electric wires from terminals.
B. Disconnect discharge hose from pump.
C.Remove two screws through bottom of steamer holding pump bracket.
D.Lift pump out.
4. To adjust lid, loosen screws in lower hinge. With lid closed, tighten screws.
5. Thermostat is set to control temperature from 350° to 375°, and we suggest replacement
if off calibration. Thermostat may be removed by:
A. Removing electric enclosure covers and switch panel.
B. Removing wires from thermostat terminals.
C.Removing two screws holding thermostat.
D.Pull capillary straight out to remove bulb.
CAUTION: Capillary tube is critical and care should be taken not to “kink”.
6. If water nozzle should clog with lime, remove by lifting up then clean small holes with
paper clip or similar tool. Lime inside tube is removed by flexing tube, then shaking or
washing out lime.
7. The water inlet is cleaned by removing plug at bottom and pushing lime out with wire
or rod.
8. The main timer controls the cooking time and the shot timer delivers a measured amount
of water to produce steam every 20 seconds. If defective, replace (attempted service may
affect timing).
5
ES5 Series Trouble Chart
DANGER: Read and understand this bulletin thoroughly before starting any
troubleshooting. An inadvertent service error could result in severe personal injury or
death. Only a trained experienced service technician should attempt any repair
procedure.
Qualified service agencies are available at most locations—Refer to EmberGlo listing of
Authorized Service Agencies included in Standard Equipment Catalog.
Important: Defective wiring or loose connections can simulate the defects outlined
below. Check associated wiring before replacing a component.
_____________________________________________
Trouble Chart
1. Unit Does Not Heat—
Switch On, Light Out
A. Confirm electric cord is securely plugged in.
B. Confirm receptacle is energized—reset breaker or repair house wiring.
WARNING: The following checks thru VII.A.1. should be done with electric cord
removed from receptacle.
C. Confirm continuity in 3-conductor cord—replace if defective.
D. Confirm continuity in single pole, single throw Power Switch (the two adjacent terminals
are switch terminals and the remote terminal is a tie-terminal). Replace if defective.
2. Unit Does Not Heat—
Switch On, Light On
A. Confirm continuity of Thermostat—replace if defective.
B. Confirm continuity of Heating Element—replace Steam Generator Casting if defective.
C. Confirm Thermal cutoff.
3. Unit Heats—
Switch on, Light Out.
4. Unit Heats Up,
But Does Not Steam—
No Water Evident
5. Unit Floods—Switch On
6. Unit Works—
Ready Light Inoperative
7. Unit Works with Push
Button But Not With Timer—
Signal Switch On
6
A. Defective light in switch— replace entire switch.
A. All Models: Clogged water nozzle, water inlet or strainers—check and clean as
required, see Maintenance and Service sections.
B. Models ES5M, ES5TS, ES5PTS & ES5PBS: Water pan empty—fill pan.
C. Model ES5M: Confirm pump is operative—check valves—inlet hose must not leak.
See Service section. Rebuild or replace as required.
D. Models ES5PB & ES5T:
1. Confirm Water Shut-Off Valve is on and Water Hose Assembly is properly hooked
up. Refer to #3 from the Installation section page 2. A quick way to confirm water
line is operational is to disconnect Water Hose at quick disconnect fitting and push
a small probe into quick disconnect fitting—water should flow freely.
2. Confirm continuity of Water Solenoid Valve—replace if defective.
E. Models ES5T, ES5PB, ES5PBS, ES5PTS & ES5TS: Confirm continuity of Steam Push
Button Switch when depressed—replace if defective.
F. Models ES5TS, ES5PTS & ES5PBS:
1. Confirm continuity of Oscillating Pump—replace if defective.
2. Confirm integrity of hoses and fittings. Any and all leakage must be eliminated.
Models ES5T & ES5PB: Water Solenoid Valve seat dirty—clean or replace as required.
Models ES5T, ES5PTS & ES5TS: Confirm continuity of light—replace if defective.
A. Models ES5T & ES5TS:
1. Confirm continuity of SPST signal toggle switch—replace if defective.
WARNING: The following checks should be done with power to unit. Use extreme
ES5 Series Trouble Chart
care as bare wire terminals and/or bare wires are exposed.
2. Ready Light should go out when Main Timer button is pushed and then if at end of
timing, Ready Light goes out and buzzer sounds—replace Shot Timer.
3. If Ready Light does not go out when timer button is pushed or if Shot Timer does
not run—replace Main Timer.
8. Buzzer Does Not Sound at
End of Timing—
Signal Switch On
A. Set Main Timer to O and Confirm for 120 volts to GND at NC terminal of Main Timer. If
none, replace Main Timer.
B. If 120 volts is present in above test, Buzzer is defective—replace.
7
Heating and Cooking Guide
Cooking Instructions
The manual model is generally operated with one or two shots at the start. If additional
heat is required, operate about three shots per minute. Since the product to be heated can
only absorb heat at a certain rate, do not over steam, exceeding three shots per minute is
not necessary. The timer model controls the number of steam injections per minute. The
unit can be used as a warmer or cooker. When the product heating time is established, set
the timer to obtain the same results.
Shots/Time
Breads
Seafood
Eggs
Meats
Vegetables
Dinner Rolls
1 Shot/Wait 10-20 Seconds
Hamburger Buns (open)
1 Shot/Wait 10-20 Seconds
Hot Dog Buns (open)
1 Shot/Wait 10-20 Seconds
Hard Rolls
2 minutes
Hoagies
2 minutes
Tamales
4 minutes
Tamales (frozen)
6-7 minutes
King Crab Leg (1 lb.)
4-5 minutes
Clams, Open (1 lb.)
1 Shot
Rock Lobster Tail, 4 pcs. (8 oz.)
7 minutes
Rock Lobster Tail, frozen (8 oz.) 4 pcs.
16 minutes
Fresh Shrimp (1 lb.)
6 minutes
Frozen Shrimp (1 lb.)
8-9 minutes
Hard Boiled
14 minutes
Soft Boiled
4 minutes
Poached
3-4 minutes
Scrambled (12)
7 minutes
Brats
8 minutes
Hot Dogs, 10 per lb. (1 lb.)
3 minutes
Hot Dogs, 8 per lb. (1 lb.)
4 minutes
Hot Dogs, 6 per lb. (1 lb.)
5 minutes
Asparagus Spears (1 lb.)
11-12 minutes
Broccoli (1 lb.)
12-14 minutes
Carrots Sliced (1 lb.)
10 minutes
Cauliflower (1 lb.)
14-20 minutes
Corn on the cob (3”) 8 pcs.
5 minutes
Corn on the cob (6”) 4 pcs.
5 minutes
Green Beans (1 lb.)
15-16 minutes
Frozen Peas (11/2 lb.)
8 minutes
Potatoes, Whole (Small)
20 minutes
Potatoes, Mashed (2 quarts)
8 minutes
Excellent results can also be achieved with many other precooked or frozen foods such as
any non-breaded seafood clams lobster tails scallops red snapper crab legs
all breads and rolls french bread loaves hoagies onion buns many specialty
foods tortillas enchiladas pizza slices and much more!
EmberGlo
8
®
tel 773.604.8700
A division of Midco International Inc. 4140 West Victoria Street * Chicago, Illinois 60646
fax 773.604.4070
web www.em b erglo.com
email [email protected]
110
8449 96
Printed in USA