1
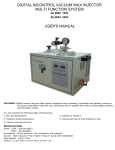
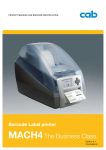
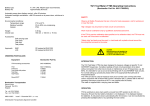
Service Manual for Showcase cooler PREMIUM MODEL PRF68DX PRF98DX PRF128DX PRF90DX PRF125DX Content Table 1. Main feature and product appearance---------------------2 2. Unit Specification----------------------------------- 3 3. Safety during maintenance or service ------------- 3 4. Electrical Diagram ------------------------------- 4 5. Cooling System Diagram --------------------------- 5 6. Part Lists and explanation ---------------------------- 5 7. Disassembling and replacing of the components ---------6 8. Check the breakdowns of the cooling system --------------7 9. Table for quick answer for the field problem ------9 10. Note of the cooling system maintenance with R134a refrigerant -------------------------------13 11. The performance testing requirement after service--------14 12 Maintenance parts list ----------------------------- 15 1 1、Main feature: Model PRF68DX PRF98DX PRF128DX PRF90DX PRF125DX Door Integrated Glass Door with beautiful recessed handle Gasket seal for the door Recessed door gasket seal, easy to be discharged and cleaned. Hinge Plastic material, simple and practically Accessory Four and Structure With top light box,evaporator inside,condenser fan near shelves compressor and evaporator fan inside body to control the temperature well Product appearance: PRF68DX/ PRF98DX/ PRF128DX PRF90DX/ PRF125DX 2 2、 Unit Specification: No. Model PRF68DX PRF98DX PRF128DX PRF90DX PRF125DX 1 Net Capacity(L) 168 238 338 239 339 2 Voltage(V) 115 115 115 115 115 3 Frequency(Hz) 60 60 60 60 60 4 Refrigerant R134a R134a R134a R134a R134a 5 Refrigerant Amount (g) 100g 125g 155g 135g 155g 3、Safety during maintenance or service: In order to be safety during maintenance, must obey the following basic attention: 1) During service: Pay attention to the flame or ignition nearby, particually after welding using gas too, must turn off the flame first, then can do other maintenance work, because the refrigerant will produce the toxic air when it touch with flame, sparkle or capacitor. Do not do the welding work in the airtight or bad air circulation room. When discharging the refrigerant, must keep the room good air circulation condition. When cutting the suction pipe or discharging pipe of the compressor, pay attention to the surplus refrigerant and internal pressure in cooling system pipe 2) Unplug the unit: When you are ready to proceed the maintenance, must first unplug the freezer first to ensure the safety. 3).Avoid electrical shock: Normal when proceeding the maintenance, must open the power supply first. But if you must check the field wiring or the component of the unit with power supply in, must be very carefully and don’t touch the live parts. If you find out the wiring is aged, please replace it in time. 4).Correct use the components: If the component is damaged and need to be replaced, be sure to replace with the component with same model,do not use other models or other brand components, and not use the changed component. 5).Correct use the service tools: 3 Ensure to use the appropriate service tool right. Otherwise it will cause bad electrical contact or loose fixing, and the incidence will happen. 6).Wiring connection: When re-connecting the cut wire, be sure to use soldering method or terminal connection, and then wrap the connection point with insulation tape, ensure the good connection. 7).Insulation resistance measure: After completing the service and assembly,must use the multi-meter to measure the insulation resistance, if it is greater than 1 million ohm, then you can plug on the unit. 8).Grounding test: After maintenance, use the multimeter to measure the grounding resistance to ensure the grounding resistance is less than 0.1 ohm. 9).Pay attention to the child or infant nearby: When maintenance, don’t let the child or the infant nearby. 10).Cleaning: After service, do the necessary cleaning work and tell the customer the necessary precaution. 4、Electrical Diagram Please note, maybe some units are without RUNNING CAPACITOR marked in red color in above diagram, according to the used compressor model. 4 5、Cooling System Diagram: Capillary Dry Filter Condenser Evaporator Air Suction Pipe Compressor Note: Arrow direction means the flowing direction of the refrigerant. 6、Part Lists and explanation: 1、PRF68DX/ PRF98DX/ PRF128DX No. Parts Name PRF68DX PRF90DX/ PRF125DX PRF98DX PRF128DX PRF90DX PRF125DX 1 Door 1 1 1 1 1 2 Hinge 2 2 2 2 2 3 Shelf 4 4 4 4 4 5 5 Thermostat cover 1 1 1 1 1 6 Compressor base 1 1 1 1 1 7 Condensate Water Drain cap Fixing feet 1 1 1 1 1 4 4 4 4 4 8 7、Disassembling and replacing of the components: When replacing the components, must unplug the unit first, in order to be safety. 1). Replace the thermostat: Unscrew the fixing screw of the thermostat box, remove the thermostat box, then remove the old thermostat, install the new thermostat with same model, and reinstall back the whole thermostat box with same fixing screw. 2).Replace the PTC starter and overload protector of the compressor: Remove the clamp of the connecting terminal cover of the compressor and the terminal cover, toward the vertical direction, remove the broken-down starter or overload protector, install back the new starter or overload protector, then fix back the terminal box cover and its clamp. 3).Replace the door gasket seal: Remove the old door gasket seal from the groove of the door linear, then install the new gasket seal into the four sides of the groove, install it oven as possible, open and close the door several times, ensure that the door is sealed. 4).Replace the compressor: (a)、First cut the welding point of the technical pipe of the compressor to discharge the refrigerant inside the cooling system, then weld the old point to disconnect the pipe to the compressor, remove the compressor to replace with a new one, pay attention to replace with a new refrigerant dry filter. (b)、Install the new compressor, weld the high pressure side and low pressure side pipe to the compressor, check the system leakage, after completing vacuum the cooling system, charge the correct amount refrigerant into the system from low pressure side pipe. After this, run the unit to check the cooling performance is ok or not, then weld and close the technical pipe. 8、Check the breakdowns of the cooling system: Following the next illustration to check the problem: 6 Problem and check point Cause Solution Compressor Leakage point ? Yes Check the frost No on the cabinet frost liner surface Leakage No check On the pipe joint Refrigerant Leaks Cut off the low pressure pipe and spurt out the residual refrigerant Repair the welding, clean the pipe and replace the dry filter Bad compression No air suction on Replace the the compressor Cut off the high of the compressor low pressure pipe pressure pipe compressor A little A little refrigerant air Repair the welding, refrigerant air Cut off the Leaks Leakage Detected Leakage spurt out spurt out clean the pipe and checking low preesure pipe slowly replace the dry filter point ? Big quantity refrigerant air Cut off the high spurt out pressure pipe No air suction or weak suction on the compressor low pressure pipe Normal suction of the comressor low pressure pipe Condensate dew Check the high Too high but no frost pressure side pipe temperature Check low pressure pipe and compressor Cooling discontinuously Pipe is clogged with ice Compressor not working Good Compressor breaks down Charge the nitrogen to the condenser pipe Frost Replace the compressor Not sufficient nitrogen air return back the low pressure side Too more refrigerant Frost Pipe is clogged slightly Recharge appropriate quantity refrigerant Replace the dry filter and clean the system pipe with warm nitrogen Check the electrical parts such as PTC starter,capacitor,overload protector, thermostat etc. Broken-down Measure the resistance of the compressor winding Normal Leakage check again No refrigerant air spurt out Cut off the low preesure pipe Normal suction of No air on the Refrigerant the comressor low Charge the Cut off the high low pressure side Pipe air spurt out pressure pipe nitrogen to the clogged pressure pipe condenser pipe Little frost Vacuuming and recharging Replace the broken-down parts Abnormal resistance Replace the compressor Over large Overload current protector acts Compressor goes wrong Replace the compressor Replace the dirty and clogged parts and clean the system pipe Vacuuming and recharging Leakage check again Replace the dirty and clogged parts and clean the system pipe Check the frost on the cabinet liner surface, if find like following: 1) No frost, then do the leakage detecting. A). If the leakage point is found, then first cut off the low pressure pipe to discharge the left refrigerant in the system, then clean the pipe, replace with a new dry filter and welding again, again recharge the refrigerant and do the leakage detecting. B). If the leakage can not be found, cut off the low pressure pipe, if there is no refrigerant omitting, then recharge the refrigerant and do the leakage detecting again; If there is refrigerant omitting, cut off the high pressure pipe(means that compressor suction is normal), charge the condenser pipe with pressurized nitrogen, if no air at low pressure side, means the pipe is blocked, then replace the blocked parts and clean the system pipe; If no air suction at compressor low pressure side, cut off the high pressure pipe, means air compression of the compressor is not good, please replace the compressor. 2). A little frost on the surface, also do the leakage detecting first. A) If the leakage point is confirmed, then cut off the low pressure pipe, if a little refrigerant air spurt out, means that the system leaks slowly on the leakage point, you should repair the welding of cut pipe and the leakage point and clean the system pipe by the high pressure nitrogen, replace the dry filter, after completion these work, re-vacuum and recharge the refrigerant, at last do the leakage detecting again. B). If big quantity refrigerant spurt out, cut off the high pressure pipe to check the suction of the compressor low pressure pipe is normal or not: if no suction or weak suction, it means not good compression and need to replace the compressor; if normal suction, then charge the clean and warm nitrogen to the condenser pipe, if you find the returned nitrogen of the low pressure side is not sufficient, it means that the system pipe is clogged lightly, please replace the clogged parts and clean the pipe. 3). No frost, but have condensate water on the surface on the cabinet liner, check the temperature of the high pressure side pipe and the compressor, you will find it is too high temperature and check the low pressure pipe with frost, if like this, means too more refrigerant in the system, please recharge with appropriate quantity refrigerant once more. 4) The unit works discontinuously, maybe the system is clogged with ice, please replace the dry filter and clean the system with clean and warm nitrogen. 5) Compressor doesn’t run. Please check the electrical parts, such as PTC starter, capacitor, overload protector, thermostat etc., if you find the parts go wrong, then replace a new one with same type and specification. If all of these parts are good, please measure the resistance of the compressor winding, if the resistance is abnormal, must replace the compressor; otherwise check the overload protector act or not, means the over large current and compressor goes wrong, also replace the compressor. 9 9、Table for quick answer for the field problem: Item Phenomenon Check point and the detail No power supply in neighbor house Power indicator is All of other Check that other not on and appliances in appliances are working compressor house don’t or not. doesn’t run work Only this freezer doesn’t work Caused by Field power supply is cut off. Main fuse is cut off. Power supply outlet has problem If the cooling thermostat is shorted of the Thermostat is circuit or turn the thermostat to the coldest breakdown point, the compressor can run. The knob is (A). There is sound when turning the knob of broken or is not Not cool the thermostat. installed completely properly. Check it is cutoff If it is cutoff, Thermal protector may or not by the means it is be overloaded. multi-meter. broken down. Compressor Check it is cutoff If it is open, doesn’t run, but PTC Starter or not by the means it is power indicator is multi-meter. broken down. on. Check it have broken point or Maybe the lead Check the circuit not in the circuit is broken or the wiring wiring according connection point the electrical is loosing diagram Measure the The winding is winding broken or burnt Compressor problem resistance of the compressor 10 Power supply voltage Cooling system Compressor run can Compressor (B)、 Compressor Incorrect using Measure the insulation resistance by meg-ohm meter, if the insulation resistance < 1 MΩ,the unit can’t be used for long time. The voltage is too low. (Maybe lower than 175V) There is no sound of refrigerant flowing in cooling system and it leaves oil on the welding point There is no sound of refrigerant flowing in cooling system and no oil on the welding point. No air is discharged out on the discharging mouth of the compressor. There is abnormal sound inside compressor Check the thickness of frost(>5mm?) The winding is burnt. Compressor can’t start because of under voltage. Leakage refrigerant of Inside leakage of cooling pipe or the pipe is blocked. Compressor valve breakdown Compressor breakdown is is The frost is too thick 11 runs but cooling effect is not good. Leakage cooling air of The unit is not placed at good position (C)、 Temperature is too low Abnormal action of thermostat Thermostat is set at higher temperature Set it to lower (lower digit)? temperature There is too more food in cooling Too more food compartment, too crowded, ensure good air circulation inside freezer Hot temperature food let the temperature Is there high temperature food, like hot inside freezer soup etc., inside freezer? cooling compartment rise. It will affect the Too more times of opening of the door cooling effect Check the door gasket sealing strip is Broken of the broken or deforming door gasket sealing strip Check the door is warded off by the food The door is not and the door is closed tightly or not. closed tightly The freezer is inside direct sunshine The unit can not dissipate the heat because sunshine The back of the unit is too close to the Too close will wall affect the heat dissipation Over-hot environment will There is heat source near the unit. affect the heat dissipation Check the sensor head of the thermostat Incorrect is loosing or not temperature sensing of thermostat Thermostat is not at good quality (D)、 Water condensate (E)、 Leakage of electricity There is condensed water The environment is too wet on the closure Confirm the insulation resistance is lower Electrical shock than 1 MΩ by the meg ohm meter sense on the Check the electrical parts of the unit are enclosure wet Thermostat breakdown is The relative humidity is too high Insulation is not good Insulation is not good 12 (F)、 Too noisy and vibration Check the electrical parts touch with the Electricity metal enclosure or not, and the grounding leakage lead is not grounded properly Check it have static electricity influence Static electricity influence There is sound Check the compressor has abnormal Compressor inside compressor sound or not. abnormal Check the pipe is touched each other or Pipe touching not produce resonance There is vibration sound Check the installation ground is flat and The unit is not the feet is adjusted at proper position or placed evenly not 10、Note of the cooling system maintenance with R134a refrigerant: 1)The requirement of the cooling system parts: Because refrigerant R134a and its lubricating oil grease is of strong water absorbability and oxidation ability, and will cause catalysis reactivity with chloride to produce impurity to be silt. So during service process, you should pay more attentions to the water quantity, oxide quantity, chloride quantity, oil quantity and impurity quantity in the cooling system, and control it more strictly. ·Left water quantity control: a)If the cooling system parts, like condenser, evaporator, compressor, or the dry filter etc., need to be replaced, the replaced parts should be stored charging with dry nitrogen with pressure 0.2~0.3Mpa, and if these parts have leakage of nitrogen, they must be dried in the high temperature chamber and be taken out of the water before using. b ) The molecular dry desiccant inside dry filter must be controlled strictly, guaranteed that the left water quantity must be lower than 1.5WT%. And normally, after the dry filter is opened from vacuum package, must be welded to the pipe system within 5 minutes. If at wet condition (relative humidity>50%), must take measure to be protected from humidity, and the dry filter must be connected to the system pipe at once after removing from package, so as to produce the sealing system. 2)The requirement of the service equipment: ①No need recycling equipment, except charging machine, if the equipment is special for R134a refrigerant system, must mark it clearly to avoid use each other. (except welding machine, pliers, electronic balance) ②The vacuum machine and charging machine are special used for R134a refrigerant system. 3) Service Procedure: 13 Special requirement during service process: (a). Duration of from opening of compressor to vacuuming process must be less than 10 minutes, and for other parts not more than 12 minutes. (b). Vacuuming duration should not loess than 20 minutes. (c). If refrigerant leakage happens, it need to replace the compressor. Before welding, dry the cooling system by the nitrogen air. (d). If the dust blockage happens in cooling system pipe, if can be blow out by the nitrogen, don’t need to replace the compressor, otherwise the cabinet is no useful (and the evaporator is no useful). (e). If ice blockage happens in the system pipe, must replace the compressor. f. Change the dry filter only if the system is opened. 4) Main point of service: ①The replaced compressor must return back to the compressor manufacturer to be treated. ②The compressor can’t be tested through direct absorbing atmosphere, it will damage the compressor. ③If the system pipe is opened for a long time or leakage happens, you can dry the system by nitrogen during service. ④All of the welding material must be protected from wet condition. And ensure to use a little as enough as possible. ⑤Check the compressor is pressurized or not when opening. ⑦When storing the R134a refrigerant, must keep it sealed and not touch with atmosphere directly. 11、The performance testing requirement after service: After completing the service, normally need to be done test running for 1-2days. When proved to be safely and good cooling performance, then move to the customer or user. During test running, we suggest that you can do following item: 1) Insulation and safety: Before plugging in, use the DC 500 meg-ohm meter to measure the insulation resistance between the live parts and dead metal enclosure, ensure the result is not lower than 1 meg-ohm. 2) Starting capability: The compressor can start smoothly, and can start or stop normally. If the unit can’t start or stop normally, must find the root cause and delete the cause, then you can plugging it in to let it run. 3) Cooling performance: After running for 24 hours, check that the frost on the surface of the cabinet linear is oven or not, and there is no frost on the suction pipe. 4) Electrical structure and safety: After service, check all of the electrical parts, ensure the connection terminal of the electrical parts don’t loose and the grounding wire is ok. 14 5)Leakage checking: After running for 24 hours, check one by one of welding point by using halogen leakage detecting device or suds. If leakage happens again, then should service again. 12、Maintenance parts list: No. 1 2 3 4 5 6 7 8 9 Parts name Compressor Thermal protector compressor PTC starter Feet of compressor Refrigerant dry filter Thermostat Power cord assembly Adjustable feet Door gasket sealing strip 9 10 Running indicator Power indicator of PCS/unit 1 1 Note 1 4 1 1 1 4 1 0 0 15