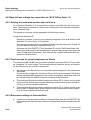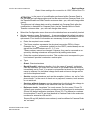
1
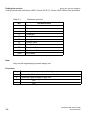
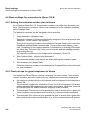
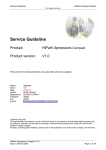
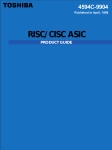
Plus products Caracas Desk Rel. 2.0 Service Manual A31003-E1320-S100-4-7620 3$(6 *1PA31003-E1320-S100-4-7620* Issued by Information and Communication Networks Hofmannstrasse 51, D-81359 München Siemens AG 1999. All rights reserved. Subject to availability. Right of modification reserved. Siemens Aktiengesellschaft Ref. no.: A31003-E1320-S100-4-7620 Printed in the Federal Republic of Germany. System data 1 Plus products Caracas Desk Rel. 2.0 Installation 2 Service Manual Putting into service 3 Basic settings 4 -A31003-E1320-S100-4-7620 5 Nur für den internen Gebrauch Contents Contents 0 1 Caracas Desk . . . . . . . . . . . . . . . . . . . . . . . . . . . . . . . . . . . . . . . . . . . . . . . . . . . . . . . . 1-1 1.1 System data . . . . . . . . . . . . . . . . . . . . . . . . . . . . . . . . . . . . . . . . . . . . . . . . . . . . . . . . . 1-1 2 Installation . . . . . . . . . . . . . . . . . . . . . . . . . . . . . . . . . . . . . . . . . . . . . . . . . . . . . . . . . . . 2-1 3 Putting into service . . . . . . . . . . . . . . . . . . . . . . . . . . . . . . . . . . . . . . . . . . . . . . . . . . . 3-1 3.1 Putting into service with Hicom 100 E, Hicom 150 E 2.2, Hicom 150 E Office Com and Office Point . . . . . . . . . . . . . . . . . . . . . . . . . . . . . . . . . . . . . . . . . . . . . . . . . . . . . . . . . . . 3-1 4 Basic settings . . . . . . . . . . . . . . . . . . . . . . . . . . . . . . . . . . . . . . . . . . . . . . . . . . . . . . . . 4-1 4.1 Loading new firmware in Caracas Desk . . . . . . . . . . . . . . . . . . . . . . . . . . . . . . . . . . . 4-1 4.2 Saving the zoning table in Caracas Desk . . . . . . . . . . . . . . . . . . . . . . . . . . . . . . . . . . 4-1 4.3 Setting the printout in Caracas Desk . . . . . . . . . . . . . . . . . . . . . . . . . . . . . . . . . . . . . . 4-1 4.4 Basic settings for connection to Hicom 100 E . . . . . . . . . . . . . . . . . . . . . . . . . . . . . . . 4-2 4.4.1 Setting the extension number plan in Hicom. . . . . . . . . . . . . . . . . . . . . . . . . . . . . 4-2 4.4.2 Trunk access for guest telephones in Hicom . . . . . . . . . . . . . . . . . . . . . . . . . . . . 4-2 4.4.3 Extension settings in Caracas Desk . . . . . . . . . . . . . . . . . . . . . . . . . . . . . . . . . . . 4-3 4.5 Basic settings for connection to Hicom 118-2 (two-box system) . . . . . . . . . . . . . . . . . 4-5 4.5.1 Setting the extension number plan in Hicom. . . . . . . . . . . . . . . . . . . . . . . . . . . . . 4-5 4.5.2 Trunk access for guest telephones in Hicom . . . . . . . . . . . . . . . . . . . . . . . . . . . . 4-5 4.5.3 Extension settings in Caracas Desk . . . . . . . . . . . . . . . . . . . . . . . . . . . . . . . . . . . 4-6 4.6 Basic settings for connection to Hicom 150 E Rel. 2.2 . . . . . . . . . . . . . . . . . . . . . . . . 4-8 4.6.1 Setting the extension number plan in Hicom. . . . . . . . . . . . . . . . . . . . . . . . . . . . . 4-8 4.6.2 Trunk access for guest telephones in Hicom . . . . . . . . . . . . . . . . . . . . . . . . . . . . 4-8 4.6.3 Extension settings in Caracas Desk . . . . . . . . . . . . . . . . . . . . . . . . . . . . . . . . . . . 4-9 4.7 Basic Hicom settings for connection to 150 E Office Com 1.0. . . . . . . . . . . . . . . . . . 4-11 4.7.1 Setting the extension number plan in Hicom. . . . . . . . . . . . . . . . . . . . . . . . . . . . 4-11 4.7.2 Trunk access for guest telephones in Hicom . . . . . . . . . . . . . . . . . . . . . . . . . . . 4-11 4.7.3 Extension settings in Caracas Desk . . . . . . . . . . . . . . . . . . . . . . . . . . . . . . . . . . 4-11 4.8 Basic Hicom settings for connection to 150 E Office Point 1.0 . . . . . . . . . . . . . . . . . 4-14 4.8.1 Setting the extension number plan in Hicom. . . . . . . . . . . . . . . . . . . . . . . . . . . . 4-14 4.8.2 Trunk access for guest telephones in Hicom . . . . . . . . . . . . . . . . . . . . . . . . . . . 4-14 4.8.3 Extension settings in Caracas Desk . . . . . . . . . . . . . . . . . . . . . . . . . . . . . . . . . . 4-14 4.9 Basic Hicom settings for connection to 150 E Office Com 2.0 / 2.2. . . . . . . . . . . . . . 4-17 4.9.1 Setting the extension number plan in Hicom. . . . . . . . . . . . . . . . . . . . . . . . . . . . 4-17 4.9.2 Trunk access for guest telephones in Hicom . . . . . . . . . . . . . . . . . . . . . . . . . . . 4-17 4.9.3 Extension settings in Caracas Desk . . . . . . . . . . . . . . . . . . . . . . . . . . . . . . . . . . 4-18 4.10 Basic Hicom settings for connection to 150 E Office Point Rel. 2.0 / 2.2. . . . . . . . . . . . . . . . . . . . . . . . . . . . . . . . . . . . . . . . . . . . . . . . . . . . . . . . 4-20 4.10.1 Setting the extension number plan in Hicom. . . . . . . . . . . . . . . . . . . . . . . . . . . 4-20 4.10.2 Trunk access for guest telephones in Hicom . . . . . . . . . . . . . . . . . . . . . . . . . . 4-20 4.10.3 Extension settings in Caracas Desk . . . . . . . . . . . . . . . . . . . . . . . . . . . . . . . . . 4-21 A31003-E1320-S100-4-7620 Service Manual 0-1 Contents Nur für den internen Gebrauch 4.11 Setting call charges with a password . . . . . . . . . . . . . . . . . . . . . . . . . . . . . . . . . . . . 4-23 4.12 Features without password . . . . . . . . . . . . . . . . . . . . . . . . . . . . . . . . . . . . . . . . . . . . 4-24 0-2 A31003-E1320-S100-4-7620 Service Manual Nur für den internen Gebrauch Figures Figure 1-1 Figure 2-1 Figures 0 Configuration overview . . . . . . . . . . . . . . . . . . . . . . . . . . . . . . . . . . . . . . . 1-1 Wall mounting and ports . . . . . . . . . . . . . . . . . . . . . . . . . . . . . . . . . . . . . . 2-2 A31003-E1320-S100-4-7620 Service Manual 0-3 Figures 0-4 Nur für den internen Gebrauch A31003-E1320-S100-4-7620 Service Manual Nur für den internen Gebrauch Tables Table 1-1 Table 1-2 Table 3-1 Tables 0 Overview of item code numbers . . . . . . . . . . . . . . . . . . . . . . . . . . . . . . . . 1-2 AT modem adapter pin assignment . . . . . . . . . . . . . . . . . . . . . . . . . . . . . 1-3 Checksum error list . . . . . . . . . . . . . . . . . . . . . . . . . . . . . . . . . . . . . . . . . . 3-2 A31003-E1320-S100-4-7620 Service Manual 0-5 Tables 0-6 Nur für den internen Gebrauch A31003-E1320-S100-4-7620 Service Manual Caracas Desk System data Nur für den internen Gebrauch 1 Caracas Desk 1.1 System data Introduction The Caracas Desk hotel application implemented as a system-specific functional expansion for Hicom 100 E, Hicom 150 E 2.2, Hicom 150 E OfficeCom and OfficePoint. Overview a/b Room telephones Hicom Reception telephone a/b Trunk UP0/E UP0/E V.24 V.24 2m 8m Caracas Desk Plug-in PSU optiset E (memory) 1 2 3 4 Max. 4 add-on devices V.24 Printer 10m Modem adapter max. 10m Service PC max. 10m Figure 1-1 Configuration overview Note In the case of Hicom 150 E 2.2, Hicom 150 E Office Com and Office Point, the twostage cable for the V.24 interface to Hicom is replaced by a single cable (see overview of code numbers in Table 1-1). A31003-E1320-S100-4-7620 Service Manual 1-1 Caracas Desk System data Nur für den internen Gebrauch Item code numbers Table 1-1 Overview of item code numbers Designation Item code number Caracas Desk S97238-U3008-X200-* incl. V24 printer cable, AT modem adapter and V.24 Hicom cable without plug-in PSU Plug-in PSU C97280-Z3002-C8(IM) C97280-Z3002-C9(GBR) C97280-Z3002C10(AUS) 12 volts V.24 printer cable S97238-Z3008-X1-1 25-pin SubD AT modem adapter C97334-Z3012-C2 25-pin SubD <-> 9-pin SubD for connecting front end or service PC Hicom 100 E V.24 cable S97238-Z3008-X2-1 9-pin SubD for connecting to Hicom 100 E V.24 adapter V.24 adapter cable S30122-X5468-X1 not supplied, to be ordered separately S97238-Z3008-X1-1 V.24 cable Hicom 150 E 2.2 Hicom 150 E Office Com Hicom 150 E Office Point 1-2 Notes not supplied, to be ordered separately if Caracas Desk is to be connected to Hicom 150 E 2.2, Hicom 150 E Office Com and Office Point A31003-E1320-S100-4-7620 Service Manual Caracas Desk System data Nur für den internen Gebrauch Table 1-2 AT modem adapter pin assignment DB9 DB25 1 8 2 3 3 2 4 20 5 7 6 6 7 4 8 5 9 22 A31003-E1320-S100-4-7620 Service Manual 1-3 Caracas Desk System data 1-4 Nur für den internen Gebrauch A31003-E1320-S100-4-7620 Service Manual Installation Nur für den internen Gebrauch 2 Installation Introduction This chapter contains information on installing Caracas Desk at Hicom 100 E, Hicom 150E 2.2, Hicom 150 E OfficeCom and OfficePoint systems. ! Danger Installation must be performed by authorised technical personnel only. Installation sequence Installation activity 1. Insert the polarised lithium battery in the module slot provided (housing must be open). 2. Close the housing. 3. Attach to wall at 2 fixing points (suspend from above, screw in below). 4. Cabling to Hicom, printer, connection to plug-in PSU. 5. Perform visual inspection 6. Close the hinged cover. Note V.24 line lengths (10m in each case) must be observed, see Figure 1-1. A31003-E1320-S100-4-7620 Service Manual 2-1 Installation Nur für den internen Gebrauch Caracas Desk wall mounting Ports: 1 = V.24 cable to the printer 2 = V.24 cable to Hicom* 3 = Plug-in power supply unit 4 = Reception telephone 5 = 1st Hicom UP0/E interface Slots in rear of housing Ports: 1 23 4 5 * V.24-adapter cable (2m) + accompanying V.24 cable (8m) or Hicom 150E 2.2/OfficeCom/ Office Point V.24 cable Housing closed. Hinged cover open. Figure 2-1 2-2 Wall mounting and ports A31003-E1320-S100-4-7620 Service Manual Putting into service Putting into service with Hicom 100 E, Hicom 150 E 2.2, Hicom 150 E Office Com and Office Po Nur für den internen Gebrauch 3 Putting into service 3.1 Putting into service with Hicom 100 E, Hicom 150 E 2.2, Hicom 150 E Office Com and Office Point Prerequisite ● The UP0/E interface to the system must be connected to the 1st or 2nd Hicom UP0/E port (the port must be authorised for system administration). ● At least one add-on device must be connected to the reception telephone. Up to four add-on devices may be connected, the first for hotel features, the second to fourth mainly for room keys. ● The printer is to be set to: 2400 bauds, no parity, 1 stop bit and 8 data bits. ● The Hicom V.24 interface is to be set to 9600 baud. ● Select 1 for CDRC port under Port assignment in the System settings menu. ● Central call detail recording (CDRC) in Hicom is to be set to compressed output format, without recording incoming calls and without call logging. ● Insert the following as service codes: *95 for System administration *91 for Program key *68 for Send message #68 for Read/delete (sent) message ● The first modifiable system information text, which can be sent to in-house users be entering *68, cannot be modified if Caracas Desk is connected to the Hicom system. You may only delete the blanks following the text so that the text is truncated to the maximum length of the display text Notes: DTMF suffix dialling can be activated for Optiset terminals in the system under System settings/Automatic DTMF in order to avoid having to type in "*53" after a call for the wake-up service. Checksum errors 512 and 1024 are displayed the first time the system is put into service. A31003-E1320-S100-4-7620 Service Manual 3-1 Putting into service Nur für den internen Gebrauch Putting into service with Hicom 100 E, Hicom 150 E 2.2, Hicom 150 E Office Com and Office Table 3-1 Checksum error list No. Checksum error 1 Roomlist 2 Alarmlist 4 Chargelist 8 Calldetails 16 Historyfile 32 Configuration 64 Lookup Table 128 Charge Counter 256 Persistent State 512 Persistence Pattern 1024 CCM Base Note Only use the original plug-in power supply unit. Procedure Step 3-2 Activity 1. Connect the V.24 cable to the printer and to Hicom. 2. Connect the plug-in power supply unit. 3. Connect the UP0/E to Optiset. 4. Connect the UP0/E to Hicom. A31003-E1320-S100-4-7620 Service Manual Nur für den internen Gebrauch Basic settings Loading new firmware in Caracas Desk 4 Basic settings Note The basic settings are password-protected. Password: 51695 (cannot be changed!). The password should not be revealed to customers! 4.1 Loading new firmware in Caracas Desk ● Select the *.fls file in Assistant for Caracas Desk and confirm the upload operation. ● Select the menu item Settings/Basic settings/Load SW? and confirm. The reception telephone is not available during SW loading. 4.2 Saving the zoning table in Caracas Desk ● Create zoning tables with the call charge manager. Note: The call charge manager documentation is supplied with the program as a selfextracting EXE file. ● Open the database in Assistant for Caracas Desk. ● Transfer the data to Caracas Desk with the Assistant. 4.3 Setting the printout in Caracas Desk ● Select the menu item Settings/Basic settings/Print? and set required print mode. – Transmit print data to front office solutions, e.g. Caracas Inn, – Invoice printout only, or – Combination of these two options. A31003-E1320-S100-4-7620 Service Manual 4-1 Basic settings Basic settings for connection to Hicom 100 E Nur für den internen Gebrauch 4.4 Basic settings for connection to Hicom 100 E 4.4.1 Setting the extension number plan in Hicom As of Caracas Desk Rel. 2.0, the extension numbers can differ from the room numbers. The extension numbers in Hicom must correspond to the extension numbers set in Caracas Desk. The extension numbers can be assigned in three manners. 1. Using Assistant L (fbzadmin.exe): Extension numbers in Hicom can be directly assigned in the usual manner with Assistant L via the Hicom V.24 interface. The current extension numbers are loaded into Caracas Desk via the menu Settings/Basic settings/Read customer data. This procedure lasts approx. 3 minutes. Completion of the loading operation is indicated by a flashing LED beside the Alarm key. The result (OK, error) can be queried and the message deleted by pressing this key. An extension number must be configured for extensions 73 and 74. 2. With Caracas Desk - without using Assistant L The extension numbers can also be set when defining the extension types. 3. With Assistant for Caracas Desk Enter the extension numbers in the Assistant for Caracas Desk in the usual manner with Assistant L. 4.4.2 Trunk access for guest telephones in Hicom The extensions 73 and 74 are used as "templates" for trunk access. Trunk access cannot, therefore, be set as required for any telephones connected to these ports. 4-2 ● An extension number which is not required must be assigned to the extensions 73 and 74. The extension numbers for extensions 73 and 74 must be changed if S0 buses without separate MSN assignment are used in the system. Otherwise, there will be collisions with the default extension numbers of the S0 buses. ● The extension 73 in Hicom is to be granted the level of access which a guest telephone without trunk access should receive (e.g. all lines outward restricted). ● The extension 74 in Hicom is to be granted the level of access that a guest telephone with trunk access should receive (e.g. all lines unrestricted trunk access). A31003-E1320-S100-4-7620 Service Manual Nur für den internen Gebrauch Basic settings Basic settings for connection to Hicom 100 E 4.4.3 Extension settings in Caracas Desk ● Load the current extension numbers to Caracas Desk via the Settings/Basic settings/Read customer data menu. ● Once the numbers have been successfully loaded (indicated by flashing Alarm LED), select the menu item Settings/Basic settings/Extensions. ● Set the extension types and, if necessary, the extension numbers. Extensions 11-16 are preconfigured by default as administration. The preconfigured extensions are to be modified in accordance with requirements. Four items of information are necessary for each extension: ● Enter the required room number. ● The Hicom number represents the physical connection PEN in Hicom. The numbering represents the standard extension number of the extension. Example: the UP0/E extensions (master) on the motherboard are assigned the Hicom numbers 11-16. These numbers cannot be changed. However, they can be removed as required by deleting extensions and specified by adding extensions. ● Enter the required extension number. The internal extension number and the DDI number of the extension are simultaneously changed. In the case of a 3-digit extension number and an S0 connection, check that DDI has been released by the local network provider. ● Type: – Guest: Guest extensions – Booth 1/booth 2: telephone booths. As in the case of "guests", individual calls are itemized. On check-out, the name is not deleted and the status is immediately set to "free". If a name is not specified at check-in, the original name is retained. An individual charge factor and minimum charge can be set for the telephone booth. – Service: service extensions such as the reception, kitchen, etc. as for "telephone booth". In the event of check-out or payment, however, trunk access is not switched. – Services without charges: service extensions for which only the charge total is recorded: no details of the individual calls are recorded. – Not used: for special extensions which cannot use Caracas Desk but which are connected, e.g. entrance telephones, service extensions for which call detail recording is not carried out via Caracas Desk, etc. – If extensions are deleted in the process, they are not assigned an extension number and cannot be reached! Extensions should only be deleted, therefore, it they are not connected. A31003-E1320-S100-4-7620 Service Manual 4-3 Basic settings Basic settings for connection to Hicom 100 E Nur für den internen Gebrauch ● Transfer the extension numbers back to Hicom via the menu Settings/Basic settings/Write to customer data. This procedure lasts approx. 3 minutes. Completion of the loading operation is indicated by a flashing LED beside the Alarm key. The result (OK, error, conflict) can be queried and the message deleted by pressing this key. ● If conflicts arise between the extension numbers, the customer data is not transferred back to Hicom and a message regarding the conflict is output. Please note that conflicts can also arise with codes 7..., 8..., 9... and 0 (for routes by default, etc.). These codes can only be changed with Assistant L. For reasons of security (old customer data), the data can only be transferred back to Hicom within 30 minutes of loading the extension numbers to Caracas Desk. The wake-up service is located at extension 17 (with the default extension number 17). A name may not be set in Hicom for the configured extensions. Names are automatically assigned at check-in. Names must are also be assigned for service extensions and booths at check-in. Names are only deleted for guests at check-out. 4-4 A31003-E1320-S100-4-7620 Service Manual Nur für den internen Gebrauch Basic settings Basic settings for connection to Hicom 118-2 (two-box system) 4.5 Basic settings for connection to Hicom 118-2 (two-box system) 4.5.1 Setting the extension number plan in Hicom As of Caracas Desk Rel. 2.0, the extension numbers can differ from the room numbers. The extension numbers in Hicom must correspond to the extension numbers set in Caracas Desk. The extension numbers can be assigned in three manners. 1. Using Assistant L: Extension numbers in Hicom can be directly assigned in the usual manner with Assistant L via the Hicom V.24 interface. The current extension numbers are loaded into Caracas Desk via the menu Settings/Basic settings/Read customer data. This procedure lasts approx. 3 minutes. Completion of the loading operation is indicated by a flashing LED beside the Alarm key. The result (OK, error) can be queried and the message deleted by pressing this key. An extension number must be configured for extensions 73 and 74 (with the default extension numbers 262 and 263). 2. With Caracas Desk - without using Assistant L The extension numbers can also be set when defining the extension types. 3. With Assistant for Caracas Desk Enter the extension numbers in Assistant for Caracas Desk in the usual manner with Assistant L. 4.5.2 Trunk access for guest telephones in Hicom The extensions 73 and 74 (with the default extension numbers 262 and 263) are used as "templates" for trunk access. Trunk access cannot, therefore, be set as required for any telephones connected to these ports. ● An extension number which is not required must be assigned to the extensions 73 and 74. The extension numbers for extensions 73 and 74 must be changed if S0 buses without separate MSN assignment are used in the system. Otherwise, there will be collisions with the default extension numbers of the S0 buses. ● The extension 73 (with the default extension number 262) in Hicom is to be granted the level of access which a guest telephone without trunk access should receive (e.g. all lines outward restricted). A31003-E1320-S100-4-7620 Service Manual 4-5 Basic settings Basic settings for connection to Hicom 118-2 (two-box system) ● Nur für den internen Gebrauch The extension 74 (with the default extension number 263) in Hicom is to be granted the level of access that a guest telephone with trunk access should receive (e.g. all lines unrestricted trunk access). 4.5.3 Extension settings in Caracas Desk 4-6 ● Load the current extension numbers to Caracas Desk via the menu Settings/Basic settings/Read customer data. ● Once the numbers have been successfully loaded (indicated by a flashing Alarm LED), select the menu item Settings/Basic settings/Extensions. ● Set the extension types and, if necessary, the extension numbers. Extensions 11-16 are preconfigured by default as administration. The preconfigured extensions are to be modified in accordance with requirements. The following items of information are necessary for each extension: ● Enter the required room number. ● The Hicom number represents the physical connection PEN in Hicom. Example: the UP0/E extensions (master) on the first SLMO Hicom numbers 1, 2, 3, etc. These numbers cannot be changed. However, they can be removed as required by deleting extensions and specified by adding extensions. ● Enter the required extension number. The internal extension number and the DDI number of the extension are simultaneously changed. In the case of a 3-digit extension number and an S0 connection, check that DDI has been released by your local network provider. ● Type: – Guest: Guest extensions – Booth1/booth2: telephone booths. As in the case of "guests", individual calls are itemized. On check-out, the name is not deleted and the status is immediately set to "free". If a name is not specified at check-in, the original name is retained. An individual charge factor and minimum charge can be set for the telephone booth. – Service: service extensions such as the reception, kitchen, etc. as for "telephone booth". In the event of check-out or payment, however, trunk access is not switched. – Services without charges: service extensions for which only the charge total is recorded: no details of the individual calls are recorded. – Not used: for special extensions which cannot use Caracas Desk but which are connected, e.g. entrance telephones, service extensions for which call detail recording is not carried out via Caracas Desk, etc. A31003-E1320-S100-4-7620 Service Manual Nur für den internen Gebrauch – Basic settings Basic settings for connection to Hicom 118-2 (two-box system) If extensions are deleted in the process, they are not assigned an extension number and cannot be reached! Extensions should only be deleted, therefore, it they are not connected. ● Transfer the extension numbers back to Hicom via the Settings/Basic settings/ Write to customer data menu. This procedure lasts approx. 3 minutes. Completion of the loading operation is indicated by a flashing LED beside the Alarm key. The result (OK, error, conflict) can be queried and the message deleted by pressing this key. ● If conflicts arise between the extension numbers, the customer data is not transferred back to Hicom and a message regarding the conflict is output. Please note that conflicts can also arise with codes 7..., 8..., 9... and 0 (for routes by default, etc.). These codes can only be changed with Assistant L. For reasons of security (old customer data), the data can only be transferred back to Hicom within 30 minutes of loading the extension numbers to Caracas Desk. The wake-up service is located at extension 17 (with the default extension number 206). A name may not be set in Hicom for the configured extensions. Names are automatically assigned at check-in. Names must are also be assigned for service extensions and booths at check-in. Names are only deleted for guests at check-out. A31003-E1320-S100-4-7620 Service Manual 4-7 Basic settings Basic settings for connection to Hicom 150 E Rel. 2.2 Nur für den internen Gebrauch 4.6 Basic settings for connection to Hicom 150 E Rel. 2.2 4.6.1 Setting the extension number plan in Hicom As of Caracas Desk Rel. 2.0, the extension numbers can differ from the room numbers. The extension numbers in Hicom must correspond to the extension numbers set in Caracas Desk. The extension numbers can be assigned in three manners. 1. Using Assistant E: Extension numbers in Hicom can be directly assigned in the usual manner with Assistant E via the Hicom V.24 interface. The current extension numbers are loaded into Caracas Desk via the Settings/ Basic settings/Read customer data menu. This procedure lasts approx. 30 seconds (max. 3 minutes). Completion of the loading operation is indicated by a flashing LED beside the Alarm key. The result (OK, error) can be queried and the message deleted by pressing this key. An extension number must be configured for extensions 63 and 64 (with the default extension numbers 262 and 263). 2. With Caracas Desk - without using Assistant E The extension numbers can also be set when defining the extension types. 3. With Assistant for Caracas Desk Enter the extension numbers in Assistant for Caracas Desk in the usual manner with Assistant E. 4.6.2 Trunk access for guest telephones in Hicom The extensions 63 and 64 (with the default extension numbers 262 and 263) are used as "templates" for trunk access. Trunk access cannot, therefore, be set as required for any telephones connected to these ports. 4-8 ● An extension number which is not required must be assigned to the extensions 63 and 64. The extension numbers for extensions 63 and 64 must be changed if S0 buses without separate MSN assignment are used in the system. Otherwise, there will be collisions with the default extension numbers of the S0 buses. ● The extension 63 (with the default extension number 262) in Hicom is to be granted the level of access which a guest telephone without trunk access should receive (e.g. all lines outward restricted). A31003-E1320-S100-4-7620 Service Manual Nur für den internen Gebrauch ● Basic settings Basic settings for connection to Hicom 150 E Rel. 2.2 The extension 64 (with the default extension number 263) in Hicom is to be granted the level of access that a guest telephone with trunk access should receive (e.g. all lines unrestricted trunk access). 4.6.3 Extension settings in Caracas Desk ● Load the current extension numbers to Caracas Desk via the Settings/Basic settings/Read customer data menu. ● Once the numbers have been successfully loaded (indicated by a flashing Alarm LED), select the menu item Settings/Basic settings/Extensions. ● Set the extension types and, if necessary, the extension numbers. Extensions 16 are preconfigured by default as administration. The preconfigured extensions are to be modified in accordance with requirements. The following items of information are necessary for each extension: ● Enter the required room number. ● The Hicom number represents the physical connection PEN in Hicom. Example: the UP0/E extensions (master) on the first SLMO Hicom numbers 1, 2, 3, etc. These numbers cannot be changed. However, they can be removed as required by deleting extensions and specified by adding extensions. ● Enter the required extension number. The internal extension number and the DDI number of the extension are simultaneously changed. In the case of a 3-digit extension number and an S0 connection, check that DDI has been released by your local network provider. ● Type: – Guest: Guest extensions – Booth1/booth2: telephone booths. As in the case of "guests", individual calls are itemized. On check-out, the name is not deleted and the status is immediately set to "free". If a name is not specified at check-in, the original name is retained. An individual charge factor and minimum charge can be set for the telephone booth. – Service: service extensions such as the reception, kitchen, etc. as for "telephone booth". In the event of check-out or payment, however, trunk access is not switched. – Services without charges: service extensions for which only the charge total is recorded: no details of the individual calls are recorded. – Not used: for special extensions which cannot use Caracas Desk but which are connected, e.g. entrance telephones, service extensions for which call detail recording is not carried out via Caracas Desk, etc. A31003-E1320-S100-4-7620 Service Manual 4-9 Basic settings Basic settings for connection to Hicom 150 E Rel. 2.2 – Nur für den internen Gebrauch If extensions are deleted in the process, they are not assigned an extension number and cannot be reached! Extensions should only be deleted, therefore, it they are not connected. ● Transfer the extension numbers back to Hicom via the Settings/Basic settings/ Write to customer data menu. This procedure lasts 20 seconds (max. 3 minutes). Completion of the loading operation is indicated by a flashing LED beside the Alarm key. The result (OK, error, conflict) can be queried and the message deleted by pressing this key. ● If conflicts arise between the extension numbers, the customer data is not transferred back to Hicom and a message regarding the conflict is output. Please note that conflicts can also arise with codes 7..., 8..., 9... and 0 (for routes by default, etc.). These codes can only be changed with Assistant E. For reasons of security (old customer data), the data can only be transferred back to Hicom within 30 minutes of loading the extension numbers to Caracas Desk. The wake-up service is located at extension 151 (with the default extension number 600). A name may not be set in Hicom for the configured extensions. Names are automatically assigned at check-in. Names must are also be assigned for service extensions and booths at check-in. Names are only deleted for guests at check-out. 4-10 A31003-E1320-S100-4-7620 Service Manual Nur für den internen Gebrauch Basic settings Basic Hicom settings for connection to 150 E Office Com 1.0 4.7 Basic Hicom settings for connection to 150 E Office Com 1.0 4.7.1 Setting the extension number plan in Hicom As of Caracas Desk Rel. 2.0, the extension numbers can differ from the room numbers. The extension numbers in Hicom must correspond to the extension numbers set in Caracas Desk. The extension numbers can be assigned in the following manner. Using Hicom Assistant E: Extension numbers in Hicom can be directly assigned in the usual manner with Assistant E via the Hicom V.24 interface. An extension number must be configured for the extensions 63 and 64 (with the default extension numbers 162 and 163). Generate the file HCMPP.TXT with Assistant E (via the File/Create Hicom info files menu) and import it with Assistant for Caracas Desk (press Load Hicom file under Configuration/Extension). This data can be modified and saved with Assistant for Caracas Desk. 4.7.2 Trunk access for guest telephones in Hicom The extensions 63 and 64 (with the default extension numbers 162 and 163) are used as "templates" for trunk access. Trunk access cannot, therefore, be set as required for any telephones connected to these ports. ● An extension number which is not required must be assigned to the extensions 63 and 64. The extension numbers for extensions 63 and 64 must be changed if S0 buses without separate MSN assignment are used in the system. Otherwise, there will be collisions with the default extension numbers of the S0 buses. ● The extension 63 (with the default extension number 162) in Hicom is to be granted the level of access which a guest telephone without trunk access should receive (e.g. all lines outward restricted). ● The extension 64 (with the default extension number 163) in Hicom is to be granted the level of access that a guest telephone with trunk access should receive (e.g. all lines unrestricted trunk access). 4.7.3 Extension settings in Caracas Desk ● Load the current extension numbers to Caracas Desk from the HCMPP.TXT file with Assistant for Caracas Desk (via the Configuration/Extension/Load Hicom file menu). A31003-E1320-S100-4-7620 Service Manual 4-11 Basic settings Basic Hicom settings for connection to 150 E Office Com 1.0 Nur für den internen Gebrauch ATTENTION: in the event of a modification performed while Caracas Desk is live, all data and call charge data must first be removed from Caracas Desk (via the Transfer/Read from Desk/Transfer customer data - yes, with call charge data menu). The data and call charge data must be reloaded into Caracas Desk after the modification in Assistant for Caracas Desk (via the Transfer/Write to Desk/ Transfer customer data - yes, with call charge data menu). 4-12 ● Select the Configuration menu item once the data has been successfully loaded. ● Set the extension types. Extensions 1 - 6 are preconfigured by default as administration. The preconfigured extensions are to be modified in accordance with requirements. Four items of information are necessary for each extension: ● Enter the required room number. ● The Hicom number represents the physical connection PEN in Hicom. Example: the UP0/E extensions (master) on the CBFC (central board) are assigned the Hicom numbers as of 1, 2, 3, etc. These numbers cannot be changed. However, they can be removed as required by deleting extensions and specified by adding extensions. ● Enter the required extension number. This number must correspond to your local network provider’s extension number plan. ● Type: – Guest: Guest extensions – Booth1/booth2: telephone booths. As in the case of "guests", individual calls are itemized. On check-out, the name is not deleted and the status is immediately set to "free". If a name is not specified at check-in, the original name is retained. An individual charge factor and minimum charge can be set for the telephone booth. – Service: service extensions such as the reception, kitchen, etc. as for "telephone booth". In the event of check-out or payment, however, trunk access is not switched. – Services without charges: service extensions for which only the charge total is recorded: no details of the individual calls are recorded. – Not used: for special extensions which cannot use Caracas Desk but which are connected, e.g. entrance telephones, service extensions for which call detail recording is not carried out via Caracas Desk, etc. ● If conflicts arise between the extension numbers, the customer data is not transferred back to Hicom and a message regarding the conflict is output. Please note that conflicts can also arise with codes 7..., 8..., 9... and 0 (for routes by default, etc.). These codes can only be checked or changed with Assistant E. ● Write the data to Caracas Desk (via the Transfer/Write to Desk menu) A31003-E1320-S100-4-7620 Service Manual Nur für den internen Gebrauch Basic settings Basic Hicom settings for connection to 150 E Office Com 1.0 The wake-up service is located at subscriber 101 (with the default extension number 500). A name may not be set in Hicom for the configured extensions. Names are automatically assigned at check-in. Names must are also be assigned for service extensions and booths at check-in. Names are only deleted for guests at check-out. A31003-E1320-S100-4-7620 Service Manual 4-13 Basic settings Basic Hicom settings for connection to 150 E Office Point 1.0 Nur für den internen Gebrauch 4.8 Basic Hicom settings for connection to 150 E Office Point 1.0 4.8.1 Setting the extension number plan in Hicom As of Caracas Desk Rel. 2.0, the extension numbers can differ from the room numbers. The extension numbers in Hicom must correspond to the extension numbers set in Caracas Desk. The extension numbers can be assigned in the following manner. Using Hicom Assistant E: Extension numbers in Hicom can be directly assigned in the usual manner with Assistant E via the Hicom V.24 interface. An extension number must be configured for the last two extensions 39 and 40 (with the default extension numbers 69 and 70). Generate the file HCMPP.TXT with Assistant E (via the File/Create Hicom info files menu) and import it with Assistant for Caracas Desk (press Load Hicom file under Configuration/Extension). This data can be modified and saved with Assistant for Caracas Desk. 4.8.2 Trunk access for guest telephones in Hicom The extensions 39 and 40 (with the default extension numbers 69 and 70) are used as "templates" for trunk access. Trunk access cannot, therefore, be set as required for any telephones connected to these ports. ● An extension number which is not required must be assigned to the extensions 39 and 40. The extension numbers for extensions 39 and 40 must be changed if S0 buses without separate MSN assignment are used in the system. Otherwise, there will be collisions with the default extension numbers of the S0 buses. ● The extension 39 (with the default extension number 69) in Hicom is to be granted the level of access which a guest telephone without trunk access should receive (e.g. all lines outward restricted). ● The extension 40 (with the default extension number 70) in Hicom is to be granted the level of access that a guest telephone with trunk access should receive (e.g. all lines unrestricted trunk access). 4.8.3 Extension settings in Caracas Desk ● 4-14 Load the current extension numbers to Caracas Desk from the HCMPP.TXT file with Assistant for Caracas Desk (via the Configuration/Extension/Load Hicom file menu). A31003-E1320-S100-4-7620 Service Manual Nur für den internen Gebrauch Basic settings Basic Hicom settings for connection to 150 E Office Point 1.0 ATTENTION: in the event of a modification performed while Caracas Desk is live, all data and call charge data must first be removed from Caracas Desk (via the Transfer/Read from Desk/Transfer customer data - yes, with call charge data menu). The data and call charge data must be reloaded into Caracas Desk after the modification in Assistant for Caracas Desk (via the Transfer/Write to Desk/ Transfer customer data - yes, with call charge data menu). ● Select the Configuration menu item once the data has been successfully loaded. ● Set the extension types. Extensions 1 - 6 are preconfigured by default as administration. The preconfigured extensions are to be modified in accordance with requirements. Four items of information are necessary for each extension: ● Enter the required room number. ● The Hicom number represents the physical connection PEN in Hicom. Example: the UP0/E extensions (master) on the CBFC (central board) are assigned the Hicom numbers as of 1, 2, 3, etc. These numbers cannot be changed. However, they can be removed as required by deleting extensions and specified by adding extensions. ● Enter the required extension number. This number must correspond to your local network provider’s extension number plan. ● Type: – Guest: Guest extensions – Booth1/booth2: telephone booths. As in the case of "guests", individual calls are itemized. On check-out, the name is not deleted and the status is immediately set to "free". If a name is not specified at check-in, the original name is retained. An individual charge factor and minimum charge can be set for the telephone booth. – Service: service extensions such as the reception, kitchen, etc. as for "telephone booth". In the event of check-out or payment, however, trunk access is not switched. – Services without charges: service extensions for which only the charge total is recorded: no details of the individual calls are recorded. – Reference trunk: “templates” for trunk access. For the rooms 73 and 74 (default room number), extension numbers must be assigned to extensions 39 and 40 (default extension numbers 69 and 70). The extension numbers for extensions 73 and 74 are thus identical in Caracas Desk to the extension numbers for extensions 39 and 40. Rooms 39 and 40 (default room numbers) must be defined in Caracas Desk as “not used”. A31003-E1320-S100-4-7620 Service Manual 4-15 Basic settings Basic Hicom settings for connection to 150 E Office Point 1.0 – Nur für den internen Gebrauch Not used: for special extensions which cannot use Caracas Desk but which are connected, e.g. entrance telephones, service extensions for which call detail recording is not carried out via Caracas Desk, etc. ● If conflicts arise between the extension numbers, the customer data is not transferred back to Hicom and a message regarding the conflict is output. Please note that conflicts can also arise with codes 7..., 8..., 9... and 0 (for routes by default, etc.). These codes can only be checked or changed with Assistant E. ● Write the data to Caracas Desk (via the Transfer/Write to Desk menu) The wake-up service is located at subscriber 21 (with the default extension number 51). A name may not be set in Hicom for the configured extensions. Names are automatically assigned at check-in. Names must are also be assigned for service extensions and booths at check-in. Names are only deleted for guests at check-out. 4-16 A31003-E1320-S100-4-7620 Service Manual Nur für den internen Gebrauch Basic settings Basic Hicom settings for connection to 150 E Office Com 2.0 / 2.2 4.9 Basic Hicom settings for connection to 150 E Office Com 2.0 / 2.2 4.9.1 Setting the extension number plan in Hicom As of Caracas Desk Rel. 2.0, the extension numbers can differ from the room numbers. The extension numbers in Hicom must correspond to the extension numbers set in Caracas Desk. The extension numbers can be assigned in the following manner. Using Hicom Assistant E: Extension numbers in Hicom can be directly assigned in the usual manner with Assistant E via the Hicom V.24 interface. An extension number must be configured for the extensions 63 and 64 (with the default extension numbers 162 and 163). Generate the file HCMPP.TXT with Assistant E (via the File/Create Hicom info files menu) and import it with Assistant for Caracas Desk. This data can be modified and saved with Assistant for Caracas Desk. Enter CARACASDESK (in upper-case and without blanks) under User name in the Assistant E menu File/Transfer/User administration; in the case of user range, select System input and enter a password of your choice (max. 15 characters). Before using Caracas Desk, dial *95 at a reception telephone to activate the Hicom system administration function. Enter CARACASDESK as the user. The first time a user is registered, Hicom allows you to modify the password defined in the Assistant. To do this, enter the defined password three times or a new password. 4.9.2 Trunk access for guest telephones in Hicom The extensions 63 and 64 (with the default extension numbers 162 and 163) are used as "templates" for trunk access. Trunk access cannot, therefore, be set as required for any telephones connected to these ports. ● An extension number which is not required must be assigned to the extensions 63 and 64. The extension numbers for extensions 63 and 64 must be changed if S0 buses without separate MSN assignment are used in the system. Otherwise, there will be collisions with the default extension numbers of the S0 buses. ● The extension 63 (with the default extension number 162) in Hicom is to be granted the level of access which a guest telephone without trunk access should receive (e.g. all lines outward restricted). A31003-E1320-S100-4-7620 Service Manual 4-17 Basic settings Nur für den internen Gebrauch Basic Hicom settings for connection to 150 E Office Com 2.0 / 2.2 ● The extension 64 (with the default extension number 163) in Hicom is to be granted the level of access that a guest telephone with trunk access should receive (e.g. all lines unrestricted trunk access). 4.9.3 Extension settings in Caracas Desk ● Load the current extension numbers to Caracas Desk from the HCMPP.TXT file with Assistant for Caracas Desk (via the Configuration/Extension/Load Hicom file menu). ATTENTION: in the event of a modification performed while Caracas Desk is live, all data and call charge data must first be removed from Caracas Desk (via the Transfer/Read from Desk/Transfer customer data - yes, with call charge data menu). The data and call charge data must be reloaded into Caracas Desk after the modification in Assistant for Caracas Desk (via the Transfer/Write to Desk/ Transfer customer data - yes, with call charge data menu). 4-18 ● Select the Configuration menu item once the data has been successfully loaded. ● For user: enter CARACASDESK (in upper-case and without blanks) ● For password: re-enter the password defined in Hicom Assistant E for the user name CARACASDESK. ● Set the extension types. Extensions 1 - 6 are preconfigured by default as administration. The preconfigured extensions are to be modified in accordance with requirements. Four items of information are necessary for each extension: ● Enter the required room number. ● The Hicom number represents the physical connection PEN in Hicom. Example: the UP0/E extensions (master) on the CBFC (central board) are assigned the Hicom numbers as of 1, 2, 3, etc. These numbers cannot be changed. However, they can be removed as required by deleting extensions and specified by adding extensions. ● Enter the required extension number. This number must correspond to your local network provider’s extension number plan. ● Type: – Guest: Guest extensions – Booth1/booth2: telephone booths. As in the case of "guests", individual calls are itemized. On check-out, the name is not deleted and the status is immediately set to "free". If a name is not specified at check-in, the original name is retained. An individual charge factor and minimum charge can be set for the telephone booth. A31003-E1320-S100-4-7620 Service Manual Nur für den internen Gebrauch Basic settings Basic Hicom settings for connection to 150 E Office Com 2.0 / 2.2 – Service: service extensions such as the reception, kitchen, etc. as for "telephone booth". In the event of check-out or payment, however, trunk access is not switched. – Services without charges: service extensions for which only the charge total is recorded: no details of the individual calls are recorded. – Not used: for special extensions which cannot use Caracas Desk but which are connected, e.g. entrance telephones, service extensions for which call detail recording is not carried out via Caracas Desk, etc. ● If conflicts arise between the extension numbers, the customer data is not transferred back to Hicom and a message regarding the conflict is output. Please note that conflicts can also arise with codes 7..., 8..., 9... and 0 (for routes by default, etc.). These codes can only be checked or changed with Assistant E. ● Write the data to Caracas Desk (via the Transfer/Write to Desk menu) The wake-up service is located at subscriber 189 (with the default extension number 500). A name may not be set in Hicom for the configured extensions. Names are automatically assigned at check-in. Names must are also be assigned for service extensions and booths at check-in. Names are only deleted for guests at check-out. A31003-E1320-S100-4-7620 Service Manual 4-19 Basic settings Nur für den internen Gebrauch Basic Hicom settings for connection to 150 E Office Point Rel. 2.0 / 2.2 4.10 Basic Hicom settings for connection to 150 E Office Point Rel. 2.0 / 2.2 4.10.1 Setting the extension number plan in Hicom As of Caracas Desk Rel. 2.0, the extension numbers can differ from the room numbers. The extension numbers in Hicom must correspond to the extension numbers set in Caracas Desk. The extension numbers can be assigned in the following manner. Using Hicom Assistant E: Extension numbers in Hicom can be directly assigned in the usual manner with Assistant E via the Hicom V.24 interface. An extension number must be configured for the last two extensions 39 and 40 (with the default extension numbers 69 and 70). Generate the file HCMPP.TXT with Assistant E (via the File/Create Hicom info files menu) and import it with Assistant for Caracas Desk. This data can be modified and saved with Assistant for Caracas Desk. Enter CARACASDESK (in upper-case and without blanks) under User name in the Assistant E menu File/Transfer/User administration; in the case of user range, select System input and enter a password of your choice (max. 15 characters). Before using Caracas Desk, dial *95 at a reception telephone to activate the Hicom system administration function. Enter CARACASDESK as the user. The first time a user is registered, Hicom allows you to modify the password defined in the Assistant. To do this, enter the defined password three times or a new password. 4.10.2 Trunk access for guest telephones in Hicom The extensions 39 and 40 (with the default extension numbers 69 and 70) are used as “templates” for trunk access. Trunk access cannot, therefore, be set as required for any telephones connected to these ports. 4-20 ● An extension number which is not required must be assigned to the extensions 39 and 40. The extension numbers for extensions 39 and 40 must be changed if S0 buses without separate MSN assignment are used in the system. Otherwise, there will be collisions with the default extension numbers of the S0 buses. ● The extension 39 (with the default extension number 69) in Hicom is to be granted the level of access which a guest telephone without trunk access should receive (e.g. all lines outward restricted). A31003-E1320-S100-4-7620 Service Manual Basic settings Basic Hicom settings for connection to 150 E Office Point Rel. 2.0 / 2.2 Nur für den internen Gebrauch ● The extension 40 (with the default extension number 70) in Hicom is to be granted the level of access that a guest telephone with trunk access should receive (e.g. all lines unrestricted trunk access). 4.10.3 Extension settings in Caracas Desk ● Load the current extension numbers to Caracas Desk from the HCMPP.TXT file with Assistant for Caracas Desk (via the Configuration/Extension/Load Hicom file menu). ATTENTION: in the event of a modification performed while Caracas Desk is live, all data and call charge data must first be removed from Caracas Desk (via the Transfer/Read from Desk/Transfer customer data - yes, with call charge data menu). The data and call charge data must be reloaded into Caracas Desk after the modification in Assistant for Caracas Desk (via the Transfer/Write to Desk/ Transfer customer data - yes, with call charge data menu). ● Select the Configuration menu item once the data has been successfully loaded. ● For user: enter CARACASDESK (in upper-case and without blanks) ● For password: re-enter the password defined in Hicom Assistant E for the user name CARACASDESK. ● Set the extension types. Extensions 1 - 6 are preconfigured by default as administration. The preconfigured extensions are to be modified in accordance with requirements. Four items of information are necessary for each extension: ● Enter the required room number. ● The Hicom number represents the physical connection PEN in Hicom. Example: the UP0/E extensions (master) on the CBFC (central board) are assigned the Hicom numbers as of 1, 2, 3, etc. These numbers cannot be changed. However, they can be removed as required by deleting extensions and specified by adding extensions. ● Enter the required extension number. This number must correspond to your local network provider’s extension number plan. ● Type: – Guest: Guest extensions – Booth1/booth2: telephone booths. As in the case of "guests", individual calls are itemized. On check-out, the name is not deleted and the status is immediately set to "free". If a name is not specified at check-in, the original name is retained. An individual charge factor and minimum charge can be set for the telephone booth. A31003-E1320-S100-4-7620 Service Manual 4-21 Basic settings Nur für den internen Gebrauch Basic Hicom settings for connection to 150 E Office Point Rel. 2.0 / 2.2 – Service: service extensions such as the reception, kitchen, etc. as for "telephone booth". In the event of check-out or payment, however, trunk access is not switched. – Services without charges: service extensions for which only the charge total is recorded: no details of the individual calls are recorded. – Reference trunk: “templates” for trunk access. For the rooms 73 and 74 (default room number), extension numbers must be assigned to extensions 39 and 40 (default extension numbers 69 and 70). The extension numbers for extensions 73 and 74 are thus identical in Caracas Desk to the extension numbers for extensions 39 and 40. Rooms 39 and 40 (default room numbers) must be defined in Caracas Desk as “not used”. – Not used: for special extensions which cannot use Caracas Desk but which are connected, e.g. entrance telephones, service extensions for which call detail recording is not carried out via Caracas Desk, etc. ● If conflicts arise between the extension numbers, the customer data is not transferred back to Hicom and a message regarding the conflict is output. Please note that conflicts can also arise with codes 7..., 8..., 9... and 0 (for routes by default, etc.). These codes can only be checked or changed with Assistant E. ● Write the data to Caracas Desk (via the Transfer/Write to Desk menu) The wake-up service is located at subscriber 21 (with the default extension number 51). A name may not be set in Hicom for the configured extensions. Names are automatically assigned at check-in. Names must are also be assigned for service extensions and booths at check-in. Names are only deleted for guests at check-out. 4-22 A31003-E1320-S100-4-7620 Service Manual Basic settings Setting call charges with a password Nur für den internen Gebrauch 4.11 Setting call charges with a password Activity 1. Customer-specific password: 123 (default). 2. Charge factor guest: with max. 3 digits after the decimal point (* as decimal point). 3. Charge factor booth: for telephone booths. 4. Charge factor service: for service extensions. 5. Minimum charge guest (no basic charge). 6. Minimum charge booth (no basic charge). 7. Standard check-in: trunk access, message waiting yes/no at check-in. 8. Standard check-out: trunk access, message waiting unchanged/no at check-out. 9. Standard payment: trunk access unchanged/not when paying. 10. Display format: rounded up 100 - 10 - 1- 0.10 - 0.01 (GER) - 0.001. 11. Value added tax: in % with max. one digit after the decimal point. 12. Currency: 3-digit currency unit (max). 13. Enter second currency (e.g.: EUR). 14. Enter conversion factor for second currency. 15. Change password charge setting: password for call charge settings. A31003-E1320-S100-4-7620 Service Manual 4-23 Basic settings Features without password Nur für den internen Gebrauch 4.12 Features without password Activity 4-24 1. Press the Settings key and select the standard language. 2. Reception telephone: lock the reception telephone. 3. Query/delete the call charge total counter (two can be deleted and one cannot be deleted). 4. Load room keys programmed at the add-on devices (previously at the reception telephone by entering S* 91). 5. Line feed: number of linefeeds at the start and end of a page. Single page feed: enter * to end line feed. 6. Automatic query: query the feature statuses, e.g. all occupied rooms. 7. Default language 8. Acoustic alarm: an alerting tone is output (e.g. guest cannot be woken up). 9. Hotel data: hotel name and address for invoices. Maximum four lines with 24 digits each. A31003-E1320-S100-4-7620 Service Manual Index Nur für den internen Gebrauch Index X I Installation 2-1 A AT modem adapter pin assignment 1-3 B Basic settings Hicom 100 E 4-2 Hicom 118-2 4-5 Hicom 150 E OfficeCom 1.0 4-11 Hicom 150 E OfficeCom 2.0 / 2.2 4-17 Hicom 150 E OfficePoint 1.0 4-14 Hicom 150 E OfficePoint 2.0 / 2.2 4-20 Hicom 150 E Rel. 2.2 4-8 Booth 4-3 C Caracas Desk wall mounting 2-2 Central call detail recording 3-1 Checksum error list 3-2 Configuration overview 1-1 E Extension number plan Hicom 100 E 4-2 Hicom 118-2 4-5 Hicom 150 E OfficeCom 1.0 4-11 Hicom 150 E OfficeCom 2.0 / 2.2 4-17 Hicom 150 E OfficePoint 1.0 4-14 Hicom 150 E OfficePoint 2.0 / 2.2 4-20 Hicom 150 E Rel. 2.2 4-8 Extension settings in Caracas Desk Hicom 100E 4-3 Hicom 118-2 4-6 Hicom 150 E OfficeCom 1.0 4-11 Hicom 150 E OfficeCom 2.0 / 2.2 4-18 Hicom 150 E OfficePoint 1.0 4-14 Hicom 150 E OfficePoint 2.0 / 2.2 4-21 Hicom 150 E Rel. 2.2 4-9 F Features without password 4-24 Firmware, loading 4-1 A31003-E1320-S100-4-7620 Service Manual O Overview of item code numbers 1-2 P Password 4-18, 4-21 Password for basic settings 4-1 Printer 3-1 Printout, setting 4-1 Putting into service 3-1 R Reception telephone 3-1 S Service 4-3 Service codes 3-1 Services without charges 4-3 Setting call charges with a password 4-23 System data 1-1 T Trunk access for guest telephones 4-2, 4-11 Hicom 100E 4-2 Hicom 118-2 4-5 Hicom 150 E OfficeCom 1.0 4-11 Hicom 150 E OfficeCom 2.0 / 2.2 4-17 Hicom 150 E OfficePoint 1.0 4-14 Hicom 150 E OfficePoint 2.0 / 2.2 4-20 Hicom 150 E Rel. 2.2 4-8 U User name 4-17, 4-20 Users 4-18, 4-21 W Wake-up service Hicom 100E 4-4 Hicom 118-2 4-7, 4-10 Hicom 150E 2.2 4-10 Hicom Office Com 1.0 4-13 Hicom Office Com 2.0 / 2.2 4-19 Hicom Office Point 1.0 4-16 Z-1 Index Nur für den internen Gebrauch Hicom Office Point 2.0 / 2.2 4-22 Z Zoning table, saving 4-1 Z-2 A31003-E1320-S100-4-7620 Service Manual