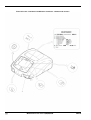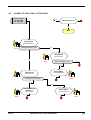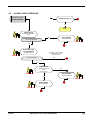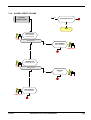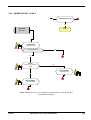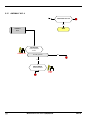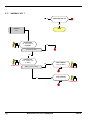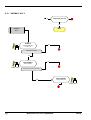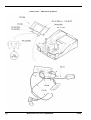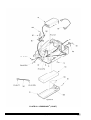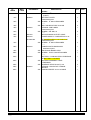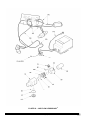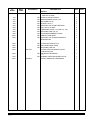
1
Legendair Service Manual Tel: 604 540-8288 Fax: 604 540-8245 Web: www.westcaremedical.com Maintenance File LEGENDAIR ® Chapter 0 – Introduction to Maintenance (Rev. B) CH0-1 Maintenance File of the LEGENDAIR ® CONTENTS 1. INTRODUCTION .......................................................................................................................... 3 1.1 WARNINGS / SAFETY RULES......................................................................................................... 3 1.2 GUARANTEE / GUARANTEE SEAL ................................................................................................ 3 1.3 METHOD/TRACEABILITY/CONTROL 1.3.1 Traceability............................................................................................................................ 4 1.3.2 Inspection sheet (appendix 1 – Chap IV).............................................................................. 4 2. DEFINITION OF CHAPTERS....................................................................................................... 4 2.1 DOCUMENTATION PLAN: ............................................................................................................... 4 Maintenance File of the LEGENDAIR ® CH0-2 1. INTRODUCTION 1.1 WARNINGS / SAFETY RULES This maintenance file was produced within a limited context. Only persons trained and approved by AIROX are authorized to use it. The person (operator) who needs to do any work on defective elements must refer to the electrical safety rules in force for this type of work. Similarly, knowledge about how this type of device is used is desirable (Refer to the "LEGENDAIR® User's Manual" if necessary). BEFORE DOING ANY MAINTENANCE WORK, MAKE SURE THAT THE DEVICE IS SWITCHED OFF. >> AIROX cannot be held responsible for incidents caused by this device unless the installation, maintenance or modifications are made by an authorized person using original spare parts and respecting quality assurance and traceability rules approved by AIROX. Due to its CE marking, no modifications may be made without the written permission of AIROX. 1.2 GUARANTEE / GUARANTEE SEAL >> No maintenance work for which the equipment needs to be opened is necessary within the first twelve months of operation. A tamper proof label under the equipment states that the equipment is under "Guarantee" for the first year. The contractual guarantee provided by AIROX will be null and void if this label is damaged in any way by opening the equipment during the first twelve months (unless AIROX gave written permission before the equipment was opened). 1.3 METHOD / TRACEABILITY / INSPECTION The operator should note all equipment configuration parameters before starting to do any work, if possible depending on the operating condition. CH0-3 Maintenance File of the LEGENDAIR ® 1.3.1 Traceability It is recommended that approved After Sales services should keep the following elements for 10 years, for traceability purposes: − work data, − inspection sheet. If there is an incident with a device, these documents will be requested to determine its history and to demonstrate that maintenance and the work operations have actually been done. In general, the operator should record information about the work - Nature of the work, replacement of defective parts. 1.3.2 Inspection sheet (appendix 1 – Chap IV). Adjustment-inspection instructions must be applied in all cases after each mechanical and/or electrical operation. Do not forget to reconfigure the device in accordance with the user's parameters (Elements backed up before the work operation). 2. DEFINITION OF CHAPTERS This file is organized in the form of chapters to define all information necessary for the maintenance technician. 2.1 DOCUMENTATION PLAN: >> Cover page. >> Chapter 0: Introduction to Maintenance. >> Chapter 1: Technical and Functional Description. >> Chapter 2: Preventive Maintenance. Maintenance File of the LEGENDAIR ® CH0-4 >> Chapter 3: Troubleshooting Assistance. >> Chapter 4: Inspection. >> Chapter 5: Corrective Maintenance. >> Chapter 6: Illustrated catalog. >> Editions management page. CH0-5 Maintenance File of the LEGENDAIR ® Parc d’activités Pau-Pyrénées ZI de l’échangeur 64008 PAU CEDEX (FRANCE) Tel. : 33.(0)5.59.14.02.02- Fax : (33.(0)5.59.14.02.00 - E-mail : [email protected] Maintenance File LEGENDAIR ® Chapter 1 – Technical and Functional Description (Rev. B) CH1-1 Maintenance File of the LEGENDAIR ® Maintenance File of the LEGENDAIR ® CH1-2 CONTENTS 1. INTRODUCTION ...........................................................................................................................5 1.1 OVERVIEW ........................................................................................................................................5 2. TECHNICAL DESCRIPTION ........................................................................................................5 2.1 GENERAL TECHNICAL DATA FOR THE DEVICE...........................................................................5 3. FUNCTIONAL DESCRIPTION......................................................................................................7 3.1 ARCHITECTURE - PRINCIPLE.........................................................................................................7 3.2 OPERATION OF THE DEVICE .........................................................................................................8 CH1-3 Maintenance File of the LEGENDAIR ® Maintenance File of the LEGENDAIR ® CH1-4 1. INTRODUCTION 1.1 OVERVIEW This chapter presents a brief reminder of the technical and functional characteristics of the LEGENDAIR®. 2. TECHNICAL DESCRIPTION The LEGENDAIR® is composed of elements located in two sub-assemblies forming the top casing and the bottom casing of the nose ventilator. These two equipped sub-assemblies also incorporate wiring and an air circuit (see the air path – fig LE1.1). 2.1 GENERAL TECHNICAL DATA FOR THE DEVICE Insufflation Flow Rate: from 0 to 200 l/min (or dm3/min) in absolute. >> Maximum flow rate at 10 mbar = 190 l/min, >> Maximum flow rate at 20 mbar = 160 l/min, >> Precision of measurement: ± 10% above 15 L/min. Insufflation Pressure: from 4 to 55 mbar (or hPa) absolute(1) . >> Precision of measurement: ± (0.8 mbar + 4% of reading). Note : The maximum pressure limit threshold above which the device cannot supply a flow of air (intrinsic limitation of the turbine motor) is 70 mbar. Cycling rate: from 4 to 40 bpm (or breaths/min) absolute. >> Precision of calculation: ± 1 bpm. I/T cycling mode: from 25% to 50% in absolute setting. >> Precision of calculation: ± 10%. I/E cycling mode: from 1/1 to 1/3 in absolute setting >> Precision of calculation: ± 10%. FiO2 measurement: from 18% to 100% with cell COMEPA MI COM 102-1 to 1013 hPa and 25°C >> Precision of measurement: ± 3% >> Response time: < 13 s for 90% of the final value >> Stability of the precision of measurement: ± 1% past 8 h (1) There are specific limitations for each mode. CH1-5 Maintenance File of the LEGENDAIR ® Inspiratory resistance of the ventilator: - 3 mbar to 60 L/min. Level of sound pressure in accordance with standard NF EN ISO 17510-1: 30 dBA A/C Electrical supply: − 115/230 V ± 10% - 50/60 Hz. − Consumption: 80 VA nominal and 90 VA max. DC direct electrical power supply: − 24 V ± 2.5 V -3.3 A maxi − Consumption: 80 VA nominal Internal battery: 25.2 V -4.4 Ah of the Lithium Ion - rapid recharge type. The autonomy offered by the internal battery depends on the level of adjustments made, the environmental conditions (primarily in terms of temperature) as well as the physiological characteristics of the patient. On average autonomy with a temperature of 25°C is as follows: Ventilation parameters Average autonomy based on maximum battery charge VT ˜ 200 ml IPAP ˜ 10 mbar R ˜ 20 bpm VT ˜ 300 ml IPAP ˜ 20 mbar R ˜ 15 bpm VT ˜ 500 ml IPAP ˜ 30 mbar R ˜ 15 bpm 10 h 8h 6h Max of ventilation parameters 4h The time taken to recharge the internal batteries is of the order of 8 hours to obtain a good level of autonomy (see § Battery maintenance). Insulation class: Class II – Protection index IP 30. Medical device class: Class II B – Type BF applied part. Dimensions (excluding accessories) : H = 154 mm, L = 235 mm, D = 315 mm. Weight: 4.5 kg in double branch option. Maintenance File of the LEGENDAIR ® CH1-6 The following environmental conditions shall be respected: In storage or transport: − Temperature: -20 to 60 °C. − Humidity: 10 to 80 % RH. − Atmospheric pressure: 600 to 1060 hPa. In use: − Temperature: 5 to 35 °C. − Humidity: 30 to 75 % RH. − Atmospheric pressure: 700 to 1060 hPa. Note: The measurements of the flow rates and therefore the estimations of volume of leakage that result (see § Measurement visualisation) are influenced by the variations in atmospheric pressure. A calibration of the flow rate sensor is recommended if atmospheric pressure is much different than 1000 hPa (see § Sensor calibration). For example, altimetric variation of 1000 m leads to a variation of flow rate measurement of the order of 10%. In extreme conditions of use (such as humidity at 95% and power supply at -15%) the ventilator does not demonstrate particular malfunction. 3. FUNCTIONAL DESCRIPTION 3.1 ARCHITECTURE - PRINCIPLE The LEGENDAIR® ventilator is composed of an airflow generator to manage the inspiration and expiration phases controlled by variable set values. The overall system is controlled by a computer that receives information from pressure and flow sensors. The flow generator is a micro-turbine driven by an electric motor. The main function blocks are as follows: − Generator block (Turbine built into a box with sound insulation and air filter) − Supply block / Charger (AC/DC power supply, wiring, switching board) − Battery block − Pneumatic block (flow laminator + solenoid valve+ O2 supply + Expiration block (Option) + couplings + silicon and polyurethane tubes) CH1-7 Maintenance File of the LEGENDAIR ® − CPU block (piloting printed circuit board + turbine control board) − Structure and User-Machine Interfaces (housings + display + keypad + communication ports) 3.2 OPERATION OF THE DEVICE The LEGENDAIR® ventilator is composed on one hand of an airflow generator capable of supplying a sufficient range of flow rates and pressures and on the other hand of a three-way valve enabling piloting of the expiration valve. The flow generator is a low-inertia micro-turbine driven by a brushless electric motor: the valve is a proportional piezo valve. These two actuators are controlled according to specific piloting laws by a computer receiving information from the pressure and flow sensors built into the apparatus. The operation of the device is based on a self-adapting drive system of the speed of the flow generator, in a closed loop. The speed of the flow generator (turbine) is servo-controlled to the patient pressure signal or the inspired flow signal. The laws for piloting turbine speed are based on equations and vary according to the ventilation modes, settings and the ventilatory cycle phases. Thus, fixing the pressure flow ramp or flow rise time has an influence on the level of turbine acceleration at the start of insufflation. The transition between the insufflation and expiration phase is itself controlled by a deceleration or braking proportional to the difference in pressure between the two phases. The expiration valve is pressure-piloted during the inspiratory phase and as the main regulation part during the expiratory phase. The speed of the turbine is thus adapted to the expiratory pressure level during the entire expiratory phase in order to compensate for "parasite" leaks in the circuit beyond the leak regulated by the valve. This rinsing flow is as small as possible in order to limit the patient expiratory brake phenomenon without however cancelling it in order to prevent turbine overheating and expired gasses re-aspiration phenomena. A system of non-return valve and spontaneous ventilation are used to facilitate the threshold of balance. Maintenance File of the LEGENDAIR ® CH1-8 Input 110 / 220 V AC 50 / 60 Hz Partial ON/OFF switch Inlet O2 Air inlet Air filter or DC 24 V Series port 25.2 V 4.4 Ah A Switching board Ctrl Turbine board Battery Turbine casing+ sound insulation Turbine Reminder Alarm Valve Block Laminator CPU board Solenoid valve Pressure sensor Socket FiO2 Pressure sensor Display Flow sensor Keypad Laminator Expiration Command Valve Housing From patient CH1-9 Maintenance File of the LEGENDAIR ® Toward patient The measurement of the flow rate completes the system by enabling detection of patient inspiratory efforts and to trigger insufflation phases. The flow rate measurement can also be used to determine the end of the insufflation phase in certain ventilation modes. Finally, it serves to calculate the leak volumes and rates reached at each cycle, regardless of the ventilation mode in progress. This also enables the proposal of an automatic adjustment of the insufflation pressure between two determined limits in order to attain a desired volume. The various measurement signals used in the piloting and detection are specifically filtered in order to limit risk of disturbance and malfunction. Maintenance File of the LEGENDAIR ® CH1-10 CH1-11 Maintenance File of the LEGENDAIR ® Parc d’activités Pau-Pyrénées ZI de l’échangeur 64008 PAU CEDEX (FRANCE) Tel. 33.(0)5.59.14.02.02- Fax : (33.(0)5.59.14.02.00 - E-mail : [email protected] Maintenance File LEGENDAIR ® Chapter 2 – Preventive Maintenance (Rev. B) CH2-1 Maintenance File of the LEGENDAIR ® Maintenance File of the LEGENDAIR ® CH2-2 CONTENTS 1. INTRODUCTION...........................................................................................................................4 1.1 OVERVIEW ....................................................................................................................................... 4 1.2 DEFINITION OF MAINTENANCE PROCEDURES .......................................................................... 4 1.2.1 Preventive operations summary table................................................................................... 5 1.3 CORRESPONDENCE TABLE .......................................................................................................... 6 1.3.1 Correspondence table in months of use ............................................................................... 7 1.3.2 Correspondence table in hours of use (intensive use).......................................................... 7 1.4 SAFETY MEASURES ....................................................................................................................... 7 1.5 TIGHTENING TORQUE / TOOLS / FASTENERS ............................................................................ 8 1.5.1 Tightening torque .................................................................................................................. 8 1.5.2 Removal – installation tools .................................................................................................. 8 1.5.3 Fasteners 2. MAINTENANCE INSPECTION V1 (OR 1500 H) ..........................................................................10 2.1 CLEANING AND DISINFECTION (FIG CP 2.1)................................................................................ 10 2.1.1 Cleaning the device............................................................................................................... 10 2.1.2 2.2 Patient circuit......................................................................................................................... 10 CLEANING THE EXPIRATION UNIT (DOUBLE BRANCH OPTION (FIG CP 2.2).......................... 12 2.2.1 Removal / Cleaning / Installation........................................................................................... 12 3. MAINTENANCE INSPECTION V2 (OR 1500 H) ..........................................................................14 3.1 REMOVAL / INSTALLATION OF THE AIR INLET FILTER (FIG CP 2.3)......................................... 14 3.1.1 Removal / Installation............................................................................................................ 14 4. MAINTENANCE INSPECTION V3 (OR 3000 H) ..........................................................................16 4.1 CHECKING USER-MACHINE INTERFACES, VOLTAGES AND SENSORS (FIG CP 2.4A/ 2.4B/ 2.4C) 16 4.1.1 Checking user/machine interfaces ........................................................................................ 16 4.1.2 Checking the sensors............................................................................................................ 18 4.1.3 Check the internal voltages................................................................................................... 22 4.1.4 Check the buzzers ................................................................................................................ 24 4.2 OPENING AND CLOSING THE DEVICE – RELATED PROCEDURE (FIG CP 2.5) ....................... 26 4.2.1 Opening and closing ............................................................................................................. 26 4.3 FLOW LAMINATOR CLEANING PROCEDURE (FIG CP 2.6) ......................................................... 30 4.3.1 Removal / Cleaning / Installation........................................................................................... 30 5. MAINTENANCE INSPECTION V4 (OR 4500 H) ..........................................................................32 5.1 REMOVAL / INSTALLATION OF THE BATTERY (FIG CP 2.7)....................................................... 32 5.1.1 Removal / Installation............................................................................................................ 32 6. MAINTENANCE INSPECTION V5 (OR 15000 H) ........................................................................34 6.1 CH2-3 REMOVAL / INSTALLATION OF THE TURBINE BOX WITH WIRING (FIG CP 2.8) ...................... 34 6.1.1 Removal / Installation............................................................................................................ 34 Maintenance File of the LEGENDAIR ® 1. INTRODUCTION 1.1 GENERAL This chapter sets forth preventive maintenance conditions and procedures. Preventive maintenance procedures relate to systematic maintenance operations. These activities are conducted according to maintenance intervals defined by the manufacturer. Preventive maintenance conditions are contingent on certain predefined events resulting from measurements or observations made during operations. Non-compliance to these maintenance recommendations can result in performance alterations, excessive overheating or even loss of certain functionalities, and compromise the long term durability of the device. >> It is generally recommended to clean and disinfect the device before performing any maintenance operations. >> According to maintenance quality procedures, the technician should complete an intervention report for each device. 1.2 MAINTENANCE PROCEDURE DEFINTION Overall operations to be performed are set forth in various maintenance procedures: >> equipment replacement procedures, >> operational inspection and monitoring, >> cleaning and disinfection, >> general audit operations. There are 4 types of maintenance visits, based on operating time of the device which is either determined by hours of use or months of operation. Visit every year Visit every 3 years Visit every 6 years GM-February 2008 SAV COVIDIEN-AIROX Note: Only the cleaning and disinfecting procedure is not part of this structure, as it is defined as recommended and is only performed according to the usage of the device and the environment in which it is used. V2 V3 V4 ® LEGENDAIR MAINTENANCE FILE Edition C CH2-4 1st level maintenance*: (V1) Maintenance performed at the patient, please refer to the current User Manual. 2nd level maintenance: (V2, V3, V4) Maintenance performed in the workshop, please refer to the maintenance file. CAUTION BEFORE ANY MAINTENANCE OPRATION: PLEASE MAKE SURE THE DEVICE USES THE MOST RECENT SOFTWARE VERSION ® From serial # LEGENDAIR 40957K166311 and 40959K207311, software version LE02XXX Before serial # LEGENDAIR® 40957K166311 and 40959K207311, software version LE01XXXX Check the distance between the CPU card and the INVERTER (IC5) card (the gap must be more than 1 mm). 1.2.1 Preventive Operations Summary Table OPERATION V2 V3 V4 CORRESPONDING PARAGRAPH Cleaning and disinfection Cleaning of autoclavable expiratory block (double branch option) (3809999) * * * CHAPTER II-2.1 * * * CHAPTER II-2.2 * * * CHAPTER II-2.2 Air inlet filter replacement (2963399) ** * * * CHAPTER II-3.1 User interface control, adjustment and calibration X X X CHAPTER II-4.1 Cleaning of flow laminator (3812099) X X X CHAPTER II-4.2 Cleaning of single-patient expiratory block (double branch option) (3823099) Battery replacement (2963599) X CHAPTER II-5.1 Piezo valve replacement (3811799) X CHAPTER II-6.1 Turbine casing replacement (3806499) X CHAPTER II-7.1 >> (**) or with each patient change and Specific procedure: Fine particle filter must be changed more often according to fouling levels or operation location. GM-February 2008 SAV COVIDIEN-AIROX ® LEGENDAIR MAINTENANCE FILE Edition C CH2-5 1.3 CORRESPONDENCE TABLES 1.3.1 Correspondence table in months of use Visit after … of use 1 year 2 years 3 years Visit after … of use 4 years 5 years 6 years Visits to perform V2 V2 V2+V3 Visits to perform V2 V2 V2+V3+V4 1.3.2 Correspondence table in hours of use (intensive use) Visit after an intensive use of … Visits to perform 3 000 h 4 500 h 15 000 h V2 V2+V3 V2+V3+V4 >> V2, V3, V4 : Must be performed in the workshop. RECALL: FIRST LEVEL MAINTENANCE* Consumables replacement frequency In normal ventilator use, i.e. in a dust-free environment and notwithstanding any part damage (impacts, tears, major pollution), replacement frequency recommended for consumables is described in the User Manual. Non-compliance to these recommendations can results in performance alterations, excessive overheating or even loss of certain functionalities, and compromise the long term durability of the device. Note: For all other accessories not necessarily considered as consumables, please refer to the manufacturer’s recommendations. GM-February 2008 SAV COVIDIEN-AIROX ® LEGENDAIR MAINTENANCE FILE Edition C CH2-6 1.3.1 Correspondence table in months of use Inspection after ... Inspections to be made of use Inspection after ... Inspections to be made of use 2 months (*) V1 38 months V1 4 months V1 40 months V1 6 months V1+V2 42 months V1+V2 8 months V1 44 months V1 10 months V1 46 months V1 1 year V1+V2+V3 4 years V1+V2+V3 14 months V1 50 months V1 16 months V1 52 months V1 18 months V1+V2 54 months V1+V2 20 months V1 56 months V1 22 months V1 58 months V1 2 years V1+V2+V3 5 years V1+V2+V3 26 months V1 62 months V1 28 months V1 64 months V1 30 months V1+V2 66 months V1+V2 32 months V1 68 months V1 34 months V1 70 months V1 3 years V1+V2+V3+V4 6 years V1+V2+V3+V4+V5 (*) or every 3 months, according to the in-house procedure of the service provider. 1.3.2 Correspondence table in hours of use (intensive use) 1.4 Inspection after intensive use of ... Inspections to be made 1,500 h V1+V2 3,000 h V1+V2+V3 4,500h V1+V2+V3+V4 15,000 h V1+V2+V3+V4+V5 SAFETY MEASURES The person (operator) who needs to work on defective elements must refer to electrical safety rules in force for this type of work. BEFORE DOING ANY MAINTENANCE WORK, MAKE SURE THAT THE DEVICE IS SWITCHED OFF. Maintenance File of the LEGENDAIR ® CH2-8 >> AIROX cannot be held responsible for incidents caused by this device unless the installation, maintenance or modifications are made by an authorized person using original spare parts and respecting quality assurance and traceability rules approved by AIROX. Due to its CE marking, no modifications may be made without the written permission of AIROX. 1.5 TIGHTENING TORQUE / TOOLS / FASTENERS 1.5.1 Tightening torque All tightening torques respect standards in force and depend on the diameter of the screw or nut to be tightened. All specific torques are summarized in maintenance procedures. 1.5.2 Removal – installation tools The tools necessary for carrying out all the maintenance procedures are: Screwdriver or T10 + T20 male Hexalobe adapter spanner, flat screwdriver. CH2-9 Maintenance File of the LEGENDAIR ® Figure CP 2.1 - Cleaning and disinfection of LEGENDAIR® Maintenance File of the LEGENDAIR ® CH2-10 2. MAINTENANCE INSPECTION V1 (OR 1500 H) 2.1 CLEANING AND DISINFECTION (FIG CP 2.1) Product reference: .......................... Bactericide and germicide solution: ANIOSPRAY 29 or 41, or AMPHOSPRAY 41. Number of operator: ....................... 1. Special or specific tools: ............... Cloth, sponge, vaporizer. Preliminary operations: .................. Make sure that the device is switched off. Do not allow any liquid to enter inside the device (in particular through the cooling apertures). 2.1.1 Cleaning the device - Clean the outside of the device using a cloth (A) or a sponge (B) slightly dampened with a bactericide or germicide solution. Spray (C) the device if necessary, taking account of the requirements discussed in the preliminary operations. >> Do not dampen filters, or dry them before reuse if they are wet. 2.1.2 Patient circuit Patient circuits distributed for this device are for single use only and therefore cannot be disinfected. If a re-usable patient circuit is used, follow the recommendations of the manufacturer for cleaning and disinfecting. CH2-11 Maintenance File of the LEGENDAIR ® Figure CP 2.2 - Cleaning the expiration unit (double branch option) Maintenance File of the LEGENDAIR ® CH2-12 2.2 CLEANING THE EXPIRATION UNIT (DOUBLE BRANCH OPTION (FIG CP 2.2) Product reference: .......................... Bactericide and germicide solution: ANIOSPRAY 29 or 41, or AMPHOSPRAY 41. Number of operator: ....................... 1. Special or specific tools: ............... None. Preliminary operations: .................. Make sure that the device is switched off. Clean the device before starting the work (Chap II.2.1). 2.2.1 Removal / Cleaning / Installation - Put the device in a clean and open environment. - Unscrew the knurled knob (Pl1-160) to release the Expiration Block (Pl1-180). - Extract the Expiration Block laterally. - Clean the block in soapy water and then rinse with clean water. - Use products such as ANIOSPRAY 29 for external cleaning. >> Use a light air blast to clear away any remaining water. - Replace the Expiration Block (Pl1-180) and screw the knurled knob (Pl1-160) in place. - Calibrate the sensors (Chap V-3-1). - Perform the final inspection procedures before putting back into service (Chap IV). CH2-13 Maintenance File of the LEGENDAIR ® Figure CP 2.3 – Air inlet filter Maintenance File of the LEGENDAIR ® CH2-14 3. MAINTENANCE INSPECTION V2 (OR 1500 H) 3.1 REMOVAL / INSTALLATION OF THE AIR INLET FILTER (FIG CP 2.3) Spare part reference: ...................... 3804800 : Air inlet filter. Number of operator: ....................... 1. Special or specific tools: ............... None. Preliminary operations: .................. Clean the device before starting the work (Chap II.2.1). 3.1.1 Removal / Installation - Put the device in a clean and open environment. - Extract the old filter and replace it. CH2-15 Maintenance File of the LEGENDAIR ® Figure CP 2.4a – Checking User/Machine interfaces, voltages and sensors Maintenance File of the LEGENDAIR ® CH2-16 4. MAINTENANCE INSPECTION V3 (OR 3000 H) 4.1 CHECKING USER-MACHINE INTERFACES, VOLTAGES AND SENSORS (FIG CP 2.4A/ 2.4B/ 2.4C) Spare part reference: ...................... . Number of operator: ....................... 1. Special or specific tools: ............... 0 to 200 L/min flow meter (measurement device), Ø22 patient tube without accessory, a T-union, a leak aperture (Ø 5mm), O2 cell COMEPA mi com 102-1. Preliminary operations: .................. Clean the device before starting the work (Chap II.2.1). Check that there are no appearance defects on the device. Check that the wiring is present and that the casing is properly fixed. 4.1.1 Checking user/machine interfaces 4.1.1.1 Check the keypad, the display and the clock/date - Switch the device on in Setup mode by simultaneously pressing the On/Off switch found at the rear of the machine (position "1" or ON") and keeping the key pressed until the menu appears on the screen. - Check the device date. >> If necessary: Place the cursor on the DATE line (with intention to modify the parameters by the left cursor becomes new value with the or ) Validate your key: the parameter flashes and the . Modify its value using the key. or keys. Validate the - Check the time on the device. >> If necessary: Place the cursor on the TIME line (with intention to modify the parameters by the left cursor becomes new value with the or ). Validate your key: the parameter flashes and the . Modify its value using the key. or keys. Validate the Note : When a parameter comprises several adjustment fields (ex. Date, Time) go from field to field using the same key. If a parameter modification is not validated after 7 seconds, the ventilator restores the previous value. The parameters of the setup menu remain memorised until they are partially or completely modified anew. >> Place the cursor on the Maintenance line to continue the checks. CH2-17 Maintenance File of the LEGENDAIR ® Figure CP 2.4b – Checking User/Machine interfaces, voltages and sensors Maintenance File of the LEGENDAIR ® CH2-18 4.1.2 Checking the sensors 4.1.2.1 Check calibration of the pressure sensor - Check correct operation of the sensor by connecting the patient outlet (1) of the LEGENDAIR ® to the measurement devise. >> Use two T- unions on the machine outlet, one for coupling the endcap of the pressure meter and the second where the measurement device and a leak aperture (Ø 5mm) have been placed. >> The device must be in MAINTENANCE mode (see above). - Place the cursor on line "Patient Pressure” press key line "Patient Pressure”. - Again press key : a 0 must appear opposite : a value of 40 should appear opposite line "Patient Pressure”. - Check the difference between values read on the measurement devise and on the device (Patient Pressure) is less than +/- 1 mbar. >> If it is not, do a calibration (Chap V.3.1). - Switch the device Off. 4.1.2.2 Check calibration of the valve pressure sensor >> The device must be in MAINTENANCE mode (see above). - Place the cursor on the line "Valve Pressure" and check that the display indicates 0.0 to 0,2 mbar. >> If it is not, do a calibration (Chap V.3.1). - Switch the device Off. CH2-19 Maintenance File of the LEGENDAIR ® Figure CP 2.4b – Checking User/Machine interfaces, voltages and sensors Maintenance File of the LEGENDAIR ® CH2-20 4.1.2.3 Checking the inspired flow sensor - Connect the ventilation patient outlet (1) to the measurement devise using a tube of sufficient length and section. >> No part should be placed in series between the ventilator and the measurement devise during the operation so as not to introduce either leak or loss of supplementary charge. >> The device must be in MAINTENANCE mode (see above). - Place the cursor on the line "Inspired flow" and then press the appear opposite the Inspired flow. key: a 0 must - Repeat the operation for calibration point : the flows indicated by the measurement devise must be 5±0,5l/min; 12±0,6l/min; 37±1,9l/min; 60±3l/min; 90±4,5l/min; 135±6,7l/min and 160±8l/min >> If it is not, do a calibration (Chap V.3.1). - Switch the device Off. 4.1.2.4 Checking the expired flow sensor >> This is necessary if the device is equipped with an Expiration Block. - Connect the patient ventilator to the female cone of patient return with the help of a Ø 22 mm tube. >> The device must be in MAINTENANCE mode (see above). - Put the cursor on line "Inspired flow", then press key . - The interval between the values appearing on the line "Expired flow" and the line "Inspired flow" must be less than +/- 0,5 l/min. >> If it is not, do a calibration (Chap V.3.1). - Switch the device Off. CH2-21 Maintenance File of the LEGENDAIR ® Figure CP 2.4c – Checking User/Machine interfaces, voltages and sensors Maintenance File of the LEGENDAIR ® CH2-22 4.1.2.5 Checking the FiO2 sensor - Connect a cell O2 COMEPA Mi Com 102-1 to the device. >> The device must be in MAINTENANCE mode (see above). - Place the cursor on the line "FiO2" and check that the display reads 21% +/- 1 %. >> If it is not, do a calibration (Chap V.3.1). - Switch the device Off. 4.1.3 Check the internal voltages - Switch the device on in setup mode by simultaneously pressing the On/Off switch found at the rear of the machine (position "1" or ON") and keeping the key pressed until the menu appears on the screen. Place the cursor on " MAINTENANCE" and then validate, select the line "Voltage control" and verify: - With the mains connected, display the general power supply voltage "ALIM 24,5±1,5V". >> If it is not, check the supply circuit (Chap V.3.1). - With the external source of DC connected up, display the general power supply voltage "ALIM 24,5±1,5V". >> If it is not, check the supply circuit (Chap V.3.1). - With internal battery branching, display the voltage of the battery "28,5±1V" (function of the charge status) and the appearance of the battery symbol. >> If it is not, check the supply circuit (Chap V.3.1). - Place the cursor on the line "return", then validate. On "turbine speed" press , let the device run for 5 min and replace the cursor in order to see the battery voltage and check that it equals 27,5V ± 0,5V. - Reconnect the mains power supply and check that after 5 min of charging the battery voltage level has returned to its initial value. >> If it is not, check the supply circuit (Chap V.3.1). - Reconnect the device to the mains power supply. - Display the CPU logic circuit voltage "CPU 5V±0,5V". CH2-23 Maintenance File of the LEGENDAIR ® Figure CP 2.4c – Checking User/Machine interfaces, voltages and sensors Maintenance File of the LEGENDAIR ® CH2-24 >> If it is not, check the supply circuit (Chap V.3.1). - Display the Watchdog voltage "25±2V". >> If it is not, check the supply circuit (Chap V.3.1). - Switch the device Off. 4.1.4 Check the buzzers - Switch the device on in setup mode by simultaneously pressing the On/Off switch key found at the rear of the machine (position "1" or ON") and keeping the pressed until the menu appears on the screen. Place the cursor on “MAINTENANCE” and validate. - Place the cursor on the line of each one of the buzzers and press the Validation key . >> you can activate the buzzers separately and ensure that they operate correctly and are correctly supplied. - The voltages must lie within the following range: Tension BUZZER 1 5 V ± 1V Tension BUZZER 2 5 V ± 1V - Switch the device Off. CH2-25 Maintenance File of the LEGENDAIR ® Figure CP 2.5 – Opening and closing the device. Maintenance File of the LEGENDAIR ® CH2-26 4.2 OPENING AND CLOSING THE DEVICE – RELATED PROCEDURE (FIG CP 2.5) Spare part reference: ...................... None. Number of operator: ....................... 1. Special or specific tools: ............... None. Preliminary operations: .................. Make sure that the device is switched off. Clean the device before starting the work (Chap II.2.1). 4.2.1 Opening and closing GUARANTEE SEAL A tamper proof label under the equipment states that the equipment is under "Guarantee" for the first year. The contractual guarantee provided by AIROX will be null and void if this label is damaged in any way by opening the equipment during the first twelve months (unless AIROX gave written permission before the equipment was opened). IMPORTANT Device sensitive to electrostatic phenomena SDES Sensitive to electrostatic discharge No work necessary on parts of the device can be done until methods for protection against electrostatic discharges have been applied. - Put the device in a clean and open environment. - Remove the five attachment screws (Pl1.20) on the bottom casing side (Pl1-280) and open the device. >> Carefully separate the two casings to avoid tearing off the keypad connections. CH2-27 Maintenance File of the LEGENDAIR ® Figure CP 2.5 – Opening and closing the device. Maintenance File of the LEGENDAIR ® CH2-28 - Disconnect the keypad from the CPU board (Pl1-120) (Connection Pl1.J6.CPU to be unbolted by traction on the upper part of the connection) in order to disassociate the two casings. - Do the work that made it necessary to open the device. … … >> Before closing the device, check the position of the wires and tubes. Also check that each element is attached. - Connect the keypad to the CPU board (Pl1-120) (Connection Pl1.J6.CPU to be bolted). - Put the two casings of the device into place and fix them using the five screws (Pl1.20) on the bottom casing side (Torque 10 Nm max). >> Pay attention to the positioning of the cone supports (Pl1-200 & Pl1-220) prior to final fixation. Do not forget to replace the air inlet filter (Pl1-310) following assembly of casings. - Perform the final inspection procedures before putting back into service (Chap IV). CH2-29 Maintenance File of the LEGENDAIR ® Figure CP 2.6 – Flow laminator cleaning Maintenance File of the LEGENDAIR ® CH2-30 4.3 FLOW LAMINATOR CLEANING PROCEDURE (FIG CP 2.6) Product reference: .......................... Bactericide and germicide solution: ANIOSPRAY 29 or 41, or AMPHOSPRAY 41. Number of operator: ....................... 1. Special or specific tools: ............... None. Preliminary operations: .................. Make sure that the device is switched off. Clean the device before starting the work (Chap II.2.1). 4.3.1 Removal / Cleaning / Installation - Put the device in a clean and open environment. - Open the device (see procedure CHAP II.4.2). - Unscrew the three attachment screws (Pl1-130) for the CPU board (Pl1-120). >> Do not disconnect the wiring of the CPU board. - Tilt the CPU board forward in order to disconnect its two tubes (Pl3-140). >> Take care not to tear off the sensors during removal. - Raise the turbine casing (Pl1-50) slightly in order to extract the flow laminator assembly (Pl1-260). - Clean these elements in soapy water and then rinse with clean water. - Use products such as ANIOSPRAY 29 to clean these parts, except for the tubes that should be used once only. >> Use a light air blast on the different connections to clear away any remaining water. - Reinstall all removed elements. It is essential to check the direction of assembly of the tubes (see detail fig. LE2-5). - Position the support cone (Pl1-220) ad check that the flow laminator in firmly secured (Pl1-260). - Reinstall the CPU board (Pl1-120) with the three attachment screws (Pl1-130) (Torque 5 Nm max.) - Close the device again, taking all necessary precautions (see procedure ). - Calibrate the sensors (Chap V-3-1). - Perform the final inspection procedures before putting back into service (Chap IV). CH2-31 Maintenance File of the LEGENDAIR ® Figure CP 2.7 – Batteries Maintenance File of the LEGENDAIR ® CH2-32 5. MAINTENANCE INSPECTION V4 (OR 4500 H) 5.1 REMOVAL / INSTALLATION OF THE BATTERY (FIG CP 2.7) Spare part reference: ...................... 2963500 : Battery. Number of operator: ....................... 1. Special or specific tools: ............... None. Preliminary operations: .................. Make sure that the device is switched off. Clean the device before starting the work (Chap II.2.1). 5.1.1 Removal / Installation - Put the device in a clean and open environment. >> Caution, the device must be switched off: electrostatic risk. - Remove the both attachment screws (Pl2.20) from the battery cover (Pl2-10). - Clear the cover away from its holding rails by pulling it towards the rear of the device. - Remove the battery (Pl2.110) and replace it (be careful of the direction in which it is inserted). >> Faulty batteries should be disposed of according to environmental legislation in your country. - Check the position of all the elements and secure the cover by means of screw Pl2.20 (Cp 10 Nm maxi). - Perform the final inspection procedures before putting back into service (Chap IV). CH2-33 Maintenance File of the LEGENDAIR ® Figure CP 2 8 – Turbine box with wiring Maintenance File of the LEGENDAIR ® CH2-34 6. MAINTENANCE INSPECTION V5 (OR 15000 H) 6.1 REMOVAL / INSTALLATION OF THE TURBINE BOX WITH WIRING (FIG CP 2.8) Spare part reference: ...................... 3806499 : Turbine box with wiring (Legendair). Number of operator: ....................... 1. Special or specific tools: ............... None. Preliminary operations: .................. Make sure that the device is switched off. Clean the device before starting the work (Chap II.2.1). 6.1.1 Removal / Installation - Put the device in a clean and open environment. - Open the device (see procedure CHAP II.4.2). - Unscrew the three attachment screws (Pl1-130) for the CPU board (Pl1-120). - Disconnect all connectors Pl1.J1.CT, Pl1.J2.CT of the turbine control board. >> Caution, the device must be switched off: electrostatic risk. - Extract the turbine casing (Pl1.50) from its housing and uncouple the flow rate measurement block (Pl1-260), the O2 supply pipes and the piezo solenoid valve. - Place the turbine box (Pl1-50) in a clean and open environment, then remove the four screws, the washers and the spacers (Pl1.70, Pl1.80, Pl1.90) in order to extract the turbine control board (Pl1.60). - Disconnect the box from the turbine control board (Pl1.J6.CT). - Replace the turbine box (Pl1-50). - Replace the turbine control board (Pl1.60) on the box with four screws, the washers and the spacers (Pl1.70, Pl1.80, Pl1.90) (Torque 5 Nm max.). - Connect the box to the turbine control board (Pl1.J6.CT). - Couple the flow rate measurement block (Pl1-260) to the casing and connect the two O2 supply pipes and the piezo solenoid valve, then reinsert the assembly into its housing. Put the cone support (Pl1-50) also into place. Put the cone support (Pl1220) also into place. - Reconnect all connectors Pl1.J1.CT, Pl1.J2.CT to the turbine control board. >> Pl1.J1.CT with the power supply wiring, Pl1.J2.CT connected to Pl1.J7.CPU. CH2-35 Maintenance File of the LEGENDAIR ® Figure CP 2.8 – Turbine box with wiring Maintenance File of the LEGENDAIR ® CH2-36 - Check the support of all the elements. - Reinstall the CPU board (Pl1-120) with the three attachment screws (Pl1-130) (Torque 5 Nm max.) - Close the device again, taking all necessary precautions (see procedure ). - Perform the final inspection procedures before putting back into service (Chap IV). CH2-37 Maintenance File of the LEGENDAIR ® Parc d’activités Pau-Pyrénées ZI de l’échangeur 64008 PAU CEDEX (FRANCE) Tel. 33.(0)5.59.14.02.02- Fax : (33.(0)5.59.14.02.00 - E-mail : [email protected] Maintenance File LEGENDAIR ® Chapter 3 – Troubleshooting Assistance (Rev. B) CH3-1 Maintenance File of the LEGENDAIR ® CONTENTS 1.1 OVERVIEW ....................................................................................................................................... 3 1.2 DEFINITION OF PROCEDURES...................................................................................................... 3 2.1 ALARM: HIGH PRESSURE / LOW PRESSURE / ANOMALY N°5 .................................................. 4 2.2 ALARM: VTI TOO LOW < VTI TOO HIGH........................................................................................ 5 2.3 ALARM: VTE TOO LOW OR ANOMALY NO 3 ................................................................................ 6 2.4 ALARM: CYCLES CHEKED / FREQ MAXI / HIGH FREQ ............................................................... 7 2.5 ALARM: ABSENCE MAINS .............................................................................................................. 8 2.6 ALARM: ABSENCE POWER SUPPLY............................................................................................. 9 2.7 ALARM: CHECK BATTERY.............................................................................................................. 10 2.8 ALARM: CHECK PRESSURE........................................................................................................... 11 2.9 ALARM: CHECK VALVE................................................................................................................... 12 2.10 ALARM: VALVE LEAKAGE............................................................................................................... 13 2.11 ALARM: FIO2 TOO LOW / FIO2 TOO HIGH / ABSENCE FIO2 / CALIBRATE FIO2 / CALIBRATION FAILURE....................................................................................................................................................... 14 2.12 ALARM: VERIFY VOLUME............................................................................................................... 15 2.13 ALARM: VERIFY ADJUSTMENT...................................................................................................... 16 2.14 ANOMALIES NO 1 & NO 2 ............................................................................................................... 17 2.15 ANOMALY NO. 4 .............................................................................................................................. 18 2.16 ANOMALY NO. 6 .............................................................................................................................. 19 2.17 ANOMALY NO. 7 .............................................................................................................................. 20 2.18 ANOMALY NO. 8 .............................................................................................................................. 21 2.19 ANOMALY NO. 9 .............................................................................................................................. 22 3.1 LED AC AND DC ILLUMINATED...................................................................................................... 23 3.2 LED NOT ILLUMINATED / OPERATION OF THE DEVICE............................................................. 24 3.3 MAINS POWER FAIL / NO OPERATION OF THE DEVICE ............................................................ 25 3.4 VIBRATION NOISE........................................................................................................................... 26 3.5 WHISTLING OR AIR NOISE............................................................................................................. 27 3.6 DISSIPATION OF EXCESSIVE HEAT ............................................................................................. 28 3.7 DISPLAY BLOCKED ......................................................................................................................... 29 3.8 DEGRADED DISPLAY / NO DISPLAY LIGHTING ........................................................................... 30 3.9 DISPLAY POOR (OTHER THAN LIGHTING)................................................................................... 31 Maintenance File of the LEGENDAIR ® CH3-2 1. INTRODUCTION 1.1 OVERVIEW This chapter describes all incident solving procedures used for alarms and anomalies (troubleshooting assistance). These procedures are applicable when simple corrective actions carried out when an alarm appears are unsuccessful (see User's Manual) and the user decides that the result is due to a hardware failure. 1.2 DEFINITION OF PROCEDURES Each alarm is described in the form of steps to be validated to define the cause of the recorded anomaly. These steps are systematically sent to maintenance operations (maintenance symbol). These activities must be performed with methodology to achieve the best result of the investigation. Note: "NC" means that the procedure has not been described (simple operation to be done). The only exit condition is that a general operating test step should be carried out (Chap IV). CH3-3 Maintenance File of the LEGENDAIR ® 2. INCIDENT SOLVING PROCEDURES 2.1 ALARM: HIGH PRESSURE / LOW PRESSURE / ANOMALY N°5 No OPERATION TEST OK Monitoring problem LOW PRESSURE HIGH PRESSURE / ANOMALY No 5 Yes Exit VERIFICATION AND /OR CALIBRATION of pressure sensor CHAP V.3.1 Sensor offset error No Yes VERIFICATION of air circuit of pressure sensor Yes CHAP V.3.2 NO REPLACEMENT of defective tube CHAP V.2.5 REPLACEMENT of the CPU board CHAP V.2.1 Maintenance File of the LEGENDAIR ® CH3-4 2.2 ALARM: VTI TOO LOW < VTI TOO HIGH Monitoring problem VTI TOO LOW VTI TOO HIGH No OPERATION TEST OK Yes Exit RECALIBRATE Insp. flow sensor. CHAP V.3.1 Result of calibration correct Yes RECALIBRATE Pressure sensor CHAP V.3.1 No Result of calibration correct Yes No REPLACEMENT of the CPU board VERIFICATION of internal circuit CHAP V.2.1 CHAP V.3.2 Mounting or elemnt correct No Yes REPLACEMENT OR REINSTALL leaks pipework REPLACEMENT of the CPU board CHAP V.2.5 CH3-5 CHAP V.2.1 Maintenance File of the LEGENDAIR ® 2.3 ALARM: VTE TOO LOW OR ANOMALY NO 3 Monitoring problem VTE TOO LOW or Anomaly No 3 No OPERATION TEST OK Yes Exit VERIFICATION of Exp flow sensor CHAP V.3.1 Difference between imsp flow and exp flow values less than 10% No RECALIBRATE Flow sensor CHAP V.3.1 Result of calibration correct Yes No VERIFY condition of pneumatic circuit CHAP V.3.2 No Tube correctly installed Yes REPLACEMENT of defective tube REPLACEMENT of the CPU board CHAP V.2.1 CHAP V.2.5 Maintenance File of the LEGENDAIR ® CH3-6 2.4 ALARM: CYCLES CHEKED / FREQ MAXI / HIGH FREQ Monitoring problem CYCLES CHEKED FREQ. MAXI HIGH FREQ No OPERATION TEST OK Yes Exit VERIFICATION and/or CALIBRATION of patient pressure sensor CHAP V.3.1 Pressure result : 0 mbar and 40 mbar reference point Np REPLACEMENT of the CPU board Yes CHAP V.2.1 VERIFICATION and/or CALIBRATION of the insp flow sensor. CHAP V.3.1 Result of calibration correct No Yes REPLACEMENT of the CPU board CHAP V.2.1 CH3-7 Maintenance File of the LEGENDAIR ® 2.5 ALARM: ABSENCE MAINS Monitoring problem ABSENCE MAINS No OPERATION TEST OK Yes Exit VERIFICATION on front panel state of Leds and blocks NC AC led lit with presence of mains cord Yes No VERIFY On connector J5-CPU Pins 1 and 3 2.5 V < V < 8 V REPLACEMENT Power supply / charger CHAP V.3.3 Yes CHAP V.2.8 No REPLACEMENT of the CPU board CHAP V.2.2 VERIFY On connector TB3 Power Pins 1 and 2 & 2 et 5 -> 24 V CHAP V.3.3 Yes No REPLACEMENT Switching board CHAP V.2.7 REPLACEMENT Power supply / charger CHAP V.2.8 Maintenance File of the LEGENDAIR ® CH3-8 2.6 ALARM: ABSENCE POWER SUPPLY Monitoring problem ABSENCE POWER SUPPLY No OPERATION TEST OK Yes Exit VERIFICATION on front panel state of Leds and blocks NC DC Led lit with presence of DC cord Yes No VERIFY On connector J5-CPU Pins 1 and 3 8 V < V <14,5 V REPLACEMENT Power supply / charger CHAP V.3.3 Oui CHAP V.2.8 Non REPLACEMENT of the CPU board CHAP V.2.2 VERIFY On connector TB3 Power Pins 1 and 2 & 2 et 5 -> 24 V CHAP V.3.3 Yes No REPLACEMENT Switching board CHAP V.2.7 REPLACEMENT Power supply / charger CHAP V.2.8 CH3-9 Maintenance File of the LEGENDAIR ® 2.7 ALARM: CHECK BATTERY No OPERATION TEST OK Monitoring problem CHECK BATTERY Yes Exit VERIFICATION device startup mains PS off REPLACEMENT of the CPU board Yes CHAP V.2.1 CHAP V.3.3 No REPLACEMENT of battery No Check voltage on battery connector CHAP V.2.7 Yes VERIFICATION Output voltage Switching board No CHAP V.2.7 Yes REPLACEMENT of the CPU board REPLACEMENT Switching board CHAP V.2.2 CHAP V.2.7 Maintenance File of the LEGENDAIR ® CH3-10 2.8 ALARM: CHECK PRESSURE Monitoring problem CHECK PRESSURE No OPERATION TEST OK Yes Exit VERIFICATION of statuts of external air circuit NC REPLACEMENT of defective tube No Air circuit tubecorrect CHAP V.2.5 Yes VERIFICATION AND /OR CALIBRATION of pressure sensor ** Caution : there may be an offset error if sensor disconnected CHAP V.3.1 Sensor offset error** No Yes VERIFICATION of pressure sensor air circuit Circuit correct Yes CHAP V.3.2 REPLACEMENT of the CPU board No CHAP V.2.1 REPLACEMENT of defective tube CHAP V.2.5 CH3-11 Maintenance File of the LEGENDAIR ® 2.9 ALARM: CHECK VALVE No OPERATION TEST OK Yes Monitoring problem CHECK VALVE Exit VERIFICATION Thightness of tubes and connections of cone 22 subassembly REPLACEMENT of defective tube No NC CHAP V.2.5 Yes VERIFICATION of status of piezzo solenoid valve connector CHAP V.3.2 Connector base torn off REPLACEMENT of the CPU board Yes Connector torn off Yes CHAP V.2.1 No REPLACEMENT of solenoid valve Yes CHAP V.2.6 VERIFICATION of solenoid valve power supply CHAP V.3.3 Power supply correct REPLACEMENT of the CPU board No CHAP V.2.1 Maintenance File of the LEGENDAIR ® CH3-12 2.10 ALARM: VALVE LEAKAGE PROBLEM OF VALVE LEAKAGE OPERATION TEST OK No Yes VERIFICATION and/or calibration of exp flow V.3-1 Exit VERIFICATION Expiration block No Result correct NC Expiration block correct Yes Yes REPLACEMENT Expiration block NC VERIFICATON circuit of pneumatic coupling VERIFICATION and/or calibration of inp flow V.3-1 No No V.3-2 RESTORE link Result correct No NC Yes Yes VERIFICATION Flow laminator REPLACEMENT of the CPU board NC CHAP V.2.1 Flow laminator correct No V.3-1 REPLACEMENT Flow laminator Yes VERIFICATION valve pressure V.2.5 Result correct No VERIFICATON circuit of pneumatic coupling No Yes RESTORE link V.3-2 VERIFICATON circuit of pneumatic coupling Yes V.3-1 No NC RESTORE link REPLACEMENT of the CPU board NC CH3-13 CHAP V.2.1 Maintenance File of the LEGENDAIR ® 2.11 ALARM: FIO2 TOO LOW / FIO2 TOO HIGH / ABSENCE FIO2 / CALIBRATE FIO2 / CALIBRATION FAILURE No PROBLEM FIO2 OPERATION TEST OK Yes Exit VERIFICATION calibration at 21% V.3.1 Result correct Yes No VERIFICATION Ext cord and internal strand of branching V.3.2 Result correct RESTORE the connection No NC Yes VERIFICATION O2 supply tube V.3.2 Result correct RESTORE the branching No NC Yes REPLACEMENT of the CPU Board CHAP V.2.1 Maintenance File of the LEGENDAIR ® CH3-14 2.12 ALARM: VERIFY VOLUME No PROBLEM VERIFY VOLUME OPERATION TEST OK Yes Exit VERIFICATION and/or calibration Insp flow sensor V.3.1 Result correct Yes REPLACEMENT of the CPU board CHAP V.2.1 No VERIFICATION of pneumatic circuit V.3.2 Result correct No RESTORE Link NC Yes REPLACEMENT of the CPU board CHAP V.2.1 CH3-15 Maintenance File of the LEGENDAIR ® 2.13 ALARM: VERIFY ADJUSTMENT PROBLEM VERIFY ADJUSTMENT NO OPERATION TEST OK Yes Exit RESUME Adjustments of parameters and memorization NC Result correct No REPLACEMENT of the CPU board CHAP V.2.1 Maintenance File of the LEGENDAIR ® CH3-16 2.14 ANOMALIES NO 1 & NO 2 No OPERATION TEST OK Yes Exit ANOMALIES No1 / No2 CALIBRATION of insp flow sensor CHAP V.3.1 Anomaly persists No Yes CHECK condition of pneumatic circuit No CHAP V.3.2 REPLACEMENT of defective tube Yes V.2.5 REPLACEMENT of the CPU board CHAP V.2.1 Note: Anomaly No 1 may occur during an endurance test on sublung, signaled by operating conditions! CH3-17 Maintenance File of the LEGENDAIR ® 2.15 ANOMALY NO. 4 No OPERATION TEST OK Yes Exit ANOMALY No 4 CALIBRATION of valve pressure sensor CHAP V.3.1 Anomaly persists No Yes REPLACEMENT of the CPU board CHAP V.2.1 Maintenance File of the LEGENDAIR ® CH3-18 2.16 ANOMALY NO. 6 ANOMALY N°6 No OPERATION TEST OK Yes VERIFICATION of state of turbine connector Exit CHAP V.3.2 Connector base torn off REPLACEMENT Ctrl board Yes Connector base off CHAP V.2.2 No Yes VERIFICATION of turbine power supply ( signals ) REPLACEMENT turbine casing Yes CHAP V.3.4 CHAP II.5.1 Power supply corret Ctrl board fuse OK REPLACEMENT Ctrl board fuse No No VERIFICATION de l'état du connecteur Carte CPU / Cde CHAP V.2.2 CHAP V.3.2 Connector base torn off ( CPU ) REPLACEMENT of CPU board Yes Connector base torn off ( Ctrl ) CHAP V.2.1 Yes Connector torn off No REPLACEMENT Ctrl board VERIFICATION of board inputs / ctrl signals / PS CHAP V.3.4 & V.3.3 No CHAP V.2.2 Yes Signals correct Ctrl board power supply REPLACEMENT CPU / Ctrl board No CHAP V.2.7 REPLACEMENT of faulty power supply element Yes REPLACEMENT of CPU board REPLACEMENT Ctrl board CHAP V.2.1 CHAP V.2.2 CHAP V.2.7 CH3-19 Maintenance File of the LEGENDAIR ® 2.17 ANOMALY NO. 7 No OPERATION TEST OK Yes Exit ANOMALY N°7 REPROGRAM the machine clock, RE-START No NC Persistent anomaly Yes VERIFICATION of the condition of the 3V battery REPLACEMENT of the 3V Battery Yes CHAP V.3.4 Battery in poor condition CHAP V.2.1 REPLACEMENT of the CPU board No CHAP V.2.2 Maintenance File of the LEGENDAIR ® CH3-20 2.18 ANOMALY NO. 8 No OPERATION TEST OK Yes Exit ANOMALY No 8 VERIFICATION Power supply voltage of buzzers insufficient V.3.1 Result correct REPLACEMENT of the CPU board Power supply problem Yes CHAP V.2.1 No REPLACEMENT of the CPU board Buzzers problems CHAP V.2.1 CH3-21 Maintenance File of the LEGENDAIR ® 2.19 ANOMALY NO. 9 No OPERATION TEST OK Yes Exit ANOMALY No. 9 OPERATE all the keypad keys, one by one No NC Persistent anomaly Yes No REPLACEMENT of the keypad CHAP V.2.4 Persistent and lasting anomaly REPLACEMENT of the CPU board Yes CHAP V.2.1 Maintenance File of the LEGENDAIR ® CH3-22 3. INCIDENT SOLVING PROCEDURES WITHOUT ALARM SIGNAL 3.1 LED AC AND DC ILLUMINATED In presence of a single power source AC or DC. No OPERATION TEST OK Yes LED AC and DC ILLUMINATED Exit REPLACEMENT of the CPU board CHAP V.2.1 CH3-23 Maintenance File of the LEGENDAIR ® 3.2 LED NOT ILLUMINATED / OPERATION OF THE DEVICE No OPERATION TEST OK Yes LED NOT ILLUMINATED / DEVICE OPERATION Exit VERIFICATION of the condition of the Leds REPLACEMENT of keypad Yes CHAP V.3.5 Leds burnt out CHAP V.2.4 No VERIFICATION of the condition of keypad connector REPLACEMENT of CPU board Yes CHAP V.2.1 CHAP V.3.2 Connector base unplugged Connector unplugged REPLACEMENT of keypad Yes No Yes CHAP V.2.4 VERIFICATION of supply to LEDs CHAP V.3.4 Supply OK REPLACEMENT of CPU board No CHAP V.2.1 Maintenance File of the LEGENDAIR ® CH3-24 3.3 MAINS POWER FAIL / NO OPERATION OF THE DEVICE No OPERATION TEST OK MAINS POWER FAIL Yes Exit VERIFICATION of complete power circuit WORK on the mains No NC CHAP V.3.3 230 V mains present Power cord OK REPLACEMENT of cord No 24V power supply output between Pins 1-2 & 2-5 TB3 NC NO 24V voltage at CPU terminal between Pins 1 and 2 J5-CPU REPLACEMENT 24V power supply Yes CHAP V.2.8 No REPLACEMENT Switching board REPLACEMENT of the CPU board CHAP V.2.7 CHAP V.2.1 CH3-25 Maintenance File of the LEGENDAIR ® 3.4 VIBRATION NOISE No OPERATION TEST OK Yes VIBRATION NOISE Exit VERIFICATION of general condition of device CHAP V.3.2 Result: Elements not fixed Yes FIX the elements NC REPLACEMENT Turbine box No CHAP II.5.1 Maintenance File of the LEGENDAIR ® CH3-26 3.5 WHISTLING OR AIR NOISE No OPERATION TEST OK Yes WHISTLING NOISE Exit VERIFICATION of the presence of the air inlet filter PLACE an air inlet filter Yes CHAP V.3.2 Result : Element missing CHAP II.3.1 No VERIFICATION of general condition of device REPLACEMENT of the faulty element No NC CHAP V.3.2 Air circuit OK REPLACEMENT Turbine box Yes CHAP II.5.1 CH3-27 Maintenance File of the LEGENDAIR ® 3.6 DISSIPATION OF EXCESSIVE HEAT No OPERATION TEST OK Yes DISSIPATION OF EXCESSIVE HEAT Exit VERIFICATION of condition of air inlet CLEAN Air inlets Yes CHAP V.3.2 Air inlets dogged NC No VERIFICATION Inpired flow = 160l/min times turbine speed = 50000 tr/min CHAP IV Result correct No REPLACEMENT Turbine box CHAP II.6.1 Maintenance File of the LEGENDAIR ® CH3-28 3.7 DISPLAY BLOCKED No OPERATION TEST OK DISPLAY UNIT BLOCKED Exit Yes CHECK that it is not locked UNLOCK keypad Yes NC Keypad locked NC No VERIFICATION of condition of keypad connector REPLACEMENT of CPU board Yes CHAP V.2.1 CHAP V.3.2 Connector base unplugged Connector unplugged REPLACEMENT of keypad Yes No No CHAP V.2.4 VERIFICATION of keypad CHAP V.3.5 Keypad OK Yes REPLACEMENT of the display REPLACEMENT CPU board Yes CHAP V.2.1 CHAP V.2.3 Persistent anomaly No CH3-29 Maintenance File of the LEGENDAIR ® 3.8 DEGRADED DISPLAY / NO DISPLAY LIGHTING No OPERATION TEST OK NO DISPLAY LIGHTING Yes Exit VERIFICATION of state of connector of neon tube REPLACEMENT of the CPU board Yes CHAP V.2.1 CHAP V.3.2 Connector base unplugged Connector unplugged REPLACEMENT of the display Yes No CHAP V.2.3 VERIFICATION of power supply to neon tube Yes CHAP V.3.4 Power supply correct REPLACEMENT of the CPU board No CHAP V.2.1 Maintenance File of the LEGENDAIR ® CH3-30 3.9 DISPLAY POOR (OTHER THAN LIGHTING) No OPERATION TEST OK DISPLAY POOR (Other than lighting) Yes Exit VERIFICATION of contrast NC Device cold ADJUSTMENT of contrast Yes NC No REPLACEMENT of display unit REPLACEMENT of CPU board Yes CHAP V.2.3 Persistent anomaly CHAP V.2.1 Yes CH3-31 Maintenance File of the LEGENDAIR ® Parc d’activités Pau-Pyrénées ZI de l’échangeur 64008 PAU CEDEX (FRANCE) Tel. 33.(0)5.59.14.02.02- Fax : (33.(0)5.59.14.02.00 - E-mail : [email protected] Maintenance File LEGENDAIR ® Chapter 4 – Inspection (Rev. B) CH4-1 Maintenance File of the LEGENDAIR ® CONTENTS 1. INTRODUCTION ........................................................................................................................ 3 1.1 OVERVIEW ..................................................................................................................................... 3 1.2 INSPECTION EQUIPMENT ............................................................................................................ 3 2. INSPECTION PROCEDURE ...................................................................................................... 4 2.1 GENERAL APPEARANCE INSPECTION ...................................................................................... 4 2.2 CHECKING ELECTRICAL SAFETY ............................................................................................... 4 2.2.1 Checking of electrical leaks with Metron QA-90 ................................................................. 4 2.3 CHECKING THE POWER SUPPLIES ............................................................................................ 4 2.4 CHECKING SOFTWARE VERSION .............................................................................................. 4 2.5 CLOCK / DATE / CONTRAST SETTING........................................................................................ 5 CHECK/CALIBRATION/PERFORMANCE LEVELS ............................................................................ 6 2.5.1 Checking operation of keys/LEDs............................................................................................ 6 2.5.2 Pressure and flow calibration check ........................................................................................ 7 2.5.3 Checking performance levels................................................................................................... 8 2.5.4 Contrôle alarme pression basse et débranchement secteur 2.5.5 Default parameters ................................................................................................................ 10 2.5.6 Checking the inspiratory resistance when stopped ............................................................... 10 2.6 COMPLETE DEVICE INSPECTION................................................................................................ 10 3. APPENDIX 1................................................................................................................................... 11 Maintenance File of the LEGENDAIR ® CH4-2 1. INTRODUCTION 1.1 OVERVIEW This document describes conditions for the execution and final inspection phases to be done on the ventilators so that they can be put back into service. The results for each device are noted and validated by the inspector on the sheet attached in Appendix 1: − work sheet, − final inspection sheet. >> Note: The format of the work sheet is optional and it can be replaced by any other document that can be used to trace the work. The devices are accepted at the end of the technical intervention (mechanical), fully assembled and with their work sheet filled in. 1.2 INSPECTION EQUIPMENT Before each use, the inspector checks the validity of the following required equipment: − Flow measurer from 0 to 200 l/min, resolution 0.1 l/min, precision 5% (measurement devise) − A simple cone-branching circuit (22 mm to 2 m), with an INTERSURGICAL F5013005 reference valve and proximal pressure off take, − a METRON QA-90 type electrical safety analyzer: measurement of the leakage current, earthing, insulation resistance, − an autotransformer, − a stop watch, − a SIEMENS test lung (TEST LUNG190 réf.6006832 E037E), − a flow generator (set to 60 l/min), − a manometer ±50 mbar, precision 2%, − DC power supply 24V- 3A, − FiO2 kit (code 3810600). CH4-3 Maintenance File of the LEGENDAIR ® 2. INSPECTION PROCEDURE 2.1 GENERAL APPEARANCE INSPECTION - Before any handling, check that the work sheet is completely filled in, signed and that the information in it is correct. - Check that there are no general appearance defects on the device. - Check that the strainer and air inlet filter are present and adjusted. - Check that the stands are present and that the casing is properly fixed. - Check that 3 labels are present (air inlet - identification - O2). >> Fill in the corresponding box on the final inspection sheet. 2.2 CHECKING ELECTRICAL SAFETY 2.2.1 Checking of electrical leaks with Metron QA-90 >> Check the configuration: class II, test 60601-1, type BF. - Switch the Metron QA-90 on at a voltage of 253 V, created by the autotransformer. - Plug the device into the power supply connector on the front of the Metron QA-90. - Connect the "envelope" cable to the RS232 port. - Connect the applicable part cable to the patient outlet. - Start the test and print the test sheet. >> The test result appears at the bottom of the test sheet, check that it shows: TEST OK. >> Attach the results sheet to the final inspection sheet. >> Fill in the corresponding box on the final inspection sheet. 2.3 CHECKING THE POWER SUPPLIES - Switch the device on in setup mode by simultaneously pressing the On/Off switch found at the rear of the machine (position "1" or ON") and keeping the key pressed until the menu appears on the screen. Place the cursor on " MAINTENANCE" and then validate, select the line "Voltage control" and verify: Maintenance File of the LEGENDAIR ® CH4-4 - With the mains connected, display the general power supply voltage "ALIM 24,5±1,5V". - With the external source of DC connected up, display the general power supply voltage "ALIM 24,5±1,5V". - With the built-in battery power supply connected up, display the battery symbol. >> With the battery fully charged, the supply voltage should display « 29 ± 1 V ». - Place the cursor on the line "return" and then validate. On "turbine speed" press , let the device run for 5 min and replace the cursor in order to see the battery voltage and check that it equals 27,5 ± 0,5V. >> This point will be repeated at the end of the inspection to check that the voltage has returned to 29 ± 1 V. - Reconnect the device to the mains power supply. - Display the CPU logic circuit voltage "CPU 5V±0,5V". - Display the Watchdog voltage "25±2V". >> Fill in the corresponding boxes on the final inspection sheet. - Place the cursor on BUZZER 1, then press the displays along with a beep for two seconds. key, the corresponding voltage >> Repeat the operation on BUZZER 2 and note the values of the voltages on the test sheet. - The voltages must lie within the following range: Tension BUZZER 1 5 V ± 1V Tension BUZZER 2 5 V ± 1V >> Fill in the corresponding boxes on the final inspection sheet. - Switch the device Off. 2.4 CHECKING THE SOFTWARE EDITION >> Check on welcome menu software version. CH4-5 Maintenance File of the LEGENDAIR ® 2.5 CLOCK / DATE / CONTRAST SETTING - Switch the device on in setup mode by simultaneously pressing the On/Off switch found at the rear of the machine (position "1" or ON") and keeping the key pressed until the menu appears on the screen. - Check the device date. >> If necessary: Place the cursor on the DATE line (with or ) Validate your key: the parameter flashes and the intention to modify the parameters by the left cursor becomes new value with the . Modify its value using the key. or keys. Validate the - Check the time on the device. >> If necessary: Place the cursor on the TIME line (with or ). Validate your key: the parameter flashes and the intention to modify the parameters by the left cursor becomes new value with the . Modify its value using the key. - Test the display contrast by keeping the successively pressing the and the . or keys. Validate the key pressed down and adjusting it by CHECK/CALIBRATION/PERFORMANCE LEVELS 2.5.1 Checking operation of keys/LEDs - Connect to the mains, the led ~ must be lit up. - Flip the switch to ON; the and ~ LEDs must be activated. - Run ventilation by pressing the key, the corresponding LED should go out. - Wait for 15 seconds until the "low pressure" alarm is triggered; the up. LED must be lit - Inhibit the low-pressure alarm, the sound alarm should disappear. >> Fill in the corresponding boxes on the final inspection sheet. >> Switch the device Off. Maintenance File of the LEGENDAIR ® CH4-6 2.5.2 Pressure and flow calibration check - Switch the device on in SETUP mode by pressing the putting the On/Off switch to ON. key on the keypad and - Put the cursor onto the MAINTENANCE line and press the key. CHECKING PATIENT PRESSURE - Insert a T union with a manometer and a leak aperture (Ø 5mm) on the patient outlet. - Place the cursor on line "Patient Pressure” press key line. - Again press key , a 0 must appear opposite , a value of 40 should appear opposite line "Patient Pressure”. - Note the values shown by the manometer on the inspection sheet. - Press the key, the pressure should again be displayed. CHECKING VALVE PRESSURE - Place the cursor on line "Valve Pressure” press key - Press the , a 0 must appear opposite line. key, the pressure should again be displayed. - Note the value shown by the manometer on the inspection sheet. CHECKING INSPIRED FLOW - Connect the patient outlet of the ventilator to the measurement devise. >> Use a patient circuit with no valve or pressure reading to prevent any leaks. - Put the cursor on the “Inspired flow” line, then press the calibration point to the next. key to go from one - Repeat the operation for each calibration point. The flow rates indicated by the measurement devise must be in the range of tolerance given (see inspection sheet in Appendix 1). >> Note the values read on the device for each measuring point. CHECKING EXPIRED FLOW (applicable to LEGENDAIR equipped with double branch option) - Connect the patient outlet of the ventilator to the expiration block. - Maintain the cursor on the “Inspired flow” line, then press the calibration point to the next. CH4-7 Maintenance File of the LEGENDAIR ® key to go from one - Repeat the operation for each calibration point. Note the flows indicated on the “Expired flow” line. They should be between the indicated tolerances (see the inspection sheet in Appendix 1). CHECKING FIO2 - Connect the cell O2 to the connection made available for this purpose (see Pl1-250). - Put the cursor onto line « FIO2 », then press key . - Check that the display of FIO2 is at 21% and press the key again to validate. CHECKING FLOW MAXI / PRESSURE MAXI - Leave the patient outlet open, - Place the cursor on the “Turbine speed” line and press the flow (pwm = 50 000). key to select maximum - Read the value shown on the screen, line “Inspired Flow” (higher than 160 l/min). - Connect a manometer with the O2 union on the O2 power outlet. - Block the patient outlet and read the pressure value obtained on the screen, line “Patient Pressure” and on the manometer. It should the same as or greater than 70 mbar. >> Be careful not to let the device run with the outlet blocked: RISK OF TURBINE DETERIORATION. >> Note the values indicated on the display in the corresponding boxes of the inspection sheet. - Switch the device Off. 2.5.3 Checking performance levels Manometer Air bladder "SIEMENS" lung LEGENDAIR Pressure reading - Connect the ventilator furnished with a simple patient circuit branch to the SIEMENS lung, connect the piloting valve and the proximal pressure meter. - Switch the device On by positioning the switch to ON. Maintenance File of the LEGENDAIR ® CH4-8 - Start the ventilation in PACV mode with the key. - The main parameters must be set as follows: IPAP 40 mbar, EPAP 5 mbar, Flow Ramp 2 (3 lit blocks), frequency 10 bpm, I/T 33%. - Press the key to go to the monitoring page. - Wait for several cycles to be completed so that the measurements are stable. >> Note the Ipap and Epap values indicated. They should be 40 ± 2 mbar and 5 ± 1 mbar. - Check that the Vt indicated is 750 ml ± 10%. - Note the Vt value on the final inspection sheet. - Check the valve pressure on the manometer. >> Fill in the corresponding boxes on the final inspection sheet. 2.5.4 Checking low pressure alarm and mains disconnection LOW PRESSURE - Disconnect the "Siemens" lung. >> A sound and a visual alarm (red Led lit up) with the message LOW PRESSURE should be triggered after 15 seconds. - Reconnect the lung to the patient outlet to inhibit the alarm. >> Validate the triggering of the LOW PRESSURE ALARM on the inspection sheet. ALARM POWER SUPPLIES - Connect the mains power supply and DC power supply adjusted to 24 V. - Mains power supply, check that the LED AC is active. >> Validate the box corresponding to the test sheet - Disconnect the mains power supply, an EXT POWER SUPPLY FAILURE alarm must be triggered. - External continuous power supply, check that the LED DC is active. - Inhibit the alarm by keeping the key pressed down. >> Validate the box corresponding to the test sheet. - Disconnect the 24 V power supply, an EXTERNAL POWER FAILURE alarm should be triggered. CH4-9 Maintenance File of the LEGENDAIR ® - Check that the buzzers operate, then inhibit the alarm and check that the battery symbol is displayed. - Switch off the device and turn it back on in configuration mode by pressing simultaneously on the M/A switch located at the back of the machine (position “1 or ON”) and holding down the key until the menu appears on the screen. Place the cursor on “MAINTENANCE“, then validate on ”Voltage Control” and validate again: - the power voltage should have risen to 29V ± 1 V (confirmation of the proper functioning the battery charge). >> Validate the corresponding boxes on the final inspection sheet. 2.5.5 Default parameters - Set the main parameters as follows: IPAP : 10 mbar, Epap : 4 mbar, Flow Ramp 2: 3 lit blocks, frequency: 10 c/min, I/T : 33%. >> Fill in the corresponding box on the final inspection sheet. 2.5.6 Checking the inspiratory resistance when stopped Manometer Flow rate measurer Flow generator 0 to 200 l/mn set to 60 l/min LEGENDAIR Direction of flow - Connect the patient outlet tube via the measurement devise, ventilator stopped, to the flow generator. - Place a pressure check union at the patient connection in order to measure the inspiratory resistance. - Apply a flow rate of 60 l/min to the TIMETER (calibrated to 36) and measure the depression at the patient connection (see inspection sheet in Appendix 1). >> Fill in the corresponding box on the final inspection sheet. 2.6 COMPLETE DEVICE INSPECTION Check: - O2 union, - The presence of the instructions and the patient tube in its pocket. Maintenance File of the LEGENDAIR ® CH4-10 3. APPENDIX 1 Appendix 1 below contains a model of the work sheet and a copy of the inspection sheet. CH4-11 Maintenance File of the LEGENDAIR ® WORK SHEET LEGENDAIR SAV SERIAL NUMBER: PREVENTIVE MAINTENANCE SOFTWARE: YES NO Customer No: V1 V2 V3 V4 HOURS OF OPERATION DESIGNATION OF THE ELEMENT REPLACED COMMENTS: Serial number / Batch COMMENTS OPERATOR Name: DATE : INITIALS: V5 INSPECTION SHEET LEGENDAIR SAV Serial number: SOFTWARE: Customer No: DOCUMENTS / APPEARANCE Timer: Result Comments Result Comments Result Comments Result Comments Result Comments Verification of work sheet General appearance inspection: filter, fastenings, bases Labels (air inlet + identification + O2). ELECTRICAL SAFETY METRON check class II BF POWER SUPPLIES Verification power voltage from mains 24,5 ± 1.5 V Verification power voltage from external power 24 ± 1.5 V Verification battery voltage 29 ± 1V and battery Symbol Verification of 5 V ± 0.5 V CPU voltage Verification of Watchdog 25 ± 2 V voltage Buzzer 1 voltage: 5 ± 1 V Buzzer 2 voltage: 5 ± 1 V CLOCK / DATE / CONTRAST Setting of clock / date Display contrast + / Keypad keys 65+ Led / Led / Led CALIBRATIONS / PERFORMANCE LEVELS Check of pressure calibration 0 and 40 mbar Check of valve pressure calibration at 0 mbar Check of flow rate calibration 5 ± 0.5 l/min 12 ± 0.6 l/min 37 ± 1.9 l/min 60 ± 3 l/min 90 ± 4.5 l/min 135 ± 6.7 l/min 160 ± 8 l/min Check of calibration expired flow at ± 0,5 l/min Verification FIO2 at 21% at +1 / -2% Check of performances flow maxi: >160 l/min Check of performances pressure maxi: >70 mb Check of performances: Mode PCV Ipap 40 mbar, Epap 5 mbar, Flow Ramp 2 (3 lit squares), frequency 10 c/min, I/T 33% Bar graph IPAP/EPAP: 40 ± 2 mbar / 5 ± 1 mbar Check of Vt: 800 ml ±10% Check of valve: 40 mbar ±10% Low pressure alarm Led + Alarm mains power supply Led + Alarm external continuous power supply Battery symbol and power voltage = 29 ± 1V Default setting: Ipap 15 mbar, Epap 0mbar Inspiratory resistance when stopped: -2 mbar ± 1 mbar EQUIPMENTS COMMENTS OPERATEUR O2 union Instructions for use Date Pocket Patient Tube Stamp Parc d’activités Pau-Pyrénées ZI de l’échangeur 64008 PAU CEDEX (FRANCE) Tel. 33.(0)5.59.14.02.02- Fax : (33.(0)5.59.14.02.00 - E-mail : [email protected] Maintenance File LEGENDAIR ® Chapter 5 – Corrective Maintenance (Rev. B) CH5-1 Maintenance File of the LEGENDAIR ® CONTENTS 1. INTRODUCTION .......................................................................................................................... 4 1.1 OVERVIEW ....................................................................................................................................... 4 1.2 SAFETY MEASURES ....................................................................................................................... 4 1.3 TIGHTENING TORQUE / REMOVAL - INSTALLATION TOOLS..................................................... 4 1.3.1 Tightening torque .................................................................................................................. 4 1.3.2 1.4 Removal – installation tools .................................................................................................. 5 EQUIPMENT NECESSARY FOR THE CHECK AND VERIFICATION ............................................ 5 2. REMOVAL / INSTALLATION PROCEDURE............................................................................... 7 2.1 REMOVAL / INSTALLATION OF THE CPU BOARD, AND THE 3V BATTERY (FIG CP 5.1)......... 7 2.1.1 Removing / Installing the CPU board.................................................................................... 7 2.1.2 2.2 Replacing the 3V battery....................................................................................................... 9 REMOVAL / INSTALLATION OF THE TURBINE CONTROL BOARD (FIG CP 5.2)....................... 11 2.2.1 Removing / Installing the turbine control board .................................................................... 11 2.2.2 Removing / Installing the fuse............................................................................................... 13 2.3 REMOVAL / INSTALLATION OF THE DISPLAY (FIG CP 5.3) ........................................................ 15 2.3.1 Removal / Installation............................................................................................................ 15 2.4 REMOVAL / INSTALLATION OF THE KEYPAD (FIG CP 5.4)......................................................... 17 2.4.1 Removal / Installation............................................................................................................ 17 2.5 REMOVAL OF THE FLOW RATE MEASUREMENT BLOCK AND THE AIR TUBES (FIGURE CP 5.5) 19 2.5.1 Removal / Installation............................................................................................................ 19 2.6 REMOVAL / INSTALLATION OF THE PIEZO SOLENOID VALVE AND OF TUBES (FIG CP 5.6) 21 2.6.1 Removal / Installation............................................................................................................ 21 2.7 REMOVAL / INSTALLATION OF POWER SUPPLY AND OTHER WIRING CIRCUIT SUBASSEMBLIES (FIG CP 5.7) .................................................................................................................. 23 2.7.1 Removal / Installation of the switching board / power supply strand .................................... 23 2.8 REMOVAL / INSTALLATION OF THE POWER SUPPLY / 24V CHARGER (FIG CP 5.8).............. 27 2.8.1 Removal / Installation............................................................................................................ 27 2.9 REMOVAL / INSTALLATION OF THE CASINGS ENSEMBLE (FIG CP 5.9) .................................. 29 2.9.1 Removal / Installation............................................................................................................ 29 3. VERIFICATION, VALIDATION AND CALIBRATION PROCEDURE .......................................... 30 3.1 CHECKING SENSORS AND CALIBRATION ................................................................................... 30 3.1.1 Pressure sensor .................................................................................................................... 30 3.1.2 Valve Pressure Sensor ......................................................................................................... 31 3.1.3 Inspired Flow Sensor ............................................................................................................ 32 3.1.4 Expired flow sensor (double branch option) ......................................................................... 33 3.1.5 Sensor FiO2 .......................................................................................................................... 34 Maintenance File of the LEGENDAIR ® CH5-2 3.2 3.3 CHECKING THE GENERAL CONDITIONS, THE AIR CIRCUIT AND ELECTRICAL CONNECTIONS 35 3.2.1 Checking the general mechanical conditions (attachment, ...) ..............................................35 3.2.2 Checking the air circuit ..........................................................................................................35 3.2.3 Checking the attachment of electrical connections ...............................................................36 CHECKING THE SUPPLY CIRCUIT / FUSES ..................................................................................36 3.3.1 Checking the power supply....................................................................................................36 3.3.2 Checking the Turbine control board fuse...............................................................................37 3.4 CHECKING THE INPUT/OUTPUT VOLTAGES: CPU BOARD, TURBINE CONTROL BOARD, AND 3V BATTERY.................................................................................................................................................37 3.4.1 Checking the CPU board input/output voltages (levels) ........................................................37 3.5 3.4.2 Checking the Turbine control board input/output voltages (levels) .......................................39 3.4.3 Checking the 3V battery ........................................................................................................41 CHECKING THE KEYPAD / LEDS ....................................................................................................41 3.5.1 Checking the keypad .............................................................................................................41 3.5.2 CH5-3 Checking the LEDs ................................................................................................................41 Maintenance File of the LEGENDAIR ® 1. INTRODUCTION 1.1 OVERVIEW ATTENTION BEFORE DOING MAINTENANCE CHECK SOFTWARE VERSION This chapter describes conditions and procedures for corrective maintenance. Corrective maintenance procedures are applicable to all elements and sub elements detected as being defective. Corrective maintenance procedures described in this chapter are derived from the list of removable elements (LRU) initially filled in by the manufacturer. The reference of the element that have to be replaced, the Number of operator, special and specific tools, preliminary operations before removal, and removal and installation operations are described for each procedure. The figures illustrating these procedures are provided in a location corresponding to the text wherever possible. >> In general, it is recommended that the equipment should be cleaned and disinfected before carrying out any maintenance operation. >> The operator should fill in a work sheet for each equipment, according to a maintenance quality scheme (Appendix1 – Chapter IV). 1.2 SAFETY MEASURES The person (operator) who needs to work on defective elements must refer to electrical safety rules in force for this type of work. BEFORE DOING ANY MAINTENANCE WORK, MAKE SURE THAT THE DEVICE IS SWITCHED OFF. >> AIROX cannot be held responsible for incidents caused by this device unless the installation, maintenance or modifications are made by an authorized person using original spare parts and respecting quality assurance and traceability rules approved by AIROX. Due to its CE marking, no modifications may be made without the written permission of AIROX. 1.3 TIGHTENING TORQUE / REMOVAL - INSTALLATION TOOLS 1.3.1 Tightening torque All tightening torques respect standards in force and depend on the diameter of the screw or nut to be tightened. All specific torques are summarized in maintenance procedures. Maintenance File of the LEGENDAIR ® CH5-4 1.3.2 Removal – installation tools The tools necessary for carrying out all the maintenance procedures are: Screwdriver or male hexalobe endcap key T10 + T20, flat screwdriver and cross screwdriver. 1.4 EQUIPMENT NECESSARY FOR THE CHECK AND VERIFICATION Before each use, the inspector checks the validity of the following required equipment: − Flow measurer from 0 to 200 l/min, resolution 0.1 l/min, precision 5%, − a multimeter. CH5-5 Maintenance File of the LEGENDAIR ® Figure CP 5.1 – CPU board, 3V battery Maintenance File of the LEGENDAIR ® CH5-6 2. REMOVAL / INSTALLATION PROCEDURE 2.1 REMOVAL / INSTALLATION OF THE CPU BOARD, AND THE 3V BATTERY (FIG CP 5.1) Spare part reference: ...................... 3811600 : CPU board. ........................................................... 3 V lithium battery type CR 1220. Number of operator: ....................... 1. Special or specific tools: ................ None. Preliminary operations: .................. Make sure that the device is switched off. Clean the device before doing the work (Chap II.2.1) 2.1.1 Removing / Installing the CPU board - Put the device in a clean and open environment. - Open the device (see procedure Chap II.4.2). - Disconnect all connectors Pl1.J3.CPU, Pl1.J2.CPU, Pl1.J8.CPU, Pl1.J1.CPU, Pl1.J5.CPU and Pl1.J7.CPU of the CPU board. >> Caution, the device must be switched off: electrostatic risk. - Unscrew the three attachment screws (Pl1-130) for the CPU board (Pl1-120). - Extract the board from its housing and uncouple the set of air tubes (Pl3-130 and Pl3140). - Replace the CPU board (Pl1-120) and put back the set of air tubes (Pl3-130 and Pl3140). >> It is recommended that these elements be replaced if justified, depending on their general condition (Chap V.2.5). Take care not to reverse the tubes during reassembly (see figure CP 5.1). - Position the new board and pre-position the three attachment screws (Pl1-130). Validate the position of the board and finish tightening (Torque 5 Nm max). - Reconnect all connectors of the CPU board. >> Pl1.J3.CPU with the Alarm Reminder strand , Pl1.J2.CPU with the RS232 strand, Pl1.J8.CPU with the FiO2 strand, Pl1.J5.CPU with the Power Supply strand, Pl1.J7.CPU connected to Pl1.J2.CT, Pl1.J1.CPU with the piezo solenoid valve strand. - Close the device again taking all necessary precautions (see procedure Chap II.4.2). - Perform the final inspection procedures before putting back into service (Chap IV). CH5-7 Maintenance File of the LEGENDAIR ® Figure CP 5.1 – CPU board, 3V battery Maintenance File of the LEGENDAIR ® CH5-8 2.1.2 Replacing the 3V battery - Put the device in a clean and open environment. - Open the device (see procedure Chap II.4.2). - Locate the 3V battery. - Carefully extract the 3V battery and replace it. >> Take care not to damage the support. - Close the device again taking all necessary precautions (see procedure Chap II.5.1). - Perform the final inspection procedures before putting back into service (Chap IV). CH5-9 Maintenance File of the LEGENDAIR ® Figure CP 5.2 – Turbine control board, fuse Maintenance File of the LEGENDAIR ® CH5-10 2.2 REMOVAL / INSTALLATION OF THE TURBINE CONTROL BOARD (FIG CP 5.2) Spare part reference: ...................... 3812200 : Turbine control board. ........................................................... CMS 5A fuse. Number of operator: ....................... 1. Special or specific tools: ................ None. Preliminary operations: .................. Make sure that the device is switched off. Clean the device before doing the work (Chap II.2.1). 2.2.1 Removing / Installing the turbine control board - Put the device in a clean and open environment. - Open the device (see procedure Chap II.4.2). - Unscrew the three attachment screws (Pl1-130) for the CPU board (Pl1-120). - Disconnect all connectors Pl1.J1.CT, Pl1.J2.CT of the turbine control board. >> Caution, the device must be switched off: electrostatic risk. - Extract the turbine casing (Pl1.50) from its housing and uncouple the flow rate measurement block (Pl1-260), the 02 supply pipes and the piezo solenoid valve. WITH ROUND SPACERS (Zone A) - Place the turbine box (Pl1-50) in a clean and open environment, then remove the four screws, the washers and the spacers (Pl1.70, Pl1.80, Pl1.90) in order to extract the turbine control board (Pl1.60). - Disconnect the box from the turbine control board (Pl1.J6.CT). - Replace the turbine control board (Pl1-60). - Replace the turbine control board (Pl1.60) on the box with four screws, the washers and the spacers (Pl1.70, Pl1.80, Pl1.90) (Torque 5 Nm max.). WITH HEXAGONAL SPACERS (Zone B) CH5-11 - Place the turbine box (Pl1-50) in a clean and open environment, then remove the four screws and the spacers (Pl1.70, Pl1.90) in order to extract the turbine control board (Pl1.60). - Disconnect the box from the turbine control board (Pl1.J6.CT). - Replace the turbine control board (Pl1-60). Maintenance File of the LEGENDAIR ® Figure CP 5.2 – Carte Commande Turbine, fusible Maintenance File of the LEGENDAIR ® CH5-12 - Replace the turbine control board (Pl1.60) on the box with four screws and the spacers (Pl1.70, Pl1.90) (Torque 5 Nm max.). COMMON ASSEMBLING - Connect the box to the turbine control board (Pl1.J6.CT). - Couple the flow rate measurement block (Pl1-260) to the casing and connect the two O2 supply pipes and the piezo solenoid valve, then reinsert the assembly into its housing. Put the cone support (Pl1-50) also into place. Put the cone support (Pl1-220) also into place. - Reconnect all connectors Pl1.J1.CT, Pl1.J2.CT to the turbine control board. >> Pl1.J1.CT with the power supply wiring, Pl1.J2.CT connected to Pl1.J7.CPU.- Check the support of all the elements. - Reinstall the CPU board (Pl1-120) with the three attachment screws (Pl1-130) (Torque 5 Nm max.). - Close the device again taking all necessary precautions (see procedure Chap II.5.1). - Perform the final inspection procedures before putting back into service (Chap IV). 2.2.2 Removing / Installing the fuse - Put the device in a clean and open environment. - Open the device (see procedure Chap II.5.1). - Locate the CMS fuse. - Extract the fuse carefully and replace it. >> Take care not to damage the support. - Close the device again taking all necessary precautions (see procedure Chap II.5.1). - Perform the final inspection procedures before putting back into service (Chap IV). CH5-13 Maintenance File of the LEGENDAIR ® Figure CP 5.3 – Removal of the display Maintenance File of the LEGENDAIR ® CH5-14 2.3 REMOVAL / INSTALLATION OF THE DISPLAY (FIG CP 5.3) Spare part reference: ...................... 3810900 : Legendair Display Number of operator: ....................... 1. Special or specific tools: ................ None. Preliminary operations: .................. Make sure that the device is switched off. Clean the device before doing the work (Chap II.2.1). 2.3.1 Removal / Installation - Put the device in a clean and open environment. - Open the device (see procedure Chap II.4.2). - Unscrew the four attachment screws CBL M3-6 (Pl1-110a) for the display (Pl1-100a). - Tilt the display on its side. - Unscrew the four countersunk attachment screws M3-6 (Pl1-110b) of the ‘’DRIVER‘’ board (Pl1-100b). - Disconnect the connector Pl1.J9.CPU of the display. - Extract the ‘’DRIVER’’ board from its housing by decoupling the CPU board (Pl1120). >> Caution, do not damage the connector. - Replace the display (Pl1-100). - Put the new ‘’DRIVER’’ board in position (Pl1-100b) on the CPU board (Pl1-120). Validate its position and finish its holding into place with four attachment countersunk head screw M3-6 (Pl1-110b) (Torque 5 Nm max). - Put the display in place (Pl1-100a). Validate its position and finish its holding into place with four attachment screws CBL M3-6 (Pl1-110a) (Torque 5 Nm max). - Reconnect the connector Pl1.J9.CPU of the display (Neon Power Supply display). - Close the device again taking all necessary precautions (see procedure Chap II.4.2). - Perform the final inspection procedures before putting back into service (Chap IV). CH5-15 Maintenance File of the LEGENDAIR ® Figure CP 5.4 – Removal of the keypad Maintenance File of the LEGENDAIR ® CH5-16 2.4 REMOVAL / INSTALLATION OF THE KEYPAD (FIG CP 5.4) Spare part reference: ...................... 3808900 : LEGENDAIR keypad only Number of operator: ....................... 1. Special or specific tools: ................ None. Preliminary operations: .................. Make sure that the device is switched off. Clean the device before doing the work (Chap II.2.1). 2.4.1 Removal / Installation - Put the device in a clean and open environment. - Remove the five attachment screws (Pl1.20) on the bottom casing side (Pl1-280) and open the device. >> Carefully separate the two casings to avoid tearing off the keypad connections. - Disconnect the keypad from the CPU board (Pl1-120) (Connection Pl1.J6.CPU to be unbolted by traction on the upper part of the connection) in order to disassociate the two casings. >> After removing the keypad, clean the glued surface to eliminate glue residue. >> Before closing the device, check the position of the wires and tubes. Also check that each element is attached. - Connect the keypad to the CPU board (Pl1-120) (Connection Pl1.J6.CPU to be bolted). - Put the two casings of the device into place and fix them using the five screws (Pl1.20) on the bottom casing side (Torque 10 Nm max). >> Pay attention to the positioning of the cone supports (Pl1-200 & Pl1-220) before final attachment. Do not forget to replace the air inlet filter (Pl1-310) following assembly of casings. - Perform the final inspection procedures before putting back into service (Chap IV). CH5-17 Maintenance File of the LEGENDAIR ® Figure CP 5.5 – Removal of the flow rate measurement block and the air tubes Maintenance File of the LEGENDAIR ® CH5-18 2.5 REMOVAL OF THE FLOW RATE MEASUREMENT BLOCK AND THE AIR TUBES (FIGURE CP 5.5) Spare part reference: ...................... 3812099 : Flow laminator with tubing. Number of operator: ....................... 1. Special or specific tools: ................ None. Preliminary operations: .................. Make sure that the device is switched off. Clean the device before doing the work (Chap II.2.1). 2.5.1 Removal / Installation - Put the device in a clean and open environment. - Open the device (see procedure Chap II.4.2). - Unscrew the three attachment screws (Pl1-130) for the CPU board (Pl1-120). >> Disconnect the wiring from the CPU board Pl1.J5.CPU, Pl1.J7.CPU. - Tilt the CPU board forward in order to disconnect its tube ensemble (Pl3-140). >> Take care not to tear off the sensors during removal. - Raise the turbine casing (Pl1-50) slightly in order to extract the flow rate measurement block (Pl1-260). - Replace the flow rate measurement block. - Replace the defective tubes. - Reinstall all elements. It is essential to check the direction of assembly of the tubes (see detail fig. SM5-5). - Position the support cone (Pl1-220) ad check that the flow rate measurement block in firmly secured (Pl1-260). - Reinstall the CPU board (Pl1-120) with the three attachment screws (Pl1-130) (Torque 5 Nm max.) - Reconnect the CPU board Pl1.J5.CPU with the power supply strand, Pl1.J7.CPU connected to Pl1.J2.CT. - Close the device again taking all necessary precautions (see procedure Chap II.4.2). - Calibrate the sensors (Chap V-3-1). - Perform the final inspection procedures before putting back into service (Chap IV). CH5-19 Maintenance File of the LEGENDAIR ® Figure CP 5.6 – Removal of the piezo solenoid valve and air tubes Maintenance File of the LEGENDAIR ® CH5-20 2.6 REMOVAL / INSTALLATION OF THE PIEZO SOLENOID VALVE AND OF TUBES (FIG CP 5.6) Spare part reference: ...................... 3811700 : fitted solenoid valve. Number of operator: ....................... 1. Special or specific tools: ................ None. Preliminary operations: .................. Make sure that the device is switched off. Clean the device before doing the work (Chap II.2.1). 2.6.1 Removal / Installation - Put the device in a clean and open environment. - Open the device (see procedure Chap II.4.2). - Unscrew the three attachment screws (Pl1-130) for the CPU board (Pl1-120). >> Disconnect the wiring of the CPU board Pl1.J5.CPU, Pl1.J7.CPU and Pl1.J1.CPU. - Tilt the CPU board forward in order to disconnect its tube ensemble (Pl3-130, Pl3140). >> Take care not to tear off the sensors during removal. - Remove the fitted solenoid valve (Pl3-150) from the lower casing. - Replace the fitted solenoid valve (Pl3-150) with its tubes. - Replace the defective tubes (Pl3-130, Pl3-140). - Reinstall all elements. It is essential to check the direction of assembly of the tubes (see detail fig. SM5-6). >> Verify the airtightness of the air circuit ensemble, especially at the level of the T- shaped plastic (Pl3-120). - Position the support cone (Pl1-220) ad check that the flow rate measurement block in firmly secured (Pl1-260). - Reinstall the CPU board (Pl1-120) with the three attachment screws (Pl1-130) (Torque 5 Nm max.) >> Reconnect the CPU board Pl1.J5.CPU to the power supply strand, Pl1.J7.CPU connected to Pl1.J2.CT and Pl1.J1.CPU connected to the fitted piezo solenoid valve. - Close the device again taking all necessary precautions (see procedure Chap II.4.2). - Perform the final inspection procedures before putting back into service (Chap IV). CH5-21 Maintenance File of the LEGENDAIR ® Figure CP 5.7 – Power supply and other wiring circuit subassemblies Maintenance File of the LEGENDAIR ® CH5-22 2.7 REMOVAL / INSTALLATION OF POWER SUPPLY AND OTHER WIRING CIRCUIT SUBASSEMBLIES (FIG CP 5.7) Spare part reference: ...................... 3808600 : Battery cover and 2963500: Battery …………………………………………...3809100 : Switching board ……………………………………………3805600 : CPU/CT strand and 2961400: Mains cable Number of operator: ....................... 1. Special or specific tools: ................ None. Preliminary operations: .................. Make sure that the device is switched off. Clean the device before doing the work (Chap II.2.1). - Remove the two attachment screws (Pl2.20) from the battery cover (Pl2-10), then extract it in order to access the battery (Pl2.110). - Clear the cover away from its holding rails by pulling it towards the rear of the device. - Remove the battery (Pl2.110). - Replace the battery cover or the battery according to the element in question. >> Faulty batteries should be disposed of according to environmental legislation in your country. - Check the position of all the elements and secure the cover by means of screw Pl2.20 (Cp 10 Nm maxi). - Perform the final inspection procedures before putting back into service (Chap IV). 2.7.1 Removal / Installation of the switching board / power supply strand - Put the device in a clean and open environment. - Open the device (see procedure Chap II.4.2). - For access reasons, extract the CPU board prior to any other intervention (Chap V.2.1). - Remove the screw (Pl2.100) and the attachment stop (Pl2.90) to extract the switching board (Pl2.80). - Disconnect the power supply cabling (Pl2-70), clear the strand from the ferrite and extract the switching board ensemble (Pl2.80). - Replace the switching board ensemble (Pl2.80) and position it in its housing. CH5-23 Maintenance File of the LEGENDAIR ® Figure CP 5.7 – Power supply and other wiring circuit subassemblies Maintenance File of the LEGENDAIR ® CH5-24 - Attach the attachment stop (Pl2.90) with the screw (Pl2.100). - Replace the CPU board (Chap V.2.1). - Close the device again taking all necessary precautions (see procedure Chap II.4.2). - Perform the final inspection procedures before putting back into service (Chap IV). CH5-25 Maintenance File of the LEGENDAIR ® Figure CP 5.8 – Removal of the power supply Maintenance File of the LEGENDAIR ® CH5-26 2.8 REMOVAL / INSTALLATION OF THE POWER SUPPLY / 24V CHARGER (FIG CP 5.8) Spare part reference: ...................... 2964100 : Power supply / 24V Charger. from LEGENDAIR serial n° KXXXXXX) ........................................................... 2967900 : Power supply 24V Push Pull (From LEGENDAIR serial N° KXXXXXX) Number of operator: ....................... 1. Special or specific tools: ................ None. Preliminary operations: .................. Make sure that the device is switched off. Clean the device before doing the work (Chap II.2.1). 2.8.1 Removal / Installation - Put the device in a clean and open environment. - Open the device (see procedure Chap II.4.2). - Remove the both attachment screws (Pl2.20) from the battery cover (Pl2-10). - Clear the cover away from its holding rails by pulling it towards the rear of the device. - Extract the ensemble then remove the four attachment screws (Pl2-75) of the power supply (Pl2-70). - Disconnect the cabling (Connector TB3). - Replace the power supply (Pl2-70) and attach it with the four attachment screws (Pl275). - Reconnect the cabling of the switching board (Connector TB3). - Check the position of the battery and secure the cover by means of screw Pl2.20 (Cp 10 Nm maxi). - Close the device again taking all necessary precautions (see procedure Chap II.4.2). - Calibrate the sensors (Chap V-3-1). - Perform the final inspection procedures before putting back into service (Chap IV). CH5-27 Maintenance File of the LEGENDAIR ® Figure CP 5.9 – Fitted LEGENDAIR casings Maintenance File of the LEGENDAIR ® CH5-28 2.9 REMOVAL / INSTALLATION OF THE CASINGS ENSEMBLE (FIG CP 5.9) Spare part reference: ...................... 3806399 : Fitted LEGENDAIR Casings Number of operator: ....................... 1. Special or specific tools: ................ None. Preliminary operations: .................. Make sure that the device is switched off. Clean the device before doing the work (Chap II.2.1). 2.9.1 Removal / Installation - Put the device in a clean and open environment. - Carry out the ”Opening of the device” operation (CH II-4-2). - Carry out the successive removal of different components (Chap V-2-1 to V-2-8). - Reassemble the different elements following the instructions. >> The replacement of the identification label will be carried out by our after-sales service, upon request. - Close the device again taking all necessary precautions (see procedure Chap II.4.2). - Calibrate the sensors (Chap V-3-1). - Perform the final inspection procedures before putting back into service (Chap IV). CH5-29 Maintenance File of the LEGENDAIR ® 3. VERIFICATION, VALIDATION AND CALIBRATION PROCEDURE 3.1 CHECKING SENSORS AND CALIBRATION 3.1.1 Pressure sensor 3.1.1.1 Operating check - Switch the device on in Setup mode by simultaneously pressing the On/Off switch found at the rear of the machine (position "1" or ON") and keeping the key pressed until the menu appears on the screen. - Place the cursor on the MAINTENANCE line. - Validate by pressing the key. The MAINTENANCE menu should appear. - Check correct operation of the sensor by connecting the patient outlet of the LEGENDAIR ® to the measurement device. >> Use two T-unions in the machine outlet, one for the coupling of the endcap of the pressure reader and the second where the measurement device and a leak aperture (Ø 5mm) have been placed. - Place the cursor on line "Patient Pressure” press key line "Patient Pressure”. - Again press key : a 0 must appear opposite : a value of 40 should appear opposite line "Patient Pressure”. - Check the difference between values read on the measurement device and on the device (Patient Pressure) must be less than +/- 1 mbar. >> If not, do a calibration. - Switch the device Off. 3.1.1.2 Calibration of pressure sensor - A calibration at zero and at 40 mbar is recommended for this sensor. - Switch the device on in Setup mode by simultaneously pressing the On/Off switch found at the rear of the machine (position "1" or ON") and keeping the key pressed until the menu appears on the screen. - Place the cursor on the MAINTENANCE line. Maintenance File of the LEGENDAIR ® CH5-30 - Validate by pressing the key. The MAINTENANCE menu should appear. - Use a T-union in the machine outlet or where the measurement device and a leak aperture (Ø 5mm) have been placed. - Place the cursor on the line "Patient Pressure" then press the key, a validation beep should sound and a value of 0 should appear opposite the Patient Pressure line. - Again press the key, a validation beep should sound and a value of 40 should appear opposite the Patient Pressure line. With the help of the and keys, adjust the value of pwm so that the pressure read on the manometer is equal to 40 mb +/- 0,2 mb. - Keep the key pressed until you hear a beep. - Switch the device Off. 3.1.2 Valve Pressure Sensor 3.1.2.1 Operating check - Switch the device on in Setup mode by simultaneously pressing the On/Off switch found at the rear of the machine (position "1" or ON") and keeping the key pressed until the menu appears on the screen. >> The coupling of the piloting balloon must be in the open air. - Place the cursor on the MAINTENANCE line. - Validate by pressing the key. The MAINTENANCE menu should appear. - Place the cursor on the line "Valve Pressure" and verify that the display indicates 0.0 to 0,2 mbar. >> If not, do a calibration. - Switch the device Off. 3.1.2.2 Calibration of valve pressure sensor - A calibration at zero is recommended for this sensor. - Switch the device on in Setup mode by simultaneously pressing the On/Off switch key found at the rear of the machine (position "1" or ON") and keeping the pressed until the menu appears on the screen. - Place the cursor on the MAINTENANCE line. CH5-31 Maintenance File of the LEGENDAIR ® - Validate by pressing the key. The MAINTENANCE menu should appear. - Place the cursor on line "Valve Pressure” press key line "Valve Pressure”. - Press the : a 0 must appear opposite key again until a sound is heard which validates the value. - Switch the device Off. 3.1.3 Inspired Flow Sensor 3.1.3.1 Operating check - Switch the device on in Setup mode by simultaneously pressing the On/Off switch found at the rear of the machine (position "1" or ON") and keeping the key pressed until the menu appears on the screen. - Place the cursor on the MAINTENANCE line. - Connect the ventilation patient outlet to the measurement device using a tube of sufficient length and section. >> No part should be placed in series between the ventilator and the measurement device during the operation so as not to introduce either leak or loss of supplementary charge. - Place the cursor on the line "Inspired flow" then press the opposite Inspired flow. key: a 0 will display - Repeat the operation for calibration point : the flows indicated by the measurement device must be 5±0,5; 12±0,6; 37±1.9; 60±3; 90±4.5; 135±6.7 and 160±8l/min of the device reference flows. >> If not, do a calibration. - Switch the device Off. 3.1.3.2 Calibration of the inspired flow sensor - Switch the device on in Setup mode by simultaneously pressing the On/Off switch found at the rear of the machine (position "1" or ON") and keeping the key pressed until the menu appears on the screen. - Place the cursor on the MAINTENANCE line. - Validate by pressing the key. The MAINTENANCE menu should appear. - Connect the ventilation patient outlet to the measurement device using a tube of sufficient length and section. Maintenance File of the LEGENDAIR ® CH5-32 >> No part should be placed in series between the ventilator and the measurement device during the operation so as not to introduce either leak or loss of supplementary charge. - Put the cursor on the "Inspired flow" line and start a calibration sequence by pressing the key. >> The flow rate objectives to be calibrated are displayed in succession facing "Inspired Flow": 0 l/min, 5 l/min, 12 l/min, 37 l/min, 60 l/min, 90 l/min, 135 l/min and 160l/min. >> On each calibration point the machine automatically adjusts the speed of the generator to reach the point to adjust. - Adjust the point of operation of the ventilator with the aid of the buttons or so that the flow rate value returned by the measurement device is as close as possible to the point to be calibrated, to within ± 0.2 l/min for each point. - When the value measured is correct, validate the configuration of the ventilator by pressing the button until you hear a beep. >> Every calibration procedure undertaken must be carried out to its end, i.e. the validation of the 7 points of the flow rate curve. - Switch the device Off. 3.1.4 Expired flow sensor (double branch option) 3.1.4.1 Operating check - Couple the patient outlet of the ventilator to the female cone of the patient return, with the help of a Ø 22 mm tube. - Switch the device on in Setup mode by simultaneously pressing the On/Off switch found at the rear of the machine (position "1" or ON") and keeping the key pressed until the menu appears on the screen. - Place the cursor on the MAINTENANCE line. - Validate by pressing the key. The MAINTENANCE menu should appear. - Put the cursor onto line "Inspired flow", then press key . - The interval between the values read on the line "Expired flow" and the line "Inspired flow" must be less than +/- 0,5 l/min. >> If not, do a calibration. - Switch the device Off. CH5-33 Maintenance File of the LEGENDAIR ® 3.1.4.2 Calibration of the expired flow sensor - Couple the patient outlet of the ventilator to the female cone of the patient return, with the help of a Ø 22 mm tube. - Switch the device on in Setup mode by simultaneously pressing the On/Off switch key found at the rear of the machine (position "1" or ON") and keeping the pressed until the menu appears on the screen. - Place the cursor on the MAINTENANCE line. - Validate by pressing the key. The MAINTENANCE menu should appear. - Put the cursor onto line "Expired flow ", then press key . >> The sensor shall then be automatically calibrated with reference to the values measured by the previously calibrated inspired flow sensor. >> In the event that the sensor is not calibrated or is badly calibrated, the unit sends several beeps. A technical default will be activated by the apparatus (See Chapter III). - Switch the device Off. 3.1.5 Sensor FiO2 3.1.5.1 Operating check - Couple a cell O2 COMEPA Mi Com 102-1 to the device. - Switch the device on in Setup mode by simultaneously pressing the On/Off switch key found at the rear of the machine (position "1" or ON") and keeping the pressed until the menu appears on the screen. - Place the cursor on the MAINTENANCE line. - Validate by pressing the key. The MAINTENANCE menu should appear. - Place the cursor on the line "FiO2" and verify that the display reads 21% +/- 1 %. >> If not, do a calibration. - Switch the device Off. 3.1.5.2 Calibrating the FiO2 sensor - Switch the device on in Setup mode by simultaneously pressing the On/Off switch found at the rear of the machine (position "1" or ON") and keeping the key pressed until the menu appears on the screen. Maintenance File of the LEGENDAIR ® CH5-34 - Place the cursor on the MAINTENANCE line. - Validate by pressing the key. The MAINTENANCE menu should appear. - Place the cursor on line « FIO2 », then press key “21%“ blinks on the "FiO2" line. . The objective of the calibration After making sure that the sensor is indeed vented (not in an oxygen-enriched flow) for a period of 15 to 30 seconds, the point is validated by pressing the key; this validation will be confirmed by a beep. >> In the event that the sensor is not calibrated or is badly calibrated, the unit sends several beeps. A technical default will be activated by the apparatus (See Chapter III). - Switch the device Off. 3.2 CHECKING THE GENERAL CONDITIONS, THE AIR CIRCUIT AND ELECTRICAL CONNECTIONS 3.2.1 Checking the general mechanical conditions (attachment, ...) - Check that there are no general appearance defects on the device. Check that the support stands are present. - Open the device (see procedure Chap II.4.2). - Check that the elements assembly is properly fixed and that there are no bodies or parts of foreign elements moving in the device. >> If there is a vibration problem, also open the compartment to check the turbine box (condition of the foam...). - Replace damaged or broken elements. - Close the device again taking all necessary precautions (see procedure Chap II.4.2). 3.2.2 Checking the air circuit - Open the device (see procedure Chap II.4.2). - Verify the airtightness for each coupling situated on the flow laminator, the expiration support cone and the inspiration support cone. >> Do this by removing the tube (inside the Legendair) for the union to be checked, block the end piece and apply pressure at the union. >> If the union leaks, replace it. CH5-35 Maintenance File of the LEGENDAIR ® - Similarly, check that the air is correctly routed in the flow rate measurement block to make sure that nothing is blocking it. - Check that the tubes are in good condition (polyurethane, silicon) and properly attached. >> If one of the tubes is trapped, split or blocked, replace it. - Check the air routing from its exit from the turbine outlet. >> If the tube has come out of its position, put it back. If it is broken or split, replace it. - Close the device again taking all necessary precautions (see procedure Chap II.4.2). 3.2.3 Checking the attachment of electrical connections - Open the device (see procedure Chap II.4.2). - For each connector on the CPU board and on the turbine control board, move the assembly to make sure that it is properly fixed and also check that there are no breaks (broken wire, socket torn off or unsoldered, ...). >> If it is, replace either the CPU / control board, or the element attached to the defective connector. - Close the device again taking all necessary precautions (see procedure Chap II.4.2). 3.3 CHECKING THE SUPPLY CIRCUIT / FUSES - Before starting the investigation, check that mains power is present at the electrical connection. (Change outlets if necessary). Also check the condition of the circuit connections. The check procedures described below contain simple instructions for failure investigations. 3.3.1 Checking the power supply - Verify the different outlet voltages on the power supply. - Open the device (see procedure Chap II.4.2). - Verify the outlet voltage + 24V on the Connector of the power supply/Charger with the help of a multimeter. Voltage + 24V between the pins 1 and 2 but also between 5 and 2. Maintenance File of the LEGENDAIR ® CH5-36 >> If it is not, replace the power supply. - Check that this same +24V voltage arrives at the CPU board connector Pl1.J5.CPU across pins 1 and 2. (See also the voltage of the CPU board), and the level of the turbine control board Pl1.J1.CT across pins 1 and 2. (See also the voltage at the CT board). >> If this is not the case, change the fitted switching board. 3.3.2 Checking the Turbine control board fuse - Open the device. - Use a multimeter to check the condition of the fuse on the Turbine control board. >> Also check their reference: CMS 5A fuse. 3.4 CHECKING THE INPUT/OUTPUT VOLTAGES: CPU BOARD, TURBINE CONTROL BOARD, AND 3V BATTERY 3.4.1 Checking the CPU board input/output voltages (levels) Each connector on the CPU board is connected to a peripheral element. The following table shows the correspondences between the connectors and the given elements: J1 Piezo solenoid valve J6 Keypad J2 RS232 J7 Turbine control board J3 Alarm signal J8 FiO2 J5 Power supply J9 Neon Display Check that the available input/output voltages (levels) are correct for each connector (Measurement Instrument – multimeter). These results will be helpful in investigating the defective element (CPU board / wiring or peripheral element). CH5-37 Maintenance File of the LEGENDAIR ® Maintenance File of the LEGENDAIR ® CH5-38 3.4.2 Checking the Turbine control board input/output voltages (levels) Each connector on the Turbine Control board (shown on the diagram as CT) is connected to a peripheral element. The following table shows the correspondences between the connectors and the given elements: J1 Power supply J2 Turbine J6 CPU board Check that the available input/output voltages (levels) are correct for each connector (Measurement Instrument – multimeter). These results will be helpful in investigating the defective element (Turbine control board / wiring or peripheral element). CH5-39 Maintenance File of the LEGENDAIR ® Maintenance File of the LEGENDAIR ® CH5-40 3.4.3 Checking the 3V battery - Open the device. - Remove the 3V battery and use a multimeter to check its condition (CPU board). >> Replace the 3V battery if its level is less than 2V. 3.5 CHECKING THE KEYPAD / LEDS 3.5.1 Checking the keypad - Open the device. - Disconnect the keypad (connector Pl1.J6.CPU) from the CPU board and check that it is operating correctly using a multimeter (continuity position). - Do this by connecting the multimeter between pins 1 and 6, and press on the ALARM INHIBITION key on the keypad: the multimeter should validate the continuity of the circuit. - Do this check for these keys: +HAUT = V (pins 4-6), and I (M/A) (pins 5-6.) (pins 2-6), -BAS = (pins 3-6), VALID >> Replace the keypad if the test is not correct. 3.5.2 Checking the LEDs - Open the device. - Disconnect the keypad (connector Pl1.J6.CPU) from the CPU board and use a multimeter (diode test position) to check the state of the LEDs. - Do this by connecting the multimeter between pins 7 and 8: the multimeter should display a diode threshold. - Also check this between pins 9 and 10, and 11 and 12, 13 and 14, 15 and 16. >> Replace the keypad if the test is not correct. CH5-41 Maintenance File of the LEGENDAIR ® Parc d’activités Pau-Pyrénées ZI de l’échangeur 64008 PAU CEDEX (FRANCE) Tel. 33.(0)5.59.14.02.02- Fax : (33.(0)5.59.14.02.00 - E-mail : [email protected] Maintenance File LEGENDAIR ® Chapter 6 – Illustrated Catalog (Ed. B) CH6-1 Dossier de Maintenance du LEGENDAIR ® CONTENTS 1. INTRODUCTION .......................................................................................................................... 3 1.1 GENERAL BREAKDOWN SYSTEM USED...................................................................................... 3 1.2 CREATING DIRECTORIES .............................................................................................................. 4 1.2.1 Overview ............................................................................................................................... 4 1.2.2 1.3 1.4 Alphanumeric list of manufacturer's references.................................................................... 4 HOW TO USE THE CATALOG......................................................................................................... 4 1.3.1 Part identification .................................................................................................................. 4 1.3.2 Interchangeable parts ........................................................................................................... 5 1.3.3 Specification of article quantities........................................................................................... 5 1.3.4 Applicability ........................................................................................................................... 5 ABBREVIATIONS AND SPECIAL CODES....................................................................................... 5 1.4.1 Abbreviations ........................................................................................................................ 5 1.4.2 Coding system ...................................................................................................................... 6 1.5 DIRECTORY OF MANUFACTURER'S DESIGNATIONS ................................................................ 7 1.6 LIST OF AFTER SALES REFERENCES MARKETED IN KIT (/ASSEMBLED)............................... 8 2. DETAILED PARTS LIST .............................................................................................................. 9 LIST OF FIGURES PLATE 01 - LEGENDAIR ® ................................................................................................................. 10 PLATE 02 - LEGENDAIR ® (CON'T) .................................................................................................. 12 PLATE 03 – AIR FLOW LEGENDAIR ® .............................................................................................. 14 PLATE 04 – FITTED TURBINE BOX LEGENDAIR ............................................................................ 16 Maintenance File of the LEGENDAIR ® CH6-2 1. INTRODUCTION 1.1 GENERAL BREAKDOWN SYSTEM USED The following principle is used for presentation of the descriptive articles list: − an assembly comprises all immediately lower components, the name of which is offset towards the right by one indent, − a component forms part of an immediately higher assembly, the names of which are offset towards the left by one indent, − attachment elements are shown immediately after the article that they are used to fix and before any of the components of the article, preceded by the term "Attachment parts" and followed by " * * * " − the relation between the different elements is highlighted in the "NAME" column using the following system, − this breakdown can continue as far as the 7th indent. Example: 1234567 Main assembly * Attachment parts for the main assembly *** * Components of the main assembly * Assembly * Attachment parts for the assembly *** * * Components of the assembly * * Sub-assembly * * Attachment parts for the sub-assembly *** * * * Components of the sub-assembly * * * Subdivision of the sub-assembly * * * Attachment parts for the subdivision *** Mark 1 is not shown in any of the plates in the parts list. The mark is preceded by a dash (-). Maintenance File of the LEGENDAIR ® CH6-3 1.2 CREATING DIRECTORIES 1.2.1 Overview Directories are used for logistics needs. They facilitate searches in the illustrated catalog, provide part identifications and fix distribution levels of "replenishment" articles that have to be procured, put into stock and distributed. 1.2.2 Alphanumeric list of manufacturer's references The classification is made in increasing alphanumeric order of references from the left towards the right, each rank being taken separately. The order of priority for each rank is as follows: − space, − dash, − letters from A to Z, − numbers from 0 to 9. A manufacturer's reference can only begin with a letter or a number. For repetitive articles: − the manufacturer reference and the designation of articles included in this parts list several times are only given once, however all other information is given, − the reference and designation are repeated on the first line of each new page. 1.3 HOW TO USE THE CATALOG 1.3.1 Part identification Several cases can arise: − The part to be identified originates from a disassembly: • find the corresponding plate, identify the part on the plate and note the mark assigned to the part, • then read the information on the text page adjacent to this mark. − Only the manufacturer's reference is known: • find this reference in the alphanumeric list of manufacturer references, • then note the information for the reference, plate number and mark, adjacent to this reference. CH6-4 Maintenance File of the LEGENDAIR ® 1.3.2 Interchangeable parts If two interchangeable articles may be used indifferently for the same purpose during manufacture, they are included in the illustrated catalog one after the other separated by the word "OR" on the line between them. The interchangeable article is only shown on the plate if it includes a major difference. 1.3.3 Specification of article quantities The " QTY" column is filled in for one immediately higher assembly. Attachment elements are given for only one element. 1.3.4 Applicability The applicability code is used to indicate if it is possible to install variants of the article on the immediately higher assembly. When applicability is full, the "APPL." column is left blank. This code consists of a variant letter associated with the mark of the assembly and article. Example: 01 –1A ASSEMBLY " -1B " –1C -10A 1 2 3 SUB–ASSEMBLY " -10B 1 2 1A 1BC Article mark 10B is installed on assemblies 2 and 3, marks 1B and 1C. Article mark 10A can only be installed on assembly 1 mark 1A. 1.4 ABBREVIATIONS AND SPECIAL CODES 1.4.1 Abbreviations − DET Detail Cross reference to the breakdown plate or a document − EIS Ensemble immédiatement supérieur (Immediately higher assembly) Cross-reference to the plate for the assembly − EI Interchangeable − ND Article not distributed in this quantity or article forming an After Sales kit (assembled) − NP Non-procurable article Maintenance File of the LEGENDAIR ® CH6-5 1.4.2 − NI Not illustrated − SB Selon Besoin (As required) This abbreviation is made whenever it is impossible to define the quantity. − SR Spécial Rechange (Special Spare Part) This abbreviation is used for an assembly of articles created specially to repair an assembly. − RF Reference This abbreviation is used when the article was mentioned on a previous plate and it has to be repeated to facilitate understanding of how an assembly is composed. Coding system − CBLXS Wide pan head screw, TORX end CH6-6 − CL Wide cylindrical head screw − CHC Cylindrical hexagonal socket head screw − H Hexagonal head screw − HM Narrow hexagonal head screw − HU Machined hexagonal head screw − STHC Hexagonal grub screw − TCBL Cylindrical head screw, TORX end − LU Wide machined washer − MU Average machined flat washer − ZU Narrow machined flat washer − FX Countersunk head screw, TORX end Maintenance File of the LEGENDAIR ® 1.5 DIRECTORY OF MANUFACTURER'S DESIGNATIONS DESIGNATION LOCATION QTY. ADHESIVE TRANSFER 03 160A 1 DISPLAY LEGENDAIR 01 100A 1 POWER SUPPLY / CHARGER 24V 3.3A or Power Supply PUSH PULL 02 70A 1 TRUARC RING 01 150A 1 FOAM STRIP (10-50) LEGENDAIR 04 21A 2 FOAM STRIP (3-20) SMARTAIR 04 20A 2 FOAM STRIP (5-30) 04 30A 2 BATTERY LI-ION LEGENDAIR 02 110A 1 EXPIRATION BLOCK DOUBLE BRANCH 01 180A 1 CAPTIVE KNURLED KNOB 01 160A 1 ADHESIVE STOP Dia 9.5 Ep 3.8 02 130A 2 SWITCHING BOARD STOP 02 90A 1 MASKED HOUSING SIMPLE BRANCH 01 185A 1 TURBINE BOX 04 10A 1 FITTED TURBINE BOX 01 50A 1 TURBINE BOARD CDE LEGENDAIR or Filtered control motor board 01 CABLED SWITCHING BOARD 02 80A 1 CPU BOARD LEGENDAIR 01 120A 1 SILICONE VALVE 03 30A 2 KEYPAD LEGENDAIR 01 30A 1 SELF-ADHESIVE PIPE COLLAR 02 30A 5 CONE 22 PORTE VALVE 03 10A 1 LOWER CASING LEGENDAIR 01 280A 1 UPPER CASING LEGENDAIR 01 10A 1 FITTED CASINGS LEGENDAIR 01 350A 1 BATTERY COVER 02 10A 1 FITTED PIEZO SOLENOID VALVE 01 140A 1 FITTED PIEZO SOLENOID VALVE 03 150A 1 ENDCAP O2 MALE 01 340A 1 BALLOON PILOTING ENDCAP 01 230A 1 NYLON SPACER LG 5 or HEXAGONAL Sapcer M/F M3 Lg 5 01 90A 4 AIR INLET LABEL 01 290A 1 IDENTIFICATION LABEL 01 270A 1 BATTERY ASSEMBLY LABEL LEGENDAIR 02 120A 1 LABEL PSDE 01 300A 1 ROUND FERRITE 34-23-19 CABLE 02 150A 1 AIR INLET FILTER 01 310A 1 01 260A 1 03 60A 2 AIR FLOW LEGENDAIR ® PIN GO5 3-12 INOX Maintenance File of the LEGENDAIR ® 60A 1 CH6-7 DESIGNATION LOCATION O-RING 1.6-22.1 FLOW LAMINATOR LEGENDAIR BIPOLAR MAINS OUTLET CABLE SELF-ADHESIVE BASE 12,7x12,7 EP. 5,8 THERMAL CONDUCTION PLATE HANDLE THREADED JOINT 10-32 (dia. Int. 1/8) FLOW MEASUREMENT JOINT JOINT O2 FEMALE WITH VALVE JOINT PRESSURE FEMALE JOINT PRESSURE MALE WASHER GROWER D3 SUPPORT VALVE ANTI-RETURN SUPPORT VALVE SPONTANEOUS RESPIRATION SUPPORT CONE EXPIRATION SUPPORT CONE INSPIRATION VENTILATION SIEVE T-SHAPED PLASTIC D1.5 MAINTENANCE VALVE LUG STRAND CPU/CDE TURBINE 9brs/9brs STRAND PIEZO SOLENOID VALVE STRAND OUTLET FIO2 STRAND ALARM REMINDER STRAND SUB D 9BRS CROSSPIECE OF FLUTED PARTITION POLYURETHANE TUBE SILICONE TUBE (15-21) SILICONE TUBE 3-6 SCREW SCREW CBL M6,5-8 SCREW TCB D 3,5x8 HEXALOBES SCREW TCB D 3,5x8 HEXALOBES SCREW TCB M3x10 HEXALOBES SCREW TF M3-8 HEXALOBES SCREW TF M3-8 HEXALOBES SCREW TF M4X10 HEXALOBES 1.6 03 03 02 01 04 01 03 03 01 01 01 01 03 03 01 01 03 03 03 02 03 01 01 02 01 03 03 03 01 02 01 02 01 02 02 01 40A 180A 60A 170A 40A 40A 70A 90A 330A 210A 240A 80A 50A 110A 200A 220A 100A 120A 20A 140A 170A 250A 320A 40A 190A 130A 80A 140A 110A 50A 130A 100A 70A 20A 75A 20A 4 1 2 4 1 1 2 1 1 2 1 4 1 1 1 1 1 1 1 1 1 1 1 1 2 1 1 1 8 2 3 1 4 2 4 7 LIST OF AFTER SALES REFERENCES MARKETED IN KIT (/ASSEMBLED) DESIGNATION LOCATION 01 Fitted casings LEGENDAIR 01 10A * Screw 01 20A 01 30A TFM4-10 LEGENDAIR Maintenance File of the LEGENDAIR ® AFTER SALES REF. 3808399 * Upper casing LEGENDAIR * Keypad CH6-8 QTY. 3808900 DESIGNATION LOCATION * Handle 01 40A * Truarc ring 01 150A * Captive knurled knob 01 160A * Self-adhesive bases 12,7x12,7 Ep.5,8 01 170A * Lower casing LEGENDAIR 01 280A * Air inlet label 01 290A * Label PSDE 01 300A * Battery cover 02 10A * Screw TFM3-8 02 20A * Battery assembly Label 02 120A * Adhesive stop 02 130A 01 10A Fitted upper casing LEGENDAIR Flow Laminator LEGENDAIR 3808499 3812099 * Cone 22 valve portal 03 10A * Maintenance valve lug 03 20A * Silicone valve 03 30A * O-ring D1.6 – 22.1 03 40A * Support valve anti-return 03 50A * Pin G 05 3-12 03 60A * Threaded joint 10-32 03 70A * Silicone tube (15-21) 03 80A * Flow measurement joint 03 90A * Ventilation sieve 03 100A * Support valve spontaneous respiration 03 110A * Silicone tube 3-6 03 120A Fitted turbine box LEGENDAIR 3806499 * Turbine box LEGENDAIR 04 10A * Foam strip (3-20) SMARTAIR Plus 04 20A * Foam strip (10-50) LEGENDAIR 04 21A * Foam strip (5-30) 04 30A * Thermal conduction plate 04 40A 03 150A * Piezo solenoid valve strand 03 170A * Silicone tube 3-6 03 140A * Polyurethane tube 03 130A * T-shaped plastic 03 120A * Adhesive transfer 03 160A Fitted piezo solenoid valve 2. AFTER SALES REF. 3811700 DETAILED PARTS LIST (see below.) Maintenance File of the LEGENDAIR ® CH6-9 PLATE 01 - LEGENDAIR ® CH6-10 Maintenance File of the LEGENDAIR ® PL. MARK 01 - MAN. CODE 1A 4095700 LEGENDAIR 10A 3808499 .FITTED UPPER CASING LEGENDAIR Attachment parts .SCREW TF M4X10 HEXALOBES *** .KEYPAD LEGENDAIR .HANDLE .FITTED TURBINE BOX SEE DETAIL 04-1A * * * .FILTERED CONTROL LOTOR BOARD Attachment parts .SCREW TCB M3x10 HEXALOBES .WASHER GROWER D3 .NYLON SPACER LG 5 *** .DISPLAY LEGENDAIR Attachment parts .SCREW *** .CPU BOARD LEGENDAIR Attachment parts .SCREW TCB D 3,5x8 HEXALOBES *** .FITTED PIEZO SOLENOID VALVE SEE DETAIL 03-150A * * * .TRUARC RING .CAPTIVE KNURLED KNOB .SELF-ADHESIVE BASE 12,7x12,7 EP. 5,8 .EXPIRATION BLOCK DOUBLE BRANCH .MASKED HOUSING SIMPLE BRANCH .CROSSPIECE OF FLUTED PARTITION .SUPPORT CONE EXPIRATION .PRESSURE JOINT FEMALE .SUPPORT CONE INSPIRATION .BALLOON PILOTING ENDCAP .PRESSURE JOINT MALE .STRAND OUTLET FIO2 .AIR FLOW AIR LEGENDAIR ® SEE DETAIL 03-01A .IDENTIFICATION LABEL .LOWER CASING LEGENDAIR .AIR INLET LABEL .LABEL PSDE .AIR INLET FILTER .STRAND ALARM REMINDER .JOINT O2 FEMALE WITH VALVE .ENDCAP O2 MALE .FITTED CASINGS LEGENDAIR ROUND UNDER CASING EQUIPED ND 30A 40A 50A 3808900 60A 3812700 ND 3806499 70A 80A 90A 100A ND ND ND 3810900 110A 120A NP 3811600 130A 140A 150A 160A 170A 180A 185A 190A 200A 210A 220A 230A 240A 250A 260A 270A 280A 290A 300A 310A 320A 330A 340A 350A QTY. APPL. 1234567 20A - DESIGNATION REFERENCE ND 3811700 ND ND ND 3809999 3809800 ND ND ND ND ND ND 3809500 NP ND ND ND 3804800 3809600 2962600 2962700 3806399 3818099 ® RF 1 7 1 1 1 1 4 4 4 1 8 1 3 1 1 1 4 1 1 2 1 2 1 1 1 1 1 1 1 1 1 1 1 1 1 1 (-) NOT ILLUSTRATED Maintenance File of the LEGENDAIR ® CH6-11 PLATE 02 - LEGENDAIR ® (CON'T) CH6-12 Maintenance File of the LEGENDAIR ® PL. MARK 02 - MAN. CODE REFERENCE 1A 4095700 10A 3808600 20A 30A 40A 60A 70A ND 3809200 ND 2961400 2964100 OR 2967900 75A 80A ND 3809100 90A 100A 110A ND ND 2963500 120A 130A 140A 150A 1234567 LEGENDAIR ® (CON'T) ND 50A DESIGNATION ND ND 3805600 ND QTY. APPL. RF .BATTERY COVER Attachment parts .SCREW TF M3-8 HEXALOBES *** .SELF-ADHESIVE PIPE COLLAR .STRAND SUB D 9BRS Attachment parts .SCREW CBL M6,5-8 *** .BIPOLAR MAINS OUTLET CABLE .POWER SUPPLY / CHARGER 24V 3.3A OR POWER SUPPLY 24V PUSH PULL Attachment parts .SCREW TF M3-8 HEXALOBES *** .CABLED SWITCHING BOARD Attachment parts .SWITCHING BOARD STOP .SCREW TCB D 3,5x8 HEXALOBES *** .BATTERY LI-ION MOLTECH LEGENDAIR OR BATTERY LI-ON SAFT .BATTERY ASSEMBLY LABEL LEGENDAIR .ADHESIVE STOP Dia 9.5 Ep 3.8 .STRAND CPU/CDE OF TURBINE 9brs/9brs .ROUND FERRITE 34-23-19 CABLE 1 2 5 1 2 1 1 4 1 1 1 1 1 2 1 1 (-) NOT ILLUSTRATED Maintenance File of the LEGENDAIR ® CH6-13 PLATE 03 – AIR FLOW LEGENDAIR ® CH6-14 Maintenance File of the LEGENDAIR ® PL. MARK 03 - MAN. CODE REFERENCE 1A DESIGNATION 1234567 AIR FLOW LEGENDAIR ® SEE EIS 01-260A .CONE 22 VALVE PORTAL .MAINTENANCE VALVE LUG .SILICONE VALVE .O-RING 1.6-22.1 .SUPPORT VALVE ANTI-RETURN .PIN GO5 3-12 INOX .THREADED JOINT 10-32 (dia. Int. 1/8) .SILICONE TUBE (15-21) .FLOW MEASUREMENT JOINT .VENTILATION SIEVE .SUPPORT VALVE SPONTANEOUS RESPIRATION 10A 20A 30A 40A 50A 60A 70A 80A 90A 100A 110A ND ND ND ND ND ND ND ND ND ND ND 120A 130A 140A 150A ND .T-SHAPED PLASTIC D1.5 ND .POLYURETHANE TUBE ND .SILICONE TUBE 3-6 .FITTED PIEZO SOLENOID VALVE Attachment parts ND .ADHESIVE TRANSFER *** ND .STRAND PIEZO SOLENOID VALVE .FLOW LAMINATOR LEGENDAIR - 160A - 170A 180A 3811700 3812099 QTY. APPL. RF 1 1 2 4 1 2 2 1 1 1 1 1 1 1 1 1 1 1 - (-) NOT ILLUSTRATED Maintenance File of the LEGENDAIR ® CH6-15 PLATE 04 – FITTED TURBINE BOX LEGENDAIR CH6-16 Maintenance File of the LEGENDAIR ® PL. MARK MAN. CODE REFERENCE 04 - 1A 3806499 - 10A 20A ND ND 21A 30A 40A - 50A ND ND ND ND DESIGNATION 1234567 FITTED TURBINE BOX LEGENDAIR SEE EIS 01-140A .TURBINE BOX .FOAM STRIP(3-20) SMARTAIR PLUS .FOAM STRIP(10-50) LEGENDAIR .FOAM STRIP(5-30) .THERMAL CONDUCTION PLATE BANDE MOUSSE (5-30) Lg 100 QTY. APPL. RF 1 2 2 2 1 1 (-) NOT ILLUSTRATED Maintenance File of the LEGENDAIR ® CH6-17 Parc d’activités Pau-Pyrénées ZI de l’échangeur 64008 PAU CEDEX (FRANCE) Tel. : 33.(0)5.59.14.02.02- Fax : (33.(0)5.59.14.02.00 - E-mail : [email protected] SUD OUEST MAINTENANCE FILE: LEGENDAIR ® Ce document est la propriété de la société AIROX Il ne peut être reproduit ou communiqué sans son autorisation. This document is the property of AIROX Its contents cannot be reproduced or divulged without the company's written approval. MODIFICATION MANAGEMENT Approval of revision of the LEGENDAIR Name Made by: Index B Function JM TOLDI Verified or Approved by: ® Signature After Sales Manager ALAIN SOUBRA General Manager Revision Validity/application date A 03/2004 Creation of the documentation B 02/2006 Update from ADM n°05/12/54 include Nb of pages Nb of appended pages Subject and description of the modification INSPECTION SHEET LEGENDAIR Service Request Number : Serial Number : Software : Date : Ventilator Hours : Customer Asset ID # : DOCUMENTS / APPEARANCE Result √ Comments Result √ Comments Verification of work sheet General appearance inspection: filter, fastenings, bases Labels (air inlet + identification + O2). ELECTRICAL SAFETY METRON Check class II BF POWER SUPPLIES Result Comments Verification power voltage from mains 24.5 V ± 1.5 V V Verification of 5 V ± 0.5 V CPU voltage V Verification of Watchdog 25 V ± 2 V voltage V Verification power voltage from external power 24 V ± 1.5 V V Verification battery voltage 29 V ± 1V and battery symbol V Buzzer 1 voltaxe: 5.1 V V Buzzer 2 voltage: 5.1 V V CLOCK / DATE / CONTRAST Result √ Comments Result √ Comments Setting of clock / date Display contrast Keypad keys Led / led / Led CALIBRATIONS / PERFORMANCE LEVELS Check pressure calibration 0 and 40 mbar or 1,181 inHg Check valve pressure calibration at 0 mbar Check flow rate calibration l/min 5 ± 0.5 l/min 12 ± 0.6 l/min l/min 37 ± 1.9 l/min l/min 60 ± 3 l/min l/min 90 ± 4.5 l/min l/min 135 ± 6.7 l/min l/min 160 ± 8 l/min l/min Check calibration expired flow at 0,5 l/min Verification FIO2 at 21% at +1 / -2% l/min Check performance flow maxi: >160 l/min Check performance pressure maxi: >70 mb or > 2,067 inHg VENTILATION MODE Result √ Comments Performance Check : Mode PCV Ipap 40 mbar, Epap 5 mbar, Flow Ramp 2, Rate 10 c/min, I/T 33% Bar graph IPAP/EPAP: 40 ± 2 mbar / 5 ± 1 mbar Check of Vt: 800 ml ±10% Check of valve: 40 mbar ±10% mbar ml mbar Low pressure alarm Led + Alarm mains power supply Led + Alarm external continuous power supply Battery symbol Default setting: Ipap 15 mbar, Epap 0mbar TEST EQUIPMENT & SERIAL # : COMMENTS : BIOMEDICAL REPRESENTATIVE : % UPGRADES INSPECTION SHEET LEGENDAIR Service Repport Number : Serial Number : Software : Date : Ventilator Hours : Customer Asset ID # : Upgrades Inpection Part Number Bottom case / Power supply CPU PCB Board (Should be marked SLC) Ferrite Core / Cables RS232 & Nurse call New Silicon Tubing New Tubing Connectors (clear) 3818099 / 2967900 381160 Main Parts Part Number Top Cover Laminator Cover Main Switch Key Board Filter Communication Board Turbine Battery Charger Board Battery 3808499 3812099 3814299 3808900 3804800 3809100 3806499 3799200 2963500 Upgraded √ Tel: 604 540-8288 Fax: 604 540-8245 Toll Free: 1 888-540-8288 Website: www.westcaremedical.com