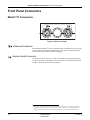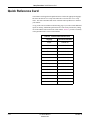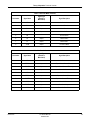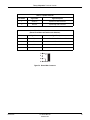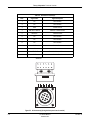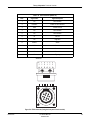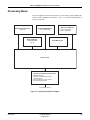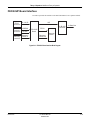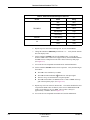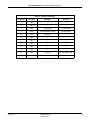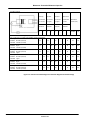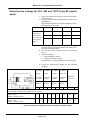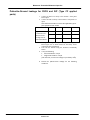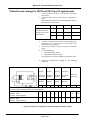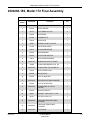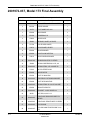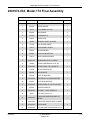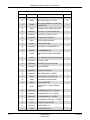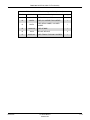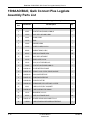
1
Corometrics®170 Series SERVICE MANUAL MANUAL P/N 2000947-004 REV. D Corometrics® 170 Series SERVICE MANUAL MANUAL P/N 2000947-004 REV. D GUARANTEE All equipment sold by GE Medical Systems Information Technologies, is fully guaranteed as to materials and workmanship for a period of 1 year. Information Technologies reserves the right to perform guarantee service operations in its own factory, at an authorized repair station, or in the customer’s installation. Our obligation under this guarantee is limited to repairing, or, at our option, replacing any defective parts of our equipment, except fuses or batteries, without charge, if such defects occur in normal service. Claims for damage in shipment should be filed promptly with the transportation company. All correspondence covering the instrument should specify the model and serial numbers. GE Medical Systems Information Technologies A GE Medical Systems Company GE Medical Systems Information Technologies will make available on request such circuit diagrams, component diagrams, component parts lists, descriptions, calibration instructions, or other information which will assist the users or appropriately qualified technical personnel to repair those parts of the equipment which are classified by GE Medical Systems Information Technologies as repairable. Refer to the service manual for further information. ! CAUTION: In the United States of America, Federal Law restricts this device to sale by or on the order of a physician. Corometrics and Marquette are registered trademarks of GE Medical Systems Information Technologies. GE is a registered trademark of General Electric Company. All other product and brand names are trademarks or registered trademarks of their respective companies. ©2002-2004 GE Medical Systems Information Technologies. All rights reserved. No part of this manual may be reproduced without the permission of GE Medical Systems Information Technologies. ПРЕДУПРЕЖДЕНИЕ Това упътване за работа е налично само на английски език. (BG) • • • Ако доставчикът на услугата на клиента изиска друг език, задължение на клиента е да осигури превод. Не използвайте оборудването, преди да сте се консултирали и разбрали упътването за работа. Неспазването на това предупреждение може да доведе до нараняване на доставчика на услугата, оператора или пациентa в резултат на токов удар, механична или друга опасност. 警告 (ZH-CN) • 本维修手册仅提供英文版本。 • 如果客户的维修服务人员需要非英文版本,则客户需自行提供翻译服务。 • 未详细阅读和完全理解本维修手册之前,不得进行维修。 • 忽略本警告可能对维修服务人员、操作人员或患者造成电击、机械伤害或其他形式的伤 害。 警告 本服務手冊僅提供英文版本。 (ZH-HK) • 倘若客戶的服務供應商需要英文以外之服務手冊,客戶有責任提供翻譯服務。 • 除非已參閱本服務手冊及明白其內容,否則切勿嘗試維修設備。 • 不遵從本警告或會令服務供應商、網絡供應商或病人受到觸電、機械性或其他的危險。 警告 本維修手冊僅有英文版。 (ZH-TW) • 若客戶的維修廠商需要英文版以外的語言,應由客戶自行提供翻譯服務。 • 請勿試圖維修本設備,除非 您已查閱並瞭解本維修手冊。 • 若未留意本警告,可能導致維修廠商、操作員或病患因觸電、機械或其他危險而受傷。 UPOZORENJE Ovaj servisni priručnik dostupan je na engleskom jeziku. (HR) • • • Ako davatelj usluge klijenta treba neki drugi jezik, klijent je dužan osigurati prijevod. Ne pokušavajte servisirati opremu ako niste u potpunosti pročitali i razumjeli ovaj servisni priručnik. Zanemarite li ovo upozorenje, može doći do ozljede davatelja usluge, operatera ili pacijenta uslijed strujnog udara, mehaničkih ili drugih rizika. VÝSTRAHA Tento provozní návod existuje pouze v anglickém jazyce. (CS) • • • V případě, že externí služba zákazníkům potřebuje návod v jiném jazyce, je zajištění překladu do odpovídajícího jazyka úkolem zákazníka. Nesnažte se o údržbu tohoto zařízení, aniž byste si přečetli tento provozní návod a pochopili jeho obsah. V případě nedodržování této výstrahy může dojít k poranění pracovníka prodejního servisu, obslužného personálu nebo pacientů vlivem elektrického proudu, respektive vlivem mechanických či jiných rizik. ADVARSEL Denne servicemanual findes kun på engelsk. (DA) • • • Hvis en kundes tekniker har brug for et andet sprog end engelsk, er det kundens ansvar at sørge for oversættelse. Forsøg ikke at servicere udstyret uden at læse og forstå denne servicemanual. Manglende overholdelse af denne advarsel kan medføre skade på grund af elektrisk stød, mekanisk eller anden fare for teknikeren, operatøren eller patienten. WAARSCHUWING Deze onderhoudshandleiding is enkel in het Engels verkrijgbaar. (NL) • • • Als het onderhoudspersoneel een andere taal vereist, dan is de klant verantwoordelijk voor de vertaling ervan. Probeer de apparatuur niet te onderhouden alvorens deze onderhoudshandleiding werd geraadpleegd en begrepen is. Indien deze waarschuwing niet wordt opgevolgd, zou het onderhoudspersoneel, de operator of een patiënt gewond kunnen raken als gevolg van een elektrische schok, mechanische of andere gevaren. WARNING: This service manual is available in English only. (EN) • • • If a customer’s service provider requires a language other than English, it is the customer’s responsibility to provide translation services. Do not attempt to service the equipment unless this service manual has been consulted and is understood. Failure to heed this warning may result in injury to the service provider, operator, or patient from electric shock, mechanical hazards, or other hazards. HOIATUS See teenindusjuhend on saadaval ainult inglise keeles (ET) • Kui klienditeeninduse osutaja nõuab juhendit inglise keelest erinevas keeles, vastutab klient • • tõlketeenuse osutamise eest. Ärge üritage seadmeid teenindada enne eelnevalt käesoleva teenindusjuhendiga tutvumist ja sellest aru saamist. Käesoleva hoiatuse eiramine võib põhjustada teenuseosutaja, operaatori või patsiendi vigastamist elektrilöögi, mehaanilise või muu ohu tagajärjel. VAROITUS Tämä huolto-ohje on saatavilla vain englanniksi. (FI) • • • Jos asiakkaan huoltohenkilöstö vaatii muuta kuin englanninkielistä materiaalia, tarvittavan käännöksen hankkiminen on asiakkaan vastuulla. Älä yritä korjata laitteistoa ennen kuin olet varmasti lukenut ja ymmärtänyt tämän huoltoohjeen. Mikäli tätä varoitusta ei noudateta, seurauksena voi olla huoltohenkilöstön, laitteiston käyttäjän tai potilaan vahingoittuminen sähköiskun, mekaanisen vian tai muun vaaratilanteen vuoksi. ATTENTION Ce manuel d’installation et de maintenance est disponible uniquement en anglais. (FR) • • • Si le technicien d’un client a besoin de ce manuel dans une langue autre que l’anglais, il incombe au client de le faire traduire. Ne pas tenter d’intervenir sur les équipements tant que ce manuel d’installation et de maintenance n’a pas été consulté et compris. Le non-respect de cet avertissement peut entraîner chez le technicien, l’opérateur ou le patient des blessures dues à des dangers électriques, mécaniques ou autres. WARNUNG Diese Serviceanleitung existiert nur in englischer Sprache. (DE) • • • Falls ein fremder Kundendienst eine andere Sprache benötigt, ist es Aufgabe des Kunden für eine entsprechende Übersetzung zu sorgen. Versuchen Sie nicht diese Anlage zu warten, ohne diese Serviceanleitung gelesen und verstanden zu haben. Wird diese Warnung nicht beachtet, so kann es zu Verletzungen des Kundendiensttechnikers, des Bedieners oder des Patienten durch Stromschläge, mechanische oder sonstige Gefahren kommen. ΠΡΟΕΙ∆ΟΠΟΙΗΣΗ Το παρόν εγχειρίδιο σέρβις διατίθεται µόνο στα αγγλικά. (EL) • • Εάν ο τεχνικός σέρβις ενός πελάτη απαιτεί το παρόν εγχειρίδιο σε γλώσσα εκτός των αγγλικών, αποτελεί ευθύνη του πελάτη να παρέχει τις υπηρεσίες µετάφρασης. Μην επιχειρήσετε την εκτέλεση εργασιών σέρβις στον εξοπλισµό αν δεν έχετε συµβουλευτεί και κατανοήσει το παρόν εγχειρίδιο σέρβις. • Αν δεν προσέξετε την προειδοποίηση αυτή, ενδέχεται να προκληθεί τραυµατισµός στον τεχνικό σέρβις, στο χειριστή ή στον ασθενή από ηλεκτροπληξία, µηχανικούς ή άλλους κινδύνους. FIGYELMEZTETÉS Ezen karbantartási kézikönyv kizárólag angol nyelven érhető el. (HU) • • • Ha a vevő szolgáltatója angoltól eltérő nyelvre tart igényt, akkor a vevő felelőssége a fordítás elkészíttetése. Ne próbálja elkezdeni használni a berendezést, amíg a karbantartási kézikönyvben leírtakat nem értelmezték. Ezen figyelmeztetés figyelmen kívül hagyása a szolgáltató, működtető vagy a beteg áramütés, mechanikai vagy egyéb veszélyhelyzet miatti sérülését eredményezheti. AÐVÖRUN Þessi þjónustuhandbók er aðeins fáanleg á ensku. (IS) • • • Ef að þjónustuveitandi viðskiptamanns þarfnast annas tungumáls en ensku, er það skylda viðskiptamanns að skaffa tungumálaþjónustu. Reynið ekki að afgreiða tækið nema að þessi þjónustuhandbók hefur verið skoðuð og skilin. Brot á sinna þessari aðvörun getur leitt til meiðsla á þjónustuveitanda, stjórnanda eða sjúklings frá raflosti, vélrænu eða öðrum áhættum. AVVERTENZA Il presente manuale di manutenzione è disponibile soltanto in lingua inglese. (IT) • • • Se un addetto alla manutenzione richiede il manuale in una lingua diversa, il cliente è tenuto a provvedere direttamente alla traduzione. Procedere alla manutenzione dell’apparecchiatura solo dopo aver consultato il presente manuale ed averne compreso il contenuto. Il mancato rispetto della presente avvertenza potrebbe causare lesioni all’addetto alla manutenzione, all’operatore o ai pazienti provocate da scosse elettriche, urti meccanici o altri rischi. このサービスマニュアルには英語版しかありません。 (JA) • サービスを担当される業者が英語以外の言語を要求される場合、翻訳作業はその業者 • このサービスマニュアルを熟読し理解せずに、装置のサービスを行わないでください • の責任で行うものとさせていただªます。 この警告に従わない場合、サービスを担当される方、操作員あるいは患者 さんが、感電や機械的又はその他の危険により負傷する可能性があります。 경고 본 ¼비스 매뉴얼은 영어로만 이용하실 수 있습니다. (KO) • 고객의 ¼비스 제공자가 영어 이외의 언어를 요구할 경우, 번역 ¼비스를 제공하는 것은 고객의 책임입니다. • 본 ¼비스 매뉴얼을 참조하여 숙지하지 않은 이상 해당 장비를 수리하려고 시도하지 마십시오. • 본 경고 사항에 유의하지 않으면 전기 쇼크, 기계적 위험, 또는 기타 위험으로 인해 ¼비스 제공자, 사용자 또는 환자에게 부상을 입힐 수 있습니다. BRĪDINĀJUMS Šī apkopes rokasgrāmata ir pieejama tikai angļu valodā. (LV) • • • Ja klienta apkopes sniedzējam nepieciešama informācija citā valodā, klienta pienākums ir nodrošināt tulkojumu. Neveiciet aprīkojuma apkopi bez apkopes rokasgrāmatas izlasīšanas un saprašanas. Šī brīdinājuma neievērošanas rezultātā var rasties elektriskās strāvas trieciena, mehānisku vai citu faktoru izraisītu traumu risks apkopes sniedzējam, operatoram vai pacientam. ĮSPĖJIMAS Šis eksploatavimo vadovas yra tik anglų kalba. (LT) • • • Jei kliento paslaugų tiekėjas reikalauja vadovo kita kalba – ne anglų, suteikti vertimo paslaugas privalo klientas. Nemėginkite atlikti įrangos techninės priežiūros, jei neperskaitėte ar nesupratote šio eksploatavimo vadovo. Jei nepaisysite šio įspėjimo, galimi paslaugų tiekėjo, operatoriaus ar paciento sužalojimai dėl elektros šoko, mechaninių ar kitų pavojų. ADVARSEL Denne servicehåndboken finnes bare på engelsk. (NO) • • • Hvis kundens serviceleverandør har bruk for et annet språk, er det kundens ansvar å sørge for oversettelse. Ikke forsøk å reparere utstyret uten at denne servicehåndboken er lest og forstått. Manglende hensyn til denne advarselen kan føre til at serviceleverandøren, operatøren eller pasienten skades på grunn av elektrisk støt, mekaniske eller andre farer. OSTRZEŻENIE Niniejszy podręcznik serwisowy dostępny jest jedynie w języku angielskim. (PL) • • Jeśli serwisant klienta wymaga języka innego niż angielski, zapewnienie usługi tłumaczenia jest obowiązkiem klienta. Nie próbować serwisować urządzenia bez zapoznania się z niniejszym podręcznikiem • serwisowym i zrozumienia go. Niezastosowanie się do tego ostrzeżenia może doprowadzić do obrażeń serwisanta, operatora lub pacjenta w wyniku porażenia prądem elektrycznym, zagrożenia mechanicznego bądź innego. AVISO Este manual de assistência técnica encontra-se disponível unicamente em inglês. (PT-BR) • • • Se outro serviço de assistência técnica solicitar a tradução deste manual, caberá ao cliente fornecer os serviços de tradução. Não tente reparar o equipamento sem ter consultado e compreendido este manual de assistência técnica. A não observância deste aviso pode ocasionar ferimentos no técnico, operador ou paciente decorrentes de choques elétricos, mecânicos ou outros. ATENÇÃO Este manual de assistência técnica só se encontra disponível em inglês. (PT-PT) • • • Se qualquer outro serviço de assistência técnica solicitar este manual noutro idioma, é da responsabilidade do cliente fornecer os serviços de tradução. Não tente reparar o equipamento sem ter consultado e compreendido este manual de assistência técnica. O não cumprimento deste aviso pode colocar em perigo a segurança do técnico, do operador ou do paciente devido a choques eléctricos, mecânicos ou outros. ATENŢIE Acest manual de service este disponibil doar în limba engleză. (RO) • • • Dacă un furnizor de servicii pentru clienţi necesită o altă limbă decât cea engleză, este de datoria clientului să furnizeze o traducere. Nu încercaţi să reparaţi echipamentul decât ulterior consultării şi înţelegerii acestui manual de service. Ignorarea acestui avertisment ar putea duce la rănirea depanatorului, operatorului sau pacientului în urma pericolelor de electrocutare, mecanice sau de altă natură. ОСТОРОЖНО! (RU) Данное руководство по техническому обслуживанию представлено только на английском языке. • • • Если сервисному персоналу клиента необходимо руководство не на английском, а на каком-то другом языке, клиенту следует самостоятельно обеспечить перевод. Перед техническим обслуживанием оборудования обязательно обратитесь к данному руководству и поймите изложенные в нем сведения. Несоблюдение требований данного предупреждения может привести к тому, что специалист по техобслуживанию, оператор или пациент получит удар электрическим током, механическую травму или другое повреждение. UPOZORENJE Ovo servisno uputstvo je dostupno samo na engleskom jeziku. (SR) • • • Ako klijentov serviser zahteva neki drugi jezik, klijent je dužan da obezbedi prevodilačke usluge. Ne pokušavajte da opravite uređaj ako niste pročitali i razumeli ovo servisno uputstvo. Zanemarivanje ovog upozorenja može dovesti do povređivanja servisera, rukovaoca ili pacijenta usled strujnog udara ili mehaničkih i drugih opasnosti. UPOZORNENIE Tento návod na obsluhu je k dispozícii len v angličtine. (SK) • • • Ak zákazníkov poskytovateľ služieb vyžaduje iný jazyk ako angličtinu, poskytnutie prekladateľských služieb je zodpovednosťou zákazníka. Nepokúšajte sa o obsluhu zariadenia, kým si neprečítate návod na obluhu a neporozumiete mu. Zanedbanie tohto upozornenia môže spôsobiť zranenie poskytovateľa služieb, obsluhujúcej osoby alebo pacienta elektrickým prúdom, mechanické alebo iné ohrozenie. ATENCION Este manual de servicio sólo existe en inglés. (ES) • • • Si el encargado de mantenimiento de un cliente necesita un idioma que no sea el inglés, el cliente deberá encargarse de la traducción del manual. No se deberá dar servicio técnico al equipo, sin haber consultado y comprendido este manual de servicio. La no observancia del presente aviso puede dar lugar a que el proveedor de servicios, el operador o el paciente sufran lesiones provocadas por causas eléctricas, mecánicas o de otra naturaleza. VARNING Den här servicehandboken finns bara tillgänglig på engelska. (SV) • • • Om en kunds servicetekniker har behov av ett annat språk än engelska, ansvarar kunden för att tillhandahålla översättningstjänster. Försök inte utföra service på utrustningen om du inte har läst och förstår den här servicehandboken. Om du inte tar hänsyn till den här varningen kan det resultera i skador på serviceteknikern, operatören eller patienten till följd av elektriska stötar, mekaniska faror eller andra faror. OPOZORILO Ta servisni priročnik je na voljo samo v angleškem jeziku.· (SL) • • • Če ponudnik storitve stranke potrebuje priročnik v drugem jeziku, mora stranka zagotoviti prevod.· Ne poskušajte servisirati opreme, če tega priročnika niste v celoti prebrali in razumeli.· Če tega opozorila ne upoštevate, se lahko zaradi električnega udara, mehanskih ali drugih nevarnosti poškoduje ponudnik storitev, operater ali bolnik. DİKKAT Bu servis kılavuzunun sadece ingilizcesi mevcuttur. (TR) • • • Eğer müşteri teknisyeni bu kılavuzu ingilizce dışında bir başka lisandan talep ederse, bunu tercüme ettirmek müşteriye düşer. Servis kılavuzunu okuyup anlamadan ekipmanlara müdahale etmeyiniz. Bu uyarıya uyulmaması, elektrik, mekanik veya diğer tehlikelerden dolayı teknisyen, operatör veya hastanın yaralanmasına yol açabilir. Contents 1 Safety . . . . . . . . . . . . . . . . . . . . . . . . . . . . . . . . . . . . . . . . . 1-1 General Information . . . . . . . . . . . . . . . . . . . . . . . . . . . . . . . . . . . . . . . . . . . . . . . . . . 1-2 Definitions of Terminology . . . . . . . . . . . . . . . . . . . . . . . . . . . . . . . . . . . . . . . . . . . . 1-3 Monitor Contraindications, Warnings, and Precautions . . . . . . . . . . . . . . . . . . . . 1-4 Equipment Symbols . . . . . . . . . . . . . . . . . . . . . . . . . . . . . . . . . . . . . . . . . . . . . . . . . 1-9 2 Introduction . . . . . . . . . . . . . . . . . . . . . . . . . . . . . . . . . . . . 2-1 Indications for Use . . . . . . . . . . . . . . . . . . . . . . . . . . . . . . . . . . . . . . . . . . . . . . . . . . . 2-2 Monitoring Methods . . . . . . . . . . . . . . . . . . . . . . . . . . . . . . . . . . . . . . . . . . . . . . . . . . 2-3 Features . . . . . . . . . . . . . . . . . . . . . . . . . . . . . . . . . . . . . . . . . . . . . . . . . . . . . . . . . . . 2-4 About Your Monitor . . . . . . . . . . . . . . . . . . . . . . . . . . . . . . . . . . . . . . . . . . . . . . . . . . 2-5 3 Controls, Indicators, and Connectors . . . . . . . . . . . . . . . 3-1 Front Panel Controls . . . . . . . . . . . . . . . . . . . . . . . . . . . . . . . . . . . . . . . . . . . . . . . . . 3-2 Front Panel Displays and Indicators . . . . . . . . . . . . . . . . . . . . . . . . . . . . . . . . . . . . 3-6 Front Panel Connectors . . . . . . . . . . . . . . . . . . . . . . . . . . . . . . . . . . . . . . . . . . . . . . 3-8 Strip Chart Recorder . . . . . . . . . . . . . . . . . . . . . . . . . . . . . . . . . . . . . . . . . . . . . . . . 3-12 Rear Panel Connectors . . . . . . . . . . . . . . . . . . . . . . . . . . . . . . . . . . . . . . . . . . . . . . 3-14 4 Setup Procedures . . . . . . . . . . . . . . . . . . . . . . . . . . . . . . . 4-1 Loading Strip Chart Paper . . . . . . . . . . . . . . . . . . . . . . . . . . . . . . . . . . . . . . . . . . . . 4-2 Turning the Monitor On . . . . . . . . . . . . . . . . . . . . . . . . . . . . . . . . . . . . . . . . . . . . . . . 4-7 Revision D Corometrics 170 Series 2000947-004 5 Monitor Self-Test Routines . . . . . . . . . . . . . . . . . . . . . . . . . . . . . . . . . . . . . . . . . . . . 4-8 Customizing the Monitor . . . . . . . . . . . . . . . . . . . . . . . . . . . . . . . . . . . . . . . . . . . . . 4-10 Quick Reference Card . . . . . . . . . . . . . . . . . . . . . . . . . . . . . . . . . . . . . . . . . . . . . . . 4-18 Flasher Software Utility Upgrade . . . . . . . . . . . . . . . . . . . . . . . . . . . . . . . . . . . . . . 4-20 5 Theory of Operation . . . . . . . . . . . . . . . . . . . . . . . . . . . . . 5-1 Functional Overview . . . . . . . . . . . . . . . . . . . . . . . . . . . . . . . . . . . . . . . . . . . . . . . . . 5-2 Main Board Theory of Operation . . . . . . . . . . . . . . . . . . . . . . . . . . . . . . . . . . . . . . 5-17 FECG/IUP Board Theory of Operation . . . . . . . . . . . . . . . . . . . . . . . . . . . . . . . . . . 5-36 6 Functional Checkout Procedure . . . . . . . . . . . . . . . . . . . 6-1 Equipment Required . . . . . . . . . . . . . . . . . . . . . . . . . . . . . . . . . . . . . . . . . . . . . . . . . 6-2 General . . . . . . . . . . . . . . . . . . . . . . . . . . . . . . . . . . . . . . . . . . . . . . . . . . . . . . . . . . . . 6-3 Monitor Self-Test . . . . . . . . . . . . . . . . . . . . . . . . . . . . . . . . . . . . . . . . . . . . . . . . . . . . 6-4 Front Panel Pushbutton Test . . . . . . . . . . . . . . . . . . . . . . . . . . . . . . . . . . . . . . . . . . 6-5 Connecting the Simulator . . . . . . . . . . . . . . . . . . . . . . . . . . . . . . . . . . . . . . . . . . . . . 6-6 FECG Test . . . . . . . . . . . . . . . . . . . . . . . . . . . . . . . . . . . . . . . . . . . . . . . . . . . . . . . . . 6-7 Legplate Inspection . . . . . . . . . . . . . . . . . . . . . . . . . . . . . . . . . . . . . . . . . . . . . . . . . 6-12 Ultrasound Test . . . . . . . . . . . . . . . . . . . . . . . . . . . . . . . . . . . . . . . . . . . . . . . . . . . . 6-13 Fetal Movement Detection Test . . . . . . . . . . . . . . . . . . . . . . . . . . . . . . . . . . . . . . . 6-16 Ultrasound Transducer Test . . . . . . . . . . . . . . . . . . . . . . . . . . . . . . . . . . . . . . . . . . 6-18 Uterine Activity Test . . . . . . . . . . . . . . . . . . . . . . . . . . . . . . . . . . . . . . . . . . . . . . . . 6-19 Tocotransducer Test . . . . . . . . . . . . . . . . . . . . . . . . . . . . . . . . . . . . . . . . . . . . . . . . 6-21 Strain Gauge Transducer Test . . . . . . . . . . . . . . . . . . . . . . . . . . . . . . . . . . . . . . . . 6-22 Pattern Memory Test . . . . . . . . . . . . . . . . . . . . . . . . . . . . . . . . . . . . . . . . . . . . . . . . 6-23 Dual Heart Rate Test (Non-Pattern) . . . . . . . . . . . . . . . . . . . . . . . . . . . . . . . . . . . . 6-24 6 Corometrics 170 Series 2000947-004 Revision D Alarm Test . . . . . . . . . . . . . . . . . . . . . . . . . . . . . . . . . . . . . . . . . . . . . . . . . . . . . . . . 6-28 7 Serviceable Assemblies . . . . . . . . . . . . . . . . . . . . . . . . . . 7-1 General Anti-Static Handling Precautions . . . . . . . . . . . . . . . . . . . . . . . . . . . . . . . . 7-2 Transducer Plug Replacement Kits . . . . . . . . . . . . . . . . . . . . . . . . . . . . . . . . . . . . . 7-3 Nautilus Transducer Cable Replacement . . . . . . . . . . . . . . . . . . . . . . . . . . . . . . . 7-15 Removing the Monitor Top Cover . . . . . . . . . . . . . . . . . . . . . . . . . . . . . . . . . . . . . 7-19 Tocotransducer Calibration . . . . . . . . . . . . . . . . . . . . . . . . . . . . . . . . . . . . . . . . . . 7-20 Nautilus Ultrasound Transducer Top Cover Replacement . . . . . . . . . . . . . . . . . 7-30 Nautilus Transducer Reassembly . . . . . . . . . . . . . . . . . . . . . . . . . . . . . . . . . . . . . 7-32 Testing a Repaired Transducer (TOCO or US) . . . . . . . . . . . . . . . . . . . . . . . . . . . 7-34 Replacing the Main Board . . . . . . . . . . . . . . . . . . . . . . . . . . . . . . . . . . . . . . . . . . . . 7-35 Replacing the FECG/IUP Board . . . . . . . . . . . . . . . . . . . . . . . . . . . . . . . . . . . . . . . 7-36 Replacing the Membrane Switch Panel . . . . . . . . . . . . . . . . . . . . . . . . . . . . . . . . . 7-37 Replacing a Front Panel Connector . . . . . . . . . . . . . . . . . . . . . . . . . . . . . . . . . . . . 7-40 Servicing the Recorder . . . . . . . . . . . . . . . . . . . . . . . . . . . . . . . . . . . . . . . . . . . . . . 7-41 Boot ROM Error Codes . . . . . . . . . . . . . . . . . . . . . . . . . . . . . . . . . . . . . . . . . . . . . . 7-49 8 Peripheral Devices . . . . . . . . . . . . . . . . . . . . . . . . . . . . . . 8-1 Remote Marks Connectors . . . . . . . . . . . . . . . . . . . . . . . . . . . . . . . . . . . . . . . . . . . . 8-2 Telemetry Connector . . . . . . . . . . . . . . . . . . . . . . . . . . . . . . . . . . . . . . . . . . . . . . . . 8-3 RS-232 Connectors . . . . . . . . . . . . . . . . . . . . . . . . . . . . . . . . . . . . . . . . . . . . . . . . . . 8-4 9 Maintenance . . . . . . . . . . . . . . . . . . . . . . . . . . . . . . . . . . . 9-1 Cleaning . . . . . . . . . . . . . . . . . . . . . . . . . . . . . . . . . . . . . . . . . . . . . . . . . . . . . . . . . . . 9-2 Preventative Maintenance Inspection . . . . . . . . . . . . . . . . . . . . . . . . . . . . . . . . . . . 9-5 Revision D Corometrics 170 Series 2000947-004 7 10 Specifications . . . . . . . . . . . . . . . . . . . . . . . . . . . . . . . . . 10-1 General Monitor . . . . . . . . . . . . . . . . . . . . . . . . . . . . . . . . . . . . . . . . . . . . . . . . . . . . 10-2 Operating Modes . . . . . . . . . . . . . . . . . . . . . . . . . . . . . . . . . . . . . . . . . . . . . . . . . . . 10-3 Strip Chart Recorder . . . . . . . . . . . . . . . . . . . . . . . . . . . . . . . . . . . . . . . . . . . . . . . . 10-4 11 Parts Lists . . . . . . . . . . . . . . . . . . . . . . . . . . . . . . . . . . . . 11-1 2000268-188, Model 171 Final Assembly . . . . . . . . . . . . . . . . . . . . . . . . . . . . . . . . 11-2 2000268-189, Model 172 Final Assembly . . . . . . . . . . . . . . . . . . . . . . . . . . . . . . . . 11-5 2001972-037, Model 173 Final Assembly . . . . . . . . . . . . . . . . . . . . . . . . . . . . . . . . 11-8 2001972-038, Model 174 Final Assembly . . . . . . . . . . . . . . . . . . . . . . . . . . . . . . . . 11-11 2264AAX, Button-Style Nautilus Tocotranducer Assembly Parts List . . . . . . . 11-14 5700GAX, Button-Style Nautilus Ultrasound Transducer Assembly Parts List 11-15 5700KAX, Loop-Style Nautilus Ultrasound Transducer Assembly Parts List . 11-16 2264DAX, Loop-Style Nautilus Tocotransducer Assembly Parts List (5-ft cord) 11-17 1509AAO/BAO, Qwik Connect Plus Legplate Assembly Parts List . . . . . . . . . 11-18 Block Diagrams. . . . . . . . . . . . . . . . . . . . . . . . . . . . . . . . . . . . . . . . . . . . . . . . . . . . . 11-19 Addendum to use PS320 Simulator..................................................12-1 8 Corometrics 170 Series 2000947-004 Revision D Chapter 1 ! 1 Safety The information presented in this section is important for the safety of both the patient and operator and also serves to enhance equipment reliability. This chapter describes how the terms Danger, Warning, Caution, Important, and Note are used throughout the manual. In addition, standard equipment symbols are defined. This section includes the following important information: General Information . . . . . . . . . . . . . . . . . . . . . . . . . . . . . . . . . . . . . . Definitions of Terminology . . . . . . . . . . . . . . . . . . . . . . . . . . . . . . . . Monitor Contraindications, Warnings, and Precautions . . . . . . . . . . Equipment Symbols . . . . . . . . . . . . . . . . . . . . . . . . . . . . . . . . . . . . . . Revision D 170 Series Monitor 2000947-004 1-2 1-3 1-4 1-9 1-1 Safety: Revision History Revision History Each page of this manual has a revision letter located at the bottom of the page. This letter identifies the revision level of the entire manual. This may be important if you have different manuals and you do not know which is the most current. For the initial release, all pages have the revision letter A. For the second update, all pages receive the revision letter B. The latest letter of the alphabet added to the table below corresponds to the most current revision. Revision A B Date 22 July 2002 26 Mar 2004 Comment 1) 2) 3) C D 14 Nov 2007 10 Feb 2012 1) 2) 3) 4) 5) 6) 1-2 Initial Release Updated GE Asia and Europe addresses and phone numbers on back cover and deleted GE addresses and Revision letter and date on the Title Guarantee page. On page 4-15, changed code #21 (HBC) from "0=off, 1=off" to "0=off, 1=on" On page 7-49, added Boot ROM error codes Addition of TYPE CF equipment symbol Addition of addendum for use of PS320 Simulator Updated Electrical Safety Test section for Patient Leakage tests with reference to IEC 60601-2-49 standard. Updated procedure to test Ultrasound and TOCO Transducer. Corrected the Symbol for FAST. Added Service Manual Disclaimer Functional Checkout Procedure: Connecting the simulator Section: Added note to”Refer addendum for using PS320 Simulator”. 170 Series Monitor 2000947-004 Revision D Safety: General Information General Information General Use If the monitor is cold to the touch or below ambient temperature, allow it to stabilize before use. To ensure patient safety, use only parts and accessories manufactured or recommended by GE Medical Systems Information Technologies. Parts and accessories used shall meet the requirements of EN60601.1.1. Disposable devices are intended for single use only. They should not be reused. Periodically, and whenever the integrity of the monitor is in doubt, test all functions. Refer to the “Maternal/Fetal Monitoring Operator’s Manual” for information concerning the limitations of internal and external fetal heart rate monitoring techniques. Responsibility of the Manufacturer GE is responsible for the effects on safety, reliability, and performance if: assembly operations, extensions, readjustments, modifications, or repairs are carried out by persons authorized by GE; the electrical installation of the relevant room complies with the requirements of appropriate regulations; and the monitor is used in accordance with the instructions of use. Responsibility of the User This device is intended for use by clinical professionals who are expected to know the medical procedures, practices, and terminology required to monitor obstetrical patients. This manual documents all possible parameters available in the 170 Series of monitors. It is the responsibility of each hospital to ensure that the Labor and Delivery staff is trained in all aspects of the selected model. The 170 Series Monitor is designed to assist the perinatal staff by providing information regarding the clinical status of the fetus during labor. The monitor does not replace observation and evaluation of the mother and fetus at regular intervals, by a qualified care provider, who will make diagnoses and decide on treatments or interventions. Visual assessment of the monitor display and strip chart must be combined with knowledge of patient history and risk factors to properly care for the mother and fetus. Revision D 170 Series Monitor 2000947-004 1-3 Safety: Definitions of Terminology Definitions of Terminology Six types of special notices are used throughout this manual. They are: Danger, Warning, Caution, Contraindication, Important, and Note. The warnings and cautions in this Safety section relate to the equipment in general and apply to all aspects of the monitor. Be sure to read the other chapters because there are additional warnings and cautions which relate to specific features of the monitor. When grouped, warnings and cautions are listed alphabetically and do not imply any order of importance. Table 1-1. Definitions of Terminology 1-4 Danger A DANGER notice indicates an imminently hazardous situation which, if not avoided, will result in death or serious injury. Warning A WARNING indicates a potentially hazardous situation which, if not avoided, could result in death or serious injury. Caution A CAUTION indicates a potentially hazardous situation which, if not avoided, may result in minor or moderate injury. Cautions are also used to avoid damage to equipment. Contraindication A CONTRAINDICATION describes any special symptom or circumstance that renders the use of a remedy or the carrying out of a procedure inadvisable, usually because of a risk. Important An IMPORTANT notice indicates an emphasized note. It is something you should be particularly aware of; something not readily apparent. Note A NOTE indicates a particular point of information; something on which to focus your attention. 170 Series Monitor 2000947-004 Revision D Safety: Monitor Contraindications, Warnings, and Precautions Monitor Contraindications, Warnings, and Precautions Warnings WARNINGS ACCIDENTAL SPILLS—In the event that fluids are accidentally spilled on the monitor, take the monitor out of operation and inspect for damage. APPLICATION—This monitor is not designed for direct cardiac connection. CONDUCTIVE CONNECTIONS—Avoid making any conductive connections to applied parts (patient connection) which are likely to degrade safety. CONDUCTIVE PARTS—Ensure that the conductive parts of the lead electrodes and associated connectors do not contact other conductive parts including earth. DEFIBRILLATION—During defibrillation, all personnel must avoid contact with the patient and monitor to avoid a dangerous shock hazard. In addition, proper placement of the paddles in relation to the electrodes is required to minimize harm to the patient. ELECTRICAL SHOCK—To reduce the risk of electrical shock, do not remove monitor cover. Refer servicing to qualified personnel. ELECTROMAGNETIC INTERFERENCE—Be aware that strong electromagnetic fields may interfere with monitor operation. Interference prevents the clear reception of signals by the monitor. If the hospital is close to a strong transmitter such as TV, AM or FM radio, police or fire stations, a HAM radio operator, an airport, or cellular phone, their signals could be picked up as signals by the monitor. If you feel interference is affecting the monitor, contact your Service Representative to check the monitor in your environment. Refer to page 1-8 for additional information. Revision D 170 Series Monitor 2000947-004 1-5 Safety: Monitor Contraindications, Warnings, and Precautions WARNINGS ELECTROSURGERY—The monitor is not designed for use with high-frequency surgical devices. In addition, measurements may be affected in the presence of strong electromagnetic sources such as electrosurgery equipment. EXPLOSION HAZARD—Do not use this equipment in the presence of flammable anesthetics or inside an oxygen tent. GROUNDING—Do not defeat the three-wire grounding feature of the power cord by means of adaptors, plug modifications, or other methods. A dangerous shock hazard to both patient and operator may result. INSTRUCTIONS—For continued and safe use of this equipment, it is necessary to follow all listed instructions. However, the instructions provided in this manual in no way supersede established medical procedures concerning patient care. The monitor does not replace observation and evaluation of the patient, at regular intervals, by a qualified care provider who will make diagnoses and decide on treatments and interventions. INTERFACING OTHER EQUIPMENT—Monitoring equipment must be interfaced with other types of medical equipment by qualified biomedical engineering personnel. Be certain to consult manufacturers’ specifications to maintain safe operation. LEAKAGE CURRENT TEST—The interconnection of auxiliary equipment with this device may increase the total leakage current. When interfacing with other equipment, a test for leakage current must be performed by qualified biomedical engineering personnel before using with patients. Serious injury or death could result if the leakage current exceeds applicable standards. The use of accessory equipment not complying with the equivalent safety requirements of this equipment may lead to a reduced level of safety of the resulting system. Consideration relating to the choice shall include: use of the accessory in the patient vicinity; and evidence that the safety certification of the accessory has been performed in accordance with the appropriate EN60601.1 and/or EN60601.1.1 harmonized national standard. 1-6 170 Series Monitor 2000947-004 Revision D Safety: Monitor Contraindications, Warnings, and Precautions WARNINGS LINE ISOLATION MONITOR TRANSIENTS—Line isolation monitor transients may resemble actual cardiac waveforms, and thus cause incorrect heart rate determinations and alarm activation (or inhibition). STRANGULATION—Make sure all patient cables, leadwires, and tubing are positioned away from the patient’s head to minimize the risk of accidental strangulation. WATER BIRTHS—Do not use the monitor to directly monitor patients during water births, in whirlpool or submersion water baths, during showers, or in any other situation where the mother is immersed in water. Doing so may result in electrical shock hazard. Revision D 170 Series Monitor 2000947-004 1-7 Safety: Monitor Contraindications, Warnings, and Precautions Cautions CAUTIONS ANNUAL SERVICING—For continued safety and performance of the monitor, it is recommended that the calibration, accuracy, and electrical safety of the monitor be verified on an annual basis by an GE Service Representative. DAILY TESTING—It is essential that the monitor and accessories be inspected every day. It is recommended practice to initiate the monitor’s self-test feature at the beginning of each monitoring session; follow the instructions in “Chapter 4, Setup Procedures”. ENVIRONMENT—The performance of the monitor has not been tested in certain areas, such as x-ray and imaging suites. The monitor is not recommended for use in these environments. PERFORMANCE—Report all problems experienced with the monitor. If the monitor is not working properly, contact your Service Representative for service. The monitor should not be used if it is not working properly. PINCHING—Keep fingers clear of the paper roller because the roller could pinch your fingers. TRAPPING—Keep hands, hair, jewelry, and loose clothing away from the paper roller because the roller could trap these items. TRIPPING—Arrange monitoring equipment so that cords and cables do not present a tripping hazard. 1-8 170 Series Monitor 2000947-004 Revision D Safety: Monitor Contraindications, Warnings, and Precautions Electromagnetic Interference This device has been tested and found to comply with the limits for medical devices to the IEC 601-1-2:1993, EN60601-1-2:1994, Medical Device Directive 93/42/EEC. These limits are designed to provide reasonable protection against harmful interference in a typical medical installation. However, because of the proliferation of radio-frequency transmitting equipment and other sources of electrical noise in the health-care and home environments (for example, cellular phones, mobile two-way radios, electrical appliances), it is possible that high levels of such interference due to close proximity or strength of a source, may result in disruption of performance of this device. This equipment generates, uses, and can radiate radio frequency energy and, if not installed and used in accordance with these instructions, may cause harmful interference with other devices in the vicinity. Disruption or interference may be evidenced by erratic readings, cessation of operation, or incorrect functioning. If this occurs, the site of use should be surveyed to determine the source of this disruption, and actions taken to eliminate the source. The user is encouraged to try to correct the interference by one or more of the following measures: Revision D Turn equipment in the vicinity off and on to isolate the offending equipment. Reorient or relocate the other receiving device. Increase the separation between the interfering equipment and this equipment. If assistance is required, contact your GE Service Representative. 170 Series Monitor 2000947-004 1-9 Safety: Equipment Symbols Equipment Symbols The following is a list of symbols used on products manufactured by GE. Some symbols may not appear on your unit. Table 1-2. Equipment Symbols ! ATTENTION: Consult accompanying documents. TYPE B EQUIPMENT. Type B equipment is suitable for intentional external and internal application to the patient, excluding direct cardiac application. TYPE BF EQUIPMENT. Type BF equipment is suitable for intentional external and internal application to the patient, excluding direct cardiac application. Type BF equipment has an F-type applied part. TYPE CF EQUIPMENT. Type CF equipment is suitable for intentional external and internal application to the patient, including direct cardiac application. Type CF equipment has an F-type applied part. ALTERNATING CURRENT (AC). EQUIPOTENTIALITY. ON/STANDBY: button toggles between full power and standby. CAUTION AC MAINS—The On/Standby switch does not disconnect the monitor from AC mains power. To completely remove power, you must disconnect the power cord from the AC wall outlet. 1-11 170 Series Monitor 2000947-004 Revision D Chapter 2 2 Introduction This section lists the indications for use for monitors in the 170 Series as well as provides an explanation of the different patient monitoring modalities. This section summarizes the clinical applications of monitors in the 170 Series: Indications for Use . . . . . . . . . . . . . . . . . . . . . . . . . . . . . . . . . . . . . . . Monitoring Methods. . . . . . . . . . . . . . . . . . . . . . . . . . . . . . . . . . . . . . Features . . . . . . . . . . . . . . . . . . . . . . . . . . . . . . . . . . . . . . . . . . . . . . . About Your Monitor. . . . . . . . . . . . . . . . . . . . . . . . . . . . . . . . . . . . . . Revision D 170 Series Monitor 2000947-004 2-2 2-3 2-4 2-5 2-1 Introduction: Indications for Use Indications for Use Models 171 and 172 Models 171 and 172 Fetal Monitors are indicated for use in the monitoring of the fetus during the antepartum period as well as throughout labor and delivery. Each monitor also has an optional monitoring mode to detect fetal body movements. Models 173 and 174 Models 173 and 174 Fetal Monitors are indicated for use in the monitoring of the fetus throughout labor and delivery. Each monitor also has an optional monitoring mode to detect fetal body movements. 2-2 170 Series Monitor 2000947-004 Revision D Introduction: Monitoring Methods Monitoring Methods The following is a summary of all the clinical monitoring methods found in the 170 Series. Fetal Heart Rate External Method, Pulsed Doppler Ultrasound Ultrasound monitoring is available on all 170 Series Monitors. Models 171 and 173 provide a single ultrasound channel, while Models 172 and 174 provide two ultrasound channels. Fetal heart rate can be measured externally using pulsed Doppler Ultrasound. A transducer placed on the mother’s abdomen is used to direct an ultrasonic beam toward the fetal heart and to sense Doppler shifted echoes created by moving cardiac structures. A patented autocorrelation process is used to determine the timing of successive cardiac cycles. The resulting fetal heart rate (FHR) pattern is recorded on the strip chart paper and the FHR appears on the digital display. Internal Method, Direct Fetal Electrocardiogram (FECG) FECG is available on Models 173 and 174 only. The Model 173 provides a dedicated FECG connector. The Model 174 provides a combi-connector which can be used for either FECG or US. FECG signals are obtained via a spiral electrode attached to the fetal presenting part. FHR is computed on a beat-to-beat basis using the R-to-R time interval of the QRS complexes. The instantaneous FHR pattern is printed on the strip chart paper and the FHR appears on the digital display. Maternal Uterine Activity External Method, Tocotransducer (TOCO) Maternal uterine activity is measured externally using a tocotransducer (toco). Relative pressure within the uterus is measured using a tocotransducer attached to the mother’s abdomen in the area of the uterine fundus. The readings are plotted on the strip chart paper in a relative scale from 0 to 100 as well as shown on the digital display. All 170 Series Monitors provide external uterine activity monitoring. Internal Method, Intrauterine Pressure Catheter and Strain Gauge (IUP) IUP is available on Models 173 and 174 only. Intrauterine pressure is measured using a transcervical catheter. The pressure trend is plotted over the range of 0 to 100 mmHg and the readings appear on the digital display. Revision D 170 Series Monitor 2000947-004 2-3 Introduction: Features Features The 170 Series is a family of fetal monitors offering various combinations of modalities to suit your institution’s needs. Each monitor boasts the following qualities: 2-4 The strip chart recorder is a quiet, easy-to-load, high resolution thermal array printer. The recorder prints continuous trends and alphanumeric data on one strip chart. Automatic mode selection is provided simply by inserting the appropriate transducer plug into the front panel receptacle. Wide beam ultrasound transducer provides an advanced level of system performance. Transducer connectors are easy-to-use, color-coded, and durable. Frequently-used functions are controlled by front panel buttons—including audio volume, uterine activity reference, alarm silence, event mark, paper advance, and user setup controls. The ultrasound mode provides clean accurate traces with few “dropouts” because of a patented autocorrelation processing. Fetal heart rate alarm limits are user-defined, with pre-set defaults. Alarm silencing is controlled by a front panel pushbutton—colored for easy recognition. Fetal heart rate alarm conditions have both audible and visual indications. The audible indicator can be silenced on an alarm-by-alarm basis. Two RS-232C ports provide interfacing to external devices. 170 Series Monitor 2000947-004 Revision D Introduction: About Your Monitor About Your Monitor This manual describes all monitors in the 170 Series; therefore some sections may not apply to your model monitor. Refer to Table 2-1. Model 171 The Model 171 Antepartum Fetal Monitor provides singleton ultrasound and external uterine activity monitoring. Model 172 The Model 172 Antepartum Fetal Monitor provides dual ultrasound and external uterine activity monitoring. Model 173 The Model 173 Intrapartum Monitor provides dual heart rate monitoring using FECG and ultrasound. The monitor also provides external uterine activity monitoring using a tocotransducer or internal monitoring using an intrauterine pressure catheter (IUPC). Model 174 The Model 174 Intrapartum Monitor provides dual heart rate monitoring using FECG/ultrasound or dual ultrasound. The monitor also provides external uterine activity monitoring using a tocotransducer or internal monitoring using an IUPC. Table 2-1. Summary of Features Feature External uterine activity (TOCO) 171 172 173 174 9 9 9 9 9 9 9 9 Internal uterine activity (IUPC) Ultrasounda 9 Dual ultrasound 9 9 FECGa 9 9 9 Fetal heart rate alarms 9 9 9 9 Fetal movement detection (optional) 9 9 9 9 Heartbeat coincidence 9 9 9 Fetal heart rate offset 9 9 9 a Revision D The Model 174 has a combi-connector for the primary FHR that can be used for either US or FECG. 170 Series Monitor 2000947-004 2-5 For your notes 2-6 170 Series Monitor 2000947-004 Revision D Chapter 3 Controls, Indicators, and 3 Connectors This section describes all possible controls, indicators, and connectors in the 170 Series. This section contains the following information: Front Panel Controls. . . . . . . . . . . . . . . . . . . . . . . . . . . . . . . . . . . . . . 3-2 Front Panel Displays and Indicators. . . . . . . . . . . . . . . . . . . . . . . . . . 3-6 Front Panel Connectors . . . . . . . . . . . . . . . . . . . . . . . . . . . . . . . . . . . 3-8 Strip Chart Recorder. . . . . . . . . . . . . . . . . . . . . . . . . . . . . . . . . . . . . 3-12 Rear Panel Connectors . . . . . . . . . . . . . . . . . . . . . . . . . . . . . . . . . . . 3-14 Revision D 170 Series Monitor 2000947-004 3-1 Controls, Indicators, and Connectors: Front Panel Controls Front Panel Controls Figure 3-1. Front Panel Controls (Model 172 shown) Table 3-1. Front Panel Controls Symbol Name Power Record Paper Advance Mark/Offset Setup Volume 3-2 170 Series Monitor 2000947-004 Revision D Controls, Indicators, and Connectors: Front Panel Controls Table 3-1. Front Panel Controls UA Reference Alarm Silence Power Button and Indicator Pressing the blue Power button turns the monitor on and illuminates the green indicator to the left of the button. Pressing the button again puts the monitor in standby and extinguishes the indicator. Record Button and Indicator Pressing the Record pushbutton activates the recorder, provided paper is installed; the amber indicator illuminates to the left of the button. Pressing the button again turns the recorder off and extinguishes the indicator. Paper Advance Button Pressing the Paper Advance button causes the recorder to advance chart paper at a rate of 40 cm/min for as long as the button is pressed. If the recorder is on, twenty seconds after the button is released, the recorder prints the time, date, active trends legends, and chart speed. Mark/Offset Button The Mark/Offset button is a multifunction button: Mark Briefly pressing the button prints an event mark heart rate grid. on the bottom two lines of the Offset (Models 172, 173, and 174 Only) When the heart rate offset mode is enabled, pressing and holding the Mark/Offset button for at least two seconds shifts the secondary FHR trend +20 BPM for visibility purposes. You will hear a “beep” for confirmation. Refer to the “170 Series Operator’s Manual” for more information. Revision D 170 Series Monitor 2000947-004 3-3 Controls, Indicators, and Connectors: Front Panel Controls Setup Button Pressing and holding this button while the monitor is on enters a user setup mode for configuring the monitor. Pressing and holding this button during power up enters a service setup mode. Refer to “Chapter 4, Setup Procedures” for instructions. Volume Buttons The Volume buttons are used to raise ( ) and lower ( ) the volume of the audio signals emitted by the speaker. The volume buttons are also used during setup. Model 171 This monitor has two volume buttons used to control the ultrasound audio. Models 172, 173, and 174 These monitors have four volume buttons. The left pair controls the audio signals for the mode shown in the primary FHR display; likewise, the right pair of buttons controls the audio for the mode shown in the secondary FHR display. Setup Mode When the monitor is in setup mode (user or service), the volume buttons change: the setting or value shown in the FHR display; or the monitor feature code shown in the UA display. (For Models 172, 173, and 174, only the leftmost volume controls are active during setup mode.) 3-4 170 Series Monitor 2000947-004 Revision D Controls, Indicators, and Connectors: Front Panel Controls UA Reference Button The UA Reference button is used to set the uterine activity pressure reference. This button is also used during setup. Setting a Baseline for External Monitoring (Tocotransducer) Briefly pressing the UA Reference button sets the pressure baseline at a preset default. The monitor is shipped from the factory with a default setting of 10 relative units. Qualified service personnel can access a service screen to set the default to 5, 10, 15, 20, or 25 relative units. Pressing this button for more than two seconds causes the uterine activity reference value to override the default setting and cycle through all available selections: 5, 10, 15, 20, or 25 relative units, starting at the default setting—until the button is released. While the button is held down, the strip chart tracing remains unchanged. Once the button is released, the recorder trace takes on this new value. This value is stored as the new baseline for the currently measured uterine activity signal. Setting a Baseline for Internal Monitoring (IUPC) Pressing the UA Reference button sets the pressure baseline at 0 mmHg. NOTE: IUPC monitoring is only available on Models 173 and 174. Setup Mode When the monitor is in setup mode, the UA Reference button selects the active display. Pressing the button alternates between the UA display (which shows a monitor feature code) and the FHR display (which shows the setting or value for the selected feature code). When the UA display is active, the ± sign lights. When the FHR display is active, the heartbeat indicator lights. Alarm Silence Button This button is yellow for easy recognition. Pressing the Alarm Silence button removes the audible indication of an individual fetal heart rate alarm. NOTE: Silencing an alarm does not affect the visual indications. Revision D 170 Series Monitor 2000947-004 3-5 Controls, Indicators, and Connectors: Front Panel Displays and Indicators Front Panel Displays and Indicators Fetal Heart Rate Display(s) and Indicator(s) FHR Display A three-digit yellow numeric display indicates the fetal heart rate in beats per minute. The value flashes during an alarm condition. Heartbeat Indicator A yellow heart shaped indicator flashes with each detected valid heartbeat for the fetal heart. Primary Versus Secondary (Models 172, 173, and 174 only) Refer to Table 3-2 for a summary of display positions relative to connectors. Uterine Activity Display This green three-digit display indicates the uterine activity values. Tocotransducer If uterine activity is measured using a tocotransducer, the uterine activity value displays in relative units. A plus sign flashes when the uterine activity value exceeds the strip chart range of 100 relative units. IUP (Models 173 and 174 Only) If uterine activity is measured using an intrauterine pressure catheter or a strain gauge pressure transducer, the uterine activity value displays in mmHg. . Table 3-2. Display/Connector Summary Monitor Mode Model 171 US TOCO Model 172 US1 US2 1 2 Display Connector 1 Model 173 TOCO US FECG Model 174 TOCO or IUP US1 or FECG US2 TOCO or IUP 2 NOTE: FECG is Type BF for ANZ region. 3-6 170 Series Monitor 2000947-004 Revision D Controls, Indicators, and Connectors: Front Panel Displays and Indicators Alarms Disabled Indicator This yellow indicator illuminates when all alarms have been disabled. The indicator is unlit when alarms are enabled. Refer to “Chapter 4, Setup Procedures” for information on enabling/disabling alarms. Audio Alarm Indicator Active Patient Alarms For active patient alarms, this yellow indicator flashes; it continues to flash even if the alarm is silenced. Resolved Patient Alarms For resolved patient alarms, the indicator continues to flash until you silence the alarm. This ensures that the alarm is acknowledged by a clinician. Signal Quality Alarms For signal quality alarms, the indicator flashes during an active alarm and turns off as soon as the condition is resolved. The indicator is unaffected by silencing the audio alarm. Revision D 170 Series Monitor 2000947-004 3-7 Controls, Indicators, and Connectors: Front Panel Connectors Front Panel Connectors Model 171 Connectors Figure 3-2. Model 171 Connectors Ultrasound Connector The ultrasound connector1 is a blue, round receptacle mechanically keyed to accept only a Corometrics ultrasound transducer plug. The fetal heart rate derived from this transducer shows in the fetal heart rate display. Uterine Activity Connector The uterine activity connector is a white, round receptacle mechanically keyed to accept a Corometrics tocotransducer. The uterine activity value obtained from this transducer shows in the uterine activity display. 1 3-8 If the Model 171 is interfaced to a clinical information system (CIS), be aware that the CIS may be designed to alarm when there is no fetal heart rate signal. Therefore it is recommended that you unplug the ultrasound transducer from the monitor, when not in use, to eliminate false alarms. 170 Series Monitor 2000947-004 Revision D Controls, Indicators, and Connectors: Front Panel Connectors Model 172 Connectors 1 2 Figure 3-3. Model 172 Connectors 1 Primary Ultrasound Connector 2 Secondary Ultrasound Connector The primary ultrasound connector1 is a blue, round receptacle mechanically keyed to accept only a Corometrics ultrasound transducer plug. The fetal heart rate derived from this transducer shows in the primary fetal heart rate display. The secondary ultrasound connector1 is a blue, round receptacle identical to the primary ultrasound connector described above. The fetal heart rate derived from this connector displays in the secondary fetal heart rate display. Uterine Activity Connector The uterine activity connector is a white, round receptacle mechanically keyed to accept a Corometrics tocotransducer. The uterine activity value obtained from this transducer shows in the uterine activity display. 1 Revision D If the Model 172 is interfaced to a clinical information system (CIS), be aware that the CIS may be designed to alarm when there is no fetal heart rate signal. Therefore it is recommended that you unplug the ultrasound transducer(s) from the monitor, when not in use, to eliminate false alarms. 170 Series Monitor 2000947-004 3-9 Controls, Indicators, and Connectors: Front Panel Connectors Model 173 Connectors Figure 3-4. Model 173 Connectors Ultrasound Connector The ultrasound connector1 is a blue, round receptacle mechanically keyed to accept only a Corometrics ultrasound transducer plug. The fetal heart rate derived from this transducer shows in the primary fetal heart display. FECG Connector 1 The FECG connector is a dark grey, round receptacle mechanically keyed to accept a Corometrics FECG cable/legplate plug. The fetal heart rate derived from the spiral electrode displays in the secondary fetal heart rate display. Uterine Activity Connector The uterine activity connector is a white, round receptacle mechanically keyed to accept a Corometrics tocotransducer, a Corometrics strain gauge transducer plug, or any intrauterine pressure catheter with compatible cable plug. The uterine activity value obtained from this transducer shows in the uterine activity display. 1 3-10 If the Model 173 is interfaced to a clinical information system (CIS), be aware that the CIS may be designed to alarm when there is no fetal heart rate signal. Therefore it is recommended that you unplug the ultrasound and/or FECG transducers from the monitor, when not in use, to eliminate false alarms. 170 Series Monitor 2000947-004 Revision D Controls, Indicators, and Connectors: Front Panel Connectors Model 174 Connectors Figure 3-5. Model 174 Connectors Combi-Connector (Primary Ultrasound or FECG) The combi-connector is a blue connector1 with a dark grey inner center. This round receptacle is mechanically keyed to accept only a Corometrics ultrasound transducer plug or a Corometrics FECG cable/legplate plug. The fetal heart rate derived from this transducer or cable/legplate shows in the primary fetal heart display. IMPORTANT COMBI-CONNECTOR—The combi-connector can be used for monitoring ultrasound or FECG depending on what you plug in (US transducer or FECG cable/legplate). When used in conjunction with the secondary ultrasound connector, you have the option of monitoring twins using dual US or FECG/US. Secondary Ultrasound Connector 1 The secondary ultrasound connector is a blue, round receptacle mechanically keyed to accept only a Corometrics ultrasound transducer plug. The fetal heart rate derived from this connector shows in the secondary fetal heart rate display. Uterine Activity Connector The uterine activity connector is a white, round receptacle mechanically keyed to accept a Corometrics tocotransducer, a Corometrics strain gauge transducer plug, or any intrauterine pressure catheter with compatible cable plug. The uterine activity value obtained from this transducer shows in the uterine activity display. 1 Revision D If the Model 174 is interfaced to a clinical information system (CIS), be aware that the CIS may be designed to alarm when there is no fetal heart rate signal. Therefore it is recommended that you unplug the ultrasound and/or FECG transducers from the monitor, when not in use, to eliminate false alarms. 170 Series Monitor 2000947-004 3-11 Controls, Indicators, and Connectors: Strip Chart Recorder 30 60 90 120 150 180 210 0 2 8 4 6 10 4305AAO 12 kPa FHR 240 bpm UA Strip Chart Recorder Figure 3-6. Strip Chart Recorder The strip chart recorder is located on the right side of the front panel. Latches on each side of the recorder open the paper drawer. Two styles of paper are available: 30-240 BPM scale and 50-210 BPM scale. Refer to “Chapter 4, Setup Procedures” for instructions on loading strip chart paper into the recorder. Heart Rate Grid One or two fetal heart rate trends print in the top (or left) grid of the strip chart paper—depending on your model monitor and the active modalities. If only one fetal heart rate is being monitored, the FHR trend is printed in black. If twins are being monitored, the primary trend is printed in plain black while the secondary trend is bolded. Refer to the “170 Series Operator’s Manual” for additional information about fetal heart rate trends and annotations. 3-12 170 Series Monitor 2000947-004 Revision D Controls, Indicators, and Connectors: Strip Chart Recorder Uterine Activity Grid The uterine activity trend prints in black on the bottom (or right) grid of the strip chart paper. Refer to the “170 Series Operator’s Manual” for more information about uterine activity trends and annotations. Annotation Area An annotation area is provided between the fetal heart rate and uterine activity grids. Revision D 170 Series Monitor 2000947-004 3-13 Controls, Indicators, and Connectors: Rear Panel Connectors Rear Panel Connectors CONNECT TO: GE MEDICAL SYSTEMS RS232 1 REF 7714AAT ONLY RS232 2 Figure 3-7. Rear Panel Connectors Power Supply Connector This is the receptacle for the AC adapter, P/N 7714AAT only. A line cord connects from the other end of the adapter to an AC wall outlet. The connector is labeled CONNECT TO GE MEDICAL SYSTEMS REF 7714AAT ONLY. The power supply is a universal AC-to-DC converter which can accept an AC input in the range 100–230 VAC. The converter supplies a regulated 12 Vdc to the monitor. FAST Connector This connector is provided for attaching an optional Corometrics Model 146 Fetal prints on the strip chart each time Acoustic Stimulator (FAST). The annotation the Model 146 is used. Remote Mark Connector This connector is provided for attaching an optional Corometrics Remote Event Marker. This accessory annotates the strip chart recorder paper with a marker which can be configured as one of the following: : This annotation is commonly used to record an “event.” FM : This annotation is commonly used as an indication that the mother has perceived fetal movement. FM The monitor is factory set to use the annotation. Refer to the “Chapter 4, Setup Procedures” for information about selecting the annotation. 3-14 170 Series Monitor 2000947-004 Revision D Controls, Indicators, and Connectors: Rear Panel Connectors Nurse Call Interface This connector is intended for future interfacing to a standard Nurse Call System. RS-232C Connectors Two RS-232C connectors are provided for interfacing to peripheral equipment such as: a maternal non-invasive blood pressure monitor a central information system that uses Hewlett-Packard’s Digital Series Interface Protocol Contact your Service Representative for more information. CAUTION NON-DESTRUCTIVE VOLTAGE—The maximum nondestructive voltage that may be applied to the rear panel connectors is 0 V. Do not attempt to connect cables to these connectors without contacting your Biomedical Engineering Department or Service Representative. This is to ensure the connectors comply with leakage-current requirements of one of the following applicable standards: Underwriters Laboratories UL-2601.1, Canadian Standards Associations CSA 22.2 No. 125, or International Electrotechnical Commission EN60601.1. Telemetry Connector This high-density 15-pin connector is intended for future interfacing to the receiver of a Corometrics telemetry system. Contact your Service Representative for more information. IMPORTANT TELEMETRY—For proper operation when using a telemetry system, disconnect all transducers from the front panel of the 170 Series Monitor. Refer to the operator’s manual for your telemetry system for more information. Revision D 170 Series Monitor 2000947-004 3-15 For your notes 3-16 170 Series Monitor 2000947-004 Revision D Chapter 4 Setup Procedures 4 This section contains information about configuring a 170 Series Monitor to meet the individual needs of your clinic or hospital. Use of the monitor will vary according to the accessories attached to it, the clinical applications in which it is used, and the personal preferences of the users. This chapter lists all available user setup options in the monitor and provides stepby-step instructions for making selections: Loading Strip Chart Paper . . . . . . . . . . . . . . . . . . . . . . . . . . . . . . . . . 4-2 Turning the Monitor On . . . . . . . . . . . . . . . . . . . . . . . . . . . . . . . . . . . 4-7 Recorder Test . . . . . . . . . . . . . . . . . . . . . . . . . . . . . . . . . . . . . . . . . . . 4-9 Customizing the Monitor . . . . . . . . . . . . . . . . . . . . . . . . . . . . . . . . . 4-10 Printing a Summary of Configuration Settings . . . . . . . . . . . . . . . . 4-17 Quick Reference Card . . . . . . . . . . . . . . . . . . . . . . . . . . . . . . . . . . . 4-18 Flasher Software Utility Upgrade . . . . . . . . . . . . . . . . . . . . . . . . . . 4-20 Revision D 170 Series Monitor 2000947-004 4-1 Setup Procedures: Loading Strip Chart Paper Loading Strip Chart Paper The required paper for use with the 170 Series Monitor is: catalog number (REF) 4305AAO/CAO (HR scale of 30–240 BPM); or catalog number (REF) 4305BAO/DAO (HR scale of 50–210 BPM). CAUTIONS LOADING PAPER—The instructions for loading paper into a 120 or 170 Series Monitor are different than the instructions for loading paper into other Corometrics monitors with which you may be familiar. Improper loading can cause paper jams. Follow the instructions carefully. PAPER TYPE—Do not use non-Corometrics paper or paper designed for use with other Corometrics monitors. Using paper other than catalog number (REF) 4305AAO/BAO/CAO/DAO: may produce inferior print quality; could result in permanent damage to the recorder’s print head; and may void your warranty. STORAGE/TRANSPORT—Paper should be installed in the monitor’s strip chart recorder at all times. This reduces particle build up on the printhead and facilitates opening the recorder door. To protect against paper jams, the 170 Series recorder contains a paper-loading sensor which detects if the paper has been incorrectly loaded. When the recorder detects a paper-load–error condition: the recorder will not print; the Record indicator flashes on and off every second; and three short beeps (low tones) sound every three seconds at a fixed volume. The most likely cause of a paper-load–error condition is that you loaded the paper with the black squares facing up. The correct method is to load the paper with the black squares down, as explained later in this section. 4-2 170 Series Monitor 2000947-004 Revision D Setup Procedures: Loading Strip Chart Paper To install Corometrics catalog number (REF) 4305AAO/BAO/CAO/DAO chart paper in the 170 Series Monitor, follow these steps: CAUTION LOADING PAPER—Paper loading instructions for a 170 or 120 Series Monitor are different than other Corometrics monitors with which you may be familiar. 1. Press on each side of the paper drawer to release the drawer latches. Figure 4-1. Releasing the Drawer Latches 2. Slide the paper drawer out toward you. Figure 4-2. Opening the Paper Drawer 3. Revision D Remove the plastic wrapper from the paper and discard. 170 Series Monitor 2000947-004 4-3 Setup Procedures: Loading Strip Chart Paper 4. Fan the pack of Z-fold paper on all sides to loosen any folds and to ensure proper feed of the paper throughout the recorder. Figure 4-3. Fanning the Paper 5. Hold the package of paper so that: the black squares are on the bottom of the pack; and the Information Technologies name and page numbers are on the left side of the pack. NOTE: The black squares indicate the end of the recorder paper. When the black squares appear, the strip chart recorder has approximately 20 minutes of paper remaining, when running at a speed of 3 cm/min. Figure 4-4. Orienting the Paper 4-4 170 Series Monitor 2000947-004 Revision D Setup Procedures: Loading Strip Chart Paper 6. Unfold two sheets from the top of the pack so that they extend toward you. Figure 4-5. Creating a Paper Leader 7. Place the pack in the drawer so that the pack is laying flat in the bottom of the paper tray. Figure 4-6. Inserting the Paper Revision D 170 Series Monitor 2000947-004 4-5 Setup Procedures: Loading Strip Chart Paper 8. Pull the paper leader taut at an angle between remaining pack and the paper guides. The balance of the paper pack should stay flat in the drawer as shown in Figure 4-7. (The paper guides are shown in Figure 4-8.) Pull paper leader taut Remaining paper lays flat in drawer Figure 4-7. Paper Drawer Side Cutaway View 9. Slide the drawer closed by exerting even pressure on both sides of the drawer. Avoid skewing the drawer in its tracks. (The pre-printed vertical lines on the paper should be parallel to the printhead.) You will hear a click when the drawer is locked in place. Paper Guide 210 Paper Guide 12 0 2 4 6 kPa 8 10 UA 30 4305 AA O 60 90 120 150 180 FH R 240 bpm Printhead Figure 4-8. Closing the Paper Drawer IMPORTANT PAPER—Paper should always be installed in the monitor. The monitor runs a self-test routine each time it is powered on; part of this routine includes a recorder test. 4-6 170 Series Monitor 2000947-004 Revision D Setup Procedures: Turning the Monitor On Turning the Monitor On The 170 Series uses a universal AC-to-DC converter which accepts an AC input in the range 100–230 VAC. The converter supplies a regulated 12 Vdc to the 170 Series Monitor. 1. Connect the AC adapter into the power supply connector labeled: CONNECT TO GE MEDICAL SYSTEMS REF 7714AAT ONLY. Figure 4-9. Connecting the AC Adapter 2. Connect one end of the detachable line cord to the AC adapter; connect the other end into a hospital grade grounded wall outlet. 3. . The green indicator next to the button Press the monitor’s Power button illuminates. A self-test routine automatically runs. Read "Monitor Self-Test Routines" on the next page. Figure 4-10. Turning the Monitor On Revision D 170 Series Monitor 2000947-004 4-7 Setup Procedures: Monitor Self-Test Routines Monitor Self-Test Routines NOTE: Ensure paper is installed in the recorder in order to verify a successful recorder test. Each 170 Series Monitor contains a self-test routine which checks the internal circuitry of the monitor, the displays and indicators, and the strip chart recorder. The self-test routine is automatically initiated each time you turn on the monitor. CAUTION SELF-TEST FAILURE—If there is any problem with the self-test routine, turn off the monitor and remove it from operation. Notify your Biomedical Engineering Department or Service Representative. After completion of a successful self-test routine, the monitor is ready for use. NOTE: If the recorder was off at the time the monitor was turned off, the test routine will turn the recorder on, then turn it off after the tests are complete. If the recorder was on at the time the monitor was turned off, the tests will be performed and the recorder will remain on. Table 4-1. Summary of Self-Test Routines Test Description 4-8 What to Verify Display/Indicator Test: All displays and indicators illuminate. Ensure all indicators and each segment of the displays illuminate throughout the entire self-test routine. Internal Test: The internal circuitry of the monitor is verified. Make sure the monitor performs the recorder test. If there is a problem with the internal circuitry, the recorder test will not be performed. Recorder Test: The following message prints on the strip chart paper: TEST: ARE ALL DOTS PRINTED? Three continuous lines are drawn across the strip chart recorder paper, testing the integrity of the printhead. See Figure 4-11. Ensure that the lines are printed in the correct positions on the paper. Verify that the lines are continuous and no gaps appear on the traces. 170 Series Monitor 2000947-004 Revision D Setup Procedures: Monitor Self-Test Routines GE MEDICAL SYSTEMS 4305CAO 41153 PAGES REMAING FHR 240 bpm 210 180 150 HR Scale 30-240 120 90 60 30 TEST:ARE ALL DOTS PRINTED? 100 12 75 10 8 50 6 4 25 2 0 kPa UA 0 mm Hg Figure 4-11. Recorder Test Revision D 170 Series Monitor 2000947-004 4-9 Setup Procedures: Customizing the Monitor Customizing the Monitor User Setup Mode The monitor includes a user setup mode where you can: enable/disable alarm functionality set the high alarm limit for the fetal heart rate set the low alarm limit for the fetal heart rate set the alarm volume set the time and date Service Setup Mode The monitor includes a service setup mode where you can access all user setup modes as well as the following: 4-10 enable/disable fetal movement detection (if purchased and installed) select the language for printing on the strip chart paper set the chart speed select the paper scale choose a communication mode for each rear panel communications port set the baud rate for each communications port select the remote mark annotation style enable/disable fetal heart rate offset (Models 172, 173, and 174 only) enable/disable ECG artifact elimination (Models 173 and 174 only) enable/disable heartbeat coincidence (Models 172, 173, and 174 only) set the default UA reference value perform a recorder alignment test print the software version number along with a summary of all current configuration settings 170 Series Monitor 2000947-004 Revision D Setup Procedures: Customizing the Monitor Setting or value for selected feature (e.g. FHR Alarms On or 180 BPM High Alarm Limit). Monitor Feature Code (e.g. FHR Alarms or High Alarm Limit). EXAMPLE 1 Press to enter the user setup mode. 1 2 ( or ) to Use change the number. 2 3 ( ) to select Use feature code 2FHR High Alarm Limit. See Table 4-2. Press to switch displays. The heartbeat indicator lights. 1 2 Press to switch between displays. 1 2 Use ( or ) to change the number. 4 5 Use ( ) to change the value to 185 BPM. See Table 4-2. Press to switch displays again. The ± sign lights. (Repeat steps 2 to 5 .) 1 2 Press to switch between displays. Repeat steps to change other settings. 1 2 NOTE: For Models 172, 173, and 174, use the leftmost set of volume controls. Figure 4-12. Setup Mode Summary (Model 172 shown) Revision D 170 Series Monitor 2000947-004 4-11 Setup Procedures: Customizing the Monitor You can enter the user setup mode during an active monitoring session. The fetal heart rate and uterine activity trends print without interruption and the FHR tones remain audible; however you will be unable to see the heart rate and uterine activity values on the display while in the user setup mode. You can only enter the service setup mode from a power off state. NOTE: If an alarm occurs while in user setup mode, the heart rate display will not flash; however, the alarm indicator flashes and the audio alarm sounds. As soon as you exit the setup mode, the affected display flashes to indicate the alarm condition. 1. Enter the appropriate mode, user or service, as follows: User: To enter the user mode: Press the monitor’s Power button to turn on the monitor. Wait until the monitor completes the self-test routine and enters the normal operating mode. Press and hold the Setup button setup mode. , for three seconds, to enter the user Service: To enter the service mode: 4-12 Press and hold the Setup button Press and hold the blue Power button Release both buttons. The service mode is now activated. . 2. Use the UA Reference button to toggle between the setup code (shown in the UA display) and the setting or value (shown in the primary FHR display). The UA display is active when the ± qualifier illuminates; the FHR display is active when the heartbeat indicator ( ) illuminates. 3. Use the Volume buttons to increase ( ) or decrease ( ) the code, value, or setting shown in the active display. Refer to Table 4-2 (user codes) or Table 4-3 (service codes). (For Models 172, 173, and 174, use the leftmost set of volume controls.) 4. Repeat steps 2 and 3 until all settings are configured. 5. to exit the setup mode. Exiting the user setup Press the Setup button mode returns to the monitoring mode; exiting the service setup mode turns the monitor to standby. 170 Series Monitor 2000947-004 Revision D Setup Procedures: Customizing the Monitor to exit the setup mode (user or service) NOTE: If you press the Power button any changes you made will not be stored in memory. NOTE: You must exit by pressing the Setup button take effect. in order for changes to NOTE: If an alarm is in progress when you exit the user setup mode, any changes to an alarm setting do not take effect until the alarm condition is resolved. Table 4-2 lists the available settings for the user setup mode. Table 4-3 lists the available settings for the service setup mode. Table 4-4 provides a summary of the factory default settings for both the user and service setup options. Revision D 170 Series Monitor 2000947-004 4-13 Setup Procedures: Customizing the Monitor Table 4-2. Summary of User Setup Codes Code (UA Display) Code 1 4-14 Setting or Value (Primary FHR Display) Description FHR Alarms 0 = off (disabled) 1 = on (enabled) 2 FHR High Alarm Limit 140–210 (BPM, in increments of 5 BPM) 3 FHR Low Alarm Limit 50–140 (BPM, in increments of 5 BPM) 4 FHR Alarm Volume 2–10 10 Minutes (time setting) 0–59 (minutes) 11 Hours (time setting) 0–23 (hours) 12 Day of Month (date setting) 1–31 (day) 13 Month (date setting) 1–12 (month) 14 Year (date setting) 00–99 (year) 170 Series Monitor 2000947-004 Revision D Setup Procedures: Customizing the Monitor Table 4-3. Summary of Service Setup Codes Code (UA Display) Setting Or Value (Primary FHR Display) Code # Code Description 20 ECG artifact elimination (173, 174 only) 0 = off; 1 = on 21 heartbeat coincidence (172, 173, 174 only) 0 = off; 1 = on 22 fetal movement enable/disable 0 = off 1 = on (if option installed) 23 language 0 = English; 1 = Spanish; 2 = German; 3 = French; 4 = Japanese; 5 = Italian; 6 = Swedish; 7 = Dutch; 8 = Portuguese; 9 = Chinese 24 chart speed 1= 1; 2 = 2; 3 = 3 (cm/min) 25 paper scale 0 = 30–240; 1 = 50–210 (BPM) 30, 40 communications mode (port 1, 2) 0 = HP; 1 = HP w/notes; 2 = ext BP; 3 = factory test; 4 = ext. FSpO2; 5 = 115 update; 6 = 115 transmit/receive 31, 41 baud rate (port 1, 2) 300; 600; 1200; 2400; 4800; 9600; 19200; 38400 50 remote mark annotation style 0 = FM; 1 = arrow 51 future use (Japanese units only) 0 = off; 1 = on 52 fetal heart rate offset enable/disable 0 = off; 1 = 10 minute auto-revert; 2 = on 53 UA reference default 5, 10, 15, 20, 25 (relative units) 100 recorder alignment 0–255 Revision D 170 Series Monitor 2000947-004 4-15 Setup Procedures: Customizing the Monitor Table 4-4. Summary of Factory Defaults Setup Option Factory Default FHR Alarms on FHR High Alarm Limit 160 BPM FHR Low Alarm Limit 120 BPM FHR Alarm Volume 5 Time/Date Eastern Standard Time or DaylightSaving Time—whichever is applicable *ECG Artifact Elimination (Models 173 and 174 only) off *Heartbeat Coincidence (Models 172, 173, and 174 only) off *Fetal Movement Detection (if purchased and installed) on *Language set according to shipping destination *Recorder Speed United States: 3 cm/min International: 1 cm/min *Paper Scale United States: 30–240 BPM International: 50–210 BPM *RS-232 Port 1 Communications Mode HP *RS-232 Port 1 Baud Rate 1200 *RS-232 Port 2 Communications Mode ext. BP *RS-232 Port 2 Baud Rate 600 *Remote Mark Annotation on ( FM Hospital/Clinic Setting ) *HR Offset (Models 172, 173, and 174 only) on with 10-minute auto-revert *UA Reference 10 relative units * = service setup mode NOTE: User shall verify and save the settings required by the Hospital before using the monitor. 4-16 170 Series Monitor 2000947-004 Revision D Setup Procedures: Customizing the Monitor Printing a Summary of Configuration Settings To print the software version number and a summary of configuration settings on the strip chart paper: NOTE: You can only enter the service setup mode from a power off state. 1. 2. Enter the service mode: Press and hold the Setup button Press and hold the blue Power button Release both buttons. The service mode is now activated. Press the Record button . . Figure 4-13 shows a sample printout. Figure 4-13. Configuration Summary Printout Revision D 170 Series Monitor 2000947-004 4-17 Setup Procedures: Quick Reference Card Quick Reference Card Your monitor was shipped with a Quick Reference Card in the appropriate language. The front side lists the user setup codes while the reverse lists the service setup codes. The card is laminated and comes with hook and loop adhesives to attach to your monitor. A copy of this card is included on the following page if you wish to make additional copies for training. Additional Quick Reference Cards can be purchased by calling one of the numbers listed in the front of this manual. Table 4-5 provides a summary of the Quick Reference Card re-order numbers: Table 4-5. 170 Series Quick Reference Card 4-18 Language Document Part Number English 2003024-001 Chinese 2003024-002 Dutch 2003024-003 French 2003024-004 German 2003024-005 Italian 2003024-006 Japanese 2003024-007 Portuguese 2003024-008 Spanish 2003024-009 Swedish 2003024-010 Polish 2003024-011 Greek 2003024-013 Russian 2003024-014 Czechoslovakian 2003024-015 170 Series Monitor 2000947-004 Revision D Setup Procedures: Quick Reference Card Revision D 170 Series Monitor 2000947-004 4-19 Setup Procedures: Flasher Software Utility Upgrade Flasher Software Utility Upgrade The Corometrics Flasher is a software utility program which uses one of the monitor’s RS-232 serial ports to upgrade to a newer software release; or to install a purchased option such as fetal movement detection. Each Flasher disk contains the software upgrade for one-time use only. (In other words, you need an individual Flasher disk for each monitor being upgraded.) Table 4-6 lists the Flasher kits available for the 170 Series. Table 4-6. Flasher Kits Kit Description Catalog Number Fetal Movement Detection Feature Addition 1700AAO Software Upgrade to Version 3.23 which includes the following features: Heartbeat coincidence Communications interface to external FSpO2 monitors Communications support of 115 Update and 115 Transmit/ Receive protocols 4-20 170 Series Monitor 2000947-004 2005770-004 (English language units) Revision D Chapter 5 Theory of Operation 5 This section of the manual contains the electronic theory of operation for the 170 Series Monitor. When possible, references are made to the appropriate schematic contained in “Chapter 11, Parts Lists” of this manual Throughout this chapter, signal names ending with an asterisk (*) are active low. This chapter contains the following information: Functional Overview . . . . . . . . . . . . . . . . . . . . . . . . . . . . . . . . . . . . . 5-2 Main Board Theory of Operation. . . . . . . . . . . . . . . . . . . . . . . . . . . 5-17 FECG/IUP Board Theory of Operation . . . . . . . . . . . . . . . . . . . . . . 5-36 Revision D 170 Series Monitor 2000947-004 5-1 Theory of Operation: Functional Overview Functional Overview For all 170 Series Monitors, the Main Board controls the majority of the 170 Series functionality including: antepartum (US, TOCO) front ends and connector(s) uterine activity front end and connector seven-segment displays user-interface buttons peripheral device communications processing For Models 173 and 174, a separate FECG/IUP Board controls: intrapartum front ends isolation for analog signals Figure 5-1 provides an overview of the system architecture. Table 5-1 through Table 5-17 provide pinouts for each of the external connectors and the internal main board harness connectors. Figure 5-2 through Figure 5-9 provide illustrations of the front and rear panel connectors. Speaker Cable Printhead Cable Sensor Display Board Membrane Switch Panel Display Speaker Cable Cable RECORDER MODULE Printhead and Sensors MAIN BOARD Membrane Cable Figure 5-1. Overview of System Architecture 5-2 170 Series Monitor 2000947-004 Revision D Theory of Operation: Functional Overview Table 5-1. Main Power Connector Pin Number Description 1 +12 Vdc Input 2 Negative Input 3 Shield 2 1 3 Figure 5-2. Main Power Connector Revision D 170 Series Monitor 2000947-004 5-3 Theory of Operation: Functional Overview Table 5-2. Recorder Printhead Connector Pin Number Signal Name Signal Type (Relative To Recorder Board) Signal Description 1 +24V Input +24 Volts for Recorder 2 +24V Input +24 Volts for Recorder 3 +24V Input +24 Volts for Recorder 4 +24V Input +24 Volts for Recorder 5 HGND Input Ground for +24V 6 HGND Input Ground for +24V 7 HGND Input Ground for +24v 8 HGND Input Ground for +24V 9 HGND Input Ground for +24V 10 +5v Input +5V for Logic 11 NC No Connection 12 NC No Connection 13 STB0* Input Head Strobe 0 14 STB1* Input Head Strobe 1 15 STB2* Input Head Strobe 2 16 STB3* Input Head Strobe 3 17 BSCK Input Head Serial Clock (3.07 MHz) 18 LD* Input Head Load Line 19 PDATA Input Head Serial Data 20 NC No Connection * Active low. 5-4 170 Series Monitor 2000947-004 Revision D Theory of Operation: Functional Overview Table 5-3. Recorder Motor Connector Signal Type (Relative to Main board) Pin Number Signal Name Signal Description 1 NC 2 P3 Output Motor Phase 3 3 P4 Output Motor Phase 4 4 +5VM Output +5 Volts for Motor 5 NC 6 P2 Output Motor Phase 2 7 P1 Output Motor Phase 1 8 +5VM Output +5 Volts for Motor No Connection No Connection Table 5-4. Recorder Sensor Connector Signal Type (Relative to Main board) Pin Number Signal Name 1 NC 2 MISCOL Input Paper Misload Sensor Collector 3 MISLED Output Paper Misload Sensor LED Voltage 4 GND Output Ground for Sensor 5 NC 6 OUTCOL Input Paper Out Sensor Collector 7 OUTLED Output Paper Out Sensor LED Voltage 8 GND Output Ground for Sensor 9 DOOR Input Door Switch Input 10 GND Output Ground for Door Switch Revision D Signal Description No Connection No Connection 170 Series Monitor 2000947-004 5-5 Theory of Operation: Functional Overview Table 5-5. RS-232 Connector 1 Pin Number Signal Name Signal Description 1 +5V 200 mA Fused 2 RTS Request to Send Output from Monitor 3 RXD Receive Data Input to Monitor 4 GND Signal Ground 5 GND Signal Ground 6 TXD Transmit Data Output from Monitor 7 CTS Clear to Send Input to Monitor 8 +5V 200 mA Fused Table 5-6. RS-232 Connector 2 Pin Number Signal Name Signal Description 1 GND Signal Ground 2 RTS Request to Send Output from Monitor 3 RXD Receive Data Input to Monitor 4 GND Signal Ground 5 GND Signal Ground 6 TXD Transmit Data Output from Monitor 7 CTS Clear to Send Input to Monitor 8 GND Signal Ground 1 2 3 4 5 6 7 8 Figure 5-3. RJ-45 Connector (facing the rear panel from the outside) 5-6 170 Series Monitor 2000947-004 Revision D Theory of Operation: Functional Overview Table 5-7. Speaker Connector Pin Number Signal Name Signal Description 1 SPKR-LO Speaker Low Side Connection 2 SPKR-HI Speaker High Side Connection Table 5-8. Remote Mark Connectors (Remote Event Marker and Fetal Acoustic Stimulator) Pin Number Signal Name Signal Description 1 Tip Remote Event Marker or Fetal Acoustic Stimulator 2 Shunt No Connection 3 NC No Connection 4 Sleeve Ground 1 2 3 4 Figure 5-4. Remote Mark Connectors Revision D 170 Series Monitor 2000947-004 5-7 Theory of Operation: Functional Overview Table 5-9. Ultrasound Connector(s) Pin # Signal Name Signal Description 1 NC No Connection 2 NC No Connection 3 GND Chassis Ground 4 XMIT/RCV SHIELD Shield for Transmit/Receive 5 XMIT/RCV Transmit/Receive 6 NC No Connection 7 NC No Connection 8 NC No Connection 9 GND Chassis Ground 10 NC No Connection 11 U/S ENABLE* Enable for Ultrasound Channel 12 GND Chassis Ground * Active low. 8 7 9 1 3 2 12 6 5 11 4 10 8 7 12 6 1 9 2 10 11 5 3 4 Figure 5-5. US Connector(s) (facing the front panel from the outside) 5-8 170 Series Monitor 2000947-004 Revision D Theory of Operation: Functional Overview Table 5-10. FECG Connector (Model 173) Pin # Signal Name Signal Description 1 NC No Connection 2 FECGEN* Enable for FECG Channel 3 GND Chassis Ground 4 NC No Connection 5 NC No Connection 6 LA Left Arm 7 RA Right Arm 8 SHIELD Shield 9 NC No Connection 10 NC No Connection 11 NC No Connection 12 RL Right Leg * Active low. 8 7 9 1 3 2 12 6 5 11 4 10 8 7 12 6 1 9 2 10 11 5 3 4 Figure 5-6. FECG Connector (facing the front panel from the outside) Revision D 170 Series Monitor 2000947-004 5-9 Theory of Operation: Functional Overview Table 5-11. Ultrasound/FECG Combi-Connector (Model 174) Pin # Signal Name Signal Description 1 NC No Connection 2 FECGEN* Enable for FECG Channel 3 ISOGND Isolated Ground 4 XMIT/RCV SHIELD Shield for Transmit/Receive (isolated ground) 5 XMIT/RCV Transmit/Receive (isolated ground) 6 LA Left Arm 7 RA Right Arm 8 SHIELD Shield (isolated ground) 9 NC No Connection 10 NC No Connection 11 U/S ENABLE* Enable for Ultrasound Channel 12 RL Right Leg * Active low. 8 7 9 1 3 2 12 6 5 11 4 10 8 7 12 6 1 9 2 10 11 5 3 4 Figure 5-7. US/FECG Combi-Connector (facing the front panel from the outside) 5-10 170 Series Monitor 2000947-004 Revision D Theory of Operation: Functional Overview Table 5-12. Uterine Activity Connector Pin# Signal Name Signal Description 1 +PRESSURE Positive Input to Pressure Amplifier 2 –PRESSURE Negative Input to Pressure Amplifier 3 NC No Connection 4 +4 VOLT EXCITATION +4 Volt Reference 5 NC No Connection 6 GND (EXCITATION REF) +4 Volt Reference Ground 7 UA SHIELD Shield 8 NC No Connection 9 NC No Connection 10 NC No Connection 11 NC (171/172) IUP ENABLE (173/174) No Connection (171/172) Mode Enable for IUP (173/174) 12 TOCO ENABLE * Mode Enable for TOCO * Active low. 8 7 9 1 3 2 12 6 5 11 4 10 8 7 12 6 1 9 2 10 11 5 3 4 Figure 5-8. Uterine Activity Connector (facing the front panel from the outside) Revision D 170 Series Monitor 2000947-004 5-11 Theory of Operation: Functional Overview Table 5-13. Telemetry Connector Pin Number Signal Name Signal Type (Relative To Main Board) Signal Description 1 TMARK/ Input Telemetry Mark Line (active low) 2 TELPR/ Input Telemetry Present (active low) 3 NC (171/172) TECGEN/ (173) Input No Connection (171/172) Telemetry FECG Enable (173/174) 4 NC 5 NC (171/172) TECG (173) Input No Connection (171/172) Telemetry FECG (173/174) 6 TTOCO Input Telemetry TOCO 7 AGND Output Analog Ground 8 TELMAUDIO Input Telemetry US Audio 9 DGND Output Digital Ground 10 NC 11 TTOCOEN/ Input Telemetry TOCO Enable 12 TUSEN/ Input Telemetry US Enable 13 NC (171/172) TIUPEN/ (173) Input No Connection (171/172) Telemetry IUP Enable (173/174) 14 NC No Connection 15 NC No Connection No Connection No Connection 5 4 10 15 9 14 2 3 8 13 1 7 12 6 11 Figure 5-9. Telemetry Connector (facing the rear panel from the outside) 5-12 170 Series Monitor 2000947-004 Revision D Theory of Operation: Functional Overview Table 5-14. Display Interface (J18) Pin Number Signal Name Signal Type (Relative To Main Board) Signal Description 1 D6 Output Main Board Data Bit 6 2 D5 Output Main Board Data Bit 5 3 D7 Output Main Board Data Bit 7 4 DISPLCS* Output Not Used 5 A0 Output Telemetry ECG (173/174) 6 D4 Output Main Board Data Bit 4 7 D1 Output Main Board Data Bit 1 8 D0 Output Main Board Data Bit 0 9 D2 Output Main Board Data Bit 2 10 D3 Output Main Board Data Bit 3 11 SEGA Output Segment A for Pressure ±1 LED 12 SEGB Output Segment B for Pressure ±1 LED 13 SEGC Output Segment C for Pressure ±1 LED 14 SEGD Output Segment D for Pressure ±1 LED 15 +5V Output +5 Volts for LEDs 16 GND Output Ground for LEDs Revision D 170 Series Monitor 2000947-004 5-13 Theory of Operation: Functional Overview Table 5-15. Membrane Switch Panel Interface (J19) Pin Number Signal Name Signal Type (Relative To Main Board) Signal Description 1 UAREF* Input UA Ref Switch Input 2 PWRANODE Output Power Indicator LED Anode 3 REC* Input Recorder On Switch Input 4 NC Output No Connection 5 MARK* Input Mark Switch Input 7 PADV* Input Paper Advance Switch Input 6 GND Output Ground 8 RECANODE Output Recorder on LED Anode 9 VOLDN* Input Volume Down Channel 1 Switch Input 10 CANCEL Input Alarm Cancel Switch Input 11 VOLUP* Input Volume Up Channel 1 Switch Input 12 VOLDN2* Input Volume Down Channel 2 Switch Input 13 PWRSWITCH Input Power Switch Input 14 VOLUP2* Input Volume Up Channel 2 Switch Input 15 GND Output Ground for LEDS and Switches 16 MENU Input Menu Switch Input * Active low. 5-14 170 Series Monitor 2000947-004 Revision D Theory of Operation: Functional Overview Table 5-16. FECG/UA Option Interface Part One (J16), Models 173/174 Only Pin Number Signal Name Signal Type (Relative To Main Board) Signal Description 1 +12V Output +12 V for FECG Isolated Power Supply 2 GND Output +12 V Ground 3 +5V Output +5 V Supply 4 +7.5V Output +7.5 V Supply 5 2.5VREF Output 2.5 V Reference 6 IUPEN* Input IUP Enable Output 7 +3.3VANA Output +3.3 V for Analog 8 144KC Output 144 KHz for Isolated Power Supply 9 –3.3VANA Output –3.3 V for Analog 10 AGND Output Analog Ground 11 FECGOUT Input FECG Analog Output 12 PRESSOUT Input Pressure Analog Output 13 FECGEN* Input FECG Enable (Active Low) 14 NC (171/172/173) CLEAR* (174) — Output No Connection (171/172/173) Clear (Model 174) 15 TOCOEN* Input TOCO Enable 16 NC — No Connection * Active low. Revision D 170 Series Monitor 2000947-004 5-15 Theory of Operation: Functional Overview Table 5-17. FECG/UA Option Interface Part Two (J15), Models 173/174 Only Pin Number Signal Name Signal Type (Relative To Main Board) Signal Description 1 RA Output Right Arm Input from Patient Connector 2 LA Output Left Arm Input from Patient Connector 3 RL Input Right Leg Drive Signal from FECG/IUP Board 4 SHIELDF Output Isolated Shield 5 –PRESS Output UA Channel Negative Input 6 +PRESS Output UA Channel Positive Input 7 ISO4V Input Isolated 4 V Reference 8 ECGEN* Output Enable for FECG Cable 9 4VISOGND Input Isolated 4 V Reference Ground 10 PEN* Output Isolated IUP Enable 11 NC — No Connection 12 ENTOCO* Output Isolated TOCO Enable * Active low. 5-16 170 Series Monitor 2000947-004 Revision D Theory of Operation: Main Board Theory of Operation Main Board Theory of Operation Figure 5-10 provides a block diagram of the Main Board in the 170 Series Monitor. The board number varies according to the particular model in the series as summarized in Table 5-18. Table 5-18. Main Board Variations Revision D 170 Series Model Main Board FRU Number Ultrasound Channels FECG/IUP Board Mount Model 171 2000244 Single No Model 172 15269 Dual No Model 173 2000324 Single Yes Model 174 2000952 Dual Yes 170 Series Monitor 2000947-004 5-17 Theory of Operation: Main Board Theory of Operation Audio Module Audio amplifier Ultrasound volume controls ECG/alarm-tone volume control Status/Switch Input Module Front panel switch input buffers Rear panel, recorder, and front-end status buffers Display Interface Data buffers ESD protection Communications Module Quad async UART RS-232 transceivers Recorder Interface Motor control latches Head control latches Status input buffers Printhead serial data link Processing Block System processor System flash memory System boot flash memory System RAM System address decoder PAL System battery RAM with real-time clock Ultrasound Module Ultrasound transmitter Control logic PAL Pin diode switches, preamplifier, and demodulator Ultrasound envelope filters Ultrasound envelope detector Audio frequency doubler and filters Fetal movement bandpass filters Telemetry multiplexor A/D converter Local voltage regulators Interface to FECG/UA Board (173/174) Uterine Activity Module Pressure differential amplifier +4 V reference A/D converter System Power Supply Pre-regulators +5 V regulators ±3.3 V regulators +7.5 V regulators (173/174) +24 V regulators +11 V regulators (173/174) +12 V input Figure 5-10. Main Board Block Diagram 5-18 170 Series Monitor 2000947-004 Revision D Theory of Operation: Main Board Theory of Operation Processing Block The processing block consists of the processor, system memory, battery RAM (with real time clock), and address decoder PAL. Figure 5-11 provides a block diagram of the processing block. System Boot Flash Memory (128k x 8) System SDRAM Memory (1M x 32 standard) Battery RAM with Real Time Clock (8k x 8) System Flash Memory 512k x 32 standard 512k x 32 optional 12.288 MHz Crystal SH3 Processor System Control/Address Decoder PAL Address decoding Recorder control latch and head protection timer SPI chip select and clock control Recorder serial interface to peripheral devices Figure 5-11. Processing Circuitry Block Diagram Revision D 170 Series Monitor 2000947-004 5-19 Theory of Operation: Main Board Theory of Operation The processor (U1) is an Hitachi SH3 used with a 32-bit data bus and 24-bit address bus. Series 100 Ω resistors and 100 kΩ pull-up resistors are provided for all address, data bus and output lines. The series resistors limit transient response resulting in better EMI performance. Pull-up resistors prevent these lines from floating if the processor enters sleep mode which tri-states these lines. Crystal X2 is the main crystal for the processor running at 12.288 MHz. Mode lines which the CPU examines at power up are pulled up and down to set the CPU to mode 4. This allows the CPU to run internally at either X2 x 1 (12.288 MHz) or X2 x 4 (49.152 MHz). The external bus and SYSCLK run at the X1 frequency. Crystal X1 is for the processor’s real-time clock. The real-time clock is not used; however, in addition to time/date, it can be used to process interrupts for exiting sleep mode. A MAX809 reset IC (U2) monitors 3 V backup power to hold RESET* low during power up from the AC line cord and or the DC power cable. Power-up reset using the power button is accomplished through an external RC circuit (R544 and C285) for a shorter on reset time. Four AMD AM29LV800B 8 Mb flash memory parts (U23–U26) are used to provide 4 MB of data storage and non-volatile program memory. The flash parts are arranged in pairs to allow 32-bit data access. Separate write enable lines allow access to individual 16-bit words, if required. Chip selects for each flash pair are controlled by the programmable array logic device (PAL) U4 and are memory mapped to make all 4 MB appear as a single area of memory. The system RAM consists of two Hitachi HM5216165 16-Mb SDRAMs (U27, U28). The processor provides all of the DRAM support signals (RAS, CAS, etc.). A 32-bit data bus is used and 8- and 16-bit access are supported. An AT29LV010A 1 Mb flash memory part (U29) is used as a boot ROM. The processor begins execution from this area of memory (Area 0 / CS0*). An 8-bit data bus is used. A battery RAM, with real-time clock MT48T18 (U31), provides the clock and 8k x 8 data storage function for parameters, error logs, etc. Transceiver U30 buffers and voltage translates data from the 5 V battery RAM. The PAL (U4) provides the address decoding for the system flash memory, UART, battery RAM, display, input buffers, and recorder control latches. The PAL also contains latches which allow control of the printhead, serial peripheral interface (SPI) chip selects, telemetry, and fetal movement signal controls. PAL U4 also provides the parallel-to-serial conversion for the printhead data. The PFAIL and software enable bits are used to disable battery RAM writes. Figure 5-12 provides a block diagram of the PAL. 5-20 170 Series Monitor 2000947-004 Revision D Theory of Operation: Main Board Theory of Operation Processor Address/Data and Control System Flash ROM Decoder Bank 1 System Flash ROM Decoder Bank 2 Recorder Control Decoder and Latch Head strobes Head supply control Head protection Recorder Control Latch Decoder Motor phase latches General Decoder and Latch SPI (serial peripheral interface) chip selects Front-end/telemetry control Battery RAM/RTC Decoder Status Port Decoder Front panel buttons Recorder status Display Decoder UART Decoder Recorder Printhead Data Shift Register Figure 5-12. PAL Block Diagram Revision D 170 Series Monitor 2000947-004 5-21 Theory of Operation: Main Board Theory of Operation Display Interface Module The display interface consists of a data buffer (U14) for D0–D7 which interfaces to the ICM7228A seven-segment LED driver IC (U1 on the display board), and D flipflop U3 which drives the ±1 UA segments through Q1–Q4 transistors. Data lines have 100 Ω series resistors (R524–R531) which help to reduce emissions. A diode clamp device (U18) on the data bus is a used to protect against ESD to the display area. Figure 5-13 provides a block diagram of the display interface module. to Data Bus Data Buffer Chip Select and Address 10 Display Board to Data Bus Latch Transistor Drivers for Pressure ± Display 4 Figure 5-13. Display Module Interface Block Diagram Status/Switch Input Module The status/switch input module consists of buffers U15 and U16 and series/parallel elements for protection against ESD. The monitor membrane switch panel provides 11 switch closures to ground which are fed to 100 kΩ pull up resistors and through 10 kΩ series elements. Buffers U14 and U15 are further protected by capacitors to ground and diode clamp devices U17 and U22. Two LEDs are present on the membrane switch panel: the power LED is driven by +5 V through resistor R350; the recorder LED is driven from PAL U4 through buffer U6 and resistor R351. Figure 5-14 provides a block diagram of the status/switch input module. Membrane Switch Inputs Data Buffers to Data Bus Recorder Status Inputs Figure 5-14. Status/Switch Input Module Block Diagram 5-22 170 Series Monitor 2000947-004 Revision D Theory of Operation: Main Board Theory of Operation Communications Module The communications section consists of quad UART U21 and RS-232 transceivers U19 and U20. The baud rate frequencies are generated from crystal X3 (3.6864 MHz). Two of the RS-232 channels are used for external communications while the remaining two provide spare internal channels. Each channel has four ports for RTS/CTS/general input-output. Both external channels support the RTS/CTS lines. Transceivers U19 and U20 convert the UART 3 V digital communications lines to RS-232 levels (±7 V typically) for transmission; and ±7 V RS-232 levels to 3 V levels for reception. RJ-45 connectors J7 and J8 provide center connection compatibility to the 6-pin RJ-11 connectors found on the 120 Series Maternal/Fetal Monitors. The 170 Series uses the larger 8-pin connectors to provide fused power for future interfacing. Each channel has shunt 1000 pF shunt capacitors for emissions, 100 Ω series resistors, and clamp devices D6 and D7 for ESD protection. Figure 5-15 provides a block diagram of the communications module. RS-232 Line Transceivers (Channel 1) to Data Bus QUAD UART RS-232 Line Transceivers (Channel 2) TXD, RTS, RXD, CTS TXD, RTS, RXD, CTS to Rear Panel to Rear Panel Miscellaneous Inputs Miscellaneous Outputs Figure 5-15. Communications Module Block Diagram Revision D 170 Series Monitor 2000947-004 5-23 Theory of Operation: Main Board Theory of Operation Recorder Interface Module The recorder interface consists of motor control, paper status logic, and printhead control logic. The motor control consists of latch U3, buffer U6, and FET transistors Q5–Q8. The four phase signals are generated by the processor using U3. These phases are translated to 5 V and buffered by U6 to drive the FETs which in turn drive the unipolar motor. Clamp diodes are used to limit the inductive spike generated when the switches open. The paper status logic consists of paper out and paper misload optical sensor interface circuitry as well as a door switch interface. The paper status logic consists of dual digital potentiometer U9, resistors R216 and R217 for LED drive to the paper out sensor, and R219 and R220 for LED drive to the paper misload sensor. The digital potentiometer connects to the collector of the sensor transistor and becomes the variable pull-up. These signals (MISCOIL and OUTCOIL) are further processed by the analog-to-digital converter to determine the correct threshold for the two sensors. Clamp device U8 is used for ESD protection. The door switch input is a switch closure to ground and is read by the processor through buffer U15. The printhead interface consists of PAL U4 which contains the printhead control latch, head protection circuitry, and printhead shift register. The printhead control latch contains the four strobes for the printhead sections, the printhead load line, and the printhead power supply enable line. The printhead protection timer consists of a four-bit counter which uses a 2 kHz clock [Usmode, U4 (pin 35)] to count off six clocks. The counter is enabled when any one of the four processor-latched strobes is active. After six counts of any active strobe (3 ms), the counter disables all four output strobes and turns off the +24 V head supply. The circuit resets when the processor-latched strobes return to an inactive state. The power fail control line input U4 (pin 76) is also a form of protection which turns off all strobes and the power supply when the +12 V drops to about 10 V. The printhead shift register consists of an 8-bit shift register which clocks out D7 first and clock counters which allow eight clocks to be output for every processor write to the register. The clock counter also provides a done status bit (BUSY*) which goes high after all eight bits are shifted out. This status bit is read through the UART spare port line U21 (pin 28). Figure 5-16 provides a block diagram of the recorder interface. 5-24 170 Series Monitor 2000947-004 Revision D Theory of Operation: Main Board Theory of Operation to Data Bus Motor Control Latch Status Read Buffer to Motor Paper Status Lines from PAL Device Printhead Control Latch Printhead Protection Circuitry to Printhead strobes load line clock data Printhead Data Shift Register Figure 5-16. Recorder Interface Block Diagram Revision D 170 Series Monitor 2000947-004 5-25 Theory of Operation: Main Board Theory of Operation Ultrasound Module Model 171 and Model 173 Monitors contain a single ultrasound channel board. Model 172 and Model 174 Monitors contain a dual ultrasound channel board. The theory contained in this section references the dual ultrasound board but is applicable to the single ultrasound board as well. Overview The ultrasound circuitry is a dual channel pulsed Doppler system with Channel 1 and Channel 2. Each channel generates a 1.151 MHz (center frequency) pulsed carrier signal. This signal carrier causes the crystals in the transducer to emit ultrasonic waves. When these sound waves enter the maternal abdomen, they create echoes when encountering an interface between tissues of differing acoustic impedance. If the interface is moving either toward or away from the ultrasound transducer, the frequency of the reflected sound differs from the frequency sent from the transducer. Isolation Transformer Model 174 Monitors have an isolation transformer for US Channel 1 signals since the connector is shared with the FECG Channel. Ultrasound Transducer When the reflected sound wave is received by the transducer crystals, it is converted to an electrical signal. After being amplified, detected, and filtered, this signal is split into two paths: ultrasound audio and ultrasound envelope. The audio signal is amplified for driving the speaker, while the ultrasound envelope is processed for heart rate data. The center frequency of the transmitted carrier is 1.151 MHz with a pulse repetition frequency of 2 kHz (single or dual use). When both ultrasound channels are being used, Channel 1 completes a transmit/ receive cycle while Channel 2 is muted; then Channel 2 completes a transmit/ receive cycle while Channel 1 is muted. Programmable Array Logic (PAL) All functions of the pulsed Doppler ultrasound circuit are controlled by a PAL U50. Integrated circuit U48 latches the transmit and demodulator signals to prevent race conditions and phase jitter caused by the PAL U50. Table 5-19 provides a summary of PAL outputs. Figure 5-17 provides a block diagram of the ultrasound module. 5-26 170 Series Monitor 2000947-004 Revision D Theory of Operation: Main Board Theory of Operation Table 5-19. PAL Outputs US Channel 1 Isolation Transformer (174 only) Pin Number Signal Name Signal Description 1 TRANS_BURST Operates the Ultrasound Transmitter. 2 DET_BURST1 Activates the Demodulator. 18 575KC Synchronizes the Power Supplies 19 USMODE Signals the Processor that the US Channel is Active 21 PIN1 Selects Channel 1 Transducer 22 PIN2 Selects Channel 2 Transducer 42 CH2 Selects CH2 Track and Hold Circuit 43 CH1 Selects CH1 Track and Hold Circuit Transmitter US Channel 2 Input Pin Diode Switching Pre-Amplifier Demodulator Main Filter CH2 CH2 Demultiplexor Envelope Detector CH2 to Data Bus AGC CH1 Telemetry Switch Telemetry Audio Telemetry Switch Main Filter CH1 Envelope Detector CH1 A/D Fetal Movement Detection Filter Control Lines Figure 5-17. Ultrasound Module Block Diagram Revision D 170 Series Monitor 2000947-004 5-27 Theory of Operation: Main Board Theory of Operation Ultrasound Oscillator Internal gates located in integrated circuit U50, X4, and associated components comprise a crystal-controlled oscillator running at 4.604 MHz. The inverted output of this oscillator is the clock that is used to clock latch U48; therefore changes at the outputs of U50 are not clocked out of U48 until one-half clock cycle later. The system runs at a frequency of 2 kHz [(4.604 MHz/1151)/2=2 kHz] and the time for each transmission and reception is 250 µs [(1/2000)/2=250 µs]. The signal TRANS_BURST is a square wave at a frequency of 1.151 MHz. It is initiated four clock cycles after the internal reset of the binary counter within U50 used to decode the signals used by the ultrasound system and continues 428 clock cycles. The signal DET_BURST1 is also a square waves at a frequency of 1.151 MHz. This signal is output 640 clock cycles after reset, and continues up to 1020 clock cycles. Pin Diode Circuitry The signals PIN1 and PIN2, from PAL U50, turn on the appropriate switches of U47 so as to bias pin diodes D21 and D22 on; this in turn provides a low impedance path for the Channel 1 transducer to the ultrasound transmitter and preamplifier. Diodes D23 and D24 are biased off, providing a high impedance path to the ultrasound transmitter and preamplifier for the Channel 2 transducer. The opposite of the above is true when the Channel 2 transducer is activated. Transmission/Reception Integrated circuits U53, U54, and U55 are voltage regulators used to provide stable, low-noise power supplies for the ultrasound receiver and transmitter. Transistor Q11, inductor L1, and capacitor C208 form the ultrasound transmitter. Q11 is driven by the signal TRANS_BURST. Inductor L2 and capacitors C209, C210, and CV1 provide tuning for the transmitter output. The transmitter has a nominal output impedance of 30 Ω, and can typically drive 4 V peak-to-peak into a 20 Ω load. Transistors Q12, Q13, and Q14, and associated components, form the preamplifier. Capacitors C213, C215, C229, and C216 provide power supply rejection for the preamplifier. Inductor L3, along with capacitors C211 and C212, form a series resonant tank circuit. This tank circuit provides a low impedance path for the received signals from the transducer, and a voltage gain of approximately 28 dB. The typical input impedance to this tank circuit is 30 Ωs. Transistors Q12 and Q13 form a cascode amplifier. Transistor Q13 is a dual nchannel field effect transistor connected in parallel. This parallel connection provides an improvement of 3 dB in signal-to-noise ratio due to the gain doubling and the noise adding in quadrature. Inductor L4 and capacitors C214 and CV3 form a parallel resonant tank circuit with an impedance of approximately 17 kΩs. The shunt impedance of resistors R388, R389, R390, R391, and R392 effectively lower this impedance to 3.6 kΩ. The gain of the preamplifier is approximately 19 dB and is defined by: Rl/((1/(2*gm))+R386)= 3.6k/((1/.002)+200) Transistor Q14 and transformer T1 provide a differential output for the preamplifier. Diode D19 provides protection for Q13 and removes the low impedance tank circuit L3 and C211, and C212 during transmission by shunting L3. Diode D20 provides overload recovery for the preamplifier and voltage limiting to the demodulator through Q14 and T1. 5-28 170 Series Monitor 2000947-004 Revision D Theory of Operation: Main Board Theory of Operation U43 is a quad-switched capacitor integrated circuit configured as a balanced ring demodulator. Its analog inputs are connected to the differential outputs of the preamplifier at the secondary of T1. The switches within the device are actuated by the signal DET_BURST1. The two analog outputs of U43 drive the difference amplifier U44 and its associated components. Integrated circuit U45 switches the output of the difference amplifier U44 (pin 14) to the track-and-hold circuit of either Channel 1 or Channel 2. The track-and-hold circuit for Channel 1 is comprised of components R408, C225, and buffer amplifier U46 (pin 7). The track-and-hold circuit for Channel 2 is comprised of components R409, C226 and buffer amplifier U46 (pin1). The track-and-hold circuits retain the amplitude of the last value from the previous demodulator activation. If this method were not employed, the system gain would have to be twice as high since it is a time sampled system. The samples must be integrated over time (averaged) to produce the desired output. In summary, this method improves the signal-to-noise ratio of the system. Since the DET signal is driven at the same frequency as the transmitted signal, any return signal of the same frequency will be averaged and produce either 0 V or a dc offset at the output of the demodulator; this is not seen by the main filter driven by the demodulator since it is AC coupled by capacitors C253 and C262. Therefore, a difference frequency (Doppler shift frequency) must be present to produce an output from the demodulator. The output of the track-and-hold circuit of Channel 1 at U46 (pin 7) is switched to the Channel 1 main filter through U39 (pin 11) to U39 (pins 6 and 10). Telemetry (if present) is switched to the Channel 1 main filter through U39 (pin 7) to U39 (pins 6 and 10). Telemetry FECG (if present) is switched by U39 (pin 3) to U39 (pins 2 and 15) to the analog-to-digital converter. The main filter is a band-pass amplifier. Its 3 dB points are 120 Hz and 300 Hz, respectively. The bandwidth slopes are greater than 40 dB/octave. The maximum gain of the filter is 46 dB with peaking of approximately 48 dB at 250 Hz. The nominal gain in the system is approximately 36 dB and is controlled by R454. The Channel 1 main filter is comprised of U51 and associated components. Revision D 170 Series Monitor 2000947-004 5-29 Theory of Operation: Main Board Theory of Operation Filtering The main filter is a band-pass amplifier with 3 dB points at 120 Hz and 300 Hz, respectively. The band width slopes are greater than 40 dB/octave. The maximum gain of the filter is 46 dB with peaking of approximately 48 dB at 250 Hz. The nominal gain in the system is approximately 36 dB and is controlled by R454. The Channel 1 main filter is comprised of U51 and associated components. The output of the track-and-hold circuit of Channel 2 at U46 (pin 1) is connected directly to the Channel 2 main filter. The main filter is a band-pass amplifier with 3 dB points are 120 Hz and 300 Hz, respectively. The band width slopes are greater than 40 dB/octave. The maximum gain of the filter is 46 dB with peaking of approximately 48 dB at 250 Hz. The nominal gain in the system is approximately 36 dB and is controlled by R467. The Channel 2 main filter is comprised of U52 and associated components. Integrated circuit U40 switches the output of either the Channel 1 demodulator, the Channel 2 demodulator, or telemetry audio to the fetal movement band-pass filter. This filter has a gain of 3.5 and corner frequencies of 15 Hz. and 39 Hz, respectively. It is comprised of U41 and associated components. The output of the fetal movement filter is input to the analog-to-digital converter. The output of the main filters are input to U10 through capacitors C44 and C45. The input impedance of these inputs is 10 kΩ, thus producing a high-pass filter at 72 Hz. A tone is also one of the inputs to U10 through a high-pass filter at 15 Hz and a gain reduction of –21 dB. The components comprising the filter are C47 and R223. U10 is a quad digital potentiometer with 255 step producing a gain range from 0 to –48 dB. It is controlled by the serial peripheral interface (SPI) system bus. Ultrasound Audio Ultrasound audio (Channel 1 and Channel 2) is output on U10 (pin 8) and U10 (pin 4), respectively. These outputs are buffered by U11 (pin 7) and U11 (pin 8), respectively. The buffered outputs are high-pass filtered at 80 Hz by C57/R236 and C58/R237. They are then half-wave rectified by U13 (pin 8) and its associated components. The output of the rectifier is band-pass filtered from 43 to 260 Hz at a gain of 7.3 by U13 (pin 1) and its associated components. This effectively doubles the frequency which is necessary because the transducer operates at a low RF frequency (1.151 MHz); and the frequencies produced from the fetal heart would not produce acceptable audio quality. The output of U13 (pin 1) is input to summing amplifier U11 (pin 14). The tone output of U10 (pin 18) is also summed by U11 (pin 14) which is a low-pass filter at 2600 Hz with a slope of –12dB/octave. The output of U11 (pin 14) is high-pass filtered at 72 Hz by C52/R231 to the audio power amplifier. The audio power amplifier U12 is a bridge type configuration with a gain of 2.5 and capable of delivering 1.5 W of power into 8 Ω. Figure 5-18 provides block diagram of the audio module. 5-30 170 Series Monitor 2000947-004 Revision D Theory of Operation: Main Board Theory of Operation Summing Amplifier Tone Bit Channel 1 US Audio Bridge Amplifier Digital Potentiometers for Volume Control (x3) Channel 2 US Audio Summing Amplifier Ultrasound Audio Doubler Serial Clock and Data Figure 5-18. Audio Module Block Diagram Ultrasound Envelopes The outputs of the main filters are also input to U32 and U35. The input to U35 is through high-pass filters at 63 Hz. The high pass components for Channel 1 and Channel 2 are C154/R338 and C159/R357, respectively. The output of the main filters are also input to U32; this integrated circuit, in conjunction with U35, forms an AGC (automatic gain control) circuit for both ultrasound channels. Each of these AGC circuit has a maximum gain of 200 with a dynamic range of 46 dB. Each of the AGC outputs are high-pass filtered by C169/R343 at 90 Hz with a gain of one, then input to a half-wave detector U36 (pin 7) with a gain of 1.47. The output of the detector circuits are low-pass filtered by U36 (pin 1)at 20 Hz at gain of ten. These envelopes are then input to the analog-to-digital converter U38. Other inputs to the analog-to-digital converter are the telemetry TOCO signal. This signal is scaled and offset to provide –100 to +400 relative UA units. Revision D 170 Series Monitor 2000947-004 5-31 Theory of Operation: Main Board Theory of Operation Uterine Activity Integrated circuit U33, with a gain of 200, and U34 (pin 7), with a gain of 1.25, provide a total gain of 250 for the on-board tocotransducer pressure channel. The output of U34 (pin 7) is offset +0.5 V, providing a dynamic range of –80 to +400 relative units. Each relative unit represents 20 µV at the input of U33 through resistors R318 and R320. Integrated circuit U42, and its associated components, comprise a charge pump that converts the +3.3 V to –3.3 V. U38 (pin 11) and U34 (pin 1) comprise a 2.5 V reference voltage. U71 (pin 7) provides a reference voltage which is half the 2.5 V reference, called VREF/2. Integrated circuit U56 (pin 7), and associated components, provides the +4 V required for the tocotransducer. Figure 5-19 provides a block diagram of the antepartum uterine activity section. Pressure Differential Amplifier to Data Bus Gain Stage Pressure Telemetry TOCO +4 V Reference +4 V Reference Amplifier A/D +2.5 V Reference Figure 5-19. Antepartum UA Module Block Diagram 5-32 170 Series Monitor 2000947-004 Revision D Theory of Operation: Main Board Theory of Operation Power Supplies Integrated circuit U60 is a voltage comparator that senses that the power has been removed, and inhibits battery RAM access and recorder printing when the supply drops to approximately 10 V. Integrated circuit U58 forms an R-S flip-flop. U58 (pin 6) is set high when the Power button is pressed. Q19 collector also goes to a logic 1 whenever the Power button is pressed. When U58 (pin 6) is pulled high, it enables the SYNC signal at U59 (pin 4) which is inverted by U59 (pin 3) to reach all the switching power supplies. The sync frequency is 575 kHz and is derived, and hence synchronized to the ultrasound system. U62 and its associated components comprise a buck converter with an output voltage of +5.8 V. This is used as the pre-regulator for linear regulators U65, U66, U68, and U69. U65 provides the system +5 V. U66 provides the +5 V for the recorder motor. U67 provides the +5 V for the audio amplifier. U68 provides +3.3 V for the analog circuitry. U69 provides the +3.3 V for the digital circuitry. U61, and its associated components, comprise a linear regulator with an output voltage of +7.5 V. This is used as the pre-regulator for the linear regulator U55 which provides the +6 V for the ultrasound front end; it also powers U53 which provides the –6 V and powers U56 which is used to generate the +4 V for the tocotransducer circuitry. U64, and its associated components, comprise a boost converter with an output voltage of +24 V. Integrated circuit U70, under microprocessor control, is used to control the +24 V for the recorder printhead. The +24 V output is current limited by Q20, Q21, and associated components. The power output is limited to 17 W. Figure 5-20 provides a block diagram of the power supply section. Revision D 170 Series Monitor 2000947-004 5-33 Theory of Operation: Main Board Theory of Operation Power Status Comparator 5 V Linear Regulator for Audio 5 V Linear Regulator for Motor 5 V Linear Regulator for Digital Logic Switching Pre-Regulator 3.3 V Linear Regulator for Digital Logic +12 V Input 3.3 V Linear Regulator for Analog Circuitry 6 V for Ultrasound +7.5 V Linear Pre-Regulator +6 V for Ultrasound +5 V for Ultrasound Switching Regulator for Recorder +24 V Shutdown digital control Sync input from ultrasound timing Low Power +3.3 V Regulator from Power Switch Power Off Control Power Switch Flip-Flop Switching Regulator Shutdown Figure 5-20. Power Supply Section Block Diagram 5-34 170 Series Monitor 2000947-004 Revision D Theory of Operation: Main Board Theory of Operation FECG/IUP Board Interface J16 and J15 provide the interface to the FECG/IUP Board. J15 is patient isolated. RA, LA, RL FECG Connector Pressure Connector Telemetry Connector ±PRESS 4V REF Telemetry FECG In IUP FECG/IUP Board 12-Bit A/D Converter FECG Telemetry FECG Out to Data Bus Telemetry Switch Figure 5-21. FECG/IUP Board Interface Block Diagram Revision D 170 Series Monitor 2000947-004 5-35 Theory of Operation: FECG/IUP Board Theory of Operation FECG/IUP Board Theory of Operation Isolated Power Supply Patient isolation for the FECG and the IUP catheter is accomplished by providing floating power supplies to power the FECG and IUP front end electronics. Integrated circuit U12 provides non-overlapping drive signals to dual FET U9 which in turn drives the primary of transformer T1. Resistor R94 and capacitor C12 provide dampening for the primary of T1 so as to limit the voltage at the drains of U9 to a level below their breakdown voltage. The frequency at which the primary of T1 is switched is 35968.75 Hz which is derived by dividing the signal 144 kHz by four. The actual frequency of this signal is 143875 Hz and is derived from the PAL U50 in the ultrasound circuit. Thus the transformer switching frequency is synchronized to the ultrasound circuit. The secondary of transformer T1 drives rectifiers D9 and D10. These rectifiers are filtered by C8 and C10 for the positive power supply, and by C9 and C11 for the negative power supply. Integrated circuit U3 and its associated components provide a regulated positive voltage (+10 V for Model 173; +9.3 V for Model 174), while integrated circuit U4 provide a regulated negative voltage (–10 V for Model 173; –9.3 V for Model 174). Integrated circuit U1 is a positive precision 2.5 volt reference. The output of U1 is input to the non inverting input of amplifier U2 (pin 3). The output of this amplifier U2 (pin 1) drives the emitter follower Q1. The gain of the amplifier-emitter follower is 1.6 and is set by resistors R3 and R4. The output of Q1 emitter is 4 V (1.6 x 2.5). This voltage is used to power either an IUP transducer or tocotransducer. Resistor R1 in the collector of Q1 is used to sense the current drain from other manufacturers of IUP transducers who don't have an IUP enable associated with them. When the voltage at the junction of resistors R36 and R37 falls below 1.164 V (4 mA) the output of the voltage comparator U16 (pin 8) switches from a high state to a low state, which in turn causes transistor Q3 to turn on and transfer the IUP enable across the isolated barrier. This signal is named IUPEN*. However If a tocotransducer is present, this signal is ignored. Transistor Q3 can also be turned on by the signal PEN*. For Model 173 and 174 Monitors, integrated circuit U33 and associated components provide regulation of the power supplied to the FECG/IUP Board circuitry (+12 V for Model 173; +11.6 V for Model 174). For a Model 174 only, the CLEAR signal synchronizes the counter in the PAL; this in effect stops the power supply during the receive cycle of the ultrasound process for noise reduction purposes. 5-36 170 Series Monitor 2000947-004 Revision D Theory of Operation: FECG/IUP Board Theory of Operation Pressure Channel The input to the pressure channel is to resistors R9 and R10 with the signal names of –PRESS and +PRESS respectively. Resistors R9 through R12 and capacitors C16 through C18 provide RF filtering, and in conjunction with diode limiters D1 and D2, provide protection from electro-static discharge.Instrumentation amplifier U5 provides a gain of 248 which is given by (49.4E3/R13)+1. The output of U5 which is inverting with respect to the signal –PRESS, drives the inverting amplifier U6 (pin 1). This amplifier has a gain of –4.99 and rolls off at approximately 32 Hz. The output of U6 (pin 1) drives U6 (pin 5) with a division of two formed by resistors R18 and R19. The operation of this amplifier is best understood if analyzed from its quiesent condition of no input signal. Under this condition U6 (pin 5) is at zero volts, therefore U6 (pin 6) must also be at zero volts. This forces a quiesent current of 75 µA through R20. This current is produced by U6 (pin 7) driving the LED that illuminates the photodiode at U10 (pins 3 and 4) which is the feedback path. The LED also illuminates the photodiode at U10 (pins 5 and 6) which are on the nonisolated side. The current transfer ratio of this photodiode with respect to the photodiode on U10 (pins 3 and 4) is 0.85 to 1.05. The tocotransducer and the IUP transducer have the transfer function of 5µV/UA-Unit/Volt-excitation. Therefore since the excitation voltage is 4 V, the input voltage is 0.002V/100UA-Units. This corresponds to 2.475 V at U6 (pin 1) and 1.2375 Vat U6 (pin 5). This causes a delta current of 9.3 µA through R20, which is also transferred across the barrier with the same transfer ratio of 0.85 to 1.05. This current is input to U13 (pin 6) through R32. Potentiometer R25 sets the gain at U13 (pin 8) to 0.5 V/100UA-Units. Potentiometer R30 sets the initial offset voltage to +0.5 V. The output amplifier U13 (pin 8) is a unity gain amplifier with 3 poles of filtering with its 3 dB frequency of 3 Hz. Since the system analog-to-digital converter has an input range of 0 to 2.5 V, the dynamic range is from –100 to +400UA-Units. Revision D 170 Series Monitor 2000947-004 5-37 Theory of Operation: FECG/IUP Board Theory of Operation FECG Channel The input to the FECG channel is two resistors R42 and R43 with the signal names of RA and LA respectively. Resistors R42, R43, R45, and R462 and capacitors C38 through C40 provide RF filtering, and in conjunction with diode limiters D3 through D6 provide protection from electro-static discharge. Resistors R40, R41, and R44 cause amplifier U7 to saturate when the FECG cable is not connected to a fetus. This disables the FECG channel from counting noise and flashing LEDs and causing tones to be generated by the speaker. Instrumentation amplifier U7 provides a gain of 13.7 which is given by (49.4E3/R54)+1. Amplifier U2 (pins 5, 6, and 7) is an integrator which has high gain at DC with reducing gain as frequency increases. Amplifier U2 (pin 7) drives amplifier U2 (pin8). Amplifier U2 (pin 8) is noninverting and is patient protected in the event of a failure of this device. The two sections of U2 provide the right leg drive circuit. The right leg drive is a feedback circuit that provides drive in the opposite polarity to a common mode voltage. Its purpose is to cancel DC offset from the electrode, and to help reject 50 and 60 Hz components. The output of U7, which is inverting with respect to the signal RA, drives the non-inverting amplifier U2 (pin 12) through a high-pass filter of 10 Hz. Resistor R58 and diode D7 provide voltage limiting at U2 (pin 12). This amplifier has a gain of 22.5 and rolls off at approximately 224 Hz. The output of U2 (pin 14) drives U8 (pin 3) through R64. Resistor R64 and diode D8 provide voltage limiting at U8 (pin 3). This amplifier has a gain of 22.5 and rolls off at approximately 224 Hz. The composite bandwidth and gain at this point is from 10 Hz to 320 Hz with a gain of 6936. The output of U8 (pin 1) drives amplifier U8 (pin 5) with a division of 10/11 formed by resistors R67 and R68. The operation of this amplifier is best understood if analyzed from its quiesent condition of no input signal. Under this condition U8 (pin 5) is at zero volts, therefore U8 (pin 6) must also be at zero volts. This forces a quiesent current of 75 µA through R69. This current is produced by U8 (pin 7) driving the LED that illuminates the photodiode at U11 (pins 3 and 4) which is the feedback path. The LED also illuminates the photodiode at U11 (pins 5 and 6) which are on the un-isolated side. The current transfer ratio of this photodiode, with respect to the photodiode, on U11 (pins 3 and 4) is 0.85 to 1.05. The input voltage required to drive U8 (pin 1) to either of its power supply limits is approximately ±1.44 mV peak. This corresponds to approximately ±5 V at U8 (pin 1) for ±0.72 mV input, and ±4.55 V at U8 (pin 5). This causes a delta current of 34.2 µA through R69, which is also transferred across the barrier with the same transfer ratio of 0.85 to 1.05. This current is input to U15 (pin 3) with resistor R75 being the load resistor that produces a voltage proportional to the current transferred to it. Amplifier U15 (pin 7) produces an offset voltage of –1.97 V. The quiesent current of 75 µA flowing through R75 will produce a voltage of approximately +1.25 V at U15 (pin 3). A 0.72 mV signal peak-to-peak at the input will produce approximately 1.26 V at U15 (pin 1). Thus ±1.44 mV at the input will produce ±2.52 V at U15 (pin 8). Amplifier U15 (pin 14) is a non-inverting amplifier with a gain of one. It also provides 3 sections of high-pass filtering at 25 Hz. Amplifier U15 (pin 8) is a non-inverting amplifier with a gain of one. It also provides 3 sections of low-pass filtering at 90 Hz. Mode Enables The FECG enable ties resistor R87 to the floating ground when the FECG cable is attached. This causes approximately 4.5 mA to flow in the LED of opto-coupler U17. The current transfer function of the coupler is 19% typically which causes 860 µA to flow in the photo-transistor of U17 in turn causing R103 to be pulled to 5-38 170 Series Monitor 2000947-004 Revision D Theory of Operation: FECG/IUP Board Theory of Operation ground on the non-floating side of the barrier. It is then sensed by the system microprocessor. The IUP enable ties resistor R97 to the floating ground when the IUP transducer cable is attached. This causes approximately 4.5 mA to flow in the LED of optocoupler U17. The current transfer function of the coupler is 19% typically which causes 860 µA to flow in the photo-transistor of U17 in turn causing R104 to be pulled to ground on the non-floating side of the barrier. It is then sensed by the system microprocessor. The tocotransducer enable ties resistor R100 to the floating ground when the IUP transducer cable is attached. This causes approximately 4.5 mA to flow in the LED of opto-coupler U17. The current transfer function of the coupler is 19% typically which causes 860 µA to flow in the photo-transistor of U17in turn causing R105 to be pulled to ground on the non-floating side of the barrier. It is then sensed by the system microprocessor. For a Model 174 only, the ultrasound enable ties resistor R109 to the RL when the ultrasound cable is attached. This causes approximately 4.5 mA to flow in the LED of opto-coupler U17. The current transfer function of the coupler is 19% typically which causes 860 µA to flow in the photo-transistor of U17 in turn causing P16 (pin 6) to be pulled to ground on the non-floating side of the barrier. It is then sensed by the system microprocessor. In summary, the US1 enable isolated one channel of US from the Main Board along with a mode enable from the FECG/IUP Board. Revision D 170 Series Monitor 2000947-004 5-39 Theory of Operation: FECG/IUP Board Theory of Operation To Main Board A/D Converter for Processing To Main Board Front End FECG/IUP Connector Isolated Side Connector Unisolated Side Connector RA LA RL PRESS +PRESS FECG Low Noise Differential Amplifier with Protection Circuitry RL Drive Circuitry High-Pass Filter Optical Isolation Pressure Differential Amplifier with Protection Circuitry Optical Isolation Filtering and Gain Stages Gain and Offset Adjustments Filtering Stages +4 V Reference IUP Detection Circuitry 4 V To TOCO Enable FECGEN FECGEN IUPEN TOCOEN US1EN (174 only) IUPEN Model Line Optical Isolation for FECG, IUP, US1 (174 only) and TOCO TOCOEN US1EN (174 only) +12 V (173); +11.6 V (174) 144 KHz (173 only) Isolated Supplies Isolated Power Supply Q, Q* Power Supply Control PAL 144 KHz CLEAR* 174 Only Figure 5-22. FECG/IUP Board Block Diagram 5-40 170 Series Monitor 2000947-004 Revision D Theory of Operation: FECG/IUP Board Theory of Operation Table 5-20. FECG/UA Unisolated Output (P16), Models 173/174 Only Signal Type (Relative To Main Board) Signal Description 1 +12 V (173) +11.6V (174) Output +12 V for FECG Isolated Power Supply (Model 173 only) +11.6 V for FECG Isolated Power Supply (Model 174 only) 2 GND Output Digital Ground 3 +5V Output +5 V Supply 4 +7.5V Output +7.5 V Supply 5 2.5VREF Output 2.5 V Reference 6 IUPEN* Input IUP Enable Output 7 +3.3VANA Output +3.3 V for Analog 8 144KC Output 144 KHz for Isolated Power Supply 9 –3.3VANA Output –3.3 V for Analog 10 AGND Output Analog Ground 11 FECGOUT Input FECG Analog Output 12 PRESSOUT Input Pressure Analog Output 13 FECGEN* Input FECG Enable 14 CLR* Output Ultrasound Sync Timing Line (Model 174 only) 15 TOCOEN* Input TOCO Enable 16 US1EN* Input US1 Mode Enable (Model 174 only) Pin Number Signal Name * Active low. Revision D 170 Series Monitor 2000947-004 5-41 Theory of Operation: FECG/IUP Board Theory of Operation Table 5-21. FECG/UA Isolated Output (P15), Models 173/174 Only Pin Number Signal Name Signal Type (Relative To Main Board) Signal Description 1 RA Output Right Arm Input from Patient Connector 2 LA Output Left Arm Input from Patient Connector 3 RL Input Right Leg Drive Signal from FECG Board 4 SHIELDF Output Isolated Shield 5 –PRESS Output UA Channel Negative Input 6 +PRESS Output UA Channel Positive Input 7 ISO4V Input Isolated 4 V Reference 8 ECGEN* Output Enable for FECG Cable 9 4VISOGND Input Isolated 4 V Reference Ground 10 PEN* Output Isolated IUP Enable 11 USEN* (174 only) Output US1 Mode Enable (Model 174 only) 12 ENTOCO* Output Isolated TOCO Enable * Active low. 5-42 170 Series Monitor 2000947-004 Revision D Chapter 6 Functional Checkout Procedure 6 Like all electronic monitoring devices, internal and external components are subject to fatigue, wear, and the potential for failure over time and under varying conditions of use. Additionally, events such as dropping the monitor, spilling liquids on the monitor, or crimping the lead wires or patient cables can cause damage which may affect the overall system performance. This chapter contains the following: Equipment Required. . . . . . . . . . . . . . . . . . . . . . . . . . . . . . . . . . . . . . 6-2 General . . . . . . . . . . . . . . . . . . . . . . . . . . . . . . . . . . . . . . . . . . . . . . . . 6-3 Monitor Self-Test . . . . . . . . . . . . . . . . . . . . . . . . . . . . . . . . . . . . . . . . 6-4 Front Panel Pushbutton Test . . . . . . . . . . . . . . . . . . . . . . . . . . . . . . . 6-5 Connecting the Simulator. . . . . . . . . . . . . . . . . . . . . . . . . . . . . . . . . . 6-6 FECG Test . . . . . . . . . . . . . . . . . . . . . . . . . . . . . . . . . . . . . . . . . . . . . 6-7 Legplate Inspection . . . . . . . . . . . . . . . . . . . . . . . . . . . . . . . . . . . . . 6-12 Ultrasound Test . . . . . . . . . . . . . . . . . . . . . . . . . . . . . . . . . . . . . . . . 6-13 Fetal Movement Detection Test . . . . . . . . . . . . . . . . . . . . . . . . . . . . 6-16 Ultrasound Transducer Test . . . . . . . . . . . . . . . . . . . . . . . . . . . . . . . 6-18 Uterine Activity Test . . . . . . . . . . . . . . . . . . . . . . . . . . . . . . . . . . . . 6-19 Tocotransducer Test . . . . . . . . . . . . . . . . . . . . . . . . . . . . . . . . . . . . . 6-21 Strain Gauge Transducer Test . . . . . . . . . . . . . . . . . . . . . . . . . . . . . 6-22 Pattern Memory Test . . . . . . . . . . . . . . . . . . . . . . . . . . . . . . . . . . . . 6-23 Dual Heart Rate Test (Non-Pattern). . . . . . . . . . . . . . . . . . . . . . . . . 6-24 Alarm Test . . . . . . . . . . . . . . . . . . . . . . . . . . . . . . . . . . . . . . . . . . . . 6-28 Revision D 170 Series Monitor 2000947-004 6-1 Functional Checkout Procedure: Equipment Required Equipment Required Table 6-1 provides a complete listing of equipment required for a functional checkout procedure. Table 6-1. Equipment Required Test Equipment Model 325 Simulator # (14203A/B) Monitor Interconnect Cable (14212A/B) FECG Legplate Legplate for Qwik Connect Plus with round connector (1590AAO) US/FMD Model 325 Simulator # (14203A/B) Monitor Interconnect Cable (14212A/B) US Transducer Nautilus Ultrasound Transducer (5700GAX–5700MAX Series) TOCO/IUP Model 325 Simulator # (14203A/B) Monitor Interconnect Cable (14212A/B) Tocotransducer Nautilus Tocotransducer (2264GAX–2264MAX Series) Reusable Strain Gauge with holder (4007BAX); or Reusable Strain Gauge without holder (4007LAX); or Disposable Strain Gauge (4009AAX) NOTE: These items are no longer sold by GE. However, transducers in the field are compatible with the 170 Series Monitor. Strain Gauge Transducer Pattern Memory Dual Heart Rate (FECG/US) Model 325 Simulator # (14203A/B) Monitor Interconnect Cable (14212A/B) Model 325 Simulator # (14203A/B) Monitor Interconnect Cable (14212A/B) Two Model 325 Simulators # (14203A/B) with two sets of Monitor Interconnect Cables (14212A/B); or Two Nautilus Ultrasound Transducers 5700GAX–5700MAX Series) Dual Heart Rate (US/US2) Alarms Model 325 Simulator # (14203A/B) Monitor Interconnect Cable (14212A/B) PS320 Maternal/Fetal Simulator (Fluke Biomedical) NOTE: PS320 Maternal/Fetal simulator by Fluke Biomedical can also be used as an alternative to model 325 simulator. To use the PS320 Simulator Refer “Addendum for using PS320 Simulator” in chapter 12.” 6-2 170 Series Monitor 2000947-004 Revision D Functional Checkout Procedure: General General Between Factory Service visits it is necessary that the proper operation of each monitor be verified by performing the functional checkout procedure described in this section. This procedure should be completed prior to initially placing the monitor on a patient, when monitor performance needs to be verified, on a semiannual basis, or more frequently as dictated by your equipment maintenance and management policies. NOTE: Read each step of this procedure thoroughly before actually performing the test. Visually inspect the monitor, patient cables, and other accessories for cracks, fissures, or other signs of wear or damage. Do not use any monitor or accessory which appears to be worn or damaged. If unsure, contact your GE Service Representative to arrange for evaluation, replacement, or repair of the suspect item(s). Revision D 170 Series Monitor 2000947-004 6-3 Functional Checkout Procedure: Monitor Self-Test Monitor Self-Test The 170 Series Monitor contains test routines which verify the unit’s calibration and internal circuitry. These routines are initiated by each time the monitor is turned on. The test results are printed on the strip chart recorder paper, verifying the integrity of the unit. This information is covered in detail in “Monitor Self-Test Routines” on page 4-8. 6-4 170 Series Monitor 2000947-004 Revision D Functional Checkout Procedure: Front Panel Pushbutton Test Front Panel Pushbutton Test This procedure ensures the functionality of the front panel pushbuttons. 1. Disconnect all transducers from the front panel. 2. Enter the service setup mode (see page 4-10) and set the recorder speed to 1 cm/ min. 3. Press the Setup button to exit the setup mode. 4. Press the monitor’s Power button to turn on the monitor. 5. Press the monitor’s Record button and verify the following: The yellow indicator next to the button illuminates continuously. The recorder paper advances at a rate of 1 cm/min. The recorder prints the correct time and date information on the strip chart paper. (If an incorrect time or date is listed, refer to “Chapter 4, Setup Procedures” in this manual.) The recorder prints the messages CARDIO INOP and UA INOP, indicating that no ultrasound or uterine activity transducers are plugged into the front panel US, US2, or UA connectors. The recorder prints the message 1 CM/MIN, indicating the selected chart speed. 6. Press the monitor’s front panel Paper Advance pushbutton and verify that the recorder paper advances at a rate of 36 cm/min. 7. Press the Paper Advance pushbutton again and verify that the recorder prints the message 1 CM/MIN. 8. Access the service setup mode and set the recorder speed to 3 cm/min. 9. Press the Setup button to exit the service setup mode. 10. Press the monitor’s Power button to turn the monitor back on. 11. Verify that the recorder paper advances at a rate of 3 cm/min and that after approximately 40 seconds, the message 3 CM/MIN prints on the recorder paper. (The time, date and monitoring modes also print again.) 12. Press the Mark button and verify that an event mark ( ) prints on the bottom two lines of the recorder paper. Revision D 170 Series Monitor 2000947-004 6-5 Functional Checkout Procedure: Connecting the Simulator Connecting the Simulator NOTE: For using PS320 simulator refer “Addendum to use PS320 simulator” This part of the procedure prepares the simulator for use. NOTE: You must use a Model 325 Simulator for the functional checkout procedure. (Monitors in the 170 Series do not work with Model 305 Simulators.) NOTE: For using P320 simulator refer "Addendum to use P320 simulator"from page 12-2. 6-6 1. Ensure the Model 325 Power switch is in the off position. 2. Connect the Model 325 Simulator’s power cord to the power receptacle on the rear panel of the simulator; plug the other end of the power cord into a properly grounded wall outlet of appropriate voltage. 3. Ensure the 170 Series Monitor is turned off. 4. Connect the simulator interconnect cable’s 50-pin end to the simulator’s Fetal Monitor connector. 5. Connect the sub-cables of the other end of the simulator interconnect cable into the color-coded connectors on the monitor/adapter: US and UA (as required by the procedure). 6. Turn on the Model 325 Simulator. Verify that the green Power indicator illuminates. 7. Turn on the 170 Series Monitor.xt 170 Series Monitor 2000947-004 Revision D Functional Checkout Procedure: FECG Test FECG Test This portion of the functional checkout procedure ensures the integrity of the FECG circuitry and the heart rate channel of the recorder. 1. Connect the Model 325 Simulator’s ECG sub-cable to the FECG receptacle on the monitor 2. Set the switches on the Model 325 Input Simulator according to Table 6-2. 3. If not already on, press the monitor’s Record button. 4. Turn the simulator’s Manual Adjustment knob fully counterclockwise and verify the following on the monitor: The FHR1 value is 30 BPM. The FHR1 heartbeat indicator ( The ECG “beep” volume of the rear panel speaker can be increased or decreased using the Volume buttons. (Set the volume to the desired level.) The recorder prints a continuous line at 30 BPM on the top grid of the strip chart paper. 5. Revision D ) flashes at a rate of 30 times per minute. The recorder prints the message FECG on the center margin of the strip chart paper after approximately 20 seconds. Turn the simulator’s Manual Adjustment knob to input an FECG signal of approximately 120 BPM. Verify the following on the monitor: The FHR1 value is 120 BPM. FHR1 heartbeat indicator ( The ECG “beep” volume of the rear panel speaker can be increased or decreased using the Volume buttons. (Set the volume to the desired level.) The recorder prints a continuous line at 120 BPM on the strip chart paper. 170 Series Monitor 2000947-004 ) flashes at a rate of 120 times per minute. 6-7 Functional Checkout Procedure: FECG Test Table 6-2. Model 325 Simulator Settings for FECG Test Section Switch Setting Main RATE Rate MANUAL Mode FECG QRS Amplitude 15 µV QRS Polarity + Pattern Memory OFF Main CMR Mode TOCO FECG/MECG GENERAL UA 6. Repeat step 5 for each of the following rates: 60, 210, and 240 BPM. 7. Change the simulator’s QRS Polarity switch from + to –. Verify that the monitor does not skip any beats. 8. Set the simulator’s ECG Rate switch to the RAMP setting. Verify that the monitor’s FHR1 value counts between approximately 30 and 240 BPM and that the FHR1 trend is a ramp between the same values on the strip chart paper. (See Figure 6-1.) 9. Access the Service Setup Mode and disable ECG Artifact Elimination. 10. Set the simulator’s ECG Rate switch to the ∆15 position. Verify the following on the monitor: The FHR1 value oscillates by 15 BPM. The FHR1 heartbeat indicator ( The ECG “beep” is heard from the rear panel speaker. The FHR trend oscillates 15 BPM between 115 and 130 BPM on the top grid of the strip chart paper. (See Figure 6-2.) ) flashes for each input signal. 11. Repeat step 10 for rate values of ∆22 and ∆27. The results should be the same except that the FHR1 value oscillates by either 22 or 27 BPM and the FHR trend is an oscillation of 22 or 27 BPM. The top value is always at approximately 130 BPM. (Refer to Figure 6-2.) 12. Access the Service Setup Mode and enable ECG Artifact Elimination. 6-8 170 Series Monitor 2000947-004 Revision D Functional Checkout Procedure: FECG Test 13. Set the simulator’s ECG Rate switch to the ∆15 position. Verify the following on the monitor: The FHR1 value oscillates by 15 BPM. The FHR1 heartbeat indicator ( The ECG “beep” is heard from the rear panel speaker. The recorder prints an oscillation of 15 BPM between 115 and 130 BPM on the top grid of the strip chart paper. (Figure 6-2. shows the strip chart paper results.) ) flashes for each input signal. 14. Repeat step 13 for the rate value of ∆22. The result should be the same as step 13 except that the FHR1 value oscillates by 22 BPM and the trend is an oscillation of 22 BPM between the 108 and 130 BPM on the strip chart paper. 15. Set the simulator’s ECG Rate switch to the ∆27 position. Verify the following on the monitor: The FHR1 value oscillates by 27 BPM. The FHR1 heartbeat indicator ( The ECG “beep” is heard from the rear panel speaker. The trend does not indicate any oscillation. ) flashes for each input signal. 16. Access the Service Setup Mode and disable ECG Artifact Elimination. 17. Set the simulator’s ECG Rate switch to the MANUAL position and the Manual Adjustment knob to the fully counterclockwise position. Disconnect the ECG simulator sub-cable from the monitor’s FECG receptacle. Verify the following on the monitor: The FHR1 value is blank. The FHR1 trend stops plotting on the strip chart paper. After approximately 30 seconds, the message CARDIO INOP prints on the center margin of the strip chart paper. 18. Set the simulator’s ECG Mode switch to the OFF position. Revision D 170 Series Monitor 2000947-004 6-9 Functional Checkout Procedure: FECG Test Figure 6-1. FECG Ramp 6-10 170 Series Monitor 2000947-004 Revision D Functional Checkout Procedure: FECG Test Figure 6-2. FECG Artifact Elimination Revision D 170 Series Monitor 2000947-004 6-11 Functional Checkout Procedure: Legplate Inspection Legplate Inspection Inspect the legplate as follows: 6-12 1. Check for a proper seal around the ground plate. 2. Ensure that no contaminants are present on either the ground plate or the push posts. 3. Visibly assess the condition of the cable, strain relief, and connector pins. 170 Series Monitor 2000947-004 Revision D Functional Checkout Procedure: Ultrasound Test Ultrasound Test This portion of the functional checkout procedure ensures the integrity of the ultrasound circuitry and the heart rate channel of the recorder. 1. Connect the simulator’s US sub-cable to the US receptacle on the monitor. 2. Set the switches on the Model 325 Input Simulator according to Table 6-3. 3. If not already on, press the monitor’s Record pushbutton. 4. Turn the simulator’s Manual Adjustment knob to input an ultrasound signal of approximately 120 BPM. Verify the following on the monitor: 5. 6. The FHR1 value is 120 BPM. The FHR1 heartbeat indicator ( minute. Ultrasound audio volume from the rear panel speaker can be increased or decreased using the left pair of Volume pushbuttons. (Set the volume to the desired level.) The recorder prints a continuous line at 120 BPM on the top grid of the strip chart paper. The recorder prints the message US on the center margin of the strip chart paper after approximately 20 seconds. ) flashes at a rate of 120 times per Use the simulator’s Manual Adjustment knob to increase the heart rate value by less than 13 BPM from the 120 BPM baseline. Verify the following on the monitor: The FHR1 value immediately reflects this new input rate. The strip chart recorder immediately reflects this new input rate. Use the simulator’s Manual Adjustment knob to decrease the heart rate value by more than 13 BPM from the 120 BPM baseline. Verify the following on the monitor: The FHR1 value immediately reflects this new input rate. The strip chart recorder prints at the last input rate for an additional 3 seconds before blanking the heart rate data and printing a continuous line at the new input rate. Set the simulator’s US Rate switch to the RAMP position. Verify that the FHR1 value counts between approximately 50 and 210 BPM and that the recorder prints a ramp between the same values. (Refer to Figure 6-3.) Table 6-3. Ultrasound Test Simulator Settings Section US/FMD Revision D 170 Series Monitor 2000947-004 Switch Setting Mode US Signal Level MED Rate MANUAL 6-13 Functional Checkout Procedure: Ultrasound Test Table 6-3. Ultrasound Test Simulator Settings Section Switch Setting General Pattern Memory OFF Main CMR Mode TOCO UA 7. 6-14 Place the simulator’s US Rate switch in each of the individual rate settings (50, 60, 120, and 210 BPM). Verify the following on the monitor: The FHR1 value reflects the simulator setting ± 1 BPM. The FHR1 heartbeat indicator ( Ultrasound audio is heard coming from the rear panel speaker. The recorder prints a continuous line at the respective value ± 3 BPM on the top grid of the strip chart paper. ) flashes at the simulator setting. 8. Repeat step 4 through step 7 using the second ultrasound channel. 9. Place the simulator’s US Mode switch in the OFF position. Verify the following on the monitor: The FHR1 value is blank. The recorder stops printing the fetal heart rate trace. The recorder prints the message CARDIO INOP on the center margin of the strip chart paper after approximately 20 seconds. 170 Series Monitor 2000947-004 Revision D Functional Checkout Procedure: Ultrasound Test Figure 6-3. Ultrasound Ramp Revision D 170 Series Monitor 2000947-004 6-15 Functional Checkout Procedure: Fetal Movement Detection Test Fetal Movement Detection Test This portion of the functional checkout procedure ensures the integrity of the fetal movement detection circuitry and the heart rate channel of the recorder. (Refer to Figure 6-4.) NOTE: Fetal movement detection is an option which must be installed and enabled for use on your monitor. 1. Connect the simulator’s US sub-cable to the US receptacle on the monitor. 2. Set the switches on the Model 325 Input Simulator according to Table 6-4. 3. If not already on, press the monitor’s Record pushbutton. 4. Turn the simulator’s Manual Adjustment knob to input an ultrasound signal of approximately 120 BPM. Verify the following on the monitor: The FHR1 value is 120 BPM. The FHR1 heartbeat indicator ( minute. Ultrasound audio volume from the rear panel speaker can be increased or decreased using the left pair of Volume pushbuttons. (Set the volume to the desired level.) The recorder prints a continuous line at 120 BPM on the top grid of the strip chart paper. Fetal movement markers are shown on for a duration of one second, then off for eight seconds, then on for one second, etc. The recorder prints the messages US and FMD on the center margin of the strip chart paper after approximately 20 seconds. ) flashes at a rate of 120 times per Table 6-4. Fetal Movement Detection Test Simulator Settings Section US/FMD General UA 6-16 170 Series Monitor 2000947-004 Switch Setting Mode US/FMD Signal Level MED Rate MANUAL Pattern Memory OFF Main CMR Mode TOCO Revision C Functional Checkout Procedure: Fetal Movement Detection Test Figure 6-4. Fetal Movement Detection Ultrasound Transducer Test 1. Inspect a Model 170/250 ultrasound transducer as follows: Ensure there are no cracks around the transducer face. Visibly assess the condition of the cable, strain relief, and connector pins. 2. Disconnect the simulator's ultrasound cable from the front panel of the 170 Series Monitor. Revision D 170 Series Monitor 2000947-004 6-17 Functional Checkout Procedure: Ultrasound Transducer Test 3. Connect the ultrasound transducer to either US input receptacle on the front panel of the monitor. Verify the following on the monitor: The value shows three steady dashes “– – –” in the FHR1 display. The recorder prints the message US on the center margin of the strip chart paper after approximately 20 seconds. 4. Connect the MFH-1 (Mechanical Fetal Heart) to the US1 port on the PS320 Simulator via the cable supplied with MFH-1. NOTE 1: MFH-1 cannot be used with Corometrics 325 Simulator NOTE 2: Refer “Addendum to use PS320 Simulator” for using the PS320 Simulator 5. Place the Ultrasound Transducer face up on the work surface and coat it with Ultrasound conductive gel and place the MFH-1 on the Ultrasound transducer, as shown in Figure below 6. For MFH-1 to function, power the PS320 Simulator using the battery eliminator, the MFH-1 will not function on battery power. 7. Set the rate of the MFH-1 to 120 BPM by setting the US1 value in the PS320 Simulator to 120 BPM and verify the following on the monitor. (Refer appendix for Using PS320 Simulator) The FHR value in the Monitor is 120±1 BPM The recorder prints a continuous line at 120 ±3 BPM on the top grid of the strip chart paper. The FHR1 heartbeat indicator (♥) flashes at a rate of 120 times per minute. Ultrasound audio is heard coming from the monitor’s rear panel speaker. 8. Disconnect the ultrasound transducer from the front panel of the monitor. Verify the following on the monitor: The FHR1 value and heartbeat indicator are both blank. The recorder stops printing the fetal heart rate trace. The recorder prints the message CARDIO INOP on the center margin of the strip chart paper after approximately 20 seconds ABOUT LATCHING ALARMS The fetal heart rate alarms are latching alarms which means that a Unsilenced, Resolved Threshold Alarm: If a threshold alarm condition ResolvedResolved ThresholdThreshold Alarm: IfAlarm: a threshold alarm condition The fetal The heart rateheart alarms latching alarms which means that a thatUnsilenced, rateare alarms areusing latching alarms which means a Unsilenced, If a threshold alarm condition clinician mustfetal acknowledge the alarm the monitor’s Alarm is resolved, prior to be silenced (clinical acknowledgement), the visual Silence button in order to clear the alarm. Active Threshold Alarm: and audible indications both remain present. Press the Alarm Silence Press the Alarm Silence button to cancel the audio component of an button to cancel both the audible and visual indications. (This is active threshold alarm. The visual indications remain present until the tested in steps 17 to 19 for a high alarm and 25 to 27 for a low FHR value returns to within the defined acceptable range. (This is alarm.)NOTE: For continuous limit violations: a high alarm activates tested in steps 14 to 16 for a high alarm, and steps 22 to 24 for a low after 5 minutes; a low alarm activates after 30 seconds. alarm.) 6-18 170 Series Monitor 2000947-004 Revision D Functional Checkout Procedure: Uterine Activity Test Uterine Activity Test This portion of the functional checkout procedure tests the uterine activity section of the 170 Series Monitor. 1. Set the switches on the Model 325 Simulator according to Table 6-5. 2. Connect the simulator’s UA sub-cable to the UA receptacle on the monitor. 3. Access the service setup mode and note the UA reference default value. (The monitor is shipped from the factory with this value set at 10 relative units; however, your unit may have been custom configured.) Exit the service mode. 4. Press the monitor’s Power button to turn on the monitor. 5. Press the monitor’s Record pushbutton. 6. Briefly press the monitor’s UA Reference pushbutton. Verify the following on the monitor: The UA value matches the default setting. The recorder prints a continuous line at the default value on the uterine activity channel of the strip chart paper. The recorder prints the messages TOCO and UA REF on the strip chart paper. 7. Press and hold the UA Reference button on the monitor to cycle through the available selections for UA reference: 5, 10, 15, 20, or 25 relative units. Test each of these reference settings. Verify that the UA value is displayed accordingly and that the recorder prints a continuous line at the corresponding value on the uterine activity channel of the strip chart paper. 8. Place the simulator’s UA Level switch at each of the level settings: 0, 10, 50, and 100 relative units. Verify that the UA value is displayed accordingly and that the recorder prints a continuous line at the corresponding value on the heart rate channel of the strip chart paper. Table 6-5. Uterine Activity Test Simulator Settings Section Switch Setting General Pattern Memory OFF Main LEVEL Level 0 mmHg Mode TOCO UA 9. Press the UA Reference button to reference to 10 relative units. If the default is set to a different value, press and hold the UA Reference button to cycle to 10. 10. Place the simulator’s UA Level switch to the RAMP position. Verify that the UA value measures a ramp between 10 and 100 relative units and that the recorder prints a ramp between the same values. Refer to Figure 6-5. Revision D 170 Series Monitor 2000947-004 6-19 Functional Checkout Procedure: Uterine Activity Test 11. Disconnect the Model 325 Simulator’s uterine activity sub-cable from the UA input receptacle on the front panel of the monitor. Verify the following on the monitor: The UA value is blank. The recorder stops printing the uterine activity trace. The recorder prints the message UA INOP on the center margin of the strip chart paper after approximately 20 seconds. Figure 6-5. Uterine Activity Ramp 6-20 170 Series Monitor 2000947-004 Revision D Functional Checkout Procedure: Tocotransducer Test Tocotransducer Test 1. Inspect a Nautilus tocotransducer as follows: Check for any cracks or contaminants on the tocotransducer especially on the diaphragm located on the bottom of the tocotransducer. Visibly assess the condition of the cable, strain relief, and connector pins. 2. Connect the tocotransducer to the UA input receptacle on the front panel of the 170 Series Monitor. 3. Access service setup mode and note the default TOCO reference setting. 4. Exit the service setup mode. 5. Press the monitor’s Power button to turn the monitor back on. 6. Momentarily press the monitor’s UA Reference pushbutton. Verify the following: The UA value shows the default setting. The recorder prints the messages UA REF and TOCO on the strip chart paper. 7. Plug the TOCO transducer connector to the monitor and set the US reference as 10 on the monitor. 8. Place 52.5 gm Teflon Weight on the transducer face and verify the value as "32" (±5.0 UA). 9. Place 100 gm Teflon Weight on the transducer face and verify the value as "53" (±5.0 UA). 10. Place 150 gm Teflon Weight on the transducer face and verify the value as "73" (±5.0 UA). 11. Remove the TOCO transducer from the monitor's UA input receptacle. Verify the following on the monitor: The UA value is blank. The recorder stops printing the uterine activity trace. The recorder prints the message UA INOP on the center margin of the strip chart paper after approximately 20 seconds. Revision D 170 Series Monitor 2000947-004 6-21 Functional Checkout Procedure: Strain Gauge Transducer Test Strain Gauge Transducer Test 1. 2. 3. 6-22 Inspect a strain gauge as follows: Unscrew the plastic dome from the transducer and check for any cracks or contaminants on the transducer. Visibly assess the condition of the cable, strain relief, and the connector pins. Connect the strain gauge to the UA input receptacle on the front panel of the monitor. Verify the following on the monitor: The UA value may read negative numbers indicating baseline pressure is off scale. In this case, the message BASELINE PRESSURE OFF SCALE prints on the strip chart paper. After approximately 20 seconds, the message IUP prints on the center margin of the strip chart paper. Select the monitor’s UA Reference button and verify the following on the monitor: The UA value is 0 mmHg. The UA trend is a continuous line at 0 mmHg on the strip chart paper. The message UA REF prints on the strip chart paper. 4. Apply gentle pressure on the strain gauge diaphragm and verify that the UA value and trend respond to the input. Increasing force should produce an increasing value and vice versa. 5. Disconnect the strain gauge from the front panel of the monitor. Verify the following on the monitor: The UA value is blank. The UA trend stops plotting on the strip chart paper. After approximately 20 seconds, the message UA INOP prints on the strip chart paper. 170 Series Monitor 2000947-004 Revision D Functional Checkout Procedure: Pattern Memory Test Pattern Memory Test The pattern memory of the simulator can be used to test any of the following mode combinations of the monitor. FECG/TOCO FECG/IUP US/TOCO or US2/TOCO US/IUP or US2/IUP US/FMD/TOCO US/FMD/IUP FECG/US/TOCO FECG/US/IUP NOTE: US/US2 cannot be tested simultaneously unless two Model 325 Simulators or two ultrasound transducers are used. Do not attempt to test dual ultrasound using one Model 325 Simulator and one ultrasound transducer or a conflict between enable lines will occur. NOTE: Although dual heart rate can be verified using the pattern memory, an additional procedure is given in this functional checkout procedure. To check any of the mode combinations listed above: 1. Connect the appropriate simulator sub-cables to the corresponding receptacles on the monitor. 2. Enable the modes on the simulator. 3. Set the simulator’s Pattern Memory switch to the ON position. 4. If not already on, press the monitor’s Record pushbutton. 5. Verify the following on the monitor: Each heart rate display (FHR1 and FHR2) responds accordingly for value and heartbeat indicator. The UA display responds accordingly for the value. The recorder responds appropriately in both trending and message information. NOTE: Refer to the “Model 325 Simulator Product Manual” for illustrations of the patterns to be expected on the monitor. Revision D 170 Series Monitor 2000947-004 6-23 Functional Checkout Procedure: Dual Heart Rate Test (Non-Pattern) Dual Heart Rate Test (Non-Pattern) FECG/US Modes 6-24 1. Connect the Model 325 Simulator’s ECG sub-cable to the monitor’s FECG input receptacle. 2. Connect the simulator’s US sub-cable to the monitor’s US input receptacle. 3. Set the switches on the Model 325 Simulator according to Table 6-6. 4. If not already on, select the monitor’s Record button. 5. Verify the following on the monitor: The FHR1 value reads 120 BPM. The FHR1 heartbeat indicator ( minute. The FHR2 value varies between approximately 50 and 210 BPM. The FHR2 heartbeat indicator ( value. The messages FECG and US print on the center margin of the strip chart paper. The FHR1 trend is a continuous plain black line ( ) on the 120 BPM mark on the top grid of the strip chart paper. (Refer to Figure 6-6.) The FHR2 trend is a bold black ramp trace ( ) between 50 and 210 BPM on the top grid of the strip chart paper. (Refer to Figure 6-6.) 170 Series Monitor 2000947-004 ) flashes at a rate of 120 times per ) flashes at a rate consistent with the Revision D Functional Checkout Procedure: Dual Heart Rate Test (Non-Pattern) Table 6-6. Model 325 Simulator Settings for FECG/US Test Section FECG/MECG ULTRASOUND/FMD General Revision D 170 Series Monitor 2000947-004 Switch Setting Main RATE Rate 120 BPM Mode FECG QRS Amplitude 50 µV QRS Polarity + Mode US Level MED Rate RAMP Pattern Memory OFF 6-25 Functional Checkout Procedure: Dual Heart Rate Test (Non-Pattern) Figure 6-6. Dual Heart Rate, FECG and US 6-26 170 Series Monitor 2000947-004 Revision D Functional Checkout Procedure: Dual Heart Rate Test (Non-Pattern) Dual Ultrasound Modes As stated previously, the dual ultrasound mode of the 170 Series Monitor cannot be tested unless two Model 325 Simulators are used or two Nautilus ultrasound transducers. Do not attempt to test dual ultrasound using one Model 325 Simulator and one ultrasound transducer. This procedure details using two transducers since it is more practical for a test site. 1. If not already on, press the monitor’s Record pushbutton. 2. Plug one ultrasound transducer into the monitor’s US input receptacle and the other into the monitor’s US2 receptacle. Verify the following on the monitor: 3. 4. Revision D The FHR1 value shows three steady dashes “– – –.” The FHR2 value shows three steady dashes “– – –.” The recorder prints the messages US and US2 on the center margin of the strip chart paper. Use your finger to rub the face of the ultrasound transducer connected to the monitor’s US input receptacle; try to maintain a steady rate and verify the following on the monitor: The FHR1 value responds to the rubbing. The FHR1 heartbeat indicator ( The recorder prints the heart rate tracing corresponding to the rate and the trace is plain black ( ). ) responds to the input. Use your finger to rub the face of the ultrasound transducer connected to the monitor’s US2 input receptacle; try to maintain a steady rate and verify the following on the monitor: The FHR2 value responds to the rubbing. The FHR2 heartbeat indicator ( The recorder prints the heart rate tracing corresponding to the rate and the trace is bold black ( ). 170 Series Monitor 2000947-004 ) responds to the input. 6-27 Functional Checkout Procedure: Alarm Test Alarm Test This portion of the test ensures the integrity of the audio alarms and tests the alarm limit software. 1. Connect the Model 325 Simulator’s US sub-cable to the monitor’s US input. 2. Press and hold (for three seconds) Setup to enter the monitor’s setup mode. 3. Set the FHR alarm enable to on. 4. Set the FHR high alarm limit value to 180 BPM. 5. Set the FHR low alarm limit value to 100 BPM. 6. Set the FHR audio alarm to a level you can easily hear. 7. Press the Setup button to exit the setup mode. 8. Press the monitor’s Record button. 9. Verify that the FHR high and low limits print in the annotation area of the strip chart paper. 10. Turn off the monitor’s recorder. 11. Set the switches on the Model 325 Input Simulator according to Table 6-7. 12. Using the simulator’s Manual Adjustment knob, input an US signal of 179 BPM as indicated on the monitor. Verify that there is no alarm tone sounding from the monitor’s speaker. 13. Using the simulator’s Manual Adjustment knob, increase the US rate to 180 BPM. Again, verify that there is no alarm tone sounding from the monitor’s speaker. 14. Using the simulator’s Manual Adjustment knob, increase the US rate to 181 BPM. After five minutes, verify the following on the monitor: An alarm tone is emitted from the monitor’s speaker (alternating high/low tones). The Alarm indicator flashes. The affected heart rate numerics flash. 15. Press the monitor’s front panel Alarm Silence pushbutton and verify that the alarm tone silences but the visual indications remain present. 6-28 170 Series Monitor 2000947-004 Revision D Functional Checkout Procedure: Alarm Test Table 6-7. Alarm Test Simulator Settings Section Switch Setting Main RATE Rate MANUAL Mode US Pattern Memory OFF US General 16. Use the simulator’s Manual Adjustment knob to decrease the US rate to 180 BPM. Verify that the Alarm indicator goes out and the heart rate numerics stop flashing. 17. Use the simulator’s Manual Adjustment knob to increase the US rate to 181 BPM to set off the alarm once more. It will take five minutes for the alarm appear. 18. Use the simulator’s Manual Adjustment knob to decrease the US rate to 180 BPM. Verify the following on the monitor: The alarm tone continues sounding. The Alarm indicator continues flashing. The affected heart rate numerics continue flashing. 19. Press the monitor’s front panel Alarm Silence pushbutton. Verify that the visual and audio alarm indications disappear. 20. Using the simulator’s Manual Adjustment knob, input an US signal of 101 BPM. Verify that there is no alarm tone sounding from the monitor’s speaker. 21. Using the simulator’s Manual Adjustment knob, decrease the US rate to 100 BPM. Again, verify that there is no alarm tone sounding from the monitor’s speaker. 22. Using the simulator’s Manual Adjustment knob, decrease the US rate to 99 bpm. After 30 seconds, verify the following on the monitor: The alarm tone is emitted from the monitor’s speaker. The Alarm indicator flashes. The affected heart rate numerics flash. 23. Press the monitor’s front panel Alarm Silence pushbutton. Verify that the visual and audio alarm indications disappear. 24. Use the simulator’s Manual Adjustment knob to increase the US signal to 100 BPM. Verify that the Alarm indicator goes out and the heart rate numerics stop flashing. 25. Use the simulator’s Manual Adjustment knob to decrease the US signal to 99 BPM to set off the alarm one more time. It will take 30 seconds for the alarm to appear. Revision D 170 Series Monitor 2000947-004 6-29 Functional Checkout Procedure: Alarm Test 26. Use the simulator’s Manual Adjustment knob to increase the US signal to 100 bpm. Verify the following on the monitor: The alarm tone continues sounding. The Alarm indicator stops continues flashing. The affected heart rate numerics continue flashing. 27. Press the monitor’s front panel Alarm Silence pushbutton. Verify that the visual and audio alarm indications disappear. 28. This concludes the functional checkout procedure. 6-30 170 Series Monitor 2000947-004 Revision D Chapter 7 Serviceable Assemblies 7 This chapter provides information to aid in performing routine service and maintenance on a 170 Series Monitor. This section of the manual is not intended as a substitute for proper professional training, or familiarity with the 170 Series Monitor. Only qualified service personnel should attempt servicing a 170 Series Monitor. This chapter contains the following information: General Anti-Static Handling Precautions . . . . . . . . . . . . . . . . . . . . . . . . 7-2 Transducer Plug Replacement Kits . . . . . . . . . . . . . . . . . . . . . . . . . . . . . 7-3 Nautilus Transducer Cable Replacement . . . . . . . . . . . . . . . . . . . . . . . . 7-15 Removing the Monitor Top Cover . . . . . . . . . . . . . . . . . . . . . . . . . . . . . 7-19 Tocotransducer Calibration . . . . . . . . . . . . . . . . . . . . . . . . . . . . . . . . . . 7-20 Nautilus Ultrasound Transducer Top Cover Replacement . . . . . . . . . . 7-30 Nautilus Transducer Reassembly . . . . . . . . . . . . . . . . . . . . . . . . . . . . . . 7-32 Testing a Repaired Transducer (TOCO or US) . . . . . . . . . . . . . . . . . . . 7-34 Replacing the Main Board . . . . . . . . . . . . . . . . . . . . . . . . . . . . . . . . . . . 7-35 Replacing the Membrane Switch Panel . . . . . . . . . . . . . . . . . . . . . . . . . 7-37 Replacing a Front Panel Connector . . . . . . . . . . . . . . . . . . . . . . . . . . . . 7-40 Servicing the Recorder . . . . . . . . . . . . . . . . . . . . . . . . . . . . . . . . . . . . . . 7-41 Revision D 170 Series Monitor 2000947-004 7-1 Serviceable Assemblies: General Anti-Static Handling Precautions General Anti-Static Handling Precautions The following guidelines should be followed when handling circuit boards or assemblies containing circuit boards. Following these procedures helps resist damage that can be caused by static electricity. 7-2 Discharge any static charge you may have built up before handling parts. Wear a grounded, anti-static wristband at all times. Use a static-free work surface. Store items in anti-static bags or boxes. Do not remove items from anti-static containers until needed. 170 Series Monitor 2000947-004 Revision D Serviceable Assemblies: Transducer Plug Replacement Kits Transducer Plug Replacement Kits Refer to Table 7-2 and ensure you have the correct kit. Unpack the kit and ensure it contains the items listed in Table 7-1. If something is missing, contact your GE Service Representative immediately. Table 7-1. Kit Summary Plug Type Plug Kit Cat. No. (REF) Tocotransducer Cable: T Nautilus, 2264 Series 6158J Ultrasound Transducer Cable: Standard, 5700 Series Nautilus, 5700 Series 8675A FECG Cable/Legplate 6158F Table 7-2. Packing List Item Quantity Contact Pin, male, #24 AWG, 16.5 mm 11 Contact Pin, male, #24 AWG, 18 mm 1 Gripper of appropriate size: 3-5 mm for smaller cables (TOCO) 5-7 mm for larger cables (US, FECG) 1 Plastic Ring 21.8 x 4 mm 1 Retaining Ring 1 Strain Relief Clamp, 3-7 mm 1 Screw (for above clamp), M 2.6 x 10 2 Half-Shell with Clamp of appropriate size: 3-5 mm for smaller cables 5-7 mm for larger cables 1 Half-Shell with Tongue 1 Color-Coded Connector Plug, 12-pin 1 Oetiker Clampa 1 a Revision D The Oetiker clamp is used only for Nautilus Tocotransducers (2264 Series). 170 Series Monitor 2000947-004 7-3 Serviceable Assemblies: Transducer Plug Replacement Kits Handling Precautions Transducers are delicate measuring instruments and must be handled accordingly. Transducer damage can be avoided by taking the following precautions: Avoid banging or dropping transducers. Refrain from wrapping transducer cables around transducer body. Do not immerse transducers in aqueous cleaning solutions. Do not pull on cables when removing transducer plugs from the monitor frontpanel connectors; remove plugs by grasping the gripper. Equipment Required You will need the following equipment: Green1 Stranded Wire (approximately 6 inches) #24 AWG for tocotransducers and ultrasound transducers #26 AWG for FECG cable/legplates #26 AWG Blue Stranded Wire (approximately 4 inches) for FECG Cable Wire Cutter/Stripper Soldering Iron and Solder Shrink Tubing Oetiker Pincers (for Nautilus Tocotransducers only)2 1 The color green is specified for consistency with factory builds and the wiring charts contained in this document. 2 This tool is required to place an Oetiker clamp on a 2264 Series Nautilus Tocotransducer. You can order the Standard Pincers (No. 1098) or Side Jaw Pincers (No. 1099) from Oetiker, Inc., P.O. Box 93, Livingston, NJ 07039. The telephone number is: 201-992-1920. 7-4 170 Series Monitor 2000947-004 Revision D Serviceable Assemblies: Transducer Plug Replacement Kits Tocotransducer Cable Preparation Refer to Figure 7-1 and Table 7-3 while following these steps: 1. Cut #24 AWG green wire (not supplied) to 1-1⁄2 inches long and strip each end 1 ⁄8 inch. This will be used as a jumper wire. 2. Cut #24 AWG green wire to 2 inches long. Strip one end 3⁄4 inch. 3. Route the transducer cable through the gripper. Slide the gripper, followed by the retaining ring, down the cable until they are out of the way. 4. For Nautilus Tocotransducers only: Slide Oetiker clamp over end of cable. 5. Score around grey cable jacket 1 inch. Peel and remove jacket. Trim filler flush to jacket. 6. For Nautilus Tocotransducers only: Cut vent tubing flush with jacket being careful not to restrict air flow. 7. Pull back the braided shield and twist into pigtail. 8. 9. Solder the 2-inch prepared green wire to the shield, wrapping the strip on to the shield. Cut wire flush with other conductors of the cable. 3⁄4-inch Install shrink tubing over the solder joint of the shield. 10. Strip all conductors 1⁄8 inch. Twist and tin conductors. 11. Locate the grounding contact pin (longer pin) in the kit. Solder this pin to the shield wire. 12. Solder a short pin to the yellow wire and one end of the green jumper wire. Both wires share this pin. 13. Solder a short pin to the free end of the green jumper wire. 14. Solder a short pin to each of the other conductors. 15. For Nautilus Tocotransducers only: Crimp Oetiker clamp over cable jacket 1⁄8 inch from end. 16. Continue with “Plug Assembly” on page 7-13. Revision D 170 Series Monitor 2000947-004 7-5 Serviceable Assemblies: Transducer Plug Replacement Kits 1² ¤8² ¤8² 1 1 Vent Tube (Nautilus only) yellow Oetiker Clamp (Nautilus only) 1 1¤2² #24 AWG Green Jumper Wire Shield Shrink Tubing 1² #24 AWG Green Wire Figure 7-1. Tocotransducer Cable Preparation Table 7-3. Tocotransducer Cable Wiring 7-6 Pin Number Pin Length Description Wire Color 1 short +PRESS Red 2 short –PRESS White 3 short — — 4 short +4 V Blue 5 short — — 6 short Reference/Enable #24 AWG Green Jumper and Yellow 7 LONG Shield Ground #24 AWG Green 8 short — — 9 short — — 10 short — — 11 short — — 12 short TOCO Enable #24 AWG Green Jumper 170 Series Monitor 2000947-004 Revision D Serviceable Assemblies: Transducer Plug Replacement Kits Ultrasound Transducer Cable Preparation Refer to Figure 7-2 and Table 7-4 while following these steps: 1. Cut #24 AWG green wire (not supplied) to 1-1⁄2 inches long and strip each end inch. This will be used as a jumper wire. 1⁄8 2. Cut #24 AWG green wire to 4 inches long and strip each end 3⁄4 inch. 3. Route the transducer cable through the gripper. Slide the gripper, followed by the retaining ring, down the cable until they are out of the way. 4. Score around grey jacket of cable 1 inch. Peel and remove jacket. 5. Pull back the outer braided shield and twist into pigtail. 6. Solder the 4-inch prepared green wire to the outer shield, wrapping the 3⁄4-inch strip onto shield. Cut wire flush with other conductor(s) of cable. Retain remaining piece of wire for inner shield. 7. This step varies according to the ultrasound transducer type: Standard Ultrasound Transducer: This cable is a dual-coaxial cable. Cut off black coaxial cable and fillers flush to jacket. Nautilus Ultrasound Transducer: This cable is a single-coaxial cable. Trim fillers flush to jacket. 8. Score around the white jacket leaving 3⁄16 inch of the jacket remaining. 9. Pull back the inner shield and twist into a pigtail. The clear dielectric is now exposed. 10. Solder remaining piece of green wire to inner shield, wrapping the 3⁄4 inch strip onto shield. Cut wire flush with other conductors. 11. Install shrink tubing over the solder joint between the white coaxial cable and the inner shield. 12. Strip the three conductors 1⁄8 inch (clear and both green). Twist and tin conductors. 13. Locate the grounding contact pin (longer pin) in the kit. Solder this pin to the inner shield. 14. Solder a short pin to the clear conductor and the outer shield. 15. Solder a short pin to each end of the green jumper wire (1-1⁄2 inches long). 16. Continue with “Plug Assembly” on page 7-13. Revision D 170 Series Monitor 2000947-004 7-7 Serviceable Assemblies: Transducer Plug Replacement Kits 1² Score around length of jacket 1inch. Peel jacket and remove. Separate outer braided shield and twist. For Standard ultrasound transducers, the cable is a dual coaxial cable. For Nautilus ultrasound transducers, the cable is a single coaxial cable. If present, cut black coax and fillers flush with grey jacket. Solder #24 AWG green wire to outer shield. ¤16² 3 Score around white jacket leaving 3⁄16 inch. Separate inner braided shield and twist. Solder #24 AWG green wire to inner shield. Apply shrink tubing over clear wire and solder joint of inner shield. 1 Strip conductors ⁄8 inch. Twist and tin conductors. Solder contact pins to conductors and jumper wire. Figure 7-2. Ultrasound Transducer Cable Preparation 7-8 170 Series Monitor 2000947-004 Revision D Serviceable Assemblies: Transducer Plug Replacement Kits Table 7-4. Ultrasound Cable Wiring Revision D Pin Number Pin Length Description Wire Color 1 short — — 2 short — — 3 short Overall Shield #24 AWG Green 4 LONG US Transmit/Receive Shield #24 AWG Green 5 short White Coax — 6 short — — 7 short — — 8 short — — 9 short — — 10 short — — 11 short US Enable #24 AWG Green Jumper 12 short US Enable Ground #24 AWG Green Jumper 170 Series Monitor 2000947-004 7-9 Serviceable Assemblies: Transducer Plug Replacement Kits FECG Cable Preparation Refer to Figure 7-3 and Table 7-5 while following these steps: 1. Cut #26 AWG green wire (not supplied) to 2 inches long. Strip one end 3⁄4 inch. 2. Cut #26 AWG blue wire (not supplied) to 1-1⁄2 inches long and strip each end 1⁄8 inch. This will be used as a jumper wire. 3. Route the transducer cable through the gripper. Slide the gripper, followed by the retaining ring, down the cable until they are out of the way. 4. Score around cable jacket 1 inch. Peel and remove jacket. Trim filler flush to jacket. 5. Pull back the braided shield and twist into pigtail. 6. Strip black conductive coating back to the outer jacket. 7. Solder the 2-inch prepared green wire to the shield, wrapping the strip onto the shield. Cut the wire flush with other conductors of cable. 3⁄4-inch 8. Install shrink tubing over the solder joint of the shield. 9. Strip all conductors 1⁄8 inch. Twist and tin conductors. CAUTIONS CABLE IDENTIFICATION—Identify each cable as it is stripped since colors will be difficult to determine once the sleeving contracts. HEAT—Avoid excess heat when tinning ends and soldering braids since the polyethylene inner insulation melts very easily. 10. Slide shrink tubing over cable. 11. Locate the grounding contact pin (longer pin) in the kit. Solder this pin to one end of the blue jumper wire. 12. Solder a short pin to the blue wire and the free end of the blue jumper wire. Both wires share this pin. 13. Solder a short pin to each of the other conductors, 14. Continue with “Plug Assembly” on page 7-13. 7-10 170 Series Monitor 2000947-004 Revision D Serviceable Assemblies: Transducer Plug Replacement Kits 1² ¤8² ¤8² 1 1 blue 1 1¤2² #26 AWG Blue Jumper Wire Shrink Tubing Shield Shrink Tubing 1² #26 AWG Green Wire Figure 7-3. FECG Cable Preparation Revision D 170 Series Monitor 2000947-004 7-11 Serviceable Assemblies: Transducer Plug Replacement Kits Table 7-5. FECG Cable Wiring 7-12 Pin Number Pin Length Description Wire Color 1 short — — 2 short ECG Enable Blue and #26 AWG Blue Jumper 3 LONG Ground #26 AWG Blue Jumper 4 short — — 5 short — — 6 short LA (red terminal) White/Black 7 short RA (green terminal) White 8 short Shield #26 AWG Green 9 short — — 10 short — — 11 short — — 12 short RL (plate) White/Red 170 Series Monitor 2000947-004 Revision D Serviceable Assemblies: Transducer Plug Replacement Kits Plug Assembly Refer to Figure 7-4 while replacing a transducer plug. Note that the strain relief clamp (3) orientation is different between tocotransducers and all other transducers (ultrasound, FECG). In addition, the Oetiker clamp (11) is used for Nautilus Tocotransducers only. Figure 7-4. Transducer Plug Construction 1. Remove the old plug. 2. Follow cable preparation procedures earlier in this document: “Tocotransducer Cable Preparation”, “Ultrasound Transducer Cable Preparation”, or “FECG Cable Preparation”. 3. Insert pinned wires into corresponding positions in the pin housing according to the wiring table in each of the above listed sections. Push in each pin until it bottoms out and is retained by the pin spring fingers which prevent it from backing out of the hole. NOTE: If a pin is removed from the sprocket housing, it must be discarded and replaced. 4. Revision D Insert remaining pins into unused positions in the pin housing. 170 Series Monitor 2000947-004 7-13 Serviceable Assemblies: Transducer Plug Replacement Kits 5. Insert the pin housing into the corresponding recess of the half-shell (with strain-relief mounting holes). Position the housing so that the two dots at the back are visible and at right angles to the plane of the half-shell. Push the cable into the strain-relief slot. Ensure the slot surrounds a portion of the cable with the outer covering intact. 6. Fasten the strain-relief clamp to the half-shell using the two metric screws. Refer to inset of Figure 7-4. Tocotransducer: the indent of the strain relief should face outward. Ultrasound and FECG Transducers: the indent of the strain relief should face inward. 7. Place the half-shell (with tongue) on the pin housing, aligning it with the two dots on the back of the housing. The half-shells should snap together evenly. Slip the retaining ring over them to hold the assembly together. 8. Slide the gripper back up the cable and align the two projections at the rear of the plug assembly with the two recesses at the rear of the gripper. NOTE: Do not allow projections and recesses to become misaligned while sliding the gripper onto the plug or the gripper will not seat properly. Position the tongue opposite the gripper boot through which the cable extends. This ensures that the cable will extend downward once the plug is inserted into the monitor. CAUTION KINKING—When sliding the gripper over the plug assembly, pull the cable through the boot to prevent any kinking inside the gripper. 9. 7-14 Install the plastic ring on the front of the plug. 170 Series Monitor 2000947-004 Revision D Serviceable Assemblies: Nautilus Transducer Cable Replacement Nautilus Transducer Cable Replacement You can replace the cable on a Nautilus Tocotransducer or Ultrasound Transducer using one of four kits. Refer to Table 7-6 and ensure you have the correct kit. The text of the instruction sheet is repeated here for informational purposes. Unpack the kit and ensure it contains the items listed in Table 7-7. If something is missing, contact your GE Service Representative immediately. NOTE: Transducers are available in 5-, 8-, and 10-foot cable lengths. However, the cable assembly included in a replacement kit is available in an 8-foot length only. Table 7-6. Kit Summary Nautilus Transducer Type and Cat. No. (REF) Cable Kit Cat. No. (REF) Loop-Style Ultrasound Transducer, 5700 KAX/LAX/MAX 2003659-001 Button-Style Ultrasound Transducer, 5700 GAX/HAX/JAX 2003660-001 Loop-Style Tocotransducer, 2264 DAX/EAX/FAX/KAX/LAX/MAX 2003661-001 Button-Style Tocotransducer, 2264 AAX/BAX/CAX/GAX/HAX/JAX 2003662-001 Table 7-7. Packing List Item Transducer Case Top 1 Cable Assembly, 8-ft 1 Flat-Seal O-Ring 1 Sealing Screw, #4-40 x 5/16 in 6 Screw Cap, Curved 4 Screw Cap, Flat 1 Belt Knoba 1 a Revision D Qty The belt knob is included in button-style kits 2003660-001 and 2003662-001 only. 170 Series Monitor 2000947-004 7-15 Serviceable Assemblies: Nautilus Transducer Cable Replacement Equipment Required You will need the following equipment: Phillips Head Torque Driver Screw Cap Extraction Tool (cat. no. 2004084-001) Soldering Iron and Solder (ultrasound transducers only) Loctite Adhesive #454 (recommended) Anti-Static Wristband Static-Free Work Surface Reference Figures Refer to Figure 7-5 and Figure 7-6 while using the cable replacement kit. Flat Screw Cap Button-Style Loop-Style Figure 7-5. Sealing Screw Caps Self-Tapping Screws Cable Nut Set Screw Tocotransducer 2264 AAX/BAX/CAX/DAX/EAX/FAX Tocotransducer 2264 GAX/HAX/JAX/KAX/LAX/MAX Cable Nut Set Screw Green Wire (Shield) Clear Wire (Center Conductor) Green Wire (Ground) Ultrasound Transducer Figure 7-6. Nautilus Transducers—Cover Removed 7-16 170 Series Monitor 2000947-004 Revision D Serviceable Assemblies: Nautilus Transducer Cable Replacement Procedure 1. Unplug the transducer from the monitor or telemetry transmitter. 2. Use the screw cap extraction tool to pry off the five screw caps (Figure 7-5). Discard all caps. CAUTION HANDLING–Take care not to damage the base sealing groove. 3. Remove the five sealing screws and discard. 4. Remove the transducer cover and flat-seal o-ring. Discard both items. 5. Remove the cable connector according to the transducer type (Figure 7-6): Tocotransducer a. If the PC board header is on the underside of the board (2264 GAX/HAX/ JAX/KAX/LAX/MAX only), remove the three self-tapping screws from the board to gain access. Set aside screws. b. Observe the orientation of the cable connector in the PC board header, then unplug. Ultrasound Transducer a. Unscrew the green cable ground wire from the PC board. Set aside screw. b. Unsolder the green and clear cable wires from the PC board. 6. Loosen the cable nut set screw, then unscrew the cable from the cable nut. Set aside screw and cable nut. 7. Remove the cable from the transducer base. CAUTION CABLE HANDLING–Do not place undue stress on cable wires and shielding. Do not damage the cable o-ring or the hole in the transducer base. 8. Revision D Feed the connector end of the new cable through the hole in the transducer base. The cable o-ring should be seated in hole. 170 Series Monitor 2000947-004 7-17 Serviceable Assemblies: Nautilus Transducer Cable Replacement 9. Secure the molded strain relief end of the cable in the cable nut: a. Place the flat side of the cable nut against the case base. b. Rotate the cable assembly into the cable nut; continue threading until the two are completely seated. Ensure the o-ring is seated in the hole and one of the cable’s four set screw holes is centered under the hole in the cable nut. c. Tighten the set screw until flush with the cable nut. 10. Connect cable according to transducer type (refer to Figure 7-6): Tocotransducer CAUTION PRESSURE SENSITIVE BUTTON–Do not turn the pressure sensitive button. Doing so will change the button height and affect the tocotransducer calibration. a. Plug the cable connector into the PC board header conforming to the keying observed earlier. b. If removed earlier, replace the PC board and tighten the three self-tapping screws in the transducer base. CAUTION OVERTIGHTENING–Do not overtighten the screws. Doing so could damage the threads in base. Ultrasound Transducer a. Solder the green and clear cable wires to the PC board (Figure 7-6). b. Replace and tighten the green ground wire on the PC board. 11. Install new flat-seal o-ring. 12. Nautilus Tocotransducers only: Prior to replacing the case top, it is recommended that you calibrate the transducer. Refer to “Tocotransducer Calibration” on page 7-20 prior to completing the cable replacement procedure. 13. Follow the instructions for “Nautilus Transducer Reassembly” on page 7-32. 7-18 170 Series Monitor 2000947-004 Revision D Serviceable Assemblies: Removing the Monitor Top Cover Removing the Monitor Top Cover 1. Unplug the AC adapter from the monitor to completely remove power. 2. Remove the four bottom panel screws. CAUTION TOP COVER—The top cover remains tethered to the main board via the display board and membrane switch panel cables. Do not attempt to remove the monitor cover without first disconnecting these cables. Revision D 3. Partially lift the top cover and slide it partways back to reveal the cables connecting to the main board. 4. Disconnect the display board cable from J18 on the main board. 5. Disconnect the membrane switch panel cable from J19 on the main board. 170 Series Monitor 2000947-004 7-19 Serviceable Assemblies: Tocotransducer Calibration Tocotransducer Calibration Any of the following three transducers can be used with the 170 Series Monitor: Corometrics Nautilus Tocotransducer C +P Pin 1* P Pin 2* +4 V Pin 4* 475 W REF Pin 6* *Front Panel UA Connector Figure 7-7. CMR Test Jack Table 7-8. CMR Test Jack Components 7-20 Part Description Catalog Number Pressure Connector 6158J 475 Ω, 1/8 W, 1% Resistor 472127 170 Series Monitor 2000947-004 Revision D Serviceable Assemblies: Tocotransducer Calibration Nautilus Tocotransducers Calibrating a Nautilus Tocotransducer requires a Calibration Kit. Refer to Table 7-9 to order the correct kit. Unpack the kit and ensure it contains the items listed in Table 7-10. If something is missing, contact your GE Service Representative immediately. The text of the instruction sheet is repeated here for informational purposes. Table 7-9. Kit Summary Nautilus Transducer Type and Cat. No. (REF) Cable Kit Cat. No. (REF) Loop-Style Tocotransducer, 2264 DAX/EAX/FAX/KAX/LAX/MAX 2003663-001 Button-Style Tocotransducer, 2264 AAX/BAX/CAX/GAX/HAX/JAX 2003664-001 Table 7-10. Packing List Item Qty Transducer Case Top 1 Flat-Seal O-Ring 1 Sealing Screw, #4-40 x 5/16 in 6 Screw Cap, Curved 4 Screw Cap, Flat 1 Belt Knoba 1 Instruction Sheet 1 aThe belt knob is included in button-style kit 2003664001 only. Revision D 170 Series Monitor 2000947-004 7-21 Serviceable Assemblies: Tocotransducer Calibration Equipment Required IMPORTANT WEIGHT TYPE—The specified weight, cat. no. (REF) 2003005001, is designed specifically for testing Nautilus Tocotransducers. You will need the following equipment: Phillips Head Torque Driver Screw Cap Extraction Tool (cat. no. 2004084-001) Digital Voltmeter: DM501 or equivalent with x1 probe or leads Common Mode Rejection (CMR) Test Jack (Figure 7-7 and Table 7-8) Potentiometer Adjustment Tool 52.5 gram Weight (cat. no. 2003005-001) Torque Seal Loctite Adhesive #454 (recommended) Anti-Static Wristband Static-Free Work Surface Calibrated 170 Series Monitor Disassembly CAUTION HANDLING—Take care not to damage the transducer base sealing groove. 7-22 1. Turn off the monitor. 2. Unplug the transducer from the monitor. 3. Use the screw cap extraction tool to pry off the five screw caps (Figure 7-5). Discard all caps. 4. Remove the five sealing screws and discard. 5. Remove the transducer cover and flat-seal o-ring. Discard both items. 170 Series Monitor 2000947-004 Revision D Serviceable Assemblies: Tocotransducer Calibration Calibration for Cat. No. (REF) 2264 GAX/HAX/JAX/KAX/LAX/MAX Refer to Figure 7-6 during calibration. 1. Set the Gain (R11) and Offset (R6) potentiometers fully clockwise. 2. Connect the positive lead of the digital voltmeter to TP2 on the Main Board; connect the negative lead to TP9. 3. Turn on the monitor. 4. Plug the CMR Test Jack into the monitor’s UA connector. 5. Measure the voltage across the test points and record the value. 6. Replace the CMR Test Jack with the transducer to be calibrated. 7. Place the tocotransducer on a flat surface so that the button is face up, then center the 52.5 gram weight on the pressure sensitive button. 8. Adjust the Offset (R6) potentiometer so that the voltage matches the reading recorded in step 5 ± 0.04 V. This voltage is referred to as the “weight on” voltage. 9. Remove the weight and observe the voltage reading; this voltage is referred to as the “weight off” voltage. A correctly adjusted transducer will show a voltage change of +0.115 V ± 0.015 V. If the change is less, adjust the Gain (R11) potentiometer counterclockwise to increase the gain. If the change is more, adjust the Gain (R11) potentiometer clockwise to decrease the gain. 10. Repeat step 7 through step 9 until the change in voltage between the “weight on” and “weight off” conditions falls into specification. 11. Torque seal all potentiometers. 12. Follow the instructions for “Nautilus Transducer Reassembly” on page 7-32. Revision D 170 Series Monitor 2000947-004 7-23 Serviceable Assemblies: Tocotransducer Calibration Calibration for Cat. No. (REF) 2264 AAX/BAX/CAX/DAX/EAX/FAX Refer to Figure 7-6 during calibration. 1. Set the Gain (R15) and Offset (R5) potentiometers fully counterclockwise. 2. Set the Offset Trim (R6) potentiometer to its mid-position—approximately six turns from fully counterclockwise. 3. Connect the positive lead of the digital voltmeter to TP2 on the Main Board; connect the negative lead to TP9. 4. Turn on the monitor. 5. Plug the CMR Test Jack into the monitor’s UA connector. 6. Measure the voltage across the test points and record the value. 7. Replace the CMR Test Jack with the transducer to be calibrated. 8. Place the tocotransducer on a flat surface so that the button is face up, then center the 52.5 gram weight on the pressure sensitive button. 9. Adjust the Offset (R5) and Offset Trim (R6) potentiometers so that the voltage matches the reading recorded in step 6 ± 0.04 V. This voltage is referred to as the “weight on” voltage. The Offset (R5) potentiometer provides course adjustment. The Offset Trim (R6) potentiometer provides fine adjustment. 10. Remove the weight and observe the voltage reading; this voltage is referred to as the “weight off” voltage. A correctly adjusted transducer will show a voltage change of +0.115 V ± 0.015 V. If the change is less, adjust the Gain (R15) potentiometer counterclockwise to increase the gain. If the change is more, adjust the Gain (R15) potentiometer clockwise to decrease the gain. 11. Repeat step 8 through step step 10 until the change in voltage between the “weight on” and “weight off” conditions falls into specification. 12. Torque seal all potentiometers. 13. Follow the instructions for “Nautilus Transducer Reassembly” on page 7-32. 7-24 170 Series Monitor 2000947-004 Revision D Serviceable Assemblies: Nautilus Ultrasound Transducer Top Cover Replacement Nautilus Ultrasound Transducer Top Cover Replacement In order to replace the top cover of a Nautilus Ultrasound Transducer in the field, you will require one of two kits. Refer to Table 7-11 and ensure you have the correct kit. Unpack the kit and ensure it contains the items listed in Table 7-12. If something is missing, contact your GE Service Representative immediately. The text of the instruction sheet is repeated here for informational purposes. . Table 7-11. Kit Summary Nautilus Ultrasound Transducer Type and Cat. No. (REF) Cable Kit Cat. No. (REF) Loop-Style Ultrasound Transducer, 5700 KAX/LAX/MAX 2011679-001 Button-Style Ultrasound Transducer, 5700GAX/HAX/JAX 2011680-001 Table 7-12. Packing List Item Qty Transducer Case Top 1 Flat-Seal O-Ring 1 Sealing Screw, #4-40 x 5/16 in 6 Screw Cap, Curved 4 Screw Cap, Flat 1 Belt Knoba Screw Cap Extraction Tool a 1 The belt knob is included in button-style kits 2011680-001 only. Equipment Required You will need the following equipment: Revision D Phillips Head Torque Driver Loctite Adhesive #454 (recommended) Anti-Static Wristband Static-Free Work Surface 170 Series Monitor 2000947-004 7-25 Serviceable Assemblies: Nautilus Ultrasound Transducer Top Cover Replacement Procedure 1. Turn off the monitor. 2. Unplug the transducer from the monitor. 3. Use the screw cap extraction tool to pry off the five screw caps (Refer to Figure 7-5). Discard all caps. CAUTION HANDLING—Take care not to damage the transducer base sealing groove. 7-26 4. Remove the five sealing screws and discard. 5. Remove the transducer cover and flat-seal o-ring. Discard both items. 6. Follow the instructions for “Nautilus Transducer Reassembly” on page 7-32. 170 Series Monitor 2000947-004 Revision D Serviceable Assemblies: Nautilus Transducer Reassembly Nautilus Transducer Reassembly CAUTIONS VISIBLE INSPECTION—Ensure the base sealing groove, flatseal o-ring, sealing surface, and sealing screws are free of visible surface defects, dust, dirt, and foreign material. SINGLE-USE COMPONENTS—Do not reuse case top, flat-seal o-ring, sealing screws, or screw caps. Discard these items each time a transducer is opened. SEALS—Wetting of seals is not required. 1. Install new flat-seal o-ring. 2. Install case top and tighten five sealing screws. Hand tighten each screw a small amount going in a clockwise direction, skipping every other screw. Repeat until all screws are torqued to 48 in-oz. 3. Apply one drop of Loctite adhesive1 to the perimeter of the hole for the flat screw cap (Figure 7-5). Insert flat screw cap and press into place. 4. Apply one drop of Loctite adhesive1 to the perimeter of the hole for a curved screw cap. Insert the curved screw cap being careful to align it according to the curvature of the case top; the small burr on the screw cap side should face the outside edge of the transducer. (See Figure 7-10 and Figure 7-11.) Press the screw cap firmly into place. Repeat for the remaining three curved screw caps. 5. For button-style transducers only, install and torque belt knob to 48 in-oz. 6. Refer to “Testing a Repaired Transducer (TOCO or US)” on page 7-34. 1 Revision D Using Loctite Adhesive #454 is recommended in order to secure the screw caps. 170 Series Monitor 2000947-004 7-27 Serviceable Assemblies: Nautilus Transducer Reassembly burr Figure 7-10. Curved Screw Cap Shape, Nautilus Transducer burr Figure 7-11. Curved Screw Cap Alignment, Nautilus Transducer 7-28 170 Series Monitor 2000947-004 Revision D Serviceable Assemblies: Testing a Repaired Transducer (TOCO or US) Testing a Repaired Transducer (TOCO or US) CAUTIONS Following completion of the cable replacement procedure: LEAKAGE TEST—Perform a leakage and dielectric test on the transducer per applicable standards. FUNCTIONAL TEST—Perform a functional response test on the transducer. Revision D 170 Series Monitor 2000947-004 7-29 Serviceable Assemblies: Replacing the Main Board Replacing the Main Board Equipment Required Phillips screwdriver Main board part no. 2000243 (Model 171) part no. 15269 (Model 172) part no. 2000324 (Model 173) part no. 2000973 (Model 174) Procedure 7-30 1. Disconnect the AC adapter from the monitor to completely remove power. 2. Remove the monitor top cover, disconnecting the display board cable and membrane switch panel cable from J18 and J19, respectively. 3. Disconnect the sensor board cable from J3 on the main board. 4. Disconnect the printhead cable from J1 on the main board. 5. Disconnect the motor cable from J2 on the main board. 6. Disconnect the speaker cable from J4 on the main board. 7. Remove the nine mounting screws from the main board and carefully place the board on an anti-static surface. 8. For Models 173/174, you will need to transfer the FECG/IUP Board to the new Main Board. Remove the four mounting screws, then carefully detach the FECG/IUP Board from J15 and J16 on the Main Board. Carefully align the FECG/IUP Board onto J15 and J16 on the new Main Board and push into place. Secure to the stand-offs with the four screws removed earlier. 9. Position the new board in place and follow steps 1–7 in reverse. 1 70 Series Monitor 2000947-004 Revision D Serviceable Assemblies: Replacing the FECG/IUP Board Replacing the FECG/IUP Board Follow the instructions for “Replacing the Main Board” on page 7-35 with the following exceptions: Revision D Retain the existing Main Board Mount a new FECG/IUP Board onto the existing Main Board 170 Series Monitor 2000947-004 7-31 Serviceable Assemblies: Replacing the Membrane Switch Panel Replacing the Membrane Switch Panel The membrane switch panel cannot be removed from the top cover without possible damage to the monitor. You must order a new top cover assembly in order to replace the membrane switch panel. Equipment Required Phillips screwdriver Wrench Hand file Top cover Rear panel adhesive gasket Rear panel label Membrane switch panel Display overlay Refer to Table 7-13 for order numbers. Table 7-13. Top Cover Assembly Order Numbers Item Model 171 Model 172 Model 173 Model 174 Top Cover 2004993-003a 2004993-001b 2004993-002c 2004993-004d Rear Panel Adhesive Gasket 14561AA Rear Panel Label 2003930-001 Membrane Switch Panel 15323BA Display Overlay 15324BA 15323AA 15324AA 15324CA 15324DA a Replaces older 15453CA top covers. b Replaces older 15453AA top covers. c Replaces older 15453BA top covers. d Replaces older 15453DA top covers. 7-32 170 Series Monitor 2000947-004 Revision D Serviceable Assemblies: Replacing the Membrane Switch Panel Procedure 1. Disconnect the AC adapter from the monitor to completely remove power. 2. Follow the instructions for “Removing the Monitor Top Cover” on page 7-19. 3. Unscrew the top cover standoff and set aside. You may need a wrench to loosen the standoff. 4. Remove the two display board bracket screws. Set aside the display board and screws. 5. Remove the screw fastening the membrane shield tongue. Set aside the screw. 6. Remove the rear panel plug in J4 and set aside. 7. Newer monitors have top covers with tabs which fit into corresponding slots in the bottom enclosure. (Refer to Figure 7-12 and Figure 7-13.) If you are installing a newer tabbed top cover onto an older bottom enclosure (without slots), you must remove the tabs. Use a small hand file or other tool to remove the plastic tabs. 8. Apply the new membrane switch panel: peel off the adhesive backing and position on the new top cover making sure the shield tongue is threaded through the slot. IMPORTANT SHIELD TONGUE—If the shield tongue is caught between the top cover and the switch panel, the panel cannot be properly positioned. 9. Screw the shield tongue in place using the old screw. 10. Replace the display board and secure all four screws. 11. Replace the top cover standoff. 12. Install the rear panel gasket on the inside of the cover: remove the adhesive backing and align over the rear panel connectors. 13. Install the display overlay: remove the adhesive backing and align on the outside of the top cover. 14. Install the rear panel label on the outside of the cover: remove the adhesive backing and align over the rear panel connectors. 15. Re-connect the display board and membrane switch panel cables to J18 and J19 on the main board. 16. If you are installing a tabbed cover onto a bottom slotted enclosure, ensure that the tabs align with the slots. 17. Secure the top cover with the four bottom panel screws. 18. Discard previous top cover assembly. Revision D 170 Series Monitor 2000947-004 7-33 Serviceable Assemblies: Replacing the Membrane Switch Panel alignment tabs Figure 7-12. Top Cover Alignment Tabs alignment slots Figure 7-13. Bottom Enclosure Alignment Slots 7-34 170 Series Monitor 2000947-004 Revision D Serviceable Assemblies: Replacing a Front Panel Connector Replacing a Front Panel Connector Equipment Required Screwdriver Connector (see Table 7-14) De-soldering tool Soldering iron Solder Table 7-14. Front Panel Connectors Connector Color Part Number US/US2 Blue 212174 UA (TOCO/IUP) White 212173 FECG Dark Grey 212175 COMBI (US/FECG) Blue and Grey 2003692-001 Procedure Revision D 1. Disconnect the AC adapter from the monitor to completely remove power. 2. Follow the instructions for “Removing the Monitor Top Cover” on page 7-19. It is not necessary to disconnect the cables. You only need access to the front panel connectors. 3. Follow the instructions for “Replacing the Main Board” on page 7-35. (There is no need to remove the FECG/IUP Board.) 4. Remove the six screws from the front-end connector shield. 5. De-solder the damaged connector and discard. 6. Solder a new connector in place. 7. Replace the connector shield, main board, and top cover. 170 Series Monitor 2000947-004 7-35 Serviceable Assemblies: Servicing the Recorder Servicing the Recorder Replacing the Printhead Equipment Required Phillips screwdriver Vernier caliper Printhead (part no. 2000133-001) Procedure 1. Remove the AC line cord from the monitor to completely remove power. 2. Follow the instructions for “Removing the Monitor Top Cover” on page 7-19. 3. Pry the printhead cable connectors free from the back of the printhead. 4. Open the recorder drawer. 5. Remove the four screws (two per side) holding the printhead in place. The printhead will drop out. 6. Insert the new printhead, aligning the edges near the ends flush with the support plate. Secure with the four screws. 7. Slowly close the drawer observing the roller and printhead. Ensure that the roller is parallel to the printhead striking the printhead evenly as the drawer shuts. 8. Replace the printhead cable. 9. Verify that there is a slight gap (0.003 in minimum) between the shoulder nut standoff and the downstop plate (without paper installed). Adjust accordingly. 10. Follow the instructions for “Aligning the Printhead” on page 7-43. 11. Once the recorder prints satisfactorily, secure the monitor top cover in place. 7-36 170 Series Monitor 2000947-004 Revision D Serviceable Assemblies: Servicing the Recorder Adjusting the Printhead Current Equipment Required Phillips screwdriver Digital voltmeter 30 Ω, 20 W, 5% resistor Procedure CAUTION RECORDER STATUS—Ensure the recorder remains off during this procedure. 1. Remove the AC line cord from the monitor to completely remove power. 2. Follow the instructions for “Removing the Monitor Top Cover” on page 7-19, including disconnection of the display board cable and the membrane switch panel cable from the main board. 3. Disconnect the printhead cable from J1 on the main board. 4. Locate resistor R562 and potentiometer R507 on the main board. 5. Attach the leads of the digital voltmeter across R562. 6. Re-connect the AC adapter cord to the monitor and turn on the monitor. 7. Measure the voltage across R562 and record the value. 8. Turn off the monitor. 9. Attach a 30 Ω (20 W, 5%) resistor across R562. 10. Turn on the monitor. 11. Adjust potentiometer R507 until the voltage across R562 is 0.5 V less than the voltage recorded in step 5. 12. Turn off the monitor and remove the voltmeter leads and the 30 Ω resistor. Revision D 170 Series Monitor 2000947-004 7-37 Serviceable Assemblies: Servicing the Recorder Aligning the Printhead Equipment Required Phillips screwdriver Vernier caliper Printing a Continuous Test Pattern 1. Re-connect the AC adapter cord to the monitor. 2. Access the service setup mode: press and hold the Setup button hold the blue Power button; release both buttons. 3. ) to change the number in the UA display Use the Volume buttons ( or to 100. (On Model 172 Monitors, use the left set of volume controls.) 4. Press the UA Reference button to activate the FHR display and start printing the test pattern. See Figure 7-14. 5. Follow the instructions under “Left/Right Alignment” and “Front/Back Alignment”. 6. to exit the service setup mode. The monitor Press the Setup button automatically turns to standby. 1. Follow the instructions for “Adjusting the Printhead Current” on page 7-42. 2. Print the recorder test pattern. (See “Printing a Continuous Test Pattern” above.) 3. Load paper and close the recorder drawer. 4. Observe the printing quality under the following conditions: ; press and Front/Back Alignment 5. 7-38 Press and hold the door toward the rear of the monitor. If the printing darkens on either side: loosen the four mounting screws; move the printhead forward slightly on the affected side; then re-tighten the screws. Pull and hold the drawer forward slightly. If the printing darkens on either side: loosen the fours mounting screws; move the printhead back slightly on the affected side; then re-tighten the screws. Verify that the print quality is satisfactory when the drawer is latched in place. 170 Series Monitor 2000947-004 Revision D Serviceable Assemblies: Servicing the Recorder Figure 7-14. Recorder Test Pattern Revision D 170 Series Monitor 2000947-004 7-39 Serviceable Assemblies: Servicing the Recorder Left/Right Alignment 1. Print the continuous recorder test pattern. (See “Printing a Continuous Test Pattern” above.) 2. Check the quality of the printed lines. Verify that the horizontal lines print evenly. Ideally the distance between the right paper guide at the roller and the first line printed by the test pattern should be 0.490 in which represents a nominal value. Use a vernier caliper to measure this distance. 3. ( or ) to align the printhead left or right, Use the Volume buttons respectively. A number between 0 and 255 shows in the FHR display. The number increases or decreased as you make adjustments using the Volume buttons. IMPORTANT ACCURACY—A common mistake in the field is to adjust the printhead so that the first test pattern line prints at 0 mmHg on the paper, rather than by measuring the nominal distance. This method is often inaccurate as it does not account for paper variations. For best results: 7-40 Use only GE paper. Ensure paper is correctly loaded as instructed on page 4-2. Use a vernier caliper to adjust the printhead to its nominal position. 170 Series Monitor 2000947-004 Revision D Serviceable Assemblies: Servicing the Recorder Replacing the Recorder Motor Assembly Equipment Required Phillips screwdriver Motor assembly (part no. 15136A) Procedure 1. Remove the AC line cord from the monitor to completely remove power. 2. Follow the instructions for “Removing the Monitor Top Cover” on page 7-19. 3. Follow the instructions for “Replacing the Main Board” on page 7-35. 4. Remove the two screws holding the motor mount in place. 5. Remove the two screws holding the motor assembly on the motor mount. Retain the motor mount and all screws. 6. Install the new motor on the motor mount and tighten both screws. 7. Position the new motor in place, aligning the motor gear with the roller gear. Push the motor assembly slightly forward against the roller gear. There should be a slight clearance between the teeth. Check clearance by rotating the print roller back and forth. (There should be a slight rotation.) 8. Secure the motor mount to the main board mounting plate. Tighten both screws. 9. Replace and align the printhead by following the instructions on page 7-41 and page 7-43. 10. Replace the main board and secure all eight mounting screws. 11. Re-connect all cables. 12. Replace the monitor top cover. Cleaning the Printhead The thermal printhead heater elements must be cleaned at regular intervals to remove any accumulated paper dust. The heater elements may be cleaned with methanol or isopropyl alcohol. Care must be taken to avoid touching the heater elements with bare hands. CAUTION AIR DRY—Allow to air dry completely prior to using the monitor. Revision D 170 Series Monitor 2000947-004 7-41 Serviceable Assemblies: Servicing the Recorder Replacing the Sensor Board Equipment Required Phillips screwdriver Sensor board (part no. 15231) Sensor board insulator (part no. 2000147-001) Cable tie, x2 (part no. 608036) Cable mount adhesive back, x2 (part no. 608030) Procedure 1. Remove the AC line cord from the monitor to completely remove power. 2. Follow the instructions for “Removing the Monitor Top Cover” on page 7-19. 3. Follow the instructions for “Replacing the Main Board” on page 7-35. 4. Note the location of the printhead assembly relative to the notches on each side. This is the nominal location for when it is replaced later. Remove the four screws from the printhead assembly downstop plate and set aside. 5. Remove the three screws from the main board mounting plate and slide back and out to remove. 6. Remove the two screws holding the drawer microswitch in place. 7. Snip the sensor board cable tie located on the monitor bottom panel. 8. Pull the recorder drawer forward slightly. 9. Snip the cable tie on the back of the recorder drawer. 10. Pull drawer forward and lift out. CAUTION LOOSE ROLLERS—The drawer rollers are normally held in place by the drawer. Take care not to dislodge them while the drawer is removed. 11. Turn drawer over and peel off the sensor board insulator. 12. Remove the four flathead screws securing the sensor board. Discard the board, but retain the screws. 13. Insert the new board, secure all four screws, and cover with a new insulated sheet. 14. Secure the sensor board cable with a cable tie on the back of the recorder drawer. 15. Align the drawer over the slot, drop down, and slide into place. 16. Pull drawer fully foward to allow slack on the sensor board cable. 17. Secure the sensor board cable with a cable tie on the monitor bottom panel. 7-42 170 Series Monitor 2000947-004 Revision D Serviceable Assemblies: Servicing the Recorder 18. Replace the microswitch and secure both screws. Make sure the microswitch clicks when the drawer is closed. 19. Replace the main board mounting plate, pulling the plate forward, parallel with the roller while tightening the screws. 20. Return the printhead assembly to its original position as noted in step 4. 21. Replace the main board, re-connect all cables, and replace the monitor top cover. 22. Check printing and re-align the printhead as necessary. (See “Aligning the Printhead” on page 7-43.) Revision D 170 Series Monitor 2000947-004 7-43 Serviceable Assemblies: Boot ROM Error Codes Boot ROM Error Codes If the error codes in the following table display during the boot process, cycle power. If the error codes reappear when you power up, phone GE Technical Support for assistance. Table 7-15. Boot ROM Error Codes Error Code 7-44 Description E1 Configuration data incorrect for program target E2 Configuration data checksum error E3 Boot code CRC error 170 Series Monitor 2000947-004 Revision D Serviceable Assemblies: Boot ROM Error Codes For your notes Revision D 170 Series Monitor 2000947-004 7-45 Chapter 8 Peripheral Devices 8 The 170 Series Monitor allows connection to optional peripheral equipment. This section discusses the following: Remote Marks Connectors . . . . . . . . . . . . . . . . . . . . . . . . . . . . . . . . . 8-2 Telemetry Connector . . . . . . . . . . . . . . . . . . . . . . . . . . . . . . . . . . . . . 8-3 RS-232 Connectors . . . . . . . . . . . . . . . . . . . . . . . . . . . . . . . . . . . . . . 8-4 Revision D 170 Series Monitor 2000947-004 8-1 Peripheral Devices: Remote Marks Connectors Remote Marks Connectors Remote Mark, Fetal Acoustic Stimulator This receptacle is provided for connection to a Corometrics Model 146 Fetal Acoustic Stimulator. Remote Mark, Remote Event Marker This receptacle is provided for connection to an optional Corometrics Remote Event Marker. A Corometrics Remote Event Marker is used to annotate the strip chart recorder paper with a mark. The printed mark can be configured as , commonly used to record an “event”; or it FM can be configured as , commonly used as an indication that the mother has perceived fetal movement. The monitor is factory set with the mark configured as FM . Refer to “Customizing the Monitor” on page 4-10 for more information on selecting the mark. Refer to the instructions accompanying the Remote Event Marker for more information about using the accessory. 8-2 170 Series Monitor 2000947-004 Revision D Peripheral Devices: Telemetry Connector Telemetry Connector This connector is for future interfacing to the receiver of a Corometrics Model 340 Telemetry System. NOTE: The monitor, receiver, and transmitter must all be turned on. NOTE: When any telemetry mode is detected (US or TOCO), all equivalent front panel modes (US, US2, or TOCO) are ignored. You cannot “mix and match” telemetry and monitor modes. The telemetry connected annotation of the strip chart paper: upon commencement of telemetry monitoring; and every 30 minutes along with the modes. The telemetry disconnected annotation Revision D is printed on the bottom line of the top grid is printed on the strip chart paper if: you unplug the telemetry receiver from the 170 Series Monitor; you turn off the receiver; you turn off the transmitter; or the receiver does not detect any active mode information from the transmitter. 170 Series Monitor 2000947-004 8-3 Peripheral Devices: RS-232 Connectors RS-232 Connectors Two RS-232C serial interface receptacles (RJ-45) allow connecting the 170 Series Monitor to the following devices: Critikon Model 1846/1846SX Blood Pressure Monitor Quantitative Sentinel/Perinatal System Nellcor N-400 Fetal Pulse Oximeter 115-Compatible Device Table 8-1 lists the factory default settings for each port. Refer to Customizing the Monitor on page 4-10 for information on using the service setup mode to change these settings. Table 8-1. Communication Default Settings RS-232 Port Intended Device Mode Baud Rate 1 QS System HP 1200 2 Critikon Model 1846/1846SX ext. BP 600 Baud Rate Select a baud rate that is compatible with the external device. The available settings: 600, 1200, 2400, 4800, 9600, 19,200, and 384,000 bps. Mode Select a communications mode compatible with the external device. HP or HP with Notes Select HP or HP w/notes for connecting to a Marquette Quantitative/Perinatal System or another central system that uses the Hewlett Packard communications protocol. HP mode does not print central station annotations on the fetal monitor strip chart, whereas HP w/notes does. Ext. BP Select ext. BP for connecting to a Critikon Model 1846/1846SX Blood Pressure Monitor. 8-4 170 Series Monitor 2000947-004 Revision D Peripheral Devices: RS-232 Connectors Ext. FSpO2 Select ext. FSpO2 for connecting to a Nellcor Fetal Pulse Oximeter. Factory The FACTORY mode is reserved for factory testing only. 115 Update Select for backward-compatibility so the 170 Series Monitor can operate in a Model 115-compatible communication mode. This mode outputs all available information and ignores requests from a host computer system. 115 Transmit/Receive Select for backward-compatibility so the 170 Series Monitor can operate in a Model 115-compatible communication mode. This mode only outputs data requested from a host computer system. Revision D 170 Series Monitor 2000947-004 8-5 Peripheral Devices: RS-232 Connectors Critikon Model 1846/1846SX Critikon Model 1846/1846SX Monitors can be interfaced to a 170 Series Monitor to provide a printout of NBP values on the strip chart paper. 8-6 1. Refer to Table 8-2 for the appropriate interface cable. Connect one end to an available RS-232C port (1 or 2) on the 170 Series Monitor; connect the other end to the serial communications port on the blood pressure monitor. Refer to the Critikon documentation for information on the name of the connector. 2. Access the fetal monitor service setup mode and set the baud rate and mode for the appropriate port to 600 and ext. BP, respectively; then exit the service setup mode. 3. Be aware of the following information specific to Critikon monitors: The clock on the Critikon Modes 1846/1846SX Monitors must be set to within 10 minutes of the 170 Series Monitor. If the clocks are not within 10 minutes of each other, the time will print with each blood pressure reading. Due to the storage capabilities of Critikon monitors, it is recommended that power be cycled at the beginning of each data session. This ensures that any previously stored data is cleared. When using STAT mode on a Critikon monitor, the 170 Series Monitor does not print the time with each reading due to overcrowding on the strip chart. Instead the time is printed once every three to five minutes. The Critikon Model 1846SX discards NBP values after 90 minutes. 170 Series Monitor 2000947-004 Revision D Peripheral Devices: RS-232 Connectors Quantitative Sentinel/Perinatal System Through this interface, the 170 Series Monitor outputs FHR and UA data to a central information such as GE’s Quantitative Sentinel/Perinatal System. Annotations made at the central station can be optionally printed on the strip chart paper of the 170 Series Monitor as summarized below: Each message is preceded by a computer icon ( ). Messages are restricted to a maximum length of 50 characters. Lower-case letters are converted to upper-case letters. Non-standard characters are replaced with spaces. The 170 Series Monitor can be configured with the remote annotation capability enabled (HP w/notes mode) or disabled (HP mode). The following is an example of a remote message sent to a 170 Series Monitor from a central information system using this serial communications protocol: <SPW> AVERAGE VARIABILITY where SPW is an example of a physician’s initials. To connect a central information system: Revision D 1. Refer to Table 8-2 for the appropriate interface cable. Connect one end to an available RS-232C connector (1 or 2) on the 170 Series Monitor; connect the other end to the wallplate wired to the central information system. For a Marquette Quantitative Sentinel/Perinatal System: the interface cable is catalog number (REF) 1376AAO; the corresponding wallplate connector is labeled RS232 COMMUNICATIONS. 2. Access the monitor’s service setup mode and set the baud rate and mode to either HP or HP w/notes mode, respectively; then exit the service setup mode. 170 Series Monitor 2000947-004 8-7 Peripheral Devices: RS-232 Connectors Nellcor Puritan Bennett Model N-400 Fetal Pulse Oximeter Through this interface, FSpO2 readings provided by an NPB Model N-400 are printed every five minutes on the strip chart paper of the 170 Series Monitor. The reading is printed in the annotation area between the top and bottom grids. A solid diamond marker, above the data, marks the time of the reading and identifies the data source as an external device. The following is an example annotation: FSpO2 47% In addition, the FSpO2 data is trended on the bottom grid of the strip chart paper as a beaded trace. The trend uses a 0-100% scale. Refer to Figure 8-1. FSpO2 47 % 9:00 US US2 TOCO FSpO2 % 100 12 3 CM/MIN 100% SpO2 75 10 10 8 8 50 6 4 50% 25 2 0 12 6 4 2 UA 0 mm Hg0% kPa 0 Figure 8-1. FSpO2 Data Example To connect the Model N-400: 1. Using interface cable catalog number (REF) 1557AAO/BAO: connect one end to an available RS-232C port on the 170 Series Monitor; connect the other end to the Serial Communications port on the pulse oximeter. NOTE: This cable can be used with both 120/2121is and 170 Series Monitors. Although the 120/2120is uses 6-pin RJ-11 connectors and the 170 uses 8pin RJ-45 connectors, the latter is center keyed to account for this. The 170 uses RJ-45 connectors to provide for future interface features. 2. 8-8 Access the monitor’s service setup mode and set the baud rate to 2400 and the mode to ext. FSpO2; then exit the service setup mode. 170 Series Monitor 2000947-004 Revision D Peripheral Devices: RS-232 Connectors Table 8-2. External Device Summary External Device Parameter(s) 170 Series Baud Rate 170 Series Mode Interconnect Cable Cat. No. Critikon Model 1846/1846SX NBP 600 ext. BP 1562AAO (1 foot) 1562BAO (6 feet) Quantitative Sentinel System Annotations (optional) 1200 HP or HP w/notes 1558AAO (10 feet) 1558BAO (20 feet) Nellcor N-400 FSpO2 2400 ext. FSpO2 1557AAO (1 foot) 1557BAO (6 feet) NOTE: The interface cables can be used with both 120/2120is and 170 Series Monitors. Although the 120/2120is uses 6-pin RJ-11 connectors and the 170 uses 8-pin RJ-45 connectors, the latter is center keyed to account for this. The 170 uses RJ-45 connectors to provide for future interface features. Revision D 170 Series Monitor 2000947-004 8-9 Peripheral Devices: RS-232 Connectors Model 115-Compatible Communications Protocols Two options provide backward-compatibility so that the 170 Series Monitor can operate in a Model 115-compatible communication mode: 115 Update Mode: The 115 Update mode outputs all available information and ignores requests from a host computer system. 115 Transmit/Receive: The 115 Transmit/Receive mode only outputs data requested from a host computer system. When the Model 115 Fetal Monitor was released, many customers developed their own interfaces for communicating with the monitor. Setting the 170 Series Monitor to one of these communication modes allows these users to use their existing interfaces with the 170 Series Monitor as well. The 170 Series Monitor emulates the Corometrics Model 830 Converter’s implementation of the 115 Communication Protocols. This protocol is named after the Corometrics Model 115 Fetal Monitor in which it originated. NOTE: The baud rate must match the external computer; however, the recommended baud rate is 9600. Lower baud rates may result in some data loss. 8-10 170 Series Monitor 2000947-004 Revision D Peripheral Devices: RS-232 Connectors 115 Update Mode All information is transmitted from the 170 Series Monitor as soon as the information becomes available. IMPORTANT DATA REQUESTS—When set to the 115 Update Mode, the 170 Series Monitor will not respond to any requests for information sent from an external (host) computer. Heart rate data is transmitted on a quarter second basis. Uterine activity is transmitted eight times per second. Modes are transmitted once per minute, and whenever a mode change occurs. Annotation messages are sent as they are entered from the Annotations window. Event marks are transmitted each time the Mark button is selected. Fetal movement data is transmitted four times per second. Recorder status (PAPER OUT) information is transmitted once per second, when active, until the condition is resolved. NOTE: Refer to Requested Data Format on page 8-12 for information about the response data format. The format is the same for both the 115 Update mode and the 115 Transmit/Receive mode. Revision D 170 Series Monitor 2000947-004 8-11 Peripheral Devices: RS-232 Connectors 115 Transmit/Receive Mode Once a valid request for data is received, the 170 Series Monitor will send only the information that is requested. The selection of this information is done by sending a request stream to the 170 Series Monitor. After processing the request, the 170 Series Monitor will then send only the selected parameters to the external computer. The information selected by the external computer will be transmitted following the same criteria described for the 115 Update Mode. The requested parameters may be changed at any time by the host computer by sending a new request sequence. NOTE: Refer to Requested Data Format on page 8-12 for information about the response data format. The format is the same for both the 115 Update mode and the 115 Transmit/Receive mode. Requested Data Format The format of the data requested by the external computer from the monitor is shown in Figure 8-2. NOTE: This applies to 115 Transmit/Receive mode only. The definitions of the bytes are as follows: Monitor Type This field contains a 1-byte ASCII value indicating the type of monitor from which information is being requested. The 170 Series Monitor is set to a fixed value of 9 (39H). Data Field This field of 1 to 8 bytes indicates which parameters the external computer wishes to receive. The values for the bytes are given in Table 8-3. End of Text This 1-byte field contains the value 03H. If this byte is sent immediately following the Monitor ID, then the 170 Series Monitor will cancel transmission of all data. 8-12 170 Series Monitor 2000947-004 Revision D Peripheral Devices: RS-232 Connectors Transmitted Data Format The format of the information transmitted from the 170 Series Monitor to the external computer is shown in Figure 8-3. NOTE: This applies to both 115 Update mode and 115 Transmit/Receive mode. The definitions of the bytes are as follows: Monitor Type This field contains a 1-byte ASCII value indicating the type of monitor sending the information. The 170 Series Monitor is set to a fixed value of 9 (39H). Response Type This 1-byte value indicates the type of information being sent from the 170 Series Monitor as shown in Table 8-3. Monitor ID This 1-byte ASCII value indicates the ID number of the monitor information. The 170 Series Monitor sets this byte to a fixed value of 0 (30H). Data Field This field of n-bytes contains the actual data sent from the monitor to the external computer. The contents of this field for each response is given below: Revision D Event Mark: This data field is empty whenever the monitor’s Mark button is selected. Heart Rate: This data field contains two or three ASCII characters representing the value of the heart rate. A value of 00 (30H, 30H) indicates a penlift condition. Heart rate data (including penlift data) is transmitted four times per second. Uterine Activity: This data field contains two or three ASCII characters representing the value of uterine activity. A value of 128 (31H, 32H, 38H) indicates a penlift condition. Uterine activity data (including penlift data) is transmitted eight times per second. Modes: This data field contains two ASCII characters indicating the mode. The first character is the combined mode of both heart rates according to Table 8-4. The second character is the mode for uterine activity as listed in Table 8-5. Mode data is transmitted at startup, with each mode change, with each request, and once every minute. 170 Series Monitor 2000947-004 8-13 Peripheral Devices: RS-232 Connectors Fetal Movement: This field contains one ASCII character representing the current status of the FM signal: low or high. If the data byte is a 0 (30H), then the signal is low indicating no movement is detected; if the data byte is 1 (31H), then the signal is high indicating fetal movement is detected. If the fetal movement feature is not in the monitor, the data byte is 2 (32H). If the fetal movement feature is present but not enabled, the data byte is 4 (34H). This data is transmitted four times per second. (Fetal movement detection circuitry is an option which can be purchased for the 170 Series Monitor. Recorder Status: This field contains one ASCII character representing the current status of the PAPER OUT* signal: low or high. If the data byte is a 0 (30H), then the signal is low indicating paper is loaded and the recorder door is closed; if the data byte is 1 (31H), then the signal is high indicating a paper out condition. This data is transmitted once per second, when active. End of Text This 1-byte field contains the value 03H. If this byte is sent immediately following the Monitor ID, then the 170 Series Monitor will cancel transmission of all data. Limitations The only restriction on the information transmitted during either 115 communication mode occurs when the baud rate is set below 4800 baud. Under this condition, data loss may occur. NOTE: The recommended baud rate is 9600. 8-14 170 Series Monitor 2000947-004 Revision D Peripheral Devices: RS-232 Connectors Error Conditions Transmission Errors Transmission errors may be detected by the external computer as parity errors, framing errors (no valid stop bit), or invalid characters. There is no facility in the 170 Series Monitor to re-transmit any information found to contain an error. It is therefore up to the user to decide what action to take as a result of an error. Request Errors These errors apply to the 115 Transmit/Receive Mode only. Request errors are detected by the monitor as parity errors, framing errors, and invalid Monitor ID. If the monitor fails to respond properly to a request, it is suggested that the external computer re-transmit a request sequence. FIRST DATA FIELD MONITOR TYPE DATA FIELD(S) Nth DATA FIELD END OF TEXT Figure 8-2. Data Request Format—115 Transmit/Receive Mode Only MONITOR TYPE RESPONSE TYPE MONITOR ID DATA FIELD END OF TEXT Figure 8-3. Transmitted Data Format Table 8-3. Response Type and Data Field Type Revision D Response Type ASCII Character Hexadecimal Value Heart Rate 1 ` 60 Uterine Activity a 61 Modes b 62 Event Mark d 64 Heart Rate 2 e 65 Fetal Movement f 66 Paper Out g 67 170 Series Monitor 2000947-004 8-15 Peripheral Devices: RS-232 Connectors Table 8-4. Heart Rate Modes HR1 Mode HR2 Mode ASCII Character Hexadecimal Value INOP INOP 0 30 FECG INOP 1 31 US INOP 2 32 US FECG 9 39 US US2 ; 3B FECG US < 3C INOP US2 > 3E Table 8-5. Uterine Activity Modes 8-16 UA Mode ASCII Character Hexadecimal Value INOP 0 30 TOCO 1 31 IUP 2 32 170 Series Monitor 2000947-004 Revision D Peripheral Devices: RS-232 Connectors Cabling Information Monitor RS-232 Connector The 170 Series Monitor’s RS-232C Ports each use an 8-pin RJ-45 connector, shown in Figure 8-4. The following control signals are supported: Request to Send (RTS): This output line is asserted (+12 V) whenever the 170 Series Monitor is on and operating; it can be used to determine whether the monitor is powered on. Transmit Data (TXD): This output line provides the serial data sent to the external computer from the 170 Series Monitor. Clear to Send (CTS): This input line must be asserted in order to enable the transmission of data from the 170 Series Monitor. Under conditions where no modem is used, the line can be tied to the RTS line of the monitor. If a modem is used, this line should be tied to the CTS line of the modem. Receive Data (RXD): This input line provides the serial data sent from the external computer to the 170 Series Monitor. Standard RS-232C Rules The following rules must be observed: When a direct connection is made between a 170 Series Monitor and another Data Terminal Equipment (DTE), a standard null-modem cable must be used. When an indirect connection is made, using a modem, a 170 Series Monitor requires a normal-modem cable. Cable Distance The RS-232C Interface supplied with the 170 Series Monitor is capable of operating over varying distances depending upon the data rate used and whether the cabling is shielded or unshielded. Refer to the manufacturer’s specifications. Data Terminal Equipment Cabling When the 170 Series Monitor is directly connected to another Data Terminal Equipment (DTE) device, a standard null-modem cable is required as shown in Figure 8-5. Data Communications Equipment Cabling When the 170 Series Monitor is connected to a Data Communications Equipment (DCE) device (a modem), a standard normal-modem cable is required as shown in Figure 8-6. Revision D 170 Series Monitor 2000947-004 8-17 Peripheral Devices: RS-232 Connectors Table 8-6. RS-232 Connector 1 Pin Number Signal Name Signal Description 1 +5V 200 mA Fused 2 RTS Request to Send Output from Monitor 3 RXD Receive Data Input to Monitor 4 GND Signal Ground 5 GND Signal Ground 6 TXD Transmit Data Output from Monitor 7 CTS Clear to Send Input to Monitor 8 +5V 200 mA Fused Table 8-7. RS-232 Connector 2 Pin Number Signal Name Signal Description 1 GND Signal Ground 2 RTS Request to Send Output from Monitor 3 RXD Receive Data Input to Monitor 4 GND Signal Ground 5 GND Signal Ground 6 TXD Transmit Data Output from Monitor 7 CTS Clear to Send Input to Monitor 8 GND Signal Ground 1 2 3 4 5 6 7 8 Figure 8-4. RJ-45 Connector (facing the rear panel from the outside) 8-18 170 Series Monitor 2000947-004 Revision D Peripheral Devices: RS-232 Connectors 170 SERIES MONITOR SIDE 8-PIN DATA TERMINAL EQUIPMENT (DTE) SIDE SIGNAL NAME SIGNAL NAME 25-PIN 9 PIN 6 PIN 6 TXD TXD 2 3 2 3 RXD RXD 3 2 5 2 RTS RTS 4 7 1 7 CTS CTS 5 8 6 4 GND 5 GND GND 7 5 3 Figure 8-5. Standard Null-Modem Cable 170 SERIES MONITOR SIDE 8-PIN SIGNAL NAME DATA TERMINAL EQUIPMENT (DTE) SIDE SIGNAL NAME 25-PIN 9 PIN 6 PIN 6 TXD TXD 2 3 5 3 RXD RXD 3 2 2 2 RTS* RTS 4 7 1 7 CTS* CTS 5 8 6 4 GND 5 GND GND 7 5 3 Figure 8-6. Standard Normal-Modem Cable Revision D 170 Series Monitor 2000947-004 8-19 For your notes 8-20 170 Series Monitor 2000947-004 Revision D Chapter 9 Maintenance 9 All equipment, no matter how reliable, needs to be maintained on a regular basis. This chapter describes general care and cleaning instructions for the 170 Series Monitor and its accessories. If an accessory is not listed, consult the manufacturer’s instructions. This chapter describes the following: Cleaning . . . . . . . . . . . . . . . . . . . . . . . . . . . . . . . . . . . . . . . . . . . . . . . 9-2 Preventative Maintenance Inspection. . . . . . . . . . . . . . . . . . . . . . . . . 9-5 Revision D 170 Series Monitor 2000947-004 9-1 Maintenance: Cleaning Cleaning CAUTION PREPARATION—Unplug the monitor from the AC power source and detach all accessories from the monitor. Do not immerse accessories in any liquid. Do not use abrasive cloth or cleaners on monitor or accessories. Cleaning the Monitor Exterior To clean the exterior of the monitor, including the displays and the membrane switch panel: 9-2 1. Wipe any fluids from the surface of the monitor. 2. Dampen a cloth or paper towel with isopropyl alcohol and gently rub soiled area until clean. 170 Series Monitor 2000947-004 Revision D Maintenance: Cleaning Cleaning the Tocotransducer, Ultrasound Transducer, and Legplate CAUTIONS ABRASION—Do not use abrasive cloth, sharp objects, or abrasive cleaners. ALCOHOL—Do not use Alcohol in cleaning solutions. DISCONNECTION—Detach the transducers/cables/legplate from the monitor. IMMERSION—Do not immerse transducers/cables/legplate or hold under running water. 1. Revision D Dampen a cloth or paper towel with one of the following products; then wring out until only slightly wet: Sodium Hypochlorite 5.25 % (Bleach) diluted 10:1 Cidex Sporicidin Soap and water 2. Rub soiled area until clean, taking care not to excessively wet the tocotransducer diaphragm seal or the contact surface of the ultrasound transducer. 3. Use a cloth dampened with water on the contact surface of the ultrasound transducer and around the seal of the tocotransducer. Do not use a sharp object which might damage the seal of the tocotransducer. 4. Dry all accessories with a soft, dry cloth. 170 Series Monitor 2000947-004 9-3 Maintenance: Cleaning Cleaning the UA Strain Gauge 1. Remove the plastic dome. 2. If desired, wash the transducer with sterile water or saline solution. 3. Carefully clean the diaphragm seal with a cotton swab to remove deposits. Avoid excessive pressure since this may damage the diaphragm. If there are excessive stains on the diaphragm or sides of the transducer, remove with a cotton swab and solvents of increasing strength. Do not use pumice, Ajax, Bon Ami or other abrasives. 4. After cleaning, rinse the transducer thoroughly in distilled water and replace the dome loosely. 5. Dry the transducer with sterile gauze. CAUTIONS AUTOCLAVE—Do not autoclave pressure transducer. IMMERSION—Do not immerse any part of the electrical connector of the transducer in the cleaning solution at any time. Examine the outer sheath of the cable for perforations. If the outer covering is damaged in any way, do not immerse the cable in the cleaning solution; this may result in moisture entering the transducer case, which is vented through the cable. WARNING LIQUIDS—If liquids enter the electrical connector, check the resistance between the electrical element and the transducer case. A resistance level of greater than 10 M¾ ensures that the leakage current is within acceptable levels for safe use on patients. 6. Leave transparent dome attached to the transducer during storage, but slacken the locking ring at least one quarter of a turn. CAUTION STERILIZATION—Prior to patient use, ensure the dome is sterile. 9-4 170 Series Monitor 2000947-004 Revision D Maintenance: Preventative Maintenance Inspection Preventative Maintenance Inspection Equipment Required Digital Multimeter Dielectric Tester Leakage Current Tester Aluminum Foil Ultrasound Test Body (ultrasound transducer wrapped in aluminum foil) Tocotransducer Test Body (tocotransducer wrapped in aluminum foil) FECG Test Body for Model 173 or 174 only (Shorted legplate with all three leads tied together) IUP Test Body for Model 173 or 174 only (SensorTip transducer wrapped in aluminum foil) Anti-Static Wristband Static-Fee Work Surface 170 Series Operator’s Manual Visual Inspection Inspect the following for excess wear and/or signs of damage: Power Supply Cord AC-to-DC Converter AC Line Cord Ultrasound Transducer(s) Legplate(s) IUPC Transducer(s) Remote Event Marker Monitor Input Receptacles Chassis Membrane Switch Panel Internal Harnesses/Connectors Display Panel Revision D 170 Series Monitor 2000947-004 9-5 Maintenance: Preventative Maintenance Inspection Cleaning Clean the monitor’s exterior. Refer to “Cleaning the Monitor Exterior” on page 9-2. Clean the recorder printhead. Refer to “Cleaning the Printhead” on page 746. Clean the monitor’s accessories. Refer to “Cleaning the Tocotransducer, Ultrasound Transducer, and Legplate” on page 9-3. Clean the monitor’s interior using a hand-held vacuum. Calibration Adjust the printhead. Refer to “Aligning the Printhead” on page 7-43. Calibrate the tocotransducer(s). Refer to “Tocotransducer Calibration” on page 7-20. 9-6 170 Series Monitor 2000947-004 Revision D Maintenance: Preventative Maintenance Inspection Electrical Safety Tests Electrical safety tests provide a method of determining if potential electrical hazards to the patient or operator of the device exist. Recommendations The Patient Leakage Tests are performed with reference to IEC Standard 60601-2-49. GE recommends that you perform all safety tests presented in this chapter: upon receipt of the device (monitor and its associated equipment) every twelve months thereafter each time the main enclosure is disassembled or a circuit board is removed, tested, repaired, or replaced, and record the date and results in a Maintenance Repair Log. These instructions are intended for every component in the system. WARNING MAINTENANCE SCHEDULE—Failure to implement a satisfactory maintenance schedule may cause undue equipment failure and possible health hazards. Unless you have an Equipment Maintenance Contract, GE does not in any manner assume the responsibility for performing the recommended maintenance procedures. The sole responsibility rests with the individual or institution using the equipment. GE service personnel may, at their discretion, follow the procedures provided in this manual as a guide during visits to the equipment site. Test Conditions Electrical safety tests may be performed under normal ambient conditions of temperature, humidity, and pressure. Revision D 170 Series Monitor 2000947-004 9-7 Maintenance: Preventative Maintenance Inspection Unit to Primary Leakage 1. 2. 3. 4. Test Description Unit to primary leakage current measurements. TP1 connected to metal part of the UUT. Polarity: Normal Neutral: Normal (Closed) Ground: Normal (Closed) Polarity: Normal Neutral: Open Ground: Normal (Closed) Polarity: Normal Neutral: Normal (Closed) Ground: Open Polarity: Reverse Neutral: Normal (Closed) Ground: Open Polarity: Reverse Neutral: Open Ground: Normal (Closed) Polarity: Reverse Neutral: Normal (Closed) Ground: Normal (Closed) Configure a leakage tester to perform a unit AC line leakage test. Refer Figure 9-1 for safety tester connection and switch details. Turn ON the monitor using the monitor’s On/Standby button. Verify the following: <300 μA (132–253 VAC, or at the line voltage at your facility +10%) Record the primary leakage for the following conditions: S1: DPDT S2: SPDT S3: SPDT S4: SPDT Polarity Neutral Ground Test Point a) Normal b) reverse a) Closed b) Open a) Closed b) Open a) Internal b) TP1 Position Position Position Position a a a a b X b X X X X X b EN/IEC X X 10 10 X X 50 50 X X 50 50 X X X 50 50 X X 50 50 X X 50 50 X X Figure 9-1. Unit to Primary leakage test connection diagram and switch settings - 9-8 UL X X X b Maximum Limits (uA) 170 Series Monitor 2000947-004 Revision D Maintenance: Preventative Maintenance Inspection Patient-to-Ground Leakage for US1, US2 and TOCO (Type BF applied parts) 1. 2. Connect the Ultrasound Transducer test body to monitors front panel US1, and/or US2 input. Connect a TOCO transducer test body to the monitor’s front panel UA input. Note: Refer below table to connect the applicable Type BF parts specific for each model. → Model Type of Connectors to be Shorted for the Leakage test for each of the Model 3. 4. 5. 6. Revision D 171 172 173 174 US1 (BF) US1 (BF) US1 (BF) US1 (BF) -------- US2 (BF) -------- US2 (BF) TOCO (BF) TOCO (BF) TOCO (BF) TOCO (BF) Configure a leakage tester to perform a patient leakage test. Refer Figure 9-2 as shown below for the Safety Tester connection and switch details. Turn ON the monitor using the monitor’s On/Standby button. Verify the following: Normal Condition: <10 μA Single Fault Condition: <50 μA (132–253 VAC, or at the line voltage at your facility +10%) Record the patient-to-ground leakage for the following conditions: 170 Series Monitor 2000947-004 9-9 Maintenance: Preventative Maintenance Inspection Test Description S1: DPDT S2: SPDT S3: SPDT S4: SPDT Polarity Neutral Ground Test Point a) Normal b) reverse a) Closed b) Open a) Closed b) Open a) Internal b) TP1 Position Position Position Position a a a a b Patient to Ground Leakage Current Measurements: LEADS TP1 connected to LEADS (all LEADS connected together). Polarity: Normal Neutral: Normal (Closed) X Ground: Normal (Closed) Polarity: Normal Neutral: Open X Ground: Normal (Closed) Polarity: Normal Neutral: Normal (Closed) X Ground: Open Polarity: Reverse Neutral: Normal (Closed) X Ground: Open Polarity: Reverse Neutral: Open X Ground: Normal (Closed) Polarity: Reverse Neutral: Normal (Closed) X Ground: Normal (Closed) b X X b b Maximum Limits (uA) EN/IEC UL X X 10 10 X X 50 50 X X X 50 50 X X X 50 50 X X 50 50 X X 50 50 X X Figure 9- 2. Patient to Ground leakage test connection diagram and switch settings 9-10 170 Series Monitor 2000947-004 Revision D Maintenance: Preventative Maintenance Inspection Patient-to-Line Leakage for US1, US2 and TOCO (Type BF applied parts) 1. 2. Model → Connect the Ultrasound test body to monitors front panel US1, and/or US2. Connect a tocotransducer test body to the monitor’s front panel UA input. Note: Refer below table to connect the applicable Type BF parts specific for each model. 171 172 173 174 Type of Connectors to be Shorted for the Leakage test for each of the Model 3. 4. 5. 6. Test Description US1 (BF) US1 (BF) US1 (BF) US1 (BF) -------- US2 (BF) -------- US2 (BF) TOCO (BF) TOCO (BF) TOCO (BF) TOCO (BF) Configure a leakage tester to perform a patient leakage test. Refer Figure 9-3 as shown below for the Safety Tester connection and switch details. Turn ON the monitor using the monitor’s On/Standby button. Verify the following: Normal Condition: <50 μA Single Fault Condition: <50 μA (132–253 VAC, or at the line voltage at your facility +10%) Record the patient-to-line leakage for the following conditions: S1: DPDT S2: SPDT S3: SPDT S4: SPDT Polarity Neutral Ground Test Point a) Normal b) reverse a) Closed b) Open a) Closed b) Open a) Internal b) TP1 Position Position Position Position a a a b a Patient Leakage Current Measurements: LEADS TP1 connected to LEADS (all LEADS connected together). Polarity: Normal Neutral: Open X Ground: Normal (Closed) Polarity: Reverse Neutral: Open X Ground: Normal (Closed) b b b Maximum Limits (uA) EN/IEC UL X X X 50 50 X X X 50 50 Figure 9-3. Patient to Line leakage test connection diagram and switch settings Revision D 170 Series Monitor 2000947-004 9-11 Maintenance: Preventative Maintenance Inspection Patient-to-Ground Leakage for FECG and IUP (Type CF applied parts) Connect an FECG test body to the monitor’s front panel FECG input. 2. Connect an IUP test body to the monitor’s front panel UA input. Note: Refer below table to connect the applicable Type CF parts specific for each model. Model → 171 172 173 174 1. Type of Connectors to be Shorted for the Leakage test for each of the Model 3. 4. 5. 6. 9-12 -------- -------- -------- -------- -------- -------- FECG (CF) FECG (CF) -------- -------- IUP (CF) IUP (CF) Configure a leakage tester to perform a patient leakage test. Refer Figure 9-4 as shown below for the Safety Tester connection and switch details. Turn ON the monitor using the monitor’s On/Standby button. Verify the following: Normal Condition: <10 μA Single Fault Condition: <50 μA (132–253 VAC, or at the line voltage at your facility +10%) Record the patient-to-line leakage for the following conditions: 170 Series Monitor 2000947-004 Revision D Maintenance: Preventative Maintenance Inspection Test Description S1: DPDT S2: SPDT S3: PDT S4: SPDT Polarity Neutral Ground Test Point a) Normal b) reverse a) Closed b) Open a) Closed b) Open a) Internal b) TP1 Position Position Position Position a a a a b Patient to Ground Leakage Current Measurements: LEADS TP1 connected to LEADS (all LEADS connected together). Polarity: Normal Neutral: Normal (Closed) X Ground: Normal (Closed) Polarity: Normal Neutral: Open X Ground: Normal (Closed) Polarity: Normal Neutral: Normal (Closed) X Ground: Open Polarity: Reverse Neutral: Normal (Closed) X Ground: Open Polarity: Reverse Neutral: Open X Ground: Normal (Closed) Polarity: Reverse Neutral: Normal (Closed) X Ground: Normal (Closed) b X X b b Maximum Limits (uA) EN/IEC UL X X 10 10 X X 50 50 X X X 50 50 X X X 50 50 X X 50 50 X X 50 50 X X Figure 9-4. Patient to Ground leakage test connection diagram and switch settings Revision D 170 Series Monitor 2000947-004 9-13 Maintenance: Preventative Maintenance Inspection Patient-to-Line Leakage for FECG and IUP (Type CF applied parts) Connect an FECG test body to the monitor’s front panel FECG input. 2. Connect an IUP test body to the monitor’s front panel UA input. Note: Refer below table to connect the applicable Type CF parts specific for each model. Model → 171 172 173 174 1. Type of Connectors to be Shorted for the Leakage test for each of the Model 3. 4. 5. 6. Test Description -------- -------- -------- -------- -------- -------- FECG (CF) FECG (CF) -------- -------- IUP (CF) IUP (CF) Configure a leakage tester to perform a patient leakage test. Refer Figure 9-5 as shown below for the Safety Tester connection and switch details. Turn ON the monitor using the monitor’s On/Standby button. Verify the following: Normal Condition: <50 μA Single Fault Condition: <50 μA (132–253 VAC, or at the line voltage at your facility +10%) Record the patient-to-line leakage for the following conditions: S1: DPDT S2: SPDT S3: SPDT S4: SPDT Polarity Neutral Ground Test Point a) Normal b) reverse a) Closed b) Open a) Closed b) Open a) Internal b) TP1 Position Position Position Position a a a a b Patient Leakage Current Measurements: LEADS TP1 connected to LEADS (all LEADS connected together). Polarity: Normal Neutral: Open X Ground: Normal (Closed) Polarity: Reverse Neutral: Open X Ground: Normal (Closed) b b b Maximum Limits (uA) EN/IEC UL X X X 50 50 X X X 50 50 Figure 9-5. Patient to Line leakage test connection diagram and switch settings 9-14 170 Series Monitor 2000947-004 Revision D Chapter 10 Specifications 10 This section contains a detailed list of the technical specifications for the 170 Series Monitor. This chapter lists specifications for the following: General Monitor . . . . . . . . . . . . . . . . . . . . . . . . . . . . . . . . . . . . . . . . 10-2 Operating Modes . . . . . . . . . . . . . . . . . . . . . . . . . . . . . . . . . . . . . . . 10-3 Strip Chart Recorder. . . . . . . . . . . . . . . . . . . . . . . . . . . . . . . . . . . . . 10-4 Revision D 170 Series Monitor 2000947-004 10-1 Specifications: General Monitor General Monitor Table 10-1. General Monitor Technical Specifications Category ! ! Technical Specifications Power Requirements Nominal Line Voltage: Line Frequency: Power Consumption (maximum): Monitor DC Input: 100–230 VAC 50/60 Hz (operates over 47–63 Hz) ≤30 VA 12 Vdc at 2.5 A Physical Characteristics Height: Width: Depth: Weight: 5.75 in (14.6 cm) 16.75 in (42.5 cm) 10.0 in (25.4 cm) 8 lbs (3.6 kg) approx. Environmental Conditions Monitor: Ambient Temperature: Relative Humidity: Strip Chart Papera: Ambient Temperature: Relative Humidity: Certification UL-2601.1: CUL: a 10-2 Operating Storage 50°F to 104°F (10°C to 40°C) 10% to 75%, non-condensing 14°F to 131°F (–10°C to 55°C) 10% to 90%, non-condensing 50°F to 104°F (10°C to 40°C) 30% to 70%, non-condensing < 80°F (< 26.5°C) 45% to 65%, non-condensing Designed to meet UL-2601.1 Medical electrical equipment classified by Underwriter’s Laboratories, Inc., with respect to fire, shock, and mechanical hazards in accordance with UL-2601.1. Classified with respect to electric shock, fire, mechanical, and other specified hazards only, in accordance with CAN/CSA C22.2 No. 601.1 Paper operating environmental conditions are for a period of less than one month. Paper storage environmental conditions are for extended storage. 170 Series Monitor 2000947-004 Revision D Specifications: Operating Modes Operating Modes Table 10-2. Operating Mode Specifications FECG Mode Technique: Heart Rate Counting Range: Heart Rate Resolution: Artifact Elimination: Countable Input Signal Range: Offset Voltage Tolerance (Differential): Maximum Common Mode Voltage: Preamplifier Bandwidth: Common Mode Rejection: Balanced: Unbalanced 5kΩ RA or LA: Input Equivalent Noise: Input Impedance: Differential: Common Mode: Mains Frequency Rejection: Leakage Current: Isolation, Mains-to-Patient: Ultrasound Mode Technique: Transducer Type: Pulse Repetition Frequency: Pulse Duration: Transmitter Frequency: Spatial-Average Temporal Average Intensity: Focal 20 dB Beam Area: Peak Instantaneous Intensity: Peak-Negative Acoustic Pressure: Heart Rate Counting Range: Leakage Current: Uterine Activity Mode Range: Resolution: Bandwidth: Excitation Voltage: Zero Set Temperature Drift: Leakage Current: Revision D Peak detecting, beat-to-beat cardiotachometer 30–240 BPM ±1 BPM Selectable, ±25 BPM artifact rejection 15 µV to 2 mV peak-to-peak ±300 mVdc maximum 20 V peak-to-peak 1–100 Hz > 120 dB at mains frequency, with patient cable > 110 dB at mains frequency < 10 µV peak-to-peak > 10 MΩ > 20 MΩ > 40 dB < 60 µA at 254 VAC, electrically isolated > 4 kVAC Pulsed Doppler with autocorrelation processing 9-crystal 2 kHz (all modes) 92 µs 1.151 MHz Isata < 5 mW/cm2 16.6 cm2, at a range = 7 cm 1.8 mW/cm2 p < 10.0 kPa 50–210 BPM Complies with IEC 60601-2-49 Strain Gauge Tocotransducer 0–100 mmHg 0–100 relative units 1 mmHg 1 relative unit dc to 3Hz dc to 0.5 Hz +4.0 Vdc < 0.1 mmHg/°C (0.013 kPa/°C), excluding transducer Complies with IEC 60601-2-49 170 Series Monitor 2000947-004 10-3 Specifications: Strip Chart Recorder Strip Chart Recorder Table 10-3. Strip Chart Recorder Technical Specifications Heart Rate Scale Chart Width: Scaling: Range: Resolution: Domestic International 7 cm 30 BPM/cm 30–240 BPM 1 BPM 8 cm 20 BPM/cm 50–210 BPM 1 BPM Uterine Activity Scale Chart Width: Scaling: Range: Resolution: Strain Gauge 4 cm 25 mmHg/cm 0–100 mmHg 1 mmHg Tocotransducer 4 cm 25 relative units/cm 0–100 relative units 1 relative unit Recorder Drive Speeds: Speed Accuracy: 1, 2, and 3 cm/min ±1 % NOTE: Specifications are subject to change without notice. 10-4 170 Series Monitor 2000947-004 Revision D Chapter 11 Parts Lists 11 This chapter of the manual provides parts lists and block diagrams. NOTE: GE makes every effort possible to provide the most up-to-date reference documentation for your Corometrics equipment. However, in special cases involving field-installed upgrades, a drawing or parts list in this manual may not reflect the revision level of your unit’s subassemblies. When discrepancies are found, contact the GE Service Department at one of the numbers found on the back cover of this manual. Revision D 170 Series Monitor 2000947-004 11-1 Parts Lists: 2000268-188, Model 171 Final Assembly 2000268-188, Model 171 Final Assembly Table 11-1. Model 171 Final Assembly, 200268-188 11-2 Item Number Part Number 1 2000281-001 2 15451AA 3 140173 4 Description Qty ENCL BOTTOM SHIELDED 170 SERIES 1 COVER SPEAKER 1 FOOT RUBBER .50D .26H 4 15222AA BRG DRAWER 2 5 15212AA PIN BEARING-170 2 6 15200A ASSY ROLLER 1 7 250096 BEARING,FLANGED,.187 BORE 2 8 11717AA ROLLER GEAR-120REC 1 9 15207A ASSY DRAWER, WELDED 1 10 15224AA SPACER DRAWER 1 11 15223AA PLASTIC 9 CM PARTITION 1 12 15231A ASSY PCB SENSOR BOARD 1 13 2000147-001 SENSOR INSULATOR 170 SERIES 1 14 250099 SPRING COMPRESSION,.24 OD,,.38L 1 15 2000222-001 SPRING CPRSN .3 OD .022WIRE SS 2 16 15136A MOTOR STEPPER ASSY 1 17 15202AA MOUNT MOTOR 1 18 15201AA PLATE PC MOUNTING 1 19 2000133-001 PRINTHEAD 8 DOTS/MM 216MM WIDE 1 20 15203AA PLATE HEAD MOUNTING 1 21 2000223-001 SPRING CPRSN .56L .240 OD .024 WIRE 2 22 15204AA BRACKET HEADSTOP 1 23 280201 STANDOFF,1/4HEX,1/8SL,4-4,0 THD 2 24 281501 NUT,HEX,4-40,5/64 X 1/4 2 25 2000234-001 CABLE ASSY RIBBON RECORDER 170 SERIES 1 26 2000235-001 CABLE ASSY SPEAKER WIRE 170 SERIES 1 27 2000146-001 CLIP GROUND 2 170 Series Monitor 2000947-004 Revision D Parts Lists: 2000268-188, Model 171 Final Assembly Table 11-1. Model 171 Final Assembly, 200268-188 (Continued) Revision D Item Number Part Number 28 2000243-004 29 Description Qty PCB MAIN SINGLE U/S COMPLETE 1 284105 SCREW #4 PH 1/4L THD FORM 7 30 284072 SCR 4-40 PH 5/16L PHL LL STRIP 29 31 284285 SCR 4-40 FH UNDERCUT 3/16 PHIL 2PS NYLON PATCH 4 32 289516 SCR M3X5 PH PHIL ZP W/NYLOK PATCH 4 33 2000220-001 SCR PH #2 1/2L PHIL ZPS PLASTITE 2 34 2000221-001 SCR #4 PH 1/4L TYPE F PHIL ZPS 4 35 2000142-001 SPRING FRONT GROUND 1 36 15301A ASSY PCB DISPLAY BOARD 1 37 15461AA GASKET REAR PANEL 1 38 15453CA PAD PRINT,TOP COVER-MODEL175 1 39 15323BA KYBD MEMBRANE US1 1 40 15324BA LABEL DISPLAY OVERLAY US1 1 41 14943AA CLIP, SPEAKER, 2 42 2000178-001 PLUG CALL LIGHT 1 43 2000359-001 STANDOFF M-F 440 1IN LG ALUM 1 44 2000246-001 PLUG TELEMETRY 1 45 2000186-001 PLUG NICOLAY CONN 1 46 2000240-001 LABEL CUSTOM REAR PANEL OVERLAYS 170 1 47 284031 SCR 4-40 BH 1/4 LG SLTD N YLON 2 49 608030 CABLE MOUNT ADHESIVE BACK 2 50 608036 TYRAPS CABLE TIES 2 51 7714AAT POWER SUPPLY 12V 30W EXTERNAL SUPPLY 1 52 600028 ASSY LINE CORD IEC 1 55 2000890-001 PACKAGING RIGHT CAP 170 SERIES 1 56 2000891-001 PACKAGING LEFT CAP 170 SERIES 1 57 2000892-001 PACKAGING BOXES 170 SERIES 1 170 Series Monitor 2000947-004 11-3 Parts Lists: 2000268-188, Model 171 Final Assembly Table 11-1. Model 171 Final Assembly, 200268-188 (Continued) 11-4 Item Number Part Number 58 2000893-001 59 Description Qty PACKAGING SLOTTED TRAY 170 SERIES 1 13984AA LBL PACKING LIST 340 1 60 2000555-001 SHLD SPEAKER - 170 1 61 410066 POLY BAG 23X26X.006 1 62 410097 TAPE SHIPPING 3IN WIDE 4 63 4281CA LBL SERIAL# UL APPV’D-155 1 64 4281DA LABEL C-UL HAZZARD TAG120 SERIES 1 170 Series Monitor 2000947-004 Revision D Parts Lists: 2000268-189, Model 172 Final Assembly 2000268-189, Model 172 Final Assembly Table 11-2. Model 172 Final Assembly, 2000268-189 Revision D Item Number Part Number 1 2000281-001 2 15451AA 3 140173 4 Description Qty ENCL BOTTOM SHIELDED 170 SERIES 1 COVER SPEAKER 1 FOOT RUBBER .50D .26H 4 15222AA BRG DRAWER 2 5 15212AA PIN BEARING-170 2 6 15200A ASSY ROLLER 1 7 250096 BEARING FLANGED .187 BORE 2 8 11717AA ROLLER GEAR-120REC 1 9 15207A ASSY DRAWER WELDED 1 10 15224AA SPACER DRAWER 1 11 15223AA PLASTIC 9 CM PARTITION 1 12 15231A ASSY PCB SENSOR BOARD 1 13 2000147-001 SENSOR INSULATOR 170 SERIES 1 14 250099 SPRING COMPRESSION .24 OD .38L 1 15 2000222-001 SPRING CPRSN .3 OD .022WIRE SS 2 16 15136A MOTOR STEPPER ASSY 1 17 15202AA MOUNT MOTOR 1 18 15201AA PLATE PC MOUNTING 1 19 2000133-001 PRINTHEAD 8 DOTS/MM 216MM WIDE 1 20 15203AA PLATE HEAD MOUNTING 1 21 2000223-001 SPRING CPRSN .56L .240 OD .024 WIRE 2 22 15204AA BRACKET HEADSTOP 1 23 280201 STANDOFF 1/4HEX 1/8SL 4-4 0 THD 2 24 281501 NUT HEX 4-40 5/64 X 1/4 2 25 2000234-001 CABLE ASSY RIBBON RECORDER 170 SERIES 1 26 2000235-001 CABLE ASSY SPEAKER WIRE 170 SERIES 1 27 2000146-001 CLIP GROUND 2 170 Series Monitor 2000947-004 11-5 Parts Lists: 2000268-189, Model 172 Final Assembly Table 11-2. Model 172 Final Assembly, 2000268-189 (Continued) 11-6 Item Number Part Number 28 15269E PCB ASSY MAIN PCB DUAL US COMP 1 29 284105 SCREW #4 PH 1/4L THD FORM 7 30 284072 SCR 4-40 PH 5/16L PHL LL STRIP 29 31 284285 SCR 4-40 FH UNDERCUT 3/16 PHIL 2PS NYLON PATCH 4 32 289516 SCR M3X5 PH PHIL ZP W/NYLOK PATCH 4 33 2000220-001 SCR PH #2 1/2L PHIL ZPS PLASTITE 2 34 2000221-001 SCR #4 PH 1/4L TYPE F PHIL ZPS 6 35 2000142-001 SPRING FRONT GROUND 1 36 15301A ASSY PCB DISPLAY BOARD 1 37 15461AA GASKET REAR PANEL 1 38 15453AA PAD PRINT TOP COVER-MODEL 170 1 39 15323AA KYBD MEMBRANE US2 1 40 15324AA LABEL DISPLAY OVERLAY US2 1 41 14943AA CLIP SPEAKER 2 42 2000178-001 PLUG CALL LIGHT 1 43 2000359-001 STANDOFF M-F 440 1IN LG ALUM 1 44 2000246-001 PLUG TELEMETRY 1 46 2000240-001 LABEL CUSTOM REAR PANEL OVERLAYS 170 1 47 284031 SCR 4-40 BH 1/4 LG SLTD N YLON 2 49 608030 CABLE MOUNT ADHESIVE BACK 2 50 608036 TYRAPS CABLE TIES 2 51 7714AAT POWER SUPPLY 12V 30W EXTERNAL SUPPLY 1 52 600028 ASSY LINE CORD IEC 1 55 2000890-001 PACKAGING RIGHT CAP 170 SERIES 1 56 2000891-001 PACKAGING LEFT CAP 170 SERIES 1 57 2000892-001 PACKAGING BOXES 170 SERIES 1 58 2000893-001 PACKAGING SLOTTED TRAY 170 SERIES 1 Description 170 Series Monitor 2000947-004 Qty Revision D Parts Lists: 2000268-189, Model 172 Final Assembly Table 11-2. Model 172 Final Assembly, 2000268-189 (Continued) Revision D Item Number Part Number 59 13984AA LBL PACKING LIST 340 60 2000555-001 SHLD SPEAKER - 170 61 410066 POLY BAG 23X26X.006 1 62 410097 TAPE SHIPPING 3IN WIDE 4 63 4281CA LBL SERIAL# UL APPV’D-155 1 64 4281DA LABEL C-UL HAZZARD TAG120 SERIES 1 Description 170 Series Monitor 2000947-004 Qty .0001 1 11-7 Parts Lists: 2001972-037, Model 173 Final Assembly 2001972-037, Model 173 Final Assembly Table 11-3. Model 173 Final Assembly, 2001972-037 11-8 Find Num Item Number 1 2007385-001 2 15451AA 3 140173 4 Item Description Qty ENCL ,BOTTOM, SHIELDED-170 SERIES 1 COVER SPEAKER 1 FOOT RUBBER .50D .26H 4 15222AA BRG DRAWER 2 5 15212AA PIN BEARING-170 2 6 15200A ASSY ROLLER 1 7 250096 BEARING,FLANGED,.187 BORE, 2 8 11717AA ROLLER GEAR-120REC, 1 9 15207A ASSY DRAWER, WELDED 1 10 15224AA SPACER DRAWER 1 11 15223AA PLASTIC 9 CM PARTITION 1 12 15231A ASSY PCB SENSOR BOARD 1 13 2000147-001 SENSOR INSULATOR 170 SERIES 1 14 250099 SPRING COMPRESSION,.24 OD,,.38L 1 15 2000222-001 SPRING CPRSN .3 OD .022WIRE SS 2 16 15136A MOTOR STEPPER ASSY 1 17 15202AA MOUNT MOTOR 1 18 15201AA PLATE PC MOUNTING 1 19 2000133-001 PRINTHEAD 8 DOTS/MM 216MM WIDE 1 20 15203AA PLATE HEAD MOUNTING 1 21 2000223-001 SPRING CPRSN .56L .240 OD .024 WIRE 2 22 15204AA BRACKET HEADSTOP 1 23 2002433-001 STANDOFF 1/4 HEX SWAGE 4-40 2 24 281501 NUT,HEX,4-40,3/32 X 1/4 2 25 2000234-001 CABLE ASSY RIBBON RECORDER 170 SERIES 1 26 2000235-001 CABLE ASSY SPEAKER WIRE 170 SERIES 1 27 2000146-001 CLIP GROUND 2 28 2000324-007 PCB ASSY MAIN FECG/PRS COMP V3.20173 1 170 Series Monitor 2000947-004 Revision D Parts Lists: 2001972-037, Model 173 Final Assembly Table 11-3. Model 173 Final Assembly, 2001972-037 (Continued) Revision D Find Num Item Number Item Description 29 284105 SCREW #4 PH 1/4L THD FORM 7 30 284072 SCR,4-40,PH,5/16L,PHL,LL,STRIP 33 31 284285 SCR,4-40,FH UNDERCUT 3/16,PHIL 2PS NYLON PATCH 4 32 289516 SCR,M3X5,PH,PHIL,ZP,W/NYLOK PATCH 4 33 2000220-001 SCR PH #2 ,1/2L PHIL ZPS PLASTITE 2 34 2000221-001 SCR #4 PH 1/4L TYPE F PHIL ZPS 2 35 2001894-001 SPRING FRONT GROUND-173 1 36 15301A ASSY PCB DISPLAY BOARD 1 37 15461AA GASKET REAR PANEL 1 38 2004993-002 PAD PRINT,TOP COVER, MODEL 173 1 39 15323AA KYBD MEMBRANE US2 1 40 15324CA LABEL DISPLAY OVERLAY FECG MODEL 173 1 41 14943AA CLIP, SPEAKER, ACCESS HOME MONITOR 2 42 2000178-001 PLUG CALL LIGHT 1 43 2000359-001 STANDOFF M-F 440 1IN LG ALUM 1 44 2000246-001 PLUG TELEMETRY 1 45 15287AP PCB ASSY FECG/UA BOARD-PURCH 1 46 2003930-001 LABEL REAR PANEL 170 SERIES 1 47 284031 SCR,4-40,BH,1/4 LG,SLTD,N,YLON 2 49 608030 CABLE MOUNT,ADHESIVE BACK, 2 50 608036 TYRAPS,CABLE TIES 2 51 7714AAT POWER SUPPLY 12V 30W EXTERNAL SUPPLY 1 55 2000890-001 PACKAGING RIGHT CAP, 170 SERIES 1 56 2000891-001 PACKAGING LEFT CAP, 170 SERIES 1 57 2000892-001 PACKAGING BOXES , 170 SERIES 1 58 2000893-001 PACKAGING SLOTTED TRAY, 170 SERIES 1 59 410010 PACKING LIST ENVELOPES, 1 60 2000555-001 SHLD SPEAKER - 170 1 61 410066 POLY BAG 23X26X.006, 1 170 Series Monitor 2000947-004 Qty 11-9 Parts Lists: 2001972-037, Model 173 Final Assembly Table 11-3. Model 173 Final Assembly, 2001972-037 (Continued) 11-10 Find Num Item Number Item Description 62 410097 TAPE,SHIPPING,3IN WIDE, 4 63 4281DA LABEL,C-UL HAZZARD TAG120,SERIES 1 64 4281EA LABEL SERIAL NUMBER, UL & MODEL NUMBER 1 65 408230-008 LABEL CE MARK 1 66 160019 SEALANT MED BLUE, 0 67 2000741-001 LABEL TRANS & STOR COND 170 SERIES 1 170 Series Monitor 2000947-004 Qty Revision D Parts Lists: 2001972-038, Model 174 Final Assembly 2001972-038, Model 174 Final Assembly Table 11-4. Model 174 Final Assembly, 2001972-038 Revision D Find Num Item Number 1 2007385-001 2 15451AA 3 140173 4 Item Description Qty ENCL ,BOTTOM, SHIELDED-170 SERIES 1 COVER SPEAKER 1 FOOT RUBBER .50D .26H 4 15222AA BRG DRAWER 2 5 15212AA PIN BEARING-170 2 6 15200A ASSY ROLLER 1 7 250096 BEARING,FLANGED,.187 BORE, 2 8 11717AA ROLLER GEAR-120REC, 1 9 15207A ASSY DRAWER, WELDED 1 10 15224AA SPACER DRAWER 1 11 15223AA PLASTIC 9 CM PARTITION 1 12 15231A ASSY PCB SENSOR BOARD 1 13 2000147-001 SENSOR INSULATOR 170 SERIES 1 14 250099 SPRING COMPRESSION,.24 OD,,.38L 1 15 2000222-001 SPRING CPRSN .3 OD .022WIRE SS 2 16 15136A MOTOR STEPPER ASSY 1 17 15202AA MOUNT MOTOR 1 18 15201AA PLATE PC MOUNTING 1 19 2000133-001 PRINTHEAD 8 DOTS/MM 216MM WIDE 1 20 15203AA PLATE HEAD MOUNTING 1 21 2000223-001 SPRING CPRSN .56L .240 OD .024 WIRE 2 22 15204AA BRACKET HEADSTOP 1 23 2002433-001 STANDOFF 1/4 HEX SWAGE 4-40 2 24 281501 NUT,HEX,4-40,3/32 X 1/4 2 25 2000234-001 CABLE ASSY RIBBON RECORDER 170 SERIES 1 26 2000235-001 CABLE ASSY SPEAKER WIRE 170 SERIES 1 27 2000146-001 CLIP GROUND 2 28 2000973-005 PCB ASSY MAIN FECG/PRS DUAL U/S-174 1 170 Series Monitor 2000947-004 11-11 Parts Lists: 2001972-038, Model 174 Final Assembly Table 11-4. Model 174 Final Assembly, 2001972-038 (Continued) 11-12 Find Num Item Number Item Description 29 284105 SCREW #4 PH 1/4L THD FORM 7 30 284072 SCR,4-40,PH,5/16L,PHL,LL,STRIP 33 31 284285 SCR,4-40,FH UNDERCUT 3/16,PHIL 2PS NYLON PATCH 4 32 289516 SCR,M3X5,PH,PHIL,ZP,W/NYLOK PATCH 4 33 2000220-001 SCR PH #2 ,1/2L PHIL ZPS PLASTITE 2 34 2000221-001 SCR #4 PH 1/4L TYPE F PHIL ZPS 2 35 2001894-001 SPRING FRONT GROUND-173 1 36 15301A ASSY PCB DISPLAY BOARD 1 37 15461AA GASKET REAR PANEL 1 38 2004993-004 PAD PRINT,TOP COVER, MODEL 174 1 39 15323AA KYBD MEMBRANE US2 1 40 15324DA LABEL DISPLAY OVERLAY FECG MODEL 174 1 41 14943AA CLIP, SPEAKER, ACCESS HOME MONITOR 2 42 2000178-001 PLUG CALL LIGHT 1 43 2000359-001 STANDOFF M-F 440 1IN LG ALUM 1 44 2000246-001 PLUG TELEMETRY 1 45 2000952-001 PCB DUAL U/S FECG-174 1 46 2003930-001 LABEL REAR PANEL 170 SERIES 1 47 284031 SCR,4-40,BH,1/4 LG,SLTD,N,YLON 2 49 608030 CABLE MOUNT,ADHESIVE BACK, 2 50 608036 TYRAPS,CABLE TIES 2 51 7714AAT POWER SUPPLY 12V 30W EXTERNAL SUPPLY 1 55 2000890-001 PACKAGING RIGHT CAP, 170 SERIES 1 56 2000891-001 PACKAGING LEFT CAP, 170 SERIES 1 57 2000892-001 PACKAGING BOXES , 170 SERIES 1 58 2000893-001 PACKAGING SLOTTED TRAY, 170 SERIES 1 59 410010 PACKING LIST ENVELOPES, 1 60 2000555-001 SHLD SPEAKER - 170 1 61 410066 POLY BAG 23X26X.006, 1 170 Series Monitor 2000947-004 Qty Revision D Parts Lists: 2001972-038, Model 174 Final Assembly Table 11-4. Model 174 Final Assembly, 2001972-038 (Continued) Revision D Find Num Item Number Item Description 62 410097 TAPE,SHIPPING,3IN WIDE, 4 63 4281DA LABEL,C-UL HAZZARD TAG120,SERIES 1 64 4281EA LABEL SERIAL NUMBER, UL & MODEL NUMBER 1 65 408230-008 LABEL CE MARK 1 66 160019 SEALANT MED BLUE, 0 67 2000741-001 LABEL TRANS & STOR COND 170 SERIES 1 170 Series Monitor 2000947-004 Qty 11-13 Parts Lists: 2264AAX, Button-Style Nautilus Tocotranducer Assembly Parts List (5-ft cord) 2264AAX, Button-Style Nautilus Tocotranducer Assembly Parts List (5-ft cord) Table 11-5. 2264AAX, Button-Style Nautilus Tocotransducer Assembly Parts List (5-ft cord) 11-14 Find Num Item Number 1 14894A TOCO CBL ASSY OB 5' LG,WATERTIGHT 1 4 15079AA MARKING CASE BUTTON TOP-TOCO,WATERTIGHT 1 6 14790B CASE BOTTOM ASSY TOCO OB,WATERTIGHT 1 7 14594AA FLAT SEAL TOCO U/S WATERTIGHT XDCR 1 8 14640AA CABLE MOUNTING NUT TOCO US WATERTIGHT 1 9 284106 SCR,4-40,PH,5/16L,W/SEAL,PHIL,SS,LL 5 10 14638AA SCREW CAP WATERTIGHT 4 11 15254AA SCREW CAP FLAT MARING,WATERTIGHT SCUCERS 1 12 7529DA KNOB,TOCO-KNOB TOP XDCR K,IT116 1 13 281260 SCR SET 2-56 1/8L OVAL PT SS 1 17 8974AA ABD STRAP-BUTTON STYLE BE,LT 1 18 14855AA WARNING TAG CABLES WATERTIGHT 1 19 13658FA LBL,CE,CAUTION IP68,WATERTIGHT XDCR 1 20 440011 LABEL,2.25X.75,SELF-LAM,WHITE 1 21 4991AA ACC PACKER, 1 22 410069 PACK MATERIAL ST 1 23 410112 BAG,AIRCAP, 6 X 8-1/2, 1 24 15264AA SHIPPING LBL, 2264AAX WATERTIGHT XDUCERS 1 30 13434AA LBL,SHIP CRTN CE MARK-VAR, 1 31 160034 LOCTITE,SUPERBONDE, 0 32 162004 OIL,SILICONE,3ML TUBE, 0 Item Description 170 Series Monitor 2000947-004 Qty Revision D Parts Lists: 5700GAX, Button-Style Nautilus Ultrasound Transducer Assembly Parts List (5-ft cord) 5700GAX, Button-Style Nautilus Ultrasound Transducer Assembly Parts List (5-ft cord) Table 11-6. 5700GAX, Button-Style Nautilus Ultrasound Transducer Assembly Parts List (5-ft cord) Revision D Find Num Item Number 1 14895A U/S CBL ASSY 5' OB,WATERTIGHT 1 4 15081AA MARKING,CASE BUTTON TOP U/S,WATERTIGHT 1 6 14791A CASE BOTTOM ASSY U/S,WATERTIGHT 1 7 14594AA FLAT SEAL TOCO U/S WATERTIGHT XDCR 1 8 14640AA CABLE MOUNTING NUT TOCO US WATERTIGHT 1 9 284106 SCR,4-40,PH,5/16L,W/SEAL,PHIL,SS,LL 5 10 2008660-001 SCR CAP, TOCO, U/S 4 11 15254AA SCREW CAP FLAT MARING,WATERTIGHT SCUCERS 1 12 7529EA KNOB TOP, NAUTILUS WATERTIGHT TOCO 1 13 281260 SCR SET 2-56 1/8L OVAL PT SS 1 17 8974AA ABD STRAP-BUTTON STYLE BE,LT 1 18 14855AA WARNING TAG CABLES WATERTIGHT 1 19 13658FA LBL,CE,CAUTION IP68,WATERTIGHT XDCR 1 20 440011 LABEL,2.25X.75,SELF-LAM,WHITE 1 22 4991AA ACC PACKER, 1 23 410069 PACK MATERIAL ST 1 24 410113 BAG,AIRCAP, 8 X 11-1/2, 1 25 15265AA SHIPPING LBL, 5700GAX WATERTIGHT XDUCERS 1 31 13434AA LBL,SHIP CRTN CE MARK-VAR 1 32 160103 ADHESIVE,454 0 33 162004 OIL,SILICONE,3ML TUBE 0 34 OBSER-003 ADDENDUM,WATERTIGHT XDCR 1 35 14957AA WARNING LABEL KIT U/S TOCO WATERTIGHT 1 36 14897AA INSTRUCTION SHEET,WATERTIGHT TOCO 1 37 474045 NETWORK,RES,SIP,47 OHM,9,RES 1 Item Description 170 Series Monitor 2000947-004 Qty 11-15 Parts Lists: 5700KAX, Loop-Style Nautilus Ultrasound Transducer Assembly Parts List (5-ft cord) 5700KAX, Loop-Style Nautilus Ultrasound Transducer Assembly Parts List (5-ft cord) Table 11-7. 5700LAX, Loop-Style Nautilus Ultrasound Transducer Assembly Parts List (5-ft cord) 11-16 Find Num Item Number 1 14895A U/S CBL ASSY 5' OB,WATERTIGHT 1 5 15082AA MKG CASE TOP U/S,WATERTIGHT 1 6 14791A CASE BOTTOM ASSY U/S,WATERTIGHT 1 7 14594AA FLAT SEAL TOCO U/S WATERTIGHT XDCR 1 8 14640AA CABLE MOUNTING NUT TOCO US WATERTIGHT 1 9 284106 SCR,4-40,PH,5/16L,W/SEAL,PHIL,SS,LL 5 10 2008660-001 SCR CAP, TOCO, U/S 4 11 15254AA SCREW CAP FLAT MARING,WATERTIGHT SCUCERS 1 13 281260 SCR SET 2-56 1/8L OVAL PT SS 1 16 7514DA ABDOMINAL STRAP-BLUE 1 18 14855AA WARNING TAG CABLES WATERTIGHT 1 19 13658FA LBL,CE,CAUTION IP68,WATERTIGHT XDCR 1 20 440011 LABEL,2.25X.75,SELF-LAM,WHITE 1 22 4991AA ACC PACKER 1 23 410069 PACK MATERIAL ST 1 24 410113 BAG,AIRCAP, 8 X 11-1/2 1 28 15265DA SHIPPING LBL, 5700KAX WATERTIGHT XDUCERS 1 31 13434AA LBL,SHIP CRTN CE MARK-VAR 1 32 160103 ADHESIVE,454 0 33 162004 OIL,SILICONE,3ML TUBE 0 34 OBSER-003 ADDENDUM,WATERTIGHT XDCR 1 35 14957AA WARNING LABEL KIT U/S TOCO WATERTIGHT 1 36 14897AA INSTRUCTION SHEET,WATERTIGHT TOCO 1 37 474045 NETWORK,RES,SIP,47 OHM,9,RES 1 Item Description 170 Series Monitor 2000947-004 Qty Revision D Parts Lists: 2264DAX, Loop-Style Nautilus Tocotransducer Assembly Parts List (5-ft cord) 2264DAX, Loop-Style Nautilus Tocotransducer Assembly Parts List (5-ft cord) Table 11-8. 2264, Loop-Style Nautilus Tocotransducer Assembly Parts List (5-ft cord) Revision D Find Num Item Number 1 14894A TOCO CBL ASSY OB 5' LG,WATERTIGHT 1 5 15080AA MARKING CASE TOP TOCO,WATERTIGHT 1 6 14790B CASE BOTTOM ASSY TOCO OB,WATERTIGHT 1 7 14594AA FLAT SEAL TOCO U/S WATERTIGHT XDCR 1 8 14640AA CABLE MOUNTING NUT TOCO US WATERTIGHT 1 9 284106 SCR,4-40,PH,5/16L,W/SEAL,PHIL,SS,LL 5 10 14638AA SCREW CAP WATERTIGHT 4 11 15254AA SCREW CAP FLAT MARING,WATERTIGHT SCUCERS 1 13 281260 SCR SET 2-56 1/8L OVAL PT SS 1 16 7514CA ABDOMINAL STRAP-GRAY 1 18 14855AA WARNING TAG CABLES WATERTIGHT 1 19 13658FA LBL,CE,CAUTION IP68,WATERTIGHT XDCR 1 20 440011 LABEL,2.25X.75,SELF-LAM,WHITE 1 21 4991AA ACC PACKER 1 22 410069 PACK MATERIAL ST 1 23 410112 BAG,AIRCAP, 6 X 8-1/2 1 27 15264CA SHIPPING LBL, 2264CAX WATERTIGHT XDUCERS 1 30 13434AA LBL,SHIP CRTN CE MARK-VAR 1 31 160034 LOCTITE,SUPERBONDE 0 32 162004 OIL,SILICONE,3ML TUBE 0 227 15264DA SHIPPING LBL, 2264DAX WATERTIGHT XDUCERS 1 Item Description 170 Series Monitor 2000947-004 Qty 11-17 Parts Lists: 1509AAO/BAO, Qwik Connect Plus Legplate Assembly Parts List 1509AAO/BAO, Qwik Connect Plus Legplate Assembly Parts List Table 11-9. 1509AAO/BAO, Qwik Connect Plus Legplate Assembly Parts List 11-18 Find Num Item Number 1 2000532-001 2 Item Description Qty CABLE STRAIN RELIEF 8 FEET 1 210227 CONTACT,MALE,24AWG,16.5MM,LG 11 3 210180 HALF-SHELL,W/CLAMP,3-5MM 1 4 210181 CLAMP,3-7MM 1 5 210176 RING 1 6 210183 GRIPPER,3-5MM 1 7 210182 SCREW,CLAMP,M 2.6 X 10 2 8 608048 SHRINK TUBING,1/4 BLK, .021 9 605105 WIRE,#24 STRANDED,GRN, .125 10 210179 HALF-SHELL,W/TONGUE 1 11 210178 RING,PLASTIC,21.8 X4 1 12 212133 PLUG,12 CKT GREY/BRN,A-D, 1 13 210226 CONTACT,MALE,24AWG,18MM L,G 1 14 2000528-001 COVER INTERFACE CABLE 1 15 2002641-001 O-RING .101 ID, .070THK, 70DUR, SILICONE 1 16 2000529-001 PIN COAX RECEPTACLE 1 17 2000527-001 CABLE BASE INTERFACE 1 18 2000429-003 PCB LEG PLATE BD 1 19 2000208-001 SPRING WIRE,LEG PLATE SNAP .125 STUD 1 20 440011 LABEL,2.25X.75,SELF-LAM,WHITE 1 22 2000595-001 LABEL SHIPPING FOR 1590AAO 1 23 410112 BAG,AIRCAP, 6 X 8-1/2 1 24 605106 WIRE,#24 STRANDED,BLUE 25 2002357-001 26 13658AA .083 SPACER SPRING QWIK CONNECT PLUS 1 LABEL,CE MARK-ACCESSORIES,WATERPROOF 1 170 Series Monitor 2000947-004 Revision D Parts Lists: 2000268-188, Model 171 Final Assembly Item Description Corometrics Series 170 Model 171 / 172 / 173 / 174 Corometrics Series 170 Power Supply. 2020760-002 Power Supply Corometrics Series 170 Recorder Parts. 2000223-001 Printhead Springs 512018 Door Microswitch 2000147-001 Sensor Bd Insulator 2000234-001 Printhead Cable Assy 250096 Drive Roller Bearings 2021595-001 ASSY FRU 170 SERIES PRINTHEAD 487710 Optosensor 15203AA Plate Head mounting 11717AA 15202AA Motor mounting bracket 15136A Stepper Motor Assy 15207A Drawer Assy (Paper Box - Plastic only) 2015527-001 Drive Roller Assy Corometrics Series 170 Label Sets. 2003930-001 Label Rear Panel for Model 171 / 172 / 173 / 174 15324BA Label Display Overlay for Model 171 15324CA Label Display Overlay for Model 173 15324DA Label Display Overlay for Model 174 15324AA Label Display Overlay for Model 172 Corometrics Series 170 Keypads. 15323AA Keyboard Membrane Switch for Model 172/173 /174 15323BA Keyboard Membrane Switch for Model 171 Corometrics Series 170 Switches / Connectors. 2003692-001 Dual input connector US / FECG for Model 174 only 404579-015 15 pin Telemetry Input Connector J13 212174 12 pin US Input Connector Blue / Gray J11&J12 212173 12 pin UA Input Connector White J10 422255-001 3 pin Power Input Connector J17 422256-001 8 pin RJ45 RS232 Connecxtor for RS23#1 and RS232#2 212175 FECG Input Connector 2000221-001 Screws to fix the connectors to the mainboard Corometrics Series 170 Repair-Kit Nautilus Transducer. 2003661-001 Loop Style Cable Replacement kit, TOCO 2011679-001 Kit Nautilus Top Cover replacement for Loop Style US Transducer without Cable 2011680-001 Kit Nautilus Top Cover replacement for Buttom Style US Transducer without Cable 2003659-001 Loop Style Cable Replacement kit, Ultrasound 14594AA Flat Seal Toco/ US Watertight 2003660-001 Button Style Cable Replacement kit, Ultrasound 2003662-001 Button Style Cable Replacement kit, TOCO 15254AA Screw plastic cap for TOCO and US Tranc. Corometrics Series 170 Calibration kit. 2003664-001 Button Style Nautilus TOCO Calibration kit 2003663-001 Loop Style Nautilus TOCO Calibration kit Corometrics Series 170 Service Tool. Availability 1203AAO 2003005-001 Orderable Orderable Revision D Flasher Cable Kit Weight 52.5 Gram 170 Series Monitor 2000947-004 Orderable Orderable Orderable Orderable Orderable Orderable Orderable Orderable Orderable Orderable Orderable Orderable Orderable Orderable Orderable Orderable Orderable Orderable Orderable Orderable Orderable Orderable Orderable Orderable Orderable Orderable Orderable Orderable Orderable Orderable Orderable Orderable Orderable Orderable Orderable Orderable Orderable Orderable 11-19 Parts Lists: 2000268-188, Model 171 Final Assembly Corometrics Series 170 Housing Parts. 2004993-003 Top Cover for Model 171 ( Please order also bottom Cover 200240-001) The new Top Cover does not fit 2004993-001 PAD PRINT,TOP COVER-MODEL 172 2004993-002 Top Cover for Model 173 ( Please order also bottom Cover 200240-001) The new Top Cover does not fit 2004993-004 Top Cover for Model 174 ( Please order also bottom Cover 200240-001) The new Top Cover does not fit 2007385-001 ENCL ,BOTTOM, SHIELDED-170 SERIES 15451AA COVER with SPEAKER Corometrics Series 170 Miscellaneous Parts. 2000235-001 Speaker Cable Assy 15461AA Gasket on Rear Panel 140173 418830-001 Battery for time-Keeper RAM 2000222-001 Drawer Release Spring 2000178-001 Plug Call Light 2000186-001 Plug Nicoly 2000246-001 Plug Telemetry 2000235-002 Speaker Cable Assy Corometrics Series 170 Printed Circuit Boards. 15301A Display Board for Model 171 / 172 / 173 / 174 2027372-002 Main Board Dual U/S for Model 172 loaded with V 3.23 2027376-002 Main Board Single U/S for Model 173 loaded with software version 3.23 2027385-001 FECG / UA Board for Model 173 2000243-014 Main Board Single U/S for Model 171 loaded with software version 3.23 2027380-002 Main Board Dual U/S for Model 174 without U/S FECG-174 board. 2027389-001 Dual FECG / US Board for Model 174 2027368-002 Main Board Single U/S for Model 171 loaded with software version 3.23 15231A Sensor Board for Model 171 / 172 / 173 / 174 11-20 170 Series Monitor 2000947-004 Orderable Orderable Orderable Orderable Orderable Orderable Orderable Orderable Orderable Orderable Orderable Orderable Orderable Orderable Orderable Orderable Orderable Orderable Orderable Orderable Orderable Orderable Orderable Orderable Revision D Addendum to use PS320 Simulator Revision D 170 Series Monitor 2000947-004 12-1 Addendum PS 320 Simulator startup 1. Connect the correct simulation cables to the PS320 and fetal monitor. Single or twin ultrasound simulation is available (1 or 2 US cables). Refer the Manufacturer part number mentioned below for the correct cable. 2462519: GE-Corometrics EXT. TOCO Simulation Cable 2462469: GE-Corometrics IUP TOCO Simulation Cable 2651757: MFH-1 Mechanical Fetal Heart Probe 2056279-001: Multilink 3 Lead FECG cable (To be purchased from GE) 2. Connect the Monitors Cables to the ECG / US / TOCO Output posts on the PS320 Simulator. 3. Switch ON the PS320 Fetal Simulator, the default settings of the simulator is given below 4. Use the front panel of the unit to - Increase or decrease FETAL ECG rate and amplitude - Increase or decrease MATERNAL ECG rate and amplitude (Only for Coro 250 Series) - Select TOCO level and sensitivity - Adjust display contrast 5. 12-2 Press the Enter Key to confirm your selection. 170 Series Monitor 2000947-004 Revision D Addendum 6. For additional and advanced information, utilize the MAIN, SUB and SCROLL keys below the display. a) Make a selection from MAIN menu options - FETAL ECG - UTERINE ACTIVITY - MATERNAL ECG - FETAL PATTERNS - AUXILIARY b) Use the SUB key to look at the selection available within the MAIN selection. c) Use the SCROLL key to move back through the selections in the SUB menu. d) Press ENTER to confirm the selection and make the changes. Note 1: The Fluke Simulator and its accessories (except FECG Cable) are orderable from FLUKE Biomedical, for your nearest location refer www.flukebiomedical.com Note 2: The Fluke simulator needs to be calibrated periodically (Annual calibration). Revision D 170 Series Monitor 2000947-004 12-3 Addendum FECG Test This portion of the functional checkout procedure ensures the integrity of the FECG circuitry and the heart rate channel of the recorder. . 1. Connect the 3 Lead FECG cable from the Coro Monitor to the left panel Terminals of the PS 320 Simulator. As per below mentioned Table 3 Lead ECG Terminal LA LL RA 2. Section Fetal ECG Left Panel Terminal of PS320 Simulator Fet / Mat Maternal Reference Set the values on the PS320 Simulator according to Table below Table 12-1. . FECG Test Simulator Settings Function Key Setting Fetal (Rate) 30 BPM Amplitude 50 µV 3. Verify the following on the monitors display: 12-4 The FHR1 Value is 30 BPM. The FHR1 heartbeat indicator (♥) flashes at a rate of 30 times per minute. The ECG “beep” volume of the rear panel speaker can be increased or decreased using the Volume buttons. (Set the volume to the desired level.) The recorder prints a continuous line at 30 BPM on the top grid of the strip chart paper. The recorder prints the message FECG on the center margin of the strip chart paper after approximately 20 seconds. 4. Set the value on the PS320 Simulator to 120 BPM. Verify the following on the monitor: The FHR1 Value is 120 BPM. The FHR1 heartbeat indicator (♥) flashes at a rate of 120 times per minute. The ECG “beep” volume of the rear panel speaker can be increased or decreased using the left pair of Volume buttons. (Set the volume to the desired level.) The recorder prints a continuous line at 120 BPM on the HR grid of the strip chart paper. 5. Repeat Step 4 for each of the following rates: 60, 90, 150, 180, 210 and 240 BPM. 170 Series Monitor 2000947-004 Revision D Addendum Ultrasound Test This portion of the functional checkout procedure ensures the integrity of the ultrasound circuitry and the heart rate channel of the recorder. Note: This section Requires Mechanical Fetal Heart (MFH) and Ultrasound Transducer for testing the Coro monitor. For MFH-1 to function, power the PS320 Simulator using the battery eliminator, the MFH-1 will not function on battery power. 1. Connect the MFH to US1 port in PS320 Simulator via the cable supplied with the MFH-1. 2. Place the Ultrasound Transducer face up on the work surface and coat it with Ultrasound conductive gel and place the MFH-1 on the Ultrasound transducer and connect the Ultrasound Transducer to US1 channel on the Coro Monitor. 3. Set the values on the PS320 Simulator according to Table below, Table 12-2. Ultrasound Test Simulator Settings Section Function Key Setting Ultrasound (Fetal Heart Rate) Fetal (Rate) 120 BPM Amplitude 50 µV 4. If not already on, depress the monitor’s Record button. 5. Set the simulator to input an Ultrasound signal of 120 BPM. Verify the following on the monitor The FHR1 value is 120 BPM. The FHR1 heartbeat indicator (♥) flashes at a rate of 120 times per minute. Ultrasound audio volume from the rear panel speaker can be increased or decreased using the upper-left pair of Volume buttons. (Set the volume to the desired level.) The recorder prints a continuous line at 120 BPM on the top grid of the strip chart paper. The recorder prints the message US on the center margin of the strip chart paper after approximately 20 seconds. 6. Increase the value of US from 120 BPM baseline to 150 BPM in the simulator. Verify the following on the monitor. The FHR1 value immediately reflects this new input rate. The strip chart recorder immediately reflects this new input rate. 7. Decrease the value of US from 120 BPM baseline to 90 BPM in the simulator. Verify the following on the monitor. Revision D The FHR1 value immediately reflects this new input rate. The strip chart recorder prints at the last input rate for an additional 3 seconds before blanking the heart rate data and printing a continuous line at the new input rate. 170 Series Monitor 2000947-004 12-5 Addendum 8. Set the simulator value for each of rate 60, 90, 120, 150, 180 and 210 BPM. Verify the following on the monitor. The FHR1 value reflects the simulator setting ± 1 BPM. The FHR1 heartbeat indicator (♥) flashes at the simulator setting. Ultrasound audio is heard coming from the rear panel speaker. The recorder prints a continuous line at the respective value ± 3 BPM on the top grid of the strip chart paper. 9. Remove the US simulator cable from US connector of the Monitor. Verify the following on the monitor. The FHR1 value and mode are both blank. The recorder stops printing the fetal heart rate trace. The recorder prints the message CARDIO INOP on the center margin of the strip chart paper after approximately 20 seconds. 10. Repeat Steps 1 to 9 using the second Ultrasound channel of the monitor. 12-6 170 Series Monitor 2000947-004 Revision D Addendum Uterine Activity Test This portion of the functional checkout procedure tests the uterine activity section of the 170 Series Monitor. 1. 2. Revision D Connect the TOCO cable (Cable No: 2462469) from TOCO connector in PS320 Simulator to the UA receptacle of the monitor. Access the service setup mode and note the UA reference default value. (The monitor is shipped from the factory with this value set at 10 relative units; however, your unit may have been custom configured.) Exit the service mode. 3. Press the monitor’s Power button to turn on the monitor. 4. Press the monitor’s Record pushbutton. 5. Briefly press the monitor’s UA Reference pushbutton. Verify the following on the monitor: The UA value is the default setting. The recorder prints a continuous line at the default value on the uterine activity channel of the strip chart paper. The recorder prints the messages TOCO and UA REF on the strip chart paper. 6. Press and hold the UA Reference button on the monitor to cycle through the available selections for UA reference: 5, 10, 15, 20, or 25 relative units. Test each of these reference settings. Verify that the UA value is displayed accordingly and that the recorder prints a continuous line at the corresponding value on the uterine activity channel of the strip chart paper. 7. Set the simulator’s TOCO amplitude to 5µV and TOCO Level switch at each of the level settings: 0, 20, 40, 60, 80 and 100 relative units. Verify that the UA value is displayed accordingly and that the recorder prints a continuous line at the corresponding value on the heart rate channel of the strip chart paper. 8. Press the UA Reference button to reference to 10 relative units. If the default is set to a different value, press and hold the UA Reference button to cycle to 10. 9. Disconnect the TOCO cable from the UA input receptacle on the front panel of the monitor. Verify the following on the monitor: The UA value is blank. The recorder stops printing the uterine activity trace. 170 Series Monitor 2000947-004 12-7 Addendum Fetal Pattern: TREND # 1 (Pattern Memory Test) Selects real patient trend of fetal heart rate and TOCO 1. Connect the FECG and UA cable to the corresponding connector on the monitor 2. Select FETAL PATTERNS by repeatedly pressing MAIN button on the PS320 Simulator. 3. Select TREND 1 from the Menu by pressing the SUB button, and press ENTER after selecting the TREND 1 pattern. 4. If not already on, depress the monitor’s Record button. 5. 12-8 Verify the following on the monitor: Recorder should print out a value equal to that displayed on the Monitor at each heart rate area (FHR1, FHR2) and UA area (TOCO). 170 Series Monitor 2000947-004 Revision D Addendum Dual Heart Rate Test (FECG/US Modes) Note: 2 PS320 Simulator, 1 MFH and 1 Ultrasound Transducer are required to perform this test case. One for giving FECG Signal and the other for Ultrasound signal FECG/US Modes: 1. Connect the 3 lead ECG Cable from the PS320 simulator to the FECG input on the monitor. 2. Connect the MFH to US1 port in PS320 Simulator via the cable supplied with the MFH-1. 3. Place the Ultrasound Transducer face up on the work surface and coat it with Ultrasound conductive gel and place the MFH-1 on the Ultrasound transducer and connect the Ultrasound Transducer to US1 channel on the Coro Monitor. 4. Set the values on the PS320 Simulator according to Table below, Table 12-3. FECG Test Simulator Settings Section Function Key Fetal ECG Fetal (Rate) Amplitude Ultrasound (US1 Port) Fetal (Rate) Amplitude 5. 6. Revision D Setting 120 BPM 50 µV 150 BPM 50 µV If not already on, depress the monitor’s Record button. Verify the following on the monitor: The FHR1 value reads 120 ± 1 BPM. The FHR1 heartbeat indicator (♥) flashes at a rate of 120 times per minute. The FHR2 heartbeat indicator (♥) flashes at a rate of 150 times per minute. The messages FECG and US print on the center margin of the strip chart paper. The FHR1 trend is a continuous plain black line ( ) on the 120 BPM mark on the top grid of the strip chart paper. The FHR2 trend is a bold black ramp trace ( ) on the 150 BPM mark on the top grid of the strip chart paper. 170 Series Monitor 2000947-004 12-9 Addendum Dual Ultrasound Modes (Applicable for Corometrics 172 & 174 Monitors only) 12-10 1. The dual ultrasound mode of the 170 Series Monitor cannot be tested unless two PS320 Simulators are used or two Model 170 Series ultrasound transducers. Do not attempt to test dual ultrasound using one PS320 Simulator and one ultrasound transducer. This procedure details using two transducers since it is more practical for a test site. 2. If not already on, depress the monitor’s Record button. 3. Plug one ultrasound transducer into the monitor’s US1 input connector and the other into the monitor’s US2 connector. Verify the following on the monitor: The FHR1 value shows three steady dashes “– – –.” The FHR2 value shows three steady dashes “– – –.” The recorder prints the messages US and US2 on the center margin of the strip chart paper. 4. Connect the transducer to monitor’s US1 input connector and Hold the transducer in your hand and rub the back of the hand holding the transducer; try to maintain a steady rate and verify the following on the monitor: The FHR1 value responds to the rubbing. The FHR1 heartbeat indicator (♥) responds to the input. The recorder prints the heart rate tracing corresponding to the rate ). and the trace is plain black ( 5. Connect the transducer to monitor’s US2 input connector and Hold the transducer in your hand and rub the back of the hand holding the transducer; try to maintain a steady rate and verify the following on the monitor: The FHR2 value responds to the rubbing. The FHR2 heartbeat indicator (♥) responds to the input. The recorder prints the heart rate tracing corresponding to the rate and the trace is bold black ( ). 170 Series Monitor 2000947-004 Revision D Addendum Alarm Tests This portion of the test ensures the integrity of the audio alarms and tests the alarm limit software. 1. Connect the MFH to US1 port in PS320 Simulator via the cable supplied with the MFH-1. 2. Place the Ultrasound Transducer face up on the work surface and coat it with Ultrasound conductive gel and place the MFH1 on the Ultrasound transducer and connect the Ultrasound Transducer to US1 channel on the Coro Monitor. 3. Press and hold (for three seconds) Setup to enter the monitor’s setup mode. 4. Set the FHR alarm enable to on. 5. Set the FHR high alarm limit value to 180 BPM. 6. Set the FHR low alarm limit value to 100 BPM. 7. Set the FHR audio alarm to a level you can easily hear. 8. Press the Setup button to exit the setup mode. 9. Press the monitor’s Record button. 10. Verify that the FHR high and low limits print in the annotation area of the strip chart paper. 11. Turn off the monitor’s recorder. 12. Set the values on the PS320 Simulator according to Table below Table 12-4 . Alarm Test Simulator Settings Section Function Key US (Rate) Ultrasound (US1 Port) Amplitude Setting 120 BPM 0.5 mV 13. Set the PS320 simulator to input an US signal of 180 BPM as indicated on the monitor. Verify that there is no alarm tone sounding from the monitor’s speaker. 14. Set the simulator’s value to input an US signal of 210 BPM as indicated on the monitor. Verify the following on the monitor: An alarm tone is emitted from the monitor’s speaker (alternating high/low tones). The Alarm indicator flashes. The affected heart rate numerics flash. Revision D 170 Series Monitor 2000947-004 12-11 Addendum 15. Press the monitor’s front panel Alarm Silence pushbutton and verify that the alarm tone silences but the visual indications remain present. 16. Set the simulator to input an US signal of 180 BPM.. Verify that the Alarm indicator goes out and the heart rate numerics stop flashing. 17. Set the simulator to input an US signal of 120 BPM. Verify that there is no alarm tone sounding from the monitor’s speaker. 18. Set the simulator to input an US signal of 90 BPM. After 30 seconds, verify the following on the monitor: The alarm tone is emitted from the monitor’s speaker. The Alarm indicator flashes. The affected heart rate numerics flash. 19. Press the monitor’s front panel Alarm Silence pushbutton. Verify that the visual and audio alarm indications disappear. 20. Set the simulator to input an US signal of 120 BPM. Verify that the Alarm indicator goes out and the heart rate numerics stop flashing. 21. Set the simulator to input an US signal of 90 BPM to set off the alarm one more time. It will take 30 seconds for the alarm to appear. 22. Set the simulator to input an US signal of 120 BPM. Verify the following on the monitor: The alarm tone continues sounding. The Alarm indicator stops continuous flashing. The affected heart rate numerics continue flashing. 23. Press the monitor’s front panel Alarm Silence pushbutton. Verify that the visual and audio alarm indications disappear. 24. This concludes the functional checkout procedure. 12-12 170 Series Monitor 2000947-004 Revision D 0459 World Headquarters Wipro GE Healthcare Private Limited No: 4 Kadugodi Industrial Area Bangalore. 560 067 Karnataka, INDIA. Tel: + 1 414 355 5000 1 800 558 5120 (US only) Fax: + 1 414 355 3790 European Representative GE Medical systems SCS 283 Rue de la Minière, 78530 BUC, FRANCE D-79111 Freiburg Germany Tel: + 49 761 45 43 - 0 Fax: + 49 761 45 43 - 233 Asia Headquarters GE Medical Systems Information Technologies Asia; GE (China) Co., Ltd. 24th Floor, Shanghai MAXDO Center, 8 Xing Yi Road, Hong Qiao Development Zone Shanghai 200336, P.R. China Tel: + 86 21 5257 4650 Fax: + 86 21 5208 2008