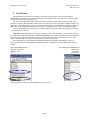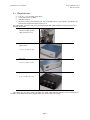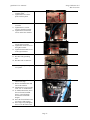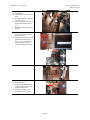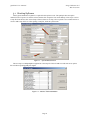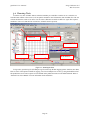
1
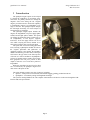
Quad-Pole Magnet Option
User’s Manual
Integral Solutions Int'l
– QPSSplitter version 1.3.7 –
March 29, 2010
Copyright ©2010 Integral Solutions Int'l
All rights reserved
Integral Solutions Int'l
3000 Olcott St
Santa Clara, CA 95054
Phone: (408) 653-0300
Fax: (408) 653-0309
Web: http://www.us-isi.com/
E-mail: [email protected]
While every effort has been made to verify the accuracy of the information contained in this publication, this publication may contain technical
and/or typographical errors. Please contact Integral Solutions Int’l to report any errors in this publication.
Quad-Pole User’s Manual
Integral Solutions Int’l
March 29, 2010
Contents
1 INTRODUCTION ....................................................................................................................................... 4 1.1 2 INSTALLATION......................................................................................................................................... 6 2.1 2.2 2.3 2.4 2.5 2.6 2.7 2.8 3 REQUIREMENTS ...................................................................................................................................... 7 ARRIVAL CHECKLIST .............................................................................................................................. 8 CONNECTIONS ........................................................................................................................................ 9 RUNNING 1ST TIME ................................................................................................................................ 11 INSTALLING QUAD-POLE MAGNET (HGA) ........................................................................................... 12 HGA QUAD-POLE MAGNET ALIGNMENT ............................................................................................. 15 INSTALLING QUAD-POLE MAGNET (BLAZERX6).................................................................................. 16 INSTALLING QUAD-POLE MAGNET (WAFER) ....................................................................................... 19 QUAD-POLE BASICS .............................................................................................................................. 20 3.1 3.2 3.3 4 RELATED DOCUMENTATION ................................................................................................................... 5 STARTING SOFTWARE ........................................................................................................................... 21 RUNNING TESTS ................................................................................................................................... 22 QUAD-POLE STRESS OPTIONS .............................................................................................................. 23 QPS SPLITTER SOFTWARE ................................................................................................................. 24 4.1.1 TESTING ............................................................................................................................................... 24 4.2 QPS SPLITTER STRESS OPTIONS ........................................................................................................... 24 4.3 QPS SPLITTER MAIN MENU ................................................................................................................. 25 5 CALIBRATION......................................................................................................................................... 28 5.1 5.2 6 TOOLS ....................................................................................................................................................... 32 6.1 6.2 7 HALL EFFECT CARTRIDGE .................................................................................................................... 32 QUAD-POLE MAGNET CALIBRATION ADAPTOR ................................................................................... 34 TROUBLESHOOTING ............................................................................................................................ 36 7.1 8 BLAZERX6 MAGNET CALIBRATION...................................................................................................... 30 WAFER ANALYZER MAGNET CALIBRATION ......................................................................................... 31 FAQ ..................................................................................................................................................... 36 LIMITED WARRANTY........................................................................................................................... 37 Page 2
Quad-Pole User’s Manual
Integral Solutions Int’l
March 29, 2010
Figures
FIGURE 1-1 – QUAD-POLE OPTION ............................................................................................................................................. 4 FIGURE 2-1 – QUAD-POLE SYSTEM CONNECTION DIAGRAM ..................................................................................................... 10 FIGURE 3-1 – SYSTEM MENU SELECTION .................................................................................................................................. 21 FIGURE 3-2 – ADD-INS Æ SELECTED MODULES ....................................................................................................................... 21 FIGURE 3-3 – RUNNING THE TESTS ........................................................................................................................................... 22 FIGURE 3-4 – QPSSPLITTER CUSTOM STRESS ........................................................................................................................... 23 FIGURE 4-1 – QPS SPLITTER APPLICATION ............................................................................................................................... 25 FIGURE 4-2 – QPS SPLITTER DIAGNOSTICS MENU ..................................................................................................................... 27 FIGURE 5-1 – BLAZERX6 QUAD-POLE MAGNET CALIBRATION ................................................................................................. 30 FIGURE 5-2 – BLAZERX6 QUAD-POLE LONGITUDINAL FIELD CALIBRATION ............................................................................. 30 FIGURE 5-3 – WLA QUAD-POLE MAGNET CALIBRATION ......................................................................................................... 31 FIGURE 6-1 – HGA HALL-EFFECT CARTRIDGE ......................................................................................................................... 32 FIGURE 6-2 – BLAZERX6 HALL EFFECT PROBE CARD............................................................................................................... 32 FIGURE 6-3 – WAFER HALL EFFECT PROBE CARD .................................................................................................................... 33 FIGURE 6-4 – HGA QUAD-POLE MAGNET CALIBRATION ADAPTOR .......................................................................................... 34 FIGURE 6-5 – GAUSSMETER PROBE ........................................................................................................................................... 34 FIGURE 6-6 – WAFER QUAD-POLE MAGNET CALIBRATOR ........................................................................................................ 35 Page 3
Quad-Pole User’s Manual
Integral Solutions Int’l
March 29, 2010
1 Introduction
The quad-pole magnet option was developed
to expand the capabilities of QST-2002 quasistatic tester. It’s primary function is to change the
magnetic field vector during the test. Original
magnet provided transverse field with capability
to mechanically rotating it to longitudinal or any
angle in between. The quad-pole option changes
the field angle electrically, for in-situ analysis of
head parameter vs field angle.
The Quad-pole magnet option includes the
magnet, the longitudinal coil power supply QMS1050B, and the QPS splitter module. The option
can change the field angle from 0 (transverse) to
90 (longitudinal), to 180 degrees (opposite
transverse). It can also apply field on one set of
coils while sweeping the field on another set to
analyze how magnetic bias can effect the head.
The option will work with existing QST-2002
tester, inserting a QPS Splitter module in between
the original QST-2002 and QPS-1050. If
qpssplitter software is not running, the qpssplitter
module automatically provides 100% of the input
field value to the qps-1050. So the old setup files
will work as is with no medication. If QPSSplitter
software is running and user enables non-0 angle,
then qpssplitter box will put a portion of field
output to transverse set of coils and a portion to
longitudinal.
While the qpssplitter has provision for third
axis of rotation (Z), the quad-pole magnet itself
does not have the poles for this.
Figure 1-1 – Quad-Pole Option
The option includes complete test suite of software, including:
• Quasi97 – field proven test environment, that includes logging, grading, production mode etc.
• QPSSplitter – for manually setting field magnitude and angle.
The system is running Windows XP. The computer communicates to all devices on the tester through the USB
interface and serial port interface.
Page 4
Quad-Pole User’s Manual
Integral Solutions Int’l
March 29, 2010
1.1 Related Documentation
This manual is dedicated on the Quad-Pole magnet option and QPSSplitter module that is used for its control. In
addition to this, the following literature is recommended:
Quasi97 Software
Contains detailed description of all menus in Quasi97 software,
User’s Manual
along with procedures on how to set up test parameters, log data,
and run the QST in production and engineering modes.
QST External Modules
Description of additional tests provided with the QST and Quasi97
User’s Manual
software. The Angle Transfer test, added by QPSSplitter
application is described there.
RIA-2008 Users
Relative Inductance analyzer uses quad-pole magnet features quite
Manual
heavily.
FMRA Users Manual
Ferro-magnetic resonance analyzer can use quad-pole magnet
features, refer to it for parameter settings in FMR tests.
STT-MRAM Users
The STT-MRAM test module is designed for wafer level testing.
Manual
It uses features of the quad-pole magnet as well.
Configuring BlazerX6
This describes how to install quad-pole magnet on BlazerX6 in
Options
more detail.
BlazerX6 User’s
Manual Supplement
Page 5
Quad-Pole User’s Manual
Integral Solutions Int’l
March 29, 2010
2 Installation
The QPS Splitter box needs to be connected by USB cable to the computer. After connecting USB, in
WindowsÆDevice Manager, a new device should appear called ISI FLDCntrl. User must follow windows prompts
to ensure that the driver is installed properly.
The serial cable (DB9) and the BNC cable connections previously connecting QST-2002 to the QPS-1050,
should be rerouted to QPS Splitter Box (INPUT ports). The output port 1 of the QPS splitter should be connected to
QPS-1050, which would be driving the transverse field. The output port 2 of the QPS splitter should be connected to
QMS-1050, for the longitudinal field magnet. Note that the second QPS-1050 can also be used instead of QMS.
Note that the QPSSplitter gets its DC power from the computer through the USB, so the auxiliary power input
on the QPSSplitter is not used.
Important: If upgrading from 2-pole magnet, in addition to connecting the hardware, user must also program
new field gain in the Quasi97ÆDiagnosticsÆMainboard EEPROM. This gain must match the transverse (0degrees)
gain of the magnet. This actual gain (Oe/Ampere) is located on the factory sticker on the magnet, next to serial
number. The first number is for transverse field, and the second for longitudinal.
The Field parameters in QST Motherboard EEPROM should be programmed with Magnet1 (transverse
direction) parameters from the QPSSplitter EEPROM (available in Diagnostics window of QPS Splitter software
module).
QPS Splitter EEPROM field
“Magnet1 Resistance”
“Magnet1 Gain”
“0”
QST Motherboard EEPROM Field
“Magnet Res”
“Field Gain”
“Field Offset”
After copying above values into QST Motherboard, restart Quasi’97.
Page 6
Quad-Pole User’s Manual
Integral Solutions Int’l
March 29, 2010
2.1 Requirements
•
•
•
•
115VAC +/- 9%, 50-60Hz, Single Phase
11.5A peak current, 7A RMS
Available USB port
The tester can only run on Windows XP. This is installed on the PC, but if the PC is provided by the
customer this requirement must be taken care of.
The QPS splitter option uses only power provided through USB. QMS-1050B also requires separate power.
Nominal dimensions:
Quad-pole magnet
(dimensions differ for Bar,
HGA and Wafer levels)
QPS-1050
QMS-1050B
17”(L) x 16”(W) x 6”(H)
RIA-2008
13”(L) x 8”(W) x 4”(H)
QPS Splitter
6”(L) x 6”(W) x 2.5”(H)
The magnet does not require cooling. The QPS-1050, QMS-1050B and QST-2002 have slots on the bottom for
air intake, which should not be blocked. QPS Splitter box do not require any cooling.
Page 7
Quad-Pole User’s Manual
Integral Solutions Int’l
March 29, 2010
2.2 Arrival Checklist
The QPS Splitter is an add-on for QST-2002 tester, so the items included in the shipment may differ from
the list below. The following list is a guide of what items should be present in order for the QPS-Splitter to work
properly:
1) QST-2002 Electronics (not part of the quad-pole option)
a. USB Cable Type A (flat)
b. M-F 14-pin Round Cable
c. BNC Field Control Cable
d. M-M DB9 Cable
2) QPS-1050 Power Supply (not part of the quad-pole option)
a. AC Power Cable
b. 9pin round to 2-pin flat Transverse Coil Cable
3) QMS-1050B Magnet Power Supply
a. AC Power Cable
b. BNC Field Control Cable (transverse field)
c. M-M DB9 Cable (transverse field)
d. BNC Field Control Cable (longitudinal field)
e. M-M DB9 Cable (longitudinal field)
f. 9pin round to 3-pin flat Longitudinal Coil Cable
4) QPS Splitter Module
a. USB Cable Type B (square)
5) Quad-pole Magnet
Page 8
Quad-Pole User’s Manual
Integral Solutions Int’l
March 29, 2010
2.3 Connections
QST-2002
BNC (Field 1)
DB9
QPS-1050
3pin AC Power
14-pin round
9-pin round
BNC
DB9
QMS-1050B
3pin AC Power
9-pin round
BNC
DB9
QPS Splitter
USB
DC Power Inlet
Input BNC
Input DB9
Output BNC X
Output DB9 X
Output BNC Y
Output DB9 Y
Output BNC Z
Output DB9 Z
Quad-pole Magnet
2-pin Female
2-pin Male
To QPS Splitter Input BNC (field output control)
To QPS Splitter Input DB9 (QPS communication)
To 115VAC outlet
To QST-2002 (DC power for QST-2002)
To quad-pole magnet 2-pin Female connector for Transverse coils
To QPS Splitter Output BNC X (field output control)
To QPS Splitter Output DB9 X (QPS communication)
To 115VAC outlet
To quad-pole magnet 2-pin Male connector for Longitudinal coils
To QPS Splitter Output BNC Y (field output control)
To QPS Splitter Output DB9 Y (QPS communication)
To computer (digital IO)
No Connect
To QST-2002 Field 1 output
To QST-2002 DB9
To QPS-1050 BNC
To QPS-1050 DB9
To QMS-1050B BNC
To QMS-1050B DB9
No Connect
No Connect
To QPS-1050 9-pin round connector
To QMS-1050B 9-pin round connector
Page 9
Quad-Pole User’s Manual
Integral Solutions Int’l
March 29, 2010
Figure 2-1 – Quad-Pole System Connection Diagram
Page 10
Quad-Pole User’s Manual
Integral Solutions Int’l
March 29, 2010
2.4 Running 1st Time
1)
2)
3)
4)
5)
6)
7)
8)
9)
Turn ON the PC, monitor.
Check that the operating system boots up with no problems.
Turn ON the QPS-1050, ensure that the Power LED is ON.
Turn ON the QMS-1050B, ensure that the Power LED is ON.
Turn ON the QST-2002, ensure that the LED on the front panel is ON.
Check the LED in the back of the QPS Splitter box (next to USB port) is on.
Start Quasi97, select a setup file.
In the Add-InsÆAvailable Modules, add item “QPSSplitter.Application”.
In the Add-InsÆSelected Modules, add a new item and selection “QPSSplitter.Application”. Close the
dialog box.
10) In the System menu, change the maximum field to 3500Oe.
Note: You may need to repeat steps 9 and 10 every time you create a new setup file.
11) Click START in Quasi97. Add an instance of Transverse test and run it. This will check the that the
hardware is operating properly. The outcome of the test will depend on the head installed, so at this
step it only matters if there are any errors. Check the Active LED on the QPS-1050 – it should turn on
for a short time and then go off before the test is over.
12) Add a Field Angle=90 stress option in the transverse test. Run the test. Now the Active LED on the
QMS-1050B should turn on and off.
Once this checklist is complete the tester is operational and is ready for use. If there are any problem, review the
connections or contact ISI support.
Page 11
Quad-Pole User’s Manual
Integral Solutions Int’l
March 29, 2010
2.5 Installing Quad-Pole Magnet (HGA)
If quad-pole upgrade was ordered, then user would have to install additional components before the system can
be used. This is not required is the complete system was ordered.
1. Remove the old magnet from
QST-2002 baseplate, by
removing the 4 screws on
each side of the magnet.
2. Put on the new magnet.
3. The quad-pole magnet is
mounted by 4 screws (2 on
each side). Use the outside
holes for this. To install the
magnet insert one pair of
screws first, then shift the
magnet to the back of the
tester and install the second
pair. Use the short shoulder
wrench supplied with the
tester.
4. Push the magnet towards the
tooling and tighten the screws
lightly. The Y position of the
magnet will depend on the
type of cartridge installed (UP
or DOWN).
Page 12
Quad-Pole User’s Manual
Integral Solutions Int’l
March 29, 2010
5. Remove the 2xHGA G2
tooling from the QST-2002.
6. Install the quad-pole tooling
adapter on the baseplate.
7. Substitute the 50pin ribbon
cable with the longer one
supplied in the upgrade kit.
8. Install the 2xHGA G2 tooling
back on QST.
9. Remove the white pomalux
cover from the 2xHGA
tooling.
Page 13
Quad-Pole User’s Manual
Integral Solutions Int’l
March 29, 2010
10. Loosen the hardstop (refer to
QST-2002 manual for
hardstop adjustment)
11. Move the cartridge all the way
towards the magnet. The
cartridge should be as close as
possible to the magnet but not
touching the poles.
12. Tighten the hardstop at this
position.
13. Adjust the position of the
magnet, so that the head is in
the center spot between the 4
poles.
14. Connect the RIA module to
the RIA controller box, using
a 40pin ribbon cable supplied.
Note that the RIA controller
has to be off, plugging it in
while the power is on may
result in equipment damage.
Page 14
Quad-Pole User’s Manual
Integral Solutions Int’l
March 29, 2010
2.6 HGA Quad-Pole Magnet Alignment
The magnet position will depend on the type of cartridge installed: UP or DOWN. The height of the magnet is
also adjustable. The following procedure shows how to adjust the magnet:
1) The magnet is held by 4
screws at the base. Loosen all
4 screws as shown on the
picture.
2) Move the magnet such that
the head in the tooling is in
the midpoint between the 4
poles.
3) Tighten the screws. One of the
screws may be hard to access,
use a shorter wrench to access
it.
4) On the back of the magnet
loosen the 4 screws.
5) Use the Vertical alignment
screwn (V) to move the
magnet UP and DOWN.
V
6) Use the HGA to determine the
best height of the magnet.
7) After the magnet alignment is
done, secure the 4 screws on
the back of the magnet.
Page 15
Quad-Pole User’s Manual
Integral Solutions Int’l
March 29, 2010
2.7 Installing Quad-Pole Magnet (BlazerX6)
Refer to “Configuring BlazerX6 Options” supplement for more complete instructions on how to go from 2-pole
to quad-pole magnet option.
1. If up-facing OCR camera is
present, move it to location
closer to the back of the
machine.
2. Thread, but do not tighten the
screws.
3.
Install the quad-pole left Lbracket to the top plate. Do
not tighten the screws.
4.
5.
Install the quad-pole base.
Thread and tighten four 2.5”
screws to secure the quad-pole
base.
6.
Install the quad-pole magnet.
Slide the magnet cables
carefully in the opening in the
center of the base, and route
them towards the lens and out
to the back of the machine.
7.
Secure the magnet to the base
using four 8-32 ¾” screws.
Page 16
Quad-Pole User’s Manual
8.
9.
Integral Solutions Int’l
March 29, 2010
Install the quad-pole probe
card base pillar.
Tighten the screws on the
probe card base pillar.
10. Thread the screws in the left
L-bracket.
11. Tighten the two vertical
screws in the left L-bracket.
12. Tighten the two horizontal
screws on the left L-bracket.
13. Thread two 8-32 1” screws
into the right L-bracket.
14. Tighten the vertical screws in
the right L-bracket.
15. Tighten the horizontal screws
in the right L-bracket.
16. Install the bar arm.
17. Reconnect the grounding
wire.
18. Reconnect the vacuum line.
19. Install the quad-pole magnet
cover panel.
20. Loosen the forward limit
sensor on Y stage.
21. Release the EMO button and
turn on the machine.
22. Start Barcont in service mode.
Click “No” to “Find Homes”.
23. In 1000um increments, move
the arm forward such that
there is ~2mm clearance
between the arm and the
magnet.
24. Move the forward limit sensor
to activate at that position.
25. Move stage away and tighten
the screw on the limit sensor.
Page 17
Quad-Pole User’s Manual
Integral Solutions Int’l
March 29, 2010
26. Restart Barcont.
27. Find Homes.
28. Find Software Limits on the Y
stage.
29. Using dial indicator, align the
Z to Y-travel tilt.
30. Check the X to Y-travel tilt of
the arm and realign if out of
spec.
31. Mount the vacuum gripper on
the arm.
32. If up-facing OCR camera is
present, turn on the vacuum
and put on a bar.
33. Align OCR camera, focus and
tighten the OCR lens to the
base. Use 1/8” to control the
camera position and 1/16”
wrench to change the lens tilt.
34. Install the probe card holder.
35. Install the Probe card
36. Realign the tester
37. Install the grounding bracket
in the available location and
readjust its Z position.
38. Install the YZ stage cover.
39. Reinstall the access panels.
Page 18
Quad-Pole User’s Manual
Integral Solutions Int’l
March 29, 2010
2.8 Installing Quad-Pole Magnet (Wafer)
Wafer Level Analyzer magnet installation is complex and should be performed only by authorized ISI
representative.
Page 19
Quad-Pole User’s Manual
Integral Solutions Int’l
March 29, 2010
3 Quad-Pole Basics
The quad-pole magnet option includes the second magnet power supply and the QPS Splitter module. The QPS
Splitter is responsible for setting the field angle, but it can also set fixed (static) fields. The QPS Splitter module is
controlled by QPSSplitter.exe application. User can start QPS Splitter.exe application on its own - to control the
field and angle outside of Quasi97.
The main software module to run the tester is still Quasi97. In order to enable quad-pole capabilities, user must
add “QPSSplitter.Application” to the Add-InsÆSelected Modules. This adds the angle transfer test to the setup file,
as well as the field angle and static field stress option. Adding “QPSSplitter.Application” is required for every new
setup file. Other test suites (such as RIA2008, FMRA, STTRAM) may automatically enable QPSSplitter, so in such
cases this step is not required.
Add-InsÆPeripherals gives you access QPS Splitter application menu. These menu is primarily for diagnostics,
but can be used to manually set field vectors, calibrate magnet and so on.
The 0 degress setting corresponds to transverse field (normal to the ABS), and 90 degrees is counterclockwise
rotation to the longitudinal direction (parallel to the ABS).
Page 20
Quad-Pole User’s Manual
Integral Solutions Int’l
March 29, 2010
3.1 Starting Software
Full (Typical) installation of Quasi97 is required for this option to work. The quad-pole does not require
runtime license to operate. To start the software, double click on Quasi97 icon on the desktop. Next step is to select
a setup file from the list (click “Select Setup” button). If there is no setup, refer to Quasi97 User’s manual on how to
create or add a setup to the list. After opening a setup file, check the system menu.
Figure 3-1 – System Menu Selection
The next step is to add QPSSplitter.Application to the setup file. This will add a test and some stress options
that will allow operating quad-pole magnet.
Figure 3-2 – Add-Ins Æ Selected Modules
Page 21
Quad-Pole User’s Manual
Integral Solutions Int’l
March 29, 2010
3.2 Running Tests
To run the test, click “START” button. Select the head that you would like to run the test on. Select the test
from the button toolbar or the test tree (refer to Quasi97 manual for more information), then click Run Test. The test
will run and show the results on its menu. You can select a different test and click “Run Test” again. The required
condition to run a test is that the bias is turned on (“START” button is pressed).
Current Test
Test Menu
Test Results
START Button
Run Test Button
HEAD SELECT
Figure 3-3 – Running the Tests
To log results, open the log file (FileÆOpen Log File) and set up the data logging options. Statistics, Raw Data,
Plots are some of the options available for logging. You can run multiple tests at once, by using the Production Test.
The production test will run a sequence of tests defined on the production menu on each enabled channel. Refer to
“External Tests Users Manual” for more information on the test details.
Page 22
Quad-Pole User’s Manual
Integral Solutions Int’l
March 29, 2010
3.3 Quad-Pole Stress Options
QPSSplitter module also adds a few stress options that can be used to control the quad-pole magnet and the
writer during any test. These stress options allow to enabling write current output, setting write current, setting field
angle, setting fixed field on one of the axis.
Figure 3-4 – QPSSplitter Custom Stress
Field Control.Field Angle(XY;XZ)
This stress option allows to set field vector angle on the quad-pole magnet. The stress expects two values,
separated by semicolon. The first is XY angle, which is the angle in transverse-longitudinal plane. Valid settings
include -180 to +180 degrees. For example “90;0” will change to longitudinal field output.
The XZ angle is reserved for future use and should be set to 0. The Field Angle stress will remain for the
duration of the test, unless the test has field angle as a parameter.
Field Control.Static Field X-Pole (Oe)
This sets the transverse coil set to a fixed field output. Whether the setting will be applied or not, depends on
“static field overrides angle” setting in the QPS Splitter application and is described in more detail there. X-pole is
the transverse output, Y-pole is the longitudinal and the Z-pole is not supported. The static field can be set to any
value from negative to positive max field.
Page 23
Quad-Pole User’s Manual
Integral Solutions Int’l
March 29, 2010
4 QPS Splitter Software
QPSSplitter software is designed to operate the quad-pole magnet. It is able to rotate field 360degrees, or run a
field sweep on one magnet, while keeping constant field on the orthogonal coil. The software module can operate on
its own (QPSSPlitter.exe), where it can be used to calibrate the magnet for general troubleshooting. It can also
operate as part of Quasi97 Add-Ins modules.
QPSSplitter software is included in Quasi97 installation, starting from version 4.6.56. The installation includes
the USB driver, as well as the diagnostics software.
4.1.1 Testing
After installation user should add QPSSplitter.Application to the Quasi97ÆAdd-Ins modules in every setup
where user wants to use it. Some software modules, such as RIA2008 and FMRApp will load QPSSplitter
automatically, so if those are enabled then splitter functionality will be enabled automatically. In either case, the
module should appear in Quasi97ÆAdd-InsÆPeripherals as QPS Splitter <SerialNumber>.
If QPS Splitter application is not loaded, then the module works as a pass-through device, routing all the current
from QPS-1050 to the transverse magnet.
If QPS Splitter application is loaded then user can set the field angle in any one of the available tests through
stress options. In case of field angle option, the QPSSplitter will divide the current between transverse and
longitudinal coils to get the proper angle. Another mode of operation called ‘Static Field’ is also available through
stress option – this is where one coil can be fixed to output constant field, while other can sweep field.
The QPSSplitter.Application adds Angle Transfer, which can change the field angle while keeping the same
field magnitude.
The application could also run in stand-alone mode, where you can check resistance of the magnet, read QMS
EEPROM and set the field.
4.2 QPS Splitter Stress Options
The QPS Splitter registers some custom stress options, which enable users to set different angles in tests that do
not have such parameters. The stress items apply immediately and last until the end of the test (where they are
added) . If the test has Field Angle or Static Field parameter, then the test will override this options. Here is the list
of stress option and short description:
QPS Splitter.Field Angle
(XY;XZ)
QPS Splitter.Field Angle XY
QPS Splitter.Static Field XPole (Oe)
QPS Splitter.Static Field YPole (Oe)
This option sets the magnet field in 3D, by using XY
angle component and XY-Z components. To set
transverse field, set 0 for XY angle; to set longitudinal –
set 90 for XY angle. The 3rd coil is currently not
available.
For Example value 45;0 sets the field angle to 45
degrees.
This is a simplified option, that allows to setting angle in
transverse-longitudinal plane. Unlike the previous stress
- this option can easily be used in the sweep test.
This fixes the transverse field output to constant field, if
the field angle is set to 90 degrees. If the angle is not 90
then the field on transverse coil can be different. See
“Static Field Overrides Angle” option for more
information on specifics.
This fixes the longitudinal field output to constant field,
if the field angle is set to 0 degrees. If the angle is not 0
then the field on longitudinal coil can be different. See
“Static Field Overrides Angle” option for more
information on specifics.
Page 24
Quad-Pole User’s Manual
Integral Solutions Int’l
March 29, 2010
4.3 QPS Splitter Main Menu
This application may be used to set the field without Quasi97. To do that run QPS Splitter.exe from Program
Files\Integral Solutions\External Apps\ folder. The QPS Splitter application allows setting the field and angle and
calibrating the magnet.
Figure 4-1 – QPS Splitter Application
Stop All Output
RESET ALL
Start Sensor
Checking
Magnet Angles
XY Angle
xyZ Angle
Magnitude (Oe)
Can be used to quickly turn off output to all three QPSs
Resets all the settings in this menu. Note that restarting the field
control software will do the same thing.
Button enables/stops sensor checking. This is not recommended in
standalone mode, because QST2002 needs to be turned on. The
indicator next to this button will show purple if the sensor checking
is enabled. Sensor checking allows catching conditions such as
power fault, magnet circuit breaker tripped, magnet driver overheat
etc.
Angle in degrees in the Longitudinal-Transverse plane. The range is
-180 to +180. 0 degrees is transverse field and 90 degrees is
longitudinal.
The Z component of the magnetic field angle. This controls the
output to 3rd power supply, which currently is not used. The angle
here can be -90 degrees to +90 degrees.
The magnitude of the vector at a give XY and Z angles. The
maximum and minimum values depend on the magnet gains
specified in the Diagnostics menu.
User can also use the slide to change the field magnitude.
Page 25
Quad-Pole User’s Manual
Set Angle and Field
XY and xyZ planes
Set Field Locally
Static Field
Overrides Angle
Settling
Integral Solutions Int’l
March 29, 2010
Button that actually sets the values specified in the textboxes. Note
that the slides (for XY, Z angles and magnitude) automatically set
the field and angle.
This shows the currently set angle using polar coordinate plane,
taking into account all the options.
Option that will set field magnitude using internal DACs in the QPS
splitter box. If this option is set, then QST field input will be
ignored.
This option is related to static field selection, for those outputs that
have “STATIC Field Mode” selected. If this option is turned on,
then no matter what angle the user will try to set, that particular
output will be set to constant field. This means that the actual angle
will differ from what user has selected.
For example user sets 100 Oe static field on axis X and then sets
angle to 45degrees and magnitude to 1000. If “static field overrides
angle” is on, then axis X will still have 100 Oe, but axis Y will have
707 Oe. So the field vector will be at 82 degrees and magnitude
714Oe, but static field of 100oe will be kept on axis X.
If “Static Field overrides Angle” option is turned off, then static field
will only be set when the output on that axis is 0. For example user
sets 100 Oe static field on axis X and then sets angle to 45degrees
and magnitude to 1000. If “static field overrides angle” is OFF, then
axis X will still have 707 Oe and axis Y will have 707 Oe. If user
sets 90degrees (X has 0 component), then software will output 100
Oe on X (static field) and 1000 Oe on axis Y (per user setup).
This shows how long it took to set the last step. When setting a new
angle and field magnitude, the settling indicator would flash yellow
briefly and return to gray.
Output 1, Output 2, Output 3
These sections control output to individual axes, mostly for override mode.
Control
Angle Controlled mode means that the setting in Magnet Angles
Angle / Static /
portion of the menu will control this axis. Also tests in Quasi97 will
Override
control that axis.
Static Field mode means that user will set the magnitude of the field
component on this axis manually. This option works in conjunction
with Magnet Angles section: by default, only when the output to this
axis is 0, the static field will turn on. Such as when angle is set to 90,
or -90 and static field on X is set to 100, then X axis will set 100Oe;
for the rest of angles the field will be split according to user set
angle.
If static field overrides angle option is on, then this particular axis
will keep fixed output for all angles set in the magnet angles section.
Override mode completely overrides the setting in the magnet
angles section of the menu for that particular axis.
Output Percentage This is what fraction of the input output is directed to that particular
axis.
QST /
This controls the output mode for manual override. If QST is
DC 0V-10V
selected, then a portion of QST input will go to this output. If DC010V is selected, then whatever voltage user types in for this axis will
be used to drive that QPS.
Page 26
Quad-Pole User’s Manual
Inverted
Set To %
Integral Solutions Int’l
March 29, 2010
This option inverts the output. Because the output is unipolar, to set
negative fields in override mode, this option must be enabled.
This allows user to manually set the output for this particular axis.
Current Values
This section shows the current status of the field splitter box, including the field vector components, magnitude
and so on.
Field Splitter
Shows whether the field splitter was detected by software. If this is
Present
not green, check the USB connection and the device manager in
Windows - QPS Splitter usb device should be present there.
QST output at V
Since Quasi97 input is unknown to field splitter, it cannot calculate
the field magnitudes. User can enter the value Quasi97 outputs, so
that the QPS Splitter software can calculate and display correct
magnitudes in this menu
QST Gain
This shows what gain is currently programmed in QST. Note that
you will not be able to set field higher than this gain *10 in Quasi97.
X/Y/Z Magnitude
Shows the field magnitude on that axis – projected.
XY Angle
Shows angle in the transverse-longitudinal plane.
Z Angle
Shows angle of the field angle with respect to XY angle plane.
XY Magnitude
Magnitude of the field vector projected onto XY plane
XZ Magnitude
Magnitude of the field vector projected onto XZ plane
YZ Magnitude
Magnitude of the field vector projected onto YZ plane
xyZ Magnitude
Total magnitude of the field vector.
Diagnostics Menu
Diagnostics menu allows access to the eeproms, status registers and direct ADC and DAC control. User could
use this menu to check magnet resistance, calibrate the magnet and so on. To access diagnostics menu, user should
click on the “Diagnostics” and enter the password “Quasi97”.
Figure 4-2 – QPS Splitter Diagnostics menu
Page 27
Quad-Pole User’s Manual
5
Integral Solutions Int’l
March 29, 2010
Calibration
The magnet has two calibration factors: one for transverse coil and the other one for longitudinal. The
calibration factors can be found on a sticker outside of the magnet. These are stored in the QPS Splitter eeprom and
are set in Quasi97 automatically.
When receiving the upgrade, it may be necessary to update the field gain factor in the QST-2002ÆMainboard
eeprom. This will help avoid “Maximum Field out of range” error message during loading of a setup file. To do this:
1) Go to Quasi97ÆDiagnostics
2) Double click in the center of the menu and enter the password: “Quasi97”
3) In the mainboard eeprom (on the left), change the “Magnet Gain” to 350, or whatever it says on the the
quad-pole magnet sticker.
4) Also change magnet resistance to 0.
5) Click Write EEPROM button to save this.
Field calibration for the Quad-pole magnet cannot be done in Quasi97 - use QPS Splitter software instead. To
access QPS Splitter menu, run QPS Splitter application by itself, or go to Quasi97ÆAdd-InsÆPeripheralsÆField
Splitter. Then go to “Diagnostics” menu from there to calibrate the magnet.
1) Change Magnet Gain1 to 100.
2) Change Magnet Gain2 to 100.
3) Go to Field Control main
menu and enable “Set Field
Locally” checkbox
4) Set XY angle to 0 (transverse
field)
5) Set Magnitude to 100
6) Click “Set Angle and Field”
button.
Page 28
Quad-Pole User’s Manual
Integral Solutions Int’l
March 29, 2010
7) Insert the special gaussmeter
tool into the magnet in the
transverse field orientation.
8) Note the measurement on the
gaussmeter (A).
9) Set the XY Angle to 180
degrees.
10) Click “Set Field and Angle”
11) Note the measurement on the
gaussmeter (B).
12) Calculate (abs(A)+abs(B))/2
and put the result into the field
splitter Diagnostics menu Æ
Magnet1 Gain.
13) Insert the gaussmeter probe in
the longitudinal orientation
14) Set XY Angle to 90 degrees
15) Click “Set Field and Angle”
16) Note the readout on the
gaussmeter (C)
17) Set XY Angle to -90 degrees.
18) Click “Set Field and Angle”
19) Note the measurement on the
gaussmeter (D).
20) Calculate (abs(A)+abs(B))/2
and put the result into the field
splitter Diagnostics menu Æ
Magnet2 Gain.
21) Click “Write EEPROM” in
the field Splitter Diagnostics
Menu.
22) Restart the software.
Page 29
Quad-Pole User’s Manual
Integral Solutions Int’l
March 29, 2010
5.1 BlazerX6 Magnet Calibration
To calibrate the quad-pole magnet on BlazerX6, user must move the arm all the way to the back and remove the
probe card. Then user has to mount BlazerX6 quad-pole magnet calibration tool on the magnet (from the top). Then
user can insert the gaussmeter tool and do the calibration (as shown in the picture below).
Figure 5-1 – BlazerX6 Quad-Pole Magnet Calibration
To calibrate longitudinal field, the gauss probe can be moved to the left side of the tool. Note that the gauss
probe can be held in the tool by the set screws. Undo the setscrew before removing the guass probe to avoid
damaging it.
Figure 5-2 – BlazerX6 Quad-Pole Longitudinal Field Calibration
Page 30
Quad-Pole User’s Manual
Integral Solutions Int’l
March 29, 2010
5.2 Wafer Analyzer Magnet Calibration
Wafer quad-pole magnet calibration requires special tool, based on wafer probe card mechanics. Since only the
fringe field is used, the placement of the gauss probe is critical with respect to the probe card. User should unlock
the probe card holder, then substitute the real probe card with the magnet calibrator base. Then move and lock the
probe card into place.
Figure 5-3 – WLA Quad-Pole Magnet Calibration
User can then insert the gaussemeter probe in vertical orientation to calibrate transverse field. Or insert the
probe in horizontal orientation to calibrate longitudinal field. To do this loosen the screws holding the plastic cover
and slide in the probe.
Page 31
Quad-Pole User’s Manual
6
Integral Solutions Int’l
March 29, 2010
Tools
6.1 Hall Effect Cartridge
The standard hall effect cartridge will not work with the new magnet, because the gap is much smaller than on
standard HSA magnet.
Figure 6-1 – HGA Hall-Effect Cartridge
Quad-pole hall-effect probe cards also orient the hall sensor at ~45degrees (mid point between the transverse
and longitudinal field vector). This way user can check transverse coil set and longitudinal coil set using the same
tooling. Such probe card will specify the PkPk amplitude at 0degrees, 90degrees and the exact angle of the hall
effect to the probe card.
Figure 6-2 – BlazerX6 Hall Effect Probe Card
Page 32
Quad-Pole User’s Manual
Integral Solutions Int’l
March 29, 2010
Figure 6-3 – Wafer Hall Effect Probe Card
Page 33
Quad-Pole User’s Manual
Integral Solutions Int’l
March 29, 2010
6.2 Quad-Pole Magnet Calibration Adaptor
This tooling helps position the gaussmeter probe at the center of the uniform field and at the right angle to the
generated field. This adaptor is made especially for HGA quad-pole magnet. The gausmeter probe can be inserted in
transverse or longitudinal directions.
Figure 6-4 – HGA Quad-pole Magnet Calibration Adaptor
Figure 6-5 – Gaussmeter Probe
Page 34
Quad-Pole User’s Manual
Integral Solutions Int’l
March 29, 2010
Figure 6-6 – Wafer Quad-Pole Magnet Calibrator
Page 35
Quad-Pole User’s Manual
Integral Solutions Int’l
March 29, 2010
7 Troubleshooting
7.1 FAQ
XXXXX Board not
detected
Active LED is ON.
Fault LED is ON.
“Magnet Resistance is
out of range.”
“QMS Power is OFF”
During Initialization the QST 2002 reads all board EEPROM’s and
verifies board communications. No system has every board we have
built so it is to be expected that some boards will not be detected
during startup. If the board not detected is a board you believe you
have please contact ISI.
Active LED turns on when the QMS drives current through the
magnet. You should not attempt disconnecting the magnet if Active
LED is on.
QMS has a 5Amps circuit breaker in front, which protects the
magnet from damage. If transverse or longitudinal field is left on for
a long time the circuit breaker will trip and Fault LED will turn on,
but user can reset it within one minute. Software will report that fault
and reset the field to 0.
Software will check the magnet resistance on the startup, and if
resistance is out of range then either the magnet is not connected or
saved resistance is wrong. To save resistance of the current magnet,
run QPS Splitter in stand-alone mode and click Measure Magnet
Resistance. Then put the value into “Magnet <x> Resistance” field,
and click Write to EEPROM.
is displayed when the power is off
Page 36
Quad-Pole User’s Manual
Integral Solutions Int’l
March 29, 2010
8 LIMITED WARRANTY
Integral Solutions Int'l, a California Corporation, having its principal place of business at 3000 Olcott St, Santa
Clara, CA 95054 ("Manufacturer") warrants its Quasi-Static Tester model QST-2001 products (the "Products") as
follows:
Limited Warranty
Manufacturer warrants that the Products sold hereunder will be free from defects in material and workmanship
for a period of six (6) months from the date of purchase. If the Products do not conform to this Limited Warranty
during the warranty period (as herein above specified), Buyer shall notify Manufacturer in writing of the claimed
defects and demonstrate to Manufacturer satisfaction that said defects are covered by this Limited Warranty. If the
defects are properly reported to Manufacturer within the warranty period, and the defects are of such type and nature
as to be covered by this warranty, Manufacturer shall, at its own expense, furnish, replacement Products or, at
Manufacturer's option, replacement parts for the defective Products. Shipping and installation of the replacement
Products or replacement parts shall be at Buyer's expense.
Other Limits
THE FOREGOING IS IN LIEU OF ALL OTHER WARRANTIES, EXPRESS OR IMPLIED, INCLUDING
BUT NOT LIMITED TO THE IMPLIED WARRANTIES OF MERCHANTABILITY AND FITNESS FOR A
PARTICULAR PURPOSE. Manufacturer does not warrant against damages or defects arising out of improper or
abnormal use of handling of the Products; against defects or damages arising from improper installation (where
installation is by persons other than Manufacturer), against defects in products or components not manufactured by
Manufacturer, or against damages resulting from such non-Manufacturer made products or components.
Manufacturer passes on to Buyer the warranty it received (if any) from the maker thereof of such non-Manufacturer
made products or components. This warranty also does not apply to Products upon which repairs have been effected
or attempted by persons other than pursuant to written authorization by Manufacturer.
Exclusive Obligation
THIS WARRANTY IS EXCLUSIVE. The sole and exclusive obligation of Manufacturer shall be to repair or
replace the defective Products in the manner and for the period provided above. Manufacturer shall not have any
other obligation with respect to the Products or any part thereof, whether based on contract, tort, strict liability or
otherwise. Under no circumstances, whether based on this Limited Warranty or otherwise, shall Manufacturer be
liable for incidental, special, or consequential damages.
Other Statements
Manufacturer's employees or representatives' ORAL OR OTHER WRITTEN STATEMENTS DO NOT
CONSTITUTE WARRANTIES, shall not be relied upon by Buyer, and are not a part of the contract for sale or this
limited warranty.
Entire Obligation
This Limited Warranty states the entire obligation of Manufacturer with respect to the Products. If any part of
this Limited Warranty is determined to be void or illegal, the remainder shall remain in full force and effect.
Page 37