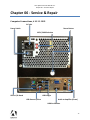
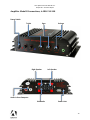
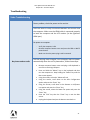
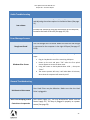
1
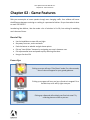
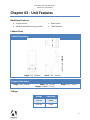
Lane Splitter Extreme Operation & Service Manual Version 1.1 * Read this manual before use Lane Splitter Extreme Manual V1.1 General Remark If you encounter any difficulties or if you need support on how to update and/ or install your Lane Splitter Extreme product, we invite you to contact your local distributor or reach us at [email protected] or by calling our support line +1-450-824-1671 Adrenaline Amusements Team Adrenaline Amusements 1150 Levis, Suite 302 Terrebonne, Qc Canada J6W 5S6 2 Lane Splitter Extreme Manual V1.1 Table of Contents Contents General Remark .................................................................................................. 2 Table of Contents................................................................................................ 3 Chapter 01 - Preface ........................................................................................... 5 Precaution for Game Operation .................................................................................................. 5 Safety ........................................................................................................................................... 6 Environmental Conditions ........................................................................................................... 6 Chapter 02 - Game Features................................................................................ 7 How to Play ................................................................................................................................. 7 Power Ups ................................................................................................................................... 7 Chapter 03 - Unit Features .................................................................................. 8 Hardware Features ...................................................................................................................... 8 Cabinet Facts ............................................................................................................................... 8 Voltage ........................................................................................................................................ 8 Chapter 04 - Unit Installation .............................................................................. 9 Assembling your Lane Splitter Extreme Unit .............................................................................. 9 Chapter 05 - Admin Menu & Game Setup ......................................................... 10 The Admin Menu ....................................................................................................................... 10 Calibrate Handlebars Screen ............................................................................................................... 12 Test Handlebars Screen ...................................................................................................................... 13 Ticket Redemption – Off ..................................................................................................................... 13 Ticket Redemption – Normal .............................................................................................................. 14 Ticket Redemption – Fixed.................................................................................................................. 15 Stats Screen......................................................................................................................................... 16 Chapter 06 - Service & Repair............................................................................ 17 Computer Connections, # LS-11-1001 ...................................................................................... 17 3 Lane Splitter Extreme Manual V1.1 Amplifier Model A Connections, #ADR-AMCA-2550I................................................................ 18 Amplifier Model B Connections, # ADR-310-308 ...................................................................... 19 Adrio SM I/O Board Connections, # LS-04-1001 ....................................................................... 20 Troubleshooting ........................................................................................................................ 21 Video Troubleshooting........................................................................................................................ 21 Audio Troubleshooting ....................................................................................................................... 22 Error Message Screens........................................................................................................................ 22 General Troubleshooting .................................................................................................................... 22 Chapter 07 - Parts ............................................................................................. 24 Main Box Parts .......................................................................................................................... 24 Console Parts ............................................................................................................................. 25 Inside Parts ................................................................................................................................ 26 Decals ........................................................................................................................................ 27 HAPP Controls ........................................................................................................................... 28 Wiring Harness .......................................................................................................................... 29 4 Lane Splitter Extreme Manual V1.1 Chapter 01 - Preface Chapter 01 - Preface Please read this page before preparing your Lane Splitter Extreme product for game play. The following safety instructions apply to all game operators and service personnel. Specific warnings and cautions will be included throughout this manual. Use the following safety guidelines to help protect the system from potential damage and to ensure your personal safety: Electronic components in the game cabinet run on 115V AC 60Hz (220V/ 50Hz in most of Europe, the Middle East and the Far East delivered units). To help prevent electric shock, plug the system into a properly grounded power source. These cables are equipped with 3-prong plugs to help ensure proper grounding. Do not use adapter plugs or remove the grounding prong from a cable. If you must use an extension cable, use a 3-wire cable with properly grounded plugs. To help protect your system from sudden increases and decreases in electrical power, use a surge suppressor, line conditioner or Uninterruptible Power Supply (UPS). Be sure nothing rests on the system’s cables and that the cables are not located where they can be stepped on or tripped over. Keep your system far away from radiators and other heat sources. Do not block cooling vents. Precaution for Game Operation Adrenaline Amusements Inc. assumes no liability for injuries incurred while playing our games. Operators should be aware that certain health and physical conditions may make people susceptible to injury when playing video games. 5 Lane Splitter Extreme Manual V1.1 Chapter 01 - Preface Safety To avoid electrical shock, unplug the cabinet before performing installation or service procedures. If a power cord is damaged, it must be replaced by the equivalent power cord available from your distributor. Adrenaline Amusement Inc. assumes no liability for any damages or injuries incurred while setting up or servicing the cabinet. Only qualified service personnel should perform installation or service procedures. Environmental Conditions Cabinet is intended for indoor use only. Be sure to keep the cabinet dry and maintain operating temperatures of 59° - 86° (15° - 30°C). . 6 Lane Splitter Extreme Manual V1.1 Chapter 02 - Game Features Chapter 02 - Game Features Ride your motorcycle at insane speeds through ever changing traffic. Your reflexes will mean the difference between surviving or crashing in a spectacular fashion. Do you have what it takes to reach TOP SPEED? Introducing Jake Melton, Jake has made a lot of mistakes in his life, but missing his wedding won’t be one of them. How to Play Use the handlebars to steer left and right. Stay away from cars, trucks and walls. Push the button to wheelie and gain bonus points. Pick up “Lane Splitter” bonuses by navigating your way in between cars. Pick up awesome items and power-ups by ramming into them. Hang on for dear life! Power Ups Picking up a star will start “Coin Chaos” mode. For a few seconds, tons of coins will appear for your greedy pleasure. (Star) Picking up a magnet will turn you into a literal coin magnet! For a limited time, coins will fly right onto you. (Magnet) Picking up a diamond will multiply your final coin total. Try collecting them as much as you can. (Diamond) 7 Lane Splitter Extreme Manual V1.1 Chapter 03 - Unit Features Chapter 03 - Unit Features Hardware Features 42 Inch monitor Stand-up motorbike steering controls Boost button Ticket dispenser Cabinet Facts Cabinet Dimensions Height = 84’’ / 2.13m Length = 34’’ / 0.865m Depth = 52’’ / 1.321m Shipping Dimensions Length = 38’’ / 0.965m Depth = 56’’ / 1.42m Weight = 390 lbs. / 177 kg Height = 84’’ / 2.13m Voltage Voltage Operating 115V AC 4 AMP 220V AC 2 AMP 8 Lane Splitter Extreme Manual V1.1 Chapter 04 - Unit Installation Chapter 04 - Unit Installation Assembling your Lane Splitter Extreme Unit 1. Carefully remove the Cabinet from the shipping container, giving yourself enough space. 2. Move the cabinet to the desired location. 3. Lane Splitter Extreme cabinets are shipped in 2 parts, slide the top part in. (See fig. 1) Watch out for the top part’s power cord, make sure to insert it in the appropriate hole, on the top-right of the unit, before sliding the top part in. 4. Open the back of the unit and plug in the top part in the appropriate outlet, situated on the left side of the unit. 5. Locate the power cord and insert the power cord into the bottom of the unit to power it from a floor outlet. Fig. 1 9 Lane Splitter Extreme Manual V1.1 Chapter 05 - Admin Menu & Game Setup Chapter 05 - Admin Menu & Game Setup This chapter describes how to use and navigate the Admin Menu to set up your product and adjust all of the game’s parameters. The Admin Menu To access the Admin Menu, use the Admin Button located inside the coin door or plug in a USB keyboard and press the “A” key. This screen will then appear. To navigate the menu, use the handlebars / keyboard arrows to change the active line, highlighted in white. Turning left will move up and turning right will go down. Pressing the boost button / “Enter” key will interact with the active line, looping through the available options. 10 Lane Splitter Extreme Manual V1.1 Chapter 05 - Admin Menu & Game Setup Operator Menu Values What it does Calibrate Handlebars N/A Automatically calibrates the handlebars. Do not touch the handlebars during the calibration process. Test Handlebars N/A Opens the “Test Handlebars” screen witch will automatically close if the handlebars are not moved for a few seconds. Steering Resistance 0 - 10 Adjusts the resistance of the handlebars. “0” will completely remove resistance. Credits per Play 0–9 Adjusts the number of credits required to play. “0” puts the unit in free play mode. Credit Type Coin / Card Changes the credit type between “Coin” and “Card”. This will change the in-game text accordingly. Ticket Redemption Off / Normal / Fixed Changes the ticket redemption mode between “Off”, “Normal” and “Fixed”. Jump to page 14 for more details on redemption options. Choose Difficulty Time 10 – 30 Adjusts the timer for the “Choose your Difficulty” screen, in seconds. Default Difficulty Easy / Medium / Expert Sets the default difficulty when entering the “Chose your Difficulty” screen to “Easy”, “Medium” or “Expert”. Enter Name Time 15 – 60 Adjusts the timer for the “Enter your Name” screen, in seconds. Game Volume 1- 10 Adjusts the in-game audio volume. Attract Loop Volume 1 - 10 Adjusts the audio volume of the attract loop. View Stats N/A Open the stats screen. Reset Stats N/A Clears all the stats screen’s values. Restore Default Settings N/A Restores the unit to default settings. Reset High Scores N/A Resets the high scores. Return to Game N/A Exits the Admin Menu and returns to the game. Exit to Windows N/A Exits the game and returns to the Windows desktop. 11 Lane Splitter Extreme Manual V1.1 Chapter 05 - Admin Menu & Game Setup Calibrate Handlebars Screen This screen shows that the calibration process will begin in five seconds. It’s important to do as instructed and to not touch the handlebars during this process. It’s during this screen that the calibration process will be executed. The handlebars will move during this process so take caution. This screen shows that the calibration process is succesfull. This screen will dissapear after a few seconds. 12 Lane Splitter Extreme Manual V1.1 Chapter 05 - Admin Menu & Game Setup Test Handlebars Screen In this screen, the circle shows the handlebars current orientation. The numbers right under show the handlebars orientation in a numerical way, from -1, left, to 1, right. Ticket Redemption – Off In this mode, no options are available since no tickets are dispensed. 13 Lane Splitter Extreme Manual V1.1 Chapter 05 - Admin Menu & Game Setup Ticket Redemption – Normal Operator Menu Values What it does Points per Ticket 50 – 500 Adjusts how many points are needed per ticket. Example: If “Points per Ticket” is set to 200 and the final score is 1000, 5 tickets will be dispensed. Minimum Tickets 0 – 20 Adjusts the minimum amount of tickets dispensed, regardless of score. Ticket Unit Value 1/2 Adjusts the value of physical tickets. Physical tickets are either worth “1” ticket or “2” tickets. Redemption Unit Name Ticket / Coupon Changes the redemption unit type between “Ticket” and “Coupon”. This will change the ingame text accordingly. Easy Ticket Bonus 0 – 500 Adjusts the ticket bonus when winning the game on “Easy” difficulty. Medium Ticket Bonus 0 – 500 Adjusts the ticket bonus when winning the game on “Medium” difficulty. Expert Ticket Bonus 0 – 500 Adjusts the ticket bonus when winning the game on “Expert” difficulty. Advertise Bonus Yes / No Adjusts whether or not the ticket bonuses are advertised during the attract loop. 14 Lane Splitter Extreme Manual V1.1 Chapter 05 - Admin Menu & Game Setup Ticket Redemption – Fixed Operator Menu Values What it does Fixed Ticket Amount 0 - 50 Adjusts the number of tickets dispensed per play. Ticket Unit Value 1/2 Adjusts the value of physical tickets. Physical tickets are either worth “1” ticket or “2” tickets. Redemption Unit Name Ticket / Coupon Changes the redemption unit type between “Ticket” and “Coupon”. This will change the ingame text accordingly. 15 Lane Splitter Extreme Manual V1.1 Chapter 05 - Admin Menu & Game Setup Stats Screen Operator Menu What it does Bonus Tickets Dispensed Show the total number of bonus tickets dispensed in this difficulty / total. Total Tickets Dispensed Show the total number of tickets dispensed in this difficulty / total. AVG Tickets Dispensed Shows the average number of tickets dispensed, per game, in this difficulty / total. Games Played Shows the number of games played in this difficulty / total. Games Won Shows the number of games won in this difficulty / total. AVG Play Time Shows the average play time, per game, in this difficulty / total. Total Play Time Show the total play time of this difficulty / total. Return to Admin Screen Returns to the Admin Menu. 16 Lane Splitter Extreme Manual V1.1 Chapter 06 – Service & Repair Chapter 06 - Service & Repair Computer Connections, # LS-11-1001 AC Inlet Power Switch Power Button 120V / 240V Selection USB to I/O Board USB Dongle USB Recovery Drive Audio to Amplifier (Green) HDMI to Monitor 17 Lane Splitter Extreme Manual V1.1 Chapter 06 – Service & Repair Amplifier Model A Connections, #ADR-AMCA-2550I Volume Sub Volume RightSpeaker AC Inlet Audio In from Computer Left Speaker Power Switch 120V / 240V Selection 18 Lane Splitter Extreme Manual V1.1 Chapter 06 – Service & Repair Amplifier Model B Connections, # ADR-310-308 Power Switch Treble Bass Right Speaker Volume Left Speaker Audio In from Computer Subwoofer Power Inlet 19 Lane Splitter Extreme Manual V1.1 Chapter 06 – Service & Repair Adrio SM I/O Board Connections, # LS-04-1001 Reset Fuse 4 AMP 250V AC To Ticket Feeder Fuse 2.5 AMP 200V AC To Service Switch To Coin Door Not Used DC Power USB from Computer To Steering Potentiometer 5 AMP 250V AC 24 DC To Steering Motor 20 Lane Splitter Extreme Manual V1.1 Chapter 06 – Service & Repair Troubleshooting Video Troubleshooting Power problem, check the power to the monitor. There are loose or faulty connections between the monitor and the computer. Make sure the HDMI cable is connected properly to both the computer and the LCD monitor (In the rightmost HDMI port). No power to computer. - No picture and no audio Verify the computer is ON. Remove computer bottom cover and press the RED or WHITE power button. Make sure that the power plug is well connected. The Bios settings have changed, If the computer does not power automatically when the unit is powered on, follow these steps: Remove computer bottom cover and plug a USB keyboard in one of the remaining USB ports. Press and hold the “Delete” key on the keyboard and then turn the computer on. Keep holding the “Delete” key until the Bios screen appears. Using the arrows, select the “Advanced” tab. Using the arrows, scroll down to the ACPI Configuration option and press the “Enter” key. Using the arrows, scroll down to the Restore on AC/Power Loss option and press the “Enter” key. Using the arrows, select the Power On option and press the “Enter” key. Press the “F10” key then the “Enter” key to exit the Bios screen. Unplug the keyboard and put the bottom cover back on. 21 Lane Splitter Extreme Manual V1.1 Chapter 06 – Service & Repair Audio Troubleshooting Low volume Increase the volume in the game by pressing the Admin Button and adjusting the volume options in the Admin Menu (See page 11). Increase the volume by using the volume dials on the amplifier, located at the back of the unit (See page 18 / 19). Error Message Screens Dongle not found The USB Dongle can’t be found. Make sure that the USB Dongle is connected to the computer in the right USB port (See page 17 & 26). You will need to restore your hard drive by following these steps. Windows Blue Screen Plug in a keyboard in one of the remaining USB ports. Power up the unit and press “F11” when the first splash screen appears to access the boot menu. Using the arrows on the keyboard select: USB: …, then press “Enter”. The restore process will start; it will take about 20 minutes, when done the computer will restart by itself. General Troubleshooting Unit boots to bios screen Unit is not accepting credits Controls are irresponsive Your Hard Drive may be defective. Make sure that the Hard Drive is plugged in. Your Power Supply 5V / 12V may be defective. Make sure the Power Supply 5V / 12V Amp is plugged in properly to a power source (See page 26). 22 Lane Splitter Extreme Manual V1.1 Chapter 06 – Service & Repair Admin menu is inaccessible Your Power Supply 5V / 12V may not output the correct voltage. Measure the voltage and make sure it stands between 4.9V and 5.2V and adjust if necessary (See page 26). Your I/O Board may be defective. Make sure that the I/O Board is plugged in properly to a power source and the computer. (See page 20) Controls are over-sensitive Handlebars have no force feedback Header light is not working Your Steering Motor may be defective. Make sure that the Steering motor is plugged in properly to the I/O board (See page 20). Your Power Supply 24V 5 Amp may be defective. Make sure the Power Supply 24V 5 Amp is plugged in properly to a power source (See page 26). Your Header Panel may be defective. Make sure that the Header Panel is plugged in properly to the Power Supply 5V / 12V (See page 26). 23 Lane Splitter Extreme Manual V1.1 Chapter 07 - Parts Chapter 07 - Parts Main Box Parts Ref Part Description Part Number 1 Monitor 42’’ RAC-02-0001 2 Speakers ADR-50-9986-00 3 Subwoofer ADR-299-114 4 Subwoofer Grill ADR-260-422 24 Lane Splitter Extreme Manual V1.1 Chapter 07 - Parts Console Parts Ref Part Description Part Number 1 Steering Holder Bracket RAC-01-0020 2 Handlebar Clamp (Bottom) RAC-01-0120 3 Handlebar Clamp (Top) RAC-02-0130 4 Plastic Dash LS-07-1001 5 Handlebar LS-01-0200 6 Grips LS-07-0210 7 Steering Wheel Active Mech (No-Hoop) ADR-50-0102-08NH 8 Booster Button ADR-686 25 Lane Splitter Extreme Manual V1.1 Chapter 07 - Parts Inside Parts Ref Part Description Part Number 1 Amplifier (Model A) ADR-AMCA-2550I 2 Amplifier (Model B) ADR-310-308 3 I/O Board Adrio SM LS-04-1001 4 Computer LS-11-1001 5 USB Dongle – Lane Splitter LS-11-1002 6 USB Recovery Drive LS-11-2010 7 Power Supply 5V / 12V ADR-80-0210-00 8 Power Supply 24V 5 Amp ADR-80-0216-00 26 Lane Splitter Extreme Manual V1.1 Chapter 07 - Parts Decals Ref Part Description Part Number N/A Decal Kit LS-13-2001 1 Main Box Right Side LS-13-1002 2 Main Box Left Side LS-13-1003 3 Main Box Monitor Screen Up LS-13-1004 4 Main Box Monitor Screen Down LS-13-1005 5 Cash Box LS-13-1006 6 Console Right Side LS-13-1007 7 Console Left Side LS-13-1008 8 Console Front LS-13-1009 9 Speedometer LS-13-1010 10 Tickets LS-13-1011 11 Logo Adrenaline Handlebar LS-13-1012 12 Header with Decal LS-07-2002 27 Lane Splitter Extreme Manual V1.1 Chapter 07 - Parts HAPP Controls Ref Part Description Part Number 1 Entropy Triple Door ADR-40-0406-25 2 Entropy 2000 Ticket Dispenser ADR-42-1337-00 3 Meter with Bracket 12V DC 7 Digit ADR-42-0754-07 4 Miniature Switch (Admin Menu) ADR-49-0577-01 28 Lane Splitter Extreme Manual V1.1 Chapter 07 - Parts Wiring Harness Part Description Part Number Ticket Feeder LS-03-4010 Coin Acceptor LS-03-4020 Low Ticket LS-03-4030 Steering Motor Power LS-03-4040 Steering Pot + Buttons LS-03-4050 Power Supply 5V / 12V LS-03-4060 Subwoofer LS-03-4070 Power Supply 24V LS-03-4080 Speakers LS-03-4090 29