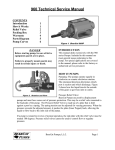
1
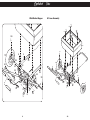
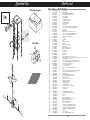
FEATURES &
BENEFITS
120 SERIES
"ACCUWAY'' Spread Pattern Equalizer
ENSURES spreading dead center of the
spreader. (Indicated with "22" in model number)
spread with confidence
Gears are unconditionally guaranteed
ENSURES trouble free operation.
20 SERIES
Spreading Chart
Operation Guide
Dial-A-Matic spread rate control
ENSURES spreading at exact spread
rates.
MODEL 179
For Models:
76-22 96-22
78-22 98-22
Service Manual
Parts List
Optional BORDER PATROL spread pattern
cut-off prevents spreading on drive-ways,
flower beds, etc.
MODEL 88
Extension hoppers available for all round
hopper spreaders. Adds 20 lbs. to
capacity.
Model:
98-22
pictured
Shipped Set-Up. Saves time and labor
ENSURES proper assembly. (except #64)
MODEL 298
Mulch Spreader
Stainless steel frames ensure longer
spreader life, easier maintenance and
present a quality image.
High grade plastic non-corroding wheels
with nylon bearings, no lubrication
required, ENSURES trouble free
maintenance.
MODEL 299
Mulch Spreader
P.O. Box 7
• Urbana, IN
1-800-972-6130
•
46990
P.O. Box 7
140 Mill Street
Urbana, IN
46990 USA
USA
Fax 260-774-3416
© 2004 Spyker Spreaders – Urbana, IN U.S.A.
It’s the spread that counts
05-99-0078
1-800-972-6130
Fax: 260-774-3416
Assembly Instructions
Tow Behind Frame Assembly
For Quick and Easy Assembly - First Read Entire Procedure
Then Follow Carefully The Step by Step Instructions
1.
Tools you will need:
Medium Sized Screwdriver
7/16” & 3/8” wrenches
Hammer
Pliers
Sit spreader
assembly on
hopper as shown.
Parts you will use:
Parts for Models:
76-22 96-22
78-22 98-22
• (3) 1/4 - 20 x 1 1/2" 55 bolt
• (8) 1/4 - 20 55 hex nut
• (3) 1/4 - 20 x 1 3/4" 55 bolt
• (1) 1/4 - 20 x 2 3/4" 55 bolt
• (1) 1/4 - 20 x 1" bolt
• (2) 10 - 24 x 1 1/2" 55 bolt
• (2) 10 - 24 55 lock nut
• (2) handle grips
• (1) agitator wire
• (4) handle/tow bar braces
• (1) cable clamp
• (1) felt washer
• (1) manual
• (1) 1/4 - 20 x 1" 55 bolt
2.
For stainless
steel models
remove nuts and
bolts that attach
front of hopper to
frame as indicated, and then
insert Bump Bar
(3) into frame
assembly. Next,
re-insert bolts and
tighten nuts.
Note: For black frames remove nuts and bolts
that attach front hopper to frame. Push
bump bar into frame (Black bump bars do
not have holes drilled in them). Re-insert
bolts and nuts and tighten against the
bump bar.
1
2
Tow Bar Assembly
3.
4.
Tow Bar Assembly
5.
Attach braces (8)
to frame with bolts
(37) and nuts
(34). Attach
braces to towbar,
and towbar to
frame using 2
bolts (35) and
nuts (34).
6.
Attach Hitch
plates (44) to Tow
Bar assembly
using 2 bolts (35)
and nuts (34).
Insert Clevis Pin
(43) into Hitch
Plates and fasten
with Cotter Pin (42).
Attach On/Off Lever
Control (46) to Tow
Bar assembly using
2 bolts (32) and
nuts (33).
Proceed to page 9 for instructions on connecting cable to
Rate Gate Linkage.
3
4
Walk Behind Frame Assembly
1.
2.
Remove nuts and
bolts that attach
front of hopper to
frame as indicated
and then insert
Bump Bar (3) into
frame assembly.
Next, re-insert bolts
and tighten nuts.
Walk Behind Frame Assembly
3.
4.
Insert T-Handle (6)
into Ground Prop
(5) and fasten with
2 bolts (37) and
nuts (34).
5
Attach T-Handle
assembly to frame
with 1 bolt (31) and
nut (34).
Attach Braces (8)
to frame and THandle assembly.
Use 3 bolts (35)
and nuts (34) to
attach braces to
the frame and to
the round tube of
ground prop. Use
bolt (57) and nut
(34) to attach
braces to the flat
support section of
ground prop.
6
Walk Behind Frame Assembly
Rate Dial Adjustment
New Linkage Adjustment Procedure
1. Set regulator dial to 1.
5.
2. Set lever completely to off
position.
Attach On/Off
Control Lever (13)
to T-Handle
assembly using 2
bolts (32) and
nuts (33).
3. Attach cable clamp (59) to
ground prop with 11/4” bolt
and nut and finger tighten.
4. Route cable through clamp,
then through swivel and then
tighten the cable clamp bolt
just enough to allow the cable
to slide back and forth easily.
5. Adjust sheath on cable so there is a 1/8” inch of control wire that
is visible between the sheath and the edge of the rate gate linkage.
6. Tighten the cable clamp bolt to secure the sheath.
7. Tighten the screw on the cable fastener to anchor the wire, making
sure that the rate gate linkage is pushed up against the dial.
8. Trim excess wire behind cable fastener connector when finished
(if necessary).
Dial Setting Information
The RATE DIAL has 9 numbers with 10 stops
between each number, for accurate control of
the spreading rate.
The dial is set with only a turn. It will automatically lock into the set position. LINE UP THE
DIAL NUMBER WITH THE DIAL INDICATOR.
7
8
View
View
Exploded
Walk Behind Hopper
& Frame Assembly
55
38
35
55
35
35
55
35
55
1
10
48
34
7
32
34
34
34
13
4
8
35
37
38
35
56
31
34
34
37
5
9
8
57
34
34
35
34
4
33
6
30
41
10
48
34
8
34
7
37
32
4
34
34
35
13
4
3
35
56
31
34
34
37
5
10
8
57
34
34
35
34
4
30
41
48
9
Exploded
Pull Behind Hopper
View
& Frame Assembly
55
35
55
Note:
Nylon washers [55] go on
plastic hoppers only
35
35
35
55
55
1
9
30
48
37
33
47
46
35
34
34
32
34
45
34
8
56
3
34
36 35
34
8
35
34
9
34
34
41
4
48
37
33
38
37
30
47
48
42
44
43
46
35
34
34
32
34
45
34
8
56
34
36 35
34
8
35
34
3
11
12
34
34
34
41
4
38
37
48
10
Exploded View
Parts List
Item #
f
Stainless Hopper
11
16
17
14
14
50
15
2
51
18
Gear Box
63
12
12
12
21
40
52
12
12
39
41
39
41
24
20
54
19
24
64
30
22
23
28
53
29
27
25
30
26
38
48
13
Part #
1
2
3
3
4
4
5
5
6
6
7
8
8
9
10
11
12
13
14
15
16
17
18
19
20
21
22
22
23
24
25
26
27
28
29
30
31
32
33
34
35
36
37
38
39
40
41
42
43
44
44
45
45
46
47
48
05-94-0054-0
05-91-1100
05-81-1030
05-97-3030
05-81-1020
05-97-3020
05-94-1120
05-98-3020
05-94-1010
05-98-3010
05-94-0022
05-81-1040
05-97-3040
05-95-0017
05-95-0016
05-71-2205
99-10-0205
05-98-0018-1
05-94-0042
05-94-0068
05-94-0069
SS-94-0006
05-24-1101
SS-94-0012-1
SS-94-0007
SS-96-0003
05-97-0021
05-97-0016
05-94-0035
SS-92-0002
05-94-0034
05-94-0033
05-90-0014
05-90-0012-R
SS-90-0002
99-50-1081
05-90-0017
05-90-0015
05-91-0008
SS-91-0004
05-90-0016
05-93-1065
SS-90-0012
05-90-0029
05-94-0036
05--98-0094
05--98-0095
99-50-1042
SS-90-0006
05-81-1013
05-97-3013
05-81-1110
05-97-3210
05-98-0017-1
05-94-0021
05-94-0028
50
51
52
53
54
55
56
56
57
58
59
60
61
62
63
64
05-94-0045
05-94-0046
05-94-0043
SS-96-0002
05-94-0049
05-94-0064
05-24-1105
05-81-1105
05-90-0047
05-74-2350
05-73-2350
05-78-2350
05-79-2350
05-99-0078
05-90-0044
05-92-0004
Quantity
1
1
1
1
1
1
1
1
1
1
2
4
4
1
1
1
5
1
2
1
1
1
1
1
1
1
1
1
1
2
1
1
1
1
1
2
1
2
2
11
8
1
3
1
2
1
2
1
1
2
2
1
1
1
1
2
1
1
1
1
1
4
1
1
1
1
1
1
1
1
1
1
Description
Price
Hopper/Black
Hopper/Stainless
Hand Hold/Bump Bar/Painted
Hand Hold/Bump Bar/Stainless
Frame/Painted
Frame/Stainless
Ground Prop./Painted
Ground Prop./Stainless
T-Handle/Painted
T-Handle/Stainless
Handle Grip
Brace for Ground Prop./Tow Bar/Painted
Brace for Ground Prop./Tow Bar/Stainless
Idle Wheel
Drive Wheel
Hopper Bottom Plate/Plastic Hopper
1/4 - 20 x 1/2" Bolt/Hopper Bottom Plate
On/Off Control Lever/Walk Behind
Guide for Rate Gate/Diffuser
Rate Gate
Dial Mount
Dial
Rate Gate Linkage
Spinner
Hopper Bottom Bearing
Agitator Wire
Spinner Shaft 70 Series
Spinner Shaft 90 Series
Gear Support
Felt Washer
Pinion Gear
Bevel Gear
Cotter Pin/Bevel Gear 3/16" x 3/4"
Collar 5/8" Bore, 1 1/8" OD, 1/2" wide SS 5/16" - 18 Set Screw
Roll Pin/Spinner 1/8" x 7/8"
Cotter Pin/Pinion/Gear 1/8" x 1"/Idle Wheel
1/4 - 20 x 2 3/4" Bolt/Ground Prop. To Frame
10 - 24 x 1 3/8" Bolt/Levers
10 - 24 Lock Nut/Levers
1/4 -20 Lock Nut
1/4 - 20 x 1 3/4" Bolt/Hopper/Braces
Axle
1/4 - 20 x 1 1/2" Bolt/T-Handle to Ground Prop.
Cotter Pin/Drive Wheel 3/16" x 1 1/2"
Gear Box Cover
Gearbox Retainer Clip SS - Small
Gearbox Retainer Clip SS - Large
Hairpin Cotter #8
Clevis Pin/ 1/2" x 1 27/64"
Hitch Plates/Painted
Hitch Plates/Stainless
Tow Bar/Painted
Tow Bar/Stainless
On/Off Control Lever/Tow Behind
End Cap/Tow Bar
Axle Bushings
Accuway Adjustment Screw
Accuway Adjustment Nut Bracket
Diffuser
Screen
Spinner Cam Extension
Nylon Washer/Plastic Hopper Only
Cable Clamp Tow Behind
Cable Clamp Walk Behind
1/4 - 20 x 1" Bolt
Parts Bag for Push Spreader/Painted
Parts Bag for Pull Spreader/Painted
Parts Bag for Push Spreader/Stainless
Parts Bag for Pull Spreader/Stainless
Manual
Cable Fastener
5/8” Finishing Washer/Stainless
14
Read Before Using
Read Before Using
SPEED - ACCURACY - FREEDOM FROM STRIPES AND STREAKS
are yours - when you use this Spreader.
Rotary Agitator
The spread width ranges from 4 ft. to 12 ft. wide, depending on the
volume/density, particle size of the material and the rate of travel.
Use the rotary agitator only if needed. Free-flowing, lump-free materials will not require the agitator. The rotary agitator is easily installed or
removed. Note the clockwise rotation & sweep. Place felt washer
around spinner shaft before inserting agitator. - See page 14.
The spread thins or feathers at the outer edges, eliminating sharp,
“Edge of spread” lines which cause stripes and streaks. Extra coverage
can be given under trees and other heavy feeding areas without showing “edge of spread” lines.
Gaps and double overlaps are less likely. Small errors in travel are
forgiven and do not show.
WARNING: When spreading products containing herbicides, exercise extreme
caution with respect to careless spreading and to wind-drift.
CONTACT OF SOME PRODUCTS ON SOME PLANTS CAN BE FATAL.
If a dial setting is not found, use the size and weight comparison table
found on the back page.
Determine a dial setting on the low side. If the setting proves to be
too low, cover the area more than one time. A higher setting can be
used when a proven dial setting is established.
REMEMBER - Published dial settings can be approximate only. The
operation of the spreader, the condition of the material (damp or dry
or over-pulverized) and weather conditions, are all contributing factors.
For these reasons, it’s often a good idea to spread the area 2 times at one-half rate - in cross directions (SEE INFORMATION ON ONE-HALF
RATE DIAL SETTINGS ON REFERENCE CHART ON THE BACK PAGE.
SPREADING AT ONE-HALF RATE DIAL SETTINGS IS HIGHLY RECOMMENDED UNDER DAMP & HUMID CONDITIONS.
BECOME FAMILIAR WITH THE OPERATION OF THE SPREADER
BEFORE YOU PUT MATERIAL IN THE HOPPER.
Practice walking with the spreader, opening and closing the rate gate
at the appropriate times.
Travel at a constant speed and operate the spreader lever position.
Remember: Open the rate gate after the spreader is in motion at
operating speed (about 3 mph., or at a brisk walking pace).
Close the rate gate while spreader is still at operational speed.
OIL BEARINGS AND ALL MOVING PARTS
Make certain the spreader is running freely!
Now You are Ready to Put Material in the Hopper
• Make certain the rate gate is in closed position.
• As insurance against spill damage and spill loss, put material in the
hopper with the spreader on a walk, driveway, paper, plastic, etc.
• The spreader will be easier to use if you only half-fill the hopper. Later
on you can fill the hopper if you so choose.
• Or for added capacity, the inverted bag in the hopper can serve as a
capacity extension. Also, an extension hopper, complete with filtering
and pulverizing screen, is available from the manufacturer.
Now You are Ready to Spread
• Spread header strips at the ends of the area
OPPOSITE the direction of spreading. This will
provide a “turn-around” area, an area to realign the spreader for the return spread.
• Example is for 6 ft. wide spread: Make the
first spreading pass at one-half the spread
width from the edge of the spreading area or
in this case approximately 3 feet or one big
step.
Header
3’
6’
6’
• Additional spreading passes will be at the full
spread width or approximately 6 feet apart.
• TAKE A SIGHTING AT THE FAR END. Keep
your eye on the sighting as you spread. You
will not need to wonder where you are or
where you have been. Continue until spreading is completed.
Header
• Left over fertilizer can be spread under trees and other high feeding
areas without showing “edge of spread” lines.
15
16
Read Before Using
NOTE: With the rotary agitator installed, the rate gate closed (not spreading) and with
material in the hopper, the spreader will push harder than normal. (This is because the
agitator is stirring the material and it has no place to go.)
Read Before Using
Accuway - What It Does
RECOMMENDATION: When not spreading and the spreader is being
pushed some distance, tip the spreader so only the idle wheel is on
the ground.
Accuway Spread Pattern Equalizer Balances the spread
pattern - Bulls Eye - Dead to the Center of the Spreader. All
products. All spreading conditions. Skewing is eliminated.
Does not change the spread width.
Cleaning the Spreader is Part of the Spreading Job.
CAUTION: Never, never, never use the Accuway to split the product
flow from the hopper to the spreading spinner.
IMMEDIATELY AFTER USE - CLEAN AND OIL THE SPREADER
• Method #1 - Wipe spreader thoroughly with an oily cloth. Oil all
bearings and bearing areas.
• Method #2 - Wash, rinse, and dry the spreader. Note: Drying
takes time. (Moisture trapped in bearing areas is slow to go.)
Immediately after drying - oil all bearings and moving parts. Make
certain all operations are thorough.
Note: Good “Dry Cleaning” is preferable to poor “Wet Cleaning”.
VARIABLES in product, weather, spreading equipment, spreader
operator, etc., and combinations of variable elements produce
VARIABLES in the spread pattern.
• VARIABLES include product size, weight, shape, surface finish,
hygroscopic or non hygroscopic composition, condition of product
(exposure to humidity, temperature, etc.)
• VARIABLES include spreading rate (light, medium, heavy).
• It is virtually impossible to have rust and corrosion on a clean, dry,
oiled surface.
• VARIABLES include size, shape, design of spreading spinner.
• Again - just before using - oil all bearings and moving parts.
• VARIABLES include product dispensing on spreading spinner.
• In storage, ideally the spreader should be hung by the handle. In
any case, do not pile weight on the spreader, as excess weight over
a period of time can distort the tires.
• VARIABLES include condition of the spreader end the spreading
spinner (product build up on the casting vanes, etc.)
“Accuway” Use Instructions.
• VARIABLES include operator habits, fast or slow walking, tilting
spreader forward or backward or operating spreader in a level
attitude.
BALANCING THE SPREAD - A COMPLICATED PROBLEM WITH A SIMPLE SOLUTION
Accuway - How It Works
HERE’S THE PROBLEM - IT’S THE VARIABLES
It’s the VARIABLES. Each variable has it’s own spread pattern
characteristics.
It’s the VARIABLES. They’re transposed and mirrored in the Spread
pattern.
TRAVEL SPEED, HUMIDITY AND CONDITION OF PRODUCT ARE
MAJOR FACTORS IN BALANCING THE SPREAD
A turn of the spread pattern shifter dial factors the variables.
Shifts the product placement on the spreading spinner.
This in turn balances the spread pattern heavier to right or heavier to
left as required.
Adjustment is very sensitive. (Note the very fine threads on the
Equalizer adjustment stem.)
Viewed from the operators position
To spread heavier left - move the ramp out.
To spread heavier right - move the ramp in.
“To Every Action There Is Always An Opposed and Equal Reaction”
(Newton’s law of motion - Sir Isaac Newton, 1642-1727.)
17
18
Grass Seed Spreading Chart
Read Before Using
The Accuway has two ramps. A front side and a back side ramp.
The front side ramp
2
is used to shift the spread pattern to the right.
The back side ramp
1
is used to shift the spread pattern to the left.
NEVER, NEVER, NEVER USE ACCUWAY FRONT AND REAR RAMPS TO
SPLIT THE PRODUCT FLOW. Use only the front side or the back side.
With proper adjustment you should be able to achieve a balanced
spread pattern.
First - set the spread rate dial 3 .
Now you are ready to balance the spread pattern.
Dial settings are approximate only. Spreading at one half rate in cross directions
is usually recommended.
Manufacturer’s
Bag Rate
Manufacturer
and Product
Lbs. per
Sq. Ft.
1000 Sq. Ft. Coverage
Full Rate
Once over
Half rate
Twice over
Spread
Width
(In feet
based on
brisk walking)
Bent Grass or Red Top
0.5#
1#
2#
1,000
1,000
1,000
1.25
2.0
2.5
4
4
4
Park, Merion, Delta, or Kentucky Bluegrass
0.5#
1#
2#
1,000
1,000
1,000
2.5
3.0
3.5
4
4
4
Hulled Bermuda
2#
3#
4#
1,000
1,000
1,000
2.75
3.0
3.25
Mixtures including coarse seeds
2#
4#
6#
1,000
1,000
1,000
6.0
7.0
7.0
6
6
6
Rye Grasses or Tall Fescue
2#
4#
6#
1,000
1,000
1,000
6.0
7.0
7.75
6
6
6
4 oz.
8 oz.
12 oz.
1,000
1,000
1,000
1.9
2.1
2.5
8
8
8
4#
5#
6#
1,000
1,000
1,000
4.5
4.75
5.0
2
A
Micro-Dial Settings
Dichondra
Pensacola Bahia
Note the relationship of the rate gate opening
to the front side of the ramp.
2.25
2.5
2.75
6
6
6
3.75
4.0
4.25
7
7
7
Granule Size - Dial Setting Guide
1
Dial settings are approximate only.
Product
B
3
Note the relationship of the rate gate opening
to the back side of the ramp.
19
Lbs. per 1000 Sq. Ft.
Full Rate
Half Rate
Fine Pellets
1
2
3
3.6
4.0
4.2
3.1
3.5
3.7
Mixed Fine Pellets
2
4
6
3.7
4.7
5.2
3.2
4.1
4.5
Small Pellets
2
4
6
3
4.2
4.5
2.2
3.7
4
Nitrogen Pellets Med.
1
2
3
3.5
4.2
4.7
3
3.7
4
Med. Pellets & Granules
2
4
6
3.5
4.2
5.2
3
3.8
4.5
Med. Pellets
2
4
6
3.5
4.2
5.2
3
3.8
4.5
Large Heavy Pellets
2
4
6
3.8
4.9
5.9
3.3
4.1
4.9
20
1 YEAR
Broadcast Spreading
LIMITED WARRANTY
Broadcast
spreading is as
old as early man.
In the early days
of agriculture,
field seeding was
accomplished
with hand cast
broadcasting. The
hand cast method
of seeding was a
limited factor in
growing field
crops that were
hand seeded.
Mechanized casting came into
being in 1868
when Samuel
Speicher invented
the Hand Crank
"Cyclone" Seeder.
Paul Speicher put
the hand crank
seeder on wheels
in 1955.
This development
ushered in a new
era in spreading
and spreading
products. New
products and
product forms
adapted to broadcast spreading
were developed.
The seed sower
was a breakthrough in field
seeding. It was
hailed as a major
advancement in
agricultural implements.
In 1988 a new
dimension was
added to broadcast
spreading SPREAD PATTERN
CONTROL - a dead
center spread pattern equalizer.
Spyker's Accuway®
spread pattern
equalizer solves a
complicated problem with a fundamental patented
solution.
Did You Know?
THERE'S MORE TO A SPREADER THAN MEETS THE EYE –––
LOTS MORE
Spreadability - Dial-a-matic regulator ensures exact spread rate.
Accuway® Spread Pattern Equalizer assures exact placement of the
spread pattern - Bull's Eye - dead to the center of the spreader. All
products - All spreading conditions. Skewing is eliminated.
Durability - 70 & 90 Series spreaders will survive use and abuse.
Welded steel construction is double braced, finished in baked on epoxy
enamel. Generous use of highest quality stainless steel. Guaranteed
metal gears.
Reliability - You can count on.
Accuway® spread control system is so innovative, it's patented. Is so
successful it's used on all Spyker 70 & 90 Series spreaders. Is so
simple. A complicated problem is solved with a fundamental solution.
(Newton's law of motion: To every action there is always an opposed
and equal reaction.)
Serviceability - 24 hour replacement parts service available direct
from the factory. 70 & 90 Series spreaders shipped set up except
hand hold/bump bar and push handle or tractor pull bar.
21
This is warranted to the original purchaser only. Spyker will
replace parts with defects in materials or workmanship, for a
period of one year from the date of purchase.
*For Spyker Spreaders LLC, products employing metal gear
systems, pinion and bevel, these metal gears, only, not inclusive
of any other parts or materials, are warranted for the life of
the spreader, not to be used for replacement or repair past
original purchase.
Spyker Spreaders LLC will not be liable for any loss, damage
or expense including, but not limited to, consequential or
incidental damages, arising from the operation, condition or use
of the item. The sole and exclusive remedy against Spyker
Spreaders LLC being the replacement of the defective parts.This
warranty gives you specific legal rights, and you may also have
other rights which vary from state to state.
THIS EXPRESS WARRANTY, WHICH IS APPLICABLE ONLY TO
THE ORIGINAL PURCHASE, IS IN LIEU OF AND EXCLUDES ALL
OTHER WARRANTIES, WHETHER EXPRESSED OR IMPLIED BY
OPERATION OF LAW OR OTHERWISE, INCLUDING ANY
WARRANTY OF MERCHANTABILITY OR FITNESS FOR
PARTICULAR PURPOSE.
SPYKER SPREADERS LLC
P.O. Box 7
• Urbana, IN
46990
USA