1
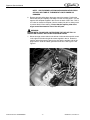
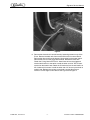
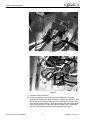
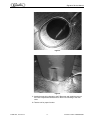
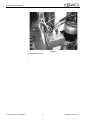
WCC - 700 REMOTE
Service Manual
Release Date: June 30, 2009
Publication Number: 629096990SER
Revision Date: March 18, 2014
Revision: C
Visit the Cornelius web site at www.cornelius.com for all your Literature needs.
The products, technical information, and instructions contained in this manual are subject to change without notice.
These instructions are not intended to cover all details or variations of the equipment, nor to provide for every possible contingency in the installation, operation or maintenance of this equipment. This manual assumes that the person(s) working on the equipment have been trained and are skilled in working with electrical, plumbing, pneumatic,
and mechanical equipment. It is assumed that appropriate safety precautions are taken and that all local safety and
construction requirements are being met, in addition to the information contained in this manual.
This Product is warranted only as provided in Cornelius’ Commercial Warrant applicable to this Product and is subject to all of the restrictions and limitations contained in the Commercial Warranty.
Cornelius will not be responsible for any repair, replacement or other service required by or loss or damage resulting
from any of the following occurrences, including but not limited to, (1) other than normal and proper use and normal
service conditions with respect to the Product, (2) improper voltage, (3) inadequate wiring, (4) abuse, (5) accident,
(6) alteration, (7) misuse, (8) neglect, (9) unauthorized repair or the failure to utilize suitably qualified and trained persons to perform service and/or repair of the Product, (10) improper cleaning, (11) failure to follow installation, operating, cleaning or maintenance instructions, (12) use of “non-authorized” parts (i.e., parts that are not 100%
compatible with the Product) which use voids the entire warranty, (13) Product parts in contact with water or the
product dispensed which are adversely impacted by changes in liquid scale or chemical composition.
Contact Information:
To inquire about current revisions of this and other documentation or for assistance with any Cornelius product contact:
www.cornelius-usa.com
800-238-3600
Trademarks and Copyrights:
This document contains proprietary information and it may not be reproduced in any way without permission from
Cornelius.
This document contains the original instructions for the unit described.
CORNELIUS INC
101 Regency Drive
Glendale Heights, IL
Tel: + 1 800-238-3600
Printed in U.S.A.
TABLE OF CONTENTS
Introduction . . . . . . . . . . . . . . . . . . . . . . . . . . . . . . . . . . . . . . . . . . . . . . . . . . . . . . . . . . . . . . . . . . . . . . 1
Manual Overview . . . . . . . . . . . . . . . . . . . . . . . . . . . . . . . . . . . . . . . . . . . . . . . . . . . . . . . . . . . . . . . . 1
Safety Instructions. . . . . . . . . . . . . . . . . . . . . . . . . . . . . . . . . . . . . . . . . . . . . . . . . . . . . . . . . . . . . . . . . 2
Read and Follow ALL Safety Instructions . . . . . . . . . . . . . . . . . . . . . . . . . . . . . . . . . . . . . . . . . . . . . 2
Safety Overview . . . . . . . . . . . . . . . . . . . . . . . . . . . . . . . . . . . . . . . . . . . . . . . . . . . . . . . . . . . 2
Recognition . . . . . . . . . . . . . . . . . . . . . . . . . . . . . . . . . . . . . . . . . . . . . . . . . . . . . . . . . . . . . . 2
Different Types of Alerts. . . . . . . . . . . . . . . . . . . . . . . . . . . . . . . . . . . . . . . . . . . . . . . . . . . . . . . . 2
Safety Tips . . . . . . . . . . . . . . . . . . . . . . . . . . . . . . . . . . . . . . . . . . . . . . . . . . . . . . . . . . . . . . . . . . . . . 2
Qualified Service Personnel. . . . . . . . . . . . . . . . . . . . . . . . . . . . . . . . . . . . . . . . . . . . . . . . . . . . . . . . 3
Safety Precautions. . . . . . . . . . . . . . . . . . . . . . . . . . . . . . . . . . . . . . . . . . . . . . . . . . . . . . . . . . . . . . . 3
Shipping And Storage . . . . . . . . . . . . . . . . . . . . . . . . . . . . . . . . . . . . . . . . . . . . . . . . . . . . . . . . . . . . 3
Mounting in or on a Counter . . . . . . . . . . . . . . . . . . . . . . . . . . . . . . . . . . . . . . . . . . . . . . . . . . . . . . . 3
Kit Contents . . . . . . . . . . . . . . . . . . . . . . . . . . . . . . . . . . . . . . . . . . . . . . . . . . . . . . . . . . . . . . . . . . . . . . 5
Summary . . . . . . . . . . . . . . . . . . . . . . . . . . . . . . . . . . . . . . . . . . . . . . . . . . . . . . . . . . . . . . . . . . . . . . 5
Bin Stat Mounting. . . . . . . . . . . . . . . . . . . . . . . . . . . . . . . . . . . . . . . . . . . . . . . . . . . . . . . . . . . . . . . . 5
Signature Service Manual
INTRODUCTION
MANUAL OVERVIEW
This new primary bin stat is designed to shutdown the remote icemaker when the
ice in the bin or hopper reaches the bottom of the icemaker base. The electronic
bin stat in the drop tube now acts as a fail safe in case the primary bin stat fails.
© 2009-2014, Cornelius Inc.
-1-
Publication Number: 629096990SER
Signature Service Manual
SAFETY INSTRUCTIONS
READ AND FOLLOW ALL SAFETY INSTRUCTIONS
Safety Overview
•
Read and follow ALL SAFETY INSTRUCTIONS in this manual and any warning/
caution labels on the unit (decals, labels or laminated cards).
•
Read and understand ALL applicable OSHA (Occupational Safety and Health
Administration) safety regulations before operating this unit.
Recognition
Recognize Safety Alerts
!
This is the safety alert symbol. When you see it in this manual or on the unit, be alert
to the potential of personal injury or damage to the unit.
Different Types of Alerts
! DANGER:
Indicates an immediate hazardous situation which, if not avoided, WILL result in
serious injury, death or equipment damage.
! WARNING:
Indicates a potentially hazardous situation which, if not avoided, COULD result in
serious injury, death, or equipment damage.
! CAUTION:
Indicates a potentially hazardous situation which, if not avoided, MAY result in
minor or moderate injury or equipment damage.
SAFETY TIPS
•
Carefully read and follow all safety messages in this manual and safety signs on the
unit.
•
Keep safety signs in good condition and replace missing or damaged items.
•
Learn how to operate the unit and how to use the controls properly.
•
Do not let anyone operate the unit without proper training. This appliance is not
intended for use by very young children or infirm persons without supervision. Young
children should be supervised to ensure that they do not play with the appliance.
•
Keep your unit in proper working condition and do not allow unauthorized
modifications to the unit.
QUALIFIED SERVICE PERSONNEL
Publication Number: 629096990SER
-2-
© 2009-2014, Cornelius Inc.
Signature Service Manual
! WARNING:
Only trained and certified electrical, plumbing and refrigeration technicians should
service this unit. ALL WIRING AND PLUMBING MUST CONFORM TO
NATIONAL AND LOCAL CODES. FAILURE TO COMPLY COULD RESULT IN
SERIOUS INJURY, DEATH OR EQUIPMENT DAMAGE.
SAFETY PRECAUTIONS
This unit has been specifically designed to provide protection against personal
injury. To ensure continued protection, observe the following:
! WARNING:
Disconnect power to the unit before servicing following all lock out/tag out
procedures established by the user. Verify all of the power is off to the unit before
any work is performed.
Failure to disconnect the power could result in serious injury, death or equipment
damage.
! CAUTION:
Always be sure to keep area around the unit clean and free of clutter. Failure to
keep this area clean may result in injury or equipment damage.
SHIPPING AND STORAGE
! CAUTION:
Before shipping, storing, or relocating the unit, the unit must be sanitized and all
sanitizing solution must be drained from the system. A freezing ambient
environment will cause residual sanitizing solution or water remaining inside the
unit to freeze resulting in damage to internal components.
MOUNTING IN OR ON A COUNTER
! WARNING:
When installing the unit in or on a counter top, the counter must be able to support
a weight in excess of 677 lbs. to insure adequate support for the unit.
Failure to comply could result in serious injury, death or
damage to the equipment.
NOTE: Many units incorporate the use of additional equipment such
as icemakers. When any addition equipment is used you must
check with the equipment manufacturer to determine the
additional weight the counter will need to support to ensure a
safe installation.
© 2009-2014, Cornelius Inc.
-3-
Publication Number: 629096990SER
Signature Service Manual
KIT CONTENTS
SUMMARY
The kit contents are listed in Table 1.
Table 1. Loose-Shipped Parts
Sl. No.
Part No.
Description
Qty.
1
630400413
Label Wiring WC700R
1
2
638036067
Swt-Assy Bin Control WCC
1
3
630300433
Lead Wire 5" BK
1
4
630300431
Lead Wire 9" BK
1
5
638007026-03
Screw Mach. 08-32 PAPH
2
6
638007972-02
Screw 10X1/2 TYPE B HHWF
1
7
620047469
Template Drill WCC700 Remote E-Box
1
8
629096990SER
Installation Instructions
1
! WARNING:
Only trained and certified electrical, plumbing and refrigeration technicians should
service this unit.
ALL WIRING AND PLUMBING MUST CONFORM TO NATIONAL AND LOCAL
CODES. FAILURE TO COMPLY COULD RESULT IN SERIOUS INJURY,
DEATH OR EQUIPMENT DAMAGE.
BIN STAT MOUNTING
! WARNING:
Disconnect power to the unit before servicing. Follow all lock out/tag out
procedures established by the user. Verify all power is off to the unit before
performing any work.
Failure to comply could result in serious injury, death or
damage to the equipment.
1. Remove the top, front and left side panels.
2. Unplug the three connections on top of the E-Box and remove the E-Box
cover.
3. Remove the two remaining screws holding the E-box in place.
4. Disconnect the red and blue wires from the auger control thermostat.
5. Flip the E-Box over, exposing screws holding down the auger control
thermostat.
© 2009-2014, Cornelius Inc.
-5-
Publication Number: 629096990SER
Signature Service Manual
NOTE: USE EXTREME CAUTION WHEN MANIPULATING E-BOX
SO CAPILARY TUBE OF THERMOSTAT IS NOT KINKED OR
DAMAGED.
6. Remove screws holding down the auger control thermostat. Position the
thermostat body and capillary tube away from the mounting holes. Cut and
tape the drill template supplied in the kit over the back of the E-box. Drill 3/
16” holes as marked on template. Use the smaller pilot drill or center punch
to prevent the drill from walking. Ensure that the capillary tube of the
auger control thermostat is clear of the drill path.
! WARNING:
ENSURE METAL FILINGS ARE CAPTURED SO THEY DO NOT FALL IN
HOPPER OR CONTACT ANY OTHER FOOD ZONE AREAS.
7. Mount the auger control switch in the left set of holes and the new bin control
in the right set of holes using 8-32 screws supplied in the kit. Route the
capillary tube of the new bin stat into the slot with the capillary tube of the
auger control. Slide the rubber grommet into the slot. See Figure 1 and
Figure 2.
Figure 1.
Publication Number: 629096990SER
-6-
© 2009-2014, Cornelius Inc.
Signature Service Manual
Figure 2.
8. Remove the electronic bin control board by loosening screws on top of the
E-box. Remove the black wire from terminal X2 on the bin control board.
Remove the other end from the bottom right terminal on the power switch.
Remove the wire from the piggy back terminal. Discard the loose wire.
Obtain the 9” long black wire from kit. Install loose wire to the piggyback
terminal and back on to the switch. Install the other end of 9” wire to lower
terminal on the new bin stat. Obtain the 5” black wire from kit and install it on
X2 of electronic bin control. Install the other end of 5” wire to top terminal on
new bin stat. Replace the red wire on terminal 2 and the blue wire on
terminal 1 on the auger control switch. See Figure 3 and Figure 4.
© 2009-2014, Cornelius Inc.
-7-
Publication Number: 629096990SER
Signature Service Manual
Figure 3.
Figure 4.
9. Install E-box back onto base.
10. Loosen the dispense tray clamp on top of the evaporator. Lift up the
dispense tray and drop it to allow clearance to install the bin stat loop. Slide
the tail of the bin stat loop through the hole in the base and secure it with a
sheet metal screw from the kit. Route the cap tube away from sharp edges.
Ensure the grommet is in place to protect the capillary tube. Replace the
drop tube and the dispense tray. Tighten the clamp. See Figure 5.
Publication Number: 629096990SER
-8-
© 2009-2014, Cornelius Inc.
Signature Service Manual
Figure 5.
Figure 6.
11. Attach the new wiring diagram to the E-Box cover and install the cover on
the E-box. Replace the connections on the E-box according to the color
code.
12. Test the unit for proper function.
© 2009-2014, Cornelius Inc.
-9-
Publication Number: 629096990SER
Signature Service Manual
Figure 7.
13. Replace the panels.
Publication Number: 629096990SER
- 10 -
© 2009-2014, Cornelius Inc.
Cornelius Inc.
www.cornelius.com


![Installation/Service Manual [ 000995 ]](http://vs1.manualzilla.com/store/data/006030040_1-6e05d98358e67eccf6d1d26ecb5fcb81-150x150.png)