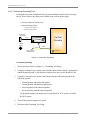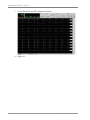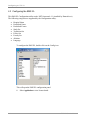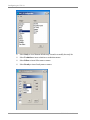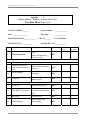
1
Conformity according to the Council Directive 93/42/EEC concerning Medical Devices Manufacturer Name: Mennen Medical Ltd. 4 Ha-Yarden Street, Yavne, 81228 P.O. Box 102, Rehovot, 76100, Israel Tel.: +972-8-9323333 Fax: +972-8-9328510 European Representative: Charter-Kontron Limited Unit 18, Avant Business Centre 12 Denbigh Road Milton Keynes, MK1 1DT England Tel: (44) 01908 646070 Fax: (44) 01908 646030 Publication No.FBE-965-001 REV.A Revision: Jan 2007 Copyright © Mennen Medical Ltd. 2003. All RIGHTS RESERVED. Trademarks are the Proprietary of their respective holders. Important Notice This document is delivered subject to the following conditions and restrictions: The EMS XL Service Manual contains proprietary information of Mennen Medical Ltd. This information is supplied solely for the purpose of assisting authorized technicians of Mennen Medical Ltd. products. The instructions presented in this manual should in no way supersede established medical protocol concerning patient care. No part of the contents hereof may be used for any other purposes, disclosed to any person or firm, or reproduced by any means, without the express prior written permission of Mennen Medical Ltd. The text and drawings herein are for the purposes of illustration and reference only. The specifications on which they are based are subject to change without notice. Trademarks EMS XL is a registered trademark of Mennen Medical Ltd. Other company and brand, product and service names are for identification purposes only and may be trademarks or registered trademarks of their respective holders. Data is subject to change without notice. Responsibility of Manufacturer Mennen Medical, Ltd. considers itself responsible for the effects on safety, reliability, and performance of the equipment only if: Maintenance and repairs are carried out only by personnel authorized by Mennen Medical. Electrical installation of the room in which the system is installed complies with all aspects of the relevant internationally recognized electrical safety standards, as well as specific hospital requirements. The equipment is used in accordance with instructions for use. Contents Chapter 1 Introduction .......................................................... 1-1 1.1 Scope .............................................................................................................................1-1 1.2 Overview .......................................................................................................................1-1 1.3 Functional Description ..................................................................................................1-2 1.3.1 1.3.2 1.3.3 1.3.4 1.3.5 PC......................................................................................................................1-4 Two Local LCD Displays .................................................................................1-4 Amplifier/stimulator .........................................................................................1-5 AC Power Unit..................................................................................................1-5 Laser Printer......................................................................................................1-5 1.3.6 Patient Connection box 20 differential channels .............................................1-5 1.3.7 Video Splitter ....................................................................................................1-5 1.3.8 Modem ..............................................................................................................1-5 1.4 System Specifications....................................................................................................1-6 1.4.1 1.4.2 1.4.3 1.4.4 1.4.5 1.4.6 1.4.7 1.4.8 Mechanical and Environmental Specifications.................................................1-6 Amplifier/Stimulator.........................................................................................1-7 Vital Signs.........................................................................................................1-7 Central Computer – PC.....................................................................................1-9 Patient Connection Box ..................................................................................1-10 Video Line Splitter..........................................................................................1-11 Modem ............................................................................................................1-11 Display screen monitors..................................................................................1-12 Chapter 2 System Description .............................................. 2-1 2.1 Introduction ...................................................................................................................2-1 2.2 Cart Description.............................................................................................................2-1 2.2.1 2.2.2 2.2.3 2.2.4 2.2.5 2.2.6 2.2.7 Cart Description................................................................................................2-1 EMS XL Computer Description .......................................................................2-1 Local LCD Displays .........................................................................................2-3 Video Line Driver .............................................................................................2-3 AC Power Unit..................................................................................................2-5 Modem ..............................................................................................................2-5 Analog board.....................................................................................................2-6 EMS XL Service Manual i Contents 2.2.8 Front End Processor Board .............................................................................. 2-6 2.2.9 Stimulator Board .............................................................................................. 2-6 2.3 Expansion Amplifier Block Diagram Description....................................................... 2-7 2.3.1 Analog board .................................................................................................... 2-7 2.3.2 Front End Processor Board .............................................................................. 2-7 Chapter 3 System Installation ...............................................3-1 3.1 Overview....................................................................................................................... 3-1 3.2 Site Preparation............................................................................................................. 3-3 3.2.1 Environmental Requirements ........................................................................... 3-3 3.2.2 Power Requirements......................................................................................... 3-4 3.2.3 Grounding Requirements ................................................................................. 3-4 3.3 Unpacking ..................................................................................................................... 3-4 3.4 Placing and Preparing the Cables for consol ................................................................ 3-5 3.4.1 Placing the and Preparing Remote Display Cables (optional) ......................... 3-6 3.5 Installing the Remote Display (optional)...................................................................... 3-6 3.6 EMS-XL V1.35 - Installation from scratch. ................................................................. 3-6 3.7 Pre-operation procedures .............................................................................................. 3-7 3.7.1 System Check ................................................................................................... 3-7 3.7.2 Performing Grounding Test.............................................................................. 3-8 3.7.3 Connecting the Central Console to Hospital Power and Ground..................... 3-9 Chapter 4 Operation..............................................................4-1 4.1 Introduction................................................................................................................... 4-1 4.2 Initializing the EMS XL System................................................................................... 4-1 4.3 Configuring the EMS XL.............................................................................................. 4-4 4.3.1 User Interface Basic Test ................................................................................. 4-7 4.3.2 Software Version Validation ............................................................................ 4-7 4.4 Prepare Report formats ................................................................................................. 4-8 4.4.1 General ............................................................................................................ 4-8 4.5 Ablation Interface – V1.35 ......................................................................................... 4-10 4.6 Multi - Language support............................................................................................ 4-10 4.7 EMS XL Archive utility.............................................................................................. 4-15 4.8 Shutting Down the EMS XL System .......................................................................... 4-16 ii EMS XL Service Manual Contents Chapter 5 Maintenance & Troubleshooting .......................... 5-1 5.1 Overview .......................................................................................................................5-1 5.2 Preventive Maintenance ................................................................................................5-1 5.2.1 Periodic Visual Inspection ................................................................................5-1 5.2.2 Periodic Cleaning Directives ............................................................................5-2 5.2.3 Periodic Functional Tests..................................................................................5-2 5.3 Troubleshooting.............................................................................................................5-2 5.3.1 Power Problems ................................................................................................5-2 5.3.2 Computer Problems ..........................................................................................5-3 5.3.3 Amplifier and Accessory Problems ..................................................................5-3 5.4 Parts Replacement .........................................................................................................5-5 5.4.1 Introduction.......................................................................................................5-5 Chapter 6 6.1 Combo Option ...................................................... 6-8 Combined Horizon SE & EMS-XL, configuration .......................................................6-8 6.1.1 Control Room....................................................................................................6-8 6.1.2 Interconnection Cables .....................................................................................6-8 6.1.3 Procedure Room................................................................................................6-8 6.2 Combine EP SE Installation Instruction........................................................................6-9 6.2.1 Installation sequence.........................................................................................6-9 6.2.2 Cable connections .............................................................................................6-9 6.3 Starting the system ......................................................................................................6-10 Chapter 7 Software Loading ............................................... 7-11 7.1 7.2 General installation......................................................................................................7-11 Install applications from install directory:...................................................................7-11 Appendix 1 – Final Test Procedure ....................................... 7-12 1. 2. 3. 4. 5. 6. Introduction .................................................................................................................7-14 Affectivity....................................................................................................................7-14 Test Equipment Required: ...........................................................................................7-14 Software Loading ........................................................................................................7-14 Functional Testing of the EMS-XL.............................................................................7-14 Invasive Blood pressure calibrating ............................................................................7-15 EMS XL Service Manual iii List of Figures List of Figures Figure 1-1: EMS XL – General View...................................................................................... 1-2 Figure 1-2: EMS XL System – Block Diagram.........................Error! Bookmark not defined. Figure 2-2: Cart........................................................................................................................ 2-1 Figure 2-3: PC Front and Back Panels..................................................................................... 2-2 Figure 2-4: Front Panel of the Video Line Driver ................................................................... 2-3 Figure 2-5: Video Line Driver Back Panel .............................................................................. 2-4 Figure 2-6: Amplifier – Front and rear panels ......................................................................... 2-6 Figure 2-7: Amplifier – Front and rear panels ......................................................................... 2-7 Figure 3-1: EMS XL Interconnections Diagram ..................................................................... 3-2 Figure 3-2. Grounding Test Setup ........................................................................................... 3-8 Figure 4-1. EMS Real Time (RT) Screen ................................................................................ 4-3 Figure 4-2. EMS Non Real Time (NRT) Screen ..................................................................... 4-3 iv EMS XL Service Manual CHAPTER 1 INTRODUCTION 1.1 Scope This Service Manual provides information and procedures for maintaining, troubleshooting, and returning to service of the EMS XL Electrophysiology Measurement System, known in short as the EMS XL. 1.2 Overview The EMS XL is a computerized Electrophysiology Measurement System that monitors, measures, stores and reports surface and intra-cardiac electrocardiograms signals. The acquisition of patient signals and physical patient interfacing is done only through the amplifier/stimulator box. The EMS XL is intended for use in a hospital or clinic under the direct supervision of a physician and nurse. Specific locations for the EMS XL monitor are Cardiac Catheterization Lab Units. The following are examples of intended clinical applications: Adult catheterization Pediatric and Neonatal catheterizations EMS XL Service Manual 1-1 Functional Description Figure 1-1: EMS XL – General View 1.3 Functional Description The main parts of the EMS XL system are a mobile central console/pedestal and the following devices: 1. 2. 3. 4. 5. 6. Central Computer (PC) Acquisition module (amplifier and stimulator) Printer Two display screens Surface ECG cable and interconnecting cables Patient connection boxes See the block diagram in Figure 2 below: 1-2 EMS XL Service Manual Chapter 1 Introduction EMS-XL, 965-100-040, 64ch BLOCK DIAGRAM 935-823-X20 935-823-X20 20" LCD Display 20" LCD Display Keyboard Ac in Video in AMP. BOX 965-103-015 5+6 Atrum 9 pin BUS Surface ECG 9 pin ibp1-in ibp2-in 5+6 Atrum AMP. BOX 965-103-025 Intracardiac Signal 9 pin 9 pin 9 pin Dualhead Video Card 146-040-330 G450 Com-1 9 pin 9 pin Ventricle 15pin 9 pin N.C. 965-304-000 PC-AUX-1 965-303-000 PC-DI-1 965-304-000 PC-AUX-2 965-303-000 PC-DI-2 965-305-000 PC-COMM. BUS Main Computer 965-104-020 965-205-010 EMS PC INTERFACE 25 pin 9 pin 965-205-020 EMS PC INTERFACE 25 pin 9 pin Parallel Com-2 Ventricle Surface ECG Ac in 15pin 965-305-000 PC-COMM. ibp1-in ibp2-in Video in Ac in N.C. USB USB N.C. N.C. 25 pin HASP RJ45 N.C. 965-200-081 15pin M.B Video out N.C. Intracardiac Signal Ac out To TFT Display Laser Printer 146-030-xxx Ac out To TFT Display Accessory 551306-810, 10lead ECG cable 551-306-011, Single BP cable 965-302-000, Patient Connection cable 965-030-020, Patient Conn. Box*5 Ac in Power Unit CART - 965-060-115/230 Console-965-160-122 Ac in AC Hospital Ground EMS XL Service Manual 1-3 Functional Description The central console consists of a mobile cart that houses the following devices: Central Computer - PC Two local 20” LCD displays Basic Amplifier/stimulator (For 32 channel version) Expansion Amplifier (For 64 channel version) AC Power Unit. Laser printer. Patient Connection box Video Board Modem Standard keyboard and mouse 1.3.1 PC The PC is used to display, store and measure the incoming signals from the amplifier. The PC supplies the power to the amplifier via a special Mennen interface board which also controls the stimulator in the amplifier box. The main processor of the PC is Pentium 4 or higher . The PC has a standard ISA Bus connector. The PC runs the EMS XL on a Windows XP operating system. The PC has an interface board with two output connectors: • one 9-pin connector “pc-aux” for communication with the EMS amplifier via a 9-pin flat cable, and • one 25-pin connector “pc-di” for communication with the EMS amplifier via a 9-pin flat cable An special dual head video board is located on the BUS for the support of two displays. 1.3.2 Two Local LCD Displays The local display consists of two 20”” TFT LCD color computer displays that support a resolution of 1600 x 1200 pixels. One monitor displays real-time multi-lead surface ECG and intracardiac signals, and the second monitor, called Non real time display, is used for system controls, interval measurements, and data entry. Additional one or two slave monitors can be used for procedure room 1-4 EMS XL Service Manual Chapter 1 Introduction 1.3.3 Amplifier/stimulator The amplifier “box” acquires and digitizes the patient signals and sends them to the PC for display and storage. The amplifier is also responsible for activation of the signals, gain, filters, calibration, etc. In fact, the amplifier works as an independent unit. The stimulator creates electrical impulses that can enter the desired areas of the heart via the electrodes of the catheter. 1.3.4 AC Power Unit The AC Power Unit consists a transformer that supplies isolated 110/220 Vac power to all devices in the central console, and to the two display screens. 1.3.5 Laser Printer The laser printer model is a Hewlett Packard Laser Jet 3005. The printer is subject to change according to the available model in the market and performance requirements. The laser printer enables printing of catheterization procedures, catheterization reports, and textual/graphical summaries of all patient data. 1.3.6 Patient Connection box 20 differential channels 1.3.7 Video Splitter (Option) The video splitter (line driver), model , KRAMER VP-103or compatible, is used to drive one of the output video to a remote display. The distance of the remote display can be up to 30 meters. 1.3.8 Modem The modem is a standard (or compatible) internal modem that enables remote communications with Mennen Medical for technical support and software upgrade. EMS XL Service Manual 1-5 System Specifications 1.4 System Specifications 1.4.1 Mechanical and Environmental Specifications Cart Dimensions: Height: 143 cm (56.2”) Width: 85 cm (33.4”) Depth: 60 cm (23.6”) Table Dimensions: Height: 122 cm (48”) Width: 88 cm (34.6”) Depth: 80 cm (31.4”) Dimensions of PC chassis (desk top): Height: 19 cm (7.48”) Width: 38 cm (14.96”) Depth: 45 cm (17.71”) Power Requirements: 108-130 VAC, 60 Hz; or 180-250 VAC, 50 Hz. Total Power Consumption: 2000 Watts (pick load) Patient Connection Box 20 differential inputs Detailed Power Consumption: PC: 250 Watts Laser Printer: 800 Watts 20” TFT LCD display: 100 Watts per screen Modem, and Video line driver: 15 Watts Environmental: Temperature Range: 5oC to 40oC (41oF to 104oF) Humidity: 10% to 95%, non-condensing HVAC load: 6000 BTU/Hr. max (total system) 1-6 EMS XL Service Manual Chapter 1 Introduction 1.4.2 Amplifier/Stimulator Stimulator Built-in Channels (all channels provided with RF Filter) Total Intra-cardiac ECG Surface ECG 2 channels 32 channel or 64 optional 18 , 50 optional 12 Additional Channels Blood Pressure 2 High Pass Unipolar/Bipolar 0.05, 0.2, 40, 80 Hz High Pass Bipolar 40 Hz or 80 Hz Low Pass 500 Hz Notch 50/60 Hz Filters Acquisition Conversion/sec Gain: 1:1; 1:2; 1:4; 1:8; 2:1 0.1 to 25.5 in respect to 1mV/cm Extra Stimuli (S1, S2...) S1 to S5 Increment/ decrement Manual or automatic Pulse range 0.3 - 25 mA, 40V Pulse width 0.1 - 9.9 msec 1.4.3 Vital Signs ECG Number of leads Twelve Analog Frequency Response: 0.05 to 100 Hz, -3 dB. Input Impedance: Typical 20 MΩ (minimum greater than 5 MΩ) differential, DC to 10 Hz; 2.5 MΩ differential 10 Hz to 100 Hz. Greater than 3 MΩ differential at 10 Hz. Common Mode Rejection: At least 120 dB at 50/60 Hz (80 dB grounded) with 5 KΩ in-balance. Input Dynamic Range: ± 5 mV, p-p, offset by up to +/- 600 mVdc. EMS XL Service Manual 1-7 System Specifications electrode differential. Gain: Manual selection of 0 to 255, where 10 = 1mV/cm Noise: Less than 40µV p-p referenced to input. Defibrillator Protection: Up to 5 KV. Amplifier recovery time (Defibrillator pulse) – less than 3 seconds. Heart Rate Range: 20 to 255 bpm. Accuracy: RR intervals in mSec resolution QRS Detection 0.25 to 5.0 mV, 70-120 msec width. ICECG – Intra-Cardiac ECG Number of channels In 32 channel Version – 18 ICECG channels In 64 channel Version – 50 ICECG channels Sampling rate 1000 sampling per second Analog Frequency Response: 0.05 to 500 Hz Input Impedance: Typical 20 MΩ (minimum greater than 5 MΩ) differential, DC to 10 Hz; 2.5 MΩ differential 10 Hz to 100 Hz. Greater than 3 MΩ differential at 10 Hz. Common Mode Rejection: At least 120 dB at 50/60 Hz (80 dB grounded) with 5 KΩ in-balance. Input Dynamic Range: ± 5 mV, p-p, offset by up to +/- 600 mVdc. electrode differential. Gain: Manual selection of 0 to 255, where 10 = 1mV/cm 1-8 EMS XL Service Manual Chapter 1 Introduction Noise: Less than 40µV p-p referenced to input. Defibrillator Protection: Up to 5 KV. Amplifier recovery time (Defibrillator pulse) – less than 3 seconds. Blood Pressure Channels Two Input Sensitivity: 5 µV/mmHg. Transducer Excitation: 10 Vdc (+5 to -5V). Ranges: -10 to +250 mmHg. Zero Accuracy: ± 1 mmHg. Transducer Load Impedance: 300 – 600 Ω. Linearity: Better than 1% of full scale. Common Mode Rejection: 80 dB minimum (reference to chassis 50/60Hz). Frequency Response: DC to 12 Hz (DC to 40 Hz optional). 1.4.4 Central Computer – PC Enclosure: Desktop-style system enclosure, or mini-tower Power supply: 250 Watts CPU: IP-4GV122 Socket 478 PC133 CPU Card with LVDS; Flat Panel/CRT SVGA, Fast Ethernet AC97 3D Audio, ATA/133IDE and DOC Interface, Pentium 4 2.4GHz 512MB with 4 Eisa slots Hard drive: 40 (or higher) gigabyte, 7,200 RPM with ATA133 interface Diskette drive: 1.44 MB manual eject Optical drive: Built-in DVD-R/W drive EMS XL Service Manual 1-9 System Specifications Audio: On board, 3D Audio PCI connectors: 33-MHz, 32-bit peripheral component interconnect (PCI) Two long PCI connectors accept both long and short PCI cards Video cards: PCI SLOT Matrox G450 DualHead DDR+Adapter from DVI Serial ports: One serial port on the chassis back panel One serial port on the riser card (requires one PCI slot to access the connector) Parallel port One parallel port Ethernet: On-board 10/100MB/sec Firewire Two IEEE 1394 ports USB ports Four USB ports, (two are required for keyboard and mouse) Modem PCI modem to support via Pc-anywhere Multi-serials For system with 64 channels serial no’3 Hasp One key for each system Keyboard: Standard, with Mennen Medical dedicated keys in color Mouse: Standard Design and specifications are subject to change without notice. 1.4.5 Patient Connection Box Number of channels Number of connection boxes 1-10 20 differential 2 for 32 channel version 5 for 64 channel version EMS XL Service Manual Chapter 1 Introduction 1.4.6 Video Line Splitter Input: Signal: Analog RGB HV, RGBS, RGsB, RsGsBs. Connectors: (1) HD-15 Female Video Impedance: 75Ω Video Level: 0.3 – 1.2 Vpp Sync Level: Analog / TTL (-0.3 Vpp) Sync Polarity: +/- Output: Signal: Analog RGBHV, RGBS, RGsB, RsGsBs Connectors: (12) BNC Female (1) HD-15 Female Video Impedance: 75Ω Video Level: Analog / TTL (-0.3 Vpp) Sync impedance: 22Ω Sync Polarity: Analog 0.77 Vpp Bandwidth: 350 MHz Physical Specifications Dimensions: Height: 24.5 cm (9.6”) Width: 18.6 cm (7”) Depth: 4.5 cm (1.8”) Enclosure: Aluminum, texture finish Weight: 0.1.1 Kg (2.4 lbs.) Power input: 12 Volt DC power supply Power consumption: 12 Watts 1.4.7 Modem Standard internal PCI Modem EMS XL Service Manual 1-11 System Specifications 1.4.8 Display screen monitors Characteristic Two 2O” Display screens (NEC or compatible) Resolution: Horizontal: Vertical: Max. 1600 dots Max. 1200 lines Design and specifications are subject to change without notice. 1-12 EMS XL Service Manual CHAPTER 2 SYSTEM DESCRIPTION 2.1 Introduction This chapter describes the following topics: Cart description. Amplifier principle of operation. 2.2 Cart Description 2.2.1 Cart Description The cart houses the central console devices, which are safely secured inside the internal locked cabinet. The cart includes four wheels that provide easy mobility. The cart contains openings for ventilation. Figure 2-1: Cart 2.2.2 EMS XL Computer Description The computer contains one hard drive of (at least) 40GB. The hard drive contains the EMS Software, Windows XP , Nero software and the PC-Anyware program. EMS XL Service Manual 2-1 Cart Description The System components are housed in a desktop-style enclosure or in a mini tower. System electronics are contained on a single plug-in printed circuit board (motherboard). The motherboard contains the CPU, memory modules, system control application-specific integrated circuits (ASIC), and I/O ASICs. The motherboard plugs into a riser board that provides the system power and integrated drive electronics (IDE) hard drive data interface. The figure below shows the PC system front and back panels. COM1 N.C HASP&Printer N.C N.C N.C Video -Main Video -W.F Modem N.C COM-2 PC-AUX2 PCI-2 PC-AUX1 PCI-1 Figure 2-2: PC Front and Back Panels 2-2 EMS XL Service Manual Chapter 2 System Description Graphic card Matox G450 Dual head 2.2.3 Local LCD Displays The local displays are 20” TFT LCD color computer display that supports resolution 1600 x 1200 pixels. For more information, refer to manufacturer documentation according to the model installed in your EMS XL system. 2.2.4 Video Line Driver The video line driver, KRAMER VP-103, provides a simple solution for converting a computer video signal to a selected analog format for interfacing with incompatible display devices. There are a wide variety of computers, video cards, data monitors, and large screen displays. When a computer image is displayed on large monitors or projectors, the computer is not always compatible with these devices. The VP-103 helps resolve this incompatibility. The VP-103 amplifies a computer video signal and converts the sync portion to a selected format. It does not change the scan rate or resolution of the video signal. Figure 2-3 illustrates the front panel of the video line driver. Figure 2-3: Front Panel of the Video Line Driver 1. 2. VP – 103 Front Panel Features Feature Function Power switch Illuminated Switch supplies power to the unit S+G/GREEN Select either Sync+Green or Green at the GREEN BNC pushbutton connector. (Sync + Green = pressed EMS XL Service Manual 2-3 Cart Description 3. H+V/H pushbutton 4. BNC OUT EQ. knob BNC OUT Level knob Termination switch 5. 6. Selects horizontal & vertical sync (when pressed) or horizontal sync only (when released) at the H/HV SYNC connector Controls cable equalization of the BNC video outputs. Controls video level of the BNC video outputs. When released, allows for looping. When pressed in, looping cannot be used. Figure 2-4: Video Line Driver Back Panel 7. 8. 9-11 12 13 14. VP – 103 Rear Panel Features Feature Function VGA/XGA LOOP Provides VGA/XGA looping capability to increase the HD15F connector number of outputs. VGA/XGA input The VGA/XGA input connector. HD15F connector RED, GREEN and Two sets of amplified and buffered RED, GREEN & BLUE BNC BLUE signal outputs connectors CS/Hs SYNC BNC Amplified and buffered horizontal sync (when Hs/Cs connector pushbutton is pressed) or Composite sync (only when Hs/Cs pushbutton is released) Vs SYNC BNC Amplified and buffered vertical sync output connector DC Power supply A DC connector allows power (12VDC) to be supplied connector to the unit. For a more information, see “XGA Line Amplifier & Converter, model VP-103 User Manual” . 2-4 EMS XL Service Manual Chapter 2 System Description 2.2.5 AC Power Unit The AC power unit consists on an isolation transformer, inrush current limiter, and AC female connectors. Two options are available according to the voltage regulations in your country: A 220V model and an 110V model. Laser Printer The laser printer model is HP 3005 or higher, that allows fast printing in a resolution of 1200DPI. For more information, refer to HP documentation. 2.2.6 Modem The modem is a standard internal 56K modem. Basic Amplifier/Stimulator Block Diagram Description The Amplifier consists of the following sub-assemblies: Analog board Digital board Stimulator board EMS XL Service Manual 2-5 Cart Description REAR WARNIN POWER DOWN BEFORE CHANGING PC - DI PC - COM BUS AUXILIARY CARDIAC AMPLIFIER AND STIMULATOR MODEL: CASU S/N PC POWER CONSUMPTION: 12V 1A , 5V 100 Figure 2-5: Amplifier – Front and rear panels . 2.2.7 Analog board The analog board…………….. 2.2.8 Front End Processor Board The digital board… 2.2.9 Stimulator Board The stimulator board……. 2-6 EMS XL Service Manual Chapter 2 System Description 2.3 Expansion Amplifier Block Diagram Description The Amplifier consists of the following sub-assemblies: Analog board Digital board REAR WARNIN POWER DOWN BEFORE CHANGING PC - DI PC - COM BUS AUXILIARY CARDIAC AMPLIFIER AND STIMULATOR MODEL: CASU S/N PC POWER CONSUMPTION: 12V 1A , 5V 100 Figure 2-6: Amplifier – Front and rear panels . 2.3.1 Analog board The analog board…………….. 2.3.2 Front End Processor Board The digital board… EMS XL Service Manual 2-7 CHAPTER 3 SYSTEM INSTALLATION 3.1 Overview Two installation options are available for the EMS XL: Install the central console inside the physician’s room, close to the amplifier. Therefore, a remote display is not necessarily required. This type of installation is simple and rapid, since you do not need to route long cables between the amplifier and the central console. Install the central console in a control room and the amplifier in the physician’s room. This type of installation requires you to route cables from the control room to the physician’s room, between the amplifier and the central console. In addition, a remote display is required including its cable connections to the central console. The system installation consists on the following main stages: Site preparation. This includes verifying that the site complies with the environmental requirements, power requirements, and grounding requirements. Unpacking. This includes verifying the content of the packages according to the packaging list. Placing and preparing cables. This includes placement and preparation of cables that their length depends on the distance of the amplifier and the optional remote display from the central console. Installing the amplifier. This includes mounting the amplifier and connecting its cables. Installing the central console. This includes mounting the EMS XL computer, keyboard, mouse, local LCD displays, laser printer, and their cable connections. Installing the remote display (optional). This includes mounting the display and connecting its cables in the physician’s room. A remote display is required if the central console is located outside the physician’s room. Settings before first time operation. This includes checking cable connections and grounding test. EMS XL Service Manual 3-1 Overview below illustrates the interconnections between the EMS XL devices and shows the cables (in red or bold print) that you must place on site according to the location of the amplifier and the optional remote display, while installing the system and prepare the connectors. Figure 3-1 also presents the devices that are packaged separately (gray) and are part of the central console. These devices include the computer and laser printer, which you mount and connect inside the central console; and the local LCD displays, mouse, and keyboard, which you mount and connect on the central console. EMS-XL, 965-100-030, 32ch BLOCK DIAGRAM 935-823-X20 935-823-X20 20" LCD Display 20" LCD Display Keyboard Ac in Video in Atrum AMP. BOX 965-103-015 5+6 9 pin BUS Surface ECG Intracardiac Signal 9 pin 9 pin Ventricle 9 pin 15pin 9 pin Dualhead Video Card 146-040-330 G450 Com-1 N.C. 965-304-000 PC-AUX-1 Ac in 15pin 965-305-000 PC-COMM. ibp1-in ibp2-in Video in Main Computer 965-104-010 965-205-010 EMS PC INTERFACE 25 pin 965-303-000 PC-DI-1 Parallel USB Com-2 Ac in N.C. N.C. USB N.C. 25 pin HASP RJ45 N.C. 965-200-081 Ac out To TFT Display Laser Printer 146-030-xxx Ac out To TFT Display Accessory 551306-810, 10lead ECG cable 551-306-011, Single BP cable 965-302-000, Patient Connection cable 965-030-020, Patient Conn. Box*2 15pin M.B Video out N.C. Ac in Power Unit CART - 965-060-115/230 Console-965-160-122 Ac in AC Hospital Ground 3-2 EMS XL Service Manual Chapter 3 System Installation Site Preparation To prepare the site, consult with the Hospital Biomedical Engineer and Facilities Engineer and verify that the physician’s room and the control room comply with the following requirements: Environmental Requirements. Power Requirements. Grounding Requirements. 3.1.1 Environmental Requirements The environmental requirements are: Clean air atmosphere. No direct sunlight. Antistatic floor. Operating Temperature Range: 10oC to 32oC (50oF to 90oF). Temp Rate of Change: 3.6o F/hr (2o C/hr). Humidity: 30% to 95%, non-condensing. Humidity Rate of Change 2% hr. The system Heat Ventilation Air Conditioning (HVAC) thermal load is up to 6000 BTU/Hr. Consider this additional heat and confirm with the Hospital Plant Engineering Department (or the Biochemical Engineering Department) that the HVAC System can manage the additional heat without exceeding the operating temperature range. Space required for the standard size cart: 143x85x60 cm (H, W, D). Space required for the table: 122x88x80 cm (H, W, D). Verify passage width of at least 85 cm or 88 cm accordingly. Space for cable ducts running from the central console to the Amplifires and optional remote display. EMS XL Service Manual 3-3 Unpacking 3.1.2 Power Requirements The power line must meet the following requirements: One of the following voltage requirements, according to the EMS XL model: • 115 Vac ±10%, 60 Hz ±1% single phase, 25A, 3 prong dual outlet (2 wire plus ground), NEMA #5-20R Hospital Grade. Current con - or – • 220 Vac ±10%, 50 Hz ±1% single phase, 15A, 3 prong dual outlet (2 wire plus ground), NEMA #5-20R Hospital Grade. A maximum deviation of ±10% of nominal voltage for 0.1 seconds occurring no more than once every 10 seconds. A maximum of 300 V spike with a rise time of 0.1 ms or slower, lasting no more that 10 ms for the total duration. A maximum harmonic content of 5% RMS, with no more than 3% RMS for any single harmonic. It is recommended to connect the EMS-XL system to a power line that is connected to emergency AC power system. Normal changeover to emergency power will not affect EMS XL–C operation. To check the AC power disturbance, measure the AC power for at least 24 hours using a power line analyzer. 3.1.3 Grounding Requirements A proper grounding is essential for any patient monitoring system to establish a safe electrical environment for patients and hospital personnel. Before installing the EMS XL, make sure that the room, where the central console is placed, contains the Hospital ground connection. This ground must NOT service locations other than the monitoring area, such as other floors or equipment with high power loads. 3.2 Unpacking Before unpacking the EMS XL packages, verify that the received packages comply with the manufacturer's delivery documents and all packages are undamaged. Unpack the packages and make sure that all the parts, listed in the packaging list, exist and are undamaged. Notify Mennen Medical regarding any damage or missing parts. Lists the packages content of a basic EMS XL system. The actual list may vary according to the Hospital order. Table 3-1: System Packaging List 3-4 EMS XL Service Manual Chapter 3 System Installation Part Number Description Remarks 965-100-030 965-100-031 965-100-035 965-100-036 965-100-040 965-100-040 965-100-045 965-100-046 EMS-XL, 32 Ch. Mobile System (230V) EMS-XL, 32 Ch. Console System (230V) 965-104-010 Computer for EMS XL – 32 channel 965-104-020 Computer for EMS XL – 64 channel 965-103-015 Amplifier/Stimulator - 32 channel 965-103-025 Amplifier/Stimulator - 64 channel 965-030-020 Patient connection box 965-302-000 Patient connection cable 935-829-520 Two 20” Flat LCD Display screens 935-823-X20 20” Remote display (option) 146-030-XXX Printer, laser jet B&W, 230V 960-202-121 Video line driver 960-211-032 Internal modem 960-ISO-230 Transformer 230 Volt 960-ISO-115 Transformer 115 Volt 965-060-230 Cart for EMS-XL EMS-XL. 32 Ch. Mobile System (115V) EMS-XL, 32 Ch. Console System (115V) EMS-XL, 64 Ch. Mobile System (230V) EMS-XL, 64 Ch. Console System (230V) EMS-XL, 64 Ch. Mobile System (115V) EMS-XL, 64 Ch. Console System (115V) double 3.3 Placing and Preparing the Cables for consol Table 3-2 lists the contents of the Installation Kit package, which includes the cables, connectors and attaching parts required for placing and preparing the following cables: . Table 3-2. Installation Kit Parts List Part Number Description Purpose QTY. / Length 965-303-000 PC D1 cable 1 (2 for 64 channel option) 75 ft. EMS XL Service Manual 3-5 Installing the Remote Display (optional) Part Number Description Purpose QTY. / Length 965-304-000 PC AUX 1 (2 for 64 channel option) 75 ft. 965-305-000 COM 1 (2 for 64 channel option) 75 ft. 105-020-075 Power Cable 1 75 ft. (for remote display option) 551-306-219 12 lead ECG cable 1 40" 960-327-090 Remote display cables Video 15 pin to 5 BNC 1 (optional) 90 ft. 3.3.1 Placing the and Preparing Remote Display Cables (optional) The remote display cables include the video (5 BNC to 15 pin video). The AC-power cable arrives without connectors, allowing you to determine the cables length according to the distance between the remote monitor and the central console. (The remote monitor placement is usually near the X-ray equipment.) 3.4 Installing the Remote Display (optional) The optional remote display can be mounted using different styles of wall and ceiling mounts according to the hospital requirements. You can separately order wall and ceiling mounts from Mennen Medical with instructions for proper attachment. 3.5 EMS-XL V1.35 - Installation from scratch. General installation 1. 2. 3. 4. 5. Install standard Windows XP professional Install Matrox G400/G450 drivers Windows Display properties >> Settings – Set 2 Display to 1600 X 1200 Windows Display properties >> Settings >>Advanced 120 DPI Windows Display properties >> Appearance >>Windows And buttons - Windows classic type 6. Windows Display properties >> Appearance >> Font size - Large 7. Windows Display properties >> Screen saver – None 8. Windows Display properties >> Screen saver >> power >> power schemes – Always On – All items Never 3-6 EMS XL Service Manual Chapter 3 System Installation 9. Windows Control panel >> Regional and language Options >> Customize >> Date >> Short date format – dd-MMM-yyyy 10. Install MS Word 2003 11. Install Nero package (tested with V6.6.0.18 ultra edition – upgrade from web) 12. Install printer Install applications from install directory: 13. Install HASP – Open HASP.zip file and click hdd32.exe. 14. Install HASP – Open HASP.zip file and click hdd32.exe. 15. Install .NET Fraimwork V1.1 - click dotnetfx.exe 16. Install EMS-XL - Open Setup EMS_XL_Install_xxx.zip and click Setup.exe. 17. Install Configuration utility - Open EMS_XL_Config_xxx.zip and click Setup.exe 18. Install Archive utility – Open EMS_XL_Archive_Install_xxx.zip and click Setup.exe 19. Install Lang Editor utility - Open SetUpLAngEditor.zip and click Setup.exe 3.6 Pre-operation procedures Perform the following procedures at the completion of system installation, before operating the EMS XL for the first time: System check. Performing grounding test. Connecting the central console to hospital power outlet and ground. 3.6.1 System Check To check the system before first time operation: 1. Visually check that all devices are properly installed in the system. 2. Visually check that the ground wires are properly connected and secured. 3. Visually check that all cables are properly connected and secured. 4. Turn On the power switch of each device of the system except for the main AC switch on the cart side. These switches must always remain in ON position. EMS XL Service Manual 3-7 Pre-operation procedures 3.6.2 Performing Grounding Test Perform this test at the completion of the system installation and also after servicing the AC Power Unit or any other power related items, such as power plugs. • Maximum resistance: 100mΩ (0.1Ω) • Maximum leakage current: • 100µA (for 110V system), or • 500µA (for 220V system) Hospital AC Power Outlet Central Console Leakage Tester Power Hospital Ground Ground Power Disconnect from Hospital Ground Ground Stud Figure 3-1. Grounding Test Setup To test the grounding: 1. Set the system as shown in Figure 3-1. Grounding Test Setup. 2. Using the Leakage Tester, measure the resistance between the console’s ground stud and the hospital ground. Verify that the resistance does not exceed 100 mΩ (0.1Ω). 3. Using the Leakage Tester, measure the leakage current to the main ground in the following options: • • • • Normal polarity with connected ground. Normal polarity with disconnected ground. Reverse polarity with connected ground. Reverse polarity with disconnected ground. Verify that the leakage current does not exceed 100µA for 110V system, or 500µA for 220V system. 3-8 4. Turn off the console main power switch. 5. Disconnect the Grounding Test Setup. EMS XL Service Manual Chapter 3 System Installation 3.6.3 Connecting the Central Console to Hospital Power and Ground To connect the central console to hospital power: 1. Connect a power connector to the power cable according to the hospital requirements. 2. Plug the power connector the hospital main power outlet. 3. Reconnect the grounding cable of the central console to the Hospital mains grounding connection. EMS XL Service Manual 3-9 CHAPTER 4 OPERATION 4.1 Introduction This chapter provides instructions for returning to service after servicing the EMS XL system. For complete operating instructions, please refer to the EMS XL User’s Guide. The operation instructions include the following: Initializing the EMS XL system. Performing setup and acceptance tests. In addition to the operating instructions in this chapter, a shutdown procedure is provided, which must be followed carefully before performing any service or maintenance procedures. 4.2 Initializing the EMS XL System The EMS XL System contains a main switch on the right side of the central console that activates the Power Unit. The Power Unit provides the power for all the devices in the central console, and the optional remote display. Before turning on the main power switch, turn on and verify that the power switch of each of the EMS XL devices is ON. These include the workstation, HASP, local display, laser printer, and the optional remote display if installed. To initialize the EMS XL System: 1. Turn on the system main switch. The main switch green light turns on.. 2. Double click on the User icon. EMS XL Service Manual 4-1 Initializing the EMS XL System 4-2 3. Verify that the RT and NRT displays are shown. 4. Figure 4-1: EMS XL Service Manual Chapter 4 Operation Figure 4-1. EMS Real Time (RT) Screen Figure 4-2. EMS Non Real Time (NRT) Screen EMS XL Service Manual 4-3 Configuring the EMS XL 4.3 Configuring the EMS XL This EMS-XL Configuration utility needs .NET framework 1.1 (installed by Dotnetfx.exe) The following categories are supported by the Configuration utility: • • • • • • • • • Hospital Name Predefined Notes Predefined Events Study list Technician list Fellow list Faculty list Ablation Language To configure the EMS XL, double click on the Config icon. This will open the EMS XL configuration panel. 4-4 Select Application to view license details EMS XL Service Manual Chapter 4 Operation Select Hospital to insert the Hospital name. Select Notes to view Mennen default notes and/or to modify the notes list Select Events to view Mennen default event list and/or to modify the event list EMS XL Service Manual 4-5 Configuring the EMS XL 4-6 Select Study to view Mennen default study list and/or to modify the study list Select Technician to insert technician or technicians names Select Fellow to insert fellow name or names Select Faculty to insert faculty name or names EMS XL Service Manual Chapter 4 Operation Select Ablation to set the ablation device you wish to interface. The ablation device supported to date (Nov 2006) are Irvin IBI 1500T, Stockert, Maestro 3000 Select Languish to select the languish Select Channels to select either the 32 or 64 channels options Select the Panic Button to select between Override and Burst 4.3.1 User Interface Basic Test The EMS XL user interface includes a keyboard and a mouse. To test the user interface: 1. Select the icons on the RT – Real time display and check that they are functional. 2. Select the icons on the NRT – None Real time display and check that they are functional 3. Check that the printer is printing from both the RT and NRT record icons. 4.3.2 Software Version Validation Validate that the software versions by opening the Help panel EMS XL Service Manual 4-7 Prepare Report formats 4.4 Prepare Report formats 4.4.1 General The EMS-XL supports up to 5 Word report forms The report form has to be created using an offline procedure. In the Word Document each data element has to receive a unique name. Use Bookmark to cause the EMS-XL data to enter to the Report Word document 4.4.2 Create a report template The templates of the reports will be prepare in the computer and will be stored as *.rtpl.rtf files. The file names can be set by the user or by Mennen. Use the Word bookmark tool to insert data and events from the EP procedure into the report. 1. Open an empty word file named: *.rtpl.rtf 2. Use Insert >> Bookmark>> and insert one bookmark after the other from the list in the Export data elements table. (paragraph 4.4.3) 3. Or copy and modify an existing report file. Use Copy and paste to get the file shape you wish. Use Tools >> Options >> View to show or not show bookmarks 4-8 EMS XL Service Manual Chapter 4 Operation 4.4.3 Export data elements - Bookmark Bookmark Name DEMOG IRx CLx BEATSx SNRTx CSNRTx SRCLx AHx HVx QRSx QTx NOTES EVENTS STIMS STIMS_EVENTS BEGIN Description 2 lines of standard demographic data SNRT result - Intrinsic Rate SNRT result – Pacing CL SNRT result – Actual beats SNRT result – SNRT value (** exceeds normal range) SNRT result – corrected SNRT value. (** exceeds normal range) SR CL interval A-H interval H-V interval QRS interval QT interval All notes with time stamp All Events sorted by chronological order. All Stimulations details sorted by chronological order. All Stimulations + Events sorted by chronological order. Start position of cursor when Report open. Range x is 1 to 10 x is 1 to 10 x is 1 to 10 x is 1 to 10 x is 1 to 10 x is 1 to 5 x is 1 to 5 x is 1 to 5 x is 1 to 5 x is 1 to 5 4.4.4 Repot templates in EMS-XL Pressing the Report button on the Commands dialog will popup a menu with the following options: Open old report Build template1 Build template2 Build template3 Build template4 Build template5 Close Where template1, template2 … are the actual names of the templates stored in the EP/Data files directory.(template order is alphabetic) EMS XL Service Manual 4-9 Ablation Interface – V1.35 4.5 Ablation Interface – V1.35 1. In this version the following Ablation Generation is supported by the EMS-XL software. IBI_1500T, STOCKRET, Maestro 3000. 2. Special serial communication input, is required, for communication with this device. For 64 EMS-XL channels we need a new serial communication hardware (COM3 or COM4). For EMS-XL 32 channels we can use COM2 3. In the EP_ABLATION Registry Entry we should define the type of ablation (ABLATION_TYPE) and serial communication port (ABLATION_COM=2 or 3 or 4). This operation done by config utility. Related files: AblTest.exe – Simulator application for IBI1500T ablation Generator. This simulator application should be executed from other computer. The serial communication output of the simulator application is fixed to COM2. (The input serial communication of EMS-XL defined in the Registry entry). The cable type for this communication is 3 wire connections (Tx, Rx, ground) 4.6 Multi - Language support 1. It is possible to translate the EMS-XL to other languages, output and input. 2. Since the application is non-Unicode. The application can support simultaneous only two languages: English & target language. 3. Data that is created by none English language, EMS-XL system cannot be viewed properly on a system configured to another language. 4. Windows XP OS can be configured to support other language in additional to English. 4.6.1 The following operation should be performed before translation 5. Changing the input language can be done by the standard windows keys - ALT-Shift. 6. Windows XP OS Setup: 6.1 From the Control Panel open the regional and language options. 6.2 Regional option tab: 6.3 Standards and formats – Select target language (short date should be DD/MM/YYYY) 6.4 Location – Select your location 4-10 EMS XL Service Manual Chapter 4 Operation 7.Advanced Tab: Language for none Unicode programs – Select target language 8. Restart the computer. 9. After restart Languages Tab: Text services and Input language Details button – Set the default input language. Install Services – confirm that two languages are displayed - English and target language. 4.6.2 Dictionary file: 1. The main translation effort is to translate about 400 Text strings, that appear in the EMS-XL application. Each Text have is own special key. Each key can be translated to the target language. Note that these keys are fixed and predefined. 2. Key that will not be translated will be displayed by EMS-XL in the English Version. 3. Since the original space for each Text is prepared for English, the translation is also limited to this, original, space. Each translation string should be verified manually to fit to this space. 4. In order to make the translation easier, each translation key is related to a specific section or dialog in the EMS-XL application. 5. Text strings that are common for several dialogs will be located in a common section called GENERAL This section contains commonly used texts like OK, Close … 6. Each language translation should be stored in different dictionary file XXXX.dic. This file should be located in EP Data directory. This file format is ANSI and not Unicode. 7. The target Dictionary file name should be configured in Registry Entry "EP_LANG" 8. It is possible to insert a new line character by "\n" (two characters "\" and "n") 9. It is possible to insert tab character by "\t" (two characters "\" and "t") 10. A special utility generated to create/edit this file is called LangEditor (see description below). 11. The EMS_XL application loads the dictionary file during startup. So any change in dictionary file will become effective on the next EMS_XL application startup. 4.6.3 LangEditor utility V1.0 1. 2. New offline utility was inserted to allow editing the translation dictionary files (xxx.dic). This utility needs .NET framework 1.1 (installed by Dotnetfx.exe) SetupLangEditor.zip file contains installation for this utility. 3. The user should open the dictionary file before starting the translation. This operation can be done from file menu by New or Open .. Option. EMS XL Service Manual 4-11 Multi - Language support 4. Title bar will display the current opened file name (New file will be displayed as Unknown until Save/Save as operation). "*" besides a file name indicates modified data. 5. It is possible to display specific section or all sections by selecting the section from the combo box. 6. It is possible to sort the displayed list by specific column. This operation can be performed by clicking the specific column header. 7. Clicking the column header once more will toggle between ascending and descending sort. (Status bar displayes the sorting column and sort order) 8. Inserting/Editing text done only in the translation column. This operation can be done by selecting specific row by mouse (or keyboard) and pressing F2 (or another mouse click). 9. Clicking the right mouse button on a selected row will popup menu that allows renaming, Paste, Clear, Copy the English Text. 10. It is possible to find a text in the displayed list by find next button (or F3). Search startes from the selected item to the End of displayed list. Search operation is done within a specific column. 11. During translation, don't forget to save the file every several minutes. This operation can be done from the file menu or by CTRL-S key. 12. F1 will display the current version of this utility 4-12 EMS XL Service Manual Chapter 4 Operation 4.6.4 Related files: EMS_XL.lang – This file contains All language keys that are supported by EMS_XL. We need this file for LangEditor utility. This file should be located in EP Data directory. Dotnetfx.exe – Install .NET Framework 1.1 for LangEditor utility. SetupLangEditor.zip – Install LangEditor (Execute Setup.exe will insert LangEditor Entry into Windows startup Menu) 4.6.5 Special Stimulation Files - Translate: In the EMS-XL application we have 8 predefined stimulation files that related to special procedure. Default.prg - Stimulation loaded during startup Cont A 600.prg – F9 Cont V 600.prg – CTRL F9 Basic A.prg – F10 Basic V.prg – CTRL-F10 SNRT.prg – Loaded during SNRT Procedure Burst A.prg – Loaded during atrial Burst Procedure Burst V.prg – Loaded during Ventricular Burst Procedure EMS XL Service Manual 4-13 Multi - Language support If we don't want to see these English file names in stimulation file list, it is possible to rename these files (located in EP Data directory) to the translated language. In additional we should change this file names in the STIM_FILES section. SFN_DEFAULT=Default.prg SFN_CONT_A=Cont A 600.prg SFN_CONT_V=Cont V 600.prg SFN_BASIC_A=Basic A.prg SFN_BASIC_V=Basic V.prg SFN_SNRT=SNRT.prg SFN_BURST_A=Burst A.prg SFN_BURST_V=Burst V.prg It is also needed to translate the F keys for these functions in HELP_DLG section 4.6.6. Default Configuration Files: Special Default configuration files loaded during startup. If we don't want to see Default Entry in configuration file list, we can translate all Default Configuration file names. (Default.cfg, Default.xfg, Default.64cfg, Default.64xfg) In Additional we should change this file name in the STIM_FILES section. CFN_DEFAULT=Default 4.6.7 Special Event Name: It is possible to modify the special Event titles during special event. The following keys defined in MARK_EVENT_DLG Section. EVENT_CAT=EVENT TACHY_CAT=Tachy SNRT_CAT=SNRT START_ABLATION_CAT=Start Ablation END_ABLATION_CAT=End Ablation 4.6.8 Registry Entry: The Following Items defined in the Registry can be translated: • • • 4-14 Hospital Name Predefined Notes Predefined Events EMS XL Service Manual Chapter 4 Operation • • • • Study list Technician list Fellow list Faculty list 4.6.9 Word Template files: Template File rtpl.rtf can be translated to the target language. Template File rtpl.rtf can be renamed to target language. 4.6.10 Printer: The standard reports printed in PCL format, we need a printer that support this format in specific language (HP 3005 or equivalent have several PCL language support) 4.6.11 Known items that not translated: • Icons • Text inside stimulation Area • Ablation units results, inside BP Area. • Special caliper labels - SR CL, A-H, H-V, QRS, QT • MS Dialogs (Save Snapshot, Font Dialog in Text mode) • Word application • Windows XP. 4.7 EMS XL Archive utility The main features that are supported by this utility are: • • • • • • Store Patient data on CD-R/DVD-R media. Erase CD-RW and DVD-RW media. Compress patient data to reduce disk space. Archive patient data on a network disk. Search for old case and restore it. Mark online case as already archived. EMS XL Service Manual 4-15 Shutting Down the EMS XL System 4.7.1 Configuration • It is possible to configure the target archive devices that will be supported by this utility. • It is possible to configure up to 2 archive devices as target archive. DVD drives and disk location. (one of them or both) • DVD drives is only for burn purpose (not Nero INCD4 disc format). This Drive is the default selection. • Disk location can be selected by "Edit" button. • "Apply" button will save the current configuration for next time. • It is recommended to define a special network drive for disk archive target. This operation can be done once from Windows XP OS- Windows Explorer>>Tools >> Map Network drive. 4.7.2 Special remarks • User should leave enough disk space for CD/DVD, temporary, data storage in the local disk (before burn) . • The CD/DVD burn operations are using the "NeroCom" V1.6.0.0 SDK. • According to Nero documents: "NeroCom will only work with a fully installed Nero version!". • The Nero package works fine with the Nero OEM version 6.0 (after free upgrade from Nero web site) • There is no need to install the InCD4 Nero package. 4.8 Shutting Down the EMS XL System The EMS XL system must be shutdown using the following procedure: 4-16 Use the File icon to reach the Exit key Click on Exit Use Start key to Turn Off the Computer EMS XL Service Manual CHAPTER 5 MAINTENANCE & TROUBLESHOOTING 5.1 Overview This chapter provides the following information: Preventive Maintenance. Preventive maintenance includes procedures include periodic visual inspection, cleaning directives, and tests, that assure extended operational periods with full performance of the EMS XL System. Troubleshooting. Unplanned maintenance that includes troubleshooting procedures for isolating faulty units or modules. Parts Replacement. Disassembly/assembly procedures to be performed in case a faulty part is detected. A faulty part must be replaced with a serviceable part that is approved by Mennen Medical or by the original manufacturer. 5.2 Preventive Maintenance Perform the following preventive maintenance procedures periodically once a year: Visual Inspection. Cleaning Directives. Functional Tests. Grounding Test. During performing any maintenance activities, observe all safety warnings and cautions as described in the EMS XL User’s Manual. 5.2.1 Periodic Visual Inspection Once a year, visually inspect the system main components, back panel connectors, and cables. Check for loose connectors, cables, screws, and fasteners. EMS XL Service Manual 5-1 Troubleshooting 5.2.2 Periodic Cleaning Directives Once a year, clean the exterior surfaces, front panels, and back panels of the system, from dust and loose dirt. For detailed instructions, see Chapter 4 – Care and Maintenance in the EMS XL User’s Guide. 5.2.3 Periodic Functional Tests Once a year perform functional tests as described in Appendix 1 – Final Test Procedure. 5.3 Troubleshooting This section provides guidelines for performing corrective actions to isolate malfunctioning parts, when a problem (symptom) occurs. These symptoms may occur during normal operation or when performing acceptance tests. The symptoms are divided according to the relevant part that may be malfunctioning, as follows: Power problems. Computer problems. Amplifier and accessories problems. Follow the guidelines carefully, and if the problem persists, contact Mennen Medical using the Appendix 2 - Service Call Form, provided at the end of this manual. 5.3.1 Power Problems Table 5-1. Troubleshooting Power Problems Symptom Possible Cause Corrective Action The system does not turn on. No power from the Perform the following in the suggested order: hospital outlet. System main switch malfunction. Power disconnections. AC Power Unit malfunction. 5-2 Check the power of the hospital outlet. Check the power indicator on the main switch. If Off, check the input and output power on the main switch. Replace the switch if required. Check power connections. Repair if required. Check the output voltage from the AC Power Unit. If no voltage presents, check the Inrush Current Limiter, replace if required. Else replace the AC Power Unit. EMS XL Service Manual Chapter 5 Maintenance & Troubleshooting 5.3.2 Computer Problems Table 5-2. Troubleshooting Computer Problems Symptom Possible Cause Corrective Action No display on the local screen. Local display Perform the following in the suggested order: disconnection. Local display malfunction. Motherboard Check the display connections. Check the display. Replace if necessary. Replace the computer malfunction. No display on the remote screen. Remote display disconnection. Video line driver malfunction. Perform the following in the suggested order: Check the connections to the remote display.. Check the display. Replace if necessary. Remote display malfunction. 5.3.3 Amplifier and Accessory Problems It is assumed that the amplifier is connected according to the installation instructions, prior to turning on the system. Table 5-3. Troubleshooting Amplifier and Accessory Problems Symptom Possible Cause Corrective Action No waveforms appear although the local display is functional. Amplifier Perform the following in the suggested order: BP measurement does not appear. IBP transducer or cable adaptor malfunction. disconnected Workstation malfunction. EMS XL Service Manual Check the Amplifier connections. Repair as necessary. Replace the Computer Perform the following in the suggested order: Replace the IBP transducer and/or its cable adaptor 5-3 Troubleshooting Symptom Possible Cause Corrective Action One or more of the surface ECG traces does not appear One of the Perform the following in the suggested order: electrodes is not properly attached or malfunctions. Replace the electrode according to the ECG leads that are missing. If the problem persists, replace the ECG cable adaptor. All of the ECG traces do not appear (5/12 leads). Surface ECG Cable ECG waveforms not clean (noisy). The notch filter fault Cable between amplifier and computer disconnected of wrongly connected . (50/60Hz) is not properly set. Grounding disconnection 5-4 Perform the following in the suggested order: Replace the surface ECG cable. Check the cables between the basic amplifier and the computer. Perform the following in the suggested order: Set the Notch filter to ON Check all the ground connections. Repair as necessary EMS XL Service Manual Chapter 5 Maintenance & Troubleshooting 5.4 Parts Replacement 5.4.1 Introduction This section provides disassembly/assembly procedures that refer to the replaceable parts of the EMS XL System. Perform these procedures in case of a faulty part (unit, board, cable, connector, etc.) must be replaced. Warning! Only an authorized and qualified technician is allowed to perform disassembly/assembly of any part in the system. The technician must hold an authorization certificate issued by Mennen Medical. A basic replacement procedure consists on the following main steps: Before disassembling a suspected faulty part, turn OFF the main power switch, and disconnect the main power plug from the hospital power outlet. Make sure that all connecting cables are serviceable and the connectors are clean and have straight pins Verify that a serviceable, replacement part is available in stock. See section 5.4.1.1. Replaceable Parts List. Disassemble the faulty part as described later in this chapter. Assemble the replacement part in reverse order of disassembling. EMS XL Service Manual 5-5 Parts Replacement At the completion of part replacement, to verify that the replacement module functions properly, perform the relevant functional test as described in section 0. Figure 4-2. EMS Non Real Time (NRT) Screen Configuring the EMS XL . Warning! Before starting any disassembling and assembling procedure, turn OFF the main AC power, and then disconnect the main AC power plug from the hospital power outlet. 5.4.1.1 Replaceable Parts List The following tables provide a list of replaceable parts for the EMS XL Computer Table 5-4. EMS XL– Replaceable Parts List 5-6 Mennen P/N Description 965-104-010 Computer for EMS XL – 32 channel 965-104-020 Computer for EMS XL – 64 channel EMS XL Service Manual 0 Mennen P/N Description 965-103-015 Amplifier/Stimulator - 32 channel 965-103-025 Amplifier/Stimulator - 64 channel 965-030-020 Patient connection box 965-302-000 Patient connection cable 935-823-X20 20” Flat LCD Display screens 146-030-168 Printer, laser jet B&W, 230V 960-202-121 Video line driver 960-211-032 Internal modem 960-ISO-230 Transformer 230 Volt 960-ISO-115 Transformer 115 Volt EMS XL Service Manual 5-7 Combined Horizon SE & EMS-XL, configuration CHAPTER 6 COMBO OPTION 6.1 Combined Horizon SE & EMS-XL, configuration 6.1.1 • • • • • • • • • Control Room Console with two computers Printer Keyboard Mouse 2 Flat screens, 20”, High resolution 1200 x 1600 Switch for devices (Keyboard, Mouse, 2 screens) between the two computers Connection to slave monitor (RT of EP or Waves for Horizon SE) Connection to slave monitor (NRT of EP) – OPTIONAL Switch for Remote EP operator control in the procedure room OPTIONAL 6.1.2 • • • • Interconnection Cables CFE network cable Slave display cable – RT Slave display cable – NRT - OPTIONAL EP Amplifier interface cables (Order per length up to 15 meters) Check to confirm length o 2 x PC-DI 965-303-000 o 2 x Auxiliary 965-304-000 o 2 x PC-COM 965-305-000 6.1.3 • • • • • • • Procedure Room Flat screen - (RT of EP or Waves for Horizon SE) 2nd Flat Screen (NRT for EP) OPTIONAL CFE Basic EP amplifier Expansion EP Amplifier Box to hold the CFE + 2 Amplifiers Device to hold 2 patient boxes horizontally (Italy with slope) , on the rail (32 channel system) Additional Device to hold 3 patient boxes horizontally (Italy with slope), on the rail (64 channel system) • • • 6-8 Remote EP operator control in the procedure room OPTIONAL, consisting of: EMS XL Service Manual Chapter 6 Combo Option o o o o 6.2 2 Flat Screens Keyboard Mouse Printer Combine EP SE Installation Instruction The system will arrive with the SUN computer and the EMS-XL PC in separate boxes. Take out the computers and accessories from the packages and put the SUN into the table console and the PC on the side of the consol. DO NOT use the two video cables that are attached to the power cable of the display 6.2.1 1. 2. 3. 4. 5. 6. 7. Installation sequence Insert the SUN computer into its housing. Right side of table (Viewed from the back) The back panel to the center of the table (Viewed from the back) Insert the round black pole into it socket (Use force) At the top of the pole connect the horizontal arms for the displays Connect the displays to the horizontal arms Put the PC on the side of the consol Put the Basic Amplifier, and the Expansion amplifier as near as possible to the patient’s bed. 8. Connect the CFE to the left side on the table (Front View) 9. Put the switchbox on the table at a point you can access 10. Put the Printer somewhere – It serves the EP & WS 6.2.2 Cable connections 1. Power 2. Connect 90 degree power cable for the Sun computer, 3. Connect Printer, and Displays to the transformer 4. The Switch does not need power 5. The PC should be connected to the mains via the transformer 6. Power to CFE from the transformer 7. Video and Switch - SUN 8. Connect the left yellow Video cable to V1 on the SUN 9. Connect the left green Video cable to V2 on the SUN 10. Connect the USB connector attached to the V2 Video cable to the USB socket on the SUN 11. Connect the LAN cable to the socket for the Hub 12. Connect the cable from the Hub to the LAN input of the CFE 13. Video and Switch – PC 14. On the PC at V2, insert adapter attached to the top of the PC 15. On the Printer connector attach the HUSP adapter 16. Connect the right yellow cable to V1 on the PC 17. Connect the right green cable to V2 on the PC EMS XL Service Manual 6-9 Starting the system 18. Connect the USB connected to the to the V2 Video cable to the USB socket on the PC 19. Amplifiers 20. Connect the Basic amplifier cables to COM1-B, PC DI-B, AUX-B sockets on the PC 21. Connect the Expansion amplifier cables to COM2-E, PC DI-E, AUX-E sockets on the PC 22. Mouse, Keyboard and Printer 23. Connect the Mouse to the central USB on the switch 24. Connect the and Keyboard to the right USB on the switch 25. Connect the Printer cable to the parallel socket above the HUSP. 26. Displays 27. Connect the Black display cables to the Switch. 6.3 Starting the system 1. Power on Cathlab and the PC 2. Connect the DNI simulator to Power 3. Turn the Switch to Horizon SE 4. Wait for about 5 minutes 5. On the log in panel type: ON <enter> <enter> 6. The Horizon SE panels will be displayed 7. Connect 5 lead ECG cable to the CFE ECG socket 8. Turn the Switch to EMS-XL 9. Double click on user and wait for the displays to appear. 10. Double click on EMS-XL icon 11. Connect the wires of the black shorted 25 pin cable to LA and RA on the DNI simulator 12. Connect the wires from the shorted patient box to LA and RA on the DNI simulator 13. Tighten the black and white screws so that the snap connectors of the 12 lead ECG cable stick. 14. Connect the 12 lead cable to the DNI simulator and to the ECG socket of the Basic amplifier 15. Connect the patient box to the 13-24 socket on the Basic amplifier 16. Connect the black shorted cable to the 45-56 connector on the Expansion amplifier GOOD LUCK 6-10 EMS XL Service Manual Chapter 7 Software Loading CHAPTER 7 SOFTWARE LOADING 16-FEB-2006 EMS-XL V1.32 - Installation from scratch. 7.1 General installation 1. 2. 3. 4. 5. Install standard Windows XP professional Install Matrox G400/G450 drivers Windows Display properties >> Settings – Set 2 Display to 1600 X 1200 Windows Display properties >> Settings >>Advanced 120 DPI Windows Display properties >> Appearance >>Windows And buttons - Windows classic type 6. Windows Display properties >> Appearance >> Font size - Large 7. Windows Display properties >> Screen saver – None 8. Windows Display properties >> Screen saver >> power >> power schemes – Always On – All items Never 9. Windows Control panel >> Regional and language Options >> Customize >> Date >> Short date format – dd-MMM-yy 10. Install MS Word 2003 11. Install Nero package (tested with V6.6.0.18 ultra edition – upgrade from web) 12. Install printer 7.2 Install applications from install directory: 1. 2. 3. 4. 5. 6. Install HASP – Open HASP.zip file and click hdd32.exe. Install .NET Fraimwork V1.1 - click dotnetfx.exe Install EMS-XL - Open Setup EM XL.zip and click Setup.exe. Install Configuration utility - Open EMS_XL_Config_Install.zip and click Setup.exe Install Archive utility – Open EMS_XL_Archive_Install.zip and click Setup.exe Install Lang Editor utility - Open SetUpLAngEditor.zip and click Setup.exe EMS XL Service Manual 7-11 7-12 0 Appendix 1 – Final Test Procedure Table of Contents 1. Introduction .................................................................... 7-14 2. Affectivity ....................................................................... 7-14 3. Test Equipment Required: ............................................. 7-14 4. Software Loading ........................................................... 7-14 5. Functional Testing of the EMS-XL ................................. 7-14 6. Invasive Blood pressure calibrating ............................... 7-15 FTP EMS-XL U.U.T. SW HW Basic EXPAN Abbreviations: Final Test Procedure Electrophysiology system Unit Under Testing Software Hardware Basic Amplifier Expansion Amplifier EMS XL Service Manual 7-13 Install applications from install directory: 1. Introduction This document provides a procedure for testing the EMS-XL , and for the functional testing of the EMS-XL Amplifiers/Stimulator. 2. Affectivity EMS-XL systems and amplifiers. 3. Test Equipment Required: • DNI 217A or similar • Oscilloscope • 1000 Ohm resistor on oscilloscope inputs • 12 leads ECG cable • BP interface cable between the simulator and the amplifier input • BIO-TEK 601 PRO XL Inspect the U.U.T. for defects in workmanship (scratches, missing hardware and labels, etc.) Check that all required paperwork is attached and signed. 4. Software Loading Software will be loaded as per the software loading procedure The software, prepared by Engineering with the release of each version of the software, will be transferred to the Operations Department for storage and tooling on the following media : Purpose Storage Tooling Media Priority Disk Contents The full system will be tested for both safety and performance 5. Functional Testing of the EMS-XL 4. 5. 6. 7. ECG amplifier IECG amplifiers BP amplifier Stimulator 7-14 EMS XL Service Manual 0 Appendix 1 – Final Test Procedure 6. Invasive Blood pressure calibrating 1. On the EMS-XL activate the pressure channel. 2. Confirm that the calibration factor is 1.000 3. Set the simulator to zero 4. Zero BP on the EMS-XL 5. Set the simulator to 100 mmHg 6. Confirm that the display shows 100 mmHg. 7. If not change the calibration factor and repeat steps 3 to 6 8. Repeat the test on BP1 and BP2 EMS XL Service Manual 7-15 Install applications from install directory: Appendix A Mennen Medical EMS-XL P/N 965-100-115/230 Test Data Sheet (Page 1 of 5) Unit P/N: 965-060-_______ Serial Number : ______________ Date: ________________ Tested By: 965-104-010/020 S/N______________ S.W. Ver._______ 965-103-015: S/N____________ Par. 1. ______________ 32 / 64 Channels 965-103-025: S/N_____________ Subject Description Specifications Visual Inspection. UUT Check all connectors, sockets, screws O.K. Measured value Result (Pass/Fail) Connect the UUT to the main power and to display only. 2. Main power testing 2.1 Connect main power cable and switch on the unit 2.2 Check displays Main LED on amplifiers in green O.K. Working. O.K. Icons on real time monitor (left) O.K. 2.3 Computer 3. Tests 3.1 EMX-XL Software installation O.K. 3.2 Start EMS-XL program Both real time and non real time monitor shows GUI O.K. 3.2 Start case All Icons active O.K. 3.3 Display Report Report opens with demographics O.K 7-16 EMS XL Service Manual 0 Appendix 1 – Final Test Procedure Mennen Appendix A Medical EMS-XL P/N 965-100-115/230 Test Data Sheet (Page 2 of 5) Serial No.___________ Par. Subject Description 4. Software Version 4.1 Check SW version Software Version 4.2 Check 32/64 setting Setting correct Ablation models: ________ 5. Leakage Test- Safety Analyzer BIO-TEK, model “601PRO" or similar 5.1 Safety test 5.2 AC Hi Pot test 1.5KV AC 10sec O.K. 5.3 Defibrillator test 300 Watt x Sec O.K. 6. ECG Test , Simulator – DNI217A or similar 6.1 Connect 12 leads ECG cable (with Simulator) 6.2 Connect all IECG inputs to Channels 13-25 LA-LL on simulator O.K. 6.3 Channels 26-32 O.K. Channels 33-44 O.K. 6.5. Channels 45-56 O.K. 6.6 Channels 57-64 O.K. For 64 channels EMS XL Service Manual Add the strip result. Display 12 leads ECG Result (Pass/Fail) 32 or 64 ? Ablation interface Auto test 60601-1 Measured value V_____ 4.9 6.4 Sends parameters Specifications O.K. O.K. 7-17 Install applications from install directory: Mennen Appendix A Medical EMS-XL P/N 965-100-115/230 Test Data Sheet (Page 3 of 5) Serial No.___________ Par. Subject 7. Stimulator Test – Oscilloscope measurement on 1000 Ohm 7.1 Atrial stimulation 2 mA , 2 mSec 2 volt Ch 13 2 mA , 2 mSec 2 volt Ch 14 2 mA , 2 mSec 2 volt Ch 15 2 mA , 2 mSec 2 volt Ch 16 2 mA , 2 mSec 2 volt Ch 17 2 mA , 2 mSec 2 volt Ch 18 2 mA , 2 mSec 2 volt Ch 19 2 mA , 2 mSec 2 volt Ch 20 2 mA , 2 mSec 2 volt Ch 21 2 mA , 2 mSec 2 volt Ch 22 2 mA , 2 mSec 2 volt Ch 23 2 mA , 2 mSec 2 volt Ch 24 2 mA , 2 mSec 2 volt Ventricular stimulation 3 mA , 3 mSec 3 volt Ch 13 3 mA , 3 mSec 3 volt Ch 14 3 mA , 3 mSec 3 volt Ch 15 3 mA , 3 mSec 3 volt Ch 16 3 mA , 3 mSec 3 volt Ch 17 3 mA , 3 mSec 3 volt Ch 18 3 mA , 3 mSec 3 volt 7.2 7-18 Description Specifications Measured value Result (Pass/Fail) EMS XL Service Manual 0 Appendix 1 – Final Test Procedure Mennen Appendix A Medical EMS-XL P/N 965-100-115/230 Test Data Sheet (Page 4 of 5) Serial No.___________ Par. Subject Description Specifications Ch 19 3 mA , 3 mSec 3 volt Ch 20 3 mA , 3 mSec 3 volt Ch 21 3 mA , 3 mSec 3 volt Ch 22 3 mA , 3 mSec 3 volt Ch 23 3 mA , 3 mSec 3 volt Ch 24 3 mA , 3 mSec 3 volt Measured value Result (Pass/Fail) BP Test , Simulator-DNI217A the main board should be calibrated 8. According to the BP Calibration procedure 8.1 8.2 BP1 Simulator at Atm Zero BP1 O.K. Simulator at 100 mmHg 100 mmHg display O.K. Simulator Arterial ART WF display O.K. Simulator at Atm Zero BP1 O.K. Simulator at 100 mmHg 100 mmHg display O.K. Simulator Arterial ART WF display O.K. BP2 EMS XL Service Manual 7-19 Install applications from install directory: Mennen Appendix A Medical EMS-XL P/N 965-100-115/230 Test Data Sheet (Page 5 of 5) Serial No.___________ Par. Subject Description Specifications 9. Functional Test 9.1 Notes On note panel add two notes O.K. 9.2 Print 12L Print page with patient name and time O.K. 9.3 Print RT screen Print page with patient name and time O.K. 9.4 Copy RT to NRT screen Same WF display O.K. 9.5 Timer Start/Stop timer O.K. 9.6 Ablation Connect ablation simulator and show parameters O.K. 9.7 Store to DVD Store file to DVD and play it back O.K. Report Report should show patient demographics, Events Measurements O.K. 9.8 Tested 7-20 by _________________ Measured value Result (Pass/Fail) Date ____________ EMS XL Service Manual