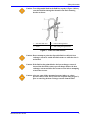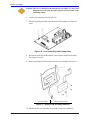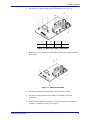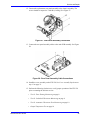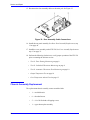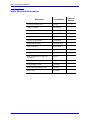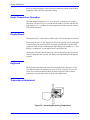
1
Warmflo Fluid Warming System
Model FW-538
SERVICE MANUAL
Nellcor Puritan Bennett Inc. is an affiliate of Tyco Healthcare. Warmflo is a registered trademark
of Nellcor Puritan Bennett.
Covered by the following patent: 5,381,510.
Contents
Contents ..............................................................................................................................i
Figures .............................................................................................................................. iii
Tables ................................................................................................................................ iv
Safety Information ............................................................................................................. 1
Warnings and Cautions .......................................................................................... 1
Warnings ...................................................................................................... 1
Cautions ....................................................................................................... 2
Notes ...................................................................................................................... 2
Disposable Fluid Warming Set Warnings & Cautions ............................................. 2
Introduction ....................................................................................................................... 5
Indications for Use .................................................................................................. 5
Contra-Indications ................................................................................................... 5
Description .............................................................................................................. 5
System Symbols ..................................................................................................... 7
Performance Verification ................................................................................................... 9
Introduction ............................................................................................................. 9
Tests ....................................................................................................................... 9
Test #1: Zone Heating Monitoring ................................................................ 9
Test #2: Individual Thermistor Monitoring .................................................... 9
Test #3: Automatic Thermistor Zone Monitoring ........................................ 10
System Testing ..................................................................................................... 10
Output Temperature Test ..................................................................................... 10
Equipment Required for Output Temperature Check ................................. 10
Test Procedure ........................................................................................... 11
Over-Temperature Alarm Check ........................................................................... 13
Troubleshooting .............................................................................................................. 19
Problems ............................................................................................................... 19
NVRAM Mode ....................................................................................................... 24
Electromagnetic Interference ................................................................................ 25
Preventive Maintenance ................................................................................................. 27
Service and Repair ......................................................................................................... 29
Information ............................................................................................................ 29
Introduction ........................................................................................................... 29
Replacement Level Support ................................................................................. 30
Cover Assembly Replacement ............................................................................. 30
Fuse Replacement ................................................................................................ 34
IV Pole Mount Replacement ................................................................................. 35
Main PCB Assembly Replacement ....................................................................... 36
Display PCB Assembly Replacement ................................................................... 38
Rear Panel Assembly Replacement ..................................................................... 41
Door Assembly Replacement ............................................................................... 46
Warmflo Model FW-538
i
Contents
Chassis Assembly Replacement .......................................................................... 50
Specifications .................................................................................................................. 55
Dimensions ........................................................................................................... 55
Weight ................................................................................................................... 55
Technical Specifications ....................................................................................... 55
Transportation and Storage .................................................................................. 56
Performance Requirements .................................................................................. 56
Compliance ........................................................................................................... 56
Manufacturer’s Declaration ................................................................................... 59
Spare Parts and Accessories .......................................................................................... 63
Introduction ........................................................................................................... 63
Disposable Fluid Warming Sets ............................................................................ 63
Infusors and Irrigators ........................................................................................... 63
Spare Parts and Accessories ............................................................................... 64
Disposal of Fluid Sets ........................................................................................... 66
Disposal Of Fluid Warming System ...................................................................... 66
Packing for Shipment ...................................................................................................... 67
Introduction ........................................................................................................... 67
Returning the FW-538 .......................................................................................... 67
General Instructions .............................................................................................. 67
Repacking in Original Carton ................................................................................ 67
Repacking in a Different Carton ............................................................................ 69
Theory of Operation ........................................................................................................ 71
Introduction ........................................................................................................... 71
Main Circuit Board: Start-Up ................................................................................. 71
Heater Control Circuitry ........................................................................................ 72
Temperature Sensing Circuitry ............................................................................. 73
Over-Temperature Operation ............................................................................... 73
Secondary Over-Temperature Protection ............................................................. 73
Under-Temperature Operation ............................................................................. 74
Display Board ....................................................................................................... 74
Keyboard .............................................................................................................. 74
Temperature Adjustment ...................................................................................... 74
Alarm Control Buttons ........................................................................................... 75
Index ............................................................................................................................... 83
ii
Contents
Figures
Figure 1:
Figure 2:
Figure 3:
Figure 4:
Figure 5:
Figure 6:
Figure 7:
Figure 8:
Figure 9:
Figure 10:
Figure 11:
Figure 12:
Figure 13:
Figure 14:
Figure 15:
Figure 16:
Figure 17:
Figure 18:
Figure 19:
Figure 20:
Figure 21:
Figure 22:
Figure 23:
Figure 24:
Figure 25:
Figure 26:
Figure 27:
Figure 28:
Figure 29:
Figure 30:
Figure 31:
Figure 32:
Figure 33:
Figure 34:
Figure 35:
Figure 36:
Figure 37:
Figure 38:
Figure 39:
Figure 40:
Figure 41:
Figure 42:
Warmflo Model FW-538
Filter and Filter Mount ........................................................................3
WF-250 Heat Exchanger Cassette.....................................................4
Warmflo FW-538 ................................................................................5
Warmflo Model FW-538 with WF-250 Surgery Set ............................6
Setup for Output Temperature Check ..............................................11
Setup for Over-Temperature Alarm Function Check ........................14
Accessing Heater Plates ..................................................................27
Filter Mounting Bracket Removal .....................................................31
IV Mounting Bracket Removal..........................................................31
Cover Assembly Cable Connections ................................................32
Display PCB Assembly Removal .....................................................32
Cover Assembly Cable Connections ................................................33
IV Mounting Bracket Removal..........................................................33
Filter Mounting Bracket Removal .....................................................34
Fuse Location...................................................................................35
Main PCB Cable Connections..........................................................37
Main PCB Screws ............................................................................37
Main PCB Cable Connections..........................................................38
Cover Assembly Cable Connections ................................................39
Display Assembly Screws ................................................................40
Cover Assembly Cable Connections ................................................40
Rear Panel Cable Connections ........................................................43
Rear Panel .......................................................................................43
Rear Panel Screws...........................................................................43
Rear Panel Ground ..........................................................................44
Equipotential Terminal Wiring ..........................................................44
Rear Panel Assembly Connection....................................................45
Rear Panel Assembly Cable Connections .......................................45
Door Assembly Cable Connections..................................................47
Door Assembly Pin...........................................................................47
Door Assembly Cable Retainer ........................................................48
Door Assembly Cable Routing .........................................................48
Cable Retainer Placement ...............................................................49
Door Assembly Pin Installation.........................................................49
Door Assembly Cable Connections..................................................50
Upper Heater Assembly ...................................................................52
Spare Parts ......................................................................................65
Packing.............................................................................................68
Increasing/Decreasing Temperature ................................................74
Main Control Board Schematic Diagram (Sheet 1 of 2) ...................77
Main Control Board Schematic Diagram (Sheet 2 of 2) ...................79
Display Printed Circuit Board Schematic Diagram ...........................81
iii
Contents
Ta b l e s
Table
Table
Table
Table
Table
Table
Table
Table
iv
1:
2:
3:
4:
5:
6:
7:
8:
System Problems and Solutions ........................................................
System Fault Codes...........................................................................
System Preventative Maintenance ....................................................
Model FW-538 Compliance ...............................................................
Electromagnetic Emissions ................................................................
Electromagnetic Immunity..................................................................
Electromagnetic Immunity, RF Portable Equipment ..........................
Recommended Separation Distances ...............................................
19
20
27
56
59
59
61
62
Safety Information
Warnings and Cautions
Warnings in this manual are identified by the WARNING symbol shown above.
A warning alerts you to potentially serious outcomes (death, injury, or adverse
events) to the user or the patient.
Warnings
WARNING: Possible electrical shock hazard. The warming unit should only
by serviced by a qualified technician. If a qualified technician is not available,
please notify your sales/service center.
WARNING: The fluid warmer must be plugged into a properly grounded 115
volt AC power source.
WARNING: Grounding reliability can only be achieved when the fluid
warmer is connected to an equivalent receptacle marked “HOSPITAL
ONLY” or “HOSPITAL GRADE.”
WARNING: If a malfunction occurs in the fluid warmer, discontinue use.
Notify your sales/service center of the malfunction. The unit must be serviced
by an authorized service technician.
WARNING: Cassette pressures above 300 mmHg may cause hemolysis.
Excessive pressures may burst the cassette.
Warmflo Model FW-538
1
Safety Information
Cautions
Cautions are identified by the CAUTION symbol shown above.
A caution alerts you to exercise care necessary for the safe and effective use of the
FW-538.
Caution: Do not store liquids on top of the fluid warmer.
Caution: Use only Warmflo® disposable fluid warming sets with the fluid
warmer.
Caution: Do not use the fluid warmer with preheated fluids. Fluids
preheated above 44ºC may activate the heater safety mechanism,
causing the high temperature alarm to activate.
Notes
Notes are identified by the Note symbol shown above.
Notes provide additional helpful information.
Disposable Fluid Warming Set Warnings & Cautions
WARNING: Refer to the instructions for use provided with all disposable
fluid warming sets prior to use.
2
Safety Information
Caution: To avoid potential kinks in the fluid line at point 1 (Figure 1 below),
route the fluid line through the channel in the filter mounting
bracket as shown:
1 — Potential kink area
2 — Filter mounting bracket
3 — Filter
4 — Slide tubing through channel
Figure 1: Filter and Filter Mount
Caution: Do not attempt to prime the disposable fluid set while the heat
exchanger cassette is outside the fluid warmer or while the door is
not latched.
Caution: If the fluid set has primed before the heat exchanger cassette is
inserted into the fluid warmer, open all clamps distal to the heat
exchanger cassette and allow the cassette to relax before attempting
to insert the cassette.
Caution: After use, turn off the automated pressure infusor or release
pressure cuffs, if used. Always close the red pinch clamp (Figure 2)
prior to removing the heat exchanger cassette from the fluid
Warmflo Model FW-538
3
Safety Information
warmer. Failure to do so could result in rupturing the heat
exchanger cassette.
1 — Red clamp
2 — Heat exchanger cassette
Figure 2: WF-250 Heat Exchanger Cassette
4
Introduction
Indications for Use
The FW-538 fluid warming system is used to provide safe and effective warming
of fluids, such as blood, blood products, physiologic fluids, and irrigation fluids.
The FW-538 can be used for all types of surgical procedures and operations that
require warmed fluids administered to patients.
Contra-Indications
There are no known contra-indications for use of this device.
Description
Figure 3: Warmflo FW-538
The FW-538 fluid warming system is designed for use in medical environments
under the direction of a physician to warm blood, intravenous (IV), and irrigation
fluids.
The FW-538 fluid warming system uses a heat exchanger cassette that is inserted
between microprocessor-controlled heater plates located within the warmer
housing. The dry heat process is safe, reliable, and requires little warm up time.
There are a variety of disposable blood and fluid administration sets available for
use in routine surgery, standard intravenous warming, and irrigation applications.
Warmflo Model FW-538
5
Introduction
The FW-538 fluid warming system may be used as a gravity flow device or in
conjunction with automatic and manual pressure infusors and irrigation pumps to
deliver fluids.
Figure 4: Warmflo Model FW-538 with WF-250 Surgery Set
A
B
C
6
Warmflo® pressure infusor or
irrigation pump (optional)
Warmflo® model FW-538
Air eliminator chamber with
filter
D
WF-250 heat exchanger
cassette
E
Roller clamp
F
Dual injection port
Introduction
System Symbols
The following symbols are used on the FW-538 unit.
On
Off
Alarm Test
Alarm Silence
Underwriters Laboratories Inc.
Canadian Standards Association
Shock Hazard BF Classification
Drip Proof
Refer to Instructions for Use
Equipotential Terminal (ground)
Warmflo Model FW-538
7
Blank Page
P e r f o r m a n c e Ve r i f i c a t i o n
Introduction
The Warmflo FW-538 software provides three internal test modes. After pressing
the Increase and Decrease temperature buttons simultaneously for five seconds,
the unit enters the internal test mode. A series of test modes are accessible in a
round-robin fashion by pressing the increase button. When a test is initially
entered, its test number is displayed in the first LED, while the other LEDs are
blank. The test number is displayed for one second.
Pressing the alarm silence button during any test will cause the program to return
to normal operating mode.
Tests
All temperatures displayed in the internal test modes are actual temperatures
without rounding.
Test #1: Zone Heating Monitoring
The first LED indicates which zones are heating. The remaining three LEDs
display the output temperature.
Test #2: Individual Thermistor Monitoring
The first LED indicates the currently selected zone (1, 2, 3, lower plate). The
selected zone is displayed as an illuminated segment in the first LED. These
segments are mapped in the following way:
1 — Zone 2
2 — Zone 3
3 — Lower plate
4 — Zone 1
Warmflo Model FW-538
9
Performance Verification
The remaining three LEDs display the temperature of currently monitored zone.
Pressing the decrease button cycles the selected zone round-robin from zone 1 to
the lower plate.
Test #3: Automatic Thermistor Zone Monitoring
The first LED indicates the currently selected zone (1, 2, 3, or lower plate), using
the same method as in test #2 above. The remaining three LEDs display the
temperature of that zone. The zone number cycles automatically at a 1 Hz rate
round-robin from zones 1 to the lower plate.
System Testing
There are two system performance checks for the FW-538 fluid warmer. The first
check verifies the output temperature of fluid passing through a WF-8860 test
cassette. The second check confirms that the over-temperature alarm is
functioning properly.
Output Temperature Test
Equipment Required for Output Temperature Check
This procedure checks the output temperature of fluid passing through a test
cassette installed in the FW-538. In addition to the FW-538 fluid warming system,
the following equipment will be required.
• WF-8860 test kit (part number 8860), which contains:
– Cassette and tubing
– Myocardial thermocouple temperature probe
– WI-48 high flow wound irrigator
• Reusable TAB instrument cable (part number 502-0065)
• Mon-a-therm® temperature monitor, model 6510 or equivalent (type T
thermocouple temperature monitor)
• Saline IV bag
The following equipment is optional:
• Warmflo pressure infusor or Warmflo irrigation pump
• Graduated cylinder
10
Performance Verification
Test Procedure
Figure 5: Setup for Output Temperature Check
Referring to Figure 5, check the output temperature of the FW-538 system:
1. Turn the Warmflo fluid warming system power switch located at the rear of
the unit to the ON position. The control panel will display the start-up test
mode, followed by the software revision number. When the temperature set
point is displayed (38°C default), the unit is ready for operation.
2. Push the door latch button on the fluid warming system to open the cassette
door. The door will open approximately 1/2 inch (1.27 cm).
Warmflo Model FW-538
11
Performance Verification
3. Slide a clean WF-8860 test cassette into the door opening until it is fully
inserted.
4. Close the door by firmly lifting up on the door until it clicks into position.
This is indicated by the appearance of a green band on the top edge of the
door latch button.
Note: To ensure that the door is closed, pull out on the door latch button until
the green band is visible.
5. Close the clamp indicated
.
6. Mount the air elimination chamber
FW-538.
7. Open the clamp indicated
into the holder on the side of the
and use this line to spike the saline IV bag.
8. Hold both the saline bag and the drip chamber
upside down. Squeeze the
saline bag to push air from the bag into the drip chamber. Continue to squeeze
until the drip chamber is half full of fluid.
9. Turn the saline bag right side up and hang the bag from the IV pole hook or
install it in the Warmflo pressure infusor or irrigation pump .
10. Close the roller clamp
11. Open the clamp
on the cassette outlet tube.
below the saline bag.
12. Pinch the ball in the air vent tube on the air elimination chamber . Saline
solution will begin to flow from the bag into the WF-8860 test cassette set.
Allow the chamber to fill 3/4 to the top with saline solution. Do not allow
solution to rise into the air vent tube.
13. Tap the air elimination chamber
enclosed filter screen.
to release micro bubbles from the
14. Attach the female Luer end of the high flow wound irrigator WI-48
male luer end of the WF-8860 test cassette.
to the
Caution: Use of the WF-8860 test cassette without the high flow wound
irrigator WI-48 attached may lead to higher-than-expected
temperatures of the output fluid while running the output
temperature check.
15. Open the roller clamp
and press the button on the WI-48
to open the
line. Allow solution to flow until air is purged from the high flow wound
irrigator tubing.
12
Performance Verification
16. Release the WI-48 button and close the roller clamp.
17. Insert the myocardial thermocouple temperature probe
into the distal
Y-injection port
of the cassette set. The probe should be carefully
positioned inside the port so that fluid is flowing around the surface of the
probe at its distal end.
18. Connect the temperature probe to the reusable TAB instrument cable ,
which in turn should be connected to a type T thermocouple temperature
monitor , such as a Mon-a-therm model 6510.
19. Turn on the thermocouple temperature monitor.
20. Use the roller clamp
on the cassette outlet tube to adjust the fluid flow to
100 ± 25 ml per minute while the button on the WI-48
is depressed.
Note: This flow may be measured by timing fluid collection in a small
graduated cylinder.
21. Allow the fluid to flow for 1 minute before taking readings. The average fluid
output temperature should be 38° C ± 2°C at 100 ± 25 ml per minute, as
measured by the temperature probe.
22. If the above performance cannot be met, refer to Troubleshooting on page 19.
Over-Temperature Alarm Check
This procedure verifies the operation of the alarm system when an
over-temperature condition is detected during operation of the FW-538. In
addition to the FW-538 fluid warming system, the following equipment is
required.
WARNING: Liquid at 55-65°C is a burn hazard. Use care in handling the IV
bag and its heated contents.
• WF-8860 test kit (part number 8860), which contains:
– Cassette and tubing
– WI-48 high flow wound irrigator
• Saline IV bags (2): Cool one bag to 8-10°C; heat second bag to 55-65°C
• IV pole
The following equipment is optional:
Warmflo Model FW-538
13
Performance Verification
• Warmflo pressure infusor(s) or Warmflo irrigation pump(s)
• Graduated cylinder
• Mon-a-therm® temperature monitor, model 6510 or equivalent (type T
thermocouple temperature monitor) and reusable TAB instrument cable
(part number 502-0065)
:
Figure 6: Setup for Over-Temperature Alarm Function Check
Referring to Figure 6, set up the FW-538 to verify the operation of the
over-temperature alarm:
1. Turn the Warmflo fluid warming system power switch located at the rear of
the unit to the ON position. The control panel will display the start-up test
mode, followed by the software revision number. When the temperature set
point is displayed (38°C default), the unit is ready for operation.
14
Performance Verification
2. Push the door latch button on the fluid warming system to open the cassette
door. The door will open approximately 1/2 inch (1.27 cm).
3. Slide a clean WF-8860 test cassette into the door opening until it is fully
inserted.
4. Close the door by firmly lifting up on the door until it clicks into position.
This is indicated by the appearance of a green band on the top edge of the
door latch button.
Note: To ensure that the door is closed, pull out on the door latch button until
the green band is visible.
5. Close the pinch clamp
.
6. Mount the air elimination chamber into the holder
FW-538.
on the side of the
7. Open the pinch clamp
and use this line to spike the 8-10° saline IV bag.
Install the 8-10°C saline IV bag as follows:
a. Hold both the saline bag and the drip chamber upside down. Squeeze the
saline bag to push air from the bag into the drip chamber. Continue to
squeeze until the drip chamber is half full of fluid .
b. Close the pinch clamp
.
c. Turn the saline bag right side up and hang the bag from the IV pole hook at
least one (1) meter from the warming unit or install it in a Warmflo
pressure infusor or irrigation pump .
8. Open the pinch clamp
and use this line to spike the 55-65°C saline IV bag.
Install the 55-65°C saline IV bag as follows:
Note: The Mon-a-therm monitor and temperature probe may be used to
determine the temperature of the pre-warmed IV solution.
a. Hold both the saline bag and the drip chamber
upside down. Squeeze
the saline bag to push air from the bag into the drip chamber. Continue to
squeeze until the drip chamber is half full of fluid.
b. Close the indicated pinch clamp
.
c. Turn the saline bag right side up and hang the bag from the IV pole hook at
least one (1) meter above the warming unit, or install it in a Warmflo
pressure infusor or irrigation pump .
9. Close the roller clamp
Warmflo Model FW-538
on the cassette outlet tube.
15
Performance Verification
10. Pinch the ball in the air vent tube on the air elimination chamber . Saline
solution will begin to flow from the bag into the 8860 test cassette set. Allow
the chamber to fill 3/4 to the top with saline solution. Do not allow solution to
rise into the air vent tube.
11. Tap the air elimination chamber
enclosed filter screen.
to release micro bubbles from the
12. Attach the female Luer end of the high flow wound irrigator WI-48 to the
male Luer end of a clean WF-8860 test cassette .
13. Open the roller clamp
and depress the button on the WI-48
air from the high flow wound irrigator tubing.
14. Close the roller clamp
to purge the
after air has been fully purged.
15. Activate the internal test mode of the fluid warming system by
simultaneously pressing the Increase and Decrease temperature buttons for
five seconds.
16. Select Test Mode #2 (individual thermistor monitoring) by pressing the
Increase temperature button until the number “2” is briefly displayed in the
first LED of the fluid warmer display.
17. Press the Decrease temperature button to select Zone 3 monitoring. When the
segment on the right side of the first LED is illuminated, Zone 3 monitoring is
active.
18. Open the pinch clamp
below the 8-10°C bag.
19. Use the roller clamp
on the cassette outlet tube to adjust the fluid flow to
100 ±25 ml per minute while the button
on the WI-48 is depressed.
Note: This flow rate may be measured by timing fluid collection in a small
graduated cylinder.
20. Allow the 8-10°C fluid to flow for one minute.
21. Close the pinch clamp
system.
16
, stopping the flow of 8-10°C fluid through the
Performance Verification
22. Open the pinch clamp
button
system.
below the 50-65°C saline bag and depress the
on the WI-48 to allow the pre-warmed fluid to flow through the
23. Observe the temperature at the Zone 3 thermistor on the display of the fluid
warming system.
As the 55-65°C fluid flows through the test cassette, the FW-538 heater plates
absorb the excess heat, driving their temperature above the set point of 38°C.
Two seconds after the temperature reaches 44.5°C ±1°C, the first
over-temperature alarm activates. The heater plates are immediately disabled,
and an intermittent tone sounds at one-second intervals.
If the temperature subsequently falls below 44.5°C, and there is no system
fault code reported, the unit will resume normal operation.
Note: If the unit is in the normal operating display mode when the first
over-temperature alarm sounds, the display will read H44.5 (±1.0°C).
24. Two seconds after the temperature exceeds 45°C ±1°C, the second
over-temperature alarm is activated. This condition is indicated by a repetitive
tone at one-second intervals.
Note: If the unit is in the normal operating display mode when the second
over-temperature alarm sounds, the display will read H45.0 (±1.0°C),
and will alternate with the display of a fault code, if appropriate.
Note: If the temperature of the heater plates rises too quickly, the first
temperature alarm may not sound the intermittent beep. Rather, the first
audible alarm may be a continuous tone, signaling the second
over-temperature alarm that occurs above 45°C. The procedure may be
repeated using a slower flow rate or using pre-warmed saline solution
of slightly lower temperature.
25. If the fluid warming system fails to properly enter the over-temperature alarm
condition, and/or fails to demonstrate both audible and visual
over-temperature alarms, immediately remove the unit from service. Notify
your sales/service center of the malfunction. The unit must be serviced by an
authorized service technician.
Warmflo Model FW-538
17
Blank Page
Tro u b l e s h o o t i n g
If the solutions in this section fail to correct the problem, contact Nellcor’s
Technical Service Department (1.800.635.5267) or your local representative.
Problems
Table 1: System Problems and Solutions
Symptom
The LED display is
dark.
Warmflo Model FW-538
Observe
Solution
AC power cord is not
plugged in.
• Plug in the power cord.
Power switch is not turned
on.
• Turn the power switch on
rear panel to ON (I).
Fuse is blown.
• Open enclosure and replace
fuse. See Fuse Replacement
on page 34.
LED connector is loose.
• Push down LED connector
into the J10 receptacle on
the main circuit board. See
Display PCB Assembly
Replacement on page 38.
Cassette door will not
engage latch.
The cassette is full of fluid
and the tubing clamps are
closed.
• Close the red clamp at the
heat exchanger to release
pressure on the cassette.
Release the fluid
downstream.
• If transferring a cassette
from one warmer to
another, be sure the red and
white clamps are open.
Cassette door will not
open.
The cassette is full of fluid
and/or under pressure.
• Close the red clamp at the
heat exchanger to release
pressure on the cassette.
Release the fluid
downstream.
Spring mechanism inside
door is broken.
• The Warmflo unit provides
an emergency technique to
remove the cassette if
normal procedures do not
open the door. Locate the
hole in the middle part of
the bottom of the door. (It
can be felt with a finger.)
Insert a #2 Phillips
screwdriver. Push until
door opens. See Figure 31
on page 48.
19
Troubleshooting
Table 1: System Problems and Solutions (Continued)
Symptom
Observe
Solution
Fluid output
temperature is too low.
The temperature set point
is too low.
• Adjust the temperature set
point to the desired setting.
The fluid flow is being
restricted above the heat
exchanger.
• Ensure all clamps above
the heat exchanger for the
spike in use are open.
Excessive high flow rate.
• Reducing the flow rate will
increase warming
efficiency.
Heater plates are dirty.
• Open the cassette door and
clean the heater plates
according to instructions in
Preventive Maintenance on
page 27.
Pre-warmed fluids were
used.
• Do not use pre-warmed
fluids.
High flow rate stopped
suddenly.
• Unit will cool and alarm
will reset automatically.
Excessive high flow rate
• Reduce the flow rate.
Over-Temperature
Alarm
Low Temperature
Alarm
Table 2: System Fault Codes
Fault Code
20
Problem
Solution
FAULT CODE F_01
Defective or wrong
EPROM
• Replace main PCB
assembly. See Main PCB
Assembly Replacement on
page 36.
FAULT CODE F_02
Defective RAM
• Replace main PCB
assembly. See Main PCB
Assembly Replacement on
page 36.
FAULT CODE F_04
Defective NVRAM
• Replace main PCB
assembly. See Main PCB
Assembly Replacement on
page 36.
FAULT CODE F_05
Membrane panel switch
is stuck.
• Push the button again.
Restart the unit.
• Replace cover assembly if
problem persists. See
Cover Assembly
Replacement on page 30.
FAULT CODE F_08
Microprocessor failure
• Replace main PCB
assembly. See Main PCB
Assembly Replacement on
page 36.
Troubleshooting
Table 2: System Fault Codes (Continued)
Fault Code
Warmflo Model FW-538
Problem
Solution
FAULT CODE F_09
OT_REF offset out of
range Voltage Reference
error
• Replace main PCB
assembly. See Main PCB
Assembly Replacement on
page 36.
FAULT CODE F_10
EXT_OT failure
• Replace main PCB
assembly. See Main PCB
Assembly Replacement on
page 36.
FAULT CODE F_11
Heater Zone 1 thermistor
failure
• Thermistor in Zone 1 is
open or shorted, possibly
caused by a loose
connector, J6, on main
board. Push J6 connector
all the way down. See Main
PCB Assembly
Replacement on page 36.
• Defective thermistor.
Replace chassis assembly.
See Chassis Assembly
Replacement on page 50.
• If the previous two steps
don’t resolve problem,
replace main PCB
assembly. See Main PCB
Assembly Replacement on
page 36.
FAULT CODE F_12
Heat Zone 2 thermistor
failure
• Thermistor in Zone 2 is
open or shorted, possibly
caused by a loose
connector, J6, on main
board. Push J6 connector
all the way down. See Main
PCB Assembly
Replacement on page 36.
• Defective thermistor.
Replace chassis assembly.
See Chassis Assembly
Replacement on page 50.
• If previous two steps don’t
resolve problem, replace
main PCB assembly. See
Main PCB Assembly
Replacement on page 36.
21
Troubleshooting
Table 2: System Fault Codes (Continued)
Fault Code
22
Problem
Solution
FAULT CODE F_13
Heater Zone 3 thermistor
failure.
• Thermistor in Zone 3 is
open or shorted, possibly
caused by a loose
connector, J6, on main
board. Push J6 connector
all the way down. See Main
PCB Assembly
Replacement on page 36.
• Defective thermistor.
Replace chassis assembly.
See Chassis Assembly
Replacement on page 50.
• If previous two steps don’t
resolve problem, replace
main PCB assembly. See
Main PCB Assembly
Replacement on page 36.
FAULT CODE F_17
Heater lower plate
thermistor failure.
• Thermistor in lower plate is
open or shorted, possibly
caused by a loose
connector, J6, on main
board. Push J6 connector
all the way down. See Main
PCB Assembly
Replacement on page 36.
• Defective thermistor.
Replace door assembly. See
Door Assembly
Replacement on page 46.
• If previous two steps don’t
resolve problem, replace
main PCB assembly. See
Main PCB Assembly
Replacement on page 36.
FAULT CODE F_20
Heater Enable failure.
• Temperature higher than
44.5°C is sensed. Shut
down the unit. Wait for 5
minutes. Restart the unit. If
problem persists, replace
the main PCB assembly.
See Main PCB Assembly
Replacement on page 36.
Troubleshooting
Table 2: System Fault Codes (Continued)
Fault Code
Warmflo Model FW-538
Problem
Solution
FAULT CODE F_21
Triac Zone 1 failure.
Heater Zone 1 does not
turn on during
initialization.
• Shut down the unit. Wait
for 5 minutes. Restart the
unit.
• Defective Triac Q6 or
Optoisolator U4. Replace
main PCB assembly. See
Main PCB Assembly
Replacement on page 36.
FAULT CODE F_22
Triac Zone 2 failure.
Heater Zone 2 does not
turn on during
initialization.
• Shut down the unit. Wait
for 5 minutes. Restart the
unit.
• Defective Triac Q4 or
Optoisolator U2. Replace
main PCB assembly. See
Main PCB Assembly
Replacement on page 36.
FAULT CODE F_23
Triac Zone 3 failure.
Heater Zone 3 does not
turn on during
initialization.
• Shut down the unit. Wait
for 5 minutes. Restart the
unit.
• Defective Triac Q2 or
Optoisolator U1. Replace
main PCB assembly. See
Main PCB Assembly
Replacement on page 36.
FAULT CODE F_30
Heater Zone 1 failed
preheat test. A/D
channel 1 failed preheat
warmer test. Temperature
higher than 42°C is
sensed during preheat
test.
• Cassette with preheated
fluid is used. Shut down the
unit. Wait for 5 minutes.
Restart the unit.
• Defective thermistor in
Zone 1. Replace main PCB
assembly. See Main PCB
Assembly Replacement on
page 36.
FAULT CODE F_31
Heater Zone 2 failed
preheat test. A/D
channel 2 failed preheat
warmer test. Temperature
higher than 42°C is
sensed during preheat
test.
• Cassette with preheated
fluid is used. Shut down the
unit. Wait for 5 minutes.
Restart the unit.
• Defective thermistor in
Zone 2. Replace main PCB
assembly. See Main PCB
Assembly Replacement on
page 36.
FAULT CODE F_32
Heater Zone 3 failed
preheat test. A/D
channel 3 failed preheat
warmer test. Temperature
higher than 42°C is
sensed during preheat
test.
• Cassette with preheated
fluid is used. Shut down the
unit. Wait for 5 minutes.
Restart the unit.
• Defective thermistor in
Zone 3. Replace main PCB
assembly. See Main PCB
Assembly Replacement on
page 36.
23
Troubleshooting
Table 2: System Fault Codes (Continued)
Fault Code
Problem
Solution
FAULT CODE F_41
Heater control failure.
Heater is stuck on.
• Shut down the unit. Wait
for 5 minutes. Restart the
unit.
• Defective Triac. Replace
main PCB assembly. See
Main PCB Assembly
Replacement on page 36.
FAULT CODE F_42
Heater Zone 1 turn on
failure. Heater Zone 1
does not turn on during
run time.
• Shut down the unit. Wait
for 5 minutes. Restart the
unit.
• Defective Triac Q6 or
Optoisolator U4. Replace
main PCB assembly.
FAULT CODE F_43
Heater Zone 2 turn on
failure
• Shut down the unit. Wait
for 5 minutes. Restart the
unit.
• Defective Triac Q4 or
Optoisolator U2. Replace
main PCB assembly.
FAULT CODE F_44
Heater Zone 3 turn on
failure
• Shut down the unit. Wait
for 5 minutes. Restart the
unit.
• Defective Triac Q2 or
Optoisolator U1. Replace
main PCB assembly. See
Main PCB Assembly
Replacement on page 36.
FAULT CODE F_45
External RAM test
failure
• Replace main PCB board.
See Main PCB Assembly
Replacement on page 36.
FAULT CODE F_46
Thermistor test failure
• Shut down the unit. Wait
for 5 minutes. Restart the
unit.
• Replace main PCB board.
See Main PCB Assembly
Replacement on page 36.
NVRAM Mode
The system uses an NVRAM (nonvolatile random access memory) U19 chip for
permanent storage of fault codes. The microprocessor enters the NVRAM mode if
the test pin (J14 pin 1) is connected to ground (J14 pin 2). If the jumper is installed
between J14 pin 1 and pin 2 when the unit is powered on, the last fault code stored
in NVRAM is displayed.
Note: Normal operation mode requires the jumper to be removed or to be
installed on one pin only.
24
Troubleshooting
The unit is supplied with a jumper only on one pin of the J14 connector. If the test
pin is not installed, the program will bypass the NVRAM mode and display a fault
code only when one is detected.
The NVRAM storage holds the most recent 16 fault codes. With the jumper
connecting pin 1 to pin 2, the display shows the most recent fault code in the
format F_##. Press the increase button to cycle through all the stored fault codes
in a round-robin fashion.
After reviewing the fault codes, remove the jumper while the unit is on, clearing
all of the fault codes. Install the jumper on only one pin. Turn off the unit. When
the unit is restarted, it will return to normal operation mode and will display a
fault code only when one is detected.
Electromagnetic Interference
This device has been tested and found to comply with the limits for medical
devices to the IEC 60601-1-2:1993. These limits are designed to provide
reasonable protection against harmful interference in a typical medical
installation.
However, because of the proliferation of radio-frequency transmitting equipment
and other sources of electrical noise in the healthcare environment, it is possible
that high levels of such interference, due to close proximity or strength of a
source, may result in disruption of performance of this device.
This equipment generates, uses, and can radiate radio frequency energy and, if not
installed and used in accordance with these instructions, may cause harmful
interference with other devices in the vicinity. Disruption or interference may be
evidenced by cessation of operation or incorrect functioning. If this occurs, the
site of use should be surveyed to determine the source of this disruption, and
actions taken to eliminate the source.
The user is encouraged to try to correct the interference by one or more of the
following measures:
• Turn equipment in the vicinity off and on to isolate the offending
equipment.
• Reorient or relocate the other receiving device.
• Increase the separation between the interfering equipment and this
equipment.
• If assistance is required, contact Nellcor’s Technical Service Department or
your local representative.
Warmflo Model FW-538
25
Blank Page
Preventive Maintenance
WARNING: Electrical shock hazard. Disconnect the unit from AC power
prior to cleaning. Thoroughly dry before returning to service.
Caution: Do not scratch the heater plates. Do not use abrasive materials or
treated polishing cloth.
Caution: To prevent equipment damage, do not autoclave or immerse in
liquids.
Note: For easy access to the heater plates, with cassette door in open position,
push the release button on the bottom of the unit. The door will swing open
approximately 3 inches (7.62 cm). (See Figure 7 below.)
Figure 7: Accessing Heater Plates
The following preventive maintenance procedures are recommended.
Table 3: System Preventative Maintenance
Action
Warmflo Model FW-538
Frequency
Method
Clean exterior surfaces
As required with use.
Use warm, mild soap water
and soft cloth. Heater
plates must be smooth,
clean and free of surface
imperfections to assure
proper warming
performance.
Clean heater plates
As required if
contaminated with blood or
other fluids or debris.
Use soft cloth moistened
with mild soapy water.
Wipe dry with clean, soft
cloth.
27
Preventive Maintenance
Table 3: System Preventative Maintenance (Continued)
Action
28
Frequency
Method
Electrical safety check
Prior to patient use and
annually thereafter.
Refer to hospital standards.
Output temperature
performance check
Annually
Refer to Performance
Verification on page 9.
Alarm test
Annually. May be tested
prior to each use or at any
time during use.
Press the Alarm Test button
on the front control panel.
Anytime the unit is turned
on, audible and visual high
and low temperature
alarms will cycle for
approximately 10 seconds,
then the unit will
automatically return to
normal operation.
Service and Repair
WARNING: Possible electrical shock hazard. The warming unit should only
by serviced by a qualified technician. If a qualified technician is not available,
please notify your sales/service center.
Information
To obtain information about a warranty, if any, for this product, contact Nellcor’s
Customer Services Department or your local Nellcor representative.
For technical support, or to obtain service, contact Nellcor’s Customer Service
Department at:
Tyco Healthcare Group LP
Nellcor Puritan Bennett Division
4280 Hacienda Drive
Pleasanton, CA 94588
1.800.635.5267
Introduction
The FW-538 can be disassembled down to all major component parts, including:
• Chassis assembly
• Cover assembly
• Door assembly
• Fuse
• PCBs
WARNING: Before attempting to open or disassemble the FW-538,
disconnect the FW-538 from AC power.
Caution: Observe ESD (electrostatic discharge) precautions when working
within the unit.
Warmflo Model FW-538
29
Service and Repair
Replacement Level Support
The replacement level supported for this product is to the printed circuit board
(PCB) and major subassembly level. Once you isolate a suspected PCB, follow
the procedures below to replace the PCB with a known good PCB. Check to see if
the trouble symptom disappears and that the FW-538 passes all performance tests.
If the trouble symptom persists, swap back the replacement PCB with the
suspected malfunctioning PCB (the original PCB that was installed when you
started troubleshooting) and continue troubleshooting as directed in
Troubleshooting on page 19.
Cover Assembly Replacement
The replacement cover assembly comes assembled with:
•
1 — molded cover
•
1 — key pad
•
1 — warning label
The tools required for this procedure are:
Tool
Parameters/Use
Hex driver
9/64 inch
Phillips screwdriver
#1
Torque driver/wrench
6 inch/lbs (15 cm/kg)
5 inch/lbs (13 cm/kg)
Use the following procedure to replace the cover assembly.
1. Turn the FW-538 off by pressing the power switch, located at the back of the
unit, to “0”.
2. Unplug the FW-538 from AC power.
3. Disconnect the power cord from the rear of the FW-538.
30
Service and Repair
4. Remove the filter mounting bracket from the cover assembly, using a 1/4 inch
hex driver. See Figure 8.
Figure 8: Filter Mounting Bracket Removal
5. Remove the IV pole mounting bracket, using a 1/4 inch allen wrench. See
Figure 9.
Figure 9: IV Mounting Bracket Removal
Warmflo Model FW-538
31
Service and Repair
Caution: The cover is attached to the main pcb by two cables. Use care when
lifting the cover off of the unit. Do not put excessive pressure on the
connecting cables.
6. Lift the cover assembly off of the FW-538.
7. Disconnect the keypad cable from the main PCB assembly. See Figure 10,
item 1.
Figure 10: Cover Assembly Cable Connections
8. Disconnect the display PCB assembly cable from the main PCB assembly.
See Figure 10. item 2.
9. Remove the display PCB assembly from the cover assembly. See Figure 11.
1 — Cover assembly
2 — Display PCB assembly
Figure 11: Display PCB Assembly Removal
10. Discard the old cover assembly in accordance with local regulations.
32
Service and Repair
11. Install the display PCB assembly into the new cover assembly. The screws
should be torqued to 5 inch/lbs (13 cm/kg). See Figure 11.
12. Connect the display PCB assembly cable and the keypad cable to the main
PCB assembly. See Figure 12.
1 — Keypad cable connection
2 — Display cable connection
Figure 12: Cover Assembly Cable Connections
13. Place the cover assembly on the FW-538 unit.
14. Install the IV pole mount bracket on the FW-538. The screws should be
torqued to 6 inch/lbs (15 cm/kg). See Figure 13.
Figure 13: IV Mounting Bracket Removal
Warmflo Model FW-538
33
Service and Repair
15. Install the filter mounting bracket from the cover assembly. The screws
should be torqued to 6 inch/lbs (15 cm/kg). See Figure 14.
Figure 14: Filter Mounting Bracket Removal
16. Perform the following checks/test to verify proper operation of the FW-538
prior to returning the unit into service:
• Test #1: Zone Heating Monitoring on page 9
• Test #2: Individual Thermistor Monitoring on page 9
• Test #3: Automatic Thermistor Zone Monitoring on page 10
• Output Temperature Test on page 10
• Over-Temperature Alarm Check on page 13
Fuse Replacement
The tools required for this procedure are:
Tool
Parameters/Use
Hex driver
9/64 inch
Torque driver/wrench
6 inch/lbs (15 cm/kg)
Use the following procedure to replace the FW-538 fuse.
34
Service and Repair
1. Turn the FW-538 off by pressing the power switch, located at the back of the
unit, to “0”.
2. Unplug the FW-538 from AC power.
3. Remove the FW-538 cover. See Cover Assembly Replacement on page 30.
4. Remove the fuse and insert a new fuse. See Figure 15.
1 — Fuse Location
Figure 15: Fuse Location
5. Replace cover assembly. See Cover Assembly Replacement on page 30.
6. Perform the following checks/test to verify proper operation of the FW-538
prior to returning the unit into service:
• Test #1: Zone Heating Monitoring on page 9
• Test #2: Individual Thermistor Monitoring on page 9
• Test #3: Automatic Thermistor Zone Monitoring on page 10
• Output Temperature Test on page 10
• Over-Temperature Alarm Check on page 13
IV Pole Mount Replacement
Use the following procedure to replace the IV pole mounting bracket.
1. Remove the IV pole mounting bracket. See Cover Assembly Replacement,
step 5 on page 31.
2. Install the new IV pole mounting bracket. See Cover Assembly Replacement,
step 14 on page 33.
Warmflo Model FW-538
35
Service and Repair
Main PCB Assembly Replacement
The main PCB assembly comes assembled with:
• 1 — universal control PCB
• 1 — 0.032A fuse
• 2 — jumpers JMP2 and JMP3
The tools required for this procedure are:
Tool
Parameters/Use
Hex driver
9/64 inch
Phillips screwdriver
#1
Torque driver/wrench
6 inch/lbs (15 cm/kg)
3 inch/lbs (8 cm/kg)
Use the following procedure to replace the main PCB assembly.
1. Turn the FW-538 off by pressing the power switch, located at the back of the
unit, to “0”.
2. Unplug the FW-538 from AC power.
3. Remove the power cord from the FW-538.
4. Remove the FW-538 cover. See Cover Assembly Replacement on page 30.
36
Service and Repair
5. Disconnect all cables from the main PCB assembly. See Figure 16.
1 — J12
2 — J10
3 — J14
4 — J9
5 — J4
6 — J3
7 — J1
8 — J2
Figure 16: Main PCB Cable Connections
6. Remove the screws holding the main PCB assembly to the chassis assembly.
See Figure 17.
Figure 17: Main PCB Screws
7. Carefully lift the main PCB assembly from the chassis assembly.
8. Discard the removed main PCB assembly in accordance with local
regulations.
9. Install the new main PCB assembly in the FW-538. The screws should be
torqued to 3 inch/lbs (8 cm/kg). See Figure 17.
Warmflo Model FW-538
37
Service and Repair
10. Connect all cables to the main PCB assembly. See Figure 18.
1 — J12
2 — J14
3 — J10
4 — J9
5 — J4
6 — J3
7 — J1
8 — J2
Figure 18: Main PCB Cable Connections
11. Replace the cover assembly on the FW-538. See Cover Assembly
Replacement, step 12 on page 33.
12. Perform the following checks/test to verify proper operation of the FW-538
prior to returning the unit into service:
• Test #1: Zone Heating Monitoring on page 9
• Test #2: Individual Thermistor Monitoring on page 9
• Test #3: Automatic Thermistor Zone Monitoring on page 10
• Output Temperature Test on page 10
• Over-Temperature Alarm Check on page 13
Display PCB Assembly Replacement
The replacement display PCB assembly comes assembled with:
38
•
1 — display PCB
•
1 — 16 pin connector
•
1 — 16 conductor ribbon cable
Service and Repair
The tools required for this procedure are:
Tool
Parameters/Use
Hex driver
9/64 inch
Phillips screwdriver
#1
Torque driver/wrench
6 inch/lbs (15 cm/kg)
5 inch/lbs (13 cm/kg)
Use the following procedure to replace the display PCB assembly.
1. Turn the FW-538 off by pressing the power switch, located at the back of the
unit, to “0”.
2. Unplug the FW-538 from AC power.
3. Disconnect the power cord from the FW-538.
4. Remove the FW-538 cover. See Cover Assembly Replacement on page 30.
5. Disconnect the cover assembly cables from the main pcb. See Figure 19.
1 — Keypad cable connection
2 — Display cable connection
Figure 19: Cover Assembly Cable Connections
Warmflo Model FW-538
39
Service and Repair
6. Remove the screws holding the display assembly to the cover. See Figure 20.
1 — Cover assembly
2 — Display PCB assembly
Figure 20: Display Assembly Screws
7. Remove the display PCB assembly.
8. Discard the removed display PCB in accordance with local regulations.
9. Install the new display assembly in the cover assembly. The screws should be
torqued to 5 inch/lbs (13 cm/kg). See Figure 20.
10. Connect the cover assembly cables to the main PCB assembly. See Figure 21.
1 — Keypad cable connection
2 — Display cable connection
Figure 21: Cover Assembly Cable Connections
40
Service and Repair
11. Install the cover assembly on the FW-538. See Cover Assembly Replacement.
step 13 on page 33.
12. Perform the following checks/test to verify proper operation of the FW-538
prior to returning the unit into service:
• Test #1: Zone Heating Monitoring on page 9
• Test #2: Individual Thermistor Monitoring on page 9
• Test #3: Automatic Thermistor Zone Monitoring on page 10
• Output Temperature Test on page 10
• Over-Temperature Alarm Check on page 13
Rear Panel Assembly Replacement
The replacement rear panel assembly comes assembled with:
Warmflo Model FW-538
•
1 — rear panel
•
1 — fan assembly
•
1 — equipment label
•
1 — equipment serial number label
•
1 — 3-position connector
•
1 — 6 Amp circuit breaker
•
1 — 6 Amp input filter
•
1 — equipotential pin
•
2 — 6 mm thin nuts
•
2 — 6 mm lock washers
•
1 — color code washer
•
1 — ground label
•
1 — 3 inch (7.6 cm) brown wire assembly
•
1 — 3 inch (7.6 cm) blue wire assembly
•
1 — 5.25 inch (13.34 cm) brown wire assembly
41
Service and Repair
•
1 — 5.25 inch (13.34 cm) blue wire assembly
•
2 — 4.5 inch (11.4 cm) green/yellow wire assemblies
The tools required for this procedure are:
Tool
Parameters/Use
Hex driver
9/64 inch
Phillips screwdriver
#1
Socket
10 mm
Torque driver/wrench
3 inch/lbs (8 cm/kg)
40 inch/lbs (102 cm/kg)
Use the following procedure to replace the rear panel assembly.
1. Turn the FW-538 off by pressing the power switch, located at the back of the
unit, to “0”.
2. Unplug the FW-538 from AC power.
3. Disconnect the power cord from the FW-538.
4. Remove the FW-538 cover assembly. See Cover Assembly Replacement on
page 30.
5. Place the cover assembly in a safe place.
6. Disconnect the rear panel assembly cables from the main PCB assembly. See
Figure 22.
1 — J4
42
2 — J3
Service and Repair
Figure 22: Rear Panel Cable Connections
Note: On some of the FW-538 units, the equipment label covers the rear panel
assembly screws.
7. Remove the rear panel assembly equipment label. See Figure 23, item 1.
Figure 23: Rear Panel
Caution: When the rear panel assembly is unscrewed from the chassis
assembly, there will still be two green/yellow wires attached to the
chassis. Do not place undue stress on these wires.
8. Remove the rear panel assembly from the chassis assembly. See Figure 24.
Figure 24: Rear Panel Screws
Warmflo Model FW-538
43
Service and Repair
9. Disconnect the two small green/yellow wires attached to the chassis assembly
from the rear panel assembly equipotential terminal. See Figure 25.
1 — Equipotential terminal
2 — Green/yellow wire
3 — Green/yellow wire
Figure 25: Rear Panel Ground
10. Discard the removed rear panel assembly in accordance with local
regulations.
11. Install the two green/yellow wires on the replacement rear panel equipotential
terminal. The nuts should be torqued to 40 inch/lbs (102 cm/kg). See Figure
25 and Figure 26.
1 — Green/yellow wire to chassis
2 — Green/yellow wire to chassis
3 — Green/yellow wire to J3
4 — Green/yellow wire to filter
Figure 26: Equipotential Terminal Wiring
44
Service and Repair
12. Connect the replacement rear panel assembly to the chassis assembly. The
screws should be torqued to 3 inch/lbs (8 cm/kg). See Figure 27.
Figure 27: Rear Panel Assembly Connection
13. Connect the rear panel assembly cables to the main PCB assembly. See Figure
28.
Figure 28: Rear Panel Assembly Cable Connections
14. Install the cover assembly on the FW-538. See Cover Assembly Replacement.
step 13 on page 33.
15. Perform the following checks/test to verify proper operation of the FW-538
prior to returning the unit into service:
• Test #1: Zone Heating Monitoring on page 9
• Test #2: Individual Thermistor Monitoring on page 9
• Test #3: Automatic Thermistor Zone Monitoring on page 10
• Output Temperature Test on page 10
Warmflo Model FW-538
45
Service and Repair
• Over-Temperature Alarm Check on page 13
Door Assembly Replacement
The replacement door assembly comes assembled with:
•
1 — molded door
•
13 — #4 x 38 flat head self tapping screws
•
1 — lower heat plate assembly
•
1 — spring latch assembly
•
1 — push bottom spring
•
1 — door limiter spring
•
1 — bottom molded door
•
1 — molded door limiter
•
1 — molded right latch
•
1 — molded button
•
1 — molded left latch
The tools required for this procedure are:
Tool
Parameters/Use
Hex driver
9/64 inch
Phillips screwdriver
#1
Use the following procedure to replace the door assembly.
1. Turn the FW-538 off by pressing the power switch, located at the back of the
unit, to “0”.
2. Unplug the FW-538 from AC power.
3. Remove the power cord from the FW-538.
4. Remove the FW-538 cover assembly. See Cover Assembly Replacement on
page 30.
46
Service and Repair
5. Remove the rear panel from the chassis. See Rear Panel Assembly
Replacement on page 41.
6. Disconnect door assembly cables from the chassis assembly. See Figure 29.
1 — J9
2 — J2
Figure 29: Door Assembly Cable Connections
7. Remove the door assembly pin from the chassis assembly. See Figure 30.
Figure 30: Door Assembly Pin
Note: It is not necessary to remove the main pcb from the chassis assembly.
Warmflo Model FW-538
47
Service and Repair
8. Remove the cable retainer from the chassis assembly. See Figure 31. The
cable retainer should be pushed from the top of the chassis assembly.
1 — Door Release
2 — Cable Retainer
Figure 31: Door Assembly Cable Retainer
9. Slide the door assembly cables through the bottom of the chassis assembly.
See Figure 32.
Figure 32: Door Assembly Cable Routing
10. Discard the removed door assembly in accordance with local regulations.
11. Route replacement door assembly cables through the bottom of the chassis
assembly. See Figure 32.
12. Place the new door assembly into the chassis assembly and position it as
shown in Figure 33.
48
Service and Repair
13. Install the cable retainer into the chassis assembly. See Figure 33. The cable
retainer slot should be placed on the chassis assembly support and the cable
retainer pressed into place.
1 — Chassis assembly support
2 — Cable retainer
Figure 33: Cable Retainer Placement
14. Slide the door assembly into position with the door assembly pin holes
aligned and insert the pin. See Figure 34.
Figure 34: Door Assembly Pin Installation
Warmflo Model FW-538
49
Service and Repair
15. Reconnect the door assembly cables to the main pcb. See Figure 35.
Figure 35: Door Assembly Cable Connections
16. Install the rear panel assembly. See Rear Panel Assembly Replacement, step
11 on page 44.
17. Install the cover assembly on the FW-538. See Cover Assembly Replacement.
step 13 on page 33.
18. Perform the following checks/test to verify proper operation of the FW-538
prior to returning the unit into service:
• Test #1: Zone Heating Monitoring on page 9
• Test #2: Individual Thermistor Monitoring on page 9
• Test #3: Automatic Thermistor Zone Monitoring on page 10
• Output Temperature Test on page 10
• Over-Temperature Alarm Check on page 13
Chassis Assembly Replacement
The replacement chassis assembly comes assembled with:
50
•
1 — molded chassis
•
6 — threaded inserts
•
5 — #4 x 3/8 flat head self tapping screws
•
1 — upper heater plate assembly
Service and Repair
The tools required for this procedure are:
Tool
Parameters/Use
Hex driver
9/64 inch
Phillips screwdriver
#1
Use the following procedure to replace the chassis assembly.
1. Turn the FW-538 off by pressing the power switch, located at the back of the
unit, to “0”.
2. Unplug the FW-538 from AC power.
3. Remove the power cord from the FW-538.
4. Remove the FW-538 cover assembly. See Cover Assembly Replacement on
page 30.
5. Remove the rear panel assembly from the chassis. See Rear Panel Assembly
Replacement on page 41.
6. Remove the main PCB assembly. See Main PCB Assembly Replacement on
page 36.
7. Remove the door assembly. See Door Assembly Replacement on page 46.
Warmflo Model FW-538
51
Service and Repair
8. Remove the upper heater plate from the main chassis. See Figure 36.
1 — Upper Heater Plate
Figure 36: Upper Heater Assembly
9. Discard the old chassis assembly in accordance with local regulations.
10. Install upper heater plate in the new chassis assembly. See Figure 36.
11. Install the door assembly on the new chassis assembly. See Door Assembly
Replacement step 11 on page 48.
12. Install the main PCB assembly on the chassis assembly. See Main PCB
Assembly Replacement step 9 on page 37.
13. Install the rear panel on the chassis. See See Rear Panel Assembly
Replacement.step 11 on page 44.
14. Install the cover assembly. See See Cover Assembly Replacement step 11 on
page 33.
15. Perform the following checks/test to verify proper operation of the FW-538
prior to returning the unit into service:
• Test #1: Zone Heating Monitoring on page 9
52
Service and Repair
• Test #2: Individual Thermistor Monitoring on page 9
• Test #3: Automatic Thermistor Zone Monitoring on page 10
• Output Temperature Test on page 10
• Over-Temperature Alarm Check on page 13
Warmflo Model FW-538
53
Blank Page
Specifications
Dimensions
Height
4.75 inches (12 cm)
Width
5.75 inches (14.5 cm)
Depth
11 inches (28 cm)
Weight
8 pounds (3.63 kg)
Technical Specifications
Complies with Standards: IEC 601.1, UL 2601, C22.2 No 601.1-M90
Warmflo Model FW-538
Supply voltage
115 Volts AC
Operating frequency
50 to 60 Hz
Maximum operating current
12 Amperes
Maximum heating power
1,440 Watts
Warmer circuit breaker rating
12 Amperes
Electrical equipment class
Class 1 equipment
Patient applied part
Type BF equipment
Heat transfer method
Dry Heat
Temperature control range
28.0 ° C to 42.0° C
Default set point temperature
38.0° C
Low temperature alarm
3.0° C below set point
High temperature alarm
44.5° C
Secondary heater disable
45.0° C
Display screen
Four-digit green LED
Fluid ingress protection
Drip Proof (IPX2)
55
Specifications
Operating temperature range
50° F to 86° F (10° C to 30° C)
Operating relative humidity
10% to 95% non-condensing
Operating elevation
0 to 10,000 feet (0 to 3,048 meters)
Mode of operation
Continuous
Transportation and Storage
Ambient temperature
-13º F to 131º F (-25° C to 55° C)
Relative humidity
10% to 95% non-condensing
Elevation
0 to 10,000 feet (0 to 3,048 meters)
Performance Requirements
1. 10°C fluid at the input of the cassette must be warmed to a minimum of 35 °C
at four feet (1.2 meters) past the air trap with a 38°C temperature set point.
This applies to a flow rate range of 15 to 250 ml/minute.
2. 20°C fluid at the input of the cassette must be warmed to a minimum of 35°C
at four feet (1.2 meters) past the air trap with a 38°C temperature set point.
This applies to a flow rate range of 15 to 250 ml/minute.
Compliance
Table 4: Model FW-538 Compliance
Item
56
Compliant With
Equipment classification
Safety Standards: EN 60601-1 (same
as EN60601-1), CSA 601.1,
UL 2601-1, EN 60601-2-35, EN
60601-1-2 (second edition)
Type of protection
Class I (on AC power)
Degree of protection
Type BF - Applied part
Mode of operation
Continuous
Resistant to liquid ingress
EN 60601-1, sub-clause 44.6 for class
IPX0, ordinary
Specifications
Table 4: Model FW-538 Compliance
Item
Warmflo Model FW-538
Compliant With
Degree of Safety in presence of a
flammable anaesthetic
UL 2601-1, sub-clause 5.5, Not
suitable
Applied label to indicate Type BF
applied part
EN 60601-1 Symbol 2 of Table DII of
Appendix D
Equipotential lug symbol to indicate a
potential equalization conductor
EN 60601-1 Symbol 9 of Table DI of
Appendix D
Attention symbol, consult
accompanying documentation
EN 60601-1 Symbols 14 of Table DI
of Appendix D
External case made with
non-conductive plastic
EN 60601-1, sub-clause 16(a)
No holes in case top
EN 60601-1, sub-clause 16(b)
Rigid case
EN 60601-1, sub-clause 21(a)
Case mechanically strong
EN 60601-1, sub-clause 21(b)
Case handle
EN 60601-1, sub-clause 21(c)
Resistant to rough handling
EN 60601-1, sub-clause 21.6
Tip/tilt test
EN 60601-1, sub-clause 24.1
Resistant to liquid ingress due to
spills
EN 60601-1, sub-clause 44.3 as
modified by EN 865, clause 4
Environmental
EN 60601-1, sub-clause 44.5
Cleaning
EN 60601-1, sub-clause 44.7
Case surface made of non-toxic
materials
EN 60601-1, sub-clause 48
Case resistant to heat and fire
EN 60601-1, sub-clause 59.2(b)
Fuse holder
EN 60601-1, sub-clause 59.3
Exterior markings
EN 60601-1, sub-clause 6.1, 6.3, and
6.4
Front panel and case labeling
EN 60878, EN 980, ISO 7000, EN
60417-1, EN 60417-2
Button spacing
ISO 7250
Year of manufacture symbol
EN 980
Conductive coating and polymeric
materials
UL 2601-1, clause 55
Operation during physical shock
EN 60068-2-27 at 100 g
Operation during vibration
EN 60068-2-6 and EN 60068-2-34
57
Specifications
Table 4: Model FW-538 Compliance
Item
58
Compliant With
Electromagnetic Compatibility
EN 60601-1, sub clause 36, EN
60601-1-2 (second edition)
Radiated and conducted emissions
EN 55011, Group 1, Class B
Harmonic emissions
EN 61000-3-2
Electrostatic discharge immunity
EN 61000-4-2, level 3 table top
equipment
Radiated radio-frequency
electromagnetic field immunity
EN 61000-4-3 at 3V/m
Electrical fast transient/burst
immunity
EN 61000-4-4, level 3, Table 10
Surge immunity
EN 61000-4-5, level 3; FDA
Reviewer’s Guide
Conducted EMI susceptibility
EN 61000-4-6 at 3 Vrms
Power frequency magnetic fields
EN 61000-4-8 at 3 Vrms
Operation with line voltage variations
EN 61000-4-11, Table 7
Operation with electrical line voltage
variations
FDA Reviewer’s Guide
Radiated magnetic field emissions
RE 101/Army/7cm of
MIL-STD-461E
Magnetic field susceptibility
RS 101 in MIL-STD-461E
Quasi-static electric field
susceptibility
FDA Reviewer’s Guide
Specifications
Manufacturer’s Declaration
WARNING: The use of accessories and cables other than those specified may
result in increased emission and/or decreased immunity of the FW-538.
Table 5: Electromagnetic Emissions
The FW-538 is suitable for use in the specified electromagnetic environment.
The customer and/or user of the FW-538 should assure that it is used in an
electromagnetic environment as described below:
Emissions
Test
Electromagnetic Environment
Guidance
Compliance
RF emission
CISPR 11
Group 1
The FW-538 must emit electromagnetic
energy in order to perform its intended
function. Nearby electronic equipment
may be affected.
RF emissions
CISPR 11
Class B
The FW-538 is suitable for use in all
establishments.
Harmonic
emissions
EN 61000-3-2
Complies
Table 6: Electromagnetic Immunity
The FW-538 is suitable for use in the specified electromagnetic environment.
The customer and/or user of the FW-538 should assure that it is used in an
electromagnetic environment as described below.
Immunity
Test
Electrostatic
discharge
(ESD)
EN
60601-1-2
Test Level
±6 kV
contact
Compliance
Level
±6 kV contact
±8 kV air
±8 kV air
EN
61000-4-2
Electric fast
transient/
burst
±2 kV for
power
supply lines
±2 kV for
power supply
lines
EN
61000-4-4
±1 kV for
input/output
lines
±1 kV for
input/output
lines
Electromagnetic
Environment Guidance
Floor should be wood,
concrete, or ceramic tile. If
floors are covered with
synthetic material, the
relative humidity should be
at least 30 %.
Mains power quality should
be that of a typical
commercial and/or hospital
environment
Note: UT is the AC mains voltage prior to application of the test level.
Warmflo Model FW-538
59
Specifications
Table 6: Electromagnetic Immunity
The FW-538 is suitable for use in the specified electromagnetic environment.
The customer and/or user of the FW-538 should assure that it is used in an
electromagnetic environment as described below.
Immunity
Test
Surge
EN
60601-1-2
Test Level
Compliance
Level
±1 kV
differential
mode
±1 kV
differential
mode
±2 kV
common
mode
±2 kV common
mode
Voltage
dips, short
interruption
s and
voltage
variations
on power
supply
<5 % UT
<5 % UT
(>95 % dip
in UT) for
0.5 cycle
(>95 % dip in
UT) for 0.5
cycle
40 % UT
40 % UT
EN
61000-4-11
(60 % dip in
UT) for 5
cycles
(60 % dip in
UT) for 5 cycles
70 % UT
70 % UT
(30 % dip in
UT) for 25
cycles
(30 % dip in
UT) for 25
cycles
<5 % UT
<5 % UT
(95 % dip in
UT) for 5
sec.
(95 % dip in
UT) for 5 sec.
3 A/m
3 A/m
EN
61000-4-5
Power
frequency
(50/60 Hz)
magnetic
field
EN
61000-4-8
Electromagnetic
Environment Guidance
Mains power quality should
be that of a typical
commercial and/or hospital
environment
Mains power quality should
be that of a typical
commercial and/or hospital
environment. If the user of
the FW-538 requires
continued operation during
power mains interruption, it
is recommended that the
FW-538 be powered from an
uninterruptible power supply
or battery.
It may be necessary to
position the FW-538 further
from the sources of power
frequency magnetic fields or
to install magnetic shielding.
The power frequency
magnetic field should be
measured in the intended
installation location to assure
that it is sufficiently low.
Note: UT is the AC mains voltage prior to application of the test level.
60
Specifications
Table 7: Electromagnetic Immunity, RF Portable Equipment
For portable and mobile communication equipment. The FW-538 is suitable for
use in the specified electromagnetic environment. The customer and/or user of
the FW-538 should assure that it is used in an electromagnetic environment as
described below:
Immunity
Test
EN
60601-1-2
Test Level
Compliance
Level
Electromagnetic
Environment Guidance
Portable and mobile RF communications equipment should be used no closer
to any part of the FW-538, including cables, than the recommended separation
distance calculated from the equation appropriate for the frequency of the
transmitter.
Recommended Separation Distance
Radiated RF
EN 61000-4-3
Conducted RF
EN 61000-4-6
3 V/m
80 MHz
800 MHz
3 V/m
distance = 1.2√Power
80 MHz to 800 MHz
3 V/m
800 MHz
2.5 GHz
3 V/m
distance = 2.3√Power
800 MHz to 2.5 GHz
3 Vrms
150 kHz
80 MHz
3 Vrms
distance = 1.2√Power
150 kHz to 80 MHz
Note: Field strengths from fixed transmitters, such as base stations for radio
(cellular/cordless) telephones and land mobile radios, amateur radio, AM and
FM radio broadcast, and TV broadcast cannot be predicted theoretically with
survey accuracy. To assess the electromagnetic environment due to fixed RF
transmitters, an electromagnetic site survey should be considered. If the
measured field strength in the location in which the FW-538 is used exceeds the
applicable RF compliance level above, the FW-538 should be observed to
verify normal operation. If abnormal performance is observed, additional
measures may be necessary, such as reorienting or relocating the FW-538.
Note: These guidelines may not apply in all situations. Electromagnetic
propagation is affected by absorption and reflection from structures, objects,
and people.
Interference may occur in the vicinity of equipment marked with the following
symbol:
Warmflo Model FW-538
61
Specifications
Table 8: Recommended Separation Distances
Recommended Separation Distances between Portable and Mobile RF
Communications Equipment and the FW-538 (EN 60601-1-2)
Frequency of
Transmitter
26 MHz to
80 MHz
80 MHz to
800 MHz
800 MHz to
2.5 GHz
Equation
d = 1.2√P
d = 1.2√P
d = 2.3√P
Rated Maximum
Output Power of
Transmitter in
Watts
Separation
Distance in
Meters
Separation
Distance in
Meters
Separation
Distance in
Meters
0.01
0.12
0.12
0.23
0.1
0.38
0.38
0.73
1
1.2
1.2
2.3
10
3.8
3.8
7.3
100
12
12
23
For transmitters rated at a maximum output power not listed above, the
separation distance can be estimated using the equation in the corresponding
column, where P is the maximum output [power rating of the transmitter in
watts (W)] according to the transmitter manufacturer.
Note: These guidelines may not apply in all situations. Electromagnetic
propagation is affected by absorption and reflection from structures, objects,
and people.
62
Spare Parts and Accessories
Introduction
The following Warmflo disposable fluid warming cassettes, pressure infusors, and
spare parts are approved for use with the FW-538 fluid warming system. Other
fluid cassettes may be available. Contact Nellcor’s Technical Service or your local
representative, or check the internet at:
http://www.mallinckrodt.com/respiratory/resp/Serv_Supp/Apartweb/main/
PartAcceMenu.html
Disposable Fluid Warming Sets
Part Number
Description
SF-150
WF-250 replacement filter
WF-100
Cassette, Fluid Warming
WF-250
Cassette, Surgical Fluid Warming
8860
Test Cassette Kit, WF-8860
Infusors and Irrigators
Part Number
Description
AD 500FW
Infusor, 500 ml
AD 1000FW
Infusor, 1000 ml
AD 1500FW
Infusor, 500 & 1000 ml, Mounted
AD 2000FW
Infusor, Dual 1000 ml, Mounted
If the FW-538 fluid warming system is used with a surgical irrigation pump or an
automatic pressure infusor, carefully read the accessory directions for use, and all
warnings, precautions, and specifications before using the equipment with the
FW-538.
Warmflo Model FW-538
63
Spare Parts and Accessories
Spare Parts and Accessories
Description
64
Part Number
Figure 37
Number
Air filter mount bracket
067045
2
Chassis assembly
520-0006SP
5
Cover assembly
128-0017SP
1
Door assembly
520-0010SP
6
Fuse, 0.063A 50 volt
128-5002
Display PCB assembly,
520-0014SP
7
Main PCB assembly,
520-0017SP12
3
Wire cover plug
128-5018SP
Power cord, 14 ft.
901-1502SP
Rear panel assembly
128-0009SP
Replacement filter for WF-250
surgical set
SF-150
IV pole screw
128-2039
PCB assembly screws
128-2036
Rear panel attachment screws
128-2031
Strain relief
128-2020
4
8
Spare Parts and Accessories
Figure 37: Spare Parts
Warmflo Model FW-538
65
Spare Parts and Accessories
Disposal of Fluid Sets
Fluid sets should be disposed using the hospital standard procedure for disposing
of blood products.
Disposal Of Fluid Warming System
Nellcor recommends that the institution follow local governing ordinances and
recycling instructions regarding disposal or recycling of device components. Fluid
warming sets cannot be recycled.
The FW-538 fluid warming system contains no toxic materials.
66
Packing for Shipment
Introduction
To ship the FW-538 for any reason, follow the instructions in this section.
Returning the FW-538
Contact Nellcor’s Technical Services Department or your local Nellcor
representative for shipping instructions, including a Returned Goods
Authorization (RGA) number. Unless otherwise instructed by Nellcor's Technical
Services Department, it is not necessary to return accessory items with the
FW-538. Pack the FW-538 in its original shipping carton. If the original carton is
not available, use a suitable carton with appropriate packing material to protect it
during shipping.
Return the FW-538 by any shipping method that provides proof of delivery.
General Instructions
Pack the FW-538 carefully. Failure to follow the instructions in this section may
result in loss or damage not covered by any applicable Nellcor warranty. If the
original shipping carton is not available, use another suitable carton; North
American customers may call Nellcor’s Technical Services Department to obtain
a shipping carton.
Prior to shipping the FW538, contact your supplier or local Nellcor office
(Technical Services Department) for a returned goods authorization number. Mark
the shipping carton and any shipping documents with the returned goods
authorization (RGA) number. Return the FW-538 by any method that provides
proof of delivery.
Repacking in Original Carton
If available, use the original carton and packing materials. See Figure 38. Pack the
FW-538 as follows:
Warmflo Model FW-538
67
Packing for Shipment
1. Place the FW-538 and, if necessary, accessory items in original packaging.
1 — Packing insert
2 — Poly bag
3 — FW-538
4 — Packing insert
5 — Shipping carton
6 — Power cord
Figure 38: Packing
2. Place in shipping carton and seal carton with packing tape.
68
Packing for Shipment
3. Label carton with shipping address, return address, and RGA number, if
applicable.
Repacking in a Different Carton
If the original carton is not available, use the following procedure to pack the
FW-538:
1. Place the FW-538 in a poly bag.
2. Locate a corrugated cardboard shipping carton with a bursting strength of at
least 200 pounds per square inch (psi).
3. Fill the bottom of the carton with at least 2 inches of packing material.
4. Place the bagged unit on the layer of packing material and fill the box
completely with packing material.
5. Seal the carton with packing tape.
6. Label the carton with the shipping address, return address, and RGA number,
if applicable.
Warmflo Model FW-538
69
Blank Page
Theory of Operation
Introduction
The schematic diagrams for the Theory of Operation are located at the end of this
section.
The FW-538 is used to warm fluids that are gravity fed or pressure infusor fed.
The fluid warming system heats fluid as it flows through a fluid warming cassette.
The cassette is inserted between two heater plates that are Tufram® coated for
surface protection. Maximum heat transfer is achieved when the cassette and
heater plates are clean, and the cassette expands due to a slight downstream
resistance, creating effective surface contact with the heater plates. The top heater
plate contains three heater elements and three thermistors (temperature sensors).
The bottom heater plate contains three heater elements and one thermistor
(temperature sensors).
The fluid warming system software monitors the temperature and duty cycle of
the three heater zones, and regulates the fluid temperature by turning the heaters
on and off, as needed to maintain the fluid SET POINT temperature. The default
SET POINT is 38°C. The temperature control range is from 28°C to 42°C. The
preset temperature set point is continuously displayed in the format ##.#, rounded
to the nearest 0.5 degree.The reading is updated approximately once every
second.
The major components of the FW-538 fluid warming system are:
• two heater plates with four embedded temperature sensors
• keyboard
• main circuit board
• display circuit board
Schematics for the circuit boards are at the back of this section.
Main Circuit Board: Start-Up
When the unit is turned on, it enters a start-up test mode. The software executes a
test of the following microprocessor components:
• RAM (U5)
• ROM (U25)
Warmflo Model FW-538
71
Theory of Operation
• CPU registers
• watchdog (U30)
• NVRAM (Non-Volatile RAM, U19)
If one of these tests fails, an appropriate fault code, in the format “F_##”,
indicates the condition, and an alarm will sound. For fault code values, refer to
Table 2 on page 20. If a fault code is displayed, the unit must be turned off and
then restarted. If the fault has been resolved, the unit will then proceed through the
sequence of startup tests:
As start-up proceeds, the following events occur:
• Each thermistor is checked for “open”, “short”, and “within range” conditions.
• Each heater is tested to ensure that current flow is under software control and
that the power triacs operate correctly.
• If all test results are normal, the unit conducts an LED display test. All
segments for each digit are displayed and held for 2 – 3 seconds.
• The software version number is then displayed. The user should verify that all
segments are displayed during this time.
• The unit then enters the preheat mode, during which a running dash line is
displayed.
• When the default temperature set point is reached, 38°C is displayed.
At this point, the unit enters normal operational mode.
Heater Control Circuitry
The power for the heaters is supplied through power triacs whose drivers are
isolated from the microprocessor by zero-crossing type opto-couplers U1, U2, and
U4. The microprocessor senses when current is being drawn through the heaters.
Heater current-detect circuitry includes transformer T1, diodes D7 and D8, and
comparator U15B. The voltage induced in the secondary of the transformer T1 is
clamped by D7 and D8. This circuit limits the output “swing” to one diode drop
voltage. This voltage is applied to the inputs of the comparator LM393, which in
turn sends a CURRENT_SENS signal to U21 (80C5552 microcontroller with an
11.0592 MHz crystal).
The microcontroller initiates a HEATER_SET signal, which is applied to the
EXTERNAL_OT U10. Output from U10 is the HEATER_EN signal, which
reflects the status of the master triac. This signal may be set HIGH (triac disabled)
by the EXT_OT signal provided by hardware. The HEATER_EN (master enable)
signal controls the U3 (optoisolator), which in turn powers the HEATER
DRIVERS and HEATER CURRENT SENSOR circuit. After heater current is
72
Theory of Operation
detected, the microcontrollor initiates an on/off test of each triac through signals
DRV_ZN1-DRV_ZN3 (Port 1 of U21), which are applied to the octal buffer U13
in sequence. The HEATER_OC from U21 enables or disables the buffer U13.
Temperature Sensing Circuitry
Four thermistors (SENS_ZN1, SENS_ZN2, SENS_ZN3, and Lower Plate) are
embedded in the heater plates using a highly heat-conductive eclectic alloy which
allows rapid sensing of zone temperature. Thermistors 1, 2, and 3 are connected to
the Main Circuit board through connector J6. The lower plate thermistor is
connected to the Main Circuit board through connector J9.
Each sensor is located in the voltage divider circuitry, which comprises a precision
resistor (5760 ohms, 0.1%) and the corresponding temperature sensor. The output
signal from each voltage divider circuit is monitored by the microprocessor’s
analog-to-digital converter (P5.0-2, P5.6)
All four thermistors monitor the temperature of the heater plates. The output fluid
temperature is affected by both the rate of fluid flow through the cassette and the
length of the tubing between the fluid warming system and the patient.
Over-Temperature Operation
If an output temperature of 44.5°C ± 1°C is detected for greater than two seconds,
the heater plates will be disabled, an intermittent, audible alarm will sound, and a
display of temperature preceded by the letter “H” will indicate over-temperature
condition. At this point, all heaters are disabled, and the master triac is turned off.
All of the heater triacs are then tested. If any heaters are still producing current,
the program will enter the FAULT mode, an audible alarm will sound, and the
appropriate fault code will indicate the condition.
Secondary Over-Temperature Protection
The fluid warming system provides a secondary over-temperature shutdown,
separate from the microcontroller, if the temperature exceeds 45°C ± 1°C. A
continuous audible alarm and display of temperature preceded by the letter “H”
(HXX.X), indicate this condition. If a fault code is reported, the display will
alternate between the temperature and the reported fault code.
The secondary over-temperature protection is hardware-implemented. The
over-temperature reference signal (OT_REF_HI) is formed by the voltage divider
circuit, which consists of R23 (5760 ohms, 1%) and R21 (4530 ohms, 0.1%) the
output of which is applied to the comparator U15 pin 13, which disables the
heaters. If current to the heaters is detected, this condition is not recoverable
without turning off the unit. If the condition is due to preheated fluid or overshoot
Warmflo Model FW-538
73
Theory of Operation
due to an abrupt stoppage of flow, the unit will resume operation when the fluid
temperature falls below the temperature setting.
Under-Temperature Operation
When the output temperature is 3°C or more below set point for ten seconds, a
short beep will sound every five seconds and the display will flash with the first
digit displaying “L” to indicate an under-temperature condition, but the warmers
will continue operation.
Display Board
The display board is connected by a ribbon cable to J10 of the main circuit board.
The display consists of a four-digit green LED. Each segment of the leading digit
is addressable by the microprocessor. In normal operating mode, the first LED
segment is blank, and the remaining three digits display only numbers 0 – 9. The
display is continuously on and updated at one second intervals.
The display will flash when the heater set point is being increased or decreased.
After no change for three seconds, the display will stop blinking and display the
set point.
Keyboard
The keyboard is attached to the main circuit board through connector J12. The
user interface buttons are monitored at a rate of 10 Hz or greater. The On, Off,
Alarm Test, and Alarm Silence buttons on the keyboard are used to control
temperature set point and to check or silence the audible alarm.
Temperature Adjustment
Figure 39: Increasing/Decreasing Temperature
74
Theory of Operation
The temperature set point can be adjusted by pressing the increase or decrease
button on the front panel, located below the temperature set point display.
Pressing the increase button (up arrow) or decrease button (down arrow) will
alter the set point in 0.5 degree increments, to a maximum of 42°C or a minimum
of 28°C. An error tone is sounded if the set point is already at a limit value. While
the user is increasing or decreasing the temperature set point, the display flashes.
After no change to the set point is made for three seconds, the display stops
flashing and displays the set point.
Alarm Control Buttons
The alarm test buttons are located on either side of the set point display. Pressing
the alarm test causes a simulation of an over-temperature alarm, followed by a
low temperature alarm. Normal operation automatically resumes within ten
seconds after the test.
The alarm silence button silences any alarm (except the secondary
over-temperature alarm) for a two-minute period. If the condition persists after the
timeout has elapsed, the audible alarm will sound again.
Note: The secondary over-temperature alarm cannot be silenced with this button.
The unit must be turned off and allowed to cool.
Warmflo Model FW-538
75
Blank Page
Theory of Operation
VCC
R27
R23
R22
5760 .1%
R24
R25
R26
R34
R36
R2
5760 .1%
5760 .1%
5760.1%
4.7K
4.7K
4.7K
5760 .1%
OT_REF
5760 .1%
SENS_ZN_1
OT_REF_HI
R21
SENS_ZN_2
R20
4.530K 0.1%
4.870K 0.1%
SENS_ZN_3
U28
8
7
6
5
4
3
2
1
GND
IN7
IN6
IN5
IN4
IN3
IN2
IN1
9
10
11
12
13
14
15
16
IN9
IN10
IN11
IN12
IN13
IN14
IN15
VCC
Lower Plate
VCC
C2
.1
JMP4
0 ohm
J12
U26 pin 11
1
2
3
4
5
6
7
8
9
10
11
12
13
14
15
16
17
18
19
20
21
22
23
24
25
26
27
28
29
30
31
32
33
34
Cut to
disable
watchdog
INCREASE
DECREASE
ALARM_TEST
ALARM_SILENCE
SPARE
TEST
J 14
DRV_ZN11
2
DRV_ZN2-
TEST
DRV_ZN3-
KEYBD
C4
.1
C7
.1
C8
.1
HEATER_SET+
HEATER_OCCURRENT_SENSHEATER_EN-
C11
.1
C10
.1
J6
1
2
3
4
5
6
D[0..7]
U21
SP720AP
1
2
3
4
5
6
7
8
9
10
C3
.1
P5.0/ADC0
VDD
STADC
PWM0
PWM1
EW
P4.0/CMSR0
P4.1/CMSR1
P4.2/CMSR2
P4.3/CMSR3
P4.4/CMSR4
P4.5/CMSR5
P4.6/CMT0
P4.7/CMT1
RST
P1.0/CT0I
P1.1/CT1I
P1.2/CT2I
P1.3/CT3I
P1.4/T2
P1.5/RT2
P1.6
P1.7
P3.0/RXD
P3.1/TXD
P3.2/INT0
P3.3/INT1
P3.4/T0
P3.5/T1
P3.6/WR
P3.7/RD
NC
NC
XTAL2
68
67
66
65
64
63
62
61
60
59
58
57
56
55
54
53
52
51
50
49
48
47
46
45
44
43
42
41
40
39
38
37
36
35
P5.1/ADC1
P5.2/ADC2
P5.3/ADC3
P5.4/ADC4
P5.5/ADC5
P5.6/ADC6
P5.7/ADC7
AVDD
AVSS
AVREF+
AVREFP0.0/AD0
P0.1/AD1
P0.2/AD2
P0.3/AD3
P0.4/AD4
P0.5/AD5
P0.6/AD6
P0.7/AD7
EA
ALE
PSEN
P2.7/A15
P2.6/A14
P2.5/A13
P2.4/A12
P2.3/A11
P2.2/A10
P2.1/A09
P2.0/A08
NC
VSS
VSS
XTAL1
.1
10
9
12
11
14
13
16
15
D0
D1
D2
D3
D4
D5
D6
D7
7
8
5
6
3
4
1
2
D0
D1
D2
D3
D4
D5
D6
D7
1
11
Q0
Q1
Q2
Q3
Q4
Q5
Q6
Q7
2
5
6
9
12
15
16
19
10
9
8
7
6
5
4
3
25
24
21
23
2
26
27
A8
A9
A10
OC
G
A11
A12
A13
A14
74HC373N
A15
A0
A1
A2
A3
A4
A5
A6
A7
A8
A9
A10
A11
A12
A13
A14
20
22
1
D0
D1
D2
D3
D4
D5
D6
D7
11
12
13
15
16
17
18
19
O0
O1
O2
O3
O4
O5
O6
O7
ZONE SENSORS
J9
1
2
Lower Plate Sensor
CE
OE
VPP
J10
D0
D1
D2
D3
D4
D5
D6
D7
27C256-12/P
VCC
[AT29C256-12PC]
A
B
C
6
4
5
Y0
Y1
Y2
Y3
Y4
Y5
Y6
Y7
G1
G2A
G2B
22 pF
1
2
3
4
5
6
7
8
9
10
11
12
13
14
15
16
VCC
U29
1
2
3
C39
11.0592 MHz
4.7
3
4
7
8
13
14
17
18
U25
15
14
13
12
11
10
9
7
U5
U10
74HC00
74HC138N
WR18
20
21
9
10
11
13
14
15
16
17
DISPLAY
U26
CE
OE
WE
4.7K_DIP
COM
R15
R14
R13
R12
R11
R10
R9
WATCHDOG-
D0
D1
D2
D3
D4
D5
D6
D7
R1
R2
R3
R4
R5
R6
R7
R8
3
A0
A1
A2
A3
A4
A5
A6
A7
A8
A9
A10
1
2
3
4
5
6
7
8
8
7
6
5
4
3
2
1
23
22
19
1
C38
+
C35
100 ohm
RP1
Y1
22 pF
D0
D1
D2
D3
D4
D5
D6
D7
VCC
C34
2
80C552-4A68
U23
16
15
14
13
12
11
10
9
LH5116-15
TONE
VCC
2
1
13
EXTERNAL OVER-
CURRENT_SENS-
U12A
HEATER_SET+
U19
4
9
DO
61
1
60
U21 Pin
DI
CE
SK
6
7
RECALL
STORE
Configuration
CSPUP
12
10
HEATER_OC3
1
2
U21 Pin 6
RESET+
VCC
Vcc
X24C44P
U30
44
26
43
JMP 5
6
5
0 ohm
4.7K
3
OT_REF_HI
DS1232
2
Lower Plate
11
13
1Y1
1Y2
1Y3
1Y4
1A1
1A2
1A3
1A4
2Y1
2Y2
2A1
2A2
1G
2G
C18
U15A
+
C33
270K
4.7
+
1
SPEAKER
LM393N
U27
3
5
7
9
RESET+
.1
R47
PBRST-
R49
2
4
6
10
4
Cut to
disable
reset
SRST
RST
8
27
LS1
R45
7
3
2
1
ST
TOL
TD
RST
33K
U12B
R1
3
4
5
12
14
Q5
2N3904
6
4.7K
74HC27
1
15
VCC
74HC367N
U24
.1
J11
Ring
Tip
Shield
5
4
3
2
1
RS 232
C12
1
3
5
7
9
11
13
15
2
4
6
8
10
12
14
16
U12C
C17
11
10
9
DISABLE
8
EXT_OT-
.1
74HC27
VCC
R48
C15
MAX202CPD
4.7K
VCC
C13
.1
.1
VCC
+
C37
4.7
+
C23
4.7
C41
+
4.7
C32
.1
C24
.1
C43
.1
C42
.1
C36
.1
C27
.1
C26
.1
C40
.1
C29
.1
C28
.1
C22
.1
C20
.1
GND
Figure 39
Main Control Board Schematic Diagram
Sheet 1 of 2
77
Theory of Operation
DC POWER SUPPLY
U9
1
Vcc
LM340T-5
IN
OUT
3
+5V
FOR 220-240 VAC INPUT CUT J2 AND J3
+
D1
LINE
NEUTRAL
1
2
3
1
RXE90
5
C5
470
C6
C1
10
+
.1
J4
-
1
2
+
FAN
J3
1/16 A_240_VAC Slo Blo
2
J1
Power Input
T2
2
J3
GND
F3
FOR 100-120 VAC INPUT CUT J1
F1
MOV1
0 ohm
275 V
0 Ohms
2
6
3
J2
7
DF04
BRIDGE
1
0 Ohms
4
8
Prem SPW 1100
T1
TRANSFORMER
HEATER ENABLE
2
1
VCC
1
VCC
R8
6
100
+
Q1
C25
4.7
.1
C16
R33
Q6015L5
680
.1
2
C14
R10
2
510
U3
3
ZERO
1
1N4148
4
CROSS
CIRCUIT
D8
MOC3063-T
D7
1N4148
HEATER DRIVERS
1
VCC
R19
6
100
HEATER CURRENT DETECT
R32
2
510
4
3
UPPER HEATER
ZERO
VCC
1
U4
2
Q6
Q6015L5
CROSS
CIRCUIT
CSPUP
J1
Zone 1
Zone 2
Zone 3
MOC3063-T
VCC
R44
10K
2
4
Q4
4.7K
R41
Q6015L5
R11
-
510
100K
Burndy HEADER
3
ZERO
CROSS
CIRCUIT
MOC3063-T
4
.1
Heater Common
1
2
3
4
1
U2
6
+
C19
R14
100
2
8
LM393N
5
CURRENT_SENS-
6
R40
U15B
7
1
R37
680
1
VCC
R13
100
6
HEATER_SET+
R9
2
510
4
3
ZERO
1
U1
2
Q2
Q6015L5
CROSS
CIRCUIT
MOC3063-T
EXTERNAL OVERTEMPERATURE
Power Connections
U10
LOWER HEATER
12
PART ID
11
13
EXT_OT-
74HC00
HEATER_ENU13
2
4
6
8
11
13
15
17
DRV_ZN1DRV_ZN2DRV_ZN3-
1
19
HEATER_OC-
1A1
1A2
1A3
1A4
2A1
2A2
2A3
2A4
1Y1
1Y2
1Y3
1Y4
2Y1
2Y2
2Y3
2Y4
18
16
14
12
9
7
5
3
HEATER_OC
TEST
1G
2G
74HC244N
Vcc +5V
OT_REF HI
OT_REF
CURRENT_SENSHEATER_SET-
U10
U10
9
6
5
74HC00
74HC00
1
3
5
7
9
11
13
15
2
4
6
8
10
12
14
16
Ground
U5
24
12
U9
3
2
U10
14
7
U12
14
7
U13
20
10
U15
8
4
U19
8
5
U21
2
36&37
U23
20
10
U24
16
15
U25
28
14
U26
16
NA
U27
16
8
U28
16
8
U29
16
8
U30
8
4
J2
1
2
3
4
Burndy HEADER
EXT_OT-
TEST
PBRST-
4
8
10
J13
+5V
Figure 40
Main Control Board Schematic Diagram
Sheet 2 of 2
79
Theory of Operation
D3
16
15
3
2
1
18
17
4
J1
11
10
8
6
5
12
7
9
U1
1
2
3
4
5
6
7
8
9
10
11
12
13
14
15
16
D0
D1
D2
D3
D4
D5
D6
D7
A8
12
11
13
14
10
6
5
7
9
8
CON16
ID0
ID1
ID2
ID3
ID4(SHUT)
ID5(DEC)
ID6(HEXA)
ID7(DATA)
DP
SEGA
SEGB
SEGC
SEGD
SEGE
SEGF
SEGG
MODE
WRITE
D8
D7
D6
D5
D4
D3
D2
D1
ICM7218AIPI
VCC
+
C1
47 uF
C2
.1
C3
.1
C4
.1
4
27
3
1
25
2
24
26
18
21
22
17
20
23
16
15
A1
B1
C1
D1
E1
F1
G1
DP1
A2
B2
C2
D2
E2
F2
G2
DP2
DIG1
DIG2
14
13
LN524GA
D3
16
15
3
2
1
18
17
4
11
10
8
6
5
12
7
9
A1
B1
C1
D1
E1
F1
G1
DP1
A2
B2
C2
D2
E2
F2
G2
DP2
DIG1
DIG2
14
13
LN524GA
Figure 41
Display Printed Circuit Board
Schematic Diagram
81
Index
A
Accessories 63
Alarm silence 7
Alarm test 7, 28
B
BF classification 7
C
Canadian Standards Association 7
Cautions 2
Chassis assembly replacement 50
Clean exterior surfaces 27
Clean heater plates 27
Contra-indications 5
Cover assembly replacement 30
F_13 22
F_17 22
F_20 22
F_21 23
F_22 23
F_23 23
F_30 23
F_31 23
F_32 23
F_41 24
F_42 24
F_43 24
F_44 24
F_45 24
F_46 24
Fluid sets 66
Fluid warming sets 63
Fuse 64
Fuse replacement 34
D
Dimensions 55
Display PCB assembly replacement 38
Disposable fluid warming cassettes 63
Disposal of fluid sets 66
Door assembly replacement 46
Drip proof 7
I
I.V. pole mount replacement 35
Indications for use 5
M
Main PCB assembly replacement 36
Manufacturer’s Declaration 59
E
Electrical safety check 28
Electromagnetic Emissions 59
Electromagnetic interference 25
Electrostatic Immunity 61
N
NVRAM mode 24
O
F
Fault codes
F_01 20
F_02 20
F_04 20
F_05 20
F_08 20
F_09 21
F_10 21
F_11 21
F_12 21
Warmflo Model FW-538
Output temperature check 10
Output temperature performance check 28
Over-temperature alarm check 13
P
Performance requirements 56
Performance verification 9
Preventive maintenance 27
83
Index
R
Rear panel assembly replacement 41
Recommended Separation Distances 62
Repacking in a Different Carton 69
Repacking in Original Carton 67
Repair 29
Replacement
chassis assembly 50
cover assembly 30
display PCB assembly 38
fuse 34
I.V. pole mount 35
main PCB assembly 36
rear panel assembly 41
Resolving electromagnetic interference 25
Returning the N-595 67
S
Safety information 1
Service 29
Shock hazard 7
Shock Hazard BF Classification 7
Spare parts 63
Specifications 55
Storage 56
Symbols 7
System testing 10
T
Technical specifications 55
Theory of operation 71
Transportation 56
Troubleshooting 19
U
Underwriters laboratories 7
W
Warnings 1
Weight 55
84
Tyco Healthcare Group LP
Nellcor Puritan Bennett Division
4280 Hacienda Drive
Pleasanton, CA 94588 USA
Toll Free: 1.800.635.5276
© 2003 Nellcor Puritan Bennett Inc.
All rights reserved.
Rx ONLY
067719A-1003