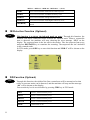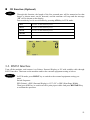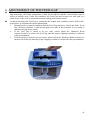
1
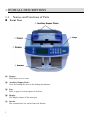
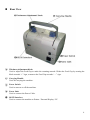
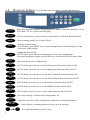
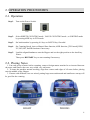
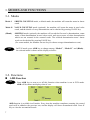
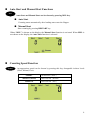
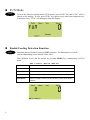
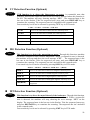
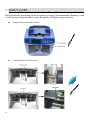
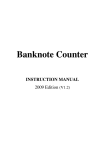
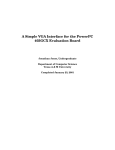
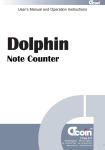
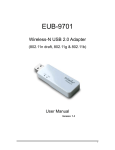
Banknote Counter
USER MANUAL
2010 Edition
CONTENT
1. OVERALL DESCRIPTIONS
1-1. Names and Functions of Parts
1-2. Overview of Keys
2. OPERATION PROCEDURES
2-1. Operation
2-2. Placing Notes
3. MODES AND FUNCTIONS
3-1. Modes
3-2. Functions
3-3. RS232 Interface
3
3
5
6
6
6
7
7
7
12
4. DEFAULT SETTINGS IN FACTORY
13
5. SPECIFICATIONS
13
6. ADJUSTMENT OF THE FEED GAP
14
7. DAILY CARE
15
8. ERRORS AND REMEDIAL MEASURES
16
9. ACCESSORIES & OPTIONS
17
2
1.OVERALL DESCRIPTIONS
1-1. Names and Functions of Parts
Front View
① Hopper
Place notes on it to count.
② Auxiliary Hopper Plates
Used for leading the notes to the feeding mechanism.
③ Keys
Refer to page 5 for description of each key.
④ Display
The Display shows all the messages.
⑤ Stacker
The counted notes are stacked onto the Stacker.
3
Rear View
⑥ Thickness Adjustment Knob
Used to adjust the Feed Gap to make the counting smooth. Widen the Feed Gap by turning the
Knob towards “+” sign, or narrow the Feed Gap towards “-” sign.
⑦ Carrying Handle
Used for carrying the machine.
⑧ Power Switch
Used to turn on or off the machine.
⑨ Power Inlet
Used to connect the Power Cable.
⑩ RS232 Interface
Used to connect the machine to Printer / External Display / PC.
4
1-2. Overview of Keys (keys and functions are subject to models and machines)
FUNC
Enter/Exit from the function setting mode(FUN mode). When the machine is in the
FUN mode, “FUN” is shown on the display.
BATCH
Press it continuously to select the preset batch number (05102050100).
SPEED
Select counting speed (Fast, Normal, Slow).
PRINT
Print the counted result.
In FUN mode, press PRINT key to switch among Printer, External Display, PC and
print paper width settings.
ADD
Adding function On/Off.
In FUN mode, press ADD key continuously to select the counting mode.
In external equipment settings, press ADD key to switch on/off or print paper width.
MNL
Select Automatic start or Manual start.
7/UV
In FUN mode, press this key to set the Fluorescence Detection On(level)/Off.
8/MG
In FUN mode, press this key to set the Magnetism Detection On(level)/Off.
9/MT
In FUN mode, press this key to set the Metal Thread Detection On(level)/Off.
0/IR
In FUN mode, press this key to set the Infrared Marks Detection On(level)/Off.
4/DEN
In FUN mode, press this key to set the Density Detection On(level)/Off.
5/DD
In FUN mode, press this key to set the Width Detection On(level)/Off.
6/3D
In FUN mode, pree this key to set the Length Detection On(level)/Off.
C
VALUE
Clear error message, counted result, batch number, etc.
Check the total sheets of the counted notes and details of each denomination.
RESTART
0
5
Used to initiate a counting operation or clear an error message.
9
To set the batch number with 0-9 keys.
2. OPERATION PROCEDURES
2-1. Operation
Step 1.
Turn on the Power Switch.
ON
OFF
Step 2.
Select SHEETS COUNTING mode , VALUE COUNTING mode , or SORTING mode
by pressing ADD key in FUN mode.
Step 3.
Set batch number by pressing 0-9 keys or BATCH key if needed.
Step 4.
Set Counting Speed, Auto or Manual Start function, ADD function, [FUN mode] DEN,
UV, MG, MT, and IR functions if necessary.
Step 5.
Load the aligned banknotes onto the Hopper and set the right position to the Auxiliary
Plates.
Then press RESTART key to start counting if necessary.
2-2. Placing Notes
1. Fan each group of notes before counting, remove foreign matter attached to or inserted between
the notes, and remove the torn, wet, soiled, very soft notes.
2. To asure the machine normal working, align four corners and edges of all notes before placing
onto the middle of the Hopper.
3. If notes with different sizes are mixed, putting large notes underneath and small notes on top will
be good for the counting.
×
RIGHT
WRONG
6
3. MODES AND FUNCTIONS
3-1. Modes
Mode-1
SHEETS COUNTING mode, a default mode, the machine will count the notes in sheets
result.
Mode-11
VALUE COUNTING mode (optional), the machine will count the notes in total value
result, and the details of every denomination can be checked by pressing VALUE key.
(Blank)
SORTING mode (optional), the machine will record the first note’s denomination, count
notes of that denomination in total value result, and stop at notes of other denomination
which are not counted in the counted result. The selected denomination notes’ sheets
result can be checked by pressing VALUE key.
(For some models, the machine can use keys to choose a target denomination to sort.)
ADD
In FUN mode, press ADD key to change among “Mode-1”, “Mode-11” and (Blank) ,
the selected mode is shown on the display as below:
3-2. Functions
ADD Function
ADD
Press ADD key to turn on or off this function when machine is not in FUN mode.
ADD will be shown on display when it’s on.
ADD function is available in all modes. Every time the machine completes counting, the couted
result will be added to the previous one, and the display will show accumulated result. Press C
Key to clear the accumulated result.
7
Auto Start and Manual Start Functions
MNL
Auto Start and Manual Start can be chosen by pressing MNL key.
● Auto Start
Counting starts automatically after loading notes onto the Hopper.
● Manual Start
Start counting by pressing RESTART key.
When “MNL” is shown on the display, the Manual Start function is activated. When MNL is
not shown on the display, the Auto Start function is selected.
Counting Speed Function
SPEED
An appropriate speed can be chosen by pressing this key, changeable in three levels
(Slow, Normal, Fast):
SPEED-1
SPEED-11 (default)
SPEED-111
750 notes/min. ( Slow )
1000 notes/min. ( Normal)
1500 notes/min. ( Fast )
8
FUN Mode
FUNC
To enter the function setting mode (FUN mode), press FUNC key and “FUN” will be
shown on the display. To exit, press FUNC key again or any other non-composite key,
or machine runs, “FUN” will disappear from the display.
Double Feeding Detection Function
4/DEN
Machine detects Double Feeding by DEN function. The detection level can be
selected depending on the density of the notes.
Four different levels can be chosen by pressing 4/DEN key continuously in FUN
mode.
DEN-1→ DEN-11 →DEN-111→DEN-1111
9
DEN-1
Level 1:
To count dark-colored (thick) notes.
DEN-11
Level 2:
To count high density notes.
DEN-111
Level 3:
To count median density notes.
DEN-1111
Level 4:
To count light-colored (thin) notes.
OFF(Blank)
When counting very dark-colord notes or very thick notes, this
function should be turned off. But machine can not detect Double
Feeding.
UV Detection Function (Optional)
7/UV
UVD function is to detect the fluorescence on notes. A counterfeit note that
generates fluorescence under the ultraviolet rays can be detected when this function is
set ON. The machine will stop, showing message “CF1” . The suspected note is the
last one in the Stacker. Take the suspected note away and press RESTART key to
countinue the counting. The suspected one isn’t included in the counted result.
Four sensitivity levels can be selected by pressing 7/UV key in FUN mode.
UVD-1→ UVD-11 →UVD-111→UVD-1111
UVD-1
Level 1: To count notes of the lowest UV sensitivity level
UVD-11
Level 2: To count notes of middle UV sensitivity level
UVD-111
Level 3: To count notes of high UV sensitivity level
UVD-1111
Level 4: To count notes of the highest UV sensitivity level
OFF(Blank)
Function inactive.
MG Detection Function (Optional)
8/MG
This function is to detect the magnetism on notes. Through this function, machine
can detect counterfeit notes without magnetism. When a counterfeit note is detected,
the machine will stop and show the error message “CF2”. The suspected note is the
last one in the Stacker. Take the suspected one away and press RESTART key to
countinue the counting. The suspected one isn’t included in the counted result.
Four sensitivity levels can be selected by pressing 8/MG key in FUN mode.
MGD-1→ MGD-11 →MGD-111→MGD-1111 → (Blank)
MGD-1
Level 1: To count notes of the lowest magnetic sensitivity level
MGD-11
Level 2: To count notes of middle magnetic sensitivity level
MGD-111
Level 3: To count notes of high magnetic sensitivity level
MGD-1111
Level 4: To count notes of the highest magnetic sensitivity level
OFF(Blank)
The function should be turned off when counting notes without
magnetism.
MT Detection Function (Optional)
9/MT
This function is to detect the metal thread of the banknotes. Through this function,
the machine can detect counterfeit notes without a metal thread. When a counterfeit
note is detected, the machine will stop, showing the error message “CF3” on the
display. The suspected note is the last one in the Stacker. Take the suspected one away
and press RESTART key to countinue the counting. The suspected one isn’t included
in the counted result.
Four sensitivity levels can be selected by pressing 9/MT key in FUN mode.
10
MTD-1→ MTD-11 →MTD-111→MTD-1111 → (Blank)
Level 2:To count notes of middle sensitivity level
MTD-111
Level 3:To count notes of high sensitivity level
MTD-1111
Level 4:To count notes of the highest sensitivity level
OFF(Blank)
The function should be off when counting notes without a metal
thread.
This function is to detect the infrared mark on notes. Through this function, the
machine can detect counterfeit notes without the infrared mark. When a counterfeit
note is detected, the machine will stop, showing the error message “CF4” on the
display. The suspected note is the last one in the stacker. Take the suspected one away
and press RESTART key to countinue the counting. The suspected one isn’t included
in the counted result.
In FUN mode, press 0/IR key to enter this function and “IRD-1” will be shown on the
display.
DD Function (Optional)
5/DD
11
Level 1:To count notes of the lowest sensitivity level
MTD-11
IR Detection Function (Optional)
0/IR
MTD-1
Through this function, the width of the first counted note will be memorized so that
wider or narrower notes can be detected, and the machine will stop and the message
“dd” will be shown on the display.
Four sensitivity levels are selectable by pressing 5/DD key in FUN mode.
DD-1
Level 1: 6 mm sensitivity level.
DD-11
Level 2: 5 mm sensitivity level.
DD-111
Level 3: 4 mm sensitivity level.
DD-1111
Level 4: 3 mm sensitivity level.
Blank
The function is off.
3D Function (Optional)
6/3D
Through this function, the length of the first counted note will be memorized so that
longer or shorter notes can be detected, and the machine will stop and the message
“3d” will be shown on the display.
Four sensitivity levels are selectable by pressing 6/3D key in FUN mode.
3D-1
Level 1: 6 mm sensitivity level
3D-11
Level 2: 5 mm sensitivity level
3D-111
Level 3: 4 mm sensitivity level
3D-1111
Level 3: 3 mm sensitivity level
Blank
The function is off.
3-3. RS232 Interface
Turn off the machine, and connect it to Printer, External Display or PC with suitable cable through
RS232 interface. Then turn on the machine and set the external equipment setting as below:
PRINT
In FUN mode, press PRINT key to switch to the external equipment setting you
want.
Switch Sequence:
PPP (Printer)→EEE (External Display)→CCC (PC)→PRP (Print Paper Width)
Then press ADD key to switch on/off or print paper width. And press RESTART key
to confirm the operation.
12
4. DEFAULT SETTINGS IN FACTORY
Turn the Power Switch on, the machine will be in the previous setting.
Turn on the Power Switch while pressing the RESTART key for 2 seconds, and the machine
will be in the default settings.
The default settings in factory are as follow:
Function
Settings
DEN
DEN-1
Descriptions
Level 1: To count dark-colored (thick) notes.
DD
OFF
DD function is off.
3D
OFF
3D function is off.
UVD
UVD-11
Level 2: To count notes of middle UV sensitivity.
MGD
MGD-11
Level 2: To count notes of middle MG sensitivity.
MTD
MTD-11
Level 2: To count notes of middle MT sensitivity.
IRD
OFF
Infrared detection is off.
ADD
OFF
ADD function is off.
MODE
Mode-1
Sheets counting mode
SPEED
Speed-11
1000 notes/min
MNL
OFF
Auto Start is on.
Batch
100
100 sheets
5. SPECIFICATIONS
Ambient Temperature
Ambient Humidity
Feeding System
Hopper Capacity
Stacker Capacity
Size of Countable Note
Thickness of Countable Note
Batch Number Displayed
Counting Number Displayed
Message Displayed
Power Source
Power Consumption
Dimensions
Weight
Width detection sensitivity
Length detection sensitivity
Counting Speed
13
5 ~ 40℃
20 ~ 80%
Roller Friction System
400 notes
200 notes
50×90 ~ 110×185(mm)
0.075 ~ 0.15(mm)
Three Digits (LCD)
Seven Digits (LCD)
Three Digits (LCD)
AC100 ~ 240V, 50 ~ 60Hz
≤55W
272mm×235mm×239mm
5.5 ~ 6.0Kg
3 ~ 6 mm
3 ~ 6 mm
Speed-1
750 notes/min
Speed-11 1000 notes/min
Speed-111 1500 notes/min
6. ADJUSTMENT OF THE FEED GAP
The correct Feed Gap is vitally important to the smooth functioning of the machine. After a
long-term usage, the rubber components of both the Feed Roller and the Friction Roller may be
subject to natural wear. Under this condition, the Feed Gap may become too wide and, as a
result, Error Codes will be generated and note feeding will become erratic.
To check and adjust the Feed Gap to counteract this simple wear condition, please follow the 3
steps below, in conjunction with the photograph:
1.
Manually insert a genuine banknote into the Feed Gap and move it back and forth. If you
don’t feel any resistance, it indicates the gap is too wide; if the resistance is very strong, it
indicates the gap is too narrow.
2.
If the Feed Gap is found to be too wide, please adjust the Thickness Knob
counter-clockwise to reduce the Feed Gap until the proper slipping-resistance is achieved
with your banknote.
3.
If the Feed Gap is found to be too narrow, please adjust the Thickness Knob clockwise to
increase the Feed Gap until the proper slipping-resistance is achieved with your banknote.
14
7. DAILY CARE
Clean the following Sensors with a brush/Money Counter cleaning card/air blow
ball periodically depending on the frequency of usage. Recommended cleaning is once
a week for low usage machines, more frequently for higher usage machines.
15
Hopper Sensor and Stacker Sensor
Counting Sensors & CIS Sensor
8. ERRORS AND REMEDIAL MEASURES
When an error occurs during counting, the LCD Display will flash the error code. Clear the error
in accordance with the following procedures.
Error
Code
Cause of Error
Remedial Measures
EA
Hopper Sensor is covered.
Remove what is covering the Hopper Sensor.
E1
1, One or both of the Counting Sensors are
damaged if E1 appears when power on.
2, Counting Sensors are dirty.
3, Notes are jammed in the roller.
1, Replace the damaged Counting Sensor.
2, Clean Counting sensors. ( Refer to Chapter 7)
3, Take away jammed note(s) with hand. When there is a difficulty in taking
away jammed notes, turn Drum Rollers by hand.
E2
1, Notes on Stacker when power on.
2, Stacker Sensor is dirty.
3, Stacker Sensor is damaged.
1, Remove the notes placed on the Stacker.
2, Clean Stacker Sensor with the brush. (Refer to Chapter 7)
3, Replace the damaged Stacker Sensor.
E3
1, Hopper Sensor is covered when power on.
2, Hopper Sensor is dirty.
3, Hopper Sensor is damaged.
1, Remove what is covering the Hopper Sensor.
2, Clean the Hopper Sensor with the brush. (Refer to Chapter 7)
3, Replace the damaged Hopper Sensor.
E4
Communication of CIS Sensor is wrong.
Check the CIS communication.
EH
1, Half-sized note is fed.
2, A small note passes from the left or right
side.
3, DEN Function is not adjusted right.
4, One of the Counting Sensors is damaged.
1, Take away the half-sized note.
2, Let the note pass in the middle.
3, Adjust the DEN Function according to DEN ADJUSTMENT in Chapter 6
of the service manual.
4, Replace the damaged Counting Sensor.
Ec
More than two notes are fed in chain.
If this error happens very often, the Feed Gap might be too wide. Please
adjust the size of the gap. (Refer to Chapter 6)
Two notes are fed at a time or a dirty note is
If this error happens very often, please adjust the DEN Function. (Refer to
fed.
Chapter 6 of the service manual)
dd
A note of a different width from the first note.
1, Take out the last note from the Stacker.
2, Check the denomination and width of the note.
3, Press RESTART key to continue the counting.
3d
A note of a different length from the first note.
1, Take out the last note from the Stacker.
2, Check the denomination and length of the note.
3, Press RESTART key to continue the counting.
Ed
CF1
CF2
Suspected counterfeit note is detected by UV
detection.
Suspected counterfeit note is detected by MG
detection.
1, Take away the last note from the Stacker and make sure that it is the same
note as the others.
2, Press RESTART key.
3, Recount the last note taken away from the Stacker.
1, Take away the last note from the Stacker and make sure that it is the same
note as the others.
2, Press RESTART key.
3, Recount the last note taken away from the Stacker.
CF3
Suspected counterfeit note is detected by MT
detection.
1, Take away the last note from the Stacker and make sure that it is the same
note as the others.
2, Press RESTART key.
3, Recount the last note taken away from the Stacker.
CF4
Suspected counterfeit note is detected by IR
detection.
1, Take away the last note from the Stacker and make sure that it is the same
note as the others.
2, Press RESTART key.
3, Recount the last note taken away from the Stacker.
EID
Machine can’t read the value of the note.
1, Take away the last note from the Stacker and make sure that it is the same
note as the others.
2, Press RESTART key.
3, Recount the last note taken away from the Stacker.
16
9. ACCESSORIES & OPTIONS
9-1 Accessories
1. Power Cable……………..1
2. Instruction Manual………1
3. Brush…………………….1
9-2 Options
(Refer to Page 12, “3-3 RS232 Interface” for operation)
1. External Display
An option of External Display is available, which will show the counting results
synchronously when connected to the RS232 interface of the banknote counter.
2. NCC Driver and RS232 Serial Cable
This option is for connecting the banknote counter to a computer.
1) Install the NOTE COUNTER CONTROLLER (NCC) Driver in the computer.
2) Connect the banknote counter to computer through RS232 interface.
3) Turn on the banknote counter and then run the NCC.EXE.
4) The counting results will be displayed on the computer, and can be stored in an excel
format file.
3. Printer
The note counter can connect with a printer, which uses Epson “ESC” Command System, by
the RS232 interface to print out the counting result.
17