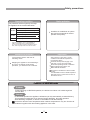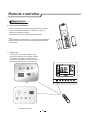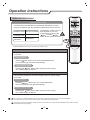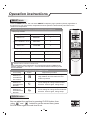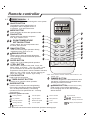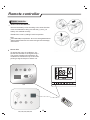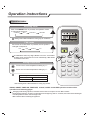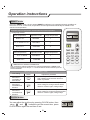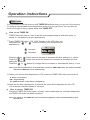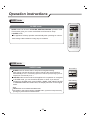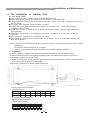
1
Thank you very much for purchasing this Air Conditioner. Please
read this use and installation instructions carefully before installing
and using this appliance and keep this manual for future reference.
Welcome to use our product!
Thanks for trusting us.
Please read this manual carefully before installation!
Keep it properly for future use after installation!
Features of This Cassette Air-Conditioner
Save Installation Space
The indoor unit can be installed inside the
ceiling conveniently.
High Efficiency and Environment Friendly
New Refrigerant-R410A*
R410A can protect the environment and do
not harm to the ozone layer.
24-hour Timer ON and OFF
This Timer can be set to automatically turn
the unit on or off within a 24-hour period.
Mute Operation
The excellent fan design enable the airflow
to be quiet and smooth with minimum noise.
Self Recovery of Power Break
When the power supply is recovered after
break, all preset are still effective and the airconditioner can run according to the original
setting.
Fault Self-diagnose Function
When there is something wrong with the airconditioner, the micro computer could
diagnose the faults, which can be read from
the display and is convenient for maintenance.
*NOTE:
For Cooling Only Unitary Air-conditioner, use referigerant
R22.
APPLICATION MODEL
DC Inverter Unitary Air-conditioner
AUC-18UX4SGAA
AUC-24UX4SZEA
AUC-36UX4SAEA
AUC-48UX6SPFA
AUC-60UX6SPFA
On\Off Unitary Air-conditioner
AUC-18HR4SUAA
AUC-24HR4SZGA
AUC-36HR6SAGA
AUC-48HR6SPHA
AUC-60HR6SPHA
New DC Inverter Unitary Air-conditioner
(High-Efficiency Type)
Cooling Only Unitary Air-conditioner
AUC-18UR4SZAA1
AUC-24UR4SAEA1
AUC-36UR4SAEA1
AUC-18CR4FUAA
AUC-42CR4FEHA
IMPORTANT NOTICE
● We pursue a policy of continuing improvement in design and performance of products. The
right is therefore reserved to vary specifications without notice.
● We cannot anticipate every possible circumstance that might involve a potential hazard.
● This air conditioner is designed for standard air conditioning only. Do not use this heat
pump air conditioner for other purposes such as drying clothes, refrigerating foods or for any other
cooling or heating process.
● The installer and system specialist shall secure safety against leakage according to local regulations
or standards.
● No part of this manual may be reproduced without written permission.
● Signal words (DANGER, WARNING and CAUTION) are used to identify levels of hazard
seriousness. Definitions for identifying hazard levels are provided below with their respective signal
words.
Immediate hazards which WILL result in severe personal injury or
death.
Hazards or unsafe practices which COULD result in severe personal
injury or death.
Hazards or unsafe practices which COULD result in minor personal
injury or product or property damage.
Useful information for operation and/or maintenance.
● It is assumed that this heat pump air conditioner will be operated and serviced by English speaking
people. If this is not the case, the customer should add safety, caution and operating signs in the
native language.
● If you have any questions, contact your distributor or dealer .
● This manual gives a common description and information for this air conditioner which you operate
as well as for other models.
● This air conditioner has been designed for the following temperatures. Operate it within this range.
New DC-Inverter Unitary (High-Efficiency type)
Cooling Operation
Heating Operation
outdoor working temperature(℃)
maximum
minimum
48
-15
24
-10
ON/OFF Unitary type
Cooling Operation
Heating Operation
DC-Inverter Unitary type(18K,24K,36K)
Cooling Operation
Heating Operation
outdoor working temperature(℃)
maximum
minimum
43
15
24
-10
DC-Inverter Unitary type(48K,60K)
outdoor working temperature(℃)
maximum
minimum
43
15
24
-10
Cooling Operation
Heating Operation
outdoor working temperature(℃)
maximum
minimum
48
-15
24
-10
Cooling Only Unitary type
Cooling Operation
outdoor working temperature(℃)
maximum
minimum
43
15
This manual should be considered as a permanent part of the air conditioning equipment and should
Remain with the air conditioning equipment.
NOTE:Heating and electric heating function are not available in single cooling only model.
CHECKING PRODUCT
● Upon receiving this product, inspect it for any shipping damage .Claims for damage, either
apparent or concealed, should be filed immediately with the shipping company.
● Check the model number, electrical characteristics (power supply, voltage and frequency) and
accessories to determine if they are correct.
The standard utilization of the unit shall be explained in these instructions.
Therefore, the utilization of the unit other than those indicated in these instructions is not
recommended.
Please contact your local agent, as the occasion arises.
Contents
Safety precautions ---------------------------------------------------------------------------------1
Identification of Parts -------------------------------------------------------------------------------3
remote controller operation Manual
1. Wire Remote Controller introduce ------------------------------------------------------------------5
2. Operation with wire remote controller ---------------------------------------------------------------7
2.1 Mode function ------------------------------------------------------------------------------7
2.2 Sleep function -------------------------------------------------------------------------------8
2.3 Timer function -------------------------------------------------------------------------------8
2.4 Flap Setting---------------------------------------------------------------------------------8
3.Wire Remote controller installation------------------------------------------------------------------9
4.Wireless Remote Controller introduce--------------------------------------------------------------10
4.1. Remote controller-H1-----------------------------------------------------------------------10
operation mode----------------------------------------------------------------------------12
airflow direction control --------------------------------------------------------------------13
smart mode ------------------------------------------------------------------------------14
clock button ------------------------------------------------------------------------------14
timer mode -------------------------------------------------------------------------------15
sleep mode ------------------------------------------------------------------------------16
super mode -------------------------------------------------------------------------------16
4.2. Remote controller-J1-----------------------------------------------------------------------17
operation mode----------------------------------------------------------------------------19
airflow direction control --------------------------------------------------------------------20
smart mode -------------------------------------------------------------------------------21
clock button -------------------------------------------------------------------------------21
timer mode -------------------------------------------------------------------------------22
sleep mode ------------------------------------------------------------------------------ 23
super mode -------------------------------------------------------------------------------23
4.3. Remote controller-E4-07 ------------------------------------------------------------------ 24
operation mode----------------------------------------------------------------------------26
airflow direction control --------------------------------------------------------------------27
smart mode -------------------------------------------------------------------------------28
clock button-------------------------------------------------------------------------------28
timer mode -------------------------------------------------------------------------------29
sleep mode ------------------------------------------------------------------------------30
super mode ------------------------------------------------------------------------------30
5. Before Operation ------------------------------------------------------------------------------31
6. Special Remarks -------------------------------------------------------------------------------31
7. Setting of Automatic Swing Louver ----------------------------------------------------------------31
8. Filter Cleaning ----------------------------------------------------------------------------------32
9. Trouble shooting --------------------------------------------------------------------------------33
Contents
Diagram of Refrigerant Cycle
1.Refrigerant Flow Diagram ---------------------------------------------------------------34
2.Electrical Wiring Diagram ---------------------------------------------------------------34
Installation and Maintenance
1. Safety Notice------------------------------------------------------------------------35
2. The Tools and Instrument for Installation --------------------------------------------------36
3. The Installation of the Indoor Unit---------------------------------------------------------36
3.1 The Initial Check -------------------------------------------------------------------37
3.2 Installation (for 24K,36K,42K,48K,60K) ----------------------------------------------39
3.3 Installation (for 18K)---------------------------------------------------------------42
4. The Installation of the Outdoor Unit -------------------------------------------------------44
4.1 The Initial Check -------------------------------------------------------------------44
4.2 Installation ------------------------------------------------------------------------44
4.3Tuber length between indoor and outdoor ------------------------------------------------45
5. Refrigerant Pipe----------------------------------------------------------------------46
5.1 The Pipe Material-------------------------------------------------------------------46
5.2 The Connection of the Pip ------------------------------------------------------------46
6. Drain Piping-------------------------------------------------------------------------48
7. Electrical wiring ----------------------------------------------------------------------50
7.1 General check---------------------------------------------------------------------50
7.2 Electrical wiring connection -----------------------------------------------------------51
8.Test Run----------------------------------------------------------------------------52
9. Common--------------------------------------------------------------------------------------53
.
Safety precautions
Symbols in this User's Manual are interpreted as shown below:
Be sure not to do.
Be sure to follow the instruction.
The feature of the appliance,
instead of a fault.
Grounding is necessary.
Pay attention to such a situation.
Warning: Incorrect handling could
cause a serious hazard, such as death,
serious injury,etc.
ON
ON
OFF
OFF
Do not use the power supply circuit
breaker or pull off the plug to turn it off
during operation. This may cause a fire
due to spark, etc.
Do not knit, pull or press the power supply
cord, lest the power supply cord be broken.
An electric shock or fire is probably caused
by a broken power supply cord.
Keep the power supply circuit breaker
or plug from dirt. Connect the power
supply cord to it firmly and correctly,
lest an electric shock or a fire break out
due to insufficient contact.
Used correct power supply in
accordance with the rating plate
requirement . Otherwise, serious faults
may be occur or a fire may be break out
Never insert a stick or similar to the unit. It is harmful to your health if the cool air
Since the fan rotates at high speed, this reaches you for a long time. It is advisable
to let the air flow be deflected to all the room.
may cause an injury.
ON
OFF
Turn off the appliance first before cutting
Do not repair the appliance by yourself. Prevent the air flow from reaching the gas
off power supply when malfunction occurs. If this is done incorrectly, it may cause an
burners and stove.
electric shock, etc.
It is the user's responsibility to make the
appliance be grounded according to
local codes or ordinances by a licenced
person.
Do not touch the operation buttons
when your hands are wet.
1
Safety precautions
Operating condition
Noise pollution
The protective device maybe trip and stop
the appliance in the cases listed below:
o
Outdoor air temperature is over 24 c
HEATING
o
Outdoor air temperature is below -10 c
Install the air conditioner at a place
that can bear its weight in order to
operate more quietly.
o
Room temperature is over 27 c
o
COOLING
DRY
Outdoor air temperature is over 43
3c
o
Room temperature is below 21 c
o
Room temperature is below 18 c
If the air conditioner runs in "COOLING" or
"DRY" mode with door or window opened
for a long time when relative humidity is above
85%, dew may drip down from the air outlet.
Features of protector
Inspection
After using for a long time , the air
conditioner should be inspected on
the following items:
Overheat of the power supply cord
and plug or even a burned smell.
Abnormal operating sound or vibration.
Water leakage from indoor unit.
Metal cabinet electrified .
The protective device will work at
following cases:
Stopping the appliance and restarting it
at once or changing mode during
operation, you need to wait 3 minutes.
Stop the air conditioner if above trouble
occurs.
It is advisable to have a detail inspection
after using it for 5 years even if none of
the above occurs.
Features of HEATING mode
Preheat
At the beginning of HEATING operation, the airflow from indoor unit is discharged 2-5
minutes later.
Defrost
In HEATING operation the appliance will defrost (de-ice) automatically to raise efficiency.
This procedure usually lasts 2-10 minutes. During defrosting, fans stop operation.
After defrosting completes, it returns to "HEATING" mode automatically.
It is hard to raise the room temperature when outdoor temperature is very low. Use the air
conditioner together with other heating appliance in this case.
2
Identification of parts
Indoor unit
Indoor unit
18K
24K,36K,42K,48K,60K
outdoor unit
18K,24K,36K
42K,48K,60K
Note:The picture above is for reference only ,specifications are subject to the material product.
3
Identification of parts
Wire remote controller
Wireless remote controller
SET TEMP
ROOM TEMP
ON
OFF
ON
OFF
ON/OFF
C
SMAR
T
FAN
FAN
IFEEL
DIMMER
TIMER OFF
CLOCK
SWIN
G
SMART
TIMER ON
MODE
OFF
SL
EE
P
SUPER
ER
TIM
SLEEP
SWING
ON
TIMER
A
MODE
AUTO
SUPER
NO.
TIMER ON
TIMER OFF SET TIMER
CL
OC
K
EL
I FE
SWING
Remote controller is used for controlling embedded
display panel and wire remote controller.
Note : There are different types of Remote controllers,
specific models are subject to the material products.
Wire remote controller is used for
controlling indoor embedded unit directly.
Display Panel
Filter clean (Yellow)
Defrost indicator (Yellow)
It lights on during the defrost.
It lights on when the filter
It lights off when defrost finishes. should be cleaned.
buzzer
Timer indicator (Green)
It rings when the signal from
It lights on when timer is in use.
It lights off when timer finishes.
Remote controller is received.
Emergency switch
The filter clean is resetted
if press the switch .
Signal receiving section
Receives signal from
the remote controller.
Run indicator (RED)
It lights on during operation.
It lights off all when setting
SLEEP mode.
18K
Emergency switch
Signal receiving section
Defrost
Filter Timer
24K,36K,42K,48K,60K
The figures in this manual are based on the external view of a standard model.
Consequently, the shape may differ from that of the air conditioner you have selected.
4
Wire remote controller
1.Wire remote controller introuce:
LCD screen
ROOM TEMP
C
Wireless remoter receiver
ON/OFF button
MODE select button
TIMER/SLEEP button
TEMP. setting button
FAN speed/FLAP button
Room temperature sensor
1 . Room temperature sensor:
A temperature sensor inside the wire remote control switch is set to sense room temperature, and the
temperature will be sent to indoor unit. When do not connect the wire remote control switch, indoor unit
will switch to the temperature sensor which is built into indoor unit.
2 . Wireless remoter receiver:
by this receiver, you can use a additional wireless remoter switch to control indoor unit.
3 . ON/OFF button:
press this button to turn on or turn off the unit.
4 . MODE select button:
Press this button to select COOLING, DEHUMIDIFICATION , FAN ,HEATING or AUTO-RUN mode.
COOLING mode, the air conditioner makes the room cool.
DEHUMIDIFICATION mode, the air conditioner reduces the humidity in the room.
FAN mode, the air conditioner makes the room's temperature suitable, providing the soft air flow.
HEATING mode, The air conditioner makes the room warm.
A
AUTO-RUN mode, The air conditioner runs in right mode according to the temperature of room.
(This mode is invalid for 18k,24k DC Inverter Unitary air-conditioners except high-energy efficiency types).
5 . TIMER/SLEEP button:
Press this button to active sleep mode, and“
” will appear in LCD. Press again to cancel sleep function.
Press this button for 3 seconds to active timer function, Press for 5 seconds again to cancel timer function.
To timer function Pls. refer to timer function introduce.
6 . FAN speed button:(Flap button setting refers to description page 8.)
” (auto fan speed), “
”(low fan
Press this button to change current fan speed. You can select“
AUTO
”(medium fan speed), and “
”(high fan speed) by each press.
speed), “
7 . TEMP Setting button:
Press the couple of buttons to set room temperature you want, when you press“SET TEMP”sign will
”button to reduce setting temperature, and press“
”button to increase
appear in LCD, press “
setting temperature.
5
Wire remote controller
8 .LCD screen
Display room temperature
and setting temperature
Running state sign area Which
indicate the running state
SET TEMP
ROOM TEMP
Fan speed display
C
NO.
A
TIMER ON
TIMER OFF SET TIMER
Display timer setting
Mode indication area Which indicate
the current running mode
Operation mode
cooling mode
A
Flap direction display (Only for embedded
type unit)
AUTO
Fan speed setting
AUTO
auto fan
dehumidification mode
high fan speed
fan mode
meddle fan speed
heating mode
low fan speed
Temperature display
Room temperature:
ROOM TEMP
C
Setting temperature:
SET TEMP
auto mode
(This mode is invalid for18k,24k DC
Inverter Unitary air-conditioners except
high-energy efficiency types).
TIMER ON
TIMER OFF
timer on
C
Flap direction display
Outdoor is defrosting
timer off
Compressor is running
timer clock
Soft running mode is active
Sleep mode is active
6
swing sign
Wire remote controller
2.Operation with wire remote controller
2.1 Mode function
1.Press MODE button“
”to select operation mode:
cooling mode
dehumidification mode
fan mode
heating mode
A
auto-run mode (This mode is invalid for 18k,24k DC Inverter Unitary air-conditioners
except high-energy efficiency type s ) .
”button to turn on or turn off the unit
2. Press ON/OFF“
”“
”button to set room temperature. The temperature
3. Press TEMP. SETTING “
range can be set from 18℃ to 32℃。
” to set fan speed you want. Of course you can set auto fan and indoor
4. Press FAN button“
unit will automatic select fan speed according to the difference between room temperature and
setting temperature
” button again
5. You may turn off the unit by press ON/OFF“
Note:In fan mode, temperature setting is invalid.
7
Wire remote controller
2.2 Sleep function
ROOM TEMP
C
Press timer/sleep button once to active sleep function. And sleep
sign“
”will appear on LCD.
Press timer/sleep button again to cancel sleep function, and sleep
sign on LCD will disappear.
Note:
During fan mode, auto mode , the sleep function is invalid.
ROOM TEMP
C
2.3 Timer function
TIMER OFF mode
1 you can set timer off when indoor unit is running. By press
TIMER/SLEEP button for 3 seconds, timer clock appear on
LCD, and “TIMER OFF”flag will twinkle.
2 you can adjust the time after which the indoor unit would turn
off automatically by press “ ”“ ” button. The time can
be set from 0.5 to 24(or 12) hour in 30 minutes steps.
3 when you have set the time, press TIMER/SLEEP button for
3 seconds again or wait for 5 seconds to active the timer ,
“TIMER OFF”flag will stop twinkle , and timer begin to work .
4 IF you need cancel “TIMER OFF”,press TIMER/SLEEP
button for 3 seconds to active the timer, Press “ ”“ ”
button set time 00:00,Cancel “TIMER OFF”after five
seconds automatically.
TIMER OFF
Timer clock
ROOM TEMP
C
TIMER ON
TIMER ON mode
1 you can set timer on when indoor unit is shut off, By press
TIMER/SLEEP button for 3 seconds, timer clock appear on
LCD, and “TIMER ON” flag will twinkle.
2 you can adjust the time after which the indoor unit would turn
on automatically by press “ ” “ ” button. The time
can be set from 0.5 to 24(or 12) hour in 30 minutes steps.
3 when you have set the time, press TIMER/SLEEP button
for 3 seconds again or wait for 5 seconds to active the timer,
“TIMER ON” flag will stop twinkle, and timer begin to work.
4 IF you need cancel “TIMER ON”,press TIMER/SLEEP
button for 3 seconds to active the timer, Press “ ”“ ”
button set time 00:00,Cancel “TIMER ON”after five
seconds automatically.
2.4 Flap setting
IF the air conditioner is on, press the“ ”for two
seconds,“trickle”a sound, Then the flap begin swing.
IF you need stop swing,press the“ ”for two seconds
again,and the flap stop swing.
8
ROOM TEMP
C
TIMER ON
Wire remote controller
3.Wire Remote controller installation
Installation of the wire remote controller please refer to the following:
The wire remote controller must be installed by qualified installation technicians in accordance
with installation drawing instruction, the power should be shut off before installation. Air flow and
away from heating where the wire remote controller is installed. The following is process of
installation.
1 .Insert a minus screw driver into down slot (2 places).
Be careful not to damage the PC board with minus screw driver.
2 .Remove the back cover.
3 .Use two screw(φ4×16) to fasten the back and metal board in the mounting place and tighten
the screw, then link the communication wire.
4 .Fasten top cover into back cover.
5 .Fasten bottom cover into back cover.
9
Remote controller
Remote controller -H1
The remote controller transmits signals to the system.
1 ON/OFF BUTTON
2
The appliance will be started when it is
energized or will be stopped when it is
in operation, if you press this button.
1
4
13
5
MODE BUTTON
3
12
Press this button to select the operation mode.
10
3 FAN BUTTON
Used to select fan speed in sequence
auto, high, medium or low.
2
SMART BUTTON
SMART
SLEEP
SWING
MUTE
TEP SWITCH
11
DIMMER
9
8
SOFT
6
16
18*
17
14
Used to enter fuzzy logic operation directly,
regardless of the unit is on or off.
15
SWING BUTTON
Used to stop or start horizontal adjustment
louver swinging and set the desired up/down
airflow direction.
8 SLEEP BUTTON
15 I FEEL BUTTON
Used to set or cancel Sleep Mode operation.
9
SWING
I FEEL
Used to adjust the room temperature and
the timer, also real time.
7
CLOCK TIMER ON TIMER OFF
7
4 5 ROOM TEMPERATURE
SETTING BUTTONS
6
MODE
Used to start or stop the I feel mode. Press this
button above 5 seconds , Turn off I FEEL mode.
(In I feel mode,the Air Conditioner operates basis
temperature sensor fitted in remote instead of machine,
Advice to use I FEEL mode and the remote put
where the indoor unit receive signal easily.)
DIMMER BUTTON
The screen brightness is decreased each time
that button is pressed and it goes blank after
pressing the button four times.
10 CLOCK BUTTON
Used to set the current time.
16 TEP SWITCH BUTTON (invalid for this model)
Display set temperature flickeringly when the button is
pressed. Display indoor temperature when the button
is pressed again. And the flicker must be closed by
pressing the button or cutting off the electricity supply.
11 12 TIMER ON/OFF BUTTON
Used to set or cancel the timer operation.
13 SUPER BUTTON (invalid for heating mode)
Used to start or stop the fast cooling.
(Fast cooling operates at high fan speed with
18℃ set temp automatically)
17 SOFT BUTTON ( only effective for DC inverter
14 MUTE BUTTON
18*
Used to set or cancel Mute mode operation.
Cooling indicator
SWING BUTTON (invalid for this model)
Used to stop or start vertical adjustment
louver swinging and set the desired left/right
airflow direction.
Indication symbols on LCD:
*Some remote controller models without this button.
Auto fan speed
Smart indicator
Dry indicator
High fan speed
Sleep indicator
Fan only indicator
Medium fan speed
Mute indicator
Heating indicator
Low fan speed
Super indicator
Soft indicator
Cancel I feel indicator
Note: Each mode and relevant function will be further specified in following pages.
10
model)
Used to limit the maximum electric current,so that
you can use it with other electric instrument when
power is not enough.
Signal transmit.
Display set timer
Display current time
Display set temperature
Remote controller
Remote controller
How to Insert the Batteries
Remove the battery cover according to the arrow direction.
Insert new batteries making sure that the (+) and (-) of
battery are matched correctly.
Reattach the cover by sliding it back into position.
Note:
Use 2 LR03 AAA(1.5volt) batteries. Do not use rechargeable batteries.
Replace batteries with new ones of the same type when the display
becomes dim.
How to Use
To operate the room air conditioner, aim
the remote controller to the signal receptor.
The remote controller will operate the air
conditioner at a distance of up to 8m when
pointing at signal receptor of indoor unit.
SET TEMP
ROOM TEMP
RUN
TIMER FILTER DEFROST
C
AUTO
NO.
A
TIMER ON
TIMER OFF SET TIMER
18K
ER
ER
ON
OFF
TIM
MER
DIM
TIM
CK
EP
CLO
SLE
E
TCH
RT
MOD
SMA
TEP
NG
SWI
E
SWI
T
MUT
SOF
NG
SWI
L
I FEE
24K,36K,42K,48K,60K
11
Operation instructions
Operation modes
Selecting mode
Each time MODE button is pressed, the operation mode
is changed in sequence:
COOLING
DRY
HEATING
FAN ONLY
Heating mode is NOT available for cooling only air conditioner.
FAN mode
2
Each time the "FAN" button is pressed, the fan speed is
changed in sequence:
Auto
High
3
Medium
Low
1
MODE
CLOCK TIMER ON TIMER OFF
SWING
SMART
SLEEP
SWING
MUTE
TEP SWITCH
I FEEL
DIMMER
SOFT
At "FAN ONLY" mode, only "High","Medium" and "Low" are available.
At "DRY" mode, Fan speed is set at "Low" automatically, "FAN" button
is ineffective in this case.
Setting temperature
Press once to raise temperature setting by 1℃
Press once to lower temperature setting by 1℃
Range of available set temperature
*HEATING, COOLING
18℃~32℃
Note: Heating mode is NOT available for cooling only models.
SWING, SMART, TIMER ON, TIMER OFF, CLOCK, SLEEP and SUPER operation modes will be
specified in the following pages.
Changing modes during operation, sometimes the unit does not response at once. Wait 3 minutes.
During heating operation, air flow is not discharged at the beginning. After 2-5 minutes, the air flow will be discharged
until temperature of indoor heat exchanger rises.
Wait 3 minutes before restarting the appliance.
12
Operation instructions
Airflow direction control
Airflow direction control
Horizontal and vertical airflow is automatically adjusted to a certain
angle in accordance with the operation mode after turning on the unit.
Operation mode Direction of airflow
COOLING, DRY
horizontal
*HEATING,
FAN ONLY
downward
The direction of airflow can be
also adjusted to your own
requirement by pressing the
" SWING " and the " SWING "
button of the remote controller.
4
4
Note: Vertical airflow control is invalid for cassette type.
MODE
CLOCK TIMER ON TIMER OFF
SWING
SMART
SLEEP
SWING
MUTE
TEP SWITCH
4
I FEEL
DIMMER
SOFT
Vertical airflow control (with the remote controller)
Using remote controller to set various angles of flow or specific angle
as you like.
Swinging airflow
Pressing " SWING" button once, the horizontal adjustment
louver will swing up and down automatically.
Desired direction airflow
Pressing the " SWING " button again when the louvers swing
to a suitable angle as desired.
Horizontal airflow control (with the remote controller)
Using remote controller to set various angles of flow or specific angle
as you like.
Swinging airflow
Pressing " SWING " button once, the vertical adjustment
louver will swing left and right automatically.
Desired direction airflow
Pressing the " SWING " button again when the louvers swing
to a suitable angle as desired.
Do not turn the horizontal adjustment louvers manually, otherwise malfunction may occur. If that happens,
turn off the unit first and cut off the power supply, then restore power supply again.
It is better not to let the horizontal adjustment louver tilt downward for a long time at COOLING or DRY mode to prevent
condensed water from dripping.
13
Operation instructions
SMART mode
Press the SMART button, the unit enters SMART mode(fuzzy logic operation) directly regardless of
the unit is on or off. In this mode, temperature and fan speed are automatically set based on the
actual room temperature.
Operation mode and temperature are determined by indoor temperature
Heat pump models
Indoor temperature
Target temperature
Operation mode
Below T-3℃
T-3℃≦Tindoor≦T+3℃
Over T+3℃
HEATING
T
FAN ONLY
T
COOLING
T
Cooling only models
Indoor temperature
Target temperature
Operation mode
T+3℃ or below
FAN ONLY
MODE
CLOCK TIMER ON TIMER OFF
SWING
SMART
SLEEP
SWING
MUTE
TEP SWITCH
T
I FEEL
T
COOLING
Over T+3℃
SMART button is ineffective in SUPER mode.
Note: Temperature, airflow and direction are controlled automatically in SMART mode.
However, a decrease or rise of up to 7 ℃ can be set with the remote controller if you still
feel uncomfortable.
What you can do in SMART mode
Your feeling
Uncomfortable
because of
unsuitable air
flow volume.
Uncomfortable
because of
unsuitable flow
direction.
Uncomfortable
because of
unsuitable flow
direction.
button
adjustment procedure
Indoor fan speed alternates among
High, Medium and Low each time this
button is pressed.
SWING
SWING
DIMMER
Press it once, the horizontaladjustment
louver swings to change vertical airflow
direction. Press it again, swings stops.
Press it once, the vertical adjustment
louver swings to change horizontal airflow
direction. Press it again, swings stops.
CLOCK button
You can adjust the real time by pressing CLOCK button, then
using
and
buttons to get the correct time, press
CLOCK button again the real time is set.
14
SOFT
Operation instructions
Timer mode
It is convenient to set the timer on with TIMER ON buttons when you go out in the morning
To achieve a comfortable room temperature at the time you get home. You can also set
Timer off at night to enjoy a good sleep with TIMER OFF.
How to set TIMER ON
TIMER ON button can be used to set the timer programming as wished in order to
switch on the appliance at your desired time.
i) Press TIMER ON button, "12:00 ON" flashes on the LCD, then you
can press the
appliance on.
or
buttons to select your desired time for
Increase
ON
Decrease
Press the
Press the
10 minute.
Press the
or
or
button once to increase or decrease the time setting by 1 minute.
button 5 seconds to increase or decrease the time setting by
or
button for a longer time to increase or decrease the time by 1 hour.
Note: If you don't set the time in 5 seconds after you press TIMER ON button, the remote controller
will exit the TIMER ON mode automatically.
ii) When your desired time displayed on LCD, press the TIMER ON button and confirm it.
A "beep" can be heard.
"ON" stops flashing.
The TIMER indicator on the indoor unit lights up.
iiI) After the set timer displayed for 5 seconds the clock will be displayed on the LCD
of the remote controller instead of set timer.
How to cancel TIMER ON
Press the TIMER ON button again, a "beep" can be heard and the indicator disappears,
the TIMER ON mode has been cancelled.
Note: It is similar to set TIMER OFF, you can make the appliance switch off automatically at your
desired time.
15
Operation instructions
SLEEP mode
SLEEP mode
SLEEP mode can be set in COOLING, HEATING or DRYING operation mode,
This function gives you a more comfortable environment for sleep.
In SLEEP mode,
The appliance will stop operation automatically after operating for 8 hours.
MODE
CLOCK TIMER ON TIMER OFF
SWING
SMART
SLEEP
SWING
MUTE
TEP SWITCH
DIMMER
Note: Heating is NOT available for cooling only air conditioner.
SOFT
I FEEL
SUPER mode
(invalid for heating mode)
SUPER mode
SUPER mode is used to start or stop fast cooling.
Fast cooling operates at high fan speed, changing the set temperature
automatically to 18℃.
SUPER mode can be set when the appliance is in operation or energized.
In SUPER mode, you can set airflow direction or timer. If you want to
escape from SUPER mode, press any - SUPER , MODE, FAN, ON/OFF
or TEMPERATURE SETTING button.
Note:
SLEEP and SMART buttons are not available in SUPER mode.
SUPER button is ineffective in HEATING mode.
The Appliance will continue working in SUPER mode with set temperature of 18℃, if
you don't escape from it by pressing any of the buttons mentioned above.
16
MODE
CLOCK TIMER ON TIMER OFF
SWING
SMART
SLEEP
SWING
MUTE
TEP SWITCH
I FEEL
DIMMER
SOFT
Remote controller
4.2
Remote controller J1
The remote controller transmits signals to the system.
1 ON/OFF BUTTON
The appliance will be started when it is
energized or will be stopped when it is
in operation, if you press this button.
2
MODE BUTTON
3
FAN BUTTON
ON
OFF
Press this button to select the operation mode.
4
1
Used to select fan speed in sequence
auto, high, medium or low.
4 5
ROOM TEMPERATURE
SETTING BUTTONS
2
Used to adjust the room temperature and
the timer, also real time.
6
13
7
MODE
FAN
9
6
SWING
SWING BUTTON
SLEEP
SUPER
IFEEL
DIMMER
TIMER OFF
CLOCK
14
12
Used to stop or start horizontal adjustment
louver swinging and set the desired up/down
airflow direction.
8
8
SMART BUTTON
Used to enter fuzzy logic operation directly,
regardless of the unit is on or off.
7
5
ON/OFF
3
11
SMART
10
15
SLEEP BUTTON
TIMER ON
Used to set or cancel Sleep Mode operation.
9 I FEEL BUTTON
SWING
Used to start or stop the I feel mode. Press this
button above 5 seconds , Turn off I FEEL mode.
(In I feel mode,the Air Conditioner operates basis
temperature sensor fitted in remote instead of machine,
Advice to use I FEEL mode and the remote put
where the indoor unit receive signal easily.)
*Note:Some remote controller models without buttons in the
dashed circle.
10 CLOCK BUTTON
Used to set the current time.
14
11 12 TIMER ON/OFF BUTTON
The screen brightness is decreased each time
that button is pressed and it goes blank after
pressing the button four times.
Used to set or cancel the timer operation.
13 SUPER BUTTON
SWING BUTTON(invalid for this model)
15
Used to start or stop the fast cooling/heating.
(Fast cooling operates at high fan speed with
18℃ set temp automatically ; Fast heating
operates at auto fan speed with 32℃ set temp
automatically )
Indication symbols on LCD:
Cooling indicator
DIMMER BUTTON
Used to stop or start vertical adjustment
louver swinging and set the desired left/right
airflow direction.
Auto fan speed
Smart indicator
Dry indicator
High fan speed
Sleep indicator
Fan only indicator
Medium fan speed
I feel
Heating indicator
Low fan speed
Super indicator
Display is invalid
Note: Each mode and relevant function will be further specified in following pages.
17
ON
OFF
Signal transmit
Display set timer
Display current time
Display set temperature
Remote controller
Remote controller
How to Insert the Batteries
Remove the battery cover according to the arrow direction.
Insert new batteries making sure that the (+) and (-) of
battery are matched correctly.
Reattach the cover by sliding it back into position.
Note:
Use 2 LR03 AAA(1.5volt) batteries. Do not use rechargeable batteries.
Replace batteries with new ones of the same type when the display
becomes dim.
How to Use
To operate the room air conditioner, aim
the remote controller to the signal receptor.
The remote controller will operate the air
conditioner at a distance of up to 8m when
pointing at signal receptor of indoor unit.
SET TEMP
ROOM TEMP
DEFROST
C
AUTO
NO.
A
TIMER ON
TIMER OFF SET TIMER
R
D IM
EP
C LO
S LE
L
DE
O FF
IF
EE
MO
G
IN
ME
R
SW
T
TI
AR
R
ON
SM
ME
TI
24K,36K,42K,48K,60K
18
CK
FA
ME
N
ON
SU
/O
PE
R
FF
OF
F
ON
18K
Operation instructions
Operation modes
Selecting mode
Each time MODE button is pressed, the operation mode
is changed in sequence:
COOLING
DRY
FAN ONLY
HEATING
ON
OFF
Heating mode is NOT available for cooling only air conditioner.
FAN mode
Each time the "FAN" button is pressed, the fan speed is
changed in sequence:
Auto
High
Medium
ON/OFF
Low
2
At "FAN ONLY" mode, only "High","Medium" and "Low" are available.
At "DRY" mode, Fan speed is set at "Low" automatically, "FAN" button
is ineffective in this case.
Setting temperature
Press once to raise temperature setting by 1℃
1
MODE
FAN
3
SWING
SLEEP
SUPER
SMART
IFEEL
DIMMER
TIMER ON
TIMER OFF
CLOCK
Press once to lower temperature setting by 1℃
Range of available set temperature
*HEATING, COOLING
FAN ONLY
SWING
18℃~32℃
unable to set
*Note: Heating mode is NOT available for cooling only models.
SWING, SMART, TIMER ON, TIMER OFF, CLOCK, SLEEP and SUPER operation modes will be
specified in the following pages.
Changing modes during operation, sometimes the unit does not response at once. Wait 3 minutes.
During heating operation, air flow is not discharged at the beginning. After 2-5 minutes, the air flow will be discharged
until temperature of indoor heat exchanger rises.
Wait 3 minutes before restarting the appliance.
19
Operation instructions
Airflow direction control
ON
OFF
Airflow direction control
Horizontal and vertical airflow is automatically adjusted to a certain
angle in accordance with the operation mode after turning on the unit.
Operation mode Direction of airflow
COOLING, DRY
*HEATING,
FAN ONLY
horizontal
The direction of airflow can be
also adjusted to your own
requirement by pressing the
" SWING " and the " SWING "
button of the remote controller.
downward
ON/OFF
MODE
4
4
4
FAN
SLEEP
SUPER
SMART
IFEEL
DIMMER
TIMER ON
TIMER OFF
CLOCK
SWING
SWING
Note: Horizontal airflow control is invalid for cassette type.
Vertical airflow control (with the remote controller)
Using remote controller to set various angles of flow or specific angle
as you like.
Swinging airflow
Pressing " SWING" button once, the horizontal adjustment
louver will swing up and down automatically.
Desired direction airflow
Pressing the " SWING " button again when the louvers swing
to a suitable angle as desired.
Horizontal airflow control (with the remote controller)
Using remote controller to set various angles of flow or specific angle
as you like.
Swinging airflow
Pressing " SWING " button once, the vertical adjustment
louver will swing left and right automatically.
Desired direction airflow
Pressing the " SWING " button again when the louvers swing
to a suitable angle as desired.
Do not turn the horizontal adjustment louvers manually, otherwise malfunction may occur. If that happens, turn off the unit
first and cut off the power supply, then restore power supply again.
It is better not to let the horizontal adjustment louver tilt downward for a long time at COOLING or DRY mode to prevent
condensed water from dripping.
20
Operation instructions
SMART mode
Press the SMART button, the unit enters SMART mode(fuzzy logic operation) directly regardless of
the unit is on or off. In this mode, temperature and fan speed are automatically set based on the
actual room temperature.
Operation mode and temperature are determined by indoor temperature
Heat pump models
Indoor temperature
Target temperature
Operation mode
ON
OFF
Below T-3℃
T-3℃≦Tindoor≦T+3℃
HEATING
T
FAN ONLY
T
ON/OFF
Over T+3℃
COOLING
T
Cooling only models
Indoor temperature
Operation mode
T+3℃ or below
FAN ONLY
FAN
SWING
SLEEP
SUPER
SMART
IFEEL
DIMMER
TIMER ON
TIMER OFF
CLOCK
T
T
COOLING
Over T+3℃
MODE
Target temperature
SWING
SMART button is ineffective in SUPER mode.
Note: Temperature, airflow and direction are controlled automatically in SMART mode.
However, a decrease or rise of up to 7 ℃ can be set with the remote controller if you still
feel uncomfortable.
What you can do in SMART mode
Your feeling
Uncomfortable
because of
unsuitable air
flow volume.
Uncomfortable
because of
unsuitable flow
direction.
Uncomfortable
because of
unsuitable flow
direction.
button
FAN
SWING
SWING
adjustment procedure
Indoor fan speed alternates among
High, Medium and Low each time this
button is pressed.
Press it once, the horizontal adjustment
louver swings to change vertical airflow
direction. Press it again, swings stops.
Press it once, the vertical adjustment
louver swings to change horizontal airflow
direction. Press it again, swings stops.
CLOCK button
You can adjust the real time by pressing CLOCK button, then
using
and
buttons to get the correct time, press
CLOCK button again the real time is set.
21
Operation instructions
Timer mode
It is convenient to set the timer on with TIMER ON buttons when you go out in the morning
To achieve a comfortable room temperature at the time you get home. You can also set
timer off at night to enjoy a good sleep with TIMER OFF.
How to set TIMER ON
TIMER ON button can be used to set the timer programming as wished in order to
switch on the appliance at your desired time.
i) Press TIMER ON button, "ON 12:00" flashes on the LCD, then you
can press the
appliance on.
or
buttons to select your desired time for
Increase
ON
Decrease
Press the
or
button once to increase or decrease the time setting by 1 minute.
Press the
or
button one and a half seconds to increase or decrease the time
setting by 10 minute.
Press the
or
button for a longer time to increase or decrease the time by 1 hour.
Note: If you don't set the time in 10 seconds after you press TIMER ON button, the remote controller
will exit the TIMER ON mode automatically.
ii) When your desired time displayed on LCD, press the TIMER ON button and confirm it.
A "beep" can be heard.
"ON" stops flashing.
The TIMER indicator on the indoor unit lights up.
iiI) After the set timer displayed for 5 seconds the clock will be displayed on the LCD
of the remote controller instead of set timer.
How to cancel TIMER ON
Press the TIMER ON button again, a "beep" can be heard and the indicator disappears,
the TIMER ON mode has been cancelled.
Note: It is similar to set TIMER OFF, you can make the appliance switch off automatically at your
desired time.
22
Operation instructions
SLEEP mode
SLEEP mode
ON
OFF
SLEEP mode can be set in COOLING, HEATING,DRYING operation mode.
This function gives you a more comfortable environment for sleep.
In SLEEP mode,
The appliance will stop operation automatically after operating for 8 hours.
Note: Heating is NOT available for cooling only air conditioner.
ON/OFF
MODE
FAN
SWING
SLEEP
SUPER
SMART
IFEEL
DIMMER
TIMER ON
TIMER OFF
CLOCK
SWING
SUPER mode
SUPER mode
fast cooling
SUPER mode is used to start or stop fast cooling/fast heating.
Fast cooling operates at high fan speed, changing the set temperature
automatically to 18℃;Fast heating operates at auto fan speed,changing the set
ON
OFF
temperature automatically to 32 ℃.
SUPER mode can be set when the appliance is in operation or energized.
In SUPER mode, you can set airflow direction or timer. If you want to
escape from SUPER mode, press SUPER , MODE, FAN, ON/OFF,SLEEP
or TEMPERATURE SETTING button, the display will return to the original
mode.
fast heating
ON
OFF
Note:
SMART button is not available in SUPER mode.
The Appliance will continue working in SUPER mode , if you don't escape from it by
pressing any of the buttons mentioned above.
23
Remote controller
4.3 Remote controller-E4-07
The remote controller transmits signals to the system.
1 ON/OFF BUTTON
The appliance will be started when it is
energized or will be stopped when it is
in operation, if you press this button.
2
MODE BUTTON
Press this button to select the operation mode.
1
3 FAN BUTTON
ON
4
3
SMAR
T
13
MODE
7
12
11
OFF
ER
TIM
SWING BUTTON
Used to stop or start vertical adjustment
louver swinging and set the desired up/down
airflow direction.
FAN
ON
TIMER
SMART BUTTON
Used to enter fuzzy logic operation directly,
regardless of the unit is on or off.
7
6
SUPER
Used to adjust the room temperature and
the timer, also real time.
6
2
SWIN
G
4 5
ROOM TEMPERATURE
SETTING BUTTONS
OFF
CL
OC
K
10
5
SL
EE
P
Used to select fan speed in sequence
auto, high, medium or low.
8
EL
I FE
9
88 SLEEP BUTTON
Used to set or cancel Sleep Mode operation.
9 I FEEL BUTTON
Press this button, turn on IFEEL mode.
10 CLOCK BUTTON
Used to set the current time.
13 SUPER BUTTON
11 12 TIMER ON/OFF BUTTON
Used to start or stop the fast cooling.
(Fast cooling operates at high fan speed with
18 C set temp automatically )
Used to set or cancel the timer operation.
Indication symbols on LCD:
Cooling indicator
Auto fan speed
Smart indicator
Dry indicator
High fan speed
Sleep indicator
Fan only indicator
Medium fan speed
I FEEL indicator
Heating indicator
Low fan speed
Super indicator
Signal transmit.
ON
Display set timer
OFF
Display current time
Display set temperature
Note: When insert the batteries into the remote controller first time all of the signs appear on the LCD for several seconds ,then
"Cooling" and "Heating"sign appears in turns , you can select "Heating" for heat pump models or "Cooling" for only cool
models.
Each mode and relevant function will be further specified in following pages.
24
Remote controller
How to Insert the Batteries
Remove the battery cover according to the arrow direction.
Insert new batteries making sure that the (+) and (-) of
battery are matched correctly.
Reattach the cover by sliding it back into position.
Note:
Use 2 LR03 AAA(1.5volt) batteries. Do not use rechargeable batteries.
Replace batteries with new ones of the same type when the display
becomes dim.
How to Use
To operate the room air conditioner, aim
the remote controller to the signal receptor.
The remote controller will operate the air
conditioner at a distance of up to 8m when
pointing at signal receptor of indoor unit.
SET TEMP
ROOM TEMP
DEFROST
C
AUTO
NO.
A
TIMER ON
TIMER OFF SET TIMER
FA
N
P
SLEE
MO
DE
ING
SW
OF
F
ON
T
AR
SM
18K
LOCK
SU
PE
R
TIME
R ON
TIMER OFF
24K,36K,42K,48K,60K
25
CLOCK
Remote controller
4.3.1 Operation mode
Selecting mode
Each time MODE button is pressed, the operation mode
is changed in sequence:
COOLING
DRY
FAN ONLY
HEATING
ON
OFF
Heating mode is NOT available for cooling only air conditioner.
FAN mode
High
Medium
Low
FAN
MODE
SWIN
G
ON
TIMER
1
OFF
ER
TIM
CL
OC
K
Setting temperature
SL
EE
P
2
At "FAN ONLY" mode, only "High","Medium" and "Low" are available.
At "DRY" mode, Fan speed is set at "Auto" automatically, "FAN" button
is ineffective in this case.
SMAR
T
Auto
4
SUPER
Each time the "FAN" button is pressed, the fan speed is
changed in sequence:
3
EEL
IF
Press once to raise temperature setting by 1℃
Press once to lower temperature setting by 1℃
Range of available set temperature
*HEATING, COOLING
FAN ONLY
18℃~32℃
unable to set
*Note: Heating mode is NOT available for cooling only models.
Turning on
Press
button, when the appliance receives the
signal, the RUN indicator of the indoor unit lights up.
SWING, SMART, TIMER ON, TIMER OFF, SLEEP, CLOCK and SUPER operation modes will be
specified in the following pages.
Changing modes during operation, sometimes the unit does not response at once. Wait 3 minutes.
During heating operation, air flow is not discharged at the beginning. After 2-5 minutes, the air flow will be discharged
until temperature of indoor heat exchanger rises.
Wait 3 minutes before restarting the appliance.
26
Remote controller
4.3.2
Airflow direction control
Airflow direction control
ON
OFF
Vertical airflow is automatically adjusted to a certain angle
in accordance with the operation mode after turning on the unit.
SMAR
T
SWIN
G
SL
EE
P
downward
CL
OC
K
SW
ING
*HEATING,
FAN ONLY
5
MODE
OFF
ER
TIM
horizontal
FAN
ON
TIMER
COOLING, DRY
The direction of airflow can be
also adjusted to your own
requirement by pressing the
"SWING" button of the
remote controller.
SUPER
Operation mode Direction of airflow
EL
I FE
*Heating mode is only available for heat pump models.
Vertical airflow control (with the remote controller)
Using remote controller to set various angles of flow or specific angle
as you like.
Swinging airflow
Pressing "SWING" button once, the horizontal adjustment
louver will swing up and down automatically.
Desired direction airflow
Pressing the "SWING" button again when the louvers swing
to a suitable angle as desired.
Do not turn the horizontal adjustment louvers manually, otherwise malfunction may occur. If that happens, turn off the unit
first and cut off the power supply, then restore power supply again.
Horizontal airflow control (with hands)
It is better not to let the horizontal adjustment louver tilt downward for a long time at COOLING or DRY mode to prevent
condensed water from dripping.
27
Remote controller
4.3.4
SMART mode
Press the SMART button, the unit enters SMART mode(fuzzy logic operation) directly regardless of
the unit is on or off. In this mode, temperature and fan speed are automatically set based on the
actual room temperature.
SMAR
T
SUPER
FAN
MODE
SWIN
G
ON
TIMER
SL
EE
P
OFF
ER
TIM
CL
OC
K
EL
I FE
SMART button is ineffective in SUPER mode.
Note: Temperature, airflow and direction are controlled automatically in SMART mode.
However, a decrease or rise of up to 7 ℃ can be set with the remote controller if you still
feel uncomfortable.
What you can do in SMART mode
Uncomfortable
because of
unsuitable air
flow volume.
button
FAN
Uncomfortable
because of
unsuitable flow
direction.
4.3.5
SW
ING
Your feeling
adjustment procedure
Indoor fan speed alternates among
High, Medium and Low each time this
button is pressed.
Press it once, the horizontal adjustment
louver swings to change vertical airflow
direction. Press it again, swings stops.
CLOCK button
You can adjust the real time by pressing CLOCK button, then
using
and
buttons to get the correct time, press
CLOCK button again the real time is set.
28
Remote controller
4.3.5 Timer mode
It is convenient to set the timer on with TIMER ON button when you go out in the morning
To achieve a comfortable room temperature at the time you get home. You can also set
timer off with TIMER OFF button at night to enjoy a good sleep. .
How to set TIMER ON
TIMER ON button can be used to set the timer programming as wished in order to
switch on the appliance at your desired time.
i) Press TIMER ON button, "ON 12:00" flashes on the LCD, then you
can press the
appliance on.
or
button to select your desired time for
Increase
ON
Decrease
or
Press the
Press the
or
setting by 10 minute.
or
Press the
button once to increase or decrease the time setting by 1 minute.
button one and a half seconds to increase or decrease the time
button for a longer time to increase or decrease the time by 1 hour.
Note: If you don't set the time in 10 seconds after you press TIMER ON button, the remote controller
will exit the TIMER ON mode automatically.
ii) When your desired time displayed on LCD, press the TIMER ON button and confirm it.
A "beep" can be heard.
"ON" stops flashing.
The TIMER indicator on the indoor unit lights up.
iiI) After the set timer displayed for 5 seconds the clock will be displayed on the LCD
of the remote controller instead of set timer.
How to cancel TIMER ON
Press the TIMER ON button again, a "beep" can be heard and the indicator disappears,
the TIMER ON mode has been cancelled.
Note: It is similar to set TIMER OFF, you can make the appliance switch off automatically at your
desired time.
29
Remote controller
4.3.6 SLEEP mode
SLEEP mode
SLEEP mode can be set in COOLING, HEATING,DRYING or SMART
operation mode.
This function gives you a more comfortable environment for sleep.
In SLEEP mode,
ON
The appliance will stop operation automatically after operating for 8 hours.
SMAR
T
SUPER
*Note: Heating is NOT available for cooling only air conditioner.
FAN
MODE
SWIN
G
ON
TIMER
SL
EE
P
OFF
ER
TIM
CL
OC
K
El
I FE
4.3.7 SUPER mode
SUPER mode
SUPER mode is used to start or stop fast cooling.
Fast cooling operates at high fan speed, changing the set temperature
automatically to 18℃.
SUPER mode can be set when the appliance is in operation or energized.
30
SMAR
T
MODE
SWIN
G
SL
EE
P
OFF
ER
TIM
1
FAN
ON
TIMER
1
Note:
SLEEP and SMART buttons are not available in SUPER mode.
SUPER button is ineffective in HEATING mode.
The Appliance will continue working in SUPER mode with set temperature of 18℃, if
you
don't escape from it by pressing any of the buttons mentioned above.
.
SUPER
In SUPER mode, you can set airflow direction or timer. If you want to
escape from SUPER mode, press any - SUPER , MODE, FAN, ON/OFF
or TEMPERATURE SETTING button.
CL
OC
K
EL
I FE
Before Operation
5.Before Operation
●Supply electrical power to system for approximately 12 hours before start-up after long shutdown.
●Do not start the system immediately after power supply, it may cause a compressor failure, because the
compressor is not heated well.
●Make sure that the outdoor unit is not covered with snow or ice. If covered, remove it by using hot water
(approximately 50℃).If the water temperature is higher than 50℃, it will cause damage to plastic parts.
●When the system is started after a shutdown longer than approximately 3 months, it is recommended that the
system be checked by your service contractor.
●Turn OFF the main switch when the system is stopped for a long period of time. If the main switch is not
turned OFF, electricity is consumed because the oil heater is always energized during compressor stopping.
6. Special remarks
●3 minutes protect after compressor stop
For protect compressor, there are at lest 3 minutes stopping after compressor stop.
●5 minutes protect
Compressor must run 5 minutes at least once running. In the 5 minutes, compressor will not stop even the
room temperature reach the setting point unless you use remoter to turn off the unit(all indoor unit be turned
off by user).
●Cooling operation
In cooling mode, the temperature can be set between18℃—32℃ .
The fan of the indoor unit will never stop running. It remains running even if the compressor stops working.
●Heating operation
Since the air conditioner carries out the heating operation by drawing on the heat of the outside air (through
heating pump), the heating capacity may decrease if the temperature outside the room is too low. If the
heating effect is not so satisfying, use some other heating device together.
●Anti-freezing function during cooling
When the temperature of the air from the indoor outlet is too low, the unit will run for some time under the
fan mode, to avoid frost or ice forming in the indoor heat exchanger.
●Cold air prevention
In several minutes after the heating mode is started, the fan of the indoor unit will not run until the heat
exchanger of the indoor unit reaches a high enough temperature. That is because cold air prevention system
is operating.
●Defrosting
When the outdoor temperature is too low, frost or ice may form in the outdoor heat exchanger, reducing
heating performance. When this happens, a defrosting system of the air conditioner will operate. At the same
time the fan in the indoor unit stops(or runs at a very low speed in some cases),a few minutes later, the
defrosting is over, and the heating operation restarts.
●Blow out the survival heating air
When stop the air conditioner in normal operation, the fan motor would run in low speed for a while to blown
out the survival heating air.
●Self Recovery of Power Break
When the power supply is recovered after break, all preset are still effective and the air-conditioner can run
according to the original setting.
7. Setting of Automatic Swing Louver
Wire Remote control
When the SWING switch is pressed 3S longer, the swing louver starts its operation. The swing louver stops,
when the SWING switch is pressed 3S longer again.
Wireless Remote control
When the SWING switch is pressed, the swing louver starts its operation. The swing louver stops, when the
SWING switch is pressed again.
Do not turn the air louver by hand, If moved, the louver mechanism will be damaged.
31
Before Operation
8.Filter Cleaning
Do not operates the system without air filter to protect the indoor unit heat exchanger against being
clogged.
Turn OFF the main power switch before taking out the filter.(The previous operation mode may
appear.)
8.1 Setting the Cleaning Period of Filter
Step 1:
Enter choose and set mode.
It is time to clean the filter,When the light of "Filter" turn on.
Step 2:
Cancel the setting
Press Emergency switch to return to the standard state.
Emergency
switch
18K
Filter
24K,36K,42K,48K,60K
8.2Take Out the Filter
Take out the air filter according the following steps.
Step1
Open the air inlet grille after pushing the two knobs as shown by the arrow mark.
Step2
Take out the air filter from the air inlet grille by supporting the air grille and lifting the air filter
after detaching the filter from the hinges.
18K
24K,36K,42K,48K,60K
32
Before Operation
8.3 Clean the Filter
Clean the air filter according to the following
Steps.
Step 1
Use a vacuum cleaner or let water flow onto the air filter for removing the dirt from the air filter.
Do not use hot water higher than approximately 40℃.
Step2
Dry the air filter in the shade after shaking off moisture.
8.4 Reset of Filter indication
After cleaning the air filter, press the “Emergency switch” button. The FILTER indication with disappear and
the next filter cleaning time will be set.
9.Troubleshooting
When overflow of drain water from the indoor unit occurs, stop the operation and contact your
contractor.
When you smell or see white smoke coming from the unit, turn OFF the main power supply and
contact your contractor.
9.1 If Trouble Still Remains ...
If the trouble still remains even after checking the following, contact your contractor and inform them of the
following items.
(1)Unit Model Name
(2)Content of Trouble
9.2 No Operation
Check whether the SET TEMP is set at the correct temperature.
9.3 Not Cooling or Heating Well
Check for obstruction of air flow of outside or inside units.
Check if too much heat source exists in the room.
Check if the air filter is clogged with dust.
Check to see if the doors or windows are opened or not.
Check if the temperature condition is not within the operation range.
9.4 This is Not Abnormal
Smells from indoor unit
Smell adheres on indoor unit after a long period of time. Clean the air filter and panels or allow a good
ventilation.
Sound from Deforming Parts
During system starting or stopping, an abrading sound might be heard. However, this is due to thermal
deformation of plastic parts. It is not abnormal.
Steam from Outdoor Heat Exchanger
During defrosting operation, ice on the outdoor heat exchanger is melted, resulting in making steam.
Dew on Air Panel
When the cooling operation continues for a long period of time under high humidity conditions(higher than
27℃/80%R.H.), dew can form on the air panel.
Refrigerant Flow Sound
While the system is being started or stopped, sound from the refrigerant flow may be heard.
33
Diagram of refrigerant cycle
1.REFRIGERANT FLOW DIAGRAM
INDOOR UNIT
OUTDOOR UNIT
Gas piping
Compressor
Accumulator
Wide service valve
Heat exchanger
Heat exchanger
4-way valve
Liquid piping
EEV
Service valve
Heating cycle
Note:
EEV is only valid for DC inverter air-conditioner,for air conditioner,use capillary.
Accumulator is only applicable to 48k and 60k air-conditioners.
4-way valve is only valid for heat-pump type air-conditioner.
Cooling cycle
2.ELECTRICAL WIRING DIAGRAM
DC INVERTER UNITARY TYPE:
ON\OFF UNITARY TYPE:
Terminal
Terminal
L
L
Power connecting cord
N
N
SI
SI
Indoor unit
Outdoor unit
Indoor unit
Outdoor unit
Terminal
Terminal
3L
3L
2L
2L
Power connecting cord
1L
1L
N
N
L
L
N
N
Power supply
18K/24K/36K
Indoor unit
Outdoor unit
Terminal
L
Power supply
18K
Indoor unit
Outdoor unit
Terminal
Power connecting cord
Terminal
L
Terminal
N
N
L
SI
SI
N
N
L
SI
SI
Power connecting cord
W
V
L
U
N
N
24K
Power supply
Power supply
48K/60K
Outdoor unit
Outdoor unit
Terminal
Terminal
Indoor unit
L
Terminal
N
N
SI
SI
3L
3L
2L
Indoor unit
Terminal
Cooling Only Unitary type
Power connecting cord
L
Power connecting cord
2L
1L
1L
N
N
W
V
U
N
L
N
Power supply
Power supply
18K
34
36K/42K/48K/60K
Installation and Maintenance
1.Safety Notice
●Installation should be left to the dealer or another professional person. (Improper installation may cause
water leakage, electrical shock, or fire.)
●Install the unit according to the instruction given in this manual. (Incomplete installation may cause water
leakage, electrical shock, or fire.)
●Be sure to use the supplied or specified installation parts. (Use of other parts may cause the unit to come to
lose, water leakage, electrical shock, or fire.)
●Install the air conditioner on a solid base that can support the unit weight. (An inadequate base or
incomplete installation may cause injury in the event the unit falls off the base. )
●Electrical work should be carried out in accordance with the installation manual and the local national
electrical wiring rules or code of practice.(Insufficient capacity or incomplete electrical work may cause
electrical shock or fire. )
●Be sure to use a dedicated power circuit. (Never use a power supply shared by another appliance. )
●For wiring ,use a cable long enough to cover the entire distance with no connection, do not use an
extension cord.
●Do not put other loads on the power supply , use a dedicated power circuit. (Failure to do so may cause
abnormal heat, electric shock or fire.)
●Use the specified types of wires for electrical connections between the indoor and outdoor units. (Firmly
clamp the interconnecting wires so their terminals receive no external stresses.)
●Incomplete connections or clamping may cause terminal overheating or fire.
●After connecting interconnecting and supply wiring be sure to shape the cables so that they do not put
undue force on the electrical covers or panels. (Install covers over the wires, incomplete cover installation
may cause terminal overheating, electrical shock or fire.)
●When installing or relocating the system, be sure to keep the refrigerant circuit free from substances other
than the specified refrigerant (refer to nameplate) ,such as air. (Any presence of air or other foreign
substance in the refrigerant circuit causes an abnormal pressure rise or rupture, resulting in injury.)
●If any refrigerant has leaked out during the installation work, ventilate the room. (The refrigerant reduces a
toxic gas if exposed to flames.)
●After all installation is completed, check to make sure that no refrigerant is leaking out. (The refrigerant
produces a toxic gas if exposed to flames.)
●When carrying out piping connection, take care not to let air substances other than the specified refrigerant
go into refrigeration cycle. (Otherwise, it will cause lower capacity, abnormal high pressure in the
refrigeration cycle, explosion and injury. )
●Be sure to establish an earth. do not earth the unit to a utility pipe, arrester, or telephone earth. Incomplete
earth may cause electrical shock. (A high surge current from lightning or other sources may cause damage
to the air conditioner.)
●An earth leakage circuit breaker may be required depending on site condition to prevent electrical shock.
(Failure to do so may cause electrical shock. )
●Disconnect the power supply before completion of wiring, piping , or checking the unit.
●When moving the indoor unit and outdoor unit , please be careful .do not make the outdoor unit incline over
45 degree. Please avoid to be hurt by the sharp edge of the air conditioner.
●Install the remote controller: Be sure that the length of the wire between the indoor unit and remote
controller is within 50 meters.
●Do not install the air conditioner in a place where there is danger of exposure to inflammable gas leakage.
(If the gas leaks and builds up around the unit, it may catch fire.)
●Establish drain piping according to the instructions of this manual. (Inadequate piping may cause flooding.)
●Tighten the flare nut according to the specified method such as with a torque wrench. (If the flare nut is
tightened too hard, the flare nut may crack after a long time and cause refrigerant leakage.)
35
Installation and Maintenance
2. The Tools and Instruments for Installation
Number
Tool
Number
Tool
1
Standard screwdriver
8
Knife or wire stripper
2
Vacuum pump
9
Gradienter
3
Charge hose
10
Hammer
4
Pipe bender
11
Churn drill
5
Adjustable wrench
12
Tube expander
6
Tube cutter
13
Inner hexagon spanner
7
Cross head screw-driver
14
Tape measure
3. The Installation of the Indoor Unit
Do not install the indoor unit in a flammable environment to avoid fire or an explosion.
●Check to ensure that the ceiling slab is strong enough. If not strong enough the indoor units may
fall down on you.
●Do not install the indoor unit outdoors. If installed outdoors, an electric hazard or electric leakage
will occur.
36
Installation and Maintenance
3.1 The Initial Check
●Install the indoor unit with a proper clearance around it for operation and maintenance working
space, as shown in Fig.3.1.
●Provide a service access door near the unit piping connection area on the ceiling.
●Check to ensure that the ceiling has a sufficient strength to hang the indoor unit.
●Check the ceiling surface is flat for the air panel installation work.
3
●Select the installation location as follows Fig 3.2 :
(A) Minimum Space
(B) Down Slope Pitch of Drain Piping:1/25~1/100
(unit : mm)
Model
Capacity (BTU/h)
18K
H
270
24K,36K
248
42K,48K,60K
298
3
●Consider the air distribution from the indoor unit to the space of the room, and select a suitable
location so that uniform air temperature in the room an be obtained.It is recommended that the
indoor unit be installed 2.3 to 3 meters from the floor level. If the unit is installed higher than 3
meters, it is also recommended that the setting of increasing fan speed or 3-way Outlet Parts
set (Option) be utilized so that uniform air distribution is available.
●Do not install flammable parts in the service space for the indoor unit.
●Avoid obstacles which may hamper the air intake or the air discharge flow.
37
Installation and Maintenance
● Do not install the indoor unit in a machinery shop or kitchen where vapor from oil or its mist flows
to the indoor unit . The oil will deposit on the heat exchanger, thereby reducing the indoor unit
performance, and may deform and in the worst case, break the plastic parts of the indoor unit.
●Pay attention to the following points when the indoor unit is installed in a hospital or other facilities
where there are electronic waves from medical equipment, etc.
(A) Do not install the indoor unit where the electromagnetic wave is directly radiated to the
electrical box, remote control cable or remote control switch.
(B) Install the indoor unit and components as far as practical or at least 3 meters from the
electromagnetic wave radiator.
(C) Prepare a steel box and install the remote control switch in it. Prepare a steel conduit tube
and wire the remote control cable in it. Then, connect the ground wire with the box and the
tube.
(D) Install a noise filter when the power supply emits harmful noises.
● To avoid any corrosive action to the heat exchanger , do not install the indoor unit in an acid or
alkaline environment. In an application where the indoor unit is to be utilized under such
environmental conditions, it is recommended that the corrosion-proof type unit be used.
Check to ensure that the number of below is within 0.3kg/cm³. Otherwise it may cause
danger situation if the refrigerant in the Outdoor Unit leaks into the room where this Indoor
Unit is installed.
In detail, refer to the Installation Manual for outdoor unit.
38
Installation and Maintenance
3.2 Installation(24K,36K,42K,48K,60K)
3.2.1 Opening of False Ceiling and Suspension Bolts
(1) Determine the final location and installation direction of the indoor unit paying careful attention
to the space for the piping, wiring and maintenance.
(2) Cut out the area for the indoor unit in the false ceiling and install suspension bolts, as shown
in Fig.3.3.
Fig.3.3 Opening of False Ceiling and Suspension Bolts
(3) Check to ensure that the ceiling is horizontally level, otherwise drainage can not flow.
(4) Strengthen the opening parts of the false ceiling.
(5) Mount suspension bolts, as shown in Fig.3.4.
Fig.3.4. Mounting Suspension Bolts
3.2.2 Mounting Position of the Indoor Unit
Model
24K,36K
42K,48K,60K
3.
3
39
Installation and Maintenance
3.2.3 Mounting the Indoor Unit
(1) Mount the nuts and washers to the suspension bolts.
Fig.3.7 Mounting Nuts and washer
*Put the washer so that the surface with insulation can faces downwards.
(2) Lift the Indoor Unit by hoist, and do not put any force on the drain pan.
(3) Secure the indoor unit using the nuts, washer.
3
NOTE: If
a false ceiling has already been installed, complete all piping and wiring work
inside the ceiling before hooking-up the indoor unit.
3.2.4 Adjusting the Space between Indoor Unit and False Ceiling Opening
● Check the level of the drain pan using a water level to avoid incorrect operation of the
drain discharge mechanism in the indoor unit. The drain piping side of the indoor unit
must be approximately 5mm lower than the other part.
● Tighten the nuts of the suspension brackets after the adjustment is completed. Apply
LOCK-TIGHT paint* to the bolts and nuts in order to prevent them from loosening. If
not done, abnormal noises or sounds may occur and the indoor unit may fall down.
LOCK-TIGHT paint*: Paint the lock blots and nuts. Adjust the indoor unit to the correct position
while checking with the checking scales (factory-supplied).
(1) Pattern Board for installation is printed on the packing. Cut off the checking scale for
dimension of opening from packing.
(2) Adjust the position of indoor unit, as shown below by using checking scale .
40
Installation and Maintenance
a .For Ceiling already Completed with Panels
b . Ceiling not Completed with Panels yet
Installation Details for Air Panels
●The details of installation work for air panel shall be according to the Installation Manual for Air
Panel.
●Check to ensure that the connection of connectioner between the indoor unit and the air plane.
41
Installation and Maintenance
3.3 Installation(18K)
Roof
Drain pipe
Wall
3.3.1 Location for installing indoor unit
Ceiling
Where there is no obstacle near the air outlet and air can be easily blown
to every corner.
H>295mm
Where drain pipe can extend t outside of the wall from the ceiling board.
It is preferable to have a special draining facility.
Keep the required space from the unit to the ceiling, ground and wall as
the right figure shown.
Do no put anything near the air inlet grill to obstruct it from air absorption.
Over 1000mm
Where the roof is strong enough to bear the weight of indoor unit ,
and in not tend to increasing operation sound and vibration.
To prevent the effects of a fluorescent lamps, keep the main unit from it
at least 1.5m.
Over 1500mm
Keep the unit and remote controller 1m or more apart from television,
radio etc.
Over1500mm
The maximum connecting piping length between indoor and outdoor units
is 15m, and the maximum elevation between the units is 7.5m.
Avoid installing at a place of greasy dirt or steam.
Over 1500mm
3.3.2 Height of ceiling board
Normally, keep it ceiling board 2m-3.5m above the ground.
Over1500mm
3.3.3 Indoor unit installation
(Note: Below reference is only applicable to a house made of concrete.)
Measure the distance H between the roof surface and the ceiling board ;
Make four suspending poles with M10 screw thread on both ends (metric system)
as the below figure shown.(processed with F
10 pole)
L1
H
L1
L
Value of L and L1 are calculated as below:
L1=50mm (when H<255mm,L1=40mm)
L=1.5L1+H-230 (unit: mm)
Turn 4 attached nuts onto the thread ends on the suspending poles as shown below:
42
Installation and Maintenance
Take out the moulding board from the packing carton of indoor unit, do not fold it, just use it to
decide an installation location and direction of the unit on the roof and ceiling.
Press the moulding board tightly onto the surface of the roof, draw out the hole position for
expand bolt with a pencil, then take off the moulding board, drill 8 holes for the expand bolts.
It is preferable if the depth of holes just reveal the thread of the poles.
Cut an opening (AxB) on the ceiling board with assistance of the moulding board, make sure to
follow the same direction of the holes for roof bolts. Fix the edges of the opening with the
[-shaped aluminum bars.
Model
18K
A
400
B
610
Mount the attached suspending brackets with expand bolts M8X50 on the roof surface.
Make sure to tighten the expand bolts and nuts well. The opening of suspending brackets
should face outward as shown below.
Take out the suspending poles with nut on one end, mount them on the fixed suspending bracket,
then tighten the nuts and washers on the top of the suspending brackets.
Fix the main unit onto the suspending poles with attached nuts and washer.
The nuts on the bottom should turn to about half of the thread length.
( Note: This procedure needs at least 2 persons together.)
8~13mm
Adjust the nuts on the bottom of the suspending poles, allow the bottom of the
unit 8-13mm higher than that of the ceiling board. (as the above figure shown)
Then adjust each corner of the bottom horizontally with a leveling ruler.
( Levelness should be within the scope of 1/100.)
Leveling ruler
43
Installation and Maintenance
.
4 The Installation of outdoor Unit
4.1 The Initial check
● The outdoor should be kept in well ventilated and dry place.
● Make sure that the noise and exhaust do not disturb your neighbours .
● Never install the outdoor unit at the place with high oil fog , salt mist or harmful gas such as
sulfur steam.
● Far away from radiation source at least 3 meters.
● Install snow hood before the inlet and outlet of the outdoor unit , when the machine is
installed at the ice area.
● Install the machine in shade place to avoid the sunshine directly and the high temperature
heat radiation.
● Not install the machine at the place with dustiness or pollution avoid the heat exchanger
blocked.
● Not install the machine at the place easy to touch.
● Not install the machine at the place where the monsoon or the wind between building can
blow the fan directly.
NOTE: The fan COULD be destroyed by the strong wind when it blow the exchanger part of the outdoor
unit directly .
Be careful of the Aluminum foil fin, it is sharp.
There is no one allowed to touch the outdoor unit except the service engineer.
4.2 Installation
(1) Use the washer provided in the accessory to fasten the machine at the foundation bolts.
(2) When fasten the outdoor unit with the foundation bolts, the fasten holes position as the Fig4.1.
(3) Fasten the outdoor unit as the Fig4.2.
(4) Make sure fasten the outdoor unit tight and horizontal avoid to make noise when the machine oblique
Or inclined by strong breeze or earthquake.
(5) Not drain off water to the public places avoid to slip.
Cut it off, if the bolts is
too long, or it will be
troublesome of the
moving in the future.
(Unit:mm)
New DC-Inverter Unitary Air Conditioner
(High-Eefficiency type)
A
898
948
B
295
338
C
580
580
D
320
378
E
345
413
DC-Inverter Unitary Air Conditioner
ON/OFF Unitary Air Conditioner
Cooling Only Air Conditioner
18K
24K
36K/42K/48K/60K
A
798
898
948
B
255
295
338
C
608
580
580
D
290
320
378
E
316
345
413
F
71
135
159
anchor bolt
Fig.4.2 The installation of anchor bolts
Fig.4.1 The position of anchor bolts
18K
24K,36K
beton
d
12
12
15
44
F
135
159
d
12
15
Installation and Maintenance
4.3 Tuber length between indoor and outdoor
Indoor unit
Height difference H
Tube length L
Outdoor unit
Add.
Max. Tube Max. Height
Refrigerant
Model length(L) difference(H)
(exceed 5m)
18k
15(m)
7.5(m)
15(g/m)
24k*
20(m)
10(m)
35(g/m)
36k
30(m)
15(m)
35(g/m)
50(m)
15(m)
35(g/m)
42k/48k/60k
*For 24K High- Efficiency DC Inverter type:
Tuber length between indoor and outdoor is the same as 36k types.
Fig.4.3
If the total tube length is between 5m and 50m (Max. length), an additional refrigerant can be added.
It's not necessary to add compressor oil.(Figure 4.3)
Additional charge:
For 18k:
Xg = 15g / m × (Total pipe length(m) -5)
For 24k/36K/42K/48K/60K:
Xg =35g / m × (Total pipe length(m) -5)
45
Installation and Maintenance
5.Refrigerant Piping
Use refrigerant R22 or R410A in the refrigerant cycle(refer to outdoor nameplate). Do not
charge oxygen, acetylene or other flammable and poisonous gases into the refrigerant cycle
when performing a leakage test or an air-tight test. These types of gases are extremely
dangerous and can cause an explosion. It is recommended that compressed air, nitrogen or
refrigerant be used for these types of tests.
5.1 The Piping Materials
(1) Prepare locally-supplied copper pipes.
(2) St the piping size from the following table.
Liquid pipe
Gas pipe
18K
12.7mm
6.35mm
24K/36K
15.88mm
9.52mm
19.05mm
9.52mm
42K/48K/60K
(3) Select clean copper pipes. Make sure there is no dust and moisture inside. Blow the inside
of the pipes with nitrogen or dry air, to remove any dust or foreign materials before
connecting pipes.
5.2 The Piping Connection
(1) Position of piping connection is shown in Fig.5.1.(Indoor Unit)
Drain pipe connector
Gas pipe connector
Liquid pipe connector
Check water pump here
Hole for cords and cables
18K
24K,36K,42K,48K,60K
5
(2) When tightening the flare nut, use two spanners as shown in Fig.5.2.
6.35mm
φ12.7mm
5
46
20
6
Installation and Maintenance
(3) After connecting the refrigerant piping, seal the refrigerant pipes by using the factorysupplied insulation material as shown in Fig5.3.
● Cap the end of the pipe when the pipe is to be inserted through a hole.
● Do not put pipes on the ground directly without a cap or vinyl tape at the end of the pipe.
(4) Evacuation and refrigerant charging procedures should be performed according to “
Installation & Maintenance Manual” of the outdoor unit.
47
Installation and Maintenance
6.Drain Piping
Do not create an upper-slope or rise for the drain piping, since drain water
can flow back to the indoor unit and leakage into the room will occur when
the system operation is stopped.
● Do not connect the drain pipe with sanitary or sewage piping or any other
drainage piping.
● When the common drain piping is connected with other indoor units, the
connected position of each indoor unit must be higher than the common
drain pipe must be large enough according to the unit size and number of
nuits.
● After performing drain piping work and electrical wiring, check to ensure that
water flows smoothly as in the following procedure..
● Checking with the Float Switch:
(A) Switch ON the power supply.
(B) Pour 1.8 liters of water into the drain pan.
(C) Check to ensure that the water flows smoothly or whether no water
leakage occurs. When water cannot be found at the end of the drain
piping, pour another 1.8 liters of water into the drain.
(D) Switch ON the power supply and press the RUN/STOP button.
●
48
Installation and Maintenance
(1) The position of the drain pipe connection is shown in Fig.6.1.
(2) Prepare a polyvinyl chloride pipe with a 32mm outer diameter.
(3) Fasten the tubing to drain hose with the adhesive agent and factory-supplied clamp . The
drain piping must be performed with a down-slope pitch of 1/25 to 1/100.
*The total length of a+b+c shall be within 1,100mm.
*In case of lifting the drain pipe at outlet part, perform the drain piping work as shown in the
above figure.
(4) Insulate the drain pipe after connecting the drain hose.
.
49
Installation and Maintenance
7.Electrical Wiring
● Turn OFF the main power switch to the indoor unit and the outdoor unit before electrical wiring
work or a periodical check is performed.
● Check to ensure that the indoor fan and the outdoor fan have stopped before electrical wiring
work or a periodical check is performed.
● Protect the wires, drain pipe, electrical parts , etc. from rats or other small animals. If not
protected, rats may gnaw at unprotected parts and at the worst, a fire will occur.
● Check the item below before turning ON the main switch .
● Tighten screws according to the following torque
M3.5: 1.2N-m
M5: 2.0~2.4 N-m
● Wrap the accessory packing around the wires, and plug the wiring connection hole with the
seal Material to protect the product from any condensate water or insects.
● Tightly secure the wires with the cord clamp inside the indoor unit.
● Secure the cable of the remote control switch using the cord clamp inside the electrical box.
7.1 General Check
(1) Make sure that the field-selected electrical components (main power switches, circuit breakers,
wires, conduit connectors and wire terminals) have been properly selected according to the
electrical data given in “Technical Catalog Ⅰ”. Make sure that the components comply
with National Electrical Code(NEC).
(2) Check to ensure that the power supply voltage is within ±10% of the rated voltage.
(3) Check the capacity of the electrical wires. If the power source capacity is too low, the
system cannot be started due to the voltage drop.
(4) Check to ensure that the ground wire is connected.
(5) Power Source Main Switch Install a multi-pole main switch with a space of 3.5mm or more
between each phase.
50
Installation and Maintenance
.7.2 Electrical Wiring Connection
The electrical wiring connection for the indoor unit is shown in Fig.7.1. The intermediate
connection between the indoor unit and the air panel should be referred to in the “Installation
Manual for Air Panel”
(1) Connect the cable of an optional remote control switch or an optional extension cable to the
connectors on the printed circuit board inside the electrical box through the connecting hole in
the cabinet.
(2) Connect the power supply and earth wires to the terminals in the electrical box.
(3) Connect the wires between the indoor unit and the outdoor unit to the terminals in the electrical
box.
*Field Minimum Wire Sizes for Power Source
Refer to the item “9. Common”.
Leaf motor connection
Wire remote controller
connection(Optional
Components)
Transmission Wiring
Power Source Wiring
1
51
Installation and Maintenance
8.Test Run
●Only after all the checking points have been checked the unit can be operated.
(A) Check and make sure that the resistance of the terminal to ground is more than 1MΩ, otherwise, you
cannot operate the unit before the electricity leakage point is found and repaired.
(B) Check and make sure that the stop valve has been opened before operating the unit.
(C)Make sure that turn on electric power 6 hours before operating the unit.
●Make sure the power and unit run well then plug in.
● Turn on the appliance and adjust it to Cooling or Heating mode according to the room temperature. Set
tem. at 18℃when coolling mode and 32℃ when heating mode.Check if the appliance can run well.
●Installation of the appliance is generally finished after the above operations are done. If you still have any
trouble, please contact local technical service center of our company for further information.
● Pay attention to the following items while the system is running.
(A) Do not touch any of the parts by hand at the discharge gas side, since the compressor
chamber and the pipes at the discharge side are heated higher than 90℃.
(B) DO NOT PUSH THE BUTTON OF THE MAGNETIC SWITCH(ES). It will cause a serious
accident.
( C) Use remote controller to operate ,and check whether room temperature and function well.
After test,turn off the electric power.
52
Installation and Maintenance
9. Common
● Use an ELB (Electric Leakage Breaker). If not used, it will cause an electric shock or a
fire.
● Do not operate the system until all the check points have been cleared.
(A) Check to ensure that the insulution resistance is more than 1 megohm, by measuring the
resistance between ground and the terminal of the electrical parts. If not, do not operate the
system until the electrical leakage is found and repaired.
(B) Check to ensure that the stop valves of the outdoor unit are fully opened and then start the
system.
● Pay attention to the following items while the system is running.
(A) Do not touch any of the parts by hand at the discharge gas side, since the compressor
chamber and the pipes at the discharge side are heated higher than 90℃.
(B) DO NOT PUSH THE BUTTON OF THE MAGNETIC SWITCH(ES). It will cause a serious
Accident.
Capacity
(Btu/h)
18K(Cooling Only Unitary Type)
18K(On\Off Unitary Type)
18K(DC Inverter Unitary Type)
18K(High- Efficiency DC Inverter Type)
24K
36K (DC Inverter Unitary Type)
36K(High-Energy Efficiency DC Inverter Type)
36K(On\Off Unitary Type)
42K/48K/60K
Power
Supply
EN60 335-1
EN60 335-1
220~240V,50Hz
220~240V,50Hz
3X1.5mm 2
3X1.5mm 2
4X1.5mm 2
5X1.5mm 2
220~240V,50Hz
3X1.5mm2
220~240V,50Hz
3X2.5mm
380~418V,50Hz
5X1.5mm
380~418V,50Hz
5X2.5mm 2
2
4x0.75mm2
2
NOTES:
1) Follow local codes and regulations when selecting field wires.
2) The wire sizes marked in the table are selected at the maximus current of the unit according to the
European Standard ,En60 335-1. Use the wires which are not lighter than the ordinary tough rubber
sheathed flexible cord (code designation H05RN-F) or ordinary polychloroprene sheathed flexible
cord (code designation H05RN-F) .
3) Use a shielded cable for the transmitting circuit and connect it to ground .
4) In the case that power cables are connected in series, add each unit maximum current and
select wires below.
* in the case that current exceeds 63A, do not connect cables in series.
5)To be in compliance with EN 61000-3-11, the product shall be connected only to a supply of the system impedance:
︱Zsys︱≤0.247Ω(for 18Κ On\Off Unitary type) ︱Zsys︱≤0.209Ω(for 24Κ On\Off Unitary type).Before connecting the
product to public power network,please consult your local power supply authority to ensure the power network meet
above requirement.
53
MODEL: AUC-18UX4SGAA
AUC-36UX4SAEA
AUC-60UX6SPFA
AUC-24UX4SZEA
AUC-48UX6SPFA
PACKING LIST
NAME
AMOUNT
1.
OUTDOOR UNI T
1
2.
INDOOR UNIT
1
NO.
INDOOR ACCESSORIES
3.
1
4.
MANUAL
1
5.
PANEL
1
6.
WIRE REMOTE CONTROLLER
1
MODEL: AUC-18HR4SUAA
AUC-24HR4SZGA
AUC-36HR6SAGA AUC-42CR6FEHA
AUC-48HR6SPHA
AUC-60HR6SPHA
AUC-18UR4SZAA1
AUC-24UR4SAEA1 AUC-36UR4SAEA1 AUC-18CR4FUAA
PACKING LIST
NO.
NAME
AMOUNT
1.
OUTDOOR UNI T
1
2.
INDOOR UNIT
1
3.
INDOOR ACCESSORIES
1
4.
MANUAL
1
5.
PANEL
1
6.
WIRELESS REMOTE CONTROLLER
1
Correct Disposal of this product
This marking indicates that this product should not be disposed with other household wastes
throughout the EU. To prevent possible harm to the environment or human health from
uncontrolled waste disposal, recycle it responsibly to promote the sustainable reuse of material
resources. To return your used device, please use the return and collection systems or contact
the retailer where the product was purchased. They can take this product for environmental safe
recycling.
Version No. 1504003,J