1
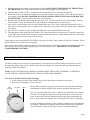
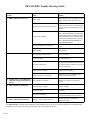
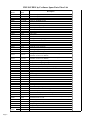
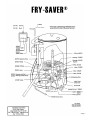
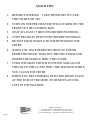
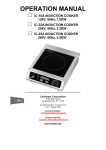
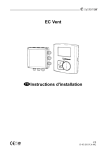
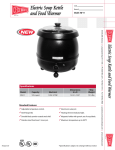
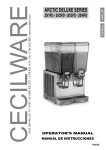
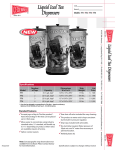
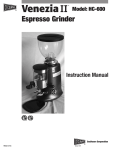
Operation & Service Manual
FRY-SAVER® Oil Filtration System
MODEL #
OIL CAPACITY
VOLTAGE
SHIP WT.
F-60
60 lbs.
120v/60/1
85 lbs.
F-100
120 lbs.
120v/60/1
95 lbs.
F-150
150 lbs.
120v/60/1
105 lbs.
STANDARD FEATURES:
•
•
•
•
•
•
•
•
All stainless steel body and filter housing construction.
1/4 HP heavy-duty reversible pump & motor.
Built-in suction line heater with indicator light for solid shortening.
5-foot (1.5 meter) flexible, sanitary, high temperature hose and heat proof handle assembly.
Easy to remove pleated filter cartridge for super fine filtering.
Built-in thermal reset switch.
Four heavy-duty swivel casters allow easy movement.
Filters 50 lbs. of oil in 5 minutes.
®
Since 1911
Cecilware Corporation
43-05 20th Avenue ~ Long Island City, NY 11105
Tel: 800.935.2211 718.932.1414 Fax: 718.932.7860
www.cecilware.com [email protected]
NM47A
FILTER CARTRIDGE DIRECTIONS:
To insert or replace the filter cartridge in the unit, follow these simple steps:
1) Remove cartridge support assembly by lifting straight up, and applying a twisting motion. Discard the
used cartridge. Wipe machine down with a clean cloth.
DO NOT USE WATER OR OTHER CLEANING SOLUTIONS WHEN CLEANING
THE FRY-SAVER®.
2) Place the cartridge support assembly over the center tube in the filter tank. Push down until the
cartridge support rests on the bottom of the tank.
3) Place the pleated filter cartridge (pleats facing up) over the cartridge support. Push down on the outer
rim until the cartridge rests on the support bead.
BE CAREFUL NOT TO DAMAGE PLEATS. Improper handling will crush them.
NOTE: Each filter cartridge can be used to filter up to 1,000 pounds of oil before a new cartridge must be
used. This equates to the cartridge being entirely covered with foreign matter.
It is recommended that you only remove and re-insert the cartridge when it needs to be replaced. By
continuously removing and re-inserting the cartridge, you will lessen its efficiency by breaking the seal
formed around the cartridge diameter. This allows for oil and particles to flow into the filtered oil and recontaminate the oil.
OPERATING INSTRUCTIONS
Before operating the filter, check the control lever and heater switch to see that they are in the "OFF"
position. The drain valve should be in the “CLOSED” position too. The filter cartridge should be inserted
as well (SEE FILTER CARTRIDGE DIRECTIONS).
NOTE: The FRY-SAVER® is equipped with a circuit breaker to protect against electric overload or shortcircuiting. If the unit is plugged in and does not operate, simply push the circuit breaker button located on
the face of the control panel and hold in for a few seconds. If the unit still does not operate, unplug and call
either a service technician or our office at 1-800-935-2211 or 718-932-1414. DO NOT CONTINUE TO
PUSH THE BUTTON! THIS WILL HARM THE MOTOR.
1) Turn off the fryer. Wait for the temperature of the oil to cool down to approximately 250° F. If you are
using solid shortening, see below.
2) Plug the FRY-SAVER® into the correct service outlet.
The FRY-SAVER® is equipped with an additional "pre-heat" feature for when the cooking oil is solidified
or thick.
A)
B)
Page 2
Pre-heat the unit by turning the heater switch to "ON" and allow the unit to heat for
approximately 15 minutes. You will know the unit is ready because suction is felt at the
nozzle when the control switch is turned to "FILL."
When the machine is pre-heated, turn the heater switch to "OFF" and proceed with filtering.
3) Place the nozzle in the cooking oil approximately 2 inches. DO NOT REST THE NOZZLE ON THE BOTTOM
OF THE FRYER. This will prevent the nozzle from becoming clogged with solid particles.
4) Turn the control switch to "FILL", keeping the nozzle tip submerged as oil is pumped into the filter.
5) When most of the oil is transferred from the fryer to the filter, turn the control switch to "OFF" and clean the fryer as
you normally would. DO NOT TRANSFER WATER AND SOLID PARTICLES FOUND ON THE BOTTOM
OF THE FRYER. You do not want to mix water and oil together.
6) Place the nozzle in the filter tank through the hole in the cover. DO NOT rest the nozzle on the cartridge. Turn the
control switch to "filter" and allow the oil to pass through the cartridge while you clean the fryer.
7) After you have removed most of the oil, only sediment and water is left. Place a container under the drain valve in
front of the fryer and open the valve to empty the unit. When the fryer is empty, follow the manufacturer's instructions
for cleaning.
8) Once the fryer is cleaned, the oil in the FRY-SAVER® tank can be transferred back to the fryer.
9) Turn the control switch on the FRY-SAVER® to "OFF" and position the nozzle in the fryer. Switch the control lever
to "FILTER" and run until all the cooking oil is transferred back into the fryer. When finished, turn the control switch
"OFF" and replace the nozzle in the cover for storage.
Even though you have emptied the FRY-SAVER® of oil, there will still be some residual oil in the valve and hose. This oil
must be drained so it does not cause any clogging.
Place a pan or other suitable container under the valve located below the flexible hose connection at the bottom of the filter
tank. Turn the valve cock open until dripping stops. Then close the drain valve. THE DRAIN VALVE MUST BE
CLOSED BEFORE FILTERING.
FRY-SAVER® FILTER CARTRIDGES:
The filter cartridge has an average life of approximately 1,000 pounds of oil before needing to be replaced. If you are
uncertain how many pounds you have filtered, the easiest rule of thumb is to replace the cartridge when the pleats are
completely filled with sediment.
NOTE: DO NOT CONTINUOUSLY REMOVE AND RE-INSERT THE FILTER CARTRIDGE, AS THIS WILL
CAUSE THE SEAL AROUND THE EDGE OF THE PAN TO BECOME STRIPPED.
Two Ways To Extend The Life Of The Cartridge
1. Use the stainless steel pre-filter assembly and pre-filter paper that is available as an accessory
2. Re-use the old cartridge as well as a new one
Filter
Cartridge
Pre-Filter
Paper
The pre-filter assembly and paper are available from your local dealer and highly
recommended to further eliminate larger particles during the filtering process.
To re-use the old cartridge, first remove it from the unit and install a new cartridge.
Take the used cartridge and empty out all the particles that have collected in the
pleats. Remove the cloth wick around the outside edge of the old cartridge and
place it on top of the new cartridge. This will extend the life of the new cartridge.
On the next change of cartridges, remove both the old and the newer discarding the
top cartridge. Install the new cartridge on the bottom and place the cartridge that
was on the bottom, on the top. This process can be continued indefinitely.
Page 3
FRY-SAVER® Trouble Shooting Guide
Trouble
1) FRY-SAVER® does not start
Cause
Solution
Power “OFF”
Check that power cord is plugged into the
proper outlet and the outlet has current.
Check that the “Fill-Filter” switch is in the
“OFF” position. Re-set the circuit breaker
Circuit breaker on the unit may be “OFF”
by pressing the button and holding it for 5
seconds.
2) FRY-SAVER® will not fill
Pump may be jammed
Use hand crank to manually release the
pump. Insert the flattened end of the crank
onto the pump shaft at the offset vent hole
on the bottom of the unit. Turn the crank
several times in both directions to release
pump. MAKE CERTAIN POWER IS
“OFF” BEFOREHAND.
Solid fat clogged in valve assembly
Turn the heater switch “ON” to pre-heat
the fat.
Motor Burnout
Replace Motor
Oil temperature is above 250°F.
Allow oil to cool
Drain valve open
Close the drain valve.
Loose hose connection
Make certain hose assembly does not have
any breaks or loose connections. If hose is
cracked, replace hose.
V-Belt is loose or broken
Tighten V-belt or replace
Fill-filter switch is not working
Check wiring—if no evidence of loose
connection, replace the switch.
3) Gurgling Noise – oil is filling from
under the cartridge instead of over Valve assembly is jammed
the top
Contact service agency to repair the
raceway.
4) FRY-SAVER® is not filtering
Filter cartridge is clogged
Replace cartridge
Drain valve open
Close drain
Loose hose connection
Check hose for breaks and/or loose
connections. Replace hose if necessary.
O-rings in valve assembly are bad
Filtering at excessive temperature.
Replace the o-rings.
5) FRY-SAVER® leaks at bottom
The FRY-SAVER is equipped with an additional crank handle that can be used to free the pump should it become jammed with
hardened oil. One or two turns of the pump manually will clear any jammed particles.
Page 4
Page 5
FRY-SAVER® by Cecilware Spare Parts Price List
Page 6
Cecilware
Part #
20000
20003
20005
20020
20025
20026
20030
20035
20045
20050
20055
20065
20066
20070
20085
20086
20090
20095
20100
20125
20130
Blickman
Part #
F-101
20000/3
F-121
F-134-NB
F-135
F-135-NUL
F-140
F-141
F-143
F-144
F-145
F-146
F-146 -NUL
F-147
F-151
F-151-NUL
F-152
F-156
F-157
F-171
F-172
20135
F-181-V
20135
F-181-H
20140
20145
20150
20155
20160
20165
20170
20175
20180
20185
20190
20195
20200
20205
20210
20215
20220
20225
20230
F-182
F-183
F-185
F-191
F-192
F-192-7
F-193-1
F-193-2
F-193-4
F-194-1A
F-194-1B
F-194-2
F-194-3
F-194-4
F-199
F-201
F-202
F-196
20230
20240
20240
23090
2004B
2011H
2011V
NM25A
20080
SS62A
F-122-1
F-142
F-160H
F-160V
F-145-A
F-149
Description
Filter Cartridge, (1 Dz/Carton)
Filter Cartridge (3 Pack)
Cover w/Knob
Caster 2", No Brake (4/Set)
V-Belt, 3L-230
V-Belt, 3L-220, For 220v NUL Units
Valve Assembly, Complete
Raceway Assembly
Base Plate, Less Casters
S/S Ball For Valve Assembly
Valve Plug
Heater, 120 Volt
Heater, 220 Volt, NUL
O-Ring For Cartridge Support
Motor, 120 Volt, 1/4HP
Motor, 220 Volt/50 HZ, 1/4HP
Sheeve, Pulley
Catch for Cover (W/Loop)
Cord Set, 8 FT, 120 Volt, w/Plug
Cartridge Support, Complete
O-Ring For Valve Plug
Tubing Bent, Valve To Pump Connection (Viking) - reference last
character in serial # of machine
Tubing Bent, Valve To Pump Connection (Haight) -reference last
character in serial # of machine
Compression Fitting, 3/8" Straight
Compression Fitting, Right Angle
Fan Blade
Hose, 5 Ft Neoprene, New Style w/Couplings
Nozzle, S/S, w/Handle
Grip, For F-192 Nozzle, Black Rubber
Nipple, 1/2 x 4-1/2
Tee Fitting, 3/8 x 1/2
Drain valve
Switch, Fill/Filter
Boot, For Fill/Filter Switch
Circuit Breaker
Switch, Heater
Pilot Light
Hose Assembly, Complete, Nozzle Attached
Pre-Filter, S/S w/Hold-Down Ring
Pre-Filter Paper, 150 Sheets Per Case
Control Box, Complete With All Components
Caster 3", No Brake (4/Set)
Stabilizing Wings For 3" Casters (Model # F-150 Only) *can only be
installed at time of order
Knob Only For Cover
O-Ring, Thick, For Top Of Valve
Pump, Haight - reference last character in serial # of machine
Pump, Viking - reference last character in serial # of machine
Decal, Control Box Cover
Hand Crank
List Price
$ 357.00
106.00
104.00
48.00
12.60
12.60
250.00
22.00
56.00
5.00
12.00
100.00
120.00
5.00
220.00
320.00
19.00
4.50
24.00
72.00
5.00
10.50
10.50
16.00
24.00
12.00
140.00
76.00
8.00
12.00
12.00
28.00
38.00
6.80
17.00
12.60
12.60
194.00
205.00
108.00
280.00
135.00
150.00
7.00
18.00
520.00
640.00
10.00
25.00
24.00
20080
Page 7
QUICK TIPS
1.
2.
3.
4.
5.
6.
7.
8.
BEFORE FILTERING – TURN FRYER OFF TO COOL
THE OIL BELOW 300◦.
TURN ON THE PRE-HEAT SWITCH LOCATED ON THE
FRONT OF THE CONTROL BOX.
WAIT AT LEAST 15 MINUTES BEFORE FILTERING.
TURN PRE-HEAT SWITCH OFF BEFORE FILTERING.
DO NOT STICK NOZZLE TO THE BOTTOM OF THE
FRYER.
WHEN YOU HAVE REMOVED MOST OF THE OIL
FROM THE FRYER, TURN OFF THE FRY SAVER AND
INSERT THE NOZZLE THRU THE COVER.
TURN THE MAIN SWITCH TO FILTER AND ALLOW
THE OIL TO CIRCULATE THRU THE MACHINE WHILE
YOU CLEAN THE FRYER.
WHEN YOU ARE FINISHED, OPEN THE DRAIN VALVE
AT THE END OF THE HOSE, TO REMOVE ANY OIL
LEFT IN THE MACHINE.
®
Page 8
Since 1911
Cecilware Corporation
43-05 20th Avenue ~ Long Island City, NY 11105
Tel: 800.935.2211 718.932.1414 Fax: 718.932.7860
www.cecilware.com [email protected]