1
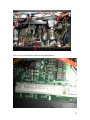
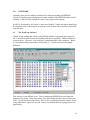
I2C MANUAL
An Instruction Manual for Building and Using the
I2C Parallel Port Device
Prepared by Skepptik
VERSION #4 – September 10, 2001
TABLE OF CONTENTS
1.0
2.0
3.0
3.1
3.2
3.3
3.4
3.5
3.6
4.0
4.1
4.2
5.0
5.1
5.2
6.0
7.0
INTRODUCTION................................................................................................. 1
RISKS..................................................................................................................... 2
I2C DEVICE.......................................................................................................... 3
Parts List for Device Inside a DB25 Connector Housing .............................. 3
Connector Cable................................................................................................ 3
Building The Device.......................................................................................... 4
Device Construction Tips ............................................................................... 10
Testing the Device ........................................................................................... 11
Connecting to the TV...................................................................................... 11
SOFTWARE........................................................................................................ 14
The PonyProg Software.................................................................................. 14
Kwik Fix........................................................................................................... 16
USING THE DEVICE AND SOFTWARE ...................................................... 16
Backup Both EEPROMs ................................................................................ 16
Red Push Fix.................................................................................................... 17
WARNINGS ........................................................................................................ 19
CONCLUSION ................................................................................................... 20
APPENDICES
APPENDIX A - Locations and Register Values in Hexadecimal
i
1.0
INTRODUCTION
In this manual, I will describe how to construct an I2C parallel port device that can be
used to read and write the 2464/2465 EEPROMs found on Mitsubishi rear projection
TVs. This manual is specifically intended for the owners of Mitsubishi rear projection
TV sets who willingly accept the potential liability associated with performing
modifications to their sets. Please do not attempt these modifications if you do not
understand the risks involved or are not willing to accept full responsibility for your
actions. The information in this manual was derived from ideas and work conducted by
forum members of the Yahoo! I2C-Interface Group and The R&D “Spot” on
Hometheaterspot.com. The information contained in this instruction manual is believed
by the author to be accurate. However, the author, as well as the owners and members of
the forum groups mentioned above, cannot warrant the accuracy or the validity of the
information contained in this document. Any use of, or reliance upon, this information
shall be solely at the risk of such user without legal recourse against the author or owners
or members of the I2C-Interface Group and Hometheaterspot.com regardless of whether
the action in which recovery of damages is sought is based upon contract, tort, statute, or
otherwise.
I am not a technician, programmer or electrical engineer, but just an amateur that has
always enjoyed tinkering with anything (electronics, pianos, old cars, etc.). I welcome
any suggestions for improvement of this manual and nobody will hurt my feelings by
pointing out my lack of knowledge. This document is a work in progress and will
continue to be modified as needed.
There is nothing really original in the ideas presented here. Our quest to conduct these
TV modifications started several months ago when an un-named Mitsubishi technician
suggested the possibility of building a simple interface device that would allow the
reading and writing of information contained on the Mitsubishi EEPROMs. The source
of much of this information was from Claudio Lanconnelli, who lives in Italy. Mr.
Lanconnelli developed the basic design of the device and the PonyProg software that
makes the device work. He generously shared the software and his device design on his
web site where it subsequently came to the attention of a home theater enthusiast. Later,
I will point out a very useful modification to Claudio’s device that was suggested by DJ
Frazier. Of course, thanks also go to Steve Holtham for starting and hosting the I2CInterface Group, Paul Carleton for use of the The R&D “Spot”, and to Don Bennett,
Steve Martin, Craig M, Robert Y, Chuck W and many others for sharing their ideas and
knowledge. This has really been quite a remarkable, totally volunteer effort.
1
2.0
RISKS
I will not go into a long explanation about warnings and disclaimers. If you are still
reading this, I assume that you realize there are possible risks both to yourself and to your
TV, and you are willing to accept full responsibility for them.
As with any electrical device, if you touch the wrong thing while poking around inside
your TV, you could receive a shock or possibly damage a sensitive electrical component.
Please exercise caution and unplug your TV while working inside it. It has been
recommended that you only place one limb at a time inside your TV. That may help
prevent accidental electrical shocks from crossing your chest area where more serious
harm could occur. There should not be any dangerous voltages in the vicinity of the RG
connector that you will be accessing.
Avoid any contact with the power supply board (the large chassis board to the left)
that contains both wall-socket and high voltages. In addition, high voltage (15,000 V
+) flows to the CRT’s when the set is on. When the set is off, the CRT’s act
somewhat like capacitors and may store some of this voltage for a time. So avoid
the large wire (anode) which connect to the back of each CRT tube (its end is
covered by a large, flat rubber insulator).
I have been told that there is not much risk of physically damaging your EEPROM since
digital devices should not be damaged by shorting them or by applying voltages of 5V or
less. (A few years ago, my son-in-law installed a computer motherboard WITHOUT the
plastic mounting feet – right up against the metal frame. Every component on the
motherboard was grounded or shorted. Amazingly, after I corrected his error, it still
worked just fine).
The biggest risk may be trashing the values of your EEPROM the first time you try to
read it. However, out of dozens of working devices, we have not heard of this happening
yet. If it did, it may be recoverable by getting a device that is known to work properly
and an EEPROM image from somebody else that is correct for your set. But you may
still need to go back and redo any tweaks you may have done in the past – a real hassle if
you have done a lot of geometry adjustments as I have.
Once you have a good backup of your EEPROMs memory, you can use that file to
restore the values should a future problem result in incorrect EEPROM values. A
side benefit is that you will, in effect, be making a record of all of the accessible
service menu settings. Chuck Williams reported an interesting incident that
occurred during an ISF calibration. He made an error (having nothing to do with
the I2C interface) that resulted in a complete loss of H Sync. To no avail, he tried
every trick in his book to restore the set to operation. Fortunately, he had
previously backed up the EEPROM’s. After reloading them, the set returned to
operation and he was able to finish the calibration.
2
3.0
I2C DEVICE
In order to read and write to your TV’s EEPROMs, you will need a computer and the I2C
parallel port device. You are on your own where the computer is concerned (a laptop is
recommended), but the device can be built following the instructions that follow.
Alternatively, certain members of the forums mentioned above may be willing to build
and sell you a device.
3.1
Parts List for Device Inside a DB25 Connector Housing
Quantity
1
1
2
2
2
1
1
Description
Small project board (actually ½ of a double board)
Modular/EIA Adapter kit (DB-25 + RJ-11)
MPS2222A Transistor NPN Silicon
100 ohm Resistors 1/8 or ¼ watt
2.2 K Resistors 1/8 or ¼ watt
Molex KK interconnect - .1” housing w/ crimp term,
10 circuit (wmlx-105)
OR
JST XHP-12 with contacts SXH-001T-P0.6
Extra male solder-lug connector pins for DB-25 Connector
1
3’ length of 4-wire telephone cord.
(Leave RJ-11 connector attached to one end.)
Radio Shack Part#
276-14b
276-1405
276-2009
271-1311
271-1325
n/a
www.jst.com
n/a
n/a
Total Cost of Parts – About $15
3.2
Connector Cable
All my parts came from Radio Shack except the Molex connectors, which I found at
Fry’s electronics (large retailer found mostly in major metropolitan areas). Most
electronic supply houses that deal with professionals should also be able to provide
such specialized parts. You might also try an online supplier such as
www.digikey.com . Unfortunately such suppliers may require large minimum
quantities or have high shipping and handling costs. I believe that Don Adams
(Spotname - agent86; [email protected]) has ordered these in quantity and
has some available. He may also have some complete connector cables and devices.
The Molex’s stocked at Fry’s come in 2-pin, 4-pin, 6-pin and 10 pin configurations. The
12-pin connector described above would be ideal (these are the ones Don Adams has). I
used the 10-pin Molex since the only pins used on the Mits RG connector are #6, # 7 and
# 12. The molex connectors need to be ground down or filed a little, since they are .2 “
wide, while the RG connector is closer to about .17”. Fitting the molex to the RG
connector is pretty easy, since you can do it without the terminals installed in the
connector. One nice thing is that the pins are offset rather than centered (in both the
3
molex and the RG connector), so they will only go on one way. There may actually be
other old computer parts that would work as long as their pins are .1” on center.
I wanted to construct a device that could not be hooked up incorrectly as I was concerned
about damage to the set. The molex connector takes care of this at the RG end as long as
you make sure that the RG ground connector and Pin # 12 of the cable are matched up.
On the other end of the cable, I felt that an RJ-11 telephone connector would be a good
idea. It makes for a nice, easy, quick connection to the I2C device. My cord is (semi)
permanently plugged so I don’t have to poke my hands in there every time I want to
make an adjustment. You should make this cable at least 18 to 24 inches long to give
yourself plenty of working room, but probably not longer than about 36 inches.
3.3
Building The Device
For those preferring to build a less compact device, you might want to check the
document i2cdeviceA.doc from the files area at the i2c Interface Group. It spreads the
components out on ½ of the RS perfboard, making it easier to see the layout and visualize
the circuit diagram. If you use that device, most of what is contained in this document
will still be relevant.
Below is Claudio’s schematic of the parallel port I2C device along with some
modifications suggested by DJ Frazier.
According to the schematic posted at Claudio’s web site, we believed that we needed a +
5V power supply to power the device. Originally we took this + 5 V supply from a pin
inside the TV. However, DJ Frazier discovered that this is unnecessary as long as a 100
ohm pull-up resistor is used in the data and clock lines. Thus, all of the devices described
4
herein use his circuitry. There are only two transistors and four resistors that need to be
connected together properly. Nearly all of the devices currently being used by this group,
although they may look different, use the schematic above as the basis for their
construction.
Both DJ Frazier and Don Bennett constructed their devices by soldering the components
directly to the DB-25 connector, which snaps into the end of the housing. It you are good
at soldering and know how to check things out after construction, this method may work
for you. I prefer to be able to layout the components on a project board so that I can
repeatedly check my connections against the circuit diagram. Photos of devices
constructed by various individuals are presented below. Additional pictures are available
at the I2C-Interface Group Message Board.
“Flying Leads” by DJ Frazier – The picture below shows the male DB-25 connector with
components attached prior to inserting it into the housing.
5
Don Bennett also attaches all components to the DB25.
“Perfboard Mini” by Skepptik – In the picture below, you can see the DB25 housing, the
small perfboard containing the components and the DB25 connector. The perfboard is
later inserted into the housing and the DB25 connector snaps into the end.
6
7
Here is a picture of the final assembly of my device showing the housing, which contains
the perfboard, and the cable I used to attach to the set. Some have been surprised to find
that this is the entire I2C device.
Below is a very nice example of a compact breadboard layout from Wiraklim which
shows all of the connections very clearly. It used a smaller piece of perfboard than my
device and fits more easily into the housing:
8
There has been some confusion regarding the pin configuration of the 2N2222
transistors. The diagram on the Radio Shack package shows the pin order as
viewed from the pin side. Wiraklim’s diagram is looking down on the board from
above with the components clearly visible.
Below is another picture and diagram of a very nicely constructed device from DJ
Frazier:
9
A couple of things to note about the device pictured directly above.
1. It does not use the DB25 connector that comes with the Radio Shack housing. Rather,
it replaces it with a “solder-lug” version of the DB25 (also available at RS), which fits
just as well into the housing. In this case, the perfboard slides almost perfectly into the
space between the pins.
2. Perfboard with solder pads could have been used. In this case, you can solder a
couple of lugs of the DB25 directly to the PCB securing the connector to the board.
3.4
Device Construction Tips
I will provide a couple of tips on constructing the perfboard mini device.
1. You will only need three of the six leads that come with the Radio Shack
connector. I used the black, yellow and green leads since these colors are also
used in standard phone cord line. Just reach in with a pair of long nose pliers and
pull out the other leads. I did not pay attention to the “twisted pair” relationship
of the RJ-11 connection since I was only interested in retaining the proper colorcoding of the three wires I needed.
2. Initially, I intended to clip off and reuse the Male D-sub pins that came with the
Radio Shack device. But this will mean soldering them onto leads from the DB25. Don’t bother. Just buy an extra DB-9 plug at Radio Shack (about $ 1.50),
which comes with 12 new connector pins with bare solder lugs. If you do this
you can retain the maximum amount of length on the three leads that come from
the housing.
3. It is pretty easy to cut the perfboard to the desired size. Just score it with an
exacto knife and snap off the pieces with pliers. Then sand or grind the edges.
This is especially important on the front and back of the board where you will
want to grind down the board right up to the foil that surrounds the pins to make it
as narrow as possible. You will also need to taper the sides of the board near the
back to get it to fit into the housing.
4. If you use the DB-25 connector that comes with the Radio Shack housing, even
though the board may fit into the housing OK, you will still find that the 25-pin
connector from Radio Shack may bump into the components mounted near the
front of the board. After attaching components but before installing leads, check
it out to make sure the DB-25 will fit into the housing. If not, grind or trim off the
bottom edge of the black plastic part of the connector. Take off as much as you
need because the only pin on the bottom row that is used is Pin # 25. Better yet,
use the construction method of the “un-named device” pictured above.
10
5. It may be tricky to get the perfboard into the connector, what with all of the leads
attached to it. I used 22-gauge wire about 3” in length. 24-gauge would have
worked better. I tried out the device (attached to the TV) before final assembly. I
then pushed the perfboard into the connector and snapped in the DB-25.
3.5
Testing the Device
Here are some resistance measures I took with a little cheapo Radio Shack analog
voltmeter. Some people, using digital meters, have reported that they do not get these
resistance measurements but that their devices work fine. If you don’t, at least make sure
that you do not have a short between any of the three leads at the RG end of the
connector.
Negative
Ohm-meter Lead
DB-25 # 2
DB-25 # 3
DB-25 # 12
DB-25 # 13
DB-25 # 25
3.6
Plus Lead of Ohm-Meter to Molex Connector
# 6-Green
# 7-Yellow # 12-Black
INF
5.5K
5.8K
5.5K
INF
5.5K
100
INF
INF
INF
100
INF
INF
INF
0
Connecting to the TV
When you remove the front access cover, you will see that there are two large circuit
boards in the Mitsubishi sets. The RG connector will be found on the one on the right. It
is located right at the front edge of the rightmost mainboard directly behind and below
the blue CRT. You may not see it at first because there are a couple of wire bundles that
are routed right above it.
The following picture from CraigM shows the front access cover removed, which clearly
shows the RG connector:
11
Here is a close-up of the RG connector from Don Bennett:
12
After making sure the device works OK, you can leave the connector cord attached and
dangling out around the front access cover.
To reiterate, if the connector cable has been constructed properly, the green wire goes on
the sixth pin of the RG connector (moving from left to right), which is E2SDA. The
white wire goes on pin # 7 (E2SCL), and the black wire (ground) goes to pin # 12.
The 12 RG connector pins, from left to right, are:
(1) SDA5; (2) Missing; (3) REQ; (4) BUS-; (5) CACK; (6) E2SDA; (7) E2SCL;
(8) CSDA; (9) CSCL; (10) Busy; (11) CMUTE; and, (12) GND.
You can see these labels on the board in the close photo from Don Bennett.
Note the slight offset of the pins such that, if you use a molex (or similar) connector, it
cannot be inserted backwards.
I used an HP Omnibook laptop (Pentium II, 466) for all of my reading and writing with
PonyProg.
13
4.0
SOFTWARE
Currently, there are two software solutions for reading and writing the EEPROM.
Claudio’s PonyProg program displays the entire contents of the EEPROM in the form of
a bitmap. It allows you to change the value of any register in the bitmap.
Kwik Fix, developed by Joe Frazier, is more user-friendly. It does not require identifying
the location of any of the registers or using hex code to enter values in order to adjust the
color decoder.
4.1
The PonyProg Software
I did all of my reading and writing to the EEPOM with the set plugged in but powered
off. I am not sure that I want to try anything with the set operating. I did not find much
reason to do so. However, a few users have reported that this is not a problem. Below
is a screenshot of the main window of PonyProg V 1.15 (later versions look slightly
different).
This software is not difficult to use. Prior to reading the EEPROM you will enter the
Options, Setup menu. In the setup menu, select the parallel interface, Easy I2C Bus and
LPT1. Do not check any other boxes. There is also a calibration function, which I do not
really understand. It gives me an “OK” status even without the device plugged in to the
parallel port.
14
In the Device selection of the main menu, click on “Select”, “I2C EEPROM”, and select
“2464/2465” from the list of devices. The software is now ready to use.
I did get one small error the first time I used the program. It was “Missing-device – 13”.
I checked my connections and found that the lug of the green lead (to E2SDA) had not
been seated properly in the molex connector. When I installed the connector, the RG pin
pushed its lug out of the housing so that it was not making contact. Anyway, no harm
was done and I now know what the error looks like if the device is not fully connected to
the RG connector.
There are program icons for reading and writing the EEPROMs. When you click on the
read icon, a small dialog box appears with a progress indicator. The entire EEPROM is
read in about ten seconds. The entire contents of the EEPROM (in hexadecimal notation)
will appear in the window. Down at the bottom is a CRC indicator. CRC is a sort of
complicated version of a checksum. You should read the device several times and if
everything is working properly, you should get the exact same CRC value each time.
This means all of the data is being read consistently (I usually read the EEPROM several
times and have never gotten differing CRC values). The slightest difference in EEPROM
values, even a change in one register by a single digit will generate a dramatically
different CRC value. If the CRC values are consistent, save the file to the hard drive.
You may also want to make a backup copy onto a floppy disk (it is only 9k – i.e.
approximately 8000 bytes or 64,000 bits). With this image, you should always be able to
get your set back to its current state.
As I mentioned in my I2C-Interface Group message of July 21, it took a bit of courage to
write back to the EEPROM. However, I knew I had a good image of my own EEPROM
and felt sure that soon there would be a lot of people with device readers (as there are
now). At worst, I might have to beg for some help. When you execute the write
function, you get a warning that says that the old contents will be erased. This, of course,
is the scary part. The “write” takes a little longer than the “read”. It then goes back and
does a “Verify”, by reading the EEPROM again and comparing the values. At this point
you are home free. Even now, I remember the feeling of satisfaction the first time I used
my device. When I saw that the write was completed with the same CRC value, there
was no doubt in my mind that when I turned the set back on it would still be working
exactly as before.
Changing EEPROM values is very easy. Just Click on EDIT and EDIT BUFFER
ENABLED. When you click on any value in the table, a dialog appears that allows you
to change that register’s value. You can enter the new value in either hex or decimal
notation (a discussion of the hexadecimal numbering system is contained in the
appendix of this document). Then you rewrite the entire EEPROM.
15
4.2
Kwik Fix
Joe Frazier has developed a piece of software that is more user-friendly than PonyProg.
It can be used to adjust the color decoder, iris settings and a number of other settings of
interest to techs and tweakers. It can also be used to change specific EEPROM values by
entering the hex location and desired register value.
By default, Kwik Fix saves its files in .mot (Motorola) format, whereas PonyProg uses a
.e2p format. However, PonyProg can read and write from either format and these options
are provided in the “file-type” option of the files menu.
PonyProg and Kwik fix use different methods for calculating the CRC value. Therefore,
if you read the same EEPROM image with each program, you will not get the same CRC
result. The important thing is that if you read an unchanged EEPROM repeatedly with
the same program, you should get the same CRC result each time.
5.0
USING THE DEVICE AND SOFTWARE
5.1
Backup Both EEPROMs
We know that there are two data storage EEPROMs in the Mitsubishi TVs although all of
our work so far has been with registers in the first one. I believe that the second one
contains the user convergence values although this has not been verified. The point is
that if you want a complete backup for future reference, you should probably back up and
save both.
Kwik Fix makes this very easy. Just click on “Select” under “EEP Operations” and
choose which image to read.
It is a little more difficult in PonyProg. To read the second EEPROM image, you must
edit PonyProg’s .ini file found in the directory where the program is installed – probably
C:\Program Files\PonyProg. By default, PonyProg uses a base page address of 0xA0,
which reads the first EEP. The second EEPROM starts at page address 0xA2, so you
must temporarily make this change in the .ini file to read the second EEP.
CAUTION: I BELIEVE THAT EITHER IMAGE COULD PROBABLY BE WRITTEN
TO EITHER EEPROM (RESULTING IN BIG PROBLEMS). SO CAREFULLY
LABEL YOUR TWO IMAGES AND DO NOT RESTORE AN IMAGE TO THE
WRONG EEPROM.
16
5.2
Red Push Fix
Although experiments with adjusting the color decoder are ongoing, here are three sets of
values that others have come up with. It is important to note that several settings are
interdependent with red and green saturation and tint. #19 COL and #20 TINT in the
Video Chr menu are global for all inputs. In addition, each mode has its own SCOL and
STIN setting. These are combined with the global settings as offsets (additions to or
subtractions from) the global settings. The point is that if you are trying to test the
settings that others have arrived at, you need to use all of them or you will be comparing
apples and oranges.
You will also notice that the settings for COL and TINT are rather unusual hex numbers.
It is believed that the number in the register is actually a combination of numbers from a
couple of settings. For this reason, if you want to reset COL (for instance, to center your
sliders), you should do it from the service menu (It is not locked out). With regard to
TINT, nearly everyone has found that the factory default is optimal so we recommend
that if you do any TINT changes, do them from the STIN register for the respective
mode.
Ideally, you should go through the normal Avia calibration procedure. The only
difference is that, for the locked out decoder settings, you will have to turn the set off,
load the software and make the change. This may take several iterations. Basically, you
may now use any procedure available to owners of the xxx03 and xxx05 series TVs.
Paul Carleton described this procedure in detail in the HomeTheaterSpot Mitsubishi
Tweaks section. The post is “Adjusting the color decoder on the Mits 1999 and 2000
Line.” I don’t believe it is listed in the index, so just search the Tweaks section for “color
+ Decoder + 2000” and you should find it. Another very nice document is “Adjusting
the Color Decoder for Dummies” by Mark H, recently posted to The R&D Spot.”
However, several people have asked for a set of values that seem to work well for other
calibrators so I have reproduced their input below:
From dbennett:
# 19 COL 8Ch
# 20 TINT 6Eh (This is the factory default)
3 SCOL
4 STIN
60 R-YR
61 R-YB
62 G-YR
63 G-YB
NTSC
Location Code
0928h
00
0929h
11
093Dh
12
093Eh
14
093Fh
7
0940h
5
480P
Location Code
094Ch
00
094Dh
11
0961h
12
0962h
14
0963h
7
0964h
5
HD
Location
0970h
0971h
0985h
0986h
0987h
0988h
Code
04
11
15
12
8
6
17
From Steve Martin:
# 19 COL 7Ch (Default)
# 20 TINT 6Eh (This is the factory default)
3 SCOL
4 STIN
60 R-YR
61 R-YB
62 G-YR
63 G-YB
NTSC
Location Code
0928h
03
0929h
14
093Dh
13
093Eh
15
093Fh
7
0940h
7
480P
Location Code
094Ch
06
094Dh
13
0961h
13
0962h
15
0963h
7
0964h
7
HD
Location
0970h
0971h
0985h
0986h
0987h
0988h
Code
08
14
14
13
08
07
Things that can explain differences:
•
•
•
•
I had previously adjusted CR01 and CB01 per the service manual procedure with
a color analyzer.
I did not use the color filters, I covered the other guns when viewing test patterns.
I used an Accupel HDTV pattern generator to calibrate the HD input.
I was viewing 480pi through an iScan line doubler.
From Craig M:
It is very important that 3-SCOL and 4-STIN are set the same for all modes. By default
Video Chr, Mode 2-HD is not. Then you can check/set the decoder for one mode and
transfer the settings into the other memory locations. 19-COL and the locked 20-TNT are
global so SCOL and STIN become the overriding factors.
After many many tests on HD, 480p and 480i these are the decoder settings that work the
best on my set across the board for all modes with SCOL and STIN and the sliders set the
same (centered in my case).
# 19 COL 7Ch (Default)
# 20 TINT 6Eh (Default)
3 SCOL
4 STIN
60 R-YR
61 R-YB
62 G-YR
63 G-YB
NTSC
Location Code
0928h
7
0929h
7
093Dh
12
093Eh
14
093Fh
7
0940h
6
480P
Location Code
094Ch
7
094Dh
7
0961h
12
0962h
14
0963h
7
0964h
6
HD
Location
0970h
0971h
0985h
0986h
0987h
0988h
Code
7
7
12
14
7
6
18
Red Sat and Hue actually need a half click. This is why you are seeing 1 click differences
between everyone's sets. Green at 8 and 7 looks very close to 7 and 6 but it mutes green a
little too much and lacks "punch" in actual images. Trees and grass are too laid back
considering the Mits Green phosphors exceed SMPTE 274 (HD) standards.
Also note that this is with SCON set to 2, which affects color saturation and with the Mits
Black Level Enhancement set to Off. Black Level Enhancement On reduces color
saturation about 1 - 1.5 clicks.
6.0
WARNINGS
For those who do not have laptop computers, we have tested the device through a 25’
telephone extension cord.
WE HAVE DISCOVERED SOME SPECIAL PRECAUTIONS SHOULD BE
OBSERVED WHEN USING LONG LINE CONNECTIONS THROUGH A
TELEPHONE EXTENSION CORD.
This problem is not associated with the device itself. Rather, it occurs any time the RG
connector is simply attached to a 25' telephone extension, whether or not the I2C device
is attached at the other end. When it occurs, it is easy to recover from by simply turning
the set off, disconnecting the long phone cord and turning the set back on. In every case
this has taken care of the problem.
The problem has been described by Steve Martin as “warp mode.” It is recognized
by considerable distortion of the picture with severe color fringing around the
objects. Our theory is that, when the set it powered up, the TV reads data from the
"Data" EEPROM, which is the one that is being modified with the I2C device. The
excessive length of the extension cord appears to create a large amount of capacitance
(noise on the bus) between the E2SDA line and the E2SCL line causing the set to read
the data EEPROM incorrectly (even though the EEPROM contains a completely correct
set of data). It appears that, under these conditions the Mitsubishi TV reverts to a default
(safe) set of values when the set is powered up. It is possible that this is how the set
looks before it is adjusted at the factory.
Powering the set off, disconnecting the cable, and reapplying power allows the data
EEPROM to be read correctly and everything is fine. Nothing in the data EEPROM is
corrupted. It is simply that its data cannot be read properly.
To reiterate, we have had no difficulty recovering from this problem. However, use
caution if using a telephone extension cord to reach a computer located at some distance
from the set. The safest method is to use a laptop and a connection length of three feet or
less.
19
Despite the above warning, it does appear possible to reliably read and write the
EEPROM through an extension cord (I’ve personally used a 25’ length with no problem).
However, if you do, just be sure to get stable CRC values and DISCONNECT THE
LONG TELEPHONE CABLE PRIOR TO POWERING UP THE TV.
Another time when “warp mode” had occurred was when the device was connected to the
set and to the computer but the computer was off. This also appears to prevent the TV
from properly reading the EEPROM when it is powered up. This problem was also
remedied by turning off the set, disconnecting the connector from the device and
reapplying power to the TV.
A few people have also noted some problems when leaving even a short connector
attached to the TV (Steve Martin says he has seen this in a few of the 15-20 sets he has
fixed with the device). If you make adjustments in the service menu that do not seem to
be permanently recorded, you may want to consider disconnecting the cord from the RG
connector.
7.0
CONCLUSION
Since the things I write are never as clear to others as they are to me, I welcome any
suggestions to this document which, at least for awhile, will be edited at frequent
intervals.
Be sure to check the files and photos areas of the I2C-Interface Group as well as The
R&D “Spot” for more information.
http://groups.yahoo.com/group/I2C-Interface
http://www.hometheaterspot.com
See The R&D “Spot”
20
APPENDIX A
Locations and Register Values in Hexadecimal
Two different types of numbers are used in the following discussion. Those followed by
a “d” are in the decimal (base 10) number system – the one you have been using all your
life. Those followed by an “h” are in the hexadecimal (base 16) number system.
All numbering systems have a base. The binary number system is base 2 and has only
two digits. The decimal number system is a base 10 system and has ten digits, 0 thru 9.
To display higher numbers we add more significant digits. The number 10d could be
thought of as the number 10 + 0 while 11d is the same as 10 + 1 and the number 19 is 10
+ 9. The number 132 could be thought of as 100 + 30 + 2 (for the mathematically
inclined, this is 1*10^2 + 3*10^1+2*10^0).
Hexadecimal uses base 16. Therefore, in the hex system we need some characters that go
higher than 9 so we use letters. There are 16 single digit values 0 thru F (0, 1, 2, …..9,
A, B, C, D, E, F). In decimal these would be the numbers 0 thru 15. Numbers higher
than 15d are represented by adding more significant digits. The number 10h is actually
16 + 0 = 16d. The number 11h is equivalent to 16 + 1 = 17d. The hex number 20 is
equivalent to decimal 32 (i.e. 2*16^1 + 0). 21h is equivalent to 33d (i.e 2*16^1 + 1).
The values in our 64k EEPROM are actually stored sequentially as a string of 8192 2digit hexadecimal values (each comprising one byte), and they could be displayed in
8192 rows. However, in order to save space, a standard bitmap displays 16 of these
values in each row so that it only takes 512 rows to display all of the data. The last row is
identified as 0001FF0h and the last number in that row is 0001FFFh (8191d). Each of
the registers can store a value from 00 through FF (0 through 255 in decimal).
The PonyProg bitmap (shown in the manual pictures) has been scrolled down to the rows
in the vicinity of the color decoder. In fact, the first line (0000930) is the row where the
first few NTSC values are stored. The first set of row characters (displayed in brown),
identify the first hexadecimal string (or byte) in that row. However, this same row also
contains all of the hex values for locations 000930h, 000931h, 000932h, … 000939h,
00093Ah , 00093Bh, 00093Ch 00093Dh, 00093Eh, and 00093Fh. The next value in the
sequence would be 000940h, which is the first number on the next row. So, looking
across the row, if we were looking for the number 000937, we would count across “0, 1,
2, ….7” which is the eighth number in the row (because 0 counts as a number). To find
the number 00093Dh, we would count, “0, 1, 2, …, 8, 9, A, B, C, D” or the 14th number
in the row. In the picture, you will notice that the cursor is at 00093D, which is the
location for R-YR for NTSC.
The values contained in each register are also displayed in hexadecimal. In order to edit a
value, you first click (in the Main Menu) “Edit, Edit Buffer Enabled.” Then move the
cursor to the desired location and double click. Editing the register values at each hex
location is easy because PonyProg’s edit window shows this value in both hex and
decimal. In the manual picture, PonyProg is in the edit mode and location 00093D has
1
been selected. The edit buffer shows that the location contains a hex value of 03, which
is also equivalent to a decimal value of 03.
If you wanted to enter a decimal value of, say, 13 you would just enter 13 in the decimal
box of the edit window. The hex code does not immediately change. However, when
you click OK, you will see that the new hex value (0D) appears as the register’s value. If
you again edit that register, you will see both the hex and decimal values (0Dh and 13d)
appear in the edit window. The decimal value will be the one that you entered in the
previous step. A decimal value higher that 15, for instance 29, would appear as a 1Dh in
the edit buffer window.
You can edit several bitmap values at the same time. One you have enabled the edit
buffer, all you need to do is to double click on the value you want to change. Then you
can write back to the PROM and/or save the file.
2