1
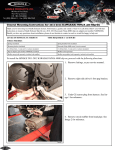
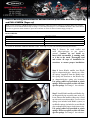
General Mounting Instructions for SKIDOO ROTAX 4-TEC 1200 SLIP-ON (Pages 1-2)
and FULL SYSTEM (Pages 2-3)
Thank you for investing in a Hindle Exhaust System. Performance, quality and sound is what we’re all about. Below you will find
instructions to mount a Hindle Exhaust Slip-on (Pages 1-2) or Full System (Pages 2-3) for a SKIDOO ROTAX 4-TEC 1200. Should
you have any questions about installation, please do not hesitate to contact us and we would be happy to help out.
LEVEL OF DIFFICULTY: DIFFICULT
TOOLS NEEDED:
TIME REQUIRED: 1-1.5 HOURS FOR SLIP-ON, 3 HOURS FOR FULL SYSTEM
Springs (included)
Spring Installer Tool (included)
“T” shaped mounting bracket (included)
Bent mounting bracket (included)
2 x 20mm bolts, 2 x nut and 4 x washers (included)
6mm bolt x 6mm nut (included)
Muffler (sold separately)
2 x muffler strap protective rubber (sold separately, included with muffler)
2 x muffler straps (sold separately, included with muffler)
Skidoo 1200 owner’s/service manual
To install the HINDLE SKIDOO ROTAX 4-TEC 1200 slip-on, proceed with the following directions:
Step 1: Remove the stock muffler and
stock elbow/mid-pipe as per owner’s
manual. Caution: do not install exhaust while snowmobile is running, and/
or is hot to the touch. Thoroughly read
and review all steps of installation instructions to ensure proper installation.
Image 1
Image 2
Step 2: Insert Hindle muffler into Hindle
slip-on adapter/mid-pipe. Attach two Hindle springs (supplied) from the Hindle muffler spring tab locations to the Hindle slipon adapter/mid-pipe spring tab locations.
Use spring puller tool provided to attach
springs. Do not use pliers, as this will damage the springs. See Image 1 for reference.
Step 3: Install Hindle muffler and Hindle slipon adapter/mid-pipe assembly onto stock collector. Ensure that muffler exhaust tip is lined
up with stock rear exhaust hole. Use two stock
springs (not included with Hindle system) or
use Hindle springs (included) to secure Hindle
slip-on adapter/mid-pipe to stock front section.
Use spring puller tool provided to attach
springs. Do not use pliers, as this will damage the springs. See Image 2 for reference.
Step 4: Remove protective plastic wrap from
outer side of muffler strap. Install muffler
strap protective rubber insert on inside of muffler strap. Ensure that grooves of rubber insert
form around edge of muffler strap. Install first
muffler strap so that both ends of strap meet
behind the Hindle muffler. Use “T”-shape
bracket (supplied) to mount muffler strap to
stock muffler rubber mount on upper frame.
Use 8x20mm bolt (supplied), two 8mm washers (supplied) and one 8mm locknut (supplied) to secure muffler strap to bracket.
Image 3
Step 5: Use bent bracket (supplied) to
mount muffler strap to tunnel on frame. Use
stock bolts (not supplied) to mount bracket
to frame. Remove protective plastic wrap
from outer side of muffler strap. Install muffler strap protective rubber insert on inside
of muffler strap. Ensure that grooves of rubber insert form around edge of muffler strap.
Then, fasten muffler strap to bracket by using
8x20mm bolt (supplied), two 8mm washers
(supplied) and an 8mm locknut (supplied).
See Image 3 for reference. Install second muffler strap so that both ends of strap join together on the left side of the Hindle muffler.
Image 4
Step 6: You must ground battery wire to 6mm
hole on bent bracket. Use 6mm bolt and 6mm
locknut (supplied) to secure ground wire to muffler bracket. Failure to do so will result in snowmobile not starting. See Image 4 for reference.
To install the HINDLE SKIDOO ROTAX 4-TEC 1200 full system, proceed with the following directions:
Step 1: Remove the stock exhaust system, as per owner’s manual. Caution: do not install exhaust while snowmobile is running, and/or is hot to the touch. Thoroughly read and review all steps of installation instructions to ensure proper installation.
Step 2: Install exhaust flanges into engine ports. Tighten exhaust flanges to engine ports using stock studs. Tighten
finger tight. Do not over tighten.
2
Step 3: Install Hindle front exhaust primaries into flanges. Use spring puller tool (provided) to attach one spring
on each primary to flange location. Do not use pliers to install springs. Failure to use spring puller tool provided may result in springs becoming over-extended/loosened.
Step 4: Install Hindle collector onto Hindle primaries, using three (3) springs (provided) on each spring tab location. Use spring puller tool (provided) to attach springs. Do not use pliers to install springs. Failure to use
spring puller tool provided may result in springs becoming over-extended/loosened.
Step 5: Insert Hindle muffler into Hindle mid-pipe. Attach two Hindle springs (supplied) from the Hindle muffler
spring tab locations to the Hindle mid-pipe spring tab locations. Refer to Image 1 of Slip-on instructions for reference.
Step 6: Install Hindle mid-pipe and Hindle muffler assembly onto Hindle collector, using two springs (provided)
on each spring tab location. Use spring puller tool (provided) to attach one springs. Do not use pliers to install
springs. Failure to use spring puller tool provided may result in springs becoming over-extended/loosened.
Step 7: Follow Step 4, Step 5, and Step 6 of Skidoo 1200 Rotax 4-Tec Hindle Slip-on instructions to install
Hindle muffler.
WARNING
Exhaust system(s) and muffler(s) may be hot when engine is/has been running. Take preventative measures
with the handling of any Hindle system or Hindle muffler. Allow the engine to cool before installing or removing the exhaust system and/or muffler. Severe burns, bodily injury and/or death may occur.
WARNING
Keep flammable materials away from exhaust at all times.
WARNING
Exhaust gas contains poisonous carbon monoxide that can rapidly accumulate in an enclosed or poorly
ventilated area. If inhaled, it may cause serious injury or death. Start and run the motorcycle in a wellventilated area.
12 MONTH LIMITED WARRANTY AND LIABILITY DISCLAIMER
Hindle Products Ltd. warrants this product free from defects in material or workmanship for a period of 12 months from the date of purchase, except as noted. The product warranty does not cover damage caused by misuse or abuse; accident; the attachment of any unauthorized accessory; alteration to the product, improper installation,
exposure to harsh weather and/or chemicals, lack of proper maintenance, or any other conditions that are beyond the control of Hindle Products Ltd. Hindle Products Ltd.
shall not be responsible for any type of incidental, consequential, or special damages. All implied warranties, including but not limited to those warranties of fitness and
merchantability, are limited in the total duration to 12 months from the original purchase date.Hindle will not warrant any product for fitment issues after the system has
been ran on the motorcycle for any length of time. If the warranty occurs within 30 days from the date of purchase, please contact the dealer product was purchased from.
Over 30 days from the date of purchase, please contact Hindle Products Ltd. direct at (905) 985-6111 before shipping the product. Customer must contact Hindle Products
Ltd. prior to sending warranty product. Claims for lost shipment, damaged shipments, or other problems regarding freight must be made directly to the responsible carrier.
To obtain warranty service on Hindle Exhaust System products, mail the product prepaid and a copy of your dated sales receipt (as proof of purchase), together with a note
explaining the reason for repair to this item to: Hindle Products Ltd., 140 North Port Road, Port Perry, Ontario, Canada, L9L 1B2. Product being returned without
notification prior to shipping will be overlooked. Upon receipt, Hindle Products Ltd. will repair or replace, as appropriate, your Hindle product and return it to you, post
paid. Warranty is solely through Hindle Products Ltd. Service to our products by anyone other than Hindle Products Ltd. voids warranty. Hindle Products Ltd. disclaims
any and all liability for consequential or incidental damages. Hindle Products Ltd. will not be held responsible for personal damage, bodily harm or any other legal matters.
3