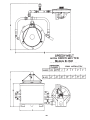
1
Dear MIFCO Customer:
We would like to thank and congratulate you on the purchase of the McEnglevan machine and
accessories, and to share with you our confidence in the quality and reliability of our equipment.
The enclosed Operating Manual and Warranty Registration Card are important to both of us for two
reasons:
1. Your Registration Card, with proper serial number, will be documented in our files and your
written warranty will be forwarded to you upon the receipt of this card. Please complete and mail
the return card now.
2. Proper instruction on the maintenance of your machine is very important. Please read your
instruction manual completely for best results and maximum machine tool life.
Should you ever need service, it is available through the distributors, our factory
representatives or directly from the factory. It is the obligation of our franchised distributor who sells you this
equipment to conduct field service where possible. Please contact your local distributor first and they will
assist you in resolving any problems you may encounter.
We take pride along with you in your purchase of this equipment. We will be happy to assist you in
any way possible to receive optimum results in its operation and use.
Sincerely yours,
Matt Walter
President / CEO
-1-
DO NOT REMOVE THIS PAGE
In accordance with the National Electric Code, A.G.A., Canadian Standard Association, O.S.H.A.,
N.F.P.A., and the F.I.A. recommendations, this specification sheet must remain a part of this manual. Most of
the components are U.L. and A.G.A. listed. The Control Panel wiring and Ultra-Violet Combustion Safeguard
Systems are designed to conform to the specifications of the National Electric Code.
This manual contains the Electrical Wiring Schematic applicable to this particular piece of equipment.
If there are any questions, contact your distributor or the factory. Only licensed electricians or qualified
factory representatives should trouble shoot the electrical system of this equipment.
Purchased from ________________________________________ Date _____________________
City ______________________ State __________ Zip Code _____________________________
Model Number _____________________ Serial Number __________________________________
Electrical Service Specifications
____________________ Volts _____________________ Phase ___________________ Hertz
Note: Schematic drawings showing different voltages, phase and hertz data are included in the manual.
The Drawing Number for this furnace is: ______________
Note:
Maximum incoming gas pressure and required operating pressure for this unit is listed on a test
tag attached to the gas gate valve of the burner system.
HIGHER PRESSURE WILL DAMAGE REGULATOR AND MODULAR VALVE SYSTEM.
-2-
SPEEDY MELT HIGH SPEED MELTERS
OPERATION AND INSTALLATION
LOCATION OF FURNACE:
Locate furnace and casting area at least four feet from the wall, across the room from windows or
ventilation openings. Such openings should face to the direction of the prevailing wind. As fresh air is drawn
in through the ventilation openings or windows, it will sweep across the shop floor and over the casting and
furnace area. It will then be drawn out with the fumes and heat through the hoods and exhaust system.
NEVER LOCATE A FURNACE WHERE WORKING ROOM IS RESTRICTED OR THE AREA IS HARD TO
VENTILATE PROPERLY. A ìHOT CORNERî is both dangerous and uncomfortable.
VENTILATION AND HOODS:
For ideal working conditions; it is advisable to install a hood or hoods over the entire hot work area.
This includes the heat treating furnaces, melting, molding, pouring, forging and welding area. Individual hoods
can be manifolded to a main exhaust system, or one main hood can cover the entire area, depending on the
size of the installation.
For adequate ventilation, we suggest the exhaust system should be designed to change the total
volume of air in the shop at least twenty times per hour, or the total volume of air directly beneath the hood at
least twice every minute. For furnaces with BTU ratings in excess of 150,000 BTU per hour, we suggest the
hood area should be a minimum of forty-eight square feet. The National Ventilating Code, requires 250
lineal feet of air flow per minute, across the total face of the hood opening. LOCAL OR AREA CODES MAY
VARY, SO IT IS ADVISABLE TO CHECK WITH LOCAL OR STATE AUTHORITIES ON FINAL DESIGN AND
CAPACITY. A small hood, located and sized to remove only the products of combustion from the furnace, is
not adequate.
A. Rigid Hood Support Rods - 3/8" Round
B. Hood Exhaust Opening to Exhaust Fan
C. Inner Baffle Support Cross Rods - 3/8" Round
D. Galvanized 26 Gauge Sheet Baffle
-3-
Ventilation and Hoods - (cont.)
Removal of the products of combustion from the shop area is vital, BUT OF EQUAL IMPORTANCE
IS THE REMOVAL OF THE FUMES AND SMOKE FORMED WHEN THE HOT METAL IS POURED INTO
THE SAND MOLDS. The size of the hood should be large enough to extend over all parts of the casting
area to pick up casting fumes. An alternate system is to have a casting or pouring area hooded and ventilated
separately from, and in addition to, the hoods for the furnace and melting area.
A hood large enough to cover both the melting and casting areas may be too large for the capacity of
the blower selected for the ventilating system. This may be corrected by baffling the center area of the hood
with sheet metal so a slot with a minimum width of twelve inches around the outer edge of the hood forms the
total hood opening. The smaller total hood opening area should carry the full capacity of the ventilation
suction unit. By being a smaller total hood face area, there should be an increase in the air velocity or lineal
flow to meet the minimum 250 lineal foot flow. SEE ILLUSTRATION ON PAGE THREE.
DO NOT CONNECT VENTILATING STACKS DIRECTLY TO THE EXHAUST PORT OF THE
FURNACE. Furnaces capable of melting metals have an extremely high exhaust or flue gas temperature,
and will cause rapid deterioration of the stack metal. By positioning the hood high enough above the melting
station, the ventilating system draws additional air from the adjacent area, and will reduce the exhaust gas
temperature to an acceptable, cooler level. We suggest that the hood should be suspended with rigid
mounting and have at least eight feet clearance from the floor to the bottom of the hood. This will allow
adequate head room for the operator to charge or draw the hot crucible from the furnace chamber, using
standard crucible tongs.
GAS SERVICE LINE:
The gas connecting line should be one pipe size larger than the gas inlet size of the mixer. Main gas
line shut off valves must be full flow design to insure maximum gas flow. Low gas pressure or inadequate
volume will result in flame fluctuation, improper firing, and slow heating. The easiest method of determining
whether or not you have sufficient gas supply to operate the furnace correctly is to operate the furnace with
the blower air adjusting valve completely open. At this setting, there should be excess gas available. If
excess gas is not available, the utility company may be able to increase gas line pressure, and use a step
down pressure regulator at the furnace gas solenoid valve. Maximum gas pressure allowable by the solenoid
valve manufacturer is 2 Ibs. THE GAS COMPANY SHOULD BE CONSULTED FOR ADEQUATE PIPE
SIZING ON INITIAL INSTALLATION, or where pressure drop is a problem.
The Speedy Melt gas-air mixers will operate efficiently on natural, manufactured, or bottled fuel gas.
There are no metering jets, orifices, or spuds to change or remove. When using MANUFACTURED OR
BOTTLE GAS as fuel, the utility company should be advised of the furnace BTU rating, so adequate service
can be installed. A HIGH FLOW GAS REGULATOR should be set to hold at least eight inches minimum
W.P. with the furnace operating at minimum input.
-4-
Gas Service - (cont.)
1.
2.
3.
4.
5.
6.
7.
1/4" pipe from tank to regulator.
Tank regulator for required BTU for each
furnace.
1/4" to 1/2" reducing elbow
Regulator for required BTU for each
furnace.
3/4" to 1" reducing coupling.
1 ì pipe 10 feet to furnace.
1/2" pipe between regulators.
GAUGE SETTING:
2.
4.
Set this gauge at 4 Ibs.
Set this regulator at pressure on
furnace test tag.
RECOMMENDATIONS:
A. Propane tank should be outside of
building.
B. (2) Regulator should be outside of
building, covered and locked.
C. (4) Regulator should be 10 feet from furnace to protect diaphragms inside regulator from heat.
POURING FLOOR:
It is a good practice to install the furnace on a ìpadî of tamped molding sand, clay, or loam, since
molten metal or constant heat will damage a concrete floor. By extending the size of the pad into a pouring
floor - a safe pouring area can be added to the casting area. A satisfactory pad can be made in the shop by
welding a rectangular framework of angle iron. Size will depend on the room available and the instructorís
preference, but the pad should be large enough for the furnace plus eight molds. The inner area is then piled
and tamped with old molding sand or foundry clay. The pad should be at least two inches thick. Expanded
metal, laid on the surface of the earthen pad will help prevent tracking earth or clay through the shop area.
PIT INSTALLATION:
The larger B-700 and B-1500 series furnaces are usually installed in a furnace pit to simplify handling
the crucible of metal. Illustrations of the Speedy-Melt Model B-1500 illustrate such installation. Overall furnace
dimensions are found in the Relining Section of this manual. Diagrams show both pit and surface installation.
THE BLOWER, GAS/AIR MIXER, AND CONTROL SYSTEMS SHOULD ALWAYS BE LOCATED AT FLOOR
LEVEL AND NEVER IN THE FURNACE PIT. The controls should be located in a safe, accessible location.
-5-
BURNER ADJUSTMENT:
The Speedy Melt furnace is designed with two valve control. This makes it possible to obtain a
reducing, oxidizing, or neutral flame depending on the metal being melted. Experience is gained by lighting
and observing the flame. Adjusting all two valve burner systems is identical to adjusting an oxyacetalyne
torch. After the main burner flame has been initiated, the firing rate of the furnace is increased by opening
the gas valve slightly until there is an excess of gas in the mixture burning within the furnace chamber. Then
open the air valve until the flame draws back to burner tunnel and burns with a blue flame. Continue the
adjusting sequence to obtain the maximum burning rate.
FURNACE OPERATION AND STARTUP:
Locate the crucible block in the center of the furnace chamber. ALWAYS use the correct size block
and NEVER place the crucible on the floor of the furnace over the drain hole. Doing so causes a cold spot
at the bottom of the crucible and retards melting. The block locates the crucible at the proper height for the
hottest combustion and reflected heat. If the crucible sticks to the base block, apply fine graphite or silica
flour to the top of the block, or wet a piece of corrugated cardboard and drop on the base block just before
the crucible is set in place. If the furnace is cold, use the cardboard dry. The paper will char and form a
parting layer between the block and the crucible. DO NOT CHARGE METAL THROUGH, OR OBSTRUCT
THE LID EXHAUST HOLE IN ANY MANNER WHILE IN OPERATION. If the crucible breaks while in the
furnace, the molten metal will flow out the drain at the bottom of the furnace. Included with your new furnace
is a circle of 1î thick, ceramic fiber blanket, the diameter of the furnace lid. Place this on top of the furnace lid
for the first 2 or 3 firings / melts. After the lid bricks have been heated to a yellowish color, all the way through,
this blanket can be discarded. It is provided to insure that the lid bricks are completely cured.
A layer of high temperature refractory insulation is cast between the pre-burned brick lining and the
steel furnace shell. This increases melting efficiency and holds heat loss through the furnace walls to a
minimum. Since the insulation is a castable material, a certain amount of moisture is absorbed by the
furnace lining. It is recommended that the initial firing periods should not exceed fifteen minutes, to allow the
lining to expel the moisture slowly. The moisture may appear as steam or drops of water. Two or three short
firing periods will be sufficient to remove excess moisture.
Instructions in the section USE AND CARE OF GRAPHITE CRUCIBLES should be followed as
closely as possible. This practice is routine in the foundry trade, and will increase crucible life and prevent
failure due to cracking and spalling.
FLAME ADJUSTMENT:
Adjust the firing to low fire, raise the lid, and swing it to the rear. Place the crucible in the center of the
furnace chamber. Close the lid, being sure it seats inside the seal ring. Adjust firing rate to full open. IF
SUFFICIENT GAS VOLUME IS AVAILABLE, IT SHOULD BE POSSIBLE TO ADJUST THE AIR VALVE TO
FULL OPEN WITH AN EXCESS OF GAS SHOWING AT THE LID EXHAUST HOLE. Final adjustment for
furnace atmosphere depends on the metal being melted. Aluminum and copper should be melted with as
near a neutral atmosphere as possible. This type of atmosphere is obtained by adjusting the gas / air valves
until the exhaust shows two to three inches of yellow flame, then close the gas valve until the yellow flame
disappears. Melt brass with a slightly rich or reducing flame - have about one inch yellow flame showing in
the exhaust.
-6-
NOTE OF CAUTION WHEN MELTING ALUMINUM:
Due to the high velocity of the flame and the light weight of molten aluminum, THE FURNACE SHOULD
BE THROTTLED TO HALF FIRING RATE DURING THE LAST HALF OF THE MELTING CYCLE, or after
the aluminum has reached the PLASTIC or MUSHY state.
If the furnace is fired at maximum rate when the aluminum is molten and ready to pour, THE HIGH
VELOCITY FLAME WILL PICK UP ALUMINUM PARTICLES FROM THE CRUCIBLE AND EXPEL THEM
THROUGH THE TOP EXHAUST HOLE. This condition will not be experienced with heavier metals such as
brass or gray iron.
At maximum firing rate, the Speedy Melt Series of furnaces are noisy. This is due to the high velocity
flame and the amount of BTUís generated within the combustion chamber to obtain the rapid melting cycles.
If the noise is objectionable, the furnace can be operated at a lower input rate with slightly slower melting
cycles. However, for melting gray iron, the furnace must be fired at maximum input.
The exposed refractory should periodically be cleaned thoroughly and coated with a refractory sealer.
A separate section called ìTHE CARE AND MAINTENANCE OF FURNACE LININGSî gives detailed
instructions.
MAINTENANCE:
All MIFCO furnaces are constructed with hard, pre-burned, sectional refractory shapes. Each brick is
made by air ramming the granular refractory particles into a steel mold, forming the desired shape. The
shape is removed from the mold, dried to remove all moisture, then fired. Defective bricks that fail during the
final burning are discarded. This assures controlled quality refractory for all MIFCO furnaces before assembly
into a furnace lining.
We can control quality through the point of manufacture of the furnace, but preventative maintenance
is necessary for maximum productive life of the furnace lining. The exposed surfaces of the refractory lining
should be resealed when scuffing and wear takes place.
MINRO-WASH REFRACTORY SEALER FOR FURNACE LININGS:
The basic refractory used for our sealer is ground to a very fine powder. It is then mixed with a water
soluble bonding agent which develops a mechanical bond to the refractory. When the furnace is fired to a
high temperature, the bonding agent burns out and the refractory sealer forms a ceramic bond with the
furnace lining. It is available in twenty pound bags and should be stored in a dry warm area. Prepare only the
quantity to be used at one time for one application.
REFRACTORY PLASTIC PATCHING MATERIAL:
If the refractory lining has been chipped or broken, and the damaged areas are too large to be filled
with refractory sealer, they should be filled with patching material. The ìplasticî patching material consists of
the same refractory as the sealer, except a coarser grain size is used. It is a medium grained, heat setting
mix that should be thoroughly tempered with water before use. The material not used must be discarded.
Mix with water only the amount needed each time.
-7-
APPLICATION OF SEALER AND PATCHING MATERIAL:
Remove all loose scale and foreign material from the surface to be sealed. Wire brush to remove flux
and old loose sealer. Excessive flux and spilled metal are detrimental to refractory and should be removed.
Prepare the surface by priming with a saturated solution of sodium silicate. This material is available from
drug or foundry supply houses. Brush or sponge the solution liberally on the refractory.
The refractory patching material should be used at this point to fill larger holes. Saturate damaged
areas with primer or water. This forms a strong bond between the refractory and patching plastic. Place a
layer of patching plastic with a maximum thickness of 1/8" into the area being filled. The thin patch should be
allowed to dry for one hour, then heat the area to a red temperature by using the furnace. When the furnace
has cooled, add another thin layer, not exceeding 1/8" thickness over the original layer, using the above
instructions for the second patch. Successive thin layers should be applied and burned until the patch conforms
to the original contour of the furnace lining. If the procedure of applying and burning in the successive thin
layers is not followed, and a heavy patch is used to fill the damaged area, the moisture retained in the center
of the heavy patch will generate sufficient steam to cause it to rupture and peel.
After the primer has been applied, and any severely damaged sections have been repaired with
plastic patching, prepare the sealer as follows:
Step 1. Use one pint of warm water in a metal container.
Step 2. Sift the refractory into the water while stirring constantly.
Step 3. Allow the mixture to set overnight to completely dissolve the bonding agent.
Step 4. Remove the lid from the furnace so both the bottom and top surfaces can be sealed. With the
use of a sponge, saturate exposed refractory with water and immediately brush the prepared
sealer into the surface of the refractory lining and lid. Unless the refractory is pre-saturated
with water, it will draw the moisture from the sealer, preventing a tight bonding action and the
seal coating will peel. (LIGHT COATINGS APPLIED OFTEN, ARE MORE SATISFACTORY
THAN ONE HEAVY APPLICATION.)
Step 5. Allow the furnace to dry for a period of at least two hours.
Step 6. Light furnace and fire slowly for about five minutes, then shut furnace down. (THIS PROVIDES
HEAT TO EXPEL MOISTURE FROM THE PATCHING PLASTIC.)
Step 7. Allow the furnace to dry an additional hour, then light furnace and increase heat slowly to red
heat. The furnace chamber should be inspected and cleaned of any accumulation of slag or
spilled metal while the furnace is cold, prior to startup. Proper cleaning and the use of sealer
should triple the life of the refractory in your furnace.
THE USE AND CARE OF FOUNDRY CRUCIBLES
COMPOSITION - TYPES OF MATERIAL:
Crucibles are manufactured in two basic compositions; the CLAY GRAPHITE-CERAMIC BONDED,
AND THE SILICON CARBIDE-CARBON BONDED TYPES. Both types utilize the refractory materials,
graphite and silicon, as conductors of heat and for structural strength. Graphite is predominant in the
composition of the clay graphite crucible, while silicon carbide predominates in the silicon carbide crucible.
Due to its higher heat conductivity and greater strength, the silicon carbide crucible is more popular in industry.
The less expensive clay graphite crucible is generally used in the School Shop. Crucible failure in School
Shops is generally due to mishandling by inexperienced students, so the benefits of the more expensive
silicon carbide crucible would not be realized.
-8-
COMPOSITION - TYPES OF MATERIAL: - (cont.)
Either type of crucible can be used for melting aluminum, brass, or gray iron. However, different
metals should not be melted in the same crucible. This practice will cause contamination of each melt and it
will be very difficult to get good castings. Different crucibles should be used for each type of metal melted. If
gray iron is to be melted in appreciable quantity, a special clay lined silicon carbide crucible is recommended.
DO NOT USE JUST ANY SIZE CRUCIBLE IN YOUR FURNACE, USE THE SIZE FOR WHICH THE
FURNACE WAS DESIGNED.
RECEIVING AND STORAGE:
A great deal of stress has been put on the proper care of graphite crucibles for maximum service life
and safety. Several factors are important and should be carefully considered.
DO NOT STORE crucibles as received in their original container. Examine the container, UNPACK
CRUCIBLES IMMEDIATELY, and inspect each crucible for cracks or damage. ìSOUNDî each crucible by
tapping lightly with a hammer handle. If cracked, the crucible will have a dull sound. Undamaged crucibles
will have a clear ring. If the shipment contains damaged pieces, have the delivering carrier acknowledge the
damage on your delivery receipt, or notify the carrier of hidden damage and call for immediate inspection.
After inspecting crucibles, they should be STORED IN A WARM, DRY PLACE. If it is necessary to
stock the crucibles in an exposed, unheated location, they should be moved to a warm area for two or three
days prior to using. EXCESS MOISTURE SHOULD BE REMOVED PRIOR TO TEMPERING. Some shops
use the top of core ovens, or build drying racks near the melting furnaces, for drying. This is an acceptable
practice, provided the crucibles are not subjected to a direct furnace exhaust to force the drying. Forced
drying usually results in uneven heating and sets up strains which will eventually cause cracking and premature
failure.
ANNEALING NEW CRUCIBLES:
All clay graphite crucibles should be properly annealed before being put into production. Annealing
relieves all strains set up in the crucible during manufacture. This also DEVELOPS A FULL ELASTIC
PROPERTY TO WITHSTAND THERMAL SHOCK during service. The crucible should be dried as outlined
previously, and placed in a warm furnace.
Adjust the furnace burners at idle, or lowest heat input, for the first ten minutes. Increase burner setting
gradually to raise furnace temperature to a red heat. Total heating cycle should cover a period of forty to
fortyfive minutes. After the crucible has reached a red heat, it can be removed from the furnace, charged with
metal, and put into immediate service.
CHARGING THE CRUCIBLE WITH METAL:
Crucibles are usually charged with metal before they are placed in the furnace chamber. The part of
the charge consisting of gates and risers, or of clean scrap of equivalent size, is charged first. Ingots and
bars are charged last. Turnings or very light scrap should be added into the crucible after the initial charge
has become molten. Otherwise, the turnings and light sections will be attacked by the furnace atmosphere,
and will be oxidized excessively before the melting temperature is reached. These oxides and impurities
are carried into the casting metal, resulting in porous and unsound castings. Heat is transmitted to the light
scrap more rapidly by the molten metal with a minimum of oxidation. ALWAYS BE POSITIVE THAT ANY
METAL ADDED TO A MOLTEN BATH IS DRY, OTHERWISE AN EXPLOSION WILL OCCUR. This is because
of steam generation in the molten bath. Ingots should be thoroughly dry, and added to the molten charge with
long handled pickup tongs.
-9-
ADDING INGOT OR PIG TO THE CRUCIBLE:
Heavy sections of the charge should not protrude above the lip of the crucible or they will be subjected
to furnace atmosphere and excessive oxidation. THE INGOTS AND BARS SHOULD BE CUT TO A LENGTH
SHORTER THAN THE INSIDE DIAMETER OF THE CRUCIBLE. This is particularly true when adding bars
or pig to crucibles of molten metal. Long pieces, when added, will sink and come to rest in a horizontal
position. They then expand before melting and press against the sides of the crucibles, causing cracks and
premature failure.
PREHEATING CHARGE METAL:
It is very poor practice to preheat scrap or bars by placing them across the exhaust port in the lid of
the furnace. Such practice causes excess oxidation of the metal and will result in poor castings. For the
same reason, LONG BARS SHOULD NOT PROTRUDE THROUGH THE EXHAUST PORT INTO THE
CRUCIBLE. In extreme cases, some of the bars will reach melting temperature, allowing the molten metal to
run down inside the furnace lid and walls. This molten metal is oxidized very rapidly and attacks the refractory
lining, causing premature replacement of the lid and lining. INGOT CAN BE PLACED AROUND THE LID,
WELL AWAY FROM THE EXHAUST PORT.
MELTING CAST GRAY IRON:
If cast iron ingot material is used, we suggest that you purchase a Class 25 or a Class 30 iron. This
type of cast iron melts at a slightly lower temperature and has better fluididity than the higher class irons. If
new ingot is not available, good cast iron scrap can be used. One type which has good casting features is
the scrap cast iron in steam radiators. The original ingot used to produce this quality of casting had to have
good casting characteristics and high fluidity. Otherwise, it would not produce the thin walled, steam tight
castings required in steam systems.
Cast iron motor blocks and other machinery products should not be used as scrap for remelting in a
gas fired crucible type furnace. The pouring temperature of alloyed scrap iron is usually 100 -150∞ higher
than the Class 25 or the Class 30 Iron. The higher temperature needed to melt this alloy is very detrimental
to both crucibles and the furnace linings. Pieces of steel or malleable iron scrap should not be added to the
crucible charge because they also raise the melting temperature of the iron. In addition to having less
desirable casting properties and being harder to pour, the finished castings may be hard and very difficult to
machine.
Standard clay graphite or silicon carbide crucibles can be used for melting gray iron, however, the
clay or alumina lined silicon carbide crucible is more suitable. Molten iron has an extremely high affinity for
carbon, and it will leach or absorb carbon from the inner wall of the crucible during the melt. This will erode
the inner surface of the crucible and shorten crucible life. The alumina or clay lined crucible has an inner
lining of alumina refractory; which acts as an inert barrier between the molten iron and the carbon in the
crucible. The cost of the clay lined silicon carbide crucible is slightly higher than the standard silicon carbide
crucible. Availability is the problem, so ample lead time must be considered when purchasing this type of
crucible.
Graphitic Carbon should be added to the cast iron scrap when the crucible is filled, prior to setting in
the furnace. Certain types of Graphitic Carbon are absorbed rapidly by the molten iron, so care must be
taken in selection of the correct Graphitic Carbon Raiser. Approximately three percent, by weight, of Graphitic
Carbon Raiser should be added with the charge metal. A suitable material is charcoal briquets, but they do
not furnish the same form of carbon. It is not as readily absorbed by the iron as is the Graphitic type of carbon
raiser. Approximately six charcoal briquettes should be added to a #30 size crucible and it should be mixed
with the scrap iron. This crucible will hold about 75 Ibs. of iron. When charging the crucible with iron, thin
sections should be added along with heavier pieces and the ingot.
-10-
Melting Cast Gray Iron - (cont.)
The thin sections will melt rapidly and form a molten puddle, which will transfer heat to the heavier sections
more rapidly and reduce the over-all melting time. Additional scrap can be added to the crucible as the
charge melts down. The Graphitic Carbon will generate additional heat as it burns, but more important, it will
protect the molten metal from oxidation during the melt and maintain the carbon content of the cast iron.
It is imperative that both students and operators use cobalt blue goggles when melting iron, to protect
their vision from the high temperature radiation. They must check the melt periodically to determine the
fluidity of the melt preparatory to pouring the mold. There is usually a heavy slag formation over the surface
of the melt so a rod should be used to penetrate the heavy slag to check the fluidity of the molten bath. DO
NOT USE A LANCE PYROMETER WITH THERMOCOUPLE TO CHECK THE TEMPERATURE. THE
MOLTEN IRON WILL MELT THE TIP OF THE LANCE.
An optical pyrometer or a replaceable thermocouple tip, lance type pyrometer should be used to
check the temperature of the molten iron. The replaceable tip pyrometer is equipped with a socket type
receptacle to which the thermocouple tip is attached. The thermocouple tip, when immersed in molten iron,
will resist melting and destruction long enough to get a high temperature reading. A NEW TIP MUST BE
USED FOR EACH TEMPERATURE READING. This equipment is quite expensive to purchase, and to
maintain, except in industrial use.
After the melt has attained the proper temperature and fluidity, remove it from the furnace, then add a
cast iron flux material to the crucible. This will change the plastic condition of the slag and make it easier to
skim. After the molten iron has been skimmed, it is advisable to add ferro-silicon shot to replace the silicon
lost during the melt. Ferro-silicon is usually wrapped in a paper envelope, and plunged beneath the surface
of the molten cast iron with a bell plunger. A stainless steel bell plunger is more satisfactory because of the
high temperature. It is extremely important that the ferro-silicon is added just prior to the pour. Adding this
alloy at an earlier time in the melt will retard or prevent carbon absorption. About one and one half percent, by
weight, should be used for crucible melting.
As an added precaution against chill, or, hard spots in the gray iron casting, it is advisable to place an
inoculating agent in the mold. One such agent is in the form of a small tablet called Inotab, and is made up of
a compound which combines with the iron. It innoculates the iron to prevent the formation of chills and hard
spots. The lnotab is placed in the sprue-well of the mold prior to pouring. IT IS VITALLY IMPORTANT THAT
THE MOLD BE POURED CONTINUOUSLY ONCE POURING HAS STARTED.
Another important factor in pouring gray cast iron is to design the feeding system with larger runners,
gates, and risers. The feeding system which would be used for aluminum or brass casings, will not permit a
fast enough flow of molten iron into the mold cavity. The molten iron must be free to fill the mold cavity rapidly
and completely. Risers will be used more frequently in iron castings than in either brass or aluminum, due to
shrinkage normally found in iron solidification. We do not recommend pouring cast iron into petroleum
bonded sand, due to the smoke and gas evolution. If petroleum bonded sand is used, the mold should be
designed with additional venting. The smoke and gases formed when the hot metal contacts the petroleum
bonded sand can then leave the mold cavity freely. It is also important to delay casting shake-out to be sure
the hot casting has cooled sufficiently so the oil bonded sand does not ignite and burn.
-11-
Melting Cast Gray Iron - (cont.)
The melting furnace should be adjusted so that the air valve is completely open, utilizing the total
output of the blower. The gas valve is adjusted so there is a reducing or slightly gas-rich atmosphere in the
melting chamber of the furnace. The different pouring temperatures for different classes of cast gray iron
and temperatures for malleable irons and steels are as follows:
Metal
Melting Point
Pouring Temperature
Gray Iron Class 20
Gray Iron Class 25
Gray Iron Class 60
Malleable Iron*
Steel*
2150∞ F
2270∞ F
2370∞ F
2585∞ F
2700∞ F
2550∞ F
2625∞ F
2650∞ F
2800∞ F Avg.
2800∞ F Avg.
*Alloyed Gray Cast Iron, Malleable Iron, and Steel, should be melted in a Cupola or an Electric Induction or
Arc Furnace.
The lower two classes of gray iron, #20 and #25, can be poured at lower temperatures, and are the
most suitable for crucible melting. Cast Gray Iron alloyed with chromium or nickel, such as the grade used
for gasoline engine blocks, transmission housings, etc., will have a casting temperature range which is
slightly higher than the Class 60 Grey Iron. Such elevated temperatures are extremely detrimental to the
furnace and crucible. These metals SHOULD NOT BE USED for crucible melting.
ACCESSORIES:
Correctly designed tongs and shanks should be used, both for safety and to minimize crucible failure.
MIFCO Tongs and Shanks are designed especially for use with our furnaces.
The MIFCO Crucible Tong is designed and manufactured according to the recommendations of crucible
manufacturers. Each gripper pad is die coined to uniform shape, and nests the crucible below the bilge
diameter. Adjustable stops prevent excessive pressure being exerted on the crucible walls, thus avoiding
crushing. All Tongs are equipped with a lifting eye and a safety bar lock.
The MIFCO Safety Shank was developed by our engineers at the request of School Shop Instructors
and Educational Administrators. It is simple in design, easy to operate, and holds the crucible securely. This
prevents accidental dropping and dumping a crucible of molten metal. The holding ring is die coined and
formed to insure proper size and shape for secure seating of the crucible.
Automatic temperature control of most of our B, C, and small T series furnaces is not practical from a
cost standpoint. These crucible furnaces are designed for fast melting and are fired with high input burners.
Consequently, the furnace chamber develops a high thermal head that makes automatic control extremely
difficult and cost prohibitive. Normal foundry practice is to use a portable lance pyrometer to check the
furnace temperature periodically. When the metal approaches pouring temperature, the burners are throttled
down, and the thermal head in the furnace finishes the heat. The crucible should be pulled, fluxed, and
poured immediately.
-12-
ULTRA VIOLET COMBUSTION SAFEGUARD WITH SPARK IGNITION
MIFCO COMBUSTION SAFEGUARD SYSTEM No. 4
SAFE STARTING:
1. Open the lid and swing away from the burner. (WARNING - DO NOT SWING THE HOT LID OVER
BURNER EQUIPMENT.)
2. Open main gas line shut off cock leading to the furnace. This does not include the gas adjusting
valve at the mixer.
3. Be sure both mixer gas and air adjusting valves are closed.
IGNITION:
4. Press the start button. This energizes the flame protection circuit.
5. There will be a 10 second self diagnostic period when the unit receives power. During this time, the
unit checks all circuits for continuity before powering the blower.
6. After the blower starts, there is a 10 second purge cycle prior to the spark transformer and main gas
coming on.
7. When the purge cycle is finished, the spark transformer and main gas solenoid will receive power.
This will be indicated by the PILOT and MAIN indicator lights on the flame supervision chassis. At
that time, you have 10 seconds to achieve ignition before the unit shuts down for flame failure. Open
the gas adjusting valve slowly (smaller adjusting valve which enters the side of the mixer) until main
burner ignites. When the flame is established and is being seen by the flame scanner, the FLAME
indicator light on the chassis will be lit. The ignition trial period only lasts for 10 seconds, so burner
flame must be established within this time.
8. Adjust the mixer to about 1/3 firing rate. Adjusting any two valve burner system is identical to adjusting
an oxy-acetalyne torch. Increase the gas slightly until the flame shows a slight excess of gas, then
open the air valve to form the flame cone at burner tunnel. IMPORTANT THE MAIN BURNER
FLAME MUST BE HELD NEAR THE BURNER TUNNEL OPENING SO THE ULTRAVIOLET
SCANNER CAN SEE THE FLAME.
ADJUSTING:
9. Close the furnace lid and continue opening the gas and air valves per step í8' until the air valve is
wide open. There should NEVER BE MORE THAN 5 inches of flame coming out of the exhaust port
at any time during adjustment of burner. See the Operating Manual for adjusting the atmosphere for
melting.
10. To decrease heat, close the air valve until the exhaust flame at the exhaust port is about 5 inches
long. Next, close the gas valve until the flame disappears into the furnace. Repeat the turn down
sequence to the desired firing rate. Idle is about one fourth open.
SHUT DOWN FOR POURING OR TEMPERATURE CHECK:
11. IDLE FURNACE PER STEP í10', then press the stop button. This closes the gas solenoid shut off
valve and stops the blower. DO NOT CHANGE IDLE ADJUSTMENT OF VALVES. To restart the
furnace, press the start button and the furnace will re-ignite at the idle position.
SHUT DOWN TO SECURE FURNACE AT END OF MELTING PERIOD:
12. Press the stop button. Close both of the mixer adjusting valves. Close the gas line shut off cock.
Close the furnace cover.
-13-
RE-IGNITION AFTER FLAME FAILURE:
a.
b.
c.
d.
e.
Turn off all burner adjusting valves.
Press the stop button on the start-stop station.
Wait 50 to 60 seconds for safety timers to cool off.
Depress the RESET button on the flame supervision chassis.
Open the furnace cover. Repeat ignition steps 4 through 8.
TROUBLE SHOOTING FOR INITIAL START-UP:
A. FURNACE WILL NOT RESTART AFTER MELTING CYCLE AND SHUTDOWN: The gas valve was
closed, extinguishing the flame before the stop button was pressed. This simulates a flame failure
and initiates the flame failure shutdown cycle. Follow the steps in RE-IGNITION AFTER FLAME
FAILURE, to restart the furnace.
B. FURNACE IGNITES SATISFACTORILY, BUT SHUTS DOWN WHEN HEATING RATE IS
INCREASED: Too much gas in the mixture. The flame blows away from the burner tunnel, simulating
a flame failure. Refer to the information in STEP 8 of IGNITION.
C. FURNACE SHUTS DOWN WHEN FURNACE IS ADJUSTED TO MAXIMUM FIRING: Insufficient
gas supply. The excess air extinguished the flame. Have a gas utility company check the gas
regulator and size of installation against the BTU rating of furnace.
D. SLOW MELTING: Insufficient gas supply. The operator should be able to open the air valve all the
way and still have excess gas available. See the Operating Manual on: OPERATION.
E. FURNACE WILL NOT START AFTER FLAME FAILURE SHUTDOWN: The flame relay has not been
reset. See STEP ìdî in RE-IGNITION. Insufficient waiting period for cool down of timers. See STEP
ìcî RE-IGNITION.
SERVICING - TROUBLE SHOOTING:
Problems with MIFCO furnaces with Fireye Controls can be easily isolated by following the approved
procedure in the sequence given below. Before starting any trouble shooting, however, make sure of the
following:
1. Installation and wiring has been made in accordance with the manufacturerís instructions.
2. The Fireye Chassis is securely plugged in and the top and bottom retaining screws are tightened.
The Lockout Switch (red pushbutton) is reset.
In the following list, problems are listed first, and the possible causes are listed below in numerical
order. Refer to the manufacturerís instruction manual included in this operating manual for proper component
and contact identification. It is necessary to have a 20,000 ohm, DC volt meter to perform signal testing.
This meter, set on 150 volt AC scale, may be used to check line and load voltages at the identified terminal
studs on the components.
A. FURNACE WILL NOT START:
1. No voltage at start button or at UV terminals S1 and S2:
a. Power cord not plugged into outlet.
b. No power at outlet, (check with meter).
c. Disconnect switch is off that feeds outlet.
-14-
A. FURNACE WILL NOT START: - (cont.)
d. Broken wire between outlet and control box.
e. Blown fuse that feeds circuit breaker.
f. Check the 2 amp control fuse.
2. Insufficient voltage at UV terminals S1 and S2:
a. Minimum voltage is 102 volt - 50/60 cycle.
b. Maximum voltage is 132 volt - 50/60 cycle.
3. No voltage to coil of motor starting relay R-1:
a. With volt-meter, check wires to relay coil from start / stop buttons.
4. Unit not properly grounded.
B. MOTOR STARTING AND HOLDING RELAY WILL NOT OPERATE:
1. No action when start button is activated:
a. Check for voltage on either side of start button. If there is no voltage, replace the bad switch.
b. Check relay coil, gray wire, for voltage.
C. HOLDING RELAY WORKS BUT MOTOR DOES NOT RUN:
1. Check motor overload:
a. Check with voltmeter to see if power is passing through to motor. Check from ground to
overload.
b. Push the reset button on the motor overload.
c. Check the heater element on the top of the motor overload to see if it is burnt in half.
d. Examine relay contacts.
D. THE MOTOR RUNS, BUT THE SPARK DOES NOT COME ON:
1. Check the spark plug for power:
a. Remove the spark plug cap. Hold this cap by the outside corner and hold the cap up to a
metal part of the furnace and push the start button to see if there is a spark at the cap.
2. Check the air pressure switch:
a. Remove the junction box cover on the top of the air pressure switch (004226). Place both
wires inside on the same terminal, this will by-pass the switch. If you get a spark when you
press the start button, you know the switch is bad.
b. With the air switch by-passed and the motor running, check UV terminals 2 & 4 for line voltage,
120V. If no voltage is present, replace UV chassis.
3. Check the spark plug:
a. Pull off the spark wire and hold by the outside corner of the connector cap. Hold the metal
part of the cap close to the burner and press the start button. If it sparks, the transformer is
OK. If not, check the spark wire connections on both ends and try again. If there is still no
spark and there is 120 volts-on terminals 2 & 4, then you should replace the spark transformer.
4. The spark plug does not fire:
a. Remove the plug and look for cracks in the porcelain insulator. If it is cracked, replace with
the same electrode.
-15-
4. (cont.)
b. If the plug is not cracked, install it back in the furnace. The gap between the wire tip of the
plug and the end of the burner nozzle should be 1/16" to 1/8". This can be adjusted by
bending the electrode wire, swiveling the electrode, and then tightening the clamping nut to
hold it in place. Observation can be made with a mirror inside the furnace or through the UV
Scanner observation port. In either case, BE SURE THE GAS IS OFF.
E. THE MOTOR RUNS, THERE IS A SPARK, BUT NO GAS:
1. Scanner does not see spark:
a. Remove the scanner to see if the sight tube is blocked.
b. Wipe off scanner bulb with soft cloth or tissue and replace.
2. Broken Scanner wire:
a. Check for cuts or mashed conduit.
3. Ignition signal testing using a 20,000 ohm per volt DC volt meter:
a. Connect the meter to terminals S1 & S2.
b. Set the volt meter on the 10 volt DC scale and initiate a normal start up, but with the gas valve
CLOSED. The meter should read between 41/2 and 5 volts. If the-meter goes backwards,
reverse the leads. If the reading is less than 41/2 volts, the scanner needs to be replaced.
F. GAS SOLENOID WILL NOT OPEN:
1. After checking all of the above, check terminals 2 & 3 on UV Chassis for line voltage:
a. Put the volt meter back on the AC-250 volt scale and put the leads on terminals 2 & 3. Start
the furnace, and when the unit goes to Main Flame, terminal 3 should be energized, reading
120 volts. If it is not, and every thing else proves out, the chances are that the UV Chassis is
bad and needs replacing.
2. Terminal 3 is powered but the solenoid still will not open:
a. Check for broken wires or loose connections.
b. The solenoid wires can be taken loose by a qualified electrician and powered with 120 volts to
see if it will open. If it does not open, it will have to be replaced.
c. Check to see that the gas pressure is not higher than the rating on the valve nameplate.
G. MAIN FLAME SIGNAL TESTING:
1. Same procedure as STEP îEî - ì3î.
H. MAIN FLAME DOES NOT LIGHT:
1. Gas valve shutoff someplace in building.
I. MAIN FLAME LIGHTS AND GOES OUT AFTER 10 SECONDS:
1. Flame not adjusted properly:
a. It is best to get the furnace flame at least half way open before the spark goes off, especially
on a cold start up.
-16-
J. FURNACE SHUTS DOWN WHEN IT IS ADJUSTED TO MAXIMUM FIRE:
1. Insufficient gas supply:
a. Excess of air extinguishes the flame. Have the gas utility company check the gas pressure
with the furnace running. If the pressure drops to ì0î, the gas supply is inadequate.
b. Not enough gas in adjustment, the flame should come out of the exhaust port about 3 inches.
2. Too much gas:
a. The flame is burning away from the burner port. The UV Scanner cannot see flame and turns
off gas.
K. SLOW MELTING:
1. Insufficient gas supply:
a. The operator should be able to open the air valve all the way and still have an excess of gas
after the flame has been balanced.
2. Low service line voltage:
a. The voltage on the service line should be 115 volts. Low voltage causes the rpm of the motor
to drop, which results in a reduced volume of air.
b. Bad bearings will also slow down a motor.
L. FURNACE WILL NOT RESTART AFTER STOPPING:
1. Gas valve was shut off before stop button was pressed:
a. The reset has kicked out. Push the Reset Button on the UV Chassis and then restart.
2. UV Chassis may be going out.
3. Gas supply marginal and / or fluctuates:
a. When starting with the valves in a set position and the gas supply or pressure changes, like
when a boiler comes on, the valve setting would not be right and the unit would not start.
M. FURNACE WILL NOT START AFTER FLAME FAILURE:
1. Not enough time has elapsed for blower to stop spinning and allow the air switch to reset:
a. Allow blower to stop spinning then press reset button on UV Chassis.
2. Bad UV Chassis.
3. Bad UV Scanner.
a. Check and replace if necessary.
N. ELECTRICAL SEQUENCE:
1.
2.
3.
4.
Press the start button and the system performs- self check.
Holding coil pulls in and motor starts.
Air switch closes powering terminal 6 in UV Chassis.
Terminals 4 and 3 powered. Ignition transformer powered and ignition timing starts. Main gas
solenoid powered.
-17-
N. ELECTRICAL SEQUENCE - (cont.):
5. Gas in scanner ionized, allowing power to flow between electrodes.
6. Main flame is proven and stays on.
7. Flame failure for any reason cuts off power to terminal 4 and 3 in 3 seconds.
8. Alarm light comes on.
9. Push reset button.
10. Blower failure, air switch opens - cutting power to gas solenoid. Blower runs another 10 seconds
and turns off.
-18-
4 UV Safety System
-19-
Installation of Spark Electrode
4 UV Safety System
Step 1.
Step 2.
Step 3.
Step 4.
Step 5.
Step 6.
Remove scanner shield covering burner tip assembly.
Remove the Ultra-Violet Scanner head ìAî.
Remove spark connector ìBî and brass electrode lock nut ìCî.
Remove old spark electrode.
Put a light inside the furnace chamber, at the end of the tunnel, and insert new spark electrode.
The steel electrode ìGî is bent at an angle. Look through the scanner tube ìDî and revolve
spark electrode until spark gap ìFî is 3/32" maximum. Be sure the porcelain extends beyond the
brass lock nut at least an inch.
Step 7. Tighten the brass locking nut just tight enough to prevent the electrode from moving. (Tightening
the nut too tightly will break the porcelain.)
Step 8. Replace spark wire to the electrode. Press the start button and observe the spark by looking
through the scanner tube ìDî.
Step 9. If the spark is satisfactory, replace the scanner head ìAî, press the start button and light the
furnace.
-20-
PREVENTATIVE MAINTENANCE
For Model C-10, C-20 Speedy Melt
Electrical System
Always check start stop buttons, to make sure they remain tight in the control box. Loose buttons can
cause the wire connectors inside to pull away from the buttons, thus causing a short or other failures.
Make sure that the UV cover is always in position. If the cover were missing, this would allow for the
bumping of the spark wire and possible disconnection of the wire, and also damage to the scanner cable.
Make monthly checks of the spark wire to make sure that the angle connector is tight on the wire, and
also pushed up tight on the electrode. At the same time, remove the scanner from the swaged nipple and
clean the glass glove with a clean cloth.
Lid & Lid Lift Assembly
The jack tube assembly should be greased at least once a month. This will allow for easy rotation of
the assembly. This unit is equipped with two lids. The top can be left open allowing you to melt within a cast
iron pot. The pot rests on top of the four section lid. When melting within the chamber using a crucible,
always make sure that the top cover is closed down at all times, while firing the furnace. This unit is supplied
with a chimney on the side to allow for exhaust escape. Always remember to remove the lid handle from the
fulcrum pin, while the furnace is in operation. Leaving the handle in position, could result in serious burns to
the hands.
Shell Assembly
Always make it a practice to check the furnace shell for what we call hot spots. Be mainly concerned
with the area around the burner guide tube. You will notice discoloration of the paint in this area, but only be
alarmed if you should see a red glow to the shell. This may indicate that the end has burned off the burner
nozzle, allowing the flame to direct itself back into the insulation and thus causing damage to the shell. If you
should notice this, shut the furnace down at once. Your first step would be to remove the bolt holding the
blower nozzle to the side of burner guide tube. Then pull the blower unit away from the side of the furnace,
and check the condition of the burner nozzle. If the end of the nozzle is burnt away, replace it. Simply place
the unit up in a vice, or use two pipe wrenches to remove the old nozzle. It would also be advisable to remove
the top cast iron seals, and chisel your way down into the insulation, just above the burner guide tube. Recast new insulation in this area , as it has a tendency to deteriorate from the high heat. Then you can place
the blower unit back into the side of the furnace shell, and be sure to put the bolt back in position holding the
blower to the shell.
Firing Chamber
Make regular checks for cracks in the liner bricks, and also for loose mortar between the rows of
brick. If there are open gaps between the brick, the flame can penetrate and erode the insulation, thus
causing hot spots on the side of the shell.
-21-
Firing Chamber - cont.
At least once a month, take a putty knife and scrape the loose refractory, allowing it to fall to the
bottom of the chamber. Then, remove with a vacuum. After the removal of all the loose materials, find an old
paint brush and a can of water. Brush a liberal coat of water on your bricks to allow your new application of
sealer to adhere to the bricks. Keep in mind that thin applications of sealer are better than one heavy
coat. A thick coat of sealer will flake off on the first firing, and fall to the bottom of the chamber. It is best to fill
all large openings with thick material then thin your mixture down and apply at least tree very thin coats with a
low firing between each application. Pull the lid assembly up out of the jack pipe, and turn the lid upside down
on the floor, to allow you to apply the sealer to the bottom side of the bricks. You can then place the lid back
in position and apply a coat of sealer to the upper surfaces. Keep in mind that continued maintenance
of the chamber is to your advantage, as it prolongs the life of the brick. Always keep any loose
metals out of the chamber. If liquid metal is allowed to run down in and around the bottom brick, it will work its
way under the liners, thus causing the liner bricks to start working their way upward, as the metal hardens up.
It is advisable to make sure that the drain hole in the bottom of the furnace is always open and not
blocked with hardened metal. This is an escape route for the metal, in case of a crucible break. The metal
is supposed to flow into the small valley, under the base block, and out on the floor. The bottom is designed
in this manner to prevent all the metal from backing up into the burner port in case the crucible should break.
Metal in the burner port, can cause major repair costs.
Reline kits are available for this unit. The shipping is usually two weeks from the receipt of your
purchase order. Shipped by truck, freight collect.
-22-
Preventative Maintenance
For Model B-160
Electrical Systems
Always check start stop buttons, to make sure they remain tight in the control box. Loose buttons can
cause the wire connectors inside to pull away from the buttons, thus causing a short or other failures.
Make sure that the UV cover is always in position. If the cover were missing, this would allow for the
bumping of the spark wire and possible disconnection of the wire, and also damage to the scanner cable.
Make monthly checks of the spark wire to make sure that the angle connector is tight on the wire, and also
pushed up tight on the electrode, At the same time, remove the scanner from the swaged nipple and clean the
glass glove with a clean cloth.
Lid & Lid Lift Assembly
The jack tube assembly should be greased at least once a month. This will allow for easy rotation of the
assembly. Make sure that when the lid is raised, that it raises level. After a period of time, the lid will have a
tendency to raise in the back before it raises in the front. If the lid isnít raising level, loosen the lock nuts on the lifting
rods and back them off a couple of turns, then tighten the bottom nuts which will raise the lid up. Continue to tighten
the nuts until the lid raises properly. Always remember to remove the lid handle from the fulcrum rod after the
furnace has ignited and the lid is closed. If the handle is left in that position, it will become very hot. Lay the handle
aside for easy access.
Shell Assembly
Make it a practice to always check the furnace for what we call hot spots. Be mainly concerned with the
area around the burner guide tube. You will notice a discoloration of the paint in this area, but only be alarmed if you
should see a red glow to the shell. This may indicate that the end has burned off the burner nozzle, allowing the
flame to direct itself back into the insulation and thus causing damage to the shell. If you should notice this red glow,
shut the furnace down at once. The first step would be to loosen the small bolt that is holding the blower to the side
of the shell. Pull the blower away from the side of the furnace, you may have to use a twisting motion, if there is a
problem with the exterior of the nozzle. The nozzle might be in such bad shape, that you may have to cut it off flush
with the burner guide tube. If you are able to pull the whole assembly away with out problems, place the pipe
assembly in a vise, and proceed to remove the old nozzle, and install the new one. After the new nozzle is installed,
you may have to re-adjust your spark plug. Then place your pipe work back in position as you removed it, and reattach your bolt to the side of the shell.
Firing Chamber
Make regular checks for cracks in the liner bricks, and also for loose mortar between the rows of brick. If
there are open gaps between the brick, the flame can penetrate and erode the insulation, thus causing hot spots on
the side of your furnace shell.
At least once a month, take a putty knife and scrape the loose refractory, allowing it to fall to the bottom of the
chamber, and remove with a vacuum. After the removal of all the loose materials, find an old paint brush and a can
of water. Brush a liberal coat of water on your bricks to allow your new application of sealer to adhere to the bricks.
Keep in mind that thin applications of sealer are better than one heavy coat. Thick coats of sealer will flake
off and fall to the bottom of the chamber. It is best to fill all large openings with thick material, then thin the mixture
down and apply at least three very thin coats, with a low firing between each application.
Make sure that the drain hole in the bottom of the furnace chamber is always open and not blocked with
hardened metal. Do not allow spilled metals to get down in around the wall area where the bottom and side liner
bricks come together. Continuous melting and re-hardening of this metal will cause your side liner bricks to rise. If
this is allowed to happen, the next thing you will experience, will be that your lid will not open or close as it should. At
this point you will have to re-line the furnace chamber.
-23-
Preventative Maintenance
Models B-301
B-702
B-1501
Electrical System
Make frequent checks in your control box to see the lock nuts on the back sides of your stop and start
buttons are tight. Loose buttons can cause the wire connectors inside to pull away from the buttons, thus
causing a short or other failures.
Do not run the unit without the UV protection cover in position. If the cover is missing, this will allow for
bumping of the stark wire, and possible disconnection. The scanner cable must also be protected at all
times.
Make monthly checks of the spark wire to make sure that the connectors are tight on the wire, and
pushed up tight on the electrode. At the same time, remove the scanner from the swaged nipple, and clean
the glass with a clean cloth. If the glass on the scanner is dirty, it will not be able to see the spark, thus causing
ignition failure.
Do not allow the conduit going from the ultra violet controller to the motor to be loose from their connectors. Exposure of the wire from the conduit, could cause the wire to get burnt, or cut, thus causing failure
of the equipment. One last thing is to make sure that the scanner and spark cables are fastened up around
the manifold pipe. Do not allow the cables to lie on the floor, being walked on, and getting mashed. This can
also be cause for machine failure.
Lid & Lid Lift Assembly
Make it a practice to grease the jack tube assembly at least once a month, allowing for easy rotation
of the assembly. Make sure that when the lid is raised, that it raises level. After a period of time, the lid will
have a tendency to raise in the back before it raises in the front. Do not allow the lid to drag across the top of
your side liners or the cast iron top seals. This will cause damage to the front edge of your lid brick. In order
to correct this problem loosen the lock nuts on the lifting rods and back them off a couple of turns, then tighten
the bottom nuts up, which will raise the lid upward. Continue to tighten the nuts until the lid raises level.
If you notice that your lid bricks are uneven, when the lid is closed, loosen the lid band and take a
rubber mallet and very carefully hammer the bricks down flush on top of the side liners, then tighten the nut on
the bolt. Do not over tighten the nut, as to much pressure will cause the lid sections to break and fall down
into the chamber.
Always remember to remove the lid handle from the fulcrum rod after the furnace has ignited and the
lid is closed. If the handle is left in position, it will become very hot, and could cause a sever burn to the
hands, if you are not wearing gloves. Lay the handle aside for easy access.
Shell Assembly
Frequently check your furnace shell for what we call hot spots. Be mainly concerned with the area
around the burner guide tubes. You will notice a discoloration of the paint in the area, but only be alarmed if
you should see a red glow to the shell. This may indicate that the ends have burned away on the burner
nozzles, allowing the flame to direct itself back into the insulation and thus causing damage to the shell. If you
notice deformation of the metal, or the red glow, shut the unit down at once. Your first step would be to loosen
the union holding the blower unit to the manifold, disconnect the spark wire and scanner cable, and pull the
blower unit away from the furnace body. Next you will have to loosen the other union holding the two halves of
the manifold together, then proceed to pull the burner pipes away from, and out of the burner guide tubes.
-24-
Shell Assembly - cont.
Place each half of the manifold in a vise and proceed to remove the burner nozzles. It is advisable to always
have an extra set of nozzles on hand as a back up. Reinstall your new nozzles into the manifold pipe and
adjust your spark electrode. Next, place a generous amount of refractory sealer around the ends of the
nozzles prior to returning them back into the guide tubes. Once you have the manifold assembly back together, check the burner ports from the inside of the chamber to make sure that there is no excess sealer
blocking the burner tubes. If there is excess sealer present inside the nozzles, remove it. Reconnect the
blower unit to the manifold assembly. Reconnect the spark and scanner and fasten the cables up and around
the manifold assembly, always keeping them off the floor.
Firing Chamber
Make regular checks of your chamber lining, looking for cracks in the bricks, or loose mortar between
the rows of bricks. If you find open gaps between the brick, they must be filled at once, as the flame can
penetrate and erode the insulation, thus causing hot spots to the side of the furnace shell.
At least once a month, take a putty knife and scrape the loose refractory from the sides of your chamber, and remove with a vacuum. After the removal of all loose materials, find an old paint brush, or sponge,
and a can of water. Brush a liberal coat of water on your brick to prepare them for the new application of RS
sealer. The application of the water will keep the brick from soaking all the moisture out of your sealer before
you cover the whole inside of the chamber. Keep in mind that a thin application of sealer is better than
one heavy coat. Thick coats of sealer will flake off and fall to the bottom of the chamber. It is best to fill large
openings with thick material, then thin your mixture down, and apply at least three thin coats over the entire
chamber, with a low firing between each application.
Always make sure that the drain hole in the bottom of the furnace chamber is open and not blocked
with hardened metals. It is also a good idea to work your drain plug bricks back and forth, to make sure that
they work freely. Do not allow spilled metals to block the drain escapes. Also, do not allow spilled metals to
penetrate down in and around the area where the bottom brick and the side liners come together. If this is
allowed to happen, the melting and re hardening of the metals will cause your side liners to rise upward, thus
causing a major problem with the opening and closing of your lid. Continuous rubbing of the brick surfaces,
under pressure, will cause major damage to your lid brick, as well as the top of your liner brick.
Relining kits are available for all furnaces that we manufacture. The delivery on any reline kit would be
at least two weeks from the time of order placement. All reline kits will have to be shipped by truck, because
of their weight, and size.
Always remember that continued maintenance will prolong the life of your furnace, and in the long run,
cost you less in repairs.
-25-
RELINING INSTRUCTIONS
INSTRUCTIONS FOR REPLACING THE LINING AND LID FOR SPEEDY MELT
STATIONARY CRUCIBLE FURNACES.
MODELS: B-16, B-160, B-30, B-70 SINGLE BURNER SERIES
MODELS: B-301, B701, B-702, B-1500, B-1501 DOUBLE BURNER SERIES
EACH RELINING KIT CONTAINS ALL REFRACTORY SHAPES, REFRACTORY MORTAR AND
INSULATION, AND COMPLETE INSTRUCTIONS TO RELINE AND RENOVATE YOUR FURNACE.
LOCATE THE SPECIFIC PAGES OF THIS SECTION OF THE SERVICE MANUAL COVERING YOUR
MODEL FURNACE. IT SHOWS LINE DRAWINGS AND MATERIAL LISTS.
PREPARING THE REFRACTORY CASTABLE INSULATION:
Each relining kit contains enough insulation to pour between the hard brick lining and the steel shell of
the furnace. Dump the pre-mixed components into a box similar to a plaster mixing box. Add water so that
the insulation will have about the same consistency as plaster. Pour the mixture between the refractory lining
and the steel shell. Vibrate or rod the insulation to remove any trapped air from the space between the brick
and the shell. This is extremely important around burner ports and the furnace bottom. Further information is
contained in the instruction sections.
-26-
RELINING INSTRUCTIONS FOR
C-9, C-10, C-20 Soft Metal Melters
The Speedy Melt furnaces have been designed so that relining is easily and rapidly done. Complete
relining kits are available as a package unit. These kits include all replacement refractory shapes, insulation
and correct type mortar.
Structural parts of the furnace which are subject to normal abuse and may need replacement are
available. See the operating and maintenance instructions for these parts reference. Relining procedure is
as follows:
1. Remove blower, mixer-burner and pilot assembly from furnace. Remove lid lift assembly by lifting
out of base tube.
2. Remove lid ring bolt and remove lid brick. Remove front bolt from ring band clamp and remove four
ring brick sections. Replace lid band if damaged or burned.
3. Remove four segments of top cast iron seal by removing four hex nuts on top of furnace chamber.
Remove all insulation and refractory from furnace shell. Remove and replace the seal hold down
bolts if broken. Support the ears, or use gear puller to prevent bending, hold down ear.
4. Mix part of refractory sealer to consistency of heavy cream to use for mortaring joints.
5. Model C-10 - Place bottom row of liners in center of the shell, locating burner brick on burner guide
tube and cement into place. Cement I.D. of burner tunnel and O.D. of guide tube to seal against
flame leakage. Insert finger in burner guide tube and remove excess cement. Model C-20 - Place
row one of liner bricks down in the bottom of the shell and center, making sure burner brick is in line
with hole on side of shell.
6. Place a hand full of sealer in the bottom of the shell, and place the bottom brick down in place with
grooves up.
7. Place a row of sealer on top of row one bricks. Place second row of bricks on top of row one and
align the exhaust liner with the chimney. Cement exhaust sleeve liner in place even with I.D. of
furnace chamber. Press row of bricks down to be sure of a good seal. Be sure top ring of liners is
level to form seat for cover.
8. Mix pre-mixed insulation with enough water to make a pouring consistency. Pour insulation between
shell and refractory lining. Prod while pouring to form an even distribution of insulation. Fill to height
of liners. Let insulation set for approximately 20 minutes. Now take a rubber mallet, and tap all
around the side of the shell. The insulation will settle down. Now, add more insulation to fill gap back
up to the top of the bricks.
9. Replace top seal segments and bolt down in place. Replace lid lift assembly after applying a thin
layer of grease to tube.
10. Locate the pot ring bricks. Dip the tongue and groove ends in the sealer, then place the bricks on top
of the liners forming your circle. Now spread the lid band, placing it around the bricks aligning the
lugs with the notch in the bricks. Do not over tighten. Now, place your cover brick in place and put
band around it.
11. Apply small amount of refractory sealer to burner nozzle and reassemble. Be sure burner enters to
bumper lock. Replace pilot unit, (if unit has one), and seal with plastic sealer.
12. Mix balance of refractory sealer to consistency of latex paint and cover all exposed refractory with
single coat of sealer. It is better to brush several light coats on instead of one heavy coat. A heavy
coat will peel off. Furnace should set for 24 hours to cure insulation, then fire for one hour to remove
moisture. The following day, fire as desired.
-27-
OPN 032030
List of Contents for C-9 Relining Kit
Part No.
008056
008050
008051
008052
008053
008059
008057
008173
008141
Qty.
1
6
1
1
1
1
1
Description
Bottom Brick
Solid Liner
Burner Brick
Exhaust Side Liner
Exhaust Liner Tile
Cover Brick
Chimney Brick
Refractory Sealer
Matrilite 28
OPN 032002
List of Contents for C-10 Relining Kit
Part No.
008056
008050
008051
008052
008053
008054
008055
008057
008173
008141
Qty.
1
6
1
1
1
4
1
1
Description
Bottom Brick
Solid Liner
Burner Brick
Exhaust Side Liner
Exhaust Liner Tile
Pot Ring Bricks
Cover Bricks
Chimney Brick
Refractory Sealer
Matrilite 28
OPN 032003
List of Contents for C-20 Relining Kit
Part No.
008007
008005
008009
008061
008062
008060
008059
008058
008173
008141
-28-
Qty.
1
6
1
1
1
4
1
1
Description
Bottom Brick
Solid Liner
Burner Brick
Exhaust Side Liner
Exhaust Liner Tile
Pot Ring Bricks
Cover Brick
Chimney Brick
Refractory Sealer
Matrilite 28
-29-
-30-
RELINING INSTRUCTIONS FOR SPEEDY MELT
B-16, B-160 AND B-30 FURNACES
B-16 and B-160 Furnaces
A
B
C
D
OPN
008002
008000
008003
008004
008141
DESCRIPTION
Lid Section
Solid Side Liner
Piloted Burner Brick
Bottom Brick
Premixed Insulation
QTY.
4
7
1
1
B-30 Furnace
A
B
C
D
OPN
008008
008005
008009
008007
008141
DESCRIPTION
Lid Section
Solid Side Liner
Piloted Burner Brick
Bottom Brick
Premixed Insulation
QTY.
4
7
1
1
The material used in the manufacture of the
lining and lid for these Speedy Melt Furnaces
is High-Alumnia refractory. This material is
one of the best available, designed to
withstand the extreme temperatures, drastic
temperature changes and high velocity
circulation encountered in top performing
crucible melting furnaces. The fusion point
of this material is near 3300∞F. DOMESTIC
FIRE CLAY REFRACTORY, NORMALLY
USED, IS ENTIRELY UNSATISFACTORY.
All shapes are compressed under extreme
pressures, and kiln burn. The MIFCO
Furnaces have been designed so that
relining is rapidly and easily done. Complete
relining kits are available as a package unit.
These kits include all
replacement refractory shapes, insulation, and the correct type of High-Alumnia refractory mortar. Structural
parts of the furnaces which are subject to normal abuse and may need replacement are available. Relining
procedure is as follows:
1. Remove blower and mixer-burner assembly from furnace.
2. Remove front bolt from lid band, spread lid band, remove the four lid brick sections, A.
3. Remove lid lift assembly by lifting out of the base tube. Replace lid band if damaged or burned, being
careful not to lose collar bushings in jack tube. Replace both lid support rods if bent or burned.
4. Remove the four top cast iron segments by removing hex nuts on top of furnace. Remove all insulation
and refractory from the furnace shell. Remove and replace seal hold down bolts if broken.
-31-
Relining Instructions for B-16, B-160, B-30 - (cont.)
5. Mix part of refractory sealer to consistency of heavy cream for mortaring joints.
6. Locate burner row, (4 bricks banded together), on burner guide tube and cement in place. DO NOT
REMOVE THE BANDS. Apply cement to I.D. of burner tunnel and O.D. of guide tube to prevent flame
leakage. Wet brick surfaces to be mortared with water. This improves the mortar joints. Dry bricks absorbs
moisture from mortar too rapidly, resulting in weak joints. Use a brush or sponge to saturate surfaces with
water.
7. Cement bottom of liner in place with drain grooves up.
8. Cement second ring of four solid, liner bricks in place, staggering bricks to split the joints. Level top
surface of second, ring with top of furnace so lid will seat properly.
9. Mix PRE-MIXED INSULATION with sufficient water to the consistency of plaster. Pour insulation between
shell and-refractory lining. Prod while pouring to form an even-distribution of insulation. Fill to height of
liners. Allow to stand approximately 30 minutes and then fill to the top again.
10. Replace top seal segments and bolt down in place. Replace lid lift assembly after applying thin layer of
grease to tube.
11. Spread lid band and place four lid segment sections on top of furnace chamber, lining. Align the grooves
on the outside of the lid bricks to match the holding lugs in the lid band. Press or tap each top segment down
to seat against chamber lining. Replace the front lid band bolt and tighten snug. DO NOT OVER TIGHTEN.
OVER TIGHTENING WILL CAUSE THE LID BRICKS TO CRACK WHEN THEY EXPAND FROM HEATING.
12. Apply a small amount of refractory sealer to burner nozzle and reassemble. Be sure burner enters to
refractory stop. Thin mortar with water to consistency of a paint and paint all exposed brick surfaces.
13. Furnace should set for 24 hours to cure insulations then fire at low fire for one hour to remove moisture.
The following day, fire as desired. Firing at HIGH-FIRE right away will cause steam to form in the bricks and
blow them apart.
NOTE: REFER TO BULLETIN - CARE AND MAINTENANCE OF FURNACE LININGS.
-32-
RELINING INSTRUCTIONS FOR SPEEDY MELT MODEL B-70 FURNACE
A
B
C
D
E
F
G
J
OPN
008022
008010
008011
008104
008013
008103
008160
008141
DESCRIPTION
QTY.
Lid Section
4
Solid Side Liner
10
Piloted burner brick
1
Drain Side liner brick
1
Bottom brick
4
Drain Tile
1
Drain Tile Plug
1
Pre-mixed Insulation
The MIFCO Furnaces have been designed
so that relining is rapidly and easily done.
Complete relining kit are available as a
package unit. These kits include all
replacement refractory shapes, insulation,
and the correct type of highalumina
refractory. Structural parts of the furnace
which are subject to normal abuse and may
need replacement, are available. Relining
procedure is as follows:
1. Remove blower and mixer-burner
assembly from furnace.
2. Remove front bolt from lid band, spread
lid band, remove the four lid sections.
3. Remove lid lift assembly by lifting out of
the base tube. Replace lid band if damaged
or burned, being careful not to lose collar
bushings in jack tube. Replace both lid
support rods if bent or burned.
4. Remove the six top cast iron segments by removing hex nuts on top of furnace. Remove all insulation and
refractory from furnace shell. Remove and replace seal hold down bolts if broken. Remove burner guide
tube.
5. Mix part of refractory sealer to consistency of heavy cream for mortaring joints.
6. Place four segments of Bottom Bricks E in center of furnace chamber. Measure side clearance between
brick and shell to locate bottom correctly. Wet brick surfaces to be mortared, with water. This improves
mortar joints. Dry bricks absorb moisture from mortar too rapidly resulting in weak joints. Use brush or
sponge to saturate surfaces with water.
7. Set banded burner ring in place, lining up the burner hole with the burner guide tube when they are in
place. DO NOT REMOVE THESE BANDS. This burner ring should be cemented in place by pouring a ring
of cement where the bottom row of bricks are to set. Be sure to wet the mating surfaces before applying
mortar. Put mortar inside of burner hole, insert burner guide tube, and bolt into place. Wipe excess mortar
from inside of burner tunnel.
-33-
Relining Instructions for B-70 - (cont.)
8. Mortar drain tile F in place and line up drain hole by inserting drain tile plug G.
9. Mix patching plastic per instructions on container and build up all around the burner guide tube. This build
up should be about 1" thick and next to the burner brick C, there should be a heavy fillet working the castable
well against the brick to assure a good bond.
10. Cement second ring of six solid liner bricks B in place. Put the smooth side up to mate with the lid. If the
bricks are loose, turn the smooth side down on a flat surface and make wooden wedges to drive between the
bands and the bricks. This will tighten the bands. DO NOT OVER-TIGHTEN. Over-tightening will cause the
bricks to crack when they expand from heating. Wet the bottom of this row and the top of the bottom row well
and then pour a ring of cement on the top of the bottom row. Lower the top row of bricks in place and revolve
ring of bricks to get the cement thinned out and seat the bricks. The vertical joints should be staggered.
11. Mix pre-mixed insulation with sufficient water to the consistency of plaster. Pour insulation between shell
and refractory lining. Prod while pouring to form even distribution of insulation. Fill to height of liners, wait
approximately 30 minutes and fill to top again.
12. Replace top seal segments and bolt down in place. Replace lid lift assembly after applying thin layer of
grease to tube.
13. Spread lid band and place four lid segments A on top of furnace chamber lining. Align the grooves on the
outside of the lid bricks to match the holding lugs in the lid band. Press or tap each top segment down to seat
against the chamber lining. Replace the front lid band bolt and tighten snug. DO NOT OVER-TIGHTEN.
14. Apply small amount of refractory sealer to burner nozzle and reassemble. Be sure burner enters to
refractory stop. Thin mortar with water to consistency of a paint and paint all exposed brick surfaces.
15. Furnace should set for 24 hours to cure insulation, then fire at low fire for one hour to remove moisture.
The following day, fire as desired. Firing at HIGH-FIRE right away will cause steam to form in the bricks and
blow them apart.
NOTE: REFER TO BULLETIN - CARE AND MAINTENANCE OF FURNACE LININGS.
-34-
RELINING INSTRUCTIONS FOR SPEEDY-MELT MODEL B-301 FURNACE
A
B
C
D
E
OPN
008008
008005
008009
008007
008141
DESCRIPTION
Lid Section
Solid Side Liner
Piloted Burner Brick
Bottom Brick
Pre-mixed Insulation
QTY.
4
6
2
1
The MIFCO Furnaces have been designed
so that relining is rapidly and easily done.
Complete relining kits are available as a
package unit. These kits include all
replacement refractory shapes, insulation,
and the correct type of High Alumina
refractory. Structural parts of the furnace
which are subject to normal abuse, and may
need replacement, are available. Relining
procedure is as follows:
1. Remove blower, gas-air mixer assembly,
ignition and combustion safeguard system
from manifold. Disassemble manifold and
unbolt burner guide tubes from furnace shell.
2. Remove front bolt from lid band, spread
lid band and remove the four lid brick
sections,
3. Remove lid lift assembly by lifting out of
the base tube. Replace lid band if damaged
or burned, being careful not to lose collar
bushings in jack tube. Replace both lid
support rods if bent or burned.
4. Remove the four top cast iron segments
by removing hex nuts on top of furnace.
Remove all insulation and refractory from
furnace shell. Remove and replace seal hold
down bolts if broken. Remove burner guide
tubes.
5. Mix part of refractory sealer to consistency of heavy cream for mortaring joints. Wet the brick surfaces to
be mortared with water to improve mortar joints. Dry bricks absorb moisture from mortar too rapidly, which
results in weak joints. Use brush or sponge to saturate brick surfaces with water.
6. Locate the bottom row of two burner bricks C and two solid side liners B to match up with burner guide
tubes. If bands are loose, turn the row upside down on flat surface and drive wooden wedges between
straps and bricks to tighten up the bands. DO NOT REMOVE BANDS. Line the hole in the brick where the
burner guide tube goes with mortar and insert the burner guide tube. Do this to the other side and then
tighten all four bolts on the burner guide tubes. DO NOT OVERTIGHTEN.
-35-
Relining Instructions for a B-301 - (cont.)
7. Cement the bottom brick ìDî in place with the drain grooves up.
8. Cement the second row of four solid side liners ìBî in place and stagger the joints so that they donít line up
with the bottom row. Also, DO NOT BREAK THE BANDS. If they are loose, put the smooth side of the bricks
down on the floor or flat surface and tighten bands with wedges of wood driven between bands and bricks.
DO NOT OVER TIGHTEN. Wet the joints between the top and bottom rows and then, pour a row of mortar
on top of the bottom row. Next sit the top row in place, moving it around a little to line up sides and flatten out
mortar. Be sure you cement the top row with the smooth side up.
9. Mix pre-mixed insulation with sufficient water to the consistency of plaster. Pour the mixed insulation
between the furnace shell and the brick lining. Prod while pouring to assure even distribution of insulation.
Fill to the height of the furnace shell. Wait approximately 30 minutes and finish filling.
10. Replace top seal segments and bolt down in place. Replace lid lift assembly after applying thin layer of
grease to inside lifting tube.
11. Spread lid band and place four lid segment sections ìAî on top of furnace chamber lining. Align the
grooves in the outside of the lid bricks to match the holding lugs in the lid band. Press or tap each top
segment down to seat against chamber lining. Replace the front lid band bolt and tighten snug. DO NOT
OVER TIGHTEN. OVERTIGHTENING WILL CAUSE THE LID BRICKS TO CRACK WHEN THEY EXPAND
FROM HEATING.
12. Apply a small amount of refractory cement to the outside of the main burner tips and re-assemble burner
manifold. Thin the mortar with water to the consistency of paint and cover all exposed brick surfaces. As
explained above, wet the brick surfaces before coating.
13. Re-connect blower, gas-air mixer unit, ignition and combustion safeguard leads to furnace body.
14. Furnace should set for 24 hours to cure insulation, then fire at low fire for one hour to remove moisture.
The following day, fire as desired. Firing at HIGH-FIRE right away will cause steam to form in the bricks and
blow them apart. The furnace will emit steam and water from the lining when first fired. This is normal until the
furnace is completely dry.
-36-
RELINING INSTRUCTIONS FOR SPEEDY MELT MODEL B-702 FURNACE
A
B
C
D
E
F
G
H
I
OPN
008022
008010
008011
008104
008013
008103
008160
008158
008141
DESCRIPTION
QTY.
Lid Section
4
Solid Side Liner
9
Piloted Burner Brick
2
Drain Side Liner
1
Bottom Brick
4
Drain Tile
1
Drain Tile Plug
1
Bottom Support Brick 4
Premixed Insulation
The MIFCO Furnaces have been designed
so that relining is rapidly and easily done.
Complete relining kits are available as a
package unit. These kits include all
replacement refractory shapes, insulation,
and the correct type of High-Alumina
refractory. Structural parts of the furnace
which are subject to normal abuse and may
need replacement are available.
Relining procedure is as follows:
1. Remove blower, gas-air mixer assembly,
ignition and combustion safeguard system
from manifold. Dis-assemble manifold and
unbolt burner guide tubes from furnace shell.
2. Remove front bolt from lid band, spread
lid band, remove the four lid brick sections
A.
3. Remove lid lift assembly by lifting out of
the base tube. Replace lid band if damaged
or burned, being careful not to lose collar
bushings in jack tube. Replace both lid
support rods if bent or burned.
4. Remove the six top cast iron segments by removing hex nuts on top of furnace. Remove all insulation and
refractory from furnace shell. Remove and replace seal hold down bolts if broken.
5. Mix part of refractory cement to a consistency that will spread out but not run for mortaring joints. Wet the
brick surfaces to be mortared with water to improve mortar joints. Dry bricks absorb moisture from mortar
too rapidly, which results in weak joints. Use brush or sponge to saturate brick surfaces with water.
-37-
Relining Instructions for a B-702 - (cont.)
6. The Bottom Brick, (E), consists of four sections banded together. DO NOT REMOVE THESE BANDS.
Place in the bottom of the shell, centering all around. Place first row of bricks in place, aligning burner brick
(C) with burner guide tubes. Paint a layer of refractory-sealer inside holes of burner bricks and slide burner
guide tubes into bricks. Tighten down burner guide tubes.
7. Included with your relining kit, find two 10 lb. boxes of patching plastic. Mix this to a consistency of a heavy
paste. Pack around burner tube between the outside brick wall and inside shell wall, making sure there is at
least three inches all around the burner tube itself, next to the brick.
8. Mortar Drain Tile, (F), in alignment with the drain hole. Insert Drain Tile Plug, (G), in place to complete
bottom ring. Wet brick surfaces before applying mortar.
9. Saturate matching surfaces of top and bottom rings with water to prevent rapid drying of mortar. Place a
layer, of mortar on top surface of the bottom ring of bricks, already located in the furnace. Next, lower the
banded top ring of solid side-liners, (B), into position over the bottom ring, flat side up. Rotate top ring to get
a tight mortar joint, making sure to stagger brick joints in top and bottom rows. Level top surface of second
ring with top of furnace so lid will seat properly.
10. Mix the pre-mixed insulation with sufficient water to the consistency of plaster. Pour the mixed insulation
between the furnace shell and the brick lining. Prod while pouring to assure an even distribution of insulation.
Fill to the height of the furnace shell, wait approximately 30 minutes and finish filling.
11. Replace top seal segments and bolt down in place. Replace lid lift assembly after applying thin layer of
grease to tube.
12. Spread lid band and place four Lid Segment Sections, (A), on top of furnace chamber lining. Align the
grooves in the outside of the lid bricks to match the holding lugs in the lid band. Press or tap each top
segment down to seat against chamber lining. Replace the front lid band bolt and tighten snug. DO NOT
OVER TIGHTEN. OVER-TIGHTENING WILL CAUSE THE LID BRICKS TO CRACK WHEN THEY EXPAND
FROM HEATING.
13. Apply a small amount of refractory cement to the outside of the main burner tips and re-assemble burner
manifold. Thin the mortar with water to the consistency of heavy paint and cover all exposed brick surfaces.
As explained above, wet the brick surfaces before coating.
14. Re-connect blower, gas-air mixer unit, ignition and combustion safeguard leads to furnace body. Furnace
should set for 24 hours to cure insulation, then fire at low-fire for one hour to remove moisture. The following
day, fire as desired. Firing at HIGH-FIRE right away will cause steam to form in the bricks and blow them
apart. The furnace will emit steam and water from the lining when first fired. This is normal until the furnace
is completely dry.
-38-
RELINING INSTRUCTIONS FOR SPEEDY-MELT MODEL B-1501 FURNACE
A
B
C
D
E
F
G
H
I
OPN
008089
008087
008090
008093
008092
008088
008096
008152
008141
DESCRIPTION
QTY.
Lid Section
8
Solid Side Liner
26
Piloted Burner Liner
4
Side Drain Liner.
1
Drain Tile
1
Drain Tile Plug
1
Bottom Brick
4
Steel Support Frame
1
Pre-Mixed Insulation
The MIFCO Furnaces have been designed
so that relining is rapidly and easily done.
Complete relining kits are available as a
package unit. These kits include all
replacement refractory shapes, insulation
and the correct type of High Alumnia
refractory. Structural parts of the furnace
which are subject to normal abuse, and may
need replacement, are available. Relining
procedure is as follows:
1. Remove blower and mixer / burner
assembly from furnace by disconnecting the
pipe union at the manifold and the spark
ignition and ultra violet scanner leads to the
burner tee fitting. Scanner leads and spark
ignition lead wires are with furnaces with
safety systems.
2. Disconnect manifold union and remove
the manifold and burners from furnace body.
3. Remove burner guide tubes from burner
shell.
4. Remove the front clamp bolt from the lid
band, spread the lid band, and remove the
eight lid sections, (A).
5. Remove lid lift assembly by lifting out of
the base tube. Replace lid band if damaged
or burned. Replace both lid support rods if
bent or burned.
-39-
Relining Instructions for B-1501 - (cont.)
6. Remove six top iron segments by removing hex nuts on furnace top. Remove all insulation and refractory
from furnace shell. Replace seal hold down bolts if broken.
7. The three rows of bricks come banded together in rows. DO NOT REMOVE THESE BANDS. If the
bricks are loose, place on flat surface with top side down and drive a wooden wedge between the band and
the bricks. This will tighten the bands. DO NOT OVER TIGHTEN.
8. Center the Steel Support Frame, (H), in the bottom of the furnace.
9. Mix enough insulation material to cover the bottom of the furnace to the top of the Steel Support Frame,
(H). The insulation has the refractory cement and insulation already mixed so all you have to do is add water
until it is just wet enough to pour. Make sure the frame is centered in the shell and pour insulation no higher
than the top of the frame. After the insulation has set a half hour or so, it may be necessary to add a small
amount to bring it up to the proper level.
10. Locate the Bottom Row of bricks, made up of Burner Liner (C), Solid Side Liners (B), and Side Drain
Liner (D), on top of the Steel Support Frame (H), and align the burner holes with the burner guide tubes. Put
some mortar in the burner holes of the brick and bolt the burner guide tube in place. Clean the excess from
the inside of the burner guide tube holes. Mortar Drain Tile (E), in place. Insert Drain Tile Plug (F), in drain tile
hole to help hold tile in place.
11. Mix up one half of patching plastic with water until it is moist enough to be able to form. It cannot be wet
enough to run or flatten out. This patching plastic is to be pressed around the burner guide tubes between
the furnace steel shell and the brick. Wet the brick surface before applying, then work the patching plastic up
against the brick insuring a good bond.
12. The four Bottom Bricks (G), are now ready to put in place. These sections set right on top of the Steel
Support Frame (H), and the insulation.
13. Mix the refractory mortar with water to consistency of paste. DO NOT USE INSULATING CEMENT.
USE THE REFRACTORY MORTAR TO MORTAR BRICKS TOGETHER.
14. The center row is to be placed in position next. DO NOT REMOVE THE BANDS. Wet the top of the
bottom row and the bottom of this row with water and then pour a ring of cement on top of the bottom row.
Lower the second row in place, aligning the burner holes, also moving the row of bricks so you will get a tight
bond between the rows. The burner guide tubes should now be put in place following the same procedure as
in steps 10 and 11. It would be advisable to put in the manifold assembly before tightening the burner guide
tube bolts.
15. Repeat the above step for top Row 3. Mix the balance of the insulation aggregate and cement, the
same as step 9. Finish filling the cavity between the shell and furnace lining. Fill to the top of the furnace
shell.
16. Tap the furnace shell to help make the insulation settle. Allow approximately 30 minutes for the insulation
to settle, then add enough insulation to top off and secure with nuts.
17. Replace sectional steel top ring plates and secure with nuts.
-40-
Relining Instructions for B-1501 - (cont.)
18. Apply a layer of grease to lid lift tube and replace the lid lift assembly in the lower guide tube.
19. Spread the lid lift brick ring and replace the Lid Bricks (A). Align the slots in the Lid Bricks to match the
lugs in the lid ring. Replace the lid band bolt and tighten bolt until just snug. Tap the lid band with a mallet or
wooden bar. Lid sections will shift slightly and allow for re-tightening of the lid band bolt. Continue this
procedure until all bricks have been aligned and the band is tight, then loosen nut about one turn.
OVERTIGHTENING WILL CAUSE THE LID BRICKS TO CRACK WHEN THEY START TO EXPAND FROM
HEATING.
20. Add some water to the mortar until you are able to brush it on. DO NOT GET IT TOO THIN OR THE
BINDER IN THE MORTAR WILL BE SO DILUTED THAT THE COATING WILL JUST BRUSH OFF WHEN IT
DRIES. Brush on a coating of water to get the brick surfaces and all joints soaked and then brush on the
mortar coating to all brick surfaces and work into all cracks. Be sure to do bottom of the lid, also.
21. The furnace should set at least 24 hours to allow the cement in the insulation to setup and cure. After this
period of time, the furnace can be fired slowly to drive off all moisture and water vapor from the insulation and
lining. The following day, fire as desired. Firing at HIGH-FIRE right away will cause steam to form in the
bricks and blow them apart. The furnace will emit steam and water from the lining when first fired. This is
normal until the furnace is completely dry.
-41-
-42-
Models B-301, B-702
-43-
Models B-1501
-44-