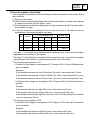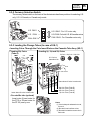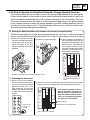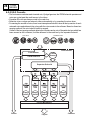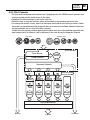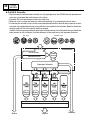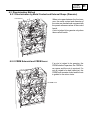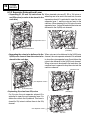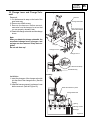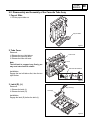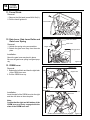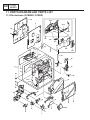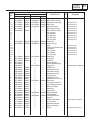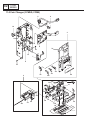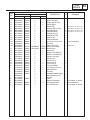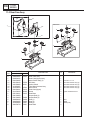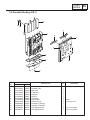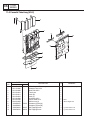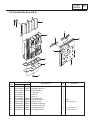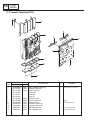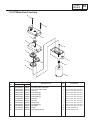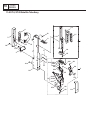
1
®
Multi Drop Bus 5-Tube Coin Changer
Series
Service Manual
DIS
C/C
A
B
C
D
E
SAT
MOD
AUT
2
CCM5
SERIES
TABLE OF CONTENTS
Page
1 Outline ................................................................................................................................................. 3
2 Product Model Names ....................................................................................................................... 4
3 General Specifications ...................................................................................................................... 5
4 Detailed Specifications ..................................................................................................................... 5
5 Handling and Installation .................................................................................................................. 13
5-1 Handling Instructions ................................................................................................................. 13
5-2 Identification of Components and their Location ........................................................................ 13
5-3 Operating Instructions ................................................................................................................ 14
5-3-1 Installation Procedure ................................................................................................................ 14
5-3-2 Currency Selection Switch ........................................................................................................ 15
5-3-3 Loading the Change Tubes ........................................................................................................ 15
5-3-4 Inventory Panel .......................................................................................................................... 17
5-3-5 Coin Accept/Rejevt Programming Function ............................................................................... 18
5-3-6 How to Operate the Simplfied Automatic Change Ajusting Function ......................................... 19
5-3-7 Removing Coins from the Payout Tubes ................................................................................... 20
5-3-8 Selecting the Change Adjusting Function .................................................................................. 21
5-3-9 Inventory Mode Function ............................................................................................................ 22
5-3-10 Vend Test ............................................................................................................................... 24
6 Construction and Description ........................................................................................................ 25
6-1 Description of Parts ................................................................................................................... 25
6-2 Flow of Coins .............................................................................................................................. 27
6-2-1 US-1 Cassette ........................................................................................................................... 27
6-2-2 US-2 Cassette ........................................................................................................................... 28
6-2-3 US-4 Cassette ........................................................................................................................... 29
6-2-4 US-5 Cassette ........................................................................................................................... 30
6-3 Discrimination Method ............................................................................................................... 31
6-4 Operation of Switches, Sensors, and Parts .............................................................................. 33
6-5 Payout System .......................................................................................................................... 35
7 Signal Condition and Wiring Diagram ............................................................................................ 37
7-1 Terminal Connections/Signals ................................................................................................... 37
7-2 Wiring Diagram .......................................................................................................................... 38
8 Preventive Maintenance ................................................................................................................. 39
9 Disassembly and Assembly Procedure .......................................................................................... 41
9-1 Disassembly and Assembly: Main Body of the Coin Changer ................................................... 41
9-2 Disassembly and Assembly: Cassette Tube Assy ..................................................................... 49
9-3 Disassembly and Assembly: Discriminator ............................................................................... 51
10 External View and Dimensions ....................................................................................................... 58
11 Exploded View and Parts List ......................................................................................................... 60
11-1 Discriminator ............................................................................................................................. 60
11-2 Coin Changer ............................................................................................................................. 62
11-3 Gear Case Assy ........................................................................................................................ 64
11-4 Cassette Tube Assy (US-1) ....................................................................................................... 65
11-5 Cassette Tube Assy (US-2) ....................................................................................................... 66
11-6 Cassette Tube Assy (US-4) ....................................................................................................... 67
11-7 Cassette Tube Assy (US-5) ....................................................................................................... 68
11-8 ST Motor Gear Case Assy ......................................................................................................... 69
11-9 ST-5, ST-25 Satellite Tube Assy ................................................................................................ 70
CCM5
SERIES
3
1. OUTLINE
* CCM5 series coin changers can be used with U.S. 5¢, 10¢, 25¢, and $1 coins as well as Canadian
5¢, 10¢, 25¢, $1, and $2 coins.
* A selector switch on back of the Discriminator allows the user to select between U.S.-coin-only,
Canadian-coin-only or U.S.-and Canadian coins.
* Five coin tubes are integrated inside a cassette for ease of handling change.
* Up to three different type of coins are dispensed simultaneously to ensure rapid return of change.
* The coin changer comminicates with the vending machine controller via the Multi-Drop Bus (M.D.B.).
4
CCM5
SERIES
2. Product Model Names
2.1 Coin changer
CCM5
Cassette division (Table I)
Color identification (Table II)
2.2 Discriminator
CCM5
D
Color identification (Table II)
2.3 Cassette Tube Assy
Division
Name
Table I
Item
Tube A
Tube B
Tube C
Tube D
Tube E
25¢
5¢
25¢
10¢
25¢
Coin filling method
Manual
Auto
Auto
Auto
Manual
Number of coins per tube
Approx.
87
Approx.
72
Approx.
79
Approx.
103
Approx.
86
10¢
5¢
25¢
10¢
5¢
Coin filling method
Manual
Auto
Auto
Auto
Manual
Number of coins per tube
Approx.
114
Approx.
72
Approx.
79
Approx.
103
Approx.
77
Type of coin accommodated
$1
5¢
25¢
10¢
25¢
Coin filling method
Auto
Auto
Auto
Auto
Manual
Approx.
64
Approx.
72
Approx.
79
Approx.
103
Approx.
86
10¢
10¢
5¢
10¢
5¢
Coin filling method
Manual
Auto
Auto
Auto
Manual
Number of coins per tube
Approx.
114
Approx.
103
Approx.
72
Approx.
103
Approx.
77
Type of coin accommodated
1
US-1
Type of coin accommodated
2
4
US-2
US-4
Number of coins per tube
Type of coin accommodated
5
US-5
2.4 Color identification
Symbol
None
G
Table II
Color identification
Discriminator and Part of other parts: Red
Standard Color: Grey
CCM5
SERIES
5
3. GENERAL SPECIFICATIONS Specifications and design are subject to change without notice.
Items
Coins Accepted
Coins Paid Out
Coin Tube Capacity
Change Payout operation
Power Supply
Insulation Resistance
Operating Temperature Range
Rated Power Consumption
Weight
Function
CCM5 Series
US coins: 5¢, 10¢, 25¢, $1
Canadian coins: 5¢, 10¢, 25¢, $1, $2
* A selector switch on the back of the coin discriminator enables the coin mode
(country) to be selected.
5¢, 10¢, 25¢, and $1 coins
* The change coins differ with the cassette tubes to be installed.
Refer to table of next page for details.
DC motor and DC solenoid used in combination (All tubes: A to E)
34 VDC ±10%
20MΩ or greater
+5°F ~ 140°F (–15°C ~ +60°C)
0.10A (Wait State)
0.66A (Operate State: Coin discrimination, motor operation, etc.)
0.92A (Peak: Max. 5 sec.)
Approx. 4.19 Lbs. (1.9 kg)
Change sensing function (All tubes: tubes A to E)
Auto fill tube; full status sensing function
Failure sensing function (Monitor L.E.D.)
Inventory function
Cassette tube assy out-of-position sensing function
Simultaneous coin payout function (up to 3 types of coins)
Coin accept/reject programming function
Simplified automatic change adjusting function
Motor lock auto recovery function
Drive power supply control function
Memory backup function
Selecting the change adjusting function
Inventory mode function
Cassette tube type sensing function
Optional device
Satellite tube
Option
Product name
ST-5/
ST-25
Coin tube capacity
5¢ coins : approx. 120 coins/
25¢ coins : approx. 110 coins
* ST-25 (for 25¢), ST-5 (for 5¢)
You can fit up to two optional tubes, either in pairs or individually, and in any
order to the CCM5.
4. Detailed Specifications
(1) Cassette Tube Assy
Five coin tubes are integrated inside a cassette which can be removed from the coin changer. The
respective tubes are also equipped with an open/close back cover so that coins can be replenished
or collected easily. The cassette tube type sensing function is activated upon attaching a cassette
to the coin changer, and the specification applicable to the cassette type is adopted.
• The names of the cassette tube assy and types of coins accommodated are as shown next
page.
6
CCM5
SERIES
Division
Name
Item
Tube A
Tube B
Tube C
Tube D
Tube E
25¢
5¢
25¢
10¢
25¢
Coin filling method
Manual
Auto
Auto
Auto
Manual
Number of coins per tube
Approx.
87
Approx.
72
Approx.
79
Approx.
103
Approx.
86
Full status detecting software counter
71
64
71
97
None
Type of coin accommodated
10¢
5¢
25¢
10¢
5¢
Coin filling method
Manual
Auto
Auto
Auto
Manual
Number of coins per tube
Approx.
114
Approx.
72
Approx.
79
Approx.
103
Approx.
77
Full status detecting software counter
97
64
71
97
None
Type of coin accommodated
$1
5¢
25¢
10¢
25¢
Auto
Approx.
79
Auto
Approx.
103
Manual
Approx.
86
Type of coin accommodated
1
2
US-1
US-2
Auto
Auto
Number of coins per tube Approx. Approx.
72
64
Coin filling method
4
5
US-4
US-5
Full status detecting software counter
63
64
71
97
None
Type of coin accommodated
10¢
10¢
5¢
10¢
5¢
Coin filling method
Manual
Auto
Auto
Auto
Manual
Number of coins per tube
Approx.
114
Approx.
103
Approx.
72
Approx.
103
Approx.
77
97
97
64
97
None
Full status detecting software counter
* Refer to section (2) for details of the full status detecting software counter.
(2) Automatic Coin Replenishment Tube Full Status Sensing Function
For sensing the number of coins, there is an interrupter switch with a lever at the top section of each
automatic coin replenishment tube, along with the coin counter in the software. Based on these
two sensing means, the coin tube full status is acknowledged.
If either of the two sensing methods detects the full status and a coin of the particular type which
has been sensed as full is inserted, it will be delivered to the cash box by the discriminator.
The software counter for sensing the full status maintains its memory even in the event of a power
failure. (Protected by the memory backup function.)
* The software counter function remains effective even if the cassette tube assembly is removed
from the coin changer. When the coins are collected out of the tubes, clear the memory of the
software counter.
* Refer to page 9 for clearing the memory.
* Refer to section (1) for the value of the software counter.
CCM5
SERIES
7
(3) Coin Acceptance Prohibited
Coin acceptance is prohibited under the following conditions irrespective of the control by the
main controller:
(1) During a power failure.
(2) When a coin or coins are being dispensed, an abnormal condition is caused or when power
is supplied for the first time (for approx. 2 sec.)
(3) Coin acceptance is prohibited by setting the coin type acceptance prohibit function (only for
the specified coin type).
(4) If the coin acceptance conditions for the coin type to be sent to the cash box are not
established by the mounted cassette tube assy.
No.
Name
1
U.S. and Canadian coins
Canadian coin
US-1
5¢
√
10¢
√
25¢
√
$1
∆
$2
∆
2
US-2
√
√
√
∆
∆
4
US-4
√
√
√
√
∆
5
US-5
√
√
∆
∆
∆ Note 1
* The mark “√” in the table above indicates that the particular type of coin can be accepted
regardless of the condition of the change.
* The mark “∆” in the table above indicates that the particular type of coin can be accepted
depending upon the condition of smaller denomination coins in the tubes.
* The following are examples in US-1.
• Conditions of the changer for acceptance of $1: Change for $1 in 10¢ and 25¢ denominations is available.
Example:
If the cassette tube assy has four 25¢ and ten 10¢ coins, it can accept two $1 coins.
If the cassette tube assy has six 25¢ and fifteen 10¢ coins, it can accept three $1 coins.
If the cassette tube assy has one 25¢ and nine 10¢ coins, it cannot accept any $1 coin.
• Conditions of the changer for acceptance of $2: Change for $2 in 25¢ denominations is
available.
Example:
If the cassette tube assy has eight 25¢ coins, it can accept one $2 coin.
If the cassette tube assy has sixteen 25¢ coins, it can accept two $2 coins.
If the cassette tube assy has eight 25¢ coins and one $1 coin has already been inserted,
it can not accept any $2 coin.
* The following are examples in US-4.
• Conditions of the changer for acceptance of $2: Change for $2 in 25¢ and $1 denominations is available.
Example:
If the cassette tube assy has eight 25¢ coins, it can accept one $2 coin.
If the cassette tube assy has sixteen 25¢ coins, it can accept two $2 coins.
8
CCM5
SERIES
If the cassette tube assy has two $1 coins, it can accept one $2 coin.
If the cassette tube assy has six $1 coins, it can accept three $2 coins.
If the cassette tube assy has one $1 and four 25¢ coins, it can accept two $2 coins.
If the cassette tube assy has one $1 and three 25¢ coins, it cannot accept any $2 coin.
* The following are examples in US-5.
• Conditions of the changer for acceptance of 25¢: Change for 25¢ in 5¢ and 10¢ denominations is available.
Example:
If the cassette tube assy has five 5¢ coins, it can accept one 25¢ coin.
If the cassette tube assy has one 5¢ coin and two 10¢ coins, it can accept one 25¢ coin.
If the cassette tube assy has one 5¢ coin and five 10¢ coins, it can accept two 25¢ coins.
If the cassette tube assy has five 10¢ coins, it cannot accept any 25¢ coin.
Note 1:
When US-5 is mounted, Canadian $2 coins are acceptable only if two satellite tubes for
25¢ (ST-25) that have sufficient change (six 25¢ each, twelve 25¢ in total) are attached,
and the status of the empty switch is “Sufficient Change.”
Example:
Both ST-25 have sufficient change: One $2 is acceptable.
Only one ST-25 has sufficient change: $2 is not acceptable.
(4) Escrow
When the main controller transmits the same value as the total amount of the inserted coins
by the EXPANSION/ALTERNATIVE PAYOUT command, all the inserted coins are returned.
(5) Failure Sensing Function
When the coin changer senses a failure, the abnormal condition is notified to the main
controller. At the same time, the L.E.D. on the inventory panel starts flashing.
The monitoring system consists of two L.E.D.’s. One is for monitoring the status of the
discriminator (DIS display: red) and the other is for monitoring the coin changer (C/C display:
yellow). The L.E.D.’s flashing whenever a failure is detected in each section.
Normal condition ................................. Both L.E.D. lamps are illuminated.
Failure in the discriminator ................. DIS L.E.D. is flashing (red).
Failure in the coin changer area ......... C/C L.E.D. is flashing (yellow).
Inventory Panel
DIS
C/C
A
B
C
D
E
SAT
MOD
AUT
CCM5
SERIES
9
(6) Automatic Recovery of Motor Lock
If the dispensing operation fails because the payout motor locks:
(1) the changer will automatically start a reset cycle to clear the jam.
(2) in case of failure to clear the jam automatically: (1) press any inventory switch and it will then
start the sequences to unlock the motor.
With the motor unlocked, the coin dispensing mechanism stops operation and enters standby
mode. If the motor remains locked, set the dispensing mechanism to the standby position to
stop the dispensing operation. Under this particular circumstance, the cassette tube assy can
be removed to make it easier to solve the cause of the motor lock.
(7) Simultaneous Dispensing Function
Up to three different types of coins can be dispensed simultaneously to complete the process
of returning change, depending on the amount of change required and the condition of coins
in the tubes.
* This function is not available in inventory mode.
* The combination of tubes D and E are not applicable to this function.
(Level 3 controller is required.)
(8) Simplified Automatic Change Adjusting Function
This function allows the coin changer, without needing to communicate with the main
controller, to independently control the increment or decrement of the quantity of change.
For detailed operating instructions, refer to section 5-3-3, “Loading the change tubes” on
page 16.
(9) Memory Backup Function
An electrical double-layer capacitor is used, so data in the memory such as the number of coins
in the tubes for change, data of the empty quantity counter, data of the full status sensing
software counter and the number of coins stored for the simplified automatic change adjusting
function are protected even in the event of a power failure.
The memory backup lasts for 3 days or longer (at 25°C) once the system has been turned on
for longer than 24 hours continuously.
The data maintained by the backup function can be forcibly cleared as follows.
(1) Deleting Backup Data
1. Detach the cassette assembly from the coin changer.
2. Press and hold down the Auto switch (AUT display “ON”) for about 5 seconds.
3. The two L.E.D.’s (red and yellow) will flash rapidly for about 1 second to indicate that all
of the data has been cleared.
Note: The backup data clear operation uses the same switch as that for the simplified automatic
change adjusting function. Be careful not to operate the switch incorrectly.
10
CCM5
SERIES
(10) Coin Accept/Reject Programming Function
This function allows the coin changer to prohibit the acceptance of particular types of coins
independently of the main controller. Instructions for setting these functions, refer to section
5-3-5, “Coin Accept/Reject Programming Function” on page 19.
(11) Driving Power Supply Control Function
The load control system of the motor solenoid
which is part of the coin discriminator and dispensing unit consists of two circuits, a driving
circuit and a driving power supply control circuit
(a circuit to supply power to the driving circuit).
Driving of the load (motor solenoid) requires
both a driving signal and driving power supply
control signal to prevent malfunctions of the
driving unit due to external noise.
Conceptual block diagram
Driving signal
(Motor solenoid)
Driving power supply control signal
Driving power supply control circuit
Driving unit
Driving unit
(Motor solenoid)
(12) Selecting the Change Adjusting Function
The CCM5 series has the following functions for adjusting change automatically.
(1) Simplified Automatic Change Adjusting Function
(2) Inventory Mode Function
You can select one of the above functions by setting the display switches on the inventory
panel.
The selection is shown on the display switches on the inventory panel.
For detailed operating instructions, refer to section 5-3-8, “Selecting the Change Adjusting
Function” on page 22.
(13) Change Sensing Function
Information on the change obtained by the coin changer is transmitted to the main controller
by the command TUBE STATUS.
Information regarding the change is maintained in the memory even in the event of a power
failure as it is protected by the memory backup function.
* Refer to page 9 for clearing the memory.
13-1 Change data
Information on each type of coin used for change is prepared on the basis of the proximity
empty switch mounted on each coin tube as well as the memorized data on the number of
inserted coins (empty quantity counter). Information for each type of coin is transmitted to
the main controller.
The change data is applicable to only those coin types specified for coin tubes in the
cassette tube unit. Other types of coins are all sent to the cash box with “0” transmitted to
the main controller.
(1) Change data on the basis of the proximity empty switch
If any of the specified types of coins to be normally stored in the automatic coin
CCM5
SERIES
11
replenishment tube or manual coin replenishment tube are stored in either tube
exceeding the fixed quantity, the number of coins is transmitted to the main controller for
each type of coin applicable. (If two or more tubes have coins exceeding each specified
quantity, the information on them is also transmitted to the main controller. In this case,
the information is not the total of the numbers of coins in different tubes.)
Number of coins for each coin type for “Sufficient Change” status by the empty switch
5¢
4 coins
10¢
9 coins
25¢
6 coins
$1
4 coins
Example: 5¢ empty switch
Empty switch status
Change data
Empty switch “Out of change” status
0
5¢ empty switch “Sufficient Change” status
4
One 5¢ coin dispensed. Empty switch “Sufficient Change” status
4
One 5¢ coin dispensed. Empty switch “Out of Change” status
3
Two 5¢ coins dispensed. Empty switch “Out of Change” status
1
One 5¢ coin dispensed. Empty switch “Out of Change” status
0
5¢ empty switch “Sufficient Change” status
4
(2) Change data on the basis of the empty quantity counter
1. When the empty switch is in “Sufficient Change” status
(Initial value of change data = number of coins by type)
Each time a coin or coins are inserted, the initial value of the number of coins by type is
increased and the value is transmitted to the main controller.
When none of the inserted coins are dispensed as a result of a sale and are stored inside
the coin changer, the number of coins inserted is added to the initial value of the number
of coins by type and the coins are held by the coin changer.
On the other hand, if any coins are dispensed as the change in a sale, the number of coins
dispensed is subtracted from the value of the number of coins by type until the initial value
(which equals “Sufficient Change”) is reached. The changed value is transmitted to the
main controller.
Example: When the 5¢ empty switch is in “Sufficient Change” status
Change data value
Initial value
4 (Empty switch “Sufficient Change” status)
One 5¢ coin is inserted.
5 (Empty switch “Sufficient Change” status)
One 5¢ coin is inserted.
6 (Empty switch “Sufficient Change” status)
One 5¢ coin is dispensed.
5 (Empty switch “Sufficient Change” status)
One 5¢ coin is dispensed.
4 (Empty switch “Sufficient Change” status)
One 5¢ coin is dispensed.
4 (Empty switch “Sufficient Change” status)
12
CCM5
SERIES
2. When the empty switch is in “Out of Change” status
(Initial value of change data = 0)
Each time a coin or coins are inserted, the number of inserted coins is transmitted to the
main controller.
When the number of inserted coins is less than the number of coins by type and the empty
switch is in the “Sufficient Change” status, the change data at that particular moment
equals the number of coins by type. The number of coins inserted thereafter is added and
transmitted to the main controller. If the sale proceeds without establishing “Sufficient
Change” as a result of coin insertion, the data of the empty quantity counter is transmitted
to the main controller as the change data.
On the other hand, if any coins are dispensed as change in a sale, the number of coins
dispensed are subtracted from the value 1 at a time after the empty switch enters the “Out
of Change” status, until the value reaches “0”. The changed value is transmitted to the
main controller.
Example: When the 5¢ empty switch is in “Out of Change” status
Change data
Initial value
0 (Empty switch “Out of Change” status)
One 5¢ coin is inserted.
1 (Empty switch “Out of Change” status)
One 5¢ coin is inserted.
4 (Empty switch “Sufficient Change” status)
One 5¢ coin is inserted.
5 (Empty switch “Sufficient Change” status)
One 5¢ coin is dispensed.
4 (Empty switch “Sufficient Change” status)
One 5¢ coin is dispensed.
3 (Empty switch “Out of Change” status)
One 5¢ coin is dispensed.
2 (Empty switch “Out of Change” status)
One 5¢ coin is dispensed.
1 (Empty switch “Out of Change” status)
* The memory stored in the software counter is cleared when the cassette assembly is
removed from the coin changer.
13-2 Maximum values of change data
The maximum values of change data for the respective types of coin are shown below.
Maximum values of change data
5¢
*1
76
10¢
*2
255
25¢
*3
160
$1
63
*1 The maximum value of the change data when US-2 with ST-5 (two tubes) or US-5 with
ST-5 (two tubes) is used.
*2 When US-5 is used, the summed up value of the change data for the full status of one
denomination in a cassette becomes 291.
A: 97 + B: 97 + D: 97 = 291
However, the value 255 is transmitted by the TUBE STATUS command, because the
maximum value of the change data to be sent by that command is specified to be 255 (FF
H). This continues until the total number of coins in the tubes becomes 254 or less by
dispensing.
*3 The maximum value of the change data when US-1 with ST-5 (two tubes) is used.
5. HANDLING AND INSTALLATION
CCM5
SERIES
13
5. HANDLING AND INSTALLATION
5-1 Handling Instructions
The discriminator is connected to the coin changer
via a dedicated connector
and should not be disassembled except for special
cases such as cleaning.
In case the discriminator is to
be disassembled, be sure to
turn off the power of the coin
changer before disassembling.
Do not carry the coin changer
by the harness.
Store the coin changer in a dry
location.
5-2 Identification of Components and their Location
This figure shows the coin changer containing the cassette tube assy US-1 and an optional satellite
tube.
• Monitor Lamp
Blinks when failure occurs.
• Discriminator Latch
• Inventory Switch
Push up to remove the discriminator.
This switch is used to remove
coins from the change tubes.
• Currency Selection Switch
• Discriminator
Located on back side of discriminator.
This is an electronic discriminator
which discriminates US $1, 25¢,
10¢ and 5¢ coins, and Can. coins.
(This discriminator can also be
used for Canadian coins by switching to US/CAN or CAN. ONLY.)
• Satellite Tube
ST-25/ST-5 (optional)
The ST-25 can store approximately 110 25-cent coins and the
ST-5 can store approximately 120
5-cent coins. (See page 8.)
• Drain Spout
Liquid poured in by vandals or by
accident is collected here.
• Cassette Tube ASSY
(US-1)
• Tube Latch
Push down to remove the cassette tube.
• 25¢ Change Tube
(Tube A)
• 5¢ Change Tube
(Tube B)
• 25¢ Change Tube
(Tube E)
• 25¢ Change Tube
(Tube C)
• 10¢ Change Tube
(Tube D)
CCM5
SERIES
14
5-3 Operating Instructions
Set Up Procedure
1. How to Install the Coin Changer in a Vending Machine .....................................................
2. Currency Selection Switch .................................................................................................
3. Loading the Change Tubes ................................................................................................
4. Inventory Panel ..................................................................................................................
5. Coin Accept/Reject Programming Function .......................................................................
6. How to Operate the Simplified Automatic Change Adjusting Function ..............................
7. Removing Coins from the Payout Tubes ...........................................................................
8. Selecting the Change Adjusting Function ..........................................................................
9. Inventory Mode Function ....................................................................................................
10. Vend Test .........................................................................................................................
Page 14
Page 15
Page 15
Page 17
Page 18
Page 19
Page 20
Page 21
Page 22
Page 24
5-3-1 Installation Procedure
(2)
(1)
Disconnec, and remove
the discriminator.
Discriminator
latch
Push up the discriminator latch and tilt the
discriminator forward.
(3)
(5)
Locate the slotted holes in
the coin changer to the
mounts in the vending
machine and tighten it at
the 3 places shown.
(Do not overtighten!)
Coin insert chute
(4)
Connect and install the
discriminator.
(6) Connect the 6 pin plug into the vending machine
socket.
Coin return lever
When coin changer is installed, ensure proper
alignment of coin insert
chute and return lever.
CAUTION: Do not plug or unplug coin changer
with power on.
CCM5
SERIES
15
5-3-2 Currency Selection Switch
The currency select switch on the back of the disciminator has three positions for selecting U.S.
only, U.S. & Canada, or Canada only mode.
U.S. ONLY
U.S. / CAN
CAN. ONLY
U.S. ONLY: For U.S. coins only
U.S./CAN: For both U.S. & Canadian coins
CAN. ONLY: For Canadian coins only
5-3-3 Loading the Change Tubes (In case of US-1)
• Inserting Coins Through the Coin Insert Slots on the Cassette Tube Assy (US-1)
• Loading 25¢ Coins
(Tube A)
• Loading 5¢, 10¢ and 25¢ Coins
5¢ Coin 10¢ Coin 25¢ Coin
U.S. Coin or
Canadian Coin
Insert about 20 coins in each tube.
25¢ Coin
Insert about 20 coins in each tube.
• For satellite tube (optional)
Insert coins (5-cent coins for
the ST-5 or 25-cent coins for
the ST-25) one by one.
25¢ Coin Tube (Tube E)
10¢ Coin Tube (Tube D)
25¢ Coin Tube (Tube C)
5¢ Coin Tube (Tube B)
Notes:
(1) If a coin drops in and stands on end,
correct it.
(2) Be careful not load bent coins.
(3) Be careful to load the correct coin in
each tube.
16
CCM5
SERIES
• Inserting Coins With the Cassette Tube Assy Removed
• For satellite tube (optional)
(1) Remove the cassette tube assy as follows:
First, push up the tube latch,
Press down the tube latch and pull the cassette tube assy totilt the satellite tube towards
ward you to remove it.
you, and remove it. Then
unlatch the rear latch, tilt the
front tube towards you, and
supply the coins (5-cent
coins for the ST-5 or 25cent coins for the ST-25).
Tube Latch
(2) Squeeze the upper two levers to release the lock and open
the rear tube. Replenish as many individual coins into their
respective tubes as required.
(3) Close the rear tube and mount the cassette tube unit back in
place.
Latches
Rear Tube
Front Tube
Notes:
(1) If a coin drops in and stands on end, correct it.
(2) Be careful not load bent coins.
(3) Be careful to load the correct coin in each tube.
* When reinstalling the cassette tube assy, be sure to verify the operations as follows:
Insert at least two coins of each denomination from the vending machine and confirm
that they are stored in the correct tubes. Then press the coin return lever and confirm
that the coins are properly returned.
CCM5
SERIES
17
5-3-4 Inventory Panel
The inventory panel consists of the eight switches and two monitor lamps shown below.
• Tube inventory switches A- E:
• Satellite inventory switch:
• Mode switch:
• Auto switch:
• Monitor L.E.D.:
5 (A ~ E display)
1 (SUT display)
1 (MOD display)
1 (AUT display)
2 (DIS and C/C display)
• Monitor L.E.D. (for displaying status)
The statuses of the discriminator (DIS) and coin changer (C/C) of the coin changer are displayed by the
L.E.D.'s. The L.E.D.'s are also used to set or check various functions.
• Failure Sensing Function
When the coin changer senses a failure, the abnormal condition is notified to the main controller. At the same time,
the L.E.D. on the inventory panel starts flashing.
The monitoring system consists of two L.E.D.'s. One is for monitoring the status of the discriminator (DIS display:
red) and the other is for monitoring the coin changer (C/C display: yellow). The L.E.D.'s flashing whenever a failure
is detected in each section.
Normal condition ......................................... Both L.E.D. lamps are illuminated.
Failure in the discriminator .......................... DIS L.E.D. is flashing (red).
Failure in the coin changer area ................. C/C L.E.D. is flashing (yellow).
• Tube Inventory Switches A ~ E (for collecting coins in the cassette tube assy)
By pressing any one of switches A to E, dispensing of the corresponding tube in the
cassette tube assy is carried out.
The dispensing operation continues until it is stopped by any of the following conditions.
<Conditions for stopping dispensing operation>
1. Operation has been carried out 150 times continuously regardless of the presence
of coins for change. (Automatic Halt)
2. After the change sensing function senses an “Out of Change” status, operation has
been carried out 20 times continuously. (Automatic Halt)
3. Any one of the inventory switches (A ~ E and SAT) is pressed during dispensing
operation. (Manual Halt)
• Satellite Inventory Switch
This inventory switch is for extensive use of the satellite tube.
When one or more satellite tubes are attached, press the switch to dispense coins as
follows (regardless of the condition of the change):
One satellite tube: A is activated / Two satellite tubes: A and B alternately
Note: A and B are the names of the satellite tubes and A is fitted closer to the coin changer.
The dispensing operation continues until it is stopped by any of the following conditions.
<Conditions for stopping dispensing operation>
1. Operation has been carried out 170 times per one tube continuously regardless of the
presence of coins for change. (Automatic Halt)
2. After the change sensing function senses an “Out of Change” status, operation has
been carried out 20 times per one tube continuously. (Automatic Halt)
3. Any one of the inventory switches (A - E and SUT) is pressed again during dispensing
operation. (Manual Halt)
DIS
C/C
A
B
C
D
E
SAT
MOD
AUT
• Mode Switch
Pressing this switch starts the coin type acceptance prohibit setting.
Refer to section 6-5 for how to use this switch.
• Auto Switch
There are two types of options for the Auto Switches as shown below.
1. Deleting Backup Data. (Refer to “Service Manual” for details.)
2. Activating Simplified Automatic Change Adjusting Operation. (Refer to section 6-6 for details.)
18
CCM5
SERIES
5-3-5 Coin Accept/Reject Programming Function
• Coin Accept/Reject procedure
Setting procedure
(1) Press the “MOD” display switch on the inventory
panel for 5 seconds or until “DIS” lamp status
flashing.
STEP 1 (2) After 5 seconds, the “DIS” display monitor lamp
(red) starts flashing rapidly to indicate that the
Accept/Reject mode has been established (Programming mode).
(1) Within 30 seconds, press the inventory switch
corresponding to the type of coin to be specified
for the Accept/Reject function.
STEP 2
Inventory switches and corresponding coin types
A Inventory switch
For setting 5¢ coin
B Inventory switch
For setting 10¢ coin
C Inventory switch
For setting 25¢ coin
D Inventory switch
For setting $1 coin
E Inventory switch
For setting *$2 coin
(2) The type of coin specified by the inventory switch
is set for the Accept/Reject function. Then, the
“DIS” display monitor lamp (red) goes out for 1
second, then starts flashing rapidly again.
“DIS” lamp(red)
Inventory Panel
5 sec. or
longer
C
D
E
SAT
MOD
AUT
Rapid flashing after
about 5 seconds
Inventory Panel
DIS
C/C
A
B
C
D
E
SAT
MOD
AUT
Goes out for 1 second
Flashes rapid again
For about 30 seconds the system remains in the
Accept/Reject standby status.
* If the currency selection switch (refer to section 6-2) is set to “U.S. only”, $2 coins cannot be
specified for this function. Also, if “U.S. only” is selected while $2 coin has been specified for
the Accept/Reject function, the setting of $2 for this function is invalidated.
Operating the return lever or pressing the “MOD” switch for 5 seconds or longer cancels the Accept/Reject
mode and enters standby mode.
Notes: Other than the step above, the Accept/Reject mode ends under any of the following conditions:
(1) No switch is pressed for more than 30 seconds since the Accept/Reject mode was established.
(2) A coin or coins are inserted.
(3) Abnormal condition occurs.
(4) The main controller transmits a command to prohibit acceptance of all types of coins.
• Check for the coin types specified for Accept/Reject function
(1) The “DIS” display monitor lamp (red) flashes rapidly for 2 seconds upon
turning on the power if any coin type has been specified for the accept/
Reject function.
Rapid flashing for 2
seconds
(2) The “DIS” display monitor lamp (red) goes out momentarily (for 0.25
second) when a coin type specified for the Accept/Reject function is
inserted.
Goes out momentarily
• Releasing the Accept/Reject programming
Refer to the “Setting Procedure” above and enter the Accept/Reject mode to cancel the Accept/
Reject Programming.
CCM5
SERIES
19
5-3-6 How to Operate the Simplfied Automatic Change Ajusting Function
This function allows the coin changer to control the change independently of the vending machine controller based on the number of coins initially loaded as the base quantity in each coin
tube (automatically replenished tube) of the cassette tube assy in the coin changer. This function is very convenient when the types of coins are restricted depending on the goods handled
by the vending machine or when the change handled by multiple vending machines needs to
be unified for easier sales control. To take advantage of this function, carefully read the handling instructions and warnings described later.
1. Setting the Base Quantities (the numbers of coins to be loaded initially)
The following steps apply to the changer with the cassette tube assy US-1 mounted. You can follow the same
steps for a changer with cassette tubes other than the US-1 if the auto replenishment function is provided.
(1) Remove the cassette tube assy
from the coin changer and replenish as many coins in each individual coin tubes (B, C and D
tubes) as desired as the base
quantities.
(2) Install the cassette tube assy.
(3) Upon completion of installation,
the coin changer judges each set
quantity as zero regardless of the
actual quantity. Thereafter the
coin changer records the dispensed or inserted coins as decrements or increments from the
base quantity, respectively.
Number of coins to be set as each base quantity (>=20)
This function is not applicable
to the manual replenishment
tubes.
2. Collecting the extra coins
(1) When the coins in the cassette
tube assy exceed the base quantity, press the automatic change
adjustment switch “AUT” for at
least one second. Then the coin
changer pays out the extra coins
to restore the initially set base
quantity.
DIS
C/C
A
B
C
D
E
SAT
MOD
AUT
(2) When the coins in the cassette tube assy become fewer than the base
quantity, remove the cassette tube assy and replenish the shortfall.
* The shortfall quantity is not displayed. Therefore, the levels of
base quantities of individual coin
types should be marked to make it
easier to recognize the shortfall
and replenish coins quicker.
Base quantities
Press for at
least one
second.
Shortfall coins to be replenished
Extra coins to be collected
20
CCM5
SERIES
[Warnings]
* DO NOT collect the coins manually while this function is in operation.
* DO NOT insert coins directly
into the tubes.
The inserted coins will be
held in the tubes without being counted by the unit.
* Each base quantity (the number of coins to be set initially in each coin tube (B, C, D)) should be at least
20 to keep the changer in the “sufficient change” status.
The coin changer’s memory will be cleared when:
(1) The cassette tube assy is removed.
(2) The coin changer’s communication with the vending machine controller is disconnected.
5-3-7 Removing Coins from the Payout Tubes
• When the Cassette Tube Assy is Removed:
(1) Press down the tube latch and
pull the cassette assy unit toward
you to remove it.
(2) If coins remain in the tubes when
removing the cassette tube assy,
use both hands as illustrated.
Tube Latch
(3) To collect the extra coins in the
coin tubes, release the locking
tabs on the rear tube and pull it
open toward you. You can also
collect the extra coins without
opening the rear tube by putting
your fingers into the coin tubes
that contain no extra coins and
turning the cassette tube assy up
side down.
Put your fingers into the coin
tubes having no extra coins.
Cassette Tube Unit
* After removing the cassette tube assy, be sure to verify the operations after reinstalling:
Insert at least two coins of each denomination and confirm that they are
stored in the correct coin tubes. Then press the coin return lever of the
vending machine and confirm that the coins are properly returned.
• When the Automatic Change Adjusting Switch (AUT) is used:
Pressing the automatic change adjusting switch for at least one second activates the automatic change adjusting function and the extra coins are paid out. (Refer to page 19 for detais.)
CCM5
SERIES
21
5-3-8 Selecting the Change Adjusting Function
The CCM5 series has the following functions for adjusting change automatically.
(1) Simplified Automatic Change Adjusting Function
(2) Inventory Mode Function
You can select one of the above functions by setting the display switches on the inventory panel.
The selection is shown on the display switches on the inventory panel.
• Selecting Functions
Setting procedure
(1) Press the “MOD” and “AUT” switches
on the inventory panel at the same
time.
STEP 1
(2) The two monitor lamps (DIS and C/
C) indicate the setting mode.
(1) Press the “MOD” and “AUT” display
switches for at least 5 seconds.
STEP 2
(2) After 5 seconds, the two monitor
lamps (DIS and C/C) indicate the
state of the switched setting.
Monitor lamp
DIS
C/C
A
B
C
D
E
SAT
MOD
AUT
C
D
E
SAT
MOD
AUT
5 sec. or longer
· Simplified Automatic Change Adjusting Function →
switched to Inventory Mode Function
· Inventory Mode Function → switched to Simplified Automatic Change Adjusting Function
Releasing the “MOD” and “AUT” switches enters standby
mode.
Note 1: Other than the step above, the setting mode ends
under any of the following conditions:
(1) The switch is kept pressed for 60 seconds or longer
after switching to the setting mode.
(2) A coin is inserted.
(3) An abnormal condition occurs.
STEP 3
(4) The main controller transmits a command to dispense
coins from the system.
Note 2: If the setting is switched, the data such as the
increment/decrement counter and the number of coins
accommodated in the tubes is initialized and cleared
to zero.
<Indication of setting mode>
For Simplified Automatic Change
Adjusting Function:
DIS: Not lit
C/C: Lit
For Inventory Mode Function:
DIS: Lit
C/C: Not lit
<Indication of switched setting
mode>
For Simplified Automatic
Change Adjusting Function:
DIS: Not lit
C/C: Lit
For Inventory Mode Function:
DIS: Lit
C/C: Not lit
<Returned to standby mode>
DIS: Lit
C/C: Lit
22
CCM5
SERIES
5-3-9 Inventory Mode Function
This function allows the coin changer to control the increment or decrement of the quantity of
change independently of the main controller.
This function is used for:
(1) Setting the number of coins accommodated in the tubes
(2) Dispensing the coins for the increment
(3) Replenishing the coins to compensate for the decrement
(1) Operating Procedure
To control the quantity of change with this function, follow the steps below.
(1) Empty the automatic replenishment tubes and clear the backup data.
(2) Set the number of coins to accommodate in the tubes.
(3) Vending operation
(4) When collecting coins, dispense for increment or replenish for decrement.
Continue with steps (3) and (4) repeatedly.
To change the number of coins accommodated in the tubes, perform step (1) then step (2).
(2) Procedure for Setting the Number of Coins Accommodated in the Tubes
Operation procedure
(1) Press the “AUT” switch on the inventory
panel for 1 second or longer.
STEP 1
(2) After 1 second, the “DIS” and “C/C” display
monitor lamps start flashing alternately to
indicate that Inventory Mode has been set.
Note: Follow the same procedure as above
when setting the dispensing of coins for
increment. If the backup data is not cleared
before the operation, coin dispensing can
be activated.
(1) Press the “MOD” switch on the inventory
panel.
(2) The “DIS” and “C/C” display monitor lamps
flash alternately twice to indicate that the
mode for setting the number of coins accommodated in the tubes has been set.
STEP 2
Monitor lamp
DIS
C/C
A
B
C
D
E
SAT
MOD
AUT
DIS C/C
Alternate flashing
DIS
C/C
A
B
C
D
E
SAT
MOD
AUT
(3) Insert the desired initial quantity of coins in
each coin tube.
Coins can be inserted in each tube until the
tube overflows.
Overflowed coins are returned to the coin exit.
Note: If you press the “AUT” switch during the above operation, the
state returns to that of STEP 1. Pressing the “MOD” switch again
enters the state for STEP 2 to continue the operation.
DIS C/C
Flashing alternately
twice
CCM5
SERIES
Operation procedure
Monitor lamp
Operating the return lever cancels the Inventory Mode and enters
standby mode.
STEP 3
23
DIS C/C
Notes: In addition to the above step, the setting mode ends under
any of the following conditions:
(1) No switch is pressed for 60 seconds since the Inventory
Mode was set.
(2) An abnormal condition occurs.
(3) The main controller transmits a command to dispense coins
from the system.
<Notes>
The data on the number of coins accommodated in the tubes is maintained in the backup data.
When the operation is repeated without clearing the backup data, the newly set number of coins
accommodated is added to the value in the stored data.
Operation
Number of coins accommodated
(1) Clearing the backup data
0
(2) Setting the number of coins accommodated in the tubes (inserting 20 coins)
20
(3) Normal operation (vending)
20
(4) Setting the number of coins accommodated in the tubes (inserting 20 coins)
40 (+ 20)
(3) Dispensing for Increment and Replenishing for Decrement
Operation procedure
STEP 1
(1) Press the “AUT” switch on the inventory
panel for 1 second or longer.
(2) After 1 second, the “DIS” and “C/C” display monitor lamps start flashing alternately to indicate that Inventory Mode
has been set.
Monitor lamp
DIS
C/C
A
B
C
D
E
SAT
MOD
AUT
(3) If there is an increase in the number of
coins against the set value, the increment
is dispensed. Dispensing is not performed
if there is no increment.
Shortfall coins
Extra coins to be collected
DIS C/C
Alternate flashing
24
CCM5
SERIES
Operation procedure
(1) Insert the coins to replenish for the decrement
(for the coin types that were not dispensed).
1)Inserted coins are delivered into the
tubes for replenishment.
2) Overflow coins are returned to the
coin exit.
STEP 2
Monitor lamp
DIS C/C
Alternate flashing
(2) Replenishment is completed when each
type of coin is returned to the coin exit.
Note: If you press the “MOD” switch during the above operation, the
state returns to the mode for setting the number of coins
accommodated in the tubes. Pressing the “AUT” switch again
enters the state for STEP 2 to continue the operation.
Operating the return lever cancels the Inventory Mode and enters
standby mode.
Notes: In addition to the above step, the setting mode ends under
any of the following conditions:
STEP 3
(1) No switch is pressed for 60 seconds since the Inventory
Mode was set.
(2) An abnormal condition occurs.
(3) The main controller transmits a command to dispense coins
from the system.
DIS C/C
5-3-10 Vend Test
(1) Connect the 6-pin plug to the vending machine socket.
(Caution: Do not plug in or unplug coin changer with power on.)
(2) Deposit three types of coins: 5¢, 10¢ and 25¢
• Is the amount indicated correctly on the amount indicator?
• Is the vend lamp on the vending machine turned on? (When the deposited coins reach the
vend price while the products to be vended are loaded in the vending machine)
• Is the coin that is set to be prohibited by the coin changer rejected and returned to the return
slot of the vending machine?
(3) Press the coin return lever of the vending machine.
• Are the deposited coins and returned coins the same?
(4) Deposit 5¢, 10¢ and 25¢ coins such that the total amount exceeds the vend price, then press
the vend button on the vending machine.
• Is the change amount correct?
(Take the product out of the vending machine.)
Perform the above steps to confirm that the system is ready for vending.
If an abnormality occurs during testing, read this manual again and identify the cause.
CCM5
SERIES
25
6. CONSTRUCTION AND DESCRIPTION
6-1 Description of Parts
• Discriminator Section
Gate Lever
Monitor Lamps
Funnel
DIS
Gate Assy
Inventory Switches
Automatic Change Adjusting Switch
Main Plate Coil Assy
CREM Lever
Coin Channel Cover
Separator Lever
Overflow Lever
Slug Cover
Currency Mode Select Switch
Rear Cover
Control Board
CREM Lever Arm
Separator Solenoid
Separator Lever Arm
26
CCM5
SERIES
• Coin Changer
Discriminator Latch
Discriminator
Drain Spout
Housing
Tube Latch
Cassette Tube Assy
(*US-1 Cassette Shown)
Bottom Cover Assy
Control Board Assy
Tube-full Lever
Tube-full Detector
Switch
(Interruptor Switch)
Cassette Switch
Board Assy
Center Cover Assy
Gear Base Assy
Empty Switch Assy
Payout Link Assy
Bottom Cover Assy
CCM5
SERIES
27
6-2 Flow of Coins
6-2-1 US-1 Cassette
• The front sensor evaluates each inserted coin, if judged genuine, the CREM solenoid operates and
coins are routed past the credit sensor to the tubes.
• Canadian $2 coins are always routed to the cash box.
• Defective coins or slugs are returned, either automatically or by operating the return lever.
• For sensing the number of coins, there is an interrupter switch with a lever at the top section of each
automatic coin replenishment tube, along with the coin counter in the software. Based on these two
sensing methods, the coin tube full status is sensed.
If either of the two sensing methods detects the full status and a coin of the particular type which has
been sensed as full is inserted, it will be delivered to the cash box by the separator solenoid.
U.S. coins
Canadian coins
Discriminator
Front Sensor
Pass
Sensor
CREM Solenoid
Separator Solenoid
Interrupter Switch
Empty
Switch
Lever
Lever
Lever
Empty
Switch
Empty
Switch
Empty
Switch
Empty
Switch
Payout Mechanism
Return
Payout
Cashbox
28
CCM5
SERIES
6-2-2 US-2 Cassette
• The front sensor evaluates each inserted coin, if judged genuine, the CREM solenoid operates and
coins are routed past the credit sensor to the tubes.
• Canadian $2 coins are always routed to the cash box.
• Defective coins or slugs are returned, either automatically or by operating the return lever.
• For sensing the number of coins, there is an interrupter switch with a lever at the top section of each
automatic coin replenishment tube, along with the coin counter in the software. Based on these two
sensing methods, the coin tube full status is sensed.
If either of the two sensing methods detects the full status and a coin of the particular type which has
been sensed as full is inserted, it will be delivered to the cash box by the separator solenoid.
U.S. coins
Canadian coins
Discriminator
Front Sensor
Credit
Sensor
CREM Solenoid
Separator Solenoid
Interrupter Switch
Empty
Switch
Lever
Lever
Lever
Empty
Switch
Empty
Switch
Empty
Switch
Empty
Switch
Payout Mechanism
Return
Payout
Cashbox
CCM5
SERIES
29
6-2-3 US-4 Cassette
• The front sensor evaluates each inserted coin, if judged genuine, the CREM solenoid operates and
coins are routed past the credit sensor to the tubes.
• Canadian $2 coins are always routed to the cash box.
• Defective coins or slugs are returned, either automatically or by operating the return lever.
• For sensing the number of coins, there is an interrupter switch with a lever at the top section of each
automatic coin replenishment tube, along with the coin counter in the software. Based on these two
sensing methods, the coin tube full status is sensed.
If either of the two sensing methods detects the full status and a coin of the particular type which has
been sensed as full is inserted, it will be delivered to the cash box by the separator solenoid.
U.S. coins
Canadian coins
Discriminator
Front Sensor
Credit
Sensor
CREM Solenoid
Separator Solenoid
Interrupter Switch
Lever
Lever
Lever
Lever
Empty
Switch
Empty
Switch
Empty
Switch
Empty
Switch
Empty
Switch
Payout Mechanism
Return
Payout
Cashbox
30
CCM5
SERIES
6-2-4 US-5 Cassette
• The front sensor evaluates each inserted coin, if judged genuine, the CREM solenoid operates and
coins are routed past the credit sensor to the tubes.
• Canadian $2 coins are always routed to the cash box.
• Defective coins or slugs are returned, either automatically or by operating the return lever.
• For sensing the number of coins, there is an interrupter switch with a lever at the top section of each
automatic coin replenishment tube, along with the coin counter in the software. Based on these two
sensing methods, the coin tube full status is sensed.
If either of the two sensing methods detects the full status and a coin of the particular type which has
been sensed as full is inserted, it will be delivered to the cash box by the separator solenoid.
U.S. coins
Canadian coins
Discriminator
Front Sensor
Credit
Sensor
CREM Solenoid
Separator Solenoid
Interrupter Switch
Empty
Switch
Lever
Lever
Lever
Empty
Switch
Empty
Switch
Empty
Switch
Empty
Switch
Payout Mechanism
Return
Payout
Cashbox
CCM5
SERIES
31
6-3 Discrimination Method
6-3-1 Discrimination by Metal Content and External Shape (Diameter)
Front Sensor
When coins pass between the front sensors, the metal content and diameter of
the coins are checked and compared with
the preset reference values of the control
board.
A coin is judged to be genuine only when
these values match.
6-3-2 CREM Solenoid and CREM Lever
If a coin is judged to be genuine, the
CREM solenoid operates, the CREM lever opens and the coin is received. If a
coin is judged to be bad (defective), the
CREM lever remains closed and the coin
is guided to the return chute.
CREM Lever
32
CCM5
SERIES
6-3-3 Separator Solenoid and Lever
• Separating $1, $2 and 10¢ coins from 5¢ When inserted coins are $1, $2 or 10¢ coins or
and 25¢ coins (or coins to be stored in the when they are to be sent to the cash box, the coin
separator solenoid 1 is activated to open the coin
cash box)
separator lever 1, and the coins are sent to the
cash box. When inserting 5¢ or 25¢ coins, the coin
separator lever 1 is kept closed and the coins are
delivered to the 5¢/25¢ coin channel.
Coin Separator Lever 1
5¢ and 25¢ Coins
$2, $1 and 10¢ Coins
(Cash Box)
• Separating the coins to be delivered to the When coins are to be delivered to the 5¢/25¢ coin
5¢/25¢ coin channel from the coins to be channel, the coin separator solenoid 2 is activated
stored in the cash box
to close the coin separator lever 2 and allows the
coins to be delivered to the 5¢/25¢ coin channel.
When coins are to be stored in the cash box, the
overflow lever is opened to drop the coins into the
cash box channel.
Overflow Lever
Coin Separator Lever 2
5¢ and 25¢ Coins
(Cash Box)
• Separating 5¢ coins from 25¢ coins
For 5¢ coins, the coin separator solenoid 3 is
activated to open the coin separator lever 3 to
deliver the coins to the 5¢ channel. This lever is
closed for 25¢ coins to deliver them to the 25¢
channel.
Coin Separator Lever 3
5¢ Coin
25¢ Coin
CCM5
SERIES
33
6-4 Operation of Switches, Sensors, and Related Parts
6-4-1 Gate Lever Assembly and Related Parts
Return
When the return lever on the vending
machine is operated, it pushes the gate
lever down and the gate opens.
If there are any defective coins, etc.
stopped behind the gate, this operation
causes them to be guided into the coin
return chute. In addition, the movement
of the front sensor causes the cancel
signal to be sent. (escrow)
Gate Lever
Gate Assy
6-4-2 Anti-Stringing Hook
The hook of the housing prevents stringing!
Front Lever
6-4-3 Credit Sensor
When a coin is determined to be genuine
by the front sensor, it will be guided past
the credit sensor and its value will be
accumulated in the memory of the control board.
Credit Sensor
34
CCM5
SERIES
6-4-4 Tube-full Detector Switches and Levers
When each coin tube (automatic coin replenishment tube) for 5¢, 10¢, 25¢ or $1
becomes full, the associated tube-full
lever is lifted to activate the respective
tube-full switch and thus inform the tubefull status. In this case, the overflowed
coins are separated and routed to the
cash box.
Cash Box Channel
Tube-full Detector Switch
Tube-full Lever
Coin Change Tube
6-4-5 Empty Switches (Proximity Switch)
This sensor detects the presence of coins
in the change tube.
The coin changer will determine the tubes
to be empty when the coins are below the
sensor levels.
5¢ coin change tube: 4 coins
10¢ coin change tube: 9 coins
25¢ coin change tube: 6 coins
Empty switch
Front Side
Detecting
Position
Empty Switch Ass’y
6-4-6 Cassette Assy Detector Switch
Cassette Tube Assy Detector Switch
Sufficient Change
Out of Change
6-4-7 Inventory Switches and Simplfied
Automatic Change Ajusting Switch
Cassette Tube Assy
1. This switch detects whether the cassette
tube assembly is installed correctly.
2. This switch also detects which cassette has
been installed.
DIS
C/C
A
B
C
D
E
SAT
MOD
AUT
Tube inventory switches:
These switches are used to manually
collect the extra coins in the tubes.
Automatic Change Adjusting Switch:
This switch is used to automatically
collect the extra coins in the tubes.
CCM5
SERIES
35
6-5 Payout System
6-5-1 Payout Diagram
When the rotation of the motor is transmitted to the gear, payout cam and payout link assembly, the payout link assembly reciprocates back and forth. This motion is also transmitted to
the change slide and the payout wiper.
The change solenoids activate the change levers to control the motions of the change slides.
Coins are carried by the payout link assembly and drop down when the change slides are
activated. The dropped coins are paid out by the payout wiper.
Motor
Change Solenoid
Assy
Change Lever
Gear Base Assy
Empty Switch Assy
Change Slide
Payout Cam
Payout Link Assy
Wiper
Payout Slide
Bottom Cover
6-5-2 Operation of the Change Solenoids and Payout System
Change solenoids are provided for each coin tube, and the solenoids are activated to dispense coins from the associated coin tube.
36
CCM5
SERIES
6-5-3 Payout of Change
• Standby status:
• Payout from the “C” tube:
Tube “C” Change Lever
Tube “C” Change Slide
Payout Link Assy
Wiper
Payout Cam
Payout Slide
Payout Coin
* Operation of the payout wiper
Coins are paid out by the payout wiper interlocked with the payout link assembly.
(1) Coins in tube A: The change solenoids for tube A are activated to move the associated change
lever. The payout link assembly is activated to move the change slide. The
coin carried by the payout link assembly drops down and is dispensed by the
payout wiper. Then all the relevant parts return to the standby status.
(2) Coins in tube B: Operations are the same as (1) except that the change solenoids for tube B
are activated.
(3) Coins in tube C: Operations are the same as (1) except that the change solenoids for tube C
are activated.
(4) Coins in tube D: Operations are the same as (1) except that the change solenoids for tube D
are activated.
(5) Coins in tube E: Operations are the same as (1) except that the change solenoids for tube E
are activated.
CCM5
SERIES
37
7. SIGNAL CONDITIONS and WIRING DIAGRAM
7-1 Terminal Connections/ Signals
(1) 6P Connector
Terminal No.
1
2
3
4
5
6
Signal Name
Power Supply
Power Supply
N. C.
Main Control Reception
Main Control Transmission
Common Communications
Receptacle housing: Molex 5557-06R
Socket terminal:
Molex 5556PBT
Input/Output
Signal Conditions
Input
+ DC 34V (usually supplied)
Input
– DC 34V (usually supplied)
Output
Input
Input
Transmission Data Output Signal.
Reception Data Input Signal.
Common Transmission Line.
Note: Input/Output is relative to the Coin Changer.
(2) Input/Output Circuits
1. Input circuit
6P Connector
R1: 270 Ω, 1/4W
R2: 270 Ω, 1/4W
PC2: Equivalent to Sharp PC702V13
D1: Equivalent to NEC 1S953
C1: Equivalent to Murata GRM40CH, 2200pF, 50 V
2. Output circuit
6P Connector
PC1: Equivalent to Sharp PC-702V13
D1: Equivalent to NEC 1S953
R1: 470 ohm, 1/10W
38
CCM5
SERIES
7-2 Wiring Diagram
CCM5
SERIES
39
8. PREVENTIVE MAINTENANCE
The coin changer can become dirty from coins, dust, foreign matter, etc. therefore, good coin
acceptance cannot be maintained.
Use mild soap water to remove sticky matter, syrup, etc. NEVER USE SOLVENTS!
• Preparing to clean the discriminator (Be sure to turn off the power to the coin changer before cleaning.)
• Removal the discriminator
(1) Push up the latch
and pull the discriminator towards
you.
(2) Disconnect, and remove the discriminator.
Discriminator
• Cleaning: Keep shaded area clean.
Open the gate assy, wipe clean the coin channel
section using a soft cloth.
CAUTION:
Do not connect or disconnect coin changer
with power on.
Gate Assy
• Removal the slug cover and the coin channel cover
(1) Press the unlatch handle on the slug cover with your thumb
and pull the cover open towards you.
(2) Pull the slug cover up to detach it from the main plate.
Slug Cover
• Cleaning the coin channels
After removing the slug cover and the coin
channel covers, wipe clean the main plate
and the coin channel covers 1 and 2. In
particular, thoroughly clean the shaded part
in the figure.
Note:
When wiping, be careful not to touch the
levers or springs on the main plate.
Unlatch
Handle
Latch
(3) Press the latch handle on the coin channel cover 1 with your
thumb and pull towards you.
Latches
Main Plate
Latch
Levers
Coin channel cover 1
(4) Slide the coin channel cover 2 upward, release the lower
latch, and pull the cover up toward you to detach it.
Slide the cover upward.
Pull up the bottom of the cover.
Coin channel cover 1
Coin channel cover 2
* Install in reversed order.
Note:
• If stubborn dirt persists, use a cloth that
has been wetted and wrung tightly.
• Never use benzene, thinner or other
volatile liquids.
40
CCM5
SERIES
• Cleaning the payout section of the coin changer
(1) Remove the cassette tube before cleaning. First press (2) Wipe clean the coin dispensing section (the bottom
down the tube latch, tilt the cassette tube towards you
cover and the payout link assembly that are shaded in
and remove it. Use both hands to hold the cassette
this figure) using a soft cloth.
tube which may be heavy with stored coins.
• Cleaning the coin dispensing section
Cassette Tube
Tube latch
(3) Remove the payout slide from the cassette tube and clean the slide with a damp cloth.
• Cleaning the payout slide
Cassette tube
Payout Slide
Caution!
If you find any deformation or damage
to the payout slide, replace it.
Deformation
• Cleaning the payout link assy
(1) Squeeze the latch on the bottom base between two
fingers and pull the assy toward you to remove it.
(2) Clean the payout wiper, the payout link assy and
the bottom base.
Damage
Wiper
Bottom Cover Assy
Payout Link Assy
[Warning]
For usual cleaning, DO NOT remove the payout link assy
or payout wiper. If they are very dirty and need to be removed for cleaning, be sure to install them back correctly
after cleaning. If incorrectly installed the payout operation will fail.
* After cleaning, insert coins in individual denominations in the normal operation status
and confirm proper payout functions.
CCM5
SERIES
41
9. DISASSEMBLY AND ASSEMBLY PROCEDURE
Remove the coin changer in the order written, install in reverse order.
9-1 Disassembly and Assembly of the Main Body of the Coin Changer
PRIOR TO ANY SERVICE ALWAYS TURN POWER OFF TO THE VENDOR!
1. Discriminator
Removal:
Discriminator
1. Push the latch up.
2. Pull the discriminator toward you.
3. Disconnect the discriminator connector.
4. Remove the discriminator from the housing.
Connector
Installation:
In reverse order.
Figure 1
2. Cassette Tube Assembly
Cassette Tube assy
Removal:
1. Press the cassette latch down.
2. Pull the cassette tube assy toward you.
Installation:
Engage the concave portions of the cassette
tube assy with the convex portions of the bottom cover assembly and push the unit until it
engages with a click.
Concave and Convex Portions
Figure 2
3. Bottom Cover Assy
Base Latch
Removal:
1. Squeeze the base latch between two fingers
and open the bottom cover assy toward you.
2. Lift the bottom cover assy up a little and pull
it out toward you.
Bottom Cover Assy
Figure 3
42
CCM5
SERIES
4. Base Latch and Bottom Cover Shaft
Bottom cover shaft 1
Base latch
Removal:
Latch
1. Release the latch that fixes the base latch.
2. Pull the base latch up toward you to detach
it.
3. Pull the bottom cover shafts 1 and 2 out from
both sides.
Slots
Installation
Engage the concave portions of the base latch
with the slots on the bottom cover shafts 1 and
2 as illustrated.
5. Payout Link Assy, Wiper, Change
Slide and Change Lever
Bottom cover shaft 2
Figure 4
Disassembly:
Removal:
1. Pull the payout link assy out toward you from
the bottom of the gear base assy.
2. The wiper and change slides 1, 2 and 3 can
be removed for cleaning.
Note: Unless very dirty, DO NOT remove
these parts.
Change Slide 2
Change Slide 1
Payout Link Assy
Remove as complete assembly
Change Slide 3
Wiper
Installation:
Assembly:
Push the payout link assy into the gear base
assy until it is firmly installed.
Note: Be sure to set the payout link assy,
change slides and wiper to the
standby status as illustrated.
Install each part in its
correct place.
Figure 5
6. Payout Cam
Removal:
Payout Cams
1. Pull the payout cams out.
Installation:
Set the payout cams at the standby positions
as illustrated.
Note: After any service to the payout area
always check the payout of each
tube!
FRONT
Standby positions
Figure 6
CCM5
SERIES
7. Center Cover Assy
Removal:
1. Hold the center cover assy with your left
hand, press section A with your thumb from
inside to allow the right side panel to unlatch from the housing (five latches).
2. Pull the center cover up and release the latch
at section B (four latches) left side panel.
3. Guide the flat ribbon connector through the
slot.
43
A and B Sections (Enlarged)
Open to the Outside.
Flat Connector
A Section
B Section
Center Cover Ass’y
Note: Be careful not to damage the latches
on sections A and B.
Side Panel
Connect the flat
ribbon connector
through the slot.
Installation:
1. Guide the flat ribbon connector through the
slot.
2. Engage the four left latches first and then
the five right latches.
Latches
Note: Be sure that the latches on sections
A and B are firmly engaged.
L
R
Figure 7
8. Tube-full Lever
Removal:
1. Pull the tube lever shaft out.
2. Then release the three tube-full levers.
Tube-full Lever 2
Tube Lever Shaft
Installation:
Be sure the shaft is aligned properly. Insert the
tube lever shaft until it is firmly locked. (See
the figure.)
Tube-full Lever 3
Slot
• Tube-full lever 1
Removal:
1. Release the latch.
Latch
Tube-full Lever 1
Figure 8
44
CCM5
SERIES
9. Gear Base Assy
Disassembly:
Connectors
Removal:
1. Unplug the three connectors.
2. Remove the cross-headed (flat head) screws
M3x8(2) “(A)”.
3. Release the latch on the rear panel and detach the assembly.
Gear Base Assy
(A)
(A)
Release the Lacht
Lacht
Assembly:
Installation:
1. Engage the lacht on the rear panel.
2. Plug in connectors and guide the harness
back in place. (See the Figure 9.)
Note:
The harness should be guided very carefully in the exact same way as before the
removal. To ensure this, be sure to memorize how the harness is set before removal.
If improperly set, it may cause abnormal
stress and damage to parts.
Install the harness properly in
place.
Figure 9
CCM5
SERIES
10. Change Lever and Change Solenoid
45
Disassembly:
Removal:
Harness
1. Cut the harness tie wrap on the back of the
gear base assy.
2. Remove two M3x8 screws.
3. Remove the harness. Before removal,
memorize how the harness is set so that
you can properly reinstall it later.
4. Detach the change solenoids and the change
levers.
Change Solenoids
Ta p - t i g h t e n i n g
Screw with Washer
Note:
When you detach the change solenoids, the
associated change levers, plungers, and
springs are also removed. Keep them together.
Do not mix them up!
Plungers
Change Lever 2
Change Lever 1
Click!
Harness Tie Wrap
Gear Base Assy
Assembly:
Installation:
1. Insert the plungers of the change solenoids
into the slots of the change levers. (See the
figure.)
2. Install the harness properly in place as it was
before removal. (See the Figure 10.)
Guide the harness in place.
Change Solenoids
Spring
Change Levers
Plunger
Figure 10
46
CCM5
SERIES
11. Empty Switch Assy
Removal:
1. Remove the harness. Before removal,
memorize how the harness is guided so that
you can properly reinstall it later.
2. Release the right and left latches and pull
the empty switch assy out.
Latches
Empty Switch Assy
Installation:
1. Install the harness properly in the same place
as before removal.
2. Bundle the harness and fasten it with the tie
wrap.
Fasten the harness with the
tie wrap.
Guide the harness in
place.
Figure 11
12. Carrier Switch Assy
Removal:
1. Release latch 1 and latch 2.
2. Remove the carrier switch.
Carrier switch
Latch 2
Latch 1
Figure 12
CCM5
SERIES
13. Power Supply Harness Assy
Power Supply Harness Assy
Removal:
1. Cut the harness tie wrap from the power supply harness assy.
2. Disconnect the connector from the board.
3. Release the right and left latches on the harness guide and remove the power supply
harness assy together with the connector.
47
Cut the Harness Tie Wrap.
Harness
Guide
Strain Relief Post
Connector
Installation:
1. Mount the power supply harness assy back
in place, and fasten the harness with the tie
wrap as illustrated.
Note:
Make sure the harness guide latches back
into place
Fasten with the Tie Wrap.
Figure 13
14. Relay Board Assy
Relay board Assy
Removal:
1. Disconnect all harnesses.
2. Release the four latches on the housing and
remove the board.
Latches
Latches
Figure 14
48
CCM5
SERIES
15. Cassette Switch Board Assy
Disassembly:
Removal:
Connector
1. Remove the harness.
2. Release the two left latches on the switch
board assy.
3. Release the two right latches on the switch
board assy.
Left Latches
Installation:
Assembly:
Guide the harness in place.
1. Guide the harness in place. (See the Figure
15.)
Figure 15
16. Discriminator Latch
Removal:
1. Release the lock and open the latch to the
outside.
2. Push the latch down.
3. Twist the latch to the outside.
Open to the outside.
Push down.
Twist to the outside.
Unlock.
Figure 16
CCM5
SERIES
49
9-2 Disassembly and Assembly of the Cassette Tube Assy
1. Payout Slide
1. Pull the payout slide out.
Payout Slide
Figure 1
2. Tube Cover
Removal:
1. Release the two right latches.
2. Release the upper left latch.
3. Release the lower left latch.
Tube Cover
Latch
Note:
The left latch is engaged very firmly, you
may need extra force to unlatch.
Flat-head Screwdriver
Installation:
Engage the two left latches first, then the two
right latches.
Figure 2
3. Latch (R), (L)
Removal:
1. Release the latch (L).
2. Release the latch (R).
Latch (L)
Latch (R)
Installation:
Engage the latch (R) before the latch (L).
Figure 3
50
CCM5
SERIES
4. Rear Tube
Upper Levers
Removal:
1. Squeeze the upper levers between two fingers and pull the rear tube toward you.
2. Release the left and right hooks.
Installation:
Engage the left and right hooks on the bottom
first.
Then close the rear tube.
Rear Tube
Lower Hooks
Figure 4
5. Select Lever (1)
Removal:
1. Remove one tapping screw M3x5.
Coin Select Lever 1
Figure 5
6. Coin Base
Removal:
1. Remove three tapping screw M3x8.
Coin Base
Figure 6
CCM5
SERIES
51
9-3 Disassembly and Assembly of the Discriminator
1. Slug Cover
Slug Cover
Removal:
1. Press the unlatch handle on the slug cover
with your thumb and pull the cover open toward you.
2. Pull the slug cover up to detach it.
Unlatch
Handle
Latch
Installation:
Align the slug cover shaft on the right with the
notch on the main plate and push in the cover
until the latch engages with a click. Then close
the cover.
Slug Cover Shaft
Figure 1
2. Coin Channel Cover (1)
Removal:
Press the unlatch handle on the coin channel
cover (1) with your thumb and pull open the
cover toward you.
Latches
Installation:
Align the latches on the right with the slots on
the main plate and push the cover in until the
latch engages with a click.
Latch
Coin Channel Cover (1)
Figure 2
3. Coin Channel Cover (2)
Removal:
Disassembly:
Slide upward.
Pull the bottom up.
1. Slide the coin channel cover (2) upward and
release the lower latch.
2. Pull the bottom of the cover up to detach the
cover.
Coin Channel Cover (2)
Installation:
1. Engage the upper latches.
2. Slide the coin channel cover (2) down to lock
it in place.
Assembly:
Engage with the upper latches.
Slide the cover down.
Coin Channel Cover (2)
Figure 3
52
CCM5
SERIES
4. Rear Cover
Rear Cover
Removal:
1. Press the unlatch handles on both sides of
the middle part of the rear cover.
2. Pull the cover toward you to detach it.
Latches to be engaged
Installation:
1. Hold the cover by the unlatch handles and
push it back in place.
2. Confirm that all the latches are firmly engaged.
Figure 4
5. Control Board Assy
Control Board Assy
Removal:
1. Release the left latch and then the two right
latches.
2. Lift the control board assy up a little to disconnect
the three connectors and the ribbon cable.
Latches
Installation:
When connecting the connectors to the control
board assy, insert the ribbon cable coming out of
the gate assy into the terminal on the board. Be
careful not to bend or twist the cable.
Ribbon Cable
Figure 5
6. Gate Assy
Removal:
Gate Spring
Press here to unlatch
the spring.
1. Unlatch the gate spring using a flat-head
screwdriver.
2. Detach the gate assy.
Note:
Take special care not to cut or twist the ribbon cable.
Gate Assy
Installation:
1. Pass the connector and the ribbon cable
through their slots on the main plate.
2. Latch the gate spring onto the main plate
using a flat-head screwdriver.
3. Push hard on the right side of the gate
against the spring.
Note:
Handle the gate spring with care as the
spring is strong.
Take special care not to damage the guide
on the left side of the gate assy.
Guide
Connector Slot
Ribbon Cable Slot
Push hard.
Figure 6
CCM5
SERIES
53
7. Gate Cover
Removal:
Gate Cover
Latch A
1. Release latch A using a flat-head screwdriver.
2. Pull up the left side of the gate cover and
release latch B.
3. Detach the cover.
Latch B
Installation:
1. Engage latch B.
2. Engage latch A.
Figure 7
8. Gate Spring and Gate Pin
Removal:
Pull the gate pin out to detach the gate spring.
Installation:
When installing, handle the gate spring with
care the spring is strong.
Gate Spring
Gate Pin
Figure 8
9. Front Lever
Removal:
1. Release the latches on both sides.
2. Pull the lever out toward you to detach it.
Front Lever
Figure 9
10. Gate Rail
Removal:
1. Release the latch.
2. Pull the rail out.
Gate Rail
Latch
Figure 10
54
CCM5
SERIES
11. Funnel Guide
Removal:
1. Remove the (flat-head) screw M3x0.5x4(1).
2. Pull the funnel guide out.
Funnel Guide
Figure 11
12. Gate Lever, Gate Lever Roller and
Gate Lever Spring
Gate Lever Spring
Gate Lever
Removal:
1. Unlatch the spring using a screwdriver.
2. Detach the gate lever assy from the main
plate.
Gate Lever Roller
Longer side
Latch for the gate lever
spring
Installation:
Mount the gate lever assy back in place.
Be sure the gate lever spring is aligned properly.
13. CREM Lever
Figure 12
Disassembly:
Removal:
1. Release the left latch and then the right latch
of the CREM lever arm.
2. Pull the CREM lever up.
Left Latch
CREM Lever
Right Latch
CREM Lever Arm
Assembly:
Installation:
Insert the shaft of the CREM lever into the right
and then left slots on the main plate.
Insert the shaft into
the slot.
Note:
Confirm that the right and left latches of the
CREM lever are firmly engaged with the
slots of the CREM lever arm.
Confirm that the latches are firmly engaged.
Figure 13
CCM5
SERIES
14. Separator Lever (2)
Disassembly:
Removal:
55
Separator lever (2)
1. Slide the separator lever (2) upward.
2. Unlatch the lower shaft.
3. Pull the lever out.
Shaft
Assembly:
Installation:
Align the latch with the slot.
Be sure to align the latch of the separator lever (2) with the slot of the separator lever arm
(2).
Separator Lever Arm (2)
Figure 14
15. Overflow Lever
Disassembly:
Removal:
1. Release the right latch on the main plate.
2. Pull the overflow lever out.
Release the latch.
Overflow Lever
Assembly:
Installation:
Be sure to engage the latch of the overflow lever with the slot of the separator lever arm (2).
Separator Lever Arm (2)
Align the latch with the slot.
Figure 15
56
CCM5
SERIES
16. Separator Solenoid Assy
Separator Solenoid Assy
Removal:
1. Release the four latches.
2. Slowly pull the separator solenoid assy out.
Note:
Be sure to pull the assembly slowly so that
the parts of the assembly will not be removed.
Installation:
1. Align the plunger shaft of each lever into the
solenoid.
2. Lock the shaft in place with the four latches.
Latches (four latches)
Note:
If the plunger position is diverted from the
solenoid slot, adjust the plunger position
using the screwdriver so that the plunger
fits into the solenoid slot.
NEVER forcibly push the plunger into the
slot, or you might damage the solenoid levers.
Plunger
Figure 16
17. CREM Lever Arm
Removal:
Pull the CREM lever arm out.
The spring will pop up.
CREM Lever Arm
Figure 17
CCM5
SERIES
18. Separator Lever (1)
Removal:
Pull the separator lever (1) out.
57
The spring will pop up.
Separator Lever (1)
Figure 18
19. Separator Lever Arm (2)
The spring will pop up.
Removal:
Pull the separator lever arm (2) out.
Separator Lever Arm (2)
Figure 19
20. Separator Lever (3)
Removal:
The spring will pop up.
Pull the separator lever (3) out.
Separator Lever (3)
Figure 20
NIPPON CONLUX C ,LTD
SERIAL NO
MODEL NO
0.59
MADE IN JAPAN
D C 34V
0.31
Coin Slot
Model Name Plate
0.83
1.37
A
25 ¢
1.28
1.63
2.53
5.43
C
25 ¢
Cashchute Outlet
B
5¢
1.42
(Waite state) 2.11
AUT
MOD
E
25 ¢
1.27
Change Coin Outlet
D
10 ¢
B
D
SAT
C
E
C/C
A
DIS
Coin Return Roller
*(Note-3)
1 58
(Operating state) 2.48
0.56
0.59
3
Bar code of SERIAL NO
Version No
(Non, A, B, C, •••••)
Bar code of MODEL NO
14
1.16
Model Plate
3-0.01
0.06
MADE IN JAPAN
D C 34V
3-ø 43
3-R0.10 ±0.008
Bar code of SERIAL NO
Version No
(Non, A, B, C, •••••)
Bar code of MODEL NO
0.01 Convex
6-R0.33
1.56
D C 8V D C 24V
MADE IN JAPAN
NIPPON CONLUX C ,LTD
SERIAL NO
MODEL NO
(For CCX5G-*)
Model Plate
2.69 ±0.02
Models
CCX5G-1
CCX5G-2
CCX5G-4
CCX5G-5
Cassette tubes
US-1
US-2
US-4
US-5
Models
CCM5*-1
CCM5*-2
CCM5*-4
CCM5*-5
Table 1
6P Recectacel housing 5557-06R
Teminal 5556PBT
Molex 6P Connetor
14.57 +1.97
0
(For CCX5G-*)
8P Recectacel housing XLR- 8V (white)
Teminal SYM- 1T-
8P Connetor
US-1
US-2
US-4
US-5
Cassette tubes
4 in unless otherwise specified
3 Cassette tube unit to be used differs with the models (see Table 1)
2 Dimensional tolerance is ±
1 This drawing shows the coin changer with the cassette tube US-1 installed
Notes:
(For CCM5*-1, CCM5*-2, CCM5*-4, CCM5*-5)
Manufacturing No : 5 digits
Line: 1 digit ( ~9, A~Z)
Month of manufacture: 1 digit (January - September are represented by 1-9 and
October, November, and December are represented by X, Y, and Z respectively )
Year of manufacture: 2 digits (The lower two digits of the year)
SERIAL NO
NIPPON CONLUX C ,LTD
SERIAL NO
MODEL NO
(For CCM5*-1, CCM5*-2, CCM5*-4, CCM5*-5)
3.23
2.95
1 94
3- 24
(3-0.01)
Returned Coin Outlet
9.84
0.76
4.5 ±0.02
1.55
1 13
1.03
1.84
0.50
0.31
0.10
+1 9
14 5
58
CCM5
SERIES
10. EXTERNAL VIEW AND DIMENSIONS
MEMO
CCM5
SERIES
59
60
CCM5
SERIES
11. PARTS DIAGRAM AND PARTS LIST
11-1 Discriminator (CCM5GD, CCM5D)
12
2-1-1
3
2-1-3
22
2-1-5
2-1-4
2-1-2
20
2-1
2-4
2-3
23
1-6
1-4
2-2
1-6
2-5
2
1-3
1-5
21
15
17
1
16
1-1-2
1-2
1-1
26
25
1-1-1
13
1-1-3
18
10
24
5
6
19
4
14
9
11
8
7
CCM5
SERIES
INDEX
NO.
0
1
1-1
1-1-1
1-1-2
1-1-3
1-2
1-3
1-4
1-5
1-6
1-7
2
2-1
2-1-1
2-1-2
2-1-3
2-1-4
2-1-5
2-1-6
2-2
2-3
2-4
2-5
3
4
5
6
7
8
9
10
11
12
13
14
15
16
17
18
19
20
21
22
23
24
25
26
61
PART NO.
CCM5GD
CCM5D
Parts No.(10 digits)
DrawNo.
Parts No.(10 digits)
DrawNo.
0000384020
6F22008020
6511008021
6511108020
6154108020
6511108070
6GX0108030
6310008020
6300008020
6311108040
6331108010
6311108050
6911108011
66X0108245
6C42108050
6G41108011
6G41108021
6G41108030
6G41108040
6G41108050
6G31108010
6G31108020
6511208021
6G51108011
6G51108020
6C21108020
6C21108010
3814010980
3913950240
3912950460
3913940040
3821030720
3911920070
6111108000
4611400020
3814010110
3212030410
384002
384107
384429
384423
384428
384203
384108
384109
384426
384415
384503
384405
384406
384407
384408
384409
384410
384411
384427
384413
384414
384422
384421
384501
384510
384505
384511
384507
384508
384509
384706
367511
902003
0000384010
6F22008010
6511008011
6511108010
6154108010
←
←
6310008010
6300008010
6311108030
←
←
←
←
6C42108060
←
←
←
←
←
←
←
6511208011
←
←
←
←
←
3913950230
←
3913940030
←
←
←
←
←
←
384001
384103
384419
384401
384417
←
384104
384105
384404
←
←
←
←
←
←
←
←
←
384412
←
←
←
←
384504
←
384506
←
←
←
←
←
←
DESCRIPTION
QTY
Discriminator
Main Plate Coil Assy
Main Plate Cover Assy
Main Plate
Main Plate Cover
Mounting Stud Piece
Rear Coil Board Assy
Coil (6) Assy
Coil (M) Assy
Coil (N) Assy
Coil (10) Assy
Coil (12) Assy
Gate Assy
Gate Coil Assy
Gate
Front Coil Harness Assy
Coil Board
Coil (6) Assy
Coil (9) Assy
Coil (12) Assy
Gate Cover
Front Lever
Gate Rail
Inventory Switch
Control Board Assy(2)
Slug Cover
CREM Lever
Separator Lever (1)
Separator Lever (2)
Separator Lever (3)
Overflow Lever
CREM Lever Arm
Separator Lever Arm (2)
Rear Cover
Coin Channel Cover (1)
Coin Channel Cover (2)
Gate Lever Rollar
Gate Lever
Gate Spring
Main Plate Seal
CONLUX Plate
Volume Blind Seal
Gate Pin
Machine Nameplate
Funnel Guide
Separator Solenoid
Gate Lever Spring
Screw
1
1
1
1
1
1
1
1
1
1
2
1
1
1
1
1
1
1
1
1
1
1
1
1
1
1
1
1
1
1
1
1
1
1
1
1
1
1
1
1
1
1
1
1
1
1
1
1
REMARKS
Includes 1~26
Assembly
Assembly
Assembly
Assembly
Assembly
Assembly
Assembly
Assembly
Assembly
Assembly
Only
Only
Only
Only
Only
Only
Only
Only
Only
Only
Assembly
Assembly
Assembly
Assembly
Assembly
Assembly
Only
Only
Only
Only
Only
Only
CCM5GD(Gray) / 5D(Red)
Not Available for Resale
(+)Flat-head M3x 0.5x4
62
CCM5
SERIES
11-2 Coin Changer (CCM5G, CCM5)
5
4
6
10
3
11
8
3-1
12
13
7
9
12
3-4
3-3
3-2
2
3-5
3-3
1
1-11
1-13
1-12
1-1
1-12
2-3
1-9
2-1
2-4
2-2
1-8
1-2
1-10
1-10
1-4
1-7
1-6
1-5
1-3
1-7
1-6
1-14
CCM5
SERIES
INDEX
NO.
1
1-1
1-2
1-3
1-4
1-5
1-6
1-7
1-8
1-9
1-10
1-11
1-12
1-13
1-14
2
2-1
2-2
2-3
2-4
3
3-1
3-2
3-3
3-4
3-5
4
5
6
7
8
9
10
11
12
13
63
PART NO.
CCM5GD
CCM5D
DESCRIPTION
Parts No.(10 digits)
DrawNo.
Parts No.(10 digits)
DrawNo.
5800004012
5800004022
5A43004070
5851104020
5841204013
5881004013
5881104020
5881104030
5871104012
5871104020
5841203040
4611400011
3264030810
4774900010
5030004010
5812004021
5812104021
5851103030
3821030030
3821030040
5500004011
5511204011
5A32104013
5A32104090
5A32104100
3822030190
4114001010
5711204010
4774900010
5AX0104020
56X0004071
5511104012
5512104010
3913950880
3257030810
3912950700
278101
278102
278107
278418
278419
278109
278423
278424
278425
278426
275426
278707
904805
994047
278110
278436
275420
275502
275503
278108
278402
278411
278412
278413
278502
278301
278432
994047
278205
278433
904602
278509
←
←
←
←
←
←
←
←
←
←
←
←
←
←
←
5812004010
5812104010
←
←
←
←
←
←
←
←
←
←
←
←
←
←
←
←
←
←
←
←
←
←
←
←
←
←
←
←
←
←
278105
278417
←
←
←
←
←
←
←
←
←
←
←
←
-
Gear Base Assy
Gear Case Assy
Empty Switch Assy
Payout Wiper
Payout Link
Change Slide (1) Assy
Change Slide (2)
Change Slide (3)
Change Lever (1)
Change Lever (2)
Payout Cam
Change Solenoid
Self Tapping Screw with Washer
Tie Wrap
Payout Link Assy
Bottom Cover Assy
Bottom Cover
Base Latch
Bottom Cover Shaft (1)
Bottom Cover Shaft (2)
Center Cover Assy
Center Cover
Tube Lever (1)
Tube Lever (2)
Tube Lever (3)
Tube Lever Shaft
Power Supply Harness Assy (1)
Harness Guide
Tie Wrap
Cassette Switch Board Assy
Relay Board Assy PT
Housing
Latch
Machine Nameplate
Self Tapping Screw
U.S. Patents Seal
QTY
1
1
1
1
1
1
2
2
1
4
2
1
2
1
1
1
1
1
1
1
1
1
1
2
1
1
1
1
1
1
1
1
1
1
2
1
REMARKS
Use Payout Link Assy(1-14)
Use Payout Link Assy(1-14)
Use Payout Link Assy(1-14)
Use Payout Link Assy(1-14)
(+)Pan-head M3x8
Gray Color
Not Available for Resale
(+)Flat-head M3x8
Not Available for Resale
64
CCM5
SERIES
11-3 Gear Case Assy
1-4
1-1
Old Version
1
1-2
1-6
5
1-5
1-3
6
7
8
1-7
4
8
3
5
6
7
4
2
3
2
PART NO.
INDEX
NO. Parts No.(10 digits) DrawNo.
0
1
1-1
1-2
1-3
1-4
1-5
1-6
1-7
2
3
4
5
6
7
8
5800004022
5830004012
5831004030
4621300100
4421300060
4112003051
3612230010
5831204011
3211030410
5851104011
5841104050
5841104020
3626220010
3626220020
3616220020
3821030710
278102
278708
993031
210433
278416
900006
278415
278428
278429
278430
278431
278501
DESCRIPTION
Gear Case Assy
Gear Case (Upper) Assy
Motor Switch Assy (3)
DC Motor
Carrier Switch
Tube Motor Harness Assy
Motor Pinion
Gear Case (Upper)
Screw
Gear Base
Output Shaft (3)
Output Shaft (2)
Gear (1)
Gear (2)
Gear (3)
Gear Shaft
QTY
1
1
1
1
1
1
1
1
2
1
1
1
1
1
1
2
REMARKS
Includes 1-2~1-5
Use Motor Switch Assy (3)
Use Motor Swicth Assy (3)
Use Motor Switch Assy (3)
Use Motor Switch Assy (3)
(±)Pan-head M3x 0.5x4
Blue
White
White (Flat)
CCM5
SERIES
11-4 Cassette Tube Assy (US-1)
2
12
8
4
1
5
10
9
7
6
3
11
PART NO.
INDEX
NO. Parts No.(10 digits) DrawNo.
0
5030004030 278002
1
5A11104010 278403
2
5A11204010 278404
3
5A11204021 278405
4
5A11304011 278406
5
5A11304021 278407
6
5A11404010 278408
7
5A11504010 278409
8
5A22104010 278503
9
3912950280 278504
10
3912950290 278505
11
3253030810 904315
12
3253030510 904218
DESCRIPTION
US-1 Cassette Tube Assy
Cassette Tube
Rear Tube
Tube Cover
Latch (R)
Latch (L)
Coin Base
Payout Slide
Select Lever (1)
Cassette (1) Seal (A)
Cassette (1) Seal (B)
Self Tapping Screw
Self Tapping Screw
QTY
1
1
1
1
1
1
1
1
1
1
1
3
1
REMARKS
(25¢, 5¢, 25¢, 10¢, 25¢)
White
Gold Single Tab
(+)Pan-head M3x8
(+)Pan-head M3x5
65
66
CCM5
SERIES
11-5 Cassette Tube Assy (US-2)
2
12
8
4
1
5
10
9
7
6
3
11
PART NO.
INDEX
NO. Parts No.(10 digits) DrawNo.
0
5030004040 278023
1
5A11104090
2
5A11204080
3
5A11204021
4
5A11304011
5
5A11304021
6
5A11404090
7
5A11504100
8
5A22104050
9
3912950470 278514
10
3912950600
11
3253030810 904315
12
3253030510 904218
DESCRIPTION
US-2 Cassette Tube Assy
Cassette Tube US-2
Rear Tube US-2
Tube Cover
Latch (R)
Latch (L)
Coin Base US-2
Payout Slide US-2
Select Lever (2)
Cassette (5) Seal (A)
Cassette (2) Seal (B)
Self Tapping Screw
Self Tapping Screw
QTY
1
1
1
1
1
1
1
1
1
1
1
3
1
REMARKS
(10¢, 5¢, 25¢, 10¢, 5¢)
Blue
Silver Single Tab
(+) Pan-head 3 x 8
(+) Pan-head 3 x 5
CCM5
SERIES
11-6 Cassette Tube Assy (US-4)
2
12
8
4
1
5
10
9
7
6
3
11
PART NO.
INDEX
NO. Parts No.(10 digits) DrawNo.
0
5030004050 278003
1
5A11104020 278437
2
5A11204030 278438
3
5A11204021
4
5A11304011
5
5A11304021
6
5A11404020 278439
7
5A11504020 278440
8
5A22104010 278503
9
3912950300 278512
10
3912950290 278505
11
3253030810 904315
12
3253030510 904325
DESCRIPTION
US-4 Cassette Tube Assy
Cassette Tube US-4
Rear Tube US-4
Tube Cover
Latch (R)
Latch (L)
Coin Base US-4
Payout Slide US-4
Select Lever (1)
Cassette (4) Seal (A)
Cassette (1) Seal (B)
Self Tapping Screw
Self Tapping Screw
QTY
1
1
1
1
1
1
1
1
1
1
1
3
1
REMARKS
($1, 5¢, 25¢, 10¢, 25¢)
Gray
Gold Single Tab
(+) Pan-head 3 x 8
(+) Pan-head 3 x 5
67
68
CCM5
SERIES
11-7 Cassette Tube Assy (US-5)
2
12
8
4
1
5
10
9
7
6
3
11
PART NO.
INDEX
NO. Parts No.(10 digits) DrawNo.
0
1
2
3
4
5
6
7
8
9
10
11
12
5030004060
5A11104030
5A11204040
5A11204021
5A11304011
5A11304021
5A11404030
5A11504030
5A22104030
3912950470
3912950480
3253030810
3253030510
278007
278441
278442
278443
278444
278513
278514
278515
904315
904325
DESCRIPTION
US-5 Cassette Tube Assy
Cassette Tube US-5
Rear Tube US-5
Tube Cover
Latch (R)
Latch (L)
Coin Base US-5
Payout Slide US-5
Select Lever (5)
Cassette (5) Seal (A)
Cassette (5) Seal (B)
Self Tapping Screw
Self Tapping Screw
QTY
1
1
1
1
1
1
1
1
1
1
1
3
1
REMARKS
(10¢, 10¢, 5¢, 10¢, 5¢)
Black
Gold Double Tab
(+) Pan-head 3 x 8
(+) Pan-head 3 x 5
CCM5
SERIES
69
11-8 ST Motor Gear Case Assy
12
12
1
5
4
11
2
3
7
6
8
9
10
PART NO.
INDEX
NO. Parts No.(10 digits) DrawNo.
0
1
2
3
4
5
6
7
8
9
10
11
12
G831004010
5831001020
5831001030
5831201020
5831201030
5831201040
3125220020
3625220030
3612230020
3821030370
4621300100
3211030410
3251032010
438107
210115
210118
210467
210468
210469
210471
210472
210473
210519
278708
900006
904038
DESCRIPTION
ST Motor Gear Case Assy
O.P. Gear Output Shaft
Gear (A)
Gear Case (A)
Gear Case (B)
Gear Case (C)
Gear (B)
Gear (C)
Pinion Gear
Gear Shaft (A)
DC Motor
Screw
Self Tapping Screw
QTY
1
1
1
1
1
1
1
1
1
1
1
2
4
REMARKS
Use ST Motor Gear Case Assy
Use ST Motor Gear Case Assy
Use ST Motor Gear Case Assy
Use ST Motor Gear Case Assy
Use ST Motor Gear Case Assy
Use ST Motor Gear Case Assy
Use ST Motor Gear Case Assy
Use ST Motor Gear Case Assy
Use ST Motor Gear Case Assy
Use ST Motor Gear Case Assy
(±) Pan-head M3 x 4
(+) Pan-head 3 x 20
CCM5
SERIES
70
11-8 ST-5, ST-25 Satellite Tube Assy
1-2
4
10
1-1
1-3
7
6
1
13
15
14
9
1-4
8
3
1-5
2-2
14
2-10
2-2-1
2-2-2
12
2-9
2-4
2-9
2
2-3
5
2-5
2-1-3
2-1 2-1-2
2-1-1
2-7
2-6
2-8
2-9
11
CCM5
SERIES
PART NO.
INDEX
NO. Parts No.(10 digits) DrawNo.
0
0000438010 438001
0
0000438020 438002
1
GA11004020 438108
1
GA11004010 438102
1-1
5A11401010 210824
1-2
GA11104040 438411
1-2
GA11104020 438408
1-3
GA11104030 438410
1-3
GA11104010 438407
1-4
GA11404020 438409
1-4
GA11404010 438406
1-5
3253030810 905011
2
G800004010 438103
2-1
G800004020 438105
2-1-1 G831004010 438107
2-1-2 4112003080 438302
2-1-3 4421300060 993031
2-2
G851004010 438101
2-2-1 G851104010 438403
2-2-2 G851104020 438404
2-3
GA11404030 438413
2-4
5521101010 210442
2-5
G854204010 438415
2-6
3913950260 250518
2-7
3913960210 473512
2-8
G511104020 472504
2-9
3253030810 905011
2-10
G851104030 438405
3
GA33004020 438104
4
G6X0004010 438201
5
G511104011 438502
6
G512104010 438414
7
G511204010 438401
8
G5Y1304010 438505
9
3811010690 438503
10
3913950070 473515
11
G511204022
12
3912950510
13
4113000740 438301
14
3211030410 900006
15
2253030510 904325
DESCRIPTION
ST-5 Satellite Tube Assy (5¢)
ST-25 Satellite Tube Assy (25¢)
ST 5 Tube Assy (5¢)
ST 25 Tube Assy (25¢)
Sub Tube Lever
5¢ Sub Front Tube (2)
25¢ Sub Front Tube (2)
5¢ Sub Rear Tube (2)
25¢ Sub Rear Tube (2)
5¢ Tube Base
25¢ Tube Base
Self Tapping Screw
ST Base Chute Assy
ST Payout Assy
ST Motor Gear Case Assy
ST Motor Harness Assy
Carrier Switch
ST Slide Assy
ST Slide (Upper)
ST Slide (Lower)
Sub Base (3)
Sub Base Chute
Sub Carrier Cam (3)
Sub Tube Spacer
Sheet
ZD Motor Support
Self Tapping Screw
Sub Payout Cam (3)
ST Sensor Lever Assy
ST-25 Control Board Assy
ST Housing
Sub Tube Latch (2)
ST Control Base
Model Nameplate
ST Sensor Lever Spring
Housing Seal
ST Front Plate
Patent Seal
ST Relay Harness Assy (1)
Screw
Self Tapping Screw
QTY
ST-25 ST-5
REMARKS
1
1
1
1
1
1
1
1
1
1
1
1
1
1
1
1
1
1
1
1
1
1
1
1
1
1
1
3
1
1
1
1
1
1
1
1
1
1
1
1
3
1
1
1
1
1
1
1
1
1
1
1
1
1
1
1
1
3
1
1
1
1
1
1
1
1
1
1
1
1
3
1
(+) Pan-head 3 x 8
Assembly Only
Assembly Only
Assembly Only
Assembly Only
Assembly Only
(+) Pan-head 3 x 8
Not Available for Resale
Not Available for Resale
(±) Pan-head M3 x 4
71
WHEN CALLING FOR SERVICE, PLEASE PROVIDE THE FOLLOWING INFORMATION:
MODEL NUMBER:
SERIAL NUMBER:
165 NORTH 10TH STREET
WAUKEE, IA 50263
TEL: 1-877-4CONLUX
(1-877-426-6589)
© 2007 January Rev. 8
Printed in Japan