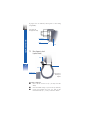
1
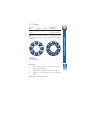
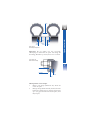
Wheel Loss
C-3257-A
R
DE EVI
CE SE
MB D E
ER DIT
19 ION
98
A risk no one can run!
1
Wheel Loss
A risk no one can run!
Research: Gilbert Lacroix
Education science specialist
Brochure aussi disponible en français.
Acknowledgments
Acknowledgments
2
The author is grateful for the collaboration of the following
persons in the preparation of this wheel installation manual:
■
Mr. François Vaillancourt
Alcoa Inter America inc.
Representative for wheel sales, eastern Canada
■
Mr. Michel Drapeau, eng.
Mr. Yves Boulanger, eng.
Société de transport de la Rive-Sud de Montréal
■
Mr. Denis Cayer
Facility advisor
Association sectorielle transport entreposage
■
Mr. Pierre Lachapelle
Training specialist
Goodyear Canada inc.
■
Mr. Pierre Coulombe, foreman
Mr. Michel Meunier, career consellor
Mr. Michel Savignac, career consellor
Centre de formation en transport de Charlesbourg
■
Mr. Henry Dawson
Education Science Specialiste
© Société de l’assurance automobile du Québec
Direction des communications
Legal deposit:
Bibliothèque nationale du Québec – 4th quarter 1998
ISBN -2-550-30778
Foreword
3
This is not a text of law. For any question of a legal
nature, please refer to the Highway Safety Code and
attendant regulations. The information contained in
this manual does not bind the SAAQ.
Please note that the masculine form is used in some instances in this
publication to include the female gender, with the sole intent of readability.
Reproduction in whole or in part is allowed as long as the source is
indicated.
Please address your comments
and suggestions concerning this manual in care of:
Service de la sécurité et de l’ingénierie des véhicules
Direction des politiques et des programmes
de sécurité routière
Société de l’assurance automobile du Québec
P.O. Box 19600
333 boulevard Jean-Lesage, C-4-21
Québec (Québec) G1K 8J6
Foreward
This manual, prepared by the road safety policy and programs division of the Société de l’assurance automobile du
Québec, is intended to raise the awareness of heavy vehicle
owners, wheel installers, drivers and maintenance staff on
the importance of proper wheel installation and securing
for safe travel.
Contents
Contents
4
1
1
Introduction
5
2
Responsibility
5
3
General Principles
6
4
The safe way to change heavy vehicle wheels
(all types)
Preparation
Verification
Mounting
8
8
9
9
4.1
4.2
4.3
5
5.1
5.2
Disc wheel with stud-located
ball seat mounting
Verification
Torquing
10
10
11
6
6.1
6.2
Hub-piloted wheels
Verification
Torquing
14
14
15
7
7.1
7.2
7.3
7.4
Spoke wheels
Verification
Torquing
Rim alignment check (spoke wheel)
Correction of rim deviation
17
17
18
20
21
8
Tightening on the road
21
9
Wheel Bearings
22
Bibliography
23
Wheel Loss:
A risk no one can run!
Introduction
Having wheels coming off a heavy vehicle is generally due to
poor assembly, badly adjusted bearings or improper lubrication, or the result of inadequate maintenance and inspection. This manual summarizes safe practices for the installation and proper maintenance of spoke, hub and bud
wheels. It gives specific advice on securing wheels, safety
rules and tightening procedures to keep the wheel in place,
according to the type of mounting system used for each.
2
Responsibility
Taking preventive action is the only way to avoid wheels flying off. The vehicle owner, wheel installer, driver and person in charge of vehicle maintenance all have a role to play:
The owner must make sure that the person who installs
wheels or maintains wheel bearings on his vehicle has the
know-how and ability to do that type of work.
The installer, by reason of his skills in the field, must
strictly observe installation standards and keep abreast of
developments, so that the vehicle will be safe not only for
the driver but for other road users as well.
The driver is responsible for doing a safety check on the
vehicle before setting out and during a trip, as required by
regulation, before going back on the roadway after a rest or
a stop at a restaurant, for instance. The driver is the person
closest to the vehicle and must take responsibility for
detecting anything out of the ordinary as far as the wheels
or bearings are concerned, and see to it that needed repairs
are done before taking to the road.
The person in charge of maintenance must ensure
that the carrier’s preventive maintenance program contains
a section on the installation, inspection, maintenance and
repair of wheels and bearings.
A risk no one can run!
1
5
1-2
General Principles
6
Being responsible means you:
General Principles
■
■
■
■
3
■
■
■
Use a torque wrench, preferably, to tighten nuts to
the recommended degree
OR
use an impact wrench equipped with a torque stick,
the length of which corresponds to the wheel manufacturer’s recommended torque.
Make sure when using an impact wrench not fitted
with a torque stick to tighten nuts that it is well
adjusted so torque values will be within recommended limits. Nut tightening must be checked and finished off with a torque wrench. Too much torque can
be as dangerous as too little.
Calibrate torque wrenches at least once yearly. Some
brands of torque wrench have not been cabibrated
by the manufacturer prior to purchase; these must
be calibrated before use.
Be attentive to the fact that when a reconditioned disc
wheel is used, the layers of protective paint can
amount to .012 in (.304 mm) thick, and could flake
off under heat, resulting in loosening of the wheel.
◆ All traces of paint must be removed prior to
tightening. Wheels must be reconditioned
according to the manufacturer’s specifications.
Retorque nuts on wheels after the first 80 to 160 km
(50 to 100 miles) of service following installation.
Keep wheels clean so as to more easily spot cracks,
oil leaks, loose nuts or any other damage.
Be attentive to the slightest oil leak, which points to a
damaged hub ring seal or that a wheel bearing is
about to slip out of the cup. Do not hesitate to
remove a suspect wheel to examine the bearings. If
lubricant is leaking, this situation must be corrected
at once.
Check wheels after an unusual manoeuvre such as
sudden braking, to ensure no nut, stud or wheel has
been damaged. Wheels can be loosened in a sharp
turn involving contact with the edge of a sidewalk. An
immediate inspection of those wheels is called for.
General Principles
7
■
3
8
The safe way to change
heavy vehicle wheels
(All types)
Wheel changing
✱:
✖:
4
These points apply to changing a wheel on the road.
Applies to spoke wheels.
4.1 Preparation
The driver must:
✱1. Bring his vehicle to a stop away from traffic on a
solid, flat surface (preferably rest stop, garage)
capable of supporting the weight of the load.
2.
Apply the parking brake.
3.
Make sure that the transmission is in first gear.
✱4. Put on the hazard lights.
✱5. Use warning lamps, flares or reflective accessoires
specified in the Regulation respecting mechanical
inspection and safety standards for road vehicles, as
follows:
◆ on a road with two-way traffic, flares, lamps or
emergency reflectors must be placed on the
traffic side of the roadway, two at 3 m and 30 m
to the rear of the vehicle and a third, at 30 m
ahead of the disabled vehicle;
◆ on a divided highway, emergency reflectors
must be placed on the roadway, 3, 30 and 60 m
to the rear of the vehicle, facing oncoming traffic.
6.
Place chocks under the wheels.
7.
Install the jack in the recommended location.
8.
Loosen nuts up to 1/2 a turn.
9.
Jack the vehicle up so that the tire on the wheel to be
replaced no longer touches the road.
✖10. Loosen nuts without removing them (risk of clamps
flying off).
✖11. Use a hammer to dislodge the clamps.
12.
13.
Remove the nuts:
✖ the clamps.
Remove the outside wheel:
✖ and the spacer band (if necessary)
◆ the inner wheel (if necessary).
9
■
■
■
For disc stud-located wheels, see section 5.1.
For disc hub-piloted wheels, see section 6.1.
For spoke wheels, see section 7.1.
4.3 Mounting
The driver must:
1.
Place the inner wheel back in the same spot as prior
to removal if possible.
2.
Make sure the valve stem is in the right location.
✖3. Replace the spacer between the wheels (dual assembly).
4.
Replace the outer wheel and centre the valve (dual
assembly).
5.
Tighten the nuts slightly to about 50 ft-lbs (6,91 kgm).
6.
Ensure that the wheel chocks are in place and the
transmission is in first gear.
✖7. Tighten nuts according to the procedure described
in section 7.2.
✖8. Release the parking brake.
9.
Tighten wheels according to the procedure
described in sections 5.2 and 6.2.
✖10. Check the wheel alignment according to the procedure in section 7.3.
✖11. Apply the parking brake.
12. Lower the wheel to the ground and check torque.
13. Remove the jack, the chocks and reflectors.
14. Check the torque again after travelling between 80
and 160 km (50 and 100 miles).
Wheel changing
4.2 Verification
4
Ball seat cap nuts
10
Disc wheel with stud-located
ball seat mounting;
Ball seat cap nuts
Wheel
Cap nut
Hub
5.1 Verification
5
N.B. Follow the wheel manufacturer’s instructions if different from below.
You must:
■
Make sure the contact surfaces between the wheel
and the drum are clean before mounting a wheel.
■
Check for cracks on the wheel or worn stud holes.
■
Check both sides of the disc area to see that there is
no crack or warp.
■
Examine the entire wheel to see that there is no
crack or gouge and no air leaking.
■
See that the threads on studs and nuts are clean and
free of defects.
■
Be watchful for rust or dirt around a nut, which usually indicates it has been loose.
Remember: Installing a stud-located wheel on a pilotmounted hub or vice versa can prove dangerous.
5.2 Torquing
Diameter
3/4”
Standard Type OR
7/8”
1 1/8”
Threads
Recommended
Dry Torque
16
450 to 500 ft-lbs
(62,21 to 69,13 kgm)
Important: (aluminium wheels only) If a thread lubricant is
used, reduce the torque to 350 to 400 ft-lbs (48,39 kgm to
55,30 kgm).
Remember: The threads are right-handed on the right side
of the vehicle and left-handed on the left side of the vehicle.
The stud standout should be stamped L for LEFT or R for
RIGHT.
N.B.: This type of mounting requires an inner cap nut to
centre and hold the inner wheel on a dual assembly
and a ball seated nut to secure the outer wheel
(Illustrations 1 and 2).
You must:
1.
Tighten the inner cap nut (Illustration 1) to a 50 ft-lbs
(6,91 kgm) torque using the proper sequence
(Illustration 3).
2.
Tighten the nuts gradually to the recommended
torque.
3.
Tighten the outer nut (Illustration 2) to a 50 ft-lbs
(6,91 kgm) torque using the proper sequence
(Illustration 3).
4.
Tighten the nuts gradually to the recommended
torque.
Illustration 1
Inner cap nut
Illustration 2
Ball seat mount cap nut
11
Ball seat cap nuts
Ball Seat
Cap Nuts
5
1
Ball seat cap nuts
12
3
6
5
4
2
10 1 8
3
5
6
4
7 2 9
Illustration 3
Torque sequence, 6 and 10 stud wheels
Apply no lubricant to the ball seat or threads.
Lubricant changes the torque value and can
overstress the stud, resulting in stripped
threads.
Nuts that are not tightened to the correct torque
lead to premature stud wear, damaged ball seats
and, most seriously, wheels coming off.
Studs
5
Illustration 4
Studs and nuts
Hub
Drum
Inner wheel
Disc
Outer wheel
13
Ball seat cap nuts
Important:
■
On a dual stud-located wheel assembly, the outer
wheel nuts must be loosened slightly and the inner
wheel tightened to the recommended torque.
■
Then tighten the outer wheel following the torque
sequence shown (Illustration 3).
N.B.: When changing a stud on a 10-stud assembly
(Illustration 4) is called for, adjacent studs should be
replaced. In cases where the assembly has fewer
than 10 studs, all of them should be replaced at once
since the remainder have been subjected to greater
stress and resulting metal fatigue could lead to
breakage.
Nuts
5
Hub-piloted wheels
14
Hub-piloted wheels
Wheel
6
Nut
Hub
6.1 Verification
N.B.: Follow the wheel manufacturer’s instructions if different from below.
You must:
■
Make sure the contact surfaces between the wheel
and the drum are clean before mounting a wheel.
■
Check for cracks on the wheel or worn stud holes.
■
Check both sides of the disc area to see that there is
no crack or warp.
■
Examine the entire wheel to see that there is no
crack or nick and no air leaking.
■
See that the threads on studs and nuts are clean and
free of defects.
■
Be watchful for rust or dirt around a nut, which usually indicates it has been loose.
Remember: Installing a stud-located wheel on a pilotmounted hub or vice versa can prove dangerous.
6.2 Torquing
1 1/2”
33 mm
Diameter
Threads
M22
1,5
15
Recommended
Dry Torque
450 to 500 ft-lbs
(62,21 to 69,13 kgm)
Important: (aluminium wheels only) If a thread lubricant is
used, reduce the torque to 350 to 400 ft-lbs (48,39 kgm to
55,30 kgm).
5
1
10 1 8
2
7
6
3
8
4
3
5
6
4
7 2 9
Hub-piloted wheels
Wrench
Size
Illustration 5
Torque sequence,
8 and 10 stud wheels
You must:
1.
Use a torque wrench to tighten in the proper
sequence (Illustration 5).
2.
Tighten the nuts gradually to 50 ft-lbs (6,91 kgm).
3.
Tighten the nuts gradually to the recommended
torque.
Note: All threads are right-handed.
6
Hub-piloted wheels
16
Flange
Lubricate here
Nut
Illustration 6
Two-piece flange nut
6
4.
Before reinstalling two-piece flange nuts, lubricate
with a few drops of oil between the cap nut and the
washer as shown in illustration 6.
N.B.: When changing a stud on a 10-stud assembly
(Illustration 4) is called for, adjacent studs should be
replaced. In cases where the assembly has fewer
than 10 studs, all of them should be replaced at once
since the remainder have been subjected to greater
stress and resulting metal fatigue could lead to
breakage.
Spoke wheels
Spoke wheels
17
7.1 Verification
N.B.: Follow the wheel manufacturer’s instructions if different from below.
■
You must:
1.
Examine the rim mounting surfaces to make sure
that there is no:
◆ dirt or foreign body to prevent good contact;
◆ defect or wear pattern (rim clamp slippage:
Illustration 7);
◆ burr or foreign body (file smooth if necessary).
2.
Check for cracked or broken spokes.
3.
Replace the spacer band if it is in any way damaged.
4.
See that threads are clean and free of defects.
5.
Make sure that the rim clamps are in good condition.
6.
Check that the valve locators are in the proper position and in good shape (Illustration 7).
7
Valve locators
Spoke wheels
18
7
Slippage
Illustration 7
Valve locators and slippage
7.2 Torquing
Diameter
Threads
5/8”
11
3/4”
10
Recommended
Dry Torque
160 to 200 ft-lbs
(22,12 to 27,65 kgm)
200 to 260 ft-lbs
(27,65 to 35,94 kgm)
Use a torque wrench to tighten rim clamps evenly in the
sequence shown (Illustration 8).
1
1
3
6
5
4
1
6
5
2
3
Illustration 8
Torque sequence
4
3
4
5
2
2
Rims
Flange
Nut
Spacer
band
Rim
clamp
Flange
Wheel
Illustration 9
Rim clamps and spacers
Important: Do not tighten rim nuts excessively.
Overtorquing can deform the rim spacer and damage the
back flange (Illustration 9), and may lead to loss of a wheel.
Spoke wheels
19
Illustration 10a
Heel-less Rim Clamp
7
Rim Clamp
Heel-less
Wheel
Gap
Check position of rim clamps.
1.
Heel-less rim clamps (Illustration 10a) should not
contact the spoke.
2.
Hell type clamps (Illustration 10b) should not bottom
before 80% of final torque is reached, and may have
up to 1/4” gap between the heel and the spoke, when
fully torqued.
If proper fit is not achieved, check spacer or rim clamp
compatibility.
20
Spoke wheels
Illustration 10b
Hell Type Rim Clamp
Rim Clamp
Heel
Wheel
7.3 Rim aligment check
(spoke wheel)
Clamp
7
Rim
Chalk
Wooden block
Illustration 11
Checking rim
aligment
Proceed as follows:
■
Place a block of wood at 1/2” (12 mm) from the
wheel;
■
rotate the wheel slowly, so you can see any variation;
■
correct any variation over 1/16” (1,6 mm) on the
front wheel and 1/8” ( 3 mm) on the rear wheels.
21
You must:
■
Rotate the wheel slowly, bringing the chalk to the
point where it makes a mark on the tire; this is maximum deviation (Illustration 11).
■
Slightly loosen the nut on the side with the greatest
deviation.
■
Tighten the nuts opposite to this nut, one-quarter
turn at a time, without overtorquing.
■
Check for deviation again. If there has been no
change, look for deformed, crushed or broken part,
or other defect.
■
Repeat the operation if necessary.
Note: Deviation that is difficult to correct could point to a
damaged component, in which case the entire assembly
mut be checked again.
Tightening on the road
7.4 Correction of rim deviation
8
Tightening
on the road
Tightening wheels without the use of a torque wrench is
considered a temporary solution, which should be repeated every 80 to 160 km (50 to 100 miles), until the wheels
can be properly tightened with a torque wrench (see
“General Principles”, p. 6).
If you have someone do the torquing on your vehicle, ask
the person to write down the torque and the date the
wrench was last calibrated.
Wheel Bearings 1
Wheel Bearings
22
9
According to the results of an investigation ordered in
September 1995 by the government of Maryland, USA the
lack of proper lubrication for wheel bearings was among
the main causes of wheel loss accidents.
What occurs is that the bearings overheat due to a lack of
lubricant. Without proper lubrication, tiny pieces of metal
wear off the bearings and fall into the lubricating fluid, and
serve as grinding compound for the bearing mecahnism.
Once the mechanism is weakened, the lack of support for
the hub/wheel/drum assembly results in the long term in
wheel separation.
There can be no doubt: Drivers and maintenance personel
must pay more attention to the inspection and maintenance
of wheel assemblies.
■
At what intervals must bearings be replaced when
grease is used?
■
At what intervals should the level of lubricant be
checked if oil is used?
■
At what intervals must the wheels be raised and rotated to check for bearing noise (cracked bearings) or
excessive play (poorly adjusted)?
■
Has the driver been shown how to take hub temperature when inspecting tires on the vehicle in the
course of the daily safety check? If not, delaying
could spell disaster.
Happy trails!
1. See “Wheel Loss Due to Faulty Bearings” also available free
of charge from the Société de l’assurance automobile du
Québec.
Bibliography
23
Webb Wheel Products Inc., Installation, Service and
Safety Instructions IM-494 Supersedes IM-989 REV.1
Mack, Manuel d’entretien des camions routiers, Chapter 7
TMC, The Maintenance Council. Recommended
Maintenance Practices Manual 1994-1995
Kenworth, Maintenance Manual, Chapter 2, Wheels,
Rims and Tires
Centre de formation en transport de Charlesbourg,
Québec. Méthode sécuritaire pour changer une roue sur
un véhicule lourd (all types of wheels) adaptation.
Bibliography
Alcoa, Alcoa Aluminum Truck Wheel Service Manual And
Operating Instructions, January 1994.
C-3257-A