1
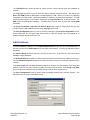
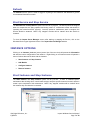
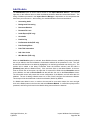
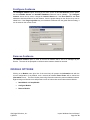
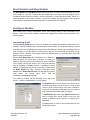
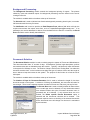
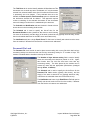
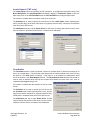
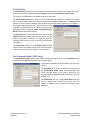
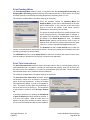
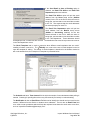
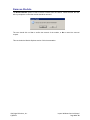
Impact Windows Service Manual Impact / SQL Version 8.0.0.NET Initial Release Date: 12/07/2012 10835 N. 25th Avenue, Suite 350 Phoenix, AZ 85029 602.866.8199 www.digisolaz.com Table of Contents INTRODUCTION .................................................................................................................................3 HELPFUL HINTS ..................................................................................................................................4 Quick Keys ................................................................................................................................................. 4 IMPACT SERVICE MANAGER ...............................................................................................................4 SERVICE OPTIONS ..............................................................................................................................5 Configure Service ...................................................................................................................................... 5 Add Instance ............................................................................................................................................. 6 Refresh ...................................................................................................................................................... 7 Start Service and Stop Service .................................................................................................................. 7 INSTANCE OPTIONS............................................................................................................................7 Start Instance and Stop Instance .............................................................................................................. 7 Add Module .............................................................................................................................................. 8 Configure Instance .................................................................................................................................... 9 Remove Instance....................................................................................................................................... 9 MODULE OPTIONS .............................................................................................................................9 Start Module and Stop Module .............................................................................................................. 10 Configure Module ................................................................................................................................... 10 Accounting Audit................................................................................................................................. 10 Background Processing ....................................................................................................................... 11 Document Deletion ............................................................................................................................. 11 Dormant File Lock ............................................................................................................................... 12 Leads Export (FNF only) ...................................................................................................................... 13 Overdrafts ........................................................................................................................................... 13 Positive Pay ......................................................................................................................................... 14 Pre-Dormant Audit (FNF only) ............................................................................................................ 14 Print Pending Wires ............................................................................................................................ 15 Print Title Instructions......................................................................................................................... 15 SQL Clear Locks ................................................................................................................................... 17 Wire Monitor (FNF only) ..................................................................................................................... 17 Remove Module ...................................................................................................................................... 18 USA Digital Solutions, Inc. 1/8/2014 Impact Windows Service Manual Page 2 of 19 INTRODUCTION The Impact Windows Service is introduced, in conjunction with Impact/SQL version 8.0, and it replaces the Batch Processor and Wire Monitor modules. As an MS Windows® service, it runs on one system on a client’s network, is controlled by users with administrative rights (system), and eliminates the need to have a dedicated session running (historically a disconnected session) for the Batch Processor and Wire Monitor programs. Note: the Wire Monitor is a limited distribution program designed to work with a proprietary FNF system and is not utilized by most Impact/SQL installations. This documentation will describe the management of the Service, with the Impact Windows Service Manager, and detail the tasks that can be administered by the Service. In its initial release, all of the functions of the Batch Processor and the Wire Monitor can be administered by the Service. In the future, additional functions may be added to the service, as they are developed. The functional categories, hereafter called Modules, are: Accounting Audit Background Processing Document Deletion Dormant File Lock Leads Export (FNF only) Overdrafts Positive Pay Pre-Dormant Audit (FNF only) Print Pending Wires Print Title Instructions SQL Clear Locks Wire Monitor (FNF only) The Service will be installed and configured by USA Digital Solutions, Inc. personnel at the time of a new Impact/SQL installation, or at the time of the upgrade of an existing Impact/SQL environment to version 8.0 (or higher). However, clients should be aware of the available functionality so they may consider the customization they wish to employ for their particular site to best work with their business processes. From time to time there will be changes that the client may wish to make to the settings of various Modules within the service. Until local System Administrators are clear on the impact of making particular changes, they are strongly urged to consult with USA Digital Solutions, Inc. personnel before making any changes to the Impact Windows Service settings. USA Digital Solutions, Inc. 1/8/2014 Impact Windows Service Manual Page 3 of 19 HELPFUL HINTS Some of the formatting conventions used in this manual are: Keystrokes, such as hitting the Enter key, will be displayed as ENTER in the manual. Any text that appears on the screen will be shown as Edit or Cancel. Work flow paths you are to use will be displayed as Service > Start Service. This will indicate you are to choose the Start Service option from the Service menu (accessed via a Right Click). Quick Keys In the Impact Service Manager, as in other Impact/SQL programs, there are opportunities to move through the options available without using the mouse. The tabs and menu items contain an underlined letter that indicates the quick key related to it. If you hold down the ALT key and hit the underlined letter of the item, it will be acted on. For example: ALT + I will present the Information screen of the Service, Instance or Module that is highlighted; ALT + E will present the Event Viewer of the Instance or Module that is highlighted. IMPACT SERVICE MANAGER The Impact Service Manager program is used to start and stop the service as well as to add and remove Modules to Service Instances. While most client sites will only have one Impact/SQL database, some manage multiple databases. Each database’s Impact Windows Service configuration is called an Instance. The components configured within each Instance are called Modules. The executable for the Impact Service Manager is called ImpSvcMgr.exe, and is typically located in the “C:\Program Files\USA Digital Solutions\ImpactNet” folder on the one, and only one, server hosting the service. A shortcut to the Impact Service Manager will normally be created on the desktop of the server hosting the service. The Manager should only be used by a user logged in under an account with administrative rights, as those rights are required to start and stop MS Windows® services. The Impact Service Manager’s initial screen, upon opening, looks like that shown here. The “Service” branch, in the tree-view on the left, is highlighted and the Information tab for the Service is presented on the right of the screen. The Instances (databases) are listed at the next tier in the treeview on the left. The Modules installed for each Instance are listed in the third tier. USA Digital Solutions, Inc. 1/8/2014 Impact Windows Service Manual Page 4 of 19 From this screen the Impact Windows Service can be started or stopped, which will affect all Instances that are configured and all Modules within those Instances. In addition, specific Modules within specific Instances can be started or stopped from this screen. Right-clicking on the Service, Instance or Module headers, in the tree-view, will bring up menus of actions available for the selected item. The tree-view can be collapsed or expanded with the “+” and “-“ icons in front of the Service and Instance headers. SERVICE OPTIONS Right-clicking on the Service header will present five options for the Service: Configure Service Add Instance Refresh Start Service and Stop Service Configure Service Configuration of the Impact Windows Service is done on the Service Configuration screen, which is reached by right-clicking on the Service tree-view branch and selecting Configure Service from the menu presented. The configuration is comprised of identifying the email mechanism for generating error messages from the service to system administration personnel and determining if any logging of module events is to be kept, and in what form. The Error Email (From) field is used to enter an address that will inform the recipient of the source of the message. It does not need to be a working address. The Error Email (To) field should be of the responsible System Admin or a distribution list for multiple System Admins. They will receive notices of issues that arise, and thereby can be informed they must investigate/address the issues. The SMTP Server, Username and Password fields are used to access the sending email server. USA Digital Solutions, Inc. 1/8/2014 Impact Windows Service Manual Page 5 of 19 The Test Email button should be used to confirm access, once the above fields are completed as needed. The Log Type dropdown is used to select the type of logging of module events. The options are None, File, WMI (Windows Management Instrumentation) or All. WMI is a protocol for publishing messages on module events; a third-party software is required to process those messages. The File option will build log files, in the location specified in the Log File Path field, of module events. The WMI option will publish the messages. The All option will both build log files and publish WMI messages. The Purge Transaction Logs After (X number) Days field is used to identify how long log files should be kept, if File or All are selected in the Log Type option field. The Save Configuration button is used to save any changes to the Service Configuration screen. Use the Windows X in the upper right hand corner to close the window; and be prompted as to whether changes should be saved or not. Add Instance To add an Instance (database) to the Impact Windows Service, right-click on the Service branch of the tree-view and select Add Instance from the option list presented. A screen like that below will be presented. An Instance Name should be entered in the field of that name. It should let the user know which database is being identified. The Available Servers dropdown is used to select the server the Instance to be added is running on, and the Available Databases dropdown is used, after server selection, to select the database for the Instance. If the Error Email To and From addresses should be different, for this Instance, from the global settings on the Service, they should be noted in the fields of those names. If the Purge Logs After day count desired is different from the global setting, it can be noted on this screen. The Save Configuration button is used to save the settings entered and to add the Instance. The Windows X can be used to exit without saving. USA Digital Solutions, Inc. 1/8/2014 Impact Windows Service Manual Page 6 of 19 Refresh The Refresh Service option is used to trigger a re-polling of the Instances and Modules to get the current status information on each. Start Service and Stop Service The Start Service and Stop Service options are used to do just that. The Service should be stopped when its components are being updated and during routine IT maintenance efforts that would be impacting the network and SQL server(s). Once the update or maintenance work is complete, the Service should be restarted. NOTE: Any “stopped” modules will be “started” when the Service is restarted. To close the Impact Server Manager screen, after starting or stopping the Service, click on the Windows X in the upper right hand corner of the Impact Service Manager window. INSTANCE OPTIONS Clicking on an Instance (database) name (second tier of the tree-view) will present the Information tab with the current configuration of the Instance. Right-clicking on an Instance name will present a menu of actions that can be taken with the Instance: Start Instance and Stop Instance Add Module Configure Instance Remove Instance Start Instance and Stop Instance The Start Instance and Stop Instance options will do just that. If there is database-specific maintenance that is being done, it would make sense to stop the specific Instance involved, and then restart it upon completion of the maintenance. NOTE: Any “stopped” modules will be “started” when the Instance they are related to is restarted. USA Digital Solutions, Inc. 1/8/2014 Impact Windows Service Manual Page 7 of 19 Add Module The Add Module option is used to add a function to the Impact Windows Service. The user will right-click on the Instance name to which the Module should be added and select Add Module. The listing of Modules presented in the Impact Service Manager is dependent on the components that have been put on the server. At this writing, the available Modules are those listed below. Accounting Audit Background Processing Document Deletion Dormant File Lock Leads Export (FNF only) Overdrafts Positive Pay Pre-Dormant Audit (FNF only) Print Pending Wires Print Title Instructions SQL Clear Locks Wire Monitor (FNF only) When the Add Module option is selected, those Modules that are available (components installed) but not yet added to the Service/Instance combination selected will be presented in a list. The user should select the Module to be added by highlighting it on the listing presented and clicking on it. The module will be added to the listing of Modules under the Instance selected, and will reflect a [Disabled] state (after the Module name). If the user then clicks on the added Module, in the treeview on the left side of the screen, the right side of screen will be filled with the Information screen for the Module, and with an Event Viewer tab that will take the user to the Event Viewer screen. The Information screen will present the current configuration of the Module, and will reflect that it is disabled. The act of adding a Module does not, in and of itself, configure and activate the Module. Those steps will be described later in this documentation, Module by Module. If a Module was added in error, or needs to be removed for some other reason, the user can right click on the Module name in the tree-view and select Remove Module. A confirmation prompt will be presented, and OK’ing it will result in the Module being removed from the Instance. USA Digital Solutions, Inc. 1/8/2014 Impact Windows Service Manual Page 8 of 19 Configure Instance The Configure Instance option will bring up the same screen as the Add Instance Service option, but the Available Servers and Available Databases fields will not be editable. The Configure Instance screen can be used to change the Instance Name and, if the Error Email To and From addresses should be different, for this Instance, from the global settings on the Service, they can be edited here. If the Purge Logs After day count desired is different from the global Service setting, it can be noted on this screen as well. Remove Instance The Remove Instance option is used to remove an Instance that is not to be managed by the Service. The user will be prompted to confirm that the Instance should be removed. MODULE OPTIONS Clicking on a Module name (third tier of the tree-view) will present the Information tab with the current configuration of the Module, and a second tab labeled Event Viewer will be behind the Information screen.. The Event Viewer present log information about the particular Module selected. Right-clicking on a Module name will present a menu of actions that can be taken with the Module: Start Module and Stop Module Configure Module Remove Module USA Digital Solutions, Inc. 1/8/2014 Impact Windows Service Manual Page 9 of 19 Start Module and Stop Module The Start Module and Stop Module options will do just that. A module cannot be started until it has been configured. If there is a need to alter the configuration of a module, it must be stopped. Once configured and the business is ready to use the functionality, a module would be started. NOTE: If a business decides to stop using a module, it should be disabled, not just stopped, as any stopped modules will be restarted when either the Service or related Instance is restarted.. Configure Module Each Module has a unique configuration screen, with settings relating to the functionality of the Module. Each of the current modules’ purpose and configuration screens will be presented in the following pages. Accounting Audit The Accounting Audit function is used to routinely run auditing tests against posted data in the database and to generate printed or emailed reports of the results. These reports normally provided to the Escrow Accounting Department responsible for the database. Running the audit daily, after the time of posting, is a good practice so that any issues with the accounting data are identified quickly and then can be corrected. DSI Support should be contacted with any questions about items that appear on the Audit reports. On the Audit Destination tab, the decision as to whether to print the reports or to email them is detailed. If printing, the printer for the Escrow Accounting Department must be defined on the system running the Service, and it would be selected from the dropdown of available printers. If emailing, the email address (or distribution list) for the recipient(s) is entered into the Email Reports To field. Entering a descriptive email address in the Email Reports From field will help the recipient know where the reports came from, such as “[email protected]”. The module is enabled with the checkbox at the top of the screen. It must be enabled before it can be started. The Schedule tab is used to specify the kick-off time for the Accounting Audits (should be after the daily posting routine is done), and the day(s) of the week it should be run (as there is typically not a posting done on weekend days, Saturday and Sunday might be skipped). The Notification tab has a single Email Errors To field used to identify who should receive errors from the module, if different from the Service or Instance error addressee. The Save button is used to save changes and exit the configuration screen. USA Digital Solutions, Inc. 1/8/2014 Impact Windows Service Manual Page 10 of 19 Background Processing The Background Processing module controls the background printing of reports. The printers utilized by users who schedule reports for background processing must be defined on the server running the Service. The module is enabled with the checkbox at the top of the screen. The Schedule tab is used to indicate how often that background processing should cycle, in seconds. 300 seconds would be every 5 minutes. The Notification tab is used to provide an Email Reports From address field which will help the recipient know where the reports came from, such as “[email protected]”. If an alternative error notice addressee is desired, from the default for the Service or Instance, the Email Errors To field is used to identify that addressee. Document Deletion The Document Deletion module is used to routinely purge the system of Escrow and Miscellaneous Title documents older than “X” number of days. Commitments, prelims, legal descriptions, policies and endorsements are not deleted through this module. Typically, a business will retain documents in the system for 180 days or more. The number of days is not from the “Closing Date”, but rather the document creation date…so the business must judge the type of business it does and the length of time it wishes to keep documents on the system. The purpose of this function is to limit the use of disk space. The module is enabled with the checkbox at the top of the screen. The Number of Days for Document Retention field is used to indicate the length of time docs should be saved on the system. A minimum of 30 days is established, but most sites will retain for much longer. There is not a separate retention number for Escrow and Title docs; just one for both. The Escrow Docs tab is used to identify whether all Escrow docs over a certain age are to be deleted, or if only documents created from selected master docs (the full master document menu is presented) are to be deleted. If only selected docs are to be deleted, the Delete specific Escrow Documents option is selected and the documents checked will be deleted. This approach requires routine re-checking of the selected documents as the documents menu will change over time as it is maintained by the business. USA Digital Solutions, Inc. 1/8/2014 Impact Windows Service Manual Page 11 of 19 The Title Docs tab is used to identify whether all Miscellaneous Title documents over a certain age are to be deleted, or if only documents created from selected master docs (the full master document menu is presented) are to be deleted. If only selected docs are to be deleted, the Delete specific Title Documents option is selected and the documents checked will be deleted. This approach requires routine re-checking of the selected documents as the documents menu will change over time as it is maintained by the business. The Schedule and Notification tabs are identical in format to those shown above in the Accounting Audit module. The Schedule tab is used to specify the kick-off time for the Document Deletion routine (should be after hours to avoid running into users in documents), and the day(s) of the week it should be run (typically would be daily, unless there is scheduled down time for the SQL server and Data server). The Notification tab has a single Email Errors To field used to identify who should receive errors from the module, if different from the Service or Instance error addressee. Dormant File Lock The Dormant File Lock module is used to place an accounting lock on any file which has had any accounting activity but which has then not had any accounting activity for “X” number of days. The module is enabled with the checkbox at the top of the screen. The Number of days without activity field is used to identify when the accounting lock should be placed on a file. Again, this function does not lock files that have never had any accounting activity. The locks placed by the module can be cleared by users with the appropriate permissions (managed through Users, in Utilities). The Schedule tab is used to specify the kick-off time for the Dormant File Lock routine (typically after hours), and the day(s) of the week it should be run (typically would be daily, unless there is scheduled down time for the SQL server). The Notification tab has a single Email Errors To field used to identify who should receive errors from the module, if different from the Service or Instance error addressee. USA Digital Solutions, Inc. 1/8/2014 Impact Windows Service Manual Page 12 of 19 Leads Export (FNF only) The Leads Export module is proprietary to FNF operations. Its configuration requires the entry of the Brand Designation and City Designation information; flagging of Transaction Types to drive the data export; and, on the FTP Information tab, the FTP Information for routing the export data. The module is enabled with the checkbox at the top of the screen. The Schedule tab is used to specify the kick-off time for the Leads Export routine (typically after hours), and the day(s) of the week it should be run (typically would be daily, unless there is scheduled down time for the SQL server). The Notification tab has a single Email Errors To field used to identify who should receive errors from the module, if different from the Service or Instance error addressee. Overdrafts The Overdrafts module is used to generate a printed or emailed report for Escrow Accounting of all files in an overdraft state. The printer the report should print to must be defined to the server running the Service, if the Print option is selected. If the report is to be emailed, the addressee’s email should be entered in the Email Reports To field. The Email Reports From address field should be used to enter an address which will help the recipient know where the report came from, such as “[email protected]”. The module is enabled with the checkbox at the top of the screen. The Schedule tab is used to specify the kick-off time for the Overdraft report routine (typically after hours), and the day(s) of the week it should be run (typically would be daily, unless there is scheduled down time for the SQL server). The Notification tab has a single Email Errors To field used to identify who should receive errors from the module, if different from the Service or Instance error addressee. USA Digital Solutions, Inc. 1/8/2014 Impact Windows Service Manual Page 13 of 19 Positive Pay The Positive Pay module is used to schedule to background processing of the Positive Pay export routines that have been defined in the Accounting module, under Daily Work, Positive Pay. The module is enabled with the checkbox at the top of the screen. The Email Export From field is used to enter an address which will help the recipient know where the notice of completion came from, such as [email protected]. The Email Export To field is used to enter the address of the recipient of the notice that the export(s) are complete. If the exported data file(s) are to be included with the email (in addition to being stored in the location specified in the Accounting module setup) the Attach Files Generated to Email checkbox should be checked. The Schedule tab is used to specify the kick-off time for the Positive Pay export routine (typically after hours), and the day(s) of the week it should be run (typically would be weekdays, after hours to pick up the day’s issued-check information). The Notification tab has a single Email Errors To field used to identify who should receive errors from the module, if different from the Service or Instance error addressee. Pre-Dormant Audit (FNF only) The Pre-Dormant Audit module runs an FNF proprietary data export routine. The Information tab is used to detail the Site ID for the export and routing settings. The module is enabled with the checkbox at the top of the screen. The Schedule tab is used to specify the kick-off time for the Pre-Dormant Audit export routine (typically after hours), and the day(s) of the week it should be run (typically would be weekdays, after the positing routine is normally run). The Notification tab has a single Email Errors To field used to identify who should receive errors from the module, if different from the Service or Instance error addressee. USA Digital Solutions, Inc. 1/8/2014 Impact Windows Service Manual Page 14 of 19 Print Pending Wires The Print Pending Wires module is used, in conjunction with the Incoming Wire Processing and Outgoing Wire Processing Impact functions to direct either printed wire or email notices, to a central wire desk (normally in the Escrow Accounting Department) of pending wires in or out. The module is enabled with the checkbox at the top of the screen. There are separate controls for Incoming Wires and Outgoing Wires, so they can be independently set to either print or email notices. In the event one or the other notice type (In or Out) is not desired, a Null Printer could be established to route notices “into the ether”. The printer the notices should print to must be defined to the server running the Service, if the Print option is selected. If the notices are to be emailed, the addressee’s email should be entered in the Email Reports To field. The Email Reports From address field should be used to enter an address which will help the recipient know where the report came from, such as “[email protected]”. The Schedule tab has a Timer Interval field in which the number of seconds between data polling is entered. Checking for pending wire information every 300 seconds (5 minutes) is a rational setting. The Notification tab has a single Email Errors To field used to identify who should receive errors from the module, if different from the Service or Instance error addressee. Print Title Instructions The Print Title Instructions module is used to direct title orders to one or more title plants’ printers or email distribution lists. In addition, if emailing is used rather than printing, email can be sent to the title officer on the file in addition to, or in place of, the distribution list for the plant. Caution should be taken with that option due to vacations and other absences. The module is enabled with the checkbox at the top of the screen. The Auto Print Title Instructions checkbox should be checked if orders are to be printed to a specified printer at the Title Department. If there are multiple Title Departments defined, a printer is designated for each. The printers for each plant must be defined on the server the Service is running on. The designation of the printers is made on the Title Dept. Printers tab. If emailing is preferred over printing, the Send Email in place of Printing checkbox should be checked. It is an all or none option…either all orders are to be printed or all are to be emailed; the option cannot be set for each Title Department defined in the database. USA Digital Solutions, Inc. 1/8/2014 Impact Windows Service Manual Page 15 of 19 If the Send Email in place of Printing option is selected, the Email Title Officer and Email Title Department options are relevant. The Email Title Officer option will pull the email address from the Users setup screen (Utilities module) for the TO on the file for which the order is being sent, and use that to route email about orders to the TO. That requires that the email addresses be entered properly for each TO. The Email Title Department option will pull the email address from the Branch setup screen (Utilities or Accounting modules) for the title branch selected on the file for which the order is being sent, and use that to route email about orders to the Title Department. Those addresses should be distribution lists, so absences are covered. The distribution lists must be kept current as turnover in the Title Department occurs. The Email Templates tab is used to customize three different email templates that are used if emailing of orders is turned on. The Modify icon, next to the name of each template is used to open the template for editing. The editing of email templates is described in the Utilities manual so will not be detailed here, but a sample of a template is presented below. The Schedule tab has a Timer Interval field in which the number of seconds between data polling is entered. Checking for pending title orders every 300 seconds (5 minutes) is a rational setting. The Notification tab has an Email Errors To field used to identify who should receive errors from the module, if different from the Service or Instance error addressee. There is also an Email From field to be used to enter an address which will help the recipient know where the email notice came from, such as “[email protected]”. USA Digital Solutions, Inc. 1/8/2014 Impact Windows Service Manual Page 16 of 19 SQL Clear Locks The SQL Clear Locks module is used to clear errant SQL locks in the Impact SQL database. Errant locks (left by users kicked out of the system or who never saved out of the file they were working with before going home) could interrupt the daily posting routine, so they should be cleared nightly. This option should be scheduled to run at a time when the SQL server is available but few if any users are in the system (generally in the middle of the night). The module is enabled with the checkbox at the top of the screen. The Clear Locks in place for longer than [ ] hours field is used to let the administrator decide how old a lock should be before it is considered errant; one or two hours is typically the setting selected. The Schedule tab is used to specify the kick-off time for the SQL Clear Locks routine (always after hours), and the day(s) of the week it should be run (typically would be daily, when the SQL server is available). The Notification tab has a single Email Errors To field used to identify who should receive errors from the module, if different from the Service or Instance error addressee. Wire Monitor (FNF only) The Wire Monitor module is utilized by a proprietary FNF wire function. The Enable MFS Wire Integration checkbox must be checked for the Wire Monitor Configuration screen to be able to be utilized. The module is enabled with the checkbox at the top of the screen. The Incoming Wires and Outgoing Wires tabs are used to configure the module for the two different wire processes. The Schedule tab is use to set the Timer Interval for polling the system for wire information. The Notification tab has an Email Errors To field used to identify who should receive errors from the module, if different from the Service or Instance error addressee. There is also an Email From field to be used to enter an address which will help the recipient know where the email notice came from, such as “[email protected]”. This concludes the Configure Module section of this documentation. USA Digital Solutions, Inc. 1/8/2014 Impact Windows Service Manual Page 17 of 19 Remove Module The Remove Module option is used to remove a module from an instance. When selected, the user will be prompted to confirm the module should be removed. The user should click on Yes to confirm the removal of the module, or No to cancel the removal request. This concludes the Module Options section of this documentation. USA Digital Solutions, Inc. 1/8/2014 Impact Windows Service Manual Page 18 of 19 (602) 866-8199 x 2 for Support [email protected] USA Digital Solutions, Inc. 1/8/2014 Impact Windows Service Manual Page 19 of 19