1
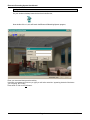
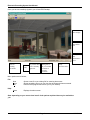
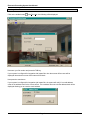
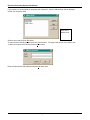
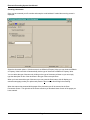
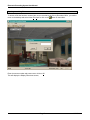
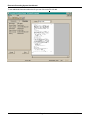
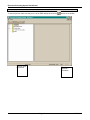
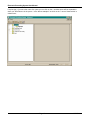
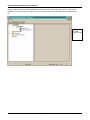
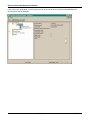
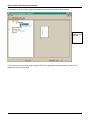
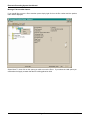
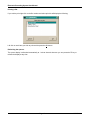
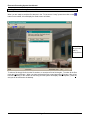
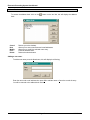
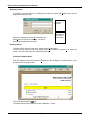
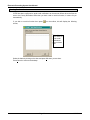
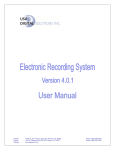
Electronic Recording System
User Manual
Table of Contents
Getting Started --------------------------------------------------------------- 1
Entering a New File --------------------------------------------------------- 3
Scanning ----------------------------------------------------------------- 5
Deleting a page--------------------------------------------------------- 6
Rotating a page--------------------------------------------------------- 6
Viewing a page --------------------------------------------------------- 6
Rescanning -------------------------------------------------------------- 6
Open an existing file -------------------------------------------------------- 7
Queues----------------------------------------------------------------------- 10
Moving a file to another queue------------------------------------ 15
Printing a file ---------------------------------------------------------- 16
Refreshing ------------------------------------------------------------- 16
Sending Files to The County Recorders Office -------------------- 17
Address Book -------------------------------------------------------------- 18
Adding a new name ------------------------------------------------- 18
Modifying a name ---------------------------------------------------- 19
Deleting a name ------------------------------------------------------ 19
Printing------------------------------------------------------------------ 19
Sending Email notification----------------------------------------------- 20
USA Digital Solutions, Inc.
10835 N. 25th Avenue, Suite 350
Phoenix, AZ 85029
Phone:(602) 866-8199
Fax: (602) 866-9525
Web address: www.digisolaz.com
Electronic Recording System User Manual
Getting Started:
On your windows desktop locate the Icon that looks like this;
Now double click on it, this will launch the Electronic Recording System program;
Enter your name and then press the tab key.
Now enter your password. Note: as you type you will notice asterisks * appearing instead of the letters
you are typing, this is okay.
Press enter or click on the OK button.
Page 1
03/03/2000
Electronic Recording System User Manual
Once you have successfully signed in you will see ERS Desktop;
Access the
queues display
Access the ERS
email address
book.
Manually send
email
notifications to
escrow.
Opens a new
order for
scanning
documents.
Current
Status
Your Name or
the persons name
who is currently
signed on.
Opens an
existing file so
that you can add
documents or
rescan all
documents.
Sends files to the
County
Recorders Office
Menu options are as follows;
File:
New
Open
Exit
Opens a new file or an existing file for scanning documents
Opens an existing file so you can view the documents that were scanned.
Exits the ERS program and returns you to your desktop.
About
Displays the about screen.
Help:
Note: depending on your access level not all of the options explained later may be available to
you.
Page 2
03/03/2000
Electronic Recording System User Manual
Entering a New File:
Click on the toolbar button
or do File; New, the following will be displayed.
Now enter your file number and press the TAB key;
If your system is configured for integration with Impact/32© then the escrow officer name will be
displayed otherwise the escrow officer name will be blank.
Now press the scan button.
If your system is configured for integration with Impact/32© the system will verify if an email address
exists in the address book for the escrow officer. If the address does not exist the address book will be
displayed allowing you to enter the email address.
Page 3
03/03/2000
Electronic Recording System User Manual
If your system is not configured for integration with Impact/32© then the address book will be displayed
so that you can pick a name.
Shows all the
names in the
address book.
Select a name and press the OK button.
To cancel without selecting a name press the Cancel button. The system will ask you if you wish to exit.
To add a new name to the list then press the New button;
Enter the name and e-mail address and press OK when done.
Page 4
03/03/2000
Electronic Recording System User Manual
Scanning a document:
Once you have entered your file number and setup the email address if needed the scanning screen is
displayed;
Select the document options. If the document is an affidavit of Property Value you can check the Affidavit
of Property Value box which will automatically set the type of document to Affidavit of Property Value.
You can select the type of document by clicking on the type of document pull down or you can simply
type the description or title of the document in the type of document pull down.
When you have entered the type of document you can press the Scan button, this will display your
scanners setup page; select you options and press the Scan button, this will begin the scanning.
When the scanner has scanned all the pages of the document you will be returned to the Scan
Documents Screen. The right side of the screen will show you thumbnail shots of each of the pages you
have scanned.
Page 5
03/03/2000
Electronic Recording System User Manual
Now that the document has been scanned you have several options;
Deleting a page:
First click on the page to be deleted and then do a right mouse click, this will display the options
menu, now select Delete. You will be asked to confirm the deletion of this page. Press Yes to
delete it or Press No to return to the thumbnail view.
Rotating a page:
First click on the page to be rotated, then do a right mouse click or press the rotate button; each
time you select rotate, the document page is rotated 90 degrees.
Viewing a single page:
Left click on the page you want to view, this will change the display from thumbnail to page view.
If you need to change the zoom factor (to increase or decrease the size of the image) click on the
Zoom Factor pull down at the top of the page. You can also rotate the page by following the
Rotating a page instructions above. When you are through simply left click on the page and
you will be returned to the thumbnail view.
Rescanning the document:
If you need to rescan the document, you can press the Rescan button.
If the document is scanned to your satisfaction press the OK button, this will save the scanned document
and allow you to scan another document on the current file. If you are through scanning for this file press
the Done button. This will save all the documents on this file in the database and return you the file
selection screen.
Note: All scanned documents are placed in the scanned queue. These documents will then need
to be reviewed and when approved they need to be moved to the Send to County folder before
they will be sent to the County Recorders Office.
Page 6
03/03/2000
Electronic Recording System User Manual
Opening an existing file:
To access a file that has been scanned but not yet recorded by the County Recorders Office, you need to
return to the desktop and select either File;Open or click on the
button on the toolbar.
Enter the escrow number and press enter or click on OK.
This will display the Display Documents screen;
Page 7
03/03/2000
Electronic Recording System User Manual
Allows you to
change the
display size of
the document.
This displays
either a
thumbnail view
or a single
page.
Returns
you to the
desktop.
List of all the
documents
scanned on this
file.
Prints the
selected
document.
Page 8
03/03/2000
Electronic Recording System User Manual
To see additional information about the file you can click on the File Info tab.
Page 9
03/03/2000
Electronic Recording System User Manual
Queues:
To see the queues make sure that you are at the ERS desktop and click the
This is a list of
the queues.
button on the toolbar.
This displays
additional
information.
Page 10
03/03/2000
Electronic Recording System User Manual
If a plus sign (+) is next to the name of a queue you can click on the + and that queue will be expanded to
show you what files are in the queue. In the above example if we click on the + next to Scanned this is
what we see;
Page 11
03/03/2000
Electronic Recording System User Manual
Now it shows us that file number 00000404 has been scanned. Note that there is plus (+) sign next to
00000404, if we click on the plus sign we will see a list of the documents that have been scanned on this
file;
List of
documents
scanned on this
file.
Page 12
03/03/2000
Electronic Recording System User Manual
If we want to see information on the file itself we can left mouse click on the folder titled 00000404 and
the information will be displayed;
Page 13
03/03/2000
Electronic Recording System User Manual
If we want to see a document that has been scanned we can click on the title of the document;
Displays a
thumbnail of the
document.
If the you want to view a single page simply left click on the page and it will be enlarged, to return to the
thumbnail view click on the page.
Page 14
03/03/2000
Electronic Recording System User Manual
Moving a File to another Queue:
If you would like to move a file to another queue simply right click on the file number and the options
menu will be displayed;
Select Move To, then click on the queue you wish to move the file to. If you select the Hold queue you
will be asked to supply a reason that the file is being placed on hold.
Page 15
03/03/2000
Electronic Recording System User Manual
Printing a file:
If you wish to print right click on the file number and select print this will display the following;
Left click on each item you wish to print and the press the OK button.
Refreshing the queues:
The queue display is refreshed automatically at 1 minute intervals however you can press the F5 key to
refresh the display at any time.
Page 16
03/03/2000
Electronic Recording System User Manual
Sending files to the County Recorders Office:
When you are ready to send the files that are in the "To be sent to County" queue then click on the
button on the toolbar, this will display the Send screen as follows;
List of all files
that are in the
Send To
County Queue.
To select a file simply left click on the file number, to not select a file left click again. To select all the files
press the Select All button. When you have selected the files to send press the OK button. After a few
minutes depending on the number of files being sent the system will display "Send Complete", press OK
and you will be returned to the desktop.
Page 17
03/03/2000
Electronic Recording System User Manual
Address Book:
To access the address book click on the
book.
Cancel
New
Modify
Print
Delete
button on the tool bar, this will display the address
Returns you to the desktop.
Allows you to enter new names and email addresses.
Allows you to modify the selected name entry.
Prints the address book.
Deletes the selected name.
Adding a new name:
To add a new name press the New button, this will display the following;
Enter the name and e-mail address then press OK to add the name or Cancel to cancel the entry.
You will be returned to the address book screen.
Page 18
03/03/2000
Electronic Recording System User Manual
Modifying a Name:
To modify a name first select it by clicking on the name then press the Modify button, this will
display the following screen;
This will be the
name you
selected.
Make your changes then press OK to save them or
press Cancel to cancel you changes. You will be
returned to the address book screen.
This will be the
email address
of the name
you selected.
Deleting a Name:
To delete a name first select the name, then press the Delete button.
You will then be asked to confirm the delete, press Yes to delete it or press No to cancel the
delete. You will be returned to the address book screen.
Printing the Address Book:
From the Address book screen press the Print button, this will display a Crystal Reports © print
preview window as shown below;
To print the report press the
icon.
To maximize the preview window click on the Maximize
Page 19
button.
03/03/2000
Electronic Recording System User Manual
Sending Email Notifications:
If ERS has been configured to send email notifications to the escrow officers when the files are
sent to the County Recorders Office then you don't need to use this function, it is done for you
automatically.
If you wish to use this function then press
screen;
on the toolbar, this will display the following
This will list all
of the dates for
which email
notifications
have not been
sent.
Select the dates by clicking on the date and press OK when you are done.
Press Cancel to return to the desktop.
Page 20
03/03/2000