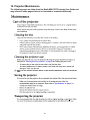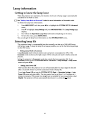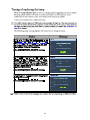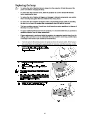
1
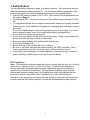
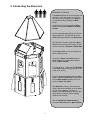
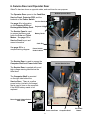
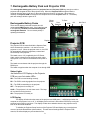
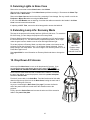
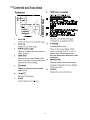
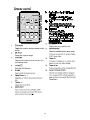
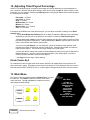
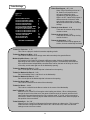
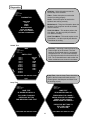
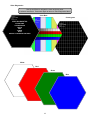
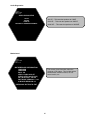
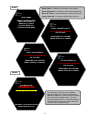
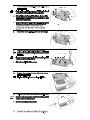
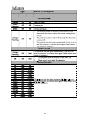
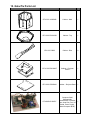
Service Manual
For Parts or Service contact
Betson Enterprises at 1(800) 828-2048
© Chicago Gaming Company 2010 All Rights Reserved
Rev 3.0
1. Safety Notices
The following safety instructions apply to all game operators. We recommend that you
read this page before setting-up GalacTix. Use the following safety guidelines to help
protect the system from potential damage and to ensure your personal safety.
• GalacTix will function at either 115V or 230V. The location of the voltage switch can
be found on Page 8.
• If operating at 230V, the operator must use a CE certified power cord rated for 250V,
5A.
• To help prevent electric shock, plug the system power cables into properly grounded
power sources. These cables are equipped with 3-prong plugs to help ensure proper
grounding.
Do not use adapter plugs or remove the grounding prong from a cable. If you must
use an extension cable, use a 3-wire cable with properly grounded plugs.
• Do not spill food or liquid on your system.
• Do not push any objects into the openings of the system. Doing so can cause fire or
electric shock by shorting out interior components.
• Keep your game far away from radiators and heat sources.
• Do not block cooling vents.
• Before working on the machine be sure to unplug it.
• Be sure to use fuses that meet the specified rating. (5A, 250V Fast-blow) Using
fuses exceeding the specified rating can cause a fire and electrical shock.
• If the supply cord is damaged, it must be replaced by the manufacturer, its service
agent or similarly qualified persons in order to avoid a hazard.
FCC Compliance
Note: This equipment has been tested and found to comply with the limits for a Class A
digital device, pursuant to Part 15 of the FCC Rules. These limits are designed to
provide reasonable protection against harmful interference when the equipment is
operated in a commercial environment. This equipment generates, uses, and can
radiate radio frequency energy and, if not installed and used in accordance with the
instructions manual, may cause harmful interference to radio communications.
Operation of this equipment in a residential area is likely to cause harmful interference,
in which case the user will be required to correct the interference at his own expense.
2
2. Connecting the Projector and Mirror Box
The projector and mirror box are both shipped under the Nose Cone. The Projector
Mounting Board and Mirror Box have dowels so that they will align properly. BE SURE
TO ALIGN DOWELS WITH THE CORRESPONDING HOLES.
Projector
Mirror Box
Projector Mount
Mirror
Mirror Mount Brackets
Dowel Goes In
Center Hole
Projector Base
Dowel Goes In
Center Hole
REQUIRES 1 PERSON
Set the Mirror Box in
position, with the Mirror
over the projection
cutout, making sure the
dowels go in their holes.
Secure it to the Top
Projector Cabinet with
four of the screws in the
bag labeled Projector
and Mirror.
Next, set the complete
Projector Mount
Assembly in position,
with the lens aimed at
the Mirror. When the
dowels are in the holes,
secure the assembly
with four of the screws
in the bag labeled
Projector and Mirror.
The projector has been set up at the factory. Do not adjust
position until you have connected the projector to the cabinet and
turned the machine on.
3
3. Aligning the Projector
Turn GalacTix on and check whether the projector needs to be adjusted. The projector may also need to
be adjusted after removing or servicing it. There is no definitive way to align the projector. Rather, you
may have to make a couple adjustments, then go back and adjust it again.
With GalacTix on, enter the Service Menu, and then enter the Diagnostics Menu. Select Video and open
the WHITE screen. This will project a pure white screen that is the exact size of the gameplay screen.
Use the projector menu to set the keystone to -10. To make the image fit perfectly on the screen, you
may need to adjust the keystone to -8 through -11, but -10 is the GalacTix default setting and the best
place to start.
The projector mount is mounted with slots
so the entire unit can move forward or
backward on the projector base. The
projector base has multiple T-Nuts, so the
screws can be moved to another set if the
slots do not give enough movement. There
is also enough room to aim the projector
right or left.
Move the projector BACK to increase
the size of the projected image.
Move the projector FORWARD to shrink
the size of the projected image.
Turn the base LEFT or RIGHT to center
the projected image.
The projector base always stays in the same position,
while the projector mount moves forward or backward
4
When in the correct position, tighten the
4 screws at the base.
The three bolts circled here are used to
change the pitch and to level the projector.
Raising or lowering the nut in the rear
will change the pitch of the projector,
which will raise or lower the image on
the screen
Adjusting the bolts on either side of the
front will help level the projector,
making the image square on the screen
This side view shows how to adjust the
pitch of the projector
Raising the 2 front nuts and the rear nut
will raise the projector
Raising the 2 front nuts and lowering
the rear nut will move the projected
image up
Lowering the 2 front nuts and raising
the rear nut will move the projected
image down
Adjust the 2 front nuts to change how level
the projector is. This will ensure that the
text on screen is straight.
When it is aligned, the projector itself
will not necessarily be level. To align it
correctly, the projector might be tilted
left or right.
When the projector is correctly aligned,
tighten the nuts on top, then the wing
nuts below.
Manually focus the projector
with the focus ring above the
lens when it is in position.
Adjust the focus so the
center of the screen is the
most clear.
5
4. Connecting the Fins
To protect the fins from warping during shipment, two fins are not attached to the
cabinet. Both fins connect to the Door Hinges.
REQUIRES 1 PERSON
The two fin assemblies connect to the two Door
Hinges. Locate the bag of fasteners labeled Fins.
This bag includes (2) 6-32 x 1/2” Self-Tapping
Screws, (2) 6-32 x 5/8” Self-Tapping Screws, (2) 632 x 7/8” Self-Tapping Screws, and (2) 6-32 x 1”
Self-Tapping Screws.
2x
Open one of the doors to the cabinet. Hold the Fin
Assembly in place on the Door Hinge. Use a 6-32 x
1/2" Self-Tapping Screw to attach it through the top
hole of the fin bracket. Use the 5/8” screw through
the second hole, the 7/8” through the third, and the 1”
screw in the bottom hole. Repeat this on the other
Door Hinge to connect the other Fin Assembly.
6
5. Connecting the Nosecone
REQUIRES 2-3 PEOPLE
The Nose Cone has an A/C access hole next
to the fan. If you are going to run the A/C
through the top of the game, go to page 10
for instruction before installing the Nose
Cone.
Locate the bag of fasteners labeled Nose
Cone, which contains (24) #6 x 5/8” Black
Screws.
Find the cable harness hanging over the top
edge of GalacTix. This will connect to the
Chase Top cable harness in the Nose Cone.
With the help of another adult, lift the Nose
Cone to the top of the main cabinet. Be very
careful to not hit the Projector or Mirror Box
Set the Nose Cone on top of the cabinet so
that it is still easy to lift.
Connect the Chase Top Cable inside the
Nose Cone to the corresponding cable on
top of the Main Cabinet.
Turn the game on. Check that all LED PCBs
in the Nose Cone are lighting up and the fan
in the top is running.
Push the Chase Top Cable inside the Nose
Cone. Adjust the Nose Cone so that it slides
onto the Main Cabinet, making sure not to
pinch the Chase Top Cable.
With GalacTix turned on, walk around the
cabinet and check that there are no shadows
on any of the marquees. If there is a
shadow, lift the Nose Cone on that side and
adjust what is causing it (cables, packing
material, and etcetera).
Use the (24) #6 x 5/8” Black Screws to
secure the Nose Cone to the Main Cabinet.
7
6. Service Door and Operator Door
GalacTix has two doors on opposite sides, and each has its own purpose.
The Operator Door opens to the Cash Box,
Service Panel, Projector PCB, and the
backside of the Power Switch.
Behind Operator Door
Service Panel
See page 9 for information
on the Projector PCB and
Rechargeable Battery Pack. Projector PCB
The Service Panel is used
to access the Menus and
holds the Coin and Ticket
Meters. See page 13 for
Service Panel layout and
menu information.
Battery Packs
Cash Box
See page 50 for a
complete wiring diagram
Power Switch
Under Cabinet
The Service Door is used to access the
Computer Shelf and Power Inlet Plate.
Behind Service Door
The Service Door is marked with a red
high voltage warning label below the
ticket door.
The Computer Shelf is mounted
on the right side behind the
Service Door. There is a yellow
power button (circled in the image)
that is used to turn on the computer
if the BIOS battery needs to be
replaced.
Power Supply Voltage Switch
115V / 230V
Power Inlet Plate
8
Computer Shelf
PC Power
Button
7. Rechargeable Battery Pack and Projector PCB
The rechargeable battery pack powers the projector fans and Projector PCB long enough to cool the
projector and elongate the life of the projector lamp. When the Projector PCB recognizes that the
computer has shut down, it will turn on the external projector fans for 3-5 minutes. When power is
restored, the Projector PCB will recognize the computer and turn the Projector back on. The battery
pack will recharge while the game is on.
Reset
Button
Rechargeable Battery Packs
There are two battery packs that contains four AA
rechargeable NiMH batteries each. If the batteries need
to be replaced, you MUST use nickel-metal hydride
rechargeable batteries. Do not reverse polarity if
replacing the batteries.
To Fans
From
Batteries
USB
12V
Display
Projector PCB
The projector PCB is located behind the Operator Door,
which accesses the cash box. It is used to turn the
projector on or off. When the projector turns on, the PCB
will automatically adjust the brightness, contrast and
horizontal flip of the projector.
The board runs on 12V, supplied by the LCD Power
Cable, which is drawn from the ticket low switch cable
while power is on, and from the batteries when power is
off.
The board communicates with the projector through the
RS232 port.
The board recognizes when the computer is on through USB.
Status Lights
Just below the LCD Display on the Projector
PCB is a row of six status LEDs.
12V
HB – The PCB is on and working correctly.
RX – The PCB is receiving signals from the projector.
TX – The PCB is transmitting to the projector.
OFF – The projector is currently off.
COOL – The projector is in cool down mode. The lamp
will cool before coming back on.
ON – The projector is currently on.
LCD Display
The display will also show the status of the projector and USB power. It will display whether the
computer or the projector is on or off. It will display how much time is left until the PCB will try turning the
projector back on during cool down. The display will also show whether there are any projector errors,
such as an abnormal shutdown.
To initialize the Projector Setup function of the Projector PCB and display any errors that have
occurred, push the Reset Button (shown above). This will reset all settings that the Projector PCB
controls, as well as display any accumulated errors.
9
Mini Din 8
8. Servicing Lights in Nose Cone
Remove the screws that hold the Nose Cone to the Cabinet
With the help of another person, lift the Nose Cone up without removing it. Disconnect the Chase Top
Cable to free the Nose Cone.
Remove the Nose Cone and set it on the floor, protecting it from damage. Be very careful not to hit the
Projector or Mirror Box when removing the Nose Cone.
If one of the LED Boards was not working, check that the cables connected to the boards in the Nose
Cone have not become disconnected.
If replacing a CCFL Tube, remove the white lamp guard to access the bad bulb.
9. Extending Lamp Life: Economy Mode
The lamp in the projector will normally last from 3,000 to 4,000 hours. To extend the
life of the lamp, you can change the projector to Economy Mode.
Economy Mode reduces the projector’s power consumption by 20% and increases
the life of the bulb by 1/3. This will make the projected image darker, which might
make the game’s screen harder to see in areas with bright ambient light.
To set the projector to Economy Mode, use either the remote or the buttons on the
projector to enter the projector’s menu. Go to System Setup: Advanced. Select
Lamp Settings, then Lamp Mode. Use Left or Right to turn Economy Mode on or off.
Press Menu again to exit.
See pages 23-24 for more information on Economy Mode and when to change the
lamp.
10. Drop Down A/C Access
At the top of the Nose Cone is a cut out for drop down A/C access. If you
are running the power cord through the top of the game, THE POWER
CABLE MUST BE CONNECTED WHILE INSTALLING THE NOSE CONE.
There is an IEC cable extension that is installed in the cabinet. It runs from
the top of the cabinet, next to the projector, down to the power inlet plate
behind the Service Door.
Find the 6’ power cable in the Cash Box. Feed the female end of this cable
down through the top of the hole in the Nose Cone, leaving the male end of
the cable sticking out of the top.
As you are connecting the Nose Cone (See page 7) connect the female
end of the power cable to the male end of the extension next to the
projector.
Finally, open the Service Door and connect the other end of the extension
cable to the power inlet plate.
10
MX613ST
Projector Lamp
Part Number
000-LMP-5JJ3T05
11.
11
12
12. Adjusting Ticket Payout Percentage
GalacTix is a skill-based game, and payout percentage will change depending on the demographic of
your customers. With the default game settings, which can be found on page 15, GalacTix pays out 8-9
tickets per coin. On average, changing the Difficulty without changing the default ticket values will adjust
the ticket payout as follows:
Extra Hard: ~3 Tickets
Very Hard: ~4 Tickets
Hard: ~5 Tickets
Medium Hard: 6-7 Tickets
Medium: 8-9 Tickets
Medium Easy: 10-11 Tickets
Easy: 12-13 Tickets
If the payout is still different from the desired payout, you can adjust a number of settings in the Game
Settings menu.
- Turning Auto Mothership Difficulty ON will let GalacTix adjust the difficulty of the mothership,
depending on the skill level of the players in the location to match the Ideal Ticket Payout.
-Change Mothership to Easy to open the space between the two ships, making it easier to hit the
Bonus and increase the ticket payout. Change Mothership to Hard to close the space, which will
make it more difficult and lower the ticket payout.
-If you are using Fire Buttons, you can adjust the number of missiles a player gets per credit.
Increase the number of missiles to raise the ticket payout. Decrease the number of missiles to
lower the ticket payout. This will cause a large change in the ticket payout.
-You are also able to change the number of tickets awarded for hitting every type of ship and the
Mothership Bonus. Lower the number of tickets awarded to lower ticket payout, or raise the
number of tickets awarded to raise the ticket payout.
- See Page 14 for the range of ticket settings
Divide Tickets By 2
For locations that value a single ticket as two tickets, GalacTix can award half as many tickets to the
player as shown in game. This setting can be found at the bottom of Ticket Settings in the service menu.
Note that when DIVIDE TICKETS BY 2 is on, all ticket payout settings should be set to an even number.
13. Main Menu
The Service Panel is located behind the Operator Door, on top of
the cash box. Press Menu to enter the service menu and to
make selections. Use Up and Down to navigate the menus
and change selected settings.
0000001
Menu
Up
Service
Down
Tickets
0000001
Coins
Volume
- Set Volume from 0-100
13
GALACTIX
CHICAGO GAMING
V 0.9.7
MARCH 3, 2010
Main Menu
VOLUME 50
TICKET SETTINGS
GAME SETTINGS
AUDITS
TICKET DIAGS
DIAGNOSTICS
RESET MENU
UPDATE
EXIT WITHOUT SAVING
EXIT AND SAVE
Ticket Settings
Ticket Fixed Payout – Off / 1-20
When Ticket Fixed Payout is set to 120, GalacTix will payout that set
amount of tickets every time,
regardless of what the player hits.
When it is OFF, GalacTix will payout a
different amount of tickets for each
type of ship a player hits. You can
adjust those values with the following
settings.
GALACTIX
CHICAGO GAMING
V 0.9.7
MARCH 3, 2010
Tickets Menu
TICKET FIXED PAYOUT
TICKETS FOR INNER GUARD
TICKETS FOR OUTER GUARD
TICKETS FOR SQUADRON
TICKETS FOR EXPLOSION
TICKETS FOR MOTHERSHIP MISS
MOTHERSHIP MISS ZONES
OFF
2
3
5
2
1
ON
TICKETS FOR MOTHERSHIP ZONE 1
TICKETS FOR MOTHERSHIP ZONE 2
TICKETS FOR MOTHERSHIP ZONE 3
2
4
6
Tickets for Inner Guard – 0-30
These are the common ships circling
closest to center
TICKETS FOR BONUS MISS
TICKETS FOR BONUS
AUTO TRY RELOAD
TICKET DIVIDE BY 2
10
100
ON
OFF
Tickets for Outer Guard – 0-30
These are the common ships circling
outside of others
Tickets for Squadron – 0-30
These less common ships appear on
screen, circle the mothership and leave
RETURN TO MAIN MENU
Tickets for Explosion – 0-30
This is when a player’s missile hits another exploding missile
Tickets for Mothership Miss – 0-10
This is when a missile hits the empty center after somebody else gets the Bonus
Mothership Miss Zones – ON / OFF
If this setting is ON, GalacTix will award a different number of tickets for Mothership Miss,
depending on how close the player was to hitting the jackpot. The Mothership is divided into
three zones that have independently controlled ticket values; the back of the ship, the “arms”
of the ship, and the area right next to the Mothership opening.
Tickets for Mothership Zone 1 – 0-30
Zone 1 is the part of the Mothership that is farthest from the opening
Tickets for Mothership Zone 2 – 0-30
Zone 2 is between Zone 1 and Zone 3 on the Mothership
Tickets for Mothership Zone 3 – 0-30
Zone 3 is the part of the Mothership that is closest to the opening
Tickets for Bonus Miss – 0-30
This is when a missile hits the side of the mothership
Tickets for Bonus – 0-200
This is when a missile hits the Bonus number in the center of the Mothership
Auto Try Reload – On / Off
When this is On, GalacTix will recognize when loading new tickets. When a ticket passes
through the opto on the ticket mech, the game will wait a couple of seconds, and then it will
start feeding the new tickets through to pay out tickets owed. If it is Off, it will not recognize
new tickets. GalacTix will only pay out owed tickets from a reloaded mech when the player at
that position wins more tickets.
Ticket Divide By 2 – On / Off
When this is On, GalacTix will dispense half as many tickets as a player wins. This is used in
locations where a single ticket has the value of two. When this is On, make sure all ticket
settings are set to an even number.
14
Game Settings
GALACTIX
CHICAGO GAMING
V 0.9.7
MARCH 3, 2010
Difficulty – Easy / Medium Easy / Medium / Medium
Hard / Hard / Very Hard / Extra Hard
GAME SETTINGS
DIFFICULTY
The difficulty level determines how quickly
ships spawn and how fast the ships move.
Easier difficulties have a longer spawn time for
.
a ship after it has been
destroyed, and the
ships move slowly. Higher difficulties keep the
ships spawning more quickly and spinning
faster.
MEDIUM
AUTO MOTHERSHIP DIFFICULTY
ON
IDEAL TICKET PAYOUT
8
MOTHERSHIP
MEDIUM
MISSILE JITTER
5%
COIN DROP DELAY
0%
ACCRUE MISSILES
OFF
BUTTON FIRE DELAY
OFF
COIN PROMPT
“INSERT COIN”
IDLE VOLUME
50%
SECONDS UNTIL IDLE
60
SECONDS PLAYER ACTIVE
10
SQUADRON ONLY IN MULTIPLAYER
OFF
OUTER GUARD ON
INNER GUARD ON
SQUADRON ON
ON
ON
ON
Mothership – Easy / Medium / Hard
This setting changes how large the opening to
the Bonus is. Easy gives more room, while
Hard closes the gap. If Auto Mothership
Difficulty is ON, you cannot directly change
this setting.
RETURN TO MAIN MENU
Auto Mothership Difficulty – ON / OFF
When this setting is turned ON, GalacTix will automatically adjust the difficulty of the mothership
to keep the ticket payout as close to the Ideal Ticket Payout as possible while leaving all other
settings the same. After the first 100 plays, GalacTix compares the actual ticket payout to the
Ideal Ticket Payout. If it is paying out too high, the mothership difficulty will go up, and if it is
paying out too low, the mothership difficulty will go down. If, after some time, the actual ticket
payout is still to far from the ideal payout, you will need to change other settings to adjust payout.
See page 13 for more information on adjusting ticket payout percentage.
Ideal Ticket Payout – 0-30
If Auto Mothership Difficulty is ON, set Ideal Ticket Payout to the desired average number of
tickets to be paid out per credit. If Auto Mothership Difficulty is OFF, this setting is inaccessible.
Missile Jitter – 0-10%
Missile Jitter is another setting that controls the difficulty of the game. This setting will vary the
speed at which a player fired missile will travel, and is used to introduce a slight element of
randomness into the game. Changing Missile Jitter to 0% will cause every missile fired by every
player to travel with the exact same speed. As you increase the percentage, every missile will
have a wider range of speeds, up to 10% faster or slower than the default speed. A low jitter
percentage is easier, and a high missile jitter is more difficult.
Coin Drop Delay – 0%-15%
Coin Drop Delay, like Missile Jitter, is a setting that adjusts the difficulty of the game. With coin
drop delay set to 0%, the missile will be fired as soon as GalacTix recognizes that a player has
entered a credit. If this setting is set to anything above 0%, there will be a small delay (up to
15%) between the credit being recognized and the missile being fired.
Accrue Missiles – Off / 1-5
This is used to set how many missiles a player receives per credit, and it can only used when the
cabinet has the optional Fire buttons installed. If the game does not have fire buttons, Accrue
Missiles must be set to Off.
Button Fire Delay – ON / OFF
If this is ON, there will be a 1 second pause after firing a missile before a player can fire again.
Coin Prompt – “Insert Coin” / “Swipe Card” / “Insert Key”
This changes the player prompt. Change the Coin Prompt to match the input method that is
installed on the game.
15
Ticket Settings Continued
Idle Volume – 20%-100%
Set the volume when the game goes idle as a percentage of main volume
Seconds Until Idle – 60-300
Set the time it takes the game to go idle
Seconds Player Active – 1-60
When more than one person is playing, GalacTix automatically decreases the ships’ respawn
time to keep the difficulty the same for each player. This setting adjusts how long each player
counts as active.
Squadron Only In Multiplayer – ON / OFF
When this setting is ON, the Squadron ships will only appear when more than 1 player is active
Outer Guard On – ON / OFF
Inner Guard On – ON / OFF
Squadron On – ON / OFF
These three settings allow you to turn OFF any of the three
ship types. If this is set to ON, that ship type will appear in
game. If it is set to OFF, that ship type will not appear.
Audits
GALACTIX
CHICAGO GAMING
V 0.9.7
MARCH 3, 2010
AUDITS
CURRENT
LIFETIME
TOTAL COINS
TOTAL TICKETS
TICKETS PER COIN
0
0
0
0
0
0
COIN CHUTE 1
COIN CHUTE 2
COIN CHUTE 3
COIN CHUTE 4
COIN CHUTE 5
COIN CHUTE 6
0
0
0
0
0
0
0
0
0
0
0
0
TICKETS 1
TICKETS 2
TICKETS 3
TICKETS 4
TICKETS 5
TICKETS 6
0
0
0
0
0
0
0
0
0
0
0
0
GUARD INNER
GUARD OUTER
SQUADRON
MOTHERSHIP MISS
PRIZE MISS
EXPLOSION
MOTHERSHIP
0
0
0
0
0
0
0
0
0
0
0
0
0
0
0Y 0D 00:00:00
TIME ON
PLAY TIME 0Y 0D 00:00:00
0Y 0D 00:00:00
0Y 0D 00:00:00
PRESS DOWN TO CLEAR CURRENT AUDITS
PRESS MENU TO EXIT
The Audits Screen shows Total Coins, Total Tickets and Tickets Per Coin
to calculate the payout percentage. This screen also shows the number
of coins entered into each mechanism, number of tickets won from each
mechanism, and the number of times each ship type has been hit.
16
Ticket Diags
GALACTIX
CHICAGO GAMING
V 0.9.7
MARCH 3, 2010
The Ticket Diags menu is used to test the
functionality of each ticket mechanism and
reset owed tickets to zero.
Ticket Tests
RESET ALL TICKETS
DISPENSER 1
DISPENSER 2
DISPENSER 3
DISPENSER 4
DISPENSER 5
DISPENSER 6
RETURN TO MAIN MENU
Reset All Tickets
Selecting this will reset owed tickets for
every player back to zero
Dispenser 1-6
Choose a ticket dispenser from this list
to run diagnostics on that specific
mechanism. This will take you to a
new screen.
This is the individual ticket diagnostic menu.
From here you can see the status of each
mech, check if the mech can see the notch in
the tickets, test the mech by dispensing a
ticket, or reset owed tickets for one mech,
rather than all six at once.
GALACTIX
CHICAGO GAMING
V 0.9.7
MARCH 3, 2010
Status – Ready / Dispensing / Error
The status shows what state the
mechanism is in.
DISPENSER 1
STATUS: READY
OWED: 0
Owed – Shows how many tickets are currently
owed at that position
SWITCH: OPEN
Switch – Shows whether the ticket notch
switch is open or closed.
PRESS SERVICE TO RESET
PRESS UP TO RETRY
PRESS DOWN TO DISPENSE
Press Service to Reset – Pressing service
while in this menu will reset owed
tickets to zero only for the specific
ticket mechanism you are testing.
PRESS MENU TO EXIT
Press Up to Retry – Press up to force the
mechanism to try to dispense owed
tickets
Press Down to Dispense – Press down to
dispense a single ticket from the mech
you are testing.
17
Diagnostics
Switches – Select this option to test the
functionality of the switches.
GALACTIX
CHICAGO GAMING
V 0.9.7
MARCH 3, 2010
Video – Select this option to test that the
monitor is working properly.
DIAGNOSTICS
Audio – Select this option to test that the
speakers are working correctly.
SWITCHES
LAMPS
VIDEO
AUDIO
MOTHERBOARD
CLICK COIN METER
CLICK TICKET METER
RETURN TO MAIN MENU
Motherboard – This gives information about the
hardware in the computer as well as software
version numbers
Click Coin Meter – This sends a pulse to the
Coin Meter. Use this to quickly test that the
Coin Meter is working.
Click Ticket Meter - This sends a pulse to the
Ticket Meter. Use this to quickly test that the
Ticket Meter is working.
Switch Test
Switches – Activating a switch will cause its
name to light up on the screen. The Coin
switches are activated when the comparator
recognizes a coin. If a coin mech is always
on, check that the switch on the back is set to
N.O. The Ticket switches are active when the
ticket mechanism sees a notch in the tickets.
GALACTIX
CHICAGO GAMING
V 0.9.7
MARCH 3, 2010
SWITCH TEST
COIN 1
COIN 2
COIN 3
COIN 4
COIN 5
COIN 6
TICKET 1
TICKET 2
TICKET 3
TICKET 4
TICKET 5
TICKET 6
SERVICE
MENU
UP
DOWN
FIRE 1
FIRE 2
FIRE 3
FIRE 4
FIRE 5
FIRE 6
PRESS MENU AND SERVICE TO EXIT
Lamp Test – Use the Lamp Test to check the
lights in the fire buttons and make sure the
Chase Lights in the Marquee and Nose Cone
are working properly
Lamp Test
GALACTIX
CHICAGO GAMING
V 0.9.7
MARCH 3, 2010
GALACTIX
CHICAGO GAMING
V 0.9.7
MARCH 3, 2010
LAMP TEST
IO BOARD REVISION: 01
LAMP TEST
IO BOARD REVISION: 01
ALL LAMPS FLASHING
PRESS ANY BUTTON
FOR INDIVIDUAL LAMP TEST
PRESS MENU FOR CHASE 1
PRESS SERVICE FOR CHASE 2
PRESS UP FOR CHASE 3
PRESS DOWN FOR CHASE 4
PRESS FIRE BUTTONS TO
TEST FIRE LAMPS
(IF INSTALLED)
PRESS MENU AND SERVICE TO EXIT
PRESS MENU AND SERVICE TO EXIT
18
Video Diagnostics
Use Up and Down to navigate the menu and press enter
to select a test screen. Press enter again to return to Video Diagnostics Menu.
Color Bars
GALACTIX
CHICAGO GAMING
V 0.9.7
MARCH 3, 2010
Convergence
VIDEO DIAGNOSTICS
GALACTIX
CHICAGO GAMING
V 0.9.7
MARCH 3, 2010
GALACTIX
CHICAGO GAMING
V 0.9.7
MARCH 3, 2010
COLOR BARS
CONVERGANCE
WHITE
RED
GREEN
BLUE
RETURN TO DIAGNOSTICS MENU
Credits: 0
White
Red
Green
Blue
19
Audio Diagnostics
GALACTIX
CHICAGO GAMING
V 0.9.7
MARCH 3, 2010
AUDIO DIAGNOSTICS
100 HZ
1000 HZ
10000 HZ
RETURN TO DIAGNOSTICS MENU
100 HZ – This tests the speakers at 100HZ
1000 HZ – This tests the speakers at 1000HZ
10000 HZ – This tests the speakers at 10000HZ
Motherboard
GALACTIX
CHICAGO GAMING
V 0.9.7
MARCH 3, 2010
MOTHERBOARD INFORMATION:
UNKNOWN
UNKNOWN
BIOS: 150
VIDEO: NVIDIA 9500 GT
AUDIO: INTEL 8201G (ICH7)
NIC: INTEL PRO / 100 VM
SOFTWARE VERSION: V 1.0.1
IO BOARD REVISION: 02
This screen gives information about the
computer in the game. This includes which
Motherboard, the BIOS version, the I/O
board version, etc.
PRESS ANY BUTTON TO EXIT
20
Reset
Reset Audits - Prompts to confirm reset current audits
Reset Adjustments – Prompts to confirm reset adjustments
GALACTIX
CHICAGO GAMING
V 0.9.7
MARCH 3, 2010
Reset All Tickets – Does not prompt to confirm reset tickets
RESET MENU
Factory Reset All – Prompts to confirm factory reset all
RESET CURRENT AUDITS
RESET ADJUSTMENTS
RESET ALL TICKETS
FACTORY RESET ALL
RETURN TO MAIN MENU
GALACTIX
CHICAGO GAMING
V 0.9.7
MARCH 3, 2010
RESET CURRENT AUDITS
THIS ACTION CANNOT BE UNDONE
ARE YOU SURE?
PRESS MENU TO CONFIRM
PRESS SERVICE TO CANCEL
GALACTIX
CHICAGO GAMING
V 0.9.7
MARCH 3, 2010
RESET ADJUSTMENTS
THIS ACTION CANNOT BE UNDONE
ARE YOU SURE?
PRESS MENU TO CONFIRM
PRESS SERVICE TO CANCEL
GALACTIX
CHICAGO GAMING
V 0.9.7
MARCH 3, 2010
FACTORY RESET ALL
THIS ACTION CANNOT BE UNDONE
ARE YOU SURE?
PRESS MENU TO CONFIRM
PRESS SERVICE TO CANCEL
Update
PUTT
CHICAGO GAMING
V 0.9.7
MARCH 3, 2010
SYSTEM UPDATE
WARNING: THIS WILL OVERWRITE FLASH MODULE
PLEASE CONNECT THUMB DRIVE WITH UPDATE AND PRESS MENU
The software on GalacTix can be updated
through a USB drive. Connect the drive with
ONLY the update on it, enter the System Update
Menu and press the Menu button. You can
cancel by pressing Service. When the update is
complete, turn the power off, remove the USB
drive and turn the power back on.
PRESS MENU TO START UPDATE PROCESS
PRESS SERVICE TO EXIT
21
14. Projector Maintenance
The following pages are taken from the BenQ MX613ST Projector User Guide and
may reference some pages that are not included or numbered differently.
22
23
24
25
26
27
28
29
15. GalacTix Parts List
Part Picture
Part Number
Part Name
Qty.
GTX-CCC-LOWCAB
Cabinet - Main
1
GTX-CCC-PROJCAB
Cabinet - Top
1
GTX-CCC-RIBS
Cabinet - Ribs
6
GTX-CCC-PROJMNT
Cabinet – Projector
Mount
1
GTX-CCC-PROJBAS
Cabinet – Projector Base
1
GTX-SUB-PCSHELF
Computer Shelf
Subassembly
(Motherboard, Processor,
Ram, Heat Sink, Fan, I/O
Board, Power Supply,
Metal Computer Shelf)
1
30
000-ELE-270WPWR
270 Watt PC Power
Supply - Sparkle Part
#FSP270-50SNV
1
000-ELE-2GIDECR
IDE Compact Flash
(2GB)
1
000-CBL-FLSHPWR
IDE Compact Flash
Power Cable
1
PUT-PCB-MBIN048
Motherboard D945PLNML S775
800FSB DDR2 UATX
BULK
1
GTX-PCB-USBIO
GalacTix USB I/O Audio
Amp
1
PUT-MLS-AHSNK15
Amp Heat Sink 1516
1
31
000-PCB-VN9502T
Biostar Graphics Card
Part #VN9502THG1YB1RY
1
PUT-ELE-1GBRAM
1GB RAM DDR2 533MHz
PC2-4200
1
PUT-ELE-PRIN780
Processor - Celeron
2.8GHZ S775 533FSB
64BIT BULK
1
PUT-ELE-SUPACC
Celeron Fan/Heat Sink
1
000-MLW-80MMGRD
80mm Fan Grill, for
Processor Fan
1
PUT-MLS-IOMOUNT
IO PCB Mount
1
32
PUT-MLS-PBTNBRK
Power Button Bracket
1
PUT-MLS-VIDOBRK
Video Support Bracket
1
PUT-MLS-ELECPNL
Computer Shelf
1
GTX-PCB-RS232PI
Projector PCB
1
000-ELE-9VACADP
9V A/C Adapter
1
000-CBL-20MDIN8
20' Mini Din 8 Cable,
Male to Male
1
33
000-CBL-10VGAMM
10' VGA Cable, Male to
Male
1
000-CBL-35ADIO2
3.5mm Stereo Audio
Cable, 2'
1
000-CBL-3USBAB
3' USB Cable, A-Male to
B-Male
1
000-CBL-6USBAB
6' USB Cable, A-Male to
B-Male
1
000-ELE-MX613ST
BenQ Digital Projector
MX613ST
1
000-LMP-5JJ3T05
MX613ST Projector
Replacement Lamp, Part
#5J.J3T05.001
1
000-ELE-80MMFAN
Projector Fan, 80mm
2
000-MLW-80MMGRD
80mm Fan Guard
2
34
GTX-PLS-WHTSCRN
Projector Screen Cut to
Size
1
GTX-SUB-NOSCONE
Complete Nose Cone
Assembly (Art Panels,
Brackets, Fan, LED
PCBs)
1
GTX-MLS-NCCAP1
Nose Cone Cap (Rev 0.1)
1
000-ELE-12VDCFN
12V DC Fan, 120mm
1
000-MWF-FANGRIL
4.68” Chrome Fan Guard,
for Nose Cone Fan
1
35
GTX-MLS-NCSBRK1
Nose Cone Side Bracket
(Rev 0.1)
6
GTX-MLS-BASBRK1
Nose Cone Base Bracket
(Rev 0.1)
6
GTX-SUB-CONEPNL
Nosecone Panel
Assembly (Plastic with
Decal and LED Diffuser)
1
GTX-ART-NCONE
Nosecone Art (decal only)
6
36
GTX-PLS-NOSCONE
Polycarbonate Nose
Cone Pieces
6
GTX-MLS-LEDMONT
LED PCB Mount
6
GTX-PCB-LEDARAY
Nose Cone LED PCB
6
GTX-SUB-MIRRBOX
Mirror Box Subassembly
1
GTX-GLS-12X12MR
12" x 12" x 1/8" Mirror
1
37
GTX-MLS-MIRRBKT
Mirror Mount Bracket
2
000-LCK-CH751
CH751 Locks
8
GTX-ART-MARQUEE
Marquee
6
GTX-PCB-LEDPUCK
Marquee LED PCBs
12
GTX-MLS-SPKGRIL
GalacTix Speaker Grill
12
000-SPK-475IN8O
Speakers 4 ¾” 8 Ohm
6
000-LMP-12CCFL
12" CCFL White (2 Bulbs,
1 Inverter)
3
38
000-LMP-12INBLB
Single 12” CCFL Bulb
000-ELE-INVRTER
CCFL Inverter
015-MLS-AGLBRKT
Angle Bracket
12
015-MLS-CFBALST
CCFL Inverter Bracket
3
GTX-MLS-BLNKPLT
Coin Blank Plate
6
GTX-MLS-MECHPLT
Coin Mech Plate
6
39
000-CUR-WEICOIN
Coin Mechanism Model
#S-071CS
6
GTX-MLS-FIREBLK
Fire Blank Plate
6
GTX-ART-COININS
Insert Coin Decal
6
GTX-ART-LOWSIDE
Lower Side Art
6
GTX-ART-TICKETS
Tickets Decal
6
40
GTX-SUB-WNDWART
Side Glass with Art
6
GTX-GLS-BODGLAS
Side Glass 3/16"
Tempered Grey, 22-7/16"
x 32-9/16"
6
GTX-ART-WINDOW
Window Art (Decal only)
6
GTX-SUB-TICKDOR
Ticket Door Assembly
(Includes Frame, Door,
Ticket Holder, Lock,
Ticket Low Switch, Ticket
Low Cable)
6
41
GTX-MLS-TICFRAM
Ticket Door Frame
6
GTX-MLS-TICKDOR
Ticket Door
6
GTX-MLS-TIKHOLD
Ticket Holder
6
000-MCH-DL1275
Ticket Dispenser
Deltronics Model
#DL-1275
6
000-LMP-5MMRED
5MM Red Ticket Low
LED
6
000-LMS-LEDCR17
LED Clip & Ring, Black,
T-1-3/4 LED
6
GTX-MLS-CINCHUT
Coin Chute
6
42
GTX-MLS-COINEXT
Coin Chute Extension
6
GTX-MLS-CONTBRK
Counter Button Plate
1
000-HAP-MBUTTON
Mini Pushbutton, Black
Bezel Yellow Center
4
000-HAP-12VMETR
12V 7 Digit Meter with
Leads
2
GTX-CCC-CASHBOX
Cash Box with Handles
1
000-HDL-4INCHST
4” Chest Handle
2
GTX-MLS-FIREPLT
Fire Switch Plate
6
43
GTX-HAP-FIREBTN
Fire Button
6
000-HAP-MINSWTC
Miniature Snap Switch
6
000-LMP-12VT134
T1-3/4 LED, 12V
6
GTX-MLS-GLASRTN
Glass Retainer Bracket
6
GTX-MLS-ISIDCPL
Inside Coupler
4
GTX-MLS-MARQBRK
Marquee Bracket
6
GTX-MLS-MONTPLT
Mech Mount Plate
6
44
GTX-MLS-RIBMTBK
Rib Mount Bracket
6
000-MLS-PWRPLT
Power Switch Plate for
Alco Switch
1
000-SWC-ALCO16A
Alco Switch
1
000-CBL-6PWR18G
6” Power Cable
1
000-ELE-FILTINL
Filter, Yunpen 6A, IEC
connector
000-ELE-FUSHOLD
Fuse base
1
000-FUS-5A250V
Fuse
1
GTX-MLS-RIBTPBK
Rib Top Bracket
6
GTX-MLS-VLTHING
Vault Hinge
1
45
GTX-MLS-DORHING
Door Hinge
1
GTX-MLS-DORJAMB
Door Jamb
1
GTX-MLS-SIDCOUP
Side Coupler
4
GTX-MLS-FINSTDL
Fin Stud Plate Left
6
GTX-MLS-FINSTDR
Fin Stud Plate Right
6
46
GTX-MLS-FINBASE
Fin Base Mount
6
GTX-SUB-FINS
Fin Assembly with Fin
Base, Left Stud Plate and
Right Stud Plate
6
GTX-PLS-FINSIDE
GalacTix Fin Side
(1 Side)
6
GTX-MLS-CASTBOX
Caster Mount Box
3
000-HDW-3SCASTE
3” Swivel Caster
3
47
000-HDW-5LEGPLT
½” Leg Leveler Plates
4
000-LVR-1213X3
Leg Levelers, ½-13 x 3”
5
GTX-CBL-TICKSWC
GTX-CBL-FIRESWC
Ticket Low Switch Cable
Fire Button Cable
Marquee Chase Light
Cable
Coin and Ticket Cable
Service Cable
Speaker / Marquee Cable
Ticket Low Light Cable
Chase Power Cable
Chase Top Cable
Marquee Power Speaker
AC Wiring Harness
CPU Power Button Cable
Computer Reset Cable
6
1
GTX-CBL-CHASLIT
GTX-CBL-COINTIX
GTX-CBL-SERVICE
GTX-CBL-SPEAKER
GTX-CBL-TICKLIT
GTX-CBL-CHASPWR
GTX-CBL-CHASTOP
GTX-CBL-MARQPWR
GTX-CBL-ACPOWER
PUT-CBL-POWRBRK
PUT-CBL-RESET
48
1
1
1
1
1
1
1
1
1
1
1
16. Block Diagram
This diagram shows how the main components in GalacTix are connected. The Computer Shelf and
Projector plug into the Power Splitter. The A/C Harness powers the Projector PCB while the game is
on, but the Battery Pack powers the Projector PCB and Projector Fans after the game is shut off. The
batteries run the fans for 3-5 minutes after power down, which helps cool the projector and extend the
life of the lamp.
See Page 9 for more information on the Rechargeable Battery Pack and Projector PCB.
WALL
OUTLET
INLET
PLATE
POWER
SWITCH
PROJECTOR
FANS
A/C
PROJECTOR
PCB
BATTERY
PACK
HARNESS
MINI DIN 8
USB
POWER
SPLITTER
PROJECTOR
VGA
COMPUTER
SHELF
STEREO
CABLE
USB
I/O
BOARD
49
17. Wiring Schematic
50
18. Board Layout
51
52
53