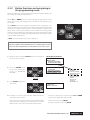
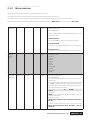
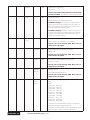
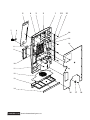
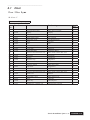
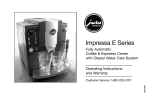
1
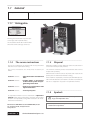
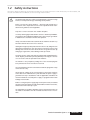
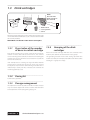
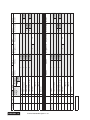
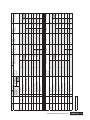
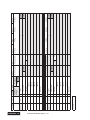
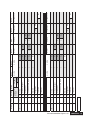
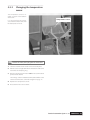
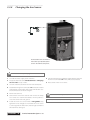
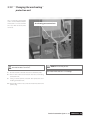
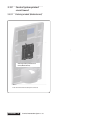
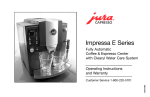
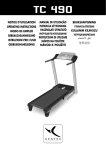
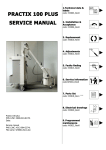
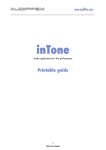
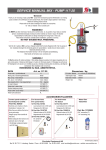
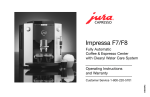
Service Instructions
________
English
__________
Contents
__________________________________________________________
1.1 General_ ___________________________________________ 4
1.1.1 1.1.2 1.1.3 1.1.4 Rating plate. . . . . . . . . . . . . . . . . . . . . . . . . . . . . . . . . . . . . . . . . . . . . . . . . . . .4
These service instructions. . . . . . . . . . . . . . . . . . . . . . . . . . . . . . . . . . . . . . .4
Disposal . . . . . . . . . . . . . . . . . . . . . . . . . . . . . . . . . . . . . . . . . . . . . . . . . . . . . . . 4
Symbols. . . . . . . . . . . . . . . . . . . . . . . . . . . . . . . . . . . . . . . . . . . . . . . . . . . . . . . .4
__________________________________________________________
1.2 Safety instructions_ __________________________________ 5
__________________________________________________________
1.3 Drink cartridges_ ____________________________________ 6
1.3.1 1.3.2 1.3.3 1.3.4 Preset value of the number of doses in a drink cartridge . . . . . . . . .6
Dosing list . . . . . . . . . . . . . . . . . . . . . . . . . . . . . . . . . . . . . . . . . . . . . . . . . . . . . 6
Dosage management . . . . . . . . . . . . . . . . . . . . . . . . . . . . . . . . . . . . . . . . . .6
Grouping of the drink cartridges . . . . . . . . . . . . . . . . . . . . . . . . . . . . . . . .6
__________________________________________________________
1.4 Technical data_______________________________________ 7
CHAPTER 1 - 2
Service Instructions Lynx rev. 03
1
General
_____________________________________
Service Instructions Lynx
_____________________________________
In this section
q
Rating plate
q
The service instructions
q
Symbols
q
Disposal
q
Safety instructions
q
Drink cartridges
q
Technical data
_______________________
1.1 General
Delivery date:
Supplier:
____________________
1.1.1 Rating plate
z
Warnings for actions that may cause personal injury and important notes.
The illustration shows the machine with
two of the drink cartridges removed.
_______________________________________
1.1.2 The service instructions
_______________________________________
1.1.3 Disposal
The service instructions are intended for use by personnel
who have received product training.
When the machine is to be disposed of, this must be done in
an environmentally friendly manner.
The service instructions are divided into 4 sections, of
which:
The machine contains printed circuit boards that can be
disposed of separately.
Otherwise the machine consists of plastic and metal. All the
plastic parts are labelled to facilitate sorting.
section 1 contains safety instructions and technical
data
section 2 contains loading tables, a description
of the control system and programming instructions
section 3 contains fault tracing information with
repair instructions
section 4 contains a list of spare parts
In conjunction with the Service instructions is Operator's
manual which among other things describes the machine
functions and operation, along with instructions for installation and maintenance.
Manufacturer: JEDE AB Box 303 542 23 MARIESTAD, Sweden
Tel: +46 (0)501 67 000, +46 (0)501 67 067
www.jede.com
CHAPTER 1 - 4
Service Instructions Lynx rev. 03
If the machine is replaced by a new one, the JEDE AB representative will take back the old machine. This will ensure that the
old one is scrapped or recycled in a responsible manner.
_______________________________________
1.1.4 Symbols
Warnings for actions that may cause personal
injury and important notes.
Remarks, comments or tips for correct use and to
avoid incorrect operation.
_______________________
1.2 Safety instructions
This advice and these warnings are provided so that you can avoid incorrect use and unnecessary risk of accidents, and
must be read before the installation, use and servicing of the machine.
This product may only be used for its intended purpose. Any other usage
involves a risk of personal injury or damage to the product.
Before servicing this drinks machine – carefully read through these
instructions. This is important to ensure correct operation and is a condition for the guarantee to be applicable.
Keep these service instructions in a suitable safe place.
Use of any cleaning agent that contains solvents is absolutely forbidden.
The machine can be damaged and poisonous gases may be generated.
In addition there would be risk of fire and explosion.
Always remember that the water tank inside the machine contains very
hot water and can cause burns if it is touched.
Although the highest quality materials have been used, and great care
taken during manufacture, this will not prevent the delivery hose from
damage due to wear. Therefore check the hose at regular intervals. By
changing it in good time, water damage will be prevented.
For safety reasons, repairs may only be performed by a qualified professional. Repairs performed by an unqualified person may pose a risk to
users or interfere with the operation of the machine.
The machine is only completely voltage-free if the electrical plug has
been pulled out or the fuse has been unscrewed.
The electrical power point must be located so that the plug can be easily
removed if necessary.
Check that the voltage of the electrical power connection conforms
to the data on the manufacturer’s plate and that the power supply is
grounded correctly in accordance with the applicable standards. We
recommend that the electrical power supply is equipped with an earth
leakage circuit breaker.
Before inserting the power supply plug into the power outlet, check that
the water connection has been made in accordance with the instructions,
and that the main water tap is open.
The manufacturer disclaims all liability if the electrical connections are
not made in accordance with the method described in these instructions.
Service Instructions Lynx rev. 03 CHAPTER 1 - 5
_______________________
1.3 Drink cartridges
NOTE!
This side of the
drink cartridge to
face outwards
1
Jede
3
1. Rubber band
2. Securing latches
3. Carrier
2
Open the plastic packaging on the new drink cartridge, push
it in and lift off the brown carrier. (This is intended for use with
other JEDE products)
NOTE! Make sure that the rubber band is still in place.
_______________________________________
_______________________________________
1.3.1 Preset value of the number
of doses in a drink cartridge
1.3.4 Grouping of the drink
cartridges
Each drink cartridge has a preset value for the maximum
number of doses that can be taken from it. The number
varies according to the contents. At the time of installing the
machine the types of drink have been determined, and the
correct values entered.
The grouping function means that during operation the
machine can offer, for example, black coffee until all the coffee
cartridges in a group are empty.
If for example there is a change to a type of coffee that was
not previously considered, the preset value may need to
be adjusted, to prevent the drink running out before this is
indicated by a steady red LED, or because the contents are
not being optimally used.
_______________________________________
1.3.2 Dosing list
Continuously updated.
_______________________________________
1.3.3 Dosage management
The Operator's manual describes how the number of doses
may need to be adjusted for various reasons. Refer therefore
to the Operator's manual, beginning at page 21.
CHAPTER 1 - 6
Service Instructions Lynx rev. 03
If there are several cartridges with the same contents in the
machine, the software associates them into a group.
_______________________
1.4 Technical data
Weight: 23 kg excluding drink cartridges and a possible payment system
Height, machine: 665 mm
Width: 350 mm
Depth: 460 mm
Voltage: 230 - 240 V
Current consumption: 10 A via an external fuse
Power rating: 2000 W
Operating voltage: 24 V DC
Hot water tank: Volume 2.5 litres
Cold water tank: Volume 10 litres
Capacity: 6 JEDEMATIC drink cartridges
Water connection pressure: 0.2 - 6.0 bar
Service Instructions Lynx rev. 03 CHAPTER 1 - 7
Gematech Innovation
Doc. No. 37004/ENG-1
2
_______________________________________
Control system
Service Instructions Lynx
_______________________________________
In this chapter
q
Loading table
q
System overview
qProgramming
________
English
__________
Contents
__________________________________________________________
2.1 Loading table_ __________________________________________3
2.1.1 Button number. . . . . . . . . . . . . . . . . . . . . . . . . . . . . . . . . . . . . . . . . . . . . . . . . . . 3
2.1.2 Drink cartridge positions. . . . . . . . . . . . . . . . . . . . . . . . . . . . . . . . . . . . . . . . . .3
2.1.3 Loading variants for the Lynx . . . . . . . . . . . . . . . . . . . . . . . . . . . . . . . . . . . . . 4
___________________________________________________________
2.2 System overview_________________________________________12
2.2.1 Control units. . . . . . . . . . . . . . . . . . . . . . . . . . . . . . . . . . . . . . . . . . . . . . . . . . . 12
2.2.2 Documentation overview . . . . . . . . . . . . . . . . . . . . . . . . . . . . . . . . . . . . . . 12
2.2.3 Authorization. . . . . . . . . . . . . . . . . . . . . . . . . . . . . . . . . . . . . . . . . . . . . . . . . . 12
2.2.4 Customer programming. . . . . . . . . . . . . . . . . . . . . . . . . . . . . . . . . . . . . . . .12
2.2.5 Recipe programming. . . . . . . . . . . . . . . . . . . . . . . . . . . . . . . . . . . . . . . . . . . 12
2.2.6 System programming. . . . . . . . . . . . . . . . . . . . . . . . . . . . . . . . . . . . . . . . . . 12
2.2.7 The machine modes of operation. . . . . . . . . . . . . . . . . . . . . . . . . . . . . . . 13
2.2.7.1 Programming mode. . . . . . . . . . . . . . . . . . . . . . . . . . . . . . . . . . . . . . . . . . . . . 13
2.2.7.2 Charging mode. . . . . . . . . . . . . . . . . . . . . . . . . . . . . . . . . . . . . . . . . . . . . . . 13
2.2.7.3 Service mode . . . . . . . . . . . . . . . . . . . . . . . . . . . . . . . . . . . . . . . . . . . . . . . . . 13
2.2.7.4 Test mode. . . . . . . . . . . . . . . . . . . . . . . . . . . . . . . . . . . . . . . . . . . . . . . . . . . . . 13
2.2.7.5 Programming mode . . . . . . . . . . . . . . . . . . . . . . . . . . . . . . . . . . . . . . . . . . 13
___________________________________________________________
2.3
Programming_ _______________________________________14
2.3.1
Programming mode. . . . . . . . . . . . . . . . . . . . . . . . . . . . . . . . . . . . . . . . . . . .14
2.3.2
Button functions and navigating in the programming mode . . . .15
2.3.3
Completion of programming. . . . . . . . . . . . . . . . . . . . . . . . . . . . . . . . . . . 16
2.3.4
Menu overview. . . . . . . . . . . . . . . . . . . . . . . . . . . . . . . . . . . . . . . . . . . . . . . . .17
2.3.5
Menu summary. . . . . . . . . . . . . . . . . . . . . . . . . . . . . . . . . . . . . . . . . . . . . . . . 27
2.3.5.2.1 Price setting. . . . . . . . . . . . . . . . . . . . . . . . . . . . . . . . . . . . . . . . . . . . . . . . . . 27
2.3.5.2.2 Statistics . . . . . . . . . . . . . . . . . . . . . . . . . . . . . . . . . . . . . . . . . . . . . . . . . . . . . 27
CHAPTER 2 - 10
Service Instructions Lynx rev. 03
________________________
2.1 Loading table
A loading table defines where the respective drink cartridges should be placed, the group number of each drink (see
Section 1), the number of doses that apply to each type of
drink and whether the whisk is to be used or not.
It is vital that the selected loading table is adhered to
when the drink cartridges are loaded. Otherwise the
drinks menu will not agree with the selections on the
front of the machine.
______________________________________
2.1.1 Button number
An EPROM in the machine contains a number of loading table
variants. On delivery one of these loading tables is loaded
into the working memory. It is easy to change this loading
table and replace it by any of the others in the following list.
Variants can also be modified to suit individual requirements.
See more about this in the 'Programming" section.
_______________________________________
2.1.2 Drink cartridge positions
Position 1 2 3 4 5 6
Button no 1
Button no 2
Button no 3
Button no 4
Button no 5
Button no 6
Button no 7
Button no 8
Loading table no:_______________________
Position
Drink
Group no
1
2
3
4
5
6
Service Instructions Lynx rev. 03
CHAPTER 2 - 11
______________________________________
2.1.3 Loading variants for the Lynx
Rev: F
The Lynx has 14 loading variants as default. Se the following pages for additional
information regarding the drinks.
Variant
Position (compartment) and ingredient
1
2
3
4
5
6
1
Arabica
Espresso
Grande
Nesquik
Lacté
Kristal
Topping
New
Creamlay
2
Arabica
Espresso
Grande
Nesquik
Lacté
Kristal
Topping
New
Creamlay
3
Arabica
Espresso
Grande
Nesquik
Lacté
Kristal
Topping
New
Creamlay
4
Arabica
Espresso
Grande
Nesquik
Lacté
Kristal
Topping
New
Creamlay
5
Arabica
Espresso
Grande
Nesquik
Lacté
Kristal
Topping
New
Creamlay
6
Arabica
Espresso
Grande
Nesquik
Lacté
Kristal
Topping
New
Creamlay
7
Arabica
Arabica
Nesquik
Lacté
Nesquik
Lacté
New Creamlay
Kristal
8
Arabica
Arabica
Nesquik
Lacté
Nesquik
Lacté
New Creamlay
Kristal
9
Espresso
Grande
Espresso
Grande
Nesquik
Lacté
Kristal
Topping
New
Creamlay
10
Espresso
Grande
Espresso
Grande
Nesquik
Lacté
Kristal
Topping
New
Creamlay
11
New Creamlay
Nesquik Lacté
Arabica
Arabica
Arabica
Arabica
12
New Creamlay
Nesquik Lacté
Arabica
Arabica
Arabica
Arabica
13
Arabica
Arabica
Kristal
Whitener
Cappuccino
Nesquik
Lacté
14
Arabica
Arabica
Kristal
Whitener
Cappuccino
Nesquik
Lacté
Volume = 18 cl.
(Espresso = 5 cl.)
Connected compartments
(Box group)
Volume = 13 cl.
(Espresso = 5 cl.)
CHAPTER 2 - 12
Service Instructions Lynx rev. 03
Singel compartments
(No box group)
Service Instructions Lynx rev. 03
CHAPTER 2 - 13
Revision: F
2
18 cl.
1
5 cl.
13 cl.
5 cl.
Vol.
Variant
Drink
Cappuccino
Café Latte
Latte Macchiato
Espresso Chocco
Chocco Top
3
4
5
6
7
Cappuccino
Café Latte
Latte Macchiato
Espresso Chocco
Chocco Top
3
4
5
6
7
Espresso
Café Au Lait
2
8
Coffee
1
Espresso
Café Au Lait
2
8
Coffee
Yes
No
Whipper
1
Number of
dosages
Button
1
3
2
3
Arabica
2
4
3
4
Arabica
Box 1
Yes
Yes
No
No
Yes
Yes
No
No
Yes
Yes
Yes
Yes
No
2
3
1
2
1
Yes
Yes
Yes
Yes
No
Espresso Grande
2
4
2
3
2
Espresso Grande
Box 2
Yes
Yes
4
3
Yes
Yes
Nesquik Lacté
4
4
Nesquik Lacté
Box 3
Kristal
Kristal
Box 4
1
1
3
3
2
Topping
2
2
4
4
2
Topping
Box 5
Yes
Yes
Yes
Yes
Yes
Yes
Yes
Yes
Yes
Yes
Yes
Yes
Yes
Yes
Yes
No
2
2
2
2
2
3
Yes
Yes
Yes
Yes
Yes
No
New Creamlay
3
3
4
4
3
4
New Creamlay
Box 6
CHAPTER 2 - 14
Service Instructions Lynx rev. 03
Revision: F
13 cl.
18 cl.
3
4
Vol.
Variant
Drink
Coffee International
Café Au Lait
Cappuccino
Cappuccino International
Café Latte
Cappuccino Chocco
Chocco Top
3
4
5
6
7
8
Chocco Top
8
2
Cappuccino Chocco
7
Coffee
Café Latte
6
1
Cappuccino International
5
Café Au Lait
3
Cappuccino
Coffee International
2
No
4
Coffee
Yes
Whipper
1
Number of
dosages
Button
1
3
2
3
3
Arabica
2
4
3
4
4
Arabica
Box 1
Yes
Yes
No
Yes
No
Yes
Yes
No
Yes
No
Yes
Yes
Yes
No
2
2
3
1
Yes
Yes
Yes
No
Espresso Grande
3
3
4
2
Espresso Grande
Box 2
Yes
Yes
4
3
Yes
Yes
Nesquik Lacté
4
4
Nesquik Lacté
Box 3
Kristal
Kristal
Box 4
1
1
3
2
2
Topping
2
2
4
2
2
Topping
Box 5
Yes
Yes
Yes
Yes
Yes
Yes
Yes
Yes
Yes
Yes
Yes
Yes
Yes
Yes
Yes
No
2
2
2
2
2
3
Yes
Yes
Yes
Yes
Yes
No
New Creamlay
3
3
4
3
3
4
New Creamlay
Box 6
Service Instructions Lynx rev. 03
CHAPTER 2 - 15
Revision: F
6
18 cl.
5
5 cl.
13 cl.
5 cl.
Vol.
Variant
Drink
Chocolate
Espresso Chocco
5
6
Chocolao
Espresso Chocco
5
6
Hot water
Café Latte
4
8
Cappuccino
3
Espresso
Café Au Lait
2
7
Coffee
1
Hot water
Café Latte
4
8
Cappuccino
3
Espresso
Café Au Lait
2
7
Coffee
Yes
No
Whipper
1
Number of
dosages
Button
1
3
2
3
Arabica
2
4
3
4
Arabica
Box 1
Yes
Yes
No
No
Yes
Yes
No
No
Yes
Yes
Yes
No
2
3
2
1
Yes
Yes
Yes
No
Espresso Grande
2
4
3
2
Espresso Grande
Box 2
Yes
Yes
3
5
Yes
Yes
Nesquik Lacté
4
6
Nesquik Lacté
Box 3
Kristal
Kristal
Box 4
1
3
2
Topping
2
4
2
Topping
Box 5
Yes
Yes
Yes
Yes
Yes
Yes
Yes
Yes
Yes
No
2
2
2
3
Yes
Yes
Yes
No
New Creamlay
3
4
3
4
New Creamlay
Box 6
CHAPTER 2 - 16
Service Instructions Lynx rev. 03
Revision: F
13 cl.
18 cl.
7
8
Vol.
Variant
Drink
Chocolate
5
8
Hot water
(empty)
Coffee white with sugar
4
7
Coffee white
3
(empty)
Coffee with sugar
2
6
Coffee
Hot water
1
8
(empty)
Chocolate
5
7
Coffee white with sugar
4
(empty)
Coffee white
3
6
Coffee with sugar
2
No
Coffee
Yes
Whipper
1
Number of
dosages
Button
Arabica
Arabica
Box 1
3
3
3
3
4
4
4
4
Arabica
Arabica
Box 2
No
No
No
No
No
No
No
No
5
Nesquik Lacté
6
Nesquik Lacté
Box 3
Yes
Nesquik Lacté
Yes
Nesquik Lacté
Box 4
No
No
2
2
No
No
New Creamlay
4
4
New Creamlay
Box 5
1
1
Kristal
2
2
Kristal
Box 6
No
No
No
No
Service Instructions Lynx rev. 03
CHAPTER 2 - 17
Cappuccino International
Café Latte
Latte Macchiato
Espresso Chocco
Cappuccino Chocco
Chocco Top
2
3
4
5
6
7
8
18 cl.
Revision: F
10
Café Au Lait
1
Café Au Lait
Cappuccino International
Café Latte
Latte Macchiato
Espresso Chocco
Cappuccino Chocco
Chocco Top
1
2
3
4
5
6
7
8
5 cl.
13 cl.
Espresso
Espresso
No
5 cl.
Yes
Whipper
9
Drink
Number of
dosages
Button
Vol.
Variant
Espresso
Grande
Espresso
Grande
Box 1
2
3
1
3
3
3
2
3
4
2
5
4
4
2
Yes
Yes
Yes
Yes
Yes
No
Yes
Espresso Grande
Yes
Yes
Yes
Yes
Yes
No
Yes
Espresso Grande
Box 2
Yes
Yes
Yes
4
3
3
Yes
Yes
Yes
Nesquik Lacté
4
4
4
Nesquik Lacté
Box 3
Kristal
Kristal
Box 4
1
1
1
3
3
2
Topping
2
2
2
4
4
2
Topping
Box 5
Yes
Yes
Yes
Yes
Yes
Yes
Yes
Yes
Yes
Yes
Yes
Yes
Yes
Yes
Yes
Yes
Yes
Yes
No
2
2
2
2
3
2
3
Yes
Yes
Yes
Yes
Yes
Yes
No
New Creamlay
3
3
3
4
4
3
4
New Creamlay
Box 6
CHAPTER 2 - 18
Service Instructions Lynx rev. 03
Revision: F
13 cl.
18 cl.
11
12
Vol.
Variant
Drink
(empty)
7
(empty)
7
Hot water
(empty)
6
8
(empty)
5
Chocolate
3
(empty)
Coffee white
2
4
Coffee
1
Hot water
(empty)
6
8
(empty)
5
Chocolate
3
(empty)
Coffee white
2
Yes
No
Whipper
4
Coffee
1
Number of
dosages
Button
No
2
No
New Creamlay
4
New Creamlay
Box 1
Yes
5
Yes
Nesquik Lacté
7
Nesquik Lacté
Box 2
Arabica
Arabica
Box 3
Arabica
Arabica
Box 4
3
3
4
4
Arabica
Arabica
Box 5
Arabica
Arabica
Box 6
No
No
No
No
Service Instructions Lynx rev. 03
CHAPTER 2 - 19
Revision: F
14
18 cl.
13
5 cl.
13 cl.
5 cl.
Vol.
Variant
Cappuccino
Chocolate
Teawater
6
7
8
Coffee white with sugar
4
Espresso
Coffee white
3
5
Coffee with sugar
2
Teawater
8
Coffee
Chocolate
7
1
Cappuccino
6
Coffee white with sugar
4
Espresso
Coffee white
3
5
Coffee with sugar
No
2
Yes
Whipper
Coffee
Drink
1
Number of
dosages
Button
Arabica
Arabica
Box 1
2
3
3
3
3
2
4
4
4
4
Arabica
Arabica
Box 2
Yes
No
No
No
No
Yes
No
No
No
No
1
1
Kristal
2
2
Kristal
Box 3
No
No
No
No
2
2
Whitener
3
3
Whitener
Box 4
No
No
No
No
Yes
8
Yes
Cappuccino
12
Cappuccino
Box 5
Yes
5
Yes
Nesquik Lacté
7
Nesquik Lacté
Box 6
________________________
2.2 System overview
_______________________________________
2.2.1 Control units
The system consists of the following sub-systems:
qBM Ordering module control unit - BM
qTank module control unit - TM
See more about this in the 'Circuit board control system'
section, chapter 3.
______________________________________
2.2.4 Customer programming
With A authorization it is also possible to display an amount of
non-alterable statistical information, such as the total value
of sales, amount of money in the coin box (if the machine
includes a coin mechanism), the total number of sales, the
total number of sales per drink and the total number of
faults per fault code.
See more about this in the 'Menu overview' section.
___________________________________
2.2.2 Documentation overview
These Service Instructions describe all the parameters that
can be programmed/displayed, and the commands that can
be executed.
The Operator's Manual contains descriptions of the programming that the user can perform, without the need to
engage service personnel.
_______________________________________
2.2.3 Authorization
The system has three authorization levels, A, B and C, associated with the type of programming.
qCustomer programming (authorization level A). Described in the ‘Operator's Manual’.
qRecipe programming (authorization level B)
qSystem programming (authorization level C)
_______________________________________
2.2.5 Recipe programming
The amount of water to be added to the drink, the number of
doses and the application of whisking are determined here.
See more about this in the 'Menu overview' section.
______________________________________
2.2.6 System programming
Here it is possible to state whether the basic settings shall
be used or not, which country and which coin table shall
apply, the water temperature in the tank and resetting of
all the statistical information.
See more about this in the 'Menu overview' section.
Each authorization level has its own service code. In the case
of authorization level A the code is preset to 0000 and does
not need to be entered. Configuration with this authorization
is performed by the user.
Service codes B and C are also preset and are given in the delivery documentation.
Personnel who are to manage the recipes and system, i.e. be
assigned authorization levels B and C, enter their codes in the
”Password” menu.
These thereby open the menus that require these codes (see
below, and the programming example later in these instructions).
Authorization level B covers level A and authorization level C
covers level B.
CHAPTER 2 - 20
Service Instructions Lynx rev. 03
_______________________________________
2.2.7 The machine modes of operation
The machine has five ‘states’ or functional modes:
qOperating mode
qCharging mode
qService mode
qTest mode
qProgramming mode
_______________________________________
2.2.7.1 Programming mode
Settings: When the machine door is closed, the electrical
plug is inserted into the wall socket.
When the electrical plug is inserted into the wall socket, the
data is read out from the EPROM and stored in RAM. In order
to be able to read and write data as quickly as possible to the
EPROM, nothing else happens during this period. Thus the display cannot be updated, so it is completely blank. In the case
of the very first start-up, certain data is initiated and written
back to the EPROM. Writing to the EPROM takes longer than
reading from it, so during the very first start-up the display
remains blank for longer than during subsequent starts.
_____________________________________
2.2.7.3 Service mode
In this ‘mode’ the machine can be operated without the water
functions being activated (filling and water heating).
Settings:
qRemove the mains power plug from the wall socket while
the door is closed
qOpen the door
qPut the mains power plug back into the wall socket.
_______________________________________
2.2.7.4 Test mode
The machine components are tested by means of the software.
The “Test operation” section in Chapter 3 contains a detailed
description and setting up instructions.
_______________________________________
2.2.7.5 Programming mode
Please refer to the next page.
When this part of the starting sequence has been completed,
the machine is ready for operation.
If a button is pressed, drink selection begins. If no button is
pressed in the next 10 seconds, drink selection ceases.
If a coin is placed in the coin mechanism, payment begins.
The cash balance is shown on the display.
If a drink has been selected and the cash balance is too low,
payment begins after the selection of a drink. The display
shows how much is to be paid. If no button is pressed within
the next 10 seconds, drink selection ceases.
_______________________________________
2.2.7.2 Charging mode
In the Lynx machine, charging and rinsing take place via a
“change panel” located on the inside of the door.
Settings: Open the door when the machine is in operating
mode.
Charging of the drink cartridges and rinsing of the mixer bowls
are described in detail in the Operator's Manual.
Service Instructions Lynx rev. 03
CHAPTER 2 - 21
________________________
2.3 Programming
The machine is equipped with a microprocessor to control the
dosing system and to store data (statistical information).
On delivery, the microprocessor is preset for the basic version.
The system can be easily updated in accordance with individual wishes by using the instructions below.
The programming language is English.
_______________________________________
8
2.3.1 Programming mode
1 Open the door.
2 Hold button 8 pressed in for about 10 seconds.
The door may be closed or left open.
The display will show the Main Menu
Alternatively it is possible to press directly on the programming button (Config. button) on the control printed circuit
card behind the inner panel of the door. Use a pen or similar
thin object.
1
2
1. Inner panel of the door
2. Aperture for the programming button(Config button)
CHAPTER 2 - 22
Service Instructions Lynx rev. 03
________________________________________________
2.3.2 Button functions and navigating in the programming mode
When the machine is in the programming mode, the additive buttons on
the menu panel change their functions.
When UP and DOWN (see the arrow markings) are pressed, the menu
cursor moves up or down along the left side of the menu alternatives on
the display.
When Select is pressed, the alternative that the cursor is pointing at is selected, and if the cursor is pointing at a sub-menu the alternatives for that
sub-menu are displayed. If the cursor is instead pointing at a parameter
when Select is pressed, the parameter is then shown in its editing mode
(if the user has the authority to edit parameters) or the display mode (if the
user does not have the authority to edit parameters). In the latter case the
value is shown continuously.
Back
Select
If Back is pressed, the previous menu is displayed.
Not all the menus and parameters are always shown. The menus and
parameters that are shown depend on the user’s authorization level and
also on the values for parameters in other places in the menu system.
1 Open the door and hold button 8 on the menu panel
pressed in for 5 seconds.
2 Press the DOWN arrow
to go to the desired submenu, e.g. ”BEVERAGE
BUTTON"
The display indications:
main menu
->password
display language
beverage buttons
main menu
password
display language
->beverage buttons
Back
Select
3 Press SELECT to go to the
sub-menu.
beverage button
->button x
copy button
main menu
->password
display language
beverage buttons
option buttons
variant settings
machine settings
payment
machine info
statistics
hardware test
Back
4 Continue in the same way until the display shows the
value that is to be edited.
Increase or decrease the value using the UP or DOWN
arrow keys to obtain the required value.
Confirm the value using SELECT
Go back in the Menu List using BACK.
If the value can be edited, and the correct authorization
code has been entered, the value will flash on and off.
Otherwise the value will remain shown continuously.
Service Instructions Lynx rev. 03
CHAPTER 2 - 23
_______________________________________________
2.3.3 Completion of programming
1 Return to the Main Menu
2 Press button 1 (exit)
When programming is exited in this way, the changes that have been made
are stored as permanent. If the power to the machine is cut off before
programming has been exited in this way, the changes will be lost.
If a parameter and the authorization level permit a value to be changed,
the current value is shown flashing.
CHAPTER 2 - 24
Service Instructions Lynx rev. 03
1
exit
____________________________________
2.3.4 Menu overview
The programming of the machine is based on a number of menus.
The display on the front of the machine has four rows, with 20 characters in each row.
The parameters are either alterable or non-alterable, the latter applying to statistical and similar information.
Alterable parameters and statistical information are obtained by selecting Main menu, and in some cases Sub-menu.
Password
A/A
Authorization level
Value: 0000-9999
Here the authorization code can be changed. The code
has 4 characters.
Authorization A
The code is 0000 and does not need to be entered.
Authorization B
The code is reserved for authorized service technician.
Authorization C
The code is reserved for authorized service technician.
Display
Language
Beverage
Buttons
Button X
Price
A/C
Language setting
Swedish
German
French
English
Czech
Finnish
Norwegian
Spanish
Hungarian
Dutch
A/B
Price for a single drink
Value: 0.000-9999
For drink selection buttons 1-8 the price of the drink is
shown here.
If the number of decimals in the price has been defined
as 2, 00.00 is shown when editing begins. If authorization
code B has been entered, the first two figures before the
decimal point flash on and off.
After editing using the UP and DOWN arrows and
SELECT, the pair of digits after the decimal point flash
on and off.
NOTE! To be able to edit the price, “Same price for all”
must be set to “NO”.
Refer to the menu:
Main menu>Payment>Price Settings>Same price
for all
For the number of decimal places, refer to the menu:
Main menu>Payment>Coin Validator > No of
decimals
Service Instructions Lynx rev. 03
CHAPTER 2 - 25
Volume
A/B
Volume for a single drink.
Value: 0-24
Can be seen on the loading table. Does not normally
need to be edited. The volume is either 13,18 or 24 cl.
Valve
A/B
Hot or cold drink.
Value: Hot Water/Tea Water/Cold Water
HotWater Settings: The machine usually has three
outlet valves. All are for hot water. The valve that is to
be used is selected automatically and cannot be set.
This is therefore the normal setting.
ColdWater Settings: A further outlet valve can be fitted and connected, to run cold water from a separate
cooling unit. The presence of a fourth outlet valve is
stated here with this setting.
Ingredient X
Box
A/B
Product in a drink.
Value: 1-6 (the current group is also shown)
Can be seen on the loading table. Does not normally need to be edited.
Dosages
A/B
Number of doses of a product in a drink.
Value: 1-10
Can be seen on the loading table. Does not normally need to be edited.
Singel
A/B
If a product is to be dispensed on its own.
Value: Yes or No
Can be seen on the loading table. Does not normally need to be edited.
Whipper
Speed
A/B
Whipper speed.
Value: Off/Slow/Medium/Fast
Can be seen on the loading table. Does not normally need to be edited.
Whipper
Time
Setup
Defines when during serving a product is to be whipped.
Value:
Delay: 0 % Run: 25%
Delay: 25% Run: 25%
Delay: 50% Run: 25%
Delay: 75% Run: 25%
Delay: 0 % Run: 50%
Delay: 25% Run: 50%
Delay: 50% Run: 50%
Delay: 0 % Run: 75%
Delay: 25% Run: 75%
Delay: 0 % Run: 100%
"Delay 0%" means that whisking begins immediately
after the start of the preparation time.
"Delay 0%" and "Run 100%" mean that whisking takes
place during the entire period of preparation.
CHAPTER 2 - 26
Service Instructions Lynx rev. 03
Add Ingredient
B/B
Delete
last ingredient
B/B
Only edited in the case of a deliberate deviation
from the loading table.
Remove the last ingredient in a recipe.
Only edited in the case of a deliberate deviation
from the loading table.
Alter
Strength
A/B
The following four menus under "Options" are
only shown if the menu: Main menu>Option
Buttons>Override btns is set to "YES". This means
that specific settings for volume, whitener and
sugar made for each drink button apply before
the selection buttons.
Defines whether the strength of a recipe may be
changed by a customer.
Value: Enabled/Disabled
Defines whether the ”STRONG DRINK” selection button may or may not be used when preparing a drink.
Alter
volume
A/B
Defines whether the volume in the cup may be changed by a customer.
Value: Enabled/Disabled
Defines whether the ”CUP/JUG” selection button
may or may not be used when preparing a drink.
NOTE! Preparing for a jug may be permitted even if
this menu item is set to “Disabled”.
Alter
whitener
A/B
Defines whether the amount of whitener in a recipe
may be changed by a customer.
Value: Enabled/Disabled
Defines whether the ”EXTRA WHITENER” selection
button may or may not be used when preparing a
drink.
Alter
sugar
A/B
Defines whether the amount of sugar in a recipe may
be changed by a customer.
Value: Enabled/Disabled
Defines whether the ”EXTRA SUGAR” selection button may or may not be used when preparing a drink.
Test
recipe
B/B
Test a recipe
Value: No editing
Start dispensing a drink for the current button.
Execute
C/C
Copy a recipe from one button to another.
Options
Copy
Button
Add an ingredient to a recipe.
The button that is to be copied and the destination are
set by the Main Menu>Beverage Buttons>Copy
Button>From button
and
the Main Menu>Beverage Buttons>Copy Button>To
button
Only edited in the case of a deliberate deviation
from the loading table.
Service Instructions Lynx rev. 03
CHAPTER 2 - 27
Alter
volumes
B/B
This menu will only be visible if actual loading schedule
is set to ’User defined’. The alternatives are:
+/- 0 cl
+1 cl
+2 cl
+3 cl
+4 cl
+5 cl
-1 cl
-2 cl
-3 cl
-4 cl
-5 cl
This menu increases or decreases the water volume for
all recipes with specified number of cl (centiliter). After
selecting, this parameter is reset to +/- 0 cl.
Option
Buttons
Strength
Option
A/B
The following menus under "Option Buttons" are
only shown if the menu: Main menu>Option
Buttons>Override btns is set to "YES".
The difference between the above is that the
selection buttons now apply when setting the
volume, mil and sugar before the drink buttons.
Defines whether the strength of a drink may be changed by a customer.
Value: Enabled/Disabled
Strenth
Price
A/B
The price of an extra strength drink.
Value: 0.000-9999
See the Main menu.
Also refer to the Charge Mode menu below.
Sugar
Option
A/B
Defines whether a customer is allowed to add extra
sugar.
Value: Enabled/Disabled
See the Main menu.
Sugar
Price
A/B
The price of extra sugar.
Value: 0.000-9999
See the Main menu.
Whitener
A/B
Defines whether a customer is allowed to add extra
whitener.
Value: Enabled/Disabled
See the Main menu.
Option
CHAPTER 2 - 28
Service Instructions Lynx rev. 03
Whitener
A/B
The price of extra whitener.
Value: 0.000-9999
See the Main menu.
Also refer to the Charge Mode menu below.
Volume
Option
A/B
Defines whether the volume of a drink may be changed by a customer.
Value: Enabled/Disabled
See the Main menu.
Volume
Price
A/B
The price of extra volume.
Value: 0.000-9999
See the Main menu.
Also refer to the Charge Mode menu below.
Charge
Mode
A/B
Defines whether the customer will be debited a fixed
amount for a changed drink, or whether the price
will depend on how much the customer changes the
drink.
Value: Flat rate/Incremental
Example: The Sugar Price is set at 0.10. If this menu
is set to "Flat rate" , 0.10 will be added to the price of
the drink regardless of whether the customer wants to
add 1 or 2 extra doses of sugar.
If this menu is set to "Incremental" , 0.10 will be
added to the price of the drink if the customer wants
to add 1 extra dose of sugar. If the customer wants 2
extra doses of sugar, 0.10 + 0.10 = 0.20 will be added
to the price of the drink.
Override
btns
A/B
When this is activated, the settings under [Option
buttons] apply in the first place, and the possibility to affect the choice for each button [Beverage
Buttons>Button X>Options] is not shown.
Value: Yes or No
Variant
A/B
Defines the loading table.
Value: 1 - 8/User Defind
User Defind means that the Beverage Buttons and
Option Buttons can be programmed in for each drink
selection button.
A/B
Defines which group a particular cartridge will belong
to.
Changes the loading table stated above.
A loading table cannot be changed, but if on the other hand, for example, loading table 7 is defined to start
with, and then “User Defind” is selected in the above
menu, it is possible to freely program a customised
program that is based on loading table 7, in which the
group that a particular cartridge must belong to can
be defined.
Price
Variant
settings
Edit
variant
Table
Boxgroup box X
Service Instructions Lynx rev. 03
CHAPTER 2 - 29
Sugar
Position
A/B
Defines which cartridge contains sugar.
Value: 1 - 6 (the current group is also shown)
Changes the loading table stated above.
A loading table cannot be changed, but if on the
other hand, for example, loading table 7 is defined
to start with, and then “User Defind” is selected in the
above menu, it is possible to freely program a customised program that is based on loading table 7, and
there define which cartridge contains sugar
Whitener
A/B
Defines which cartridge contains whitener.
Value: 1 - 6 (the current group is also shown)
Changes the loading table stated above.
A loading table cannot be changed, but if on the
other hand, for example, loading table 7 is defined
to start with, and then “User Dfind” is selected in the
above menu, it is possible to freely program a customised program that is based on loading table 7, and
there define which cartridge contains whitener.
Topping
Position
A/B
Defines which cartridge contains topping.
Value: 1 - 6 (the current group is also shown)
Changes the loading table stated above.
A loading table cannot be changed, but if on the
other hand, for example, loading table 7 is defined
to start with, and then “User Dfind” is selected in the
above menu, it is possible to freely program a customised program that is based on loading table 7, and
there define which cartridge contains topping.
Water
temp
A/B
Defines the water temperature.
Value: 75 - 90°C
Def Cupsize
A/B
Defines the current cup size.
Value: Standard Jede 13cl/Medium Jede 18 cl/Large
Jede 24 cl.
This menu is used when it is required to change the
cup size for the complete loading table that has been
selected.
Example: Loading table 1 has been selected as a
basis, with the "User Defind" supplement as described above. The cup size in loading table 1 is 18 cl.
This menu can be used to change this value to, for
example, 24 cl. In that case all the drinks in the loading
table will be recalculated to that volume and the
dosing increased proportionately.
Position
Machine
Settings
CHAPTER 2 - 30
Service Instructions Lynx rev. 03
Jug
A/B
Defines whether a jug of coffee can be purchased, and
if so, how many cups the jug may hold.
Value: YES or NO
The values that can be set are:
"Disabled"
"1 cup"
"2 cups"
"3 cups"
"4 cups"
"5 cups"
"6 cups"
"7 cups"
B/B
The alternatives are:
Disabled
1 Day
2 Days
3 Days
4 Days
5 Days
Setting
Rinse
reminder
If this menu is set to anything other than ’disabled’, a
reminder to wash the machine will show up on the
display after set number of days.
Cupsensor
option
C/C
Activates the cup sensor.
Value: Enabled/Disabled
The cup sensor is a standard feature of the machine.
This menu, however, permits the function to be switched off.
Dosage
counting
C/C
Defines whether the empty indication for drink cartridges will be activated or not.
This menu is only shown if the selected charging
scheme does NOT have grouped cartridges.
Value: Enabled/Disabled
Power
C/C
Activates the power saving mode.
Value: S.L.E.P/Timer/Off
The Timer mode switches off the machine when a
certain time since the last purchase has elapsed.
The S.L.E.P mode is a smart mode in which the
machine learns itself which times of the day it is used,
and switches itself off or on accordingly.
C/C
Sets the volume alarm.
Value: Off/1000 L/2000 L/ 4000 L/6000 L/8000 L
The stated volume is that volume that has been dispensed (since the latest reset) using normal settings
due to customers purchasing drinks.
The intention is that the alarm shall provide a warning
if, for example, an external filter is required to be changed because a certain amount of water has passed
through the machine.
save
Volum
Alarm
Filter
Alarm
Service Instructions Lynx rev. 03
CHAPTER 2 - 31
Descale
Alarm
C/C
Sets the descaling alarm.
Value: Off/1000 L/2000 L/ 4000 L/6000 L/8000 L
The stated volume is that volume that has been dispensed (since the latest reset) using normal settings
due to customers purchasing drinks.
The intention is that the alarm shall provide a warning
if descaling is required because a certain amount of
water has passed through the machine.
C/C
This menu starts the descaling process when descaling
the hot water tank. Description can be found in the
Operator’s Manual under chapter ’12.2 Descaling of hot
water tank’
Cashless
A/C
Activate Cashless key.
Value: Enabled/Disabled
Revalue
A/C
Activate recharging of the Cashless key.
Value: Enabled/Disabled
Multivending
A/B
Activates MDB multivending.
Value: Enabled/Disabled
Enabled means that the limit for the value that can
be charged in the machine can be increased from the
most expensive drink price to 5 times this value.
Disabled means that the maximum value for the
most expensive drink can be entered into the machine.
Discount
amount
A/C
Discount when purchasing with a key.
The discount is to be stated in round numbers.
Descale
Payment
MDB
Coin
Coin
Validator
table
CHAPTER 2 - 32
Defines the type of coin currency that matches the
coin validator.
Value: Cyprus/Czech Republic/Denmark/Estonia/Euro/
Great Britain/Great Britain2/Hungary/Iceland/Latvia/
Lithuania/Norway/Poland/Russia/Slovenia/Sweden/
Switzerland/Turkey/USA/User Defined
Coin
Value X
A/C
Sets the value for a coin.
Value: 0.000 - 9999.
Here there are 6 sub-menus, one for each coin channel in the coin validator. In the case for example of
"Coin Value 3", the value of the coins that can be accepted in coin channel 3 is set, and so on.
No of
decimals
A/C
Defines the number of decimals in the price display
on the machine.
Value: 0 - 3
Token
A/C
Defines whether tokens may be used in the machine.
Value: Enabled/Disabled
Service Instructions Lynx rev. 03
Price Settings
Machine
Info
Statistics
Same
price f.
all
A/C
Defines whether all drinks shall have the same price.
Value: Yes or No
Price for
all
A/C
Defines the price for all drinks.
Jackpot
A/C
Defines whether the jackpot function will be activated.
Value: Enabled/Disabled
Wins per
100
A/C
Defines the winning chances for a jackpot (wins per
100 purchases).
A win means that the customer, after completing the
purchase, can select another drink that will be free.
Asset Tag
A/C
Label for the machine.
The owner of the machine can here define a number
of characters to distinguish this machine from other
machines, for example in documentation.
Machine
Type
A/-
Shows the type of machine.
No editing
BM SW
version
A/-
Software version, Ordering module.
No editing
TM Sw
version
A/-
Software version, Tank module.
No editing
Total
Vends
A/-
Shows the total number of purchases made from the
machine.
No editing
Resetable
vends
A/-
The number of cups sold since the previous reset.
No editing
Total
cash
amount
A/-
The total amount in the coin box.
No editing
Resetable cash
A/-
The amount in the coin box since the previous reset.
No editing
Tot value
MDB
A/-
The total amount from key purchases.
No editing
Resettable MDB
choice
A/-
The key purchases amount since the previous reset.
No editing
Reset
statistics
C/C
Resets the statistics
Service Instructions Lynx rev. 03
CHAPTER 2 - 33
Hardware test
Test Dispenser
Dispenser X
C/C
Tests a dispensing motor.
No editing
See more about this in Section 3 of the Service Instructions, “Test running”.
Test
Valves
Valve X
C/C
Tests an outlet valve.
No editing
See more about this in Section 3 of the Service Instructions, “Test running”.
Test
Whipper
Whipper X
C/C
Tests an whipper motor.
No editing.
See more about this in Section 3 of the Service Instructions, “Test running”.
Test
Invalve
C/C
Tests an inlet valve.
No editing.
See more about this in Section 3 of the Service Instructions, “Test running”.
Test
Heater
C/C
Tests the heater element.
No editing.
See more about this in Section 3 of the Service Instructions, “Test running”.
Test
Floatswitch
C/C
Tests the float switch.
No editing.
See more about this in Section 3 of the Service Instructions, “Test running”.
Test Cup
Sensor
C/C
Tests the cup sensor.
No editing.
See more about this in Section 3 of the Service Instructions, “Test running”.
Test
Light/
Sound
C/C
Tests the light and sound.
No editing.
See more about this in Section 3 of the Service Instructions, “Test running”.
Test
Temp
Sensor
C/C
Tests the temperature sensor.
No editing.
See more about this in Section 3 of the Service Instructions, “Test running”.
CHAPTER 2 - 34
Service Instructions Lynx rev. 03
_______________________________________
2.3.5 Menu summary
_______________________________________
2.3.5.2.1 Price setting
_______________________________________
These menus are concerned with setting the prices of drinks
and may be altered subsequently.
2.3.5.1 Things to take into account before delivery
Main Menu > Variant settings
The machine EPROM contains all the charging variants that
are available for this machine. A loading table ensures that
the correct drink comes out for each button press and that
the drink is correctly composed of drink powder and water.
No further programming is necessary if the factory-installed
values are accepted. When a loading table has been selected,
it is therefore important:
qthat the correct menu stickers are in place (with or without
price information),
qthat the correct drink cartridges have been installed.
qthat a copy of the loading table is put up inside the machine (or kept in another safe place), so that the various drinks
are placed in the correct locations during restocking.
Main Menu > Payment > Coin Validator
These menus are associated with the payment equipment,
that may differ according to the client’s wishes.
Main Menu > Beverage Buttons > ButtonX > Price
Price for a single drink.
Service code A(display)/B(alter).
Main Menu > Option Buttons > Strength Price
The price of an extra strength drink.
Service code A(display)/B(alter).
Main Menu > Option Buttons > Sugar Price
The price of extra sugar.
Service code A(display)/B(alter).
Main Menu > Option Buttons > Cream Price
The price of extra whitener.
Service code A(display)/B(alter).
Main Menu > Option Buttons > Volume Price
The price of extra volume.
Service code A(display)/B(alter).
Main Menu > Display Language
The correct language must be set for the display.
Main Menu > Option Buttons > Charge Mode Price
Defines whether the customer will be debited a fixed amount
for a changed drink, or whether the price will depend on how
much the customer changes the drink.
Service code A(display)/B(alter).
_______________________________________
Main Menu > Payment > Price Settings > Same price
f. all
Defines whether all drinks shall have the same price.
Service code A(display)/C(alter).
2.3.5.2 Programming that is applicable during the use of the machine
This programming shall normally be performed on site by
the client.
NOTE! The contents or recipes for the drinks are primarily
determined by the loading table. To a certain extent these
values, together with pricing information for both the basic
drinks and such supplements as sugar, whitener and topping, are determined by the programming of each drink
button (the Beverage Buttons), or by programming the
Option Buttons. The menu determines which of these shall
apply. Main Menu>Option Buttons>Override btns. The
value here is YES or NO.
Main Menu > Payment > Price Settings > Price f. all
Defines the same price for all drinks.
Service code A(display)/C(alter).
_______________________________________
2.3.5.2.2 Statistics
Processes the operational statistics.
Main Menu > Statistics
No editing
Service Instructions Lynx rev. 03
CHAPTER 2 - 35
Doc No: 37004/ENG- 2
3
_______________________________________
Repair/Adjusting
Service Instructions Lynx
_______________________________________
In this chapter
q
Test running
q
Troubleshooting
q
Installation description
q
Wiring diagram
Contents
_________________________________________________________
3.1
Test running________________________________________ 3
3.1.1
Entering the test mode . . . . . . . . . . . . . . . . . . . . . . . . . . . . . . . . . . . . . . . . 3
3.1.1.1
3.1.1.2
3.1.1.3
3.1.1.4
3.1.1.5
3.1.1.6
3.1.1.7
3.1.1.8
3.1.1.9
3.1.2
Dispensing motor. . . . . . . . . . . . . . . . . . . . . . . . . . . . . . . . . . . . . . . . . . . 3
Outlet valves. . . . . . . . . . . . . . . . . . . . . . . . . . . . . . . . . . . . . . . . . . . . . . . . 3
Whipper motor . . . . . . . . . . . . . . . . . . . . . . . . . . . . . . . . . . . . . . . . . . . . . 3
Inlet valve. . . . . . . . . . . . . . . . . . . . . . . . . . . . . . . . . . . . . . . . . . . . . . . . . . . 4
Hot water tank heating element. . . . . . . . . . . . . . . . . . . . . . . . . . . . . 4
Float in the hot water tank. . . . . . . . . . . . . . . . . . . . . . . . . . . . . . . . . . 4
Cup sensor . . . . . . . . . . . . . . . . . . . . . . . . . . . . . . . . . . . . . . . . . . . . . . . . . . 4
Presentation light and buzzer. . . . . . . . . . . . . . . . . . . . . . . . . . . . . . . 4
Thermometer in the hot water tank. . . . . . . . . . . . . . . . . . . . . . . . . . 4
Leaving the test mode . . . . . . . . . . . . . . . . . . . . . . . . . . . . . . . . . . . . . . . . 4
_________________________________________________________
3.2
Troubleshooting_ ___________________________________ 5
3.2.1
3.2.2
Troubleshooting using error codes. . . . . . . . . . . . . . . . . . . . . . . . . . . . 5
Troubleshooting, otherwise. . . . . . . . . . . . . . . . . . . . . . . . . . . . . . . . . . . 8
_________________________________________________________
3.3
Installation description_______________________________ 9
3.3.1
3.3.2
3.3.3
3.3.4
3.3.5
3.3.6
3.3.7
3.3.8
3.3.9
Changing the inlet valve. . . . . . . . . . . . . . . . . . . . . . . . . . . . . . . . . . . . . . 9
Changing the outlet valves. . . . . . . . . . . . . . . . . . . . . . . . . . . . . . . . . . . 10
Changing the temperature sensor. . . . . . . . . . . . . . . . . . . . . . . . . . . 11
Changing the level sensor. . . . . . . . . . . . . . . . . . . . . . . . . . . . . . . . . . . . 12
Changing the overheating protection unit . . . . . . . . . . . . . . . . . . . 13
Changing the display. . . . . . . . . . . . . . . . . . . . . . . . . . . . . . . . . . . . . . . . . 14
Changing the button panel. . . . . . . . . . . . . . . . . . . . . . . . . . . . . . . . . . 15
Changing the validator. . . . . . . . . . . . . . . . . . . . . . . . . . . . . . . . . . . . . . 15
Control system printed circuit board . . . . . . . . . . . . . . . . . . . . . . . . . 16
3.3.9.1 Ordering module (Motherboard). . . . . . . . . . . . . . . . . . . . . . . . . . . 16
3.3.9.2 Tank module. . . . . . . . . . . . . . . . . . . . . . . . . . . . . . . . . . . . . . . . . . . . . . .17
_________________________________________________________
3.5
Wiring diagram____________________________________ 18
CHAPTER 3 - 38
Service Instructions Lynx rev. 03
________________________
3.1 Test running
The Lynx machine components are tested by means of the
software.
This method may only be used by servicing staff for test
running.
C authorization required.
_______________________________________
3.1.1
_______________________________________
3.1.1.1 Dispensing motor
Entering the test mode
The machine contains 6 dispensing motors, one for each
drink cartridge.
1 Open the door.
2 Press the programming button (Config. button) on the
control printed circuit card behind the inner panel of the
door. Use a pen or similar thin object.
Alternative: Hold button 8 pressed in for about 10
seconds.
The machine is now in the programming mode. Refer to
”Programming” in Chapter 2.
The display will show:
Hardware test>Test dispensers>dispenser 1
1 Press SELECT. The selected dispensing motor will now
operate for 3 turns.
2 Press BACK to return, and change to the next dispensing
motor. Press SELECT, so that this dispensing motor operates for 3 turns.
3 Repeat to test the other dispensing motors. Then press
BACK to return to "hardware test".
main menu
->password
display language
beverage buttons
_______________________________________
3.1.1.2 Outlet valves
The machine usually has 3 outlet valves.
Hardware test>Test Valves>Valve 1
1 Press SELECT. The selected valve will open for 3 seconds.
main menu
->password
display language
beverage buttons
option buttons
variant settings
machine settings
payment
machine info
statistics
hardware test
2 Press BACK to return, and change to the next valve. Press
SELECT, so that this valve opens for 3 seconds.
3 Repeat to test the third valve. Then press BACK to return
to "hardware test".
_______________________________________
3.1.1.3 Whipper motor
3 Press the UP or DOWN arrow buttons to take the cursor
to ”Password” and then SELECT.
4 Enter the C authorization password. Increase or decrease
the value using the UP or DOWN arrow keys. Confirm
the value using SELECT. Return to the menu list with
BACK.
5 Go to the "hardware test" menu.
The machine contains 2 whipper motors. There is one under
each funnel.
Hardware test>Test Whipper>Whipper 1
1 Press SELECT. The selected whipper motor will operate
for 3 seconds.
2 Press BACK to return, and change to the next whipper
motor. Press SELECT. This whipper motor will also operate
for 3 seconds.
3 Then press BACK to return to "hardware test".
Service Instructions Lynx rev. 03 CHAPTER 3 - 39
_______________________________________
3.1.1.4 Inlet valve
Hardware test>Test Invalve
1 Press SELECT. The inlet valve will open for 3 seconds.
_______________________________________
3.1.2
Leaving the test mode
1 Use BACK to return to the Main menu.
2 Press button 1 (exit)
2 Press BACK to return to "hardware test".
_______________________________________
3.1.1.5 Hot water tank heating element
Hardware test>Test Heater
1 Press SELECT. The heating element will be switched on
for 30 seconds.
2 Press BACK to return to "hardware test".
_______________________________________
3.1.1.6 Floatswitch in the hot water tank
Hardware test>Test Floatswitch
1 Press SELECT. The floatswitch status is shown (water level
high/low).
2 Press BACK to return to "hardware test".
_______________________________________
3.1.1.7 Cup sensor
Hardware test>Test Cup Sensor
1 Press SELECT. The status of the cup sensor is displayed
(cup sensor: Cup/No cup).
2 Press BACK to return to "hardware test".
_______________________________________
3.1.1.8 Presentation light and buzzer
Hardware test>Test Light/Sound
1 Press SELECT. The presentation light is lit and the buzzer
is activated.
2 Press BACK to return to "hardware test".
_______________________________________
3.1.1.9 Thermometer in the hot water tank
Hardware test>Test Temp Sensor
1 Press SELECT. The current temperature in the tank is
displayed.
2 Press BACK to return to "hardware test".
CHAPTER 3 - 40
Service Instructions Lynx rev. 03
1
exit
____________________________
3.2 Troubleshooting
_______________________________________________
3.2.1
Troubleshooting using error codes
Error
code
Description
Cause / Remedy
E00
Machine out of order
No communication between the PCboards and/or the display.
qBM out of order.
qThe jumper in the TM is lost.
E03
Overpower motors
High power consumption by any of
motor, pump, inlet- or outlet valve.
Measure the resistance
E06
Cup in place.
There is a cup or other object where
the cup should be.
Remove the cup.
E08
Internal error processor (SM)
qInternal error in the SM PC-board.
qToo old EPROM together w. new
TM PCB.
qChange the PCB.
E09
RS-485 error (SM) SM-, TM- or display PCB broken.
Change by try.
E10
Maximum time for first qWater supply obstructed
filling obstructed qMake sure water filling is reaching the machine
(temporary interruption to the mains water
supply may be the cause of the fault)
qIf the machine is equipped with a water filter check if the filter is blocked and if it is, replace the
cartridge.
qClean inlet valve filter
The overfill protector has not triggered
E10
qInlet valve not opening
qMeasure voltage at valve outputs when purchasing
a drink. If voltage = 20 to 25 V, the inlet valve is
defective and needs changing. If the voltage is
below 20 V, see if the float switch is indicating low
water (0 - 1 W). If not, replace switch, otherwise
circuit board.
qWater leaking from the tank
qSee fault: ’Machine leaking water’.
Maximum time for first qFloat switch in tank has not given
filling obstructed signal to interrupt flow of water.
The overfill protection has triggered.
qFloat switch working but circuit
The overfill protecboard or inlet valve defective.
tor can be reset, see
section ’Resetting
the overfill protector’ in the Operator's
Manual.
qCheck that the switch is correctly seated
(straight) and then measure its resistance
in raised position. If resistance is below 3
Mohm, the switch is defective and needs
changing.
qReset level control, check connections between float switch, circuit board and inlet
valve. Then measure voltage on inlet valve
when purchasing drink. If the voltage (24 V
approx.) is not interrupted when the float
switch indicates high water level, the circuit
board is defective and needs changing. If the
voltage is interrupted but water continues to
flow in, the inlet valve is defective and needs
changing.
Service Instructions Lynx rev. 03 CHAPTER 3 - 41
Error
code
Description
Cause / Remedy
E11
Maximum level not
reached within 3 servings
qWater supply obstructed
qMake sure water filling is reaching the machine
(temporary interruption to the mains water
supply may be the cause of the fault)
qIf the machine is equipped with a water filter check if the filter is blocked and if it is, replace the
cartridge.
qClean inlet valve filter
The overfill protector has not triggered
E11
Maximum level not
reached within 3 servings
qInlet valve not opening
qMeasure voltage at valve outputs when purchasing
a drink. If voltage = 20 to 25 V, the inlet valve is
defective and needs changing. If the voltage is
below 20 V, see if the float switch is indicating low
water (0 - 1 W). If not, replace switch, otherwise
circuit board.
qWater leaking from the tank
qSee fault: ’Machine leaking water’.
qFloat switch in tank has not given
signal to interrupt flow of water.
qCheck that the switch is correctly seated
(straight) and then measure its resistance
in raised position. If resistance is below 3
Mohm, the switch is defective and needs
changing.
The overfill protection has triggered.
qFloat switch working but circuit
The overfill protecboard or inlet valve defective.
tor can be reset, see
section ’Resetting
the overfill protector’ in the Operator's
Manual.
E12
Overpower, exits
High power consumption by any of
pump, inlet- or outlet valve.
E13
Low temperature
Temperature in water
tank below 50º C.
If the temperature fails to rise:
qNo current reaching machine
qReset level control, check connections between float switch, circuit board and inlet
valve. Then measure voltage on inlet valve
when purchasing drink. If the voltage (24 V
approx.) is not interrupted when the float
switch indicates high water level, the circuit
board is defective and needs changing. If the
voltage is interrupted but water continues to
flow in, the inlet valve is defective and needs
changing.
Measure the resistance.
qCheck mains cable and fuse
qOverheating protection triggered qReset as per description in section ’Resetting the overheating protector’ (Operator's
Manual).
qTemperature sensor not working. qChange the temperature sensor. (can not
be adjusted)
qHeater element faulty.
E14
qChange the heater element
Illogical temperature
qTemperature wrongly set or temTemperature recorded
perature sensor faulty.
in water tank below 1º
C or above 110º C
qToo little water in tank.
qChange the temperature sensor (can not
be adjusted)
E15
Internal fault in micro- Computer fault in tank module.
processor.
Change the PC-board by try.
E16
RS-485 fault
qTM-card or display PCB broken.
qChange by try.
qThe ”jumper” is not in the correct
position
qAdjust
CHAPTER 3 - 42
Service Instructions Lynx rev. 03
qSee ’E10, E11’
Error
code
Description
Cause / Remedy
E17
Fault on push-button
panel
qFault in connections to/from
control panel
qCheck wiring
qWires to control card not connected (no buttons working)
qCheck and plug in poss. loose contact.
qFault on control card (no buttons
working)
qChange the PCB.
qOne or more buttons malfunctioning
qChange the push-button panel.
E18
MDB/ICP-error, no
answer
MDB-error in the change giver, key
system or BM PVB.
Check, and change the broken device.
E19
Internal fault local processor (BM)
qShorting bar J11 missing on door
card
qCheck shorting bar J11 (adjacent programming button)
qData error in PC-Board BM
qChange
E21
Coin tube activated
qA coin or objekt is stuk in the coin qClear the tube
tube
qPress the coin return button
qThere may be magnetic object or
rubbish in the coin dispenser.
qDismantle coin dispenser and remove any
rubbish.
qThe coin dispenser is full
qEmpty the coin box
qThe coin mechanism is defective
qReplace the coin mechanism.
qPoor fit between the coin tube
and the coin dispenseer.
qCheck that the opening of the coin tube is
lined up with the input of the coin dispenser.
Check the communication.
E22
Timeout initiating
The display has no communication with the BM or SM PCB..
E23
Timeout serving
Cannot be shown. The error is selfcorrecting.
E24
Display error, no
answer
The display broken.
Change it.
E27
MDB Keyreader, no answer
The card reader is broken.
Change it.
E28
MDB Universal slave, no answer
The slave is broken.
Change it.
E29
EEPROM, write/read
error
EEPROM is broken.
Change the BM PCB.
Service Instructions Lynx rev. 03 CHAPTER 3 - 43
_______________________________________
3.2.2
Troubleshooting, otherwise
Description
Cause
The coin dispenser qDefective coin
is not accepting
coins
qIncorrect coin denomination
The coins do not
fall down into the
coin dispenser
No display text
CHAPTER 3 - 44
qCheck allowable coin denominations.
qCompare coin mechanism with program setting. Correct any errors by reprogramming or
changing coin mechanism.
qThe coin mechanism is defective
qReplace the coin mechanism
qMDB not activated
qActivate MDB (Programming menu 40)
qMDB key/card used and key charging not
permitted
qRemove key/card or activate charging (Programming menu 45)
qThe coin box is full
qEmpty the coin box
qA foreign object or coin has got stuck in the
coin tube.
qPress the coin return button.
qPoor fit between the coin tube and coin
dispenser.
qCheck that the opening to the coin tube is
directly above the inlet to the coin dispenser.
qThere is no power
qCheck the fuse and wall
qThe display is broken.
qChange it.
qEEPROM in wrong position.
qCheck.
qLeak at heater element or float switch.
Water not flowing
out into cups.
qTry another coin
qMismatch between coin mechanism and
country in system program.
Machine leaking or qLevel control in inlet valve malfunctioning
flooding
Too little water
filling
Remedy
qReplace inlet valve. See section ” Replacing the
inlet valve”. Seek and cure cause of overfilling. See error codes E10, E11.
qCheck tank gasket and make sure nuts are
tight.
qInlet or outlet valve dripping.
qCheck hose connections and replace valve.
qWater supply time wrongly programmed
qCheck volume setting for the button or global.
qToo low water pressure. Tank not filling up.
qIncrease pressure if possible. Otherwise increase amount of water.
qLow water level in tank.
qSee Error codes E10, E11
qOutlet valve blocked
qRemove limescale and dirt.
qHose constricted
qReplace kinked hose.
qFaulty outlet valve or circuit board
qCheck first that connection between the circuit
board and the outlet valve look right. Measure
the voltage at the outlet valve when ordering a
drink. If voltage is below 20 V the circuit board
is defective and needs changing. If the voltage
is 20 - 25 V and the outlet valve does not open,
the valve is defective and needs changing. See
section: ”Replacing the outlet valve”.
qWater tank empty
qSee Error codes E10. E11.
Service Instructions Lynx rev. 03
__________________________
3.3 Installation description
___________________________________________
3.3.1
Changing the inlet valve
In order to gain access to the inlet valve, the back plate must
be removed.
4
3
2
1. Inlet valve
2. Hose to water tank
3. Overfill pipe between
the inlet valve and the
water tank
4. Pipe for venting the
inlet valve
1
Remove the mains power plug from the wall socket.
1 Close the supply water tap before the machine.
2 Open the door and pull out the drain hose from the hot
water tank. Put a bucket under the drain hose.
3 Release the clamp and the hose plug to allow the water
to drain out into the bucket.
4 Turn the machine around and remove the back plate.
5 Detach the inlet hose, the overflow pipe and the hose to
the water tank.
6 Remove the valve securing screws and change the
valve.
7 Reassemble in the reverse order.
1
2
Check afterwards that there is no leakage.
1. Drain hose, cold water tank
2. Drain hose, hot water tank
Service Instructions Lynx rev. 03 CHAPTER 3 - 45
_______________________________________
3.3.2
Changing the outlet valves
1
6
2
7
A
3
1. 2. 3. 4. 5. 6. 7. 4
Service hatch
Air bleed hose
Solenoid
Valve
Outlet
Valve assembly support
Screw
5
Outlet valve
The machine usually has three outlet valves. All are for hot
water. The valve that is to be used is selected automatically
and cannot be set.
The complete valve assembly is changed and replaced by an
exchange unit.
Remove the mains power plug from the wall socket.
1 Turn off the water supply to the machine.
2 Empty the hot water tank. See Section 3.3.1 "Changing
the inlet valve" steps 2 and 3.
6 Disconnect the hoses from the outlet valves.
7 Detach the valve assembly from the tank.
8 Replace the complete assembly.
9 Reassemble in the reverse order.
3 Remove the service hatch.
4 Remove the valve assembly support (6) by removing
the screws (7).
5 Remove all the wiring from the valves. Mark the wiring so
that it can be refitted correctly.
Check afterwards that there is no leakage.
Mark the wiring so that it can refitted correctly.
CHAPTER 3 - 46
Service Instructions Lynx rev. 03
_______________________________________
3.3.3
Changing the temperature sensor
The temperature sensor is located in a pipe at the bottom
of the tank.
It is accessed from the underside of the hot water tank, with
the back plate removed.
Temperature sensor
Remove the mains power plug from the wall socket.
1 Turn the machine around and remove the back plate.
2 Pull the sensor straight down from the bottom of the tank.
Dismantle the clamping ring.
3 Remove the wiring connection J 5 from the tank module
printed circuit board.
The wiring is colour-coded blue/white/black. Refer to the
electrical connections schematic diagram on page 17.
4 Replace the temperature sensor.
5 Reassemble in the reverse order.
Service Instructions Lynx rev. 03 CHAPTER 3 - 47
_______________________________________
3.3.4
Changing the level sensor
The illustration shows the machine
with its door open (detached) and
as if the side wall was transparent.
Remove the mains power plug from the wall socket.
1 Turn off the water supply to the machine.
2 Empty the hot water tank. See Section 3.3.1 "Changing
the inlet valve" steps 2 and 3.
8 Cut the new wiring to a suitable length. Strip the ends and
fit them to connector J4 on the printed circuit board.
9 Reassemble in the reverse order.
3 Turn the machine around and remove the back plate.
4 Detach the wiring from connector J 4 on the tank module
(TM) printed circuit board. Refer to the TM Module electrical connections schematic diagram.
5 Remove the tank lid.
6 Unscrew the nut on the outside and remove the faulty
level sensor. It is recommended that a 24 mm spanner is
used. Also remove the old gasket!
7 Install the new level sensor with a new gasket. Only
tighten the nut enough to ensure that the level sensor
is sealed against the water tank, not too tight so that the
threads will be damaged.
CHAPTER 3 - 48
Service Instructions Lynx rev. 03
NOTE! The water may be hot!
Check afterwards that there is no leakage.
________________________________________
3.3.5
Changing the overheating protection unit
The overheating protection
unit is screwed into the bottom
of the tank. It is accessed from
the rear, with the back plate
removed.
Overheating protection device
Remove the mains power plug from the wall socket,
and wait for about 10 minutes.
1 Turn the machine around and remove the back plate.
NOTE! The water may be hot!
Check afterwards that there is no leakage.
2 Remove the electrical connections from the overheating
protection unit.
3 Using a socket spanner, unscrew and replace the overheating protection unit.
4 Reassemble in the reverse order and reconnect the mains
power plug.
Service Instructions Lynx rev. 03 CHAPTER 3 - 49
_______________________________________
3.3.6
Changing the display
The display is secured to the inside of the
door by two screws.
1
Remove the mains power plug from
the wall socket.
2
3
4
1 Open the machine door.
2 Gently pull on the door panel so that
the plugs on the left side are released.
These then remain in the panel for easy
refitting.
3 Detach the J 18 connection on the ordering module printed circuit board. Refer
to the electrical connections schematic
diagram.
4 Detach the cover panel from the display,
unscrew the display and replace it.
5 Connect the ribbon cable from the new
display to the printed circuit board.
6 When refitting, push the door panel inwards at the right so it hooks under the
hinge. Push to secure the plugs on the
left side.
7 Close the machine door.
8 Put the mains power plug back into the
wall socket and test the machine.
CHAPTER 3 - 50
1.
2. 3. 4. 5. Display
Button panel
Ordering module (motherboard) printed circuit board
Plastic plugs with barbs
Door panel
Service Instructions Lynx rev. 03
5
_______________________________________
3.3.7
Changing the button panel
The button panel is glued to the door.
5 The new button panel is self-adhesive, with protective film
that must be removed before the panel is secured.
Important! Install the new panel correctly first
time, since it cannot be adjusted afterwards!
Remove the mains power plug from the wall socket.
1 Open the machine door.
2 Gently pull on the door panel so that the plugs on the left
side are released. These then remain in the panel for easy
refitting.
3 Detach the button panel ribbon cable from the printed
circuit board. Refer to the electrical connections schematic
diagram.
4 Remove the button panel by releasing one of its corners.
For example, a small screwdriver or some kind of plaster
trowel can be used as a pry tool. Then the panel is pulled
off.
Connect the ribbon connector.
6 When refitting, push the door panel inwards at the right
so it hooks under the hinge. Push to secure the plugs on
the left side.
7 Close the door.
8 Put the mains power plug back into the wall socket and
test the machine.
_______________________________________
3.3.8
Changing the validator
The validator (coin mechanism) is accessible with the front
door open.
Remove the mains power plug from the wall socket.
1 Open the door.
2 Detach the wiring from the validator.
3 Remove the validator.
4 Connect the ribbon cable from the new validator.
5 Close the door.
6 Put the mains power plug back into the wall socket and
test the machine.
MARS type: This type has three lugs which secure the
validator in place. One each on the left and
right sides and one at the bottom.
Service Instructions Lynx rev. 03 CHAPTER 3 - 51
_______________________________________
3.3.9
Control system printed circuit board
_______________________________________
3.3.9.1 Ordering module (Motherboard)
Ordering module printed circuit
board (Motherboard).
Inside of the door with the door panel removed.
CHAPTER 3 - 52
Service Instructions Lynx rev. 03
_______________________________________
3.3.9.2 Tank module
The printed circuit board is fitted inside the machine. It is accessed by removing the back plate.
Tank module printed circuit board
Machine seen from the rear with the back plate removed.
Service Instructions Lynx rev. 03 CHAPTER 3 - 53
________________________
3.5 Wiring diagram
CHAPTER 3 - 54
Service Instructions Lynx rev. 03
Service Instructions Lynx rev. 03 CHAPTER 3 - 55
Gematech Innovation
CHAPTER 3 - 56
Service Instructions Lynx rev. 03
Doc.No: 37004/ENG- 3
4
_______________________________________
Spare Parts List
Service Instructions Lynx
_______________________________________
In this chapter
q
Spare parts list Door
q
Spare parts list Tank module
q
Spare parts list Serving module
q
Spare parts list Manual tank
q
Spare parts list Mixer bowl
________
English
__________
Contents
4.1 Door_______________________________________________ 5
4.2 Tank module_ _______________________________________ 7
4.3 Serving module______________________________________ 9
4.4 Manual tank_ ______________________________________ 11
4.5 Mixer bowl_________________________________________ 13
CHAPTER 4 - 58 Service Instructions Lynx rev. 03
CHAPTER 3 - 58
5
7
4
3
2
1
22
21
6
20
19
18
8
9
10
11
12
13
14
15
CHAPTER 4 - 60 Service Instructions Lynx rev. 03
CHAPTER 3 - 60
17
16
______________________________________
4.1 Door
Door / Dörr Lynx
08-10 rev. C
Recommended spare parts
Pos. Part No.
No.
Term
Benämning
Antal
Qty.
1
Screw RX-PT 2-28x8
Skruv RX-PT 2-28x8
2
2
43599
Display
Display
1
3
36281
Door
Dörr
1
4
36577
Quick change panel
Servicepanel
1
5
36284
Push button panel
Tryckknappspanel
1
6
35348
Latch
Låsregel
1
7
35347
Lock
Lås
1
8
35235
Reed sensor (door)
Dörrsensor
1
9
36282
Cover plate
Täcklock
1
10
43744
Mainboard BM-3
Modulkort BM-3
1
Screw PT KA 40x10 WN 1412
Skruv PT KA 40x10 WN 1412
3
11
12
36279
Drip grille
Spillgaller
1
13
36283
Driptray
Spillbricka
1
14
35342
Magnetic strip
Magnetlist
1
15
35346
Plastic rivet
Plastnit
3
Screw PT 3,0x10
Skruv PT 3,0x10
1
16
17
49253
Cup sensor
Koppsensor
1
18
36280
Cover
Bakstycke
1
Screw PT KA 40x10 WN 1412
Skruv PT KA 40x10 WN 1412
4
Plastic rivet
Plastnit
2
Screw SPT 4,3x15
Skruv SPT 4,3x15
4
1
19
20
35346
21
22
48703
Hinge
Gångjärn
<>
37002
Master key
Huvudnyckel
<>
35357
Validator kit, complete unit
Myntboxsats, komplett
Service Instruktions Lynx rev. 03
1
CHAPTER 4 - 61
CHAPTER 3 - 61
CHAPTER 4 - 62 Service Instructions Lynx rev. 03
CHAPTER 3 - 62
36
35
32
31
30
28
26
25
37
33
24
38
23
39
34
29
27
40
41
22
42
19
18
43
44
21
20
17
45
16
7
46
10
15
13
1
14
12
2
11
3
5
6
8
9
4
_______________________________________
4.2 Tank module
Automatic tank / Automatisk tank Lynx
08-10 rev. C
Recommended spare parts
Pos.
No.
Part No.
Term
Benämning
1
2
3
4
5
6
7
8
9
10
11
12
13
14
15
16
17
18
19
20
21
22
23
24
25
26
27
28
29
30
31
32
33
34
35
36
37
38
39
40
41
42
43
44
45
46
<>
<>
36277
35345
Fan duct, rear
Cable tie
Screw MRT TT M4x6
Fan duct, front
Filter
Silicon hose, diam. 6mm.
Seal
Valve unit
Valve unit, fixation
Screw M6S M6x50
Washer
Screw MRT-TT M4x6
Electric connection
Screw MRT-TT M3x12
Nut M6M
Transformer 80 VA
PC-Board TM-3
Clips EHCBS-7-5-01
Lock washer
Nipple, id. 5 mm.
Plug
Tank lid, complete unit
Tank
Float switch (grey)
Silicon hose, diam. 7,5mm.
Metal profile
Silicon hose, diam. 7,5mm.
Clamp, 14,8mm.
Cover
Inlet hose, diam. 10x15mm.
Temperature sensor
Spacer
Y-Pipe
Overheating protection
Screw PT KA40x10
Clamp, 14,8mm.
Inlet valve
Silicon hose, diam. 7,5mm.
Fixation, fan
Fan 24V DC
Silicon hose, diam. 7,5mm.
Clip
Adaptor
Bushing
Screw MRT TT M4x12
Plug, drain hose
Water connection hose ¾” – ½”
Mains cable (SE)
Bakre fläktkanal
Buntband
Skruv MRT TT M4x6
Främre fläktkanal
Filter
Silikonslang, diam. 6mm.
Tätning
Ventilpaket
Ventilhållare
Skruv M6S M6x50
Bricka
Skruv MRT-TT M4x6
Elanslutning m avstörningsfilter
Screw MRT-TT M3x12
Mutter M6M
Transformator 80 VA
Modulkort TM-3
Clips EHCBS-7-5-01
Låsbricka
Nippel, id. 5 mm.
Plugg
Tanklock kpl.
Tank
Float switch (grå)
Silikonslang, diam. 7,5mm.
Metallprofil
Silikonslang, diam. 7,5mm.
Trådklämma, 14,8mm.
Droppskydd
Inloppsslang, diam. 10x15mm.
Temperatursensor
Distans
Y-Koppling
Överhettningsskydd
Skruv PT KA40x10
Trådklämma, 14,8mm.
Inloppsventil
Silikonslang, diam. 7,5mm.
Fästorgan, fläkt
Fläkt 24V DC
Silikonslang, diam. 7,5mm.
Clips
Adapter
Bussning 4x8x5mm.
Skruv MRT TT M4x12
Plugg, avtappningsslang
Anslutningsslang ¾” – ½”
Nätkabel (SE)
36276
36575
46110
43981
36278
36586
47291
43402
43749-2
46417
46034
46045
47841
36291
43626
43000
43751
36569
43751
45185
36111
45142
49064
48713
45030
35019
45185
46253
43751
35344
43095
43751
Z93957
43978
48862
36123
49177
47305
Service Instruktions Lynx rev. 03
Antal
Qty.
1
1
1
1
1
3
1
1
1
1
1
1
1
2
1
1
1
4
2
2
1
1
1
1
1
1
1
1
1
1
1
1
1
1
2
1
1
1
4
1
1
1
3
2
2
1
1
1
CHAPTER 4 - 63
CHAPTER 3 - 63
CHAPTER 4 - 64 Service Instructions Lynx rev. 03
CHAPTER 3 - 64
28
27
26
24
21
20
17
16
15
19
22
23
18
25
29
2
1
14
3
4
5
6
13
8
9
10
11
12
7
_______________________________________
4.3 Serving module
Serving module / Serveringsmodul Lynx
08-10 rev. C
Recommended spare parts
Pos.
No.
Part No.
Term
Benämning
Antal
Qty.
1
36266
Serving module
Serveringsmodul
1
Screw MRT-TT M4x6
Skruv MRT-TT M4x6
2
2
3
36286
Flat spring
Fjäderbleck
1
4
36270
Motor bracket
Motorfäste
1
Screw MRT-TT M4x12
Screw MRT-TT M4x12
12
5
6
42542
Micro switch
Mikrobrytare
6
7
45131
Dispensing motor
Dispenser motor
6
8
36296
Crank
Vevsläng
6
9
43500-1
Holder, funnel
Hållare, tratt
3
10
36275
Holder, slide
Slidfäste
3
Screw SPT/7-7981-4,5x15
Screw SPT/7-7981-4,5x15
6
Slide
Dragslid
6
Screw MRT-TT M3x12
Screw MRT-TT M3x12
12
11
12
44023
13
14
36267
Service lid
Servicelucka
1
15
48997
Bushing
Bussning med krage
2
Screw MRT-TT M4x12
Skruv MRT-TT M4x12
2
Knob
Vridtapp
2
Screw MRT-TT M4x6
Screw MRT-TT M4x6
4
16
17
35349
18
19
35350
Locking device
Låsdon
2
20
36274
Funnel (left)
Tratt (vänster)
1
21
36273
Funnel (right)
Tratt (höger)
1
22
35351
Washer
Bricka
2
Screw MRT-TT M4x6
Skruv MRT-TT M4x6
3
23
24
43939
Spigot, hot water
Stos, utlopp varmvatten
1
25
36574
Outlet pipe (black)
Utloppsmunstycke (svart)
2
26
36573
Outlet pipe (brown)
Utloppsmunstycke (brun)
1
27
36287
Holder, outlet pipes
Hållare, utloppsmunstycken
1
28
36268
Bracket, outlet pipes
Konsoll, utloppsmunstycken
1
Mixer bowl with motor, see separate
drawing.
Blandarskål med motor, se separat
ritning.
2
29
Service Instruktions Lynx rev. 03
CHAPTER 4 - 65
CHAPTER 3 - 65
12
11
10
9
8
7
6
5
13
14
4
1
3
2
17
CHAPTER 4 - 66 Service Instructions Lynx rev. 03
CHAPTER 3 - 66
16
15
_______________________________________
4.4 Manual tank
Manual tank / Manuell tank Lynx
08-10 rev. C
Recommended spare parts
Pos. Part No.
No.
Term
Benämning
Antal
Qty.
1
Z93957
Clamp
Trådklämma
1
2
36587
Connection hose
Anslutningsslang
1
3
36568
Silicon hose diam. 11,5x7,5 mm.
Silikonslang diam. 11,5x7,5 mm.
1
Screw MRT-TT M3x12
Skruv MRT-TT M3x12
4
4
5
36598
Pump
Pump
1
6
45142
Silicon hose diam. 10x15 mm.
Silikonslang diam. 10x15 mm.
1
7
36589
Spigot
Stos
1
8
43981
Seal
Tätning
1
9
36285
Tank
Tank
1
10
36597
Velcro closing
Kardborreband
1
11
36299
Absorbent seal
Absorberande tätning
1
12
36588
Tank lid
Tanklock
1
13
36271
Tank shelf
Tankhållarplåt
1
Hose clip
Slangklämma
1
14
15
43751
Silicon hose diam. 7,5 mm.
Silikonslang diam. 7,5 mm.
1
16
Z93957
Clamp
Klämma
1
17
36123
Plug
Plugg
1
<>
36599
Manual tank-kit, complete unit
Manuell tank-kit, komplett
1
Service Instruktions Lynx rev. 03
CHAPTER 4 - 67
CHAPTER 3 - 67
1
2
CHAPTER 4 - 68 Service Instructions Lynx rev. 03
CHAPTER 3 - 68
3
4
5
_______________________________________
4.5 Mixer bowl
Mixer bowl / Blandarskål Lynx
08-10 rev. C
Recommended spare parts
Pos. Part No.
No.
Term
Benämning
Antal
Qty.
1
43977
Mixer bowl, upper
Blandarskål, ångfälla
1
2
35354
Mixer bowl
Blandarskål
1
3
43973
Impeller
Impeller
1
4
35353
Fixation, mixer bowl
Fästplatta
1
5
35352
Mixer motor
Mixermotor
1
Service Instruktions Lynx rev. 03
CHAPTER 4 - 69
CHAPTER 3 - 69
Gematech Innovation
Doc No: 36 024/ENG- 4