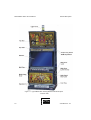
1
U.S.A. 540MVP
VIDEO GAMING MACHINE
OPERATOR MANUAL
AM-1911501-02
Preface
USA 540MVP Video Operator Manual
© Aristocrat Leisure Industries Pty Ltd 2000
The gaming machine described in this document may be covered by patents and registered designs. The information contained in
this manual is the confidential proprietary property of Aristocrat Leisure Industries Pty Limited, Australia.
Absolutely no use, dissemination or copying in any media of any portion of this material is to be made without the
prior written authorisation of Aristocrat Leisure Industries Pty Limited. All rights reserved. In the event of
publication, statutory copyright is claimed.
Aristocrat Leisure Industries Pty Limited reserves the right to change, without notice, the design or specifications
of the gaming machine covered by this document. Additional information is available from time to time in the form
of technical bulletins. New editions of this document may change its contents. This document is not for use in
countries where gaming machines are prohibited by law.
CAUTION
All functions of the machine are controlled by complex
electronics. Unqualified personnel must not interfere with any
mechanisms or controls as this may permanently damage the
machine and lead to expensive repairs or component
replacement, and will render the warranty void.
Important Safety Information
This document contains important information about the use of the
equipment and hazards involved in owning and operating the equipment to
which it relates. The equipment can be very hazardous if used other than in
accordance with this document.
Inform yourself and your staff
You must read this document before using the equipment or opening any part
of the equipment. Ensure your staff do too.
The equipment itself is marked with important warning labels detailing
dangers.
Check for warning labels whenever opening any part of the equipment.
Read and comply with all warning labels you see when operating or
opening the equipment.
Under no circumstances remove or alter any warning label.
Be careful
If you don’t follow the directions in this manual and on warning labels you
increase the risk of the following things occurring:
serious personal injury, including electrocution and amputation. Unless
you are a trained technician, tampering with the machine can kill you;
serious damage to the equipment;
serious damage to other equipment;
serious damage to the premises housing the equipment.
ii
USA - Revision 02
USA 540MVP Video Operator Manual
Preface
Aristocrat MVP Manuals
Operator Manual
Primarily intended for operators of Aristocrat
MVP Video Gaming Machines. The Operator
Manual:
• gives a general overview of the hardware and
software
• provides procedures for daily operations and
simple maintenance.
Service Manual
Primarily intended for service technicians. The
Service Manual:
• gives a general overview of the hardware and
software
• provides instructions for installation and fault
finding
• describes in detail each of the major components
of the machine.
Parts Catalogue
Primarily intended for operators and service
technicians. It enables operators and service
technicians to order machine parts. The Parts
Catalogue:
• shows an illustration of each of the components
of the machine
• links each illustration with a part number.
USA - Revision 02
iii
Preface
USA 540MVP Video Operator Manual
This page intentionally left blank
iv
USA - Revision 02
USA 540MVP Video Operator Manual
Table of Contents
Foreword
How To Use This Manual
Purpose of the Manual
This manual provides procedures for the operation of the gaming machine. Machine
installation, service, and repair must be carried out by licensed technicians.
Warnings, Cautions and Notes
WARNING
A warning immediately precedes an operating
procedure or maintenance practice which, if not
correctly followed, could result in personal injury
or loss of life.
CAUTION
A caution immediately precedes an operating
procedure or maintenance practice which, if not
strictly observed, could result in damage to or
destruction of the equipment, or corruption of the
data.
Note
A note immediately precedes or follows an
operating procedure, maintenance practice or
condition which requires highlighting.
USA - Revision 02
v
Table of Contents
USA 540MVP Video Operator Manual
About Aristocrat Leisure Industries
Aristocrat Leisure Industries (ALI) commenced operations in 1953 and is one of the oldest and
most successful gaming machine manufacturers. ALI has supplied machines to every country
and region in the world where gaming machines are legal, including Austria, France,
Germany, Holland, Malaysia, China, the Philippines, Africa, Singapore, Russia, South
America, and the USA.
Aristocrat Leisure Industries employs over 1,400 people and has the largest gaming research
and development facility in the southern hemisphere.
Offices
Spare Parts Department
PO Box 155, Rosebery, NSW 2018, Australia
Outside Australia Tel: 612 9930 5100 Fax: 612 9930 5199
Within Australia Tel: 02 9930 5100 Fax: 02 9930 5199
Head Office
Aristocrat Leisure Industries Pty Ltd (ACN 001 660 715),
85-113 Dunning Avenue, Rosebery NSW 2018, Australia.
Outside Australia Tel: 612 9697 4000 Fax: 612 9693 1340
Within Australia Tel: 02 9697 4000 Fax: 02 9693 1340
USA Offices
Aristocrat Inc.
750A South Rock Blvd, Reno, Nevada 89502, USA.
Tel: 1-702-856-7767 Fax: 0015 1 702 856 5646
Aristocrat Inc. (Missouri)
1337 Vandeventer #A, St. Louis, Mo. 63110
Tel: 1-314-534-0203
Aristocrat Inc. (Miami),
2168 NW 82nd Ave, Miami, Florida 33126, USA.
Tel: 1-305-594-2881 Fax: 0015 1 305 594 9022
Aristocrat Inc. (New Jersey)
5047 Tremont Ave., Egg Harbor Township, NJ 08234
Tel: 1-609-407-9330
Aristocrat Inc. (Michigan)
P.O. Box 126, Buckley, MI 49620-0126
Tel: 1-616-269-4088
Hanson Distributing Co.
Suite#1, 9201 Penn Ave. S., Bloomington, MN, 5431
Tel: 1-800-572-2463
Aristocrat Inc. (Oregon)
05670 Maple Drive, Florence, OR 97439
Tel: 1-541-997-5851
Vista Gaming (Colorado)
20021 Golden Gate Canyon Rd., Golden, CO, 80403
Tel: 1-303-279-0180
Aristocrat Inc. (Mississippi)
295 Hwy 90, Unit 13, Bay St. Louis, MS. 39520
Tel: 1-601-467-9342
vi
USA - Revision 02
USA 540MVP Video Operator Manual
Table of Contents
Table of Contents
General Description
1.1
Physical Description .............................................................1-1
1.2
Basic Operation.....................................................................1-7
1.2.1
1.2.2
1.3
Play Mode ................................................................................. 1-8
Operator Mode .......................................................................... 1-9
Specifications......................................................................1-11
Installation
2-1
2.1
Pre-Installation Requirements .............................................2-1
2.2
Inspection on Delivery ..........................................................2-5
2.3
Installation Procedure ..........................................................2-5
2.3.1
2.3.2
2.3.3
Machine Modes
Mounting.................................................................................... 2-5
Pre-start Connections, Checks and Power Up .......................... 2-6
Commissioning the Machine...................................................... 2-8
3-1
3.1
Modes of Operation ..............................................................3-1
3.2
Play Mode ..............................................................................3-1
3.2.1
3.2.2
3.2.3
3.2.4
3.2.5
3.2.6
3.2.7
3.3
Player Operation ....................................................................... 3-3
Video Display ............................................................................ 3-5
Sounds and Tunes .................................................................... 3-5
Light Tower................................................................................ 3-6
Pushbuttons .............................................................................. 3-6
Machine Self-Monitoring ............................................................ 3-7
Electronic Meters..................................................................... 3-10
Operator Mode.....................................................................3-11
3.3.1
3.3.2
3.3.3
3.3.4
USA Revision - 02
1-1
Machine Identification .............................................................. 3-13
Metering Information................................................................ 3-13
Diagnostic Information Menu ................................................... 3-22
Operator Setup/Selections ...................................................... 3-30
VII
Table of Contents
USA 540MVP Video Operator Manual
3.3.5
3.3.6
Miscellaneous Menu ................................................................3-35
Current Lockup Menu Items ....................................................3-40
Day-to-Day Operations
4.1
Opening and Closing Cabinet Door .................................... 4-1
4.2
Switching Machine On or Off .............................................. 4-2
4.3
Refilling Hopper.................................................................... 4-3
4.4
Clearing Coin and Note Jams.............................................. 4-4
4.4.1
4.4.2
4.4.3
4.4.4
Coin Comparator .......................................................................4-4
Coin Chute Assembly ................................................................4-5
Hopper Photo-optic Detector and Coin Chute ...........................4-6
Bill Acceptor...............................................................................4-7
4.5
Cancelling Credit ................................................................ 4-10
4.6
Resolving Disputed Win Claims ........................................ 4-11
4.7
Clearance of Coins and Notes........................................... 4-11
4.7.1
4.7.2
4.8
Cash Box Clearance................................................................4-11
Bill Acceptor Stacker Clearance ..............................................4-11
Performance and Audit Calculations................................ 4-12
Care and General Maintenance
5-1
5.1
Cabinet .................................................................................. 5-1
5.2
Fluorescent Tubes................................................................ 5-2
5.2.1
5.2.2
5.3
5.4
Removing and Replacing...........................................................5-5
Cleaning ....................................................................................5-6
Coin Comparator .................................................................. 5-7
5.5.1
5.6
Playbutton Lamps......................................................................5-4
Hopper................................................................................... 5-5
5.4.1
5.4.2
5.5
Top Box Tube ............................................................................5-2
Cabinet Door Fluorescent Tubes ...............................................5-3
Playbuttons ........................................................................... 5-4
5.3.1
VIII
4-1
Removing and Replacing...........................................................5-7
Bill Acceptor Unit ................................................................. 5-7
USA - Revision 02
USA 540MVP Video Operator Manual
5.6.1
5.6.2
Removing and Replacing .......................................................... 5-7
Maintenance.............................................................................. 5-7
Machine Conditions and Messages
6.1
6-1
Machine Alerts.......................................................................6-1
6.1.1
6.1.2
6.1.3
6.1.4
6.2
Table of Contents
Operational Messages .............................................................. 6-1
Machine Lockup ........................................................................ 6-2
Door Access and Alarm Sound ................................................. 6-4
Intelligent Bezel ......................................................................... 6-4
Message Displays and Conditions ......................................6-6
Glossary
Index
USA Revision - 02
IX
Table of Contents
USA 540MVP Video Operator Manual
List of Figures
Figure 1-1 Typical MVP Video Gaming Machine with Bill Acceptor
- External View ..........................................................................1-4
Figure 1-2 Typical MVP Video Gaming Machine with Bill Acceptor
- Internal View ...........................................................................1-5
Figure 1-3 Basic Game Operation in Play Mode ......................................1-10
Figure 2-1 Machine Dimensions .................................................................2-2
Figure 2-2 Machine Dimensions - Low Boy with Hard Meters.....................2-3
Figure 2-3 Machine Footprint and Clearances............................................2-4
Figure 2-4 Coin Comparator (CC-62 shown)...............................................2-7
Figure 3-1 Typical Format of Game Display...............................................3-2
Figure 3-2 Centre Line and Multi Line Combinations ..................................3-5
Figure 3-3 Typical Pushbutton Layout ........................................................3-7
Figure 3-4 Operator Mode Menu Displays - Typical Structure ..................3-12
Figure 3-5 Examples of Typical Printer Tickets.........................................3-39
Figure 4-1 Cabinet Key Locations ..............................................................4-1
Figure 4-2 Switching Machine On or Off .....................................................4-2
Figure 4-3 Coin Comparator Sensor Assembly..........................................4-4
Figure 4-4 Coin Comparator and Coin Chuting ..........................................4-6
Figure 4-5 Clearing Hopper Photo-optic Detector ......................................4-7
Figure 4-6 Dual Cage Housing and Bill Acceptor Access ...........................4-9
Figure 4-7 Bill Acceptor ............................................................................4-10
Figure 4-8 Removing Bill Stacker .............................................................4-12
Figure 5-1 Replacing Top Box Tube ...........................................................5-2
Figure 5-2 Cabinet Door Fluorescent Tube ................................................5-3
Figure 5-3 Playbutton Lamps .....................................................................5-4
Figure 5-4 Hopper Removal.......................................................................5-6
Figure 5-5 Hopper Photo-optic ...................................................................5-7
Figure 6-1 Bezel Assembly Indicators - LED Displays ................................6-5
X
USA - Revision 02
USA 540MVP Video Operator Manual
Table of Contents
List of Tables
Table 1-1 Video Gaming Machine Modules................................................ 1-2
Table 1-2 Machine Keys............................................................................. 1-6
Table 1-3 Physical Characteristics ........................................................... 1-11
Table 1-4 Power Requirements................................................................ 1-11
Table 1-5 Environment ............................................................................. 1-11
Table 1-6 Storage Environment ............................................................... 1-12
Table 1-7 Compliances ............................................................................ 1-12
Table 3-1 Typical Operator Mode Menu ................................................... 3-11
Table 3-2 Machine Identification Display................................................... 3-13
Table 3-3 Metering Information Menu....................................................... 3-14
Table 3-4 Current Meters Display - Screen 1 ........................................... 3-14
Table 3-5 Current Meters Display - Screen 2 ........................................... 3-15
Table 3-6 Current Meters Display - Screen 3 ........................................... 3-15
Table 3-7 Bill Acceptor Information Display .............................................. 3-17
Table 3-8 Security Meters Display (Page 1) ............................................. 3-18
Table 3-9 Security Meters Display (Page 2) - Example ............................ 3-18
Table 3-10 Previous Game Display.......................................................... 3-20
Table 3-11 CASHOUT Statistics Display.................................................. 3-20
Table 3-12 Gamble Statistics ................................................................... 3-21
Table 3-13 Game Statistics Display ......................................................... 3-22
Table 3-14 Diagnostic Information Menu .................................................. 3-22
Table 3-15 Self Test Mode Menu ............................................................. 3-23
Table 3-16 Lamp Test.............................................................................. 3-24
Table 3-17 Coin Entry Test Screen .......................................................... 3-24
Table 3-18 Hopper Test Screen............................................................... 3-25
Table 3-19 Video Monitor Test Screen..................................................... 3-25
Table 3-20 Button Test Screen ................................................................ 3-26
Table 3-21 Sound System Test Screen ................................................... 3-27
Table 3-22 Self Test Mode.- Combination Test Display ........................... 3-27
Table 3-23 Self Test Mode - Combination Test Result Display ................ 3-28
Table 3-24 Factory Test Screen............................................................... 3-28
Table 3-25 Self Test Mode - Printer Test Display..................................... 3-29
Table 3-26 Error Log Display ................................................................... 3-29
Table 3-27 Operator Setup/Selection Menu ............................................. 3-30
Table 3-28 Operator Setup Mode - Machine Options Display .................. 3-31
Table 3-29 Dip Switch Settings ................................................................ 3-32
Table 3-30 Progressive Level Setup ........................................................ 3-33
Table 3-31 Venue Name Setup................................................................ 3-33
Table 3-32 Sound System Setup ............................................................. 3-34
Table 3-33 Real Time Clock Setup .......................................................... 3-34
Table 3-34 Player Message Information................................................... 3-35
Table 3-35 Miscellaneous Menu............................................................... 3-35
Table 3-36 Reset Bills in Stacker ............................................................. 3-36
Table 3-37 Bill Acceptor CRC Check and Mismatch Clear....................... 3-36
Table 3-38 Reset Periodic Meters Screen ............................................... 3-36
USA Revision - 02
XI
Table of Contents
USA 540MVP Video Operator Manual
Table 3-39 Demonstration Mode Screen..................................................3-37
Table 3-40 Demonstration Mode Screen (Error Mode) ............................3-38
Table 3-41 Demonstration Mode Screen (Normal Mode).........................3-38
Table 3-42 Print Accounting Information Menu .........................................3-38
Table 3-43 Out of Service Screen ............................................................3-40
Table 3-44 Current Lockup Screen Display..............................................3-41
Table 6-1 Current Lockup Screen Display..................................................6-2
Table 3-2 Lockup Help Displays .................................................................6-3
Table 6-3 Typical Lockup Messages, Fault Conditions and Corrective
Actions ......................................................................................6-6
XII
USA - Revision 02
USA 540MVP Video Service Manual
General Description
_____Chapter 1_____
General Description
1.1
Physical Description......................................................................1-3
1.2
Basic Operation..............................................................................1-9
1.2.1
Play Mode ......................................................................................1-10
1.2.2
Operator Mode ...............................................................................1-11
1.3
USA Revision - 02
Specifications...............................................................................1-13
1-1
USA 540MVP Video Service Manual
General Description
List of Figures
Figure 1-1 Typical MVP Video Gaming Machine with Bill Acceptor - External View .............1-6
Figure 1-2 Typical MVP Video Gaming Machine with Bill Acceptor - Internal View...............1-7
Figure 1-3 Basic Game Operation in Play Mode.................................................................1-12
List of Tables
Table 1-1
Table 1-2
Table 1-3
Table 1-4
Table 1-5
Table 1-6
1-2
Video Gaming Machine Modules ..........................................................................1-4
Machine Keys .......................................................................................................1-8
Physical Characteristics ......................................................................................1-13
Power Requirements ..........................................................................................1-13
Environment........................................................................................................1-13
Compliances.......................................................................................................1-14
USA Revision - 02
USA 540MVP Video Service Manual
General Description
1.1 Physical Description
The Aristocrat MVP Video Gaming Machine is the latest model of a range of advanced
gaming machines that incorporates the following features:
• Advanced, high-performance electronics based on ARM RISC technology,
• Advanced software enabling a wider variety of games and simpler machine
operations,
• Complete range of machine attachments enabling note and coin currency,
communication links, progressive systems, and custom options,
Comprehensive security options,
Modular design and construction,
A multi-voltage power supply assembly,
Easier servicing and maintenance,
High resolution video displays, advanced animation and graphics, and improved
sounds and tunes,
• Variety of aesthetic cabinet types, colours, and game and score displays.
•
•
•
•
•
The machine is assembled from various sub-assemblies and major components
(modules) which are described in detail in other chapters of this manual.
Figure 1-1 shows a typical external view of the machine with a bill acceptor fitted and
Figure 1-2 shows an internal view.
USA Revision - 02
1-3
USA 540MVP Video Service Manual
General Description
The following table briefly identifies the various modules of the gaming machine.
Table 1-1 Video Gaming Machine Modules
Machine Module
Description
Cabinet, Door and Top
Box.
The physical outer enclosure which provides for the location and mounting of
other modules.
Belly Panel Door
This door is located on the main door, below the mid trim, and provides
access to the note stacker (where fitted) and main door fluorescent tube.
This door is fitted with a lock and a battery-backed security switch.
Video Monitor
High resolution 640 x 400 pixels for improved-quality graphics. The monitor
is the main medium for displaying game operation and status to the player.
Main Board
The Main printed circuit board (PCB) provides primary control of the gaming
machine. The Main Board is interfaced (via the Backplane) to all the major
components of the machine. The board receives signals from, and sends
control signals to machine components. The Main Board houses the central
processor and other logic components for game generation, video and
stepper drivers, security items, power control, memory storage, and
communications.
Backplane
(may also be called the
Interface Board).
The Backplane houses an array of connectors which are used to electrically
connect (via direct mechanical coupling or through looms and ribbon cables)
the various electrical components of the machine to the Main Board.
I/O Driver Board
The I/O Driver Board drives the lamps, receives inputs from the pushbuttons,
interfaces with the coin handling system, and provides a battery-backed
circuit for security monitoring.
Communication
Configuration Board
The Communication Configuration Board (CCB) 'piggy-backs' to the Main
Board. The board is used to set up the communications channels of the
Main Board (up to three) for external networks, bill acceptor, printer, and
touchscreen.
Logic Cage
The logic cage consists of a secure, steel cabinet which houses the Main,
Communications Configuration, and I\O Driver PCBAs. The section of the
Interface Board that interfaces with the Main Board and the I/O Driver Board
is also located within the logic cage.
Power Supply Assembly
The power supply assembly converts the AC mains input voltage into low
voltage DC power for the various machine modules and circuits. Power is
directed via the Interface Board to the machine components. The video
monitor and the fluorescent lighting system receive AC power directly from
the power supply assembly.
Coin Handling System
The function of the coin handling system is to check the validity of coins
inserted, establish a count and pass signals to the Main Board. The coin
handling system directs coins to either the hopper, cash box, or coin tray.
The MkV Series II is compatible with several different coin handling systems.
1-4
USA Revision - 02
USA 540MVP Video Service Manual
General Description
Hopper (if used)
The hopper acts as a holding unit for coins. When instructed by the main
board, the hopper returns coins to the player. For each coin ejected, the
hopper sends a signal to the Main Board. When the required number of
coins have been dispensed, the Main Board signals the hopper motor to
stop.
Bill Acceptor and Soft
Drop Analyser (if used)
The function of the bill acceptor is to accept valid note currency and register
the appropriate number of credits for gameplay. A note stacker is used to
store the notes and to record monetary and statistical information. The
information stored in the stacker may be read by a PC-based system away
from the gaming floor without opening the stacker.
Player Communication
(if used)
The function of player communication is to allow a player, using an
identification card, to 'log on' to a network system when playing a machine.
The network system maintains a record of player transactions, and allows
messages to be sent to individual players. The player communication
module can be attached to the side of the gaming machine or fitted in the
top box.
Mechanical Meter Board
(if used)
Electromechanical meters are used to record accounting data in a physical
format. The signals for the meters are received from the Main Board, via the
Backplane.
Ticket Printer (if used)
The ticket printer is an electronic device mounted within the cabinet, it is
used for providing the player with a printed ticket for redeemable credits. The
printer may also keep a second copy of all tickets printed for additional audit
information.
Communications
Interface (if used)
The function of the communications interface is to enable the machine to be
linked to a network and/or subsidiary equipment. The communications
interface may be linked to various machine modules, including security, and
transmits signals from these inputs as each one changes status.
Light Tower (if used)
Multi-level light towers may be used to provide an additional level of
customer service and security.
USA Revision - 02
1-5
USA 540MVP Video Service Manual
General Description
Figure 1-1 Typical MVP Video Gaming Machine with Bill Acceptor
- External View
1-6
USA Revision - 02
USA 540MVP Video Service Manual
General Description
Figure 1-2 Typical MVP Video Gaming Machine with Bill Acceptor
- Internal View
USA Revision - 02
1-7
USA 540MVP Video Service Manual
General Description
Machine Keys
The gaming machine requires keys for the following locks and switches to establish
effective security and correct operation. A key may only be removed from its lock or
key switch after it has been returned to the locked position. Refer to Figure 1-1 for
lock and keyswitch positions.
Table 1-2 Machine Keys
Name
1-8
Function
Cabinet Door
Lock
Allows the operator to open the cabinet door.
Insert the cabinet door key and turn it 180° clockwise, then lift the latch
to release the door.
Audit Key Switch
Enables entry to the Operator Mode Menu (see Machine Modes).
Insert the Audit Key and turn it 180° clockwise.
Jackpot Reset
Keyswitch - also
called the Cancel
Credit Key
Switch
Allows the operator to reset the machine after a machine fault has been
corrected (see Machine Modes).
Insert the Cancel Credit key, turn it 90° clockwise then back again.
Belly Panel Door
Allows the operator access to the bill acceptor note stacker and door
fluorescent tube.
Logic Cage Lock
(if fitted)
Allows the operator access to the PCB logic cage.
Insert the logic cage key and turn it 180° clockwise.
Bill Acceptor
Cage Door
Lock(s) (optional)
Allows operator access to the bill acceptor stacker lock(s) and to
remove the stacker.
Turn keys 180° clockwise to open.
Bill Acceptor
Stacker Lock
Allows the operator to remove the notes from the stacker.
Insert the key and turn it 90° clockwise, open the door and remove the
notes.
USA Revision - 02
USA 540MVP Video Service Manual
General Description
1.2 Basic Operation
The gaming machine functions are controlled by an advanced software and hardware
platform that gives operators greater control over machine functions, easier
maintenance, and simplified machine setup. New games developed with the software
provide higher quality graphics, new sounds, and a wider variety of features.
The machine has two major modes of operation: Play mode and Operator mode.
The machine is in Play Mode when the cabinet door is closed and locked, the Audit key
switch is in the OFF position and there are no fault or lock-up conditions.
The machine is in Operator Mode when the Audit key switch is in the ON position.
The operator mode provides a range of operational procedures, data displays, and
specific machine functions, all of which are fully controlled by the Operator Mode
Menu system and the on-screen guidance. The functions of the operator mode are
explained in detail in the chapter Machine Modes.
When the machine is in operator mode, normal game operation is not possible.
However, demonstration mode and combination test mode enable gameplay without
using currency.
USA Revision - 02
1-9
USA 540MVP Video Service Manual
General Description
1.2.1 Play Mode
When in Play Mode, the machine:
•
•
•
•
•
operates security and audit features,
runs self-checking and testing continuously,
permits gameplay,
monitors and records gameplay activities continuously,
displays comments and guidance for players, operators and technicians.
Basic machine operation in Play Mode is shown in Figure 1.3 Depending on the
machine configuration, credits may be registered by inserting coins, tokens, or bank
notes, or by using a cashless system. With a cashless system, credits are transferred to
and from the machine through either a computer link or a smart card. The machine has
security features for screening the currency tendered to ensure that only valid currency
is accepted.
If the currency is accepted by the machine, the playbuttons on the mid trim become
active and flash. The player may then insert more currency, play a game by pressing
one of the flashing playbuttons, or have the machine return the current credit total by
pressing the CASHOUT pushbutton. The player determines how many credits to
wager by pressing one of the BET playbuttons, and the BET meter on the display
screen shows the credits wagered.
Once the player starts a game by pressing one of the active playbuttons, the machine
runs the game sequence and displays the outcome on the screen. If the result is a
winning combination, the player may gamble the win (if the gamble feature is
available); otherwise, the machine increments the credits won. If the result is not a
winning combination, the player may continue gameplay provided there are credits
remaining.
The machine is equipped with electronic audit meters which continuously monitor and
record credit movement and game activity. Electromechanical meters may also be
fitted. The electronic meters are accessed through the Operator Mode. The
information in these meters is used for audit calculations and security purposes.
If the machine encounters an abnormal condition, it alerts the operator by automatically
entering Machine Lockup. In lockup, gameplay is disabled to prevent any further
player interaction and guidance information is displayed in the game message area.
The lockup condition can be identified by examining the Current Lockup screen, which
is accessed from the Operator Mode Menu.
1-10
USA Revision - 02
USA 540MVP Video Service Manual
General Description
1.2.2 Operator Mode
Within Operator Mode (Audit Key ON), the following options are available:
•
•
•
•
•
•
machine identification
metering information
diagnostic information
operator setup/selection
miscellaneous
current lockup mode.
In Operator Mode, the electronic audit meters and the electromechanical meters (if
fitted) do not function. Menu selections may be used to review the machine details,
select new configurations, and carry out machine tests. Refer to the chapter Machine
Modes for detailed information.
USA Revision - 02
1-11
USA 540MVP Video Service Manual
General Description
CENTRAL
PROCESSOR
PLAYER INSERTS CREDITS
Bank Note
Coin/Token
Invalid Currency
Returned To Player
AUDIT DATA
AUDIT
DATA
REJECT
CONTROL
INFORMATION
COMMS
INTERFACE
Machine
Registers Credits
ACCEPT
Machine Checks
Currency Validity
ADD
WIN
Win Credits
To Be Added
Player Presses
Selected Pushbutton
AUDIT
DATA
COLLECT
PLAY
YES
WIN
NO
WIN
Machine Displays
Game Outcome
Credits are Paid
to Player
Remaining
Credit
NO
X0004B.CDR
Figure 1-3 Basic Game Operation in Play Mode
1-12
USA Revision - 02
USA 540MVP Video Service Manual
General Description
1.3 Specifications
Table 1-3 Physical Characteristics
Dimensions (Typical)
Height of cabinet with high boy top box
Height of cabinet with casino top box
Height of low boy cabinet
Width
Depth
Recommended minimum clearance between machines
1468 mm
1278 mm
897 mm
540 mm
611 mm
180 mm
Weight (Typical)
With casino top box and bill acceptor
approx. 102 kg
Table 1-4 Power Requirements
The voltage selector switch on the power supply assembly may be set for a mains
voltage of either 110/120 V or 220/230/240 V.
Nominal Mains Input Voltage
Minimum
Maximum
Frequency
120 V
240 V
99 V AC
132 V AC
60 Hz
198 V AC
264 V AC
50 Hz
0.7 A
6A
9A
0.4 A
1.8 A
4.8 A
84 W
720 W
1180 W
96 W
432 W
1152 W
310 W
380 W
Mains Input Current
Gaming Machine Idle
Gaming Machine Maximum
Gaming Machine Maximum plus Convenience Load
Maximum
Power Consumption at Nominal Voltage
Gaming Machine Idle
Gaming Machine Maximum
Gaming Machine Maximum plus Convenience Load
Maximum
Gaming Machine Typical Power Consumption
Table 1-5 Environment
Operating
Minimum Temperature
Maximum Temperature
Relative Humidity
USA Revision - 02
0° C
50° C
0 - 80% non-condensing
Storage
-20° C
80° C
0 - 95% non-condensing
1-13
USA 540MVP Video Service Manual
General Description
Table 1-6 Compliances
Compliances
UL22 (Pending)
FCC-CFR47-Pt15
AS1099 (Pending)
1-14
Explanation
Standard for Safety Amusement and Gaming Conditions
Radiated EMI for ITE standard
Environmental testing for electro-technology over a specified
temperature and humidity range
USA Revision - 02
USA 540MVP Video Operator Manual
Installation
________Chapter 2________
Installation
2.1
Pre-Installation Requirements ......................................................2-3
2.2
Inspection on Delivery...................................................................2-7
2.3
Installation Procedure ...................................................................2-7
2.3.1
Mounting ..........................................................................................2-7
2.3.2
Pre-start Connections, Checks and Power Up ................................2-8
2.3.3
Commissioning the Machine..........................................................2-10
Revision 04 + USA Revision 02
2-1
Installation
USA 540MVP Video Operator Manual
List of Figures:
Figure 2-1 Machine Dimensions......................................................................................2-4
Figure 2-2 Machine Dimensions - Low Boy with Hard Meters .........................................2-5
Figure 2-3 Machine Footprint and Clearances ................................................................2-6
Figure 2-4 Coin Comparator (CC-62 shown) ...................................................................2-9
2-2
Revision 04 + USA Revision 02
USA 540MVP Video Operator Manual
Installation
2.1 Pre-Installation Requirements
The following items are required to install a machine (see Figure 2-1, Figure 2-2, and
Figure 2-3):
•
•
•
•
verification of jurisdictional approval.
a floor plan (only required for new installations).
a suitable base on which to mount the machine.
adequate clearance between the sides of adjacent machines to allow the doors to be
opened (a clearance of 180 mm is recommended).
• access to mains power outlets and connection cables of peripheral devices.
• machine keys (if locks are fitted).
Important Note
All mains power wiring must be installed by a qualified electrician
and comply with Australian standard AS3000-1991, or equivalent
national/jurisdictional standards for mains wiring.
WARNING
The gaming machine must be transported and handled with care.
Ensure the machine is not dropped or severely bumped.
Revision 04 + USA Revision 02
2-3
Installation
USA 540MVP Video Operator Manual
High Boy
570
Casino
(Rounded
& Square)
380
1465
Low Boy
895
Mk5S2023.cdr
144
540
658
Note: All dimensions in millimeters
Figure 2-1 Machine Dimensions
2-4
Revision 04 + USA Revision 02
USA 540MVP Video Operator Manual
Installation
Hard Meters Cover
80
975
Low Boy
895
144
540
658
Note: All dimensions in millimeters
Figure 2-2 Machine Dimensions - Low Boy with Hard Meters
Revision 04 + USA Revision 02
2-5
Installation
USA 540MVP Video Operator Manual
Mounting holes (4 shown)
Drill to suit fastener
34.5
Holes for Cables
ø53 (2 off)
419
514
Hole for Cash Box
50 (1 off)
150
326
144 Depth of Coin Tray
540
For detailed dimensions, refer to mechanical
drawing AO-564815 in the Service Manual - Volume II
Minimum spacing
between machine
and walls = flush
MACHINE
FOOTPRINT
740 Minimum Base Width
Minimum spacing
between machines
180
Side face of
adjacent
machine
95
150 (Depth of Do
Arc of
Door Swing
or)
CLEARANCES
MVPfoot
Note: All dimensions in millimeters
Figure 2-3 Machine Footprint and Clearances
2-6
Revision 04 + USA Revision 02
USA 540MVP Video Operator Manual
Installation
2.2 Inspection on Delivery
Inspect all exterior panels of the cabinet for damage that may have occurred during
transportation. Report any damage to your supervisor.
2.3 Installation Procedure
Installation and commissioning of machines must be carried out by an
appropriately licensed technician and must comply with the regulations of the
jurisdictional authority.
The following procedures are for mounting, connecting, and commissioning the gaming
machine into service.
2.3.1 Mounting
WARNING
The gaming machine is a heavy item.
Follow
the national standard and code of practice for
manual handling.
Mount the machine to the cabinet base as follows:
1.
Position the machine on the cabinet base, aligning it with the cash box and cable
holes (refer to Figure 2-3). Drill holes in the cabinet base to match four
rectangular mounting holes. The machine must be fixed in four positions, two at
the front and two at the back, to meet stability requirements.
2.
Secure the machine to the base using either bolts and nuts or the special-purpose
fasteners provided.
Revision 04 + USA Revision 02
2-7
Installation
USA 540MVP Video Operator Manual
2.3.2 Pre-start Connections, Checks and Power Up
Perform the following machine connections and checks:
1.
Check that the printed circuit board assemblies (PCBAs) in the logic cage are
firmly seated. The PCBAs are:
♦
♦
♦
♦
♦
Main Board
Backplane Board
Extended USA I/O Driver Board
Communications Configuration Board
Pulse Mechanical Meter Board
Note
For accessing PCBAs, refer to the relevant chapter in the
Service Manual.
2.
The machine power supply and monitor isolation transformer (Ceronix only) are
set at the factory for a mains input voltage of 240 V (or 110 V in North
America), unless clearly labeled otherwise. Should there be a need to change the
mains input voltage setting:
WARNING
Make sure the machine is disconnected from mains
power before adjusting voltage settings.
WARNING
Selecting the wrong power supply and/or monitor
isolation transformer voltage will cause considerable
damage to the power supply and/or monitor
transformer.
3.
2-8
a.
Set the voltage selector switch on the power supply for the correct mains
input voltage. The switch is mounted on the metal housing of the power
supply assembly, which is located at the back of the cabinet, in the bottom
right-hand corner.
b.
Where a Ceronix monitor with a manually-switched isolation mains input
transformer is used, set the mains input switch on the transformer to match
the mains input voltage.
Make sure that the mains power switch is OFF. Connect the mains power cable
to the machine. The power cable may enter the cabinet either via a hole in the
base of the cabinet or via a hole in the rear wall of the cabinet. A hole is
provided in the base of the cabinet, near the cable entrance, to allow a clamp to
be fitted to the mains cable. The purpose of this clamp is to prevent the mains
Revision 04 + USA Revision 02
USA 540MVP Video Operator Manual
Installation
power cable from being accidentally disconnected. This clamp should be fitted if
there is a reasonable risk that the mains power cable may be accidentally
disconnected.
WARNING
Visually check that the insulation of the mains power cable is sound.
Check that all machine earth wires (green/yellow stripe or braid) and
screws that were moved during installation are correctly attached.
4.
If the machine is fitted with a coin comparator (as opposed to a coin validator),
then a sample coin (or token) must be placed in the coin comparator sensor
assembly (refer to Figure 2-4) which is mounted to the reflector panel on the
inside of the main door. To install a sample coin:
a.
b.
c.
Slide (without lifting) the scanner unit to the right.
Insert the sample coin into place and carefully release the scanner unit.
The coin should automatically seat itself.
Check that the sample coin is seated firmly between the scanner unit and
the ribs of the rail insert.
Sample Coin
Scanner Unit
Rail Insert
Fork of the
Rail Insert
Mk5s2054
Figure 2-4 Coin Comparator (CC-62 shown)
5.
Switch ON the machine and close the main door within 5 seconds (see item 6
below). The monitor and fluorescent lighting system will then be powered up.
The machine will perform self-testing procedures for a few moments and any
faults detected will be highlighted by a message on the video screen. To fix
detected faults, refer to Fault Mode in the chapter Machine Modes.
Revision 04 + USA Revision 02
2-9
Installation
6.
USA 540MVP Video Operator Manual
If the monitor exhibits colour aberrations, this may be the result of magnetic
interference. Degaussing the monitor and cabinet, as described below, can
remove the colour aberrations.
a.
b.
c.
Power down the machine and wait for a 30-minute period to elapse. This
time delay enables the monitor circuit varistors to cool sufficiently and
create enough energy to degauss both the monitor's ferrous content and that
of the cabinet.
Power up the machine and close the door within 5 seconds. Automatic
degaussing will now occur.
Should colour aberrations persist, use a degaussing wand to degauss the
monitor and cabinet.
2.3.3 Commissioning the Machine
Carry out the following procedures to commission the machine:
1.
Check that the machine program type and variation match the customer order.
Use the Operator Mode menu and the options described in the chapter Machine
Modes.
2.
If the machine is fitted with a hopper, fill the hopper as described below.
Important Note
The procedure for filling the hopper is dependant on house rules.
a.
b.
c.
d.
e.
3.
Where the Operator permits, monitor gameplay operations for any faults:
a.
b.
2-10
Obtain the correct number of coins required to fill the hopper.
Open the cabinet door. If the jurisdiction requires that the hopper be
weighed, turn OFF the machine before removing the hopper.
Place the coins in the hopper, and close and lock the cabinet door.
In some markets, the hopper refill amount must be recorded in the machine
memory. To do this, insert and turn the Audit Key to enter Operator Mode,
select Record Refill (may be under Miscellaneous Operations) and press
the appropriate buttons to record the refill amount. Turn the Audit key
back to return to Play Mode.
Record the number of coins placed in the hopper in the refill register.
For machines that accept bank notes, insert a valid bank note (in good
condition) and confirm that it is accepted and credited correctly. If the
bank note is not accepted on the second attempt, repeat the test on another
note. If the second bank note is also rejected, refer to the Fault Finding
section in the Bank Note Acceptor chapter of the Service Manual.
For machines that accept coins, check that coins are accepted, credited, and
paid out correctly.
Revision 04 + USA Revision 02
USA 540MVP Video Operator Manual
Installation
Retrieve bank notes and coins inserted during testing.
4.
Machines operating on a network system may now be connected and installed
onto the network. For installation procedure refer to the manual for the particular
communications network used.
5.
For machines fitted with a ticket printer, carry out the general maintenance
procedures as detailed in the Printer chapter of the Service Manual or the Care
and General Maintenance chapter of the Operator Manual.
6.
Request an Operator to record the values of the hard audit meters (if fitted) and
the soft audit meters (as required by the applicable jurisdictional authority).
7.
Log installation data as specified by the appropriate jurisdictional requirements.
The machine may now commence operation.
Revision 04 + USA Revision 02
2-11
Installation
USA 540MVP Video Operator Manual
Notes
2-12
Revision 04 + USA Revision 02
USA 540MVP Video Service Manual
Machine Modes
________Chapter 3________
Machine Modes
3.1
Modes of Operation .......................................................................3-3
3.2
Play Mode .......................................................................................3-3
3.2.1
Player Operation ..............................................................................3-5
3.2.2
Video Display...................................................................................3-7
3.2.3
Sounds and Tunes...........................................................................3-7
3.2.4
Light Tower ......................................................................................3-8
3.2.5
Pushbuttons.....................................................................................3-8
3.2.6
Machine Self-Monitoring ..................................................................3-9
3.2.7
Electronic Meters ...........................................................................3-12
3.3
Operator Mode .............................................................................3-13
3.3.1
Machine Identification ....................................................................3-15
3.3.2
Metering Information ......................................................................3-15
3.3.3
Diagnostic Information Menu .........................................................3-24
3.3.4
Operator Setup/Selections.............................................................3-32
3.3.5
Miscellaneous Menu ......................................................................3-37
3.3.6
Current Lockup Menu Items...........................................................3-42
USA - Revision 02
3-1
Machine Modes
USA 540MVP Video Service Manual
List of Figures:
Figure 3-1
Figure 3-2
Figure 3-3
Figure 3-4
Figure 3-5
Typical Format of Game Display .........................................................................3-4
Centre Line and Multi Line Combinations.............................................................3-7
Typical Pushbutton Layout...................................................................................3-9
Operator Mode Menu Displays - Typical Structure.............................................3-14
Examples of Typical Printer Tickets ...................................................................3-41
List of Tables:
Table 3-1 Typical Operator Mode Menu..............................................................................3-13
Table 3-2 Machine Identification Display .............................................................................3-15
Table 3-3 Metering Information Menu .................................................................................3-16
Table 3-4 Current Meters Display - Screen 1......................................................................3-16
Table 3-5 Current Meters Display - Screen 2......................................................................3-17
Table 3-6 Current Meters Display - Screen 3......................................................................3-17
Table 3-7 Bill Acceptor Information Display.........................................................................3-19
Table 3-8 Security Meters Display (Page 1)........................................................................3-20
Table 3-9 Security Meters Display (Page 2) - Example.......................................................3-20
Table 3-10 Previous Game Display ....................................................................................3-22
Table 3-11 CASHOUT Statistics Display ............................................................................3-22
Table 3-12 Gamble Statistics..............................................................................................3-23
Table 3-13 Game Statistics Display....................................................................................3-24
Table 3-14 Diagnostic Information Menu.............................................................................3-24
Table 3-15 Self Test Mode Menu........................................................................................3-25
Table 3-16 Lamp Test ........................................................................................................3-26
Table 3-17 Coin Entry Test Screen.....................................................................................3-26
Table 3-18 Hopper Test Screen .........................................................................................3-27
Table 3-19 Video Monitor Test Screen ...............................................................................3-27
Table 3-20 Button Test Screen ...........................................................................................3-28
Table 3-21 Sound System Test Screen ..............................................................................3-29
Table 3-22 Self Test Mode.- Combination Test Display ......................................................3-29
Table 3-23 Self Test Mode - Combination Test Result Display ...........................................3-30
Table 3-24 Factory Test Screen .........................................................................................3-30
Table 3-25 Self Test Mode - Printer Test Display................................................................3-31
Table 3-26 Error Log Display..............................................................................................3-31
Table 3-27 Operator Setup/Selection Menu........................................................................3-32
Table 3-28 Operator Setup Mode - Machine Options Display.............................................3-33
Table 3-29 Dip Switch Settings ...........................................................................................3-34
Table 3-30 Progressive Level Setup ...................................................................................3-35
Table 3-31 Venue Name Setup ..........................................................................................3-35
Table 3-32 Sound System Setup ........................................................................................3-36
Table 3-33 Real Time Clock Setup .....................................................................................3-36
Table 3-34 Player Message Information .............................................................................3-37
Table 3-35 Miscellaneous Menu..........................................................................................3-37
Table 3-36 Reset Bills in Stacker........................................................................................3-38
Table 3-37 Bill Acceptor CRC Check and Mismatch Clear .................................................3-38
Table 3-38 Reset Periodic Meters Screen ..........................................................................3-38
Table 3-39 Demonstration Mode Screen ............................................................................3-39
Table 3-40 Demonstration Mode Screen (Error Mode).......................................................3-40
Table 3-41 Demonstration Mode Screen (Normal Mode) ...................................................3-40
Table 3-42 Print Accounting Information Menu....................................................................3-40
Table 3-43 Out of Service Screen.......................................................................................3-42
Table 3-44 Current Lockup Screen Display ........................................................................3-43
3-2
USA - Revision 02
USA 540MVP Video Service Manual
Machine Modes
Table 3-45 Lockup Help Displays .......................................................................................3-44
3.1 Modes of Operation
The gaming machine is operated in two main modes, Play Mode and Operator Mode.
Play Mode permits gameplay while the machine is fully operational and the cabinet
door is closed. Operator Mode allows the operator to configure the machine, view
audit information, carry out machine tests, and reset machine faults. Turning the Audit
Key ON switches the machine from Play Mode to Operator Mode.
The gaming machine may be configured to play one of several types of games, the most
common being spinning reel games and poker games. Although spinning reel games
are featured in this chapter, the explanations and information given can be easily
adapted to other game types. The options and procedures outlined are similar for all
game types.
3.2 Play Mode
The machine is in Play Mode when the cabinet door is closed and locked, and there are
no active lockup conditions. In Play Mode the machine:
•
•
•
•
•
shows game displays in readiness for player operation,
carries out gameplay,
continuously monitors and records play activities,
continuously runs the self-test processes,
displays comments and guidance for players, operators, and technicians.
USA - Revision 02
3-3
Machine Modes
USA 540MVP Video Service Manual
Figure 3-1 Typical Format of Game Display
Figure 3-1 shows the format of a game display. The symbols on the screen will vary
depending on the particular game software being used. The CREDIT, BET, and WIN
game meters show the number of credits applicable at the current stage of the game.
Comments appear in two message lines to guide players and operators as the game
progresses. Machine conditions, including security alerts, are also displayed in the
message area.
Examples of comments are:
•
•
•
•
Game Over
Main Door Open
Coin Diverter Fault
COMBINATION TEST
Lockup fault messages are listed in Section 3.3.8, Fault Mode - Current Lock Menu.
In Play Mode the machine operates with full security features. For example, the
machine monitors operations and alerts operators should malfunction or tampering
occur. Electronic meters and electromechanical meters (if fitted) record details of
gameplay and machine operations in Play Mode.
Options
Besides being able to alter machine controls to suit house preferences, the machine
provides menu controls for setting important game and player preferences, including:
•
•
•
3-4
Game percentage,
Links to house and stand-alone progressives in various levels,
Hopper coin-collect limit,
USA - Revision 02
USA 540MVP Video Service Manual
•
•
Machine Modes
acceptable bill ($ note) denominations
Volume settings for sounds and tunes.
See Section 3.3.5, Operator Setup/Selection Mode.
The base credit value (a game credit), machine token amount for coin entry, and game
gamble option are set using the DIP switches on the I/O Driver Board.
Note
Jurisdictional requirements must be followed
when configuring machines.
3.2.1 Player Operation
When the machine is switched on and the cabinet door is closed and locked, the
fluorescent tubes light up and the machine automatically initiates a self-test. If no
faults are detected, gameplay may begin.
Spinning Reel Games
When a player inserts a coin or note, the machine either accepts or rejects the currency.
If the machine accepts the currency, it increments the CREDIT meter on the game
video display by the number of credits. The mid trim pushbuttons become active and
flash. The player may now either insert more currency or press one of the pushbuttons
to play the game. The player selects the number of credits to bet and this number is
shown on the BET meter on the video display. A beep sound is heard when any of the
BET playbuttons are pressed.
The reels then start to spin and after a short interval come to rest. When the spinning
reels stop, the line combinations are evaluated. If the result is a winning combination,
a selected win tune is played. The video display shows the number of credits won in
the WIN meter.
Some games incorporate a win gamble feature that provides players with the chance to
double their WIN amount. This feature is initiated by pressing the GAMBLE
pushbutton. The GAMBLE feature may be selected a maximum of five times in
succession. If players do not wish to gamble their WIN, they may press the TAKE
WIN button to add the WIN to the CREDIT meter.
Due to the limit on the number of coins that can be held in the hopper, as well as other
payout considerations, there is a limit to the number of coins that the machine can pay
out. This is called the Hopper Limit and is set via the Operator Mode Menu ⇒
Operator Setup/Selections screen.
A player can collect coins up to the Hopper Limit amount by pressing the CASHOUT
pushbutton. When the CASHOUT button is pressed, the machine prevents functions
such as gameplay and entry of currency until the hopper has dispensed the coins into
USA - Revision 02
3-5
Machine Modes
USA 540MVP Video Service Manual
the coin tray. The hopper photo-optic detector counts the coins being dispensed. The
CREDIT meter decrements to zero.
When a player presses the CASHOUT pushbutton and the value of the game credits is
greater than the Hopper Limit:
•
•
•
•
•
3-6
the message Call attendant - Cancel Credit $99.99 is displayed ($99.99 is the
value of credits to be paid out).
the attendant hand pays the value of the credits and then resets the machine by
turning the Jackpot Key ON then OFF.
the message Credits paid out $99.99 is displayed on the screen.
the CANCEL CREDIT electronic meters and electromechanical meters record
the number of credits paid out.
the game CREDIT on the screen and the CREDIT electronic meters are reset to
zero.
USA - Revision 02
USA 540MVP Video Service Manual
Machine Modes
Types of Games
Machines generally have one of three game types: multiplier, multiline, and multilinemultiplier:
Multiplier- A multiplier game allows a player to gamble more than one credit per
game on a single winning line. Each additional credit gambled generally multiplies the
value of the prize by the value of the credits staked.
Multiline- A multiline game allows a player to specify multiple lines on which to bet
for a winning combination. The win total is calculated by adding each of the win lines.
VND1006
4
4
2
2
1
1
3
3
5
5
6
8
6
8
9
7
9
7
Figure 3-2 Centre Line and Multi Line Combinations
3.2.2 Video Display
The video display unit provides high-resolution graphics based on 256 colors. The
unit is able to display attractive game illustrations and animations, as well as player
messages, operator menus and information displays.
The simulated spinning reels take up most of the screen area. The area at the top of the
screen displays CREDIT, BET, and WIN information, as well as the coin
denomination accepted. Between these two areas is the message display area.
3.2.3 Sounds and Tunes
Sounds and tunes are used, in combination with the graphics and animation, to increase
game appeal.
Different sounds are played to signify various machine conditions, such as alarm, reel
spin/stop, win, lose, double-up win, jackpot bell, coins entering machine, and coins
falling to coin tray. Each game has its own specific sounds and tunes.
The volume of the sound system can be adjusted in the Sound System Setup menu.
USA - Revision 02
3-7
Machine Modes
USA 540MVP Video Service Manual
3.2.4 Light Tower
Multi-level light towers are fitted to provide an additional level of customer service,
security and house control. The tower is color coded to identify the machine’s
denomination.
Typical light tower functions are as follows:
CONDITION
Idle
Service
Tilt
Hand Pays
DOOR CLOSED
DOOR OPEN
Top Light
Bottom Light
Top Light
Bottom Light
OFF
OFF
OFF
FAST FLASH
ON
OFF
ON
FAST FLASH
SLOW FLASH
OFF
SLOW FLASH
FAST FLASH
SLOW FLASH
SLOW FLASH
SLOW FLASH
FAST FLASH
The Light Tower indicates one of four possible machine states:
The IDLE state: the default state when no other state exists.
The SERVICE state: when the ‘Service’ button has been being pressed and it is lit.
The TILT state: the machine will be considered to be in this state when one of the
following conditions exists:
• a lockup fault condition (excluding Main Door Open and the Handpays state), such
as Logic Door Accesses or Bill Acceptor Error.
• a non-lockup fault condition, such as Bill Stacker Full or Printer Paper Low.
The HANDPAYS state exists when one of the following conditions occur:
• a Jackpot lockup,
• a Cancelled Credit lockup, or
• a Progressive Link Jackpot lockup.
Note
After the Main Door has been closed, the
bottom tier light should remain lit (unless it is
otherwise flashing) until the start of the next
game.
3.2.5 Pushbuttons
A typical layout of the pushbuttons is shown below. The pushbuttons are labelled and
have the following functions: CASHOUT, SERVICE, PLAY 1/5/10/15/20 LINES,
BET 1/2/3/5/10 CREDITS, TAKE WIN, GAMBLE, and RED and BLACK, which
refer to features of the gamble option.
3-8
USA - Revision 02
USA 540MVP Video Service Manual
Machine Modes
Each pushbutton has a lamp behind it that may either be lit, unlit, flashing, or flashing
at double speed, depending on the circumstances and the machine mode.
Cash out
Play 1
Line
Play 5
Lines
Play 10
Lines
Play 15
Lines
Play 20
Lines
Service
Bet 1
Credit
Per Line
RED
Bet 2
Credits
Per Line
Bet 3
Credits
Per Line
Bet 5
Credits
Per Line
Bet 10
Credits
Per Line
BLACK
Gamble
Take
Win
NOTE
Figure 3-3 Typical Pushbutton Layout
Cash Out Button
The enabled Cash Out button is used to initiate a player credit payout from the machine
in the form of a hopper pay, a printer cash ticket, or a cancel credit handpay procedure.
The Cash Out button will be disabled if there is no credit on the credit meter, a hopper
payout is in progress, or the machine is in the process of playing a game. Otherwise,
this button will be lit to indicate it is enabled.
Service Button
This button is used by the player to request service. Pressing this button will toggle
the button lamp on and off, and will toggle the Service tier of the light tower on and
off.
The Service tier of the light tower is also used to signal non-lockup errors. The onscreen error message is cleared by pressing the Service button again. The error is
cleared when the fault has been corrected. The following faults are non-lockup faults:
•
•
•
•
•
Bill acceptor disconnected fault
Bill stacker fault
Bill stacker full
5 Bills rejected
Printer paper low.
3.2.6 Machine Self-Monitoring
Self-test
When the machine is switched on, it automatically initiates a self-test that continues in
the background as long as the machine is in play mode. During the self-test, the
machine checks the electronic meter data held in computer memory and also carries out
an audit calculation using essential meter counts.
This self-audit calculation is defined by the formula:
USA - Revision 02
3-9
Machine Modes
USA 540MVP Video Service Manual
CASH IN + HOPPER REFILLS + TOTAL CREDITS WON + JACKPOT HANDPAYS
=
TOTAL CREDITS BET + CANCEL CREDIT + COIN OUT
The memory holds up to three copies of the electronic meter data, METER SET 1,
METER SET 2 and METER SET 3. If the data in one meter set does not match that in
the other two sets, the data of the two identical sets overwrites the single set.
Security
When the machine is in Play Mode, it continuously operates the following security
features:
Coin Comparator. The coin comparator scans inserted coins and compares them with
a sample coin held in the comparator. Invalid coins are diverted to the coin tray.
Accepted coins are directed past the comparator's internal photo-optic detector and on
to the coin accept chute.
The machine software monitors the speed and direction of travel of the accepted coins.
For coins travelling too slowly or travelling in the wrong direction, an error signal is
generated and the machine locks up, with the appropriate error message being
displayed on the screen.
If the inserted coin is valid and no error conditions are encountered, the appropriate
credits are registered in the game CREDIT display and gameplay may take place. The
Jurisdictional Meters CASH IN and CREDIT and the electromechanical meter CASH
IN (if fitted) are incremented accordingly.
Hopper. If the hopper is empty and the player is in credit and presses the CASHOUT
pushbutton, the machine locks up and displays a HOPPER EMPTY message and the
electronic meter HOPPER EMPTY increments. The hopper is refilled in these
circumstances according to house rules, after which gameplay may resume.
During a payout, the hopper disc rotates and passes coins onto the coin runner where
they are counted by the hopper photo-optic detector. After passing the detector, they
are deposited in the coin tray for the player to collect. Also:
• the CREDITS COLLECTED electromechanical meter and the TRUE OUT
electronic meter are incremented by the amount paid out.
• the game CREDIT on the screen and the CREDIT electronic meter are
decremented by the amount paid out.
• a payout message is displayed on the screen showing the value paid out.
The machine monitors the hopper operation and the coin’s passage from the hopper to
the coin tray. Unusual conditions and faults are registered by increments in the
Diagnostic Meters, video messages and machine lockups. These fault conditions are
ILLEGAL COIN OUT, HOPPER EMPTY, HOPPER JAMMED, and HOPPER
DISCONNECTED.
Bill (Bank Note) Acceptor. The Bill Acceptor consists of an optical scanning unit
and a bill stacker contained in a high-security housing. The scanning unit achieves a
3-10
USA - Revision 02
USA 540MVP Video Service Manual
Machine Modes
high percentage of acceptances, and a second-level scanning option can be initiated for
high-denomination bills.
During operation, the acceptor registers acceptances and rejections. Bills accepted
increment the BILLS INSERTED electronic meter and electromechanical meter (where
fitted). Detailed information is recorded in the Bill Acceptor meters, which may be
accessed from Operator Mode / Accounting Information Menu. These meters record
the value and quantity of each note accepted. A record is also kept of the last five notes
accepted.
The machine monitors the bill acceptor operation and unusual conditions and faults are
registered by increments in the Diagnostic Meters, and by display messages and
machine lockups. The lockups and video messages are BILL ACCEPTOR ERROR
and BILL ACCEPTOR OUT OF SERVICE. Should the bill stacker door be opened,
the alarm sounds and the message BILL STACKER REMOVED is displayed.
A lockup occurs should the bill acceptor stacker become full. The lockup description
and video message is BILL ACCEPTOR FULL.
The belly panel door which provides access to the bill stacker is monitored by a
mechanical security switch (see below for further details).
Door Access
The main door, cash box door, belly panel door, and logic cage door are monitored by
battery-backed mechanical security switches. If a door fitted with a security switch is
opened, the following actions occur:
• One of the following messages is displayed on the screen: DOOR OPEN
MAIN, DOOR OPEN CASH BOX, DOOR OPEN BILL ACCEPTOR, or
SECURITY CAGE OPEN MAIN BOARD.
• The alarm sound is heard.
• One of the following lockups occurs: MAIN DOOR OPEN, CASH BOX
DOOR OPEN, BILL ACCEPTOR DOOR OPEN, or LOGIC DOOR OPEN.
• gameplay is suspended.
• One of the following electronic Diagnostic Meters is incremented: MAIN
DOOR ACCESSES, CASH BOX ACCESSES, BILL ACCEPTOR
ACCESSES, or LOGIC ACCESSES.
The condition is reset by closing the appropriate door.
USA - Revision 02
3-11
Machine Modes
USA 540MVP Video Service Manual
3.2.7 Electronic Meters
The electronic meters (soft meters) record a variety of details relating to machine
operation, gameplay and player interaction, as well as a variety of statistical counts,
security events and past games. Players have the assurance that there is a record kept
of recent win or pay situations.
When the machine is switched on, it automatically initiates a self-test that continues in
the background as long as the machine is in play mode. During the self-test, the
machine checks the electronic meter data held in memory.
Some jurisdictions require electronic metering data to be stored in triplicate in three
separate battery-backed RAM chips. In the case of a meter malfunction, where none of
the meters sets match, the machine displays the error message 3-WAY MEMORY
ERROR and the machine locks up. This message indicates a serious machine
malfunction.
Failure in the self audit calculation also causes a machine lockup with the message
SELF AUDIT ERROR being displayed.
Resetting Metering and Self Audit Errors
To clear a metering or self audit error, it is necessary to rectify the memory fault and reestablish correct operations with all corrupted meters set to zero. The lockup is
removed by turning the Audit Key ON, following the on-screen guidance, and then
turning the Audit Key OFF to return to gameplay. After recovering from a memory
error, all electronic meters will be reset to zero. The information held in the electronic
meters includes Accounting Information Menu items, Diagnostic Information Menu
items, and Operator Setup / Selections Menu items as detailed in the Operator Mode.
3-12
USA - Revision 02
USA 540MVP Video Service Manual
Machine Modes
3.3 Operator Mode
Operator Mode addresses the jurisdictional and accounting / management information
requirements, allows the machine configuration to be changed, and facilitates machine
testing and fault finding. Entry to Operator Mode is achieved by turning the Audit
(Operator) key ON. The various options can be selected by following the on-screen
guidance and pressing the appropriate pushbutton.
Note
The screen displays and options covered in
this chapter are typical; however, slight
variations may occur between markets.
The Operator Mode structure is shown in Figure 3-5 and the Operator Mode Menu
screen is shown below.
Table 3-1 Typical Operator Mode Menu
OPERATOR MODE MENU
Machine Identification
Accounting Information
Diagnostic Information
Operator Setup/Selections
Miscellaneous
Current Lockup
Play 1 Line - Press to select next item
Play 5 Lines - Press to select previous item
Play 10 Lines - Press to choose selected item
Service - Press to return to previous menu
Operator Key - Turn off to exit
Note
“Operator Key - Turn off to exit” message will
not be displayed if a Lockup is present.
Instructions are given on each screen to guide the operator through the various menus
and options available. Any active lockups are indicated by a flashing message at the
bottom of the screen.
USA - Revision 02
3-13
Machine Modes
USA 540MVP Video Service Manual
Operator Mode Menu
Machine Identification
Metering Information
Diagnostic Information
Operator Setup/Selections
Miscellaneous
Current Lockup
Machine
Identification
Accounting
Information
Diagnostic
Information
Menu
Operator
Setup /
Selections
Menu
USAMenus02
Current Meters
Self Test Menu
Periodic Meters
Bill Acceptor
Meters
Security Meters
DIP Switch Settings
Lamp Test
Coin Entry Test
Hopper Test
Monitor Test
Button Test
Sound Effect Test
Combination Test
Factory Test
Printer Test
Replay Previous
Games
Cash Out Statistics
Gamble Statistics
Machine Options
Progressive Level
Setup
Location Name
Setup
Sound System
Setup
Event Log
Real-Time Clock
Setup
Player Message
Setup
Miscellaneous
Menu
Current
Lockup Menu
Reset Bills
in Stacker
Bill Acceptor
Check & Mismatch
Clear
Reset Periodic
Meters
Demonstration
Mode
Print Accounting
Information
Out of
Service
Game Statistic
Figure 3-4 Operator Mode Menu Displays - Typical Structure
3-14
USA - Revision 02
USA 540MVP Video Service Manual
Machine Modes
3.3.1 Machine Identification
The Machine Identification screen provides essential machine information, such as
Game Eprom Id, Credit Value, Percentage Return, and Jackpot Limit.
Table 3-2 Machine Identification Display
MACHINE IDENTIFICATION AND CONFIGURATION
Game Eprom Id (UCI):
Value of 1 Credit:
Variation (% and no):
Actual Operating Percentage:
Venue Name:
Machine Number (GMID):
Mikohn Address:
Progressive Links Supported:
Comms Protocol Supported:
Hopper or Printer Installed:
Hopper Payout Limit:
Jackpot Win Limit:
Maximum Credit Limit:
0100090V (17264)
$1.00
87.890% 99
123.00%
Casino Name
0
1
3
Broadcast Dacom
Hopper selected
9999999 Coins
9999999 ($99999)
$1199.99
Service - Press to return to previous menu
Operator Key - Turn off to exit
3.3.2 Metering Information
The Metering Information displays provide information for government authorities, as
well as additional financial and statistical details, including periodic performance
details, game replay, and game and gamble statistics. Most of the information can not
be altered; although some details may be changed through Operator Setup / Selections
⇒ Machine Options.
The various screen displays may be accessed by following the on-screen guidance and
pressing the appropriate pushbuttons.
USA - Revision 02
3-15
Machine Modes
USA 540MVP Video Service Manual
Table 3-3 Metering Information Menu
ACCOUNTING INFORMATION
Current Meters
Periodic Meters
Bill Acceptor Meters
Security Meters
Replay of Previous Game
CASH OUT Statistics
Gamble Statistics
Game Statistic
Play 1 Line - Press to select next item
Play 5 Lines - Press to select previous item
Play 10 Lines - Press to choose selected item
Service - Press to return to previous menu
Operator Key - Turn off to exit
Current Meters
The Current Meters provide the financial counts of machine activity. Items include
turnover, total wins, and amounts inserted in the coin entry and the bill acceptor
devices. In depth statistical information is also provided by the Game and Gamble
displays.
Table 3-4 Current Meters Display - Screen 1
CURRENT METERS - MAIN
Current Credits:
Total Games Played:
Total Credits Bet:
Total Credits Won:
METER SET 1
nn
nn
nn
nn
METER SET 2
nn
nn
nn
nn
METER SET 3
nn
nn
nn
nn
True In (Coins Inserted):
Bills Inserted:
Coin Drop (Cashbox):
Gross Drop (Gross In):
nn
nn
nn
nn
nn
nn
nn
nn
nn
nn
nn
nn
True Out:
Cashout Handpays:
Jackpot Wins:
Total Handpays:
nn
nn
nn
nn
nn
nn
nn
nn
nn
nn
nn
nn
Play 1 Line - Press to display next meter screen
Service - Press to return to previous menu
Operator Key - Turn off to exit
3-16
USA - Revision 02
USA 540MVP Video Service Manual
Machine Modes
Table 3-5 Current Meters Display - Screen 2
CURRENT METERS - OTHER
Power Up (count):
Games Since Power Up:
Games Since Door Open:
METER SET 1
n
n
n
METER SET 2
n
n
n
METER SET 3
n
n
n
Play 1 Line - Press to display next meter screen
Play 5 Lines - Press to display previous meter screen
Service - Press to return to previous menu
Operator Key - Turn off to exit
Table 3-6 Current Meters Display - Screen 3
CURRENT METERS - LINK PROGRESSIVES
METER SET 1
Occurrences of
Jackpot 0:
Jackpot 1:
Jackpot 2:
Jackpot 3:
Jackpot 4:
Jackpot 5:
Mystery Pay
Accumulative Value of
Jackpot 0:
Jackpot 1:
Jackpot 2:
Jackpot 3:
Jackpot 4:
Jackpot 5:
Mystery Pay
METER SET 2
METER SET 3
n
n
n
n
n
n
n
n
n
n
n
n
n
n
n
n
n
n
n
n
n
$n.nn
$n.nn
$n.nn
$n.nn
$n.nn
$n.nn
$n.nn
$n.nn
$n.nn
$n.nn
$n.nn
$n.nn
$n.nn
$n.nn
$n.nn
$n.nn
$n.nn
$n.nn
$n.nn
$n.nn
$n.nn
Play 1 Line - Press to display next meter screen
Play 5 Lines - Press to display previous meter screen
Service - Press to return to previous menu
Operator Key - Turn off to exit
The items recorded in the Current Meters screens are explained below.
Current Credits
Credits currently available to be bet or collected.
Total Games Played
Total number of games played.
Total Credits Bet
Accumulated value of all credits bet.
Total Credits Won
Accumulated value of credits won that is paid out :
- to the credit meter,
- as a hopper payout, or
- a winning cash ticket.
USA - Revision 02
3-17
Machine Modes
USA 540MVP Video Service Manual
True In
The total number of all coins inserted (and accepted)
into machine.
Bills Inserted
The total credits of all bills inserted (and accepted) into
the machine.
Coin Drop
Total number of all coins that are diverted to the
cashbox.
Gross Drop
The total credit value of all money (coins and bills)
accepted by the machine.
True Out
The total credits of all cashouts paid out by the
machine, either by:
- hopper payout, or
- printer ticket (CASH OUT Tickets and CASH WIN
Ticket).
Cashout Handpays
The total of all credits paid out as handpays as a result
of cashouts exceeding the Hopper Payout Limit (or the
Printer Payout Limit).
Jackpot Wins
The total of all credits paid out as handpays as a result
of wins exceeding the Jackpot Win Limit
Total Handpays
The total credits of all combined handpays including :
- Cashout Handpays,
- Jackpot Handpays,
- Win Handpays, and
- Progressive Handpays (Links and Mysterys).
Power Up
The number of times the power has gone down.
Games Since Power
Up
The number of games played since the power was last
restored.
Games Since Door
Open
The number of games played since the main door was
last opened.
Occurrences of Link
Progressives
The number of times each level of link progressive has
been won.
Accumulative Value of The total value won (when returned by the progressive
Link Progressives
equipment) for each link progressive level.
Occurrences of
Mystery Progressives
3-18
The number of times each level of mystery progressive
has been won.
USA - Revision 02
USA 540MVP Video Service Manual
Machine Modes
Accumulative Value of The total value won (when returned by the progressive
Mystery Progressives
equipment) for each mystery progressive level.
Periodic Meters
The Periodic Meters screens contain the same information items as the Jurisdictional
Meters, but the values held usually relate only to a specified period determined by the
club management. The periodic meters can be reset via the Miscellaneous option from
the Operator Mode Menu.
Bill Acceptor Meters
This screen provides a record of the number of notes of each denomination received,
the last five notes accepted, the total value of notes received, the total value of bills in
the note stacker, the number of bills accepted / rejected, and the amount of change
money obtained.
To maintain the accuracy of this information, the Bill Acceptor Meters must be reset
when the stacker is emptied. To reset the meters, select Miscellaneous ⇒ Reset Bills
in Stacker.
Table 3-7 Bill Acceptor Information Display
BILL ACCEPTOR INFORMATION
NUMBER OF NOTES RECEIVED
$1 Notes Received:
$2 Notes Received:
$5 Notes Received:
$10 Notes Received:
$20 Notes Received:
$50 Notes Received:
$100 Notes Received:
Total Value of Notes Received:
Bills In Stacker:
Bills Validated:
Bills Rejected:
Change Credits Obtained:
n
n
n
n
n
n
n
LAST FIVE NOTES RECEIVED
Last:
Nothing
Second Last:
Nothing
Third Last:
Nothing
Fourth Last:
Nothing
Fifth Last:
Nothing
$n.nn = n credits
n
n
n
nn
Service - Press to return to previous menu
Operator Key - Turn off to exit
USA - Revision 02
3-19
Machine Modes
USA 540MVP Video Service Manual
Security Meters
The Security Meters record the number of occurrences of specific security accesses and
machine faults.
Table 3-8 Security Meters Display (Page 1)
SECURITY METERS
Main Door Accesses:
Cash Box Accesses:
Logic Door Accesses:
Bill Acceptor Door Accesses:
n
n
n
n
Mechanical Meters Disconnected:
n
Printer Faults:
Printer Disconnected:
Paper Depleted Faults:
n
n
n
Play 1 Line - Press to display next meter screen
Service - Press to return to previous menu
Operator Key - Turn off to exit
Table 3-9 Security Meters Display (Page 2) - Example
SECURITY METERS
Coin Optic Faults:
Coin Acceptor Faults:
Coin Diverter Faults:
Reverse Coin Attempts:
Illegal Coin Out:
Hopper Empty:
Hopper Jammed:
Hopper Disconnected:
Bill Acceptor Faults:
Bill Acceptor Disconnected:
Bill Stacker Removals:
Bill Stacker Full:
5 Consecutive Bills Rejected:
n
n
n
n
n
n
n
n
n
n
n
n
n
Play 5 Lines- Press to display previous meter screen
Service - Press to return to previous menu
Operator Key - Turn off to exit
The following events are recorded in the Security Meters:
3-20
Main Door Accesses
Incremented when the main door is opened.
Cash Box Accesses
Incremented when the cash box door is opened.
Logic Door Accesses
Incremented when the logic security cage is opened.
USA - Revision 02
USA 540MVP Video Service Manual
Machine Modes
Bill Acceptor Door
Accesses
Incremented when the belly panel door is opened.
Mechanical Meters
Disconnected
Incremented if the meter board is disconnected.
Printer Faults
Incremented when the printer indicates that an internal
fault occurred.
Printer Disconnected
Incremented when the printer is detected as being
disconnected.
Paper Depleted Faults
Incremented when the printer indicates that the paper
roll has been completely depleted.
Coin Optic Faults
Incremented if the coin comparator detects a coin jam.
Coin Acceptor Faults
Incremented if the coin acceptor pulse exceeds 50 ms.
Coin Diverter Faults
Incremented when the software detects that the coin
diverter isn’t operating correctly.
Reverse Coin Attempts,
(may also be referred to
as Yo-Yo attempts)
Incremented when the coin comparitor device detects a
coin passed through the coin optics in the reverse
direction.
Illegal Coin Out
Incremented when the machine is not in hopper collect,
but a coin passes the hopper optic.
Hopper Empty
Incremented when in hopper collect two consecutive 4
second attempts to pay out a coin fail.
Hopper Jammed
Incremented when the hopper optic is blocked for more
than 200 ms.
Hopper Disconnected
Incremented when hopper is disconnected (checked once
every second).
Bill Acceptor Faults
Incremented when a bill acceptor fault is detected.
Bill Acceptor
Disconnected
Incremented when a bill acceptor has being
disconnected.
Bill Stacker Removals
Incremented when a bill stacker is removed.
Bill Stacker Full
Incremented when a bill stacker is full.
5 Consecutive Bills
Rejected
Incremented when 5 consecutive bills are rejected
USA - Revision 02
3-21
Machine Modes
USA 540MVP Video Service Manual
Replay Previous Games
This Replay Previous Games screen allows the operator to replay the most recent
games played on the machine. The most recent game is game number 1, and
approximately twenty of the most recent games are normally available to be replayed.
Because these game histories are stored dynamically in memory, the number of games
available to be recalled will vary depending on the available memory.
Table 3-10 Previous Game Display
GAME REPLAY
No. Of Games Available To Replay:
Replay Game Number:
nn
nn
During replay, press any key to pause the game
Play 1 Line - Press to select next game
Play 5 Lines - Press to select previous game
Play 10 Lines - Press to see replay selected game
Service - Press to return to previous menu
Operator Key - Turn off to exit
CASHOUT Statistics
The CASHOUT Statistics screen displays, for each range of CASHOUT credits, the
number of times players CASHOUT the total credits.
Table 3-11 CASHOUT Statistics Display
COLLECT STATISTICS
COLLECT Amount (Credits)
1
11
21
31
41
51
76
101
201
301
501
+
10
20
30
40
50
75
100
200
300
500
Times COLLECTED
n
n
n
n
n
n
n
n
n
n
n
Service - Press to return to previous menu
Operator Key - Turn off to exit
The following text provides an explanation for the information in the CASHOUT
Statistics:
CASHOUT
Amount
(Credits)
3-22
Specifies the range of CASHED OUT amount in
credits, eg., 1 - 10, 11 - 20, 21 - 30, 31 - 40, 41 - 50,
51 - 75, 76 - 100, 101 - 200, 201 - 300, 301 - 500,
501+
USA - Revision 02
USA 540MVP Video Service Manual
Machine Modes
Times
The number of times that a player CASHED OUT
CASHED OUT credits in that range.
Gamble Statistics
The Gamble Statistics screen displays the gamble statistic of the machine. For each
winning amount within a winning range, the selected gambled or Take win is recorded.
Table 3-12 Gamble Statistics
GAMBLE STATISTICS
Win Amount
1
-4
5
-9
10
-19
20
-29
30
-49
50
-99
100
-199
200
-499
500
-999
1000
-1999
2000
-4999
5000
+
Service
Gambled
n
n
n
n
n
n
n
n
n
n
n
n
Take Win
n
n
n
n|
n
n
n
n
n
n
n
n
Chosen
Red
0
Won
Red
0
Black
0
Black
0
- Press to return to previous menu
The following text provides an explanation for the information in the Gamble
Statistics:
Win Amount
Specifies the range of winning amount in credits.
Full Gambled
The number of times that a player chooses to Double
after a winning play.
(if applicable)
Half Gambled
(if applicable)
The number of times that a player chooses to halve the
win and double the remainder
Take Win
The number of times that a player chooses to take the
win after a winning play.
Won
Total number of times that card beat the dealer card.
Game Statistics
Details of game play are recorded and displayed through the Game Statistics option.
The types of bets and lines chosen are analysed, and the number of games played and
the money won is displayed for each sub-division.
USA - Revision 02
3-23
Machine Modes
USA 540MVP Video Service Manual
Table 3-13 Game Statistics Display
GAME STATISTICS
Bet
Lines
Games
Played
Money
Won
Bet
Lines
Games
Played
Money
Won
1
1
1
1
1
1
5
10
15
20
4
0
0
0
0
$30.00
$0
$0
$0
$0
5
5
5
5
5
1
5
10
15
20
0
0
0
0
0
$0
$0
$0
$0
$0
2
2
2
2
2
1
5
10
15
20
0
0
0
0
0
$0
$0
$0
$0
$0
10
10
10
10
10
1
5
10
15
20
0
0
0
0
0
$0
$0
$0
$0
$0
3
3
3
3
3
1
5
10
15
20
0
0
0
0
0
$0
$0
$0
$0
$0
Service - Press to return to previous menu
Operator Key - Turn off to exit
3.3.3 Diagnostic Information Menu
The Diagnostic Information Menu provides access to the Self Test Mode and the Error
Log display.
Table 3-14 Diagnostic Information Menu
DIAGNOSTIC INFORMATION MENU
Self Test Mode
Event Log
Play 1 Line - Press to select next item
Play 5 Lines - Press to select previous item
Play 10 Lines - Press to choose selected item
Service - Press to return to previous menu
Operator Key - Turn off to exit
Self Test Mode
Self Test Mode addresses the repair and maintenance tasks for the machine. The items
on the Self Test Mode Menu are designed to test various machine components and
features. The Self Test screen is displayed below.
3-24
USA - Revision 02
USA 540MVP Video Service Manual
Machine Modes
Self Test Mode can only be entered when the following conditions are met, otherwise a
warning screen will be displayed:
•
•
•
•
Credit is zero,
Main door is open,
No other lockups active, and
No game is currently in progress.
Table 3-15 Self Test Mode Menu
SELF TEST MODE MENU
Lamp Test
Coin Entry Test
Hopper Test
Monitor Test
Button Test
Sound Effect Test
Combination Test
Factory Test
Printer Test
Play 1 Line - Press to select next item
Play 5 Lines - Press to select previous item
Play 10 Lines - Press to choose selected item
Service - Press to return to previous menu
Operator Key - Turn off to exit
Lamp Test
This screen allows the operator to test the pushbutton lamps, animation lamps and
light tower lamps. The state of individual lamps can be set to either on, off, flashing
slow, or flashing fast. The operator can then observe the lamps to verify correct
operation.
USA - Revision 02
3-25
Machine Modes
USA 540MVP Video Service Manual
Table 3-16 Lamp Test
TEST MODE - LAMP TEST
Light Tower
Animation
Player Key
Lamp #
Lamp #
Lamp #
1
1
1
2
2
2
3
3
3
4
4
5
Current Function: ON OFF FLASH SLOW
Press 1 Line
Press 5 Lines
Press 10 Lines
6
7
8
9
ALL
FLASH FAST
- Press to select next lamp
- Press to select previous lamp
- Press to select function (on/off/flash)
Service - Press to return to previous menu
Operator Key - Turn off to exit
Coin Entry Test
This screen allows the operator to test the coin entry devices. The operator can change
the reject state of the coin comparator, change the diverter state, and turn the optic
emitter on and off. A message is displayed if a fault occurs.
Table 3-17 Coin Entry Test Screen
TEST MODE - COIN ENTRY TEST SCREEN
COIN ENTRY
Reject state:
Chip Tray
Validator:
Inactive
Optic A:
Unblocked
Optic B:
Not Used
CASHBOX
Diverter state:
Optic A:
Optic B:
MESSAGE
Press 1 Line
Press 5 Lines
Chip Tray
Not Used
Not Used
- Press to change reject state
- Press to change diverter state
Service - Press to return to previous menu
Operator Key - Turn off to exit
3-26
USA - Revision 02
USA 540MVP Video Service Manual
Machine Modes
Hopper Test
Open the main door and select Hopper Test from the menu, the hopper will then pay
out 10 coins. Place the coins back into the hopper and close the main door. If a fault,
such as Hopper empty, jammed, etc, occurs, a message is displayed on the screen.
Table 3-18 Hopper Test Screen
TEST MODE - HOPPER TEST
Hopper Test Payout
Coin Reinserted:
Last Hopper Event
n
n
none
Cashout - Press to activate payout
Service - Press to return to previous menu
Operator Key - Turn off to exit
Monitor Test
This screen display allows a range of tests to be conducted on the video monitor. The
operator inspects the display to display whether the tests have been passed or failed.
The available monitor tests are described below.
Table 3-19 Video Monitor Test Screen
TEST MODE - VIDEO MONITOR TEST MENU
Screen Frame Test
Tilt Test
Horizontal Curvature Test
Vertical Curvature Test
Geometrical Linearity Test
Barrel Distortion Test
Screen Regulation Test
Press 1 Line
Press 5 Lines
Press 10 Lines
Vertical Regularity Test
Horizontal Regularity Test
Red Colour Purity Test
Green Colour Purity Test
Blue Colour Purity Test
Basic Colours Test
Mode Colours Test
- Press to select next test
- Press to select previous test
- Press to choose selected test
Service - Press to return to previous menu
Press Any Button to exit chosen test
USA - Revision 02
3-27
Machine Modes
USA 540MVP Video Service Manual
Screen Frame
Tilt
Displays a white rectangle on the extremities of the screen.
Displays the screen frame with a vertical line and a horizontal line
halfway across the screen.
Horizontal Curvature Displays a series of vertical lines that will highlight any horizontal
distortion.
Vertical Curvature
Displays a series of horizontal lines that will highlight any vertical
distortion.
Geometrical Linearity Displays the series of horizontal and vertical lines on the same screen.
Barrel Distortion
Tests for distortion at the edges of the monitor.
Screen Regulation
Tests the effects of high current on screen size.
Vertical Regularity
Compares the size of red, green and blue pixels.
Horizontal Regularity Compares the size of red, green and blue pixels.
Red Color Purity
Activates all red pixels.
Green Color Purity
Activates all green pixels.
Blue Color Purity
Activates all blue pixels.
Basic Colors
Displays a four colored rectangles, one of red, green, blue and white.
Mode Colors
Displays all of the 256 colors available on the monitor.
Button Test
The Button Test allows the operator to test the function and operation of each
playbutton.
Table 3-20 Button Test Screen
BUTTON TEST
PLAYER KEY 1
PLAYER KEY 2
PLAYER KEY 3
PLAYER KEY 4
PLAYER KEY 5
PLAYER KEY 6
PLAYER KEY 7
PLAYER KEY 8
PLAYER KEY 9
Cashout
Service
Hold 1
Hold 2
Hold 3
Hold 4
Hold 5
Bet 1-5
Deal/Draw
Service - Press to return to previous menu
Operator Key - Turn off to exit
3-28
USA - Revision 02
USA 540MVP Video Service Manual
Machine Modes
Sound Effects Test
This screen allows the operator to change the volume setting of the machine and to
listen to all the sound effects used by the machine.
Table 3-21 Sound System Test Screen
TEST MODE - SOUND SYSTEM TESTS
Hold 1 - Press to increase column
Hold 2 - Press to decrease volume
Hold 3 - Press to play machine tunes
Service - Press to return to previous menu
Operator Key - Turn off to exit
Combination Test
The combination test allows the operator to select a combination of cards to be dealt.
This test is used to check the graphics and sound output associated with any winning
combination.
Table 3-22 Self Test Mode.- Combination Test Display
SELF TEST MODE - COMBINATION TEST
KEY
Play 1 Line
Play 5 Lines
Play 10 Lines
Next Reel
Step Forward
Step Backward
0
USA - Revision 02
20
10
Play 15 Lines
Go
Reserve
Exit
19
11
3-29
Machine Modes
USA 540MVP Video Service Manual
Table 3-23 Self Test Mode - Combination Test Result Display
Factory Test
The Factory Test option automatically conducts several tests simultaneously. Tests
conducted include coin validator, coin diverter, door switch, video monitor tests, and
sound system tests. Failed tests are displayed on the screen. The Factory Test
continues until stopped by the operator or until an error occurs, in which case the type
of failure is displayed on the screen.
Table 3-24 Factory Test Screen
TEST MODE - FACTORY TEST
Cycle Count:
1
Test Description:
Coin Entry Validator Test
Time:
n
Error Type:
ccccc
Hold 1 - Press to start factory test
Service - Press to return to previous menu
Operator Key - Turn off to exit
3-30
USA - Revision 02
USA 540MVP Video Service Manual
Machine Modes
Printer Test
This test allows the operator to test various aspects of the printer. If a printer is not
fitted or enabled then the message “Printer not enabled or available” will be displayed
Table 3-25 Self Test Mode - Printer Test Display
PRINTER TEST
******************************TEST PRINT*****************************
---------------------------------------------------------------------------------------------------Abcdefghijklmnopqrstuvwxyz1234567890
ABCDEFGHIJKLMNOPQRSTUVWXYZ!@#$%^&*()
----------------------------------------------------------------------------------------------------
Error Log Display
This screen displays the date, time, and type of the most recent error messages recorded
in SRAM. The log holds information on the last eighty errors.
Table 3-26 Error Log Display
ERROR LOG
Event # Date
Time
0
dd-mm-yy hh:mm
1
dd-mm-yy hh:mm
2
dd-mm-yy hh:mm
3
dd-mm-yy hh:mm
...
4
dd-mm-yy hh:mm
...
5
dd-mm-yy hh:mm
...
6
dd-mm-yy hh:mm
...
7
dd-mm-yy hh:mm
...
8
dd-mm-yy hh:mm
...
9
dd-mm-yy hh:mm
...
80.......................................................
(1)
Error Type
Main Door Open
Operator Mode Entered
Cash Credit Hand Pay $ 15.60
Play 1 Line - Press to scroll forward by one line
Play 5 Lines - Press to scroll backward by one line
Play 10 Lines - Press to scroll forward by one page
Play 15 Lines - Press to scroll backward by one page
Cash Out - Press to display extra information (if available)
Service - Press to return to previous menu
Operator Key - Turn off to exit
USA - Revision 02
3-31
Machine Modes
USA 540MVP Video Service Manual
3.3.4 Operator Setup/Selections
The Operator Setup/Selections menu gives the operator access to configurable options
of the gaming machine.
Table 3-27 Operator Setup/Selection Menu
OPERATOR SETUP/SELECTIONS MENU
Machine Options
DIP Switch Settings
Progressive Level Setup
Location Name Setup
Sound System Setup
Real Time Clock Setup
Player Message Setup
Play 1 Line - Press to select next item
Play 5 Lines - Press to select previous item
Play 10 Lines - Press to choose selected item
Service - Press to return to previous menu
Operator Key - Turn off to exit
Machine Options
The Machine Options Setup screen allows the operator to control and change some
aspects of machine operation. Options are selected and changed by following the onscreen guidance and pressing the appropriate pushbuttons. The machine options are
stored in the first EEPROM on the Main Board.
Note
Approval from the jurisdictional authority is
required before the items in the Machine
Options screen can be changed.
The logic door must be open to save changes to machine options.
3-32
USA - Revision 02
USA 540MVP Video Service Manual
Machine Modes
Table 3-28 Operator Setup Mode - Machine Options Display
MACHINE OPTIONS
(The Logic Door must be opened to complete the change)
MACHINE ID
000123
ACCEPT $1 NOTES
NO
MIKOHN GAME ADDRESS0
ACCEPT $2 NOTES
YES
ACCEPT $5 NOTES
YES
BLACK BUTTON:
Black and Maxbet
ACCEPT $10 NOTES
YES
MAX BET LIMIT
9999999
ACCEPT $20 NOTES
NO
HAND PAY LIMIT
$200.00
ACCEPT $50 NOTES
NO
MAX CREDIT LIMIT
$1200.00
ACCEPT $100 NOTES
NO
MAX BACC LIMIT
$100.00
BET BUTTON
Continuous
ENABLE BILL JACKPOT
JACKPOT WIN LIMIT (CREDIT)
100000
HOPPER/PRINTER :Hopper select
JACKPOT BELL LIMIT (CREDIT)
100000
JACKPOT BELL TRIGGER: TRIGGER AT LIMIT
Play 10 Lines - Press to increment a digit
Play 15 Lines - Press to select another digit
Play 1 Line - Press to select next option
Play 5 Lines - Press to select previous option
Play Bet 1 Credit - Press to save new setting
Service - Press to return to previous menu
Operator Key - Turn off to exit
Explanation of Terms
MACHINE ID: a number between 0 and 999999.
MIKOHN GAME ADDRESS: a number between 1 and 32 or DISABLED.
GAMBLE: enables/disables gamble option (if available and applicable).
MAX BET LIMIT: limit for maximum bet.
HAND PAY LIMIT: limit for hand pay.
JACKPOT WIN LIMIT: the Jackpot Win Limit is the maximum win for one game that
does not need to be verified by an attendant (in the form of a Jackpot Handpay).
JACKPOT BELL LIMIT: the Jackpot Bell Limit is the minimum win for one game
that will cause the jackpot bell to be activated.
MAX CREDIT LIMIT: the Max Credit Limit is the maximum value of credits that can
be stored on the credit meter by the player.
ACCEPT NOTES: the bill acceptor can be programmed to accept only specified
denominations. The DIP switches on the bill acceptor should be configured to match
these settings.
ENABLE BILL ACCEPTOR: enables/disables the Bill Acceptor.
USA - Revision 02
3-33
Machine Modes
USA 540MVP Video Service Manual
To save the changes made to the machine options, press the save button. Changes to
all the machine options will be saved in this way. The Logic Door must be open at the
time otherwise the changes will not be saved.
To exit from the machine options screen without saving any of the changes made, press
the return to previous menu button.
Machine DIP Switch Settings
This screen displays the functions of the two 8-bit DIP switch banks on the I/O Driver
Board.
The first DIP switch bank allows the coin/token value and the base credit value of the
machine to be set. These values can only be reset during initial setup or during a 3way metering error.
The second DIP switch bank allows the Gamble, Max Bet Coin Reject, and Rounding
Gamble features to be enabled/disabled. Changes to these settings only take effect
during power-up.
Refer to the I/O Driver Board chapter of the Service Manual for details of the DIP
switch settings and the procedure for changing the switch settings.
Table 3-29 Dip Switch Settings
MACHINE DIP SWITCH SETTINGS
BANK 1 - DENOMINATION VALUES
1 - 4 Coin Value - $1.00
5 - 8 Credit Value - $0.25
Conversion Factor : 1 Coin Buys 4 Credits
BANK 2
1
: Gamble
Gamble Allowed
2
: Max Bet Coin Reject Max Bet Coin Reject Allowed
3
: Not Used
4
: Bill Acceptor
VFM4 - No CRC Check
5
: BACC Denomination
Dollar ($)
6-8
: Not Used
Service - Press to return to previous menu
Operator Key - Turn off to exit
3-34
USA - Revision 02
USA 540MVP Video Service Manual
Machine Modes
Progressive Level Setup
This screen allows the operator to set each winning hand to correspond to a link
progressive jackpot. The operator selects the desired Winning Hand to be modified.
Then the level may be changed by pressing the appropriate button to increase or
decrease the level. A non-existent level (blank) implies that there is no link
progressive level associated with that hand, and hence the normal credit win value will
be won. Otherwise a number between 0 and 5 will appear and this indicates the level
of the link that will be won.
Table 3-30 Progressive Level Setup
PROGRESSIVE LEVEL SETUP
Mikohn Address
Protocols Selected
Link Id
Disabled
Type #25 Serial
1
Winning Combinations
Levels
Mystery Pay
JP5
Play 10 Lines - Press to increment a digit
Play 15 Lines - Press to select another digit
Play 1 Line - Press to select next option
Play 5 Lines - Press to select previous option
Play Bet 1 Credit - Press to save new setting
Service - Press to return to previous menu
Operator Key - Turn off to exit
Location Name Setup
This screen allows the operator to enter the name of the venue. This name is displayed
in the Machine Identification Screen and is printed on cash tickets and metering tickets.
Table 3-31 Venue Name Setup
VENUE NAME SETUP
Venue Name : Casino Name
Play 1 Line
- Press to select next character
Play 5 Lines
- Press to select previous character
Play 10 Lines
- Press to increment the selected character
Play 15 Lines
- Press to decrement the selected character
Bet 1 Credit
- Press to save the current venue name
Service
- Press to return to previous menu
Sound System Setup
This screen allows the operator to change the volume setting of the machine and to hear
all the sound effects used by the machine.
USA - Revision 02
3-35
Machine Modes
USA 540MVP Video Service Manual
Table 3-32 Sound System Setup
SOUND SYSTEM TESTS
Play 1 Line
Play 5 Lines
Play 10 Lines
Press to increase column
Press to decrease volume
Press to play machine tunes
Service - Press to return to previous menu
Operator Key - Turn off to exit
Real Time Clock Setup
This screen allows the real time clock to be set.
Table 3-33 Real Time Clock Setup
REAL TIME CLOCK SETUP
SECOND
MINUTE
HOUR
MONTH
DAY
YEAR
:
:
:
:
:
:
Press 1 Line
Press 5 Lines
Press 10 Lines
Press 15 Lines
50
28
15
JANUARY
16
1995
- Press to choose next item
- Press to choose previous item
- Press to increase item value
- Press to decrease item value
Service - Press to return to previous menu
Operator Key - Turn off to exit
Player Message Setup
The contents of the Player Message screen display is shown on the Game Screen during
game play.
3-36
USA - Revision 02
USA 540MVP Video Service Manual
Machine Modes
Table 3-34 Player Message Information
PLAYE R MESSAGE SETUP
PLAYER MESSAGE:
ENGLISH
Play 10 Lines
- Press to select item
Service - Press to return to previous menu
Operator Key - Turn off to exit
3.3.5 Miscellaneous Menu
The Miscellaneous Menu provides a range of operational features relating to the Bank
Note Acceptor, Periodic Meters, demonstrations, accounting print outs, and removing
the gaming machine from service.
Table 3-35 Miscellaneous Menu
MISCELLANEOUS MENU
Reset Bills In Stacker
Bill Acceptor CRC Check & Mismatch Clear
Reset Periodic Meters
Demonstration Mode
Print Accounting Information
Out of Service
Play 1 Line - Press to select next item
Play 5 Lines - Press to select previous item
Play 10 Lines - Press to choose selected item
Service - Press to return to previous menu
Operator Key - Turn off to exit
Reset Bills In Stacker
This screen allows the operator to reset the Bills In Stacker meter. This meter should
be reset each time the Note Stacker is emptied.
USA - Revision 02
3-37
Machine Modes
USA 540MVP Video Service Manual
Table 3-36 Reset Bills in Stacker
RESET BILLS IN STACKER
Play 1 Line - Press to RESET BILLS IN STACKER meter
Service - Press to return to previous menu
Operator Key - Turn off to exit
Bill Acceptor CRC Check and Mismatch Clear
This security procedure enables a CRC check to be carried out by an authorised
attendant at a suitable time.
Table 3-37 Bill Acceptor CRC Check and Mismatch Clear
BILL ACCEPTOR CRC INFORMATION
Current Saved CRC Value
00000000
Current Saved CRC Seed Value
00000000
BACC Program ID:
XXXXXXXXXXX
Play 1 Line: Press to upload and run CRC BACC Program
Service - Press to return to previous menu
Operator Key - Turn off to exit
Reset Periodic Meters
This screen allows the operator to reset all periodic meters.
Table 3-38 Reset Periodic Meters Screen
RESET PERIODIC METERS
Play 1 Line - Press to RESET PERIODIC METERS
Service - Press to return to previous menu
Operator Key - Turn off to exit
Demonstration Mode
Demonstration Mode enables gameplay without any money being inserted or any
payouts being made.
3-38
USA - Revision 02
USA 540MVP Video Service Manual
Machine Modes
This option is only available when player credits are zero, the main door is open, and
no other lockups are active. To enter Demonstration Mode, the operator must close the
main door and turn the Audit key OFF.
To exit from Demonstration Mode and return to the Operator Mode Menu, turn the
Audit key ON.
If certain conditions are not met when selecting Demonstration Mode item then a
warning screen will be displayed:
Table 3-39 Demonstration Mode Screen
DEMONSTRATION MODE
Entry to this mode is not permitted unless
a) Credit is zero
b) Main Door is open
c) No other lockups active
d) Game is not currently in progress
Service - Press to return to pervious menu
Operator Key - Turn off to exit
If the previous conditions are met, and the machine is NOT currently in Demonstration
Mode then the following information is displayed:
USA - Revision 02
3-39
Machine Modes
USA 540MVP Video Service Manual
Table 3-40 Demonstration Mode Screen (Error Mode)
Operator Key
- Turn off to start DEMONSTRATION MODE
after first closing main door
Service
- Press to return to pervious menu
without entering Demonstration Mode
To exit from demonstration mode, return to operation mode menu
and choose Miscellaneous Menu / Demonstration Mode
Operator Key - Turn off to exit
When the machine is in Demonstration Mode then the following information is
displayed:
Table 3-41 Demonstration Mode Screen (Normal Mode)
DEMONSTRATION MODE complete - Normal Mode entered
Service
- Press to return to previous menu
Operator Key - Turn off to exit
Print Accounting Information
A range of functions is provided when a Ticket Printer is installed. Selection of each of
the Print Accounting Information items results in a printed ticket with a variety of
details. See selected formats following the menu display below.
Table 3-42 Print Accounting Information Menu
PRINT ACCOUNTING INFORMATION
Current Accounting Data
Last Day End Accounting Data
Win Category Data
Previous Games
Cash Out History
Play 1 Line - Press to select next items
Play 5 Lines - Press to select previous item
Play 10 Lines - press to choose selected item
Service - Press to return to previous menu
Operator Key - Turn off to exit
3-40
USA - Revision 02
USA 540MVP Video Service Manual
Machine Modes
Figure 3-5 Examples of Typical Printer Tickets
USA - Revision 02
3-41
Machine Modes
USA 540MVP Video Service Manual
Out of Service Option
This operational option enables a floor attendant to place an EGM into, or remove a
machine from, the Out of Service mode as required.
Table 3-43 Out of Service Screen
OUT OF SERVICE
Operator Key
Turn off to start Out of Service Mode
Service Key
Press to return to previous menu without
entering Out of Service Mode
Operator Key
Turn again to EXIT Out of Service Mode
Turn Reset Key to reset lockups detected in
Out of Service Mode
3.3.6 Current Lockup Menu Items
The gaming machine has an extensive system of self-monitoring and should any
abnormal conditions be detected, the machine will automatically enter a lockup
condition. In lockup, the game is disabled to prevent any further player interaction and
the game message area displays guidance information.
Lockup conditions are handled by the Operator Mode Menu item Current Lockup. The
menu is displayed and the conditions requiring attention are highlighted by the
characters ***. Each lockup condition has an associated help screen outlining the
procedure for fixing the fault.
The Current Active Lockup Menu is shown below, followed by a summary of the
associated help screens.
3-42
USA - Revision 02
USA 540MVP Video Service Manual
Machine Modes
Table 3-44 Current Lockup Screen Display
CURRENT ACTIVE LOCKUPS
***
Attendant Handpay
Cash Out Handpay
Jackpot Win
Win Handpay
Mystery Handpay
Memory Errors
3 Way Memory Error
GameEPROMs Changed
Self Audit Error
Machine Options
DIP Switch Settings
Coin Faults
Coin Acceptor Fault
Coin Jam/optic Fault
Yoyo
Coin Diverter Fault
***
***
Hopper Faults
Hopper Empty
Hopper Jammed
Illegal Coin Out
Hopper Disconnected
Mikohn Faults
Mikohn Disconnected
Mikohn Comm Error
Bill Acceptor
Bill Acceptor Error
Signature Error
Bill Acceptor Failed
Stacker Full
Stacker Removed
Bill Acc OOS
Printer Faults
Printer Disconnected
Printer Fault
Paper Depleted
Miscellaneous
Battery Low
Meters Disconnected
Out of Service
Door Faults
Main Door Open
Logic Door Open
Cashbox Door Open
Bill Acceptor Door Open
The characters *** are next to active lockups
Play 1 Line - Press to select next lockups
Play 5 Lines - Press to select previous lockups
Cashout - Press to see selected lockup help
Service- Press to return to previous menu
Operator Key - Turn off to exit
USA - Revision 02
3-43
Machine Modes
USA 540MVP Video Service Manual
Table 3-45 Lockup Help Displays
CURRENT ACTIVE LOCKUP HELP SCREENS
Lockup
Cash Out Handpay
Jackpot Win
Win Handpay
Mystery Handpay
Three Way Memory Error
Game Eproms Changed
Self Audit Error
Machine Options Setup
Mikohn Disconnected
Mikohn Comm Error
Main Door Open
Logic Door Open
Cashbox Door Open
Bill Acceptor Door Open
Coin Acceptor
Coin Optic Fault
Yoyo
Coin Diverter Fault
Dip Switch Settings
Hopper Empty
Hopper Jammed
Illegal Coin Out
Hopper Disconnected
Bill Acceptor Error
Signature Error
Bill Acceptor Failure
Stacker Full
Stacker Removed
Bill Acceptor Out Of
Service
Printer Disconnected
Printer Fault
Paper Depleted
Battery Low
Meters Disconnected
Out of Service
3-44
HELP Screen Explanation and Advice
To reset: Complete any relevant book work, and turn Reset Key on then off.
To reset: Complete any relevant book work, and turn Reset Key on then off.
To reset: Complete any relevant book work, and turn Reset Key on then off.
To reset: Complete any relevant book work. Turn the Reset Key on then off. Wait for the
Mikohn equipment to reset.
To reset this fault - Follow the instructions at the main menu.
To reset this fault - Follow the instructions at the main menu.
To reset this fault - Follow the instructions at the main menu.
To reset this fault, enter the Machine Options setup menu. Set options as required, then
save options.
Open the main door, check loom and reconnect the Mikohn, or close the main door, or
disable the "Mikohn Game Address" from the Machine Option Menu.
Caused due to 5 transmission failures, open the main door, close the main door
To reset this fault, close the Main Door.
To reset this fault, close the Logic Cage Door.
To reset this fault, close the Cashbox Door.
To reset this fault, close the Bill Acceptor Door.
(Note: Requires the Bill Acceptor Door and the Belly Panel Door to be closed)
To reset this fault, open main door, correct problem, then close main door.
To reset this fault, open main door, correct problem, then close main door.
To reset this fault, open main door, correct problem, then close main door.
To reset this fault, open main door, correct problem, then close main door.
To reset this fault, power the machine off. Set the legal coin and credit values. Power the
machine on. Return to Operator Mode Menu and reset the static RAM
Check if the hopper is empty - if so refill the hopper. Open main door, correct problem,
then close main door.
Open main door, clear the reason for the hopper jam - check the hopper coin out sensor,
close the main door.
To reset this fault, open main door, correct problem then close main door.
Open main door, reconnect the hopper, then close the main door.
To reset this fault, disconnect and then reconnect power to bill acceptor.
BACC Signature Mismatch. To reset this fault, go to the Miscellaneous Menu, select Bill
Acceptor CRC Check and follow instructions.
To reset this fault, empty the stacker, reset meter values, disconnect and then reconnect
power to bill acceptor.
To reset this fault, empty the stacker, reset meter values, disconnect and then reconnect
power to bill acceptor.
Replace the stacker.
To reset this fault, reconnect the Bill Acceptor, then close the main door. Alternatively,
disable the Bill Acceptor via the Machine Options Setup screen
Open the main door, reconnect the Printer, close the main door.
Open the main door, repair or replace the Printer, then close the main door.
Open the main door, insert new paper roll and close the main door.
To reset this fault, replace the battery (Note: this will result in a metering error).
To reset this fault, open the main door and the logic door, reconnect the mechanical meters
then close the logic door and the main door.
To exit, turn the Operator Mode Key on. After exiting from Out of Service mode, the Out
of Service lockup can be cleared by turning the Reset Key on and off.
USA - Revision 02
USA 540MVP Video Operator Manual
Day to Day Operations
________Chapter 4________
Day-to-Day Operations
4.1 Opening and Closing Cabinet Door
To open the cabinet door:
1.
2.
Insert the cabinet door key, and turn it 180° clockwise.
Insert finger into latch access, lift the door latch, and pull the cabinet door open.
Figure 4-1 Cabinet Key Locations
USA Revision - 02
4-1
Day-to-Day Operations
USA 540MVP Video Operator Manual
To close the cabinet door:
1.
2.
Push the cabinet door closed
Insert the cabinet door key, turn it 180° anticlockwise and remove.
4.2 Switching Machine On or Off
WARNING
Dangerous voltages are present inside the
machine when mains power is on. Always turn
off mains power before touching any internal
parts with bare hands or with metal objects held
in the hands.
To switch the machine ON or OFF:
1.
2.
3.
Open the cabinet door.
Switch the main power switch ON or OFF.
Close and lock the cabinet door.
Figure 4-2 Switching Machine On or Off
4-2
USA Revision - 02
USA 540MVP Video Operator Manual
Day to Day Operations
4.3 Refilling Hopper
When the hopper needs refilling, the machine will lock up and display a Hopper
Empty message.
To perform a hopper refill:
1.
2.
3.
4.
5.
6.
Obtain the correct number of coins required to fill the hopper.
Open the cabinet door (the machine will display a Door Open - Main
message).
Place the coins into the hopper.
Close and lock the cabinet door; the machine will remain in fault mode.
Insert the Jackpot Reset (Cancel Credit) key and turn it 90° clockwise, then back
again and remove. This will clear the lockup Hopper Empty.
Record the refill amount in the refill register.
If coins were owing to the player before the hopper refill, the machine will now
dispense the coins into the coin tray.
USA Revision - 02
4-3
Day-to-Day Operations
USA 540MVP Video Operator Manual
4.4 Clearing Coin and Note Jams
4.4.1 Coin Comparator
When a coin jams in the coin comparator, coins stack up at the coin entry slot. To
clear the coin jam, take the following action (see Figure 4-3):
1.
2.
3.
4.
5.
Open the cabinet door, and switch OFF the machine.
Remove the comparator sensor assembly:
a.
Remove the looms from the sensor assembly. Do not pull on the wires.
b.
Push the comparator sensor assembly upwards to the full extent of the top
locating groove. This action causes the sensor assembly to come free of
the bottom locating groove.
c.
Remove the sensor assembly from the reflector panel.
Remove any jammed coins.
Replace the sensor assembly:
a.
Position the sensor assembly at an angle and slide it into the top locating
groove on the mounting bracket.
b.
Push the bottom of the sensor assembly inwards, and slide it down until it
locks into position in the bottom locating groove.
c.
Reconnect the looms to the sensor assembly.
Switch ON the machine, and close and lock the cabinet door.
Figure 4-3 Coin Comparator Sensor Assembly
4-4
USA Revision - 02
USA 540MVP Video Operator Manual
Day to Day Operations
4.4.2 Coin Chute Assembly
When a coin jams in the coin-in chuting, the machine locks up and provides the
following alerts:
• The machine displays the message COIN ACCEPTOR FAULT or COIN OPTIC
FAULT.
• The machine sounds an alarm.
To clear the coin jam, take the following action:
1.
Open the cabinet door, and switch OFF the machine.
CAUTION
Take care not to damage the coin chuting.
2.
3.
4.
5.
6.
Clear any jammed coins from the coin chuting. (for additional information, refer
to the chapter Coin Chute Assembly in the Service Manual).
Ensure that the chute is clear by dropping a coin through the chute while the
cabinet door is still open.
Switch ON the machine, and close and lock the cabinet door.
To reset the machine, insert the Jackpot Key into the Jackpot key switch and turn
it 90° clockwise, then back again and remove.
Carry out the coin chute test as outlined in the chapter Machine Modes.
Figure 4-4 Coin Comparator and Coin Chuting
USA Revision - 02
4-5
Day-to-Day Operations
USA 540MVP Video Operator Manual
4.4.3 Hopper Photo-optic Detector and Coin Chute
CAUTION
Avoid handling the second coin wiper spring. If bent, it may
cause an incorrect coin payout, and the machine to lock up
with the message ILLEGAL COIN OUT.
If a coin passes or jams in the hopper photo-optic detector when the player has not
pressed the CASH OUT button for a payout, the machine locks up and provides an
alert by displaying the message ILLEGAL COIN OUT or HOPPER JAMMED.
Take the following action:
1.
2.
3.
4.
Open the cabinet door, and switch OFF the machine.
Clear any jammed coins from the hopper photo-optic detector.
Check that the hopper coin chute is aligned with the slot in the reflector panel.
Switch ON the machine, and close and lock the cabinet door. The machine will
automatically reset after the door is closed.
Figure 4-5 Clearing Hopper Photo-optic Detector
4-6
USA Revision - 02
USA 540MVP Video Operator Manual
Day to Day Operations
4.4.4 Bill Acceptor
If a note jams in the bill acceptor, it will automatically try (five times) to reverse the
note out of the bill acceptor. If the automatic clearance fails, the machine will lock up
and display a fault mode message. The intelligent bezel will also signal a fault by
illuminating the first pair of greens LEDs.
CAUTION
The Bill Acceptor is controlled by complex
electronics. Unqualified personnel must not
interfere with the unit.
The scanning and transport channel of the bill acceptor passes currency directly to the
stacker. Should a note become lodged within the scanning channel, the following steps
will enable the jam to be cleared:
CAUTION
Ensure the power is turned off before any
maintenance procedures are carried out on the
bill acceptor, stacker and dual cage doors.
To clear a jam in the bill acceptor (refer to Figure 4-6 and Figure 4-7):
1.
2.
3.
4.
5.
6.
Open the cabinet door and switch OFF the machine.
Unlatch the dual cage assembly from the cabinet (1).
Gently swing the assembly out of the cabinet until it is against the stop. This
will give limited access to the note channel.
Unclip the upper guide from the lower guide and remove the jammed note.
If you need to remove the bill acceptor:
a.
Disconnect the loom from the bill acceptor to the host machine (2).
b.
Pull the retaining clip out to release the bill-acceptor locating pin (3, 4).
c.
Lift the bill acceptor up and away from the back of the housing.
Unclip the upper guide channel from the lower guide channel and remove the
jammed note.
Replacing the bill acceptor and dual cage housing is a reversal of the removal
procedure.
USA Revision - 02
4-7
Day-to-Day Operations
USA 540MVP Video Operator Manual
Dual Cage
Catch & Spring
1
Bill Acceptor
Bill Acceptor
Retaining Clip
3
Connector
to Machine
2
Note Stacker Lock
(up to 2 Locks)
4
Bill Acceptor
Location Pin
& Slot
Bill Stacker
Door
Bill
Stacker
Dual Cage
Assembly
Dual Cage
Location & Pivot
Stop
Figure 4-6 Dual Cage Housing and Bill Acceptor Access
4-8
USA Revision - 02
USA 540MVP Video Operator Manual
Day to Day Operations
Figure 4-7 Bill Acceptor
4.5 Cancelling Credit
When a player has credit that is below the preset Hopper Payout Limit and the player
presses the Cash Out button, the machine dispenses the credit amount into the chip
tray.
However, when a player's credit exceeds the preset Hopper Payout Limit and the player
presses the Cash Out button, the machine locks up. When this occurs, the machine
provides an alert in the following way:
• The machine displays the message CANCEL CREDIT.
• The machine plays a distinctive tune.
Take the following action:
1.
2.
3.
In the payout book, record the CREDIT amount displayed on the screen.
Pay the player or direct the player to collect the credit amount from the cashier.
Reset the machine by inserting the Jackpot Key and turning it 90° clockwise,
then back again. This cancels the credit.
USA Revision - 02
4-9
Day-to-Day Operations
USA 540MVP Video Operator Manual
Note
If the amount of credit available does not equate to whole coins, the hopper
pays out the whole coin amount and the player may either play off the
balance of credits or collect the balance as a book payout.
4.6 Resolving Disputed Win Claims
Note
Verifying a player's claim may require the attendance of club management.
When a player claims a win that the machine has not credited, take the following
action:
1.
2.
3.
4.
Note and study the symbols on the machine display.
Check that the player has correctly placed a bet.
Check the game outcome against the pay table.
Check the current game display against the last game played information in the
Operator Mode Menu ⇒ Metering Information Menu ⇒ Replay Previous Games
(refer to the chapter Machine Modes).
If the dispute cannot be resolved immediately, record all symbols and information on
the current and last game, including credits and lines bet, for future resolution.
4.7 Clearance of Coins and Notes
4.7.1 Cash Box Clearance
The cash box is accessed via the security door in the cabinet base. The door may be
fitted with a battery-backed mechanical security switch to detect accesses. The
procedure for clearing the cash box is controlled by house management.
4.7.2 Bill Acceptor Stacker Clearance
The procedure for clearing the bill acceptor stacker must be strictly controlled by house
management. To remove the stacker:
1.
2.
3.
4-10
Open the belly panel door. The alarm sounds, the machine locks up, and the
message DOOR OPEN BILL ACCEPTOR is displayed.
Unlock and open the stacker cage door.
Grasp the stacker handle and withdraw the stacker from the machine.
USA Revision - 02
USA 540MVP Video Operator Manual
4.
Day to Day Operations
Once removed, the note stacker itself must be unlocked before the notes inside
can be withdrawn. Each stacker may be numbered to assist accounting and
control operations.
To replace the note stacker, reverse the above procedure.
Figure 4-8 Removing Bill Stacker
4.8 Performance and Audit Calculations
NOTE
Cash flow calculation formulas can vary between
jurisdictions as well as through the allocation of
individual electronic meters.
Accounting and security-type calculations are facilitated by the Operator Mode Menu
⇒ Metering Information displays. Machine auditing is carried out by analysing the
meter information in conjunction with hopper fill amounts, cash box and note stacker
clearances, and the hand-pay payout registers.
USA Revision - 02
4-11
Day-to-Day Operations
USA 540MVP Video Operator Manual
Performance Calculations
The TRUE WIN PERCENTAGE can be calculated as follows:
TRUE WIN % =
(TOTAL CREDITS BET - (TOTAL CREDITS WON + JACKPOT WINS)) x 100
TOTAL CREDITS BET
The actual number of credits won by the house is given by:
HOUSE CREDITS = TOTAL CREDITS BET - (TOTAL CREDITS WON +
JACKPOT WINS)
The Periodic Meters can be used to provide performance information that relates to a
specific period of time.
Audit Calculations
The cash flow cycle is described by the following calculation:
CASH IN + HOPPER REFILLS + TOTAL CREDITS WON + JACKPOT HANDPAYS
=
TOTAL CREDITS BET + CANCEL CREDIT + COIN OUT
4-12
USA Revision - 02
USA 540MVP Video Operator Manual
Care and General Maintenance
________Chapter 5________
Care and General Maintenance
CAUTION
All functions of the gaming machine are
controlled by complex electronics. Unqualified
personnel must never interfere with any
mechanisms or controls inside the machine as
this may permanently damage the machine and
could lead to expensive repairs or costly
component replacement, and will render the
warranty void.
5.1 Cabinet
CAUTION
On gold-plated surfaces, do not use abrasive
cleaning products or strong solvents. To clean,
use a soft chamois and water, or a proprietary
cleaning fluid that contains mild solvents and
silicone.
To clean the exterior of the cabinet and the top box, use a non-abrasive household
cleaning solution or spray. Ensure that all exterior parts are thoroughly dry,
particularly the coin tray.
Note
Call the Aristocrat service organisation to carry
out all adjustments and repairs.
USA - Revision 02
5-1
Care and General Maintenance
USA 540MVP Video Operator Manual
5.2 Fluorescent Tubes
WARNING
High voltages are present when the machine is switched ON. These
voltages are potentially lethal.
5.2.1 Top Box Tube
The top box tube is 15 W to AS 1201 (IEC 81) standard.
To replace the top box tube (refer to Fig 5-1):
1.
2.
3.
4.
5.
6.
7.
Open the cabinet door, and switch OFF the machine.
Remove the top box door by lifting it up to disengage the locating tabs.
Rotate the tube 90°, and gently remove it from the sockets.
To insert the new tube, push the tube into the sockets.
Lock the tube into place by rotating it 90° in either direction.
Replace the top box door.
Switch ON the machine, and close and lock the cabinet door.
Top Box Shell
Top Box
Door
Fluorescent
Ballast
Artwork Panel
Lower Trim
Mk5S2014a.cdr
Fluorescent Tube
Reflector Panel
Figure 5-1 Replacing Top Box Tube
5-2
USA - Revision 02
USA 540MVP Video Operator Manual
Care and General Maintenance
5.2.2 Cabinet Door Fluorescent Tubes
The cabinet door fluorescent tubes are mounted to the reflector panel on the inside of
the door.
To replace a cabinet door fluorescent tube (refer to Fig 5-2):
1.
Open the cabinet door, and switch OFF the machine.
Warning
When the lighting system is working, the
fluorescent tube becomes very hot.
2.
3.
4.
5.
Open the belly panel door.
Rotate the tube and carefully remove from its sockets. Insert the replacement
fluorescent tube.
Close and lock the belly panel door.
Switch ON the machine, check the lighting system, and close and lock the main
door.
Belly Panel
Door (open)
Reflector
Panel
Belly Panel
Door Lock
Artwork Panel
Fluorescent
Tubes
B elly3a.cdr
Bill Stacker
with cage open
Security Switch
Figure 5-2 Cabinet Door Fluorescent Tube
USA - Revision 02
5-3
Care and General Maintenance
USA 540MVP Video Operator Manual
5.3 Playbuttons
5.3.1 Playbutton Lamps
Warning
Lamp and logic looms operate on different
voltages - incorrect wiring may damage the
machine or cause improper operation.
The playbutton lamps are wedge base, 24 V
DC, 3 W.
To replace a playbutton lamp:
1.
2.
3.
4.
5.
6.
Open the cabinet door, and switch OFF the machine.
Grasp the microswitch and lamp holder unit between the thumb and forefinger,
and pull out the faulty lamp.
Push in the replacement lamp.
Replace the microswitch and lamp holder unit by inserting it with a rocking
action into the playbutton body.
Push up the microswitch and lamp holder unit until it snaps into place.
Switch ON the machine, and close and lock the cabinet door.
Figure 5-3 Playbutton Lamps
5-4
USA - Revision 02
USA 540MVP Video Operator Manual
Care and General Maintenance
5.4 Hopper
5.4.1 Removing and Replacing
CAUTION
Always use the handles to lift the hopper. Never lift the
hopper by the motor and the end of the bowl, as this action
may bend the motor spindle. Avoid handling the second coin
wipe-off spring. If this spring is damaged, it may cause an
incorrect coin payout and the machine to lock up.
To remove the hopper from the cabinet (refer to Figure 5-4):
1.
2.
3.
4.
5.
Open the cabinet door, and switch OFF the machine.
Lift the spring-loaded release pin.
Rotate the hopper 90° by sliding the left-hand side outwards. This action is
necessary because part of the hopper bowl actually sits behind the bill acceptor
(where fitted).
Slide the hopper straight out of the machine.
Lift the hopper by grabbing the handle with one hand and placing the other hand
under the base of the bowl.
To replace the hopper in the cabinet:
1.
2.
3.
4.
Lift the hopper by its handles.
Slide the hopper into the guides on the base of the cabinet until the hook on the
right-hand side is in place.
Push on the hopper handle to pivot the hopper 90° until the spring-loaded pin is
engaged in the retaining hole.
Switch ON the machine, and close and lock the cabinet door.
USA - Revision 02
5-5
Care and General Maintenance
USA 540MVP Video Operator Manual
Figure 5-4 Hopper Removal
5.4.2 Cleaning
CAUTION
Avoid handling the second coin wiper spring. If
bent, it may cause an incorrect coin payout and
the machine to lock up with the message
ILLEGAL COIN OUT displayed.
Remove any dust and dirt from the hopper photo-optic with a soft paint brush or blow
it away using a straw (refer to Fig 5-5).
5-6
USA - Revision 02
USA 540MVP Video Operator Manual
Care and General Maintenance
Figure 5-5 Hopper Photo-optic
5.5 Coin Comparator
5.5.1 Removing and Replacing
Refer to Clearing Coin and Note Jams in the chapter Day-to-Day Operations.
5.6 Bill Acceptor Unit
The bill acceptor requires a small amount of regular attention to maintain operations.
A service technician will be required if machine malfunction occurs.
5.6.1 Removing and Replacing
Refer to Clearing Coin and Note Jams in the chapter Day-to-Day Operations.
5.6.2 Maintenance
The bill acceptor and stacker requires only a minimal amount of care which can be
provided while the units are in the operating position.
Occasional wiping of the plastic bezel surface, with a soft cloth dampened with a 90%
solution of isopropyl alcohol, is all that is required to remove surface deposits and
smudges.
USA - Revision 02
5-7
Care and General Maintenance
USA 540MVP Video Operator Manual
CAUTION
Caution must be exercised not to flood the bezel
area with liquids due to the electronics in the bezel
unit and because liquids must not seep down into
the bill acceptor unit below the bezel area.
Do not use a solvent other than isopropyl alcohol as
permanent damage to the bezel assembly and
other items may result.
Over a period of time, dirt from the surface of inserted notes will accumulate on the
pressure rollers, drive belt surfaces and bill acceptor optics. These areas should be
cleaned to ensure reliable operation.
The procedure to clean rollers, belt surfaces, and validation optics is as follows (if
necessary, see Removal and Replacement Procedures in the Service Manual):
1.
2.
3.
4.
5.
5-8
Disconnect the loom from the side of the bill acceptor assembly.
Remove the bill acceptor from the dual cage housing.
Swing down the upper guide assembly to give complete access to the note
channel, as shown in Figure 4-7.
Using a soft lint cloth dampened with 90% isopropyl alcohol, wipe the note
channel surfaces on both the upper and lower guides to remove any surface dirt.
Pay particular attention to the optics area and the magnetic head when removing
deposits from the surfaces.
On the upper guide assembly, clean the surface of the pressure rollers. The belt
surface may be cleaned by rotating one of the drive rollers while holding the
cleaning cloth against the surface of the belt. Again, care should be taken to
prevent excess liquid from reaching the bill acceptor internals.
USA - Revision 02
USA 540MVP Video Operator Manual
Machine Conditions
________Chapter 6________
Machine Conditions and Messages
6.1 Machine Alerts
The gaming machine functions with a variety of operational alerts that provide for
security, customer service and maintenance events.
The machine responds to events by showing messages in the game display, by causing
a machine lockup and by sounding an alarm. The intelligent bill acceptor bezel also
provides an indication of certain machine conditions and lockups.
Note
Machine alerts and messages can vary between
jurisdictions and machine models.
Some machine functions and operational controls are configured during machine setup.
See Operator Setup / Selections Mode in the chapter Machine Modes.
6.1.1 Operational Messages
The video display unit shows messages, operator menus and information displays to
assist in identifying and resolving machine conditions. The on-screen messages
provide operators and players with guidance and information while the machine is in
Play Mode.
Examples of screen messages are:
−
−
−
−
Game over
Door Open - Main
Coin Diverter Fault
COMBINATION TEST
The message may simply be an indication of normal game or operational processes
requiring no remedial action. However, if the message indicates a lockup condition,
follow the procedure below.
USA - Revision 02
6-1
Machine Conditions
USA 540MVP Video Operator Manual
6.1.2 Machine Lockup
The gaming machine has an extensive system of self-monitoring and should any
abnormal conditions be detected, the machine will automatically lockup, i.e. activate
fault mode.
In fault mode, the game message area displays guidance information and the game is
disabled to prevent any further player interaction. Fault mode conditions are dealt with
via the Operator Mode ⇒ Current Lockup Menu.
Entry to the Current Lockup screen is achieved by turning the Audit (Operator) key
switch ON and selecting Current Lockup from the Operator Mode Menu.
The Current Lockup screen is displayed and the conditions requiring attention are
highlighted by the symbol *** (See Table 6-1). Each lockup condition has an
associated help screen that provides information on the cause of the lockup and the
procedure for resetting it. A summary of the lockup help comments is given in Table
6-2.
Table 6-1 Current Lockup Screen Display
CURRENT ACTIVE LOCKUPS
***
Attendant Handpay
Cash Out Handpay
Jackpot Win
Win Handpay
Mystery Handpay
Memory Errors
3 Way Memory Error
GameEPROMs Changed
Self Audit Error
Machine Options
DIP Switch Settings
Coin Faults
Coin Acceptor Fault
Coin Jam/optic Fault
Yoyo
Coin Diverter Fault
***
***
Hopper Faults
Hopper Empty
Hopper Jammed
Illegal Coin Out
Hopper Disconnected
Mikohn Faults
Mikohn Disconnected
Mikohn Comm Error
Bill Acceptor
Bill Acceptor Error
Signature Error
Bill Acceptor Failed
Stacker Full
Stacker Removed
Bill Acc OOS
Printer Faults
Printer Disconnected
Printer Fault
Paper Depleted
Miscellaneous
Battery Low
Meters Disconnected
Out of Service
Door Faults
Main Door Open
Logic Door Open
Cashbox Door Open
Bill Acceptor Door Open
The characters *** are next to active lockups
Play 1 Line - Press to select next lockups
Play 5 Lines - Press to select previous lockups
Cashout - Press to see selected lockup help
Service- Press to return to previous menu
Operator Key - Turn off to exit
6-2
USA - Revision 02
USA 540MVP Video Operator Manual
Machine Conditions
Table 6-2 Lockup Help Displays
CURRENT ACTIVE LOCKUP HELP SCREENS
Lockup
Cash Out Handpay
Jackpot Win
Win Handpay
Mystery Handpay
Three Way Memory Error
Game Eproms Changed
Self Audit Error
Machine Options Setup
Mikohn Disconnected
Mikohn Comm Error
Main Door Open
Logic Door Open
Cashbox Door Open
Bill Acceptor Door Open
Coin Acceptor
Coin Optic Fault
Yoyo
Coin Diverter Fault
Dip Switch Settings
Hopper Empty
Hopper Jammed
Illegal Coin Out
Hopper Disconnected
Bill Acceptor Error
Signature Error
Bill Acceptor Failure
Stacker Full
Stacker Removed
Bill Acceptor Out Of
Service
Printer Disconnected
Printer Fault
Paper Depleted
Battery Low
Meters Disconnected
Out of Service
USA - Revision 02
HELP Screen Explanation and Advice
To reset: Complete any relevant book work, and turn Reset Key on then off.
To reset: Complete any relevant book work, and turn Reset Key on then off.
To reset: Complete any relevant book work, and turn Reset Key on then off.
To reset: Complete any relevant book work. Turn the Reset Key on then off. Wait for the
Mikohn equipment to reset.
To reset this fault - Follow the instructions at the main menu.
To reset this fault - Follow the instructions at the main menu.
To reset this fault - Follow the instructions at the main menu.
To reset this fault, enter the Machine Options setup menu. Set options as required, then
save options.
Open the main door, check loom and reconnect the Mikohn, or close the main door, or
disable the "Mikohn Game Address" from the Machine Option Menu.
Caused due to 5 transmission failures, open the main door, close the main door
To reset this fault, close the Main Door.
To reset this fault, close the Logic Cage Door.
To reset this fault, close the Cashbox Door.
To reset this fault, close the Bill Acceptor Door.
(Note: Requires the Bill Acceptor Door and the Belly Panel Door to be closed)
To reset this fault, open main door, correct problem, then close main door.
To reset this fault, open main door, correct problem, then close main door.
To reset this fault, open main door, correct problem, then close main door.
To reset this fault, open main door, correct problem, then close main door.
To reset this fault, power the machine off. Set the legal coin and credit values. Power the
machine on. Return to Operator Mode Menu and reset the static RAM
Check if the hopper is empty - if so refill the hopper. Open main door, correct problem,
then close main door.
Open main door, clear the reason for the hopper jam - check the hopper coin out sensor,
close the main door.
To reset this fault, open main door, correct problem then close main door.
Open main door, reconnect the hopper, then close the main door.
To reset this fault, disconnect and then reconnect power to bill acceptor.
BACC Signature Mismatch. To reset this fault, go to the Miscellaneous Menu, select Bill
Acceptor CRC Check and follow instructions.
To reset this fault, empty the stacker, reset meter values, disconnect and then reconnect
power to bill acceptor.
To reset this fault, empty the stacker, reset meter values, disconnect and then reconnect
power to bill acceptor.
Replace the stacker.
To reset this fault, reconnect the Bill Acceptor, then close the main door. Alternatively,
disable the Bill Acceptor via the Machine Options Setup screen
Open the main door, reconnect the Printer, close the main door.
Open the main door, repair or replace the Printer, then close the main door.
Open the main door, insert new paper roll and close the main door.
To reset this fault, replace the battery (Note: this will result in a metering error).
To reset this fault, open the main door and the logic door, reconnect the mechanical meters
then close the logic door and the main door.
To exit, turn the Operator Mode Key on. After exiting from Out of Service mode, the Out
of Service lockup can be cleared by turning the Reset Key on and off.
6-3
Machine Conditions
USA 540MVP Video Operator Manual
6.1.3 Door Access and Alarm Sound
The main door, cash box door, logic cage door, and belly panel door are monitored by
battery-backed mechanical security switches. When one of these doors is opened, the
following actions occur:
• one of the following messages will appear on the screen: MAIN DOOR OPEN,
CASH BOX DOOR OPEN, BILL ACCEPTOR DOOR OPEN, LOGIC DOOR
OPEN.
• the alarm sound is heard.
• one of the following lockups occurs: MAIN DOOR OPEN, CASH BOX DOOR
OPEN, BILL ACCEPTOR DOOR OPEN, LOGIC DOOR OPEN.
• gameplay is suspended.
• one of the following electronic Diagnostic Meters is incremented: MAIN DOOR
ACCESSES, CASH BOX ACCESSES, BILL ACCEPTOR ACCESSES, LOGIC
ACCESSES.
The condition is reset by closing the appropriate door.
Alarm Sound Level
The volume of machine game and operational sounds can be adjusted via Operator
Mode⇒Operator Setup / Selections Menu⇒Sound System Setup.
6.1.4 Intelligent Bezel
The bill acceptor bezel display helps players to correctly align notes for insertion and
indicates bill acceptor faults to operators.
To facilitate recognition of the note insertion area, eight green LEDs flash (4 rows of 2,
with a wide to narrow shape) in a “runway” type effect when the machine is in idle
mode. A ninth, red LED flashes if the bill acceptor operation is inhibited for any
reason. Selected green LEDs flash to indicate machine conditions requiring attention.
6-4
USA - Revision 02
USA 540MVP Video Operator Manual
Machine Conditions
Figure 6-1 Bezel Assembly Indicators - LED Displays
Malfunctions flash different rows of the green LEDs. The pair of LEDs nearest the
player is row number 1. The pair nearest the note entry channel is row number 4. The
bezel error messages are:
Row Number 1:
Hardware fault.
Row Number 2:
Stacker full.
Row Number 3:
Jam in stacker.
Row Number 4:
Jam in currency channel.
The bill acceptor backlight, to the left of the Bezel panel, highlights the accepted note
denominations.
USA - Revision 02
6-5
Machine Conditions
USA 540MVP Video Operator Manual
6.2 Message Displays and Conditions
The table below shows typical machine condition messages together with the
respective lockup status and the appropriate procedures for correcting or removing the
lockup. Should the condition persist, call the local Aristocrat service organisation.
Table 6-3 Typical Lockup Messages, Fault Conditions and Corrective Actions
TYPE
METERS and
MESSAGE
ERROR CONDITION
RESET PROCEDURE
MEMORY ERROR
3 Way Metering (SRAM) is
corrupted.
The Game EPROMs are
not identical to those
previously installed.
Enter the Operator Mode and follow the
instructions on screen.
Enter the Operator Mode and follow the
instructions on screen.
The machine options
(stored in EEPROM) have
been corrupted.
Enter the Operator Mode and check
the information saved in the Machine
Options screen. Follow the instructions
on screen to reset the machine.
Enter the Operator Mode and follow the
instructions on screen.
MEMORY
MEMORY ERROR
- GAME
EPROMS
CHANGED
MEMORY ERROR
- MACHINE
OPTIONS
MEMORY ERROR
- SELF AUDIT
ERROR
DOOR
SECURITY
COIN
HANDLING
MECHANICAL
METERS
DISCONNECTED
This error occurs when an
error is detected in the
meters that account for all
money in and out of the
machine.
The mechanical meters
have been disconnected or
are faulty.
DOOR OPEN MAIN
DOOR OPEN LOGIC CAGE
DOOR OPEN CASH BOX
DOOR OPEN BILL ACCEPTOR
Main door is detected as
being open
Logic door is detected as
being open
Cashbox door is detected
as being open
Belly Panel Door is
detected as being open
Close Main door.
COIN ACCEPTOR
FAULT
Coin Sense pulse from the
coin acceptor is longer than
expected, indicating a fault
in the unit.
A coin is covering the
photo-optic in the
Comparator Sensor
Assembly, or the unit is
faulty.
Open Main door, check the coin
comparator and the sensor assembly,
close Main door.
COIN OPTIC
FAULT
6-6
Reconnect mechanical meters. Check
looming and sockets.
Close Logic door. If door is already
closed, then open and close the door.
Close Cashbox door.
Close Bill Acceptor door.
Open Main door, check coin chute for
jammed coins, close Main door.
USA - Revision 02
USA 540MVP Video Operator Manual
TYPE
HOPPER
MESSAGE
Coin stringing fault. Occurs
when a coin has passed
upwards through the
Comparator Sensor
Assembly.
Open Main door, check coin
comparator and sensor assembly,
close Main door.
HOPPER
DISCONNECTED
HOPPER EMPTY
Hopper is detected as
being disconnected.
Hopper empty. Refill the
hopper.
A coin has become jammed
in the hopper optic or
mechanical mechanism.
Open the main door and
remove any such coins.
A coin was detected
passing the coin-out optic
when it shouldn’t have
been.
Open Main door, check hopper is
correctly connected, close Main door.
Open main door, refill hopper, close
main door.
Open Main door, clear the jam, close
main door.
The BACC has detected an
internal fault.
Open the Main door, service or replace
the Bill Acceptor, and close the Main
door.
The BACC has detected a
fault. A bill maybe blocking
the bill entry slot or stacker
entry, or stacker may be
jammed. [NON-LOCKUP
FAULT]
Bill Acceptor disconnect or
broken. [NON-LOCKUP
FAULT]
Bill stacker has jammed
due to being too full.
[NON-LOCKUP FAULT]
Open the Main door, remove any
jammed notes from the Bill Acceptor,
close the Main door.
CALL
ATTENDANT ILLEGAL COIN
PAID
ACCEPTOR
RESET PROCEDURE
REVERSE COIN
IN (Yo-Yo)
HOPPER JAM
BILL
ERROR CONDITION
Machine Conditions
CALL
ATTENDANT -BILL ACCEPTOR
ERROR
BILL ACCEPTOR
FAULT
BILL ACCEPTOR
DISCONNECTED
BILL STACKER
FULL
5 BILLS
REJECTED
CALL
ATTENDANT -STACKER
USA - Revision 02
5 Consecutive bills
rejected. [NON-LOCKUP
FAULT]
Bill stacker removed.
Open Main door, check hopper is
correctly connected, close Main door.
Check or reconnect the Bill Acceptor
wiring harness.
Open the Belly Panel Door, empty
stacker (and reset BACC meters by
entering Operator Mode and
completing the Bill Stacker Reset
procedure), replace stacker, and close
the door.
Open and close the Main door, or
insert a valid bill.
Open Belly Panel Door, replace
stacker, and close the door.
6-7
Machine Conditions
TYPE
MESSAGE
USA 540MVP Video Operator Manual
ERROR CONDITION
RESET PROCEDURE
REMOVED
PRINTER
PRINTER FAULT
Printer has detected an
internal fault
Printer cable is
disconnected or the printer
is not responding.
Paper roll has been
depleted.
Paper Low. [NONLOCKUP FAULT]
Open main door, service printer, and
close the main door.
Open main door, check printer wire
harness is connected correctly, close
the main door.
Open main door, replace paper roll,
close the main door.
Open main door, replace paper roll or
adjust Paper Low sensor, close the
main door.
BATTERY LOW
SRAM battery backup is
low.
MIKOHN
DISCONNECTED
The Mikohn equipment is
not communicating with the
gaming machine.
Open main door, replace battery on
Main Board, close the main door.
Note: this will result in a metering error.
Open main door, check Mikohn wire
harness, or disable the Mikohn from
the Machine Options setup, close main
door.
CALL
ATTENDANT OR
PLAY ON CASHOUT
HANDPAY
$123.45
CALL
ATTENDANT YOU HAVE WON
A JACKPOT
$123.45
CALL
ATTENDANT YOU HAVE WON
A CASH WIN
$123.45
CALL
ATTENDANT YOU HAVE WON
A LINK JACKPOT
- LEVEL X $123.45
Cashout request above
hopper limit.
Complete book entries (where
applicable). Turn Reset key ON then
OFF.
Non-progressive win above
jackpot limit
Complete book entries (where
applicable). Turn Reset key ON then
OFF.
Non-Jackpot win above the
Maximum credit limit, and
cannot be paid by hopper.
Complete book entries (where
applicable). Turn Reset key ON then
OFF.
Progressive win (Link or
Mystery).
Complete book entries (where
applicable). Turn Reset key ON then
OFF.
PRINTER
DISCONNECTED
PRINTER PAPER
DEPLETED
PRINTER PAPER
LOW
OTHER
HANDPAYS
6-8
USA - Revision 02
USA 540MVP Video Operator Manual
Glossary
Glossary
ADH
Aristocrat Disc Hopper.
Animation Lamps
Lamps located in the top box for animation purposes.
Any pays
Symbols are read anywhere on the payline, and not
necessarily left to right or right to left.
ARM250
Advanced RISC Machine - a type of integrated
microcontroller
ASIC
Application Specific Integrated Circuit
Audit key switch
To display the electronic audit meters on the monitor, insert
the audit key and turn it 90° clockwise.
Audit meters
See electronic and electro-mechanical meters.
Base
A specially designed box unit on which the cabinet stands.
The cash box is usually located securely within the base.
Book pay
After the player presses the COLLECT button, the credits
are manually paid out to a player and recorded in the payout
book.
Button panel
The series of buttons across the front of the cabinet which
the player uses to control game play.
Cabinet
The major cabinet or casing in which the workings of the
machine are housed.
Cancel credit
When a player attempts to COLLECT a credit amount
greater than the amount that the Hopper can pay out, the
machine locks up. When this occurs, the Cancel Credit
procedure allows for the player to be paid manually and the
credit on the machine cancelled to zero.
Cash box
The high security compartment used to hold any coins not
held in the hopper.
Clearance
The value of coins removed from the cash box, usually
daily.
CMOS
Channel metal oxide semi-conductor.
Coin comparator
Device that compares a coin inserted by a player with a
sample coin of the correct denomination to determine if the
inserted coin is valid and acceptable for play.
USA - Revision 02
Glossary-1
Glossary
USA 540MVP Video Operator Manual
Coin detectors
See photo-optic detectors.
Coin jam
When coins jam in the coin chute assembly chute.
Coin selector
See coin comparator.
Coin tray
The tray at the bottom of the cabinet into which payout or
reject coins are deposited for collection.
Coin validator
See coin comparator.
CASH OUT
To convert the amount shown on the CREDIT meter to
cash, the player presses the CASH OUT button which
activates the hopper to pay the coins into the coin tray.
Console
See base.
CPU
Central processing unit.
Credit
Coins inserted into the machine register as credits. One coin
may equal more than one credit. Prizes are shown as credits
until such time as the player chooses to collect them.
D/A
Digital to analog.
DES
Data Encryption System
Electromechanical
meters
The electromechanical meters or counters. These meters are
non-resettable and are cumulative for the life of the machine.
Electronic meters
The electronic audit meters that provide audit information.
EPROM
Erasable programmable read only memory.
ESD
Electrostatic discharge.
FPLA
Field programmable logic array.
GL5
Communications protocol for the bill acceptor
Hard meters
See electromechanical meters.
HCMOS
High speed CMOS logic.
Hopper
The electronically controlled unit which stores the coins that
are played and which pays out the exact number of coins in
a credit collect situation.
House
The club, casino or organisation running the games.
IC
Integrated circuit
Illegal coin
A coin which is incorrectly paid out by the hopper.
Intelligent bezel
Sites the accept/reject slot for note placement on the bill
acceptor fascia panel.
2
USA - Revision 02
USA 540MVP Video Operator Manual
Glossary
Installation
A club, casino or other place which has a number of gaming
machines.
I/O
Input/output.
Jackpot key switch
To reset the machine after a cashier payout or after a
machine fault has been corrected, insert the J key, turn it
180° clockwise and back again.
LAB
New South Wales Liquor Administration Board.
LED
Light emitting diode.
Left to right pay
Symbols are read from left to right for prize determination.
Links
A series of machines are linked together by an external
progressive controller. Each machine contributes to a
common progressively incremented jackpot and is displayed
separately for the player to see.
Lockup
A lockup renders the machine unplayable and is triggered
either by a malfunction, when a jackpot has been won (if the
program permits), or when the player has pressed the CASH
OUT pushbutton when there is more than the cancel credit
amount in credit.
Manual pay
A book payment made for any amount in excess of the
cancel credit limit of the machine.
Max bet
A button which automatically bets the maximum amount
possible on a game.
Meters
Electronic (soft) meters and electro-mechanical meters
located within the machine that record and display important
audit information for the operator.
Microprocessor
The computer component which controls and processes
game play instructions.
Multiline
A game in which a player bets on additional lines to
multiply the chance of a prize.
Multiplier
A game in which a player bets additional coins on any one
game to multiply the value of the prize.
MVP
Gaming machine model name (MVP models were
previously known as MkV Series II).
Payline(s)
The line or lines which indicate where the symbols must line
up for a player to win.
Payout book
Book used to record hopper refill amount, jackpot amount
and cancel credit amount.
USA - Revision 02
3
Glossary
USA 540MVP Video Operator Manual
PCBA
Printed circuit board assembly.
Play button
One of the illuminated buttons on the button panel, used in
game play.
PLD
Programmable logic device.
Progressive jackpot
This is an additional jackpot to the game's normal jackpot.
This jackpot increments by a fixed percentage of the
machine's turnover and is displayed separately for the player
to see.
PROM
Programmable Read Only Memory.
Refill
Money you add to a hopper by opening the door and
inserting coins, usually when the machine has run out of
coins.
Reserve
A button on the machine which allows a player to indicate
to others that the machine is reserved. This reserve message
remains lit for 3 minutes.
RISC
Reduced Instruction Set Computer.
Scattered pays
Symbols can be above, below or on the payline to qualify
for a prize.
SEF
Subsidiary equipment function.
SESI
Subsidiary equipment serial interface.
Short time out
The machine locks up when a coin jams across the hopper
photo-optic detector for more than 0.5 seconds.
Soft meters
See electronic meters.
SPI
Serial Peripheral Interface
SRAM
Static Random Access Memory.
Symbols
The various designs on the reel strips. Common symbols
include Jacks, Kings, Aces, Cherries, and Gold Bars.
Top box
The box unit on top of the cabinet which carries the game
graphics, rules and score card.
Yo-Yo
A coin travelling in reverse to its normal direction. For
example: a coin is dangled through and withdrawn from the
coin entry slot of the machine in an attempt to cheat the
machine of a coin during game play.
4
USA - Revision 02
USA 540MVP Video Operator Manual
Index
Index
USA - Revision 02
Index-1
Index
USA 540MVP Video Operator Manual
A
Accounting Information .............................. 3-38
Audit Calculations ...................................... 4-12
Audit Key ..................................................... 3-1
B
Bet ............................................................... 3-2
Bill Acceptor
Bezel ....................................................... 6-4
Maintenance ............................................ 5-8
Removal .................................................. 4-8
Bill Acceptor
Security ................................................... 3-8
Bill Acceptor Faults ..................................... 6-4
Bill Acceptor Jams ....................................... 4-7
Bill Acceptor Meters .................................. 3-17
Bill Acceptor Stacker Clearance ................ 4-11
Button Test ................................................. 3-26
C
Cabinet Base ................................................ 2-5
Cancelling Credit ........................................ 4-10
Cash Box Clearance ................................... 4-11
Cash Out Button ........................................... 3-7
Cashless System ........................................... 1-8
Coin Comparator
Removal .................................................. 4-4
Sensor Assembly ..................................... 2-7
Coin Comparator
Security ................................................... 3-8
Coin Entry Test .......................................... 3-24
Coin Jam
Clearing ................................................... 4-4
Coin Jam ...................................................... 4-5
Collect Limit ................................................ 3-3
Credit ........................................................... 3-2
Credit Value ............................................... 3-13
Current Lockup .......................................... 3-40
Help Screens ......................................... 3-40
Current Lockup Menu .................................. 6-2
D
Demonstration Mode .................................. 3-37
Diagnostic Information Menu ..................... 3-22
Dip Switch Settings .................................... 3-32
Dip Switches ................................................ 3-3
Display Messages ........................................ 6-1
Index-2
Disputed Win Claims .................................. 4-11
Door Access ................................................. 3-9
Door Security ............................................... 6-4
E
Electromechanical Meters ............................ 3-2
Electronic Meters ......................................... 3-2
Electronic Meters ....................................... 3-10
Error Log Display ...................................... 3-29
F
Factory Test ............................................... 3-28
Fault Conditions ........................................... 6-6
Fault Mode ................................................. 3-40
Fluorescent Tubes
Replacing ................................................. 5-2
Font Type Selection ........................... 3-35, 3-40
G
Gamble ......................................................... 3-3
Game Eprom Id .......................................... 3-13
Gameplay ..................................................... 3-1
Gaming Machine
Basic Operation ....................................... 1-7
Specifications ........................................ 1-11
H
Handpays ...................................................... 3-6
Hopper
Coin Wiper .............................................. 4-6
Photo-Optic ............................................. 4-6
Removing ................................................ 5-5
Hopper
Security ................................................... 3-8
Hopper Fault ................................................ 4-6
Hopper Payout Limit .................................. 4-10
Hopper Photo-Optic ..................................... 5-6
Hopper Refill ............................................... 4-3
Hopper Test ............................................... 3-25
I
Idle ............................................................... 3-6
Installation Requirements ............................. 2-1
Installing The Sample Coin ........................... 2-7
J
Jackpot Key ................................................. 3-4
Jackpot Limit ............................................. 3-13
USA - Revision 02
USA 540MVP Video Operator Manual
L
Lamp Test .................................................. 3-23
Light Tower ................................................. 3-6
Lockup ................................................ 3-40, 6-2
Lockup Help Displays .................................. 6-3
Lockup Messages ........................................ 6-6
M
Machine Dimensions .................................... 2-3
Machine Footprint And Clearances ....... 2-4, 2-7
Machine Identification ................................ 3-13
Machine Keys .............................................. 1-6
Machine Modules ......................................... 1-2
Machine Options Setup .............................. 3-30
Machine Self-Monitoring ............................. 3-7
Mains Cable
Clamp ...................................................... 2-6
Metering And Self Audit Errors ................. 3-10
Metering Information ................................. 3-13
Miscellaneous Menu ................................... 3-35
Multiline ....................................................... 3-5
Multiplier ..................................................... 3-5
N
Non-Lockup Faults ....................................... 3-7
O
Operator Mode ................................... 3-1, 3-11
Operator Mode Menu Displays .................. 3-12
Operator Setup/Selections .......................... 3-30
Index
R
Real Time Clock Setup .............................. 3-34
Record Refill ................................................ 2-8
Refilling Hopper ........................................... 4-3
Removing Hopper ........................................ 5-5
Replacing A Playbutton ................................ 5-4
Replacing Fluorescent Tubes ........................ 5-2
Replay Previous Games .............................. 3-20
Reset Bills In Stacker ................................. 3-36
Reset Periodic Meters ................................ 3-36
Reverse Coin .............................................. 3-19
Risc .............................................................. 1-1
S
Sample Coin
Installation ............................................... 2-7
Security ........................................................ 3-8
Security Meters .......................................... 3-18
Self Test Mode ........................................... 3-23
Self-Test ....................................................... 3-7
Service ......................................................... 3-6
Service Button .............................................. 3-7
Smart Card ................................................... 1-8
Sound Effects Test ..................................... 3-27
Sound Level ................................................. 6-4
Sound System Setup ................................... 3-34
Sounds And Tunes ........................................ 3-5
Specifications ............................................. 1-11
Spinning Reels .............................................. 3-1
T
P
Panic Log ................................................... 3-29
Percentage Return ...................................... 3-13
Performance Calculations ........................... 4-12
Periodic Meters .......................................... 3-17
Play Mode .................................................... 3-1
Playbutton
Replacing ................................................ 5-4
Poker ............................................................ 3-1
Power Cable ................................................. 2-6
Printer Test ................................................. 3-29
Progressive Level Setup ............................. 3-33
Pushbutton Layout ....................................... 3-7
Pushbuttons .................................................. 3-6
Tilt ................................................................ 3-6
Types Of Games ........................................... 3-5
V
Venue Name Setup ..................................... 3-33
Video Display .............................................. 3-5
Video Gaming Machine
External View ................................... 1-4, 1-5
Physical Description ................................ 1-1
Voltage Selector Switch ............................... 2-6
W
Win ............................................................... 3-2
Y
Yo-Yo ........................................................ 3-19
USA - Revision 02
Index-3
Index
Index-4
USA 540MVP Video Operator Manual
USA - Revision 02