1
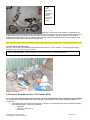
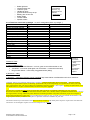
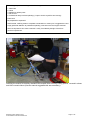
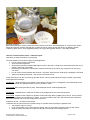
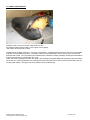
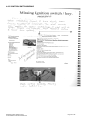
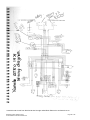
Assessment Type 1
PART A: PROPOSAL
BROAD AREA OF RESEARCH: How to rebuild a moped?
Background to choice:
I have a real interest in mechanics and have done so since I was a kid. I grew up taking things apart and
putting them back together again. Luckily, we have a really large workshop at our place and a lot of
tools, as my father and brother are also keen on working with cars. I started an apprenticeship in
electrical engineering but have returned to school as I would really like to complete my SACE and have
the option to go on to tertiary study. I’m not sure if I want to just rebuild things as a hobby or if I would
like it to be my future career and own my own business, or if I want to go to university and study
engineering there. When I heard about the Research Project at the end of last year I got the idea of
restoring a moped. I had been thinking about doing for a long time as I wanted a cheap environmentally
friendly set of wheels. During the holidays, after doing some research on the internet, I decided on the
model to buy based on availability and cost. Six days after putting an online advertisement I got a call
and was able to buy a vintage Yamaha QT50 moped for $50! PERFECT!
This led me to a:
Refined topic: Rebuild a Yamaha QT50 to vintage specifications
Planned research processes:
a) Web-based research:
• Information about different types of bikes – to inform my decision on what sort to buy
• eBay – for bike, parts, components
• online stores – for parts, components
• YouTube- advice from experts re various stages of the re-build
• Online Forums – solutions to problems that may arise
• Transport SA site – for official, legal requirements
b) Technical Book based – studying service manual
c) Consultation with Experts – advice on how to do some of the tasks, problem diagnosis, solutions
d) Observation – painting and polishing techniques in a trade workshop
e) Trial and Error
f) Testing of parts
g) Interview/s – with expert (have already asked WH – vehicle restorer)
Ethical Issues:
• need to find out about safe work practices for the mechanical tasks
• environmental issues – observe safe practice when disposing of chemical wastes from engine,
cleaning agents, painting
• provide information about the project to people I wish to work with and obtain their permission
Capability
I have chosen work as the most relevant capability. My reasons for this are that I will be developing
employability skills relevant to the work place e.g.:
• Time management.
• Responsibility.
• Specific mechanical skills, e.g. painting, polishing, sanding, measuring.
Research Project Clarifying Forum
© SACE Board of South Australia 2011
Page 1 of 29
•
•
•
Working independently and with others.
Learning about responsible participation in work – finding out about environmental issues and
OHSW practices.
Problem solving.
I also hope that by undertaking this research project will help me make up my mind about my future
career, (e.g. setting up my own business specialising in restoring vintage bikes) or whether I should try to
go on to University.
Research Outcome
A restored moped and a written report explaining how the research drove the decisions to restore it in
the way I did.
Part B: Research Development
1.0 Sourcing Vehicle (this was completed in the holidays)
I am interested in rebuilding some sort of bike/moped, but don’t want to have to get a special drivers
licence.
Task: Investigate Legal requirements for riding a moped , (e.g. licence) at TransportSA website.
Here is what they said!
Riding a moped
The holder of any class of South Australian driver's licence can ride a moped as long as the moped is
registered, insured and compliant with Australian design rules.
The holder of a learner's permit cannot ride a moped unless the permit is for R-DATE or R-class.
What is a moped?
A moped is defined as a two or three-wheeled motor vehicle (other than a power-assisted bicycle)
that:
is propelled by an internal combustion engine with a capacity not exceeding 50 millilitres; or a
motor other than an internal combustion engine, and
is capable of a speed not exceeding 50 kilometres per hour.
http://www.sa.gov.au/subject/Transport,+travel+and+motoring/Motoring/Motorcycling/Motorcycles/Ridi
ng+a+moped
THIS IS PERFECT FOR ME!
Task : Will brainstorm all aspects of my topic. Work Breakdown Structure would be helpful.
Research Project Clarifying Forum
© SACE Board of South Australia 2011
Page 2 of 29
WORK BREAKDOWN STRUCTURE
Source & rebuild
vintage moped
1
Research parts
needed 2.0
Source moped
1.0
Internet search – diff
manufacturers
Dismantle/source
parts 3.0
Purchase online manual
2.0.1
1.0.1
Investigate parts
availability
Research manual specifications
1.0.2
2.0.2
Decide on type of moped
to buy
1.0.3
Advertise online/local
newspapers
1.0.4
Purchase & transport
home
1.0.5
Register and Ride
5.0
Rebuild
4.0
Dismantle. Take
photographs of all
parts 3.0.1
Engine
4.01
Test drive/ make
adjustments
5.0.1
3.0.2
Clean components
4.01.1
Reg requirements
5.0.2
Legal requirements –
rebuilding mopeds
Local Yamaha
motorcycle dealers
Replace damaged
4.01.2
Inspection
2.0.3
3.0.3
Assess current state of
Source painting and
polishing 3.0.4
Resurface
4.01.3
Pay registration
moped
2.0.4
Draw up list of parts
needed
2.0.4
Parts dealers online
Motor trimmers
Framework
3.0.5
4.0.2
Research tyres
2.0.5
3.0.6
Strip
4.0.2.1
Trade Study
Compare prices etc
Repaint/polish
4.0.2.2
3.0.7
Wheels.tyres
4.0.3
3.0.9
Seat
4.0.4
Ignition switch/wiring
4.0.5
Research Project Clarifying Forum
© SACE Board of South Australia 2011
5.0.4
Hit the road
5.0.5
Prepare budget
3.0.8
5.0.3
Page 3 of 29
Research Project Clarifying Forum
© SACE Board of South Australia 2011
Page 4 of 29
1.0 Sourcing moped
Factors in decision of which type of bike/moped to buy
• Price of unit ( don’t want to spend more than $200)
• Proximity – needs to be close to Adelaide, so I can inspect, pick up /or delivery costs not too much
• Parts need to be readily available and affordable
1.01
Internet Search of different manufacturers of bikes/mopeds
Research Processes • Internet search (Google) on mopeds
• talked to people I know.–Advice - stay clear of vehicles build in China due to poor build quality with
metal imperfections which lead to breakages
• cheap-mopeds.com – advised “noped” type as cheapest available on Ebay. Suzuki FA50, Yamaha
QT50, Honda Express – because they are big brands (See quote below)
DEFINITION : Nopeds - Are a clever combination of moped and scooter. They usually have a minimal chassis design and
larger wheels like a moped, with a modern enclosed engine/transmission that moves in unit with the rear suspension like a
scooter. Nopeds have no pedals so hills and acceleration can be a problem, but as we're talking about cheap mopeds, they are
often the cheapest mopeds available on eBay. The models to look for are the Suzuki FA50, and Yamaha QT50, or the Honda
Express and particularly the Honda Urban Express 50's are cool, and comfortable. Their big brands mean parts are easy to get
new from the dealers or second hand from a bike wrecker. If cheap mopeds are what you're looking for then nopeds in my
experience are the models to go for. http://www.cheap-mopeds.com/
This looks like
the best way
to go – these
models and
parts will fit
into my
budget and
meet my
criteria for
affordability
and parts
availability
1.01.1Research – availability and affordability of Suzuki FA50, Yamaha QT50, Honda Express
•
•
put ad on local website http://adelaide.gumtree.com.au for a 1979 Yamaha QT50
looked at ads on ebay for the ones recommended by cheap-mopeds.com
Honda NC50
1 bikes available
Yamaha QT50
2 bikes available
Honda Express
Very rare
705 parts available internationally
498 parts available internationally
Limited parts available
Discarded Honda Express as too expensive and rare
1.0.2 Continue to Investigate parts availability to narrow search
WIKIPEDIA re the Yamaha QT50 http://en.wikipedia.org/wiki/Yamaha_QT50
Research Project Clarifying Forum
© SACE Board of South Australia 2011
Page 5 of 29
1.0.3
After
assessing
all
information,
Yamaha
QT50
seems like
the best
option.
Its simple, maintenance-free shaft-drive contained in the
single-sided swingarm eliminates chain maintenance, safety and wear concerns as well as weather wear factors
and contributes to the durability and ease of use of these tiny motorbikes. The drive unit also incorporates a
traditional centrifugal clutch but only a single speed gearing, unlike most mopeds which have two speeds. The
simplified driveshaft setup makes wheel changes easy.
Most of the parts for the QT50 are still available from Yamaha dealers. New and used parts are often found on eBay as well.
1.05 Purchase/ transport home
26/4/10 – Recvd call – purchased Yamaha QT50 for $50. Body is in poor condition – requiring full restoration.
Engine OK, as the motor turns over. Perfect.
TOPIC: REFINEMENT: How to rebuild a 1979 Yamaha QT50 to vintage specifications!
Moped I purchased.
2.0 Research Parts Needed (for 1979 Yamaha QT50)
2.0.1, 2.0.2, 2.03, 2.04 Purchase service manual, research specifications, assess moped, list parts needed
Purchased Yamaha QT50 manual from eBay (cost $25) – will be guide to removing and rep\fitting parts and
components
• after studying service manual and analysing my moped, my first thoughts are that will need the following
parts that are broken or need to be replaced:
o Gasket kit
o Tyres by 2 sizes 225 14
o Seat cover
Research Project Clarifying Forum
© SACE Board of South Australia 2011
Page 6 of 29
o
o
o
o
o
o
o
o
o
Brake light lens
Yamaha sticker set
Tubes for tyres
Handle bar grips
Ignition barrel and key set up
Battery part no 6n4 2na
Brake cables
Throttle cables
Speedo cables
Research Process
–book based
research, e.g.
studying service
manual
- observation of
moped.
2.0.5 Therefore have made up budget – to see if manageable (within my budget –)
Item
Estimate in $
Actual Purchase Price in $
Moped
150
50
Service and repair manual
20
25
Paint frame
200
250
Tyres
100
83 delivered
Handle bar grips
40
20
Re-chrome components
100
90
Workshop consumables
50
Spray cans for painting
40
40
Polishing compound
30
20
Engine gaskets
40
27
Stickers
30
65
Re-trim seat
50
50
Cables (new)
200
185
Ignition switch
50
70
Battery
50
32
Tail light lenses
20
20
Tyres/tube removed/fitted
30
Registration
150
92
TOTAL
Research- Parts
a) parts available locally
• 29/4 Email to Yamaha Pitmans – no luck, gave me a mobile number to call
• 7/5 Called – no answer (tried again one month later – number disconnected)
• Ring Scooter World – none locally. Suggested online (eBay)
Research
Processes:
a) Web-based
– eBay
Online stores
Experts
b)
Consultation
with local
experts
b) Research – eBay
c) Research – web-based (Robert Livesay’s website http://www.helium.com/items/507127-how-to-restore-amotorcycle)
Complete, motorcycle restoration almost always requires a complete disassembly down to the frame, a thorough cleaning,
rebuilding or replacement of parts, re-chroming, professional body work and painting. Poor paintwork on motorcycle body
parts, especially the tank, can ruin an otherwise outstanding restoration project. It also requires re-lacing of spoke wheels, new
seat foam and cover, engine overhaul/rebuild, and electrical system upgrades.
The first step is to haul the motor off to an engine shop that specializes in completely rebuilding your type of motor.
Restoration includes not only the parts that can be seen; the frame, trim, chrome, wheels, speedometer and tachometer, but also
the engine, brake, cooling, and fluid systems The three essential ingredients in any bike restoration project are an engine, a
frame and a manufacturer's parts book. If your budget doesn't allow for this, go round your area and ask the mechanics at the
larger Japanese motorcycle dealers if they know a specialist restoration mechanic in your area
The nature of motorcycle restoration is that there are always surprises and usually those surprises require more time and work
and not less. Even though it requires a lot of time and quite a bit of money .
Research Project Clarifying Forum
© SACE Board of South Australia 2011
Page 7 of 29
Rebuilding sequence according to this short but good article :
1. Dismantle
2. Clean
3. Rebuild or replace parts
4. Re-chrome
5. Professional body work and painting ( I hope to do this myself to save money)Parts book
Be prepared for surprises!!!
Useful article: outlining areas to complete a restoration on motorcycle. It suggests the need
to pay particular attention to professional painting, new seat cover and engine overhaul.
Also how important it is to have a manual. Luckily I had already thought of that from
previous experiences.
Studying the manual to carefully dismantle the moped. Note- wearing safety glasses, covered in shoes
and well covered clothes (Service manual suggested this was necessary)
Research Project Clarifying Forum
© SACE Board of South Australia 2011
Page 8 of 29
Some pieces of the moped after dismantling (also shows some of the parts that needed to be repainted
by a professional).
I have decided to clean in stages; as I dismantle and rebuild each section
4.0 Rebuild
4.0.1 WORKING ON THE ENGINE
Original state of the engine
After consultation with WH about some things to particularly look out for when dismantling and rebuilding the
engine
• I learned that I would need to use a high pressure wash machine to clean and remove the oil (luckily we
already have one of these and I have used it before).
• pull apart required components and inspect for damage.
• Measure engine tolerances.
• Sandblast cylinder head.
• Purchase new sparkplug port
Research Project Clarifying Forum
© SACE Board of South Australia 2011
Page 9 of 29
ETHICAL ISSUES:
Before dismantling the engine I knew that there would be some oil to drain and dispose of. I looked in the Yellow
Pages and found a company that will pick up waste oil free of charge as they will reuse it.!!! (Mulhern Waste
Company) Great news! They suggested putting it in a large strong plastic bucket. I was really pleased.
18/6/10 I viewed YouTube video – rebuild a moped
http://www.youtube.com/watch?v=yIt1rjcqQ1g
This was helpful to me because I gained knowledge about:
• how to inspect engine components
• clean and remove gaskets
• where parts could be purchased (although this was in the USA, it did give me some ideas about the sort of
places I might look in Australia)
• reassembly, modifications, maintenance areas that will help in the future (e.g. things that can go wrong
over time)
• how to remove carbon buildup with solvents – kerosene, steel brushes, white spirits, sandpaper, steel wool
• spark plug cleaning with petrol – this sounds a bit unsafe to me!
Using information from this YouTube clip and the service manual, I pulled apart the engine cylinder components
and inspected for damage.
PROBLEM: While dismantling the cylinder I discovered an oil leak which I investigated. I was determined source
of oil leak. Decided new gaskets needed, so did my research online:
SOLUTION: Discovered great site for parts: www.bikebandit online. Ordered gasket parts.
PROBLEM - I realised there is a flat rate of US$110 for postage which was more than the parts.
SOLUTION. Research other options for gaskets. Online searching. MotorcycleRecyclers.com.au. Found a full kit
for a Yamaha PW50 which looked like my engine, so I sent an email to ask if this was the same as the QT50 kit.
Parts were ordered and I was very happy with the outcome.
Gasket kit arrived. I test fitted components.
Called WH and he told me that the important things to consider when replacing the gaskets were:
• check piston rings for scoring
• hone cylinder bore using a hone with fine stones. Hone no more than required to remove wear marks
• apply kerosene and clean all components properly as metal dust will damage engine
Research Project Clarifying Forum
© SACE Board of South Australia 2011
Page 10 of 29
Cylinder head –
As you can see, the engine components of the cylinder head were rusted and had corrosion.
I followed instructions from the Service Manual, e.g. to remove warpage, have to resurface by rubbing on 400 grit
sandpaper using a figure 8 sanding pattern.
I thought about purchasing a new cylinder head as these are really important parts but decided to persist. WH was
very helpful again in a short phone call. He suggested that the parts be sandblasted, acid cleaned, sanded and
polished. Components were painted in Kill Rust to prevent further damage.
Reflection
Getting great deal of knowledge about engines. Did not have much experience in pulling apart an engine. Worried
about forgetting how to reassemble the motor – so used the photographs in the service manual. The engine
condition was overall very clean. Having never seen it work/run it was a big unknown. All measurements of engine
parts were taken using the Vernier Calipers as the service manual suggested and they were within tolerance by the
manufacturers, which meant I could reuse them.
Measurements of the piston and the cylinder bore were taken as seen below:
Test Results of measurement - Piston Size = 40.20 mm Wear Limit = 40.10mm
Outcome: Piston is OK to reuse
Test Results of measurement – Cylinder bore size = 40.30mm. Wear Limit=40.50mm
Outcome: Cylinder bore is OK to reuse
This was a very time consuming process but worth it in the long run.
I continued replacing all the gaskets and completed maintenance cleaning as recommended in the service manual
which was a fantastic reference for this exercise. When I had trouble reassembling any part of the engine I simply
followed the step by step guide for fitment and tensioning requirements.
Research Project Clarifying Forum
© SACE Board of South Australia 2011
Page 11 of 29
Using the manual
Measuring the piston with the Vernier Calipers.
Process for Rear driveshaft –Luckily there was no damage here when I took it apart. It was just dry, dirty, and
required cleaning. The service manual said to grease it every two years using a lithium based grease. I followed
the diagram in the service manual to position grease for reassembly. All parts of the rear driveshaft were regreased, cleaned and painted. Weren’t any drama’s here.
Engine was then reassembled using the Service Manual as my guide.
New Skills learnt during the dismantling and rebuilding of the engine– :
• How to pull apart engines
• How to measure engine components for proper function
• Importance of taking photos during disassembly
• Checking head for warpage using surface plate
• Honing cylinder bore techniques to remove wear marks
• Cleaning techniques for rear drive axle
• How to check rear drive axle for run out
• Applying grease to moving parts
• Engine maintenance
• Tension requirements for reassembly
Skills and
Knowledge
gained and
applied
ENGINE IS COMPLETED – It looks fantastic!
Research Project Clarifying Forum
© SACE Board of South Australia 2011
Page 12 of 29
Response to Challenge – change of direction
I originally set out to rebuild moped using original components. Due to research findings project is becoming too
expensive. E.g. genuine scooter seat cover $64 US, whereas replica (called an aftermarket copy) is $24.90.
Is a pity, I feel really let down, but I don’t think the average person would know the difference. Have decided I will
only buy the original if no other option, e.g. no other parts available.
REFINEMENT OF TOPIC: Rebuild a Yamaha QT50, only using genuine parts if no other parts
are available
4.0.2 FRAMEWORK –
To do list
-
completely strip all components
load parts into car that require painting, ring pro-finish custom painting and organize time for
quotation
polish forks and handle bars
order Yamaha emblems
When pulling apart moped framework– some parts were rusted and seized together.
Had phone conversation with W H – advised an anti seize lubricant which releases rusted threads. I used this and
was able to loosen and remove the rust so that I could dismantle this part of the bodywork without damaging it.
Research Project Clarifying Forum
© SACE Board of South Australia 2011
Page 13 of 29
After dismantling this part of the moped here is the list of parts that need repainting and re-chroming :
- frame
- plastic components
Research Processes –
- foot rests
observation and analysis of
- headlight surround
information
- number plate bracket
- rims
- rear basket
- front basket
- engine components, cylinder head, engine side covers
- rear drive shaft and hub set up
Some of the parts and components that need repainting and re-chroming
PROBLEM: think the moped’s paint condition is too damaged for me to do a good job. It’s rusty, faded, flaking off in
places. Needs an expert to do job or will look very amateurish. Advice from WH – put me on to another
professional (Pro-Finish custom painting)
Contacted Pro-Finish - Got quote ($250).
Will compare with another quote - Contacted tradesperson I knew from school, visited workshop – his quote came
in at $700. This person insisted the components had to be dipped in acid first, to prevent rust, which made it more
expensive – probably worth it, but just too pricey for me.
Another painting problem, mudguards and brackets. Plastic was sun damaged and metal rusted. I cleaned this was
kerosene as the YouTube clip said, but after first coat of paint, some sort of reaction had occurred. Consulted WH (explained -Due to cleaning with kerosene – the paint reacted to the oil in the kerosene base product). Suggested
to re-sand mudguard, clean with thinners and repaint.
Followed this advice and it worked without a paint reaction.
NOTE – will not clean the rear mudguard with kerosene!!!
Research Paint colour
(Google search) to discover the name of the original paint colour: Majolica Blue
http://www.jacksscootershop.com/Yamaha_VIN.html
Research Processes –
trial and error
-consultation with
experts
-observation
-web-based
-consultation with
experts
-testing
-sourcing and
comparing quotes
Research – observation, action research.
The tradesperson from Pro-Finish- allowed me to enter his workshop and showed me through stages of preparing
the frame for painting. He said it would get a much better finish due to the rust eating into the metal if I used a bare
metal preparation. This involved removing all the original paint.
Research Project Clarifying Forum
© SACE Board of South Australia 2011
Page 14 of 29
Consumed many hours of time – using different methods. Learnt many new skills from taking part:
• use sand paper ( e.g. 320 grit sandpaper) or a power sander, or a sandblaster
• clean the entire surface using a grease and wax remover
• Best not to use paint thinner or mineral spirits as can leave a residue
• Wipe surface dry with a tack cloth
• Also have to be careful to drag the cloth across the surface and not rub or you will get bits of the tack cloth
stuck on the surface.
• And even though it added $250 to cost I think it was worth it as can be seen in the photo below.
Luckily I didn’t have to cut away any parts that were so damaged or rusted and patch them up with 18 to 22 gauge
metal, which would have needed a cutting and welding torch. I have never used one of those, although I would like
to learn.
This cleaning really took the most time. Imagine how long it would take if you were doing a car!!!!
Then we had to prime the surface using even strokes to apply a urethane primer. This is then sanded down to even
it out using a method called “blocking” – use a 400 grit sandpaper around a rigid block. He used two coats of paint
which took 90 minutes each to dry, followed by three coats of paint that each took 15 minutes to dry.
Seems like the best $250 spent – the paint job was so professional with no imperfections.
According to WH and the manual, with Rebuilding – one of main activities is test fitting the components – to make
sure they fit.
RUSTY PARTS NEEDING RE-CHROMING:
1. Research in Phone book in Yellow pages
2. Load all parts in car
3. Visit business and obtain quotes
4. Compare prices for quality v cost
5. book in job
6. pick up parts
Comparison of quotes for re-chroming:
Windsor Electroplaters
Quote = $70 for front headlight surround
$90 for rear basket including polishing
Wait time = 3 weeks
TOTAL = $160
Winner = Klemzig Platers
Klemzig Platers
Quote = $45 for front headlight surround
$45 for rear basket including polishing
Wait time = 2 weeks
TOTAL = $90
After visiting both businesses - also learned that I cant chrome the wheels unless they are completely pulled apart.
This is a task that will risk further damage to the wheels due to their rusted components. Recommended to paint
and polish the wheels. Will need to have old tyres professionally removed and buy new tyres I think, otherwise I will
risk damaging the rims.
Research Project Clarifying Forum
© SACE Board of South Australia 2011
Page 15 of 29
4.0.3 WHEELS AND TYRES – Things to do:
• Investigate legal requirements re tyre specifications for these bikes in SA
• Research in phone book for local motor cycle tyre shops
• Get tyres stripped from rims
• Get advice from WH re polishing techniques for chrome rims
• Do paint and polish of rims
Legal Requirements: Quote From Transport SA website –
Motorcycle tyres which are marked ‘not for highway use’ or have a marking meaning the same, must not be fitted
to motorcycles used on public roads. It is recommended that only tyres of the size and speed rating specified by
the motorcycle manufacturer are fitted to the motorbike.
Tyre specifications from QT50 Service Manual:
• Front 225 14” (Yokahama brand)
• Rear 225 14”
PROBLEM – After checking out shops in Adelaide NO tyres available in SA for my moped! Very frustrating. One
old man with his own motorcycle business gave me a list of every contact he knows that deals in tyres - no one
had them due to the vintage age of the moped.
Will have to research on line again! Was quite difficult to find but did so eventually at a reasonable cost from Tiaro
Motorcycle wreckers (in Qld) - $83 delivered)
Delivered the wheels to Total Motorcycles to have the old tyres removed. Also ordered two new tubes as old tubes
were damaged due to age.
THE RIMS
Need to gather knowledge about how to restore my very rusty old rims to the original. Will interview WH
Research Processes –
Interview with expert
Interview with WH
Re Rust removal, painting and polishing techniques for wheels and rims
Most important – is
preparation, preparation
preparation
1) Where do you recommend to start when faced with such poor condition rims?
Lightly remove all heavy rust with coarse sandpaper, also using wire brush. Gradually change to less coarse
sandpaper to remove scratches, then finish with steel wool. Do not concentrate on one area – constantly move
around rim.
2) What products do I need to purchase to aid with cleaning rims and dust removal?
Steel wool, 100 grade sandpaper, 800 grade sandpaper, water (bucket), scourer, wire brush, thinner solvent,
For paint use Kill Rust spray paint as this prevents rust from coming back
3) Any tips regarding painting for a beginner?
Preparation is important. Make sure all oils and dust has been cleaned with thinners solvent. Purchase Kill
Rust spray cans and shake well before use. Wear a mask for breathing and lay down paper on the ground to
avoid painting the ground.
4) Further comments you would like to add?
Paint components on warm day as end result will improve with heat.
Preparation – the more effort you put in, determines whether it is a quality or poor finish. When rims are
painted (make sure they are dry) - use steel wool to bring out the chrome finish in the rims.
Research Project Clarifying Forum
© SACE Board of South Australia 2011
Page 16 of 29
The rims – before and after! *Followed WH’s process on this. Even though they are 30 years old they look amazing
– restored and new!
Next step – was restoring the throttle.
Was a bit rusty and tarnished.
I didn’t know anything about polishing – skills. I used the knowledge I got from doing the wheels. Again WH was
really helpful in giving me expert advice on this. This is the process I followed:
• Light sandpaper all over the parts
• Wash with kerosene
• When dry, use a product called ‘Autosol’ to rub down the throttle and its parts
Looked up how to polish metal using ‘Autosol’ on YouTube http://www.youtube.com/watch?v=rvY2SBIFewg (The
Polish Guy,2008)- very helpful
These are the important tips from that video:
• Wear Nitro gloves
• Squeeze a bit out of the tube and rub into surface with finger tip of your glove.
• Can use micro fibre cloth but is more wasteful
• Rub the ‘Autosol’ onto the surface and when complete leave for a few moments.
• Then take a microfiber cloth and start to rub it off
• Then buff with a microfiber cloth
I used a microfiber cloth and it worked really well as didn’t have Nitro gloves. The throttle came up like new!
Even though it was time consuming it worked well. The only other option I could have used was to pay a
professional. But this would have been too expensive and as it was I learnt more new skills and gained knowledge I
didn’t have before.
PROBLEM : MORE BROKEN PARTS
- as rebuilding the front hub parts realized that more ports were broken – e.g. Speedo gear,
Speedo cable, rusted/seized front brake cable.
- Frustrating as many damaged components were overlooked at the beginning but when
focusing on rebuilding a particular area this becomes apparent.
- Then I need to investigate parts online to solve the latest issue
- Research on eBay for these cables
Tail light lens – replacement purchased on eBay
Research Project Clarifying Forum
© SACE Board of South Australia 2011
Page 17 of 29
4.0.4 SEAT RESTORATION
Photograph of my seat.
Needed to find a seat cover and a motor trimmer to fit it.
Purchased a replica seat on eBay (1/3 the price of an original).
Still need to find someone to refit it.
Google search for Motor Trimmers – turned up 7 businesses. I telephoned the first three. Only one who was able
to do the work quoted $90 minimum. Decided to visit one of the businesses close to home only to find out that
business had moved. As I was leaving the industrial area I noticed a furniture upholstery business and decided to
drop in and see if they would refit the new cover.
Learnt the value of getting more than one quote! This upholstery business (Massoud Upholstery) quoted me $50
for the refit, so I saved myself $40. Even though the owner instructed me on how to remove the old seat cover by
removing the staples, I thought it was worth getting it done professionally.
Research Project Clarifying Forum
© SACE Board of South Australia 2011
Page 18 of 29
4.0.5 IGNITION SWITCH/WIRING
Research Project Clarifying Forum
© SACE Board of South Australia 2011
Page 19 of 29
Attempt to start the moped
Research Project Clarifying Forum
© SACE Board of South Australia 2011
Page 20 of 29
PROBLEM – NO Spark
- had followed all steps in service manual of how to start and test components for function.
- First attempt to start – showed nothing
-Concern – have no experience in electronics and diagnosing this problem was going to be trial and error, based
on other people’s experience in forum
GOOGLE SEARCH FOR ‘SOLUTION TO NO SPARK’
Showing results for yamaha QT 50 no spark. Search instead for yamata QT 50 no spark
Search Results
1.
Moped Army - yamaha QT50 no spark
14 Jul 2008 ... Just bought a 1982 QT50. No spark, Replaced the plug still nothing. Replaced spark coil and boot.
Still would not fire. ...
www.mopedarmy.com/forums/discuss/6/135744/135744/ LOTS of Yamaha QT50 QT60 Performance Parts, JEMCO! - 17 Jan 2010
Help! Yamaha QT50 - 18mph max & Slow off the m - 24 Oct 2009
1980 Yamaha QT50 - 25 May 2005
More results from mopedarmy.com »
2.
Yamaha QT50 - Wikipedia, the free Encyclopedia
The Yamahopper is not really a scooter, as the QT50 has no fairing, sports footpegs ... ignition supplies a stronger
than normal spark for initial starting , ...
en.wikipedia.org/wiki/Yamaha_QT50 3.
Motorcycle Questions - I have a Yamaha QT50, I cant get a spark to ...
17 Aug 2008 ... I have a Yamaha QT50, I can't get a spark to the plug. ... I have checked the plug gap .24 to .28 on
a new plug. no spark. checked the cdi ...
www.justanswer.com/.../1d5hc-yamaha-qt50-can-t-spark-plug.html -
Re: yamaha QT50 no spark
•
•
•
Research Processes:
Web –based research
Checking online forums
Author: peterg (---.ri.ri.cox.net)
Verified User: peterg
Date Posted: 07-14-08 23:16
check/clean all connections, one at a time so you don’t mix them up. I seem to remember
something about grounding, also…
-
discovered from research forums that it was likely that electrical components were missing.
Followed advice to check/clean all connections one at a time. Found one plug not connected
properlyChecked the wiring diagram with the ----- and confirmed likelihood of missing
components but still not confident
bwdbrn1
Registered-II
Join Date: Mar 2010
Location: Rock Island, Illinois
Posts: 97
Thanks: 5
Thanked 40 Times in 32 Posts
Yamaha moped electrics
I've tried other forums, so I'll try this one too. I picked up a little 50cc Yamaha QT50 moped. It's a
very clean little machine, and doesn't look to have been abused, but I can't get spark to the plug.
It's got a 6v system. I've put in a new battery as the old one was toast. New rectifier, as the original
was missing completely, and a new fuse and fuse holder as they were missing too. I used a spade
type fuse, and it calls for a 10amp.
Somewhere along the line, somebody before me evidently replaced the charging coil. The stator
tested O.K. on a multimeter on the bench, but the ignition coil tested bad. Installed a new ignition
Research Project Clarifying Forum
© SACE Board of South Australia 2011
Page 21 of 29
coil, but I'm still not getting spark. I can let the coil dangle from the input lead, and I get a flash on
a circuit tester out at the plug end, but not with a spark plug, and as soon as I attach the coil to the
bike, I don't get anything.
So, question is where do I begin to start checking now.
bwdbrn1
Registered-II
Join Date: Mar 2010
Location: Rock Island, Illinois
Posts: 97
Thanks: 5
Thanked 40 Times in 32 Posts
Re: Yamaha moped electrics
Turned out to be the charging coil. Put a new one in and it started after three kicks. It's got other
issues that need to be looked into, leaky case seal, can't get the mixture right, and it's becoming
one of those man vs. machine things now, but it runs, and that's a good thing.
http://www.smokstak.com/forum/showthread.php?t=79909
- Learnt new skills - ability to make up two wires and joining them together – result – complete electrical circuit that
created spark
Research Project Clarifying Forum
© SACE Board of South Australia 2011
Page 22 of 29
I
Research Project Clarifying Forum
© SACE Board of South Australia 2011
Page 23 of 29
I used this and a book from Dick Smith that I bought called Basic Electronics and learnt how to:
Research Project Clarifying Forum
© SACE Board of South Australia 2011
Page 24 of 29
•
•
read wiring diagram
All wiring has a colour code and needs to be matched
•
Need to have earth connected to ground
•
How to test for electricity
•
How to diagnose a problem
•
Soldering wires
I didn’t know any of this or have any of these skills before!!!!!
Research
Processes:
Web=based
Looking on
YouTube for
information to solve
the electrical
problem
Managed to get engine to run for 5-10 seconds before cutting out!!!!!! So this problem is still not solved.
Further research is required.
Found a YouTube where a guy was having a similar problem to me and there was a lot of helpful comments under
the YouTube
http://www.youtube.com/watch?v=NX4rRTh5fFY See below !
•
this guy is right, i have owned a couple of those exact mopeds and the problem with mine was the fuel filter was
clogged.
cjmotorsified 11 months ago
•
FUEL!!!!! If it starts for a few seconds then cuts out it's fuel! NOT ENOUGH FUEL!!! Did you check the in tank fuel
filters? They are in the tank attached to the top of the petcock. They're just little screens. Blow them out and soak the
petcock in high octane gas. They get corroded BAD! I just popped both of them off the petcock and installed an inline
filter from a riding mower, I suggest you do the same. The low bog sound is lean, a high pitch or a every other time
fireing is too rich.
galactophore 1 year ago
Followed advice from this - realized one area I had overlooked while rebuilding was the fuel tank. It was full of
rust/dirt and was blocking the fuel filter. Cleaned the filter and moped runs properly.
5.0 Register and Ride
5.0.1 TEST DRIVE
It’s alive, throughout the test ride the moped felt good. Engine operated smoothly without a misfire. I got a lot of
attention from pedestrians and motorists. After test ride performed a full spanner check (as per tension
requirements in service manual).
5.0.2. REGISTRATION
Phone call to Transport SA – re how to get it registered:
• Discovered that needed previous owner’s name.
• Research to solve this problem -Looking at photos on a Yamaha QT50 webpage came across photos of
my moped put on line by previous owner!!!!! How lucky!!!
• able to contact him and got necessary details.
• Got it registered!
Fully able to ride it legally! What a rush!
NEW IDEA for Research Outcome
All through the project it has been very time consuming to get information. I have come up with
the idea for my outcome to be a Google Site. It will have a main page of advice for people who
want to restore a moped. Then I will put all the photos and specific details from this folio into
other pages that can be accessed from the main page. This would have been really helpful to
me and hopefully will be great for others.
Research Project Clarifying Forum
© SACE Board of South Australia 2011
Page 25 of 29
Research Project Clarifying Forum
© SACE Board of South Australia 2011
Page 26 of 29
ASSESSMENT TYPE 1: The Folio
PART C: The Discussion
The formal discussion took place near the end of the research project. We were given a list of questions and I
prepared some answers. After the discussion I added some reflections on what I said and the feedback I got in the
discussion.
How have you refined your research topic, if at all?
It was pretty specific to start with, e.g. rebuilding a Yamaha QT50 to vintage specifications. The demands of cost
and time have meant that I have had to refine this just to rebuilding a Yamaha QT50.
Reflection: In a way this topic is more general and less specific than it was to start with but it is just necessary
How effective and manageable are the research processes that you originally planned?
1. Work Breakdown Structure and Gantt chart -incredibly detailed and covered everything could think of at the
time.
2. The sequence and the time allocation turned out differently.
3. I found that some things took longer than others and that I actually often had a number of processes on the
go at the same time, while I was waiting for parts to arrive, or while I was waiting for the parts to be painted,
I needed to be going on with something else, so I started another part of the rebuilding. If I hadn’t done this,
then I would be way behind time.
4. I had originally planned to repaint the bodywork myself. After a bit of research into the process of doing this
to the professional standards was hoping to achieve (through consulting an expert on body work, and
reading this up on Forums, and a bit of experimentation), realized that I couldn’t do it to the standard I
wanted, so I then had to do more research, like a trade study to get quotes from paint places to do it for
me. So that meant I didn’t get to personally undertake that research process of implementing the
techniques I’d found out about. Even thought it ate into my budget it was worth it in the end.
5. Also, while it was dismantling moped I realized that there were some things I would have to do that I had
not planned for originally. I didn’t realize, for example that the rust would be so severe it was too difficult to
get the parts apart without damaging them, so I had to research how to do this.
6. Also sometimes I discovered that more parts needed repairing than I had planned – such as when I was
rebuilding the front hub I realized that there was a broken Speedo gear, broken Speedo cable and
rusted/seized front brake and cable. SO needed to purchase those parts
7. I didn’t anticipate everything in my original plan or all the research processes.
How are you showing consideration of safe and ethical research processes?
1. I have learned a lot mostly about OHSW and safe work practices when doing trial and error, observation
and experimentation research processes. Have learned and have followed practices recommended by WH,
the expert vehicle restorer, to wear covered shoes, long sleeved trousers, shirts, safety glasses, gloves
(with some coverings)
2. This research has also meant I take care of my safety while undertaking this practical research
Are the research processes producing the information required to investigate the research topic?
Yes –Yamaha QT50 service manual – this is absolutely essential. Don’t know what I would do without it. Has such
detailed drawings and step by step instructions, normally for a mechanic servicing a moped, but they are gold me –
even though I don’t have all the technical knowledge of a specialist bike mechanic.
WH was really helpful with information on techniques and skills for restoring, even though he is a motor vehicle
restorer and has never done a moped. His knowledge is able to be applied to my research on mopeds.
Online research processes have on the whole been the most successful processes I have used to locate the
information I needed:
•
YouTube and Online Forums – really helpful, particularly as there doesn’t seem to be any books published
about mopeds, so have to rely on experts (some of them ordinary people like me who just have a bit of a
hobby) and enthusiasts. But it is amazing how other people have had similar problems to me – like the fuel
problem, and just like me they have worked out a solution by trail and error!
•
eBay research for parts
Trial and error – e.g. used kerosene to clean the sun damage and rust off the paint of mudguard +brackets. After
the first coat of paint- reaction occurred. Expert Phil Hoffman said the oil in the oil based kerosene reacted with
paint’, so told me to re-sand it, clean with thinners and repaint. Did this and worked and followed this process with
the other mudguard and worked well.
Research Project Clarifying Forum
© SACE Board of South Australia 2011
Page 27 of 29
What important ideas and findings emerging from the research so far, and how they have developed
directly or indirectly from the research processes?
Necessity for a manual when rebuilding a moped (from Robert Livesay’s website)
What skills and knowledge specific to your topic have you been developing? Which of these are new and
which already existed?
- had some skills from apprenticeship e.g. skills in precision work in putting metal parts together, checking the
accuracy of finished parts. I was comfortable with machinery – but these had not been applied before in the area of
motor vehicle engines, particularly moped engines. .
Many of the other skills I already had were not relevant e.g. using the designing tools such as CAD and CNC
machines, robotics.
Probably already had problem solving skills that have needed and developed further in this research project. in
Job Descriptions
Didn’t have any knowledge or skills about moped or motor vehicle engines. Skills specific to this topic that I have
developed, either through observation, advice from experts (realtime or online), trial and error, studying the service
manual:
• Disassembling an engine
• Measuring engine components for proper function using Vernier Clips
• Honing the cylinder bore to remove wear marks using a hone with fine stones
• Checking head for warpage using surface plate
• Cleaning techniques for rear axle drive
• Applying grease to moving parts
• Tension requirements of engine parts
• Polishing metal components
• Preparation of metal for painting
• Soldering wires
• How to test for electricity
What challenges have you faced and how have you overcome them?
-lack of local expert knowledge or availability of parts on vintage Yamaha mopeds in Adelaide.
-early research - really good model to buy because parts would be available locally.
- every step along the way - were no parts available locally in Adelaide.
- had to show lot more initiative look for alternative sources through research. Thank God for the internet. I found a
number of overseas and Australian sites who had the parts I needed, usually in vintage specifications. Everything
has in fact been purchased interstate or internationally. I couldn’t even get a globe for the moped as the one
required is an old style that is no longer used.
-having to my topic to just rebuild it, not necessarily to vintage specifications
What are your thoughts about your chosen capability, work?
Still most relevant – so many employability skills have been learned:
All the skills mentioned above:
Budgeting, OHSW practices, Talking to people I don’t know, working independently
Problem solving
My question at the discussion was about my new idea for my Outcome
I found that there was a real need for detailed accurate information about all stages of the restoring and rebuilding
process of the moped, ideally in one location, such as a website, or a link on a Forum – looking over individual
forum entries had been helpful for me to find information I needed. thinking about preparing the information for a
website bringing together all the things I had learned about the process for others. Teacher said it was a great
idea.
BIBLIOGRAPHY:
bikebandit.com. “Yamaha at Bikebandit.com”.Accessed numerous times throughout 2010.
http://www.bikebandit.com/
Diospeed Demon. Sept 14.2008. “1983 YAMAHA QT50/MJ50 TOWNY MOPED 2#”
Accessed 25/4/2010. http://www.youtube.com/watch?v=yIt1rjcqQ1g
Research Project Clarifying Forum
© SACE Board of South Australia 2011
Page 28 of 29
eBay. Accessed numerous times throughout 2010. <www.ebay.com>
Livesay, R. “How to restore a motorcycle” .Accessed 3/3/2010.
<http://www.helium.com/knowledge/88371-how-to-restore-a-motorcycle>
McKay, I. 2009. Cheap-Mopeds.com : Your Guide to finding Cheap Mopeds and Scooters on the
Internet. Accessed February 2010. <“http://www.cheap-mopeds.com/>
Moped Army. Forum. viewed numerous times throughout 2010. <http://mopedarmy.com>
SA Govt. Motor cycle legal requirements. Accessed Jan 2010 and June 2010.
<http://www.sa.gov.au/subject/Transport,+travel+and+motoring/Motoring/Motorcycling/Motorcycles/Ridin
g+a+moped>
Smith, Dick. 1998. Electronic Basics.
Smokstak, 2009. Forum. Accessed numerous times throughout 2010
<http://www.smokstak.com/forum/showthread.php?t=79909>
Taro Motor Cycle Wreckers. “New Old Stock. Genuine New Yamaha Parts”. Accessed 2/6/10.
<http://www.tiaromotorcyclewreckers.com/Nos%20Yamaha.htm>
Radical Harmony. July13, 2009. “QT50 Starting issues.” Accessed June, 2010.
<http://www.youtube.com/watch?v=NX4rRTh5fFY>
Yamaha. 1979. Yamaha QT50 Service/Repair Manual. Yamaha Corporation. Japan
Yuba Community College District. Codes of Practices for Mechanics. http://www.yccd.edu/Mechanics.pdf
- provides detailed advice on safe practices for mechanics, even though American based
Research Project Clarifying Forum
© SACE Board of South Australia 2011
Page 29 of 29