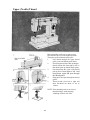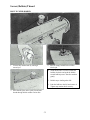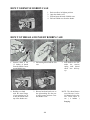
1
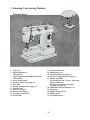
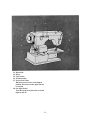
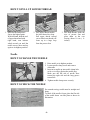
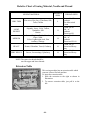
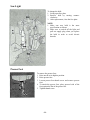
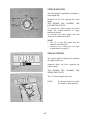
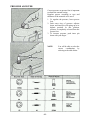
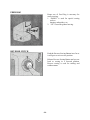
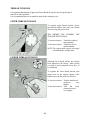
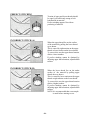
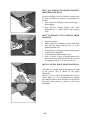
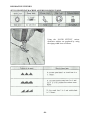
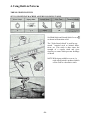
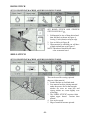
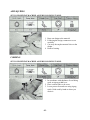
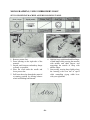
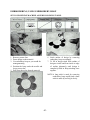
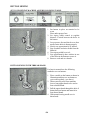
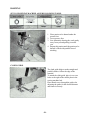
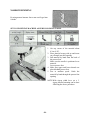
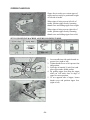
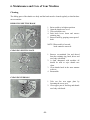
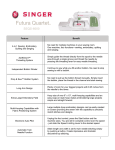
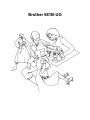
Brother 681B-UG
CAUTION
WHEN CHANGING NEEDLE, BOBBIN OR LIGHT BULB, OR
WHEN SEWING MACHINE IS NOT IN USE, IT IS
RECOMMENDED
THAT
ELECTRICAL
SUPPLY
IS
DISCONNECTED TO AVOID ELECTRICAL HAZARDS.
CONTENTS
1. Knowing Your Sewing
Machine . . . . . . . . . . . . . . . . . . . . . . .2
PRINCIPAL PARTS . . . . . . . . . . . . . . . . . . 2
ACCESSORIES . . . . . . . . . . . . . . . . . . . . . . 4
OPERATING YOUR SEWING
MACHINE . . . . . . . . . . . . . . . . . . . . . . . . . . 5
Connecting plug. . . . . . . . . . . . . . . . . 5
Controlling sewing speed. . . . . . . . . .5
UPPER (NEEDLE) THREAD. . . . . . . . . . . . 6
LOWER (BOBBIN) THREAD. . . . . . . . . . . 7
How to wind bobbin. . . . . . . . . . . . . 7
How to remove bobbin case . . . . . . . 8
How to thread and insert
bobbin case . . . . . . . . . . . . . . . . . . . . 8
How to pull up lower thread . . . . . . . 9
NEEDLE . . . . . . . . . . . . . . . . . . . . . . . . . . . . 9
How to change the needle . . . . . . . . . 9
How to check the needle . . . . . . . . . . 9
RELATIVE CHART OF SEWING
MATERIAL, NEEDLE AND THREAD. . . .10
EXTENSION TABLE . . . . . . . . . . . . . . . . . .10
SEW-LIGHT. . . . . . . . . . . . . . . . . . . . . . . . . 11
PRESSER FOOT . . . . . . . . . . . . . . . . . . . . . 11
VARIOUS CONTROLS . . . . . . . . . . . . . . . . 12
Stitch length . . . . . . . . . . . . . . . . . . . .12
Zigzag width . . . . . . . . . . . . . . . . . . . 12
Pressure adjuster . . . . . . . . . . . . . . . . 13
Feed dog . . . . . . . . . . . . . . . . . . . . . . 14
Reverse stitch . . . . . . . . . . . . . . . . . . 14
THREAD TENSIONS . . . . . . . . . . . . . . . . . 15
Upper thread tension. . . . . . . . . . . . . 15
Lower thread tension. . . . . . . . . . . . . 15
3. Zigzag Stitching . . . . . . . . . . . . . . .19
Simple zigzag stitch . . . . . . . . . . . . . . . . .19
Satin stitch . . . . . . . . . . . . . . . . . . . . . . . .19
Decorative stitches . . . . . . . . . . . . . . . . . 20
4. Using Built-in Patterns . . . . . . . . 21
Triple stretch stitch . . . . . . . . . . . . . . . . . 21
Blind stitch . . . . . . . . . . . . . . . . . . . . . . . 22
Shell stitch . . . . . . . . . . . . . . . . . . . . . . . 22
5. Various Other Stitches. . . . . . . . . 23
Buttonholes . . . . . . . . . . . . . . . . . . . . . . . 23
Mending . . . . . . . . . . . . . . . . . . . . . . . . . 24
Attaching lace . . . . . . . . . . . . . . . . . . . . . 24
Appliquéing . . . . . . . . . . . . . . . . . . . . . . .25
Cording. . . . . . . . . . . . . . . . . . . . . . . . . . 25
Monogramming . . . . . . . . . . . . . . . . . . . .26
Embroidering . . . . . . . . . . . . . . . . . . . . . 27
Button sewing . . . . . . . . . . . . . . . . . . . . . 28
Darning . . . . . . . . . . . . . . . . . . . . . . . . . . 29
Cloth guide . . . . . . . . . . . . . . . . . . . . . . . 29
Narrow Hemming . . . . . . . . . . . . . . . . . . 30
Zipper insertion . . . . . . . . . . . . . . . . . . . 31
6. Maintenance and Care of
Your Machine . . . . . . . . . . . . . . . . . 32
CLEANING . . . . . . . . . . . . . . . . . . . . . . 32
Removing shuttle hook . . . . . . . . . . . 32
Cleaning shuttle race . . . . . . . . . . . . . 33
Cleaning feed dog . . . . . . . . . . . . . . . 33
2. Straight Stitching . . . . . . . . . . . . . .17
OILING . . . . . . . . . . . . . . . . . . . . . . . . . . 33
CHECK LIST FOR BETTER SEWING . . .
. . . . . . . . . . . . . . . . . . . . . . . . . . . . . . . . . 34
How to start sewing. . . . . . . . . . . . . . . . . 17
How to change sewing direction. . . . . . . 17
How to finish your sewing
project . . . . . . . . . . . . . . . . . . . . . . . . . . . 18
How to remove final sewing
from machine . . . . . . . . . . . . . . . . . . . . . 18
How to guide and support material. . . . . 18
-1-
1. Knowing Your Sewing Machine
Principal Parts
1. Top Cover
2. Zigzag Width Lever
(See page 12)
3. Upper Thread Guide and Bobbin Winder
Tension Disc
4. Front Thread Guide
5. Pressure Adjuster (See page 13)
6. Face Plate
7. Thread Tension Dial (See page 15)
8. Thread Cutter
9. Presser Foot Screw
10. Presser Foot (Zigzag)
11. Feed Dog (See page 14)
12. Needle Plate
13.
14.
15.
16.
17.
18.
19.
20.
21.
22.
-2-
Needle Clamp Screw
Shuttle Race cover
Drop Feed Knob (See page 14)
Reverse Sewing Button (See page 14)
Stitch Length Dial
By turning this dial, you can control the
length of the stitch.
The higher the number, the longer
the stitch (See page 12)
Blind Stitch & Stretch Stitch Lever
Spool Pins
Bobbin Winder Device
Balance Wheel
Stop Motion Knob
23.
24.
25.
26.
27.
Motor Belt
Motor
3-pin Socket
Extension table
Presser Foot Lifter
When the presser foot is at the highest
position, the tension on the upper thread
is released.
28. Sew-light Switch
Turn this knob in any direction to switch
light on and off.
-3-
Accessories
1. Needles
Single Needle No.14 (3 pcs.)
2. Straight Stitch Foot
3. Narrow Hemmer foot
4. Zipper Foot
5. Buttonhole Foot
6. Button Sewing Foot
7. Seam Ripper
8. Bobbin (3 pcs.)
9. Cloth Guide with Screw
10. Screw Drivers (Large & Small)
11. Oiler
-4-
Operating Your Sewing Machine
CONNECTING PLUGS
1. First connect three-prong plug in socket.
2. Then connect electric supply plug into wall.
CAUTION
When changing needle, bobbin or light bulb,
or when sewing machine is not use, it is
recommended that electrical supply plug
is disconnected to avoid electrical hazards.
Place foot on control pedal as shown in
illustration at left.
When foot controller is pushed down lightly,
machine will run at a low speed.
When pressure on foot is increased, sewing
machine will pick up speed.
When foot controller is released the sewing
machine will stop.
NOTE: Care should be taken that nothing is
placed on foot controller when
sewing machine is not in use.
-5-
Upper (Needle) Thread
Before threading, make sure to raise presser
foot and take-up lever to the highest position.
Then place spool of thread on the spool.
1.
Pass thread through the upper thread
guide, (rear) and thread guide (front).
2.
Now bring thread down and up through
thread tension dial from right to left so
that thread picks up thread check spring.
3.
Pass thread into the eyelet of the thread
take-up lever from right to left. And
bring down again and pass through
the thread guard.
4.
5.
Bring down and pass through the thread
guides.
Thread needle from left to right and
draw the thread out about 15 cm (6
inches).
NOTE: If the threading order is not correct,
thread breakage, stitch skipping,
wrinkling of fabric will occur.
-6-
Lower (Bobbin) Thread
HOW TO WIND BOBBIN
1. Loosen stop motion knob by turning it
toward you.
2. Place an empty bobbin on the bobbin
winder pin.
4. Wind the thread a few times around the
bobbin clockwise and push the bobbin
toward bobbin presser. Start the machine
gently.
5. Bobbin stops winding when full.
6. Push the bobbin to the left and remove it.
Tighten stop motion knob securely.
3. Place thread spool on the spool pin and take
thread through bobbin winder tension disc.
-7-
HOW TO REMOVE BOBBIN CASE
1.
2.
3.
4.
Raise needle to its highest position.
Open the shuttle cover.
Pull and open the latch of bobbin case.
Pull out bobbin case from the shuttle.
HOW TO THREAD AND INSERT BOBBIN CASE
1. Unwind about 8 cm
(3- inches) of thread
from the bobbin. Insert
wound bobbin into
2. Pull trailing thread into the slot
case.
3. Pull thread to the left
under the tension
spring until thread
enters into delivery
eye.
4. Holding case latch
with the metal finger
of case pointing up, fit
it into the notch at the
top of the shuttle race.
5. Release latch and push case to
the right making sure the case
is in the proper position. Close
the Shuttle Cover.
NOTE: The thread drawn
out of the case is to be
left hanging below the
race. Leave about 15
cm ( 6 inches )
hanging.
-8-
HOW TO PULL UP LOWER THREAD
1. Raise needle and presser
foot to the highest point.
With left hand, hold the end
of upper thread and with
right hand, turn balance
wheel toward you until the
needle moves down and up
again to its highest position.
2. Now upper thread catches
the lower thread in a loop.
Pull upper thread toward
you so that lower thread will
come up in a large loop
from the presser foot.
3. Pull both threads under the
toes of presser foot and
place them to the rear
leaving about 10 cm ( 4inches).
Needle
HOW TO CHANGE THE NEEDLE
1. Raise needle to its highest position.
2. Loosen needle clamp screw and remove
old needle.
3. Insert new needle up into needle clamp hole
as far as it will go against the needle stop.
Make sure the flat side of needle faces
toward the right side and the long groove
toward left.
4. Tighten needle clamp screw securely.
HOW TO CHECK THE NEEDLE
For smooth sewing, needle must be straight and
sharp.
To check if the needle is bent, place the flat side
of the needle down on slide plate as shown in
illustration.
-9-
Relative Chart of Sewing Material, Needle and Thread
NEEDLES
SIZES
SEWING MATERIAL
VERY THIN
Fine tricot, Fine Lace, Thin linen, Silk,
Tulle, Chiffon
9
LIGHT
WEIGHT
Organdy, Jersey, Voile, Taffeta,
Synthetics, Silk
Batiste
11
MEDIUM
Cotton, Gingham, Poplin, Percale,
Pique, Satin,
Velvet, Lightweight wool, Fine
corduroy, Suitings.
14
HEAVY
Denim, Gabardine, Tweed, Corduroy
16
VERY HEAVY
Canvas, Overcoatings, Upholstery
18
THREAD SIZES
Cotton: 80~120
Synthetic
Fine Mercerized
Cotton
Cotton: 60~80
Silk: “A”
Synthetic
Mercerized 50
Cotton: 50~60
Silk: “A”
Synthetic
Mercerized 50~60
Cotton: 40~50
Mercerized Heavy
Duty
Cotton: 30~40
Mercerized Heavy
Duty
NOTE: The same size thread should be
used for upper and lower threads.
Extension Table
This sewing machine has an extension table which
converts it into a flat-bed machine.
To insert the extension table:
1. Slide the extension to the right as shown in
illustration.
2. To remove extension table, just pull it to the
left.
-10-
Sew-Light
To change the bulb:
1. Swing open face plate.
2. Remove bulb by turning counterclockwise.
3. After replacement, close the face plate.
NOTE:
1. Make sure new bulb is the same
specification as old one.
2. Make sure to switch off the light and
pull out supply plug when you replace
the bulb in order to avoid electric
hazards.
Presser Foot
To remove the presser foot;
1. Raise needle to its highest position.
2. Raise presser foot.
3. Loosen presser foot thumb screw and remove presser
foot.
4. To attach the presser foot, place grooved side of the
foot against the flat of the presser bar.
5. Tighten thumb screw.
-11-
STITCH LENGTH
The stitch length is regulated by turning the
stitch length dial.
Numerals on the dial represent the stitch
length.
THE HIGHER THE NUMBER, THE
LONGER THE STITCH.
To increase the stitch length, turn stitch
length dial counter-clockwise to larger
number on the dial.
To decrease the stitch length, turn dial
clockwise to smaller on the dial.
NOTE:
1. The “0” on the dial means that the
material is not being fed.
2. Always set at 4 when you sew triple
stretch stitch (See page21).
ZIGZAG WIDTH
The zigzag width is regulated by operating
the zigzag width lever.
Numerals above the lever represent the
width of stitch.
THE HIGHER THE NUMBER, THE
WIDER THE STITCH.
The “0” means straight stitch only.
NOTE:
-12-
Do not move the lever while
the needle is in the material.
PRESSURE ADJUSTER
Correct pressure on presser foot is important
to obtain the smooth sewing.
Regulate presser according to type and
thickness of the materials to be sewn.
1. To regulate the pressure, lower presser
foot.
2. Push outer ring of pressure adjuster
down, and inner pin will spring up to its
highest position. In this position,
pressure is completely released from the
presser foot.
3. To increase pressure, push inner pin
down with your finger.
NOTE:
-13-
You will be able to select the
correct
combination
by
referring to the table below.
FEED DOG
Proper use of Feed Dog is necessary for
correct sewing.
1. “DOWN” is used for special sewing
such as
darning, embroidery, etc.
2. “UP” is used for general sewing.
REVERSE STITCH
Push the Reverse Sewing Button in as far as
it will go to sew in reverse position.
Release Reverse Sewing Button and you are
back to sewing in a forward position.
Reverse sewing is used for tacking and
reinforcement.
-14-
THREAD TENSIONS
It is important that tension of upper and lower threads be equal to prevent puckering of
material or other problems.
It is recommended that a test sample be made before starting to sew.
UPPER THREAD TENSION
To regulate upper thread tension, merely
turn thread tension dial with your thumb
after lowering the presser foot.
THE HIGHER THE NUMBER, THE
TIGHTER THE TENSION.
To increase tension: Turn dial to right to
larger number.
To decrease tension: Turn dial to left to
smaller number.
NOTE: The zigzag stitch requires less upper
tension than the straight stitch.
LOWER THREAD TENSION
Although lower thread tension has already
been adjusted at the factory, when sewing
very thin or heavy materials it may have to
be readjusted.
To regulate the lower thread tension, turn
small screw on the tension, spring of the
bobbin case with the small screw driver.
To increase tension: Turn the small screw
clockwise
very
slightly.
To decrease tension: Turn
the
screw
counterclockwise
very slightly.
-15-
PERFECT STITCHING
Tension of upper and lower threads should
be equal, just sufficiently strong to lock
both threads in material.
Perfect stitching appears flat with no
puckering of material.
INCORRECT STITCH (A)
When the upper thread lies on the surface
of the material by pulling the lower thread
up as shown.
This is caused by tight tension on the upper
thread or loose tension on the lower thread.
To correct this, turn the upper thread tension
dial to a lower number.
If perfect stitching cannot be obtained by
adjusting upper thread tension, adjust bobbin
tension.
INCORRECT STITCH (B)
When the lower thread lies on the under
surface of the material by pulling upper
thread down as shown.
This is caused by loose tension on the upper
thread or tight tension on the lower thread.
To correct this, turn the upper thread tension
dial to a higher number.
If perfect stitching cannot be obtained by
adjusting upper thread tension, adjust bobbin
tension.
NOTE: It is recommended that a test sample
is made before starting to sew.
-16-
2. Straight Stitching
SET YOUR SEWING MACHINE AS PER FOLLOWING TABLE.
HOW TO START SEWING
1. Raise needle to its highest position and
lift presser foot.
2. Place material under presser foot and
position needle about one half inch
(10mm) from material edge.
3. Lower presser foot.
4. For reverse sewing push Reverse Sewing
button sewing is used wherever
reinforcement is needed.
5. Release Reverse Sewing Button and start
sewing in forward position.
NOTE: Do not pull the material. Let the
machine do the work. Merely guide
the material with your fingers. If
you pull the material, your needle
might either bend or break.
HOW TO CHANGE THE SEWING
DIRECTION
1. Stop machine at the turning point while
the needle is in the material.
2. Raise the presser foot and turn the
material to the new direction while the
needle acts as the axis.
3. Lower presser foot and sew in new
direction.
-17-
HOW TO FINISH YOUR SEWING PROJECT
(REVERSE STITCHING)
Reverse stitching is used to reinforce stitches near
the edge of material or wherever reinforcement is
needed.
1. That is done by stitching to the material edge…
then stopping.
2. Push Reverse Sewing Button and stitch
backwards for ½ inch (10mm) from material
edge.
HOW TO REMOVE FINAL SEWING FROM
MACHINE
1. Stop the machine.
2. Raise needle to its highest position and make
sure that the thread take-up lever is in the
highest position also.
3. Lift presser foot and pull out the material gently
to the left side diagonally.
4. Cut both threads on the thread cutter.
5. Leave 4 inches (10cm) of thread between the
presser foot loose while the thread take-up lever
is at highest position. You are ready to sew.
HOW TO GUIDE AND SUPPORT MATERIAL
Generally it is enough to guide the material in front
of the presser foot as shown in the upper
illustration.
However, in case of special materials such as tricot,
crepes, knits, etc., we recommend you to support
the material both in front and back of the presser
foot with gentle tension as shown in the lower
illustration.
-18-
3. Zigzag Stitching
SET YOUR SEWING MACHINE AS PER FOLLOWING TABLE.
SIMPLE ZIGZAG STITCH
Set the Stitch zigzag, sew about 1-4 to
obtain simple zigzag stitch.
1. Before stitching zigzag, sew about 5-6
Straight stitches with stitch length
between for reinforcement.
2. Set zigzag width lever to your desired
width and commence to sew.
3. Before removing work from machine,
reset the zigzag lever to “O” and sew 5-6
stitches for reinforcement.
NOTE: Generally, zigzag stitch requires less
upper thread tension than the straight
stitches.
SATIN STITCH
When the Stitch Length Dial is set to
between the “SATIN STITCH” is produced.
This is used to make buttonholes and
various decorative stitches.
NOTE: It is recommend that a test sample
is made before starting to sew.
-19-
DECORATIVE STITCHES
SET YOUR SEWING MACHINE AS PER FOLLOWING TABLE.
Using the “SATIN STITCH” various
decorative stitches are produced by using
the zigzag width lever as follows:
-20-
4. Using Built-in Patterns
TRIPLE STRETCH STITCH
SET YOUR SEWING MACHINE AS PER FOLLOWING TABLE.
Set Blind Stitch and Stretch Stitch Lever at
as shown in illustration at left.
The “Triple Stretch Stitch” is used for any
stretch material such as knitted fabric,
tricot, etc. This stitch is three times the
strength of a regular stitch and gives
elasticity to seams which prevents breakage
of thread.
NOTE: With zigzag width lever set at 4, a
triple zigzag stitch is produced which
can be used as a decorative stitch.
-21-
BLIND STITCH
SET YOUR SEWING MACHINE AS PER FOLLOWING TABLE.
SET BLIND STITCH AND STRETCH
STITCH LEVER AT
1. Fold material to size of hem desired and
then fold back as shown in Figure A,
leaving ¼ inch (6mm) overlap at edge.
2. Sew on fold as in Figure B.
3. When material is unfolded you will have
a blind stitched hem as in Figure C.
NOTE: Thread used should be the same
color as material used.
SHELL STITCH
SET YOUR SEWING MACHINE AS PER FOLLOWING TABLE.
This can be used for sewing a picoted
edge on a light material.
1. Set the machine as for blind stitch.
2. Sew material on bias, placing material
under the presser foot so that straight
stitches are sewn on seam line and
zigzag stitches are sewn slightly over
seam edge.
3. The “SHELL STITCH” requires a little
tighter upper thread
tension than
normal.
4. Sew at slow speed.
5. Edge of material becomes picoted.
-22-
5. Various Other Stitches
BUTTONHOLE
SET YOUR SEWING MACHINE AS PER FOLLOWING TABLE.
4.
Commence to sew 5 to 6 stitches and stop
the machine when the needle is in the material
at the left side of the row.
Step C:
1.
Step A:
2.
3.
4.
Lift the presser foot slightly and set the feed
dog knob to Up.
Raise the needle and set the zigzag width
lever to 2.
Sew row to predetermined length.
Stop the machine when the needle is in the
material at the left side of row.
Step D:
1.
2.
3.
4.
Set zigzag width lever to 2.
Set drop feed to Up.
Lower presser foot and commence to sew
predetermined length.
Stop machine when the needle is in the
material at the right side of row.
1.
Step B:
2.
3.
4.
1.
2.
3.
Raise the needle and set the feed dog knob to
Down.
Set the zigzag width lever to 4.
Sew 5-6 stitches across to finish buttonhole, then
turn material 90 degrees clockwise and sew 5-6
straight stitches to secure stitching.
Lift presser foot and remove work from
NOTE:
1. It is recommended that a sample buttonhole
be made starting to sew.
2. Use tailor’s chalk to mark length of buttonhole.
Lift the presser foot and run material 180 degree
while the needle acts as the axis.
Lower the presser foot and raise the needle from
material by turning balance wheel toward you.
Set zigzag width lever to 4 and drop feed
knob to Down.
-23-
MENDING
SET YOUR SEWING MACHINE AS PER FOLLOWING TABLE.
1. Place reinforcement material under
material to be repaired.
2. Sew both edges of tear together.
3. Use satin stitch to strengthen and secure
ends of tear as in illustrations.
ATTACHING LACE
SET YOUR SEWING MACHINE AS PER FOLLOWING TABLE.
1. Place lace under material edge letting it
overlap ¼ inch (6 mm).
2. Place under presser foot and sew.
-24-
APPLIQUÉING
SET YOUR SEWING MACHINE AS PER FOLLOWING TABLE.
1. Baste cut design to the material.
2. Following the design, commence to sew
carefully.
3. Cut away the surplus material close to the
design.
4. Remove basting.
CORDING
SET YOUR SEWING MACHINE AS PER FOLLOWING TABLE.
1. In accordance with thickness of cord being
used, set zigzag width lever.
2. Place cord on fabric to be sewn.
3. Lower presser foot and sew using zigzag
stitch. Guide cord by hand to where you
desire it.
-25-
MONOGRAMMING, USING EMBROIDERY HOOP
SET YOUR SEWING MACHINE AS PER FOLLOWING TABLE.
1. Remove presser foot.
2. Draw lettering on the right side of the
material.
3. Stretch work between embroidery hoops
as firmly as possible.
4. Place the work under the needle and
lower presser bar.
5. Pull lower thread up through the material
at starting position by turning balance
wheel and holding both threads.
6. Hold the hoop with thumb and forefinger
of both hands while pressing the material
with middle and third fingers and
supporting the outside of hoop with
smaller finger.
7. Start sewing, moving hoop lightly along
the lettering with even rate of speed
while controlling zigzag width lever
with your right hand.
-26-
EMBROIDERING, USING EMBROIDERY HOOP
SET YOUR SEWING MACHINE AS PER FOLLOWING TABLE.
1. Remove presser foot.
2. Draw design on the material.
3. Use embroidery hoop as you would for
monogramming.
4. Position the hoop under the needle and
lower presser bar.
5. Pull lower thread up through material.
6. Stitch outline of design by removing
embroidery hoop accordingly.
7. To fill in design stitch from outline of
design to inside and from inside to edge
of outline alternately until design is
completely filled in. Keep stitching close
together.
NOTE: A long stitch is made by removing
embroidery hoop rapidly and a short
stitch is made by moving it slowly.
-27-
BUTTON SEWING
SET YOUR SEWING MACHINE AS PER FOLLOWING TABLE.
1. Put button in place on material to be
sewn.
Place under presser foot.
2. Set zigzag width control to regulate
distance of stitch between the holes in
the button.
3. Lower presser foot and check to see that
needle enters holes in button properly.
4. Slowly sew approximately 10 stitches.
5. Stop machine and raise needle from the
Material.
6. Turn zigzag width lever to 0.
7. Sew approximately three stitches in one
of the holes in the button to secure it.
8. Remove work and cut threads.
BUTTON SEWING WITH THREAD SHANK
For heavier material use the following
method to sew on buttons:
1. Place a needle on the button as shown in
illustration and then sew on button as
you would regularly. (see above)
2. When removing work from machine
leave a long upper thread to be used to
form a thread shank.
3. Pull the upper thread through the hole of
button between button and material to
form thread shank.
4. With normal sewing needle sew in
thread ends.
-28-
DARNING
SET YOUR SEWING MACHINE AS PER FOLLOWING TABLE.
1. Place portion to be darned under the
presser foot.
2. Lower presser foot.
3. Sew alternately drawing the work gently
away from you and pulling it toward
you.
4. Repeat this motion until the portion to be
darned is filled with parallel lines of
stitching.
CLOTH GUIDE
The cloth guide helps to make straight and
parallel stitches follow the edge of the
material.
To attach the cloth guide, place it over two
holes to the right of the needle plate in the
sewing machine bed.
Place thumb screw through the guide slot,
adjusting the guide for the desired distance
and fasten it securely.
-29-
NARROW HEMMING
By using narrow hemmer foot a neat scroll type hem
is made.
SET YOUR SEWING MACHINE AS PER FOLLOWING TABLE.
1. Cut top corner of the material about
0.3cm (1/8”).
2. Place material wrong side up and insert
cut off angel into foot opening.
3. Pull material by hand from the back of
the presser foot.
Make sure the needle is positioned over
material.
Lower presser foot.
4. Make sure upper and lower threads are
placed behind presser foot.
5. Sew at medium speed. Guide the
material by hand through the presser foot
opening.
NOTE: With zigzag width lever set a 3,
zigzag narrow hemming can be done
following the above procedure.
-30-
ZIPPER INSERTION
Zipper foot is used to sew various types of
zippers and can easily be positioned to right
or left side of needle.
When zipper is being sewn at left side of
needle, position zipper foot by loosening
thumb screw and sliding zipper foot to right.
When zipper is being sewn at right side of
needle, position zipper foot by loosening
thumb screw and sliding zipper foot to left.
SET YOUR SEWING MACHINE AS PER FOLLOWING TABLE.
1. Lower needle into side notch located on
presser foot. (right or left)
2. Tighten thumb screw to lock presser foot
into position.
3. Fold edge of material ¾ inch (2cm) and
place zipper under folded portion.
4. By guiding zipper foot along the zipper
teeth you will stitch close to edge of
zipper in correct position.
5. To sew opposite side of zipper, loosen
thumb screw and position zipper foot.
(right or left)
-31-
6. Maintenance and Care of Your Machine
Cleaning
The sliding parts of the shuttle race body and the hook must be cleaned regularly so that lint does
not accumulate.
REMOVING SHUTTLE HOOK
1.
2.
3.
4.
Raise needle to its highest position.
Open the shuttle race cover.
Take out bobbin case.
Push latch levers down and remove
retaining ring.
5. Remove hook by grasping center post of
hook.
NOTE: When needle is lowered,
hook cannot be removed.
CLEANING SHUTTLE RACE
1. Remove accumulated lint and thread
from the retaining ring, hook, driver and
race body with brush.
2. A cloth dampened with machine oil
should be used to wipe shuttle race
clean.
3. Clean shuttle hook in the same manner
as above.
4. Reassemble.
CLEANING FEED DOG
1. Take out free arm upper plate by
loosening the screw on it.
2. Clean upper part of feed dog and shuttle
race body with brush.
-32-
Oiling
For smooth and silent operation the moving parts of the machine should be oiled
periodically. (see diagram below)
OIL ONCE A WEEK IF MACHINE IS USED MORE THAN ONE HOUR.
PER DAY. IF MACHINE IS USED MORE OFTEN OIL EVERY DAY.
NOTE: If machine has not been used for along period of time, oil tends to coagulate and
operation of machine will not be smooth. To ensure best operation in such a case,
apply a small amount of benzine to oiling points as noted in diagram. For motor; One
or two drops of oil twice a year is recommended.
-33-
Check List for Better Sewing
Check this list if you are having the following problems:
IF MATERIAL IS NOT FED
IF UPPER THREAD BREAKS
1. Feed dog is down .
2. Stop motion knob is loose.
3. Stitch length regulator is at 0.
1.
2.
3.
4.
Upper threading is not correct.
Upper thread is too large for needle eye.
Upper thread tension is too tight.
Needle is inserted incorrectly.
IF NEEDLE BREAKS
1.
2.
3.
4.
5.
6.
Needle is inserted incorrectly.
Needle clamp screw is loose.
Bent needle is used.
Upper threading is not correct.
Upper thread tension is too tight.
Wrong needle and thread for cloth being
sewn are used.
7. Material pulled excessively.
IF LOWER THREADS BREAKS
IF LOOPS FORM ON FABRIC
1. Needle is not sharp and straight.
2. Needle is inserted incorrectly.
3. Wrong needle and thread for cloth being
sewn are used.
4. Upper threading is not correct.
5. Lint is clinging to under-side of needle
plate.
1. Lower thread is entangled in shuttle.
2. Lower thread tension is too tight.
3. Lower threading is not correct.
IF MACHINE SKIPS STITCHES
1. Tension of upper or lower thread is
wrong.
IF MATERIAL SHOULD PUCKER
1.
2.
3.
4.
Thread tension is too tight.
Threading is not correct.
Thread is caught by something.
Lower thread is unevenly wound on
bobbin.
-34-
MEMO
____________________________________________________
____________________________________________________
____________________________________________________
____________________________________________________
____________________________________________________
____________________________________________________
____________________________________________________
____________________________________________________
____________________________________________________
____________________________________________________
____________________________________________________
____________________________________________________
____________________________________________________
____________________________________________________
____________________________________________________
____________________________________________________
____________________________________________________
____________________________________________________
____________________________________________________
____________________________________________________
____________________________________________________
____________________________________________________
____________________________________________________
____________________________________________________
____________________________________________________
____________________________________________________
____________________________________________________
____________________________________________________
____________________________________________________
____________________________________________________
____________________________________________________
Replacement Sewing Manuals
From
http://www.mastersewusa.com
Thank you for your purchase.
We try to scan original manuals at the highest DPI settings without
compromising the readability of the manual. We also have a technical
team that has been working over a year retyping hard to find and in
poor shape manuals from many different manufacturers. During he
retype operation the technicians try their best to maintain the wording
and page set up as of the original manual.
If you are satisfied with this product please tell others about us. Many
of our sales are made to people who heard of us by referrals of
customers like you. Many homes have sewing machines but their
manuals became lost or damaged.
We are here 24/7 on the Internet at:
http://www.mastersewusa.com
We have Instructional manuals, service manuals, parts lists, and
instructional videos for many industrial and consumer sewing
machines.
We assist owners of older Singer sewing machines by using their
machines serial number and converting it to their sewing machines
model number. Contact us at: [email protected]
Mastersewusa is committed to adding manuals to our library to
consistently improve our service in the sewing community.
Our manuals are:
BERNINA * BROTHER * CONSEW * FEIYUE-YAMATA * ELNA
* GN * PFAFF * JUKI * MORSE * NECCHI * NEW HOME *
SEARS KENMORE * SIMPLICITY * SINGER * WHITE
For Reprints Visit on the web. http://www.mastersewusa.com
May 2006