1
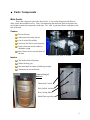
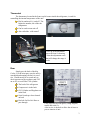
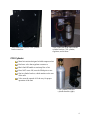
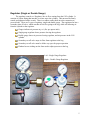
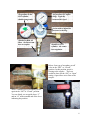
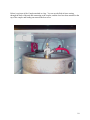
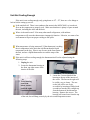
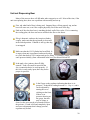
MCKC490S Keg Cooler
Customer Service Manual
Parts / Components.................................................................................................................. 2
Main Cooler ................................................................................................................................ 2
Castors..................................................................................................................................... 2
Interior..................................................................................................................................... 2
Thermostat .............................................................................................................................. 3
Rear ......................................................................................................................................... 3
CO2 Cylinder .............................................................................................................................. 4
Regulator (Single or Double Gauge) .......................................................................................... 5
Red Air Hose............................................................................................................................... 7
Coupler (Tapper, Tap) ................................................................................................................ 8
5’ Clear Beer Hose.................................................................................................................... 11
Beer Tower................................................................................................................................ 12
Chrome Beer Faucet ................................................................................................................. 14
Common Issues and Questions ............................................................................................. 15
My keg of (insert favorite beer) doesn’t fit............................................................................... 15
Leaking / Losing CO2............................................................................................................... 16
Unit Not Cooling Enough ......................................................................................................... 17
Too much foam ......................................................................................................................... 19
Unit not Dispensing Beer.......................................................................................................... 20
Can I Use Keg Cooler for Import Kegs? .................................................................................. 21
Beers with Kegs using American Sankey Coupler ............................................................... 22
1
Parts / Components
Main Cooler
This is the refrigerator part of the Keg Cooler. It is a small refrigerator with holes to
allow for the hoses and beer tower. There is a thermostat dial inside the front of the unit at the
top left that controls the temperature in the unit. The ‘cold’ is generated from a cold plate in the
rear of the unit.
Castors
Elevate the unit
Allow unit to be easily moved
Can be locked for stability
Necessary for door to work properly.
Front castors use metal washers to
distribute weight
Rear Castors screw to metal frame of
the unit
Attached Front Caster w/ Washer
Interior
The inside of the refrigerator
Where the Keg goes
Has metal plate at bottom to hold kegs weight
Thermostat is accessed inside
Cooler w/ Keg of
Bud in it
Thermostat Control
Hole for Red Air Hose
Rear Cooling Plate
Metal Plate to put keg on
2
Thermostat
The thermostat, located in the front, top left corner inside the refrigerator, is used for
controlling the internal temperature of the unit.
Dial is numbered 1-6, and off. The
higher the number, the colder the
temperature
Can be used to turn unit off
Also called the ‘cold control’
Close up of the thermostat
removed from it’s housing.
*Note the adjustment screw
that will change the range it
cools.
Rear
Simply put, the back of the Keg
Cooler. For the most part, once the unit is
assembled and running, the back is out of
site. Would mostly be accessed only to
check pressure on the regulator, turn CO2
on or off, or to refill the CO2 cylinder.
The back of the refrigerator
Compressor is in the back
CO2 Cylinder and Regulator are
in the back
Serial # and spec sheet located
on back
Has hole for Red Air Hose to
pass through
Close up of sticker with specs, wiring diagram,
model and serial #’s.
Also in view is the hole to allow the air hose to
pass to interior of unit.
3
These knobs are what the CO2 cylinder
bracket attach to.
View of the rear of the unit with the
cylinder bracket, CO2 cylinder,
regulator, and air hose.
CO2 Cylinder
Metal air canister designed to hold compressed air
Has brass valve that regulator connects to
Black On/Off handle to start/stop flow of air
Does NOT come full, must be filled prior to use
Sits in cylinder bracket, which attaches to the rear
of the unit
Valve must be opened ALL the way for proper
operation of the unit
CO2 cylinder (left) and
cylinder bracket (right)
4
Regulator (Single or Double Gauge)
The regulator controls, or ‘Regulates’ the air flow coming from the CO2 cylinder. It
consists of a brass fitting that attaches it via hex nut to the cylinder. This nut must be firmly
seated, and tightened with a wrench. There is a rubber washer built in to the connection to
prevent leaks. There are 2 types of regulator, single and double gauge. The regulator also has a
secondary shut off valve, which can shut off air flow going to the keg, while still allowing air
from the cylinder to the regulator.
Gauges indicate air pressure in p.s.i. (lbs. per square inch)
Single gauge regulator shows pressure leaving the regulator
Double gauge shows air pressure leaving regulator, and air pressure in the CO2
cylinder
Secondary cut off valve stops air flow from regulator to the keg
Secondary cut off valve must be all the way open for proper operation
Flathead screw sticking out the front used to adjust pressure to the keg
Left – Single Gauge Regulator
Right – Double Gauge Regulator
5
Air pressure in the
CO2 cylinder
(double gauge only)
Air pressure to Coupler
(Keg). Typically
between 10-14 p.s.i.
Screw used to adjust the
pressure to the Keg.
Attaches to Red Air
Hose. Air flows from
here to coupler.
Attaches to CO2
cylinder. Air comes
in to regulator.
Below: One type of secondary cut off
valve in the “OFF” or “Closed”
position. In this position, no air is
flowing to the coupler. The lever
would be down for the “ON” or “Open”
setting. Open allows air to flow to the
coupler.
Above: Another type of secondary cut off,
again in the “Off” or “Closed” position.
You can faintly see an upside down “C”
and an “O” at the rounded end of the lever
indicating the position.
6
Red Air Hose
The red air hose is the red tube the runs between the bottom of the regulator (under the
secondary cut off valve) and the coupler
5/16” Inner Diameter and 9/16”
Outer Diameter
Hose is 5’ long
Attaches to bottom of regulator with
hose clamp
Runs from regulator through hole in
back of cooler to the interior
Attaches to coupler with hex nut
Below: Barbed connector where Red Hose
connects to Coupler. Hex nut holds and secures
connector in place
Above: Red Hose and barbed connector
assembled, ready to attach to coupler via
the hex nut. Notice washer, which goes
into this connection.
Red air hose running from regulator through hole
to interior of unit.
Red air hose coming in through hole and
attached to coupler inside cooler.
7
Coupler (Tapper, Tap)
The coupler is the part of the system that ‘taps’ the keg, and allows air in from the
regulator, and beer to flow up to the tower. Our unit comes with an American Sankey, or Style
‘D’ coupler. This will work with most domestic beers (i.e.: Miller, Bud, etc). For Imports and
specialty beers, other couplers are needed and can be obtained 3rd party, from companies like
Banner Beer.
Red Hose connects to the coupler to allow air in
Coupler locks into ‘neck’ of keg
Has a ‘Probe’ that actually breaks seal on keg
Handle pulls out and down, locks into place to tap keg
Exploded Parts Diagram
Connects to Red Air
Hose. Air Enters
coupler.
# 5 – also called pressure release valve. O-ring out of place can cause air leak
# 10 – Handle Assembly pulls out, then down to actuate the probe down into the keg,
then locks in place
#13 – Probe that actually goes down and breaks seal to tap keg
#14 & #15 – Ball and Retainer. Ball prevents backflow when keg is untapped, and
retainer both holds ball in place, and acts as a washer
8
Below are actual pictures of the coupler assembly, whole and somewhat broken down
Above: Assembled Coupler, ready for installation. In this image,
the handle is in the down position. If you look at the very bottom
of the coupler, you can see the probe in the down position. This
is the part that breaks the seal on the keg, allowing air in and beer
to flow out.
Below: Basic breakdown of coupler. The parts that are not
attached are all removable and changeable. They are all
required, in the order and direction shown, for proper operation of
the unit.
9
Below is a picture of the Coupler attached to a keg. You can see the Red air hose coming
through the back of the unit and connecting to the coupler, and the clear beer hose attached to the
top of the coupler and leading out towards the beer tower.
10
5’ Clear Beer Hose
The clear hose that moves the beer from the top of the coupler, up the beer tower, to the
faucet.
Attaches to coupler with wing nut
Has black rubber washer to prevent leaks
Top attaches to beer faucet at top of beer tower
Washer in wing nut. Can fall out very
easily.
11
Beer Tower
The beer tower is the cylinder that sits
atop the keg cooler and holds the faucet. It allows
enough height to put a beer mug or pitcher under
the faucet.
The beer tower fits into a hole in the top of
the unit, a circle with 3 notches, as see to the
right. The wing nut with the clear beer hose feeds
down into the unit through this hole. The bottom
of the tower has a round base with tabs that fit
into the hole in the top of the unit, and is secured
by turning the
tower to lock
it down.
There is a plastic ring that can be placed under the beer tower
for a more secure fit if needed.
Below are pictures of the process of attaching beer tower to keg cooler.
Feed the wing nut and clear beer tube through
hole in top of unit.
Line up beer tower and insert into hole
12
Beer tower will fit in with faucet off center
Twist beer tower so faucet is facing front.
Will lock into place. Plastic ring can be
removed if too tight to twist and lock.
13
Chrome Beer Faucet
The faucet is attached to the beer tower, and is used to dispense the beer. A handle
screws to the threaded top of the faucet, either the standard black one that comes with the unit, or
specialty faucets can be purchased by various third party sellers.
The faucet comes attached to the tower out of the box, with the tap handle included in the
packaging, but not attached. If loose, or if it needs to be replaced, the collar around it can be
loosened and tightened using the included metal spanner wrench.
Collar to loosen or
tighten faucet
Spanner Wrench
14
Common Issues and Questions
My keg of (insert favorite beer) doesn’t fit
Our keg cooler will accommodate kegs that are 16-1/8” or less in diameter, and 23-3/8”
or less in height.
Certain brands (such as Coors) use different
shapes or sizes, not allowing the keg to fit in our
unit. There are also kegs that have a rubber seal
around them, which increases the diameter
beyond what the keg cooler can fit.
If a customer is using a keg that has the
right dimensions, and the door still will
not close with the keg in it, ask if they have the castors on or if it is just sitting on the
floor. If the unit is set up without the castors, the door can be pushed up, not allowing the
door to close fully.
If the customer is using the correct keg type, and has the castors on, see if they can get
the door closed by moving the door up or down a little. It may just need to be shimmed.
* Hint – If a customer has already purchased a
bulged Wall or Rubber Sided keg, they MAY be
able to fit it by raising the keg inside the unit, so
that the wider section is above the “step” in the
bottom rear of the cooler.
Raise widest part of keg
higher than this “step”.
15
Leaking / Losing CO2
There are several places where the unit can leak CO2. Any of the connections from the
cylinder to the coupler, and the coupler itself can potentially lose air. Sometimes the source of
the leak will be obvious, with air hissing out. Sometimes it needs to be identified by either
feeling around for the air, or spraying soapy water on the parts to look for bubbles.
First thing is to find the leak. As mentioned, if it isn’t apparent, spraying soapy water
around connection points and pressure release should identify where the leak is.
If air is leaking from the connection between the CO2
cylinder and the regulator, make sure that the washer
is in place and that the connection is tight. A wrench
should be used to properly tighten this connection.
Reg CO2
Tighten Here
If the leak is coming from any of the connections, where a hose connects to the regulator
or coupler, make sure that there is a washer in place. The keg cooler comes with all the
washers already in, however they can fall out, and air will leak if they are not in place.
Pull this knob
If the Coupler (Tapper) is leaking, and it isn’t from where
the red hose attaches, then the leak is most likely coming
from the pressure release valve. Sometimes, the O-ring in
the valve is out of place, and can be reseated just by pulling
the valve out and releasing the valve. If this does not solve
the issue, the coupler may need to be replaced.
Ask what kind of beer customer is using. If it is European (ie: Heineken, Amstel, etc), then the
problem is that the Couplers Probe won’t reach all the way into the Keg. If this is the case,
customer needs to obtain a European Sankey Coupler (Style G, A, or U, see distributor or contact
brewer for info).
16
Unit Not Cooling Enough
If the unit is not cooling enough, only going down to 45º – 55º, there are a few things to
look at before setting up service.
Is the unit built in? There is no condenser fan motor in the MCKC490S, so it needs air
flow on the compressor to properly cool. Make sure that there is plenty of space around
the unit, including the sides and the back.
Where is the unit located? Like many other small refrigerators, cold ambient
temperatures will cause the thermostat to improperly function. Likewise, too warm of an
environment will prevent proper cooling to take place.
What temperature is being measured? If the thermostat is reading
the air temperature in the unit, that is different than the liquid
temperature in the keg. Place a cup of water in the front corner of
the unit, and use a liquid thermometer to read the temp of the
water.
If the unit is still not cooling enough, the thermostat itself can be adjusted using the
following steps.
1. Unplug the unit
2. Locate the thermostat housing in
the front, top right corner of the
interior of the unit.
3. Locate the 2 screws that hold the
housing to the top of the interior of
the cooler. The one on the right will
T-stat housing
be visible, easy to locate. The one
seen from
on the left will be out of site,
below, screws
accessible by inserting a Philips head
on left & right.
screwdriver into the hole, straight up
from the bottom of the thermostat
housing. Remove the screws. The
housing will come loose from the top
of the unit, but will hang securely by the wires and temperature sensor.
17
4. Remove the Temperature
control dial by pulling
straight off. Thermostat
can now be removed from
the housing.
5. On the side opposite the wire connections, there is a small Philips head screw,
most likely with some red stuff on it. Give this screw ½ turn Counter-Clockwise.
Re-assemble the thermostat and plug unit back in, then turn the thermostat to the
highest setting. Wait an
hour and turn unit down Turn this screw
a bit, to about 4 or 5 on
the temperature control
dial.
Wire connectors seen here on the
bottom of the thermostat.
6. Let sit for a couple hours and check the temperature of the water in the cup. If
unit has cooled down to proper temperature, unplug the unit, put the thermostat
back in the housing, and re-attach to top of the unit. Plug unit in again, and it is
all set.
7. If temperature has come down some, but not enough, repeat procedure and adjust
the screw another ¼ turn, and check temp again after a couple of hours. Continue
doing ¼ turns until proper temperature is reached.
8. If temperature still does not change, the thermostat should be changed.
18
Too much foam
If the unit is dispensing too much foam, the problem is most likely caused by either the
unit not being cold enough, or improper pressure to the keg. If the beer is too warm or the
pressure to high or low, there will be excessive foam when dispensed.
Check the liquid temperature in the unit. DO NOT check temperature of first glass of
beer poured, as beer in the hose going up the tower will most likely be warmer than the
beer in the keg.
Make sure there are no CO2 leaks, and that the proper pressure is set on the regulator. It
is recommended to check with the brewer or distributor for proper temperatures and
pressure for each brand, as they can differ. This information can also be found online, at
sites such as www.micromatic.com.
The beer tower can be kept cooler by inserting foam insulation into the tower.
Make sure the CO2 cylinder valve and the regulator valve are all the way open.
Pull tap handle forward completely and smoothly. Keep glass tipped at an angle until
about ½ full, then start to straighten glass until full.
19
Unit not Dispensing Beer
Many of the answers here will fall under other categories as well. Most of the time, if the
unit is not pouring beer, there was a problem with assembly and set up.
First, ask what kind of beer is being used. Imported kegs will not properly tap, and no
beer will come out, even if the coupler physically fits on the neck of the keg.
Find out if the clear beer hose is touching the back wall of the cooler. If it is contacting
the cooling plate, the beer can freezer and block the flow to the faucet.
If keg is domestic, and uses the American Sankey
coupler, make sure that the tap handle is down and
in the locked position. If handle is still up, then keg
is not tapped.
Make sure that the CO2 Cylinder has been filled. It
is empty when unit is purchased, and must be taken
to a place that deals in CO2 compressed gas for filling. If cylinder is empty, there will be
some pressure initially (from carbonation in the beer), but that will bleed off.
Is the tank valve (primary shut off) fully
opened? Tank valve must be turned all the
way (counterclockwise) to work properly. If
the valve is only partly open, there may not be
proper air pressure.
Is the Gauge on the regulator indicating that there is air
pressure? It should be reading between 10 – 14 p.s.i., and it
can be adjusted by
turning the screw
sticking out the front.
If there is no
pressure showing on
the gauge, the tank
may be empty or
closed, or the screw needs to be turned to adjust
the pressure. If tank is full and completely open,
and screw adjustments don’t change pressure,
regulator may be bad.
20
Is the Regulator valve (secondary cut off) open all the way? If in the Closed or Off
position, or not fully open (straight down), then there is not proper air pressure coming
out of the regulator. If gauge shows proper pressure, and the secondary valve is all the
way in the open position, problem may be in the coupler.
*Hint – Red air hose will feel harder when under pressure than when there is no air
pressure.
Check to see if there is pressure to the coupler by pulling
Pull this knob
out the pressure release valve. If there is pressure going
to the valve, there will be a hiss as the release valve
purges the air pressure. If no air hisses out, shut off the
air at the CO2 cylinder and the regulator, and unscrew
the red air hose from the coupler to inspect the ‘check
valve assembly’. Make sure all the parts are in proper
positions as seen in the image below. Also check that the
check valve itself is facing in the right direction, with the
tapered end facing into the the coupler, and make sure it has a slit in the tapered end.
You can see the slit if you squeeze the sides of the tapered end, as seen in the lower right
picture. If the valve does not have the slit, one can be made by just poking a hole at the
end of the tapered side of the check valve.
Check Valve
Can I Use Keg Cooler for Import Kegs?
As long as the keg is within the dimensions listed above, it should physically fit within
the unit. The coupler in this unit will not fit import beers. Other styles of couplers can be
purchased through www.bannerbeer.com, or can most likely be found locally at stores that deal
in beer brewing or restaurant supply.
21
Beers with Kegs using American Sankey Coupler
Abita Amber
Abita Golden
Abita Light
Abita Purple Haze
Abita Turbodog
ACME Brown Ale
ACME IPA
ACME Pale Ale
Alaskan Amber
Alaskan ESB
Alaskan Pale Ale
Alaskan Smoked Porter
Alaskan Stout
Alaskan Winter Ale
Alexander Keith
Allagash Curieux
Allagash Dubbel
Allagash Four
Allagash Grand Cru
Allagash Musette
Allagash Tripel
Allagash Victoria Ale
Allagash White
Anderson Valley Belks Bitter
Anderson Valley Boont Amber
Anderson Valley Hop Ottin
IPA
Anderson Valley Poleeko Gold
Avery Hog Heaven
Avery IPA
Avery IPA Cask
Avery Karma Ale
Avery Maharaja
Avery Old Jubilation
Avery Reverend
Bad Frog - BAD Light
Bad Frog Golden- Amber
Lager
Bad Frog Micro-Malt
BayHawk Amber Ale
BayHawk California Pale Ale
(CPA)
BayHawk Chocolate Porter
BayHawk Hefeweizen
BayHawk Honey Blonde
BayHawk OC Lager
BBC Long Beach Crude
BBC Marathon
BBC Strawberry Blonde
BBC Top Sail
Binchoise Reserve
Black Dog
Blanche de Chambly
Blue Moon
Breckenridge
Brooklyn Brown Ale
Brooklyn East India Pale Ale
Brooklyn Lager
Brooklyn Pennant Ale 55
Brooklyn Pilsner
Brooklyn Post Road Pumpkin
Ale
Brooklyn Weisse
Bruin Pale Ale
Bud Dry
Bud Ice
Bud Ice Light
Bud Light
Budweiser
Budweiser Select
Busch
Caracole Nostradamus
Carlsberg
Carlton and United Breweries
(CUB)
Castle Maine
Celis
Cider Jack
Clipper City Heavy Seas
Below Deck
Clipper City Heavy Seas
Loose Cannon
Clipper City Heavy Seas Peg
Leg Stout
Clipper City Heavy Seas Red
Sky at Night
Clipper City Heavy Seas Small
Craft Warning
Clipper City Heavy Seas
Winter Storm
Clipper City Phillip Amber Ale
Columbia Brewing
Coors
Coors Light
Corona
Custom Brewcrafters
Des Rocs Grand Cru
Deschutes Black Butte
Devil Mountain
Dogfish Head 60 Minute IPA
Dogfish Head 90 Minute IPA
Dogfish Head Indian Brown
Ale
Dos Equis Amber
Dos Equis Lager
Duchesse de Bourgogne
Eel River Brewing
Ellicottville
Eurobrew Hobgoblin Draft
Eurobrew Monty Python Draft
Fat Tire
Firehouse
Firestone Double Barrel Ale
Firestone Lager
Firestone Pale Ale
Firestone Walker's Ale
Flying Dog
Foret Org Sais Ale
Foster's
Full Sail Amber Ale
Full Sail Pale Ale
Genesee
George Killian's Irish Red
Goose Island
Gordon Biersch Hefeweizen
Gordon Biersch Marzen
Grant's
Great Divide Fresh Hop Pale
Ale
Great Divide Hercules Double
IPA
Great Divide Hiberation Ale
Great Divide Oak Aged Yeti
Great Divide Titan IPA
Green Mountain Cidery
Hamms
Hard Core Cider
Harpoon Ale
Harpoon Brown Session Ale
Harpoon IPA
Harpoon Munchen Dunkel
Henry Weinhard's
High Falls
Highland Black Mocha Stout
Highland Cold Mountain
Winter Ale
Highland Gaelic Ale
Highland Oatmeal Porter
Highland Saint Terese
Highland Tasgall Ale
Holy Cow Red
Hornsby's
22
Hudson Valley
Humboldt Hemp Ale
Humboldt IPA
Humboldt Pale Ale
Humboldt Red Nectar Ale
Ice House
Killarney
Killian's Irish Red
Kirin Ichiban
Kokanee
Labatt Blue
Lagunitas Brown Shugga
Lagunitas Cappuccino Stout
Lagunitas Censored
Lagunitas Hairy Eyeball
Lagunitas IPA
Lagunitas Maximus
Leinenkugel
Little Kings
Lost Coast Alleycat Amber
Lost Coast Apricot Wheat
Lost Coast Downtown Brown
Lost Coast Great White
Lost Coast Raspberry Brown
Mad River Jamalca Red Ale
Mad River Steelhead Pale
Maudite
Miami Trail Brewing
Michael Shea's
Michelob
Michelob Amber Bock
Michelob Light
Michelob Speciality
Michelob Ultra
Mickey's
Middle Ages
Miller
Miller Genuine Draft
Miller Lite
Milwaukee's Best
Modelo
Molson Canadian
Moosehead
Natural Ice
Natural Light
New Amsterdam
New Zeland Steinlager
Nor'Wester
North Coast Brother
Thelonious
North Coast Old Rasputin
Stout
North Coast Old Stock
North Coast Pranqster
Belgian
North Coast Red Seal Ale
North Coast Scrimshaw
O'Doul's
Old Dominion New River
Old Dominion Oak Stout
Old Milwaukee
Old Vienna
Oskar Blues Dale's Pale Ale
Oskar Blues Duke Sour
Brown
Oskar Blues Gordon IPA
Oskar Blues Imperial Cherry
Stout
Oskar Blues Imperial Stout
Oskar Blues Mama's Lil Yella
Pilsner
Oskar Blues Money Shot
Cream Ale
Oskar Blues Oak Aged
Gordon
Oskar Blues Old Chub
Pete's Seasonals
Pete's Wicked Ale
Porter & Summerfest
Portland Mactarnahan's
Amber
Portland Oregon Honey
Pyramid Hefeweizen
Pyramid Seasonal
Razors Edge
Red Ale
Red Dog
Red Hook Blonde
Red Hook ESB
Red Hook IPA
Red Hook Seasonal
Red Wolf
Rogue Dead Guy Ale
Rogue Hazelnut Brown
Rogue Red
Rolling Rock
Rouge-Mogal
Saint Bernardus Abbot
Saint Bernardus Prior
Sais Dup Farmhouse Ale
Sam Adams Boston Lager
Sam Adams Seasonal
Saranac
Saxer Brewing
Scaldis Belgian Ale
Scaldis Noel
Schmitt's
Shiner Bock
Ship Inn
Shipyard
Shmaltz Brewing Hebrew
Messiah Bold
Sierra Nevada Pale Ale
Sierra Nevada Seasonal
Sleemans
Southpaw
Spanish Peaks Black Dog
Starr Hill Brewery
Steinlager
Strohs
Tecate
Thomas Creek Amber
Thomas Creek Dopplebock
Thomas Creek IPA
Thomas Creek Multi-Grain
Thomas Creek Pilsner
Thomas Creek Red Ale
Thomas Creek Vanilla Cream
Thomas Kemper
Tommyknocker Ornery
Amber
Trois Pistoles
Tucher
Unibroue
Val Dieu Grand Cru
Wasatch
Weinhard's
Whitbread Ale
Widmer Hefeweizen
Widmer Seasonal
Woodchuck Dark & Dry Cider
Wyder's Apple Cider
Wyder's Peach Cider
Wyder's Pear Cider
Wyder's Raspberry Cider
Yuengling
Zebra
Zuma Cancun Lager
Zuma Morena Dark Lager
1