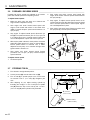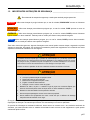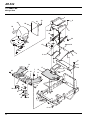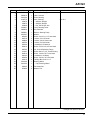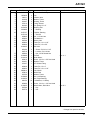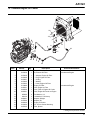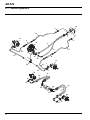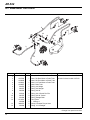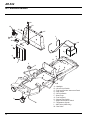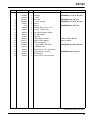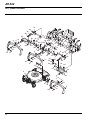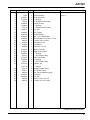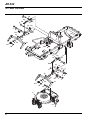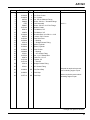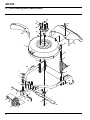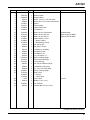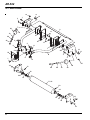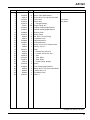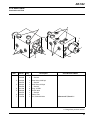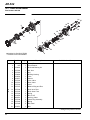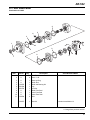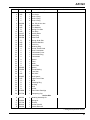
1
4179483-PT-Rev B Parts & Maintenance Manual Manual de peças e manutenção AR-522™ 68098 – AR-522, Kubota® V2403-MT, 4WD, with ROPS 68098 – AR-522, Kubota® V2403-MT, 4WD, com ROPS WARNING If incorrectly used, this machine can cause severe injury. Those who use and maintain this machine should be trained in its proper use, warned of its dangers and should read the entire manual before attempting to set up, operate, adjust or service the machine ATENÇÃO Esta máquina pode causar ferimentos graves se for utilizada incorrectamente. A pessoa responsável pela sua utilização e manutenção deve ser previamente instruída para a sua utilização correcta, avisada sobre os perigos que ela pode causar e deve ler todo o manual antes de tentar preparar, conduzir, afinar ou reparar a máquina. GB PT United Kingdom Portugal When Performance Matters.™ FOREWORD This manual contains adjustment, maintenance, troubleshooting instructions and a parts list for your new Jacobsen machine. This manual should be stored with the equipment for reference during operation. The serial plate is located on the right rear frame rail. Jacobsen recommends you record these numbers below for easy reference. Before you operate your machine, you and each operator you employ should read the manual carefully in its entirety. By following the safety, operating and maintenance instructions, you will prolong the life of your equipment and maintain its maximum efficiency. 11524WILMAR BLVD, CHARLOTTE, NC 28273 ® PRODUCT OF U.S.A. kg A Textron Company 1-800-848-1636 (US) kW If additional information is needed, contact your Jacobsen Dealer. Suggested Stocking Guide To keep your equipment fully operational and productive, Jacobsen suggests you maintain a stock of the more commonly used maintenance items. We have included part numbers for additional support materials and training aids. To order any of the following material: 1. Write your full name and complete address on your order form. 2. Explain where and how to make shipment: q UPS q Regular Mail q Overnight q 2nd Day 3. Order by the quantity desired, the part number, and the description of the part. 4. Send or bring the order to your authorized Jacobsen Dealer. Service Parts Qty. Part No. Description Qty. Part No. 4113986 557619 4133820 4133821 555771 4134323 Engine Oil Filter Engine Fuel Filter Element Primary Air Cleaner Filter Safety Air Cleaner Filter Hydraulic Filter Element Engine Fan Belt 4131618 4123183 4163106 4137186 4124087 Description Ignition Key Headlight Bulb Blade, Combination Blade, High Lift Blade, Low Lift Service Support Material Qty. Part No. 4179484 4179483 4179556 4192126 Qty. Part No. Description 4192020 Service Manual Safety & Operation Manual Parts & Maintenance Manual DVD, Operator Training Diesel Engine Parts Manual 2006/42/EC These are the Original instructions verified by Jacobsen A Textron company. © Copyright 2009, Jacobsen, A Textron Company. “All rights reserved, including the right to reproduce this material or portions thereof in any form.” en-2 Description Litho In U.S.A. 3-2011 Proposition 65 Warning This product contains or emits chemicals known to the State of California to cause cancer and birth defects or other reproductive harm. Table of Contents 1 Safety 1.1 Operating Safety ............................................ 4 1.2 Important Safety Notes ..................................5 2 Specifications 2.1 Product Identification .....................................6 2.2 V2403-M-T Engine .........................................6 2.3 Mower ............................................................6 2.4 Weights and Dimensions ...............................6 2.5 Cutting Units ..................................................7 2.6 Accessories ...................................................7 2.7 Support Literature ..........................................7 2.8 Declaration of Conformity ..............................8 3 Adjustments 3.1 General ........................................................10 3.2 Mow Speed ..................................................10 3.3 Belt ...............................................................10 3.4 Brakes ..........................................................11 3.5 Neutral Adjustment ......................................11 3.6 Forward / Reverse Speed ............................12 3.7 Steering Toe-In ............................................12 3.8 Cutting Height ..............................................13 3.9 Traction Control System Calibration ............14 3.10 Torque Specification ....................................15 4 Maintenance 4.1 General ........................................................16 4.2 Engine ..........................................................16 4.3 Engine Oil ....................................................16 4.4 Air Filter .......................................................17 4.5 Fuel ..............................................................17 4.6 Fuel System .................................................17 4.7 Battery .........................................................18 4.8 Jump Starting ...............................................18 4.9 Charging Battery ..........................................18 4.10 Muffler and Exhaust .....................................19 4.11 Hydraulic Hoses ...........................................19 4.12 Hydraulic Oil ................................................19 4.13 Hydraulic Filter .............................................20 4.14 Electrical System .........................................20 4.15 Radiator .......................................................21 4.16 Roll Over Protective Structure (ROPS) ........21 4.17 Tires .............................................................21 4.18 Wheel Mounting Procedure .........................22 4.19 Inspecting Blades ........................................22 4.20 Sharpening Blades ......................................23 4.21 Care and Cleaning .......................................23 4.22 Storage ........................................................24 5 Troubleshooting 5.1 General ........................................................25 5.2 Controller Lamps .........................................26 5.3 Electrical Circuits .........................................27 6 Maintenance & Lubrication charts 6.1 General ........................................................28 6.2 Maintenance Chart ......................................28 6.3 Lubrication Chart .........................................29 7 Parts Catalog 7.1 How To Use The Parts Catalog ...................30 7.2 To Order Parts .............................................30 7.3 Table of Contents ........................................31 en-3 1 SAFETY 1 SAFETY 1.1 OPERATING SAFETY ______________________________________________________ ! WARNING EQUIPMENT OPERATED IMPROPERLY OR BY UNTRAINED PERSONNEL CAN BE DANGEROUS. Familiarize yourself with the location and proper use of all controls. Inexperienced operators should receive instruction from someone familiar with the equipment before being allowed to operate the machine. 1. Safety is dependent upon the awareness, concern and prudence of those who operate or service the equipment. Never allow minors to operate any equipment. 11. Never operate equipment that is not in perfect working order or is without decals, guards, shields, discharge deflectors or other protective devices securely fastened in place. 2. It is your responsibility to read this manual and all publications associated with this equipment (Safety & Operation Manual, Engine Manual, and attachments/accessories instruction sheets). If the operator cannot read English it is the owner’s responsibility to explain the material contained in this manual to them. 12. Never disconnect or bypass any switch. 3. Learn the proper use of the machine, the location and purpose of all the controls and gauges before you operate the equipment. Working with unfamiliar equipment can lead to accidents. 4. Never allow anyone to operate or service the machine or its attachments without proper training and instructions, or while under the influence of alcohol or drugs. 5. Wear all the necessary protective clothing and personal safety devices to protect your head, eyes, ears, hands, and feet. Operate the machine only in daylight or in good artificial light. 6. Evaluate the terrain to determine what accessories and attachments are needed to properly and safely perform the job. Only use accessories and attachments approved by Jacobsen. 7. Stay alert for holes in the terrain and other hidden hazards. 8. Inspect the area where the equipment will be used. Pick up all the debris you can find before operating. Beware of overhead obstructions (low tree limbs, electrical wires, etc.) and also underground obstacles (sprinklers, pipes, tree roots, etc.). Enter a new area cautiously. Stay alert for hidden hazards. 9. Never direct discharge of material toward bystanders, nor allow anyone near the machine while in operation. The owner/operator can prevent and is responsible for injuries inflicted to themselves, to bystanders, and damage to property. 10. Do not carry passengers. Keep bystanders and pets a safe distance away. 13. Do not change the engine governor setting or overspeed the engine. 14. Carbon monoxide in the exhaust fumes can be fatal when inhaled. Never operate the engine without proper ventilation or in an enclosed area. 15. Fuel is highly flammable, handle with care. 16. Keep the engine clean. Allow the engine to cool before storing and always remove the ignition key. 17. Disengage all drives and engage parking brake before starting the engine (motor). Start the engine only when sitting in operator’s seat, never while standing beside the unit. 18. Equipment must comply with the latest federal, state, and local requirements when driven or transported on public roads. Watch out for traffic when crossing or operating on or near roads. 19. Local regulations may restrict the age of the operator. 20. Operate the machine up and down the face of slopes (vertically), not across the face (horizontally). 21. To prevent tipping or loss of control, do not start or stop suddenly on slopes. Reduce speed when making sharp turns. Use caution when changing directions. 22. Always use the seat belt when operating mowers equipped with a Roll Over Protective Structure (ROPS). Never use a seat belt when operating mowers without a ROPS. Accessory operator protective structures will continue to be offered for all equipment currently covered. This allows for the outfitting of any machines without previous ROPS installations or replacement of damaged structures. 23. Keep legs, arms, and body inside the seating compartment while the vehicle is in motion. 24. Disconnect battery and controller electrical connectors before performing any welding on this mower. This machine is to be operated and maintained as specified in this manual and is intended for the professional maintenance of specialized turf grasses. It is not intended for use on rough terrain or long grasses. en-4 SAFETY 1.2 1 IMPORTANT SAFETY NOTES ________________________________________________ This safety alert symbol is used to alert you to potential hazards. DANGER - Indicates an imminently hazardous situation which, if not avoided, WILL result in death or serious injury. WARNING - Indicates a potentially hazardous situation which, if not avoided, COULD result in death or serious injury. CAUTION - Indicates a potentially hazardous situation which, if not avoided, MAY result in minor or moderate injury and property damage. It may also be used to alert against unsafe practices. NOTICE - Indicates a potentially hazardous situation which, if not avoided, MAY result in property damage. It may also be used to alert against unsafe practices. For pictorial clarity, some illustrations in this manual may show shields, guards, or plates, open or removed. Under no circumstances should this equipment be operated without these devices securely fastened in place. ! WARNING The Interlock System on this mower prevents the mower from starting unless the brake lever is engaged, mower switch is OFF and traction pedal is in Neutral. The system will stop the engine if the operator leaves the seat without engaging the parking brake or setting the mower switch OFF. NEVER operate mower unless the Interlock System is working. ! WARNING 1. Before leaving the operator’s position for any reason: a. b. c. d. e. Return traction pedal to Neutral. Disengage all drives. Lower all implements to the ground. Engage parking brake. Stop engine and remove the ignition key. 2. Keep hands, feet, and clothing away from moving parts. Wait for all movement to stop before you clean, adjust, or service the machine. 3. Keep the area of operation clear of all bystanders and pets. 4. Never carry passengers, unless a seat is provided for them. 5. Never operate mowing equipment without the discharge deflector securely fastened in place. By following all instructions in this manual, you will prolong the life of your machine and maintain its maximum efficiency. Adjustments and maintenance should always be performed by a qualified technician. If additional information or service is needed, contact your Authorized Jacobsen Dealer who is kept informed of the latest methods to service this equipment and can provide prompt and efficient service. en-5 2 2 2.1 SPECIFICATIONS SPECIFICATIONS PRODUCT IDENTIFICATION_________________________________________________ 68098.............................. AR-522, 5 Gang 4WD with ROPS Serial Number ................ An identification plate, like the one shown, listing the serial number, is attached to the frame of the mower and is located on the operator’s right just over the rear axle. Always provide the serial number of the unit when ordering replacement parts or requesting service information. 2.2 Displacement .................. 148 in3 (2434 cm3) Torque ............................ 122 ft. lbs. (165 Nm) @ 1600 rpm Fuel: Type .......................... No. 2 Diesel Rating ....................... Min. cetane rating 45 41.8 kg kW XXXX 68098001651 Product EEC Sound Power Sound Pressure Level Operator Ear 68098 105 dBA 90 dBA Vibration M/S2 Arms Body 3.72 .055 Capacity.................... 17 U.S. gal. (65 liters) Governor Setting: High Idle ................... 2850 rpm Low Idle .................... 1050 rpm Lubrication: Capacity.................... 10 U.S. qts.(9.5 liter) Type.......................... SAE 10W30 API Classification ..... CD/CE Air Filter .......................... Donaldson, dual element dry type with evacuator valve and service indicator. Parking ..................... 9.25 in. (235 mm) front disc Speed: Mow ......................... 0 - 7 mph (0 - 11 kph) Transport .................. 0 - 12 mph (0 -19.3 kph) Reverse ................... 0 - 5 mph (0 - 8.1 kph) Production ...................... 6.8 acres/hr. @ 7 mph Hydraulic System: Capacity.......................... 14 U.S. gal. (37.85 liter) Fluid Type....................... 10W30 or Greens Care 68 Cooling ........................... Oil Cooler Return Line Filter ............ 10 micron Steering ......................... Hydrostatic power steering WEIGHTS AND DIMENSIONS ________________________________________________ Dimensions: Inches Length............................................................130 Height - Top of ROPS .....................................83 Height - Top of ROPS with Canopy.................91 Width - Mow.....................................................98 en-6 1694.2 1-800-848-1636 (US) MOWER _________________________________________________________________ Tires: Front ........................ 26.5 x 14 - 12: (6 ply) Rear ......................... 22.5 x 10 - 8 Tire Pressure: Front ......................... 16 psi (1.11 BAR) Rear .......................... 12 psi (0.83 BAR) Battery: Type .......................... 12V, 600 Cold Cranking Amps Group ........................ BCI 24 Brakes: Service ..................... Dynamic braking through traction circuit. 2.4 PRODUCT OF U.S.A. V2403-M-T ENGINE ________________________________________________________ Make ............................... Kubota Model .............................. V2403-M-T Diesel, 4 cycle, liquid cooled Horsepower .................... 59 Hp (44 kW) @ 2700 rpm Bore ................................ 3.43 in. (87 mm) Stroke ............................. 4.03 in. (102.4 mm) 2.3 11524WILMAR BLVD, CHARLOTTE, NC 28273 ® A Textron Company (mm) (3302) (2108) (2311) (2486) Width - Transport............................................. 98 (2489) Weight: Lbs. (kg) Overall (less operator)................................. 3805 (1726) SPECIFICATIONS 2.5 CUTTING UNITS ___________________________________________________________ Overall cutting Width .......90 in. (2.54 m) Number of cutting units: ..Five - three front, two rear. 2.6 2 Height of Cut ................... .3/4 to 5-1/4 in. (19 to 133 mm) in 1/4 in. (6 mm) increments ACCESSORIES____________________________________________________________ Refer to the Parts Catalog and contact your Jacobsen Dealer for a complete listing of accessories and attachments. ! CAUTION Use of other than Jacobsen authorized parts and accessories may cause personal injury or damage to the equipment. Orange Touch-up Paint (12 oz. spray) ..............554598 Replacement 2-Post ROPS with Seat Belt........67844 Canopy / Sunshade......... .................................68095 Hood Locking Latch......... .................................1004049 2.7 Wheel Kit......................... ................................. 68090 High Lift Blade................. ................................. 4137186 SUPPORT LITERATURE ____________________________________________________ Contact your Jacobsen Dealer for a complete listing of literature. Safety & Operation Manual ...............................4179484 Parts & Maintenance Manual ............................4179483 Engine Parts Catalog ...... .................................4192126 Service & Repair Manual. .................................4181383 en-7 2 2.8 SPECIFICATIONS DECLARATION OF CONFORMITY ____________________________________________ DECLARATION OF CONFORMITY PROHLÁENÍ O SHOD OVERENSSTEMMELSESERKLÆRING CONFORMITEITSVERKLARING VASTAVUSDEKLARATSIOON VAATIMUSTENMUKAISUUSVAKUUTUS DECLARATION DE CONFORMITE KONFORMITÄTSERKLÄRUNG MEGFELELSÉGI NYILATKOZAT DICHIARAZIONE DI CONFORMITÀ ATBILSTBAS DEKLAR!CIJA ATITIKTIES DEKLARACIJA DIKJARAZZJONI TAL-KONFORMITÀ DEKLARACJA ZGODNO"CI DECLARAÇÃO DE CONFORMIDADE DECLARA#IE DE CONFORMITATE VYHLÁSENIE O ZHODE IZJAVA O SKLADNOSTI DECLARACIÓN DE CONFORMIDAD DEKLARATION OM ÖVERENSSTÄMMELSE Business name and full address of the manufacturer Obchodní jméno a plná adresa výrobce Producentens firmanavn og fulde adresse Bedrijfsnaam en volledig adres van de fabrikant Tootja ärinimi ja täielik aadress Valmistajan toiminimi ja täydellinen osoite Nom commercial et adresse complète du fabricant Firmenname und vollständige Adresse des Herstellers !"#$%& #'()*+ !*'*!& A gyártó üzleti neve és teljes címe Ragione sociale e indirizzo completo del fabbricante Uz,-muma nosaukums un pilna raot/ja adrese Verslo pavadinimas ir pilnas gamintojo adresas Isem kummer0jali u indirizz s1i1 tal-fabbrikant Nazwa firmy i pe3ny adres producenta Nome da empresa e endereço completo do fabricante Denumirea comercial4 5i adresa complet4 a produc4torului Obchodný názov a úplná adresa výrobcu Naziv podjetja in polni naslov proizvajalca Nombre de la empresa y dirección completa del fabricante Tillverkarens företagsnamn och kompletta adress Jacobsen, A Textron Company 11524 Wilmar Blvd. Charlotte, NC 28273, USA Product Code ? @ Kód výrobku Produktkode Productcode Toote kood Tuotekoodi Code produit Produktcode E#GL $%MG!%L Termékkód Codice prodotto Produkta kods Produkto kodas Kodi0i tal-Prodott Kod produktu Código do Produto Cod produs Kód výrobku 68098 Oznaka proizvoda Código de producto Produktkod Machine Name [ \ Název stroje Maskinnavn Machinenaam Masina nimi Laitteen nimi Nom de la machine Maschinenbezeichnung ^%* +"&!%L Gépnév Denominazione della macchina Iek/rtas nosaukums Mainos pavadinimas Isem talMagna Nazwa urzqdzenia Nome da Máquina Numele echipamentului Názov stroja Naziv stroja Nombre de la máquina Maskinens namn AR-522 Designation |} Ozna~ení Betegnelse Benaming Nimetus Tyyppimerkintä Paymjimas Bezeichnung $!+$*GL Megnevezés Funzione Apzm-jums Lithuanian Denominazzjoni Oznaczenie Designação Specificaie Ozna~enie Namen stroja Descripción Lawnmower, Article 12, Item 32 Beteckning Serial Number Sériové ~íslo Serienummer Serienummer Seerianumber Valmistusnumero Numéro de série Seriennummer '$GL $)GL Sorozatszám Numero di serie S-rijas numurs Serijos numeris Numru Serjali Numer seryjny Número de Série Num4r de serie Sériové ~íslo Serijska tevilka Número de serie Serienummer 6809801651-6809802500 Engine Motor Motor Motor Mootor Moottori Moteur Motor +"& Modulnév Motore Dzin-js Variklis Sa11a Netta Installata Kubota V2403-M-T-E3B Diesel Silnik Motor Motor Motor Motor Motor Motor en-8 Net Installed Power [ istý instalovaný výkon Installeret nettoeffekt Netto geïnstalleerd vermogen Installeeritud netovõimsus Asennettu nettoteho Puissance nominale nette Installierte Nettoleistung E)$& '!'*!++ *"(L Nettó beépített teljesítmény Potenza netta installata Paredz-t/ tkla jauda Grynoji galia Wisa tal-Qtug1 Moc zainstalowana netto Potência instalada Puterea instalat4 net4 istý intalovaný výkon Neto vgrajena mo~ Potencia instalada neta Nettoeffekt 44 kW @ 2700 RPM Cutting Width } íka ezu Skærebredde Maaibreedte Lõikelaius Leikkuuleveys Largeur de coupe Schnittbreite &%L *L Vágási szélesség Larghezza di taglio Grieanas platums Pjovimo plotis Tikkonforma mad-Direttivi Szeroko cicia Largura de Corte L4imea de t4iere írka záberu irina reza Anchura de corte Klippbredd 228,6 cm Conforms to Directives Spluje podmínky smrnic Er i overensstemmelse med direktiver Voldoet aan de richtlijnen Vastab direktiividele Direktiivien mukainen Conforme aux directives Entspricht Richtlinien %%)&*!' *! !L ^#+'L Megfelel az irányelveknek Conforme alle Direttive Atbilst direktv/m Atitinka direktyv reikalavimus Valutazzjoni tal-Konformità Dyrektywy zwiqzane Cumpre as Directivas Respect4 Directivele Je v súlade so smernicami Skladnost z direktivami Cumple con las Directivas Uppfyller direktiv 2004/108/EC 2006/42/EC 2000/14/EC, 2005/88/EC 2006/66/EC Conformity Assessment Hodnocení plnní podmínek Overensstemmelsesvurdering Conformiteitsbeoordeling Vastavushindamine Vaatimustenmukaisuuden arviointi Evaluation de conformité Konformitätsbeurteilung *!*+ G$¡*+L Megfelel¢ség-értékelés Valutazione della conformità Atbilstbas nov-rt-jums Atitikties £vertinimas Livell tal-Qawwa tal-¤oss Imkejjel Ocena zgodnoci Avaliação de Conformidade Evaluarea conformit4ii Vyhodnotenie zhodnosti Ocena skladnosti Evaluación de conformidad Bedömning av överensstämmelse 2006/42/EC Annex VIII Measured Sound Power Level ¥ @ Namený akustický výkon Målte lydstyrkeniveau Gemeten geluidsniveau Mõõdetud helivõimsuse tase Mitattu äänitehotaso Niveau de puissance sonore mesuré Gemessener Schalldruckpegel !)*% ''#% +"+!&L *"(%L Mért hangteljesítményszint Livello di potenza sonora misurato Izm-rtais ska,as jaudas lmenis Imatuotas garso stiprumo lygis Livell tal-Qawwa tal-¤oss Iggarantit Moc akustyczna mierzona Nível sonoro medido Nivelul m4surat al puterii acustice Nameraná hladina akustického výkonu Izmerjena raven zvo~ne mo~i Nivel de potencia sonora medido Uppmätt ljudeffektsnivå 105 dB(A) LWA Guaranteed Sound Power Level ¨ @ Garantovaný akustický výkon Garanteret lydstyrkeniveau Gegarandeerd geluidsniveau Garanteeritud helivõimsuse tase Taattu äänitehotaso Niveau de puissance sonore garanti Garantierter Schalldruckpegel +% ''#% +"+!&L *"(%L Szavatolt hangteljesítményszint Livello di potenza sonora garantito Garant-tais ska,as jaudas lmenis Garantuotas garso stiprumo lygis Livell tal-Qawwa tal-¤oss Iggarantit Moc akustyczna gwarantowana Nível sonoro farantido Nivelul garantat al puterii acustice Garantovaná hladina akustického výkonu Zajam~ena raven zvo~ne mo~i Nivel de potencia sonora garantizado Garanterad ljudeffektsnivå 105 dB(A) LWA Conformity Assessment Procedure (Noise) @ (@) Postup hodnocení plnní podmínek (hluk) Procedure for overensstemmelsesvurdering (Støj) Procedure van de conformiteitsbeoordeling (geluid) Vastavushindamismenetlus (müra) Vaatimustenmukaisuuden arviointimenettely (Melu) Procédure dévaluation de conformité (bruit) Konformitätsbeurteilungsverfahren (Geräusch) #* ª%G+*+L G$¡*+L («G$¬%L) Megfelel¢ség-értékelési eljárás (Zaj) Procedura di valutazione della conformità (rumore) Atbilstbas nov-rt-juma procedra (troksnis) Atitikties £vertinimo procedra (garsas) Pro0edura tal-Valutazzjoni tal-Konformità (¤oss) Procedura oceny zgodnoci (poziom ha3asu) Processo de avaliação de conformidade (nível sonoro) Procedura de evaluare a conformit4ii (zgomot) Postup vyhodnocovania zhodnosti (hluk) Postopek za ugotavljanje skladnosti (hrup) Procedimiento de evaluación de conformidad (ruido) Procedur för bedömning av överensstämmelse (buller) 2000/14/EC Annex VI, Part 1 UK Notified Body for 2000/14/EC [® ¯ 2000/14/° Úad certifikovaný podle smrnice ~. 2000/14/EC Det britiske bemyndigede organ for 2001/14/EF Engels adviesorgaan voor 2000/14/EG Ühendkuningriigi teavitatud asutus direktiivi 2000/14/EÜ mõistes Direktiivin 2000/14/EY mukainen ilmoitettu tarkastuslaitos Isossa-Britanniassa Organisme notifié concernant la directive 2000/14/CE Britische benannte Stelle für 2000/14/EG E%%%+%L ^$*GL ²% ³*'% 2000/14/E 2000/14/EK egyesült királyságbeli bejelentett szervezet Organismo Notificato in GB per 2000/14/CE 2000/14/EK AK reµistr-t/ organiz/cija JK notifikuotosios £staigos 2000/14/EC Korp Notifikat tar-Renju Unit g1al 2000/14/KE Dopuszczona jednostka badawcza w Wielkiej Brytanii wg 2000/ 14/WE Entidade notificada no Reino Unido para 2000/14/CE Organism notificat în Marea Britanie pentru 2000/14/CE Notifikovaný orgán Spojeného krá¶ovstva pre smernicu 2000/14/ES Britanski priglaeni organ za 2000/14/ES Cuerpo notificado en el Reino Unido para 2000/14/CE Anmält organ för 2000/14/EG i Storbritannien Number: 1088 Sound Research Laboratories Limited Holbrook House, Little Waldingfield Sudbury, Suffolk CO10 0TH SPECIFICATIONS Operator Ear Noise Level @¸ \@ Hladina hluku v oblasti uí operátora Støjniveau i førers ørehøjde Geluidsniveau oor bestuurder Müratase operaatori kõrvas Melutaso käyttäjän korvan kohdalla Niveau de bruit à hauteur des oreilles de lopérateur Schallpegel am Bedienerohr '#% )%$(¬% *' '!%$ A kezel¢ fülénél mért zajszint Livello di potenza sonora allorecchio delloperatore Trok,a lmenis pie operatora auss Dirban~iojo su maina patiriamo triukmo lygis Livell tal-¤oss fil-Widna tal-Operatur Dopuszczalny poziom ha3asu dla operatora Nível sonoro nos ouvidos do operador Nivelul zgomotului la urechea operatorului Hladina hluku pôsobiaca na sluch operátora Raven hrupa pri uesu upravljavca Nivel sonoro en el oído del operador Ljudnivå vid förarens öra 90 dB(a) Leq (2006/42/EC) Harmonised standards used ¥ ¸ Pouité harmonizované normy Brugte harmoniserede standarder Gebruikte geharmoniseerde standaards Kasutatud ühtlustatud standardid Käytetyt yhdenmukaistetut standardit Normes harmonisées utilisées Angewandte harmonisierte Normen $%* $G! % "$+*%%&)+ Harmonizált szabványok Standard armonizzati applicati Izmantotie saska,otie standarti Panaudoti suderinti standartai Standards armonizzati u¹ati Normy spójne powiqzane Normas harmonizadas usadas Standardele armonizate utilizate Pouité harmonizované normy Uporabljeni usklajeni standardi Estándares armonizados utilizados Harmoniserade standarder som används BS EN ISO 20643 BS EN ISO 5349-1 BS EN ISO 5349-2 BS EN 836 Technical standards and specifications used ¥ ¸} ® Pouité technické normy a specifikace Brugte tekniske standarder og specifikationer Gebruikte technische standaards en specificaties Kasutatud tehnilised standardid ja spetsifikatsioonid Käytetyt tekniset standardit ja eritelmät Spécifications et normes techniques utilisées Angewandte technische Normen und Spezifikationen º'" $G! $%#$¡L % "$+*%%&)+ M»szaki szabványok és specifikációk Standard tecnici e specifiche applicati Izmantotie tehniskie standarti un specifik/cijas Panaudoti techniniai standartai ir technin informacija Standards u spe0ifikazzjonijiet tekni0i u¹ati Normy i specyfikacje techniczne powiqzane Normas técnicas e especificações usadas Standardele tehnice 5i specificaiile utilizate Pouité technické normy a pecifikácie Uporabljeni tehni~ni standardi in specifikacije Estándares y especificaciones técnicas utilizadas Tekniska standarder och specifikationer som används B71.4 ISO 2631-1 SAE J1194 The place and date of the declaration ¼ Místo a datum prohláení Sted og dato for erklæringen Plaats en datum van de verklaring Deklaratsiooni väljastamise koht ja kuupäev Vakuutuksen paikka ja päivämäärä Lieu et date de la déclaration Ort und Datum der Erklärung ºG%L +'$%+ #&*+L A nyilatkozat kelte (hely és id¢) Luogo e data della dichiarazione Deklar/cijas vieta un datums Deklaracijos vieta ir data Il-post u d-data tad-dikjarazzjoni Miejsce i data wystawienia deklaracji Local e data da declaração Locul 5i data declaraiei Miesto a dátum vyhlásenia Kraj in datum izjave Lugar y fecha de la declaración Plats och datum för deklarationen Jacobsen, A Textron Company 11524 Wilmar Blvd. Charlotte, NC 28273, USA January 1, 2011 Signature of the person empowered to draw up the declaration on behalf of the manufacturer, holds the technical documentation and is authorised to compile the technical file, and who is established in the Community. | } , @ , ½ ¾ ¸} @ ¸} ®½ ¯. Podpis osoby oprávnné sestavit prohláení jménem výrobce, dret technickou dokumentaci a osoby oprávnné sestavit technické soubory a zaloené v rámci Evropského spole~enství. Underskrift af personen, der har fuldmagt til at udarbejde erklæringen på vegne af producenten, der er indehaver af dokumentationen og er bemyndiget til at udarbejde den tekniske journal, og som er baseret i nærområdet. Handtekening van de persoon die bevoegd is de verklaring namens de fabrikant te tekenen, de technische documentatie bewaart en bevoegd is om het technische bestand samen te stellen, en die is gevestigd in het Woongebied. Ühenduse registrisse kantud isiku allkiri, kes on volitatud tootja nimel deklaratsiooni koostama, kes omab tehnilist dokumentatsiooni ja kellel on õigus koostada tehniline toimik. Sen henkilön allekirjoitus, jolla on valmistajan valtuutus vakuutuksen laadintaan, jolla on hallussaan tekniset asiakirjat, joka on valtuutettu laatimaan tekniset asiakirjat ja joka on sijoittautunut yhteisöön. Signature de la personne habilitée à rédiger la déclaration au nom du fabricant, à détenir la documentation technique, à compiler les fichiers techniques et qui est implantée dans la Communauté. Unterschrift der Person, die berechtigt ist, die Erklärung im Namen des Herstellers abzugeben, die die technischen Unterlagen aufbewahrt und berechtigt ist, die technischen Unterlagen zusammenzustellen, und die in der Gemeinschaft niedergelassen ist. ¿%$¡& !G% 'ª%*%#%!+% !+ *(!ª+ !+L #&*+L ' $%L !% !*'*!&, % %%%L !"' !+ !'"& )'*+ "' !+ 'ª%*%#G!+*+ !ª%&*' !% !'"G ¡'% % %%%L ' #%$*%L *!+ E%G!+!. A gyártó nevében meghatalmazott személy, akinek jogában áll módosítania a nyilatkozatot, a m»szaki dokumentációt ¢rzi, engedéllyel rendelkezik a m»szaki fájl összeállításához, és aki a közösségben letelepedett személy. Firma della persona autorizzata a redigere la dichiarazione a nome del fabbricante, in possesso Della documentazione tecnica ed autorizzata a costituire il fascicolo tecnico, che deve essere stabilita nella Comunità. T/s personas paraksts, kura ir pilnvarota deklar/cijas sast/danai raot/ja v/rd/, kurai ir tehnisk/ dokument/cija, kura ir pilnvarota sagatavot tehnisko reµistru un kura ir apstiprin/ta Kopien/. Asmuo, kuris yra gana inomas, kuriam gamintojas suteik £galiojimus sudaryti iq deklaracijq, ir kuris jq pasira, turi visq technin informacijq ir yra £galiotas sudaryti technins informacijos dokumentq. Il-firma tal-persuna awtorizzata li tfassal id-dikjarazzjoni fisem il-fabbrikant, g1andha d-dokumentazzjoni teknika u hija awtorizzata li tikkompila l-fajl tekniku u li hija stabbilita fil-Komunità. Podpis osoby upowa¹nionej do sporzqdzenia deklaracji w imieniu producenta, przechowujqcej dokumentacj technicznq, upowa¹nionq do stworzenia dokumentacji technicznej oraz wyznaczonej ds. wspólnotowych. Assinatura da pessoa com poderes para emitir a declaração em nome do fabricante, que possui a documentação técnica, que está autorizada a compilar o processo técnico e que está estabelecida na Comunidade. Semn4tura persoanei împuternicite s4 elaboreze declaraia în numele produc4torului, care deine documentaia tehnic4, este autorizat4 s4 compileze dosarul tehnic 5i este stabilit4 în Comunitate. Podpis osoby poverenej vystavením vyhlásenia v mene výrobcu, ktorá má technickú dokumentáciu a je oprávnená spracovaÀ technické podklady a ktorá je umiestnená v Spolo~enstve. Podpis osebe, poobla~ene za izdelavo izjave v imenu proizvajalca, ki ima tehni~no dokumentacijo in lahko sestavlja spis tehni~ne dokumentacije, ter ima sede v Skupnosti. Firma de la persona responsable de la declaración en nombre del fabricante, que posee la documentación técnica y está autorizada para recopilar el archivo técnico y que está establecido en la Comunidad. Undertecknas av den som bemyndigad att upprätta deklarationen å tillverkarens vägnar, innehar den tekniska dokumentationen och är bemyndigad att sammanställa den tekniska informationen och som är etablerad i gemenskapen. Certificate Number [ ® íslo osvd~ení Certifikatnummer Certificaatnummer Sertifikaadi number Hyväksyntänumero Numéro de certificat Bescheinigungsnummer $)GL Á*!%%+!%( Hitelesítési szám Numero del certificato Sertifik/ta numurs Sertifikato numeris Numru ta0-Âertifikat Numer certyfikatu Número do Certificado Num4r certificat íslo osved~enia tevilka certifikata Número de certificado Certifikatsnummer 2 2006/42/EC Annex II 1.A.2 Tim Lansdell Technical Director Ransomes Jacobsen Limited West Road, Ransomes Europark, Ipswich, IP3 9TT, England 2006/42/EC Annex II 1.A.10 Vasant Godhalekar VP of Engineering Jacobsen, A Textron Company 11524 Wilmar Blvd, Charlotte, NC 28273, USA 4179483 Rev B en-9 3 ADJUSTMENTS 3 3.1 ADJUSTMENTS GENERAL ________________________________________________________________ ! WARNING To prevent injury, lower implements to the ground, disengage all drives, engage parking brake, stop engine and remove key from ignition switch before making any adjustments or performing maintenance. adjustment cannot be made, contact an authorized Jacobsen Dealer. 2. Replace, do not adjust, worn or damaged components. 3. Do not wear jewelry or loose fitting clothing when making adjustments or repairs. ! CAUTION Make sure the mower is parked on a solid and level surface. Never work on a mower that is supported only by the jack. Always use jack stands. If only the front or rear of the mower is raised, place chocks in front of and behind the wheels that are not raised. 1. 3.2 Adjustments and maintenance should always be performed by a qualified technician. If proper Be careful to prevent entrapment of the hands and fingers between moving and fixed components of the machine. 4. Do not change governor settings or overspeed the engine. MOW SPEED______________________________________________________________ Cutting quality is better at speeds well below the transport speed of the mower. An initial mow speed of five to six mph is set at the factory and should be satisfactory for most cutting conditions. Local turf conditions, however, may respond better to a different speed. A To set mow speed, loosen jam nut (A) and adjust stop screw up to reduce speed, down to increase speed. Tighten nut to hold adjustment in place. LF002 Figure 3A 3.3 BELT ____________________________________________________________________ Inspect and adjust new belt after first ten hours of operation. Adjust every 100 hours thereafter. B Adjust alternator pulley so belt deflects 1/4 to 5/16 in. (6 -8 mm) with a 20 lb. push at midpoint between pulleys. See engine manual. If tension is incorrect, loosen alternator mounting bolts (B) and adjust alternator until proper belt tension is achieved. 1/4 TO 5/16 IN. (6 TO 8 MM) LF012 Figure 3B en-10 ADJUSTMENTS 3.4 BRAKES _________________________________________________________________ Adjust brakes after replacing or servicing brake assembly, or if pedal travel becomes excessive. 1. When installing new brake pads, burnish pads by driving mower at mowing speed while applying a slight pressure on brake pedal for about 5 seconds. Release and repeat five times before making the final adjustment. 2. Fully loosen adjusting nut (E). 3. Disconnect brake return Illustration 8.1) at caliper. 4. By hand, pull cable behind adjusting nut (C) away from pedal until brake pads just contact brake disk. Thread adjusting nut (C) up until it contacts the mounting plate. Tighten nut (E) to lock adjustment in place. Torque nut (E) to 20 ft. lb. (27 Nm). Do not over torque or turn cable. spring (See Item 7. Connect brake return spring. Repeat for second cable. 6. If brakes wear beyond point where they can be adjusted by the cable, move brake bracket into second set of holes provided (D) and complete adjustment procedure. D D C E Figure 3C NEUTRAL ADJUSTMENT ___________________________________________________ Neutral adjustment can only be made at the drive pump. The Neutral adjustment is preset at the factory on all new mowers and replacement pumps. Further adjustment is not required unless the pump has been disassembled for repair or service. To adjust Neutral: 1. Disconnect traction pedal linkage from pump. 2. Place mower securely on jack stands so All wheels are raised off ground. 3. Check that tow valve (H) is closed 4. Engage parking brake and set mow switch to Neutral. Make sure Neutral switch at traction pedal is closed. (Figure 3E - M). Distance between the sensing portion of switch and metal pointer (M) must be between 1/16 and 1/8 in. (1.5 and 3 mm). 5. Loosen screws (G) holding pump lever bracket just enough so it can be moved. Start engine, disengage parking brake, and observe wheels. Adjust bracket (F) in slotted holes until wheels do not turn. Turn off engine and tighten bracket in place. 6. Start mower and check operation of brakes. Park mower on an incline (approximately. 16.7° slope) and engage parking brake. Brake must prevent mower from rolling. Adjust nut (C) as required. 14, 5. 3.5 3 bracket is centered over Neutral switch (M -Figure 3E). 7. Start engine and check operation of traction pedal. Wheels must not turn when pedal returns to Neutral and lamp 5 on controller should light, see Section 5.2. F G H LF014 Figure 3D Connect traction linkage. When connecting linkage at traction pedal make sure pointer on traction pedal en-11 3 ADJUSTMENTS 3.6 FORWARD / REVERSE SPEED ______________________________________________ Forward and reverse speeds are adjusted at the traction pedal. Set forward speed before adjusting reverse. 2. Start engine and check reverse travel speed with engine at full throttle. Reverse speed should measure 3.5 mph (5.6 kph). 3. Stop engine. To adjust reverse speed, loosen nut on reverse travel stop bolt (L). Slide bolt forward in slotted hole to increase speed, back to reduce speed. Tighten nut to hold adjustment in place. 4. Start engine and check speed. Repeat procedure until 3.5 mph (5.6 kph) reverse speed is attained. To adjust forward speed: 1. Make sure drive pump has been set to Neutral and engine throttle is adjusted correctly. 2. Start engine and check forward travel speed with engine at full throttle and mower in two wheel drive (2WD). Forward transport speed should measure 10 mph (16 kph). 3. Stop engine. To adjust forward speed, disconnect eye bolt (K) from pedal and loosen jam nut. Turn eye bolt in to reduce speed, out to increase speed. Tighten jam nut to hold adjustment in place and connect eye bolt. 4. With traction pedal in Neutral, check position of Neutral switch (J). Adjust switch up or down so pointer (M) on traction pedal bracket is centered over it. When adjusted correctly lamp 5 on controller will light when ignition switch is turned to on. 5. Start engine and check forward speed. Repeat procedure until 10 mph (16 kph) forward transport speed is attained. J K M L To adjust reverse speed: 1. Set forward speed. Figure 3E 3.7 STEERING TOE-IN _________________________________________________________ 1. Turn wheels to straight ahead position. 2. Loosen jam nuts (N) on both sides of tie rod (M). 3. Turn tie rod (S) to provide proper toe-in. Toe-in must not exceed +1/16 in. (+1.5 mm) (P). Retighten jam nuts. 4. After adjusting tie rod, adjust steering cylinder by threading the rod (T) in or out of ball joint so spindle arm (R) clears the stop on the axle by 3/4 ± 1/16 in. (19 ± 1.5 mm) (U) when cylinder is fully extended. P N S N T P +0 to1/16” R (+0 to 1.5 mm) U 3/4 ± 1/16 in. (19 ± 1.5 mm) LF016 Figure 3F en-12 ADJUSTMENTS 3.8 3 CUTTING HEIGHT _________________________________________________________ Cutting height for decks can be adjusted from 3/4 to 5-1/4 in. (19-133 mm) in 1/4 in. (6 mm) increments. Actual cutting height may vary somewhat from the heights given depending on turf conditions and other factors. NOTICE NOTICE For best quality of cut, always place the same number of spacers under deck housing on all three spindles. Adjust all decks to same cutting height. When cutting undulating areas, lower cutting heights may cause scalping. Adjust height accordingly to prevent turf damage. C A F D 1. Park the mower on a flat, level surface. Fully lower cutting units. Stop engine and remove key from ignition. B ! WARNING To prevent serious injury, lower deck until it is resting completely on the front casters and rear roller. This will prevent it from accidentally lowering while making adjustments. Disengage all drives, engage parking brake, stop engine, and remove ignition key. D E 2. Refer to the chart provided for desired cutting height. Figure 3G ! CAUTION Use proper lifting techniques when lifting or lowering deck housings. The deck housing assemblies weigh approximately 50 lbs (23 kg). 3. To lower height of cut, remove all three snap lock pins (A). Lift outer spindle shaft (B) slightly and remove 1/2 in. (13 mm) spacers (D) and/or 1/4 in (6 mm) spacer (E) from bottom one at a time until desired height is obtained. Carefully remove blocks and lower deck housings (C). Place remaining spacers on top of spindle and insert snap lock pins. Washer (F) is always on top, under snap lock pin. 4. To raise height of cut, remove all three snap lock pins (A). Carefully lift deck housing (C) above desired cutting height and support with blocks. Add 1/2 in. (13 mm) spacers (D) and/or 1/4 in. (6 mm) spacer (E) as required until desired height is obtained. Lower deck housing. Place remaining spacers on top of spindle and insert snap lock pins. Washer (F) is always on top, under snap lock pin. Height 1/2” Spacers of Below Mower Cut Housing 3/4 0 1 0 1-1/4 1 1-1/2 1 1-3/4 2 2 2 2-1/4 3 2-1/2 3 2-3/4 4 3 4 3-1/4 5 3-1/2 5 3-3/4 6 4 6 4-1/4 7 4-1/2 7 4-3/4 8 5 8 5-1/4 9 1/2” Spacers Above Mower Housing 9 9 8 8 7 7 6 6 5 5 4 4 3 3 2 2 1 1 0 1/4” Spacer Location Above Housing Below Housing Above Housing Below Housing Above Housing Below Housing Above Housing Below Housing Above Housing Below Housing Above Housing Below Housing Above Housing Below Housing Above Housing Below Housing Above Housing Below Housing Above Housing en-13 3 ADJUSTMENTS 3.9 TRACTION CONTROL SYSTEM CALIBRATION _________________________________ The Traction Control System (TCS) will need to be calibrated when a system component has been replaced or the system is not working correctly. System components include controller, lift valve, lift cylinders, or hoses. 1. Allow hydraulic system to become properly warmed up. An operator must be in the seat during the calibration procedure. ! WARNING Never operate the engine without proper ventilation; exhaust fumes can be fatal when inhaled. While warming up the hydraulic system for the calibration procedure, the cutting unit blades will be turning. Make certain that the area under and around the cutting units is clean and any debris that can be thrown from the machine is cleared away. Keep bystanders away from unit. a. Start engine and move throttle to full position. b. Release the parking brake. c. Turn PTO switch ON. d. Fully lower cutting units to the ground. e. Engage traction control system. f. Allow unit to run for 5 minutes with these settings. 2. System must be calibrated with the engine running, operator in seat, PTO switch in OFF position, parking brake engaged and traction pedal in Neutral. 3. Fully lower cutting units. Verify all five decks are all the way down. 4. Press and hold TCS switch for 5 seconds. Horn will beep when controller enters calibration mode. NOTICE Do not release switch until horn stops for both starting and finishing the calibration procedure. 5. Tap the lift lever to raise position and wait for 3 to 5 seconds. Repeat if required until cutting units just begin to raise. 6. Tap the lift lever to lower position and wait until decks stop moving. Repeat, tapping joystick if required until front decks are on the ground. en-14 NOTICE Do not rush through steps 5 and 6. System will not be properly calibrated if decks do not start to raise in step 5 and are not fully lowered during step 6. 7. Press and hold TCS switch until horn beeps. System is now calibrated. NOTICE To cancel calibration mode, turn keyswitch to the OFF position. ADJUSTMENTS 3 3.10 TORQUE SPECIFICATION___________________________________________________ NOTICE All torque values included in these charts are approximate and are for reference only. Use of these torque values is at your sole risk. Jacobsen is not responsible for any loss, claim, or damage arising from the use of these charts. Extreme caution should always be used when using any torque value. Jacobsen uses Grade 5 Plated bolts as standard, unless otherwise noted. For tightening plated bolts, use the value given for lubricated. AMERICAN NATIONAL STANDARD FASTENERS SIZE UNITS GRADE 5 Lubricated GRADE 8 Dry Lubricated SIZE UNITS GRADE 5 Dry Lubri- GRADE 8 Dry Lubri- cated Dry cated #6-32 in-lb (Nm) – 20 (2.3) – – 7/16-14 ft-lb (Nm) 37 (50.1) 50 (67.8) 53 (71.8) 70 (94.9) #8-32 in-lb (Nm) – 24 (2.7) – 30 (3.4) 7/16-20 ft-lb (Nm) 42 (56.9) 55 (74.6) 59 (80.0) 78 (105) #10-24 in-lb (Nm) – 35 (4.0) – 45 (5.1) 1/2-13 ft-lb (Nm) 57 (77.2) 75 (101) 80 (108) 107 (145) #10-32 in-lb (Nm) – 40 (4.5) – 50 (5.7) 1/2-20 ft-lb (Nm) 64 (86.7) 85 (115) 90 (122) 120 (162) #12-24 in-lb (Nm) – 50 (5.7) – 65 (7.3) 9/16-12 ft-lb (Nm) 82 (111) 109 (148) 115 (156) 154 (209) 1/4-20 in-lb (Nm) 75 (8.4) 100 (11.3) 107 (12.1) 143 (16.1) 9/16-18 ft-lb (Nm) 92 (124) 122 (165) 129 (174) 172 (233) 1/4-28 in-lb (Nm) 85 (9.6) 115 (13.0) 120 (13.5) 163 (18.4) 5/8-11 ft-lb (Nm) 113 (153) 151 (204) 159 (215) 211 (286) 5/16-18 in-lb (Nm) 157 (17.7) 210 (23.7) 220 (24.8) 305 (34.4) 5/8-18 ft-lb (Nm) 128 (173) 170 (230) 180 (244) 240 (325) 5/16-24 in-lb (Nm) 173 (19.5) 230 (26.0) 245 (27.6) 325 (36.7) 3/4-10 ft-lb (Nm) 200 (271) 266 (360) 282 (382) 376 (509) 3/8-16 ft-lb (Nm) 23 (31.1) 31 (42.0) 32 (43.3) 44 (59.6) 3/4-16 ft-lb (Nm) 223 (302) 298 404 315 (427) 420 (569) 3/8-24 ft-lb (Nm) 26 (35.2) 35 (47.4) 37 (50.1) 50 (67.8) 7/8-14 ft-lb (Nm) 355 (481) 473 (641) 500 (678) 668 (905) METRIC FASTENERS 4.6 SIZE 8.8 10.9 Non Critical Fasteners into Aluminum 12.9 UNITS Lubricated Dry Lubricated Dry Lubricated Dry Lubricated Dry – – 3.83 (34) 5.11 (45) 2.0 (18) M4 Nm (in-lb) – – – – M5 Nm (in-lb) 1.80 (16) 2.40 (21) 4.63 (41) 6.18 (54) 6.63 (59) 8.84 (78) 7.75 (68) 10.3 (910 4.0 (35) M6 Nm (in-lb) 3.05 (27) 4.07 (36) 7.87 (69) 10.5 (93) 11.3 (102) 15.0 (133) 13.2 (117) 17.6 (156) 6.8 (60) M8 Nm (in-lb) 7.41 (65) 9.98 (88) 19.1 (69) 25.5 (226) 27.3 (241) 36.5 (323) 32.0 (283) 42.6 (377) 17.0 (150) M10 Nm (ft-lb) 14.7 (11) 19.6 (14) 37.8 (29) 50.5 (37) 54.1 (40) 72.2 (53) 63.3 (46) 84.4 (62) 33.9 (25) M12 Nm (ft-lb) 25.6 (19) 34.1 (25) 66.0 (48) 88.0 (65) 94.5 (70) 125 (92) 110 (81) 147 (108) 61.0 (45) M14 Nm (ft-lb) 40.8 (30) 54.3 (40) 105 (77) 140 (103) 150 (110) 200 (147) 175 (129) 234 (172) 94.9 (70) en-15 4 MAINTENANCE 4 MAINTENANCE 4.1 GENERAL ________________________________________________________________ ! WARNING Before you clean, adjust, or repair this equipment, disengage all drives, lower implements to the ground, engage parking brake, stop engine, and remove key from ignition switch to prevent injuries Make sure the mower is parked on a solid and level surface. Never work on a mower that is supported only by the jack. Always use jack stands. 1. 2. Adjustment and maintenance should always be performed by a qualified technician. If proper adjustments cannot be made, contact an Authorized Jacobsen Dealer. Inspect the equipment on a regular basis, establish a maintenance schedule and keep detailed records. a. 4.2 b. Keep all moving parts properly adjusted and lubricated. c. Replace worn or damaged parts before operating the machine. d. Keep all fluids at their proper levels. e. Keep shields in place and all hardware securely fastened. f. Keep tires properly inflated. 3. Do not wear jewelry or loose fitting clothing when making adjustments or repairs. 4. Use the illustrations in the Parts Catalog as reference for the disassembly and reassembly of components. 5. Recycle or dispose of all hazardous materials (batteries, fuel, lubricants, anti-freeze, etc.) according to local, state, or federal regulations. Keep the equipment clean. ENGINE _________________________________________________________________ IMPORTANT: A separate Engine Manual, prepared by the engine manufacturer, is supplied with this mower. Read the Engine Manual carefully until you are familiar with the operation and maintenance of the engine. Proper attention to the engine manufacturer’s directions will assure maximum service life of the engine. To order replacement engine manuals contact the engine manufacturer. 2. Check the engine oil level twice daily during the first 50 hours of operation. Higher than normal oil consumption is not uncommon during the initial break-in period. 3. Change engine oil and oil filter element after first 50 hours of operation. 4. Check and adjust fan and alternator belts. 5. Refer to Section 6.2 and Engine Manual for specific maintenance intervals. The proper break-in of a new engine can make a considerable difference to the performance and life of the engine. If the injection pump, injectors or the fuel system require service, contact an authorized Jacobsen Dealer. During the break-in period, Jacobsen recommends the following: NOTICE 1. 4.3 During the first 50 hours of operation, a new engine should be allowed to reach an operating temperature of at least 140°F (60°C) prior to operation at full load. ENGINE OIL ______________________________________________________________ Check the engine oil at the start of each day, before starting the engine. If the oil level is low, remove oil filler cap, and add oil as required. Perform initial oil change after first 50 hours of operation and every 100 hours thereafter. See Engine Manual. en-16 The mower is designed to operate and cut most efficiently at the preset governor setting. Do not change the engine governor settings or overspeed the engine. Use only engine oils with API classification CD/CE. Above 77°F (25°C) SAE 30W or SAE10W30/10W40 32 to 77°F (0 to 25°C) SAE 20W or SAE 10W30/10W40 Below 32°F (0°C) SAE10W or SAE 10W30/10W40 MAINTENANCE 4.4 AIR FILTER_______________________________________________________________ Check the service indicator daily. If red band appears in the window (B) replace the element. Do not remove the element for inspection or cleaning. Unnecessary removal of the filter increases the risk of injecting dust and other impurities into the engine. 4. Reassemble cap making sure it seals completely around the filter housing. Dust evacuator must be facing down. 5. Check all hoses and air ducts. Tighten hose clamps. When service is required, first clean the outside of the filter housing, then remove the old element as gently as possible and discard. 1. Carefully clean the inside of the filter housing without allowing dust into the air intake. 2. Inspect the new element. Do not use a damaged element and never use an incorrect element. 3. Assemble the new element and make sure it seats properly. Reset the indicator by depressing button (A). 4.5 4 B A Figure 4A FUEL ____________________________________________________________________ Handle fuel with care - it is highly flammable. Only use an approved container. The spout must fit inside the fuel filler neck. Avoid using cans and funnels to transfer fuel. ! WARNING Never remove the fuel cap from the fuel tank, or add fuel, when the engine is running or while the engine is hot. Do not smoke when handling fuel. Never fill or drain the fuel tank indoors. Clean spilled fuel immediately. • Fill the fuel tank to within 1 in. (25 mm) below the filler neck. • Use clean, fresh, #2 Diesel fuel, minimum Cetane Rating 45. Refer to Engine Manual for additional information. • Check fuel lines and clamps every 50 hours. Replace fuel lines and clamps at the first sign of damage. • Store fuel according to local, state or federal ordinances and recommendations from your fuel supplier. • Never overfill or allow the tank to become empty. Never handle or store fuel containers near an open flame or any device that may create sparks and ignite the fuel or fuel vapors. Be sure to reinstall and tighten fuel cap securely. 4.6 FUEL SYSTEM ____________________________________________________________ Refer to Section 6.2 for specific maintenance intervals. To change fuel filter: Before replacing any filter, thoroughly clean the filter housing and the area around the filter. Dirt must not be allowed to enter into fuel system. 1. Close fuel valve on tank, then remove and discard the existing filter. 2. Apply a light coat of oil to the gasket and hand tighten new filter. 3. Fill fuel tank. Open fuel valve on tank and bleed the filter. See Engine Manual. Bleed the fuel system after the fuel filter and lines have been removed, or the fuel tank has become empty. See Engine Manual. en-17 4 MAINTENANCE 4.7 BATTERY ________________________________________________________________ Make absolutely certain the ignition switch is OFF position and the key has been removed before servicing the battery. ! CAUTION Always use insulated tools, wear protective glasses or goggles and protective clothing when working with batteries. You must read and obey all the battery manufacturer’s instructions. Verify battery polarity before connecting or disconnecting the battery cables. 1. When installing the battery, always assemble the RED, positive (+) battery cable first and the ground, BLACK, negative (-) cable last. 2. When removing the battery, always remove the ground, BLACK, negative (-) cable first and the RED, positive (+) cable last. 3. Make sure battery is properly installed and secured to the battery tray. Tighten cables securely to battery terminals and apply a light coat of silicone dielectric grease to terminals and cable ends to prevent corrosion. Keep vent caps and terminal covers in place. Check the electrolyte level every 100 hours. Keep the cable ends, battery and battery posts clean. Always disconnect battery cables from battery and controller connectors before performing and welding operation on the mower. 4.8 ! WARNING Battery posts, terminals, and related accessories contain lead and lead compounds, chemicals known to the State of California to cause cancer and other reproductive harm. Wash your hands after handling. JUMP STARTING __________________________________________________________ Before attempting to “jump start” the mower, check the condition of the discharged battery. Section 4.7. ! WARNING Batteries generate explosive hydrogen gas. To reduce the chance of an explosion, avoid creating sparks near battery. Always connect the negative jumper cable to the frame of the mower with the discharged battery, away from the battery. 4.9 When connecting jumper cables: 1. Stop the engine on vehicle with good battery. 2. Connect RED jumper cable to the positive (+) terminal on the good battery and to the positive (+) terminal on the “discharged” battery. 3. Connect the BLACK jumper cable from the negative (-) terminal on the good battery to the frame of mower with discharged battery. After cables have been connected, start the engine on the vehicle with the good battery then start the mower. CHARGING BATTERY _____________________________________________________ 2. Whenever possible, remove the battery from the mower before charging. If battery is not sealed, check that the electrolyte liquid covers the plates in all the cells. 3. Make sure the charger is OFF, then connect the charger to the battery terminals as specified in the charger’s manual. 4. Always turn the charger OFF before disconnecting charger from the battery terminals. ! WARNING Charge battery in a well ventilated area. Batteries generate explosive gases. To prevent an explosion, keep any device that may create sparks or flames away from the battery. To prevent injury, stand away from battery when the charger is turned on. A damaged battery could explode. 1. Refer to Section 4.7. Read the Battery and Charger’s manual for specific instructions. en-18 MAINTENANCE 4 4.10 MUFFLER AND EXHAUST ___________________________________________________ ! WARNING Exhaust fumes contain carbon monoxide that is toxic and can be fatal when inhaled. NEVER operate an engine without proper ventilation. To protect from carbon monoxide poisoning, inspect the complete exhaust system regularly and always replace a defective muffler. If you notice a change in the color or sound of the exhaust, stop the engine immediately. Identify the problem and have the system repaired. Torque all exhaust manifold hardware evenly. Tighten or replace exhaust clamps. 4.11 HYDRAULIC HOSES _______________________________________________________ 4. ! WARNING IMPORTANT: The hydraulic system can be permanently damaged if the oil becomes contaminated. Before disconnecting any hydraulic component, clean the area around the fittings and the hose ends to keep impurities out of the system. To prevent serious injury from hot, high pressure oil, never use your hands to check for oil leaks. Use paper or cardboard. Hydraulic fluid escaping under pressure can have sufficient force to penetrate skin. If fluid is injected into the skin it must be surgically removed within a few hours by a doctor familiar with this form of injury or gangrene may result. 1. 2. 3. Thoroughly inspect all tubes, hoses and connections every 250 hours. a. Before disconnecting any hydraulic component, tag or mark the location of each hose then clean the area around the fittings. b. As you disconnect the component, be prepared to assemble plugs or caps to the hose ends and open ports. This will keep impurities out of the hydraulic system and also prevent oil spills. c. Check visible hoses and tubes daily. Look for wet hoses or oil spots. Replace worn or damaged hoses and tubes before operating the machine. Make sure “O” rings are clean and hose fittings are properly seated before tightening. d. The replacement tube or hoses must be routed in the same path as the existing hose. Do not move clamps, brackets and ties to a new location. Keep the hose from twisting. Twisted hoses can cause couplers to loosen as the hose flexes during operation, resulting in oil leaks. e. Kinked or twisted hoses can restrict the oil flow, causing the system to malfunction and the oil to overheat and also lead to hose failure. Always lower implements to ground, disengage all drives, engage parking brake, stop engine and remove key before inspecting or disconnecting hydraulic lines or hoses. 4.12 HYDRAULIC OIL___________________________________________________________ Refer to Section 6.2 for specific maintenance intervals. 3. Drain and replace the hydraulic oil after a major component failure, or if you notice the presence of water or foam in the oil, or a rancid odor (indicating excessive heat). After oil has drained, install drain plug and fill with hydraulic oil. 4. Purge air from system. Always replace both hydraulic filters when oil filter light stays on or when changing oil. a. To prevent reels from overheating, disconnect motors from reels. b. Operate all mower functions for about 5 minutes to purge air out of the system and stabilize the oil level. During this time, the oil level alarm may sound. c. Once the level has stabilized and the air is purged, fill the tank to the full mark on dipstick. Start engine and check that oil alarm remains off. To change hydraulic oil: 1. Clean the area around the oil cap to prevent impurities from entering and contaminating the system. 2. Remove drain plug from bottom of tank. en-19 4 MAINTENANCE 4.13 HYDRAULIC FILTER _______________________________________________________ The hydraulic system is protected by a 10 micron return line filter. Flow though the filters is monitored during operation. When pressure drop across the filters is too high the hydraulic oil filter warning light will come on. To ensure continued protection to the hydraulic system, replace filter as soon as possible after light comes on. NOTICE During cold weather the warning light may come on until oil has warmed up to operating temperature. Wait until oil has warmed up and light goes out before operating mower. To replace hydraulic filter: 1. Remove the old filter. 2. Install new filter. Hand tighten only. 3. Operate engine at idle speed with hydraulic system in Neutral for five minutes. The oil level alarm may sound during this time. 4. Check hydraulic oil level in reservoir and fill to full mark on dipstick. 4.14 ELECTRICAL SYSTEM _____________________________________________________ ! CAUTION Always turn the ignition switch OFF and remove the negative battery cable (BLACK) before inspecting or working on the electrical system. General precautions that can be taken to reduce electrical problems are listed below. 1. Make certain all terminals and connections are clean and properly secured. 2. Check the interlock system, fuses and circuit breakers regularly. NOTICE For factory assistance with troubleshooting controller problems, please note the controller hardware revision and software version located on the lower right corner of the controller. Controllers with equal or greater revision levels will be backward compatible. Circuits are protected by a circuit breaker, fuses and relays mounted on or near the controller. F1 F2 C If the interlock does not function properly and the problem cannot be corrected, contact an authorized Jacobsen Dealer. 3. Keep the wire harness and all individual wires away from moving parts to prevent damage. 4. Make sure the seat switch harness is connected to the main wire harness. 5. Check the battery and battery charging circuit. 6. Do not wash or pressure spray around electrical connections and components. The electrical system is monitored and controlled by the electronic controller (C) located behind the operator’s area. The controller is equipped with two banks of LED’s which can be used when troubleshooting the electrical system. See Section 5.2. K1 K2 Software Version Hardware Revision CB1 CIRCUIT BREAKER CB1 50 A CIRCUIT BREAKER FUSES F1 20 A ALTERNATOR, GAUGES, SWITCHES F2 20 A LIGHTS RELAYS K1 GLOW PLUG K2 STARTER Figure 4B en-20 MAINTENANCE 4 4.15 RADIATOR _______________________________________________________________ ! WARNING To prevent serious bodily injury from hot coolant or steam blow-out, never attempt to remove the radiator cap while the engine is running. Stop the engine and wait until it is cool. Even then, use extreme care when removing the cap. Mix clean water with ethylene glycol based anti-freeze for the coldest ambient temperature. Read and follow the instructions on the anti-freeze container and Engine Manual. Keep radiator and hydraulic oil cooler air passages clean. Use compressed air (30 psi maximum) to clean the fins. To clean radiator: 1. ! CAUTION NOTICE Do not pour cold water into a hot radiator. Do not operate engine without a proper coolant mixture. Install cap and tighten securely. Check coolant level daily. Radiator should be full and recovery bottle should be up to the cold mark. Drain and refill annually. Remove the radiator cap, open the engine block drain and the radiator drain. Empty and clean the recovery bottle. Use a blow gun to clean the radiator and oil cooler fins. A sliding panel located under the frame can be loosened and pulled back to allow dirt and debris to fall through frame. 2. Check and tighten the fan belt. Replace clamps and hoses every two years. 3. If you have to add coolant more than once a month, or add more than one quart at a time, have a Jacobsen Dealer check the cooling system. 4.16 ROLL OVER PROTECTIVE STRUCTURE (ROPS) ________________________________ A Roll Over Protective Structure (ROPS), designed for this mower, is included with this mower as standard equipment. Inspect it periodically and follow operating procedures described in the Safety & Operation Manual. ! CAUTION Do not loosen or remove bolts, do not weld, drill, modify, bend, or straighten a damaged structure. 1. The seat, the seat belt, mounting hardware, and any accessories within the ROPS, should be inspected regularly and all damaged parts replaced immediately. 2. Once the ROPS has been subjected to any form of impact it should be replaced. 3. Check and re-torque all hardware. All replacement components used for the ROPS must be as specified in the Parts Catalog. 4.17 TIRES ___________________________________________________________________ 1. Keep tires properly inflated to prolong tire life. Check inflation pressure while the tires are cool. Inspect tread wear. 2. Check pressure every 50 hours or once a month. Use an accurate, low pressure tire gauge. 3. Keep tires inflated to: ! CAUTION Unless you have the proper training, tools and experience, DO NOT attempt to mount a tire on a rim. Improper mounting can produce an explosion which may result in serious injury. Front - 16 psi (1.11 BAR) Rear - 12 psi (0.86 BAR) en-21 4 MAINTENANCE 4.18 WHEEL MOUNTING PROCEDURE____________________________________________ 1. Remove dirt, grease and oil from stud thread. Do not lubricate threads. 2. Make sure the mower is parked on a solid and level surface. Never work on a mower that is supported only by the jack. Always use jack stands. Position wheel on hub and inspect to insure full contact between mounting surface of wheel and hub or brake drum. 3. If only the front or rear of the mower is raised, place chocks in front of and behind the wheels that are not raised. Finger tighten all hardware, then torque hardware in criss-cross order; always tighten nuts in the top position. 4. Check and re-torque daily until torque is maintained at 85-95 ft.lbs. (115-128 Nm). ! WARNING 4.19 INSPECTING BLADES______________________________________________________ 1. Every 50 hours of operation or whenever mower is removed from mower, carefully examine the blades to make sure they are in good operating condition. Blades showing any bends (G), grooves (H) or cracks (J) must be replaced. G H J ! CAUTION Use care when checking blades to avoid pinching hands and fingers between blade ends. ! WARNING Never attempt to straighten, weld, or repair a damaged blade. Always replace a damaged blade. 2. Any of the above conditions can cause a piece of the blade to break away and be hurled from the mower, causing very serious injury to bystanders or property damage. 3. A bent blade could have a microscopic crack (G) that can grow and allow a piece of the blade to break. Bent blades will also create vibration and other stress on the machinery. 4. Dust or sand particles can wear a dangerous groove in the blade (H) between the air vanes and the flat portion of the blade that will rapidly grow and produce a crack (J), permitting a piece of the vane to break off. en-22 HR025 Figure 4C MAINTENANCE 4 4.20 SHARPENING BLADES _____________________________________________________ 1. Place a wooden block between the blade and mower housing to stop the blade from moving. ! WARNING The mower blades can develop sharp edges. Use caution whenever servicing and handling. 2. When dressing or sharpening the blade, do not follow the original pattern of grind as shown in (A). Grind new cutting edges at an angle as shown in (B). 3. Make sure an equal amount of material is removed from both sides of blade to prevent having an unbalanced blade. An unbalanced blade will cause excessive vibration and may damage the mower. 4. Use a blade balancer to check the blade after sharpening. 5. Torque center mounting screw holding blade to 75 to 90 ft. lb. (100 to 120 Nm). A If the maximum total loss of the blade reaches 1/2 in., (13 mm.), do not sharpen further. Replace blade. ! WARNING Maximum 1/2 in. (13 mm) B Re-sharpening the blade beyond the allowable 1/2 in. (13 mm) may allow the blade tip to break off and be thrown from the mower. Such an incident can cause very serious injury to bystanders and/or property damage. HR024 Figure 4D 4.21 CARE AND CLEANING _____________________________________________________ Clean the mower and implements after each use. Keep the equipment clean. Do not wash equipment with engine running. Serious engine damage may result. Whenever possible, clean the equipment using compressed air. 4. Clean all plastic or rubber trim with a mild soap solution or use commercially available vinyl/rubber cleaners. NOTICE 5. To maintain the original high luster of the fiberglass, periodically wax with a good grade of One-Step cleaner wax. Do not wash any portion of the equipment while it is hot. Do not use high pressure spray or steam. Use cold water and automotive cleaners. Repair damaged metal surfaces and use Jacobsen touch-up paint. Wax the equipment for maximum paint protection. 1. Use compressed air to clean engine and radiator fins. 2. Use only fresh water when washing your equipment. NOTICE Use of salt water or effluent water has been known to encourage rust and corrosion of metal parts, resulting in premature deterioration or failure. Damage of this nature is not covered by the factory warranty. ! CAUTION Clean grass and debris from cutting units, drives, muffler and engine to prevent fires. ! WARNING NEVER use your hands to clean cutting units. Use a brush to remove grass clippings from blades. Blades are extremely sharp and can cause serious injuries. 3. Do not spray water directly at the instrument panel, ignition switch, controller or any other electrical components, or at bearing housings and seals. en-23 4 MAINTENANCE 4.22 STORAGE________________________________________________________________ General 1. Wash the mower thoroughly and lubricate. Repair and paint damaged or exposed metal. 2. Inspect the mower, tighten all hardware, replace worn or damaged components. 3. 4. 5. 1. Check and reinstall battery 2. Check or service fuel filter and air cleaner. Drain and refill radiator. 3. Check the radiator coolant level. Clean the tires thoroughly and store the mower so the load is off the tires. If mower is not on jack stands, check tires at regular intervals and reinflate as necessary. 4. Check oil level in the engine crankcase and hydraulic system. 5. Fill the fuel tank with fresh fuel. Bleed the fuel system. 6. Make certain that the tires are properly inflated. 7. Remove all oil from the blades. Adjust cutting height. 8. Start and operate the engine at 1/2 throttle. Allow enough time for the engine to become properly warmed and lubricated. Keep the machine and all its accessories clean, dry and protected from the elements during storage. Never store equipment near an open flame or spark which could ignite fuel or fuel vapors. Battery 1. After Storage Remove, clean and store battery in upright position on a non-conductive surface (wood) in a cool, dry place. To prevent accelerated discharge, do not store battery on concrete or steel surface. 2. Check and recharge battery every 60 to 90 days while in storage. 3. Store batteries in a cool, dry place. To reduce the self discharge rate, room temperature should not be above 80°F (27°C) or fall below 20°F (-7°C) to prevent electrolyte from freezing. Engine 1. While the engine is warm, remove drain plug, drain the oil from the crankcase, and change oil filter. Install drain plug and refill with fresh oil. Torque drain plug to 22 ft. lb. (30 Nm). 2. Clean exterior of engine. Paint exposed metal or apply a light coat of rust preventative oil. 3. Add a fuel conditioner or biocide to prevent gelling or bacterial growth in fuel. See your local fuel supplier. Cutting Units 1. Wash the cutting units thoroughly, then repair and paint any damaged or exposed metal. 2. Lubricate all fittings and friction points. 3. Apply a light coat of rust preventative oil to the sharpened edges of the blades. ! CAUTION To prevent personal injury and damage to the cutting edges, handle the blades with extreme care. en-24 ! WARNING Never operate the engine without proper ventilation, exhaust fumes can be fatal when inhaled. TROUBLESHOOTING 5 5.1 5 TROUBLESHOOTING GENERAL ________________________________________________________________ The troubleshooting chart below lists basic problems that may occur during start-up and operation. For more detailed information regarding the hydraulic and electrical systems contact your area Jacobsen Dealer. Symptoms Engine will not start. Engine hard to start or runs poorly. Engine stops. Engine overheating. Possible Causes Action 1. Parking brake disengaged, traction pedal not in Neutral, or mow switch ON. 1. Check interlock system and start-up procedure. 2. Glow plug has not timed out. 2. Reset ignition switch and allow glow plug to time out before cranking engine. 3. Battery low on charge or defective. 3. Inspect condition of battery and battery connections. 4. Fuel tank empty or dirty. 4. Fill with fresh fuel. Change fuel filter. Bleed fuel lines. 5. Fuse blown. 5. Replace fuse. 6. Relay defective. 6. Test and replace relay. 7. Neutral switch on traction pedal out of adjustment or defective. 7. Adjust or replace switch. 1. Fuel level low, fuel or fuel filter dirty. 1. Fill with fresh fuel. Change fuel filter. Bleed fuel lines. 2. Air cleaner dirty. 2. Inspect and replace air filter. 3. Injectors, fuel pump. 3. Consult Engine Manual. 4. Engine problem. 4. Consult Engine Manual. 1. Fuel tank empty. 1. Fill with fresh fuel and bleed fuel lines. 2. Interlocks not set before leaving operator’s seat. 2. Engage parking brake and set mow switch to OFF. 1. Coolant level low. 1. Inspect and add coolant. 2. Air intake restricted. 2. Clean air intake at radiator. 3. Water pump belt broken or loose. 3. Tighten or replace belt. Battery not holding charge. 1. Loose or corroded battery terminals. 1. Inspect and clean terminals. Battery light on. 2. Low electrolyte. 2. Refill to correct level. 3. Alternator belt loose or broken. 3. Tighten or replace belt. 4. Charging system defective. 4. See Engine Manual. 1. Height of Cut not adjusted correctly. Inspect height of cut adjustment. Same number of spacers below deck housing on all spindles. 2. Engine speed too low. Check engine speed. Run engine at full throttle. 3. Mow speed not adjusted for turf conditions. Adjust mow speed for best cut. Decks cut unevenly. en-25 5 TROUBLESHOOTING 5.2 CONTROLLER LAMPS _____________________________________________________ The controller is a solid state device that monitors and controls electrical functions. The controller receives input signals from various switches and sensors throughout the machine and transmits output signals to operate relays, solenoids and warning lights. It controls and resets timers and contains built in logic to control certain machine functions. Each input and output signal is displayed through lamps located on top of the controller. A closed input switch indicates an active circuit and will turn an input lamp on. An open switch an inactive circuit and will turn a lamp off. Outputs are active when their lights are on. It is important to note that in some cases a lamp or group of lamps must be on or off for a condition to be true. For example, to start the mower the Mow Switch must be OFF (lamp 8 off) while the Neutral Start Switch (lamp 12), Brake Switch (lamp 6) and Fuel Valve Hold Coil (lamp 27) must be on. NOTICE For factory assistance with troubleshooting controller problems, please note the controller hardware revision and software version located on the lower right corner of the controller. [SEE 4.14] Controllers with equal or greater revision levels will be backward compatible. Controller Functions by Lamp Number Lamp On - Circuit is active Lamp Off - Circuit is inactive INPUTS Lamp Circuit OUTPUTS Lamp Circuit Program Select (1, 3 and 4 are not used) 19 Hydraulic Filter Light 5 Brake Switch 20 Hydraulic Oil Level Light 6 Seat Switch 21 Not Used 7 Traction Control Switch 22 Glowplug Light 8 Mow Switch 23 Lower Solenoid 9 Joystick - Lower 24 Raise Solenoid 10 Joystick - Raise 25 Glowplug Relay 11 Hydraulic Oil Level Switch 26 Start Relay 12 Neutral Switch 27 Fuel Solenoid - Hold 13 Not Used 28 Not Used 14 Keyswitch - Glowplug 29 Audible Alarm 15 Keyswitch - Start 30 Mow Solenoid 16 Joystick Active 31 Fuel Solenoid - Pull 17 Hydraulic Filter Switch 32 Power-Ignition 18 Engine Oil Pressure Switch 33 Power-Lights Lamp 1 2 3 4 5 6 7 8 9 10 11 12 13 14 15 16 17 18 INPUTS en-26 OUTPUTS 19 20 21 22 23 24 25 26 27 28 29 30 31 32 33 1,2,3,4 TROUBLESHOOTING 5.3 5 ELECTRICAL CIRCUITS ____________________________________________________ When troubleshooting the machine using the controller always check that Program Active lamps (2) is on. This indicates that the controller has power and the program is active. NOTICE The controller requires a minimum of six volts to operate. Individual circuits can be tested by operating an input switch, checking for the required input signal and looking for a corresponding output. Keep in mind that not all switches are located on the instrument panel. The traction pedal, reel lift limit and brakes are controlled by small proximity switches mounted on the frame of the mower. If an input lamp does not light, an inactive condition is indicated. This could be caused by a fuse, faulty switch or poor connection. The electrical connections to the solenoids on the hydraulic valves are also equipped with small indicator lamps. When lit, these lamps indicate that the output signal has reached the connection. If lamps do not come on, check wires to and from connector. en-27 6 MAINTENANCE & LUBRICATION CHARTS 6 MAINTENANCE & LUBRICATION CHARTS 6.1 GENERAL________________________________________________________________ 2. Lubricate with grease that meets or exceeds NLGI Grade 2 LB specifications. Apply grease with a manual grease gun and fill slowly until grease begins to seep out. Do not use compressed air. 3. For smooth operation of pivot points and other friction points, apply several drops of SAE 30 oil every 50 hours or as required. 4. Remove wheels and repack bearings once a year. ! WARNING Before you clean, adjust, or repair this equipment, disengage all drives, lower implements to the ground, engage parking brake, stop engine and remove key from ignition switch to prevent injuries. 1. Always clean grease fittings before and after lubrication. 6.2 MAINTENANCE CHART ____________________________________________________ Recommended Service and Lubrication Intervals Every 8-10 Hours Every 50 Hours Every 100 Hours Air Cleaner AR Battery Charge I**** Belt I-A* Brake Every 250 Hours Engine Oil Every 1000 Hours I-A I See Section R 4.4 R 3.4 R R 4.2 R* R 4.3 R Grease Fittings - F1 4.6 L Grease Fittings - F2 L I*** I 6.3 II 6.3 II 4.11 Hydraulic Oil I-A R** 4.12 Hydraulic Oil FIlters R* R-AR 4.13 Muffler and Exhaust Radiator Screens Tires I I-C/AR 4.15 Steering System I* 4.17 I-A Wheel Bearings L Wiring I* C - Clean I I - Inspect * Indicates initial service for new machines. ** Or yearly, whichever comes first. I II III IV Pack bearings with NLGI Grade 2 (Service Class GB) Manual grease gun with NLGI Grade 2 (Service Class LB). Engine Oil - See Section 4.3 Jacobsen Hydraulic Oil - SAE 10W30 or Greens Care 68 en-28 IV 4.10 I-A A - Add or Adjust III I Fuel Filter Hydraulic Hoses and Tubes 4.15 R* Fuel Lines and Clamps Lubricant Type 3.3 A I-C-A Engine Oil Filter Yearly 4.9 I-A* Cooling System Every 500 Hours Every 400 Hours I 4.14 L- Lubricate R - Replace AR - As Required *** Inspect visible hoses and tubes for leaks or oil marks. **** Inspect electrolyte level. See 4.7 MAINTENANCE & LUBRICATION CHARTS 6.3 6 LUBRICATION CHART______________________________________________________ 4 4 4 3 3 5 5 3 1 5 4 3 1 2 5 5 4 3 2 1 5 2 1 3 5 2 6 5 3 5 3 5 2 7 Grease Fittings F1 - 50 Hours (Every Week) 1 2 3 4 5 6 7 8 9 10 11 12 12 Mower Pivot (5) Lift Arm Pivot (5) Lift Cylinders (10) Caster Pivot (10) Mower Rear Roller (10) Brake Pedal Pivot Traction Pedal Pivot Ball Joint (2) Steering Pivot (2) Steering Cylinder (2) Axle Pivot 12 F2 - 100 Hours 8 8 12 U-joint Driveshaft (3) 10 9 9 10 11 en-29 7 7 7.1 PARTS CATALOG PARTS CATALOG HOW TO USE THE PARTS CATALOG _________________________________________ Abbreviations Indented Items N/S - Not serviced separately, can only be obtained by ordering main component or kit. AR -Variable quantity or measurement is required to obtain correct adjustment. Symbols such as l, next to the item number, indicate that a note exists which contains additional information important in ordering that part. Indented items indicate component parts that are included as part of an assembly or another component. These parts can be ordered separately or as part of the main component. Item l 7.2 Part No. 1 2 3 4 5 123456 789012 345678 N/S 901234 Qty Description 1 1 1 1 1 Mount, Valve Valve, Lift • Handle • Seal Kit Screw, 1/4-20 x 2” Hex Head Serial Numbers/Notes Indicates a piece part Includes Items 3 and 4 Serviced part included with Item 2 Non serviced part included with Item 2 TO ORDER PARTS ________________________________________________________ 1. Write your full name and complete address on the order. 5. Send or bring the order to an authorized Jacobsen Distributor. 2. Explain where and how to make shipment. 6. Inspect all shipments on receipt. If any parts are damaged or missing, file a claim with the carrier before accepting. 3. Give product number, name and serial number that is stamped on the name plate or serial plate of your product. 4. Order by the quantity desired, the part number, and description of the part as given in the parts list. 7. Do not return material without a letter of explanation, listing the parts being returned. Transportation charges must be prepaid. Use of other than Jacobsen authorized parts will void the warranty. en-30 PREÂMBULO Este manual contém instruções de afinação, manutenção, resolução de problemas e lista de peças para a sua nova máquina Jacobsen. Este manual deve ser guardado com o equipamento para consulta durante o funcionamento. A placa com o número de série está localizada na longarina posterior esquerda. A Jacobsen recomenda o registo dos números abaixo para fácil consulta. 11524WILMAR BLVD, CHARLOTTE, NC 28273 ® Antes de trabalhar com o veículo, cada operador deve ler atentamente ambos os manuais na sua totalidade. Se as instruções de segurança, de funcionamento e de manutenção forem seguidas, a máquina de cortar relva durará mais e manterá a sua eficácia máxima durante mais tempo. PRODUCT OF U.S.A. kg A Textron Company 1-800-848-1636 (US) kW Se necessitar de informações adicionais, deverá contactar o representante de Jacobsen. Sugestão para stock de peças Para manter o seu equipamento inteiramente operacional e a dar bom rendimento, a Jacobsen sugere a manutenção de um stock com os materiais de manutenção mais vulgarmente usados. Incluímos números de peças para materiais adicionais de apoio e ajudas para treino. Para encomendar qualquer do material seguinte: 1. Escreva o seu nome e endereço completos na sua nota da encomenda. 3. Encomende as quantidades pretendidas, pelo número e pela descrição da peça. 2. Descreva onde e como deve ser feito o embarque: 4. Envie ou entregue o pedido ao seu vendedor autorizado Jacobsen. q UPS q Correio normal q Correio azul q 2º dia Qt. Descrição Nº peça 4113986 557619 4133820 4133821 555771 4134323 Peças de assistência técnica Qt. Filtro do Óleo do Motor Elemento do filtro de combustível Filtro primário do ar Filtro de segurança do ar Elemento do filtro do óleo hidráulico Correia da ventoinha do motor Nº peça Descrição 4131618 4123183 4163106 4137186 4124087 Chave de Ignição Lâmpada do farol dianteiro Lâmina, combinação Lâmina, subida alta Lâmina, subida baixa Material de apoio de serviço Qt. Nº peça Descrição Manual de Segurança e de Funcionamento 4179483 Manual de Peças e Manutenção 4179566 DVD, Treino do Operador 4192126 Manual de Peças do Motor Diesel 4179484 2006/42/EC A seguir são apresentadas as traduções das instruções originais verificadas pela ACMTRAD SL. © Copyright 2009, Jacobsen, A Textron Company Inc. “Todos os direitos reservados, incluindo o direito de reprodução deste livro na íntegra ou em parte sob qualquer forma”. pt-2 Descrição Qt. 4192020 Manual de Reparações Proposta 65 Os gases de escape deste produto contêm produtos químicos que no Estado da Califórnia são reconhecidos como cancerígenos e causadores de anomalias de nascimentos e outros problemas de gestação. Impreso nos E.U.A. 3-2011 Índice 1 1.1 1.2 SEGURANÇA Segurança no funcionamento ............................. 4 Importantes instruções de segurança ................. 5 2 2.1 2.2 2.3 2.4 2.5 2.6 2.7 2.8 ESPECIFICAÇÕES Identificação do produto ...................................... 6 Motor V2003-M-T ................................................ 6 Aparador de relva ................................................ 6 Pesos e dimensões ............................................. 6 Unidades de corte ............................................... 7 Acessórios ........................................................... 7 Literatura de apoio .............................................. 7 Declaração de Conformidade .............................. 8 5 5.1 5.2 5.3 REPARAÇÃO DE AVARIAS Considerações gerais ....................................... 25 Lâmpadas do controlador ................................. 26 Circuitos eléctricos ............................................ 27 6 6.1 6.2 6.3 TABELAS DE MANUTENÇÃO E LUBRIFICAÇÃO Considerações gerais ....................................... 28 Tabela de manutenção ..................................... 28 Tabela de lubrificação ....................................... 29 7 7.1 7.2 CATÁLOGO DE PEÇAS Como usar o catálogo de peças ....................... 30 Para encomendar peças ................................... 30 3 3.1 3.2 3.3 3.4 3.5 3.6 3.7 3.8 3.9 AFINAÇÕES Generalidades ................................................... 10 Velocidade de corte .......................................... 10 Correia .............................................................. 10 Travões ............................................................. 11 Afinação neutra ................................................. 11 Velocidade de avanço / recuo ........................... 12 Convergência das rodas dianteiras ................... 12 Altura de corte ................................................... 13 Calibragem do sistema de controlo de tracção ....................................... 14 3.10 Binário ............................................................... 15 4 4.1 4.2 4.3 4.4 4.5 4.6 4.7 4.8 4.9 4.10 4.11 4.12 4.13 4.14 4.15 4.16 4.17 4.18 4.19 4.20 4.21 4.22 MANUTENÇÃO Considerações gerais ....................................... 16 Motor ................................................................. 16 Oleo do motor ................................................... 16 Filtro de ar ......................................................... 17 Combustível ...................................................... 17 Sistema de combustível .................................... 17 Bateria ............................................................... 18 Arranque induzido ............................................. 18 Carregar a bateria ............................................. 18 Silenciador e escape ......................................... 19 Mangueiras hidráulicas ..................................... 19 Óleo hidráulico .................................................. 19 Filtro hidráulico .................................................. 20 Sistema eléctrico ............................................... 20 Radiador ............................................................ 21 Estrutura protectora do operador (ROPS) ....... 21 Pneus ................................................................ 21 Procedimento de montagem de rodas .............. 22 Inspecção das lâminas ...................................... 22 Afiamento das lâminas ...................................... 23 Cuidados e limpeza ........................................... 23 Armazenamento ................................................ 24 pt-3 1 SEGURANÇA 1 1.1 SEGURANÇA SEGURANÇA NO FUNCIONAMENTO _________________________________________ ! ATENÇÃO ESTE VEÍCULO PODE SER PERIGOSO SE FOR COMANDADO INCORRECTAMENTE OU POR PESSOAL NÃO TREINADO. Familiarize-se com a localização e a utilização adequada de todos os comandos. Operadores sem experiência devem receber instrução de alguém conhecedor do veículo antes de começar a trabalhar com o veículo. 1. A segurança depende da atenção, do cuidado e da prudência de quem trabalhar com o veículo ou lhe prestar assistência. Menores não devem ser autorizados a comandar o veículo. 2. É da responsabilidade do utilizador ler este manual e todas as publicações associadas a este veículo (Manual de Segurança e de Funcionamento, Manual do Motor e fichas de instruções de equipamentos/acessórios). Se o operador não souber Inglês, o proprietário é responsável pela explicação do conteúdo deste manual. 3. Aprenda a trabalhar correctamente com o veículo, a localização e finalidade de todos os comandos e indicadores antes de trabalhar com o veículo. O trabalho com veículos desconhecidos pode provocar acidentes. 4. Nunca deixe ninguém trabalhar ou prestar assistência à máquina ou aos seus equipamentos sem formação nem instruções adequadas, ou sob a influência de álcool ou estupefacientes. 5. Use sempre o vestuário e os dispositivos de protecção pessoal necessários à protecção da cabeça, dos olhos, dos ouvidos, das mãos e dos pés. Trabalhe com o veículo só durante o dia ou com boa luz artificial. 6. Inspeccione o terreno para determinar que acessórios e equipamentos são necessários para trabalhar correctamente e com segurança. Use apenas acessórios e equipamentos aprovados por Jacobsen. 7. Tenha atenção a buracos no terreno e a outras irregularidades ocultas. 8. Inspeccione a área onde o veículo vai ser usado. Apanhe pedras e outros objectos que encontrar antes de começar a trabalhar. Tenha atenção a obstáculos aéreos (ramos de árvores, fios eléctricos, etc.) e também a obstáculos subterrâneos (aspersores, tubos, raízes, etc.). Entre com cuidado numa área nova e esteja atento a riscos ocultos. 9. Nunca descarregue material para onde houver pessoas, nem deixe que haja pessoas perto do veículo em funcionamento. O proprietário/operador deve evitar ferimentos e danos materiais, pelos quais é responsável. 10. Não transporte passageiros e mantenha pessoas e animais a distância segura. 11. Nunca trabalhe com veículos que não estejam em perfeitas condições ou sem sinalética, resguardos, chapas, deflectores ou outros dispositivos de protecção seguramente montados no lugar. 12. Nunca desligue interruptores nem faça pontes. 13. Não altere a afinação do regulador do motor nem acelere excessivamente. 14. O monóxido de carbono dos gases de escape pode ser fatal se inalado. Nunca tenha o motor ligado sem ventilação correcta ou num recinto fechado. 15. O combustível é altamente inflamável; manuseie-o com cuidado. 16. Mantenha o motor limpo. Deixe o motor arrefecer antes de guardar o veículo e retire sempre a chave da ignição. 17. Desengate todos os accionamentos e puxe o travão de estacionamento antes de ligar o motor. Ligue o motor só depois de estar sentado e nunca de pé, ao lado do veículo. 18. O veículo tem de estar em conformidade com as mais recentes determinações legais ao ser conduzido ou transportado na via pública. Atenção ao trânsito ao atravessar estradas ou ao trabalhar em estradas ou ruas ou na sua proximidade. 19. Leis locais podem limitar a idade do operador. 20. Em taludes, trabalhe para cima e para baixo (transversalmente) e nunca ao longo do talude (longitudinalmente). 21. Para evitar capotagem ou perda de controlo, não arranque nem pare subitamente em taludes. Reduza a velocidade ao fazer curvar apertadas. Seja cauteloso ao mudar de direcção. 22. Use sempre o cinto de segurança ao conduzir máquinas de cortar relva equipadas com uma estrutura protectora contra capotamento (ROPS). Nunca use cinto de segurança ao conduzir máquinas de cortar relva sem ROPS. Estruturas de protecção acessórias destinadas ao operador continuarão a ser disponibilizadas para todo o equipamento actualmente abrangido. Tal permite a montagem posterior em máquinas sem ROPS ou a substituição de estruturas danificadas. 23. Mantenha as pernas, os braços e o corpo dentro do compartimento do assento durante a deslocação do veículo. 24. Desligar a bateria e inspeccionar os conectores eléctricos antes de fazer qualquer soldadura nesta máquina de cortar relva. Esta máquina tem de ser conduzida e assistida como se indica neste manual e destina-se à manutenção de relvados especializados por profissionais. Não é própria para terrenos grosseiros nem para erva alta. pt-4 SEGURANÇA 1.2 1 IMPORTANTES INSTRUÇÕES DE SEGURANÇA ________________________________ Esta chamada de atenção de segurança é usado para assinalar perigos potenciais. PERIGO - Indica uma situação de perigo iminente que, se não for evitada, PROVOCARÁ a morte ou ferimentos graves. ATENÇÃO - Indica uma situação potencialmente perigosa que, se não for evitada, PODE provocar a morte ou ferimentos graves. CUIDADO - Indica uma situação potencialmente perigosa que, se não for evitada, PODE provocar ferimentos ligeiros a médios e danos materiais. Também pode ser usado para alertar contra práticas inseguras. AVISO - Indica uma situação potencialmente perigosa, que, se não for evitada, PODE provocar danos materiais. Também pode ser usado para alertar contra práticas inseguras. Para maior clareza das gravuras, algumas ilustrações neste manual podem mostrar chapas, resguardos ou placas abertas ou removidas. No entanto, em nenhumas circunstâncias poderá este equipamento ser conduzido sem esses dispositivos firmemente instalados nos seus lugares. ! ATENÇÃO O sistema Interlock impede que o cortador de relva arranque se o pedal dos travões não estiver activo, se o interruptor PTO não estiver desligado e se o pedal de tracção não estiver na posição neutra. O sistema fará parar a máquina se o condutor abandonar o seu assento sem accionar o travão de estacionamento ou sem desligar o interruptor PTO. NUNCA conduza o aparador de relva se o sistema contactor não estiver a funcionar. ! ATENÇÃO 1. Se, por qualquer razão, tiver de sair do posto de condução: a. b. c. d. e. Coloque o pedal de tracção na posição neutra. Desengate todos os accionamentos. Baixe todos os equipamentos para o chão. Engate o travão de estacionamento. Desligue o motor e retire a chave da ignição. 2. Mantenha as mãos, os pés e o vestuário longe de peças em movimento.Espere que todos os movimentos parem antes de limpar, afinar ou dar a assistência à máquina. 3. Mantenha a área de trabalho livre de pessoas e animais. 4. Nunca transporte passageiros se não houver banco apropriado. 5. Nunca trabalhe com equipamento de cortar a relva sem que o deflector de descarga esteja firmemente instalado no seu lugar. Se seguir todas as instruções deste manual, prolongará a vida da sua máquina e manterá o seu rendimento máximo. Operações de afinação e de manutenção só devem ser executadas por um técnico qualificado. Se precisar de informação ou assistência adicional, deverá entrar em contacto com o seu vendedor autorizado de Jacobsen, que está informado sobre os métodos de assistência mais recentes a este equipamento e pode prestar assistência rápida e eficaz. pt-5 2 2 2.1 ESPECIFICAÇÕES ESPECIFICAÇÕES IDENTIFICAÇÃO DO PRODUTO______________________________________________ 68098.............................. AR-522, 5 Gang 4WD com ROPS Número de série ............ Há uma placa de identificação, como esta, na estrutura do aparador de relva, à direita do operador, mesmo por cima do eixo traseiro, onde se indica o número de série. Indique sempre o número de série do aparelho ao encomendar peças de substituição ou ao solicitar informações acerca de assistência técnica. 2.2 Deslocação ..................... 2434 cm3 Binário............................. 165 Nm às 1600 rpm Combustível: Tipo........................... Nº 2 Diesel Potência específica... Conteúdo mín. de cetano 45 Capacidade............... 65 litros 41.8 kg kW XXXX 68098001651 Produto Nível sonoro CEE Nível de pressão Sadia orelha do operador Braços Corpo 68098 105 dba 90 dba 3,72 0,055 Vibração M/S2 Afinação do regulador: Ponto morto elevado 2850 rpm Ponto morto baixo .... 1050 rpm Lubrificação: Capacidade .............. 9,5 litros Tipo........................... SAE 10W30 Class API ................. CD/CE Filtro do ar ...................... Donaldson, de tipo seco com válvula evacuadora e indicador de assistência. Velocidade: De corte ................... 0 - 11 km/h De Transporte........... 0 -19,3 km/h Marcha-atrás ........... 0 - 8,1 km/h Rendimento .................... 6,8 acres/h a 11 km/h Sistema Hidráulico: Capacidade .................... 37,85 litros Tipo de fluido .................. 10W30 ou Greens Care 68 Arrefecimento ................. A óleo Filtro de linha de retorno. 10 microns Direcção ......................... Direcção assistida hidrostática PESOS E DIMENSÕES _____________________________________________________ Dimensões: mm Comprimento .................................................................3302 Altura - ao cimo do ROPS .............................................2108 Altura - ao cimo do ROPS com cobertura .....................2311 Largura de corte ............................................................2486 Largura - Transporte ......................................................2489 pt-6 1694.2 1-800-848-1636 (US) APARADOR DE RELVA ____________________________________________________ Pneus: Dianteiros ................. 26,5 x 14 - 12: (6 telas) Traseiros .................. 22,5 x 10 -8 Pressão dos pneus: Dianteiros.................. 111 kPa Traseiros ................... 83 kPa Bateria: Tipo........................... 12V, 600 Amp arranque a frio Grupo ........................ BCI 24 Travões: Serviço ..................... Travagem dinâmica através do circuito de tracção. Estacionamento ........ Disco dianteiro de 235 mm 2.4 A Textron Company MOTOR V2403-M-T ________________________________________________________ Marca .............................. Kubota Modelo ............................ V2403-M-T Diesel, 4 tempos, Arrefecido a água Potência .......................... 44 kW às 2700 rpm Diâmetro ......................... 87 mm Curso .............................. 102,4 mm 2.3 11524WILMAR BLVD, CHARLOTTE, NC 28273 ® PRODUCT OF U.S.A. Peso: kg PB (Excluindo o operador) ............................................ 1726 ESPECIFICAÇÕES 2.5 UNIDADES DE CORTE _____________________________________________________ Largura geral de corte .... 2,54 m Número de unidades de corte:.......................... Cinco: três à frente e duas atrás. 2.6 2 Altura de corte................. 19 a 133 mm em incrementos de 6 mm ACESSÓRIOS Consulte o Catálogo de Peças e contacte o seu concessionário Jacobsen para obter a lista completa de acessórios. ! CUIDADO A utilização de peças e acessórios não autorizados pela Jacobsen pode provocar lesões pessoais ou danos no equipamento e anulará a garantia. Tinta laranja para retoques (aspersor em lata de 340 ml)............................ 554598 ROPS de 2 lugares com cinto de segurança.... 67844 Capota ............................ ................................. 68095 Trinco de capot ............... ................................. 1004049 2.7 Conjunto de rodas........... ................................. 68090 Lâmina, subida alta......... ................................. 4137186 LITERATURA DE APOIO Contacte o seu Concessionário Jacobsen para obter uma lista completa de literatura. Manual de Segurança e Utilização ................... 4179484 Peças e Manutenção ...... ................................. 4179483 Catálogo de peças do motor............................. 4192126 Manual de Serviço e Reparação ...................... 4181383 pt-7 2 2.8 ESPECIFICAÇÕES DECLARAÇÃO DE CONFORMIDADE _________________________________________ DECLARATION OF CONFORMITY PROHLÁENÍ O SHOD OVERENSSTEMMELSESERKLÆRING CONFORMITEITSVERKLARING VASTAVUSDEKLARATSIOON VAATIMUSTENMUKAISUUSVAKUUTUS DECLARATION DE CONFORMITE KONFORMITÄTSERKLÄRUNG MEGFELELSÉGI NYILATKOZAT DICHIARAZIONE DI CONFORMITÀ ATBILSTBAS DEKLAR!CIJA ATITIKTIES DEKLARACIJA DIKJARAZZJONI TAL-KONFORMITÀ DEKLARACJA ZGODNO"CI DECLARAÇÃO DE CONFORMIDADE DECLARA#IE DE CONFORMITATE VYHLÁSENIE O ZHODE IZJAVA O SKLADNOSTI DECLARACIÓN DE CONFORMIDAD DEKLARATION OM ÖVERENSSTÄMMELSE Business name and full address of the manufacturer Obchodní jméno a plná adresa výrobce Producentens firmanavn og fulde adresse Bedrijfsnaam en volledig adres van de fabrikant Tootja ärinimi ja täielik aadress Valmistajan toiminimi ja täydellinen osoite Nom commercial et adresse complète du fabricant Firmenname und vollständige Adresse des Herstellers !"#$%& #'()*+ !*'*!& A gyártó üzleti neve és teljes címe Ragione sociale e indirizzo completo del fabbricante Uz,-muma nosaukums un pilna raot/ja adrese Verslo pavadinimas ir pilnas gamintojo adresas Isem kummer0jali u indirizz s1i1 tal-fabbrikant Nazwa firmy i pe3ny adres producenta Nome da empresa e endereço completo do fabricante Denumirea comercial4 5i adresa complet4 a produc4torului Obchodný názov a úplná adresa výrobcu Naziv podjetja in polni naslov proizvajalca Nombre de la empresa y dirección completa del fabricante Tillverkarens företagsnamn och kompletta adress Jacobsen, A Textron Company 11524 Wilmar Blvd. Charlotte, NC 28273, USA Product Code ? @ Kód výrobku Produktkode Productcode Toote kood Tuotekoodi Code produit Produktcode E#GL $%MG!%L Termékkód Codice prodotto Produkta kods Produkto kodas Kodi0i tal-Prodott Kod produktu Código do Produto Cod produs Kód výrobku 68098 Oznaka proizvoda Código de producto Produktkod Machine Name [ \ Název stroje Maskinnavn Machinenaam Masina nimi Laitteen nimi Nom de la machine Maschinenbezeichnung ^%* +"&!%L Gépnév Denominazione della macchina Iek/rtas nosaukums Mainos pavadinimas Isem talMagna Nazwa urzqdzenia Nome da Máquina Numele echipamentului Názov stroja Naziv stroja Nombre de la máquina Maskinens namn AR-522 Designation |} Ozna~ení Betegnelse Benaming Nimetus Tyyppimerkintä Paymjimas Bezeichnung $!+$*GL Megnevezés Funzione Apzm-jums Lithuanian Denominazzjoni Oznaczenie Designação Specificaie Ozna~enie Namen stroja Descripción Lawnmower, Article 12, Item 32 Beteckning Serial Number Sériové ~íslo Serienummer Serienummer Seerianumber Valmistusnumero Numéro de série Seriennummer '$GL $)GL Sorozatszám Numero di serie S-rijas numurs Serijos numeris Numru Serjali Numer seryjny Número de Série Num4r de serie Sériové ~íslo Serijska tevilka Número de serie Serienummer 6809801651-6809802500 Engine Motor Motor Motor Mootor Moottori Moteur Motor +"& Modulnév Motore Dzin-js Variklis Sa11a Netta Installata Kubota V2403-M-T-E3B Diesel Silnik Motor Motor Motor Motor Motor Motor Net Installed Power [ istý instalovaný výkon Installeret nettoeffekt Netto geïnstalleerd vermogen Installeeritud netovõimsus Asennettu nettoteho Puissance nominale nette Installierte Nettoleistung E)$& '!'*!++ *"(L Nettó beépített teljesítmény Potenza netta installata Paredz-t/ tkla jauda Grynoji galia Wisa tal-Qtug1 Moc zainstalowana netto Potência instalada Puterea instalat4 net4 istý intalovaný výkon Neto vgrajena mo~ Potencia instalada neta Nettoeffekt pt-8 44 kW @ 2700 RPM Cutting Width } íka ezu Skærebredde Maaibreedte Lõikelaius Leikkuuleveys Largeur de coupe Schnittbreite &%L *L Vágási szélesség Larghezza di taglio Grieanas platums Pjovimo plotis Tikkonforma mad-Direttivi Szeroko cicia Largura de Corte L4imea de t4iere írka záberu irina reza Anchura de corte Klippbredd 228,6 cm Conforms to Directives Spluje podmínky smrnic Er i overensstemmelse med direktiver Voldoet aan de richtlijnen Vastab direktiividele Direktiivien mukainen Conforme aux directives Entspricht Richtlinien %%)&*!' *! !L ^#+'L Megfelel az irányelveknek Conforme alle Direttive Atbilst direktv/m Atitinka direktyv reikalavimus Valutazzjoni tal-Konformità Dyrektywy zwiqzane Cumpre as Directivas Respect4 Directivele Je v súlade so smernicami Skladnost z direktivami Cumple con las Directivas Uppfyller direktiv 2004/108/EC 2006/42/EC 2000/14/EC, 2005/88/EC 2006/66/EC Conformity Assessment Hodnocení plnní podmínek Overensstemmelsesvurdering Conformiteitsbeoordeling Vastavushindamine Vaatimustenmukaisuuden arviointi Evaluation de conformité Konformitätsbeurteilung *!*+ G$¡*+L Megfelel¢ség-értékelés Valutazione della conformità Atbilstbas nov-rt-jums Atitikties £vertinimas Livell tal-Qawwa tal-¤oss Imkejjel Ocena zgodnoci Avaliação de Conformidade Evaluarea conformit4ii Vyhodnotenie zhodnosti Ocena skladnosti Evaluación de conformidad Bedömning av överensstämmelse 2006/42/EC Annex VIII Measured Sound Power Level ¥ @ Namený akustický výkon Målte lydstyrkeniveau Gemeten geluidsniveau Mõõdetud helivõimsuse tase Mitattu äänitehotaso Niveau de puissance sonore mesuré Gemessener Schalldruckpegel !)*% ''#% +"+!&L *"(%L Mért hangteljesítményszint Livello di potenza sonora misurato Izm-rtais ska,as jaudas lmenis Imatuotas garso stiprumo lygis Livell tal-Qawwa tal-¤oss Iggarantit Moc akustyczna mierzona Nível sonoro medido Nivelul m4surat al puterii acustice Nameraná hladina akustického výkonu Izmerjena raven zvo~ne mo~i Nivel de potencia sonora medido Uppmätt ljudeffektsnivå 105 dB(A) LWA Guaranteed Sound Power Level ¨ @ Garantovaný akustický výkon Garanteret lydstyrkeniveau Gegarandeerd geluidsniveau Garanteeritud helivõimsuse tase Taattu äänitehotaso Niveau de puissance sonore garanti Garantierter Schalldruckpegel +% ''#% +"+!&L *"(%L Szavatolt hangteljesítményszint Livello di potenza sonora garantito Garant-tais ska,as jaudas lmenis Garantuotas garso stiprumo lygis Livell tal-Qawwa tal-¤oss Iggarantit Moc akustyczna gwarantowana Nível sonoro farantido Nivelul garantat al puterii acustice Garantovaná hladina akustického výkonu Zajam~ena raven zvo~ne mo~i Nivel de potencia sonora garantizado Garanterad ljudeffektsnivå 105 dB(A) LWA Conformity Assessment Procedure (Noise) @ (@) Postup hodnocení plnní podmínek (hluk) Procedure for overensstemmelsesvurdering (Støj) Procedure van de conformiteitsbeoordeling (geluid) Vastavushindamismenetlus (müra) Vaatimustenmukaisuuden arviointimenettely (Melu) Procédure dévaluation de conformité (bruit) Konformitätsbeurteilungsverfahren (Geräusch) #* ª%G+*+L G$¡*+L («G$¬%L) Megfelel¢ség-értékelési eljárás (Zaj) Procedura di valutazione della conformità (rumore) Atbilstbas nov-rt-juma procedra (troksnis) Atitikties £vertinimo procedra (garsas) Pro0edura tal-Valutazzjoni tal-Konformità (¤oss) Procedura oceny zgodnoci (poziom ha3asu) Processo de avaliação de conformidade (nível sonoro) Procedura de evaluare a conformit4ii (zgomot) Postup vyhodnocovania zhodnosti (hluk) Postopek za ugotavljanje skladnosti (hrup) Procedimiento de evaluación de conformidad (ruido) Procedur för bedömning av överensstämmelse (buller) 2000/14/EC Annex VI, Part 1 UK Notified Body for 2000/14/EC [® ¯ 2000/14/° Úad certifikovaný podle smrnice ~. 2000/14/EC Det britiske bemyndigede organ for 2001/14/EF Engels adviesorgaan voor 2000/14/EG Ühendkuningriigi teavitatud asutus direktiivi 2000/14/EÜ mõistes Direktiivin 2000/14/EY mukainen ilmoitettu tarkastuslaitos Isossa-Britanniassa Organisme notifié concernant la directive 2000/14/CE Britische benannte Stelle für 2000/14/EG E%%%+%L ^$*GL ²% ³*'% 2000/14/E 2000/14/EK egyesült királyságbeli bejelentett szervezet Organismo Notificato in GB per 2000/14/CE 2000/14/EK AK reµistr-t/ organiz/cija JK notifikuotosios £staigos 2000/14/EC Korp Notifikat tar-Renju Unit g1al 2000/14/KE Dopuszczona jednostka badawcza w Wielkiej Brytanii wg 2000/ 14/WE Entidade notificada no Reino Unido para 2000/14/CE Organism notificat în Marea Britanie pentru 2000/14/CE Notifikovaný orgán Spojeného krá¶ovstva pre smernicu 2000/14/ES Britanski priglaeni organ za 2000/14/ES Cuerpo notificado en el Reino Unido para 2000/14/CE Anmält organ för 2000/14/EG i Storbritannien Number: 1088 Sound Research Laboratories Limited Holbrook House, Little Waldingfield Sudbury, Suffolk CO10 0TH ESPECIFICAÇÕES Operator Ear Noise Level @¸ \@ Hladina hluku v oblasti uí operátora Støjniveau i førers ørehøjde Geluidsniveau oor bestuurder Müratase operaatori kõrvas Melutaso käyttäjän korvan kohdalla Niveau de bruit à hauteur des oreilles de lopérateur Schallpegel am Bedienerohr '#% )%$(¬% *' '!%$ A kezel¢ fülénél mért zajszint Livello di potenza sonora allorecchio delloperatore Trok,a lmenis pie operatora auss Dirban~iojo su maina patiriamo triukmo lygis Livell tal-¤oss fil-Widna tal-Operatur Dopuszczalny poziom ha3asu dla operatora Nível sonoro nos ouvidos do operador Nivelul zgomotului la urechea operatorului Hladina hluku pôsobiaca na sluch operátora Raven hrupa pri uesu upravljavca Nivel sonoro en el oído del operador Ljudnivå vid förarens öra 90 dB(a) Leq (2006/42/EC) Harmonised standards used ¥ ¸ Pouité harmonizované normy Brugte harmoniserede standarder Gebruikte geharmoniseerde standaards Kasutatud ühtlustatud standardid Käytetyt yhdenmukaistetut standardit Normes harmonisées utilisées Angewandte harmonisierte Normen $%* $G! % "$+*%%&)+ Harmonizált szabványok Standard armonizzati applicati Izmantotie saska,otie standarti Panaudoti suderinti standartai Standards armonizzati u¹ati Normy spójne powiqzane Normas harmonizadas usadas Standardele armonizate utilizate Pouité harmonizované normy Uporabljeni usklajeni standardi Estándares armonizados utilizados Harmoniserade standarder som används BS EN ISO 20643 BS EN ISO 5349-1 BS EN ISO 5349-2 BS EN 836 Technical standards and specifications used ¥ ¸} ® Pouité technické normy a specifikace Brugte tekniske standarder og specifikationer Gebruikte technische standaards en specificaties Kasutatud tehnilised standardid ja spetsifikatsioonid Käytetyt tekniset standardit ja eritelmät Spécifications et normes techniques utilisées Angewandte technische Normen und Spezifikationen º'" $G! $%#$¡L % "$+*%%&)+ M»szaki szabványok és specifikációk Standard tecnici e specifiche applicati Izmantotie tehniskie standarti un specifik/cijas Panaudoti techniniai standartai ir technin informacija Standards u spe0ifikazzjonijiet tekni0i u¹ati Normy i specyfikacje techniczne powiqzane Normas técnicas e especificações usadas Standardele tehnice 5i specificaiile utilizate Pouité technické normy a pecifikácie Uporabljeni tehni~ni standardi in specifikacije Estándares y especificaciones técnicas utilizadas Tekniska standarder och specifikationer som används B71.4 ISO 2631-1 SAE J1194 The place and date of the declaration ¼ Místo a datum prohláení Sted og dato for erklæringen Plaats en datum van de verklaring Deklaratsiooni väljastamise koht ja kuupäev Vakuutuksen paikka ja päivämäärä Lieu et date de la déclaration Ort und Datum der Erklärung ºG%L +'$%+ #&*+L A nyilatkozat kelte (hely és id¢) Luogo e data della dichiarazione Deklar/cijas vieta un datums Deklaracijos vieta ir data Il-post u d-data tad-dikjarazzjoni Miejsce i data wystawienia deklaracji Local e data da declaração Locul 5i data declaraiei Miesto a dátum vyhlásenia Kraj in datum izjave Lugar y fecha de la declaración Plats och datum för deklarationen Jacobsen, A Textron Company 11524 Wilmar Blvd. Charlotte, NC 28273, USA January 1, 2011 Signature of the person empowered to draw up the declaration on behalf of the manufacturer, holds the technical documentation and is authorised to compile the technical file, and who is established in the Community. | } , @ , ½ ¾ ¸} @ ¸} ®½ ¯. Podpis osoby oprávnné sestavit prohláení jménem výrobce, dret technickou dokumentaci a osoby oprávnné sestavit technické soubory a zaloené v rámci Evropského spole~enství. Underskrift af personen, der har fuldmagt til at udarbejde erklæringen på vegne af producenten, der er indehaver af dokumentationen og er bemyndiget til at udarbejde den tekniske journal, og som er baseret i nærområdet. Handtekening van de persoon die bevoegd is de verklaring namens de fabrikant te tekenen, de technische documentatie bewaart en bevoegd is om het technische bestand samen te stellen, en die is gevestigd in het Woongebied. Ühenduse registrisse kantud isiku allkiri, kes on volitatud tootja nimel deklaratsiooni koostama, kes omab tehnilist dokumentatsiooni ja kellel on õigus koostada tehniline toimik. Sen henkilön allekirjoitus, jolla on valmistajan valtuutus vakuutuksen laadintaan, jolla on hallussaan tekniset asiakirjat, joka on valtuutettu laatimaan tekniset asiakirjat ja joka on sijoittautunut yhteisöön. Signature de la personne habilitée à rédiger la déclaration au nom du fabricant, à détenir la documentation technique, à compiler les fichiers techniques et qui est implantée dans la Communauté. Unterschrift der Person, die berechtigt ist, die Erklärung im Namen des Herstellers abzugeben, die die technischen Unterlagen aufbewahrt und berechtigt ist, die technischen Unterlagen zusammenzustellen, und die in der Gemeinschaft niedergelassen ist. ¿%$¡& !G% 'ª%*%#%!+% !+ *(!ª+ !+L #&*+L ' $%L !% !*'*!&, % %%%L !"' !+ !'"& )'*+ "' !+ 'ª%*%#G!+*+ !ª%&*' !% !'"G ¡'% % %%%L ' #%$*%L *!+ E%G!+!. A gyártó nevében meghatalmazott személy, akinek jogában áll módosítania a nyilatkozatot, a m»szaki dokumentációt ¢rzi, engedéllyel rendelkezik a m»szaki fájl összeállításához, és aki a közösségben letelepedett személy. Firma della persona autorizzata a redigere la dichiarazione a nome del fabbricante, in possesso Della documentazione tecnica ed autorizzata a costituire il fascicolo tecnico, che deve essere stabilita nella Comunità. T/s personas paraksts, kura ir pilnvarota deklar/cijas sast/danai raot/ja v/rd/, kurai ir tehnisk/ dokument/cija, kura ir pilnvarota sagatavot tehnisko reµistru un kura ir apstiprin/ta Kopien/. Asmuo, kuris yra gana inomas, kuriam gamintojas suteik £galiojimus sudaryti iq deklaracijq, ir kuris jq pasira, turi visq technin informacijq ir yra £galiotas sudaryti technins informacijos dokumentq. Il-firma tal-persuna awtorizzata li tfassal id-dikjarazzjoni fisem il-fabbrikant, g1andha d-dokumentazzjoni teknika u hija awtorizzata li tikkompila l-fajl tekniku u li hija stabbilita fil-Komunità. Podpis osoby upowa¹nionej do sporzqdzenia deklaracji w imieniu producenta, przechowujqcej dokumentacj technicznq, upowa¹nionq do stworzenia dokumentacji technicznej oraz wyznaczonej ds. wspólnotowych. Assinatura da pessoa com poderes para emitir a declaração em nome do fabricante, que possui a documentação técnica, que está autorizada a compilar o processo técnico e que está estabelecida na Comunidade. Semn4tura persoanei împuternicite s4 elaboreze declaraia în numele produc4torului, care deine documentaia tehnic4, este autorizat4 s4 compileze dosarul tehnic 5i este stabilit4 în Comunitate. Podpis osoby poverenej vystavením vyhlásenia v mene výrobcu, ktorá má technickú dokumentáciu a je oprávnená spracovaÀ technické podklady a ktorá je umiestnená v Spolo~enstve. Podpis osebe, poobla~ene za izdelavo izjave v imenu proizvajalca, ki ima tehni~no dokumentacijo in lahko sestavlja spis tehni~ne dokumentacije, ter ima sede v Skupnosti. Firma de la persona responsable de la declaración en nombre del fabricante, que posee la documentación técnica y está autorizada para recopilar el archivo técnico y que está establecido en la Comunidad. Undertecknas av den som bemyndigad att upprätta deklarationen å tillverkarens vägnar, innehar den tekniska dokumentationen och är bemyndigad att sammanställa den tekniska informationen och som är etablerad i gemenskapen. Certificate Number [ ® íslo osvd~ení Certifikatnummer Certificaatnummer Sertifikaadi number Hyväksyntänumero Numéro de certificat Bescheinigungsnummer $)GL Á*!%%+!%( Hitelesítési szám Numero del certificato Sertifik/ta numurs Sertifikato numeris Numru ta0-Âertifikat Numer certyfikatu Número do Certificado Num4r certificat íslo osved~enia tevilka certifikata Número de certificado Certifikatsnummer 2 2006/42/EC Annex II 1.A.2 Tim Lansdell Technical Director Ransomes Jacobsen Limited West Road, Ransomes Europark, Ipswich, IP3 9TT, England 2006/42/EC Annex II 1.A.10 Vasant Godhalekar VP of Engineering Jacobsen, A Textron Company 11524 Wilmar Blvd, Charlotte, NC 28273, USA 4179483 Rev B pt-9 3 AFINAÇÕES 3 3.1 Afinações GENERALIDADES _________________________________________________________ ! ATENÇÃO Para se evitar a ocorrência de ferimentos, antes de fazer quaisquer afinações ou operações de manutenção, desça os equipamentos até ao chão, desengate todos os accionamentos, accione o travão de estacionamento, desligue o motor e retire a chave de ignição. 1. Trabalhos de afinação e de manutenção devem ser sempre feitos por um técnico qualificado. Se não for possível fazer a afinação adequada, contacte um representante Jacobsen autorizado. 2. Componentes com desgaste ou danificados devem ser substituídos e não reajustados. 3. Cabelo comprido, adereços ou vestuário solto podem ser apanhados por peças em movimentos. Assegure-se de que o aparador de relva está estacionado numa superfície estável e horizontal. Nunca trabalhe num aparador de relva seguro apenas pelo macaco. Utilize sempre cavaletes. Se só for levantada a parte dianteira ou traseira do aparador de relva, coloque calços à frente e atrás das rodas que ficarem no chão. 3.2 ! CUIDADO Cuidado para evitar que mãos e dedos sejam apanhados entre peças móveis e componentes fixos da máquina. 4. Não altere as afinações do regulador nem acelere o motor excessivamente. VELOCIDADE DE CORTE ___________________________________________________ A qualidade do corte é melhor a velocidades consideravelmente inferiores à velocidade de transporte do aparador de relva. Uma velocidade inicial de corte de 8 a 10 km/h vem já definida de fábrica e deve ser adequada e satisfatória para a maior parte das condições de corte. No entanto, as condições da relva podem exigir uma velocidade diferente. A Para regular a velocidade de corte, solte a porca (A) e rode o parafuso de batente para cima para reduzir, ou para baixo para aumentar essa velocidade. Volte a apertar a porca para manter a afinação. 3.3 LF002 Figura 3A CORREIA ________________________________________________________________ Verifique e regule uma correia nova após as primeiras dez horas de serviço. Seguidamente, basta regular de 100 em 100 horas de serviço. B Regule a polia do alternador para que a correia sofre uma deflexão de 6 a 8 mm sob uma força de 10 kg na parte central entre as polias. Consulte o manual do motor. Se a tensão estiver incorrecta, solte os parafusos de montagem do alternador (B) e ajuste o alternador até que a tensão apropriada da correia seja atingida. 6 - 8 MM LF012 Figura 3B pt-10 AFINAÇÕES 3.4 TRAVÕES ________________________________________________________________ Afine os travões após a substituição ou trabalhos de assistência, ou ainda se o pedal tiver de ir muito ao fundo para travar. 1. Ao instalar novas pastilhas de travões, gaste-as um pouco conduzindo o aparador de relva à velocidade de corte de relva e aplicando simultaneamente alguma pressão no pedal durante cerca de 5 segundos. Liberte o pedal e repita o procedimento antes de fazer a afinação final. 2. Desaperte totalmente a porca de fixação (E). 3. Desengate a mola de retorno do travão (Consulte o Item 14, Ilustração 8.1) no seu percurso. 4. Manualmente, afaste do pedal o cabo que se situa atrás da porca de afinação (C) até que as pastilhas entrem em contacto com os discos de travão. Enrosque a porca de afinação (C) até que entre em contacto com a placa de encaixe. Aperte a porca (E) para fixá-la no lugar. Aperte a porca (E) com uma pressão de 27 Nm. Não aperte em demasia nem rode o cabo. 5. 3 6. Se o travão se gastar para além do ponto de ajuste por cabo, desloque a maxila até ao segundo conjunto de orifícios existente (D) e conclua o processo de afinação. 7. Coloque o aparador de relva a trabalhar e verifique o funcionamento dos travões. Estacione o aparador de relva num terreno inclinado (um desnível aproximado de 16,7°) e active o travão de estacionamento. O travão deverá evitar que o aparador de relva se movimente. Aperte a porca (C) conforme necessário. D D Ligue a mola de retorno do travão. Repita o procedimento para o segundo cabo. C E Figura 3C 3.5 AFINAÇÃO NEUTRA _______________________________________________________ A afinação da posição neutra só pode ser feita na bomba de accionamento. A afinação da posição neutra vem já feita de fábrica em todos os aparadores de relva novos e bombas sobressalentes. Não são precisas outras afinações, a não ser que a bomba tenha sido desmontada para reparação ou assistência. 5. Desaperte os parafusos (G) que seguram o suporte da alavanca da bomba apenas o que for necessário para que o suporte possa ser deslocado. Ligue o motor e observe as rodas. Afine o suporte (F) em furos oblongos até que as rodas deixem de rodar. Desligue o motor e aperte o suporte no seu lugar. 6. Faça o acoplamento do conjunto de tracção. Ao ligar ao pedal de tracção, assegure-se de que o ponteiro no suporte do pedal de tracção fica centrado por cima do interruptor neutro (Fig. 3E - M). 7. Ligue o motor e verifique o funcionamento do pedal de tracção. As rodas não devem rodar quando o pedal regressa à posição neutra e a lâmpada 5 no controlador deve acender. Veja a Secção 5. Afinação da posição neutra: 1. Desengate a ligação entre o pedal de tracção e a bomba. 2. Coloque o aparador de relva de forma segura em cavaletes para que todas as rodas fiquem levantadas do chão. 3. Verifique que a válvula de reboque (H) está fechada. 4. Engate os travões de estacionamento e coloque o interruptor de cortar na posição neutra. Assegure-se de que o interruptor neutro no pedal de tracção está fechado. (Fig. 3E - M). A distância entre o interruptor e a ponteira mtálica (M) deverá cifrar-se entre 1,5 e 3 mm. F G H LF014 Figura 3D pt-11 3 AFINAÇÕES 3.6 VELOCIDADE DE AVANÇO / RECUO _________________________________________ As velocidades de avanço e de recuo são reguladas no pedal de tracção. Ligue a velocidade de avanço antes de regular a marcha-atrás. Para regular a velocidade da marcha-atrás: 1. Engate a velocidade de avanço. Para regular a velocidade de avanço: 2. Ligue o motor e verifique a velocidade de marchaatrás com o motor com a borboleta totalmente aberta. A velocidade de marcha-atrás deve ser de 5,6 km/h. 3. Desligue o motor. Para regular a velocidade, solte a porca na cavilha de batente da marcha-atrás (L). Faça deslizar a cavilha para a frente no furo oblongo para aumentar a velocidade, ou para trás para a reduzir. Aperte a porca para fixar a regulação. 4. Ligue o motor e verifique a velocidade. Repita o processo até se obter a velocidade de marcha-atrás de 5,6 km/h. 1. Assegure-se de que a bomba de accionamento foi colocada na posição neutra e de que a borboleta do motor está afinada correctamente. 2. Ligue o motor e verifique a velocidade de avanço com o motor com a borboleta totalmente aberta e o aparador de relva com 2 rodas motrizes (2WD). A velocidade de avanço deve ser de 16 km/h. 3. Desligue o motor. Para regular a velocidade, solte a cavilha de olhal (K) do pedal e solte a porca de bloqueio. Rode a cavilha de olhal para dentro para reduzir a velocidade e para fora para a aumentar. Aperte a porca de bloqueio para fixar a afinação e ligue a cavilha de olhal. 4. Com o pedal de tracção na posição neutra, verifique a posição do interruptor neutro (J). Afine o interruptor para cima ou para baixo de forma a que o ponteiro (M) no suporte do pedal de tracção fique centrado por cima dele. Quando afinado correctamente, acende a lâmpada 5 no controlador logo que o interruptor de ignição é ligado. 5. Ligue o motor e verifique a velocidade. Repita o processo até se atingir a velocidade de avanço de 16 km/h. J K M L Figura 3E 3.7 CONVERGÊNCIA DAS RODAS DIANTEIRAS ___________________________________ 1. Coloque as rodas viradas para a frente. 2. Solte as porcas de fixação (N) em ambos os lados do tirante (M). 3. Rode o tirante (S) para uma convergência correcta. A convergência não pode exceder 1,5 mm (P). Volte a apertar as porcas de fixação. 4. Depois de ter afinado o tirante, afine o cilindro da direcção roscando o tirante (T) para dentro ou para fora da junta esférica para que o braço (R) fique afastado 19 ± 1,5 mm do batente do eixo (U) quando o êmbolo está todo saído. P N S N T P +0 - 1,5 mm R U 19 ± 1,5 mm LF016 Figura 3F pt-12 AFINAÇÕES 3.8 3 ALTURA DE CORTE________________________________________________________ A altura de corte dos rolos pode ser ajustada de 19 a 133 mm em incrementos de 6 mm. A altura de corte poderá variar ligeiramente das alturas dadas dependendo das condições do solo e de outros factores. AVISO Ao cortar áreas onduladas, uma altura de corte baixa poderá causar desrelvamentos. Ajuste adequa-damente a altura de corte para evitar danos ao solo. AVISO Para uma melhor qualidade de corte, coloque sempre o mesmo número de espaçadores debaixo da armação do conjunto de corte nos três eixos. Ajuste todos os conjuntos de corte à mesma altura. C A F 1. Estacione o aparador de relva numa superfície plana e nivelada e rebaixe completamente as unidades de corte. Coloque blocos na armação do conjunto de corte para que esteja apoiada por todos os lados. D B ! ATENÇÃO Para evitar lesões graves, baixe o conjunto de corte até que esteja completamente assente nos carretos dianteiros e no rolo traseiro. Isto evitará um rebaixamento acidental ao fazer os ajustes. Desengrene toda a transmissão, accione o travão de estacionamento, pare o motor e retire a chave da ignição. 2. D E Consulte o gráfico fornecido para saber a altura desejada de corte. Figura 3G ! CUIDADO Use as técnicas devidas de elevação ao elevar ou rebaixar as armações do conjunto de corte. As armações do conjunto de corte pesam aproximadamente 23 kg. 3. Para rebaixar a altura de corte, retire os três pinos de fixação (A). Eleve ligeiramente a manga exterior do eixo (B) e retire os espaçadores de 13 mm (D) e/ou o espaçador de 6 mm (E) de baixo, um de cada vez, até ter obtido a altura de corte desejada. Retire cuidadosamente os blocos e baixe as armações do conjunto de corte (C). Coloque os espaçadores restantes acima do eixo e insira os pinos de fixação. A anilha (F) fica sempre por cima, imediatamente abaixo do pino de fixação. 4. Para aumentar a altura de corte, retire os três pinos de fixação (A). Eleve cuidadosamente a armação do conjunto de corte (C) acima da altura de corte desejada e apoie-a com calços. Acrescente espaçadores de 13 mm (D) e/ou um espaçador de 6 mm (E), conforme desejado, até obter a altura de corte pretendida. Baixe a armação do conjunto de corte. Coloque os espaçadores restantes acima do eixo e insira os pinos de fixação. A anilha (F) fica sempre por cima, imediatamente abaixo do pino de fixação. Altura corte (mm) 19 25 31 37 43 50 56 62 68 75 81 87 93 100 106 112 118 125 133 Espaç. 13 mm abaixo armaç. cortador 0 0 1 1 2 2 3 3 4 4 5 5 Espaç. 13 mm abaixo armaç. cortador 9 9 8 8 7 7 6 6 5 5 4 4 Posição do espaçador de 6 mm Acima armação Abaixo armação Acima armação Abaixo armação Acima armação Abaixo armação Acima armação Abaixo armação Acima armação Abaixo armação Acima armação Abaixo armação 6 6 7 7 8 8 9 3 3 2 2 1 1 0 Acima armação Abaixo armação Acima armação Abaixo armação Acima armação Abaixo armação Acima armação pt-13 3 AFINAÇÕES 3.9 CALIBRAGEM DO SISTEMA DE CONTROLO DE TRACÇÃO ______________________ O Sistema de Controlo de Tracção (TCS) precisa de ser calibrado quando um componente do sistema foi substituído ou o sistema não estiver a trabalhar de forma adequada. Os componentes do sistema incluem o controlador, a válvula de elevação, os cilindros de elevação ou os tubos. 1. 6. AVISO Permite ao sistema hidráulico aquecer correctamente. O operador tem de estar no assento durante o processo de calibrar. Não passar depressa pelos passos 5 e 6. O sistema não será calibrado correctamente se os conjuntos não começarem a subir no passo 5 e não estiverem completamente descidos durante o passo 6. ! ATENÇÃO Nunca coloque o motor a trabalhar sem ventilação adequada; os fumos de escape podem ser fatais quando inalados. Durante o aquecimento do sistema hidráulico para o processo de calibrar, as lâminas da unidade de corte rodam. A área por baixo e à volta das unidades de corte tem de estar limpa e sem detritos, pois podem ser disparados a elevada velocidade. Manter pessoas estranhas ao serviço afastadas do equipamento. a. Ligar o motor e rodar a borboleta para o máximo. b. Soltar o travão de estacionamento c. Ligar o interruptor PTO. d. Descer totalmente as unidades de corte para o solo. e. Engatar o sistema de comando da tracção. f. Deixar o equipamento trabalhar durante 5 minutos com essa afinação. 2. O sistema precisa de ser calibrado com o motor em funcionamento, com o utilizador sentado no seu lugar, o interruptor PTO na posição OFF (Desligado), o travão de estacionamento accionado e o pedal de tracção em posição neutra. 3. Baixe completamente as unidades de corte. Verificar que os cinco conjuntos estão totalmente descidos. 4. Prima e mantenha premido o interruptor TCS durante 5 segundos. A buzina apita quando o controlador entra no modo de calibragem. AVISO Não soltar o interruptor antes da buzina parar tanto para iniciar como para terminar o processo de calibrar. 5. Levar a alavanca de subir para a posição de subir e aguardar 3 a 5 segundos. Se necessário, repetir até as unidades de corte começarem a subir. pt-14 Levar a alavanca de subir para a posição mais baixa e aguardar até os conjuntos pararem. Repetir, se necessário accionando o joystick até os conjuntos dianteiros poisarem no solo. 7. Prima e mantenha premido o interruptor TCS até que a buzina apite. O sistema já está calibrado. AVISO Para cancelar o modo de calibragem, rode a chave da ignição para a posição OFF (Desligado). AFINAÇÕES 3 3.10 BINÁRIO _________________________________________________________________ AVISO Todos os valores de binário incluídos nestas tabelas são aproximados e servem apenas como referência. A aplicação destes valores de binário é por conta e risco do utilizador. A Jacobsen não se responsabiliza por quaisquer perdas, reclamações ou danos resultantes da aplicação destas tabelas. Deve haver sempre extrema cautela ao usar qualquer valor de binário. Jacobsen utiliza normalmente cavilhas anodizadas do grau 5, salvo indicação em contrário. Para o aperto de cavilhas anodizadas, deve ser usado o valor indicado para as lubrificadas. (ELEMENTOS DE APERTO COM NORMALIZAÇÃO NACIONAL AMERICANA) TAMANHO UNIDADES GRAU 5 Lubrifica- TAMANHO GRAU 8 Secas das Lubrifica- UNIDADES Secas GRAU 5 Lubrifica- das GRAU 8 Secas Lubrifica- das Secas das #6-32 in-lb (Nm) – 20 (2,3) – – 7/16-14 ft-lb (Nm) 37 (50,1) 50 (67,8) 53 (71,8) 70 (94,9) #8-32 in-lb (Nm) – 24 (2,7) – 30 (3,4) 7/16-20 ft-lb (Nm) 42 (56,9) 55 (74,6) 59 (80,0) 78 (105) #10-24 in-lb (Nm) – 35 (4,0) – 45 (5,1) 1/2-13 ft-lb (Nm) 57 (77,2) 75 (101) 80 (108) 107 (145) #10-32 in-lb (Nm) – 40 (4,5) – 50 (5,7) 1/2-20 ft-lb (Nm) 64 (86,7) 85 (115) 90 (122) 120 (162) #12-24 in-lb (Nm) – 50 (5,7) – 65 (7,3) 9/16-12 ft-lb (Nm) 82 (111) 109 (148) 115 (156) 154 (209) 1/4-20 in-lb (Nm) 75 (8,4) 100 (11,3) 107 (12,1) 143 (16,1) 9/16-18 ft-lb (Nm) 92 (124) 122 (165) 129 (174) 172 (233) 1/4-28 in-lb (Nm) 85 (9,6) 115 (13,0) 120 (13,5) 163 (18,4) 5/8-11 ft-lb (Nm) 113 (153) 151 (204) 159 (215) 211 (286) 5/16-18 in-lb (Nm) 157 (17,7) 210 (23,7) 220 (24,8) 305 (34,4) 5/8-18 ft-lb (Nm) 128 (173) 170 (230) 180 (244) 240 (325) 5/16-24 in-lb (Nm) 173 (19,5) 230 (26,0) 245 (27,6) 325 (36,7) 3/4-10 ft-lb (Nm) 200 (271) 266 (360) 282 (382) 376 (509) 3/8-16 ft-lb (Nm) 23 (31,1) 31 (42,0) 32 (43,3) 44 (59,6) 3/4-16 ft-lb (Nm) 223 (302) 298 404 315 (427) 420 (569) 3/8-24 ft-lb (Nm) 26 (35,2) 35 (47,4) 37 (50,1) 50 (67,8) 7/8-14 ft-lb (Nm) 355 (481) 473 (641) 500 (678) 668 (905) ELEMENTOS MÉTRICOS DE APERTO 4.6 TAMANHO 8.8 10.9 Elementos de aperto não críticos para alumínio 12.9 UNIDADES Lubrifica- Secas das Lubrifica- Secas das Lubrifica- Secas Lubrifica- das Secas das M4 Nm (in-lb) – – – – – – 3,83 (34) 5,11 (45) 2,0 (18) M5 Nm (in-lb) 1,80 (16) 2,40 (21) 4,63 (41) 6,18 (54) 6,63 (59) 8,84 (78) 7,75 (68) 10,3 (910 4,0 (35) M6 Nm (in-lb) 3,05 (27) 4,07 (36) 7,87 (69) 10,5 (93) 11,3 (102) 15,0 (133) 13,2 (117) 17,6 (156) 6,8 (60) M8 Nm (in-lb) 7,41 (65) 9,98 (88) 19,1 (69) 25,5 (226) 27,3 (241) 36,5 (323) 32,0 (283) 42,6 (377) 17,0 (150) M10 Nm (ft-lb) 14,7 (11) 19,6 (14) 37,8 (29) 50,5 (37) 54,1 (40) 72,2 (53) 63,3 (46) 84,4 (62) 33,9 (25) M12 Nm (ft-lb) 25,6 (19) 34,1 (25) 66,0 (48) 88,0 (65) 94,5 (70) 125 (92) 110 (81) 147 (108) 61,0 (45) M14 Nm (ft-lb) 40,8 (30) 54,3 (40) 105 (77) 140 (103) 150 (110) 200 (147) 175 (129) 234 (172) 94,9 (70) pt-15 4 MANUTENÇÃO 4 MANUTENÇÃO 4.1 CONSIDERAÇÕES GERAIS _________________________________________________ ! ATENÇÃO Antes de proceder a limpeza, afinações ou reparações neste equipamento, desengate todos os accionadores, baixe os utensílios até ao solo, engate o travão de estacionamento, desligue o motor e retire a chave da ignição para evitar lesões. Certifique-se de que o aparador de relva está estacionado numa superfície sólida e plana. Nunca trabalhe num aparador de relva que esteja apoiado somente no macaco. Utilize sempre os suportes do macaco. 1. Afinações e trabalhos de manutenção devem ser sempre executados por técnicos qualificados. Se a afinação apropriado não puder ser realizado, entre em contacto com o distribuidor autorizado da Jacobsen. 2. Inspeccione o equipamento a intervalos regulares, estabeleça um programa de manutenção e mantenha registos detalhados. 4.2 A rodagem adequada de um motor novo pode trazer consideráveis benefícios para o desempenho e para a vida útil do motor. Durante o período de rodagem, Jacobsen recomenda o seguinte: 2. Mantenha o equipamento limpo. b. Mantenha todos os componentes móveis correctamente afinados e lubrificados. c. Substitua peças gastas ou danificadas antes de começar a trabalhar com a máquina. d. Mantenha todos os fluidos nos níveis correctos. e. Mantenha todos os painéis no seu lugar e todos os equipamentos bem presos. f. Mantenha os pneus com a pressão de ar correcta. 3. Não use adornos nem vestuário solto ao fazer afinações ou reparações. 4. Use as gravuras no Catálogo de Peças como referência para desmontar e montar componentes. 5. Proceda à reciclagem ou deite fora todos os materiais de risco (baterias, combustíveis, lubrificantes, anticongelante, etc.) de acordo com as regulamentações locais, regionais ou nacionais. MOTOR _________________________________________________________________ IMPORTANTE: Um Manual separado do motor, elaborado pelo fabricante do motor, é fornecido com o motor. Lei atentamente o manual do motor até ficar familiarizado com sua operação e manutenção. A atenção apropriada às orientações do fabricante do motor assegurará a máxima vida útil do motor. Para pedidos de mais exemplares do manual do motor, entre em contacto com o fabricante do motor. 1. a. Durante as primeiras 50 horas de operação, deve-se permitir que um motor novo atinja uma temperatura operacional de pelo menos 60°C antes de funcionar a toda carga. Verifique o nível de óleo do motor duas vezes por dia durante as primeiras 50 horas de operação. Um 4.3 3. Troque o óleo do motor e o óleo do elemento do filtro após as primeiras 50 horas de operação. 4. Verifique e afinação as correias do ventilador e do alternador. 5. Consulte a Secção 6.2 e o Manual do motor sobre intervalos específicos de manutenção. Caso a bomba injectora, os injectores ou o sistema de combustível requeiram assistência, entre em contacto com o distribuidor Jacobsen. AVISO O aparador de relva destina-se a operar e a cortar da maneira mais eficiente com a configuração pré-ajustada do regulador. Não altere os afinações do regulador do motor nem aplique velocidade excessiva ao motor. OLEO DO MOTOR _________________________________________________________ Verifique o óleo do motor no início de cada dia, antes de ligar o motor. Se o nível do óleo estiver baixo, remova a tampa do bujão de enchimento e complete conforme requerido. Faça a mudança inicial do óleo após as primeiras 50 horas de operação e, a partir dessa altura, de 100 em 100 horas. Consulte o Manual do motor. pt-16 consumo de óleo superior ao normal é habitual durante o período inicial de rodagem. Use óleos para motor com classificação API CD/CE. Acima de 25°C SAE 30W ou SAE 10W30/10W40 0 - 25°C SAE 20W ou SAE 10W30/10W40 Abaixo de 0°C SAE 10W ou SAE 10W30/10W40 MANUTENÇÃO 4.4 FILTRO DE AR ____________________________________________________________ Verifique o indicador de serviço diariamente. Se a faixa vermelha aparecer na abertura (B), substitua o elemento. Não remova o elemento para inspecção ou limpeza. Uma remoção desnecessária do filtro aumenta o risco de penetração de poeiras ou de outras impurezas no motor. 4. Recoloque a tampa certificando-se de que ela fica completamente vedada em torno da carcaça do filtro. O evacuador de poeiras deve estar virado para baixo. 5. Verifique todas as mangueiras e condutas de ar. Aperte as braçadeiras das mangueiras. Quando for necessário um serviço, primeiro limpe a parte externa da carcaça do filtro; depois disso, remova o elemento usado da maneira mais cuidadosa possível e elimine-o. 1. Limpe cuidadosamente a parte interna da carcaça do filtro sem deixar entrar poeiras na entrada de ar. 2. Inspeccione o novo elemento. Não utilize um elemento danificado e nunca use um elemento incorrecto. 3. Monte o novo elemento e certifique-se de que ele está instalado adequadamente. Reajuste o indicador pressionando o botão (A). 4.5 4 A B LF017 Figura 4A COMBUSTÍVEL____________________________________________________________ Manuseie o combustível com cautela; ele é altamente inflamável. Utilize um recipiente aprovado; o tubo de vazar deve ser encaixado dentro do gargalo do recipiente de combustível. Evite usar latas e funis para meter combustível. ! ATENÇÃO Nunca remova a tampa de combustível do tanque de combustível, ou coloque combustível quando o motor estiver em funcionamento ou ainda estiver quente. Não fume quando estiver a manusear o combustível. Nunca encha ou drene o tanque de combustível em recinto fechado. • Encha o tanque até uma polegada 25 mm da parte inferior do gargalo de entrada. • Use combustível limpo e novo, Diesel #2. A taxa mínima de cetano é de 45. Consulte o manual para obter informações adicionais. • Verifique as linhas de combustível e as braçadeiras a intervalos de 50 horas. Substitua linhas de combustível e braçadeiras ao primeiro sinal de danos. • Armazene combustível em conformidade com as regulamentações municipais, estatais e federais e com as recomendações do fornecedor de combustível. • Nunca encha em excesso o tanque nem deixe que o tanque fique vazio. Limpe imediatamente combustível derramado. Nunca manuseie ou armazene recipientes contendo combustível na proximidade de chamas ou de qualquer dispositivo que possa provocar faísca e inflamar o combustível ou os vapores do combustível. Certifique-se de que recolocou e apertou firmemente a tampa do combustível. 4.6 SISTEMA DE COMBUSTÍVEL ________________________________________________ Consulte a Secção 6.2 para obter informações sobre os intervalos de manutenção. Antes de substituir qualquer filtro, limpe completamente a caixa do filtro e a área em torno do filtro. Não permita a penetração de sujidades no sistema de combustível. Faça a purga do sistema de combustível depois do filtro e das linhas do combustível terem sido retirados ou depois do reservatório ter ficado vazio. Consulte o manual do motor. Substituição do filtro de combustível: 1. Feche a válvula de combustível no reservatório e retire e deite fora o filtro existente. 2. Aplique uma ligeira camada de óleo no vedante e aperte à mão o novo filtro. 3. Encha o reservatório de combustível. Abra totalmente a válvula no reservatório e purgue o filtro. Consulte o manual do motor. pt-17 4 MANUTENÇÃO 4.7 BATERIA_________________________________________________________________ Certifique-se de forma absoluta de que o interruptor de ignição está “desligado” e de que a chave foi retirada antes de realizar qualquer serviço na bateria. Verifique a polaridade da bateria antes de ligar ou desligar os cabos da bateria. 1. Ao instalar a bateria, monte sempre primeiro o cabo de bateria VERMELHO, positivo (+), e, por último, o cabo PRETO, de terra, negativo (-). 2. Ao remover a bateria, remova sempre primeiro o cabo de terra, PRETO, negativo (-), e o cabo positivo (+) VERMELHO por último. 3. Certifique-se de que a bateria está apropriadamente instalada e presa à bandeja da bateria. ! CUIDADO Utilize sempre ferramentas isoladas, use óculos de segurança ou de protecção e roupa de protecção quando estiver a trabalhar com baterias. Deverá ler e obedecer a todas as instruções do fabricante da bateria. Aperte os cabos firmemente nos terminais da bateria e aplique uma leve camada de massa dielétrica de silicone nos terminais e nas extremidades dos cabos para evitar corrosão. Mantenha as tampas de respiro e as coberturas do terminal instaladas. Verifique o nível do electrólito a intervalos de 100 horas. Mantenha limpas as extremidades dos cabos, a bateria e os suportes da bateria. 4.8 ! ATENÇÃO A bateria, os terminais e os acessórios relacionados contêm chumbo e seus compósitos, químicos reconhecidos pelo Estado da Califórnia como causadores de cancro e problemas de reprodução. Lave as suas mãos após manuseá-los. ARRANQUE INDUZIDO _____________________________________________________ Antes de tentar o “arranque induzido” no aparador de relva, verifique a condição de descarga da bateria. Secção 4.7. ! ATENÇÃO Baterias libertam gás hidrogénio, que é explosivo. Para reduzir o risco de explosão, evite produzir centelhas próximo à bateria. Ligue sempre o cabo negativo de ligação directa à estrutura do aparador de relva com a bateria descarregada, afastado da bateria. Ao ligar cabos de ligação directa: 1. Desligue o motor no veículo com uma bateria em bom estado. 2. Ligue o cabo VERMELHO de ligação directa ao terminal positivo (+) na bateria em bom estado e ao terminal positivo (+) na bateria “descarregada”. 3. Ligue o cabo PRETO de ligação directa proveniente do terminal negativo (-) da bateria em bom estado à estrutura do aparador de relva que está com a bateria descarregada. Depois de os cabos terem sido ligados, arranque o motor no veículo com a bateria em bom estado e em seguida arranque o aparador de relva. 4.9 CARREGAR A BATERIA ___________________________________________________ 2. Sempre que possível, remova a bateria do aparador de relva antes de a carregar. Se a bateria não for selada, verifique se o electrólito recobre os elementos em todas as células. 3. Certifique-se de que o carregador está “Desligado”. Em seguida, ligue o carregador aos terminais da bateria conforme especificado no Manual do Carregador. 4. Desligue sempre o carregador antes de desligar o carregador dos terminais da bateria. ! ATENÇÃO Carregue a bateria numa área bem ventilada. Baterias emitem gases explosivos. Para evitar explosão, mantenha chamas afastadas da bateria. Para evitar lesões, fique afastado da bateria quando o carregador estiver ligado. Uma bateria danificada pode explodir. 1. Consulte a Secção 4.7. Leia o Manual da Bateria e o Manual do Carregador para instruções específicas. pt-18 MANUTENÇÃO 4 4.10 SILENCIADOR E ESCAPE ___________________________________________________ Para se proteger contra envenenamento por monóxido de carbono, inspeccione regularmente o sistema de escape completo e substitua sempre um silenciador danificado. ! ATENÇÃO O fumo do escape contém monóxido de carbono que é tóxico e pode ser fatal quando inalado. NUNCA opere um motor em local onde não haja ventilação adequada. Se observar uma mudança de cor ou de som no escape, desligue imediatamente o motor. Identifique o problema e proceda à reparação no sistema. Aplique binário uniformemente em as ferragens da tubagem do escape. Aperte ou substitua as braçadeiras do escape. 4.11 MANGUEIRAS HIDRÁULICAS________________________________________________ ! ATENÇÃO Para evitar lesões graves provocadas por óleo quente a alta pressão, nunca use as mãos para verificar fugas de óleo; utilize papel ou papelão. Fluido hidráulico em fuga sob pressão pode ter força suficiente para penetrar através da pele. Se houver penetração de fluido na pele ele deve ser removida cirurgicamente dentro de poucas horas por um médico especializado neste tipo de lesão, caso contrário poderá resultar em gangrena. 1. 2. 3. 4. Baixe sempre os utensílios até ao solo, desengate todos os accionadores, engrene o travão de estacionamento e retire a chave antes de inspeccionar ou desligar linhas ou mangueiras hidráulicas. Verifique mangueiras e tubos visíveis diariamente. Observe se não há mangueiras húmidas ou manchas de óleo. Substitua mangueiras e tubos gastos ou danificados antes de usar a máquina. Ao substituir tubos ou mangueiras, instale-as na mesma posição que as anteriores; não desloque braçadeiras, suportes e presilhas para uma nova posição. Inspeccione completamente todos os mangueiras e conexões a cada 250 horas. IMPORTANTE: O sistema hidráulico pode ser permanentemente danificado se o óleo ficar contaminado. Antes de desligar qualquer componente hidráulico, limpe a área em torno dos encaixes e das extremidades das mangueiras para que impurezas não penetrem no sistema. a. Antes de desligar qualquer componente hidráulico, coloque uma etiqueta ou marque a localização de cada mangueira; depois, limpe a área em torno dos encaixes. b. Quando desligar o componente, esteja preparado para colocar tampões e tampas nas extremidades das mangueiras e nos orifícios abertos. Isto impedirá a penetração de impurezas dentro do sistema e também evitará derrames de óleo. c. Certifique-se de que os O-Ring estão limpos e de que os encaixes das mangueiras estão adequadamente assentados antes de apertar. d. Não deixe as mangueiras ficarem torcidas. Mangueiras torcidas podem provocar afrouxamento dos acoplamentos quando a mangueira flexionar durante a operação, resultando em vazamentos de óleo. e. tubos, Mangueiras dobradas ou torcidas podem restringir o fluxo de óleo fazendo com que o sistema funcione deficientemente e o óleo sofra sobreaquecimento, podendo também provocar falhas da mangueira. 4.12 ÓLEO HIDRÁULICO ________________________________________________________ Consulte a Secção 6.2 sobre os intervalos específicos de manutenção. 3. Depois do óleo ser drenado, instale o tampão de dreno e encha com óleo hidráulico da Jacobsen. Drene e substitua o óleo hidráulico após um defeito importante de componente, ou se notar presença de água ou espuma no óleo ou um odor rançoso (indicando calor excessivo). 4. Purgue o ar do sistema. a. Para evitar o sobreaquecimento dos rolos, desligue os motores dos rolos. b. Faça funcionar todas as funções do aparador de relva durante cerca de 5 minutos até que todo o ar contido no sistema tenha sido eliminado e o nível do óleo fique estabilizado. Durante esse tempo, o alarme do nível do óleo tem de se ouvir. c. Depois do nível ter estabilizado e do ar ter sido purgado, encha o reservatório até ao traço de marcação existente na vareta. Ligue o motor e verifique que o alarme do óleo se mantém desligado. Substitua sempre o filtro hidráulico ao mudar o óleo. Para mudar o óleo hidráulico: 1. Limpe a área em torno da tampa do óleo para evitar a penetração de impurezas e a contaminação do sistema. 2. Remova o tampão de dreno do fundo do tanque. pt-19 4 MANUTENÇÃO 4.13 FILTRO HIDRÁULICO ______________________________________________________ O sistema hidráulico é protegido por um filtro na linha de retorno de 10 micra. A passagem do fluido através dos filtros é monitorizada durante o serviço. Quando a perda de pressão através dos filtros é excessiva, a luz de aviso do filtro do óleo hidráulico acende. Para garantia de protecção contínua ao sistema hidráulico, ambos os filtros devem ser substituídos o mais rapidamente possível depois das lâmpadas acenderem. AVISO Durante a estação fria, a lâmpada de aviso pode acender até o óleo ficar à temperatura de serviço. Aguarde até o óleo ter aquecido e a lâmpada apagar antes de começar a trabalhar com o aparador de relva. Substituição dos filtros hidráulicos: 1. Retire os filtros usados. 2. Instale filtros novos. Dê somente um aperto à mão. 3. Ligue o motor no “mínimo” com o sistema hidráulico na posição neutra durante cinco minutos. O sinal sonoro de alarme do nível do óleo pode actuar durante esse período. 4. Verifique o nível de óleo hidráulico no reservatório e complete até a marca de cheio na vareta. 4.14 SISTEMA ELÉCTRICO______________________________________________________ ! CUIDADO AVISO Desligue sempre o interruptor de ignição e remova o cabo negativo da bateria (PRETO) antes de inspeccionar ou trabalhar no sistema eléctrico. General precautions that can be taken to reduce electrical Precauções gerais que podem ser adoptadas para reduzir problemas eléctricos são enumeradas abaixo. 1. Certifique-se de que todos os terminais e as conexões estão limpos e adequadamente presos. 2. Verifique regularmente disjuntores. o sistema contactor e os Para obter assistência de fábrica na resolução de problemas com o controlador, anote a o número de revisão do controlador e a versão de software localizados no canto inferior direito do controlador. Os controladores com níveis de revisão iguais ou superiores são compatíveis com os inferiores. Os circuitos são protegidos por um seccionador, fusíveis e relés, montados na proximidade do condutor. F1 F2 C Se o sistema contactor não estiver a funcionar adequadamente e o problema não puder ser corrigido, entre em contacto com o distribuidor autorizado da Jacobsen. 3. Mantenha todos os fios individuais afastados de peças móveis para evitar danos. 4. Certifique-se de que o interruptor da base está ligado ao comando principal. 5. Verifique a bateria e o circuito de carga da bateria. 6. Não lave ou aplique spray de pressão em torno de ligações e de componentes eléctricos. O sistema eléctrico é monitorizado e comandado pelo controlador electrónico (C), localizado atrás da área do condutor. O controlador está equipado com quatro bancos de LED que podem ser utilizados para detecção de avarias na instalação eléctrica. - veja a Secção 5.2. K1 K2 Versão Software Revisão Hardware CB1 SECCIONADOR CB1 50 A SECCIONADOR FUSÍVEIS F1 20 A ALTERNADOR, MANÓMETROS, INTERRUPTORES F2 20 A LUZES RELÉS K1 VELAS K2 MOTOR DE PARTIDA pt-20 Figura 4B MANUTENÇÃO 4 4.15 RADIADOR _______________________________________________________________ ! ATENÇÃO Para evitar graves lesões corporais provocadas pelo refrigerante ou por jacto de vapor quente, nunca tente remover a tampa do radiador enquanto o motor estiver em funcionamento. Desligue o motor e espere que ele arrefeça. Mesmo assim, adopte extrema cautela ao remover a tampa. instruções na embalagem no anti-congelante e no manual do motor. Mantenha limpas as passagens de ar do radiador e do radiador do óleo hidráulico. Use ar comprimido (a 210 kPa, no máximo) para limpar as palhetas. Para limpar o radiador: 1. ! CUIDADO Não coloque água fria em cima de um radiador quente. Não coloque o motor em funcionamento sem a mistura adequada de refrigerante. Instale a tampa e aperte. Verifique diariamente o nível do fluido refrigerante. O radiador deve estar cheio e o vaso de expansão deve estar cheio até ao traço de marcação frio. Esvazie e volte a encher anualmente. Retire a tampa do radiador, abra a torneira do bloco do motor e a torneira do radiador. Esvazie e limpe o vaso de expansão. Use uma pistola de ar comprimido para limpar o radiador e as palhetas do radiador do óleo. AVISO Um painel deslizante colocado por baixo do quadro pode ser solto e empurrado para trás para permitir que sujidade, terra, etc., caiam através do quadro. 2. Verifique e estique a correia da ventoinha. Substitua grampos e mangueiras de dois em dois anos. 3. Se for preciso adicionar refrigerante mais do que uma vez por mês, ou se tiver de adicionar mais do que 1,2 l de cada vez, deve contactar os serviços de assistência técnica de Jacobsen a fim de verificarem o sistema de arrefecimento. Misture água limpa com anti-congelante à base de etilglicol para a temperatura ambiente mais baixa. Leia e siga as 4.16 ESTRUTURA PROTECTORA DO OPERADOR (ROPS) ____________________________ Uma estrutura ROPS projectado para este aparador de relva está disponível como acessório opcional. Se seu aparador de relva estiver equipado com este dispositivo, o inspecione periodicamente e siga os procedimentos operacionais descritos no Manual de segurança e funcionamento. ! CUIDADO Não solte ou remova parafusos; não solde, fure, modifique, dobre ou endireite uma estructura avariada. 1. O banco, o cinto de segurança, a montagem dos equipamentos e de quaisquer acessórios no interior do sistema ROPS devem ser inspeccionados periodicamente, fazendo-se a substituição imediata de todos os componentes danificados. 2. Depois do sistema ROPS ter sofrido qualquer tipo de impacto, tem de ser substituído. 3. Verifique e reaperte todos os equipamentos. Todas as peças sobressalentes utilizadas para ROPS têm de ser de acordo com o especificado no Catálogo de Peças. 4.17 PNEUS___________________________________________________________________ 1. Mantenha os pneus adequadamente cheios para prolongar a vida útil dos pneus. Verifique a pressão quando os pneus estiverem frios. Inspeccione o desgaste dos sulcos. 2. Verifique a pressão de 50 em 50 horas, ou uma vez por mês. Use um manómetro de pressão rigoroso para pneus de baixa pressão. 3. Mantenha os pneus com ar a: ! CUIDADO A menos que possua uma formação adequado, ferramentas e experiência, NÃO tente montar um pneu num aro. A montagem inadequada pode provocar explosões e resultar em lesões graves. Frente - 111 kPa Trás - 86 kPa pt-21 4 MANUTENÇÃO 4.18 PROCEDIMENTO DE MONTAGEM DE RODAS__________________________________ ! ATENÇÃO Certifique-se de que o aparador de relva está estacionado numa superfície sólida e plana. Nunca realize trabalhos num aparador de relva que esteja apoiado somente no macaco. Utilize sempre suportes de macaco. Se apenas as rodas dianteiras ou traseiras do aparador de relva estiverem levantadas, coloque calços à frente e atrás das rodas que não estão levantadas. 1. Remova sujidades, massa e óleo das roscas dos pinos. Não lubrifique as roscas. 2. Posicione a roda no cubo e inspeccione para se certificar de que há contacto completo entre a superfície de montagem da roda e o cubo ou tambor de travão. 3. Aperte com os dedos todos os parafusos e depois aplique um binário em sequência transversal; aperte sempre as roscas na posição de topo. 4. Verifique e reaplique binário diariamente até que o binário seja mantido entre 115 -128 Nm. 4.19 INSPECÇÃO DAS LÂMINAS _________________________________________________ 1. A cada 50 horas de utilização, ou sempre que o cortador seja retirado do aparador de relva, examine cuidadosamente as lâminas para garantir que estão em boas condições de utilização. As lâminas que manifestem dobras (G), ranhuras (H) ou fendas (J), deverão ser substituídas. ! CUIDADO Tenha muito cuidado ao verificar as lâminas para evitar que as mãos ou os dedos se entalem. ! ATENÇÃO Nunca tente endireitar, soldar ou reparar uma lâmina danificada. Substitua-a sempre. 2. Qualquer das condições acima poderá causar a separação e projecção de um estilhaço de lâmina do cortador, o que poderá originar lesões muito graves a qualquer pessoa ou material que esteja nas proximidades. 3. Uma lâmina dobrada poderá ter uma fissura microscópica (G) que poderá alargar e causar a projecção de estilhaços de lâmina. Lâminas dobradas também provocam vibração e outro desgaste à máquina. 4. A poeira ou partículas de areia poderão desgastar uma ranhura na lâmina (H) entre as pás e a parte plana da lâmina, que se alastrará rapidamente e produzirá uma fissura (J), permitindo que um estilhaço da pá se projecte. pt-22 G H J HR025 Figura 4C MANUTENÇÃO 4 4.20 AFIAMENTO DAS LÂMINAS _________________________________________________ 1. Coloque um bloco de madeira entre a lâmina e a armação do cortador para impedir o seu movimento. ! ATENÇÃO As lâminas do cortador podem criar arestas afiadas. Tenha atenção ao manusear e em qualquer intervenção técnica. 2. 3. Assegure-se de que o desgaste é feito equitativamente em ambos os lados da lâmina para evitar desequilibrá-la. Uma lâmina desequilibrada causa vibração excessiva e poderá danificar o cortador. 4. Use um equalizador para verificar a lâmina após o afiamento. 5. Aperte o parafuso central da lâmina até 100 a 120 Nm. Ao revestir ou afiar uma lâmina, não siga o padrão do fio original, conforme ilustrado em (A). Afie as novas arestas cortantes no ângulo mostrado abaixo (B). A Máximo 13 mm Se a perda total máxima da lâmina atingir os 13 mm, não a afie mais; substitua-a. B ! ATENÇÃO O reafiamento da lâmina além dos 13 mm permitidos poderá provocar o estilhaçamento e projecção da extremidade da lâmina. Um acidente desse tipo causaria lesões muito graves a pessoas e/ou material situado nas proximidades. HR024 Figura 4D 4.21 CUIDADOS E LIMPEZA _____________________________________________________ Lave o aparador de relva e os utensílios após cada utilização. Mantenha o equipamento limpo. AVISO Não lave qualquer parte do equipamento enquanto ele estiver quente. Não utilize vaporizadores ou vapor com alta pressão. Use água fria e detergentes para automóveis. 1. 2. Utilize ar comprimido para limpar o motor e as alhetas do radiador. Uma pistola sopradora encontra-se à disposição no seu distribuidor Jacobsen. Use apenas água para limpar o seu equipamento. AVISO A utilização de água salina ou outra poderá originar ferrugem ou corrosão das partes metálicas, de que resulta a sua deterioração ou falha. Os danos desta natureza não estão cobertos pela garantia de fábrica. 3. Não aplique vaporizadores de água directamente no painel de instrumentos, no interruptor de ignição, no controlador ou em quaisquer outros componentes eléctricos, ou nas carcaças e vedações dos mancais. 4. Limpe todo o acabamento de plástico ou borracha com uma solução fraca de sabão ou utilize detergentes para vinil/borracha disponíveis em estabelecimentos comerciais. 5. Para manter o brilho original da fibra de vidro, encerea periodicamente com cera de limpeza. Faça reparações em superfícies de metal danificadas e utilize a tinta para retoques da Jacobsen. Encere o equipamento para protecção máxima da pintura. ! CUIDADO Limpe relva e detritos das unidades de corte, dos accionadores, dos silenciadores e do motor para evitar incêndios. ! ATENÇÃO NUNCA use as mãos para limpar as unidades de corte. Utilize uma escova para remover relva das lâminas. As lâminas são extremamente afiadas e podem provocar lesões graves. pt-23 4 MANUTENÇÃO 4.22 ARMAZENAMENTO________________________________________________________ Considerações Gerais Unidades de Corte 1. Lave completamente o aparador de relva e lubrifique-o. Repare e pinte partes de metal danificadas ou expostas. 1. Lave completamente as unidades de corte; depois disso, repare e pinte partes de metal danificadas ou expostas. 2. Inspeccione o aparador de relva, aperte todas as ferragens, substitua componentes gastos ou danificados. 2. Lubrifique todos os encaixes e pontos de fricção. 3. Aplique uma leve camada de óleo contra a corrosão nos gumes afiados da lâmina. 3. Drene e encha novamente o radiador. 4. Limpe completamente os pneus e armazene o aparador de relva de tal forma que a carga não fique sobre os pneus. Se o aparador de relva não estiver sobre suportes de macaco, verifique os pneus a intervalos regulares e encha conforme necessário. 5. Mantenha a máquina e todos os seus acessórios limpos, secos e protegidos contra a intempéries durante o armazenamento. Nunca armazene equipamento próximo a chamas abertas ou faíscas que possam inflamar combustível ou vapores de combustível. Bateria 1. Retire, limpe e guarde a bateria em posição vertical numa superfície não condutora (madeira) em local fresco e seco. Para evitar a sua descarga rápida, não a guarde sobre betão ou aço. 2. Verifique e recarregue a bateria a intervalos de 60/90 dias enquanto ela estiver armazenada. 3. Armazene a bateria em local fresco e seco. Para reduzir a taxa de auto-descarga, a temperatura ambiente não deve estar acima de 27°C ou abaixo de -7°C; deve-se evitar que o electrólito congele. ! CUIDADO Para evitar lesões pessoais e danos nos gumes de corte, manuseie o rolo de lâminas com extrema cautela. Após o Armazenamento 1. Verifique e reinstale a bateria. 2. Verifique ou faça serviços de inspecção ao filtro de combustível e ao filtro de ar. 3. Verifique o nível de refrigerante do radiador. 4. Verifique o nível de óleo no cárter do motor e no sistema hidráulico. 5. Encha o tanque de combustível com combustível novo. Sangre o sistema de combustível. 6. Certifique-se de que os pneus estão adequadamente insuflados. 7. Remova todo o óleo dos rolos de lâminas e da lâmina fixa. Afinação a lâmina fixa e a altura de corte. 8. Ligue e opere o motor a 1/2 do acelerador. Aguarde um período de tempo suficiente para o motor ficar adequadamente aquecido e lubrificado. Motor 1. Quando o motor estiver morno, remova o tampão de drenagem, drene o óleo do cárter e troque o filtro de óleo. Instale o tampão de drenagem e encha com óleo novo. Aperte o bujão de drenagem com um binário de 30 Nm. 2. Limpe a parte externa do motor. Pinte partes de metal expostas ou aplique uma leve camada de óleo contra a corrosão. 3. Adicione um condicionador de combustível ou um biocida para evitar a congelação ou o aparecimento de bactérias no combustível. Consulte o seu fornecedor local de combustíveis. pt-24 ! ATENÇÃO Nunca opere o motor em local onde não haja ventilação apropriada; o fumo do escape pode ser fatal quando inalado. REPARAÇÃO DE AVARIAS 5 5.1 5 REPARAÇÃO DE AVARIAS CONSIDERAÇÕES GERAIS _________________________________________________ A tabela de resolução de problemas apresentada a seguir indica os problemas básicos que podem ocorrer no início e durante o funcionamento. Para obter informações mais detalhadas em relação aos sistemas hidráulico e eléctrico, entre em contacto com o distribuidor Jacobsen da sua área. Sintomas Motor não pega. Causas possíveis O que fazer 1. Travão de estacionamento desengatado, pedal de tracção não em neutro ou interruptor de cortar ligado. 1. Verifique o sistema de apoio ao condutor e o processo de arranque. 2. Vela de incandescência não esgotou o tempo. 2. Leve o interruptor de ignição à posição inicial e dê à vela de incandescência antes de arranca. 3. Bateria com pouca carga ou avariada. 3. Verifique o estado da bateria e as ligações da bateria. 4. Reservatório de combustível vazio ou sujo. 4. Encha com combustível fresco. Substitua o filtro do combustível. Purgue a tubagem do combustível. 5. Fusível fundiu. 5. Substitua o fusível. 6. Relé avariado. 6. Verifique e substitua o relé. 7. Interruptor neutro no pedal de tracção mal regulado ou avariado. 7. Regule ou substitua o interruptor. 1. Baixo nível de combustível, combustível sujo ou filtro sujo. 1. Encha com combustível fresco. Substitua o filtro de combustível. Purgue a tubagem de combustível. 2. Depurador do ar sujo. 2. Verifique e substitua o filtro de ar. 3. Injectores, bomba de combustível. 3. Consulte o manual do motor. 4. Problema no motor. 4. Consulte o manual do motor. 1. Reservatório de combustível vazio. 1. Encha com combustível fresco e purgue a tubagem de combustível. 2. Interlocks não activados antes do condutor sair. 2. Engate o travão de estacionamento e coloque o interruptor de cortar em DESLIGADO. 1. Baixo nível de refrigerante. 1. Verifique e adicione refrigerante. 2. Entrada de ar obstruída. 2. Limpe a entrada de ar no radiador. 3. Correia da bomba de água partida ou frouxa. 3. Estique ou substitua a correia. Bateria não carrega. 1. Terminais soltos ou corroídos. 1. Inspeccione e limpe os terminais. Lâmpada da bateria acesa. 2. Electrólito baixo. 2. Encha até ao nível correcto. 3. Correia do alternador frouxa ou partida. 3. Estique ou substitua a correia. 4. Sistema de carga avariado. 4. Consulte o manual do motor. 1. A altura do corte não está correctamente ajustada. 1. Verifique o ajuste da altura do corte. O mesmo número de espaçadores abaixo da armação do conjunto de corte em todos os eixos. 2. A velocidade do motor é muito baixa. 2. Verifique a velocidade do motor. Acelere ao máximo o motor. 3. A velocidade de corte não está ajustada às condições do terreno. 3. Ajuste a velocidade de corte para o melhor corte. Motor custa a pegar ou trabalha mal. Motor pára. Motor aquece demasiado. Os conjuntos de corte cortam de forma desigual. pt-25 5 REPARAÇÃO DE AVARIAS 5.2 LÂMPADAS DO CONTROLADOR ____________________________________________ O controlador é um dispositivo de estado sólido que monitoriza e comanda as funções eléctricas. O controlador recebe sinais provenientes de vários interruptores e sensores distribuídos por toda a máquina e transmite sinais para comandar relés, solenóides e lâmpadas de aviso. Comanda e restabelece dispositivos de relógio e inclui sistemas lógicos para comandas certas funções da máquina. determinada condição se verificar. Por exemplo, para ligar o aparador de relva, o Interruptor de Corte tem de estar desligado (lâmpada 8 desligada), enquanto que o Interruptor Neutro de Arranque (lâmpada 12), o Interruptor de Travão (lâmpada 6) e a bobina de Retenção da Válvula de Combustível (lâmpada 27) têm de estar ligados. AVISO Cada sinal de entrada e de saída é indicado através de lâmpadas localizadas na parte de cima do controlador. Um interruptor de entrada que esteja fechado indica um circuito activado e liga uma lâmpada de entrada; um interruptor aberto indica um circuito inactivo e desliga uma lâmpada. Saídas estão activas quando as luzes estão ligadas. Para obter assistência de fábrica na resolução de problemas com o controlador, anote a o número de revisão do controlador e a versão de software localizados no canto inferior direito do controlador [VER 4.14]. Os controladores com níveis de revisão iguais ou superiores são compatíveis com os inferiores. É importante notar que nalguns casos uma lâmpada ou um grupo de lâmpadas pode estar ligado para uma Funções do controlador por número de lâmpada Lâmpada ligada - Circuito activado Lâmpada desligada - Circuito desactivado ENTRADAS SAÍDAS Circuito Lâmpada Circuito Lâmpada Selector de programas (1, 3 e 4 não utilizados) 19 Luz do filtro hidráulico 5 Interruptor do travão 20 Luz do nível do óleo hidráulico 6 Interruptor do assento 21 Não usado 7 Interruptores de nivelamento do cilindro de corte 22 Luz das velas 8 Interruptor de corte 23 Baixar solenóide 9 Baixar 24 Elevar solenóide 10 Elevar 25 Relé das velas 11 Interruptor do nível do óleo hidráulico 26 Relé do motor de arranque 12 Interruptor neutro 27 Solenóide de paragem do combustível 13 Não usado 28 Não usado 14 Comutador de chave - Velas 29 Alarme sonoro 15 Comutador de chave - Ignição 30 Solenóide do cortador 16 Joystick activo 31 Solenóide do combustível - Puxar 17 Interruptor do filtro hidráulico 32 Alimentação 18 Interruptor do nível do óleo do motor 33 Iluminação de energia Lâmpada 1 2 3 4 5 6 7 8 9 10 11 12 13 14 15 16 17 18 ENTRADAS pt-26 SAÍDAS 19 20 21 22 23 24 25 26 27 28 29 30 31 32 33 1,2,3,4 REPARAÇÃO DE AVARIAS 5.3 5 CIRCUITOS ELÉCTRICOS ___________________________________________________ Ao proceder a detecção de avarias na máquina através do controlador, verifique sempre que o indicador luminoso de programa activo (2) é ligado. Estas lâmpadas indicam que o controlador tem corrente e que o programa está activado. AVISO O controlador exige um mínimo de 6 Volt para funcionar. Circuitos individuais podem ser testados através de um interruptor de entrada, verificando-se o sinal de entrada necessário e procurando-se uma saída correspondente. Não se esqueça de que nem todos os interruptores se encontram localizados no painel de instrumentos. O pedal de tracção, o fim de curso da deslocação do rolo e os travões são comandados por pequenos interruptores de lâmina montados no quadro do aparador de relva. Se uma lâmpada de entrada não acender, é indicada uma condição não activa. Essa situação pode ser causada por um fusível, por um interruptor avariado ou por uma má ligação. As ligações eléctricas aos solenóides nas válvulas hidráulicas também estão equipadas com pequenas lâmpadas de aviso. Quando estão acesas, estas lâmpadas indicam que o sinal de saída atingiu a ligação. Se houver lâmpadas que não acendem, verifique os fios de e para a barra de ligação. pt-27 6 TABELAS DE MANUTENÇÃO E LUBRIFICAÇÃO 6 TABELAS DE MANUTENÇÃO E LUBRIFICAÇÃO 6.1 CONSIDERAÇÕES GERAIS _________________________________________________ 2. Lubrifique com massa que equivalha ou exceda as especificações da classificação NLGI 2LB. Aplique massa com uma almotolia e encha lentamente até que a massa comece a extravasar. Não use pistolas de ar comprimido. 3. Para uma operação suave de todas as alavancas, dos pontos de pivô e de outros pontos de fricção que não são mostrados na tabela de lubrificação aplique algumas gotas de óleo SAE 30 a cada 50 horas ou conforme necessário. 4. Retire as rodas e renove os rolamentos anualmente. ! ATENÇÃO Antes de limpar, ajustar ou reparar este equipamento, desengate todos os accionadores, baixe os utensílios até ao solo, engrene o travão de estacionamento, desligue o motor e retire a chave da ignição para evitar lesões. 1. Limpe sempre o encaixe de massa antes e depois de lubrificar. 6.2 TABELA DE MANUTENÇÃO_________________________________________________ Periodicidade recomendada para assistência e lubrificação A cada 8-10 horas A cada 50 horas A cada 100 horas Depurador de ar AR Carga da bateria I**** Correia I-A* Travões Sistema de arrefecimento Óleo do motor A cada 500 horas A cada 1000 horas I 4.4 R A 3.4 4.2 R 4.3 R I*** I 6.3 II R** 4.12 R* R-AR 4.13 4.15 I-A I* 4.17 I-A Rolamentos das rodas L Cablagem I* C - Limpe *Indica revisão inicial para máquinas novas. ** Ou anualmente, o que se verificar primeiro. IV 4.10 I-C/AR Direcção II 4.11 I Pneus 6.3 I-A Silenciador e escape III 4.6 L Filtros do óleo hidráulico 4.15 R L Tipo de lubrificante 3.3 R* Lubrificadores - F2 I I - Inspeccione I 4.14 L- Lubrifique R - Substitua AR - Conforme necessário *** Inspeccione mangueiras e tubos quanto a fugas ou marcas de óleo. **** Inspeccione o nível do electrólito. Ver 4.7. Lubrifique mancais e rolamentos com NLGI Grau 2 (Classe de serviço GB) Pistola de lubrificação manual com NLGI Grau 2 (Classe de serviço LB). Óleo para o motor - veja a Secção 4.3 Óleo hidráulico - SAE 10W30 / Greens Care 68 de Jacobsen pt-28 R R* Lubrificadores - F1 I II III IV Ver Secção R I A - Adicione ou afine Anualmente 4.9 I-C-A Linhas de combustível e grampos Filtro de combustível Painéis de radiador A cada 400 horas I-A I-A* Filtro do óleo do motor Mangueiras e tubos hidráulicos Óleo hidráulico A cada 250 horas TABELAS DE MANUTENÇÃO E LUBRIFICAÇÃO 6.3 6 TABELA DE LUBRIFICAÇÃO ________________________________________________ 4 4 4 3 3 5 5 3 1 5 4 3 1 2 5 5 4 3 2 1 5 2 1 3 5 2 6 5 3 5 3 5 2 7 Pontos de lubrificação F1 - 50 Horas (Semanalmente) 1 2 3 4 5 6 7 8 9 10 11 12 12 Eixo do cortador (5) Articulação do braço elevador (5) Cilindros de elevação (10) Eixo e folga das rodas (10) Rolo traseiro (10) Pino do pedal do travão Pino do pedal de tracção Rótula de engate (2) Pino da direcção (2) Cilindro da direcção (2) Pivô do eixo 12 F2 - 100 Horas 8 8 12 Junta em U do veio da transmissão (3) 10 9 9 10 11 pt-29 7 CATÁLOGO DE PEÇAS 7 CATÁLOGO DE PEÇAS 7.1 COMO USAR O CATÁLOGO DE PEÇAS _______________________________________ Artigos indicados Abreviaturas N/S - Não fornecido separadamente, apenas pode ser obtido encomendando o componente principal ou kit. AR -Quantidade variável ou medida é necessária para obter o ajuste correcto. Símbolos tais como l, próximos do número do elemento, indicam que existe uma nota que contém informação adicional importante na encomenda de uma peça. Nº da peça Item l 7.2 Qt. 1 2 3 4 123456 789012 345678 N/S 1 1 1 1 5 901234 1 Os elementos declarados indicam as peças componentes que estão incluídas como parte de um conjunto ou outro componente. Estas peças podem ser encomendadas separadamente ou como parte do componente principal Descrição Números de série/Notas Suporte, Válvula Elevação, Válvula • Comando • Conjunto de vedante Parafuso, 1/4-20 x 2” Cabeça sextavada Indica uma peça Inclui Items 3 e 4 Peça que requer assistência incluída no Item 2 Peça que não requer assistência incluída no Item 2 PARA ENCOMENDAR PEÇAS _______________________________________________ 1. Preencha seu nome e endereço completos no pedido. 5. Envie ou leve o pedido até um revendedor autorizado Jacobsen. 2. Explique onde e como fazer a remessa. 3. Indique o número do produto, o nome e o número de série que se encontram gravados na chapa de características ou na chapa de série do seu produto. 6. Inspecione todos os itens da remessa ao recebê-los. Se houver alguma peça avariada ou ausente, encaminhe uma reclamação por escrito ao transportador antes de aceitálos. 4. Encomende a quantidade desejada da peça sobressalente, referindo o código da cor e a descrição da peça como se indica na lista de peças. 7. Não devolva materiais sem uma carta de explicação, listando as peças que estão sendo devolvidas. As despesas de transporte devem ser pré-pagas. O uso de peças e acessórios que não sejam autorizadas da Jacobsen invalidará a garantia. pt-30 PARTS CATALOG 7.3 7 TABLE OF CONTENTS______________________________________________________ 1.1 .........Decals..................................................................... 32 2.1 .........Hood ....................................................................... 34 3.1 .........Seat Pan ................................................................. 36 3.2 .........Seat Pan ................................................................. 38 4.1 .........Control Panel ......................................................... 40 5.1 .........Traction Pedal........................................................ 42 6.1 .........Brake Pedal ............................................................ 44 7.1 .........Frame...................................................................... 46 8.1 .........Front Axle............................................................... 48 9.1 .........Tilt Steering............................................................ 50 9.2 .........Tilt Steering............................................................ 52 10.1 .......Rear Axle................................................................ 54 11.1 .......Tie Rod ................................................................... 56 12.1 .......Remote Engine Oil Cooler .................................... 57 13.1 .......Radiator and Air Cleaner ...................................... 58 14.1 .......Engine Mounting ................................................... 60 15.1 .......Pump Mounting and Engine Exhaust .................. 62 16.1 .......Fuel and Hydraulic Tanks ..................................... 64 17.1 .......Pump Suction Hydraulics ..................................... 66 18.1 .......Oil Cooler Hydraulics ............................................ 67 19.1 .......Hydraulic Valves and Filter .................................. 68 20.1 .......Deck Hydraulics .................................................... 69 21.1 .......Traction Hydraulics ............................................... 70 22.1 .......Front Lift Hydraulics ............................................. 72 23.1 .......Rear Lift Hydraulics .............................................. 73 24.1 .......Wheel Motor Case Drains ..................................... 74 25.1 .......Deck Motor Case Drain ......................................... 75 26.1 .......Steering Hydraulics............................................... 76 27.1 .......Hydraulic Clamps .................................................. 77 28.1 .......Electrical Harness ................................................. 78 29.1 .......Front Lift Arms....................................................... 80 30.1 .......Rear Lift Arms........................................................ 82 31.1 .......Deck Housing and Caster Wheels ....................... 84 32.1 .......Deck Frame ............................................................ 86 33.1 .......Deck Valve ............................................................. 88 33.2 .......Deck Valve ............................................................. 89 34.1 .......Front Wheel Motor................................................. 90 35.1 .......Rear Wheel Motor .................................................. 91 36.1 .......Lift Valve ................................................................ 92 37.1 .......4WD Valve .............................................................. 93 38.1 .......Steering Valve........................................................ 94 39.1 .......Traction Pump (Front Half) ................................... 96 40.1 .......Traction Pump (Rear Half) .................................... 98 41.1 .......Electrical Schematic ........................................... 100 42.1 .......Hydraulic Schematic ........................................... 104 42.2 .......Hydraulic Schematic ........................................... 106 43.1 .......O-Ring Chart ........................................................ 108 en-31 AR-522 Serial No. All 1.1 Decals CUT HEIGHT W/ 1/2 SPACERS CUT HEIGHT W/ 1/4 SPACER 5-1/4 5 4-3/4 4-1/2 4-1/4 4 3-3/4 3-1/2 3-1/4 81 4181860 3 43 6 41 2-3/4 21 2-1/2 2-1/4 2 1-3/4 1-1/2 1-1/4 3/4 4181865 1 19 17 20 TR 20 4133609 ™ IMTEK 11 19 21 11 2 2 TC-O / I 13 10 22 18 19 21 12 20 068080, 068082, 068098 1726 Kg. 16 41.8 kW 17 4179360 13 7 5002952 24 4 5 ! WARNING This structure's proctective capability may be impaired by structural damage, overturn, or alteration. If any of these conditions occur, the structure must be replaced. 557844 6 23 8 9 32 1 14 / 15 AR-522 3 AR-522 BIOD EG RA UI D ® DABLE FL 4181862 4181861 3008521 4 5 6 7 3008522 8 1 L WA Manufactured under one or more of the following U.S. Patents: xxxxxxx xxxxxxx xxxxxxx xxxxxxx 4181864 9 Item 1 2 3 4 5 6 7 8 9 10 11 12 13 14 15 16 17 18 19 20 21 22 23 24 12 10 Part No. Qty. 4111408 2 4134631 4177682 4181862 4182386 4181861 3008521 3008522 4181864 3008682 4179022 4194327 4179360 4156720 4156721 4131772 4181865 4117468 4164381 4133609 4181860 4134870 557844 5002952 1 2 1 1 1 1 1 1 1 5 1 1 1 1 1 1 1 10 10 5 1 1 1 105 dB 18 Description 3008682 Serial Numbers/Notes Decal, Bio Fluid Decal, Service Decal, AR-522 Decal, Radiator Warning Decal, Jacobsen Emblem Decal, Start Assist Fluids Decal, Traction Pedal Decal, Brake Decal, Battery Danger Decal, Tow Valve Decal, Trimtek™ Decal, Patent Decal, Weight and Power Decal, Left Side Stripe Decal, Right Side Stripe Decal, Blank Decal, Warning Decal, Noise 105 dB Decal, Danger Decal, Height of Cut Decal, Read Manual Decal, TC-O/I Decal, ROPS Structure Warning Decal, ROPS Seat Belt Warning Included with hood Included with hood 2 on each cutting unit 2 on each cutting unit Located on ROPS, See 7.1 Located on ROPS, See 7.1 > Change from previous revision 33 AR-522 Serial No. All 2.1 Hood 15 21 25 6 1 2 26 22 17 5 4 3 18 7 17 19 9 15 20 16 22 10 10 24 23 16 11 14 12 8 16 LF34-1 34 AR-522 Item 1 2 3 4 5 6 7 8 9 10 11 12 13 14 15 16 17 18 19 20 21 22 23 24 25 26 Part No. Qty. Description 4196101 1 4196103 4196105 4196106 4196104 557620 4196102 4129680 3007548 800794 400408 444758 800907 453017 366883 402056 444306 3006873 3008195 3009210 402066 446110 4138359 4129679 4184080 4184081 1 1 1 1 4 1 1 1 4 2 2 4 2 1 2 4 1 1 1 2 4 AR 1 1 1 Hood • Foam, Front • Foam, Right Side • Foam, Left Side • Foam, Top • Molding • Foam, Hood Mount Seal, Right Side Air Foam, Control Module Screw, 5/16-18 x 3/4 Hex Flange Screw, 1/2-13 x 1-1/2” Hex Head Locknut, 1/2-13 Center Nut, 5/16-18 Hex Flange Flat Washer, 1/2 Over Center Latch Screw, #8-32 x 3/8” Slotted Head Nut, #8-32 Hex Cover, Front Mount Wing Nut, 1/4-20 Steel Foam (Cut To Length) Screw, #8-32 x 1” Slotted Head Lockwasher, #8 Foam, Sealing Seal, Left Side Air Spacer, Front Hood Spacer, Rear Hood Serial Numbers/Notes Includes Decals Cut two 5-1/2” pieces > Change from previous revision 35 AR-522 Serial No. 68098 - 1651 ~ 1750 3.1 Seat Pan Michigan Seat 5 30 8 41 24 28 26 3 21 42 42 29 4 25 42 43 27 16 6 9 40 6 2 9 6 31 9 13 10 17 7 32 15 14 22 23 19 20 12 1 18 11 38 32 39 36 8 37 35 34 33 8 36 AR-522 Item 1 2 3 4 5 6 7 8 9 10 11 12 13 14 15 16 17 18 19 20 21 22 23 24 25 26 27 28 29 30 31 32 33 34 35 36 37 38 39 40 41 42 43 Part No. Qty. 1004279 1 3009292 4139241 4131137 4139237 400258 441602 445795 446142 452008 5003162 3007609 3007610 3007611 3007612 315387 4133119 4123723 4123725 445245 409812 3008218 404016 4139433 4139436 4139434 4139435 64123-68 4139450 3003928 403751 800943 64246-02 440078 400112 453023 4133121 4132917 4132913 444708 446128 5003769 452004 831053 400190 1 1 1 1 9 4 17 9 4 1 1 1 1 1 1 1 1 1 2 4 1 2 1 1 1 1 4 1 1 2 2 4 4 4 4 2 1 1 4 4 1 2 8 2 Description Serial Numbers/Notes Floor Pan Seat Pan Support, Seat Adjuster, Double Latching Base, Seat Screw, 3/8-16 x 3/4” Hex Head Carriage Bolt, 5/16-18 x 3/4” Nut, 5/16-18 Spiralock Flange Lockwasher, 3/8 Heavy Flat Washer, 3/8 Platform • Pad, Left Floorboard • Pad, Right Floorboard • Pad, Left Foot • Pad, Right Foot Grommet Floorboard • Latch, Panel • Pad, Center Floorboard • Tinnerman Nut Screw, 5/16-18 x 3/4” Thread Cutting Cover, Hydro Screw, 1/4-20 x 5/8” Truss Head Suspension Seat Assembly • Arm Rest Kit • • Arm Rest, L.H. • • Arm Rest, R.H. • • Bolt, 5/16-18 Hex • Switch, Seat Pouch, Literature Screw, 5/16-18 X 3/4” Serr Washer TScrew, #10-16 x 3/4” Plastic Nut, M8-1.25 Whizlock Flange Carriage Bolt, 5/16-18 x 1/2” Screw, 1/4-20 x 1” Hex Head Flat Washer, 1/4 Stop, Deck Bracket, Right Side Deck Stop Bracket, Left Side Deck Stop Locknut, 1/4-20 Center Lockwasher, 1/4 Seat Switch Harness Flat Washer, 1/4 Spacer, Seat Screw, 5/16-18 x 1-1/4” Hex Head REFERENCE SW-10, See 41.1 > Change from previous revision 37 AR-522 Serial No. All 4.1 Control Panel 3 4 10 24 33 8 25 26 6 34 28 33 27 21 22 32 29 1 23 7 30 9 31 7 Ref 5 2 20 16 13 18 17 17 15 19 12 11 40 14 AR-522 Item > 1 2 3 4 5 6 7 8 9 10 11 12 13 14 15 16 17 18 19 20 21 22 23 24 25 26 27 28 29 30 31 32 33 34 Part No. Qty. Description Serial Numbers/Notes 4130114 1 Instrument Panel Includes silk screen decals 4129683 365943 3005121 1004290 366751 366670 4130132 4130133 4130134 1002810 4135758 366768 452008 351956 3006035 360885 400272 444762 444310 403912 404016 4128888 4131618 N/S 4174684 4130148 4130149 402006 446106 444304 403908 3001376 4137524 1 1 1 1 1 1 1 1 1 1 1 1 1 1 1 2 1 1 4 4 2 1 1 1 1 1 1 2 2 2 6 2 1 Hour Meter, Quartz Fuel Gauge Water Temperature Gauge Joystick, 1 Axis Indicator Light, Yellow Horn Switch, Light Switch, Horn Hole Plug Bracket, Throttle Lever, Throttle Knob Flat Washer, 3/8” Spring, Compression Plate, Friction Washer, Friction Screw, 3/8-16 x 2-1/4” Hex Head Locknut, 3/8-16 Center Nut, #10-24 Hex Screw, #10-24 x 5/8” Truss Head Screw, 1/4-20 x 5/8” Truss Head Switch Assembly, Key • Key • Nut Switch, PTO Light, Indicator Fluids Light, Indicator Electric Screw, #6-32 x 1/2 SL RD HD Lockwasher, #6 Heavy Nut, #6-32 Hex Screw, #10-24 x 3/8” Truss Head Bulb, Lamp Switch, Traction Control REFERENCE U-3, See 41.1 REFERENCE U-2, See 41.1 REFERENCE U-1, See 41.1 REFERENCE SW-12, See 41.1 REFERENCE L-7, See 41.1 REFERENCE U-4, See 41.1 REFERENCE SW-3, See 41.1 REFERENCE SW-5 REFERENCE SW-2, See 41.1 REFERENCE SW-11, See 41.1 REFERENCE L3 & L4, See 41.1 REFERENCE L5 & L6, See 41.1 REFERENCE SW-5 > Change from previous revision 41 AR-522 Serial No. All 5.1 Traction Pedal 25 26 3 18 4 5 12 27 20 9 27 26 20 8 1 2 2 13 21 14 28 26 11 14 21 32 33 15 29 24 17 23 22 27 35 27 16 34 30 7 19 27 10 27 23 22 31 16 42 6 6 28 AR-522 Item 1 2 3 4 5 6 7 8 9 10 11 12 13 14 15 16 17 18 19 20 21 22 23 24 25 26 27 28 29 30 31 32 33 34 35 Part No. Qty. Description 1003288.7 1 Treadle Pivot 352726 3007230 3003474 3003475 366974 4125831 3006327 333542 3006998 4176562 4132912 471214 446136 452004 440042 443102 444718 400272 445795 400182 443112 452008 446128 3002695 400188 445796 400264 3008383 4176580 4182392 800440 308404 446102 444302 2 1 1 1 2 1 1 1 1 1 1 1 2 4 4 4 1 1 6 2 2 2 4 1 7 6 2 1 1 1 2 2 2 1 • Bushing Stop, Mow Speed Grip, Pedal Grip, Pedal Rod End Switch, Proximity Shaft, Turn Assist Tie Stud Rod, Hydro Bracket, Hydro Mount Pedal, Hydro Fitting, Grease Lockwasher, 5/16 Heavy Flat Washer, 1/4 Bolt, Carriage 1/4 - 20 UNC x 3/4 Nut, 1/4 - 20 Hex Head Locknut, 5/16-18 Center Screw, 3/8-16 x 2-1/4” Hex Head Nut, 5/16-18 Spiralock Flange Screw, 5/16-18 x 5/8” Hex Head Nut, 3/8-24 Hex Flat Washer, 3/8 Lockwasher, 1/4 Washer Screw, 5/16-18 x 1” Hex Head Nut, 3/8-16 Spiralock Flange Screw, 3/8-16 x 1-1/4” Hex Head Clip, Wire Harness Plate, Proximity Switch Mount Bracket, Neutral Switch Screw, #4-40 x 1 Flat Washer, .12 .25 .02 YS Washer, Lock #4 Reg. Nut, #4 - 40 Hex Serial Numbers/Notes REFERENCE SW-7, See 41.1 > Change from previous revision 43 AR-522 Serial No. All 6.1 Brake Pedal 13 12 13 18 4 18 15 16 5 9 1 14 31 30 17 15 28 10 25 26 29 11 24 2 25 9 16 20 10 28 14 17 6 3 7 8 27 7 21 22 23 19 44 AR-522 Item 1 2 3 4 5 6 7 8 9 10 11 12 13 14 15 16 17 18 19 20 21 22 23 24 25 26 27 28 29 30 31 Part No. Qty. Description 4142455 1 Bracket, Brake 4125831 3006327 3007606 4192220 1003616 352726 471214 446136 452004 800440 1003872 444718 445795 441602 400182 443102 400188 4108161 3008383 443812 461451 460014 4176580 440042 4182391 REF 446128 308404 446102 444302 1 1 1 1 1 2 1 2 4 2 1 2 8 8 2 4 2 2 1 2 2 2 1 4 1 Switch, Proximity Shaft, Turn Assist Lever, Parking Brake Mount, Brake Brake Arm • Bushing Grease Fitting Lockwasher, 5/16 Heavy Flat Washer, 1/4 Screw, #4 - 40 x 1” Pedal Locknut, 5/16-18 Center Nut, 5/16-18 Spiralock Flange Carriage Bolt, 5/16-18 x 3/4” Screw, 5/16-18 x 5/8” Hex Head Nut, 1/4-20 Hex Screw, 5/16-18 x 1” Hex Head Brake Spring Assembly Clip, Wire Harness Nut, 3/8-24 Hex Jam Clevis Pin, 5/16 x 15/16” Cotter Pin, 3/32 x 3/4” Plate, Proximity Switch Mount Bolt, Carriage 1/4-20 x 3/4” Bracket, Brake Switch Brake Cable Lockwasher 1/4 Regular Flat Washer, .12 .25 .02 Lockwasher #4 Nut, #4-40 Hex 4 2 2 2 Serial Numbers/Notes REFERENCE SW-8, See 41.1 See 8.1 > Change from previous revision 45 AR-522 Serial No. All 7.1 Frame ! WARNING 17 This structure's proctective capability may be impaired by structural damage, overturn, or alteration. If any of these conditions occur, the structure must be replaced. 18 557844 12 5002952 9 7 10 22 21 8 15 14 16 13 16 19 15 19 1 3 5 2 3 5 6 5 4 6 4 6 20 4 3 46 11 AR-522 Item 1 2 3 4 5 6 7 8 9 10 11 12 13 14 15 16 17 18 19 20 21 22 Part No. Qty. Description 4169363 1 Frame 366871 4113047 4140094 452016 443128 445795 441602 4193161 4192520 400188 67844 5000465 446154 400370 446148 557844 5002952 4193182 REF 446134 452006 2 6 6 6 6 1 1 1 1 1 1 8 8 2 2 1 1 1 1 1 1 • Bushing Screw, 5/8-18 x 1-1/2” Hex Head Flat Washer, 5/8 Flat Washer, 5/8 Nut, 5/8-18 Hex Nut, 5/16-18 Spiralock Flange Bolt, 5/16-18 x 3/4” Carriage Battery Tray Clamp, Battery Screw, 5/16-18 x 1” Hex Head ROPS Assembly • Screw, 1/2-13 x 1-1/4” Hex GR 8 • Lockwasher, 1/2 Heavy • Screw, 7/16-20 x 1” Hex Head • Lockwasher • Decal, ROPS Structure Warning • Decal, ROPS Seat Belt Warning • Seat Belt Kit Front Axle Lockwasher, 5/16 Flat Washer, 5/16 Serial Numbers/Notes Grade 8 Bolt Grade 8 See 8.1 > Change from previous revision 47 AR-522 Serial No. All 8.1 Front Axle 20 31 11 10 12 12 21 30 30 12 20 10 12 11 31 27 21 9 4 28 25/26 29 ▲ 13 14 16 24 17 19 2 1 6 15 5 22 7 8 18 3 40 39 23 38 39 37 35 32 33 34 48 38 36 ▲ AR-522 Item 1 2 3 4 5 6 7 8 9 10 11 12 13 14 15 16 17 18 19 20 21 22 23 24 25 26 27 28 29 30 31 32 33 34 35 36 37 38 39 40 Part No. Qty. 4133033 2 5002574 360111 4195141 557623 557624 446152 400458 4181102 4133054 446128 453023 2000141 3007862 340486 446154 400410 353914 400108 445781 523126 4149137 4159290 460093 1003047 1003048 557771 461493 460014 400114 443102 340603 503308 2500722 590259 549441 502517 503296 549443 554579 503295 590260 2 2 2 2 2 6 6 1 2 4 8 2 2 2 8 8 6 16 2 2 2 1 2 1 1 2 2 2 4 4 2 1 1 4 2 1 2 4 4 2 4 Description Serial Numbers/Notes Tire Rim Valve, Inflation Wheel Motor • Key • Nut, Hex Lockwasher, 1/2 Screw, 1/2-20 x 4-1/2” Hex Head Front Axle Bracket, Angle Upstop Lockwasher, 1/4 Flat Washer, 1/4 Hub, Wheel Spring, Extension Disk Brake Lockwasher, 1/2 Heavy Screw, 1/2-13 x 1-3/4” Hex Head Wheel Bolt Screw, 1/4-20 x 3/4” Hex Head Nut, 5/16-18 Whizlock Flange Bumper, Rubber Wheel Weight, 100 lb Wheel Weight Lift Hook Cotter Pin, 1/8 x 2-1/2” Cable, Right Brake Cable, Left Brake • Clip, Brake Cable Clevis Pin, 5/16 x 3/4” Cotter Pin, 3/32 x 3/4” Screw, 1/4-20 x 1-1/4” Hex Head Nut, 1/4-20 Hex Bracket, Brake Mounting Disk Brake, R.H. Disk Brake, L.H. • Nut, 3/8-24 • V-Plate • Cam Lever • Stud Plate with Lining • Spring • Spacer, Brake • Rib Plate with Lining • Screw, 3/8-24 x 2-1/4” See 34.1 Used to remove and install weight > Change from previous revision 49 AR-522 Serial No. 68098 - 1651 ~ 1808 9.1 Tilt Steering 17 19 2 20 15 23 5 3 22 14 24 13 25 9 21 10 11 18 11 8 7 1 6 12 11 4 16 50 AR-522 Item Part No. 1 2 3 4 5 6 7 8 9 10 11 12 13 14 15 16 17 18 19 20 21 22 23 24 25 Qty. Description 5002918 1 Actuator, Gas Spring 5002919 2811346 4146776 339979 339974 443828 3010651 3005934 3005981 2811547 400192 444718 444849 444754 447224 400216 445795 416911 404016 446142 400258 441614 2811364 2811365 445245 453009 1 1 1 3 2 1 1 2 1 1 1 3 2 4 1 1 4 2 6 2 2 4 1 1 6 4 Cable, Actuator Tower, Steering Valve, Steering • Adapter, Straight • Adapter, Straight • Nut, 5/8-18 Hex Jam Cover, Steering Tower Bolt, Shoulder Bracket, Steering Pump Washer Screw, 5/16-18 x 1-1/2” Hex Head Locknut, 5/16-18 Center Locknut, 3/4-10 Center Jam Locknut, 5/16-24 Center Lockwasher, 5/8 Internal Screw, 5/16-18 x 2-3/4” Hex Head Nut, 5/16-18 Spiralock Flange Screw, #10-24 x 1/2” Thread Cutting Screw, 1/4-20 x 5/8” Truss Head Lockwasher, 3/8 Heavy Screw, 3/8-16 x 3/4” Hex Head Carriage Bolt, 5/16-18 x 1” Steering Wheel • Cap, Steering Wheel Tinnerman Nut Washer, Flat Serial Numbers/Notes See 38.1 > Change from previous revision 51 AR-522 Serial No. All 10.1 Rear Axle 14 11 12 9 13 15 8 17 9 23 22 4 7 9 16 6 9 4 29 17 15 5 10 16 23 4 27 31 30 28 18 30 19 20 33 25 1 32 2 21 34 24 26 3 54 AR-522 Item 1 2 3 4 5 6 7 8 9 10 11 12 13 14 15 16 17 18 19 20 21 22 23 24 25 26 27 28 29 30 31 32 33 34 Part No. Qty. 4149337 2 1003638 360111 361648 361647 471214 461393 4151058 3010489 4137137 4137139 443840 452022 366789 460064 460026 4141925 400194 444718 445666 4132688 4149118 400410 361451 471227 460028 460032 2000012 353914 367350 4132699 4141934 446154 400406 4118255 554780 554779 2 2 6 2 2 2 1 4 1 1 2 1 1 1 2 2 2 2 2 1 2 8 2 1 2 2 2 8 2 1 1 14 6 2 2 2 Description Serial Numbers/Notes Tire, 22.5 x 10⁻⁸ 4 Ply Rim Inflation Valve Washer, Thrust Bearing, Thrust Fitting, Grease Pin, Spring 1/4 x 2” Steering Axle • Bushing Cylinder, Steering • Seal Kit Nut, 1-12 Hex Jam Flat Washer, 1 Spacer, Axle Cotter Pin, 1/4 x 1-1/2” Cotter Pin, 1/8 x 3/4” Ball Joint • Screw, 5/16-18 x 1-3/4” • Locknut, 5/16-18 Hex • Nut, 1/2-20 Slotted Hex Tie Rod Motor Mount Screw, 1/2-13 x 1-3/4” Hex Head Washer, Thrust 45° Grease Fitting Cotter Pin, 1/8 x 1” Cotter Pin, 1/8 x 1-1/2” Hub, Wheel Wheel Bolt Washer, Thrust Arm, Left Steering Arm, Right Steering Lockwasher, 1/2 Heavy Screw, 1/2-13 x 1-1/4” Hex Head Wheel Motor, Disk Valve • Key • Nut See 11.1 See 35.1 > Change from previous revision 55 AR-522 Serial No. All 11.1 Tie Rod Part Number 4132688 10 11 6 5 8 7 9 1 12 11 10 3 12 9 8 2 4 Item 1 2 3 4 5 6 7 8 9 10 11 12 Part No. Qty. Description 4118210 1 Tie Rod 4121828 4121986 471214 4121829 4121986 471214 322847 446136 4124204 443106 400192 1 1 1 1 1 1 2 2 2 2 2 Ball Joint, Left Hand Thread • Dust Cover • Straight Grease Fitting, 1/4-28 Ball Joint, Right Hand Thread • Dust Cover • Straight Grease Fitting, 1/4-28 Clamp, Tie Rod Lockwasher, 5/16 Heavy Nut, 9/16-18 Slotted Hex Nut, 5/16-18 Hex Screw, 5/16-18 x 1-1/4” Hex Head Serial Numbers/Notes > Change from previous revision 56 AR-522 Serial No. All 12.1 Remote Engine Oil Cooler 16 17 15 11 16 16 1 12 8 9 6 13 10 7 4 14 2 5 3 14 Item Part No. Qty. Description 1 450190 2 Screw, M8-1.25 x 16 mm Hex Head 2 3 4 5 6 7 8 9 10 11 12 13 14 15 16 17 4133238 4133239 4133240 4133241 4133242 4133243 4113986 4135261 4182500 4182501 452004 446136 4186441 4137099 4182460 4133252 4197640 1 1 1 1 1 1 1 1 1 1 4 2 1 2 1 4 4 Kit, Remote Oil Filter • Adapter, Engine Oil Filter • Plug, Engine Oil FIlter • O-Ring • Washer • Head, Engine Oil FIlter Engine Oil Filter Hose, Engine to Filter Hose, Filter to Engine Oil Cooler Hose, Engine Oil Cooler to Engine Flat Washer, 1/4 Lockwasher, 5/16 Heavy Adapter, Straight Adapter, 90° Engine Oil Cooler Tie, 3 Piece Cooler Mounting Tube, Spacer Serial Numbers/Notes Included with Engine Included with Engine > Change from previous revision 57 AR-522 Serial No. All 13.1 Radiator and Air Cleaner 6 13 1 38 37 36 4 14 8 5 30 4 37 17 12 24 29 18 2 21 19 23 25 22 27 7 10 5 2 8 3 28 31 26 16 2 2 32 15 24 11 2 28 31 33 35 9 34 20 58 AR-522 Item 1 2 3 4 5 6 7 8 9 10 11 12 13 14 15 16 17 18 19 20 21 22 23 24 25 26 27 28 29 30 31 32 33 34 35 36 37 38 Part No. Qty. 3002195 1 326112 345666 337229 5003447 365398 366526 400188 4138381 4177720 4177740 4120976 4120977 4177901 4163381 4128079A 4189940 4133818 4133820 4133821 5003373 4128084 444718 445640 445795 445796 452006 452008 557367 557374 358794 400264 400262 4180020 550863 446140 4133244 829997 452010 4138380 4190020 830930 4201661 5 1 2 AR 1 2 3 1 1 1 1 1 1 1 1 1 1 1 1 1 1 1 2 2 4 1 7 1 1 4 6 2 1 1 8 1 2 2 AR 1 2 1 Description Serial Numbers/Notes Elbow, 1/8 NPF 90° Clamp, 1-5/16 to 2-1/4” Dia Hose Clamp, 1/2” P Hose Clamp, Hose Tube, Neoprene Indicator, Air Cleaner Clamp, 1/4” to 5/8” Dia Hose Screw, 5/16-18 x 1” Hex Head Shroud, Rear Frame Hose, Radiator Inlet Hose, Radiator Outlet Hose, Air Cleaner to Engine Hose, Shroud to Air Cleaner Bracket, Air Cleaner Shroud, Fan Seal, Trim Air Cleaner • Cover, Air Cleaner • Filter, Primary Air Cleaner • Filter, Safety Air Cleaner • Vactuator Valve Bracket, Air Cleaner Mount Locknut, 5/16-18 Center Nut, 3/8-16 Steel Wing Nut, 5/16-18 Spiralock Flange Nut, 3/8-16 Spiralock Flange Flat Washer, 5/16 Flat Washer, 3/8 Reserve Tank Stay, Tank Flat Washer, 3/8 Screw, 3/8-16 x 1-1/4” Hex Head Screw, 3/8-16 x 1” Hex Head Radiator / Hydraulic Oil Cooler • Radiator Cap Lockwasher, 3/8 Bracket, Remote Oil Filter Grommet Flat Washer, 1/4 Seal, Bulk Fitting, 3/8 NPT Hose Clamp Hose, 7/16 Cut to 33” Cut two 2-1/4” and one 25” > Change from previous revision 59 AR-522 Serial No. All 14.1 Engine Mounting 10 5 2 6 19 1 22 29 14 15 26 2 10 8 18 23 25 27 2 28 10 7 20 16 2 9 11 15 2 10 8 22 13 2 6 9 18 23 20 12 9 7 15 8 18 23 2 24 24 60 21 4 15 3 2 8 18 23 17 24 19 AR-522 Item Part No. 1 4163204 2 3 4 5 6 7 8 9 10 11 12 13 14 15 16 17 18 19 20 21 22 23 24 25 26 27 28 29 4113986 310711 362263 363485 364501 365979 365981 367031 400190 400276 4165143 4165135 4120313 4120315 4133840 4174240 4185520 446142 446154 446160 453013 453017 443110 445795 400108 4135765 453023 444708 4179804 Qty. 1 Description Serial Numbers/Notes Engine, V2403-M-T 1 • Filter, Engine Oil 12 Washer, Isolator 1 Screw, M10-1.25 x 25mm Hex Head 1 Lockwasher, M10 Heavy 1 Temperature Sender 7 Screw, M12-1.25 x 25mm Hex Head 4 Screw, M14-1.5 x 25mm Hex Head 4 Washer, Isolator 8 Screw, 5/16-18 x 1-1/4” Hex Head 4 Screw, 3/8-16 x 3” Hex Head 1 Engine Mount, Right Side Front 1 Engine Mount, Left Side Front 1 Engine Mount, Left Side Rear 1 Engine Mount, Right Side Rear 4 Isolator, Engine 1 Cable, Throttle 1 Bracket, Oil Pan Protection 4 Lockwasher, 3/8 Heavy 7 Lockwasher, 1/2 Heavy 4 Lockwasher, 9/16 Heavy 1 Flatwasher, 7/16 7 Flatwasher, 1/2 4 Nut, 3/8-16 Hex 8 Nut, 5/16-18 Spiralock Flange 1 Screw, 1/4-20 x 3/4” Hex Head 1 Stud, M8-1.25 1 Flat Washer, 1/4 1 Locknut, 1/4-20 Center 1 Fan, 8 Blade See 12.1 > Change from previous revision 61 AR-522 Serial No. All 15.1 Pump Mounting and Engine Exhaust 20 18 20 28 14 25 30 29 23 15 14 27 25 A 19 12 24 26 24 24 25 22 A 13 11 21 29 30 31 13 12 9 8 16 8 7 17 10 2 3 1 6 5 2 62 9 4 AR-522 Item Part No. Qty. Description 362743 1 O-Ring Seal 7 8 9 10 400264 400286 400410 4118252 4174880 4174881 443118 444762 446142 446154 5 2 2 1 1 1 2 5 5 2 Screw, 3/8-16 x 1-1/4” Hex Head Screw, 3/8-16 x 2-3/4” Hex Head Screw, 1/2-13 x 1-3/4” Hex Head Pump, Traction Pump, 3 Section Gear • Seal Kit Nut, 1/2-13 Hex Locknut, 3/8-16 Center Lockwasher, 3/8-16 Heavy Lockwasher, 1/2 Heavy 11 162236 1 Clamp, Exhaust 12 13 14 15 16 17 362263 363485 363586 4187920 4136522 4119888 4134587 4134583 4134584 4134585 4134586 4179860 4165560 4129251 4129250 450331 441614 450400 450411 4187660 A1103051 3007889 452006 444718 362539 8 8 6 1 1 1 2 1 1 1 1 1 1 2 1 2 2 6 8 1 2 1 4 4 4 Screw, M10-1.25 x 25mm Hex Head Lockwasher, M10 Heavy Screw, M8-1.25 x 20 mm Hex Head Bracket, Upper Tail Pipe Flange, Pump Drive Driveshaft • Cross and Bearing • Joint and Tube Half • Joint and Shaft Half • Plate and Yoke • Clamp and Yoke Tail Pipe Muffler Spring, Tail Pipe Bracket, Lower Tail Pipe Nut, M8-1.25 Hex Grade 8 Carriage Bolt, 5/16-18 x 1” Washer, M8 Lockwasher, M8 Bracket, Muffler Support Screw, M8-1.25 x 25mm Hex Head Sleeve, Insulating Flat Washer, 5/16 Locknut, 5/16-18 Center Nut, M8-1.25 Hex 1 2 3 4 5 6 18 19 20 21 22 23 24 25 26 27 28 29 30 31 Serial Numbers/Notes See 39.1 and 40.1 Discard hardware included with clamp, use Items 29 and 30 Traction Pump Side Engine Side Engine Side Traction Pump Side > Change from previous revision 63 AR-522 Serial No. All 16.1 Fuel and Hydraulic Tanks 10 20 12 24 8 11 A Connect to engine fuel injector overflow. B Connect to engine fuel pump 4 18 A 16 18 28 18 B 23 14 18 18 17 15 15 13 30 9 26 1 18 22 27 18 18 29 25 19 6 21 19 19 2 7 5 3 64 AR-522 Item Part No. 1 2 3 4 5 6 7 8 9 10 11 12 13 14 15 16 17 18 19 20 21 22 23 24 25 26 27 28 29 30 Qty. 132647 1 3001279 3002397 339899 3009204 3005871 3005872 3006243 3009347 3006332 3006337 5003374 4177480 554748 554748 361117 361748 554752 366526 403769 403910 404016 445794 445796 446118 400108 800709 4132489 503626 557619 554748 2810702 1 1 1 1 1 1 2 1 1 1 1 1 1 1 3 1 1 6 14 5 5 2 3 5 2 2 1 1 1 1 1 Description Serial Numbers/Notes Valve, Shut Off Switch, Float Plug, Magnetic • O-Ring Fuel Tank Hydraulic Tank Shell, Tank Cover Plate, Tank Mounting Strainer, Fuel Filler Breather Filter Fuel Sender • Gasket Cap, Fuel Tank Fuel Line, 5/16” I.D. Cut to 72 Inches Fuel Line, 5/16” I.D. Cut to 8 Inches Bushing, Fuel Tank Valve, Overflow Fuel Line, 3/16 I.D. Cut to 70 Inches Clamp, Hose Screw, 1/4-20 x 1/2” Hex Flange Screw, #10-24 x 1/2” Truss Head Screw, 1/4-20 x 5/8” Truss Head Nut, 1/4-20 Spiralock Flange Nut, 3/8-16 Spiralock Flange Lockwasher, #10 Heavy Screw, 1/4-20 x 3/4” Hex Head Screw, 3/8-16 x 1” Hex Flange Fuel Pump Engine Fuel Filter • Element, Fuel Filter Fuel Line, 5/16” I.D. Cut to 12 Inches Valve, Inlet REFERENCE SW-9, See 41.1 REFERENCE R-1, See 41.1 Tank to Fuel Pump Fuel Filter to Engine Engine to Tank REFERENCE M-2, See 41.1 Included wih Engine Fuel Pump to Fuel Filter > Change from previous revision 65 AR-522 Serial No. All 17.1 Pump Suction Hydraulics 4 3 1 8 9 5 7 1 2 7 2 6 1 Item Part No. 1 2 3 4 5 6 7 8 9 Qty. Description 3008673 5 Clamp, Constant Torque Hose 4148857 340090 4122538 4123066 4130823 339913 3001296 339999 365959 2 1 1 1 1 1 2 1 1 Hose, Gear Pump Suction Fitting, 24-24 90° Hose, Charge Pump Suction Tube, Charge Pump Suction Tube, Pump Suction • O-Ring -16 Adapter, Straight Beaded Fitting, 16-16 Straight Strainer, Tank Mounted Serial Numbers/Notes > Change from previous revision 66 AR-522 Serial No. All 18.1 Oil Cooler Hydraulics 8 5 6 11 1 4 2 9 10 7 3 1 Item Part No. 1 2 3 4 5 6 7 8 9 10 11 Qty. Description 339999 2 Fitting, 16-16 Straight 4129037 340077 340123 340039 4123166 4128322 339909 339911 4129042 4129043 4129044 339979 1 1 1 1 1 1 3 1 1 1 1 1 Hose, 4WD Return Fitting, 16-16 90° Fitting, 16-16-16 Swivel Run Tee Fitting, 16-16 45° Fitting, Check Valve Tee Tube, Return Hoses to Oil Filter • O-Ring -6 • O-Ring -10 Hose, Filter to Oil Cooler Hose, Oil Cooler to Tee Hose, Oil Cooler to Tank Fitting, 6-6 Straight Serial Numbers/Notes > Change from previous revision 67 AR-522 Serial No. All 19.1 Hydraulic Valves and Filter 1 5 6 4 2 10 3 5 1 6 7 6 5 1 9 1 8 Item Part No. 1 2 3 H H 6 5 4 5 6 7 8 9 9 10 400258 Qty. 8 Description Serial Numbers/Notes Screw, 3/8-16 x 3/4” Hex Head 409811 4 Screw, 5/16-18 x 5/8” Thread Cutting 4121554 1 Hydraulic Filter Assembly 4121552 1 • Filter Head 555771 1 • Filter Element 556419 1 • Oil Switch REFERENCE SW-1, See 41.1 4124755 1 • Visual Indicator 4121852 1 Filter Bracket 446140 8 Lockwasher, 3/8 453011 8 Flat Washer, 3/8 445795 4 Nut, 5/16-18 Spiralock Flange 4129069 1 Lift Valve See 36.1 NS 1 Deck Valve S/N 1651 ~ 1825, See 33.1 4217900 1 Deck Valve S/N 1826 and Up, See 33.2 4129071 1 4WD Valve See 37.1 Order 4217900 to replace entire Deck Valve, or service components listed in breakdown. See 33.1 > Change from previous revision 68 AR-522 Serial No. All 20.1 Deck Hydraulics 4 10 6 13 10 4 11 4 2 4 1 4 1 2 2 11 5 9 5 4 12 4 3 4 4 Item 1 2 3 4 5 6 7 8 9 10 11 12 13 Part No. 7 8 4 Qty. 339985 2 339989 340009 340070 340030 4129015 4137588 4137382 4137589 4129595 4137383 4129597 REF 3 1 11 2 2 1 1 1 2 2 1 1 4 Description Serial Numbers/Notes Fitting, 8-10 Straight Fitting, 10-10 Straight Fitting, 10-10 Straight Fitting, 10-10 90° Fitting, 8-10 45° Hose, Gear Pump to Deck Valve Hose, LH Front Motor to Deck Valve Hose, Front Motor to Front Motor Hose, RH Front Motor to Deck Valve Hose, Rear Motor to Deck Valve Hose, Center Motor to Rear Motor Hose, Deck Valve to Return Tube Return Tube See 18.1 > Change from previous revision 69 AR-522 Serial No. All 21.1 Traction Hydraulics 20 3 7 14 1 21 4 3 23 1 1 6 19 15 2 13 19 11 5 4 8 18 21 1 10 24 12 1 22 26 25 9 28 29 27 16 29 29 17 29 22 28 9 27 70 AR-522 Item 1 2 3 4 5 6 7 8 9 10 11 12 13 14 15 16 17 18 19 20 21 22 23 24 25 26 27 28 29 Part No. Qty. Description 339994 5 Adapter, 12-12 Straight Fitting 4129035 339993 4128977 4134921 4129036 339979 340122 339989 4128320 4128318 4128317 4128319 4128324 4128325 4137625 4137607 4137608 4128967 339996 REF REF REF REF 340338 4137623 4137607 4137608 340377 340070 340033 1 2 2 1 1 1 1 2 1 1 1 1 1 1 1 1 1 1 2 1 2 2 1 1 1 1 1 2 2 4 Hose, 4WD Valve to Traction Pump Adapter, 12-10 Straight Fitting Hose, Front Tube to Rear Tube Tube, Drive Return Hose, 4WD Valve to Traction Pump Adapter, 6-6 Straight Fitting Adapter, 12-12-12 Swivel Run Tee Adapter, 10-10 Straight FItting Tube, Upper LH Front Wheel Motor Tube, Lower RH Front Wheel Motor Tube, Lower LH Front Wheel Motor Tube, Upper RH Front Wheel Motor Tube, Rear RH 4WD Tube Tube, Rear LH 4WD Tube Hose Bundle, Left Rear Motor • Hose, 4WD Valve to Wheel Motor • Hose, 4WD Valve to Wheel Motor Adapter, 12-6 Reducer Adapter, 12-16 Straight Fitting 4WD Valve Front Wheel Motor Rear Wheel Motor Pump, Traction Adapter, 12-12-12 Union Tee Hose Bundle, Right Rear Motor • Hose, 4WD Valve to Wheel Motor • Hose, 4WD Valve to Wheel Motor Adapter, 10-10 90° Swivel Fitting Adapter, 10-10 90° Fitting Adapter, 10-10 45° Fitting Serial Numbers/Notes 4WD Valve Port I 4WD Valve Port G 4WD Valve Port A 4WD Valve Port C Includes drain hose, See 24.1 4WD Valve Port D, Motor Port B 4WD Valve Port E, Motor Port A See 19.1 See 8.1 See 10.1 See 15.1 Includes drain hose, See 24.1 4WD Valve Port F, Motor Port B 4WD Valve Port B, Motor Port A > Change from previous revision 71 AR-522 Serial No. All 22.1 Front Lift Hydraulics 7 4 1 2 6 2 2 3 5 2 4 11 4 9 8 1 5 4 1 10 3 5 Item 1 2 3 4 5 6 7 8 9 10 11 Part No. Qty. Description 3000953 3 Disk, Orifice 339979 340026 340061 REF 4137562 4129018 4129019 4129020 4129021 4129022 6 2 4 3 1 1 1 1 1 1 Fitting, 6-6 Straight Fitting, 6-6 45° Fitting, 6-6 90° Lift Cylinder Hose, Lift Valve to RH Front Cylinder Hose, Lift Valve to RH Front Cylinder Hose, Lift Valve to Center Cylinder Hose, Lift Valve to Center Cylinder Hose, Lift Valve to LH Front Cylinder Hose, Lift Valve to LH Front Cylinder Serial Numbers/Notes See 29.1 Lift Valve Port #10, Base Port Lift Valve Port #4, Rod Port Lift Valve Port #9, Base Port Lift Valve Port #3, Rod Port Lift Valve Port #6, Base Port Lift Valve Port #5, Rod Port > Change from previous revision 72 AR-522 Serial No. All 23.1 Rear Lift Hydraulics 4 8 1 4 7 10 6 9 12 4 1 4 2 6 11 2 5 Item 1 2 3 4 5 6 7 8 9 10 11 12 3 Part No. Qty. Description 3000953 2 Disk, Orifice 339979 339985 340061 340376 REF 4129023 4129024 4129026 4129026 4129027 REF 4 1 4 1 2 1 1 1 1 1 1 Fitting, 6-6 Straight Fitting, 8-10 Straight Fitting, 6-6 90° Fitting, 8-8 90° Swivel Lift Cylinder Hose, Lift Valve to RH Rear Cylinder Hose, Lift Valve to RH Rear Cylinder Hose, Lift Valve to LH Rear Cylinder Hose, Lift Valve to LH Rear Cylinder Hose, Lift Valve to Return Tube Return Tube Serial Numbers/Notes See 30.1 Lift Valve Port #8, Base Port Lift Valve Port #2, Rod Port Lift Valve Port #1, Rod Port Lift Valve Port #7, Base Port Lift Valve Port T See 18.1 > Change from previous revision 73 AR-522 Serial No. All 24.1 Wheel Motor Case Drains 8 8 2 12 13 1 13 10 11 10 9 5 14 3 7 4 6 Item 1 2 3 4 5 6 7 8 9 10 11 12 13 14 Part No. Qty. Description Serial Numbers/Notes 4137634 1 Hose, LH Rear Motor to Drain Tube Included in hose bundle 4137625 4137624 4129040 4129041 4148857 339972 340007 340059 340119 340375 361689 4113601 339909 3008673 339998 1 1 1 1 1 1 2 1 2 1 1 5 2 1 Hose, RH Rear Motor to Drain Tube Hose, RH Front Motor to Drain Tube Hose, LH Front Motor to Drain Tube Hose, Drain Tube Fitting, 4-4 Staight Fitting, 6-4 Straight Fitting, 6-4 90° Fitting, 6-6-6 Swivel Run Tee Fitting, 6-6 90° Swivel Fitting, Straight Barb Tube, Drain • O-Ring -6 Clamp, Constant Torque Hose Fitting, 16-12 Straight Included in hose bundle 4137623 > Change from previous revision 74 AR-522 Serial No. All 25.1 Deck Motor Case Drain 5 3 10 4 6 2 5 7 10 5 10 9 1 10 5 5 1 8 10 Item 1 2 3 4 5 6 7 8 9 10 Part No. Qty. Description 4137561 2 Hose, Front Motor to Front Motor 4137562 4129600 4129603 339977 REF 340119 340143 340375 REF 1 1 1 5 1 2 1 1 5 Hose, Front Motors to Drain Tube Hose, Rear Motors to Drain Tube Hose, Rear Motor to Rear Motor Fitting, 6-4 Staight Tube, Drain Fitting, 6-6-6 Swivel Run Tee Fitting, 6-6-6 Swivel Branch Tee Fitting, 6-6 90° Swivel Deck Motor Serial Numbers/Notes See 24.1 See 31.1 > Change from previous revision 75 AR-522 Serial No. All 26.1 Steering Hydraulics To Return Tube (3) From Pump To Lift Valve Out (2) (1) Aux To Steering Cylinder (4) In LT RT To Steering Cylinder (5) 6 2 7 3 1 4 5 7 Item Part No. 1 2 3 4 5 6 7 Qty. Description Serial Numbers/Notes 4129028 1 Hose, Lift Valve to Steering Valve Lift Valve Port T, Steering Valve Aux 4129029 4129030 4129031 4129032 REF 339985 1 1 1 1 1 2 Hose, Gear Pump to Steering Valve Hose, Steering Valve to Return Tube Hose, Steering Valve to Cylinder Hose, Steering Valve to Cylinder Return Tube Fitting, 8-10 Straight Steering Valve IN Steering Valve Out Steering Valve LH, Base Port Steering Valve RH, Rod Port > Change from previous revision 76 AR-522 Serial No. All 27.1 Hydraulic Clamps 7 6 6 9 10 5 4 2 1 3 Steering Hoses Item 1 2 3 4 5 6 7 8 9 10 Part No. Qty. Description 1004541 1 Bracket, Hose Retaining 403770 445795 4131862 4131864 400196 364190 445796 446136 452006 2 2 2 2 2 2 2 2 2 Screw, 5/16-18 x 3/4” Flange Head Nut, 5/16-18 Spiralock Flange Clamp, Two Hose Plate, Clamp Screw, 5/16-18 x 2” Hex Head Clamp, 1-1/2” Dia. Hose Nut, 3/8-16 Spiralock Flange Lockwasher, 5/16 Heavy Flat Washer, 5/16 Serial Numbers/Notes > Change from previous revision 77 AR-522 Serial No. All 28.1 Electrical Harness 20 19 15 17 7 Part of 14 18 10 16 10 1 12 9 16 5 8 13 6 4 14 H 3 J C 11 F K L G D M E 2 A B 78 A - Headlight B - Lift Arm Limit Switch C - Fuel Level Sender/ Instrument Panel D - Seat Switch E - Oil Float Switch F - Glow Plugs G - Fuel Solenoid H - Charge Filter Switch J - Engine Oil Pressure Switch K - Temperature Sender L - 4WD Valve (4WD Only) M - Reel Valve AR-522 Item Part No. 1 2 3 4 5 6 7 8 9 10 11 12 13 14 15 16 17 18 19 20 Qty. Description Serial Numbers/Notes 2810424 1 Cable, Engine Ground Engine Mount to Frame 4122840 4123183 4122841 5003282 367631 N/S 441668 444708 445796 444310 473142 2810213 3007777 4128262 4193880 446118 403910 361439 3009251 400258 2 1 1 2 4 1 4 4 2 4 1 1 1 1 2 4 4 1 1 2 Headlight • Bulb Controller • Fuse, 20 Amp Spacer Battery Carriage Bolt, 1/4-20 x 1-1/4” Locknut, 1/4-20 Center Nut, 3/8-16 Spiralock Flange Nut, #10-24 Hex Cable Tie Cable, Negative Battery Cable, Positive Battery Body Wire Harness • Relay-SPDT With Diode Lockwasher, #10 Screw, #10-24 x 1/2” Truss Head Circuit Breaker, 12V 50A Tab, Harness Screw, 3/8-16 x 3/4” Hex Head REFERENCE L-1 & L-2, See 41.1 REFERENCE U-6, See 41.1 REFERENCE F-1 & F-2, See 41.1 REFERENCE B-1, See 41.1 Battery to Muffler Bracket Battery to Starter REFERENCE K-1 & K-2, See 41.1 REFERENCE CB-1, See 41.1 > Change from previous revision 79 AR-522 Serial No. All 29.1 Front Lift Arms 27 18 25 26 18 29 21 9 20 5 4 11 18 20 3 28 19 4 1 12 5 17 11 9 8 32 26 4 7 10 9 3 11 28 9 18 6 31 4 12 18 7 10 11 27 30 31 25 25 18 26 30 17 27 1 32 13 23 24 16 10 23 29 2 22 5 15 4 14 4 11 12 80 17 11 3 AR-522 Item 1 2 3 4 5 6 7 8 9 10 11 12 13 14 15 16 17 18 19 20 21 22 23 24 25 26 27 28 29 30 31 32 Part No. Qty. Description 548905 7 Screw, 3/8-16 x 1” Serrated Flange REF 4125547 4127480 471214 4125919 3010489 471214 4126447 4126450 4127192 4127556 4131849 444752 452016 310452 460068 4131963 4171884 3010489 471221 4171883 3010489 471221 4137128 4137138 471214 471221 445783 4134575 4181006 400198 444718 3 3 2 1 1 2 1 6 3 6 3 6 6 6 6 3 6 1 2 1 1 2 1 3 1 3 3 7 2 2 2 2 Deck Assembly Front Deck Pivot • Bushing • Straight Grease Fitting Center Lift Arm • Bushing • Straight Grease Fitting Pin, Arm Pin, Cylinder Plastic Washer Nut, 1-1/4-7 Slotted Hex Shoulder Bolt, 3/4 x 5/8-11 x 2-1/8” Locknut, 5/8-11 Center Flat Washer, 5/8 Flat Washer Cotter Pin, 1/4 x 2” Spacer, Cylinder Right Front Lift Arm • Bushing • 90° Grease Fitting Left Front Lift Arm • Bushing • 90° Grease Fitting Cylinder, Lift • Seal Kit Straight Grease Fitting 90° Grease Fitting Nut, 3/8-16 Whizlock Flange Pad, Step Pin, Arm Screw, 5/16-18 x 2-1/4” Locknut, 5/16-18 Center Serial Numbers/Notes See 31.1 > Change from previous revision 81 AR-522 Serial No. All 30.1 Rear Lift Arms 16 1 23 25 2 24 17 19 7 19 3 27 15 18 4 14 8 14 21 20 8 13 26 22 28 4 17 23 25 16 1 24 19 20 19 4 4 18 15 2 5 14 8 27 8 14 21 22 13 11 10 6 9 12 82 3 7 AR-522 Item Part No. Qty. Description 4131422 2 24 25 4131420 4126450 445783 548905 REF 548907 4127192 452016 310452 4131849 444752 4125180 4127480 471214 4131965 4131964 4132846 3010489 471221 4127556 460076 4137128 4137138 471214 471221 2 2 10 4 2 2 4 4 4 4 4 2 2 1 2 2 2 2 1 2 2 2 1 2 2 Pin, Rear Lift Arm Pin, Cylinder Nut, 3/8-16 Whizlock Flange Screw, 3/8-16 x 1” Serrated Flange Deck Assembly Screw, 3/8-16 x 1/1/4” Ser Flange Washer, Plastic Flat Washer, 5/8” Flat Washer, 3/4” Shoulder Bolt, 3/4 x 5/8-11 x 2-1/8 Locknut, 5/8-11 Center Rear Deck Pivot • Bushing • Straight Grease Fitting Spacer, Cylinder Spacer, Cylinder Rear Lift Arm • Bushing • 90° Grease Fitting Nut, 1-1/4-7 Slotted Hex Cotter Pin, 1/4 x 3” Cylinder, Lift • Seal Kit Straight Grease Fitting 90° Grease Fitting 26 4134626 AR Pad, Deck Stop 27 4136022 2 Deck Stop 28 4137716 AR Deck Stop 1 2 3 4 5 6 7 8 9 10 11 12 13 14 15 16 17 18 19 20 21 22 23 Serial Numbers/Notes Pin, Rear Cylinder See 31.1 Add pads as required to prevent deck contacting engine oil pan. Add as required to prevent deck contacting engine oil pan. > Change from previous revision 83 AR-522 Serial No. All 31.1 Deck Housing and Caster Wheels 27 14 23 29 16 18 30 22 21 25 7 26 9 31 20 28 1 6 9 9 5 19 17 3 8 17 13 24 12 15 2 4 11 84 13 10 AR-522 Item 1 2 3 4 5 6 7 8 9 10 10 10 11 12 13 14 15 16 17 18 19 20 21 22 23 24 25 26 27 28 29 30 31 Part No. Qty. 3004894 2 3007764 3008388 400410 450062 4117807 4163107 4124066 4124076 4163106 4137186 4124087 4173922 4174960 4173923 443110 450326 446142 450402 453011 557523 PJH1054 4163124 4163125 445783 450424 365948 4133007 4175100 4136829 4177360 REF 452010 4139787 440124 1 1 1 2 3 1 2 4 1 1 1 2 1 2 6 2 6 4 6 1 27 1 1 3 2 3 3 1 1 1 1 3 6 6 Description Serial Numbers/Notes Pin, 7/16 x 1-3/4” Snap Ring Washer, Blade Adapter, Blade Screw, 1/2-13 x 1-3/4” Hex Head Screw, M12-1.75 x 130 mm Hex Head Spacer Deck Housing Caster Wheel Yoke Flat Washer, 1” Blade, 22-3/8” Combination Blade, 22-3/8” High Lift Blade, 22-3/8” Low Lift Caster Wheel, 6-1/4 x 3 • Spacer, Wheel • Ball Bearing, Flange Nut, 3/8-16 Hex Nut, M12-1.75 Hex Lockwasher, 3/8 Heavy Flat Washer, M12 Flat Washer, 3/8 Key, 1/4 Square x 1” Spacer, Cutting Height Chute, Rear Discharge Cover, Mulching Nut, 3/8-16 Whizlock Flange Lockwasher, M12 Heavy Pin, 1/4 x1-3/4” Snap Ring Sleeve, Cutting Height Motor, Deck • Seal Kit • Check Valve Deck Frame Washer, 7/16 x 1-1/4” Nut, Push On Carriage Bolt, 3/8-16 x 1-3/4” Standard Blade Optional High Lift Blade Optional Low Lift Blade See 32.1 > Change from previous revision 85 AR-522 Serial No. All 32.1 Deck Frame 11 27 12 1 3 13 29 24 9 11 28 10 2 28 26 5 2 8 5 14 11 11 6 7 5 12 24 25 11 1 4 6 3 1 5 27 16 28 15 26 28 10 29 18 20 19 17 / 21 23 22 18 15 19 20 16 86 AR-522 Item 1 2 3 4 4 5 6 7 8 9 10 11 12 13 14 15 16 17 18 19 20 21 22 23 24 25 26 27 28 29 Part No. Qty. 452411 8 4161960 452415 4137665 4137674 4127478 471221 4124423 4124425 4183948 4137534 452438 450413 4163089 4163087 412017 316938 4163121 503378 367029 3010210 4163122 4124015 471214 4124129 4124395 450059 450380 450402 2198153 12 4 1 1 4 AR 1 1 1 2 14 2 1 1 2 2 1 2 1 2 1 1 2 4 1 2 2 2 2 Description Serial Numbers/Notes Screw, M12-1.75 x 40 mm Hex Head Spacer, Deck HOC Bracket Screw, M12-1.75 x 80 mm Hex Head Deck Frame Deck Frame • Flanged Bushing Grease Fitting, 90° LH Rear Cutting Height Bracket RH Rear Cutting Height Bracket Scraper, Roller Sleeve, Roller Nut, M12-1.75 Hex Flange Lockwasher, M12 RH Roller Bracket LH Roller Bracket Screw, 5/16-18 x 3/4” Square Head Roll Pin, 3/16 x 1” Roller • Bearing Cup and Cone • Locknut, 3/4-16 Hex Jam • Seal • Tube, Roller • Shaft, Roller • Grease Fitting, Straight Spacer Front Cutting Height Bracket Screw, M12-1.75 x 100 mm Hex Head Locknut, M12-1.75 Flat Washer, M12 Roller, 3” Front Decks Rear Decks > Change from previous revision 87 AR-522 Serial No. 68098 - 1651 ~ 1825 33.1 Deck Valve Part Number H 5 5 4 2 3 7 6 1 Item Part No. 1 2 3 4 5 6 7 H Qty. Description 4175181 2 Vented Logic Element Valve 5003579 4175183 5003578 4175184 5003578 4134532 4175180 5003579 4175182 4134543 4194584 5003579 1 1 1 1 1 2 2 1 1 1 1 1 • Seal Kit Relief Valve, 2600 psi • Seal Kit Solenoid Valve • Seal Kit Coil Check Valve • Seal Kit Load Shuttle Valve Seal Kit Relief Valve, 600 psi • Seal Kit Serial Numbers/Notes Reference K-7, See 41.1 Order 4217900 to replace entire Deck Valve, or service components listed in breakdown. See 33.2 > Change from previous revision 88 AR-522 Serial No. 68098 - 1826 and Up 33.2 Deck Valve Part Number 4217900 4 5 3/6 7 1 4 2 4 Item Part No. 1 2 3 4 5 6 7 Qty. Description 4223600 1 Solenoid Valve 4223640 4223620 5003579 5002912 5003554 3010199 5000049 5003579 4223621 4134530 1 1 1 1 1 8 2 1 1 1 • Seal Kit Relief Valve, 2600 psi • Seal Kit Relief Valve, 630 psi • Seal Kit Plug, -6 ORB Check Valve • Seal Kit Piston, Pilot Coil, Solenoid Valve 4 4 Serial Numbers/Notes Reference K-7, See 41.1 > Change from previous revision 89 AR-522 Serial No. All 34.1 Front Wheel Motor Part Number 4203160 ❍ 16 21 19 20 7 5 18 16 6 3 ◆ 14 ◆ 17 4 2 12 ◆ ❍ 11 ◆ 1 ◆ ◆ ◆ Included In Seal Kit 4178564 ❍ Included In Seal Kit 4200921 Item ◆ ◆ 13 15 9 1 2 3 4 5 6 7 8 9 10 11 12 13 14 15 16 17 18 19 20 21 Part No. 10 8 Qty. Description 558066 8 Screw, Torx N/S 558063 557624 557623 558064 4134516 4134517 557632 557631 557633 557637 557634 557635 557636 4134520 5003591 557639 557642 557640 4134521 1 1 1 1 1 1 1 1 1 1 1 1 1 2 3 1 2 2 2 1 Front Retainer Shaft and Bearing Kit Nut, Hex Key Bearing Housing Drive Geroler Drive, Valve Plate, Valve Valve Balance Ring and Pins Seal, Inner Face Seal, Outer Face Spring Bolt, 5-3/4” Housing, Valve Check Plug Assembly Spring Ball, Steel Bolt Serial Numbers/Notes > Change from previous revision 90 AR-522 Serial No. All 35.1 Rear Wheel Motor Part Number 4118255 2 5 6 3 8 1 11 4 2 2 10 2 7 Item 1 2 3 4 5 6 7 8 9 10 11 Part No. Qty. 9 Description A 1 Seal Exclusion A A A 4134525 554780 554779 A A A 4134526 4 1 1 1 1 1 1 1 1 4 Seal, 3” I.D. Back Up Ring Shaft Seal Shaft and Bearing Kit Key Hex Nut Shaft Face Seal Inner Face Seal Outer Face Seal Bolt 4134527 1 Seal Kit Serial Numbers/Notes Includes Items Marked A > Change from previous revision 91 AR-522 Serial No. All 36.1 Lift Valve Part Number 4129069 2 3 4 5 1 Item Part No. 1 2 3 4 5 Qty. Description 4134528 1 Check Valve 5003579 4134529 5003579 4136067 5003578 4134530 4142009 1 1 1 1 4 1 1 • Seal Kit Solenoid Valve • Seal Kit Solenoid Valve • Seal Kit Coil Coil Serial Numbers/Notes REFERENCE K-5, See 41.1 REFERENCE K-6, See 41.1 > Change from previous revision 92 AR-522 Serial No. All 37.1 4WD Valve Part Number 4129071 1 1 2 Item Part No. Qty. Description 1 4134541 2 Check Valve 2 5003579 4134535 5003579 1 1 1 • Seal Kit Pilot Operated Internal Vent Valve • Seal Kit Serial Numbers/Notes > Change from previous revision 93 AR-522 Serial No. All 38.1 Steering Valve Part Number 4138567 38 1 39 2 3 30 5 8 11 9 16 4 4 12 17 13 18 14 4 4 10 19 29 20 15 21 22 11 23 31 24 32 34 25 26 33 27 28 37 35 36 7 6 94 11 AR-522 Item Part No. 1 2 3 4 5 6 7 8 9 10 11 12 13 14 15 16 17 18 19 20 21 22 23 24 25 26 27 28 29 30 31 32 33 34 35 36 37 38 39 Qty. Description 443108 4 N/S C C C 443828 N/S N/S B N/S A and E 503398 503398 B N/S N/S N/S A C A A A A A A A 554855 554856 C N/S 554857 N/S D D D D D 4139094 557734 1 1 4 4 1 4 1 3 1 9 1 1 3 1 1 1 11 1 1 1 1 1 1 1 1 1 1 1 1 1 1 1 1 1 1 1 1 1 Serial Numbers/Notes Locknut, 5/16-18 Center Port Cover Seal, O-Ring Seal, O-Ring Seal, O-Ring Nut, 5/8-18 Hex Jam Special Bolt Port Manifold Spring, Port Side Hex Drive Needle Roller Valve Ring Valve Plate Spring, Shaft Side Isolation Manifold Drive Link Metering Ring Screw, Socket Head Seal, Commutator Commutator Cover Commutator Ring Commutator Spacer Rotor Stator Drive Plate Spacer Thrust Bearing Face Seal Ball, 9/32” Seal, Spacer Upper Cover Plate Shaft Retaining Ring Bushing Seal Jacket Relief Valve Cartridge Dampening Cap Service Kits A B C D E 5003220 502924 557738 5003219 502925 1 1 1 1 1 Metering Assembly Kit Spring Kit Seal Kit Jacket Tube Kit Needle Roller Kit > Change from previous revision 95 AR-522 Serial No. All 39.1 Traction Pump (Front Half) Part Number 4118252 21 22 2 18 1 3 19 20 4 5 15 6 17 21 22 23 16 10 13 12 11 9 13 7 9 14 16 8 8 96 AR-522 Item ● ● ● ● ● ● 1 2 3 4 5 6 7 8 9 10 11 12 13 14 15 16 17 18 19 20 21 22 23 Part No. Qty. Description 4134588 1 Shim Kit N/S 4134589 4134590 4134591 4134592 4134594 4134595 4134596 4134597 4134606 4134607 4134608 5003433 NS 4134609 4134610 4134612 N/S N/S 5003434 4134613 4134614 1 1 1 2 1 1 2 2 1 1 1 2 1 1 1 1 1 1 1 2 1 1 O-Ring Charge Relief Spring Charge Relief Valve O-Ring Needle Bearing Roller Bearing Retaining Ring Ring Variable Swashplate • Pin • Pin Journal Bearing Shaft Seal Front Cover Gasket Pump Shaft Valve Plate Bypass Valve • Backup Ring • O-Ring Relief Valve • O-Ring Cylinder Block Kit 5003034 1 Seal Kit Serial Numbers/Notes Includes all Items marked ● > Change from previous revision 97 AR-522 Serial No. All 40.1 Traction Pump (Rear Half) Part Number 4118252 (Cont) 11 10 4 3 6 1 7 8 2 6 9 15 1 17 12 14 16 13 5 98 10 11 AR-522 Item ● ● ● ● ● ● ● ● ● ● 1 2 3 4 5 6 7 8 9 10 11 12 13 14 15 16 17 Part No. Qty. Description 4134615 1 O-Ring 4134616 NS NS 4134617 4134618 4134619 NS 4134620 NS 4134621 4134622 NS NS 4134623 NS NS 1 1 1 1 1 1 1 1 2 2 1 1 1 1 1 1 O-Ring O-Ring Temper Load Ring Neutral Return Spring Piston Ring Kit Gerotor Suction FIlter Adapter Seal O-Ring Servo Cover Gasket O-Ring Spool Assembly • O-Ring • Backup Ring Sleeve Assembly • O-Ring • Backup Ring 5003034 1 Seal Kit Serial Numbers/Notes Includes all Items marked ● > Change from previous revision 99 AR-522 Serial No. All 41.1 Electrical Schematic R R-2 S DG DG Og LB/wh Bn/Ye DB Gy/Rd Tn/Bk Pu/Gn Og/Bk Pk/Bu Og/Wh Ye/Bu Og/Ye Rd A B C DE F G H J K LM N P U-1 G B Bk L LB/Tn DG + – U-3 Og/Wh Bk L-6 LB/Tn L DB R-3 S SW-13 L-5 L-3 Bk G Og/Wh I Og/Wh U-2 L-4 Tn/Bk Pu/Gn Og/Wh Bk Tn Bk LB/Tn Ye DB L-1 LB/Tn Og/Bk L-2 Bk LB/Tn 2 3 SW-3 Og Og/Wh 2 3 SW-6 Lb/Bk K-1 Og/Bu 87A LB/wh 30 87 86 Lb/Bk 85 CB-1 Gy/Rd Og/Bu K-2 Og/Wh Ye Rd A Og/Bu 30 I L B U-7 87A 87 Rd Rd Bn/Ye Pu/Wh F S RD B M-1 Rd Rd Og/Ye B Rd 85 Wh Rd SW-2 86 D Ye/Bu B-1 C Pk/Bu + 100 – Bk R-3 A B C DE F G H J K LM N P A Og/Pk Og/Pk C NC NC NO DG/Rd DB/Ye 2-4 2-3 Glow Plug Light Hyd Filter Pressure Light Start Relay Glow Plug Relay LB/wh Gy/Rd Pu/Gn Tn/Bk 2-5 2-8 2-11 Gy/Og Tn/Gn Tn/Bu 2-6 3-9 Hyd Filter Pressure 3-11 Mow Solenoid Joystick Active 3-8 SW-1 DB/Rd 1-3 1-6 Bk Grd-1 SW-9 Gy/Wh Lower Raise NO 2-2 DB/Ye Hyd Level 1-1 Gy/Wh Lower Solenoid Raise Solenoid P G Bk Tn/Bu 1 Tn/Gn 1 Gy/Og 1 K-6 Og/Pk C SW-11 Gy/Ye 1-11 Raise 1-12 Lower DG/Rd DB/Rd 1-10 Mow SW TCS 1-9 Seat SW Brake SW Gy/Ye 1-8 Og Pu H Wh LG/Ye 3-1 L-7 2-7 Wh Pk/Bk SW-4 Gy/Bk K-5 Og/Pk SW-10 1-7 Bn/Rd Fuel Pull Fuel Hold Pk/Bk Horn 3-10 Og/Wh Neutral SW 1-2 Bn/Wh Pu A SW-8 Engine Oil Select 4 Select 3 Select 2 DG B 3-12 Starter 2-12 Water Temp 2-1 4-4 4-3 4-2 U-6 Bn/Ye Bn/Rd DB Og/Ye Pu/Ye M-2 Og/Pk B SW-7 Bn/Wh Hyd Level Light 2-9 3-4 SW-5 U-4 Og/Pk Og/Pk Select 1 Key-S Lights Og/Wh Og/Wh 2 Bk 2 Bk 2 Bk 3 U-5 Bk Og 1-5 Pk/Bu Key-GP Key-I Switches 4-1 1-4 Ye/Bu 3-5 Og/Bk LB/wh 3-2 Og/Ye F1 3-3 Og/Wh DG 3-7 Rd F2 Pk/Bk Bn/Ye 3-6 Rd Battery Gy/Rd DB Pu/Gn Tn/Bk Og/Bk Og/Wh Pk/Bu Ye/Bu Og/Ye + Rd Gauges – 1 4 2 1 K-3 2 AR-522 K-7 Bk Bk K-4 Bk R 101 AR-522 Item Reference Illustration B-1 CB-1 F-1 F-2 K-1 K-2 K-3 K-4 K-5 K-6 K-7 L-1 L-2 L-3 L-4 L-5 L-6 L-7 M1 M2 R-1 R-2 R-3 SW-1 See 28.1 See 28.1 See 28.1 See 28.1 See 28.1 See 28.1 Not Shown Not Shown See 36.1 See 36.1 See 33.2 See 28.1 See 28.1 See 4.1 See 4.1 See 4.1 See 4.1 See 4.1 Not Shown See 16.1 See 16.1 See 14.1 Not Shown See 19.1 Part Number NS 361439 5003282 5003282 4193880 4193880 4134270 4134530 4142009 4134532 4123183 4123183 N/S N/S N/S N/S 366751 556988 4132489 3006337 364501 556996 556419 Description Battery 50 Amp Circuit Breaker (Alternator) 20 Amp Fuse (Ignition Circuit) 20 Amp Fuse (Lights) Glow Plug Relay Starter Relay Cruise Control Magnet (Option) Fuel Solenoid Raise Solenoid Coil Lower Solenoid Coil Mow Coil Left Headlight Bulb Right Headlight Bulb Alternator Light Glow Plug Light Engine Oil Pressure Light Hydraulic Filter Pressure Light Hydraulic Level Light Starter Motor Fuel Pump Fuel Sender Temperature Sender Glow Plugs Hydraulic Filter Pressure Switch SW-2 See 4.1 4128888 Ignition Switch SW-3 SW-4 SW-5 SW-6 SW-7 SW-8 SW-9 SW-10 SW-10 SW-11 SW-12 SW-13 See 4.1 Not Shown See 4.1 See 4.1 See 5.1 See 6.1 See 16.1 See 3.1 See 3.2 See 4.1 See 4.1 Not Shown 4130132 Light Switch Cruise Control Switch (Option) Horn Switch Traction Control System Switch Neutral Proximity Switch Parking Brake Proximity Switch Hydraulic Oil Level Switch Seat Switch Seat Switch Mow Switch Joystick Engine Oil Pressure Switch 102 4130133 4137524 4125831 4125831 3001279 4139450 4210500 2721505 1004290 554018 Serial Numbers/Notes Included in Controller Included in Controller Included with Engine Included in 4130148 Included in 4130148 Included in 4130149 Included in 4130149 Included in Engine Included in Engine OFF-None Run - A+B GP - A+B+D Start - A+B+C+D 68098 - 1601 ~ 1750 68098 - 1751 and Up Included in Engine AR-522 Item U-1 U-2 U-3 U-4 U-5 U-6 U-7 Reference Illustration See 4.1 See 4.1 See 4.1 See 4.1 Not Shown See 28.1 Not Shown Part Number 3005121 365943 4129683 366670 4122841 5000938 Description Temperature Gauge Fuel Gauge Hour Meter Horn Cruise Control Module (Option) Controller Alternator Serial Numbers/Notes Included in Engine 103 AR-522 Serial No. Steering Valve:68098 - 1651 ~ 1808 Serial No. Deck Valve: 68098 - 1651 ~1825 42.1 Hydraulic Schematic A Tow Valve 3000 RPM A B 3625 psi 2.81 ci .88 ci 5.47 ci .88 ci .5 ci 3625 psi B Drain .031 RR Deck Motor Gear Pump C D E Supply .028 Traction Pump .87ci 285 psi Displacement Control R1 M1 P1 2600 psi .87ci Deck Valve LR Deck Motor P2 600 psi R2 T M2 LF Deck Motor .87ci F .87ci G C Deck Motor .87ci 10 Micron 25 psi Crack Bypass Return Filter RF Deck Motor 100 Mesh Screen 30 psi Crack Bypass 104 Oil Cooler AR-522 A B A H D I 24.0 ci Rear Wheel Motors Front Wheel Motors 30.0 ci E .050 G C D E F 24.0 ci 30.0 ci B 4WD Valve C Lift Valve C1 C2 C3 C4 C5 P .040 Left Front Cylinder .040 C6 C10 C9 C8 C7 T Right Front Cylinder .040 Center Front Cylinder .040 Right Rear Cylinder .040 Left Rear Cylinder Steering Unit LT Out G Aux In 1740 psi F 4.13 ci RT 105 AR-522 Serial No. All 44.1 O-Ring Chart W X W-X O-Ring Face Seal Size W-X W O-Ring Boss Dash Size O-Ring Face Seal Size Straight Adapter W X O-Ring Face Seal Size X Y O-Ring Not O-Ring Face Needed Seal Size O-Ring Not O-Ring Face Needed Seal Size Swivel Branch Tee W X X W-X-Y O-Ring Face Seal Size Swivel Run Tee Straight Thread Branch Tee O-Ring Boss Dash Size W W-X-Y O-Ring Face Seal Size O-Ring Boss Dash Size O-Ring Face Seal Size W 90° Adapter Y W W-X-Y O-Ring Face Seal Size W-X O-Ring Boss Dash Size 45° Adapter X Y X X X W W W-X O-Ring Face Seal Size W-X O-Ring Face Seal Size O-Ring Face Seal Size 90° Bulkhead Adapter Y O-Ring Face Seal Size O-Ring Face Seal Size Union Bulkhead Adapter W W-X O-Ring Face Seal Size W O-Ring Face Seal Size Union Adapter Straight Thread Run Tee X X W-X-Y O-Ring Face O-Ring Boss Seal Size Dash Size O-Ring Face O-Ring Face Seal Size Seal Size Bulkhead Run Tee X W W-X O-Ring Face Seal Size O-Ring Face Seal Size 45° Bulkhead Adapter X W W-X-Y O-Ring Face Seal Size X W W-X W O-Ring Face Seal Size W-X Y O-Ring Face Seal Size O-Ring Face Seal Size W-X-Y O-Ring Face O-Ring Face Seal Size Seal Size X X W-X-Y-Z W Y Z 102 O-Ring Face Seal Size O-Ring Face Seal Size O-Ring Face Seal Size O-Ring Face Seal Size Cross Adapter O-Ring Not Needed 90° Swivel Adapter Union Tee 90° Union Adapter O-Ring Face Seal Size W Plug AR-522 Adapter Part Number. Dash Size 339974 4-6 339977 6-4 339979 6-6 339985 8-10 339989 10-10 339993 12-10 339994 12-12 339996 12-16 339998 16-12 339999 16-16 340002 16-20 340007 6-4 340009 10-10 340026 6-6 340030 8-10 340059 6-4 340061 6-6 340070 10-10 340077 16-16 340090 24-24 340119 6-6-6 340122 12-12-12 340123 16-16-16 340143 6-6-6 340375 6-6 340376 8-8 340377 16-16 Adapter Type (W) O-Ring (X) O-Ring Straight Adapter Straight Adapter Straight Adapter Straight Adapter Straight Adapter Straight Adapter Straight Adapter Straight Adapter Straight Adapter Straight Adapter Straight Adapter Straight Adapter Straight Adapter 45° Adapter 45° Adapter 90° Adapter 90° Adapter 90° Adapter 90° Adapter 90° Adapter Swivel Run Tee Swivel Run Tee Swivel Run Tee Swivel Branch Tee 90° Swivel Adapter 90° Swivel Adapter 90° Swivel Adapter 339908 339909 339909 339910 339911 339912 339912 339912 339913 339913 339913 339906 339911 339909 339910 339909 339909 339911 339913 339915 339909 339912 339913 339909 339909 339910 339913 339897 339896 339897 339899 339899 339899 339900 339901 339900 339901 339902 339896 339899 339897 339899 339896 339897 339899 339901 339903 339909 339912 339913 339909 SAE Boss O-Rings (Y) O-Ring (Z) O-Ring ORS Face Seal O-Rings Dash Size Thread Size O-Ring Tube Size Thread Size O-Ring 2 3 4 5 6 8 10 12 14 16 20 24 32 5/16-24 3/8-24 7/16-20 1/2-20 9/16-18 3/4-16 7/8-14 1 1/16-12 1 3/16-12 1 5/16-12 1 5/8-12 1 7/8-12 2 1/2-12 459290 459291 339896 459293 339897 339898 339899 339900 459296 339901 339902 339903 339904 4 6 8 10 12 16 20 24 9/16-18 11/16-16 13/16-16 1-14 1 3/16-12 1 7/16-12 1 11/16-12 2-12 339908 339909 339910 339911 339912 339913 339914 339915 > Change from previous revision 103 104 > Change from previous revision 105 Fluids and Compounds Hydraulic Fluid* 5001405 5001404 2500548 2500546 503409 503407 Two 2-1/2 Gallon Container of ISO VG68 Oil One 5 Gallon Pail of ISO VG68 Oil Two 2-1/2 Gallon Container of 10W30 Oil One 5 Gallon Pail of 10W30 Oil Two 2-1/2 Gallon Container of ATF Fluid One 5 Gallon Pail of ATF Fluid 2-Cycle Oil 554600 Twenty Four 16 Ounce Plastic Container 554599 Twenty Four 8 Ounce Plastic Container Grease 5000067 One 5 Gallon Pail OO-Grease 5000068 Twenty Four 8 Ounce Tube OO-Grease Paint 5003469 554598 2500789 546409 16 Ounce Gray Aerosol Six 12 Ounce Orange Aerosol Twelve 1 Quart Can Orange Two 1 Gallon Can Orange Lapping Compound 5002488 5002490 5002489 5002491 One 10 Pound Pail of 80 Grit One 25 Pound Pail of 80 Grit One 10 Pound Pail of 120 Grit One 25 Pound Pail of 120 Grit Specialty Compound 365422 5001581 5.3 Ounce Tube of Electrical Insulating Gel 14 Ounce Can of Lubriplate Multi Lube A Biodegradable Hydraulic Fluid* 5003102 5003103 5003105 5003104 4115976 4115977 5003106 One 55 Gallon Drum TGTSP GreensCare 68 One 5 Gallon Pail TGTSP GreensCare 68 One 55 Gallon Drum TGTSP GreensCare 46 One 5 Gallon Pail TGTSP GreensCare 46 One 55 Gallon Drum TGTSP GreensCare 32 One 5 Gallon Pail TGTSP Greens Care 32 Twenty Four 14 Ounce Tube Greens Care Grease O-Ring Kit 5002452 5002453 5002454 SAE O-Ring Boss (3/32 ~ 2” Tube O.D.) Common O-Ring Kit O-Ring Face Seal ORFS (-4 ~ -24 ORS Tube Size) Right Start Kit for New Machines See your local TGTSP Dealer On-Time Maintenance Kit See your local TGTSP Dealer * Refer to the Parts & Maintenance manual for the correct hydraulic oil requirements for your machine. Textron Golf, Turf & Specialty Products offers a High Usage Parts Catalog illustrating commonly used Parts through easy to read line Drawings. See your local TGTSP Dealer for a copy. INDEX 1002657...................... 47 1002810...................... 37 1003047...................... 45 1003048...................... 45 1003288...................... 39 1003616...................... 41 1003638...................... 49 1003872...................... 41 1004279...................... 35 1004290...................... 37 1004541...................... 71 123096........................ 47 132647........................ 59 2000012...................... 49 2000141...................... 45 2198153...................... 81 2500722...................... 82 2810424...................... 73 2810702...................... 59 2811365...................... 47 2811547...................... 47 3000953................ 66, 67 3001279...................... 59 3001296...................... 60 3001376...................... 37 3002195...................... 53 3002397...................... 59 3002695...................... 39 3003474...................... 39 3003475...................... 39 3003928...................... 35 3004894...................... 79 3005121...................... 37 3005673...................... 47 3005871...................... 59 3005872...................... 59 3005934...................... 47 3005981...................... 47 3006035...................... 37 3006243...................... 59 3006327................ 39, 41 3006332...................... 59 3006337...................... 59 3006873...................... 33 3006998...................... 39 3007230...................... 39 3007548...................... 33 3007606...................... 41 3007609...................... 35 3007610...................... 35 3007611...................... 35 3007612...................... 35 3007764...................... 79 3007776...................... 73 3007777...................... 73 3007862...................... 45 3007889 ...................... 57 3008195 ...................... 33 3008218 ...................... 35 3008383 ................ 39, 41 3008388 ...................... 79 3008521 ...................... 31 3008522 ...................... 31 3008673 ................ 60, 68 3008682 ...................... 31 3009204 ...................... 59 3009210 ...................... 33 3009251 ...................... 73 3009292 ...................... 35 3009347 ...................... 59 3010210 ...................... 81 3010489 .......... 49, 75, 77 310452 .................. 75, 77 310711 ........................ 55 315387 ........................ 35 316938 ........................ 81 322847 ........................ 50 326112 ........................ 53 333542 ........................ 39 337229 ........................ 53 339899 ........................ 59 339909 .................. 61, 68 339911 ........................ 61 339913 ........................ 60 339972 ........................ 68 339974 ........................ 47 339977 ........................ 69 339979 47, 61, 65, 66, 67 339985 ............ 63, 67, 70 339989 .................. 63, 65 339993 ........................ 65 339994 ........................ 65 339996 ........................ 65 339998 ........................ 68 339999 .................. 60, 61 340007 ........................ 68 340009 ........................ 63 340026 ........................ 66 340030 ........................ 63 340033 ........................ 65 340039 ........................ 61 340059 ........................ 68 340061 .................. 66, 67 340070 .................. 63, 65 340077 ........................ 61 340090 ........................ 60 340119 .................. 68, 69 340122 ........................ 65 340123 ........................ 61 340143 ........................ 69 340338 ........................ 65 340375 .................. 68, 69 340376 ........................ 67 340377 ........................ 65 340486 ........................ 45 340603 ........................ 82 345666 ........................ 53 351956 ........................ 37 352726 .................. 39, 41 353914 .................. 45, 49 358794 ........................ 53 360111 .................. 45, 49 360885 ........................ 37 361117 ........................ 59 361439 ........................ 73 361451 ........................ 49 361647 ........................ 49 361648 ........................ 49 361689 ........................ 68 361748 ........................ 59 361831 ........................ 51 362263 .................. 55, 57 362539 ........................ 57 362743 ........................ 57 363485 .................. 55, 57 363586 ........................ 57 364501 ........................ 55 365398 ........................ 53 365943 ........................ 37 365948 ........................ 79 365959 ........................ 60 365979 ........................ 55 365981 ........................ 55 366526 .................. 53, 59 366670 ........................ 37 366751 ........................ 37 366768 ........................ 37 366789 ........................ 49 366870 ........................ 43 366883 ........................ 33 366974 ........................ 39 367029 ........................ 81 367031 ........................ 55 367350 ........................ 49 367631 ........................ 73 400198 ........................ 75 4108161 ...................... 41 4111408 ...................... 31 4113047 ...................... 43 4113601 ...................... 68 4113986 ................ 51, 55 4117468 ...................... 31 4117807 ...................... 79 4118210 ...................... 50 4118252 ...................... 57 4118255 ...................... 49 4119888 ...................... 57 4120313 ...................... 55 4120315 ......................55 4120976 ......................53 4120977 ......................53 4121552 ......................62 4121554 ......................62 4121828 ......................50 4121829 ......................50 4121852 ......................62 4121986 ......................50 4122538 ......................60 4122840 ......................73 4122841 ......................73 4123066 ......................60 4123166 ......................61 4123183 ......................73 4123723 ......................35 4123725 ......................35 4124015 ......................81 4124066 ......................79 4124076 ......................79 4124087 ......................79 4124129 ......................81 4124204 ......................50 4124395 ......................81 4124423 ......................81 4124425 ......................81 4124755 ......................62 4125180 ......................77 4125547 ......................75 4125831 ................39, 41 4125919 ......................75 4126082 ......................73 4126447 ......................75 4126450 ................75, 77 4127192 ................75, 77 4127478 ......................81 4127480 ................75, 77 4127556 ................75, 77 4128079A ....................53 4128084 ......................53 4128262 ......................73 4128317 ......................65 4128318 ......................65 4128319 ......................65 4128320 ......................65 4128322 ......................61 4128324 ......................65 4128325 ......................65 4128888 ......................37 4128967 ......................65 4128977 ......................65 4129015 ......................63 4129018 ......................66 4129019 ......................66 4129020 ......................66 4129021 ......................66 107 INDEX 4129022.......................66 4129023.......................67 4129024.......................67 4129026.......................67 4129027.......................67 4129028.......................70 4129029.......................70 4129030.......................70 4129031.......................70 4129032.......................70 4129035.......................65 4129036.......................65 4129037.......................61 4129040.......................68 4129041.......................68 4129042.......................61 4129043.......................61 4129044.......................61 4129069.......................62 4129071.......................62 4129250.......................57 4129251.......................57 4129595.......................63 4129597.......................63 4129600.......................69 4129603.......................69 4129679.......................33 4129680.......................33 4129683.......................37 4130114.......................37 4130132.......................37 4130133.......................37 4130134.......................37 4130148.......................37 4130149.......................37 4130823.......................60 4131137.......................35 4131420.......................77 4131422.......................77 4131618.......................37 4131772.......................31 4131849.................75, 77 4131862.......................71 4131864.......................71 4131963.......................75 4131964.......................77 4131965.......................77 4132489.......................59 4132688.......................49 4132699.......................49 4132846.......................77 4132912.......................39 4132913.......................35 4132917.......................35 4133007.......................79 4133033.......................45 108 4133054.......................45 4133119.......................35 4133121.......................35 4133238.......................51 4133239.......................51 4133240.......................51 4133241.......................51 4133242.......................51 4133243.......................51 4133244.......................53 4133252.......................51 4133609.......................31 4133818.......................53 4133820.......................53 4133821.......................53 4133840.......................55 4134516.......................84 4134517.......................84 4134520.......................84 4134521.......................84 4134525.......................85 4134526.......................85 4134527.......................85 4134528.......................86 4134529.......................86 4134530.......................86 4134532.......................83 4134535.......................87 4134541.......................87 4134543.......................83 4134575.......................75 4134583.......................57 4134584.......................57 4134585.......................57 4134586.......................57 4134587.......................57 4134588.......................91 4134589.......................91 4134590.......................91 4134591.......................91 4134592.......................91 4134594.......................91 4134595.......................91 4134596.......................91 4134597.......................91 4134606.......................91 4134607.......................91 4134608.......................91 4134609.......................91 4134610.......................91 4134612.......................91 4134613.......................91 4134614.......................91 4134615.......................93 4134616.......................93 4134617.......................93 4134618 ...................... 93 4134619 ...................... 93 4134620 ...................... 93 4134621 ...................... 93 4134622 ...................... 93 4134623 ...................... 93 4134626 ...................... 77 4134631 ...................... 31 4134633 ...................... 31 4134870 ...................... 31 4134921 ...................... 65 4135261 ...................... 51 4135758 ...................... 37 4135765 ...................... 55 4136022 ...................... 77 4136067 ...................... 86 4136522 ...................... 57 4136829 ...................... 79 4137099 ...................... 51 4137128 ................ 75, 77 4137137 ...................... 49 4137138 ................ 75, 77 4137139 ...................... 49 4137186 ...................... 79 4137382 ...................... 63 4137383 ...................... 63 4137524 ...................... 37 4137534 ...................... 81 4137561 ...................... 69 4137562 ................ 66, 69 4137588 ...................... 63 4137589 ...................... 63 4137607 ...................... 65 4137608 ...................... 65 4137623 ...................... 65 4137624 ...................... 68 4137634 ...................... 68 4137665 ...................... 81 4137674 ...................... 81 4137716 ...................... 77 4138359 ...................... 33 4138380 ...................... 53 4138381 ...................... 53 4138567 ...................... 47 4139094 ...................... 89 4139237 ...................... 35 4139241 ...................... 35 4139433 ...................... 35 4139434 ...................... 35 4139435 ...................... 35 4139436 ...................... 35 4139450 ...................... 35 4139787 ...................... 79 4140094 ...................... 43 4141925 ...................... 49 4141934 ...................... 49 4142009 ...................... 86 4142455 ...................... 41 4148857 ................ 60, 68 4149118 ...................... 49 4149137 ...................... 45 4149337 ...................... 49 4151058 ...................... 49 4156720 ...................... 31 4156721 ...................... 31 4159290 ...................... 45 4161960 ...................... 81 4163087 ...................... 81 4163089 ...................... 81 4163106 ...................... 79 4163107 ...................... 79 4163121 ...................... 81 4163122 ...................... 81 4163124 ...................... 79 4163125 ...................... 79 4163204 ...................... 55 4163381 ...................... 53 4164381 ...................... 31 4165135 ...................... 55 4165143 ...................... 55 4165560 ...................... 57 4169363 ...................... 43 4171883 ...................... 75 4171884 ...................... 75 4173922 ...................... 79 4173923 ...................... 79 4174240 ...................... 55 4174684 ...................... 37 4174880 ...................... 57 4174881 ...................... 57 4174960 ...................... 79 4175100 ...................... 79 4175180 ...................... 83 4175181 ...................... 83 4175182 ...................... 83 4175183 ...................... 83 4175184 ...................... 83 4176562 ...................... 39 4176580 ................ 39, 41 4177360 ...................... 79 4177480 ...................... 59 4177682 ...................... 31 4177720 ...................... 53 4177740 ...................... 53 4177901 ...................... 53 4178564 ...................... 84 4179022 ...................... 31 4179360 ...................... 31 4179640 ...................... 62 4179860 ...................... 57 4181006 ...................... 75 4181860 ...................... 31 INDEX 4181861...................... 31 4181862...................... 31 4181864...................... 31 4181865...................... 31 4182386...................... 31 4182391...................... 41 4182392...................... 39 4182460...................... 51 4182500...................... 51 4182501...................... 51 4185520...................... 55 4186441...................... 51 4187660...................... 57 4187920...................... 57 4189940...................... 53 4190020...................... 53 4192220...................... 41 4192520...................... 43 4193161...................... 43 4193182...................... 43 4194584...................... 83 4195141...................... 45 4200921...................... 84 4201661...................... 53 440042........................ 41 444718........................ 75 5000465...................... 43 5002574...................... 45 5002918...................... 47 5002919...................... 47 5002952................ 31, 43 5003034................ 91, 93 5003076...................... 35 5003219...................... 89 5003220...................... 89 5003282...................... 73 5003373...................... 53 5003374...................... 59 5003433...................... 91 5003434...................... 91 5003447...................... 53 5003578................ 83, 86 5003579.......... 83, 86, 87 5003591...................... 84 5003769...................... 35 502517........................ 82 502924........................ 89 502925........................ 89 503295........................ 82 503296........................ 82 503308........................ 82 503378........................ 81 503398........................ 89 503626........................ 59 523126........................ 45 549441........................ 82 549443 ........................ 82 550863 ........................ 53 554579 ........................ 82 554748 ........................ 59 554752 ........................ 59 554779 .................. 49, 85 554780 .................. 49, 85 554855 ........................ 89 554856 ........................ 89 554857 ........................ 89 555771 ........................ 62 556419 ........................ 62 557367 ........................ 53 557374 ........................ 53 557523 ........................ 79 557619 ........................ 59 557620 ........................ 33 557623 .................. 45, 84 557624 .................. 45, 84 557631 ........................ 84 557632 ........................ 84 557633 ........................ 84 557634 ........................ 84 557635 ........................ 84 557636 ........................ 84 557637 ........................ 84 557639 ........................ 84 557640 ........................ 84 557642 ........................ 84 557734 ........................ 89 557738 ........................ 89 557771 ........................ 45 557844 .................. 31, 43 558063 ........................ 84 558064 ........................ 84 558066 ........................ 84 590259 ........................ 82 590260 ........................ 82 67844 .......................... 43 829997 ........................ 53 830930 ........................ 53 831053 ........................ 35 A1103051.................... 57 PJH1054 ..................... 79 109 World Class Quality, Performance and Support Equipment from Jacobsen is built to exacting standards ensured by ISO 9001 and ISO 14001 registration at all our manufacturing locations. A worldwide dealer network and factory trained technicians backed by Genuine Parts provide reliable, high-quality product support. Qualidade, prestações e assistência de classe mundial O equipamento de Jacobsen é construído segundo padrões exactos garantidos pela atribuição de ISO 9001 e ISO 14001 a todos os nossos centros de produção. Rede mundial de distribuidores e técnicos formados na fábrica apoiados por as peças originais para un apoio fiável e de alta qualidade aos nossos produtos. When Performance Matters.™ Jacobsen, A Textron Company 11108 Quality Drive, Charlotte, NC 28273, USA www.Jacobsen.com Ransomes Jacobsen Limited West Road, Ransomes Europark, Ipswich, England, IP3 9TT English Company Registration No. 1070731 www.ransomesjacobsen.com