1
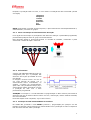
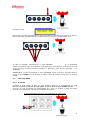
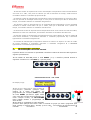
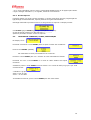
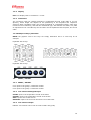
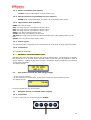
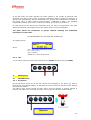
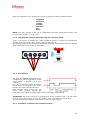
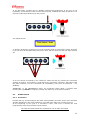
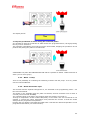
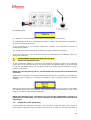
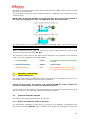
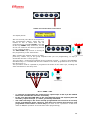
ANEXO CV
SUPPLEMENT CV
Pacific
1
INDICE
1.
1.1
1.2
1.2.1
1.2.2
1.2.3
1.2.4
1.2.5
1.3
1.3.1
1.3.2
1.3.3
1.3.4
1.3.5
1.3.6
1.3.7
1.3.8
2.
2.1
2.2
2.2.1
2.2.2
3.
3.1
3.1.1
3.1.2
3.1.3
3.1.4
3.2
3.2.1
3.2.2
3.2.3
4.
4.1
4.2
5.
5.1
5.2
5.2.1
5.2.2
6.
6.1
6.1.1
6.2
6.3
6.4
6.4.1
6.4.2
6.5
CARACTERISTICAS GERAIS
INTRODUÇÃO
INTERFACE
TECLAS
LEDS
DISPLAY
LIGAÇÃO
EXEMPLO DA DISPOSIÇÃO DAS TECLAS
INPUT / OUTPUT
INPUT / OUTPUT
ENTRADA ANALÓGICA DE BAIXA TENSÃO
SAÍDA DE BAIXA TENSÃO
LINHA DE SÉRIE RS232 (BAIXA TENSÃO)
LINHA DE PROGRAMAÇÃO DO MICROPROCESSADOR (BAIXA TENSÃO)
SAÍDA DE ALTA TENSÃO (8 RELÉS)
ALIMENTAÇÃO (ALTA TENSÃO)
LIGAÇÕES
POTENCIA DA PLACA ELECTRÓNICA
ESTADO OFF (PLACA DESLIGADA MAS ALIMENTADA)
ESTADO ON (PLACA LIGADA E ALIMENTADA)
LIGAÇÃO
OFF
PRODUÇÃO
CICLO DE CAFÉ
PRODUÇÃO
PARAR A PRODUÇÃO DE CAFÉ NA FASE DE EXECUÇÃO
PRÉ-INFUSÃO
PRODUÇÃO DE CAFÉ NA MODALIDADE DE CONTÍNUO
CICLO DE ÁGUA
PRODUÇÃO
ÁGUA + BOMBA
CICLO DE PRODUÇÃO DE VAPOR
GESTÃO E REGULAÇÃO DO NÍVEL
SONDA DO NÍVEL MÍNIMO
SONDA DO NÍVEL (MÁXIMO)
AQUECIMENTO DA CALDEIRA
CARACTERISTICAS
MÉTODOS DE CONTROLO DO AQUECIMENTO
COM CONTROLO ON/OFF COM INTERVALOS DE 2 ºC
COM CONTROLO PID (ESTABELECIDO POR DEFAULT)
PROGRAMAÇÃO E LEITURAS
PROGRAMAÇÃO DAS DOSES DE CAFÉ
SE UMA DAS DOSES DE CAFÉ NÃO SE ACTIVA…
PROGRAMAÇÃO DAS DOSES DE ÁGUA
PROGRAMAÇÃO DA TEMPERATURA DO VAPOR POR SIMULAÇÃO
PROGRAMAÇÃO DO RELÓGIO
ON/OFF AUTOMÁTICO (LIGAR/DESLIGAR AUTOMATICAMENTE)
DIA DE REPOUSO
LEITURAS DE CONSUMOS, LITROS, MANUTENÇÃO
P – 2012/03
2
1.
1.1
A
CARACTERISTICAS GERAIS
INTRODUÇÃO
versão electrónica fiamma PACIFIC possui as seguintes características principais:
Gestão de 1, 2, 3 grupos de café
Controle de quatro doses diferentes de café para o grupo
Controle de três doses diferentes de chá (água quente)
Controle de vapor
Execução de grupos contemporâneos, café, chá e água
Controle de volume de café doses
Controle cronometrado doses de chá
Programação de doses em simulação
Controle e gestão de nível de
Monitorização e gestão de caldeira de aquecimento
Sistema de alarme através de Supervisão
Entrega em contínua entrega, modo TIME-OUT e outras funções DIÁLOGO Gicar
contabilidade série de dispositivos
Gestão de 16x2 LCD para exibir os estados funcionais
Bebidas Gestão
Nº 8 actuadores (relés) = bomba, EV1, EV2, EV3, chá, enchimento da caldeira,
aquecimento e vaporizador
Nº 1 no aquecimento baixa tensão de saída com triac externos ou fora do relé de estado
sólido (SSR)
N° 2 W NTC 3,3 k (caldeira a vapor e sonda lança vapor)
Gestão de No. 3 Contadores volumétricos
Planeamento menu
Nível de Planeamento menu TÉCNICA
Programação microprocessador flash para actualizações de software on-board de
programação (OBP)
1.2
INTERFACE
1.2.1
Teclas
K1GR1,
K2GR1,
K3GR1,
K4GR1,
K5GR1,
K6GR1,
K1GR2,
K2GR2,
K3GR2,
K4GR2,
K5GR2,
K6GR2,
K1GR3:
K2GR3:
K3GR3:
K4GR3:
K5GR3:
K6GR3:
Tecla
Tecla
Tecla
Tecla
Tecla
Tecla
de produção 1a dose café
de produção 2a dose café
de produção 3a dose café
de produção 4a dose café
continuo / programação
de produção dose chá/vapor
Grupos
Grupos
Grupos
Grupos
Grupos
Grupos
1,
1,
1,
1,
1,
1,
2,
2,
2,
2,
2,
2,
3
3
3
3
3
3
Nota: Tal como especificado no respectivo parágrafo, as teclas do teclado do Grupo 1 executam
funções específicas (distintas da produção) quando se encontram em modo de programação:
FUNÇÕES
TECLA
DESCRIÇÃO DA FUNÇÃO
SUPLEMENTARES
Função de incremento dos valores numéricos ou selecção do
K1GR1
+ (MAIS)
valor a fixar para o parâmetro em programação
Função de decréscimo dos valores numéricos ou selecção do
K2GR1
- (MENOS)
valor a fixar para o parâmetro em programação
Função de confirmação das operações efectuadas durante a
K3GR1
ENTER
programação
Selecção da função / escolha do parâmetro a ser
K5GR1
MENU
programado
1.2.2
Leds
L1GR1,
L2GR1,
L3GR1,
L4GR1,
L5GR1,
L6GR1,
L1GR2,
L2GR2,
L3GR2,
L4GR2,
L5GR2,
L6GR2,
L1GR3
L2GR3
L3GR3
L4GR3
L5GR3
L6GR3
Led
Led
Led
Led
Led
Led
para 1ª dose de café
para 2ª dose de café
para 3ª dose de café
para 4ª dose de café
contínua / Programação
da dose de chá / vapor
grupos
grupos
grupos
grupos
grupos
grupos
1,
1,
1,
1,
1,
1,
2,
2,
2,
2,
2,
2,
3
3
3
3
3
3
3
1.2.3
Display
LCD: Display LCD 16 caracteres x 2 linhas
1.2.4
Ligação
A ligação com o / os teclados externos é efectuada através de um cabo de fita plana de 16
vias (8x2vie), cujo comprimento dependerá do posicionamento do teclado e respectiva placa
electrónica. Actualmente Gicar tanto pode fornecer teclados de “membranas switch” (teclas
com LED inseridas na membrana), como do tipo "mecânico" com botões e LEDS, numa placa
de circuito impresso. As teclas LED de água quente podem ser separada do painel a partir do
cabo.
1.2.5 Exemplo da Disposição das Teclas
NOTA: o grafismo usado nas teclas é puramente ilustrativo e serve, unicamente, como
exemplo.
Teclados com 6 teclas
Teclado com 5 teclas
1.3
INPUT / OUTPUT
1.3.1
INPUT / OUTPUT
CV1: entrada do contador volumétrico do grupo 1
CV2: entrada do contador volumétrico do grupo 2
CV3: entrada do contador volumétrico do grupo 3
1.3.2
Entrada Analógica de Baixa Tensão
STCAF: entrada da sonda dei temperatura da caldeira
STLVAP: entrada da sonda de temperatura da lança de vapor
SLIV: entrada da sonda de nível
SLIVMIN: entrada da sonda de nível mínimo da caldeira
1.3.3
Saída de Baixa Tensão
RISCAF: saída de baixa tensão para triac ou relé estático da caldeira (PID)
4
1.3.4
Linha de Série RS232 (baixa tensão)
TxD/RxD: sinais para transmissão em série RS232 (TTL)
1.3.5
Linha de Programação do Microprocessador (Baixa Tensão)
FLASH: sinal para programação “on board” do processador Flash (Gicar).
1.3.6
Saída de Alta Tensão (8 Relés)
BOMBA: saída relé bomba
EV1: relé de saída da electroválvula de produção do grupo 1
EV2: relé de saída da electroválvula de produção do grupo 2
EV3: relé de saída da electroválvula de produção do grupo 3
EVLIV: relé de saída da electroválvula de enchimento
EVTEA: relé de saída da electroválvula de água quente
ON/OFF: relé de saída do interruptor geral (on/off) o do interruptor de aquecimento (no PID)
EVVAP : relé de saída da electroválvula vapor.
1.3.7
Alimentação (Alta tensão)
A placa electrónica é alimentada com a tensão nomina da rede através do interruptor geral.
1.3.8
Ligações
Ver “Características Eléctricas”.
2.
POTENCIA DA PLACA ELECTRÓNICA
Alimentando a placa electrónica através do interruptor geral (não pertencente GICAR), este
reflecte o estado de ON ou OFF que apresentava antes de o desligar (ver “Procedimentos em
caso de falha de energia”). Ligando o interruptor geral, o display mostra, de imediato, a
versão do software instalado.
O display mostra:
2.1
ESTADO OFF (PLACA DESLIGADA MAS ALIMENTADA)
- Todas as saídas estão inactivas
- Todas as funções estão desactivadas, excepto as dos níveis Técnico e de Programação.
O display mostra:
Onde hh: mm indica a hora actual e minutos
2.2
ESTADO ON (PLACA LIGADA E ALIMENTADA)
2.2.1
Ligação
Para ligar a placa deve premir a tecla K3GR1.
K1
k2
k3
k4
k5
5
No estado de ON, a placa indica o estado relativo das sondas de nível máximo e mínimo
(este último se for utilizado); se a sonda detecta falta de água na caldeira o enchimento
inicia-se automaticamente até ao nível predefinido, através da activação simultânea da
electroválvula de entrada de água e da bomba. (TIME-OUT de Enchimento – ver ALLARM)
Completo o enchimento da caldeira inicia-se o aquecimento (ver Aquecimento da Caldeira).
Caso sejam detectados níveis adequados (ou após a sua recuperação), a placa permite a
selecção e programação das doses de café (ver parágrafos seguintes).
A placa permite a produção dos grupos sem que seja atingida a temperatura
predefinida da caldeira.
NO ESTADO ON, TODOS OS LEDS FICAM ACESOS
O display mostra:
onde
xxx = temperatura da caldeira detectada
hh = hora atual (0-23)
mm = minuto actual
GICAR srl = nome do cliente (se aceitar)
2.2.2
OFF
Para desligar a placa electrónica manter premida a tecla K5GR1 e prima a tecla K3GR1.
K1
3.
PRODUÇÃO
3.1
3.1.1
CICLO DE CAFÉ
Produção
k2
k3
k4
k5
No estado ON, pressione uma das quatro teclas de dose pertencente ao grupo que deseja
programar (por exemplo K1GRx). Activam-se a electroválvula EVX e a bomba
desencadeando-se a fase de produção.
A electroválvula e bomba permanecerão activas até ser atingida a quantidade de produto
previamente definida. O LED da tecla seleccionada permanece ligado durante todo o período
de produção do café.
K1
k2
k3
k4
k5
6
Enquanto a produção está em curso, o visor mostra a indicação da dose executada (Versão
em Inglês)
1 Espresso
2 Espresos
1 Coffee
2 Coffees
Continuos
Tea
Steam
NOTA: Programado o teclado do lado esquerdo, a placa memoriza a dose disponibilizando-a,
uniformemente, em todos os grupos.
3.1.2
Parar a Produção de Café na Fase de Execução
Há a opção de interromper a produção de café antes de alcançar a quantidade programada,
pressionando qualquer tecla do grupo em funcionamento.
Esta operação desliga a electroválvula EVX e a bomba de imediato, retomando a placa
electrónica o estado de apta a funcionar
K1
3.1.3
k2
k3
k4
k5
Pré-Infusão
A Placa 3d5 MAESTRO DELUXE pode ser
configurada para que a produção das
doses de café sejam precedidas de uma
pré-infusão
A “tiragem” da dose inicia e ao fim de
um curto período de tempo (t1) a
electroválvula fecha continuando, no
entanto, a bomba em funcionamento.
Após outro curto período de tempo (t2) a
electroválvula reabre permitindo concluir
a produção do café com a dose
previamente programada.
ATENÇÃO: os tempos t1 e t2 são definidos na programação no Nível Técnico para todas as
doses de café. Se um destes valores estiver em zero, esta função, mesmo estando activada,
não será efectuada.
Para informações mais completas, veja o Nível Técnico.
3.1.4
Produção de Café na Modalidade de Contínuo
No estado ON, premindo a tecla K5GRx (continuo / programação) de qualquer um dos
teclados, activamos a electroválvula e a bomba dando inicio à produção do café. O respectivo
LED fica aceso durante toda a produção.
7
K1
k2
k3
k4
k5
No display surge:
Para parar a produção prima qualquer tecla do teclado em utilizado para produzir o café. Ao
fazê-lo desligará, simultaneamente, a electroválvula e a bomba e o LED apagar-se-á.
K1
k2
k3
k4
k5
Se não for desligado manualmente, o modo CONTÍNUO parará ao atingir a quantidade
máxima de produto. Esta quantidade é controlada pelos controladores volumétricos que, ao
serem atingidos os 6000 impulsos, desligam a produção (Time Out de produção – ver
ALARMES).
IMPORTANTE: o início da produção no ciclo CONTÍNUO ocorre cerca de 5 segundos após se
premir a tecla K5GRx. A sua paragem é obtida premindo qualquer outra tecla do mesmo
teclado.
3.2
CICLO DE ÁGUA
3.2.1
Produção
Premindo a tecla relativa à dose de água (K6GRx) activa-se a electroválvula da água
(EVTEA) iniciando a produção de água quente. O LED da tecla de água (L6GRx) acende.
No início do ciclo é activado um temporizador que, uma vez atingido o limite de tempo
definido na programação, interrompe a produção do produto.
A placa electrónica permite o uso simultâneo de água e café
8
No display surge:
Parar a produção de água em fase de execução
É possível interromper a produção de água antes do tempo previsto etravés do pressionar da
tecla usada para a activar.
Esta operação desliga de imediato a electroválvula EVTEA interrompendo a produção do
produto e colocando a placa no estado ON.
ATENÇÃO: A placa 3d5 MAESTRO DELUXE possibilita a obtenção de 3 doses de água
diferentes (ukma por cada grupo)
3.2.2. Água + Bomba
Há a possibilidade de combinar a obtenção de água com a bomba.
Para tal veja o Manual Técnico.
3.2.3. Ciclo de Produção de Vapor
Esta função e o teclado que lhe é dedicado são activados por programação – ver Livro
Técnico.
O vapor apenas está disponível quando a placa está activa e o nível mínimo de água
alcançado (sonda coberta SLIVMIN).
O completo preenchimento da caldeira apenas ocorre quando se liga a máquina.
Através de uma sonda de temperatura posicionada adequadamente no braço de vapor e
ligada a STLVAP, controla a temperatura da água e promove a mistura para que o vapor
tenha a temperatura programada.
Pressionando a tecla K6GRx activa-se EVVAP até atingir a temperatura definida na
programação de simulação (ver secção abaixo).
No display surge:
9
É possível parar a produção de vapor premindo, novamente, a tecla de vapor.
Também é possível continuar a produzir vapor após este atingir a temperatura programada,
bastando continuar a pressionar a tecla de vapor.
Se a temperatura não for alcançada dentro de um tempo limite de 120 segundos, a produção
de vapor é interrompida automaticamente.
O sistema permite a produção em simultâneo de café, chá e vapor.
No caso de contemporaneidade de dois ou mais destes produtos, o display mostra o descrito
em alternadamente.
4.
4.1
GESTÃO E REGULAÇÃO DO NÍVEL
SONDA DO NÍVEL MÍNIMO
No momento em que se liga a máquina, a electrónica detecta o estado relativo à sonda de
nível mínimo. Em caso de falta de água, o interruptor ON / OFF é mantido desligado para
evitar que a resistência se ligue na ausência de água (isto independentemente da
programação que estiver activa: manual ou automática).
NOTA: após ligar o sistema, o controle da sonda do nível mínimo activa-se ao fim
de 6 segundos
Sempre que a sonda do nível mínimo da caldeira não detectar a presença de água durante 3
segundos, o ON / OFF é desligado para preservar a resistência e no display surge:
Quando a sonda de nível de mínimo volta a detectar água por 3 segundos consecutivos,
reactiva o interruptor ON/OFF e, consequentemente, liga a resistência activando o
aquecimento da água da caldeira. O alarme no display desaparece.
NOTA: a sonda de nível de mínimo não executa tarefas de controle ou gestão do
enchimento, pois tais funções são assumidas pela sonda de nível (máximo).
4.2
SONDA DO NÍVEL (máximo)
No momento em que se liga, a electrónica revela o estado relativo da sonda de nível
colocada na caldeira e, se necessário (quando falta água), executa a fase enchimento
activando a electroválvula de enchimento EVLIV e a BOMBA, até que a água atinja o nível
devido na caldeira.
(está previsto um tempo limite de enchimento programável – TIME-OUT: ver a programação
no Livro Técnico)
NOTA: ao ligar pela 1ª vez o sistema,o controlo e a regulação do nível estão
programados para desligar (TIME-OUT) ao fim de cerca de 6 segundos.
inibe a possibilidade de
A fase de enchimento não
seleccionar café, chá ou de efectuar novas programações. Somente a intervenção do TIMEOUT juntamente com a fase de enchimento inibe as funcionalidades do teclado.
10
Quando se inicia o enchimento da caldeira, a água ao tocar na primeira sonda de nível
(sonda de mínimo) activa o relé ON/OFF.
A sensibilidade da sonda à água pode ser alterada através de programação (ver Livro
Técnico). Os parâmetros disponíveis são os seguintes:
Sensibilidade baixa
150KΩ
por exemplo, quando se usa
Depurador
Sensibilidade média
400KΩ
água normal
Sensibilidade alta
1MΩ
por exemplo, no caso de usar água
muito pura (de montanha)
5.
5.1
AQUECIMENTO DA CALDEIRA
CARACTERISTICAS
O controle de aquecimento é activado pela electrónica quando esta está em IDLE-ON,
utilizando uma sonda de temperatura e um comando para a resistência de baixa tensão.
No primeiro enchimento, o aquecimento apenas se inicia DEPOIS da água atingir a
sonda de nível de mínimo, de forma a proteger a resistência.
Em todos os outros casos, o aquecimento está permanentemente activo, excepto se a sonda
de mínimo ficar a descoberto; neste caso o aquecimento é imediatamente bloqueado.
5.2
MÉTODOS DE CONTROLO DO AQUECIMENTO
O controlo poderá ser programado para trabalhar de duas formas:
5.2.1
Com Controlo ON/OFF com Intervalos de 2 ºC
A regulação da temperatura é efectuada com um intervalo de 2 ºC. A resistência é activada
pelo comando de baixa tensão RISCAF, até atingir a temperatura programada TºSET (ver
programação no Livro Técnico) e é reactivada quando essa temperatura baixa 2 ºC.
Para evitar vibrações no limiar de intervenção, existe um filtro de tempo.
Para activar esta função é necessário colocar, na PROGRAMAÇÃO TÉCNICA, todas as
constantes a “0” (ver o respectivo parágrafo).
5.2.2
Com Controlo PID (estabelecido por default)
O controlo da temperatura é efectuado através de um algoritmo proporcional, integrativo e
derivativo (ver Programação no NÍVEL TÉCNICO para a definição de parâmetros).
O controlo do aquecimento obtido com a electrónica em IDLE ON e usa uma sonda de
temperatura e um comando de baixas tensão RISCAF por triac ou relé estático com função
PID.
O controlo da temperatura é efectuado segundo um algoritmo que utiliza 3 constantes:
Proporcional (Kp)
Integrativo (Ki)
Derivativo (Kd)
As 3 constantes devem ser adaptadas ao tipo de electrónica de acordo com a
potência da resistência, o tamanho da caldeira e a sua dispersão, etc.
Define-se “valor de setpoint ou TºSET” como sendo a temperatura a que a caldeira deve
estar quando em funcionamento normal.
11
- Se durante a fase de aquecimento ou de manutenção a temperatura oscila excessivamente
em torno de T °SET, com picos de valores que não se atenuam no tempo, então torna-se
necessário diminuir a constante proporcional Kp.
- Se durante a fase de manutenção a temperatura oscila excessivamente em torno de T°SET,
com um período de oscilação muito longo ou com picos de valores que não se atenuam no
tempo, é necessário diminuir a constante integrativa Ki.
- Se durante a fase de aquecimento ou de manutenção da temperatura há uma oscilação
excessiva e muitas vezes maior do que o T°SET, mas que é atenuada com o passar do
tempo, é necessário diminuir a constante derivativa Kd.
- Se Se durante a fase de aquecimento a temperatura tende a ser inferior ao valor de TºSET,
afastando-se cada vez mais deste, é necessário aumentar a constante derivativa Kd.
- Se durante a fase de aquecimento a temperatura tende a ficar abaixo do valor de T°SET de
uma forma constante, é necessária aumentar o constante proporcional Kp e aumentar
ligeiramente a constante integrativa Ki.
- Se na fase de manutenção a temperatura tende a ser inferior ou superior ao valor de T°SET
de forma constante, é necessário aumentar a constante integrativa Ki e aumentar
ligeiramente a constante proporcional Kp.
6.
6.1
PROGRAMAÇÃO E LEITURAS
PROGRAMAÇÃO DAS DOSES DE CAFÉ
É possível alterar e memorizar a quantidade volumétrica relativa às doses de café seguindo o
seguinte procedimento:
1º No estado de IDLE-ON premir a tecla K5GRx (1..3) e mantê-la premida durante 5
segundos. Verificar se o Led L5GRx (1..3) fica a piscar.
K1
k2
k3
k4
k5
PRESSIONAR TECLA + DE 5 SEG
No display surge:
2º Em 30 seg (Time Out se saída da fase de
programação) pressione qualquer tecla
relativa às 4 doses que podem ser
programadas (por exemplo K1GRx). O LED
K1
k2
k3
k4
k5
da tecla K5GRx permanece ligado assim
como o da dose em fase de programação (no
nosso exemplo L1GRx). As EVx+BOMBA
ficam ligadas durante a programação da
dose de café.
3º Ao atingir a quantidade de café desejada,
pressione uma qualquer das teclas "café" no teclado do grupo que está a programar para
parar (desliga o conjunto EVX + bomba). O novo valor - em impulsos de funcionamento do
contador
volumétrico
é
armazenado
na
12
EEPROM. Simultaneamente verifica-se que o LED relativo à dose programada se desliga,
acendendo-se os restantes LEDS.
Este procedimento deve ser repetido para programar as doses das restantes teclas, incluindo
as de água e vapor caso existam.
.
K1
k5
k2
k3
k4
EVx + BOMBA = OFF
•
Para continuar a programação das doses remanescentes de café (se não for
excedido o limite de tempo programação de 30 segundos) de repita
sequencialmente os pontos 2 e 3.
•
Caso se active o TIME-OUT da fase de programação (ao fim de 30 segundos),
repita integralmente os passos 1,2 e 3 anteriormente descritos.
•
Os LEDS relativos Às doses “já programadas” ficam apagadas se nos
mantivermos no modo de programação. No entanto, isto não impede que se
efectue uma nova programação da dose dessas teclas (no entanto, esta questão já
não se coloca se se efectuou uma operação ON/OFF da electrónica depois da
programação)
IMPORTANTE: a programação efectuada no 1º grupo é sempre transferida para os
outros grupos. No Entanto, isto não impede que se programe o(s) outro(s)
grupo(s) de forma distinta do 1º, repetindo a operação descrita nos pontos 1, 2 e 3.
ATENÇÃO: se a função “pré infusão” está activa (ver respectivo parágrafo) a
electrónica, na fase de programação, activa esta função particular. Espere que ela
termine e prima a tecla de paragem da produção em curso.
NOTA: durante a programação de um grupo todos os outros, bem como a dispensa
de água e vapor, ficam inactivos.
6.1.1
Se uma das Doses de Café não se Activa…
Possível resolução do problema:
Se depois da programação de uma dose volumétrica ela não é efectuada, é possível que a
electrónica, por qualquer razão, não tenha recebido impulsos do contador volumétrico e
tenha assumido para a dose 0 impulsos.
Verificar:
1. Se o contador volumétrico está correctamente ligado
2. Se o contador volumétrico não estará ligado a outro grupo
3. Se o circuito hídrico está em funcionamento
6.2
PROGRAMAÇÃO DAS DOSES DE ÁGUA
É possível alterar e memorizar a quantidade da dose de água (controlada por temporizador)
seguindo o seguinte procedimento:
1º No estado de IDLE-ON premir a tecla K5GRx (1..3) e mantê-la premida durante 5
segundos; verificar se o LED L5GRx (1..3) fica a piscar. O display mostra:
13
2º Em menos de 30 seg. (TIME OUT de saída do modo de programação) premir a tecla
K6GRx relacionada com a dose de água. O LED da tecla K5GRx continua aceso.
EVTEA fica activa durante toda a programação da dose de água.
3º Para obter a quantidade de água com que se deseja programar a dose, premir novamente
a tecla K6GRx, interrompendo o fornecimento de água (e desligando EVTEA).
Fica, desta forma, memorizado o novo período de tempo de dispensa de água quente.
•
Para proceder à programação de outra dose de água (se não ultrapassou os 30
seg. de TIME OUT de programação e se entrou no modo de programação do
grupo 1 premindo a tecla K5GR1) repetir a sequência dos pontos 2 e 3.
•
Caso tenha ultrapassado os 30 seg. de TIME OUT , será necessário repetir toda
a sequência (pontos 1, 2 e 3).
•
Os LEDS relativos às doses “já programadas” ficam “ausentes” se regressar à
programação. No entanto, tal não impede a sua reprogramação (isto não se
verifica se tiver sido efectuada uma operação de ON/OFF da electrónica após a
programação).
IMPORTANTE: a programação da dose de água efectuada no 1º grupo NÃO é
transferida automaticamente para os outros grupos. Para programar a dose de
nágua nos outros grupos é necessário repetir a operação descrita nos pontos 1, 2 e
3.
NOTA: durante a programação de uma água quente, os grupos e as outras teclas de
água quente ficam desactivadas.
6.3
PROGRAMAÇÃO DA TEMPERATURA DO VAPOR POR SIMULAÇÃO
É possível modificar e memorizar a temperatura a que se deve desactivar a EVVAP. Tal é
feito através de simulação seguindo o seguinte procedimento:
1º No estado de IDLE ON pressione a tecla K5GRx(1..3) pressionada por 5 segundos.
Verifique se o LED L5GRx(1..3) fica a piscar. O display mostra:
2º Em menos de 30 seg. (TIME OUT
de saída da fase de programação) premir a tecla
K6GRx destinado ao vapor. O LED relativo K5GRx fica activo, bem como a EVVAP, durante
toda a programação.
3º Ao atingir a temperatura desejada (medida com uma sonda externa ou outro meio
independente de Gicar) pressione novamente a tecla K6GRx para suspender a produção de
vapor desligando a EVTEA.
Fica assim memorizado o novo valor para a temperatura para o vapor.
•
No caso de intervir o TIME OUT de programação (30 seg), será necessárioi
repetir integralmente toda a sequência descrita nos pontos 1, 2 e 3.
NOTA: durante la programação de vapor, todos os outros grupos ficam inactivos.
6.4
PROGRAMAÇÃO DO RELÓGIO
No estado de IDLE-ON prima a tecla K5GRx (1..3), mantendo-a por um período de 10
segundos. Verifique se o LED L5GRx (1..3) ficou a piscar. O display apresenta:
14
NOTA: quandfo surge no display DOSES SETTING, manter premida a tecla
K5GRx(1..3) para passar à fase CLOCK ADJUST.
Premir a tecla K3GR1 (RNTER) para confirmar. O display mostra:
Onde:
hh = hora actual (0...23)
mm = minuto actual
XXX = dia da semana
Se pretender modificar os parâmetros deve usar as teclas
confirmar com K5GR1.
K1GR1 (+) o K2GR1 (-),
e
Premendo novamente a tecla K5GR1 passa-se para a configuração Auto-Power.
6.4.1
ON/OFF Automático (Ligar/Desligar Automaticamente)
Permite a definição do horário de ligar e desligar a electrónica, bem como do dia de
encerramento semanal. O display mostra:
A programação é efectuada pela seguinte ordem:
•
•
•
•
•
Hora de ligar (AAA = On)
Minuto de ligar (AAA = On)
Hora de desligar (AAA = Off)
Minuto de desligar (AAA = Off)
Dia de encerramento
Para passar de um item para outro, premir a tecla K5GR1.
Pode ser programado um ligar e um desligar distintos para cada dia da semana.
Se não deseja o ligar/desligar automático deve entrar na programação correspondente e
premir K1GR1 (+) ou K2GR2 (-).O display mostra:
E deve ficar a mostrar:
(premindo K2GR1 (-) quando o display indica a hora 00, ou premindo K1GR1 (+) quando
indica a hora 23).
Neste caso:
- Se o “ligar automático” estiver inactivo as funções de ligar e desligar diariamente, bem
como do dia de repouso, ficam igualmente inactivas. Premindo a tecla K5GR1 passa-se para
o parâmetro seguinte. O ligar e desligar pode assim ser realizada manualmente apenas
através do procedimento descrito no parágrafo anterior.
15
- Se o “ligar automático” estiver activo, pressionando K5GR1 acede-se às opções para definir
o ligar e desligar automático e, de seguida, à data de encerramento.
6.4.2
Dia de Repouso
É possível definir um dia de repouso semanal, no qual a electrónica ignora a programação de
ligar/desligar automaticamente, apenas podendo ser ligada manualmente.
O desligar automático permanece activo ao longo do dia de repouso. O display mostra:
Com K1GR1 (+) ou K2GR2 (-) surge a selecção do dia (XXX).
Se não pretender escolher um dia seleccione “----------”.
Apenas é permitido escolher um dia de repouso.
6.5
LEITURAS DE CONSUMOS, LITROS, MANUTENÇÃO
No display vê-se:
Premindo novamente a tecla K5GR1 passa-se para a leitura dos contadores:
Prima a tecla K3GR1 (ENTER):
são mostrados os litros processados até ao momento.
Pressione a tecla K5GR1 para ver o número de ciclos realizados até à data:
Premindo de novo a tecla K5GR1 vê o total de cafés obtidos até aquele
momento.
Voltando a premir a tecla K5GR1 teremos acesso a ver o total de cafés por grupo e por cada
uma das teclas:
Y identifica o grupo
Zzzzz = tipo de café
Xxxxx = nº de cafés
Terminadas as leituras, prima a tecla K5GR1 para sair deste modo.
16
INDEX
1.
1.1
1.2
1.2.1
1.2.2
1.2.3
1.2.4
1.2.5
1.3
1.3.1
1.3.2
1.3.3
1.3.4
1.3.5
1.3.6
1.3.7
1.3.8
2.
2.1
2.2
2.2.1
2.2.2
3.
3.1
3.1.1
3.2.1
3.2.2
3.2.3
3.2
3.2.1
3.2.2
3.2.3
4.
4.1
4.2
5.
5.1
5.2
5.2.1
5.2.2
6.
6.1
6.1.1
6.2
6.3
6.4
6.4.1
6.4.2
6.5
GENERAL FEATURES
INTRODUCTION
INTERFACE
KEYS
LEDS
DISPLAY
CONNECTION
EXAMPLE OF KEYS’ PLACEMENT
INPUT / OUTPUT
INPUT / OUTPUT
LOW TENSION ANALOGICAL INPUT
LOW TENSION OUTPUT
SERIES’ LINE RS232 (LOW TENSION)
MICROPROCESSOR’S PROGRAMMING LINE (LOW TENSION)
HIGH TENSION OUTPUT (8 RELAYS)
POWER SUPPLY (HIGH TENSION)
CONNECTIONS
ELECTRONIC PLATE POWER
OFF (PLATE TURNED OFF BUT WITH ENERGY SUPPLY)
ON (PLATE TURNED ON AND WITH POWER SUPPLY)
CONNECTION
OFF
PRODUCTION
COFFEE CYCLE
PRODUCTION
STOPPING THE COFFEE PRODUCTION DURING THE EXECUTION PHASE
PRE-INFUSION
PRODUCTION OF COFFEE IN THE CONTINUOUS MODE
WATER CYCLE
PRODUCTION
WATER + PUMP
CYCLE OF STEAM PRODUCTION
MANAGEMENT AND REGULATION OF THE LEVEL
MINIMUM LEVEL SOUND
SOUND OF LEVEL (MAXIMUM)
HEATING OF THE BOILER
CHARACTERISTICS
WAYS OF HEATING CONTROL
ON/OFF CONTROL WITH 2ºC INTERVALS
PID CONTROL (BY DEFAULT)
PROGRAMMING AND READINGS
PROGRAMMING THE COFFEE DOSES
IF ONE OF THE COFFEE DOSES IS NOT ACTIVE…
PROGRAMMING OF WATER DOSES
PROGRAMMING OF STEAM’S TEMPERATURE BY SIMULATION
PROGRAMMING THE WATCH
AUTOMATIC ON/OFF
DAY OFF
CONSUMPTIONS READINGS, LITERS AND MAINTENANCE
GB – 2012/03
17
1.
1.1
GENERAL FEATURES
INTRODUCTION
The electronic coffee machine fiamma PACIFIC has the following characteristics:
Management of 1, 2 and 3 groups of coffee
Control of 4 different doses of coffee to the group
Control of 3 different doses of tea (hot water)
Control of steam
Simultaneous execution of groups (coffee, tea and water)
Control of the coffee volume in each dose
Timed control of tea doses
Simulation of doses programming
Control and management of the boiler’s level
Monitoring and management of the heating boiler
Alarm system through Supervision
Continuous delivery, TIME-OUT mode and other functions, GICAR dialogue, accountability
of various devices
16x2 management LCD to show functional states
Management of Drinks
8 relays = pump, EV1, EV2, EV3, tea, boiler’s filling, heating and steam
Low tension heating with external triac exit or outside of the solid state relay (SSR)
N° 2 W NTC 3,3 k (steam boiler and steam pipe probe)
Management of volumetric counters
Planning Menu
Menu of Technical Level of Planning
Microprocessors programming to software actualizations of on-board programming
1.2
INTERFACE
1.2.1
Keys
K1GR1,
K2GR1,
K3GR1,
K4GR1,
K5GR1,
K6GR1,
K1GR2,
K2GR2,
K3GR2,
K4GR2,
K5GR2,
K6GR2,
K1GR3:
K2GR3:
K3GR3:
K4GR3:
K5GR3:
K6GR3:
1st key of coffee production
2nd key of coffee production
3rd key of coffee production
4th key of coffee production
Continuous key / programming
Key of steam/tea production
Groups
Groups
Groups
Groups
Groups
Groups
1,
1,
1,
1,
1,
1,
2,
2,
2,
2,
2,
2,
3
3
3
3
3
3
Note: As specified in the corresponding paragraph, the group1 keys execute specific tasks
(different from production) when in the programming mode:
ADDITIONAL
KEY
FUNCTION’S DESCRIPTION
FUNCTIONS
Function of increasing the numerical values or selection
K1GR1
+ (MORE)
of the value to fix in the parameter being programmed
Function of decreasing the numerical values or selection
K2GR1
- (MINUS)
of the value to fix in the parameter being programmed
Function of confirming the operations done during
K3GR1
ENTER
programming
Selection of the function / choosing the parameter to be
K5GR1
MENU
programmed
1.2.2
Leds
L1GR1,
L2GR1,
L3GR1,
L4GR1,
L5GR1,
L6GR1,
L1GR2,
L2GR2,
L3GR2,
L4GR2,
L5GR2,
L6GR2,
L1GR3
L2GR3
L3GR3
L4GR3
L5GR3
L6GR3
Led
Led
Led
Led
Led
Led
to the 1st coffee doses
to the 2nd coffee doses
to the 3rd coffee doses
to the 4th coffee doses
continuous/Programming
to the tea/steam doses
groups
groups
groups
groups
groups
groups
1,
1,
1,
1,
1,
1,
2,
2,
2,
2,
2,
2,
3
3
3
3
3
3
18
1.2.3
Display
LCD: LCD display with 16 characters x 2 rows
1.2.4
Connection
The connection with the external keyboard is guaranteed through a flat cable of 16 vies
(8x2vie), which length will depend on the positioning of the keyboard and respective
electronic plate. Nowadays Gicar can provide keyboards of “membranes switch” (LED keys
inserted in the membrane), and also the mechanical type, with buttons and LEDS, in a plate
of impressed circuit. The LED keys for hot water can be separated from the panel, due to the
cable.
1.2.5 Example of keys’ placement
NOTE: the graphics used in the keys are simply illustrative and it is used only as an
example.
Keyboard with 6 keys
Keyboard with 5 keys
1.3
INPUT / OUTPUT
1.3.1
INPUT / OUTPUT
CV1: input to the group 1 volumetric counter
CV2: input to the group 2 volumetric counter
CV3: input to the group 3 volumetric counter
1.3.2
Low Tension Analogical Input
STCAF: input to the temperature sound of the boiler
STLVAP: input to the temperature sound of the steam
SLIV: input to the sound of level
SLIVMIN: input to the sound of minimum level of the boiler
1.3.3
Low Tension Output
RISCAF: Low tension exit to triac or boiler’s static relay (PID)
19
1.3.4
Serie’s Line RS232 (low tension)
TxD/RxD: signs to transmission in series RS232 (TTL)
1.3.5
Microprocessor’s Programming Line (low tension)
FLASH: sinal para programação “on board” do processador Flash (Gicar).
1.3.6
High Tension Exits (8 Relays)
PUMP: exit relay of pump
EV1: exit relay of group 1 production’s electro valve
EV2: exit relay of group 2 production’s electro valve
EV3: exit relay of group 3 production’s electro valve
EVLIV: exit relay of filling’s electro valve
EVTEA: exit relay of hot water’s electro valve
ON/OFF: exit relay of the general on/off switch button and of the heating switch (in the
PID)
EVVAP: exit relay of the steam electro valve
1.3.7
Power Supply
The electronic plate is supplied by the nominal tension of the Web, through a general switch.
1.3.8
Connections
See “Electrical Features”.
2.
POWER OF THE ELECTRONIC PLATE
Supplying the electronic plate through the general switch button, (not belonging to GICAR),
this shows the on or off light that it showed before turning off (see “Procedures in case of
energy failure”). Turning on the general switch, the display shows immediately the software
version that is installed.
The display shows:
2.1
OFF (plate turned off but with energy supply)
- All the exits are inactive
- All the functions are deactivated, except for the Technical and Programing levels.
The display shows:
hh:mm indicates the hour and minutes.
2.2
ON (plate turned on and with power supply)
2.2.1
Connection
To turn in the plate you must press the key K3GR1.
K1
k2
k3
k4
k5
20
In the ON mode, the plate indicates the state relative to the sounds of maximum and
minimum level (only if being used); if the sound detects the water is missing in the boiler, it
will fill itself automatically until the predefined level, through the simultaneous activation of
the electro valve of water entrance and the bomb. (TIME-OUT of fillinf – see ALLARM)
Completed the filling of the boiler, it starts the heating (see Heating of the Boiler).
In case that there are detected the adequate levels (or after its recuperation), the plate
allows the selection and programming of the coffee doses (see next paragraphs).
The plate allows the production of groups without reaching the predefined
temperature of the boiler.
IN THE ON MODE, ALL THE LEDS ARE TURNED ON
The display shows:
where
xxx = detected temperature of the boiler
hh = hour (0-23)
mm = minute
GICAR srl = name of the client
2.2.2
OFF
To turn off the electronic plate keep pressed the key K5GR1 and press the key K3GR1.
K1
3.
PRODUTION
3.1
3.1.1
COFFEE CYCLE
Production
k2
k3
k4
k5
On the ON mode, press one of the four doses’ keys belonging to the group you wish to
programme (for example K1GRx). It activates the electro valve EVX and the bomb, starting
the production phase.
The electro valve and the bomb will stay active until the quantity of product defined is
reached. The LED of the selected key stays on during all the process of coffee making.
K1
k2
k3
k4
k5
21
While the production is on, the display tells which is the dose chosen (English version)
1 Espresso
2 Espresos
1 Coffee
2 Coffees
Continuos
Tea
Steam
NOTE: once the keyboard on the left is programmed, the plate memorizes the doses, and
provide them uniformly in each group.
3.1.2
Stopping the coffee production during the execution phase
There is the option of stopping the coffee production before it reaches the programmed
quantity, pressing any key of the group working in the moment.
This operation turns off the electro valve EVX and the bomb, immediately, with the electronic
plate retaking the mode of able to work again.
K1
3.1.3
k2
k3
k4
k5
Pre-Infusion
The plate 3d5 MAESTRO DELUXE can be
configured so that the production of the
coffee doses is preceded of a preinfusion.
The “run” of the doses begins and after a
certain time (t1) the electro valve closes,
however the pump continues working.
After another short period (t2) the
electro valve reopens, allowing the
conclusion of the coffee production with the doses previously programmed.
ATTENTION: the times t1 and t2 are programmed at the Technical Level to all the coffee
doses. If one of these values is zero, this function, even if activated, will not be done.
To more complete information, please see the Technical Level Chapter.
3.1.4
Production of Coffee in the Continuous Mode
22
In the ON mode, pressing the key K5GRx (continuous/programming) of any one of the
keyboards, we activate the electro valve and the pump, initiating the coffee production. The
respective LED stays ON during all the process.
K1
k2
k3
k4
k5
The display shows:
To stop the production, press any key on the keyboard used to produced the coffee. By doing
it you will turn off simultaneously the electro valve and the pump and the LED light will turn
off.
K1
k2
k3
k4
k5
If it’s not turned off manually, the continuous mode will stop by reaching the maximum
quantity of product. This quantity is controlled by the volumetric controllers, that when reach
the 6000 impulses, turn the production off immediately (Time Out of Production – see
ALARMS).
IMPORTANT: in the CONTINUOUS mode, the production starts about 5 seconds after
pressing the key K5GRx. It stops by pressing any other key of the same keyboard.
3.2
WATER CYCLE
3.2.1
Production
Pressing the key corresponding to the water doses (K6GRx) the water electro valve activates
(EVTEA) initiating the hot water production. The LED of the water key (L6GRx) turns on.
At the beginning of the cycle it is activated a timer, that once it reaches the time
programmed, stops the production of the product.
The electronic plate allows the simultaneous use of water and coffee.
23
The display shows:
To stop the production of water during the execution phase
It is possible to stop the production of water before the programmed time, through pressing
the key used to activate it.
This operation immediately turns off the electro valve EVTEA, stopping the production of the
product and putting the plate on the ON mode.
ATTENTION: the plate 3d5 MAESTRO DELUXE makes it possible to obtain 3 different doses of
water (one for each group).
3.2.2. Water + Pump
There is the possibility of combining the obtaining of water with the pump. To do so, please
see the Technical Manual.
3.2.3. Steam Production Cycle
This function and the keyboard assigned to it, are activated in the programming mode – see
the Technical Manual.
The steam is only available when the plate is activated, and the minimum level of water is
covered (sound covered SLIVMIN).
The complete filling of the boiler only happens when the machine is turned on.
Through a temperature sound located adequately in the steam arm and connected to the
STVLAP, it controls the water temperature and promotes the mixture so that the steam
always has the programmed temperature.
Pressing the key K6GRx it activates the EWAP until it reaches the defined temperature in the
programmed simulation (see section below).
24
The display shows:
It is possible to stop the production of steam, pressing again the steam key.
It is also possible to keep on producing steam after it reaches the programmed temperature,
by keep pressing the steam key.
If the temperature is not reached within 120 seconds, the production of steam is
automatically stopped.
The system allows the simultaneous production of coffee, steam and water/tea.
In the case that 2 or more of these products are simultaneous, the display shows the
description alternately.
4.
4.1
MANAGEMENT AND REGULATION OF THE LEVEL
SOUND OF MINIMUM LEVEL
At the moment the machine is turned on, the electronic detects the state of the minimum
level sound. In the case that there is not enough water, the ON/OFF switch is kept turned off
so that the resistance doesn’t turn on without water (no matter which programme is active,
manual or automatic).
NOTE: after turning the system on, the minimum level sound control activates after
6 seconds.
Each time the minimum level sound does not detect the presence of water for 3 seconds, the
ON/OFF switch is turned of, to protect the resistance, and the display shows the following
message:
When the minimum level sound detects water again, for 3 consecutive seconds, it reactivates
the ON/OFF switch and, consequently, turns on the resistance activating the bolier water
heating. The alarm in the displays disappears.
NOTE: the minimum level sound does not execute the assignments of control or
management of the filling, once those functions are assumed by the sound of level
(maximum).
4.2
SOUND OF LEVEL (maximum)
At the moment the machine is turned on, the electronic reveals the stare of the sound of
level located in the boiler and, if needed (when there is no water), it executes the filling of
25
the boiler, activating the electro valve of filling EVLIV and the PUMP, until the water reaches
the proper level in the boiler.
(it is predicted a limited time to the programmed filling – TIME-OUT: see programming in the
Technical Book).
NOTE: when turning the machine on for the first time, the control and regulation of
the level are programmed to turn off (TIME OUT) after about 6 seconds.
The filling phase does not inhibit the possibility of selecting coffee, tea or of doing new
programmes. Only the intervention of TIME-OUT at the same time with the filling phase
inhibits the functions of the keyboard.
When it initiates the boiler filling, as soon as the water reaches the first sound of level
(minimum) it activates the relay ON/OFF.
The sensitivity of the sound to the water can be changed in the programme (see Technical
Book). There are available the following options:
Low Sensitivity
150KΩ
for example, when the water filter
is used
Medium Sensitivity
400KΩ
regular water
High Sensitivity
1MΩ
for example in the case of using
very pure water (of mountains)
5.
5.1
HEATING OF THE BOILER
CHARACTERISTICS
The control of the heating is activated by the electronic when it is IDLE-ON, using a sound of
temperature and a command to the low tension resistance.
During the first filling, the heating only initiates AFTER the water reaches the
sound of minimum level, in order to protect the resistance.
In every other case, the heating is permanently active, except if the sound of minimum level
gets in the open; in that case, the heating is immediately blocked.
5.2
WAYS OF HEATING CONTROL
The control can be programmed to work in two ways:
5.2.1
With control ON/OFF with 2ºC Intervals
The temperature regulation is made with a 2ºC interval. The resistance is activated by the
low tension command RISCAF, until it reaches the programmed temperature TºSET (see
26
programme in the Technical Book) and is re-activated when that temperature diminishes
2ºC.
To avoid vibrations during the intervention, there is a time filter.
To activate this function it is necessary to put in the TECHNICAL PROGRAMME all the
constants “0” (see designated paragraph).
5.2.2
With PID Control (set as default)
The temperature control is made by a proportional algorithm, integrative and derivative (see
Programme in the TECHNICAL LEVEL to define parameters).
The control of the heating is obtained with the electronic in IDLE ON and uses a temperature
sound and a low tension command RISCAF by triac or static relay with PID function.
The temperature control is done by an algorithm that uses 3 constants:
Proportional (Kp)
Integrative (Ki)
Derivative (Kd)
The 3 constants must be adapted to the type of electronic, accordingly to the
resistance power, the boiler’s size, its dispersion, etc.
It is called “value of set point” or “TºSET” to the temperature that the boiler must be when
working properly.
- If during the heating phase or maintenance, the temperature varies excessively around
TºSET, with top values that do not ease with time, it is necessary to diminish the
proportional constant Kp.
- If during the maintenance phase the temperature varies excessively around TºSET, with a
wide variation period with top values that do not ease with time, it is necessary to diminish
the integrative constant Ki.
- If during the heating or maintenance phase of the temperature there is an excessive
variation and most of the times bigger than the TºSET, but that is eased with time passing
by, it is necessary to diminish the derivative constant Kd.
- If during the heating phase the temperature is inferior to the value of TºSET, moving
further and further from it, it is needed to increase the derivative constant Kd.
If during the heating phase the temperature is below the value TºSET in a constant way, it is
necessary to increase the proportional constant Kp and increase lightly the integrative
constant Ki.
- if in the maintenance phase the temperature is below or superior to the TºSET value in a
constant way, it is necessary to increase the integrative constant Ki and increase lightly the
proportional constant Kp.
6.
6.1
PROGRAMME AND READINGS
PROGRAMMING THE COFFEE DOSES
It is possible to memorize the volumetric quantity related to the coffee doses, following this
procedure:
1 In the mode IDLE-ON press the key K5GRx (1..3) and keep it pressed for 5 seconds.
Verify if the Led L5GRx (1..3) blinks.
27
K1
k2
k3
k4
k5
PRESS KEY MORE THAN 5 SECONDS
The display shows:
2 In 30 seconds (Time Out if not anymore in
the programming phase), press any key
related to the 4 doses that can be
programmed (for example K1GRx). The LED
of the key K5GRx stays turned on, as well
as the one related to the doses programmed
(in our example K1GRx).
The EVx+PUMP stay turned on during all
the programming of the coffee doses.
K1
k2
k3
k4
k5
3 By reaching the desired amount of coffee,
press any “coffee” key on the group keyboard that you are programming, to stop (it
deactivates the EVX + Pump group).
The new value – measured as impulses of the volumetric counter – is saves in the EEPROM.
Simultaneously it is revealed that the LED related to the doses programmed turns off, and
the others turn on.
This procedure must be repeated to programme the doses of the other keys, including the
water and steam in case they exist.
K1
k5
k2
k3
k4
EVx + PUMP = OFF
•
•
•
To continue programming the coffee doses, repeat steps 2 and 3 (if the limited
time of 30 seconds has not been exceeded).
In the case that the TIME-OUT of the programming phase has expired (after 30
seconds), repeat all steps 1, 2 and 3, previously described.
The LEDs referring to the doses already programmed are turned off if we keep
in the programming mode. However, that does not prevent from doing a new
programme of the doses on those keys (this does is not a problem if it has been
made an ON/OFF operation of the electronic after programming).
28
IMPORTANT: the programming done in the 1st group is always transferred to the
other groups. However, this does not prevent one from programming the other
group(s) differently than the 1st one, repeating the operation described in points 1
to 3.
ATTENTION: if the “pre-infusion” function is active (see respective paragraph), the
electronic, in the programming phase, activates this particular function. Wait for it
to finish and then press the stopping key of the production occurring.
NOTE: during the programming of one group, all the others, as also the water and
steam dispenser, get inactive.
6.1.1
If one of the coffee doses does not activate…
Possible problem resolution:
If after programming one volumetric doses, it is not effectuated, it is possible that the
electronic, for some reason, has not received impulses from the volumetric counter and has
assumed the doses to 0 impulses.
Verify:
1. If the volumetric counter is correctly connected
2. If the volumetric counter is not connected on to another group
3. If the water circuit is functioning.
6.2
PROGRAMMING THE WATER DOSES
It is possible to change and memorize the amount of water (controlled by a timer), by doing
the following procedure:
1 At the mode IDLE-ON press the key K5GRx (1..3) and keep it pressed for 5 seconds;
verify if the LED L5GRx (1..3) is blinking. The display shows:
2 In less than 30 seconds (TIME OUT to leaving the programming mode) press the key
K6GRx related with the water doses. The LED of the key K5GRx is still on.
EVTEA gets active during all the programming of the coffee doses.
3 To obtain the amount of water you wish to programme the doses, press again the key
K6GRx, stopping the water supply (and turning off EVTEA).
In this way, the new time of water disposal is memorized.
•
To programme the other water doses (if you did not overdraw the 30 seconds
TIME-OUT period or if you entered the programming mode of the group 1 using
the key K5GR1) you just have to repeat the sequence of points 2 and 3.
•
In the case that you have overdrawn the 30 seconds TIME-OUT, i tis necessary
to repeat all the sequence (1, 2 and 3).
The LEDS related to the doses already programmed get ‘absent’ until you return
to programming mode. However, it does not prevent from being reprogrammed
(this is not verified if it has been done any operation ON/OFF of electronic after the
programming).
•
IMPORTANT: the water programme done in the first group IS NOT automatically
transferred to the other groups. To programme the water doses in the other groups
it is necessary to repeat the procedure described in points 1 to 3.
NOTE: during the programming of a hot water doses, the groups and the other keys
of water are deactivated.
29
6.3
PROGRAMMING OF THE STEAM TEMPERATURE BY SIMULATION
It is possible to change and memorize the temperature which the EVVAP should be
deactivated. It is done through a simulation, following this procedure:
1 At the IDLE ON mode press the key K5GRx(1..3) for 5 seconds. Please make sure the
LED L5GRx(1..3) is blinking. The display shows:
2 In less than 30 seconds (TIME OUT to leave the programming mode) press the key K6GRx
related to the steam. The LED of the key K5GRx is active, as also the EVVAP, during all the
programming.
3 When reaching the desired temperature (measured with an external sound or other
independent mean of Gicar) press again the key K6GRx to suspend any production of steam
related to the EVTEA.
It is now memorized the new value of temperature for the steam.
•
In the case that the TIME-OUT period had already expired it is necessary to
repeat all steps described in points 1, 2 and 3.
NOTE: during all the steam programming, all the other groups get inactive.
6.4
PROGRAMMING THE WATCH
At the mode IDLE-ON press the key K5GRx (1..3) for more than 10 seconds. Make sure the
LED L5GRx (1..3) is blinking. The display shows:
NOTE: when it appears in the display DOSES SETTING, keep pressed the key
K5GRx(1..3) to go to the CLOCK ADJUST phase.
Press the key K3GR1 (RNTER) to confirm. The display shows:
Where:
hh = hour (0...23)
mm = minute
XXX = week day
If you wish to change the parameters you must use the keys K1GR1 (+) and K2GR1 (-),
and then confirm with K5GR1.
Pressing again the key K5GR1 you go to the configuration of Auto-Power.
6.4.1
Automatic ON/OFF
It is possible to set up the electronic on and off time, as also the weekly day off. The display
shows:
30
The programming is made in the following order:
•
•
•
•
•
Hour of turning on (AAA = On)
Minute of turning on (AAA = On)
Hour of turning off (AAA = Off)
Minute of turning off (AAA = Off)
Day off
To change from one item to another, press key K5GR1.
There can be programmed different hours of turning on or off to each week day.
If the automatic on/off is not required, one should enter the respective programming and
press key K1GR1 (+) or K2GR2 (-). The display shows:
And should change to:
(pressing key K2GR1 (-) when the display shows the hour 00, or pressing key K1GR1 (+)
when it indicates the hour 23).
In this case:
- If the “automatic turn on” is inactive, the automatic on and off functions and also the day
off are also inactive. Pressing key K5GR1 it goes straightforward to the next parameter.
Turning on and off the equipment can now be done manually just through the procedure
explained in the previous paragraph.
- if the “automatic turn on” is active, pressing key K5GR1 one can accede to the automatic
on and off options and then the day off.
6.4.2
Day Off
It is possible to set up a weekly day off, in which the electronic ignores the programming of
automatically turning on and off, and can only be turned on manually.
The automatic turn off is still active in the day off. The display shows:
With K1GR1 (+) or K2GR2 (-) appears the selection of the day (XXX).
If you do not want to choose a day, select “----------”.
It is only allowed to choose one day off.
6.5
CONSUPTIONS READING, LITERS AND MAINTENANCE
The display shows:
Pressing again the key K5GR1 it goes to the counters readings:
Press key K3GR1 (ENTER):
There are shown the litres processed until that moment.
Press key K5GR1 to see the number of cycles done until the moment:
31
Pressing again key K5GR1 shows the total number of coffees obtained
until the moment.
Pressing again key K5GR1 gives Access to the number of coffees per group and for each
key:
Y identifies the group
Zzzzz = type of coffee
Xxxxx = number of coffees
Finishing the readings, press again key K5GR1 to exit this mode.
32