1
D
F
SP
ARIEL
MONTAGE- UND
WARTUNGSANLEITUNG
INSTRUCTIONS D'INSTALLATION,
USAGE ET ENTRETIEN
INSTRUCCIONES DE INSTALACIÓN,
EMPLEO Y MANUTENCIÓN
- Achtung! Die Sicherheit des Strahlers kann nur bei Befolgung der
folgenden Anweisungen und ihrer strikten Einhaltung gewährleistet werden.
- Achtung! Bevor Sie die Netzanschlüsse durchführen, und während der
Montage oder des Leuchtmittelwechsels, vergewissern Sie sich, dass die
Anlage ausgeschaltet ist.
- Achtung! Im Falle einer Beschädigung des flexiblen Kabels dieser Leuchte,
muss es vom Hersteller oder einer qualifizierten Person ausgewechselt werden.
- Attention! La sécurité de l’appareil est garantie seulement avec l’observance des instructions suivantes, donc il est nécessaire de les conserver.
- Attention! Avant d’exécuter les connexions au réseau, pendant
l’assemblage ou substitution de la lampe, s’assurer d’avoir enlevé tension.
- Attention! Si le câble flexible de cet appareil est endommagé, il faut le
faire remplacer par le constructeur ou par personnel qualifié.
- Atención! La seguridad del aparato es garantizada sólo con la observancia
de las siguientes instrucciones, por tanto es necesario conservarlas.
- Atención! Antes de ejecutar las conexiones de red, durante el montaje o
sustitución de la lámpara, cerciorarse de haber sacado tensión.
- Atención! Si el cable flexible de este aparato es perjudicado, tiene que
ser reemplazado por el constructor o por personal calificado.
- Dans l’usage de l’appareil, s’assurer que la distance entre la lampe
et l’objet embrasé ne soit pas inférieure à 0,5 mètre (ill.1).
0,5m
- L'appareil doit être utilisé seulement si complet de son verre de
protection. Il s'agit d'un verre trempé chimiquement (ill.2).
- L'appareil standard est équipé des câbles longueur 4 m. Pour distances
supérieures connecter, au moyen d'une borne, le câble standard à deux
câbles séparés, par exemple: un câble type H07 RN-F 3x1mm2 pour la
tension d'alimentation, et un câble type AWG24 2x0,5mm2 protegé,
impedence entre 100 et 150 Ω, pour zones humides, sèches, souterrain ou
encastré de mur, pour le signal DMX.
- Le projecteur n'est pas apte à la liaison en cascade.
- En el empleo del aparato, cerciorarse que la distancia entre la
0,5m
lámpara y el objeto iluminado no sea inferior a 0,5 metros (fig.1).
- El aparato tiene que ser utilizado sólo si completo de su vidrio de
protección. Es un vidrio templado químicamente (fig.2).
- El aparato estandar es suministrado con cables 4 m de largo.
Para distancias superiores conectar, por medio de un borne, el cable
estandar a dos cables distinguidos; por ejemplo un cable del tipo H07 RN-F
3x1mm2 para la tensión de alimentación y un cable del tipo AWG24
2x0,5mm2 escudado, impedancia entre 100 y 150 Ω, idóneo en entornos
h˙medos, mojados, cubos, enterrado o bajo-revoque, para la señal DMX.
- El proyector no es idóneo al enlace en catarata.
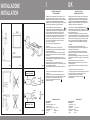
- Installation :
Pour l'impostation des Led consulter le feuille d'instructions "UTILISATION
DES LED".
Fixer l'appareil par vis ayant max. Ø 8mm, en utilisant les trous prédisposés
sur l'étrier de fixation.
Seulement pour versions à base pivotante: suivre le schéma de montage
indiqué en ill.4. Monter la base au mur par 3 goujons à expansion Ø 4mm
(non pas fournis).
Après la régulation de l'appareil, serrer profondément les vis à poignée qui
fixent le corps de l'appareil à l'étrier et, s'il existe, la vis qui fixe l'étrier à la
base.
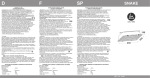
Câbler les terminaux des 2 câbles à 3 fils comme indiqué en ill.5.
- Attention! Respecter consciencieusement le schéma de câblage en ill.5,
si non l'on risque d'endommager l'appareil.
- Pendant l'installation et l'utilisation, se conformer aux distances min.
indiquées en ill.3.
- Instalación:
Para la impostación de los led consultar el manual "EMPLEO DE LOS LED".
Fijar el aparato por medio de tornillos habientes Ø 8mm máximo, utilizando
los adecuados agujeros predispuestos sobre el estribo de fijación.
Sólo para la versión con base orientable: seguir el esquema de montaje
indicado en fig.4. Montar la base a pared con 3 tornillos de expansión
Ø 4mm (no provistos).
Después de la regulación del aparato, atornillar bien los tornillos manecillas
que fijan el cuerpo del aparato al estribo y, si existe, el tornillo que fija el
estribo a la base.
Cablear los terminales del los 2 cables de 3 hilos como indicado en fig.5.
- Atención! Respetar escrupulosamente el esquema de cableado de fig.5,
peligro de perjudicar el aparato.
- Durante la instalación y el empleo atenerse a las distancias mÌnimas
indicadas en fig.3.
- Wenn der Strahler eingeschaltet ist, stellen Sie sicher, dass der Abstand
zwischen dem Strahler und der zu beleuchtenden Fläche
0,5m
mindestens 0,5m beträgt (Bild 1).
- Die Leuchte darf nur mit einer Sicherheitsglasabdeckung benutzt werden.
Die Abdeckung ist ein bedrucktes Glas, chemisch gehärtet (Bild 2).
- Die Standard-Leuchte ist mit einem 4m - Kabel ausgestattet. Für eine
groessere Entfernung verbinden Sie das Standard-Kabel (mithilfe einer
Anschlussklemme) mit 2 separaten Kabeln; ein Kabel H07 RN-F 3x1mm2 für
die Stromversorgung und ein Kabel AWG24 2x0,5mm2 abgeschirmt,
Widerstand zwischen 100 und 150 Ω, geeignet für feuchte, trockene
Untergruende oder Wandeinbau-Montage für das DMX-Signal.
- Der Strahler ist nicht für eine "Tandem-Installation" geeignet.
- Montage:
Für die LED-Einstellung siehe das Handhabungsheftchen "NUTZUNG VON LEDS".
Montieren Sie den Strahler mit Hilfe von 2 Schrauben mit einem
Maxdurchmesser von 8 mm durch die vorbereiteten Bohrungen im Bügel.
Nur für Versionen mit verstellbarer Basis: befolgen Sie die
Montageanleitung, wie in Abbildung 4 gezeigt. Befestigen Sie die
Grundplatte mithilfe von 3 Spreizdübeln D. 4mm (nicht mitgeliefert) an der
Wand.
Nach Einrichtung des Strahlers ziehen Sie die Befestigungsschrauben fest
an.
Beide Kabel wie im Bild 5 dagestellt Verbinden.
- Achtung! Beachten Sie das Verkabelungsschema wie in Bild 5,
anderenfalls kann die Leuchte beschädigt werden.
- Bei der Montage sind die in Bild 3 angegebenen Mindestabstände
einzuhalten.
- Der Strahler ist nur für den Innenbereich geeignet (max. ta=25°C).
- Sollte es erforderlich sein, die Sicherung zu wechseln, achten Sie auf die
technischen Spezifika.
- Der Strahler ist für die Montage auf normal entflammbaren Oberflächen geeignet.
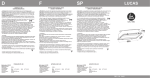
STRAHLER MIT LED
Basisserie: ARIEL
Eigenschaften:
Spannung:
230V~
I
Schutzklasse:
Leuchtmittel:
7,5W N°6 LED
Schutzart :
IP20
175x235X110 mm
Abmessungen:
Gewicht:
Kg 2,80
- Appareil apte au fonctionnement seulement en intérieurs (max. 25°C).
- L'appareil est pourvu d'un fusible et c'est possible de le remplacer en
agissant directement sur les bornes. Dans le cas oú il est nécéssaire
remplacer le fusible, s'assurer que le nouveau ait les mímes caractéristiques
téchniques.
- Appareil apte à l'assemblage sur surfaces normalement
inflammables.
- Aparato idóneo solamente al funcionamiento en interiores (max. 25°C).
- El aparato es equipado de fusible y se puede reemplazarlo obrando
directamente sobre el tablero de bornes. Si hay necesidad de reemplazar
el fusible, tener cuidado que el nuevo tienga las mismas características
técnicas.
- Aparato idóneo al montaje sobre superficies normalmente
inflamables.
APPAREIL AVEC LED
Série base: ARIEL
Caractéristiques:
- Tension d'alimentation :
- Classe d'isolement:
- Puissance lampe:
- Degré de protection :
- Dimensiones :
- Poids:
230V~
I
7,5W N°6 LED
IP20
175x235X110 mm
Kg 2,80
DAL 1960
APARATO CON LED
Serie base: ARIEL
Características:
- Tensión de alimentación
- Clase de aislamiento:
- Potencia lámpara:
- Clase de protección:
- Medidas:
- Peso:
: 230V~
I
7,5W N°6 LED
IP20
175x235X110 mm
Kg 2,80
REV. 00 09/04
I
INSTALLAZIONE
INSTALLATION
ISTRUZIONI DI INSTALLAZIONE
USO E MANUTENZIONE
Fig. 4
Fig. 2
“ DMX ”
LABEL “ DMX ”
CAVO CON ETICHETTA
ARIEL
MARRONE
BROWN
BLU
BLUE
ARIEL
GIALLO/VERDE
YELLOW/GREEN
DMX +
DMX GROUND
MARRONE
BROWN
L
BLU
BLUE
N
GIALLO/VERDE
YELLOW/GREEN
DMX
CABLE
{
CABLE WITH
{
Fig. 1
230V~
“ 230V~ ”
“ 230V~ ”
CAVO CON ETICHETTA
CABLE WITH LABEL
Fig. 3
UK
Fig. 5
INSTALLATION, USE AND
MAINTENANCE INSTRUCTIONS
- Attenzione! La sicurezza dell’apparecchio è garantita solo con l’uso
appropriato delle seguenti istruzioni, pertanto è necessario conservarle.
- Attenzione! Prima di eseguire le connessioni di rete, durante il montaggio
o sostituzione di lampade, assicurarsi di aver tolto la tensione.
- Attenzione! Se il cavo flessibile di questo apparecchio viene danneggiato,
deve essere sostituito dal costruttore o da personale qualificato.
- Warning! Safety of this fitting is guaranteed only if the following instructions are properly respected. It is therefore necessary to preserve them.
- Warning! Before connecting to the main network, during positioning or
replacement of lamps, ensure the tension has been disconnected.
- Warning! In case the flexible cable of this fixture is damaged, it must be
replaced by the manufacturer or by skilled personnel.
- Nell’uso dell’apparecchio, assicurarsi che la distanza tra
0,5m
la lampada e l’oggetto illuminato non sia inferiore a 0,5 m (Fig.1).
- L’apparecchio deve essere utilizzato solo se completo del suo schermo di
protezione. Trattasi di vetro satinato temperato sodico-calcico (Fig.2).
- L’apparecchio standard viene fornito con 2 cavi di lunghezza 4m.
Per distanze superiori collegare ai cavi standard, tramite un morsetto, 2 cavi
distinti. Esempio: cavo di tipo H07 RN-F 3x1mm2 per la tensione di
alimentazione; cavo di tipo AWG24 2x0,5mm2 schermato, impedenza
100 ÷150 Ω, idoneo per ambienti umidi, bagnati, secchi, interrato o
sotto intonaco per il segnale DMX.
- Il proiettore non é idoneo al collegamento in cascata.
- When the fitting is on, ensure that a minimum distance of 0.5 m
0,5m
between the lamp and the illuminated surface is respected (Pic.1).
- The fitting can be used only with its protective glass diffuser. It's a printed
glass, chemically tempered (Pic.2).
-The standard fixture is supplied with a 4m cables. For longer distances
connect to the standard cable (by means of a terminal) two separate cables;
for instance a cable H07 RN-F 3x1mm2 for the feeding tension and a cable
AWG24 2x0,5mm2 shielded, impedence between 100 and 150 Ω, suitable
for wet, dry, underground or wall built-in installation for the DMX signal.
- The floodlight is not suitable for serial installationof more floodlights.
- Installazione:
Impostare i LED (consultare il manuale “UTILIZZO DEI LED”).
Fissare l’apparecchio tramite viti con Ø max 8mm utilizzando gli appositi fori
predisposti sulla staffa di fissaggio.
Solo per la versione con base orientabile: seguire lo schema di montaggio
indicato in Fig.4. Montare la base a muro con n°3 tasselli ad espansione Ø
4mm (non forniti).
Dopo aver regolato l’orientamento del proiettore, serrare a fondo le viti a
manopola che fissano il corpo dell’apparecchio alla staffa e, se presente, la vite
che fissa la staffa alla base.
Cablare i terminali dei n°2 cavi a 3 poli come indicato in Fig.5.
- Attenzione! Rispettare scrupolosamente lo schema di cablaggio di Fig.5 :
pericolo di danneggiare l’apparecchio.
- Durante l’installazione ed uso attenersi alle distanze minime indicate in
Fig.3.
- Apparecchio idoneo al funzionamento esclusivamente in interni
(max ta 25°C).
- L’apparecchio é dotato di fusibile ed é possibile sostituirlo operando
direttamente sulla morsettiera. Nel caso in cui risulti necessario sostituire il
fusibile utilizzarne uno avente le stesse caratteristiche tecniche.
- Apparecchio idoneo al montaggio diretto su superfici
normalmente infiammabili.
APPARECCHIO CON LED
Serie base: ARIEL
Caratteristiche
- Tensione di alimentazione : 230V~
- Classe d’isolamento :
I
- Potenza e tipo di lampada : 7,5W N°6 LED
- Grado di protezione :
IP 20
- Dimensioni:
175x235X110 mm
- Peso:
2,80 Kg
- Installation:
For the LED set-up see the instruction leaflet "USE OF LEDS".
Fix the lighting fitting by means of screws with max Ø 8mm throught the
suitable holes on the mounting bracket.
Only for version with adjustable base: follow the assembling scheme
indicated in Pic.4. Mount the base on the wall by means of 3 expansion
dowels Ø 4mm (not supplied).
After adjusting the lighting fitting, tighten deeply the knob screws fixing the
body of the fitting to the bracket and, if existing, the screw fixing the bracket
to the base.
Connect the terminals of the two 3-wire cables as per Pic.5.
- Warning! Respect the wiring instructions as per Pic.5, otherwise the
fixture could be damaged.
- During installation and use respect the minimum distances specified in
Pic.3.
- The fitting is suitable for indoor use only (max. ta=25°C).
- The fitting is equipped with a fuse and it is possible to replace it directly on
the terminal board. Whenever it is necessary to replace the fuse,
ensure the new one has the same technical features.
- The fitting is suitable for direct installation on normally
inflammable surfaces.
FITTING WITH LED
Basic series: ARIEL
Characteristics:
- Feeding tension:
230V~
I
- Insulation class:
- Lamp's power:
7,5W N°6 LED
- Protection degree: IP20
- Dimensions:
175x235X110 mm
Kg 2,80
- Weight:
LED
DAL 1960
UTILIZZO DEI LED
USE OF LEDS
NUTZUNG VON LEDS
UTILISATION DES LED
EMPLEO DE LOS LED
REV. 00 09/04
I
LED
DAL 1960
UTILIZZO DEI LED
- Attenzione! La sicurezza dell’apparecchio è garantita solo con l’uso
appropriato delle seguenti istruzioni, pertanto è necessario conservarle.
- Attenzione! Prima di eseguire qualsiasi operazione sull’apparecchio
(connessioni di rete, modifica impostazioni DMX, cambio colore)
assicurarsi di aver tolto la tensione.
- Attenzione! Gli apparecchi al momento dell’acquisto sono impostati con
funzionamento in modalità DMX.
- L’apparecchio in MODALITÀ DMX consente di impostare colori fissi o
sequenze cromatiche personalizzate con l’ausilio di una qualsiasi
centralina DMX.
Agire sui selettori da 1 a 9 per l’assegnazione del canale DMX seguendo i
valori indicati in Fig. A tenendo presente che ogni apparecchio necessita di
5 canali. Si devono sommare più valori per ottenere il canale desiderato.
Fig.A
- Tutti gli apparecchi della serie LED con tecnologia cambiacolore possono
funzionare in modalità automatica o in modalità DMX.
Dopo aver aperto l’apparecchio agire direttamente sui selettori (da 1 a 12)
per scegliere l’impostazione desiderata.
1 2 3 4 5 6 7 8 9 10 11 12
N° selettore
1
Valore corrispondente
ON
OFF
Agire sul selettore “12” per determinare il tipo di funzionamento:
4
2
16
8
32
64 255
128
12
Funzionamento modalità
automatico
1 2 3 4 5 6 7 8 9 10 11 12
Esempi:
ON
12
OFF
Apparecchio N°1= canale 1
Funzionamento modalità
DMX
Per accedere al dip-switch nei diversi modelli procedere come segue:
Apparecchio N°2= canale 6
1 2 3 4 5 6 7 8 9 10 11 12
1 2 3 4 5 6 7 8 9 10 11 12
ON
ON
OFF
OFF
Selettore N°1
Valore corrispondente = 1
Selettore N°2 + N°3
Valore corrispondente = 2+4 =6
Apparecchio N°3= canale 11
Apparecchio N°4= canale 16
ALBA
Aprire il vetro agendo sulle 3 clips a pressione.
ARIEL
Aprire l’apparecchio svitando le n°4 viti M5 (Attenzione al vetro!).
AURORA
Togliere la parte anteriore dell’apparecchio svitando le n°4 viti a
brugola M6.
DEO
Aprire l’apparecchio tirando le 2 metà del corpo (Attenzione al vetro!);
GUAPO/GUAPA - SERA/SERA
Togliere cornice, telaio reggivetro e piastra porta LED.
1 2 3 4 5 6 7 8 9 10 11 12
1 2 3 4 5 6 7 8 9 10 11 12
ON
ON
OFF
OFF
Selettore N°1 + N°2 + N°4
Selettore N°5
Valore corrispondente = 1+2+8 = 11
Valore corrispondente = 16
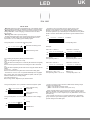
- L’apparecchio in MODALITÀ AUTOMATICA é in grado di funzionare
autonomamente e dispone di un gioco con cambio di colore a velocità
diverse con possibilità di scelta se far eseguire cambi di colore in modo
istantaneo o con dissolvenza.
La sequenza cromatica impostata é la seguente:
blu, arancio, verde, magenta, ciano, rosso, bianco.
Agendo sul selettore “2” é possibile scegliere la velocità di alternanza dei
colori:
2
Cambio colore ogni
24 secondi
1 2 3 4 5 6 7 8 9 10 11 12
ON
2
OFF
Cambio colore ogni
8 secondi
Agendo sul selettore “10” é possibile scegliere la modalità di alternanza
dei colori:
10
Dissolvenza
1 2 3 4 5 6 7 8 9 10 11 12
ON
OFF
10
Istantaneo
- Lanzini dispone di controller preimpostati in modalità DMX caratterizzati
dalla semplicità di utilizzo e dalle dimensioni ridotte:
_ Felix codice 27780 per comando manuale;
_ Anda codice 27781 per comando a distanza (max 30mt).
Questi controller dispongono n° 7 colori fissi preimpostati - blu, arancio,
verde, magenta, azzurro, rosso, bianco - e consentono di memorizzare
impostazioni personalizzate (sia colori fissi che sequenze cromatiche)
come una qualsiasi centralina DMX ma in modo intuitivo e rapido.
Ogni controller é in grado di gestire fino ad un massimo di 12 apparecchi
in modo indipendente o in alternativa gruppi di apparecchi funzionanti
sincronizzati dove l’unica limitazione é data dall’eventuale dispersione del
segnale DMX.
UK
LED
DAL 1960
USE OF LEDS
- Warning! Safety of this fitting is guaranteed only if the following instructions are properly respected. It is therefore necessary to preserve them.
- Warning! Before any operation on the fixture (mains connection, DMX
setting modification, colour changing), ensure the tension has been
disconnected.
- Warning! DMX mode is pre-set by factory.
- The fixture in DMX MODE allows to set up "fixed" colours or any
particular colour sequences through any DMX driving station.
Operate on dip-switched 1 to 9 to assign the DMX channel, following
the values specified in pic.A and taking into consideration that any fixture
needs 5 channels. Please add up the values to get the wanted channel.
Pic.A
- All LED series fixtures with colour changing technology can operate
in automatic or DMX setting. After opening the fixture select on the
dip-switches 1 to 12 for setting up the wanted program.
1 2 3 4 5 6 7 8 9 10 11 12
N° selector
1
Corresponding value
ON
OFF
Through dip-switch "12" select the functioning mode:
4
2
16
8
32
64 255
128
12
Automatic functioning mode
1 2 3 4 5 6 7 8 9 10 11 12
Examples:
ON
12
OFF
Fixture N°1 = channel 1
Fixture N°2 = channel 6
DMX functioning mode
1 2 3 4 5 6 7 8 9 10 11 12
1 2 3 4 5 6 7 8 9 10 11 12
For accessing the dip-switch please proceed as follows:
ON
ON
OFF
OFF
Selector N°1
Corresponding value = 1
Selector N°2 + N°3
Corresponding value = 2+4 =6
ALBA
Open the front glass through the 3 clips.
ARIEL
Open the fixture unscrewing the 4 screws M5 (Be careful with the glass!).
Fixture N°3= channel 11
Fixture N°4= channel 16
AURORA
Remove the front part of the fixture unscrewing the 4 allen screws M6.
DEO
Open the fixture separating the two halfs of the body (Be careful with the
glass!).
GUAPO/GUAPA - SERA/SERA
Remove the framework, the glass frame and the LED holding plate.
- The fixture in AUTOMATIC MODE can operate individually and is equipped
with a "game" with colour changings at different speeds, with the option
between instantaneous or fading change.
1 2 3 4 5 6 7 8 9 10 11 12
1 2 3 4 5 6 7 8 9 10 11 12
ON
ON
OFF
OFF
Selector N°1 + N°2 + N°4
Corresponding value = 1+2+8 = 11
Selector N°5
Corresponding value = 16
The colour sequence is =
Blue, Orange, Green, Magenta, Cyan, Red and White.
Through the dip-switch "2" it is possible to select the sequence speed:
2
Colour changes every
24 seconds
1 2 3 4 5 6 7 8 9 10 11 12
ON
2
OFF
Colour changes every
8 seconds
Through the dip-switch "10" it is possible to select the colour changing
mode:
10
Fading
1 2 3 4 5 6 7 8 9 10 11 12
ON
OFF
10
Instantaneous
- Lanzini can supply pre-set controllers in DMX mode, featuring simple
operation and compact size:
_Felix = code 27780 for manual control;
_Anda = code 27781 for remote control (max. 30 m).
- These controllers feature 7 pre-set fixed colours (Blue, Orange, Green,
Magenta, Light Blue, Red, White) and allow to record particular settings
(either fixed colours or colour sequences) as any DMX station, but in a fast
and direct way.
- Each controller can drive up to 12 fixtures individually or, alternatively,
groups of fixtures synchronized together, where the only limitation is the
possible leakage of the DMX signal.
D
LED
DAL 1960
NUTZUNG VON LEDS
- Achtung! Die Sicherheit dieses Strahlers ist nur bei strikter Befolgung
der Anleitung gewährleistet. Es ist darum notwendig, sie aufzubewahren.
- Achtung!Bevor irgendeine Handlung am Strahler durchgeführt wird
(Stromanschluss, Modifizierung der DMX - Steuerrung, Farbwechsel ...),
vergewissern Sie sich, dass der Strom unterbrochen ist.
- Achtung! DMX-Modus ist werksseits voreingestellt.
- In DMX-MODUS ist es möglich, einzelne Farben zu fixieren oder Farbfolgen
über eine DMX-Station zu steuern.
- Über die Schalter 1 bis 9 weisen Sie die DMX_Kanäle zu, entsprechend
den Werten, spezifiziert in Bild A. Beachten Sie, dass jeder Strahler 5
Kanäle benötigt. Bitte addieren Sie die Werte, um den gewünschten Kanal
zu bekommen.
- Alle LED- Strahler mit Farbwechsel-Technologie können automatisch
oder in DMX-Modus laufen. Wenn der Strahler geöffnet ist, wählen Sie das
gewünschte Programm über die Schalter-Pins 1-12.
- Bild A
Mit dem Schalter “12” wählen Sie die Funktionsweise:
1
Entsprechender Wert
4
2
Automatische
Funktionsweise
16
8
32
64 255
128
Beispiele:
ON
12
OFF
Nr. der Auswahl
OFF
12
1 2 3 4 5 6 7 8 9 10 11 12
1 2 3 4 5 6 7 8 9 10 11 12
ON
DMX-Funktionsweise
Strahler Nr.1= Kanal 1
Strahler Nr.2= Kanal 6
1 2 3 4 5 6 7 8 9 10 11 12
1 2 3 4 5 6 7 8 9 10 11 12
ON
ON
OFF
OFF
Um Zugang zu den Schaltern zu haben:
Auswahl Nr.1
Entsprechungswert =1
ALBA
Direkter Zugang, öffnen Sie das Glas.
Auswahl Nr.2 + Nr.3
Entsprechungswert = 2+4 =6
ARIEL
Öffnen Sie die Leuchte, indem Sie die 4 M5-Schrauben lösen (Vorsicht mit
dem Glas!).
Strahler Nr.3= Kanal 11
AURORA
Strahler Nr.4= Kanal 16
Entfernen Sie die Frontseite der Armatur durch Lösen der 4 Schrauben M6.
1 2 3 4 5 6 7 8 9 10 11 12
1 2 3 4 5 6 7 8 9 10 11 12
DEO
Öffnen Sie die Leuchte, nehmen Sie die beiden Hälften des Leuchtenkörpers
auseinander (Vorsicht mit dem Glas!).
GUAPO/GUAPA - SERA/SERA
Entfernen Sie den Rahmen, das Glas und die LED-Platte.
ON
ON
OFF
OFF
Auswahl Nr.1 + Nr.2 + Nr.4
Entsprechungswert = 1+2+8 = 11
Auswahl Nr.5
Entsprechungswert = 16
- Im AUTOMATISCHEN MODUS kann der Strahler individuell arbeiten und ist mit
einem Farbspiel ausgestattet, das verschiedene Geschwindigkeiten hat
und wählbar ist zwischen sofortigem und gleitendem Farbwechsel.
- Die Farbfolge ist :
Blau, Orange, Grün, Magenta, Cyan, Rot, Weiss.
- Durch den Schalter "2" ist es möglich, die Wechselgeschwindigkeit zu
wählen:
2
Farbwechsel alle
24 Sekunden
1 2 3 4 5 6 7 8 9 10 11 12
ON
2
OFF
Farbwechsel alle
8 Sekunden
- Durch den Schalter “10” ist es möglich, die Art und Weise des
Farbwechsels zu wählen:
10
Gleitend
1 2 3 4 5 6 7 8 9 10 11 12
ON
OFF
10
Sofort
Lanzini kann auch vorprogrammierte DMX-Controler in kompakter Grösse
liefern:
_ Felix = Art.-Nr. 27780 für manuelle Steuerrung
_ Anda = Art.-Nr. 27781 für Fernbedienung ( max 30m )
Diese Steuereinheiten haben 7 vordefinierte Farben (Blau, Orange, Grün,
Magenta, Hellblau, Rot, Weiss) und erlauben, spezielle Einstellungen
abzuspielen ( sowohl fixierte Farben als auch Farbfolgen), wie jede
DMX-Station, aber schnell und direkt.
Jede Steuereinheit kann 12 Strahler individuell steuern oder, alternativ,
Gruppen von Strahlern, die synchronisiert sind. Hierbei ist die einzige
Einschränkung, die mögliche Abschwächung des DMX-Signals.
F
LED
DAL 1960
UTILISATION DES LED
- Attention! La sécurité de l'appareil est garantie seulement avec l'observance des instructions suivantes, donc il est nécessaire de les conserver.
- Attention! Avant d'exécuter n'importe quelle operation sur l'appareil
(connexions au réseau, modifications DMX, changement de couleur),
s'assurer d'avoir enlevé tension.
- Attention! Au moment de votre achât l'appareil est déjà programmé
pour fonctionnement en DMX.
- L'appareil em MODALITÉ "DMX" donne la possibilité de selectionner
couleurs fixes ou séquences chromatique spéciales à l'aide de n'importe
quelle centrale de contrÙle DMX. Opérer sur les selecteurs 1 à 9 pour
assigner le canal DMX selon les valeurs indiquées en ill.A en tenant
compte que chaque appareil a besoin de 5 canaux. Il faut additionner
les valeurs pour obtenir le canal voulu.
Ill.A
- Tous les appareils de la gamme "LED" avec technologie change-couleur
pouvent fonctionner soit en modalité automatique soit en modalité DMX.
Après avoir ouvert l'appareil opérer directement sur les dip-switch 1 à 12
pour choisir l'option voulue.
A' travers le selecteur "12" déterminer le type de fonctionnement :
12
1 2 3 4 5 6 7 8 9 10 11 12
N° selecteur
1 2 3 4 5 6 7 8 9 10 11 12
ON
OFF
1
4
2
Fonctionnement en
modalité automatique
16
8
32
64 255
128
Valeur corréspondante
Examples :
ON
12
OFF
Appareil N°1= canal 1
Fonctionnement en
modalité DMX
Appareil N°2= canal 6
1 2 3 4 5 6 7 8 9 10 11 12
1 2 3 4 5 6 7 8 9 10 11 12
ON
ON
OFF
OFF
Selecteur N°1
Valeur corréspondante = 1
Selecteur N°2 + N°3
Valeur corréspondante = 2+4 =6
Pour accéder au dip-switch procéder comme il suit :
ALBA
Ouvrir le verre à travers les 3 clips
Appareil N°3= canal 11
Appareil N°4= canal 16
ARIEL
Ouvrir l'appareil en dévissant les 4 vis M5 (Attention au verre!)
AURORA
Enlever la partie frontale de l'appareil en dévissant les 4 vis "allen" M6.
DEO
Ouvrir l'appareil en tirant les 2 moitiés du corps (Attention au verre!).
GUAPO/GUAPA - SERA/SERA
Enlever le cadre, le châssis du verre et la platine porte-LED.
1 2 3 4 5 6 7 8 9 10 11 12
1 2 3 4 5 6 7 8 9 10 11 12
ON
ON
OFF
OFF
Selecteur N°1 + N°2 + N°4
Valeur corréspondante = 1+2+8 = 11
Selecteur N°5
Valeur corréspondante = 16
- L'appareil en MODALITÉ " AUTOMATIQUE" peut fonctionner individuellement
et il est pourvu d'un jeu change-couleur à vitesse variable. On peut aussi
choisir si l'on veut le changement des couleur instantané ou en fondu.
La séquence chromatique est la suivante =
bleu, orange, vert, magenta, cyane, rouge et blanc.
A' travers le dip-switch " 2 " on peut selectionner la vitesse du
changement couleurs :
2
1 2 3 4 5 6 7 8 9 10 11 12
Change couleur tous
les 24 sec.
ON
2
OFF
Change couleur tous
les 8 sec.
A' travers le dip-switch " 10 " on peut selectionner la modalité du
changement :
10
En fondu
1 2 3 4 5 6 7 8 9 10 11 12
ON
OFF
10
Instantané
- Lanzini peut fournir des " controllers " pre-programmés en modalité
DMX, caractérisés par facilité d'utilisation et dimensions compactes:
_ Felix = code 27780 pour commande manuel;
_ Anda = code 27781 pour commande à distance (max. 30 m).
Ces controleurs sont équipés de 7 couleurs fixes pre-programmés
(bleu, orange, vert, magenta, bleu clair, rouge et blanc) et permettent de
mémoriser les impostations personalisées (soit couleurs fixes soit
séquences chromatiques) comme n'importe quelle station DMX,
mais d'une façon intuitive et rapide.
Chaque controleur peut commander jusqu'à 12 appareils d'une façon
indépendante ou, alternativement, groupes d'appareils synchronisés
ensemble où la seule limite est la possible perte de signal DMX.
SP
LED
DAL 1960
EMPLEO DE LOS LED
- Atención! La seguridad del aparato es garantizada sólo con el empleo
apropiado de las siguientes instrucciones, por tanto es necesario
conservarlas.
- Atención! Antes de ejecutar cualquiera operación sobre el aparato
(conexiones de red, modificaciones impostaciones DMX, cambio color...)
cerciorarse de haber sacado la tensión.
- Atención! Los aparatos al momento de la adquisición son programados
con funcionamiento en modalidad DMX.
- Todos los aparatos de la gama LED con tecnología de cambia-color
pueden funcionar automaticamente o en modalidad DMX. Después de
haber abierto el aparato actuar directamente sobre los selectores, de 1 a
12, para elegir la impostación deseada.
- El aparato en MODALIDAD DMX permite de elegir colores fijos o bien
secuencias cromáticas personalizadas por medio de una cualquiera
centralita DMX. Actuar sobre los selectores de 1 al 9 para asignar el canal
DMX siguiendo los valores en fig.A y teniendo en consideración que cada
aparato necesita de 5 canales. Se tienen que sumar los valores para
conseguir el canal deseado.
Fig.A
1 2 3 4 5 6 7 8 9 10 11 12
Funcionamiento en
modalidad automática
1
Valor correspondiente
4
2
16
8
32
64 255
128
Ejemplos:
Aparato N° 1 = canal 1
ON
12
OFF
N° selector
OFF
Actuar sobre el selector "12" para elegir la modalidad de funcionamiento:
12
1 2 3 4 5 6 7 8 9 10 11 12
ON
Funcionamento en
modalidad DMX
Aparato N° 2 = canal 6
1 2 3 4 5 6 7 8 9 10 11 12
1 2 3 4 5 6 7 8 9 10 11 12
ON
ON
OFF
OFF
Selector N°1
Valor correspondiente = 1
Selector N°2 + N°3
Valor correspondientee = 2+4 =6
Aparato N° 3 = canal 11
Aparato N° 4 = canal 16
Para acceder a los selectores en los varios modelos, proceder como sigue:
ALBA
Abrir el vidrio por medio de las 3 clips.
ARIEL
Abrir el aparato destornillando los cuatro tornillos M5 (Atención al vidrio!!).
AURORA
Sacar la parte anterior del aparato destornillando los 4 tornillos "allen" M6.
DEO
Abrir el aparato tirando las dos midades del cuerpo (Atención al vidrio!!).
GUAPO/GUAPA - SERA/SERA
Sacar el marco, el cerco del cristal y la lámina de soporte de los LED.
1 2 3 4 5 6 7 8 9 10 11 12
1 2 3 4 5 6 7 8 9 10 11 12
ON
ON
OFF
OFF
Selector N°1 +N°2 +N°4
Valor correspondiente = 1+2+8 = 11
Selector N°5
Valor correspondiente = 16
- El aparato en MODALIDAD AUTOMÁTICA puede funcionar autonomaménte
y tiene juego de cambia-color con velicidades variables y posibilidad de
elegir entre cambio de colores inmediato o en fundido.
La secuencia de colores programada es la siguiente :
azul, naranjo, verde, magenta, ciano, rojo, blanco.
A través el selector "2" se puede elegir la velocidad de alternancia de los
colores :
2
Cambio de color
cada 24 seg.
1 2 3 4 5 6 7 8 9 10 11 12
ON
2
OFF
Cambio de color
cada 8 seg.
A través el selector "10" se puede elegir la modalidad de alternancia de los
colores:
10
En fundido.
1 2 3 4 5 6 7 8 9 10 11 12
ON
OFF
10
Instantáneo.
- Lanzini tiene posibilidad de suministrar centralitas pre-programadas en
modalidad DMX, caracterizadas por empleo facil y medidas compactas:
_ Felix = código 27780 para mando manual;
_ Anda = código 27781 para mando a distancia (max. 30 m).
Dichas centralitas disponen de 7 colores fijos pre-programados
(azul, naranjo, verde, magenta, azul claro, rojo, blanco) y permiten
memorizar programaciones personalizadas (sea colores fijos que
secuencias cromáticas) como una cualquiera centralita DMX pero más
intuitivamente y rápidamente.
Cada centralita puede mandar hasta 12 aparatos de modo independiente
o bien en grupos sincronizados, donde la única limitación es una posible
pérdida de señal DMX.