1
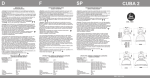
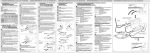
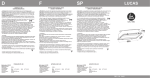
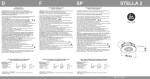
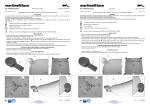
D
F
SP
ALASKA
MONTAGE- UND
WARTUNGSANLEITUNG
INSTRUCTIONS D’INSTALLATION,
USAGE ET ENTRETIEN
INSTRUCCIONES DE INSTALACION,
EMPLEO Y MANUTENCION
- Achtung! Die Sicherheit im Umgang mit dem Strahler ist nur gewaehrleistet,
wenn die folgenden Instruktionen strikt befolgt und eingehalten werden.
- Achtung! Bevor der Strahler angeschlossen, das Leuchtmittel eingesetzt
oder gewechselt wird, vergewissern Sie sich, dass der Strahler vom
Stromnetz getrennt ist.
- Für das Einsetzen oder Wechseln des Leuchtmittels befolgen Sie die Anweisungen
des Leuchtmittelherstellers, die dem Leuchtmittel beigelegt sein sollte.
- Wenn der Strahler eingeschaltet ist, stellen Sie sicher, dass der Abstand
zwischen dem Strahler und der zu beleuchtenden Fläche mindestens 1m
beträgt, wie es in dem Symbol (Bild 1) angezeigt ist.
1m
- Attention! La sécurité du projecteur est garantie seulement avec l'observance des instructions suivantes, donc il est nécessaire de les conserver.
- Attention! Avant d'exécuter les connexions au réseau, pendant
l'assemblage ou substitution de la lampe, s'assurer d'avoir enlevé tension.
- Pour l'assemblage ou substitution de la lampe, exécuter les instructions
données par le constructeur, jointes à la lampe même.
- Dans l'usage du projecteur, s'assurer que la distance entre la lampe et
l'objet embrasé ne soit pas inférieure à 1 mètre, comme indiqué dans le
symbole relatif (ill.1).
1m
- Atención! La seguridad del proyector es garantizada sólo con la observancia de las siguientes instrucciones, por tanto es necesario conservarlas.
- Atención! Antes de ejecutar las conexiones de red, durante el montaje o
sustitución de la lámpara, cerciorarse de haber sacado tensión.
- Para el montaje o sustitución de la lámpara, ejecutar las instrucciones
dadas por el constructor, suministradas con la lámpara misma.
- En el empleo del proyector, cerciorarse que la distancia entre la lámpara y
el objeto iluminado no sea inferior a 1 metro, como indicado en el relativo
símbolo (figura 1).
1m
- Benutzen Sie den Strahler nie ohne Schutzglas und wechseln Sie das
Schutzglas bei Bruch oder wenn es Risse hat. Bei dem Glas handelt es sich
um ein temperaturwechselbeständiges Glas (Bild 2).
- Montieren Sie den Strahler mit Hilfe von 2 Schrauben mit einem
Maxdurchmesser von 8 mm durch die vorbereiteten Bohrungen im Bügel.
- Achtung! Falls das äussere flexible des Kabel des Apparates beshädigt ist m
uss es im Sinne der Umfallvermeidung, durch den Hesteller, durch den
Serviceleister oder durch eigenes techisches und Fachpersonal erneuert werden.
- Nur für Versionen mit verstellbarer Basis: befolgen Sie die Montageanleitung,
wie in Abbildung 5 gezeigt. Befestigen Sie die Grundplatte mithilfe von 3
Spreizdübeln D. 4mm (nicht mitgeliefert) an der Wand.
- Bei Deckenmontage befolgen Sie die Anweisung in Bild 4.
- Bei Wandmontage befolgen Sie die Anweisung in Bild 1 und 3.
- Bei der Montage sind die in Bild 1 -2 -4 angegebenen Mindestabstände
einzuhalten und richten Sie den Strahler nicht gegen die Decke oder die
Wand.
- Befestigen Sie den Strahler an der Decke oder der Wand in der Nähe der
Steckdose unter Beachtung der Bewegungsfreiheit des Kabels beim
Positionieren des Strahlers. Beim Einrichten des Strahlers beachten Sie die
Anleitung zum Leuchtmittel (Bild 6).
- Nach Einrichtung des Strahlers ziehen Sie die Befestigungsschrauben fest an.
- Der Strahler ist nur für den Innenbereich geeignet.
- Ne pas utiliser l’appareil sans verre de protection et le remplacer si vous
relevez fêlures ou fentes. Il s’agit d’un verre plan trempé sodique-calcique
clair (ill.2).
- Fixer l’appareil par vis ayant max. Ø8mm, en utilisant les trous prédisposés
sur l’étrier de fixation.
- Attention! Si le câble exteriéur flexible de ce luminaire est endommagé au but
d’eviter du danger il doit être remplacé par le constructeur, le service aprè-vente
ou personnel expert équivalent.
- Seulement pour versions à base pivotante: suivre le schéma de montage
indiqué en ill.5. Monter la base au mur par 3 goujons à expansion Ø4mm
(non pas fournis).
- Pour le montage à plafond suivre l’ill.4.
- Pour le montage à paroi suivre les ill.1 et 3.
- Pendant l’installation et l’utilisation, se conformer aux distances min. indiquées en ill.1-3-4 et ne pas orienter le projecteur vers la paroi ou le plafond.
- Fixer l’appareil à la paroi ou au plafond près de la prise de courant, de
façon à éviter que le câble soit sollicité, en toutes les positions possibles de
fonctionnement permises. Dans la régulation de l'inclinaison de l'appareil,
tenir compte de tout ce qui est prescrit par les instructions jointes à l'ampoule
(ill.6).
- Après la régulation de l’appareil, serrer profondément les vis à poignée qui
fixent le corps de l’appareil à l’étrier et, s’il existe, la vis qui fixe l’étrier à la
base.
- L’appareil est apte au fonctionnement seulement à l’intérieur.
- No utilizar el proyector sin el vidrio de protección y reemplazarlo en el caso
observan rajas o grietas. Es un vidrio llano templado sódico-cálcico claro
(figura 2).
- Fijar el aparato por medio de tornillos habientes Ø8mm máximo, utilizando
los adecuados agujeros predispuestos sobre el estribo de fijación.
- Atención! Si el cable exterior flexible de este aparato es perjudicado, tiene que
ser reemplazado por el constructor, el servicio de assistencia técnica o por personal
calificado.
- Sólo para la versión con base orientable: seguir el esquema de montaje
indicado en fig.5. Montar la base a pared con 3 tornillos de expansión Ø4mm
(no provistos).
- Para el montaje a plafón atenerse a la fig.4.
- Para el montaje a pared atenerse a las fig.1 y 3.
- Durante la instalación y el empleo atenerse a las distancias mínimas indicadas en fig.1-3-4 y no orientes el proyector hacia la pared o el plafón.
- Fijar el aparato a pared o a plafón bastante cerca de la toma de corriente,
de modo tal de evitar esfuerzos del cable en todas las posiciones de funcionamiento permitidas. En la regulación de la inclinación del aparato tomar en
cuenta de lo que está prescrito por las instrucciones alegadas a la bombilla
(fig.6).
- Después de la regulación del aparato, atornillar bien los tornillos manecillas
que fijan el cuerpo del aparato al estribo y, si existe, el tornillo que fija el
estribo a la base.
- El proyector es idóneo solamente al funcionamiento en interiores.
STRAHLER FÜR METALLDAMPFLAMPEN
PROJECTEURS POUR LAMPES AUX VAPEURS D'HALOGENURES
PROYECTORES POR LÁMPARAS A VAPORES DE ALOGENUROS
BASISSERIE: ALASKA
Eigenschaften:
- Versorgungsspannung:
- Schutzklasse:
- Lichtleistung:
230V~
I
70W RX7s MH (MD) 1A
150W RX7s MH (MD) 1,8A
0,9
- Cos ϕ:
- Fassung:
RX7s
- Schutzart:
IP 20
- Gewicht:
4 kg
- Dieser Strahler ist zur Montage auf normalentzündbaren Oberflächen
geeignet .
- Achtung! Hochspannung innerhalb des Strahlers
- Benutzen Sie nur Leuchtmittel mit UV-Schutz.
z.B.
Osram HQI TS UVS
Philips MHN TD UV Block
SÉRIE BASE: ALASKA
Caractéristiques:
- Tension d'alimentation:
230V~
- Classe d'isolement:
I
- Puissance et courant de lampe: 70W RX7s MH (MD) 1A
150W RX7s MH (MD) 1,8A
- Cos ϕ:
0,9
- Douille:
RX7s
- Degré de protection:
IP20
- Poids:
Kg 4
- Poste apte à l'assemblage sur surfaces normalement inflammables.
- Attention! Présence de haute tension dans l’appareil.
SERIE BASE: ALASKA
Características:
- Tensión de alimentación:
230V~
- Clase de aislamiento:
I
- Potencia y corriente de lámpara: 70W RX7s MH (MD) 1A
150W RX7s MH (MD) 1,8A
- Cos ϕ:
0,9
- Portalámpara:
RX7s
- Clase de protección:
IP20
- Peso:
Kg 4
- Aparato idóneo al montaje sobre superficies normalmente inflamables.
- Atención! Presencia de alta tensión en el aparato.
- Utiliser seulement lampes avec protection UV incorporée.
Par exemple :
Osram HQI TS UVS
Philips MHN TD UV BLOCK
- Utilizar solamente lámparas con protección UV incorporada.
Por ejemplo:
Osram HQI TS UVS
Philips MHN TD UV BLOCK
DAL 1960
REV. 01 06/03
INSTALLAZIONE
INSTALLATION
I
UK
ISTRUZIONI DI INSTALLAZIONE
USO E MANUTENZIONE
INSTALLATION, USE AND
MAINTENANCE INSTRUCTIONS
- Attenzione! La sicurezza del proiettore é garantita solo con, l’osservanza
delle seguenti istruzioni, pertanto é necessario conservarle.
- Attenzione! Prima di eseguire le connessioni di rete, durante il montaggio
o sostituzione della lampada, assicurarsi di aver tolto tensione.
- Per il montaggio o sostituzione della lampada, eseguire le istruzioni date
dal costruttore allegate alla lampada stessa.
- Nell’uso del proiettore, assicurarsi che la distanza tra la lampada
e l’oggetto illuminato non sia inferiore a 1m come indicato nel
relativo simbolo (fig.1).
1m
- Warning! Safety of this floodlight is guaranteed only if the following instructions are properly respected. It is therefore necessary to preserve them.
- Warning! Before connecting to the main network, during positioning or
replacement of lamps, ensure the tension has been disconnected.
- For positioning or replacement of lamps, follow the instructions given by the
lamp’s manufacturer, which should be supplied with the lamp itself.
- When the floodlight is on, ensure that a minimum distance of 1m between
the lamp and the illuminated surface is respected, as indicated by the relative
symbol (picture 1) . 1 m
- Il proiettore deve essere utilizzato solo se completo del suo schermo di
protezione. Trattasi di vetro float temperato sodico-calcico (Fig. 2).
- Fissare l’apparecchio tramite viti con Ø max 8mm utilizzando gli appositi
fori predisposti sulla staffa di fissaggio.
- Attenzione! Se il cavo flessibile esterno di questo apparecchio viene
danneggiato, deve essere sostituito dal costruttore o dal suo servizio di
assistenza o da personale qualificato equivalente, al fine di evitare pericoli.
- Solo per versione con base orientabile: seguire lo schema montaggio
indicato in Fig. 5. Montare la base a muro con n° 3 tasselli ad espansione
Ø4mm ( non forniti).
- Per il montaggio a plafone attenersi alla Fig.4.
- Per il montaggio a parete attenersi alle Fig.1-3.
- Durante l’installazione e l’uso attenersi alle distanze minime indicate nelle
Fig. 1-3-4 e non orientare il proiettore verso la parete o il soffitto.
- Fissare l’apparecchio a parete o a plafone sufficientemente vicino alla
presa di corrente in modo tale da evitare sollecitazioni al cavo per tutte le
possibili posizioni di funzionamento consentite.
Nella regolazione dell’inclinazione dell’apparecchio tenere conto di quanto
prescritto dalle istruzioni allegate alla lampadina (Fig.6).
- Dopo la regolazione dell’apparecchio, serrare a fondo le viti a manopola
che fissano il corpo dell’apparecchio alla staffae, se presente, la vite che
fissa la staffa alla base.
- Apparecchio idoneo esclusivamente all’uso in interni.
- Do not use the floodlight without the protective glass and replace it in case
cracks or fissurations are found. It’s a float clear tempered glass, sodic-calcic
type (picture 2).
- Fix the lighting fitting by means of screws with max. Ø8mm through the
suitable holes on the mounting bracket.
- Warning! If the external flexible cable of this lighting fitting is damaged in order
to avoid any accicent it must be replaced by the manufacturer, the aftersale service or equivalent skilled personnel.
- Only for versions with adjustable base: follow the assembling scheme
indicated in picture 5. Mount the base on the wall by means of 3 expansion
dowels Ø4mm (not supplied).
- For ceiling mounting follow instructions as per picture 4.
- For wall mounting follow instructions as per pictures 1 and 3.
- During installation and use respect the minimum distances specified in
pictures 1-3-4 and do not aim the floodlight towards the wall or the ceiling.
- Fix the lighting fitting to the wall or the ceiling in proximity of the electrical
socket, in order to avoid stretching of the cable in all the possible functioning
positions. When adjusting the inclination of the lighting fitting keep into
account the instructions supplied with the lamp (picture 6).
- After adjusting the lighting fitting, tighten deeply the knob screws fixing the
body of the fitting to the bracket and, if existing, the screw fixing the bracket
to the base.
- Lighting fitting suitable for indoor use only.
APPARECCHIO PER LAMPADE A VAPORI DI ALOGENURI
SERIE BASE: ALASKA
Caratteristiche:
- Tensione di alimentazione:
- Classe di isolamento:
- Potenza lampada:
230V~
I
70W RX7s MH (MD) 1A
150W RX7s MH (MD) 1,8A
- Cos ϕ:
0,9
- Attacco lampada :
E40 / E27 / G12 / RX7s
- Grado di protezione:
IP65
- Peso:
4Kg
- Apparecchio idoneo al montaggio su superfici normalmente infiammabili.
- Attenzione! Presenza di alta tensione nell’apparecchio.
- Utilizzare solo lampade con la protezione UV incorporata.
Per esempio:
Osram HQI TS UVS
Philips MHN TD UV BLOCK
FLOODLIGHT FOR METAL HALIDE LAMPS
BASIC SERIES: ALASKA
Characteristics:
- Feeding tension:
- Insulation class:
- Lamp’s power and current:
-
Cos ϕ:
Lampholder:
Protection degree:
Weight:
230V~
I
70W RX7s MH (MD) 1A
150W RX7s MH (MD) 1,8A
0,9
RX7s
IP20
Kg 4
- Floodlight suitable for installation on normally inflammable surfaces.
- Warning! High tension inside the floodlight.
- Use only lamps with anti-UV protection.
For example:
Osram HQI TS UVS
Philips MHN TD UV BLOCK