1
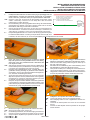
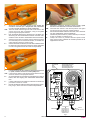
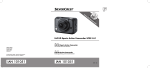
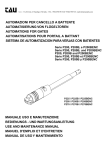
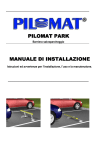
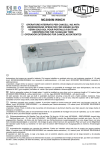
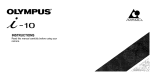
MANUALE D’USO E MANUTENZIONE USE AND MAINTENANCE MANUAL BEDIENUNGS - UND WARTUNGSANLEITUNG MANUEL D’EMPLOI ET D’ENTRETIEN MANUAL DE USO Y MANTENIMIENTO PARK D_MNL0PARK 14-07-2011 - Rev.07 Salvaparcheggio elettromeccanico Space saver Elektromechanischer Parkbügel Protege-parking electromecanique Salvaparqueo electromecanico IT - Istruzioni originali Via Enrico Fermi, 43 - 36066 Sandrigo (VI) Italia Tel +39 0444 750190 - Fax +39 0444 750376 - [email protected] - www.tauitalia.com Serie PARK 1 DATI TECNICI - TECHNICAL DATA - DONNÉES TECHNIQUES - TECHNISCHE DATEN - DATOS TÉCNICOS PARK Alimentazione - Power supply - Stromversorgung - Alimentation - Alimentación 230 V AC (50 - 60 Hz) Alimentazione motore - Power motor - Stromversorgung Motor - Alimentation moteur - Alimentación motor 18 V DC Potenza assorbita - Absorted power - Leistungsaufnahme - Puissance absorbée - Potencia absorbida 30 W Assorbimento - Absorption - Stromentnahme - Absorption - Absorción 1,6 A Tempo di manovra - Operating time - Mindestzeit Öffnungszeit - Temps de manœuvre - Tiempo de maniobra 5s Ciclo di lavoro - Work cycle - Arbeitszyklus - Cycle de travail - Ciclo de trabajo 100% Resistenza allo schiacciamento - Resistance to weight - Zardruckfestigkeit 2,5 Kg/cm² Resistance a l‘encrasement - Resistencia al aplastamie Grado di protezione - Protection level - Schutzart - Degré de protection - Grado de protección IP 54 Temperatura di esercizio - Operating temperature - Betriebstemperatur -20°C ÷ +55°C Temperature de fonctionnement - Temperatura de trabajo Larghezza max. posto auto - Max width of parking space - Max. Breite der Parkplätze 2m Largeur max. d’espace de stationnement - Ancho máx. aparcamiento MISURE D'INGOMBRO OVERALL DIMENSIONS ABMESSUNGEN MESURES D'ENCOMBREMENT DIMENSIONES MAXIMAS 11,5 138,4 311,5 291,5 69,5 331,6 45,5 I- A= fori per fissaggio tramite tasselli GB - A= hole for fixing with dowels D - A= Bohrungen zur Befestigung mit Dübeln F - A= trous pour fixation à l’aide de chevilles E - A= orificios para fijación mediante tacos 925 505 A 451,5 A A SBLOCCO MANUALE MANUAL RELEASE HANDENTRIEGELUNG DÉBLOCAGE MANUEL DESBLOQUEO MANUAL I- GB - D- F- E- 2 Aprire il lucchetto con l'apposita chiave e sfilarlo. Movimentare quindi manualmente il salvaparcheggio. Open the padlock with the key and remove it. Then manually manoeuvre the parking guard. Das Schloss mit seinem Schlüssel öffnen und herausziehen. Dann den Parkplatzschutz von Hand bewegen. Ouvrir le cadenas avec la clé et le retirer. Bouger manuellement l’arceau de parking. Abra el candado con la correspondiente llave y sáquelo. Mueva luego de forma manual la barrera abatible automática. Serie PARK INSTALLAZIONE SALVAPARCHEGGIO PARKING GUARD INSTALLATION INSTALLATION DES PARKPLATZSCHUTZES INSTALLATION ARCEAU DE PARKING INSTALACIÓN DE LA BARRERA ABATIBLE AUTOMÁTICA 1 3 I- I- Dopo aver fissato il salvaparcheggio (mediante 3 tasselli M8) nella posizione scelta (utilizzate la base come dima), sbloccarlo come visto precedentemente e abbassare del tutto la parte frontale. GB - After having fixed the parking guard (with the 3 M8 dowels) in the desired position (use the base as a template), release it as before and completely lower the front section. D - Nachdem der Parkplatzschutz mit Nr. 3 Dübeln M8 in der gewählten Stellung befestigt ist (die Basis als Schablone verwenden), muss er wie oben beschrieben entriegelt werden, dann das Vorderteil ganz senken. F - Après avoir fixé l’arceau de parking (au moyen de 3 chevilles M8) dans la position choisie (utilisez la base comme gabarit), le débloquer en suivant les indications données plus haut et abaisser complètement la partie frontale. E - Después de fijar la barrera abatible automática (mediante 3 tacos M8) en la posición escogida (utilice la base como patrón de bloqueo), desbloquéela tal como se ha mostrado anteriormente y baje completamente la parte frontal. 350 mm 550 mm B = Predisporre l'arrivo del tubo con Ø min 16mm (A) per il passaggio dei cavi d'alimentazione. Costruire una piazzola di cemento (B), se necessario, QUADRO ELETTRICO DI COMANDO E800P di 350 x 550 mm, profondità 10 mm per il posizionamento della base. E800P ELECTRICAL CONTROL PANELS SCHALT- UND STEUERTAFELN E800P GB - Prepare a pipe duct 16 mm Ø (A) for the passage of the power supply LOGIQUES DE COMMANDE E800P CUADROS ELÉCTRICOS DE MANDO E800P cables. If necessary construct a 10 mm deep 350 x 550 mm cement platform (B) to position the base. D - Zur Durchführung der Versorgungskabel eine Leitung mit 16mm MindestA durchmesser (A) verlegen. Eine 350 x 550 mm große und 10 mm tiefe Betonfläche, falls nötig, für die Basis vorbereiten. F - Prévoir l’arrivée du tube avec Ø min. 16 mm (A) pour le passage des câbles d’alimentation. Construire une dalle en ciment (B), si nécessaire, de 350 x 550 mm, profondeur 10 mm pour le positionnement de la base. E - Prepare la llegada del tubo con un Ø mín de 16mm (A) para hacer pasar los cables de alimentación. Construya una parcela de cemento (B), si es necesario, de 350 x 550 mm, de 10 mm de profundidad para el emplazamiento de la base. = I- Far passare il cavo per il cablaggio dell'automazione attraverso il passacavo posizionato a lato del tubo motore. GB - Pass the automation wiring cable through the cable clip on the side of the motor pipe. D - Das Kabel für die Verdrahtung der Automatisierung durch die Kabelführung neben dem Motorrohr führen. F - Faire passer le câble pour le câblage de l’automatisme à travers le passe-câble positionné sur le côté du tube moteur. E - Haga pasar el cable para el cableado de la automatización a través del pasacables situado al lado del tubo motor. 4 2 I- GB - D- F- E- I- Collegare il cavo bipolare al morsetto in dotazione. GB - Connect the bipolar cable to the supplied terminal. D - Das zweipolige Kabel an der mitgelieferten Klemme anschließen. F - Connecter le câble bipolaire à la borne de raccordement fournie. E - Conecte el cable bipolar al borne presente en el equipamiento de base. Rimuovere il tappo in plastica che dà accesso al motore. Remove the plastic motor access cap. Die Plastikkappe entfernen, durch die man Zugang zum Motor hat. Enlever le bouchon en plastique qui permet l’accès au moteur. Saque el tapón de plástico que permite acceder al motor. Serie PARK 3 5 7 I- I- Attraverso il foro sulla base, portare il cavo cablato alla centrale di comando per i collegamenti finali, utilizzando un tubo corrugato attraverso il canale predisposto. GB - Take the wired cable through the hole in the base to the control unit for the final connections, using a corrugated pipe through the prepared channel. D - Das verdrahtete Kabel durch die Bohrung in der Basis zur Steuerung für den Endanschlüsse führen und einen Faltschlauch durch den dazu vorbereiteten Kanal verwenden. F - À travers le trou situé sur la base, porter le câble à la logique de commande pour les connexions finales, en utilisant une gaine ondulée à travers le conduit prévu. E - A través del orificio de la base, lleve el cable cableado hasta la central de control para las conexiones finales, utilizando un tubo corrugado a través del canal correspondiente. Riportare in posizione verticale la parte frontale, quindi fermare il tubo utilizzando il lucchetto in dotazione. GB - Place the front section in the vertical position once again and secure the pipe using the supplied padlock. D - Das Vorderteil wieder senkrecht anordnen, dann das Rohr mit dem mitgelieferten Schloss befestigen. F - Remettre la partie frontale en position verticale puis bloquer le tube en utilisant le cadenas fourni. E - Coloque de nuevo en posición vertical la parte frontal, luego sujete el tubo utilizando el candado presente en el equipamiento de base. SCATOLA SCHACHTEL BOX BOITE CAJA 6 I- Alimentazione 12 Vdc - + 9 10 11 12 F1 (5x20) F2 (5x20) JP1 RX 433,92 MHz P1 DL1 1234 Lasciare quel tanto di cavo sufficiente ad eseguire la manovra e, quindi, chiudere l'accesso al canale predisposto. GB - Leave enough cable in order to perform the manoeuvre and close the access to the prepared channel. D - So viel Kabel wie zur Durchführung der Bewegung nötig ist lassen, dann den Zugang zum vorbereiteten Kanal schließen. F - Laisser suffisamment de câble pour effectuer la manœuvre puis fermer l’accès au conduit. E - Deje la cantidad de cable suficiente para ejecutar la maniobra y, luego, cierre el acceso al canal correspondiente. TRASFORMATORE 60VA TRANSFORMATOR 60VA TRANSFORMER 60VA TRASFORMATEUR 60VA TRASFORMADOR 60VA 6 5 RL1 RL2 8 7 4 13 14 15 3 2 1 P-800PARK GUAIN Ø10 mm HULLE Ø10 mm SHEAT Ø10 mm GAINE Ø10 mm VAINA Ø10 mm fig. 1 4 Serie PARK 230 Vac (3x1,5 mm²) P-750MCP433EP - CENTRALINA CON RADIOCONTROLLO PER 1 MOTORE 12Vdc P-750MCP433EP - RADIO CONTROLLED CENTRAL UNIT FOR 1 12 V dc MOTOR P-750MCP433EP - FUNKSTEUERZENTRALE FÜR 1 12V G.S. MOTOR P-750MCP433EP - CENTRALE AVEC RADIOCOMMANDE POUR UN MOTEUR 12V P-750MCP433EP - CENTRAL CON RADIOCONTROL PARA 1 MOTOR DE 12Vcc Italiano COLLEGAMENTI ELETTRICI 1-2 ingresso ALIMENTAZIONE 230 Vac (dalla rete); 3-4 uscita ALIMENTAZIONE 230 Vac per trasformatore; 5-6 ingresso ALIMENTAZIONE 12 Vac da trasformatore; 7-8 uscita ALIMENTAZIONE 12 Vdc (scheda stabilizzatrice); 9-10 ingresso ALIMENTAZIONE 12 Vdc da scheda stabilizzatrice; 11-12 non utilizzati; 13-14 uscita MOTORE 12 Vdc; 15 cavo antenna 433,92 MHz; IMPOSTAZIONI JP1 SELEZIONE FORZA MOTORE senza ponticello la forza è ad un valore intermedio (2 - 3); Ponticello JP1 in posizione: 1 forza minima; 2 forza medio minima; 3 forza medio alta; 4 forza alta. AUTOAPPRENDIMENTO RADIOCOMANDI - Alimentare la centralina; - premere il pulsante P1 (fig.1), il led DL1 lampeggia; - trasmettere il codice con il telecomando (durante il lampeggio); - un lampeggio più lungo del led DL1 conferma l’apprendimento del codice; - allo spegnimento del led DL1 la centrale è pronta per l’uso. CANCELLARE LA MEMORIA - Tenere premuto il pulsante P1 per 5 secondi, il led lampeggia una volta; - rilasciare il tasto P1, la memoria è vuota. English ELECTRICAL CONNECTIONS 1-2 230 Vac POWER SUPPLY input (from mains); 3-4 230 Vac POWER SUPPLY output to transformer; 5-6 12 Vac POWER SUPPLY input from transformer; 7-8 12 Vdc POWER SUPPLY output (stabiliser card); 9-10 12 Vdc POWER SUPPLY input from stabiliser card; 11-12 not used; 13-14 12 Vdc MOTOR output; 15 433.92 MHz antenna cable; SETTINGS JP1 MOTOR POWER SELECTION The power is at an intermediate value without jumper (2 - 3); JP1 jumper in position: 1 low power; 2 low average power; 3 high average power; 4 high power. REMOTE CONTROL SELF-LEARNING - Turn on the control unit; - push the P1 button (fig.1), the DL1 led flashes; - send the code with the remote control (while flashing); - confirmation that the code has been accepted is given with a long Flash of the DL1 led; - the control unit is ready for use when the DL1 led switches off. RÉGLAGES JP1 SÉLECTION FORCE MOTEUR sans cavalier la force est à une valeur intermédiaire (2 - 3) ; CANCELLATION OF THE MEMORY - press and hold the P1 button for 5 seconds, the led will flash once; - release the P1 button, the memory is empty. Cavalier JP1 en position : 1 force minimum ; 2 force moyenne minimum ; 3 force moyenne maximum ; 4 force maximum. Deutsch ELEKTRISCHE ANSCHLÜSSE 1-2 Eingang 230 Vac VERSORGUNG (über Netz); 3-4 Ausgang 230 Vac VERSORGUNG für Transformator; 5-6 Eingang 12 Vac VERSORGUNG (über Transformator); 7-8 Ausgang 12 Vdc VERSORGUNG (Stabilisierungskarte); 9-10 Eingang 12 Vdc VERSORGUNG über Stabilisierungskarte; 11-12 nicht Verwendet; 13-14 Ausgang 12 Vdc MOTOR; 15 Antennekabel 433 Mhz; EINSTELLUNGEN JP1 AUSWAHL DER MOTORKRAFT ohne Überbrückung ist die Kraft auf einen Zwischenwert gestellt (2 – 3); Überbrückung JP1 in Position: 1 minimale Kraft; 2 mittlere – minimale Kraft; 3 mittlere – hohe Kraft; 4 hohe Kraft. SELBSTERLERNUNG DER FUNKSTEUERUNGEN - Die Steuerzentrale speisen; - auf Taste P1 drücken (Abb.1), die LED DL1 blinkt; - den Code mit der Fernbedienung senden (während des Blinkens); - die Erlernung des Codes wird durch ein längeres Blinken der LED DL1 bestätigt; - beim Ausschalten der LED DL1 ist die Steuerzentrale betriebsbereit. LÖSCHEN DES SPEICHERS - Taste P1 5 Sekunden lang gedrückt halten; die LED blinkt ein Mal; - die Taste P1 loslassen: der Speicher ist leer. Français BRANCHEMENTS ÉLECTRIQUES 1-2 entrée ALIMENTATION 230 Vca (du secteur) ; 3-4 sortie ALIMENTATION 230 Vca pour transformateur ; 5-6 entrée ALIMENTATION 12 Vca (du transformateur) ; 7-8 sortie ALIMENTATION 12 Vvc (carte stabilisatrice) ; 9-10 entrée ALIMENTATION 12 Vcc de la carte stabilisatrice ; 11-12 non utilisée ; 13-14 sortie MOTEUR 12 Vcc ; 15 câble antenne 433,92 MHz ; Serie PARK AUTOAPPRENTISSAGE RADIOCOMMANDES - Alimenter la logique de commande ; - presser la touche P1 (fig.1), la led DL1 clignote ; - transmettre le code avec l’émetteur (durant le clignotement); - un clignotement plus long de la led DL1 confirme l’apprentissage du code ; - à l’extinction de la led DL1 la logique de commande est prête à l’emploi. EFFACER LA MÉMOIRE - Maintenir la touche P1 enfoncée pendant 5 secondes, la led clignote une fois ; - relâcher la touche P1, la mémoire est vide. Español CONEXIONES ELÉCTRICAS 1-2 entrada ALIMENTACIÓN 230 Vac (desde la red); 3-4 salida ALIMENTACIÓN 230 Vac por transformador; 5-6 entrada ALIMENTACIÓN 12 Vac desde el transformador; 7-8 salida ALIMENTACIÓN 12 Vdc (ficha estabilizadora); 9-10 entrada ALIMENTACIÓN 12 Vdc desde ficha estabilizadora; 11-12 no utilazados; 13-14 salida MOTOR 12 Vdc; 15 cable antena 433,92 MHz; CONFIGURACIONES JP1 SELECCIÓN FUERZA MOTOR sin el conector puente la fuerza se encuentra en un valor intermedio (2 3); Conector puente JP1 en posición: 1 fuerza mínima; 2 fuerza medio mínima; 3 fuerza medio alta; 4 fuerza alta. AUTOAPRENDIZAJE RADIOCONTROLES - alimente la centralina; - pulse el botón P1 (fig.1), el led DL1 parpadeará; - transmita el código con el mando a distancia (durante el parpadeo); - un parpadeo más largo del led DL1 confirma el aprendizaje del código; - cuando se apague el led DL1 la central estará preparada para el uso. ELIMINAR LA MEMORIA - Mantenga pulsado el botón P1 durante 5 segundos, el led parpadea una vez; - suelte la tecla P1, la memoria está vacía. 5 DICHIARAZIONE DI CONFORMITA’ DECLARATION OF CONFORMITY (ai sensi della Direttiva Europea UE89/392 AlI. II.A) (European Directive 89/392 All. Il.A) DECLARATlON DE CONFORMITY KONFORMITÄTSERKLÄRUNG (gemäß der Europäischen RichtlinieUE89/392 Anl. Il.A) DECLARACIÓN DE CONFORMIDAD (aux termes de la Directive européenne UE89/392 All. II.A) (según la Directiva Europea UE89/392 Anex. Il.A) Fabbricante / Manufacturer / Hersteller / Fabricant / Fabricante: TAU s.r.l. Indirizzo / Address / Adresse / Adresse / Dirección: Via E. Fermi, 43 36066 - Sandrigo VICENZA - ITALY - - - - - Dichiara sotto la propria responsabilità che i prodottI: Declares under its own responsibility that the following products: Erklärt auf eigene Verantwortung, daß die Produkte: Déclare sous sa propre responsabilté que les produits: Declara, bajo su propria responsabilidad, que los productos: P-800PARK, P-750MCP433EP - Sono stati realizzati per essere incorporati in una macchina o per essere assemblati con altri dispositivi per costruire una macchina considerata dalla DIRETTIVA MACCHINE 98/37/CE. - Have been designed to be built into machinery or to be assembled with other devices so as to form machinery covered by MACHINE DIRECTIVE 98/37/EC. - zum Einbau in eine Maschine oder zur Zusammenfügung mit anderen Vorrichtungen zum Bau einer von der Maschinenrichtlinie 98/37/EG in Betracht gezogenen Maschine verwirklicht wurde. - Ils sont réalisés pour être incorporé dans une machine ou pour être assemblé avec d’autres dispositifs pour construire une machine considérée par la Directive Machines 98/37/CE. - han sido realizados para su incorporación en una máquina o para ser ensamblados con otros dispositivos, para constituir así una máquina como lo considera la Directiva Máquinas 98/37/CE. - - - - - Sono conformi ai requisiti essenziali di sicurezza delle direttive: Comply with the main safety requirements of the follwing Directives: daß er den wesentlichen Sicherheitsbedingungen folgender Richtlinien entspricht: Ils sont conformes aux conditions essentielles de sécurité des Directives: cumple con lo requisitos de seguridad de las siguientes directivas: BASSA TENSIONE / LOW VOLTAGE / NIEDERSPANNUNG / BASSE TENSION / BAJA TENSION 73/23/CEE, 93/68/CEE COMPATIBILITÀ ELETTROMAGNETICA / ELECTROMAGNETIC COMPATIBILITY / ELEKTROMAGNETISCHE KOMPATIBILITÄT / COMPATIBILITÉ ÉLECTROMAGNÉTIQUE / COMPATIBILIDAD ELECTROMAGNETICA 89/336/CEE, 92/31/CEE, 93/68/CEE Sandrigo, 01/08/2005 Il Rappresentante Legale / The legal Representative / Der gesetzliche Vertreter / Le Représentant Légal / El Representante Legal _________________________________________ Bruno Danieli 6 Serie PARK Garanzia TAU: condizioni generali ♦ ITALIANO La garanzia della TAU ha durata di 24 mesi dalla data di acquisto dei prodotti (fa fede il documento fiscale di vendita, scontrino o fattura, che deve essere conservato allegato alla presente). Il cliente TAU ha diritto ad usufruire della garanzia qualora abbia compilato ed inviato entro 10 giorni dalla data di installazione dell’apparecchiatura l’apposito certificato. La garanzia comprende la riparazione con sostituzione gratuita (franco sede TAU: spese di imballo e di trasporto sono a carico del cliente) delle parti che presentano difetti di lavorazione o vizi di materiale riconosciuti dalla TAU. In caso di intervento a domicilio, anche nel periodo coperto da garanzia, l’utente è tenuto a corrispondere il “Diritto fisso di chiamata” per spese di trasferimento a domicilio, più manodopera. La garanzia decade nei seguenti casi: • Qualora il guasto sia determinato da un impianto non eseguito secondo le istruzioni fornite dall’azienda all’interno di ogni confezione. • Qualora non siano stati impiegati tutti componenti originali TAU per l’installazione dell’automatismo. • Qualora i danni siano causati da calamità naturali, manomissioni, sovraccarico di tensione, alimentazione non corretta, riparazioni improprie, errata installazione, o altre cause non imputabili alla TAU. • Qualora non siano state effettuate le manutenzioni periodiche da parte di un tecnico specializzato secondo le istruzioni fornite dall’azienda all’interno di ogni confezione. • Usura dei componenti. La riparazione o la sostituzione dei pezzi durante il periodo di garanzia non comporta un prolungamento del termine di scadenza della garanzia stessa. The TAU Guarantee: general conditions ♦ ENGLISH TAU guarantees this product for a period of 24 months from the date of purchase (as proved by the sales document, receipt or invoice which must be attached to this guarantee). The guarantee is only valid if customers fill in and send the relative certificate no later than 10 days after product installation. This guarantee covers the repair or replacement at TAU’s expense (ex-works TAU: packing and transport at the customer’s expense) of parts that TAU recognises as being faulty as regards workmanship or materials. For visits to the customer’s facilities, also during the guarantee period, a “Call-out fee” will be charged for travelling expenses and labour costs. The guarantee does not cover the following cases: • If the fault was caused by an installation that was not performed according to the instructions provided by the company inside the product pack. • If original TAU spare parts were not used to install the product. • If the damage was caused by an Act of God, tampering, overvoltage, incorrect power supply, improper repairs, incorrect installation, or other reasons that do not depend on TAU. • If a specialised maintenance man does not carry out routine maintenance operations according to the instructions provided by the company inside the product pack. • Wear of components. The repair or replacement of pieces under guarantee does not extend the guarantee period. TAU-Garantie: Allgemeine Bedingugen ♦ DEUTSCH Die Garantie der Firma TAU hat 24 Monate Gültigkeit ab Kaufdatum (das Datum muss durch eine Quittung oder Rechnung belegt sein, die zusammen mit dem vorliegenden Garantieschein aufbewahrt werden muss). Der Kunde der Firma TAU hat nur Anspruch auf die Garantieleistungen, falls er die Bescheinigung ausgefüllt und innerhalb von 10 Tagen ab Installationsdatum der Apparatur eingesendet hat. Die Garantie schließt die Reparatur mit kostenlosem Ersatz (ab Werk der Firma TAU: Verpackungs- und Transportkosten gehen zu Lasten des Kunden) jener Teile ein, die von TAU anerkannte Fabrikations- oder Materialfehler aufweisen. Im Falle von Eingriffen am Standort des Kunden, auch in der Garantiezeit, hat der Kunde ein “feste Abrufgebühr” für die Reisekosten zum Standort des Kunden und die Arbeitskraft zu zahlen. Die Garantie wird in folgenden Fällen ungültig: • wenn der Defekt durch eine Installation verursacht ist, die nicht nach den in jeder Packung enthaltenen Herstelleranweisungen erfolgte. • wenn für die Installation der Vorrichtung auch andere Teile als Original-TAU-Komponenten verwendet wurden. • wenn die Schäden durch Naturkatastrophen, Handhabungen, Spannungsüberlasten, unkorrekte Versorgung, unsachgemäße Reparaturen, falsche Installation oder sonstiges, für das die Firma TAU keine Verantwortung hat, verursacht sind. • wenn die regelmäßigen Wartungsarbeiten nicht durch einen Fachtechniker nach den in jeder Packung enthaltenen Herstelleranweisungen ausgeführt worden sind. • Verschleiß den Komponenten. Reparatur oder Ersatz von Teilen während der Garantiezeit führt zu keiner Verlängerung derselben. ---- -----------------------------------------------------------------------------Certificato di Garanzia TAU - The TAU Guarantee Certificate - Certificat de Garantie TAU - TAU- Garantieschein - Certificado de Garantía TAU I- IMPORTANTE: durante l’installazione è fondamentale che l’installatore compili esattamente il presente certificato di garanzia. Il certificato dovrà essere inviato alla TAU entro 10 giorni dalla data di installazione. In questo modo l’utente avrà la certezza che il prodotto installato potrà godere della garanzia per la durata di 24 mesi. GB- IMPORTANT: during installation, the installer must correctly fill in this guarantee certificate. The certificate must be sent to TAU within 10 days from the date of installation. The user will thus be sure that the installed product will enjoy a 24 month guarantee. F- IMPORTANT: Au moment de l’installation il est fondamental que l’installateur remplisse intégralement ce certificat de garantie. Le certificat devra être envoyé à TAU dans les 10 jours qui suivent la date d’installation. De cette manière, l’utilisateur aura la certitude que le produit installé pourra bénéficier d’une garantie de 24 mois. D- ACHTUNG: Während der Installation ist es wichtig, daß der Installateur diesen Garantieschein genau ausfüllt. Der Schein muß der TAU innerhalb von 10 Tagen ab dem Installationsdatum übermittelt werden. Auf diese Weise hat der Kunde die Gewißheit, daß für die installierten Produkte die 24-monatige Garantie in Anspruch genommen werden kann. E- IMPORTANTE: durante la instalación es fundamental que el instalador rellene este certificado de garantía. El certificado se debe enviar a TAU antes de transcurridos 10 días desde la fecha de instalación. Así, el cliente tendrá la certeza de que el producto instalado está cubierto por la garantía por un plazo de 24 meses. TIMBRO DEL RIVENDITORE TIMBRO DELL’INSTALLATORE DATI DELL’UTENTE FINALE RETAILER’S STAMP - CACHET DU REVENDEUR INSTALLER’S STAMP - CACHET DE L’INSTALLATEUR USER INFORMATION - COORDONNÉES DE L’UTILISATEUR FINAL STEMPEL DES HÄNDLERS - SELLO DEL REVENDEDOR STEMPEL DES INSTALLATEURS - SELLO DEL INSTALADOR DATEN DES ENDABNEHMERS - DATOS DEL USUARIO FINAL Cognome/Surname/Nom/Nachname/Apellido ______________________________ Nome/Name/Prénom/Name/Nombre ______________________________ Via/Road/Rue/Straße/Calle ______________________________ Cap/Post code/Code postal/BLZ/C.P. ______________________________ Data di acquisto: Data di installazione*: Date of purchase - Date d’achat: Date of installation* - Date d’installation*: Telefono/Tel./Téléphone/Telefon/Teléfono Kaufdatum - Fecha de compra: Installationsdatum* - Fecha de instalación*: ______________________________ * E’ obbligatorio riportare la data di installazione * Das Installationsdatum muß angeführt sein * The date of installation must be indicated * Es obligatorio indicar la fecha de instalación * Il est obligatoire d’indiquer la date d’installation Garantie TAU: conditions générales ♦ FRANÇAIS La garantie TAU a une durée de 24 mois à compter de la date d’achat des produits (le document fiscal de vente, ticket de caisse ou facture, fait foi et doit être conservé avec la présente garantie). Le client TAU a le droit de bénéficier de la garantie s’il a rempli et renvoyé le certificat de garantie dans les 10 jours qui suivent la date d’installation de l’automatisme. La garantie comprend la réparation avec remplacement gratuit (départ usine TAU: frais d’emballage et de transport à la charge du client) des parties qui présentent des défauts de fabrication ou des vices de matériau reconnus par TAU. En cas d’intervention à domicile, y compris dans la période couverte par la garantie, l’utilisateur est tenu de verser le “Forfait d’intervention” correspondant au coût du déplacement à domicile, plus la main d’œuvre. La garantie n’est plus applicable dans les cas suivants : • Si la panne est provoquée par une installation qui n’a pas été effectuée suivant les instructions fournies par le constructeur et présentes à l’intérieur de chaque emballage. • Si l’on n’a pas utilisé que des pièces originales TAU pour l’installation de l’automatisme. • Si les dommages sont causés par des calamités naturelles, des actes de malveillance, une surcharge de tension, une alimentation électrique incorrecte, des réparations impropres, une installation erronée ou d’autres causes non imputables à TAU. • Si l’automatisme n’a pas été soumis aux maintenances périodiques de la part d’un technicien spécialisé selon les instructions fournies par le constructeur à l’intérieur de chaque emballage. • Usure des composants. La réparation ou le remplacement des pièces durant la période de garantie ne comporte pas le prolongement de la date d’expiration de la garantie en question. Garantía TAU: condiciones generales ♦ ESPAÑOL La garantía de TAU tiene una cobertura de 24 meses a partir de la fecha de compra de los productos (la fecha válida es la que figura en el comprobante de venta, recibo o factura, que deberá conservarse junto con la presente). El cliente TAU tiene derecho a la garantía cuando haya cumplimentado y remitido el certificado antes de 10 días desde la fecha de instalación del equipo. La garantía incluye la reparación con sustitución gratuita (franco fábrica TAU: gastos de embalaje y de transporte a cargo del cliente) de las piezas que tuvieran defectos de fábrica o vicios de material reconocidos por TAU. En el caso de reparación a domicilio, incluso en el período cubierto por garantía, el usuario deberá hacerse cargo de los gastos de desplazamiento a domicilio, más la mano de obra. La garantía caduca en los siguientes casos: • Si la avería ha sido determinada por una instalación realizada sin respetar las instrucciones dadas por la empresa que se encuentran en el interior de cada embalaje. • Si no se han utilizado todos los componentes originales TAU para la instalación del automatismo. • Si los daños han sido causados por catástrofes naturales, modificaciones, sobrecargas de tensión, alimentación incorrecta, reparaciones inadecuadas, instalación incorrecta u otras causas no imputables a TAU. • Si no se han efectuado los trabajos de mantenimiento periódico por parte de un técnico especializado, según las instrucciones dadas por la empresa que se encuentran en el interior de cada embalaje. • Usura de los componentes. La reparación o sustitución de las piezas durante el período de garantía no implican la extensión de la garantía. Tagliare lungo la linea tratteggiata il tagliando e spedire in busta chiusa a: Cut along the dotted line and send in a closed envelope to: Couper long de la ligne pointillée et renvoyer le coupon sous enveloppe fermée à: Schneiden Sie entlang der gestrichelten Linie die Allonge ab und schicken Sie diese in einem geschlossenen Kuvert an: Corte el cupón a lo largo de la línea de puntos y envíelo en sobre cerrado a: Doc. cod. D-CGR0TAU00 rev. 05 del 20/04/2011 ---- -----------------------------------------------------------------------------Certificato di Garanzia TAU - The TAU Guarantee Certificate - Certificat de Garantie TAU - TAU- Garantieschein - Certificado de Garantía TAU I- Riportare l’etichetta adesiva (o in mancanza il numero di matricola) relativa ad ogni prodotto facente parte dell’impianto. Attenzione: la garanzia non ha validità nel caso in cui non siano stati impiegati tutti componenti originali TAU per l’installazione dell’impianto automatico di apertura. GB- Attach the adhesive label (or the series number) of each product in the system. Attention: the guarantee is not valid if TAU original components are not used to install the automatic opening system. F- Reporter l’étiquette adhésive (ou à défaut, le numéro matricule) relative à tous les produits composant l’installation. Attention la garantie n’est pas valable si des composants non originaux TAU ont été utilisés pour l’installation de l’automatisme d’ouverture. D- Die Daten auf dem Aufkleber (oder wenn dieser nicht vorhanden ist, die Matrikelnummer) sind für jedes Produkt der Anlage anzuführen. Achtung! Die Garantie verfällt, wenn für die Installation der automatischen Öffnungsanlage nicht ausschließlich TAU-Original-Ersatzteile verwendet wurden. E- Añada la etiqueta adhesiva (o, si faltara, el número de matrícula) de cada producto que forma parte del equipo. Atención: la garantía no es válida si no se han empleado todos componentes originales TAU para la instalación del equipo automático de apertura. Motore Motor Moteur Motor Motor Serial n°_______________ Quadro elettrico di comando Electric control panel Coffret électrique de commande Elektr. Schaltpult Cuadro eléctrico de mando Radio ricevente Radio receiver Récepteur Funkempfänger Radiorreceptor Fotocellule o/e altro Photocell and/or alternative Photocellules ou/etautre Photozellen bzw. Sonstiges Fotocélulas o demás Motore Motor Moteur Motor Motor Serial n°_______________ Serial n°_______________ Serial n°_______________ Serial n°_______________ I- Nel caso di un impianto comprendente più prodotti TAU soggetti a garanzia raggruppare le etichette adesive in un unico certificato di garanzia o spedire in un’unica busta chiusa tutti i certificati di garanzia relativi ai prodotti utilizzati nell’impianto. GB- In case of a system containing several TAU products under guarantee, collect the sticky labels in a single guarantee certificate and send all the guarantee certificates concerning the products used in the plant in a closed envelope. F- Si une installation comprend plusieurs produits TAU sujets à garantie, regrouper les étiquettes adhésives sur un seul certificat de garantie ou expédier dans une seule enveloppe fermée tous les certificats de garantie relatifs aux produits utilisés dans l’installation. D- Bei einer Anlage mit mehreren Produkten von TAU, die unter die Garantie fallen, sind die Daten der Aufkleber in einem einzigen Garantieschein anzuführen. Es können aber auch sämtliche Garantiescheine für die in der Anlage verwendeten Produkte in einem geschlossenen Kuvert übermittelt werden. E- Si una instalación incluyera varios productos TAU cubiertos por garantía, junte todas las etiquetas adhesivas en un solo certificado de garantía o envíe en un sobre único todos los certificados de garantía referidos a los productos usados en la instalación. I dati personali riportati sul presente tagliando saranno utilizzati allo scopo di far valere la garanzia e per un eventuale invio di materiale informativo. Saranno trattati in ottemperanza alla legge sulla privacy 675/96 (e modifiche successive). The personal data specified on the present coupon shall be used to enforce the guarantee and for eventual forwarding of informative material, and shall be treated in compliance with the privacy law 675/96 (and subsequent amendments). Die auf dem vorliegenden Schein angegebenen persönlichen Daten werden dazu benutzt, die Garantie geltend zu machen und eventuelles Informationsmaterial zu senden. Sie werden unter Einhaltung des Datenschutzgesetzes 675/96 behandelt (und ihren nachfolgende Änderungen). Les données personnelles contenues dans ce coupon seront utilisées pour faire valoir la garantie et pour l’envoi éventuel de matériel d’information. Elles seront traitées dans le respect de la loi italienne sur la protection des données personnelles n° 675/96 (et modifications successives). Los datos personales que figuran en el presente cupón se utilizarán para hacer valer la garantía y para un eventual envío de material informativo. Se tratarán cumpliendo todos los requisitos que obliga la ley sobre la privacidad 675/96 (y modificaciones sucesivas).