Transcript
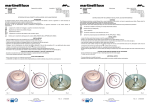
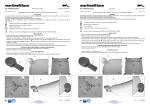
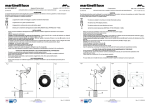
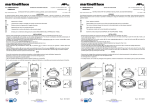
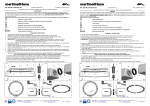
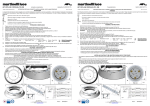
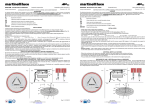
ART. 1243
TIN
1243/F/D
1243/S
Lampada a parete
2x32 W GX 24Q3 FL
1x32 W GX 24Q3 FL + 1x150 W GX5.3 HAL
1x57 W GX 24Q5 FL
ART. 1243
TIN
1243/F/D
1243/S
ISTRUZIONI PER UNA CORRETTA INSTALLAZIONE, USO E MANUTENZIONE
Wall Lamp
2x32 W GX 24Q3 FL
1x32 W GX 24Q3 FL + 1x150 W GX5.3 HAL
1x57 W GX 24Q5 FL
INSTRUCTIONS FOR THE CORRECT INSTALLATION, USE AND MAINTENANCE
Design: Elio Martinelli 1960
Dim.-7,5 x 21 h.25
AVVERTENZE
Le seguenti istruzioni devono essere seguite per la corretta installazione del sistema e servono a garantire la vostra sicurezza. É
necessario conservarle per una successiva consultazione.
IN CASO DI DUBBIO INTERPELLARE UN INSTALLATORE QUALIFICATO.
Disinserire la rete di alimentazione durante l’installazione dell’apparecchio; é opportuno disinserire la rete anche durante la
manutenzione.
Design: Elio Martinelli 1960
Dim.-7,5 x 21 h.25
WARNING
The following instructions must be followed for a correct installation of the product, and serve to guarantee your safety. Please retain for
future reference and make available to those that maintain the product.
IF IN DOUBT, PLEASE SEEK THE ADVICE OF A QUALIFIED INSTALLER.
Disconnect the mains while installing the fitting; the mains should be disconnected also during maintenance operations.
The device is suitable for mounting on normally inflammable surfaces.
L’apparecchio é adatto al montaggio su superfici normalmente infiammabili.
IMQ Certified device
Apparecchio certificato IMQ
Appliance for indoor use (not protected against water).IP40 (1243 /S version)
Apparecchio per uso interno (non protetto all’acqua).
IP40 (Versione 1243/S)
Class I appliance.
Apparecchio di Classe I.
The device conforms to current directive and norms.
L’apparecchio è conforme alle direttive e alle normative vigenti.
Symbol for product disposal (see DISPOSAL OF THE APPLIANCE – RAEE).
Simbolo per lo smaltimento dell’apparecchio (vedere SMALTIMENTO DELL’APPARECCHIO RAEE)
-
-
INSTALLAZIONE
Rimuovere il coperchio ad U (1), svitando le quattro viti laterali di fissaggio. (fig. 1);
Solo Versione 1243/S: Svitare le 2 viti di fissaggio della squadretta (A). (Fig.3);
Fissare la squadretta della lampada (B) alla parete con due tasselli con l’ interasse. (Fig.4);
Collegare i cavi di alimentazione alla morsettiera (C) come da figura 5;
Fissare il corpo della lampada (2) alla parete con due tasselli con interasse come nelle figure 2, (solo 1243/ F/ D)
Inserire le tipologie di lampadine in funzione dell’articolo scelto;
Inserire il coperchio ad U (1) e fissarlo al corpo lampada (2) con le quattro viti laterali (3). (Fig.1-6);
CAUTELE DA ADOTTARE DURANTE L’USO DELL'APPARECCHIO
Durante la manutenzione (per sostituzione lampadina o pulizia) disinserire la rete elettrica;
Per la pulizia utilizzare solamente un panno asciutto;
SOSTITUZIONE LAMPADINA
Togliere il vetro o la lamiera di protezione (9) in funzione dell’articolo scelto, svitando le due viti (si veda figura);
Inserire la tipologia di lampadina indicata sull’etichetta dell’apparecchio e richiudere l’apparecchio serrando le due viti del vetro o
lamiera di protezione (9);
NOTE SUPPLEMENTARI
Per la sostituzione delle lampadine non è necessario rimuovere il coperchio ad U (1).
Per la vostra sicurezza non modificare l'apparecchio;
La Martinelli Luce Spa non si assume alcuna responsabilità per prodotti modificati senza preventiva autorizzazione;
-
INSTALLATION
Remove the U cover (1), unscrewing the four side fixing screws;
1243/ Version only: Unscrew the two fixing screws on the bracket (A);(Fig.3)
Fix the bracket of the lamp (B) to the wall with two plugs with the distance as shown in (Fig.4);
-
Connect the power supply cables to the terminal board (C).(Fig. 5);
Fix the body of the lamp (2) to the wall using two anchors with the centre distance, as in the figure; 2 (only 1243/F/D)
Insert the bulb types based on the item chosen;
Insert the U cover (1) and secure it to the lamp body (2) with the four side screws (3). (Fig.1-6);
-
-
CAUTION TO BE ADOPTED DURING USE OF THE DEVICE
During maintenance (to change the bulb or cleaning) disconnect the mains supply.
To clean use only a dry cloth;
BULB REPLACEMENT
Remove the glass and protective sheet (9) based on the item chosen, removing the two screws (see figure);
Insert the bulb type indicated on the appliance label and close the appliance by tightening the two screws of the glass or the
protective sheet (9);
ADDITIONAL NOTES
There is no need to remove the U cover (1) to replace bulbs.
For your safety do not modify the device;
Martinelli Luce Spa does not assume any responsibility for products modified without authorisation;
Fig.4
Fig.4
A
A
Fig.2
Fig.2
B
B
Fig.3
Fig.5
Fig.3
Fig.6
Fig.5
Fig.6
Fig.1
Fig.1
3
Fig.1
C
Via T.Bandettini
55100 Lucca – Italia
tel. +39 0583 41.83.15 telefax +39 0583 41.90.03
e-mail [email protected]
3
C
Rev. 0
23/03/2009
Via T.Bandettini
55100 Lucca – Italia
tel. +39 0583 41.83.15 telefax +39 0583 41.90.03
e-mail [email protected]
Rev. 0
23/03/2009