1
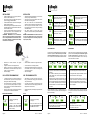
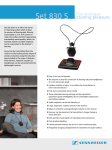
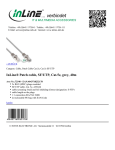
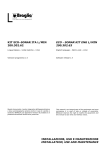
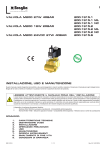
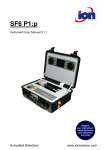
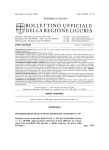
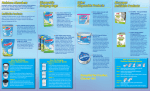
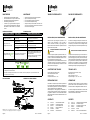
 MANUTENZIONE
MAINTENANCE
•
•
•
•
•
•
•
•
•
•
Indossare sempre indumenti protettivi adeguati;
Pulire esclusivamente con un panno morbido umido;
Non utilizzare detergenti o sostanze aggressive;
Non utilizzare getti d’acqua diretti;
Al termine di ogni giornata lavorativa, eseguire un
ciclo di pulizia del circuito dell’irroratrice e delle parti
del trasduttore a diretto contatto con la soluzione
chimica
RICERCA INCONVENIENTI
200.302.74 PRESS-MATE D
200.302.74 PRESS-MATE D
Always wear chemical proof and safety equipments;
Only use soft damp cloth for cleaning;
Do not use detergents or aggressive chemicals;
Do not use direct water jets for cleaning;
Always flush the pressure transmitter connection to the
circuit of the crop protection machine and the circuit itself
at the end of each working day
TROUBLESHOOTING
INCONVENIENTE / PROBLEM
CAUSA / CAUSE
RIMEDIO / CORRECTIVE ACTION
Il display non si accende
The display does not switch on
Manca alimentazione
No power supply
Verificare le connessioni sul cavo di alimentazione
Check connection on the power cable
INSTALLAZIONE, USO E MANUTENZIONE
INSTALLATION, USE AND MAINTENANCE
Programmazione errata
Wrong programming
Ripetere la programmazione
Repeat programming
Il trasduttore non funziona
Problems with pressure transmitter or sensor
Rivolgersi ad un centro di assistenza
Call your nearest service center
La scheda elettronica è danneggiata
PCB is damaged
Rivolgersi ad un centro di assistenza
Call your nearest service center
Questo manuale è parte integrante del prodotto a cui si
riferisce e deve accompagnarlo in caso di vendita o
cessione. Conservare il manuale per ogni impiego futuro.
Braglia si riserva il diritto di modificare in qualsiasi momento le
specifiche tecniche del prodotto.
This manual is an integral part of the product and must accompany it in the event of sale or transfer to another user. Keep
the manual in good condition for future use. Braglia reserves
the right to change the product’s technical specifications at any
time.
E’ stato raggiunto il valore di fondo scala
Pressure limit or end scale reached
Verificare il valore di fondo scala inserito e controllare che il valore da misurare rientri nel campo di
misura dello strumento
Check the end scale value and make sure that this
value is within the instrument range
Il display mostra dati errati
The display shows incorrect data
Il display visualizza il valore
The display screen shows
oL
CODICI DI ERRORE / ERROR CODES
1
E-02
RESET
TOT
2
E-03
RESET
TOT
3
E-04
RESET
READ THIS MANUAL CAREFULLY BEFORE USE
L'osservanza di quanto riportato nel presente manuale è condizone essenziale per la sicurezza dell'operatore, l'integrità del
prodotto, la costanza delle caratteristiche dichiarate e il mantenimento della garanzia generale di vendita.
Ogni modalità d'uso non prevista dalla destinazione d’uso è da
considerarsi impropria e quindi pericolosa. Il costruttore non
può essere ritenuto responsabile per eventuali danni causati
da manomissioni ed usi impropri.
Compliance with the prescriptions given in this manual is an
essential prerequisite to ensure the safety of the operator. Also
protects the integrity of the product, preserves the stated performance characteristics and maintains the coverage provided
by the general terms of warranty. All other uses other than the
intended use are considered to be improper and potentially
hazardous. The manufacturer cannot be held liable for any potential damage caused by tampering and/or improper use.
CARATTERISTICHE TECNICHE
TECHNICAL DATA
Pressione massima di impiego: 60 bar
Tensione di alimentazione: 12Vdc
Consumo: < 20 mA
Temperatura di esercizio: 0° - 50°C
Max. operating pressure: 60 bar / 870 psi
Power input: 12Vdc
Power consumption: < 20 mA
Temperature range: 0° - 50°C / 32° - 122°F
DESTINAZIONE D’USO
INTENDED USE
Press-Mate D è un dispositivo per visualizzare la pressione di
lavoro all’interno della cabina della trattrice. Press-Mate D può
essere utilizzato singolarmente o come ideale completamento
dei Kit Control M180 e Kit Control M200 Braglia.
Questo dispositivo è stato progettato per l’installazione su
macchine agricole per diserbo e irrorazione. L’apparecchiatura
è progettata e realizzata in conformità alla direttiva 89/336/
CEE del 03/05/1989 e successive modificazioni ed alla norma
EN ISO 14982.
Press-Mate D is a device to display crop protection equipment
pressure inside the tractor cab. Press-Mate D can be used
standalone or fitted over Braglia M180 and M200 control kits.
CONTENUTO
CONTENTS
TOT
1 - Trasduttore scollegato o danneggiato: verificare la connessione sul sensore. Se il problema persiste rivolgersi ad un centro di assistenza
2 e 3 - Rivolgersi ad un centro di assistenza
1 - Disconnected or damaged pressure transmitter or sensor. Check the connection. If problem persist, call your nearest service center
2 e 3 - Contact the service center directly
ESPLOSO RICAMBI
LEGGERE ATTENTAMENTE IL MANUALE PRIMA
DELL’USO
SPARE PARTS CUTAWAY DRAWING
N°1
180.1713.2
N°1
200.1605.18
N°1
200.231.4
N°1
200.309.1
N°1180.1506.8
N°4
200.402.22
Braglia srl - via Lutero, 4 – I 42122 Masone (Reggio Emilia) – Italy - UE - tel. +39 0522 340648 - fax +39 0522 340897
web: www.braglia.it – email : [email protected] – email Ufficio Tecnico : [email protected]
Pag. 4/4
Rev. 01 20/11/2012
Trasduttore 0/60bar cablato
Supporto Press-Mate D
Cavo Press-Mate D 6m
Display Press-Mate D
Rondella
Adesivo Dual Lock
This device is designed and manufactured in accordance with
drective 89/336/EEC of 03/05/1989 and subsequent amendments and with EN ISO 14982 standard.
N°1
180.1713.2
N°1
200.1605.18
N°1
200.231.4
N°1
200.309.1
N°1180.1506.8
N°4
200.402.22
0/60bar wired pressure transmitter
Press-Mate D support
Press-Mate D cable 6m / 19.7ft
Press-Mate D display
Washer
Dual Lock recloseable fasteners
Pag. 1/4
Rev. 01
20/11/2012
INSTALLAZIONE
•
Installare il trasduttore 180.1713.2 sul gruppo valvole utilizzando un attacco filettato G1/4F;
• Pulire con alcool le sedi per gli adesivi del supporto e la
superfice di appoggio del Press-Mate D;
• Incollare due adesivi Dual Lock 200.402.22 nelle apposite
sedi del supporto 200.1605.18;
• Assemblare il supporto sulla superfice scelta o sulla sommità della pulsantiera dei Kit Control M180 / M200 utilizzando i due adesivi residui;
• Inserire fino a battuta il display 200.309.1 all’interno del
supporto 200.1605.18. Il cavo di alimentazione 12Vdc
deve essere inserito all’interno del foro Ø5;
ATTENZIONE - IMPORTANTE: il cavo di alimentazione
deve essere collegato al circuito di accensione della trattrice. Se collegato direttamente all’accumulatore, alimentare il display utilizzando un interruttore On/Off. Rispettare la tensione richiesta (12Vdc).
INSTALLATION
unit
•
Assemble the pressure transmitter 180.1713.2 to the valve
assembly using a 1/4”BSP female port;
• Clean with alcool the support fasteners seats and the
Press-Mate D assembling surface;
• Stick over the two Dual Lock recloseable fasteners
200.402.22 to the provided seats of support 200.1605.18;
• Stick the support over the desired surface or over the
M180 / M200 control kit switch box using the remaining
recloseable fasteners;
• Push display 200.309.1 and cable inside support
200.1605.18. 12Vdc cable must be pushed inside the Ø5
hole;
WARNING - VERY IMPORTANT: 12Vdc cable must be wired
to to the tractor battery ignition circuit. An on/off switch
is required if directly wired to tractor battery. Respect the
required power (12Vdc)
RESET
TOT
•
•
•
Assemblare la rondella 180.1506.8 sul supporto
200.1605.18;
Collegare il cavo 200.231.4 sul display 200.309.1;
Stendere il cavo 200.231.4 ed accoppiarlo al cavo del
trasduttore 180.1713.2. Fissare bene il cavo per evitare il
contatto con organi in movimento;
Alimentare il display.
•
Assemble washer 180.1506.8 over support 200.1605.18;
•
•
Connect cable 200.231.4 to display 200.309.1;
Stretch cable to the desired position and connect it to pressure transmitter 180.1713.2 cable. Fix the wiring to avoid
contact with moving parts;
Switch on the display.
•
USO - NOTE DI PROGRAMMAZIONE
USE - PROGRAMMING NOTES
•
•
•
•
In seguito alla modifica di un parametro all’interno del
menù avanzato “OPT”, per ritornare al menù principale si
deve togliere e ridare tensione al display;
Se si modifica il valore di un parametro o si è all’interno
di un menù che non sia quello principale e non si preme
nessun pulsante entro 10 secondi il visualizzatore ritorna
al menù principale;
Variando un valore numerico la pressione prolungata del
pulsante provoca la modifica veloce del valore.
IMPOSTAZIONI PRELIMINARI
oPt
RESET
TOT
•
•
Switch display on and off to return to the main menu following a parameter data changing inside the advanced
“OPT” parameter menu;
If no switch is pressed within 10 seconds inside a menu
other than the main one or after changing parameters, the
display returns to the main menu;
Keeping the switches pressed quickly changes the values
displayed;
SETUP
RESET
EU
RESET
Unit setup
EU = Europa (bar) [ predefinito ]
US = USA (psi)
EU = Europe (bar) [ pre defined ]
US = USA (psi)
Per accedere al menù avanzato tenere premuto il tasto “TOT” durante
l’accensione fino alla comparsa del valore “OPT” sul display
oPt
RESET
TOT
To access the advanced menu, keep
pressed “TOT” while switching on the
unit until “OPT” value is shown
Pag. 2/4
Rev. 01
20/11/2012
TOT
RESET
TOT
TOT
RESET
Confermare la selezione premendo contemporaneamente “RESET” e “TOT”
fino alla comparsa sul display del valore
“SAVE”
TOT
To change unit keep pressed together
“RESET” and “TOT” switches until “SET”
value is displayed
EU
Premere “TOT” per selezionare l’unità di
misura: EU (bar) - US (psi)
SAVE
The display flashes and show the pre set
unit along with“UNIT” value
SEt
Per modificare il dato premere contemporaneamente “RESET” e “TOT” fino alla
comparsa sul display del valore “SET”
TOT
Press “TOT” to select EU (bar) or US (psi)
TOT
SAVE
RESET
To save settings, press together “RESET”
and “TOT” until “SAVE” value is displayed
TOT
L’unità impostata viene visualizzata alternata al valore “UNIT”.
The selected unit is displayed alternated to the “UNIT” value.
PROGRAMMAZIONE
PROGRAMMING
E’ necessario fornire a Press-Mate D il valore di fondo scala del
trasduttore di pressione. Il valore da inserire per il trasduttore fornito in dotazione è 60 bar ma può essere compreso
tra 0.1 e 999.99 in funzione del modello di trasduttore montato.
Press- mate D must be provided with the pressure transmitter
pressure limit value. For the pressure transmitter supplied
this value is 60 bar ( 870 psi ). Press-Mate D may be connected to other pressure transmitters or sensors. The setup
value scale is within 0.1 to 999.99.
1
2
0.0
RESET
3
SEt
RESET
TOT
-
TOT
4
50.0
RESET
TOT
SAVE
+
RESET
TOT
1
2
0.0
RESET
3
SEt
RESET
TOT
-
TOT
4
50.0
RESET
TOT
SAVE
+
RESET
TOT
1. Dopo aver eseguito la procedura di accensione il display mostra il valore del fondo scala precedentemente
impostato;
2. Per modificare il dato tenere premuti contemporaneamente “RESET” e “TOT” fino alla comparsa sul display
del valore “SET”;
3. Impostare il valore di fondo scala premendo “TOT” per
incrementare e “RESET” per decrementare. Una pressione prolungata permette la modifica rapida dei valori;
4. Per confermare l’impostazione premere contemporaneamente “RESET” e “TOT” fino alla comparsa del valore “SAVE”
1. After that the unit is switched on and setup steps are
done, the display shows the last pressure limit value;
Qualora Press-Mate D mostri una pressione diversa da 0
quando il circuito non è in pressione, è necessario eseguire la
taratura a 0 del display.
If Press-Mate D displays a pressure other than 0 when there
is no pressure in the circuit, it will be necessary to setup this
value to 0.
1
Impostazione dell’unità di misura
RESET
SEt
RESET
•
unit
Il display mostra l’unità di misura impostata alternata al valore “UNIT”
1.2
RESET
TOT
2
3
rSt
RESET
TOT
0.0
RESET
TOT
1. Accendere il display. Viene visualizzata prima l’unità di
misura e poi il valore della pressione;
2. Premere “RESET” fino alla comparsa del valore “RST”;
3. Il valore della pressione è azzerato
2. To change this value, keep pressed “RESET” and “TOT”
switches until “SET” value is displayed;
3. Setup pressure limit value pressing “TOT” switch to increase it and “RESET” to decrease this value. Keeping
the switches pressed enables quick value changes;
4. To save, keep “RESET” and “TOT” pressed until “SAVE”
value is displayed
1
1.2
RESET
TOT
2
3
rSt
RESET
TOT
0.0
RESET
TOT
1. Turn on the device The pressure data is displayed after
showing the unit set;
2. Press “RESET” until “RST” is shown;
3. The pressure value is now 0
Pag. 3/4
Rev. 01
20/11/2012
MANUTENZIONE
MAINTENANCE
•
•
•
•
•
•
•
•
•
•
Indossare sempre indumenti protettivi adeguati;
Pulire esclusivamente con un panno morbido umido;
Non utilizzare detergenti o sostanze aggressive;
Non utilizzare getti d’acqua diretti;
Al termine di ogni giornata lavorativa, eseguire un
ciclo di pulizia del circuito dell’irroratrice e delle parti
del trasduttore a diretto contatto con la soluzione
chimica
RICERCA INCONVENIENTI
200.302.74 PRESS-MATE D
200.302.74 PRESS-MATE D
Always wear chemical proof and safety equipments;
Only use soft damp cloth for cleaning;
Do not use detergents or aggressive chemicals;
Do not use direct water jets for cleaning;
Always flush the pressure transmitter connection to the
circuit of the crop protection machine and the circuit itself
at the end of each working day
TROUBLESHOOTING
INCONVENIENTE / PROBLEM
CAUSA / CAUSE
RIMEDIO / CORRECTIVE ACTION
Il display non si accende
The display does not switch on
Manca alimentazione
No power supply
Verificare le connessioni sul cavo di alimentazione
Check connection on the power cable
INSTALLAZIONE, USO E MANUTENZIONE
INSTALLATION, USE AND MAINTENANCE
Programmazione errata
Wrong programming
Ripetere la programmazione
Repeat programming
Il trasduttore non funziona
Problems with pressure transmitter or sensor
Rivolgersi ad un centro di assistenza
Call your nearest service center
La scheda elettronica è danneggiata
PCB is damaged
Rivolgersi ad un centro di assistenza
Call your nearest service center
Questo manuale è parte integrante del prodotto a cui si
riferisce e deve accompagnarlo in caso di vendita o
cessione. Conservare il manuale per ogni impiego futuro.
Braglia si riserva il diritto di modificare in qualsiasi momento le
specifiche tecniche del prodotto.
This manual is an integral part of the product and must accompany it in the event of sale or transfer to another user. Keep
the manual in good condition for future use. Braglia reserves
the right to change the product’s technical specifications at any
time.
E’ stato raggiunto il valore di fondo scala
Pressure limit or end scale reached
Verificare il valore di fondo scala inserito e controllare che il valore da misurare rientri nel campo di
misura dello strumento
Check the end scale value and make sure that this
value is within the instrument range
Il display mostra dati errati
The display shows incorrect data
Il display visualizza il valore
The display screen shows
oL
CODICI DI ERRORE / ERROR CODES
1
E-02
RESET
TOT
2
E-03
RESET
TOT
3
E-04
RESET
READ THIS MANUAL CAREFULLY BEFORE USE
L'osservanza di quanto riportato nel presente manuale è condizone essenziale per la sicurezza dell'operatore, l'integrità del
prodotto, la costanza delle caratteristiche dichiarate e il mantenimento della garanzia generale di vendita.
Ogni modalità d'uso non prevista dalla destinazione d’uso è da
considerarsi impropria e quindi pericolosa. Il costruttore non
può essere ritenuto responsabile per eventuali danni causati
da manomissioni ed usi impropri.
Compliance with the prescriptions given in this manual is an
essential prerequisite to ensure the safety of the operator. Also
protects the integrity of the product, preserves the stated performance characteristics and maintains the coverage provided
by the general terms of warranty. All other uses other than the
intended use are considered to be improper and potentially
hazardous. The manufacturer cannot be held liable for any potential damage caused by tampering and/or improper use.
CARATTERISTICHE TECNICHE
TECHNICAL DATA
Pressione massima di impiego: 60 bar
Tensione di alimentazione: 12Vdc
Consumo: < 20 mA
Temperatura di esercizio: 0° - 50°C
Max. operating pressure: 60 bar / 870 psi
Power input: 12Vdc
Power consumption: < 20 mA
Temperature range: 0° - 50°C / 32° - 122°F
DESTINAZIONE D’USO
INTENDED USE
Press-Mate D è un dispositivo per visualizzare la pressione di
lavoro all’interno della cabina della trattrice. Press-Mate D può
essere utilizzato singolarmente o come ideale completamento
dei Kit Control M180 e Kit Control M200 Braglia.
Questo dispositivo è stato progettato per l’installazione su
macchine agricole per diserbo e irrorazione. L’apparecchiatura
è progettata e realizzata in conformità alla direttiva 89/336/
CEE del 03/05/1989 e successive modificazioni ed alla norma
EN ISO 14982.
Press-Mate D is a device to display crop protection equipment
pressure inside the tractor cab. Press-Mate D can be used
standalone or fitted over Braglia M180 and M200 control kits.
CONTENUTO
CONTENTS
TOT
1 - Trasduttore scollegato o danneggiato: verificare la connessione sul sensore. Se il problema persiste rivolgersi ad un centro di assistenza
2 e 3 - Rivolgersi ad un centro di assistenza
1 - Disconnected or damaged pressure transmitter or sensor. Check the connection. If problem persist, call your nearest service center
2 e 3 - Contact the service center directly
ESPLOSO RICAMBI
LEGGERE ATTENTAMENTE IL MANUALE PRIMA
DELL’USO
SPARE PARTS CUTAWAY DRAWING
N°1
180.1713.2
N°1
200.1605.18
N°1
200.231.4
N°1
200.309.1
N°1180.1506.8
N°4
200.402.22
Braglia srl - via Lutero, 4 – I 42122 Masone (Reggio Emilia) – Italy - UE - tel. +39 0522 340648 - fax +39 0522 340897
web: www.braglia.it – email : [email protected] – email Ufficio Tecnico : [email protected]
Pag. 4/4
Rev. 01 20/11/2012
Trasduttore 0/60bar cablato
Supporto Press-Mate D
Cavo Press-Mate D 6m
Display Press-Mate D
Rondella
Adesivo Dual Lock
This device is designed and manufactured in accordance with
drective 89/336/EEC of 03/05/1989 and subsequent amendments and with EN ISO 14982 standard.
N°1
180.1713.2
N°1
200.1605.18
N°1
200.231.4
N°1
200.309.1
N°1180.1506.8
N°4
200.402.22
0/60bar wired pressure transmitter
Press-Mate D support
Press-Mate D cable 6m / 19.7ft
Press-Mate D display
Washer
Dual Lock recloseable fasteners
Pag. 1/4
Rev. 01
20/11/2012