1
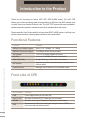
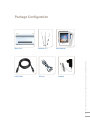
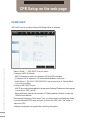
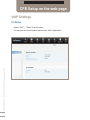
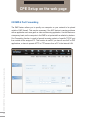
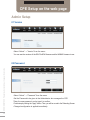
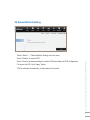
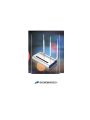
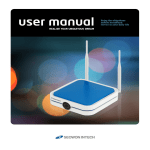
user manual
REALIZE YOUR UBIQUITOUS DREAM
Enjoy the ubiquitous
mobile broadband
service in your daily life
Contents
.......................................................... 04
Introduction to the Product
................................................................................... 04
Functional Features
Front side of CPE ......................................................................................... 04
Rear side of CPE .......................................................................................... 05
Configuration ........................................................................................ 06
Network Configuration
Package Configuration
............................................................................... 06
............................................................................... 07
PC Configuration (Windows XP)
How to check your IP address
................................................................ 08
................................................................... 11
CPE Built-in Web Server Access
CPE Setup on the web page
................................................. 12
........................................................... 13
............................................................... 13
1.1 LAN (LAN Configuration)
1.2 LAN (LAN Status) ............................................................................. 14
2.1 Switch (Switch Status) .................................................................... 15
3.1 WLAN (WiFi Setup) .......................................................................... 16
3.2 WLAN (WiFi DHCP) .......................................................................... 18
3.3 WLAN (WiFi Status) .......................................................................... 19
4.1 VoIP (VoIP Status) ............................................................................ 20
5.1 Application (Firewall)
..................................................................... 21
........................................... 22
5.2 Application (DMZ & Port Forwarding)
.................................................... 24
5.3 Application (VPN pass through)
5.4 Application (UPNP) ......................................................................... 25
5.5 Application (QoS)
5.6 Application (DDNS)
5.7 Application (MTU)
6.1 Admin (Version)
........................................................................... 26
......................................................................... 28
........................................................................... 29
.............................................................................. 30
6.2 Admin (Password) ............................................................................ 30
6.3 Admin (CPE Upgrade) ...................................................................... 31
6.4 Admin (Reboot/Default Setting)
.................................................... 33
Trouble Shooting .................................................................................
Operating Information ......................................................................
Safety Information .............................................................................
Legal Information ...............................................................................
......................................................................
Warranty Information
34
36
37
38
39
Introduction to the Product
Thank you for choosing our Indoor VoIP CPE, SWC-5x00W series. The VoIP CPE
allows you to share a superior data communication by Ethernet and WiFi network, and
to make Voice over Internet Protocol calls. The VoIP CPE comes with easy installation,
reliable network connection, advanced security & authentication and mores.
Please read this User Guide carefully to learn about SWC-5x00W series. It will help your
various communication needs properly served at home and offices.
SEOWONINTECH Proprietary-Contents may change without notice
Functional Features
04
Function
Features
IEEE802.16e WiMAX Support
Wave2 = DL : 30Mbps / UL : 6Mbps
IEEE802.3u Ethernet Support
10/100Mbps wired LAN connectable
VoIP Support
1 x RJ-11 for Analog Telephone Service
LAN Port
2 x Ports 10/100Mbps Ethernet Switch built-in
Cable Auto Sense
Straight (Direct) or Cross Cable auto sensing
NAT function
Supports up to 253 wired and wireless connections and
internet router*
Firewall function
Manages basic firewall and IP/Port/based access
Front side of CPE
LED Indicator
Function
PWR
Power Supply status (On at Power ON)
LAN1 / LAN2
ON when connected to PC, Flashing at communication
PHONE
ON when connected to Telephone, Flashing at communication
RSSI
Representation WiMAX received signal strength indication(RSSI), on
when the mode was selected router.
Rear side of CPE
Antenna2
WiMAX Main
Power Switch
Antenna1
WiMAX
Diversity
PC
Telephone
Power
Adapter
Hardware
Reset
Item
Details
External Antenna
Antenna1 : WiMAX Diversity
Antenna2 : WiMAX Main
Antenna3 : WiFi
Separable external antenna
User external type antenna attachable
* Antenna Classification
- 2.3G : M23
- 2.5G : M25
- 3.5G : M35
- WiFi : WiFi
LAN1 / LAN2
PC or Hub connection
PHONE
Telephone connection
DC 12V
Power Adapter connection (DC 12V
POWER
Power On/Off Switch (Switch between On/Off by pressing right or left)
RESET
Restore the VoIP CPE Factory Default
2.0A)
NOTE
If you lost LOGIN password for router or IP address after change, use the Reset
switch to restore its original Factory Default settings.
This Document cannot be used without the authorization of SEOWONINTECH
Antenna3 WiFi
05
Configuration
Network Configuration
Local Network
Gateway
External Network
WiMAX
PC
Internet
Telephone
SEOWONINTECH Proprietary-Contents may change without notice
To verify the normal operation of the router, check the following LEDs after connecting
the router, modem, and PC with a LAN cable, as follows:
06
LED
Normal Operation
Actions to take if not illuminated
PWR
ON when connecting adapter
Check for adapter power failure
LAN1 / LAN2
ON when cable is connected normally
Check for adapter power failure
PHONE
On when Phone cable is connected
normally
Check cable connection and
Telephone
Represents WiMAX received signal
strength indication (RSSI), ON when in
router mode
Check that router mode is selected
WiMAX
RSSI
If one or more LED lights is not in“normal operation”, take the actions specified in the table.
Install a router after connecting to the network.
If normal connection between router and PC is checked, you have to set up the PC and router.
PC setup is to control network configuration for Windows 98, Windows 2000, or Windows XP
to use the Internet while the PC is connected to a router.
Router setup is to connect a router to the Internet. Please refer to the CPE Setup chapter.
Package Configuration
LAN Cable
Antenna X 3
Tel Line
User Manual
Adapter
This Document cannot be used without the authorization of SEOWONINTECH
Main Unit
07
Configuration
PC Configuration (Windows XP)
This procedure is used to restore Windows XP’s TCP/IP setup to the default values. If
Windows has just been installed for the first time on the PC, no changes should be required,
but you should check to confirm that all values are normal according to the following.
After completing the TCP/IP setup of the PC, connect PC and CPE with a LAN cable and
turn CPE on before Windows starts up to determine whether an IP address is obtained
from CPE automatically.
■
■
Click the Windows Start button, and select Settings >> Control Panel from the menu.
Double-click the “Network Connection” icon in the Control Panel.
SEOWONINTECH Proprietary-Contents may change without notice
Double-click the Network and Internet Connections
08
Double-click the Network Connection
■
Double-click the Local Area Connection from the Network Connection list to select it.
Double-click the Local Area Connection
■
Click “Properties” in the Local Area Connection Status window.
Click Properties
This Document cannot be used without the authorization of SEOWONINTECH
09
Configuration
SEOWONINTECH Proprietary-Contents may change without notice
10
■
Double-click Internet Protocol (TCP/IP) to open its Properties window, and then select
“Obtain an IP address automatically” and “Obtain a DNS Server address automatically”.
Double-click TCP/IP
■
Select the‘Obtain an IP address automatically’
‘Obtain a DNS Server address automatically’
and click OK
After completing setup, click OK and close all of the Local Area Connection Properties windows.
■ When TCP/IP setup is completed, an IP address is automatically assigned by CPE.
For automatic assignment, the PC and the CPE should be connected with a LAN cable.
If they are not connected with a cable, connect them with a LAN cable and restart the PC.
■ You can check the automatic IP address assignment by using the ipconfig command
from the Command Prompt.
How to check your IP address
■ To run the Command Prompt, click the Start button at the lower left corner of the
Windows screen. Click Run, then enter “cmd” in the Open box, and click OK.
Run cmd
■ When the Command Prompt window opens, enter the “ipconfig” command to
verify the IP address, Subnet mask, and Gateway, which are automatically assigned to PC.
NOTE
Verify IP address
NOTE
If an IP address is not assigned, check the following, and then restart the PC and
check whether an IP address is assigned.
LAN cable connection between PC and CPE
Check TCP/IP setup details
This Document cannot be used without the authorization of SEOWONINTECH
All PCs connected to CPE will receive their own assigned IP address.
11
CPE Built-in Web Server Access
The WEB GUI is used to manage a CPE and view its current status.
You can access the web server that is built into the CPE, even when not connected to the
Internet.
To access the web server, open Internet Explorer or your Browser and type “192.168.1.1”,
which is the IP address of CPE, in the address bar, as shown below:
NOTE
If the PC is connected to the CPE but is not connected to the Internet, entering the
IP address of 192.168.1.1 in the address box will connect the PC to the CPE web
server. This function may not operate in some environments.
Upon accessing the CPE, the following Login screen will be displayed.
The default user ID and password are admin, which you can change on the web server.
SEOWONINTECH Proprietary-Contents may change without notice
ID / Password = admin/admin
12
NOTE
If you have no input activity for 1 hour, your web connection is terminated. In this
Case, please login again through the login page.
CPE Setup on the web page
LAN Setup
■
Select “LAN” → “LAN Configuration” from the menu.
Configure LAN IP address
LAN IP address is used in the LAN that the CPE manages.
Setup LAN IP address in “IP Address/Subnet Mask” text boxes.
Initial Value is “192.168.1.1/255.255.255.0” and only the last byte in “Subnet
Mask” box can be modified.
■
Configure DHCP server
Enable DHCP server to lease IP address to the computer connecting to CPE with wired LAN.
Setup Maximum lease time (in seconds), IP Starting address, Number of users and
WINS server address.
■
■
Finish setup by clicking the “Save” button. Then, you will be moved to the Rebooting Screen.
■
If you have finished CPE setup and want to reboot the CPE, click “Yes” to reboot the CPE.
■
Changed configuration is applied after rebooting the system.
This Document cannot be used without the authorization of SEOWONINTECH
01 LAN Configuration
13
CPE Setup on the web page
SEOWONINTECH Proprietary-Contents may change without notice
02 Status
14
■
Select “LAN” → “Status” from the menu.
■
You can see the details of the LAN configuration.
Switch Setting
01 Status
■
Select “Switch” → “Status” from the menu.
You can see the various configurations related to switch configuration, such as Switch
mode and several filters.
■
This Document cannot be used without the authorization of SEOWONINTECH
15
CPE Setup on the web page
WLAN(WiFi) Setup
01 WiFi Setup
WiFi configuration can be modified when Switch mode is Router (NAT) Mode.
Be careful when you select WiFi Bridge mode.
When WiFi Bridge mode is enabled.
Wired LAN and WiFi interfaces are member of a single bridge. Wired LAN and WiFi
interfaces have the same MAC address.
SEOWONINTECH Proprietary-Contents may change without notice
16
When WiFi Bridge mode is disabled.
Wired LAN and WiFi interfaces work as independent interfaces from each other. Therefore, the Wired LAN and WiFi interfaces have a different IP address. To lease IP
addresses to PC connected with WiFi, the WiFi DHCP server can be configured.
NOTE
The Wired LAN interface’s IP address can be changed according to the WiFi Bridge
mode. If you can’t access SWC-5x00W with WiFi after the modification of WiFi
Bridge mode, try to access with “192.168.2.1”.
■
Select “WLAN” → “WiFi Setup” from the menu.
■ Configure WiFi Basic
Select whether WiFi is enabled or disabled.
Select whether WiFi Bridge Mode is enabled or disabled.
Configure SSID of wireless AP.
Select wireless mode(11b/g mixed, 11B only, 11G only)
■ Configure WiFi Security
Select Authentication Mode(Open, Shared, WPA-PSK, WPA2-PSK)
Set whether encryption mode using WEP will be used or not.
Set network key if using WEP encryption.
■
Finish setup by clicking “Save”. Then, you will be moved to the Rebooting Screen.
If you have finished CPE setup and want to reboot the CPE, click “Yes” button to
reboot the CPE.
■
■
Changed configuration is applied after rebooting the system.
This Document cannot be used without the authorization of SEOWONINTECH
17
CPE Setup on the web page
02 WiFi DHCP
SEOWONINTECH Proprietary-Contents may change without notice
WiFi DHCP can be configured when WiFi Bridge Mode is disabled.
18
Select “WLAN” → “WiFi DHCP” from the menu.
Configure a WiFi IP Address
WiFi IP address is used in the wireless LAN that CPE manages.
Configure LAN IP address in “IP Address/Subnet Mask” text boxes.
Initial Value is “192.168.2.1/255.255.255.0” and only last byte in “Subnet Mask”
box can be modified.
■
■
■ Configure WiFi DHCP Server
DHCP server should be enabled for the purpose of leasing IP address to the computer
connecting to CPE via WiFi.
Setup Maximum lease time (in seconds), IP Starting address, Number of users and
WINS server address.
Finish setup by clicking the “Save” button. Then, you will be moved to the Rebooting Screen.
If you have finished CPE setup and want to reboot the CPE, click “Yes” button to
reboot the CPE.
■
■
■
Changed configuration is applied after rebooting the system.
■
Select “WLAN” → “Status” from the menu.
■
You can see a lot of information related to the WiFi configuration.
This Document cannot be used without the authorization of SEOWONINTECH
03 WiFi Status
19
CPE Setup on the web page
VoIP Settings
SEOWONINTECH Proprietary-Contents may change without notice
01 Status
20
■
■
Select “VoIP” → “Status” from the menu.
You can see a lot of information related to the VoIP configuration.
Application Setup
01 Firewall
■
Select “Application” → “Firewall” from the menu.
■
If you want to use the Firewall function, check the “Enable” checkbox.
■
Finish setup by clicking the“Apply”button. Then, you will be moved to the Rebooting Screen.
■
Changed configuration is applied immediately.
This Document cannot be used without the authorization of SEOWONINTECH
Firewall enables you to set the CPE so that it is not affected by external hacking attempts,
including Ping Flooding or DoS. Internal LAN PCs are usually isolated/protected from
external Internet attacks even when a firewall is not used, but it is still preferable to set
the firewall to ON as much as possible. By default, the firewall is set to ON.
21
CPE Setup on the web page
02 DMZ & Port Forwarding
SEOWONINTECH Proprietary-Contents may change without notice
The DMZ feature allows you to specify one computer on your network to be placed
outside of NAT firewall. This may be necessary if the NAT feature is causing problems
with an application such as a game or video conferencing application. Use this feature on
a temporary basis, as the computer in the DMZ is not protected from attacks by hackers.
Port Forwarding function is used to forward incoming packets of specific TCP/IP port
from outside to the assigned PC. This function is useful if you have to use VoIP or P2P
applications, or have to operate HTTP or FTP servers from a PC in the internal LAN.
22
■
Select “Application” → “DMZ & Port Forwarding” from the menu.
■
Configure DMZ(Demilitarized Zone)
Select whether or not to enable the DMZ function.
Set the IP address to have all ports opened in “Private LAN IP” content.
■ Finish setup by clicking the “Apply” button. Then, you will be moved to the
Rebooting Screen.
■
Configure Port Forwarding
The port forwarding function can be configured when DMZ is disabled.
Enter the information for Port Forwarding.
After entering all the specific PC information to connect, press the “Add” button to
see the added Port Forwarding information
Then, you will be moved to the Rebooting Screen.
To modify/delete the existing Port Forwarding, use the “Edit”/”Delete” button.
Changed configuration is applied immediately
This Document cannot be used without the authorization of SEOWONINTECH
Enter all information required for Port Forwarding
23
CPE Setup on the web page
03 VPN pass through
SEOWONINTECH Proprietary-Contents may change without notice
The VPN (Virtual Private Network) function is used to obtain access to a security
network installed in a company or an organization via the Internet network.
If there is a VPN Server outside, and one has access to the VPN Server via the Internet
network by using CPE, this screen shows how to activate the security protocol supported
by the appropriate VPN Server.
24
■
Select “Application” → “VPN pass through” from the menu.
■
SWC-5x00W supports 3 types of service: PPTP, L2TP and IPSEC.
■
Select the type(s) of VPN pass-through to use with the checkboxes.
■
Finish setup by clicking the “Apply” button. Then, you will be moved to the Rebooting Screen
■
Changed configuration is applied immediately.
04 UPNP
UPnP (Universal Plug and Play) is the standard for automatically detecting each other
by using the internet and web protocol when a PC, peripheral devices, intelligent home
appliances, or wireless equipment is connected to the network. When a user can add a
certain device to the network using UPnP, the device will complete its own organization,
receive the TCP/IP address, and discover the HTTP-based discovery protocol to publicize its
■
Select “Application” → “UPNP” from the menu.
■
Set the UPNP.
If you want to set the UPNP, check “Enable” in the checkbox.
Finish setup by clicking the “Apply” button. Then, you will be moved to the
Rebooting Screen.
This Document cannot be used without the authorization of SEOWONINTECH
existence to other devices.
25
CPE Setup on the web page
05 QoS
SEOWONINTECH Proprietary-Contents may change without notice
QoS (Quality of Service). On the internet or other network, the QoS can measure and
improve transmission and error rates. It is a concept of attributes that can be guaranteed
to a certain degree. If some high frequency video or multi video information needs to be
transmitted consistently, it has a very special meaning. It is very challenging to transmit
such types of contents through the public network reliably (only at the best you can do).
Using the internet RSVP, the packets passing through the gateway hosts can be quickly
processed according to the predefined policy and reservation standards. If a company
or a user applies the ATM where the service quality can be selected in advance, the QoS
can be measured in various forms such as average delays, delay changes of a cell in
the group, cell losses and transmission error rates, and therefore guaranteed by them.
26
■
Select “Application” → “QoS” from the menu.
■ To set the QoS, check“Shaping”or“Priority”.
The desirable service quality class can be set.
■
Set the priority.
■
Check “Priority” and click “Apply”. The input window will appear.
After entering all the inputs necessary for Priority Setting, press the
“Add” button to see the added priority.
Check the Shaping environment.
After entering all the necessary inputs for shaping,
press the “Add” button to see the added shaping.
This Document cannot be used without the authorization of SEOWONINTECH
By checking “Upload” and “Download” in the checkbox, you can adjust
each speed.
27
CPE Setup on the web page
06 DDNS
SEOWONINTECH Proprietary-Contents may change without notice
DDNS (Dynamic DNS) is a method for easily maintaining the DNS information of a PC that uses
a dynamic IP address. In general, when a user accesses the internet, the internet service provider
arbitrarily assigns one of the IP addresses not used at the moment, and this address is exclusively
provided for the user while accessing the internet. Using this method, you can support many more
computers with the same number of IP addresses compared to the method that assigns a fixed
IP address to each PC.
However, if your own domain name and IP address are registered in the DNS, each time you
access the internet, a new IP address is assigned. This is very inconvenient. The DDNS service
provider uses a special program run on the user’s computer in order to automatically update the
DNS database when a new IP address is assigned by the internet service provider.
In this way, although the IP address corresponding to a specific domain name is changed
frequently, there is no need to know the IP address that other users use to access the computer.
As a result, using the same domain name as before, you can easily access the network.
28
■
Select “Application” → “DDNS” from the menu.
Set the DDNS environment.
If you want to set the DDNS, check “Enable” in the checkbox to enter necessary inputs.
Select the desirable Service Provider, and the input information will be changed.
After entering all the necessary information for DDNS setting, finally, click the “Apply” button to finish setting.
■
07 MTU
■
Select “Application” → “MTU” from the menu.
■
Set the maximum transmittable packet size.
Enter a value between 500 and 1500.
Finally, click the “Apply” button to finish setting.
This Document cannot be used without the authorization of SEOWONINTECH
The MTU (Maximum Transmission Unit) is the maximum sized packet or frame that can
be transmitted in a packet or frame-based network such as TCP/IP. In general, the unit
of octet is used. TCP determines each packet size for all types of transmission. If the
MTU is too large, retransmission is sometimes required when a router cannot handle the
too large packet. On the contrary, if the MTU is to small, the overhead size for header
and transmission/receiving check tends to be large. For most computer operating
systems, you should follow the recommendations from your internet service providers
on whether to change the MTU setting and what value it should be changed to.
29
CPE Setup on the web page
Admin Setup
01 Version
■
■
Select “Admin” → “Version” from the menu.
You can see the versions of the SWC-5x00W firmware and the WiMAX firmware in use.
SEOWONINTECH Proprietary-Contents may change without notice
02 Password
30
Select “Admin” → “Password” from the menu.
Set the Password to be given to the Administrator who manages the CPE.
■ Enter the new password, and re-type it to confirm.
■ Finish setup by clicking the “Apply” button. Then, you will be moved to the Rebooting Screen.
■ Changed configuration is applied immediately.
■
■
■
■
■
Select “Admin” → “CPE Upgrade” from the menu.
Input the CPE firmware path directly, or search for the firmware file by clicking the “Browser” button.
To start the firmware update, click “Apply” button.
This Document cannot be used without the authorization of SEOWONINTECH
03 CPE Upgrade
31
CPE Setup on the web page
SEOWONINTECH Proprietary-Contents may change without notice
32
■
This will take several minutes, and time will vary according to the environment.
In some case, a pop-up window asking to rebuild the system will be opened due to
a version difference. If this occurs, click “Yes” to rebuild the system.
■
■
CPE is rebooted automatically after the upgrade process is complete.
Cau-
To avoid failure of the CPE, do not power off the CPE during the upgrading process.
04 Reboot/Default Setting
■
■
Select “Reboot” to reboot CPE.
■
Select “Reset to all default settings” to reboot CPE and initialize all CPE configuration.
■
To reboot the CPE, click “Apply” button.
■
CPE is rebooted automatically. It takes about 40 seconds.
This Document cannot be used without the authorization of SEOWONINTECH
Select “Admin” → “Reboot/Default Setting” from the menu.
33
Trouble Shooting
Actions to be taken when the Internet is disconnected
01 Check the status of external type modem.
- Check that the Link lamps of cable, modem are illuminated.
02 Check the LED status of CPE.
- Check that the POWER LED is illuminated.
- Check if the LEDs of WiMAX are illuminated.
- For LAN port, check that the lamp of the port connected to the PC is illuminated.
03 Check the IP address of PC.
For Windows 98/ME
- Click [Start] >> [Run] and enter the [winipcfg] command to open the [IP Address] window, and then check the [IP Address].
For Windows 2000/XP
- Run [Command Prompt] and enter the [ipconfig] command to check the [IP address].
04 If IP Address is not normal - Set the IP Address of the PC manually.
SEOWONINTECH Proprietary-Contents may change without notice
For Windows 98/ME
34
- Execute [Run >> Control Panel >> Network], and then click Properties of [TCP/IP] for LAN card.
- Check [Use the assigned IP address], enter [192.168.1.100] for [IP Address] and
[255.255.255.0] for [Subnet Mask].
- Select [Gateway] and enter [192.168.1.1] for [New Gateway], and then click [Add].
- Select [DNS Configuration], check [Use DNS], enter any name for [Host], enter [DNS Server
Address to search], and click [Add].
- Click [OK], click [OK] again in the [Network Properties] window, and then click [OK]
from the [Change System Setup] window to reboot the PC.
For Windows 2000
- Execute [Start -> Control Panel -> Network and Dial-UP Connections], double-click
[Local Area Connection], and click [Properties].
- Click Properties of [Internet Protocol (TCP/IP)] among Components.
- Click [Use the following IP address].
- Enter [192.168.1.100] for [IP Address], [255.255.255.0] for [Subnet Mask], and [192.168.1.1]
for [Default Gateway].
- Click [Use the following DNS Server Address].
- For [Basic Setup DNS Server], enter the communication company server of each country.
- Click [OK]. Click [OK] again in the [Local Area Connection Properties] window.
For Windows XP
For MAC OS X
- From the “Apple” menu, Choose “System Preference..“
- Click on the [Network] icon in the [Internet & Network] category.
- Click on the [Ethernet] option from the left hand side of the Network setting window.
- Select [Manually] option from the [Configure] drop-down menu.
- Enter [192.168.1.100] for [IP Address], [255.255.255.0] for [Subnet Mask], and [192.168.1.1]
for [Router].
- For [DNS Server], enter the communication company server of each country.
- Click [Apply].
05 Run [MS-DOS] or [Command Prompt] and then perform
PING Test with [192.168.1.100]
A message [Reply from 192.168.1.1: bytes=32 time=1ms TTL=64] should appear
when running [ping 192.168.1.1] command. If the result of the Ping test does not arrive
properly, please contact the Customer Support Center.
This Document cannot be used without the authorization of SEOWONINTECH
- [Start -> Control Panel -> Network and Internet Connection], double-click [Local Area
Connection], and click [Properties]. Click Properties of [Internet Protocol (TCP/IP)] among
Components.
- Click [Use the following IP address].
- Enter [192.168.1.100] for [IP Address], [255.255.255.0] for [Subnet Mask], and [192.168.1.1]
for [Default Gateway].
- Click [Use the following DNS Server Address].
- For [Basic Setup DNS Server], enter the communication company server of each country.
- Click [OK]. Click [OK] again in the [Local Area Connection Properties] window.
35
Operating Information
Temperature Range for the SWC-5x00W
- Operating temperature for the units is 0 ~ 40 C
Power Rating AC for the SWC-5x00W
SEOWONINTECH Proprietary-Contents may change without notice
- 110-240V ~ 50/60Hz 0.6A Max
36
Safety Information
Caution
■
Do not put any object on the product.
■
Avoid heating devices.
■
Never disassemble, repair or redeign the product.
■
Be careful not to let any alien particle get inside the product.
■
Do not leave the Product at a location where static electricity is severe,
it can cause malfuction to the product.
Do not put any metallic object (coin, hair pin) or flammable object
inside the product or drop the product.
■
This Document cannot be used without the authorization of SEOWONINTECH
When minor injury or product damage can
occur from violation of the following directions.
37
Legal Information
WEEE Notice
The disposal of this device is subject to the Waste from Electrical and Electronic
Equipment(WEEE) Diretive of the European Union.
The Drective aims to promote environmentally-friendly handling of WEEE by ecological
disposal or reuse/refurbishment of the collected WEEE.
This symbol on the device signifies that the device ought not to be
discarded with mormal household garbage. You are obliged to hand over
this device to a certified collection point at the end of its life. Separating.
WEEE from other waste helps minimize any of their hazardous effects on
environment and human beings. For more information, Please contact
a municipal office or the retail stores where you purchased this device.
SEOWONINTECH Proprietary-Contents may change without notice
EU Regulatory Conformance
38
Hereby, SEOWON INTECH Co., Ltd. declares that this device is in compliance with the
essential requirements and other relevant provisions of Directive 1999/5/EC.
For the declaration of conformity, visit the Web site
Http://www.seowonintech.co.kr/en/customer/regulatory.asp
1588
Warranty Information
Quality Warranty
This product is the result of high-class craftsmanship based on strict quality
control procedures.
■ In case of Product failure or malfunction during normal usage, your product will be
repaired free of charge within the Limited Warranty period.
The Consumer shall bear any labor or parts charges not covered by this Limited Warranty.
■
■
At the request for repair, you must provide the proof of purchase and the warranty.
■
Keep the warranty in a safe location because it is not reissued.
Purcahse date
Quality warranty period
1(one) year
Telephone number
Consumer
Name
Address
Telephone number
E-mail
The Consumers shall have no coverage or benefits under this Limited Warranty
if the Product has been:
■ Subjected to inappropriate use, improper storage, unauthorized repair, unauthorized
modifications, neglect abuse, inadequate installation, misuse, damage caused
by shipping, etc.
■ Damaged from fire, flooding, windstrom, lighting, earthquake, theft, blown fuse,
internet viruses, worms, Trojan Horses, etc.
■
Removed of its Product serial # plate.
This Document cannot be used without the authorization of SEOWONINTECH
Seller
39
Memo