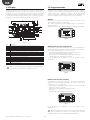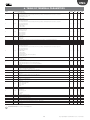
1
easy way acqua
soluzione wireless integrata per la gestione di unità fan coil
integrated wireless solution for the management of fan coils
Manuale d’uso
User manual
Integrated Control Solutions & Energy Savings
ITA
AVVERTENZE
SMALTIMENTO
CAREL basa lo sviluppo dei suoi prodotti su una esperienza pluridecennale
nel campo HVAC, sull’investimento continuo in innovazione tecnologica
di prodotto, su procedure e processi di qualità rigorosi con test in-circuit e
funzionali sul 100% della sua produzione, sulle più innovative tecnologie
di produzione disponibili nel mercato. CAREL e le sue filiali/affiliate non
garantiscono tuttavia che tutti gli aspetti del prodotto e del software incluso
nel prodotto risponderanno alle esigenze dell’applicazione finale, pur essendo
il prodotto costruito secondo le tecniche dello stato dell’arte.
Il cliente (costruttore, progettista o installatore dell’equipaggiamento finale)
si assume ogni responsabilità e rischio in relazione alla configurazione del
prodotto per il raggiungimento dei risultati previsti in relazione all’installazione
e/o equipaggiamento finale specifico.
CAREL in questo caso, previ accordi specifici, può intervenire come consulente
per la buona riuscita dello start-up macchina finale/applicazione, ma in
nessun caso può essere ritenuta responsabile per il buon funzionamento dell’
equipaggiamento/impianto finale.
INFORMAZIONE AGLI UTENTI PER IL CORRETTO TRATTAMENTO DEI RIFIUTI
DI APPARECCHIATURE ELETTRICHE ED ELETTRONICHE (RAEE)
In riferimento alla Direttiva 2002/96/CE del Parlamento Europeo e del
Consiglio del 27 gennaio 2003 e alle relative normative nazionali di attuazione,
Vi informiamo che:
• sussiste l’obbligo di non smaltire i RAEE come rifiuti urbani e di effettuare,
per detti rifiuti, una raccolta separata;
• per lo smaltimento vanno utilizzati i sistemi di raccolta pubblici o privati
previsti dalla leggi locali. È inoltre possibile riconsegnare al distributore
l’apparecchiatura a fine vita in caso di acquisto di una nuova;
• questa apparecchiatura può contenere sostanze pericolose: un uso
improprio o uno smaltimento non corretto potrebbe avere effetti negativi
sulla salute umana e sull’ambiente;
• il simbolo (contenitore di spazzatura su ruote barrato) riportato sul prodotto
o sulla confezione e sul foglio istruzioni indica che l’apparecchiatura è stata
immessa sul mercato dopo il 13 agosto 2005 e che deve essere oggetto di
raccolta separata;
• in caso di smaltimento abusivo dei rifiuti elettrici ed elettronici sono previste
sanzioni stabilite dalle vigenti normative locali in materia di smaltimento.
Il prodotto CAREL è un prodotto avanzato, il cui funzionamento è specificato
nella documentazione tecnica fornita col prodotto o scaricabile, anche
anteriormente all’acquisto, dal sito internet www . carel . com.
Ogni prodotto CAREL, in relazione al suo avanzato livello tecnologico,
necessita di una fase di qualifica / configurazione / programmazione /
commissioning affinché possa funzionare al meglio per l’applicazione
specifica. La mancanza di tale fase di studio, come indicata nel manuale,
può generare malfunzionamenti nei prodotti finali di cui CAREL non potrà
essere ritenuta responsabile. Soltanto personale qualificato può installare o
eseguire interventi di assistenza tecnica sul prodotto. Il cliente finale deve
usare il prodotto solo nelle modalità descritte nella documentazione relativa
al prodotto stesso.
Garanzia sui materiali: 2 anni (dalla data di produzione, escluse le parti di
consumo).
Omologazioni: la qualità e la sicurezza dei prodotti CAREL S.P.A. sono garantite
dal sistema di progettazione e produzione certificato ISO 9001.
Senza che ciò escluda la doverosa osservanza di ulteriori avvertenze presenti
nel manuale, si evidenza che è in ogni caso necessario, per ciascun Prodotto
di CAREL:
• evitare che i circuiti elettronici si bagnino. La pioggia, l’umidità e tutti i
tipi di liquidi o la condensa contengono sostanze minerali corrosive che
possono danneggiare i circuiti elettronici. In ogni caso il prodotto va usato
o stoccato in ambienti che rispettano i limiti di temperatura ed umidità
specificati nel manuale;
• non installare il dispositivo in ambienti particolarmente caldi. Temperature
troppo elevate possono ridurre la durata dei dispositivi elettronici,
danneggiarli e deformare o fondere le parti in plastica. In ogni caso
il prodotto va usato o stoccato in ambienti che rispettano i limiti di
temperatura ed umidità specificati nel manuale;
• non tentare di aprire il dispositivo in modi diversi da quelli indicati nel
manuale;
• non fare cadere, battere o scuotere il dispositivo, poiché i circuiti interni e i
meccanismi potrebbero subire danni irreparabili;
• non usare prodotti chimici corrosivi, solventi o detergenti aggressivi per
pulire il dispositivo;
• non utilizzare il prodotto in ambiti applicativi diversi da quanto specificato
nel manuale tecnico.
Tutti i suggerimenti sopra riportati sono validi altresì per il controllo, schede
seriali, chiavi di programmazione o comunque per qualunque altro accessorio
del portfolio prodotti CAREL.
CAREL adotta una politica di continuo sviluppo. Pertanto CAREL si riserva il
diritto di effettuare modifiche e miglioramenti a qualsiasi prodotto descritto
nel presente documento senza previo preavviso.
I dati tecnici presenti nel manuale possono subire modifiche senza obbligo
di preavviso
La responsabilità di CAREL in relazione al proprio prodotto è regolata dalle
condizioni generali di contratto CAREL editate nel sito www . carel.com e/o
da specifici accordi con i clienti; in particolare, nella misura consentita dalla
normativa applicabile, in nessun caso CAREL, i suoi dipendenti o le sue filiali/
affiliate saranno responsabili di eventuali mancati guadagni o vendite, perdite
di dati e di informazioni, costi di merci o servizi sostitutivi, danni a cose o
persone, interruzioni di attività, o eventuali danni diretti, indiretti, incidentali,
patrimoniali, di copertura, punitivi, speciali o consequenziali in qualunque
modo causati, siano essi contrattuali, extra contrattuali o dovuti a negligenza
o altra responsabilità derivanti dall’installazione, utilizzo o impossibilità di
utilizzo del prodotto, anche se CAREL o le sue filiali/affiliate siano state avvisate
della possibilità di danni.
3
easy way ACQUA +030220845 - rel. 1.0 - 26.11.2008
ITA
Indice
1. INTRODUZIONE
7
1.1 Terminologia ...................................................................................................... 7
1.2 Funzioni e caratteristiche principali ............................................................... 7
1.3 Esempi di applicazione...................................................................................... 8
2. INSTALLAZIONE
9
2.1 Scheda router: fissaggio su scheda e-drofan .............................................. 9
2.2 Terminale wireless easy set: fissaggio a muro e dimensioni ................. 9
2.3 Commissioning tool ......................................................................................... 9
2.4 Access point: fissaggio a muro e dimensioni ........................................... 10
2.5 Ripetitore: fissaggio a muro e dimensioni .................................................. 10
3. INTERFACCIA UTENTE
11
3.1 Tastiera ................................................................................................................ 11
3.2 Display ................................................................................................................ 12
3.3 Programmazione .............................................................................................. 12
3.4 Impostazione dell’ora corrente, delle fasce orarie e del set point di
temperatura .............................................................................................................. 14
4. MESSA IN SERVIZIO
15
4.1 Creazione della rete wireless ......................................................................... 16
4.2 Installazione del ripetitore ............................................................................. 18
4.3 Identificazione componenti della rete........................................................ 18
4.4 Modifica della rete ......................................................................................... 18
4.5 Associazione di un terminale ....................................................................... 18
4.6 Intervallo di trasmissione del terminale..................................................... 19
4.7 Collegamento all’Access point e al sistema di supervisione ................. 19
5. FUNZIONI
20
5.1 Modalità di funzionamento ............................................................................20
5.2 Visualizzazione display (param. loc. 01, loc.02) ....................................... 21
5.3 Funzione comfort (param. loc. 24)............................................................. 21
5.4 Reset parametri (param. loc. 28) ................................................................ 21
5.5 Calibrazione sonda di temperatura (param. loc. 07) ............................. 21
5.7 Funzione sleep (param. loc.05 e loc.06) ................................................... 21
5.8 Password (param. loc. 12 e loc. 13)............................................................ 21
5.9 Funzione occupancy (param. loc. 22 e loc. 23)....................................... 21
5.10 Gestione sonda di regolazione ..................................................................22
5.11 Ingresso/uscita dalla rete (param. loc. 14)...............................................22
5.12 Disabilitazione modalità di funzionamento (param. loc. 19) ..............22
5.13 Velocità ventilatore (param. loc. 20) .........................................................22
5.14 Blocco tastiera (param. loc. 21)..................................................................22
6. TABELLA PARAMETRI TERMINALE
23
6.1 Variabili a supervisione ..................................................................................24
7. ALLARMI
26
8. CARATTERISTICHE TECNICHE E CODICI DI ACQUISTO 27
8.1
8.2
8.3
8.4
8.5
Terminale wireless easy set ...........................................................................27
Access Point......................................................................................................27
Ripetitore...........................................................................................................28
Scheda router ZigBee™ per e-drofan .........................................................28
Codici di acquisto............................................................................................28
5
easy way ACQUA +030220845 - rel. 1.0 - 26.11.2008
ITA
1. INTRODUZIONE
Easy way acqua è un sistema wireless, che grazie alla tecnologia ZigBee™,
mette in comunicazione radio i controlli elettronici CAREL“e-drofan” per
unità fan coil, al fine di migliorare il comfort e il risparmio energetico. Il
sistema è composto dalle schede “e-drofan”, a cui viene applicata la scheda
router ZigBee™, completa di antenna flessibile, dal terminale wireless
“easy set”, dotato di sonda di temperatura e da un dispositivo, detto
Access Point, che può comunicare tramite rete RS485 con un supervisore
(pCO, PlantVisorPRO, PlantWatchPRO). Durante la prima messa in servizio,
per la creazione della rete wireless, è utilizzato un computer sul quale
è installato il software di commissioning “Carel easy net” e uno speciale
dispositivo, detto Sniffer USB, che permettono di creare e configurare la
rete wireless. Essa è costituita da zone idroniche, ognuna delle quali è
composta da un Master e al massimo da 10 Slave: il terminale wireless
è associato al Master di zona e permette tra l’altro l’impostazione del
set point di temperatura, delle fasce orarie e la rilevazione degli allarmi.
L’insieme di più zone idroniche collegate ad un Access Point prende il
nome di dominio idronico. È possibile connettere in supervisione uno
o più domini idronici, i cui Access Point sono collegati in rete RS485. Il
sistema easy way acqua è adatto a tutti gli ambiti tradizionali dell’idronica
e per garantire la massima flessibilità impiantistica sono disponibili due
tipi di terminali: uno per l’uso residenziale (versione house) e uno per
l’uso alberghiero (versione hotel), quest’ultimo senza la possibilità di
impostare le fasce orarie.
Router. È costituito da una scheda dotata di buzzer e antenna flessibile.
Può comunicare su due canali, canale di servizio (durante la prima messa
in servizio) o canale di normale funzionamento. Gestisce la comunicazione
tra il fan coil Master e il fan coil Slave e del terminale associato al fan coil
Master. Svolge la funzione di ripetitore nel trasferimento dei dati dei
fan coil Slave che non possono comunicare direttamente con il fan coil
Master. In qualità di Master risponde per conto dell’intera zona idronica al
sistema di supervisione.
Terminale wireless. Dispositivo radio dotato di sonda di temperatura,
tastiera e display, che permette la visualizzazione e la programmazione
dei parametri necessari per il controllo della temperatura della zona
idronica di appartenenza. È mobile e può essere posto a muro, su un
tavolo o dove desiderato per migliorare il comfort ambientale.
PanId (Personal Area Network Identificator). È un codice utilizzato per
definire univocamente la rete in costruzione. I dispositivi decidono a
quale rete associarsi basandosi sul canale e sul PanId.
Zona idronica. Insieme composto da un fan coil Master e dai fan coil
Slave che condividono la stessa modalità di funzionamento.
Dominio idronico. Insieme di una o più zone idroniche, ognuna delle
quali comunica tramite Access Point a un supervisore (pCO, PlantVisorPRO,
PlantWatchPRO).
Caratteristiche principali:
• rete a copertura limitata, di tipo WPLAN (wireless personal area
network);
• comunicazione nella banda di frequenza 2.4…2.4835 GHz, con bit rate
di 250 kbit/s e 16 canali di trasmissione;
• scalabilità del sistema;
• assenza di cablaggio in fase di installazione;
• possibilità di installazione a posteriori in edifici storici sottoposti a
vincoli architettonici, senza bisogno di cablaggi aggiuntivi;
• semplice messa in servizio della rete wireless da personal computer
con software dedicato (commissioning tool) “CAREL easy net”;
• flessibilità, con la possibilità di riorganizzare lo spazio (es: uffici,
supermercati) senza impatto sulla rete di comunicazione;
• tecnologia ZigBee™, ideale per il collegamento in rete di molti
dispositivi che scambiano quantità di dati non elevate, che assicura un
elevato grado di sicurezza in trasmissione/ricezione;
• intervallo di trasmissione del terminale impostabile, che permette una
lunga durata della batteria;
• topologia “mesh” della rete, che assicura, in caso di guasto di una
scheda router di una unità fan coil, la ricerca automatica di percorsi
alternativi fra le altre schede router per lo scambio dei dati;
• controllo specifico di singole zone (risparmio energetico);
• mobilità dei terminali;
• copertura della rete anche in presenza di ostacoli.
1.2 Funzioni e caratteristiche principali
Il sistema easy way acqua ha le stesse funzioni del sistema e-dronic
con i vantaggi della comunicazione wireless. Il terminale permette di
impostare le modalità di funzionamento (automatico, riscaldamento,
raffreddamento, ventilazione, deumidificazione), nonché le funzioni
“occupancy”, “sleep” , “comfort” del controllo e-drofan per la singola zona
idronica. È possibile da commissioning tool impostare i parametri di
e-drofan di ogni unità fan coil, salvare e caricare le configurazioni e quindi
velocizzare la messa in servizio.
Di seguito è riportata la serie di componenti del sistema easy way acqua:
Scheda router ZigBee™ (HYSC00F0W0)
Va montata sulla scheda di controllo e-drofan HYFC00000*, è dotata
di antenna flessibile e di buzzer attivabile da commissioning tool per
facilitare l’identificazione dei componenti della rete.
1.1 Terminologia
Sniffer USB. Dispositivo utilizzato durante la prima messa in servizio del
sistema e in caso di successive manutenzioni. Seleziona in base al livello
di disturbi il migliore canale di comunicazione e il numero identificativo
PanId. Associa i dispositivi (router e terminali) alla rete. Se successivamente
è necessaria una riconfigurazione per un cambio di struttura della rete,
è possibile spostare, inserire e eliminare un’ unità fan coil senza dover
cancellare e riconfigurare tutta la rete preesistente. Al termine della prima
messa in servizio lo sniffer USB va rimosso.
Fig. 1.a
Convertitore USB-RS485 (CVSTDUMOR0)
Consente di interfacciare una rete RS485 ad un personal computer
attraverso la porta USB.
Access point. Utilizzato come punto di raccolta di tutti i dati della rete,
da trasmettere tramite rete RS485 a un supervisore (pCO, PlantVisorPRO,
PlantWatchPRO). È collegato al termine della prima messa in servizio se è
necessario il monitoraggio del sistema.
Ripetitore. Rigenera il segnale tra le schede router, quando le distanze o
la presenza di infrastrutture impediscono una corretta comunicazione.
Fig. 1.b
7
easy way ACQUA +030220845 - rel. 1.0 - 26.11.2008
ITA
Easy net commissioning tool (HYSW000000)
Terminale wireless (HYPW001**0)
Costituito dal software Carel Easy Net da installare su computer e dallo
Sniffer USB. L’interfaccia grafica consente una facile configurazione dei
terminali, dei Master e Slave delle zone idroniche.
Dispone di una sonda di temperatura integrata. È disponibile in bianco o
nero e nei modelli “house” e “hotel”.
Sniffer
Fig. 1.g
USB
Fig. 1.h
1.3 esempi di applicazione
Fig. 1.c
1. Sistema wireless con due zone idroniche collegate in supervisione.
Access point (EW00AB2020)
Dispositivo da installare alla fine della prima messa in servizio, per
collegare la rete wireless al sistema di supervisione (pCO).
Access Point
Master
RS485
Slave
Slave
Terminale
Terminale
<50 m
Master
24 Vac/dc
Access point
RS485
Repeater
Fig. 1.d
<50 m
È anche possibile utilizzare l’Access Point per comunicare a un computer
con funzioni di supervisione (PlantVisorPRO, PlantWatchPRO). In tal caso
occorrerà utilizzare anche il convertitore RS485/USB cod. CVSTDUMOR0.
Fig. 1.i
2. Sistema wireless con 15 domini idronici collegati in supervisione.
Access Point
USB
CVSTDUMOR0
Convertitore USB/RS485
USB/RS485 converter
RS485
24 Vac/dc
15th floor
RS485
Fig. 1.e
Access point
Ripetitore (EW00RB2020)
Rigenera il segnale proveniente da schede router e terminali verso
l’Access point.
Repeater
1st floor
Access point
24 Vac/dc
Fig. 1.f
Fig. 1.j
easy way ACQUA +030220845 - rel. 1.0 - 26.11.2008
8
ITA
2. INSTALLAZIONE
2.2 Terminale wireless easy set: fissaggio a
muro e dimensioni
Montare la scheda router sulla scheda e-drofan e fissare l’antenna con
una fascetta al supporto di protezione (P), in modo che tirando non possa
essere staccata.
Il terminale wireless “easy set” può essere fissato a muro oppure
appoggiato su una superficie (es. tavolo), nella posizione più idonea per
la rilevazione della temperatura.
78.5
2.1 Scheda router: fissaggio su scheda
e-drofan
1
4
2
5
3
6
121.55
P
42.5
Fig. 2.g
Fig. 2.a
Nel caso di fissaggio a muro utilizzare il supporto (B) a corredo. Il gancio
(A) assicura il bloccaggio del terminale al supporto, utile nel caso in cui il
terminale non debba essere spostato (es. in hotel). In tal caso il terminale
può essere rimosso solo con la staffetta (C), fornita a corredo con
l’Access Point o il ripetitore. Per applicazioni ove sia necessario rimuovere
frequentemente il terminale, rimuovere con un tronchesino il gancio (A).
Fig. 2.b
23,5 mm
C
B
Fig. 2.c
Fig. 2.d
A
Attenzione: non forzare e danneggiare il connettore dell’antenna
durante il montaggio!
Posizionare l’antenna in modo da evitare l’effetto di schermo
elettromagnetico del mobiletto metallico del fan coil: praticare su
quest’ultimo un foro dal quale fare uscire l’estremità dell’antenna o
posizionarla in prossimità della grata superiore di passaggio dell’ aria.
Fig. 2.h
Fig. 2.i
Fig. 2.e
Fig. 2.f
9
easy way ACQUA +030220845 - rel. 1.0 - 26.11.2008
ITA
2.3 commissioning tool
Il commissioning tool è costituito dal software di installazione “CAREL easy
net” e dal dispositivo Sniffer USB, identificato dall’apposita etichetta, da
collegare al computer. Una volta terminata l’installazione il commissioning
tool deve essere rimosso e la supervisione passa attraverso l’Access
Point. Per maggiori informazioni vedere il manuale “CAREL easy net”
cod.+030220855 e il capitolo “Messa in servizio”.
Sniffer
2
1
2
3
4
USB
3
L N
Rx- Rx+ GND
DIP: 1 2 3 4
+ -
- + G
L1 L2 L3
Fig. 2.j
1
2.4 Access point: fissaggio a muro e
dimensioni
Fig. 2.l
13
196
4
L1 L2 L3
3
L N
Rx- Rx+ GND
+ 1
- + G
2
2.5 ripetitore: fissaggio a muro e
dimensioni
70
108
102
DIP: 1 2 3 4
Per le dimensioni e il fissaggio vedere il disegno al paragrafo 2.4.
Il ripetitore (repeater) è necessario qualora la distanza tra due schede
router sia > 50 m (ambiente chiuso) o > 100 m (all’aperto). L’attenuazione
del segnale di comunicazione può avvenire anche a causa di infrastrutture
interne o di interferenze, per la presenza di dispositivi che lavorano sulla
stessa frequenza. Deve essere installato in modo che se avviene un
guasto su una scheda router, la rete riesca a a trovare percorsi alternativi
tra le schede router per lo scambio dei dati. Vedere il paragrafo 4.2.
50
40
94
Fig. 2.k
Per l’installazione:
• svitare le 4 viti e rimuovere il coperchio superiore;
• individuare la posizione corretta sul muro, effettuare i 4 fori secondo il
disegno e inserire i tasselli;
• inserire le viti e fissare il dispositivo con il pressa cavo rivolto verso il
basso;
• collegare l’alimentazione ai morsetti L-N, rispettando la polarità nel
caso di alimentazione a tensione continua;
• effettuare il collegamento della rete RS485 tramite un cavo tripolare ai
morsetti RX-, RX+, GND
• impostare l’indirizzo 1 nei dip-switch (3) del primo Access Point: è
possibile installare al massimo 15 Access Point;
• avvitare l’antenna in corrispondenza dell’attacco (2) e verificare che il
cavo dell’antenna sia collegato al connettore predisposto (1);
• richiudere il coperchio.
Fig. 2.m
Access Point
Repeater / Router
Terminale
Attenzione: l’Access point va messo in funzione dopo che la rete
è stata creata e configurata tramite il commissioning tool. Vedere
il paragrafo 4.7.
easy way ACQUA +030220845 - rel. 1.0 - 26.11.2008
10
Fig. 2.n
ITA
3. interfaccia utente
L’interfaccia utente è costituita dal terminale wireless per e-drofan “easy
set”.
Il pannello frontale contiene il display e la tastiera, costituita da 6 tasti,
che, premuti in modo singolo o combinato, permettono di effettuare le
operazioni di programmazione della zona idronica. Per l’impostazione
dei parametri delle schede e-drofan utilizzare il commissioning tool “carel
easy net” ( vedere il capitolo “Messa in servizio”). Sono disponibili due
versioni di terminale:
• “easy set” per applicazioni residenziali, modello “house”;
• “easy set” per applicazioni alberghiere, modello “hotel”, senza la
programmazione delle fasce orarie.
3.1 Tastiera
Easy set “house“
Easy set “hotel“
easy set
easy set
mode
mode
°C/°F
1
2
1
2
Fig. 3.a
Fig. 3.b
Tasto
Funzione
Pressione breve:
• accensione del terminale e dei fan coil della zona idronica;
• cambio modalità di funzionamento;
• uscita dal modo programmazione con memorizzazione dei
valori dei parametri
ON/OFF
Pressione lunga (>3s):
mode
• spegnimento del terminale e dei fan coil della zona idronica.
Pressione breve:
• ingresso in programmazione fasce orarie e relativo set point;
Pressione lunga (>3s):
OROLOGIO
• impostazione ora corrente.
Pressione breve:
• impostazione della velocità di rotazione del ventilatore.
Pressione combinata:
VENTILATORE • se premuto per più di 3 secondi insieme con il tasto DOWN,
dà accesso al modo programmazione.
Pressione breve:
• incremento valore (UP);
• visualizzazione di tutti gli allarmi eventualmente presenti,
UP
una volta premuto il tasto multifunzione.
Pressione breve:
• permette di selezionare l’unità di misura di temperatura
(°C/°F);
• se allarme attivo, alla terza pressione entra in modalità
visualizzazione allarmi;
MULTIFUNZIONE • ad ogni pressione la visualizzazione alla prima, seconda,
terza, quarta pressione dipende rispettivamente dai
parametri loc9, loc10, loc15, loc16.
Pressione breve:
• decremento valore (DOWN);
Pressione combinata:
• se premuto per più di 3 secondi insieme con il tasto
DOWN
VENTILATORE, dà accesso al modo programmazione.
Tasto
Funzione
Pressione breve:
• accensione del terminale e dei fan coil della zona idronica;
• uscita dal modo programmazione con memorizzazione dei
valori dei parametri
Pressione lunga (>3s):
ON/OFF
• spegnimento del terminale e dei fan coil della zona
idronica.
Pressione breve:
• cambio modalità di funzionamento.
Pressione lunga (>3s):
• impostazione ora corrente.
Pressione breve:
• impostazione della velocità di rotazione del ventilatore.
Pressione combinata:
VENTILATORE • se premuto per più di 3 secondi insieme con il tasto DOWN,
dà accesso al modo programmazione.
Pressione breve:
• incremento valore (UP);
• visualizzazione di tutti gli allarmi eventualmente presenti,
UP
una volta premuto il tasto multifunzione.
Pressione breve:
• permette di selezionare l’unità di misura di temperatura
(°C/°F);
°C / °F
• se allarme attivo, alla terza pressione entra in modalità
MULTIFUNZIONE
visualizzazione allarmi;
• ad ogni pressione la visualizzazione alla prima, seconda,
terza, quarta pressione dipende rispettivamente dai
parametri loc9, loc10, loc15, loc16.
Pressione breve:
• decremento valore (DOWN);
Pressione combinata:
• se premuto per più di 3 secondi insieme con il tasto
DOWN
VENTILATORE, dà accesso al modo programmazione.
Tab. 3.a
Tab. 3.b
11
easy way ACQUA +030220845 - rel. 1.0 - 26.11.2008
ITA
3.2 Display
3.3 Programmazione
Il display visualizza nel campo principale e nel campo secondario i valori
di temperatura nel range -199…999 con la risoluzione del decimo di
grado tra -19.9 e 99.9. In caso di allarme presente in una delle unità della
zona idronica, il campo principale mostra il codice di allarme e il campo
secondario l’unità da cui proviene (Master, Slave o terminale). Durante la
programmazione mostra i codici dei parametri ed il loro valore.
I parametri sono modificabili attraverso la tastiera frontale. L’accesso
è diverso secondo il tipo: set point, parametri utente (U) e parametri
costruttore (F). Il tipo di parametro è indicato nella tabella parametri.
L’accesso ai parametri costruttore è protetto da una password, che
impedisce modifiche casuali o da parte di persone non autorizzate.
2
1
3
16
15
Nello stato ON si accendono in sequenza il terminale e quindi i fan coil
della relativa zona idronica, se in richiesta.
ON: premere brevemente il tasto ON/OFF, appare la visualizzazione
standard di display;
OFF: premere per 3 s il tasto ON/OFF. Compare il messaggio OFF a display.
5
6
14
13
12
ON/OFF
4
CAREL
e
a
s
y
s
e
mode
7
1
2
11
Fig. 3.d
10 9
8
Fig. 3.c
rif.
1
2
3
4
5
6
7
8
9
10
11
12
13
14
15
16
descrizione
Campo principale: temperatura ambiente (vedere parametro loc. 1)
Modalità di funzionamento attiva
Batteria scarica
Connessione con Master attiva
Unità di misura temperatura
Modalità programmazione parametri o visualizzazione set point
Umidità relativa (%)
Campo secondario: ora corrente (vedere parametro loc. 2)
Modalità visualizzazione ora (AM/PM o 0…23h)
Velocità ventilatore in modo automatico
Indicatore velocità ventilatore
Funzione OCCUPANCY attiva
Orologio/ Fascia oraria
Funzione SLEEP/ECONOMY attiva
Funzione tastiera limitata
Allarme attivo
Modifica del Set point (temperatura)
Per modificare il set point di temperatura (8…32 °C) la visualizzazione
standard del campo principale/secondario deve essere la temperatura o
il set point di temperatura (es. loc1 =1,2 e loc.2 = 5) *:
• premere il tasto UP/DOWN: a display compare il set point di
temperatura ambiente e a destra la scritta set;
• premere i tasti UP o DOWN per impostare il valore desiderato;
• a display riappare la visualizzazione standard.
(*): in alternativa per visualizzare i set point premere il tasto
multifunzione.
CAREL
e
a
s
y
s
e
mode
Nota: è possibile selezionare la visualizzazione standard di display
configurando opportunamente i parametri loc1 e loc2.
Fig. 3.e
Modifica del Set point (umidità)
Per modificare il set point di umidità (10…70 %rH), la visualizzazione
standard del campo principale/secondario deve essere il set point di
umidità (es. loc. 01 =3 e loc. 02=5)*:
• premere il tasto UP/DOWN: a display compare il set point di umidità
ambiente e a destra la scritta set;
• premere i tasti UP o DOWN per raggiungere il valore
desiderato;
• a display riappare la visualizzazione standard.
CAREL
e
a
s
y
s
e
mode
Fig. 3.f
(*): in alternativa per visualizzare i set point premere il tasto
multifunzione.
Nota: il terminale wireless non è provvisto di sonda di umidità, il set
point di umidità viene trasmesso al controllo pCO, che potrà
comandare l’attivazione di un umidificatore/deumidificatore.
easy way ACQUA +030220845 - rel. 1.0 - 26.11.2008
12
ITA
Modifica velocità ventilatore
Modifica dei parametri di tipo costruttore
Premere il tasto ventilatore per impostare una delle tre velocità (min, med,
max) o il modo Auto, con gestione automatica della velocità da parte del
controllore.
I parametri di tipo costruttore sono accessibili solo con PASSWORD e
riguardano fra gli altri l’abilitazione delle modalità di funzionamento, le
velocità ammesse per il ventilatore, l’abiltazione delle funzioni “Sleep”,
“Occupancy” e “Comfort”, il parametro per associare il terminale wireless
al Master di zona idronica.
1. premere contemporaneamente i tasti ventilatore e DOWN per 3 s: a
display compare il codice del primo parametro utente modificabile,
loc1;
2. premere il tasto UP/DOWN fino a raggiungere il parametro loc. 12;
3. premere il tasto multifunzione per passare alla modifica del
parametro;
4. premere il tasto UP/DOWN fino a visualizzare la PASSWORD: 22
(default);
5. confermare con il tasto multifunzione;
6. se il valore introdotto è corretto è possibile passare al parametro loc.13
e ai successivi, altrimenti si rimane al parametro loc.12;
7. premere il tasto UP/DOWN fino a raggiungere il parametro
desiderato;
8. premere il tasto multifunzione e UP/DOWN per passare alla modifica
del parametro;
9. premere il tasto multifunzione per ritornare alla lista dei
parametri;
10. ripetere le operazioni da 7) a 9) per modificare altri
parametri;
11. per memorizzare i nuovi valori dei parametri premere il
tasto ON/OFF. Si esce così dalla procedura di modifica dei
parametri.
Nota: ogni modifica dello stato di ON/OFF, dei valori di set point,
velocità ventilatore, …, viene trasmessa alla scheda del fan coil
Master dopo 5 s. (lampeggio icona antenna del terminale).
Modifica dei parametri di tipo utente
I parametri di tipo utente riguardano fra gli altri il tipo di visualizzazione
standard sul campo principale e secondario, la calibrazione della sonda di
temperatura, l’ indirizzo di supervisione del terminale.
1. premere contemporaneamente i tasti ventilatore e DOWN per 3 s: a
display compare il codice del primo parametro utente modificabile,
loc1;
2. premere il tasto UP/DOWN fino a raggiungere il parametro del quale
si vuole modificare il valore (fino a loc.12): durante lo scorrimento il
display visualizza nel campo secondario il codice del parametro e nel
campo principale il valore del parametro;
3. premere il tasto multifunzione per passare alla modifica del
parametro: la scritta set passerà dal codice del parametro al valore del
parametro;
CAREL
e
a
s
y
s
e
mode
Note:
• con questa procedura si ha accesso a tutti i parametri del terminale;
• i valori dei parametri sono memorizzati al momento del loro
inserimento, non è possibile annullare le modifiche ai parametri;
• nel caso venga tolta la batteria al terminale, esso perde l’impostazione
dell’ora corrente. I valori degli altri parametri rimangono memorizzati.
Fig. 3.g
4. incrementare o decrementare il valore con il tasto UP/ DOWN fino a
raggiungere il valore desiderato;
5. premere il tasto multifunzione per ritornare alla lista dei parametri;
6. ripetere le operazioni da 2) a 5) per modificare altri parametri;
7. per memorizzare i nuovi valori dei parametri premere il tasto ON/OFF.
Si esce così dalla procedura di modifica dei parametri.
Nota: se non è premuto nessun tasto, dopo 30 s il display torna
automaticamente alla visualizzazione standard, salvando le
modifiche.
13
easy way ACQUA +030220845 - rel. 1.0 - 26.11.2008
ITA
3.4 Impostazione dell’ora corrente, delle
fasce orarie e del set point di temperatura
Impostazione dell’ora corrente
1. premere per 3 s il tasto orologio/mode, fino a visualizzare l’icona
orologio e l’indicazione dell’ora lampeggiante;
CAREL
e
a
s
y
s
e
mode
Fig. 3.h
2.
3.
4.
5.
premere il tasto UP/DOWN per impostare l’ora;
premere il tasto multifunzione per passare ai minuti;
premere il tasto UP/DOWN per impostare i minuti;
premere il tasto ON/OFF per salvare l’impostazione e uscire dalla
procedura di modifica.
Nota: se non è premuto nessun tasto, dopo 10 s il display torna
automaticamente alla visualizzazione standard, senza salvare
l’impostazione.
Impostazione delle fasce orarie e del set point di
temperatura
Questa impostazione vale solo per il terminale modello “house”.
1. premere brevemente il tasto orologio, per visualizzare il simbolo della
prima fascia oraria, accompagnato dall’ora di inizio lampeggiante e
dal relativo set point di temperatura. È possibile che al posto del set
point di temperatura appaia ON/OFF, ad indicare che all’inizio della
fascia oraria il terminale e quindi i fan coil dell’ intera zona idronica
saranno rispettivamente accesi/spenti;
2. premere il tasto UP/DOWN per impostare l’ora di inizio della prima
fascia oraria;
3. premere il tasto multifunzione per passare ai minuti;
4. premere il tasto UP/DOWN per impostare i minuti;
5. premere il tasto multifunzione per passare al set point;
6. premere i tasti UP/DOWN per impostare il set point nel campo 8…32°C;
oppure impostare ON/OFF per avere rispettivamente l’accensione/lo
spegnimento;
7. premere il tasto orologio per passare all’impostazione della seconda
fascia oraria, apparirà l’icona della seconda fascia oraria, accompagnata
dall’ora di inizio lampeggiante e dal relativo set point. Premere ON/
OFF per salvare e uscire dalla procedura di modifica.
CAREL
easy set
CAREL
mode
e
a
s
y
s
e
mode
1
2
1
Fig. 3.i
Fig. 3.j
Nota: se non è premuto nessun tasto, dopo 20 s il display torna
automaticamente alla visualizzazione standard, salvando
l’impostazione.
easy way ACQUA +030220845 - rel. 1.0 - 26.11.2008
14
ITA
4. MESSA IN SERVIZIO
Per la messa in servizio del sistema easy way acqua seguire i passi
seguenti:
2. indirizzare le schede router, già installate sulle schede e-drofan, in
modo sequenziale e univoco, tenendo presente che gli indirizzi
configurabili vanno da 16 a 199;
1. Verificare che la distanza tra un fan coil e l’altro sia inferiore a 50 m e che
non vi siano ostacoli o infrastrutture in modo che il livello del segnale
radio sia almeno di -87dBm; in caso contrario occorre installare tra i
fan coil un ripetitore per rigenerare il segnale (vedere il paragrafo 4.2).
ON
DIP
1 2 3 4 5 6 7 8
1 2 3 4 5 6 7 8
RS485
Fig. 4.c
Esempio: in un ambiente sono presenti 3 fan coil nella prima zona idronica
e 2 nella seconda. In totale vi sono 5 fan coil, che andranno indirizzati nel
modo seguente, partendo dal bit meno significativo.
Access point
Zona idronica 1
Indirizzo
Dip-switch
Indirizzo Master 16
16 (00010000)
ON
1 2 3 4 5 6 7 8
50 m
ON
Indirizzo Slave 17
17 (00010001)
1 2 3 4 5 6 7 8
ON
Indirizzo Slave 18
18 (00010010)
1 2 3 4 5 6 7 8
Fig. 4.a
Zona idronica 2
Indirizzo
Dip-switch
Indirizzo Master 19
19 (00010011)
ON
1 2 3 4 5 6 7 8
ON
Indirizzo Slave 20
20 (00010100)
1 2 3 4 5 6 7 8
RS485
Master 18
Master 20
Master 17
Master 19
Access point
Access point
Repeater
Master 16
Fig. 4.d
Fig. 4.b
3. alimentare le schede e-drofan;
4. creare la rete wireless costituita dalle schede router e dai terminali
tramite il commissioning tool “CAREL easy net”, vedere il paragrafo
4.1;
5. collegare la rete wireless all’Access Point e quindi al supervisore
(pCO, PlantVisorPRO, PlantWatchPRO). Rimuovere a questo punto il
Commissioning Tool “Carel easy net”.
15
easy way ACQUA +030220845 - rel. 1.0 - 26.11.2008
ITA
Appaiono due messaggi di conferma, dare OK.
4.1 Creazione della rete wireless
Per l’installazione del commissioning tool “CAREL easy net”, riferirsi al
manuale relativo cod. +030220855. Lo Sniffer USB va collegato alla porta
USB del computer.
Sniffer
Fig. 4.i
Fig. 4.j
Si apre la nuova schermata: selezionare New Node per impostare lo
SNIFFER USB come mezzo per trasferire le schede router dal canale di
servizio al canale e PanId di lavoro.
USB
Fig. 4.e
Al termine dell’installazione compare sul desktop l’icona del programma
Carel easy net.
All’apertura appare una schermata con un menu a scelta multipla. Premere
Start per creare una nuova rete e successivamente Automatic Network
per scegliere automaticamente il miglior canale di comunicazione
Fig. 4.k
Selezionare Search. Appaiono i router sulla rete di servizio. Se non compare
nessun router, perché i router si trovano in un canale di comunicazione
sconosciuto, dare il comando Select Source Network.
Fig. 4.f
Fig. 4.g
L’intero processo di ricerca dura all’incirca 30-40 secondi ed al termine
compare l’indicazione del canale e del PanId impostati per la nuova rete.
Nell’ esempio seguente viene selezionato il canale 18 e il PanId=3CB5.
Fig. 4.l
Si apre la schermata Network Finder. Con il comando Option selezionare la
ricerca su tutti i canali e quindi ricercare le reti presenti con Start Search:
Fig. 4.h
Fig. 4.m
easy way ACQUA +030220845 - rel. 1.0 - 26.11.2008
16
Fig. 4.n
ITA
Alla fine compare la lista delle reti trovate, per esempio sono stati trovati
4 canali diversi (dovuti a precedenti configurazioni):
Creazione del Master di zona
1. Con il mouse puntare sopra la riga del router che si desidera
configurare come Master;
2. Selezionare con il mouse la riga (non click, solo pressione del pulsante
del mouse);
3. Iniziare un’operazione di trascinamento della riga verso lo spazio
bianco nella parte destra;
4. Rilasciare il pulsante del mouse.
In questo modo verrà creata una nuova zona Idronica che come Master
avrà il router trascinato.
Creazione degli Slave di zona
1. Con il mouse puntare sopra la riga del router che si desidera
configurare come Slave;
2. Selezionare con il mouse la riga (non click, solo pressione del pulsante
del mouse);
3. Iniziare un’operazione di trascinamento della riga verso lo spazio
bianco nella parte destra;
4. Rilasciare il pulsante del mouse quando il puntatore del mouse è
sopra il Master precedentemente creato o sopra la Zona Idronica.
In questo modo verrà automaticamente creato uno Slave per la zona
Idronica. Procedere allo stesso modo per creare le zone Idroniche
necessarie fino ad ottenere qualcosa di simile alla schermata seguente:
Fig. 4.o
Selezionare la rete sulla quale fare la ricerca: (es. 11). Un messaggio avverte
che la rete di servizio è cambiata.
Fig. 4.p
Al termine selezionare i router che faranno parte della rete e dare il
comando “Accept routers”. Se l’associazione va a buon fine comparirà il
messaggio “success” accanto a ogni router. In basso sono indicati il canale
e il PanId di lavoro.
Fig. 4.s
Selezionare infine Update Network per creare i vincoli Master/Slave tra i
vari router dei Fan Coil della rete.
Fig. 4.q
Al termine compare un messaggio di conferma. Dare OK, si apre una
schermata con i livelli dei segnali di comunicazione tra lo SNIFFER USB e
ogni scheda router:
Pallino
Verde
Giallo
Rosso
Qualità segnale
Buono
Discreto
Scarso
Livello segnale (dBm)
da 0 a -70
da -71 a -87
minore di -87
Fig. 4.r
17
easy way ACQUA +030220845 - rel. 1.0 - 26.11.2008
ITA
4.2 Installazione del ripetitore
4.5 Associazione di un terminale
Nel caso in cui a causa di interferenze o di distanze troppo elevate la
qualità del segnale di una scheda router sia scarsa, viene evidenziato un
pallino rosso (es: -92dBm).
Per associare un terminale ad un dispositivo Master:
1. accertarsi che il terminale non sia connesso in rete: loc 14=OFF;
2. impostare l’indirizzo del terminale, loc 11, pari all’indirizzo del Master
prescelto (es: 17);
e
CAREL
a
s
y
s
e
t
mode
Fig. 4.t
Fig. 4.v
Per installare un ripetitore seguire i passi seguenti:
1. posizionare il ripetitore tra i fan coil che distano tra loro più di 50 m,
in modo tale da assicurare un percorso alternativo del segnale verso
l’Access Point in caso di guasto di una scheda router;
2. alimentare il ripetitore: si accendono i tre led in modo permanente ad
indicare che il dispositivo non è ancora associato alla rete;
3. aprire la rete con il comando Open Network;
3. selezionare Open Network;
Fig. 4.u
4. attendere finchè non lampeggia lentamente il primo led giallo in alto
a sx, il ripetitore è associato;
5. chiudere la rete con il comando Close Network;
6. dare il comando Refresh Link Level per verificare il miglioramento
della qualità del segnale.
Fig. 4.w
4. sul terminale impostare il parametro 14 = ON per stabilire la
connessione di rete: apparirà il messaggio “bin” = binding e se
l’associazione è andata a buon fine apparirà il messaggio “on” e
l’antenna in alto a destra nella visualizzazione standard di display.
4.3 Identificazione componenti della rete
CAREL
e
a
s
y
s
e
t
CAREL
mode
CAREL
e
a
s
y
CAREL
e
a
s
y
s
e
t
mode
mode
È possibile identificare le schede router Master/Slave selezionando il
dispositivo e con il tasto destro del mouse dare il comando Identify/Stop
identify per attivare/disattivare il buzzer rispettivo.
e
a
s
y
s
e
t
s
e
mode
4.4 Modifica della rete
Quando si rende necessario riorganizzare le reti Idroniche, è possibile
spostare Slave e Master con una semplice operazione di trascinamento:
basta trascinare uno Slave dalla struttura ad albero a sinistra verso la
tabella per renderlo disponibile al successivo trascinamento all’interno di
una zona idronica diversa.
5. dare il comando Start Search: al termine della ricerca apparirà il
terminale collegato al relativo Master.
Nota:
• per spostare quindi un router, è necessario prima trascinarlo
nella tabella di sinistra e successivamente trascinarlo nuovamente
dentro la struttura ad albero nella nuova posizione.
• non è possibile spostare un Master fino a quando non sono stati
spostati tutti i relativi Slave.
Attenzione: in caso di reset dei parametri del terminale, si perde
la comunicazione tra il terminale stesso e la rete. È possibile
ristabilirla, una volta terminata la prima messa in servizio,
utilizzando l’Access point. Vedere il paragrafo 4.7.
Dopo avere concluso le operazioni di organizzazione delle reti idroniche,
aggiornare la situazione dei Router con il comando “Update Network”.
Attenzione: si consiglia di non effettuare operazioni di
aggiornamento o modifica della rete se esistono schede Router
FanCoil con un basso livello di segnale di comunicazione radio
(pallino rosso). In tal caso l’aggiornamento potrebbe non avvenire
correttamente o addirittura non avvenire.
easy way ACQUA +030220845 - rel. 1.0 - 26.11.2008
18
ITA
4.6 Intervallo di trasmissione del terminale
Il terminale, per prolungare la durata della batteria, non effettua
una trasmissione continuativa verso l’Access Point. Il dispositivo è
“addormentato” e si sveglia ogni n minuti, dove n è dato dal parametro
del terminale impostabile da Commissioning tool Send_Time (Intera 39,
default = 2 min).
Intervallo di trasmissione
1
5
10
15
durata batteria terminale (anni)
2
3
5
8
La trasmissione dei dati avviene istantaneamente qualora durante
l’intervallo di trasmissione la temperatura rilevata dal terminale subisca
una variazione stabilita dal parametro del terminale impostabile da
Commissioning tool Delta_var_space_temp (Analogica 7, default = 1°C).
4.7 Collegamento all’Access point e al
sistema di supervisione
Per monitorare lo stato delle zone idroniche create dal Commissioning
tool, è necessario attivare il monitoraggio dei dati attraverso l’ Access
Point. Per ogni dominio idronico, è possibile abilitare la comunicazione
verso l’ Access Point di supervisione. Per l’indirizzamento dell’Access point
utilizzare i dip switch, vedere il paragrafo 2.4 e il foglio istruzioni cod.
+050001310. Collegare il convertitore USB-RS485 alla seconda porta USB
del computer e quindi alla porta seriale dell’ Access Point. Fare click sul
pulsante “Access-Point Settings” della pagina principale del programma.
Apparirà la seguente finestra, selezionare Set network parameters e
inserire PanId e canale della rete di lavoro. Dopo pochi istanti l’Access
point sarà pronto per la comunicazione e sarà possibile rimuovere lo
Sniffer USB e chiudere il programma “Carel easy net”.
Fig. 4.x
Nel caso sia necessario, in assenza di commissioning tool, aprire la rete da
Access Point per connettere il terminale, per esempio dopo avere dato il
comando di reset dei parametri di default (loc. 28 = ON):
a. aprire il coperchio dell’Access point; il led giallo a sinistra lampeggia;
b. premere il tasto finchè i 3 led lampeggiano insieme: la rete è aperta;
c. impostare il parametro loc. 14 del terminale = ON; se l’associazione va
a buon fine appaiono le schermate come riportato al punto 4.5;
d. Premere il tasto dell’Access Point per chiudere la rete.
19
easy way ACQUA +030220845 - rel. 1.0 - 26.11.2008
ITA
5. FUNZIONI
Per accendere il terminale wireless premere il tasto ON/OFF, per spegnerlo
premere il tasto ON/OFF per 3 s . Apparirà il messaggio ”OFF” a display.
Raffreddamento
Una volta acceso il terminale:
• Premere più volte il tasto “mode” fino all’accensione dell’icona fiocco
di neve-raffreddamento. Impostare il set point di temperatura: vedere
i paragrafo 3.3.
• Premere più volte il tasto ventilatore per scegliere la velocità desiderata
di ventilazione; nel caso si selezioni la modalità Auto la velocità viene
decisa dal controllo elettronico in funzione dello scostamento dalla
temperatura desiderata.
5.1 Modalità di funzionamento
Come detto nel capitolo “Introduzione”, è possibile collegare un terminale
wireless a ogni zona idronica della rete e quindi impostare per ognuna un
set point diverso di temperatura e di umidità.
Nota: il terminale wireless non è provvisto di sonda di umidità; il set
point di umidità viene trasmesso al controllo pCO, che potrà
comandare l’attivazione di un umidificatore/deumidificatore.
CAREL
e
a
s
y
s
e
mode
Automatico
Una volta acceso il terminale:
• Premere più volte il tasto “mode” fino all’accensione della scritta Auto o
della scritta Auto più l’icona resistenza, se installata;
• Impostare il set point utilizzando il tasto UP/DOWN: vedere il paragrafo
3.3;
• Premere più volte il tasto ventilatore per scegliere la velocità desiderata
di ventilazione; nel caso si selezioni la modalità Auto la velocità viene
decisa dal controllo elettronico in funzione dello scostamento dalla
temperatura desiderata (quanto maggiore è lo scostamento, tanto
maggiore è la velocità). La modalità di funzionamento (riscaldamento
o raffreddamento) viene decisa dal controllo elettronico in funzione
dello scostamento dalla temperatura desiderata: se la temperatura
ambiente è superiore al set point il controllo effettua la funzione di
raffreddamento, se è inferiore la funzione di riscaldamento.
Fig. 5.c
Ventilazione
Tale modalità può essere utile per far ricircolare l’aria in ambiente.
Una volta acceso il dispositivo:
• Premere più volte il tasto “mode” fino all’accensione dell’icona
ventilatore;
• Premere più volte il tasto ventilatore per scegliere la velocità desiderata
di ventilazione.
CAREL
e
a
s
y
s
e
mode
CAREL
e
a
s
y
s
e
mode
Fig. 5.d
Fig. 5.a
Deumidificazione
Riscaldamento
Una volta acceso il dispositivo, grazie alla pressione del tasto ON/OFF:
• Premere più volte il tasto “mode” fino all’accensione dell’icona
deumidificazione (gocce);
• Impostare il set point di temperatura: vedere i paragrafo 3.3.
• Premere più volte il tasto ventilatore per scegliere la velocità desiderata
di ventilazione; nel caso si selezioni la modalità Auto il ventilatore ruota
alla velocità minima.
Una volta acceso il terminale:
• Premere più volte il tasto “mode” fino all’accensione dell’icona soleriscaldamento oppure sole-riscaldamento con resistenza, se installata
(*). In quest’ultimo caso viene utilizzata anche la resistenza elettrica
come fonte di calore;
• Impostare il set point di temperatura utilizzando il tasto UP/DOWN;
• Premere più volte il tasto ventilatore per scegliere la velocità desiderata
di ventilazione; nel caso si selezioni la modalità Auto la velocità viene
decisa dal controllo elettronico in funzione dello scostamento dalla
temperatura desiderata.
CAREL
e
a
s
y
s
CAREL
e
a
s
y
mode
e
mode
Fig. 5.e
Fig. 5.b
(*) per l’installazione della resistenza, vedere il manuale e-drofan cod.
+030221265. È possibile visualizzare la presenza della resistenza anche
tramite il parametro loc. 18.
easy way ACQUA +030220845 - rel. 1.0 - 26.11.2008
20
s
e
ITA
5.2 Visualizzazione display (param. loc. 01,
loc.02)
5.6 Tasto multifunzione o °C/°F (param. loc.
09, loc. 10, loc. 15, loc. 16, loc.17)
È possibile decidere le variabili visualizzate sul campo principale e sul
campo secondario del display. Nel caso si sia scelto di visualizzare la
temperatura è possibile scegliere la sonda relativa (loc. 03). L’ ora corrente
è visualizzabile nelle due modalità AM/PM o 0..23 (loc. 4).
Il tasto multifunzione consente di visualizzare la temperatura ambiente,
gli allarmi presenti, l’ora corrente, di visualizzare i set point di temperatura
e umidità, di impostare l’unità di misura di temperatura e di attivare la
funzione “sleep”. Di seguito una tabella riepilogativa.
Par.
loc. 01
loc. 02
loc. 03
loc. 04
Descrizione
Visualizzazione campo principale display
1 = se funzione comfort attiva:
scostamento da set point
se funzione comfort non attiva:
set point impostato
2 = temperatura (vedere loc. 03)
3 = set point umidità
4 = NON UTILIZZATO
Visualizzazione campo secondario display
0 = nessuna visualizzazione
1 = se funzione comfort attiva:
scostamento da set point
se funzione comfort non attiva:
set point impostato
2 = temperatura ambiente
3 = set point umidità
4 = NON UTILIZZATO
5 = ora corrente
Sonda di temperatura visualizzata
0 = terminale wireless
1 = da supervisore
2 = B1 del Master
3 = B2 del Master
4 = B3 del Master
Visualizzazione ora
0 = 0…23
1 = AM/PM
Par.
Def Min Max U.M.
2
1
4
loc. 09
5
0
5
loc. 10
loc. 15
loc. 16
0
0
4
-
0
0
1
-
loc. 17
8
-
6
0
8
-
8
0
8
-
0
0
8
-
0
0
8
-
Per l’impostazione:
• accendere il dispositivo mediante il tasto ON/OFF e selezionare la
modalità di funzionamento;
• premere il tasto multifunzione fino a raggiungere la schermata che
visualizza l’icona luna;
• premere i tasti UP/DOWN fino a impostare il numero di ore di durata
della funzione sleep (max 9);
• premere il tasto ON/OFF per tornare alla visualizzazione standard di
display, in cui vengono visualizzate le ore rimanenti (es. 3h).
Def Min Max U.M.
OFF OFF ON
0
La funzione è particolarmente utile durante le ore notturne, quando la
diminuzione della temperatura corporea (per effetto del sonno) cambia
la percezione della temperatura ambiente. Nella modalità raffreddamento
/deumidificazione il set point viene incrementato del valore del parametro
loc. 05 durante il numero di ore specificato nel display, al termine delle
quali si ritorna al funzionamento precedente (la funzione sleep viene
cancellata). Nella modalità riscaldamento il set point viene decrementato
del valore del parametro loc. 06.
Questa funzione limita entro un range di ± 5°C (± 10°F) la modifica del
Set point di regolazione: le aree del display definite per visualizzare il
set point di regolazione non mostrano il valore impostato, ma il delta di
variazione.
loc. 24
7
5.7 Funzione sleep (param. loc.05 e loc.06)
5.3 Funzione comfort (param. loc. 24)
Descrizione
Funzione comfort
OFF/ON = disabilitata/abilitata
Def Min Max U.M.
Tab. 5.d
Tab. 5.a
Par.
Descrizione
Visualizzazione tasto multifunzione: prima
pressione
0 = nessuna visualizzazione
1 = se funzione comfort attiva:
scostamento da set point
se funzione comfort non attiva: set
point impostato
2 = temperatura ambiente
3 = set point umidità
4 = NON UTILIZZATO
5 = ora corrente
6 = funzione Sleep
7 = unità di misura temperatura (°C/°F)
8 = allarmi presenti
Visualizzazione tasto multifunzione:
seconda pressione (vedere loc. 09)
Visualizzazione tasto multifunzione: terza
pressione (vedere loc. 09)
Visualizzazione tasto multifunzione: quarta
pressione (vedere loc. 09)
Visualizzazione tasto multifunzione: quinta
pressione (vedere loc. 09)
-
Tab. 5.b
5.4 Reset parametri (param. loc. 28)
CAREL
e
a
s
y
mode
s
e
t
CAREL
e
a
s
y
s
e
mode
Il parametro loc. 28 permette di impostare i parametri al valore di
default.
Con questo comando il terminale viene sconnesso dalla rete. Vedere il
paragrafo 4.7 per rieffettuare la connessione.
Fig. 5.f
5.5 Calibrazione sonda di temperatura
(param. loc. 07)
5.8 Password (param. loc. 12 e loc. 13)
Il parametro per l’immissione della password è loc. 12, quello per il
cambiare la password è loc. 13.
Nel caso sia necessario effettuare una calibrazione della sonda di
temperatura del terminale, è possibile utilizzare il parametro loc. 07, che
rappresenta una costante che viene sommata al valore misurato.
Par.
loc. 07
Fig. 5.g
Descrizione
Def Min Max U.M.
Calibrazione sonda temperatura terminale 0
-9.5 9.5 °C
Tab. 5.c
21
easy way ACQUA +030220845 - rel. 1.0 - 26.11.2008
ITA
5.9 Funzione occupancy (param. loc. 22 e
loc. 23)
5.11 Ingresso/uscita dalla rete (param. loc. 14)
Durante la prima messa in servizio, per associare un terminale a un fan
coil Master, occorre impostare l’indirizzo di supervisione del terminale
(loc. 11) pari all’ indirizzo impostato tramite dip switch sulla scheda router
del Master. A questo punto la rete deve essere “aperta” con comando da
software “Carel easy net” e il terminale associato ponendo loc. 14 = ON.
Vedere il paragrafo 4.5.
La funzione Occupancy permette di impostare un secondo set point
da utilizzare nel caso l’ambiente non sia occupato, in questo modo è
possibile effettuare la climatizzazione consumando meno energia ed
ottenere quindi un risparmio economico. Per maggiori informazioni
vedere il manuale e-drofan +030221265. La funzione occupancy è legata
alla variabile I82 gestita da supervisore, la quale definisce la modalità di
funzionamento (economy OFF / economy ON).
I parametri loc. 22 e loc. 23 corrispondono ai parametri 93 e 94 di e-drofan.
La funzione è attiva solo nel fan coil Master, mentre gli Slave sono allineati
al Master. Non appena è impostato loc. 22 ≠ 0, appare a display l’icona
della casetta vuota. La pressione di un qualunque tasto o la transizione
dell’ingresso digitale configurato come “occupancy” (vedere manuale
e-drofan) portano il sistema in stato di “occupato” e il set point al valore
impostato. Il funzionamento è leggermente diverso secondo il tipo di
ambiente impostato (parametro loc.22) e la variabile I82. Se l’ambiente è
occupato compare l’omino dentro la casa e il set point è quello nominale,
se è vuoto il set point diventa il set point economy per il tempo definito
da loc. 23 (Set point economy = set point ± loc.05/loc.06).
Par.
Descrizione
Ingresso/uscita dalla rete
OFF/ON = terminale dissociato/associato
loc. 14
e
a
s
y
s
e
t
CAREL
e
a
s
y
s
-
OFF ON
-
Tab. 5.g
5.12 Disabilitazione modalità di
funzionamento (param. loc. 19)
Il parametro loc. 19 permette di ridurre il numero di modalità di
funzionamento disponibili da terminale, secondo la tabella seguente.
loc. 19
CAREL
Def Min Max U.M.
Modalità di funzionamento
e
mode
mode
2
0
1
2
3
4
5
6
2
Fig. 5.h
Fig. 5.i
√
√
√
√
√
√
√
√
√
√
√
√
√
√
√
√
Tab. 5.h
non occupato
Refresh del timer
prima della fine
del tempo loc. 23
occupato
Prima attivazione
occupato
loc.22
non occupato
Icone a display
I82=0
I82=1
√
5.13 Velocità ventilatore (param. loc. 20)
1: sala
riunioni
tasto
tasto o ingresso
digitale
Il parametro loc. 20 determina le velocità del ventilatore impostabili con
il tasto ventilatore. Nel modo Auto (funzione Autofan) la velocità del
ventilatore è gestita autonomamente dal controllore.
ingresso digitale
(solo se I82=0)
ingresso digitale
(solo se I82=0)
Par.
2: corridoio
tasto o ingresso
digitale
tasto o ingresso
digitale
3: ufficio
Descrizione
Velocità ventilatore
0 = min, med, max, Auto
1 = min, med, max
loc. 20
sempre
non occup.
Def Min Max U.M.
2 = min, med
3 = min
0
0
3
-
Tab. 5.i
Tab. 5.e
Par.
loc. 22
loc. 23
Descrizione
Funzione Occupancy : modalità
0 = disabilitata
1 = sala riunioni
2 = corridoio
3 = ufficio
Funzione Occupancy: tempo
5.14 Blocco tastiera (param. loc. 21)
Def Min Max U.M.
0
0
3
15
1
255 min
Il parametro loc. 21 permette di inibire i tasti del terminale al fine di
impedire impostazioni accidentali. Utile in caso di impianti centralizzati
(Hotel, uffici ecc). L’inibizione è indicata a display dal lampeggio dell’icona
lucchetto.
-
Tab. 5.f
Tasto
0
1
2
3
4
5
6
7
8
9
10
11
12
13
14
15
5.10 Gestione sonda di regolazione
Le impostazioni provenienti da supervisore (sia PC o pCO) hanno la
priorità sulle impostazioni locali del Fan Coil Master nel determinare
quale sonda di temperatura usare per l’algoritmo di regolazione. Se da
supervisore viene impostata la variabile (I87-215 di e-drofan) che impone
di usare il valore della sonda virtuale proveniente da supervisore, tutti i fan
coil utilizzano questo valore per la regolazione. Se invece da supervisore
la variabile viene lasciata a zero, ogni fan coil legge l’impostazione del dip
switch 6 della scheda e-drofan (ON = sonda terminale ; OFF = sonda B1).
Se dip switch 6 = ON la sonda di regolazione è quella del terminale, se dip
switch 6 =OFF ogni fan coil regola con la propria sonda B1.
easy way ACQUA +030220845 - rel. 1.0 - 26.11.2008
/
√
/
√
√
√
√
√
√
√
√
√
√
√
√
√
√
√
√
√
√
√
√
√
√
√
√
√
√
√
√
√
√
√
Tab. 5.j
22
ITA
6. TABELLA PARAMETRI TERMINALE
Livello
U
U
U
U
U
U
U
U
U
U
U
U
F
F
F
F
F
F
F
F
F
F
F
F
F
F
F
F
Parametro e Descrizione
Visualizzazione campo principale display
1 = se funzione comfort attiva : scostamento da set point; se funzione comfort non attiva : set point impostato
loc. 01
2 = temperatura (vedere loc. 3)
3 = set point umidità
4 = NON UTILIZZATO
Visualizzazione campo secondario display
0 = nessuna visualizzazione
1 = se funzione comfort attiva : scostamento da set point; se funzione comfort non attiva : set point impostato
loc. 02
2 = temperatura ambiente
3 = set point umidità
4 = NON UTILIZZATO
5 = ora corrente
Sonda di temperatura visualizzata
0 = terminale wireless
1 = da supervisore
loc. 03
2 = B1 del Master
3 = B2 del Master
4 = B3 del Master
Visualizzazione ora
loc. 04
0 = 0…23
1 = AM/PM
loc. 05
Funzione Sleep/Occupancy: incremento set point temperatura in raffreddamento/deumidificazione
loc. 06
Funzione Sleep/Occupancy: decremento set point temperatura in riscaldamento
loc. 07
Calibrazione sonda temperatura terminale
loc. 08
NON UTILIZZABILE
Visualizzazione tasto multifunzione: prima pressione
0 = nessuna visualizzazione
1 = se funzione comfort attiva: scostamento da set point; se funzione comfort non attiva: set point impostato
2 = temperatura ambiente
3 = set point umidità
loc. 09
4 = NON UTILIZZATO
5 = ora corrente
6 = funzione Sleep
7 = unità di misura temperatura (°C/°F)
8 = allarmi presenti
Visualizzazione tasto multifunzione: seconda pressione
loc. 10
vedere loc. 09
Indirizzo supervisione
senza password: lettura
loc. 11
con password e dispositivo collegato: lettura
con password e dispositivo non collegato: lettura/scrittura
loc. 12
Password
loc. 13
Modifica password (0 = no password)
Ingresso/uscita dalla rete
loc. 14
OFF/ON = terminale dissociato/associato
Visualizzazione tasto multifunzione: terza pressione
loc. 15
vedere loc. 09
Visualizzazione tasto multifunzione: quarta pressione
loc. 16
vedere loc. 09
Visualizzazione tasto multifunzione: quinta pressione
loc. 17
vedere loc. 09
Resistenza nel fan coil (read only)
loc. 18
OFF/ON = assente/presente
loc. 19
Disabilitazione modalità di funzionamento (tasto ON/OFF)
Velocità ventilatore
0 = min, med, max, Auto
loc. 20
1 = min, med, max
2 = min, med
3 = min
loc. 21
Disabilitazione tastiera
Funzione Occupancy: modalità
0 = disabilitata
loc. 22
1 = sala riunioni
2 = corridoio
3 = ufficio
loc. 23
Funzione Occupancy: tempo
Funzione comfort
loc. 24
OFF/ON = disabilitata/abilitata
loc. 25
Versione firmware terminale – Read only
loc. 26
Versione firmware fan coil Master – Read only
loc. 27
Versione firmware scheda router fan coil Master– Read only
Reset parametri
loc. 28
ON = reset
Default Min
Max
U.M.
2
1
4
-
5
0
5
-
0
0
4
-
0
0
1
-
1
1
0
0
0
0
-9.5
-10
25
25
9.5
10
°C
%rH
7
0
8
-
6
0
8
-
16
16
199
-
22
22
0
0
999
999
-
-
OFF
ON
-
8
0
8
-
0
0
8
-
0
0
8
-
-
OFF
ON
-
0
0
6
-
0
0
3
-
0
0
15
-
0
0
3
-
15
1
255
min
OFF
OFF
ON
-
-
-
-
-
OFF
OFF
ON
Tab. 6.a
Livello parametri: U = utente, F = costruttore.
23
easy way ACQUA +030220845 - rel. 1.0 - 26.11.2008
ITA
6.1 Variabili a supervisione
Nel caso di presenza di Access point, sono visibili i seguenti parametri per ogni
zona idronica, divisi per tipologia. L’accesso ai parametri avviene interrogando
l’indirizzo del fan coil Master delle zone idroniche.
Parametro Descrizione
Temperatura da supervisore: valore
Temperatura da supervisore: abilitazione/disabilitazione
Default Min
0
-400
0
0
Max
800
1
U.M.
°C/10
-
Tipo
A
D
SPV
06
02
R/W
R/W
R/W
Tab. 6.b
Variabili terminale
Parametro
loc.19
loc.20
loc.21
-
Descrizione
Sonda temperatura
Sonda umidità
Livello batteria
Livello indicativo segnale radio
Allarme sonda temperatura
Allarme sonda di umidità
Allarme terminale off-line
Ora esterno: abilitazione scrittura
Set point umidità
Disabilitazione modalità di funzionamento
Velocità ventilatore
Disabilitazione tastiera
Tempo minimo di trasmissione del terminale verso il fan coil
Ora interna: ora
Ora interna: minuti
Ora esterna: ora
Ora esterna: minuti
Versione software terminale
Default Min Max
U.M.
Tipo
-400 800
°C/10
A
0
1000 %Rh/10
A
0
100
%
A
-900 -200 dBm/10
A
0
1
D
0
1
D
0
1
D
0
1
D
50
0
100
%RH
I
0
0
6
I
0
0
3
I
0
0
15
I
2
1
60
min
I
0
0
23
h
I
0
0
59
min
I
0
0
23
h
I
0
0
59
min
I
0
65535
I
SPV
07
08
09
10
03
04
05
07
15
16
17
18
19
20
21
22
23
24
R/W
R
R
R
R
R
R
R
R/W
R/W
R/W
R/W
R/W
R/W
R
R
R/W
R/W
R
Tab. 6.c
Variabili scheda fan coil e-drofan
Parametro
loc. 05
loc. 06
loc. 24
loc. 22
loc. 23
loc. 20
-
Descrizione
Sonda B1 (A70-70)
Sonda B2 (A72-72)
Sonda B3 (A73-73)
Occupancy: incremento set point temperatura in raffreddamento/deumidificazione (A18-18)
Occupancy: decremento set point temperatura in riscaldamento (A19-19)
Allarme globale (D1)
Versione sofware (I1-129)
Flag generali 1 (I79-207) (presenza resistenza)
Flag generali 6 (I88-216)
Allarmi (I76-204)
Ingressi digitali (I81-209)
Funzione comfort : abilitazione (I12-140)
Funzione comfort : delta variazione (I84-212)
Occupancy: modalità (I59-187)
Occupancy: tempo (I60-188)
Modalità di funzionamento (I70-198)
Velocità ventilatore (I71-199)
ON/OFF (I73–201)
Set point di temperatura impostato (I83-211)
Set temperatura economy: abilitato/disabilitato (I82-210)
Default
10
10
0
0
0
15
0
0
0
22
0
Min
0
0
0
0
0
0
0
0
0
-5
0
1
0
0
0
8
0
Max
255
255
1
255
255
255
255
255
1
5
3
255
6
3
1
32
1
U.M.
°C/10
°C/10
°C/10
°C/10
°C/10
°C
min
min
°C
-
Tipo
A
A
A
A
A
D
I
I
I
I
I
I
I
I
I
I
I
I
I
I
SPV
01
02
03
04
05
01
01
02
03
04
05
06
07
08
09
10
11
12
13
14
R/W
R
R
R
R/W
R/W
R
R
R
R/W
R
R
R/W
R/W
R/W
R/W
R/W
R/W
R/W
R/W
R/W
Tab. 6.d
Tra parentesi le corrispondenti variabili e-drofan con protocollo CAREL e
Modbus®.
easy way ACQUA +030220845 - rel. 1.0 - 26.11.2008
24
ITA
Variabili scheda router
Parametro
-
Descrizione
FcSlave_1: Sonda Regolazione (A74-74)
FcSlave_2: Sonda Regolazione (A74-74)
FcSlave_3: Sonda Regolazione (A74-74)
FcSlave_4: Sonda Regolazione (A74-74)
FcSlave_5: Sonda Regolazione (A74-74)
FcSlave_6: Sonda Regolazione (A74-74)
FcSlave_7: Sonda Regolazione (A74-74)
FcSlave_8: Sonda Regolazione (A74-74)
FcSlave_9: Sonda Regolazione (A74-74)
FcSlave_10: Sonda Regolazione (A74-74)
FcSlave_1: MSB=Indirizzo CAREL + LSB=Allarmi (I76-204)
FcSlave_2: MSB=Indirizzo CAREL + LSB=Allarmi (I76-204)
FcSlave_3: MSB=Indirizzo CAREL + LSB=Allarmi (I76-204)
FcSlave_4: MSB=Indirizzo CAREL + LSB=Allarmi (I76-204)
FcSlave_5: MSB=Indirizzo CAREL + LSB=Allarmi (I76-204)
FcSlave_6: MSB=Indirizzo CAREL + LSB=Allarmi (I76-204)
FcSlave_7: MSB=Indirizzo CAREL + LSB=Allarmi (I76-204)
FcSlave_8: MSB=Indirizzo CAREL + LSB=Allarmi (I76-204)
FcSlave_9: MSB=Indirizzo CAREL + LSB=Allarmi (I76-204)
FcSlave_10: MSB=Indirizzo CAREL + LSB=Allarmi (I76-204)
Versione software router
Totale numero slave configurati
Totale trasmissione del router verso Access Point
Default
0
2
Min
-400
-400
-400
-400
-400
-400
-400
-400
-400
-400
4096
4096
4096
4096
4096
4096
4096
4096
4096
4096
0
0
1
Max
800
800
800
800
800
800
800
800
800
800
53247
53247
53247
53247
53247
53247
53247
53247
53247
53247
65535
10
60
U.M.
°C/10
°C/10
°C/10
°C/10
°C/10
°C/10
°C/10
°C/10
°C/10
°C/10
-
Tipo
A
A
A
A
A
A
A
A
A
A
A
A
A
A
A
A
A
A
A
A
I
I
I
SPV
11
12
13
14
15
16
17
18
19
20
21
22
23
24
25
26
27
28
29
30
25
26
27
R/W
R
R
R
R
R
R
R
R
R
R
R
R
R
R
R
R
R
R
R
R
R
R
R/W
Tab. 6.e
Variabili Access point
L’accesso ai parametri avviene interrogando l’indirizzo dell’Access point
configurato tramite i dip-switches (vedere paragrafo 2.4 e il foglio istruzioni
cod.+050001310).
Parametro Descrizione
Stato apertura dominio
(0 = rete chiusa, 1 = rete aperta)
Abilitazione apertura/chiusura dominio
0 = funzionamento standard, 1 = abilitazione comando I13
(vedere comando impostato nella variabile I13)
Indirizzo CAREL dispositivo
Numero di sensori presenti
Comandi (si dà l’abilitazione con D3)
5266 Apertura dominio di rete per l’associazione di dispositivi
5267 Chiusura dominio di rete per l’associazione di dispositivi
Allarme da supervisore
Default
-
Min
0
Max
1
U.M.
-
Tipo
D
SPV
2
R/W
R
-
0
1
-
D
3
R/W
-
1
0
15
60
-
I
I
2
9
R
R
-
0
65535
-
I
13
R/W
-
0
1
-
D
06
R/W
Tab. 6.f
25
easy way ACQUA +030220845 - rel. 1.0 - 26.11.2008
ITA
7. ALLARMI
Il terminale wireless visualizza gli allarmi della zona idronica di
appartenenza, provenienti da:
• terminale;
• fan coil Master;
• fan coil Slave, se presenti;
• da supervisore, se è presente un supervisore o un pCO, tramite Access
Point.
Appare l’icona campana sul display. Per visualizzare il tipo di errore,
premere 3 volte il tasto multifunzione. A sinistra compare il numero
totale di allarmi attivi, nel campo principale il codice del tipo di allarme,
nel campo secondario il dispositivo dove si è manifestato: Master (Mst),
Slave (SL) o terminale (tEr).
Nel caso di segnalazione di allarme da supervisore comparirà nel campo
secondario la scritta “SUP”.
Esempio: presenza di 3 errori, su Master, Slave e terminale.
CAREL
easy set
CAREL
mode
easy set
mode
CAREL
easy set
CAREL
mode
easy set
mode
Fig. 7.a
Tabella allarmi terminale
Codice
EST
Causa dell’allarme
Guasto sonda temperatura terminale
EEP
Errore generico interno terminale
A01
A02
A03
Eeprom guasta (scheda e-drofan)
Perdita comunicazione tra scheda e-drofan e scheda router
Guasto sonda ambiente operativa o sonda di regolazione (e-drofan)
A04
Guasto sonda B2 o B3
A05
A06
A07
A30
Allarme finestra
Allarme pompa di circolazione
Arresto da ingresso digitale
Mancanza di comunicazione tra scheda router Master e terminale
A31
Slave off-line
Ripristino
Effetto
Verifiche/rimedi
Sostituire il terminale
Spegnere e riaccendere il terminale.
Sostituire il terminale.
Sostituire la scheda e-drofan
Spegnimento ventilatore Verificare schede
(con postventilazione per Verificare sonda scheda e-drofan
resistenza).
Verificare i collegamenti della sonda sulla
Chiusura valvole acqua
scheda e-drofan. Controllare la sonda.
calda/fredda.
Spegnimento resistenza.
Icona antenna spenta
Verificare la scheda router del Master
Sostituire scheda
router dello slave
Tab. 7.a
easy way ACQUA +030220845 - rel. 1.0 - 26.11.2008
26
ITA
8. CARATTERISTICHE TECNICHE E CODICI DI ACQUISTO
8.1 Terminale wireless easy set
Alimentazione
Potenza massima assorbita
Durata batteria in condizioni normali di funzionamento
Caratteristiche radio frequenza
Potenza trasmessa:
Protocollo radio:
Condizioni di funzionamento
Condizioni di stoccaggio
Precisone della misura della temperatura
Precisone della misura di umidità
Grado di protezione contro gli agenti atmosferici
Classificaz. secondo la protezione contro le scosse elettriche
Inquinamento ambientale
PTI dei materiali di isolamento
Periodo delle sollecitazioni elettriche delle parti isolanti
Categoria di resistenza al calore e al fuoco
Immunità contro le sovratensioni
Classe e struttura del software
Smaltimento
batteria al Litio SAFT LS 14500
1300 mW
4 anni (CAREL non si assume alcuna responsabilità per la durata indicata)
Frequenza: selezionabile da 2405 a 2480 Mhz
0 dBm
ZigBee™
0T50 °C; range umidità: <80 % U.R. non condensante
-20T70 °C; range umidità: <80 % U.R. non condensante
± 1 °C 10T40 °C; ± 2 °C 0T50 °C
± 5 % tra 20 e 80 % U.R.
IP20
Integrabili in apparecchiature di Classe I e II
Normale
250 V
Lungo
categoria D (per scatola e coperchio)
categoria I
Classe A
Seguire le norme locali per lo smaltimento di materiale elettrico
Tab. 8.a
8.2 Access Point
Alimentazione
Potenza assorbita
Caratteristiche radio frequenza
Potenza trasmessa:
Protocollo radio:
Velocità trasmissione RS485
Conformità protocollo CAREL
Max. num. di dispositivi associabili
Condizioni di funzionamento
Condizioni di immagazzinamento
Connessioni - morsetti a vite per alimentazione
Tipo cavo
Montaggio
Visualizzazione/Configurazione
Grado di protezione
Classific. secondo la protezione contro le scosse elettriche
Inquinamento ambientale
PTI dei materiali di isolamento
Periodo delle sollecitazioni elettriche delle parti isolanti
Categoria di resistenza al calore e al fuoco
Immunità contro le sovratens.
Classe e struttura del software
Smaltimento
24 V ±10 % (classe II rispetto alla linea di distribuzione)
24 V +10 % -15 % 2 VA (trasformat. di sicurezza Classe II)
1 VA
Frequenza: selezionabile da 2405 a 2480 Mhz
0 dBm
ZigBee™
19200 Kb/s
Ver. 3 e successive
24 terminali; 8 ripetitori
0T50 °C, <80% U.R. non condensante
-20T70 °C, <80% U.R. non condensante
- morsetto per alimentazione: estraibile cavi sez. max 1,5 mm2
- morsetto per comunicazioni LAN 485: estraibile cavi sez. max 1,5 mm2 (utilizzare cavo
schermato con schermo collegato a GND)
Cavo schermato lunghezza max 1000 m (RS485), 100 m (Alimentazione)
a muro tramite viti
Lettura e scrittura parametri via RS485 con protocollo CAREL master
IP55 (Nota)
integrabili in apparecchiature di Classe I e II
normale
250 V
Lungo
categoria D (per scatola e coperchio)
categoria 2
Classe A
seguire le norme locali per lo smaltimento di materiale elettrico
Tab. 8.b
Nota: Il grado di protezione viene mantenuto soltanto se si utilizza
un cavo unico per l’alimentazione e comunicazione RS485 con
sezione esterna inferiore a 8 mm.
27
easy way ACQUA +030220845 - rel. 1.0 - 26.11.2008
ITA
8.3 Ripetitore
24 V ±10% (classe II rispetto alla linea di distribuzione)
24 V ±10% -15% 2VA (trasformat. di sicurezza Classe II)
1VA
Frequenza: da 2405 a 2480Mhz
0 dBm
ZigBee™
0T50 °C, <80% U.R. non condensante
-20T70 °C, <80% U.R. non condensante
- Morsetto per alimentazione: estraibile cavi sez. max 1,5 mm2
Cavo schermato lunghezza max 100 m
A muro tramite viti
IP55 (Nota)
integrabili in apparecchiature di Classe I e II
normale
250 V
Lungo
categoria D (per scatola e coperchio)
categoria 2
Classe A
seguire le norme locali per lo smaltimento di materiale elettrico
Alimentazione
Potenza assorbita
Caratteristiche radio frequenza
Potenza trasmessa:
Protocollo radio:
Condizioni di funzionamento
Condizioni di immagazzinamento
Connessioni - morsetti a vite per alimentaz.
Tipo cavo
Montaggio
Grado di protezione
Classific. secondo la protezione contro le scosse elettiche
Inquinamento ambientale
PTI dei materiali di isolamento
Periodo delle sollecitazioni elettriche delle parti isolanti
Categoria di resistenza al calore e al fuoco
Immunità contro le sovratensioni
Classe e struttura del software
Smaltimento
Tab. 8.c
Nota: Il grado di protezione viene mantenuto soltanto se si utilizza
un cavo unico per l’alimentazione e comunicazione RS485 con
sezione esterna inferiore a 8 mm.
8.4 Scheda router ZigBee™ per e-drofan
Alimentazione
Isolamenti
Grado di protezione
Condizioni di stoccaggio
Condizioni di funzionamento
Grado di inquinamento
Categoria di resistenza al calore e al fuoco:
PTI dei materiali di isolamento:
Classe e struttura del software:
Periodo delle sollecitazioni elettriche delle parti isolanti:
15…20 Vdc ; massima corrente assorbita: 50 mA
Scheda non optoisolata. Consultare il manuale d’uso del controllo in cui viene installata.
IP00
-20T80 °C, umidità 80% U.R. non condensante
0T60 °C, umidità <90% U.R. non condensante
Normale
D
tutti i materiali hanno PTI≥250
A
lungo
Tab. 8.d
8.5 Codici di acquisto
Codice
HYPW0011H0
HYPW0011S0
HYPW0012H0
HYPW0012S0
EW00BAT000
HYSC00F0W0
HYSW000000
EW00AB2020
EW00RB2020
Descrizione
terminale wireless con sonda di temper., bianco, modello hotel
terminale wireless con sonda di temper., bianco, modello house
terminale wireless con sonda e di temper., nero, modello hotel
terminale wireless con sonda di temper., nero, modello house
batteria (per terminale wireless) tipo AA, Li-SoCI2 da 3,6 V, 1 pz
scheda router per e-drofan
easy net commissioning tool with USB sniffer
Access point nero, 24 Vac
Ripetitore di segnale, nero
Tab. 7.e
CAREL si riserva la possibilità di apportare modifiche o cambiamenti ai propri prodotti senza alcun preavviso.
easy way ACQUA +030220845 - rel. 1.0 - 26.11.2008
28
ENG
WARNINGS
DISPOSAL
CAREL bases the development of its products on decades of experience
in HVAC, on the continuous investments in technological innovations
to products, procedures and strict quality processes with in-circuit and
functional testing on 100% of its products, and on the most innovative
production technology available on the market. CAREL and its subsidiaries
nonetheless cannot guarantee that all the aspects of the product and the
software included with the product respond to the requirements of the final
application, despite the product being developed according to start-of-theart techniques. The customer (manufacturer, developer or installer of the final
equipment) accepts all liability and risk relating to the configuration of the
product in order to reach the expected results in relation to the specific final
installation and/or equipment. CAREL may, based on specific agreements, acts
as a consultant for the positive commissioning of the final unit/application,
however in no case does it accept liability for the correct operation of the final
equipment/system.
INFORMATION FOR USERS ON THE CORRECT HANDLING OF WASTE ELECTRICAL AND ELECTRONIC EQUIPMENT (WEEE)
In reference to European Union directive 2002/96/EC issued on 27
January 2003 and the related national legislation, please note that:
1. WEEE cannot be disposed of as municipal waste and such waste must be
collected and disposed of separately;
2. the public or private waste collection systems defined by local legislation
must be used. In addition, the equipment can be returned to the distributor
at the end of its working life when buying new equipment.
3. the equipment may contain hazardous substances: the improper use or
incorrect disposal of such may have negative effects on human health and
on the environment;
4. the symbol (crossed-out wheeled bin) shown on the product or on the
packaging and on the instruction sheet indicates that the equipment has
been introduced onto the market after 13 August 2005 and that it must
be disposed of separately;
5. in the event of illegal disposal of electrical and electronic waste, the
penalties are specified by local waste disposal legislation.
The CAREL product is a state-of-the-art product, whose operation is specified
in the technical documentation supplied with the product or can be
downloaded, even prior to purchase, from the website www . carel . com.
Each CAREL product, in relation to its advanced level of technology, requires
setup / configuration / programming / commissioning to be able to operate
in the best possible way for the specific application. The failure to complete
such operations, which are required/indicated in the user manual, may cause
the final product to malfunction; CAREL accepts no liability in such cases.
Only qualified personnel may install or carry out technical service on the
product.
The customer must only use the product in the manner described in the
documentation relating to the product.
Warranty on materials: 2 years (from the date of production, excluding
consumables).
Certification: the quality and safety of CAREL products are guaranteed by the
ISO 9001 certified design and production system.sono garantite dal sistema di
progettazione e produzione certificato ISO 9001.
In addition to observing any further warnings described in this manual, the
following warnings must be heeded for all CAREL products:
• prevent the electronic circuits from getting wet. Rain, humidity and all
types of liquids or condensate contain corrosive minerals that may damage
the electronic circuits. In any case, the product should be used or stored
in environments that comply with the temperature and humidity limits
specified in the manual;
• do not install the device in particularly hot environments. Too high
temperatures may reduce the life of electronic devices, damage them and
deform or melt the plastic parts. In any case, the product should be used
or stored in environments that comply with the temperature and humidity
limits specified in the manual;
• do not attempt to open the device in any way other than described in the
manual;
• do not drop, hit or shake the device, as the internal circuits and mechanisms
may be irreparably damaged;
• do not use corrosive chemicals, solvents or aggressive detergents to clean
the device;
• do not use the product for applications other than those specified in the
technical manual.
All of the above suggestions likewise apply to the controllers, serial boards,
programming keys or any other accessory in the CAREL product portfolio.
CAREL adopts a policy of continual development. Consequently, CAREL
reserves the right to make changes and improvements to any product
described in this document without prior warning.
The technical specifications shown in the manual may be changed without
prior warning.
The liability of CAREL in relation to its products is specified in the CAREL general
contract conditions, available on the website www . carel.com and/or by
specific agreements with customers; specifically, to the extent where allowed
by applicable legislation, in no case will CAREL, its employees or subsidiaries
be liable for any lost earnings or sales, losses of data and information, costs of
replacement goods or services, damage to things or people, downtime or any
direct, indirect, incidental, actual, punitive, exemplary, special or consequential
damage of any kind whatsoever, whether contractual, extra-contractual or
due to negligence, or any other liabilities deriving from the installation, use or
impossibility to use the product, even if CAREL or its subsidiaries are warned
of the possibility of such damage.
3
easy way ACQUA +030220845 - rel. 1.0 - 26.11.2008
ENG
Content
1. INTRODUCTION
7
1.1 Terminology ....................................................................................................... 7
1.2 Main functions and features............................................................................ 7
1.3 Application examples.......................................................................................... 8
2. installation
9
2.1 Router board: fitting to the e-drofan board................................................. 9
2.2 Easy set wireless terminal: wall mounting & dimensions ....................... 9
2.3 Commissioning tool........................................................................................ 10
2.4 Access point: wall mounting & dimensions............................................... 10
2.5 Repeater: wall mounting & dimensions....................................................... 10
3. user interface
11
3.1 Keypad................................................................................................................. 11
3.2 Display................................................................................................................. 12
3.3 Programming..................................................................................................... 12
3.4 Setting the current time, the time bands and the temperature set point.....14
4. commissioning
15
4.1 Creating the wireless network........................................................................ 16
4.2 Installing the repeater..................................................................................... 18
4.3 Identification of network components........................................................ 18
4.4 Modifying the network .................................................................................. 18
4.5 Associating a terminal..................................................................................... 18
4.6 Terminal send time.......................................................................................... 19
4.7 Connecting to the Access Point and the supervisory system................ 19
5. functions
20
5.1 Operating modes..............................................................................................20
5.2 Display (par. loc. 01, loc.02).......................................................................... 21
5.3 Comfort function (par. loc. 24)..................................................................... 21
5.4 Reset parameters (par. loc. 28)..................................................................... 21
5.5 Temperature sensor calibration (par. loc. 07)........................................... 21
5.6 Multifunction or °C/°F button (par. loc. 09, loc. 10, loc. 15, loc. 16,
loc.17) ........................................................................................................................ 21
5.7 Sleep function (par. loc.05 & loc.06)........................................................... 21
5.8 Password (par. loc. 12 & loc. 13).................................................................. 21
5.9 Occupancy function (par. loc. 22 & loc. 23)..............................................22
5.10 Control sensor management.......................................................................22
5.11 Network binding/unbinding (par. loc. 14)................................................22
5.12 Disabling operating modes (par. loc. 19).................................................22
5.13 Fan speed (par. loc. 20)................................................................................22
5.14 Lock keypad (par. loc. 21)............................................................................22
6. table of terminal parameters
23
6.1 Supervisor variables.........................................................................................24
7. alarms
26
8. technical specifications & purchase codes 27
8.1
8.2
8.3
8.4
8.5
Easy set wireless terminal...............................................................................27
Access Point.......................................................................................................27
Repeater.............................................................................................................28
ZigBee™ router board for e-drofan.............................................................28
Purchase codes.................................................................................................28
5
easy way ACQUA +030220845 - rel. 1.0 - 26.11.2008
ENG
1. INTRODUCTION
Easy way acqua is a wireless system that uses ZigBee™ technology for
wireless communication between CAREL “e-drofan” electronic controllers
for fan coil units, so as to improve comfort and energy saving. The system
is made up of “e-drofan” boards, fitted with the ZigBee™ router board,
complete with flexible antenna, the “easy set” wireless terminal, fitted
with temperature sensor, and a device called the Access Point that can
communicate with a supervisor (pCO, PlantVisorPRO, PlantWatchPRO)
across an RS485 network. During commissioning, the wireless network
is created using a computer running the “Carel easy net” commissioning
software and a special device, called a USB sniffer, used to create and
configure the wireless network. The network is made up of hydronic
zones, each of which has a Master and a maximum of 10 Slaves: the
wireless terminal is associated with the zone Master, and can be used
to set the temperature set point, the time bands and show the alarms.
A set of hydronic zones connected to the same Access Point is called
a hydronic domain. The supervisor can connect to a series of hydronic
domains via the Access Point, connected in an RS485 network. The easy
way acqua system is suitable for all traditional hydronics applications; to
ensure maximum flexibility, two types of terminals are available: one for
residential use (house version) and one for hotel use (hotel version), the
latter with time band setting disabled.
Router. This consists of a board fitted with buzzer and flexible
antenna. It can communicate over two channels, the service channel
(during commissioning) or the normal operation channel. It manages
communication between the Master fan coil, the Slave fan coils and
the terminal associated with the Master fan coil. It has the function
of repeater when transferring data from Slave fan coils that cannot
communicate directly with the Master fan coil. As Master it interfaces
with the supervisory system on behalf of the entire hydronic zone.
Wireless terminal. Radio device fitted with temperature sensor, keypad
and display, used to display and program the parameters for the
temperature control of the corresponding hydronic zone. The terminal is
mobile and can be wall mounted, placed on a table or wherever required
to improve ambient comfort.
PanId (Personal Area Network Identifier). This code uniquely defines the
network being created. The devices decide which network to connect to
based on the channel and the PanId.
Hydronic zone. Group made up of one Master fan coil and the Slave fan
coils that share the same operating mode.
Hydronic domain. Group of one or more hydronic zones, each of which
communicates via Access Point to a supervisor (pCO, PlantVisorPRO,
PlantWatchPRO).
Main features:
• WPLAN (wireless personal area network) with limited coverage;
• communication over frequency band from 2.4 to 2.4835 GHz, bit rate
250 kbit/s and 16 transmission channels;
• system scalability;
• no wiring required during installation;
• possibility of retrofit installation in historical buildings with architectural
restrictions, without needing additional wiring;
• simple commissioning of the wireless network using a personal
computer running “CAREL easy net” software (commissioning tool);
• flexibility, allowing the reorganisation of space (e.g.: offices,
supermarkets) without having an impact on the communication
network;
• ZigBee™ technology, ideal for the network connection of multiple
devices that don’t exchange large amounts of data, ensuring very
secure data transmission/reception;
• settable terminal send time, allowing extended battery life;
• “mesh” network layout, meaning that in the event of faults on a router
board of a fan coil, alternative routes between the other router boards
are found for communicating the data;
• specific control of individual zones (energy saving);
• mobility of the terminals;
• network coverage even when obstacles are present.
1.2 Main functions and features
The easy way acqua system has the same functions as the e-dronic
system, however with the advantages of wireless communication. The
terminal is used to set the operating mode (automatic, heating, cooling,
ventilation, dehumidification), as well as the “occupancy”, “sleep” or
“comfort” functions on the e-drofan controller for the individual hydronic
zone. The commissioning tool can be used to set the e-drofan parameters
for each fan coil unit, save and load the configurations and consequently
complete the commissioning procedure much more quickly.
Below is a description of the components in the easy way acqua system:
ZigBee™ router board (HYSC00F0W0)
Fitted on the e-drofan control board code HYFC00000*, this features a
flexible antenna and buzzer, and can be activated using the commissioning
tool to assist the identification of the components in the network.
.
1.1 Terminology
USB sniffer. Device used when commissioning the system and following
maintenance when necessary. Based on the level of disturbance, it finds
the best communication channel and PanId (identifier number). Associates
the devices (router and terminals) with the network. If reconfiguration is
subsequently required because the network structure has changed, fan
coil units can be moved, added or removed without having to cancel
and reconfigure the existing network. After the commissioning the USB
sniffer should be removed.
Fig. 1.a
USB-RS485 converter (CVSTDUMOR0)
Access point. Device that collects all the data from the network, and
forwards it via RS485 network to a supervisor (pCO, PlantVisorPRO,
PlantWatchPRO). Connected at the end of the commissioning procedure
if the system needs to be monitored.
Used to interface a RS485 network to a personal computer via the USB
port.
Repeater. Relays the signal between router boards, when excessive distance
or the presence of infrastructure prevent correct communication.
Fig. 1.b
7
easy way ACQUA +030220845 - rel. 1.0 - 26.11.2008
ENG
Easy net commissioning tool (HYSW000000)
Wireless terminal (HYPW001**0)
This comprises the Carel Easy Net software, to be installed on a PC, plus
the USB sniffer. The graphic interface allows easy configuration of the
terminals, the Master and Slaves in the hydronic zones.
Features a built-in temperature sensor. Available in white or black, and in
the “house” and “hotel” models.
Sniffer
Fig. 1.g
USB
Fig. 1.h
1.3 application examples
Fig. 1.c
1. Wireless system with two hydronic zones connected to a supervisor.
Access Point (EW00AB2020)
Device to be installed at the end of the commissioning procedure, to
connect the wireless network to the supervisory system (pCO).
Access Point
Master
RS485
Slave
Slave
Terminale
Terminale
<50 m
Master
24 Vac/dc
Access point
RS485
Repeater
Fig. 1.d
<50 m
The Access Point can also be used to communicate with a computer with
supervisor functions (PlantVisorPRO, PlantWatchPRO). In this case, the
RS485/USB converter code. CVSTDUMOR0 is also required.
Fig. 1.i
2. Wireless system with 15 hydronic domains connected to a supervisor.
Access Point
USB
CVSTDUMOR0
Convertitore USB/RS485
USB/RS485 converter
RS485
24 Vac/dc
15th floor
RS485
Fig. 1.e
Access point
Repeater (EW00RB2020)
Relays the signal from the router boards and terminals to the Access
Point.
Repeater
1st floor
Access point
24 Vac/dc
Fig. 1.f
Fig. 1.j
easy way ACQUA +030220845 - rel. 1.0 - 26.11.2008
8
ENG
2. INSTALLATION
2.2 Easy set wireless terminal: wall
mounting & dimensions
Fit the router board to the e-drofan board and fasten the antenna to
the protection support (P) using a clamp, so that it can’t be detached
by pulling.
The “easy set” wireless terminal can be wall mounted or rested on a surface
(e.g. table), in the most suitable position for measuring the temperature.
78.5
2.1 Router board: fitting to the e-drofan
board
1
4
2
5
3
6
121.55
P
Fig. 2.a
42.5
Fig. 2.g
If wall mounting the terminal, use the support (B) supplied. The catch (A)
secures the terminal to the support, useful in cases where the terminal
must not be moved (e.g. in a hotel). In these cases, the terminal can only
be detached with the bracket (C), supplied together with the Access
Point or the repeater. For applications where the terminal needs to be
detached frequently, remove the catch (A) using cutting nippers.
Fig. 2.b
23,5 mm
C
B
A
Fig. 2.c
Fig. 2.d
Important: do not force the antenna connector during assembly,
to avoid damage!
Position the antenna so as to avoid the electromagnetic shielding effect
of the metallic fan coil cabinet: make a hole on the cabinet for the end of
the antenna to pass through or position it near the top air grill.
Fig. 2.h
Fig. 2.i
Fig. 2.e
Fig. 2.f
9
easy way ACQUA +030220845 - rel. 1.0 - 26.11.2008
ENG
2.3 commissioning tool
The commissioning tool is made up of the “CAREL easy net” installation
software and the USB sniffer, identified by the corresponding label,
to be connected to the computer. Once installation is complete, the
commissioning tool must be removed and the Access Point becomes the
supervision interface. For further information, see the “CAREL easy net”
manual code +030220855 and the chapter on “Commissioning”.
Sniffer
2
1
2
3
4
USB
3
L N
Rx- Rx+ GND
DIP: 1 2 3 4
+ -
- + G
L1 L2 L3
Fig. 2.j
1
2.4 access point: wall mounting &
dimensions
Fig. 2.l
13
196
4
L1 L2 L3
3
L N
Rx- Rx+ GND
+ 1
- + G
2
2.5 repeater: wall mounting & dimensions
For dimensions and fastening, see the drawing in paragraph 2.4.
The repeater is required if the distance between two router boards is >
50 m (indoors) or > 100 m (outdoors). The quality of the communication
signal may also decline due to internal infrastructure or interference, or
the presence of devices operating on the same frequency. This must also
be installed as a backup if there is a fault on a router board, allowing the
network to find an alternative route between router boards to exchange
the data. See paragraph 4.2.
70
108
102
DIP: 1 2 3 4
50
40
94
Fig. 2.k
Installation procedure:
• unscrew the four screws and remove the top cover;
• identify the desired position on the wall, drill the four holes based on
the drawing and insert the screw plugs;
• fit the screws and fasten the device with the cable gland facing
downwards;
• connect power to terminals L-N, respecting polarity for DC power
supply;
• connect the RS485 network using a three-wire cable to terminals RX-,
RX+, GND
• set address 1 on the dipswitches (3) on the first Access Point: a
maximum of 15 Access Points can be installed;
• tighten the antenna to the fitting (2) and check that the antenna cable
is attached to the connector (1);
• close the cover again.
Fig. 2.m
Access Point
Repeater / Router
Terminal
Important: the Access Point should be switched on after the
network has been created and configured using the
commissioning tool. See paragraph 4.7.
easy way ACQUA +030220845 - rel. 1.0 - 26.11.2008
10
Fig. 2.n
ENG
3. user interface
The user interface is made up of the “easy set” wireless terminal for
e-drofan.
The front panel contains the display and the keypad, featuring 6 buttons
that, pressed either alone or combined with the others, are used to
program the hydronic zone. To set the e-drofan board parameters, use the
“Carel easy net” commissioning tool (see the chapter on “Commissioning”).
Two versions of terminal are available:
• “easy set” for residential applications, “house” model;
• “easy set” for hotel applications, “hotel” model, with time band
programming disabled.
3.1 Keypad
Easy set “house“
Easy set “hotel“
easy set
easy set
mode
mode
1
2
°C/°F
1
2
Fig. 3.a
Fig. 3.b
Button
Function
Pressed briefly:
• switches on the terminal and fan coils in the hydronic
zone;
• changes operating mode;
• exits programming mode, saving the values of the
parameters
ON/OFF
Pressed and held (>3s):
mode
• switches off the terminal and the fan coils in the hydronic
zone.
Pressed briefly:
• enters time band and corresponding set point programming
mode;
Pressed and held (>3s):
CLOCK
• sets the current time
Pressed briefly:
• sets the fan rotation speed.
Pressed in combination:
• if pressed for more than 3 seconds together with the DOWN
FAN
button, accesses programming mode.
Pressed briefly:
• increases the value (UP);
• displays any active alarms, when the multifunction button
UP
is selected.
Pressed briefly:
• used to select the temperature unit of measure (°C/°F);
• if an alarm is active, pressing the button a third time
accesses alarm display mode;
MULTIFUNCTION • when pressed the first, second, third, fourth time the display
shows parameters loc9, loc10, loc15, loc16 respectively.
Pressed briefly:
• decreases the value (DOWN);
Pressed in combination:
• if pressed for more than 3 seconds together with the Fan
DOWN
button, accesses programming mode.
Button
ON/OFF
FAN
UP
Function
Pressed briefly:
• switches on the terminal and fan coils in the hydronic zone;
• exits programming mode, saving the values of the
parameters
Pressed and held (>3s):
• switches off the terminal and the fan coils in the hydronic
zone.
Pressed briefly:
• changes operating mode.
Pressed and held (>3s):
• sets the current time.
Pressed briefly:
• sets the fan rotation speed.
Pressed in combination:
• if pressed for more than 3 seconds together with the DOWN
button, accesses programming mode.
Pressed briefly:
• increases the value (UP);
• displays any active alarms, when the multifunction button
is selected.
Pressed briefly:
• used to select the temperature unit of measure (°C/°F);
°C / °F
• if an alarm is active, pressing the button a third time accesses
MULTIFUNCTION
alarm display mode;
• when pressed the first, second, third, fourth time the display
shows parameters loc9, loc10, loc15, loc16 respectively.
DOWN
Pressed briefly:
• decreases the value (DOWN);
Pressed in combination:
• if pressed for more than 3 seconds together with the Fan
button, accesses programming mode.
Tab. 3.b
Tab. 3.a
11
easy way ACQUA +030220845 - rel. 1.0 - 26.11.2008
ENG
3.2 Display
3.3 Programming
The display shows, in the main field and in the secondary field, temperature
values in the range -199 to 999, with the resolution of a tenth of a degree
between -19.9 and 99.9. In the event of alarms on one of the units in the
hydronic zone, the main field shows the alarm code and the secondary
field shows the unit in question (Master, Slave or terminal). During
programming, this shows the parameter codes and values.
The parameters can be modified using the front keypad. Access differs
according to the type of parameter: set point, user parameters (U) and
manufacturer parameters (F). The type of parameter is shown in the table
of parameters. Access the manufacturer parameters is protected by a
password to prevent accidental modifications or access by unauthorised
people.
2
1
16
15
4
ON/OFF
When the unit is ON, the terminal and then the fan coil in the corresponding
hydronic zone come on in sequence, if temperature control is required.
ON: briefly press the ON/OFF button, the standard display is shown;
OFF: press the ON/OFF button for 3 s. OFF is shown on the display.
5
6
14
13
12
3
CAREL
e
a
s
y
s
e
mode
7
1
2
11
Fig. 3.d
10 9
8
Fig. 3.c
ref.
1
2
3
4
5
6
7
8
9
10
11
12
13
14
15
16
description
Main field: room temperature (see parameter loc. 1)
Operating mode active
Battery discharged
Connection with Master active
Temperature unit of measure
Parameter programming or display set point mode
Relative humidity (%)
Secondary field: current time (see parameter loc. 2)
Time display mode (AM/PM or 0 to 23h)
Automatic fan speed
Fan speed indicator
Occupancy function active
Clock/time band
Sleep/ECONOMY function active
Limited keypad function
Active alarm
Changing the set point (temperature)
To modify the temperature set point (8 to 32 °C), the main/secondary
field in the standard display must be showing the temperature or the
temperature set point (e.g. loc.1 =1, 2 and loc.2 = 5) *:
• press the UP/DOWN button: the display shows the room temperature
set point and the message ‘set’ on the right;
• press the UP or DOWN button to set the desired value;
• the standard display is shown again.
(*): alternatively, to display the set point press the multifunction button.
CAREL
e
a
s
y
s
e
mode
Note: the standard display can be selected by suitably setting
parameters loc1 & loc2.
Fig. 3.e
Changing the set point (humidity)
To modify the humidity set point (10 to 70 %rH), the main/secondary field
in the standard display must be showing the humidity set point (e.g. loc.
01 =3 and loc. 02=5)*:
• press the UP/DOWN button: the display shows the room humidity set
point and the message ‘set’ on the right;
• press the UP or DOWN button to scroll to the desired value;
• the standard display is shown again.
CAREL
e
a
s
y
s
e
mode
Fig. 3.f
(*): alternatively, to display the set point press the multifunction button.
Note: the wireless terminal is not fitted with a humidity sensor, the
humidity set point is sent to the pCO controller, which then
controls the activation of a humidifier/dehumidifier.
easy way ACQUA +030220845 - rel. 1.0 - 26.11.2008
12
ENG
Setting the fan speed
Setting the manufacturer parameters
Press the fan button to set one of the three speeds (min, med, max) or
Auto mode, with automatic speed management by the controller.
The manufacturer parameters are only accessible on entering the
PASSWORD and include the enabling of the operating modes, the fan
speeds allowed, the enabling of the “Sleep”, “Occupancy” and “Comfort”
functions, and the parameter for associating the wireless terminal to the
hydronic zone Master.
1. press the fan and DOWN buttons together for 3 s: the display shows
the code of the first modifiable parameter, loc1;
2. press the UP/DOWN button until reaching parameter loc. 12;
3. press the multifunction button to set the parameter;
4. press the UP/DOWN button until displaying the PASSWORD: 22
(default);
5. confirm by pressing the multifunction button;
6. if the value entered is correct, it will be possible to scroll to parameter
loc.13 and the successive parameters, otherwise the display remains
on parameter loc.12;
7. press the UP/DOWN button until reaching the desired parameter;
8. press the multifunction and UP/DOWN button to set the parameter;
9. press the multifunction button to return to the list of parameters;
10. repeat operations from 7) to 9) to set other parameters;
11. to save the new values of the parameters, press the ON/OFF button.
This exits the parameter programming procedure.
Note: each change in the unit ON/OFF status, set points, fan speed,
…, is sent to the Master fan coil board after 5 s. (antenna icon
flashing on the terminal).
Setting the user parameters
The user parameters include the type of standard display on the main
and secondary fields, the calibration of the temperature sensor, and the
terminal supervisor address.
1. press the fan and DOWN buttons together for 3 s: the display shows
the code of the first user modifiable parameter, loc1;
2. press the UP/DOWN button until reaching the parameter to be set (up
to loc.12): when scrolling the display shows the parameter code in the
secondary field and the value of the parameter in the main field;
3. press the multifunction button to set the parameter: the message ‘set’
will move from the parameter code to the value of the parameter;
CAREL
e
a
s
y
s
e
Note:
mode
• this procedure accesses all the parameters on the terminal;
• the values of the parameters are saved when they are entered, the
changes to the parameters cannot be cancelled;
• if the battery is removed from the terminal, the current time setting is
lost. The values of the other parameters remain saved.
Fig. 3.g
4. increase or decrease the value using the UP/ DOWN button until
reaching the desired value;
5. press the multifunction button to return to the list of parameters;
6. repeat operations from 2) to 5) to set other parameters;
7. to save the new values of the parameters, press the ON/OFF button.
This exits the parameter programming procedure.
Note: if no button is pressed, after 30 s the display automatically
returns to standard mode, saving the changes.
13
easy way ACQUA +030220845 - rel. 1.0 - 26.11.2008
ENG
3.4 Setting the current time, the time bands
and the temperature set point
Setting the current time
1. press the clock/mode button for 3 s, until displaying the clock icon
and the time, flashing;
CAREL
e
a
s
y
s
e
mode
Fig. 3.h
2.
3.
4.
5.
press the UP/DOWN button to set the time;
press the multifunction button to switch to the minutes;
press the UP/DOWN button to set the minutes;
press the ON/OFF button to save the setting and exit the setting
procedure.
Note: if no button is pressed, after 10 s the display automatically
returns to standard mode, without saving the settings.
Setting the time bands and the temperature set point
This setting is valid only for the “house” model terminal.
1. press the clock button briefly to display the symbol for the first time
band, accompanied by the start time flashing and the corresponding
temperature set point. The temperature set point value may be
replaced by the message ON/OFF, indicating that at the start of this
time band the terminal and consequently the fan coils in the entire
hydronic zone will be switched on/off respectively;
2. press the UP/DOWN button to set the start time for the first time
band;
3. press the multifunction button to switch to the minutes;
4. press the UP/DOWN button to set the minutes;
5. press the multifunction button to switch to the set point;
6. press the UP/DOWN buttons to set the set point in the range from 8
to 32°C; or alternatively set ON/OFF;
7. press the clock button to set the second time band, the icon for the
second time band will be displayed, accompanied by the start time
flashing and the corresponding set point. Press ON/OFF to save and
exit the setting procedure.
CAREL
easy set
CAREL
mode
e
a
s
y
s
e
mode
1
2
1
Fig. 3.i
Fig. 3.j
Note: if no button is pressed, after 20 s the display automatically
returns to standard mode, saving the settings.
easy way ACQUA +030220845 - rel. 1.0 - 26.11.2008
14
ENG
4. COMMISSIONING
To commission the easy way acqua system, proceed as follows:
2. set the address of the router boards, already installed on the e-drofan
boards, sequentially and unique for each board, remembering that
the addresses can be configured in the range from 16 to 199;
1. Check that the distance between one fan coil and the next is less than
50 m and that there are no obstacles or infrastructure between them,
ensuring the wireless signal strength is at least -87dBm; otherwise
install a repeater between the fan coils to relay the signal (see
paragraph 4.2).
ON
DIP
1 2 3 4 5 6 7 8
1 2 3 4 5 6 7 8
RS485
Fig. 4.c
Example: a space contains 3 fan coils in the first hydronic zone and 2 in
the second. In total there are 5 fan coils, whose addresses will be set as
follows, starting from the least significant bit.
Access point
Hydronic zone 1
Address
Dip-switch
Master Address 16
16 (00010000)
ON
1 2 3 4 5 6 7 8
50 m
ON
Slave Address 17
17 (00010001)
1 2 3 4 5 6 7 8
ON
Slave Address 18
18 (00010010)
1 2 3 4 5 6 7 8
Fig. 4.a
Hydronic zone 2
Address
Dip-switch
Master Address 19
19 (00010011)
ON
1 2 3 4 5 6 7 8
ON
Slave Address 20
20 (00010100)
1 2 3 4 5 6 7 8
RS485
Master 18
Master 20
Master 17
Master 19
Access point
Access point
Repeater
Master 16
Fig. 4.d
Fig. 4.b
3. power up the e-drofan boards;
4. create the wireless network made up of the router boards and
terminals, using the “CAREL easy net” commissioning tool,
paragraph 4.1;
5. connect the wireless network to the Access Point and then to
supervisor (pCO, PlantVisorPRO, PlantWatchPRO). Then remove
“Carel easy net” commissioning tool.
15
the
see
the
the
easy way ACQUA +030220845 - rel. 1.0 - 26.11.2008
ENG
Two confirmation prompts will be shown; select OK.
4.1 Creating the wireless network
For installation of the “CAREL easy net” commissioning tool, see the
corresponding manual code +030220855. The USB sniffer should be
connected to the computer’s USB port.
Sniffer
Fig. 4.i
Fig. 4.j
A new screen appears: select New Node to set the USB SNIFFER as the
means for sending the operating channel and PanId to the router boards
via the service channel.
USB
Fig. 4.e
At the end of the installation procedure, the Carel easy net program icon
is shown on the desktop.
When opening the program a screen is shown with a multiple-choice
menu. Press Start to create a new network and then Automatic Network
to automatically choose the best communication channel
Fig. 4.k
Select Search. The routers available in the service network will be
displayed. If no router is displayed it is because the router is on an
unknown communication channel; consequently click Select Source
Network.
Fig. 4.f
Fig. 4.g
The entire search process lasts around 30-40 seconds, and at the end
tells the user which PanID and which channel will be set for the new
network.
In the following example the channel is 18 and the PanId=3CB5.
Fig. 4.l
The Network Finder screen will be shown. Select Option to search all
channels and then start the network search by clicking Start Search:
Fig. 4.h
Fig. 4.m
easy way ACQUA +030220845 - rel. 1.0 - 26.11.2008
16
Fig. 4.n
ENG
At the end of the procedure the list of networks found is displayed,
for example, four different channels were found (due to previous
configurations):
Creating the zone Master
1. Move the mouse over the row corresponding to the router to be
configured as the Master;
2. Press and hold the mouse button on the row (don’t click);
3. Drag the row to the white space on the right;
4. Release the mouse button;
This will create a new hydronic zone with the router dragged into the
space as the Master.
Creating the zone Slaves
1. Move the mouse over the row with the router to be configured as
Slave;
2. Press and hold the mouse button on the row (don’t click);
3. Drag the row to the white space on the right
4. Release the mouse button when the mouse pointer is over the Master
created previously or over the hydronic zone.
This will automatically create a Slave for the hydronic zone. Repeat the
procedure to create all the hydronic zones required, until the situation is
similar to the one shown on the following screen:
Fig. 4.o
Select the network used to perform the search: (e.g. 11). A message warns
that the service network has been changed.
Fig. 4.p
At the end select the routers that are to be part of the network and select
“Accept routers”. If the association procedure is successful, the message
“success” will be shown next to each router. The operating channel and
PanId are shown at the bottom.
Fig. 4.s
Finally select Update Network to create the Master/Slave associations
between the various Fan Coil routers in the network.
Fig. 4.q
A conformation prompt is then shown. Select OK, a screen opens
showing the communication signal levels between the USB SNIFFER and
each router board:
Dot
Green
Yellow
Red
Signal quality
Good
Satisfactory
Poor
Signal level (dBm)
from 0 to -70
from -71 to -87
less than -87
Fig. 4.r
17
easy way ACQUA +030220845 - rel. 1.0 - 26.11.2008
ENG
4.2 Installing the repeater
4.5 Associating a terminal
In the event where due to interference or excessive distance the quality
of the signal on a router board is poor, a red dot is shown (e.g.: -92dBm).
To associate a terminal with a Master device:
1. check that that the terminal is not connected to the network : loc
14=OFF;
2. set the address of the terminal, loc 11, equal to the address of the
desired Master (e.g.: 17);
e
CAREL
a
s
y
s
e
t
mode
Fig. 4.t
To install a repeater, proceed as follows:
1. position the repeater between the fan coils more than 50 m apart, so
as to ensure an alternative route for the signal to the Access Point in
the event of router board faults;
2. power up the repeater: the three LEDs come on steady, indicating that
the device has not yet been associated with the network;
3. open the network using the Open Network function;
Fig. 4.v
3. select Open Network;
Fig. 4.u
4. wait until the first yellow LED at the top L flashes slowly, the repeater
is now associated;
5. close the network using Close Network function;
6. run Refresh Link Level to check the improvement in signal quality.
Fig. 4.w
4. on the terminal set parameter 14 = ON to establish the network
connection: the message “bin” = binding will be displayed, and if
the procedure is successful the message “on” will be shown, with the
antenna at the top right on the standard display.
4.3 Identification of network components
The Master/Slave router boards can be identified by selecting the device
and using the right mouse button selecting Identify/Stop identify to
activate/deactivate the buzzer respectively.
CAREL
e
a
s
y
s
e
t
CAREL
e
a
s
y
CAREL
e
a
s
y
s
e
t
mode
mode
4.4 Modifying the network
CAREL
mode
e
a
s
y
s
e
t
s
e
mode
When the hydronic networks need to be reorganised, the Slave and
Master routers can be moved by simply dragging and dropping: drag a
Slave from the tree structure to the table to make it available, and then
drag it into a different hydronic zone.
Note:
• to move a router, it first needs to be dragged into the table on
the left and then dragged into the tree structure, in the new position.
• a Master router cannot be moved until the Slave routers have all been
transferred.
5. select Start Search: at the end of the search, the terminal will be shown
connected to the corresponding Master.
After having completed the reorganisation of the hydronic networks,
update the situation of the routers by selecting the “Update Network”
button.
Important: the networks should not be updated or modified if
there are e-drofan router devices with a low wireless
communication level (red dot). In these cases, the update may
not be performed correctly or may even fail completely.
easy way ACQUA +030220845 - rel. 1.0 - 26.11.2008
Important: if resetting the terminal parameters, communication
between the terminal and the network will be lost. This can be
re-established, once commissioning is complete, from the Access
Point. See paragraph 4.7.
18
ENG
4.6 Terminal send time
The terminal, to extend battery life, does not transmit continuously to the
Access Point. The device “sleeps” and wakes up every n minutes, where n
is the value of Send_Time, set on the terminal using the commissioning
tool (Integer 39, default = 2 min).
Send time
1
5
10
15
terminal battery life (years)
2
3
5
8
Data is sent instantly if during the send time the temperature measured
by the terminal changes by the value of Delta_var_space_temp, set on
the terminal using the commissioning tool (Analogue 7, default = 1°C).
4.7 Connecting to the Access Point and the
supervisory system
In order to monitor the status of the hydronic zones created using
the commissioning tool, data monitoring can be activated through
the Access Point. For each hydronic domain, communication with the
supervisor Access Point can be enabled. To set the address of the Access
Point use the dipswitches, see paragraph 2.4 and instruction sheet code
+050001310. Connect the USB-RS485 converter to the second USB port
on the computer and then to the serial port on the Access Point. Click
“Access-Point Settings” on the main page of the program. The following
window will be displayed, select Set network parameters and enter the
network PanId and operating channel. After a few moments the Access
Point will be ready for communication and the USB sniffer can be removed
and the “Carel easy net” program closed.
Fig. 4.x
If the commissioning tool is not available and the network needs to be
opened from the Access Point to connect the terminal, for example after
having reset the default parameters (loc. 28 = ON):
a. open the cover of the Access Point; the yellow LED on the left
flashes;
b. press the button until the 3 LEDs flash together: the network is open;
c. set parameter loc. 14 on the terminal = ON; if binding is successful the
screens should be displayed as shown in point 4.5;
d. Press the button on the Access Point to close the network.
19
easy way ACQUA +030220845 - rel. 1.0 - 26.11.2008
ENG
5. FUNCTIONS
To switch on the wireless terminal, press the ON/OFF button, to switch
it off press the ON/OFF button for 3 s. The message ”OFF” will be shown
on the display.
Cooling
Once the terminal has been switched on:
• Press the “mode” button repeatedly until the snowflake-cooling icon
appears. Set the temperature set point: see paragraph 3.3.
• Press the fan button in sequence to select the desired fan speed; if
Auto mode is selected the speed is decided by the electronic controller
based on the deviation from the set point.
5.1 Operating modes
As mentioned in the “Introduction”, a wireless terminal can be connected
to each hydronic zone in the network, setting a different temperature
and humidity set point for each.
CAREL
e
a
s
y
s
e
mode
Note: the wireless terminal is not fitted with a humidity sensor; the
humidity set point is sent to the pCO controller, which can then
control the activation of a humidifier/dehumidifier.
Fig. 5.c
Automatic
Once the terminal has been switched on:
• Press the “mode” button repeatedly until the message Auto appears or
Auto plus the heater icon, if installed;
• Set the set point using the UP/DOWN button: see paragraph 3.3;
• Press the fan button in sequence to select the desired fan speed; if Auto
mode is selected, the speed is decided by the electronic controller
based on the deviation from the set point (the greater the deviation,
the higher the speed). The operating mode (heating or cooling) is
decided by the electronic controller based on the deviation from the
set point: if the room temperature is higher than the set point, the
controller operates in cooling mode, if it is lower in heating mode.
CAREL
e
a
s
y
s
Ventilation
This mode is useful for recirculating the air in the room.
Once the device has been switched on:
• Press the “mode” button repeatedly until the fan icon comes on;
• Press the fan button in sequence to select the desired fan speed.
CAREL
e
a
s
y
s
e
mode
e
mode
Fig. 5.d
Fig. 5.a
Dehumidification
Once the device has been switched on by pressing the ON/OFF button:
• Press the “mode” button repeatedly until the dehumidification icon
(droplets) comes on;
• Set the temperature set point: see paragraph 3.3.
• Press the fan button in sequence to select the desired fan speed; if
Auto mode is selected the fan operates at minimum speed.
Heating
Once the terminal has been switched on:
• Press the “mode” button repeatedly until the sun-heating icon or sunheating with heater icon appears, if installed (*). In the latter case the
electric heater is also used as a source of heat;
• Set the temperature set point using the UP/DOWN button;
• Press the fan button in sequence to select the desired fan speed; if
Auto mode is selected the speed is decided by the electronic controller
based on the deviation from the set point.
CAREL
e
a
s
y
s
CAREL
e
a
s
y
mode
e
mode
Fig. 5.e
Fig. 5.b
(*) to install the heater, see the e-drofan manual code +030221265.
Parameter loc. 18 also displays whether the heater is installed.
easy way ACQUA +030220845 - rel. 1.0 - 26.11.2008
20
s
e
ENG
5.2 Display (par. loc. 01, loc.02)
5.6 Multifunction or °C/°F button (par. loc.
09, loc. 10, loc. 15, loc. 16, loc.17)
The variables displayed in the main field and the secondary field of the
display can be selected. If the temperature is displayed, the corresponding
sensor can also be selected (loc. 03). The current time can be displayed in
both modes, AM/PM or 24 hour (loc. 4).
Par.
loc. 01
loc. 02
loc. 03
loc. 04
Description
Main field display
1 = if comfort function active: deviation
from set point
if comfort function not active:
set point
2 = temperature (see loc. 03)
3 = humidity set point
4 = NOT USED
Secondary field display
0 = nothing displayed
1 = if comfort function active: deviation
from set point
if comfort function not active:
set point
2 = room temperature
3 = humidity set point
4 = NOT USED
5 = current time
Temperature sensor displayed
0 = wireless terminal
1 = from supervisor
2 = B1 on Master
3 = B2 on Master
4 = B3 on Master
Time display
0 = 24 hr
1 = AM/PM
The multifunction button is used to display the room temperature, the
active alarms, the current time, display the temperature and humidity set
point, the temperature unit of measure and activate the “sleep” function.
Below is a table summarising the functions.
Def Min Max UoM
Par.
2
1
4
Description
Multifunction button display: pressed
once
0 = nothing displayed
1 = if comfort function active: deviation
from set point
if comfort function not active: set point
2 = room temperature
3 = humidity set point
4 = NOT USED
5 = current time
6 = Sleep function
7 = temperature unit of measure (°C/°F)
8 = alarms presenti
Multifunction button display: pressed a
second time (see loc. 09)
Multifunction button display: pressed a
third time (see loc. 09)
Multifunction button display: pressed a
fourth time (see loc. 09)
Multifunction button display: pressed a
fifth time (see loc. 09)
-
loc. 09
5
0
5
loc. 10
loc. 15
loc. 16
0
0
4
loc. 17
-
Def Min Max UoM
7
0
8
-
6
0
8
-
8
0
8
-
0
0
8
-
0
0
8
-
Tab. 5.d
0
0
1
-
Tab. 5.a
5.7 Sleep function (par. loc.05 & loc.06)
The Sleep function is especially useful at night, when the decrease in
body temperature (due to sleep) changes our perception of the room
temperature. In cooling mode the set point is increased by the value of
loc. 05 for the number of hours shown on the display, after which the
previous operation resumes (the sleep function is cancelled). In heating
mode the set point is decreased by value of parameter loc. 06. To set the
sleep function, proceed as follows:
5.3 Comfort function (par. loc. 24)
This function limits variations in the set point to within a range of ± 5°C (±
10°F): the areas of the display defined to display the control set point do
not show the set value, but rather the difference of the variation.
Par.
loc. 24
Description
Comfort function
OFF/ON = disabled/enabled
Def Min Max UoM
OFF OFF ON
To set the sleep function:
• switch the device on using the ON/OFF button and select the operating
mode;
• press the multifunction button until reaching the screen that displays
the moon icon;
• press the UP/DOWN buttons to set the desired number of hours for the
Sleep function (max 9);
• press the ON/OFF button to return to the standard display, which
shows the remaining hours (e.g. 3h).
-
Tab. 5.b
5.4 Reset parameters (par. loc. 28)
Parameter loc. 28 is used to reset the parameters to the default values.
This function disconnects the terminal from the network. See paragraph
4.7 to reconnect.
CAREL
e
a
s
y
mode
s
e
t
CAREL
e
a
s
y
s
e
mode
Fig. 5.f
Fig. 5.g
5.5 Temperature sensor calibration (par. loc.
07)
If the temperature sensor on the terminal needs to be calibrated,
parameter loc. 07 can be set to a value that represents a constant added
to the value measured.
Par.
loc. 07
Description
Terminal temperature sensor calibration
5.8 Password (par. loc. 12 & loc. 13)
The parameter for entering the password is loc. 12, and for changing the
password is loc. 13.
Def Min Max UoM
0
-9.5 9.5 °C
Tab. 5.c
21
easy way ACQUA +030220845 - rel. 1.0 - 26.11.2008
ENG
5.9 Occupancy function (par. loc. 22 & loc.
23)
5.11 Network binding/unbinding (par. loc. 14)
During commissioning, to associate or bind a terminal to a Master fan
coil, set the terminal supervisor address (loc. 11) to the same address as
set by dipswitch on the Master router board. The network must then be
“opened” by running a command from the “Carel easy net” software and
the terminal bound by setting loc. 14 = ON.
See paragraph 4.5.
The Occupancy function used to set a second set point for when the room
is not occupied, so as to consume less energy and consequently save
costs. For further information see the e-drofan manual +030221265. The
occupancy function is linked to variable I82 managed by the supervisor,
which defines the operating mode (economy OFF / economy ON).
Parameters loc. 22 and loc. 23 correspond to e-drofan parameters 93 and
94. The function is only active on the Master fan coil, while the Slaves are
aligned to the Master. As soon as loc. 22 is set ≠ 0, the display shows the
empty home icon. When any button is pressed or the status of the digital
input configured as “occupancy” changes (see the e-drofan manual),
the system switches to “occupied” mode and the set point returns to
the set value. The operation is slightly different according to the type of
environment selected (parameter loc.22) and the value of variable I82.
If the environment is occupied, the icon with the man inside the home
is shown and the standard set point is used, while if is empty the set
point switches to the economy set point for the time defined by loc. 23
(Economy set point = set point ± loc.05/loc.06).
CAREL
e
a
s
y
s
e
t
CAREL
e
a
s
y
s
Par.
Description
Bind to/unbind from the network
OFF/ON = terminal unbound/bound
loc. 14
Def Min Max UoM
-
OFF ON
Tab. 5.g
5.12 Disabling operating modes (par. loc. 19)
Parameter loc. 19 is used to reduce the number of operating modes
available on the terminal, according to the table below..
loc. 19
Operating mode
e
mode
mode
2
0
1
2
3
4
5
6
2
Fig. 5.h
Fig. 5.i
√
√
√
√
√
√
√
√
√
√
√
√
√
√
√
√
√
1: meeting
button
room
Tab. 5.h
not occupied
Timer refreshed
before the end of
the time loc. 23
occupied
First activation
occupied
loc.22
not occupied
Icons displayed
I82=0
I82=1
5.13 Fan speed (par. loc. 20)
Parameter loc. 20 determines the fan speed that can be set with the
fan button. In Auto mode (Autofan function) the fan speed is managed
independently by the controller.
button or digital
input
Par.
2: corridor
3: office
-
digital input
(only if I82=0)
digital input (only
if I82=0)
Description
Fan speed
0 = min, med, max, Auto
1 = min, med, max
loc. 20
always
not occup.
Def Min Max UoM
2 = min, med
3 = min
0
0
3
-
Tab. 5.i
button or digital
button or digital input
input
Tab. 5.e
Par.
loc. 22
loc. 23
Description
Occupancy function : mode
0 = disabled
1 = meeting room
2 = corridor
3 = office
Occupancy function: time
5.14 Lock keypad (par. loc. 21)
Def Min Max UoM
0
0
3
15
1
255 min
Parameter loc. 21 is used to disable the buttons on the terminal so as to
prevent accidental settings. This is useful in centralised systems (hotels,
offices etc.). The disabled functions are indicated on the display by the
flashing of the lock icon.
-
Tab. 5.f
Button
0
1
2
3
4
5
6
7
8
9
10
11
12
13
14
15
5.10 Control sensor management
The settings from the supervisor (either a PC or pCO) have priority over the
local settings on the Master fan coil in determining which temperature
sensor is used by the control algorithm. If the supervisor sets the variable
(I87-215 on the e-drofan) that selects the value of the virtual sensor from
the supervisor, all the fan coils use this value for control. If, on the other
hand, the variable is set to zero on the supervisor, each fan coil reads the
setting of dipswitch 6 on the e-drofan board (ON = terminal sensor; OFF
= sensor B1). If dipswitch 6 = ON, the control sensor is the sensor on the
terminal, if dipswitch 6 =OFF each fan coil controls with its own sensor
B1.
easy way ACQUA +030220845 - rel. 1.0 - 26.11.2008
/
√
/
√
√
√
√
√
√
√
√
√
√
√
√
√
√
√
√
√
√
√
√
√
√
√
√
√
√
√
√
√
√
√
Tab. 5.j
22
ENG
6. TABLE OF TERMINAL PARAMETERS
Level
U
U
U
U
U
U
U
U
U
U
U
U
F
F
F
F
F
F
F
F
F
F
F
F
F
F
F
F
Parameter & description
Main field display
1 = if comfort function active: deviation from set point; if comfort function not active : set point
loc. 01
2 = temperature (see loc. 3)
3 = humidity set point
4 = NOT USED
Secondary field display
0 = nothing displayed
1 = if comfort function active: deviation from set point; if comfort function not active : set point
loc. 02
2 = room temperature
3 = humidity set point
4 = NOT USED
5 = current time
Temperature sensor displayed
0 = wireless terminal
1 = from supervisor
loc. 03
2 = B1 on Master
3 = B2 on Master
4 = B3 on Master
Time display
loc. 04
0 = 24 hours
1 = AM/PM
loc. 05
Sleep/Occupancy function: increase temperature set point in cooling/dehumidification
loc. 06
Sleep/Occupancy function: decrease temperature set point in heating
loc. 07
Terminal temperature sensor calibration
loc. 08
DO NOT USE
Multifunction button display: pressed once
0 = nothing displayed
1 = if comfort function active: deviation from set point; if comfort function not active: set point
2 = room temperature
3 = humidity set point
loc. 09
4 = NOT USED
5 = current time
6 = Sleep function
7 = temperature unit of measure (°C/°F)
8 = alarms presenti
Multifunction button display: pressed a second time
loc. 10
see loc. 09
Supervisor address
wihtout password: read-only
loc. 11
with password and device connected: read-only
with password and device not connected: read/write
loc. 12
Password
loc. 13
Change password (0 = no password)
Network binding/unbinding
loc. 14
OFF/ON = terminal unbound/bound
Multifunction button display: pressed a third time
loc. 15
see loc. 09
Multifunction button display: pressed a fourth time
loc. 16
see loc. 09
Multifunction button display: pressed a fifth time
loc. 17
see loc. 09
Heater in fan coil (read only)
loc. 18
OFF/ON = not fitted/fitted
loc. 19
Disable operating modes (ON/OFF button)
Fan speed
0 = min, med, max, Auto
loc. 20
1 = min, med, max
2 = min, med
3 = min
loc. 21
Lock keypad
Occupancy function: mode
0 = disabled
loc. 22
1 = meeting room
2 = corridor
3 = office
loc. 23
Occupancy function: time
Comfort function
loc. 24
OFF/ON = disabled/enabled
loc. 25
Terminal firmware version – Read-only
loc. 26
Master fan coil firmware version – Read-only
loc. 27
Master fan coil router board firmware version – Read-only
Reset parameters
loc. 28
ON = reset
Default Min
Max
UoM
2
1
4
-
5
0
5
-
0
0
4
-
0
0
1
-
1
1
0
0
0
0
-9.5
-10
25
25
9.5
10
°C
%rH
7
0
8
-
6
0
8
-
16
16
199
-
22
22
0
0
999
999
-
-
OFF
ON
-
8
0
8
-
0
0
8
-
0
0
8
-
-
OFF
ON
-
0
0
6
-
0
0
3
-
0
0
15
-
0
0
3
-
15
1
255
min
OFF
OFF
ON
-
-
-
-
-
OFF
OFF
ON
Tab. 6.a
Parameter levels: U = user, F = manufacturer.
23
easy way ACQUA +030220845 - rel. 1.0 - 26.11.2008
ENG
6.1 Supervisor variables
If the Access Point is used, the following parameters are visible for each hydronic
zone, divided by type. The parameters are accessed by querying the address of
the Master fan coil in the hydronic zones.
Parameter Description
Temperature from the supervisor: value
Temperature from the supervisor: enable/disable
Default Min
0
-400
0
0
Max
800
1
UoM
°C/10
-
Type
A
D
SPV
06
02
R/W
R/W
R/W
Tab. 6.b
Terminal variables
Parameter
loc.19
loc.20
loc.21
-
Description
Temperature sensor
Humidity sensor
Battery level
Indicative wireless signal level
Temperature sensor alarm
Humidity sensor alarm
Terminal off-line alarm
External time: enable write
Humidity set point
Disable operating modes
Fan speed
Lock keypad
Minimum transmission time from terminal to fan coil
Internal time: hours
Internal time: minutes
External time: hours
External time: minutes
Terminal firmware version
Default Min Max
UoM Type
-400 800
°C/10
A
0
1000 %Rh/10
A
0
100
%
A
-900 -200 dBm/10
A
0
1
D
0
1
D
0
1
D
0
1
D
50
0
100
%RH
I
0
0
6
I
0
0
3
I
0
0
15
I
2
1
60
min
I
0
0
23
h
I
0
0
59
min
I
0
0
23
h
I
0
0
59
min
I
0
65535
I
SPV
07
08
09
10
03
04
05
07
15
16
17
18
19
20
21
22
23
24
R/W
R
R
R
R
R
R
R
R/W
R/W
R/W
R/W
R/W
R/W
R
R
R/W
R/W
R
Tab. 6.c
Fan coil e-drofan board variables
Parameter
loc. 05
loc. 06
loc. 24
loc. 22
loc. 23
loc. 20
-
Description
Sensor B1 (A70-70)
Sensor B2 (A72-72)
Sensor B3 (A73-73)
Occupancy: increase temperature set point in cooling/dehumidification (A18-18)
Occupancy: decrease temperature set point in heating (A19-19)
Global alarm (D1)
Firmware version (I1-129)
General flag 1 (I79-207) (heater available)
General flag 6 (I88-216)
Alarms (I76-204)
Digital inputs (I81-209)
Comfort function: enable (I12-140)
Comfort function: variation difference (I84-212)
Occupancy: mode (I59-187)
Occupancy: time (I60-188)
Operating mode (I70-198)
Fan speed (I71-199)
ON/OFF (I73–201)
Temperature set point (I83-211)
Economy temperature set point: enabled/disabled (I82-210)
Default
10
10
0
0
0
15
0
0
0
22
0
Min
0
0
0
0
0
0
0
0
0
-5
0
1
0
0
0
8
0
Max
255
255
1
255
255
255
255
255
1
5
3
255
6
3
1
32
1
UoM
°C/10
°C/10
°C/10
°C/10
°C/10
°C
min
min
°C
-
Type
A
A
A
A
A
D
I
I
I
I
I
I
I
I
I
I
I
I
I
I
SPV
01
02
03
04
05
01
01
02
03
04
05
06
07
08
09
10
11
12
13
14
R/W
R
R
R
R/W
R/W
R
R
R
R/W
R
R
R/W
R/W
R/W
R/W
R/W
R/W
R/W
R/W
R/W
Tab. 6.d
In brackets are the corresponding e-drofan variables with Carel and
Modbus® protocol.
easy way ACQUA +030220845 - rel. 1.0 - 26.11.2008
24
ENG
Router board variables
Parameter
-
Description
FcSlave_1: Control sensor (A74-74)
FcSlave_2: Control sensor (A74-74)
FcSlave_3: Control sensor (A74-74)
FcSlave_4: Control sensor (A74-74)
FcSlave_5: Control sensor (A74-74)
FcSlave_6: Control sensor (A74-74)
FcSlave_7: Control sensor (A74-74)
FcSlave_8: Control sensor (A74-74)
FcSlave_9: Control sensor (A74-74)
FcSlave_10: Control sensor (A74-74)
FcSlave_1: MSB=CAREL address + LSB=Alarms (I76-204)
FcSlave_2: MSB=CAREL address + LSB=Alarms (I76-204)
FcSlave_3: MSB=CAREL address + LSB=Alarms (I76-204)
FcSlave_4: MSB=CAREL address + LSB=Alarms (I76-204)
FcSlave_5: MSB=CAREL address + LSB=Alarms (I76-204)
FcSlave_6: MSB=CAREL address + LSB=Alarms (I76-204)
FcSlave_7: MSB=CAREL address + LSB=Alarms (I76-204)
FcSlave_8: MSB=CAREL address + LSB=Alarms (I76-204)
FcSlave_9: MSB=CAREL address + LSB=Alarms (I76-204)
FcSlave_10: MSB=CAREL address + LSB=Alarms (I76-204)
Router firmware version
Total number of slaves configured
Total transmission of router to Access Point
Default
0
2
Min
-400
-400
-400
-400
-400
-400
-400
-400
-400
-400
4096
4096
4096
4096
4096
4096
4096
4096
4096
4096
0
0
1
Max
800
800
800
800
800
800
800
800
800
800
53247
53247
53247
53247
53247
53247
53247
53247
53247
53247
65535
10
60
UoM
°C/10
°C/10
°C/10
°C/10
°C/10
°C/10
°C/10
°C/10
°C/10
°C/10
-
Type
A
A
A
A
A
A
A
A
A
A
A
A
A
A
A
A
A
A
A
A
I
I
I
SPV
11
12
13
14
15
16
17
18
19
20
21
22
23
24
25
26
27
28
29
30
25
26
27
R/W
R
R
R
R
R
R
R
R
R
R
R
R
R
R
R
R
R
R
R
R
R
R
R/W
Tab. 6.e
Access Point variables
The parameters are accessed by querying the address of the Access Point
configured by dipswitch (see paragraph 2.4 and instruction sheet code
+050001310).
Parameter Description
Domain opening status
(0 = network closed, 1 = network open)
Enable open/close domain
0 = standard operation, 1 = enable command I13
(see command set for variable I13)
CAREL device address
Number of sensors present
Commands (enabled with D3)
5266 Open network domain when binding devices
5267 Close network domain when binding devices
Alarm from supervisor
Default
-
Min
0
Max
1
UoM
-
Type
D
SPV
2
R/W
R
-
0
1
-
D
3
R/W
-
1
0
15
60
-
I
I
2
9
R
R
-
0
65535
-
I
13
R/W
-
0
1
-
D
06
R/W
Tab. 6.f
25
easy way ACQUA +030220845 - rel. 1.0 - 26.11.2008
ENG
7. ALARMS
The wireless terminal displays the alarms in the corresponding hydronic
zone, deriving from:
• the terminal;
• Master fan coil;
• Slave fan coils, if present;
• the supervisor, if a supervisor or pCO is connected, via the Access
Point.
The bell icon is shown on the display. To display the type of error, press
the multifunction button three times. The total number of active alarms is
displayed on the left, the main field shows the alarm code, the secondary
field shows the device where it occurred: Master (Mst), Slave (SL) or
terminal (tEr).
For alarm signals from the supervisor, the secondary field will show the
message “SUP”.
Example: three errors present, on the Master, Slave and terminal.
CAREL
easy set
CAREL
mode
easy set
mode
CAREL
easy set
CAREL
mode
easy set
mode
Fig. 7.a
Table of terminal alarms
Code
EST
Cause of the alarm
Terminal temperature sensor fault
EEP
Generic internal terminal error
A01
A02
A03
EEPROM fault (e-drofan board)
Loss of communication between e-drofan board and router board
Room sensor or control sensor fault (e-drofan)
A04
Sensor B2 or B3 fault
A05
A06
A07
A30
Window alarm
Circulating pump alarm
Stop from digital input
No communication between Master router board and terminal
A31
Slave off-line
Reset
Effect
Fan off (with postventilation for heater).
Close hot/cold water
valves.
Heater off.
Antenna icon off
Checks/solutions
Replace the terminal
Turn the terminal off and on again.Replace
the terminal.
Replace the e-drofan board
Check the boards
Check the e-drofan board sensor
Check the sensor connections on the
e-drofan board. Check the sensor.
Check the Master router board
Replace router
board on the
slave
Tab. 7.a
easy way ACQUA +030220845 - rel. 1.0 - 26.11.2008
26
ENG
8. TECHNICAL SPECIFICATIONS & PURCHASE CODES
8.1 Easy set wireless terminal
Power supply
Maximum power input
Battery life in normal operating conditions
Radio frequency specifications
Power transmitted:
Wireless protocol:
Operating conditions
Storage conditions
Precision of temperature measurement
Precision of humidity measurement
Index of protection
Classification according to protection against electric shock
Environmental pollution
PTI of insulating materials
Period of stress across the insulating parts
Category of resistance to heat and fire
Immunity against voltage surges
Software class and structure
Disposal
SAFT LS 14500 lithium battery
1300 mW
4 years (CAREL is not responsible for the specified battery life)
Frequency: selectable from 2405 to 2480 MHz
0 dBm
ZigBee™
0T50 °C; humidity range: <80 % rH non-condensing
-20T70 °C; humidity range: <80 % rH non-condensing
± 1 °C 10T40 °C; ± 2 °C 0T50 °C
± 5 % between 20 and 80 % RH
IP20
Can be integrated into class 1 or class 2 appliances
Normal
250 V
Long
category D (box and cover)
category 1
Class A
Observe local legislation for the disposal of electrical material
Tab. 8.a
8.2 Access Point
Power supply
Power input
Radio frequency specifications
Power transmitted:
Wireless protocol:
RS485 transmission speed
Carel protocol conformity
Max. num. of devices that can be associated
Operating conditions
Storage conditions
Connections - screw terminals for power supply
Type of cable
Assembly
Display/Configuration
Index of protection
Classification according to protection against electric shock
Environmental pollution
PTI of insulating materials
Period of stress across the insulating parts
Category of resistance to heat and fire
Immunity against voltage surges
Software class and structure
Disposal
24 V ±10 % (class 2 from distribution line)
24 V +10 % -15 % 2 VA (class 2 safety transformer)
1 VA
Frequency: selectable from 2405 to 2480 MHz
0 dBm
ZigBee™
19200 Kb/s
Ver. 3 and higher
24 terminals; 8 repeaters
0T50 °C, <80% rH non-condensing
-20T70 °C, <80% rH non-condensing
- power supply terminal: plug-in cables max size 1.5 mm2- LAN 485 communication
terminal: plug-in cables max size 1.5 mm2 (use shielded cable with shield connected to
GND)
Shielded cable max length 1000 m (RS485), 100 m (power supply)
wall-mounted by screws
Read and write parameters via RS485 with Carel master protocol
IP55 (Note)
can be integrated into class 1 or class 2 appliances
normal
250 V
Long
category D (box and cover)
category 2
Class A
observe local legislation for the disposal of electrical material
Tab. 8.b
Note: The index of protection is maintained only if a single cable is
used for power and RS485 communication with an outside crosssection of less than 8 mm.
27
easy way ACQUA +030220845 - rel. 1.0 - 26.11.2008
ENG
8.3 Repeater
24 V ±10% (class 2 from distribution line)
24 V ±10% -15% 2VA (class 2 safety transformer)
1VA
Frequency: from 2405 to 2480Mhz
0 dBm
Power supply
Power input
Radio frequency specifications
Power transmitted:
Wireless protocol:
ZigBee™
Operating conditions
Storage conditions
Connections - screw terminals for power supply
Type of cable
Assembly
Index of protection
Classification according to protection against electric shock
Environmental pollution
PTI of insulating materials
Period of stress across the insulating parts
Category of resistance to heat and fire
Immunity against voltage surges
Software class and structure
Disposal
0T50 °C, <80% rH non-condensing
-20T70 °C, <80% rH non-condensing
- Power supply terminal: plug-in cables max size 1.5 mm2
Shielded cable max length 100 m
Wall-mounted by screws
IP55 (Note)
can be integrated into class 1 or class 2 appliances
normal
250 V
Long
category D (box and cover)
category 2
Class A
observe local legislation for the disposal of electrical material
Tab. 8.c
Note: The index of protection is maintained only if a single cable is
used for power and RS485 communication with an outside crosssection of less than 8 mm.
8.4 ZigBee™ router board for e-drofan
Power supply
Insulation
Index of protection
Storage conditions
Operating conditions
Degree of pollution
Category of resistance to heat and fire:
PTI of insulating materials:
Software class and structure:
Period of stress across the insulating parts:
15 to 20 Vdc; maximum current input: 50 mA
Board not optically-isolated. Refer to the user manual for the controller it is installed on.
IP00
-20T80 °C, humidity 80% rH non-condensing
0T60 °C, humidity <90% rH non-condensing
Normal
D
for all materials PTI≥250
A
long
Tab. 8.d
8.5 Purchase codes
Code
HYPW0011H0
HYPW0011S0
HYPW0012H0
HYPW0012S0
EW00BAT000
HYSC00F0W0
HYSW000000
EW00AB2020
EW00RB2020
Description
wireless terminal with temp. sensor, white, hotel model
wireless terminal with temp. sensor, white, house model
wireless terminal with temp. sensor, black, hotel model
wireless terminal with temp. sensor, black, house model
battery (for wireless terminal) type AA, Li-SoCI2, 3.6 V, 1 pc
router board for e-drofan
easy net commissioning tool with USB sniffer
Access Point, black, 24 Vac
Signal repeater, black
Tab. 7.e
CAREL reserves the right modify or change its products without prior warning..
easy way ACQUA +030220845 - rel. 1.0 - 26.11.2008
28
CAREL si riserva la possibilità di apportare modifiche o cambiamenti ai propri prodotti senza alcun preavviso.
CAREL S.p.A.
Via dell’Industria, 11 - 35020 Brugine - Padova (Italy)
Tel. (+39) 049.9716611 - Fax (+39) 049.9716600
e-mail: carel @ carel . com - www . carel . com
easy way ACQUA +030220845 - rel. 1.0 - 26.11.2008
Agenzia / Agency: