1
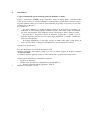
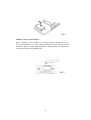
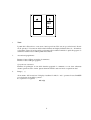
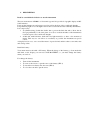
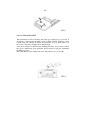
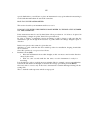
ANEMOMETRO AS2000
Manuale tecnico
1.
Introduzione
Leggete attentamente questo manuale prima di effettuare le misure.
Il nuovo anemometro AS2000 è di tipo elettronico dotato di display grafico e interfaccia RS232C di serie; fornisce la velocità istantanea e media nonché la portata della corrente in esame.
E' particolarmente adatto per correnti di debole intensità pur potendo essere usato con assoluta
sicurezza sino a 30 m/sec.
E' costituito da :
•
un anello cilindrico (2) avente la duplice funzione di proteggere la ventolina e di
indirizzare la vena fluida perpendicolarmente al piano della stessa, al fine di eliminare
gli errori di piazzamento dello strumento rispetto alla direzione della corrente in esame.
•
una ventolina a 10 palette costruita in materiale leggerissimo e quindi a piccolo
momento d'inerzia, in modo da poter seguire il più fedelmente possibile l'andamento
della velocità istantanea.
•
un display alfanumerico a due righe, una per la lettura delle unità e delle decine di
metri di vento sfilato, l’altra per la visualizzazione dei valori min, max e medi..
Installazione della batteria.
Il vostro anemometro necessita di una batteria a 9V.
Quando la tensione della batteria scende sotto un certo limite, appare sul display la dicitura
“LOW BATTERY”.
Sostituire la batteria appena possibile, poiché l’anemometro potrebbe dare letture errate.
•
Seguire queste indicazioni per installare la batteria:
• Spegnere lo strumento.
• Svitare la vite per aprire il compartimento portapila (FIG. 1)
• Inserire la batteria nell’alloggiamento. (FIG: 2)
Rimettere il coperchio e la vite.
1
FIG.1
IMPIEGO DELLO STRUMENTO
Questo strumento, oltre a misurare la velocità del vento in qualsiasi luogo ove
la cosa presenti interesse, è adatto anche per misurare la velocità delle correnti
in miniere, gallerie, camini, negli impianti di condizionamento, di ventilazione
ed in genere in tutti quegli impianti nei
FIG: 2
2
quali abbia importanza la conoscenza delle caratteristiche del moto di una corrente gassosa.
Se la vena fluida mantiene costanti le sue caratteristiche nel tempo si può, spostando lo
strumento in vari punti, conoscere la distribuzione della velocità lungo particolari direttrici.
COME USARE L’ANEMOMETRO
Questa sezione descrive il vostro strumento e come usarlo.
PER SEMPLICITA’ OGNI DESCRIZIONE FA RIFERIMENTO
RIPORTATO SULL’ILLUSTRAZIONE ALL’INIZIO DEL MANUALE.
AL
NUMERO
Se l'anemometro deve essere usato a mano, utilizzare lo strumento senza dividere il datore
dal lettore, se invece deve essere sistemato in posti difficili da raggiungersi o in posti
pericolosi. dividere le due parti ed inserire il manico.
Allo scopo di avere una misura precisa, sarà opportuno, installando l'apparecchio, stare
attenti che sia posto in luoghi sufficientemente lontani da ostacoli o da punti che possano
alterare la velocità o la direzione della corrente.
Regole precise in tal senso non possono essere date, l'operatore dovrà di volta in volta
stabilire le condizioni di installazione più adatte tenendo presente l'avvertenza suddetta;
compiuta tale operazione procedere come segue :
•
•
•
Premere il pulsante (ON),
Esporre lo strumento di fronte alla corrente in modo che
essa lo investa nel senso indicato dalla freccia.
Attendere alcuni secondi fino a quando la ventolina si sarà
portata a regime
A questo punto lo strumento e pronto per la misura.
E' consigliabile allo scopo di eliminare gli errori introdotti dall'operatore (come ad esempio
la non esatta perpendicolarità della ventolina rispetto alla vena fluida) misurare la velocità
media agendo sul pulsante (FUN).
Ciò vale naturalmente se si prevede che le caratteristiche di moto rimangano costanti per
tutto il periodo della prova.
II valore cosi ottenuto rappresenta la velocità media del vento
3
REC
•
Tasti
I punti da 1 a 5 descrivono come usare i tasti a pressione. Essi servono per selezionare i diversi
modi operativi.. L’accensione della relativa dicitura sul display indicherà il modo o la funzione
selezionata. Un modo molto rapido per ritornare alla condizione iniziale è quella di spegnere lo
strumento tramite il tasto OFF e quindi riaccenderlo.
1.
Accensione/spegnimento
Premere il tasto ON per accendere lo strumento,
Premere il tasto OFF per spegnerlo.
Spegnimento automatico
Permette di prolungare la vita della batteria spegnendo lo strumento se non viene effettuata
alcuna operazione entro 4 min.. Questa funzione NON è attiva nel modo acquisizione dati.
2.
Range ( ↑ )
Al momento dell’accensione il display visualizza il simbolo “m/s”; premere il tasto RANGE
per selezionare la modalità “portata”.
La sequenza è la seguente:
m/s > Q
4
3. Fun ( ↓ )
Lo strumento visualizza sulla riga inferiore del display il valore istantaneo rilevato (ogni sec),
nella scala prescelta con il tasto RANGE.
Sulla riga superiore è possibile visualizzare elaborazioni effettuate dallo strumento ogni 10”;
premere il tasto FUN per selezionare le varie elaborazioni disponibili.
La sequenza è la seguente:
m/s:
max > min > Av
Q:
M> m > A
4. Set
Premere il tasto SET per:
Modificare la sezione sulla quale calcolare il valore della portata agendo come
segue:
•
Premere il tasto SET; sulla riga superiore del display comparirà la dicitura
“Sez. mq” e sulla riga inferiore comparirà il valore predefinito (16 cmq).
•
Premere il tasto Rec ( ← ) per spostare il cursore sulla cifra da
modificare quindi premere i tasti Range ( ↑ ) o Fun ( ↓ ) per modificare la cifra.
•
Modificare l’intervallo del tempo di campionamento agendo come segue:
Premere il tasto SET due volte; sulla riga superiore del display comparirà la dicitura
“S.T. sec” e sulla riga inferiore comparirà il valore predefinito (0060 sec)
•
Premere il tasto Rec ( ← ) per spostare il cursore sulla cifra da modificare
quindi premere i tasti Range ( ↑ )o Fun( ↓ ) per modificare la cifra.
51
Rec ( ← )
Premere il tasto REC per iniziare ad acquisire dati (secondo l’intervallo impostato con il tasto
SET)
Premere nuovamente per terminare.
ATTENZIONE!! L’INIZIO DI UN NUOVO PERIODO DI AQUISIZIONE SOVRASCRIVE
SEMPRE IL PRECEDENTE.
5
ACQUISIZIONE VALORI
Lo strumento è in grado di acquisire fino ad un massimo di 100 valori intervallati fra loro di un
tempo selezionabile tra 5 sec e 30 min.
Premendo il tasto REC si inizia l’acquisizione.
INSTALLAZIONE SOFTWARE SU PC
Inserire il disco floppy contenente il file GANEM.EXE nel proprio lettore.
Sul desktop, cliccare con il tasto DX del mouse sull’icona
risorse del computer, scegliere “APRI”.
Selezionare l’unita floppy A con un doppio clic per visualizzarne il contenuto
Da questo, copiare il file "GANEM.EXE"
(sul file con il tasto DX del mouse poi fare “copia”)
sul proprio desktop o in una qualsiasi cartella creata a piacere.
(tasto DX del mouse poi fare “incolla”)
Collegare l’anemometro al PC tramite cavo in dotazione.
Accendere l’anemometro tramite il tasto “ON”.
Fare un doppio clic sull'icona "GANEM".
una volta avviato il programma cliccare il pulsante
"cerca e connetti" (se alla prima connessione appare l’avviso
di “anemometro non trovato” ciccare nuovamente “cerca e connetti”
al ripetersi dell’avviso verificare il collegamento)
Prima di scaricare i dati dall'anemometro si suggerisce di impostare il
"tempo di campionamento (sec)" con lo stesso tempo
impostato precedentemente nell'anemometro.
In questo modo i dati verranno automaticamente salvati
in giusta progressione calcolando il totale del tempo di campionamento.
Clic sul pulsante "scarica dati" per visualizzare e consultare velocemente
sulla maschera di sinistra
Clic sul pulsante "salva in file excel" per salvare i dati in formato excel
con il quale creare grafici o altro tipo di utilita'.
Cliccare sul pulsante "esci" per terminare l'applicazione.
6
PROTOCOLLO DI COMUNICAZIONE
• “Q”
Risposta:
Richiesta valore istantaneo
IVAL =2 bytes (16 bit – low, hi) = valore istantaneo in dm/sec
• “T”
Richiesta contenuto eeprom
Risposta:
NSAMPLES=2 bytes (16 bit – low,hi)= num campionamenti che seguono
DATA= NSAMPLES* 2 bytes (16 bit – low,hi) dati in dm/sec
Se non ci sono dati in eeprom, NSAMPLES=0 e non seguono dati
• “I”
Risposta:
Init buffer eeprom (cancella dati in eeprom)
nessuna
Parametri di comunicazione: 9600,N,8,1
MANUTENZIONE
Lo strumento non richiede manutenzione e non deve essere lubrificato, perché qualsiasi olio
ne altererebbe la taratura Non può essere esposto alle intemperie, un uso continuo ne
provocherebbe il rapido logorio Qualora si tema che un incauto maneggio possa avere
danneggiato lo strumento è opportuno rimandarlo alla fabbrica per il controllo e l'eventuale
messa a punto.
CARATTERISTICHE GENERALI
Condizioni di esercizio
Campi di misura
Precisione:
Risoluzione:
Batteria:
Uscita:
-10°….+60°C
Velocità 0,25….30 m/s
Portata 0,003…3000 mc/s
Area sez 00.01…99.99 mq
+/-0,1% del valore letto
0,1 m/s
9V (durata 80h)
RS 232C
7
LEGENDA
A Innesto a “spina per dividere il datore
dal lettore.
B Tastiera
C Innesto tipo “jack” per il cavetto a
spirale fuoriuscente dal datore.
D Porta seriale RS232C
E Manico per effettuare la lettura ogni
volta si renda necessario dividere il
datore dal lettore
8
KEY
To separate the mechanical
from the electrical part.
Keyboard
“Jack” type of clutch for the
little cable coming out from
the mechanical part
Serial port RS232C
Handle useful to carry out the
reading whenever it is
necessari to divide the
mechanical from the
electrical part
1. DESCRIPTION
Read be careful this book before to use the instrument
The new anemometer AS2000 is of electronic type and it is provided of graphic display an RS232C interface.
It reports the istantaneous and average speed as well as the flow of the considered draught.
It is particulary right for low draughts even if can be used with absolute reliability until 30 m/s.
It is composed by:
• A cylindrical ring (2)with the double aim to protect the little fan and to direct the air
flow perpendiculary to the fan's piane, in order to exclude mistakes of the instrument's
location respect to the considered draught;
• A little fan, with 10 blades. built with very light material so to have a low moment of
inertia. This way we can follow as accurately as possible the instantaneous speed's
course;
A display has two row, one to tread the meters of passed wind, and the other to treat min, max
and average value.
Install the battery
Your anemometer work with a 9V battery. When the charge of the battery go down under the
min limit, on the display you can read “LOW BATTERY”, so you must change the battery
when you can do it.
For change the battery:
•
•
•
•
Turn off the instruments
To remove the screw to open the vane of the battery (FIG.1)
To insert the new battery into the vane (FIG.2)
To close the van and to put the screw.
1E
FIG. 1
USE OF THE INSRUMENT
This instrument. beside measuring the wind speed wherever it is needed, is
useful also to measure the draughts speed in mines. tunnels, chimneys, in air
conditioning and ventilation system, and generally in every plant where it is
necessary to know the draughts flow characteristic.
!f the air flow keeps its characteristic unchanged in time, it is possible to know
the speeds distribution along particular directionsjust moving the instrument
in different points.
But if the characteristic change and if it is important for you to find the
FIG. 2
2E
speeds distribuition, you will have to piace an instrument in every point where the measuring is
needed and then make them ali start at the same time.
HOW TO USE THE ANEMOMETER
This section describe your instrument and how to use it.
FOR EASY USE EVERY DESCRIPTION MAKE REFER TO THE RELATIVE NUMBER
ON THE SCHEMATIC .
If the anemometer must be used by hand, then follow procedure nr 1. if it has to be placed in
hard reaching or dangerous points, then follow procedure nr 2
In order to achieve a particulary precise measunng, it will be better to take care that the
instrument is put far enough from obstacles or points which can change draught's speed or
direction
•
In this sense precise rules cannot be given.the user
shall have to settle each time the more suitable position for mstallation, keepmg in mind the
above-said note
Once this operation is over, proceed as follows:
Push the bottom (ON),
• Place the instrument in front ofthe draught, as this one must come from the direction
shown by the arrow.
• Wait for some seconds until the fan starts; now the instrument is ready for
measunng
It is advisable in order to exclude any users mistake (like for example a wrong perpendiculary
between the fan and the air draught) to measure the average speed using reverser (FUN).
Obviously this is correct only if the flow's charactenstic reamain unchanged during all the
testing time.
The so obtained result represents wind's average speed
3E
REC
•
Keys
The points from 1 to 5 describes like using the keys. They serve in order to select the various
operating ways. On the display will indicate the way or the selected function. A way much
express in order to return to the initial condition is that one to turn off the instrument through
key OFF and therefore to turn on it.
1.
To turn on/to turn off
To press key ON in order to turn on the instrument.
To press key OFF to turn off.
Auto power off
Allows to extend the life of the battery it turning off the instrument if it does not come carried
out some operation within 4 min.. This function is not active in the data acquisition mode.
2.
Range ( ↑ )
At the moment of the switching on the display visualizes the symbol "m/s"; to press key
RANGE in order to select the modality " FLOW ". The sequence is following:
m/s > Q
4E
3.
Fun ( ↑ )
4.
The instrument visualizes on the inferior line of display the instantaneous value (every sec), in
the scale prechoice with key RANGE. On the up line it is possible to visualize processings
carried out from every 10 "; to press key FUN in order to select the several processings
available.
The sequence is following:
m/s:
max > min > Av
Q:
M > m > A
Set
To press the key SET one time for modify the surface on which calculating
the value of the flow:
•
Pressing the key SET on the up line of the display will appear
“ Sez. mq "
and on the inferior line the predefined value will appear (16 cmq)
•
Push the key REC ( ← )in order to move the prompt on the number to modify;
push the key RANGE ( ↑ ) or FUN ( ↓ ) in order to modify the figure.
to press the key SET two times for modify the time between one
sample and the next it.
•
Pressing the key SET two times on the up line of the display
will appear S. T. sec " and on the inferior line will appear predefined value (0060
sec).
•
Push the key REC ( ← )in order to move the prompt on the
figure to modify; push the key RANGE ( ↑ ) or FUN ( ↓ ) in order to modify the
figure.
21
Rec
To press key REC ( ← ) to begin data acquisition (in accordance with the interval set up with
the key SET).
To press newly in order to finish.
ATTENTION!! THE BEGINNING OF A NEW PERIOD OF DATA AQUISITION DELETE
ALWAYS THE PREVIOUS ONE
5E
DATA ACQUISITION MODE
The instrument can acquire maximum 100 values; the time between two samples it is
selectable between 5 sec and 30 min. Pressing key REC (← ) the acquisition is begun.
SOFTWARE INCLUDED
• Processor PENTIUM ·
• 32Mb of operating RAM ·
• O.S. WIN 95,WIN98
• graphical 800x600 or advanced Resolution
Insert the floppy disk in to the drive A, copy the file “GANEM.EXE”
In to your hard disk. Connect the anemometer to PC and turn on.
Start file “GANEM.EXE” and click on the
“cerca e connetti” (if you don’ t find it repeat one again – if you don’ t find again, check the
connection).
Set the “tempo di campionamento (sec) ” as the same time of the anemometer time.
Click on “scarica dati” to download data from anemometer.
Click on “salva in excel” to save data on excel program.
Click on “esci” to end” to end the application.
COMMUNICATION PROTOCOL
" Q " Demanded instantaneous value
Answer: IVAL = 2 bytes (16 bit - low, hi) = instantaneous value in dm/sec
"T " Denanded contained eeprom
Answer: NSAMPLES=2 bytes (16 bit - low, hi) = num samplings that follow GIVEN =
NSAMPLES * 2 bytes (16 bit - low, hi) given in dm/sec If they are not given to us in eeprom,
NSAMPLES=0 and do not follow given
" I " Init buffer eeprom (cancel given in eeprom)
Answer: nobody Parameters of communication: 9600, N, 8, 1
6E
MAINTENANCE
The instrument doesn't need any maintenance, it doesn't have to be lubncated. since any kind of
oil would change its adjustement
It cannot be left exposed to bad weathe, nor used wlthout interruption, unless it couid get early
rumed
In case you are afraid an imprudent move couid have damaged the instrument, it is advisable to
sent it back to thwe factory for a control and eventual adjustment.
THECNICAL FEATURES
Instantaneous readout 1 sec
Medium reading 10 sec
Threshold of indication 0,1 mt/s
Risolution 0,01 mt/s
Precision +/-0,1% (to +20°C)
Functions: Istant. Media Min, Max,Capacity, Low Batt
Output RS-232C
Battery 9 volt
Autonomy 40 hours
Instrument Dimension 220x100x100 mm
Boxes Dimension 300 x 200 mm
Weight 0,350 Kg
7E