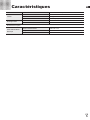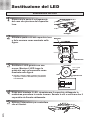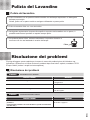
1
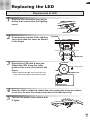
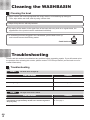
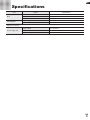
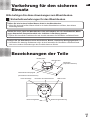
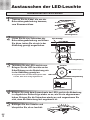
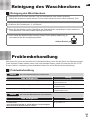
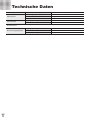
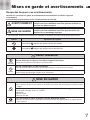
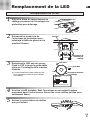
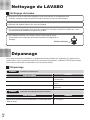
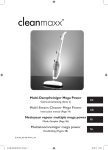
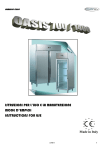
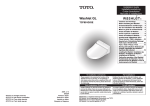
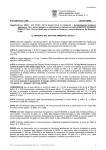
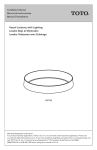
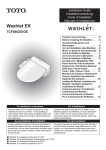
MRZ740 2010. 2.1 MY00348 Cautions and warnings . . . . . . . . . .GB_1 Precautions for use . . . . . . . . . . . . .GB_2 Names of parts. . . . . . . . . . . . . . . . .GB_2 Replacing the LED. . . . . . . . . . . . . .GB_3 Cleaning the WASHBASIN . . . . . . .GB_4 Troubleshooting . . . . . . . . . . . . . . .GB_4 Specifications . . . . . . . . . . . . . . . . .GB_5 Thank you very much for purchasing our WASHBASIN. Please read this manual carefully and use the WASHBASIN correctly. Please keep this instruction manual in a safe place and read it when required. Mises en garde et avertissements. . . FR_1 Précautions d'utilisation. . . . . . . . . FR_2 Noms des pièces . . . . . . . . . . . . . . . FR_2 Remplacement de la LED . . . . . . . . FR_3 Nettoyage du Lavabo . . . . . . . . . . . FR_4 Dépannage . . . . . . . . . . . . . . . . . . . . FR_4 Caractéristiques . . . . . . . . . . . . . . . FR_5 Nous vous remercions pour l'achat de notre LAVEMAINS. Veuillez lire ce manuel avec attention et utiliser le LAVE-MAINS correctement. Conservez ce manuel d'instructions dans un endroit sûr et lisez-le en cas de besoin. Vorsichtsmaßnahmen und Warnungen. . . DE_1 Vorkehrung für den sicheren Einsatz. . . DE_2 Bezeichnungen der Teile . . . . . . . . DE_2 Austauschen der LED-Leuchte . . . DE_3 Reinigung des Waschbecken . . . . . DE_4 Problembehandlung . . . . . . . . . . . . DE_4 Technische Daten . . . . . . . . . . . . . . DE_5 Vielen Dank für den Kauf des Waschbeckens. Bitte lesen Sie diese Anleitung aufmerksam durch und benutzen Sie Ihr Waschbecken korrekt. Bewahren Sie diese Bedienungsanleitung bitte gut auf und lesen Sie sie bei Bedarf. Avvisi di pericolo e attenzione . . . . . IT_1 Precauzioni per l'uso . . . . . . . . . . . . IT_2 Denominazione dei componenti . . . IT_2 Sostituzione del LED. . . . . . . . . . . . . IT_3 Pulizia del Lavandino. . . . . . . . . . . . . IT_4 Risoluzione dei problemi . . . . . . . . . IT_4 Specifiche tecniche . . . . . . . . . . . . . . IT_5 Grazie per aver acquistato questo LAVABO. Si prega di leggere attentamente il manuale e di attenersi alle istruzioni per un utilizzo corretto del LAVABO. Conservare questo manuale di istruzioni in un luogo sicuro e consultarlo quando necessario. Cautions and warnings Always observe these warnings. Please read these cautions and warnings carefully and use the equipment correctly. Follow all safety precautions and warnings. WARNING When this appears next to a topic, this indicates that misoperation could result in death or serious injury. CAUTION When this appears next to a topic, this indicates that misoperation may result in injury or physical damage. ● The following symbols are used to classify and explain instructions that must be followed. Symbol example Meaning of symbol The symbol indicates something that is prohibited. The symbol indicates something that must be done. WARNING Do not disassemble or repair the electric device by yourself. Do not disassemble ● It may cause ignition or electric shock. Do not damage the lighting cable. ● If the lighting cable is damaged, it may cause short-circuit and fire. Prohibited Do not step onto the bowl. ● The bowl is damaged and you may injure yourself. CAUTION Do not exert a strong shock. ● If a hard object such as a vanity glass case is dropped or struck against the bowl, a crack or damage may be generated. Do not use the following cleaning tools because they will damage the bowl. Prohibited ● "Acid" or "alkaline" cleaning material ● Cleanser ● Scrubbing brush ● Sponge with net When disposing of the bowl, sort the individual parts. Required ● Dispose of the sorted parts in an environmentally acceptable way in the country concerned. GB 1 Precautions for use Please follow these instructions regarding the WASHBASIN. Precautions on bowl Do not pour boiling water directly into the bowl. ● If you pour boiling water directly into a cold bowl, breakage may occur. Keep strong medicinal solutions such as hair dye, baldness remedies, permanent wave solution and iodine tincture away from the bowl. ● Rinse away medical solutions immediately because the surface may become discoloured if they are left untreated. Do not wipe it off with thinner, benzine, chemicals and other items. ● Do not use these items because they will cause discolouration or change of properties. Names of parts Drainage plate Bowl Counter (Optional accessories) Water discharge main unit (Rear face of bowl) Fixed base Rear face of bowl Lighting cable GB 2 LED Lighting cover Replacing the LED Replacement of LED 1 2 Remove the connection part of the wiring that comes from the lighting cover. Disconnect Unscrew four screws of the lighting cover and slide the cover as shown in the figure. Fixed base Lighting cover 3 Replace the LED with a new one. Attach the LED along the cable guide on the cover as shown in the figure. Connector With 9 cable guides LED When attaching the LED, ensure the upper and lower sides of the LED are positioned correctly. Lighting cover LED unit Up Down LED light source 4 5 After the LED is attached, attach the cover using the same procedure in reverse. Secure the screws and check it is fixed securely. Turn on the switch and confirm that it lights. GB 3 Cleaning the WASHBASIN Cleaning the bowl ● Wipe it with a soft cloth impregnated with soapy water or mild washing-up detergent. Then, wipe with a wet cloth, and dry using a clean cloth. ● Wipe off oily dirt etc. with ethyl alcohol. ● By wiping off the water on the upper face of the bowl with a dry cloth on a regular basis, the appearance of the product can be maintained indefinitely. ● If something becomes clogged in the catch basin, pull the drain cover up and out and remove the blocking matter. Catch basin Troubleshooting Please read this section to troubleshoot any problem before requesting repairs. If you still cannot solve the problem after reviewing this section, please contact TOTO Europe GmbH (see the back cover for contact information). Troubleshooting Trouble The bowl does not light up. Tests and results Is the connection cable connector inserted? ● Insert the connection cable connector. Has the lighting cable been cut off? ● Check whether the lighting cable is cut off. Is the circuit breaker thrown? ● Check the circuit breaker is not thrown. Trouble The light of the bowl is faded. Tests and results Is the LED faded due to product lifespan? (The lifespan is approximately 25,000 hours and the brightness drops by 70%.) GB 4 Solutions Solutions ● Replace the LED with a new one. ► See page 3 Specifications Item Bowl LED lightings Specification Name Dimensions 397 × 397 × 110 mm Weight 3.3 kg Material Epoxy resin Input voltage DC 12 V Current 4.3 A Input voltage AC 100-240 V Frequency 50/60 Hz Output voltage DC 12 V Optional accessory Power supply unit GB 5 Vorsichtsmaßnahmen und Warnungen Beachten Sie diese Warnungen immer. Bitte lesen Sie diese Vorsichtsmaßnahmen und Warnungen aufmerksam durch und verwenden Sie das Gerät entsprechend. Beachten Sie bitte alle Vorsichtsmaßnahmen und Warnungen. WARNUNG Wenn ein Abschnitt mit diesem Symbol gekennzeichnet ist, wird darauf hingewiesen, dass bei fehlerhafter Handhabung die Gefahr von schweren oder gar tödlichen Verletzungen besteht. VORSICHT Wenn ein Abschnitt mit diesem Symbol gekennzeichnet ist, wird darauf hingewiesen, dass bei fehlerhafter Handhabung möglicherweise Verletzungsgefahr oder die Gefahr von Sachschäden besteht. ● Die folgenden Symbole werden verwendet, um Anweisungen zu klassifizieren und zu erläutern, die befolgt werden müssen. Beispielsymbole Bedeutung des Symbols Das Symbol gibt an, dass etwas verboten ist. Das Symbol gibt etwas an, das getan werden muss. WARNUNG Zerlegen und reparieren Sie das Gerät nicht selbst. Nicht auseinandernehmen ● Dies könnte ein Feuer oder Stromschläge zur Folge haben. Beschädigen Sie das Beleuchtungskabel nicht. ● Wenn das Beleuchtungskabel beschädigt ist, kann es zu einem Kurzschluss oder zu einem Feuer kommen. Verboten Stellen Sie sich nicht auf das Waschbecken. ● Das Waschbecken könnte beschädigt werden und Sie könnten sich verletzen. VORSICHT Setzen Sie das Produkt keinen starken Erschütterungen aus. ● Wenn harte Gegenstände, beispielsweise aus Glas, auf das Waschbecken fallen oder dagegenstoßen, können Risse oder andere Beschädigungen entstehen. Verboten Verwenden Sie die folgenden Reingungsutensilien nicht, da diese das Waschbecken beschädigen. ● Als "säurehaltig" oder "basisch" gekennzeichnete Mittel ● Reinigungsmittel ● Scheuerbürsten ● Netzschwämme Wenn Sie das Waschbecken entsorgen müssen, entsorgen Sie die einzelnen Teile getrennt voneinander. Erforderlich DE 1 ● Entsorgen Sie die einzelnen Teile so, wie es die Regelungen zum Umweltschutz in dem entsprechenden Land vorschreiben. Vorkehrung für den sicheren Einsatz Bitte befolgen Sie diese Anweisungen zum Waschbecken. Sicherheitsvorkehrungen für das Waschbecken Gießen Sie kein kochend heißes Wasser direkt in das Waschbecken. ● Wenn Sie kochend heißes Wasser direkt in ein kaltes Waschbecken schütten, kann dieses beschädigt werden. Stellen Sie sicher, dass das Waschbecken nicht mit Produkten wie z. B. Haarfärbemittel, Mittel gegen Haarausfall, Dauerwellenmittel oder Jodtinktur in Berührung kommt. ● Spülen Sie chemische Produkte sofort ab, da sich ansonsten die Oberfläche verfärben könnte. Reinigen Sie das Waschbecken nicht mit Verdünner, Benzin, chemischen Reinigungsmitteln o. ä. ● Verwenden Sie derartige Substanzen nicht, da sich ansonsten die Oberfläche verfärben könnte oder es zu anderen Veränderungen des Produkts kommen könnte. Bezeichnungen der Teile Beckenplatte Waschbecken Waschtisch (Optionales Zubehör) Wasserabfluss-Hauptgerät (Rückseite des Waschbeckens) Feste Grundlage Rückseite des Waschbeckens Beleuchtungskabel LED-Leuchte Beleuchtungsabdeckung DE 2 Austauschen der LED-Leuchte Austauschen der LED-Leuchte 1 2 Trennen Sie die Kabel, die aus der Beleuchtungsabdeckung kommen, vom Stromanschluss. Verbindung trennen Lösen Sie die vier Schrauben der Beleuchtungsabdeckung und öffnen Sie diese, indem Sie sie wie in der Abbildung gezeigt wegschieben. Feste Grundlage Beleuchtungsabdeckung 3 Tauschen Sie die LED-Leuchte aus. Bringen Sie die LED-Leuchte an der Kabelführung an der Abdeckung wie in der Abbildung gezeigt an. Vergewissern Sie sich beim Anbringen der LEDLeuchte, dass diese richtig angebracht ist. Anschluss Mit 9 Kabelführungen LED-Leuchte Beleuchtungsabdeckung LED-Einheit Hoch Runter 4 5 DE 3 LED-Lichtquelle Bringen Sie nach dem Auswechseln der LED-Leuchte die Abdeckung in umgekehrter Reihenfolge wieder so an, wie Sie sie abgenommen haben. Bringen Sie die Schrauben wieder an und vergewissern Sie sich, dass die Abdeckung fest angebracht ist. Betätigen Sie den Schalter und überprüfen Sie, ob es leuchtet. Reinigung des Waschbeckens Reinigung des Waschbeckens ● Reinigen Sie es mit einem weichen Tuch mit Seifenwasser oder mildem Spülmittel. Reiben Sie es dann mit einem nassen Tuch ab und trocknen Sie es mit einem trockenen Tuch. ● Entfernen Sie Fettschmutz o. ä. mit Ethanol. ● Wenn Sie das Wasser von der Oberfläche des Waschbeckens regelmäßig mit einem trockenen Tuch abwischen, sieht das Produkt dauerhaft aus wie neu. ● Wenn etwas die Abfluss-Einheit verstopft, heben Sie die Abfluss-Abdeckung an und entfernen Sie die Verstopfungsursache. Abfluss-Einheit Problembehandlung Bitte lesen Sie zuerst den Abschnitt zur Problembehandlung, bevor Sie das Gerät zur Reparatur bringen. Sollte sich das Problem danach immer noch nicht beheben lassen, setzen Sie sich bitte mit der TOTO Europe GmbH in Verbindung (die Kontaktdaten finden Sie auf der Rückseite der Abdeckung). Problembehandlung Problem Das Licht am Waschbecken leuchtet nicht. Tests und Ergebnisse Lösung Ist der Anschluss für das Anschlusskabel eingesteckt? ● Stecken Sie den Anschluss für das Anschlusskabel ein. Wurde die Beleuchtungskabel abgeschaltet? ● Überprüfen sie, ob die Beleuchtungskabel abgestellt wurde. Ist der Hauptschalter ausgeschaltet? ● Überprüfen Sie, ob der Hauptschalter ausgeschaltet wurde. Problem Das Licht des Waschbeckens wird schwächer. Tests und Ergebnisse Lösung Lässt die Beleuchtungsstärke aufgrund der Lebensdauer der LED- ● Wechseln Sie die LED-Leuchte aus. Leuchte nach? ► Vgl. dazu S. 3 (Die Lebensdauer beträgt ca. 25.000 Stunden und die Helligkeit lässt im Laufe der Zeit um etwa 70 % nach.) DE 4 Technische Daten Gegenstand Waschbecken LED-Leuchten Spezifikation Bezeichnung Abmessungen (außen) 397 × 397 × 110 mm Gewicht 3.3 kg Material Epoxydharz Eingangsspannung 12 V (Gleichstrom) Stromstärke 4,3 A Eingangsspannung 100-240 V (Wechselstrom) Frequenz 50/60 Hz Ausgangsspannung 12 V (Gleichstrom) Sonderzubehör Stromversorgungseinheit DE 5 Mises en garde et avertissements Respectez toujours ces avertissements. Veuillez lire ces mises en garde et avertissements avec attention et utiliser l'appareil correctement. Suivez toutes les précautions et les avertissements de sécurité. AVERTISSEMENT Lorsque ce symbole apparaît en regard d'une rubrique, cela indique que toute utilisation incorrecte pourrait entraîner la mort ou une blessure grave. MISE EN GARDE Lorsque ce symbole apparaît en regard d'une rubrique, cela indique que toute utilisation incorrecte peut entraîner une blessure ou un dommage physique. ● Les symboles suivants sont utilisés pour classifier et expliquer les instructions devant être suivies. Exemple de symbole Signification du symbole Le symbole indique que quelque chose est interdit. Le symbole indique que quelque chose doit être fait. AVERTISSEMENT Ne pas démonter ou réparer vous-même l'appareil électrique. Ne pas démonter ● Cela pourrait entraîner un incendie ou une électrocution. Ne pas endommager le câble d'éclairage. ● Un câble d'éclairage endommagé risquerait de provoquer un court-circuit et un incendie. Interdit Ne pas piétiner le lavabo. ● Vous risquez d'endommager le lavabo et de vous blesser. MISE EN GARDE Ne soumettez pas le lavabo à un choc important. ● Si un objet dur, tel qu'un miroir, tombe sur le lavabo ou le heurte, cela peut entraîner une fissure ou des dégâts. N'utilisez pas les outils de nettoyage suivants au risque d'endommager le lavabo. Interdit ● Produits de nettoyage "acides" ou "alcalins" ● Nettoyant ● Brosse à laver ● Eponge avec filet Lors de la mise au rebut du lavabo, triez les différentes pièces. Requis ● Eliminez les pièces triées en respectant l'environnement selon les réglementations en vigueur dans le pays concerné. FR 1 Précautions d'utilisation Veuillez suivre ces instructions d'utilisation du LAVABO. Précautions d'utilisation du lavabo Ne versez pas d'eau bouillante directement dans le lavabo. ● Si vous versez de l'eau bouillante directement dans un lavabo froid, il risque de se briser. Eloignez du lavabo les solutions chimiques puissantes, telles que du colorant capillaire, des remèdes contre la calvitie, une solution pour permanente et de la teinture d'iode. ● Rincez immédiatement les solutions chimiques, car elles risquent d'entraîner une décoloration de la surface si vous ne les éliminez pas. N'essuyez pas le lavabo avec du diluant, du benzène, des produits chimiques ou d'autres éléments. ● N'utilisez pas ces éléments, car ils entraîneraient une décoloration ou une modification des propriétés du lavabo. Noms des pièces Plaque de l'écoulement Lavabo Comptoir (Accessoires en option) Unité principale d'évacuation de l'eau (Face arrière du lavabo) Socle fixe Face arrière du lavabo Câble d'éclairage FR 2 LED Enveloppe de protection pour éclairage Remplacement de la LED Remplacement de la LED 1 2 3 Retirez la pièce de raccordement du câblage provenant de l'enveloppe de protection pour éclairage. Débrancher Desserrez les quatre vis de l'enveloppe de protection pour éclairage et faites-la glisser de la manière illustrée. Socle fixe Enveloppe de protection pour éclairage Remplacez la LED par une neuve. Fixez la LED le long du guide-câble situé sur l'enveloppe de la manière illustrée. Lors de la fixation de la LED, vérifiez que ses faces supérieure et inférieure sont orientées correctement. Connecteur Avec 9 guide-câble LED Enveloppe de protection pour éclairage Unité LED Haut Bas 4 5 Source lumineuse LED Une fois la LED installée, fixez l'enveloppe en exécutant la même procédure dans l'ordre inverse. Serrez les vis et vérifiez qu'elles sont solidement fixées. Activez le commutateur et vérifiez que ça s'éclaire. FR 3 Nettoyage du LAVABO Nettoyage du lavabo ● Essuyez-le avec un tissu doux imprégné d'eau savonneuse ou de détergent doux. Ensuite, essuyez-le avec un chiffon humide et séchez-le avec un chiffon propre. ● Eliminez les résidus huileux, etc. avec de l'éthanol. ● En essuyant régulièrement l'eau de la face supérieure du lavabo à l'aide d'un chiffon sec, vous pourrez préserver indéfiniment l'aspect du produit. ● Si le bassin collecteur est colmaté, retirez le couvercle du tuyau d'évacuation en le soulevant et éliminez la matière à l'origine de ce blocage. Bassin collecteur Dépannage Lisez cette section pour remédier à un problème avant de solliciter une réparation. Si, après avoir lu cette section, vous ne parvenez toujours pas à résoudre le problème, contactez TOTO Europe GmbH (dont vous trouverez les coordonnées sur la couverture arrière). Dépannage Problème Le lavabo ne s'éclaire pas. Tests et résultats Solutions Le connecteur du câble de raccordement est-il inséré ? ● Insérez le connecteur du câble de raccordement. Le câble d'éclairage est-il coupé ? ● Vérifiez que le câble d'éclairage n'est pas coupé. Le disjoncteur s'est-il déclenché ? ● Vérifiez que le disjoncteur ne s'est pas déclenché. Problème L'intensité de l'éclairage du lavabo est faible. Tests et résultats Solutions L'intensité de la LED est-elle faible parce qu'elle est en fin de vie ? ● Remplacez la LED par une neuve. (Sa durée de vie est d'environ 25 000 heures ; la luminosité chute ► Voir page 3 alors de 70 %.) FR 4 Caractéristiques Elément Lavabo Eclairages LED Spécifications Nom Dimensions 397 × 397 × 110 mm Poids 3.3 kg Matière Résine époxy Tension d'alimentation 12 V CC Intensité 4,3 A Tension d'alimentation 100-240 V CA Fréquence 50/60 Hz Tension de sortie 12 V CC Accessoire en option Unité d'alimentation électrique FR 5 Avvisi di pericolo e attenzione Si raccomanda di attenersi scrupolosamente a quanto indicato in questi avvisi. Si prega di leggere gli avvisi di pericolo e attenzione per un uso corretto dell'apparecchio. Rispettare tutte le istruzioni di sicurezza e le indicazioni riportate negli avvisi. PERICOLO I paragrafi preceduti da questa indicazione contengono descrizioni importanti. In caso di inosservanza, si possono verificare gravi infortuni, anche mortali. ATTENZIONE I paragrafi preceduti da questa indicazione contengono descrizioni importanti. In caso di inosservanza, si potrebbero verificare infortuni o danni alle cose. ● In questo manuale vengono utilizzati i simboli riportati di seguito per classificare le tipologie di istruzioni contenute nei paragrafi successivi. Significato del simbolo Esempio di simbolo Il simbolo indica un divieto. Il simbolo indica un'operazione obbligatoria. PERICOLO Non smontare o riparare personalmente il dispositivo elettrico. Non smontare ● Potrebbero verificarsi scintille o scosse elettriche. Non danneggiare il cavo di luce. ● Se il cavo di luce è danneggiato, si potrebbero verificare cortocircuiti o incendi. Vietato Non camminare sopra il lavandino. ● Il lavandino potrebbe danneggiarsi provocando lesioni personali all'utilizzatore. ATTENZIONE Non esercitarvi forti pressioni. ● Se un oggetto duro, come ad esempio uno specchietto, cade sul lavandino o lo urta, si potrebbero provocare crepe o danni. Vietato Non utilizzare i seguenti strumenti per la pulizia poiché potrebbero danneggiare il lavandino. ● Materiali per la pulizia "acidi" o "alcalini" ● Soluzioni detergenti ● Spazzole abrasive ● Spugne con retine Per lo smaltimento del lavandino, separarne i singoli componenti. Obbligatorio IT 1 ● Smaltire i componenti in conformità con le disposizioni ambientali del paese di utilizzo. Precauzioni per l'uso Durante l'uso del Lavandino, attenersi alle seguenti istruzioni. Precauzioni per la cura del lavandino Non versare acqua bollente direttamente nel lavandino. ● Se si versa acqua bollente direttamente in un lavandino freddo, si potrebbero provocare delle crepe. Tenere lontano dal lavandino soluzioni medicinali aggressive, come ad esempio tinte per capelli, prodotti anti-calvizie, soluzioni per permanenti e tinture di iodio. ● Sciacquare immediatamente tali prodotti poiché, in caso contrario, la superficie del lavandino potrebbe scolorirsi. Non pulire con solventi, benzina, sostanze chimiche e altri prodotti aggressivi. ● Non utilizzare tali prodotti poiché possono provocare lo scolorimento del lavandino o modificarne le proprietà. Denominazione dei componenti Piatto di prosciugamento Lavandino Piano (Accessori opzionali) Unità principale di scarico acqua (Parte posteriore del lavandino) Base fissa Parte posteriore del lavandino LED Coperchio luce Cavo di luce IT 2 Sostituzione del LED Sostituzione del LED 1 2 Rimuovere la parte di collegamento del cavo che proviene dal coperchio luce. Scollegare Allentare quattro viti del coperchio luce e farlo scorrere come mostrato nella figura. Base fissa Coperchio luce 3 Sostituire il LED guasto con uno nuovo. Montare il LED lungo la guida dei cavi sul coperchio come mostrato nella figura. Quando si monta il LED, accertarsi che la parte superiore e inferiore del LED siano posizionate correttamente. Connettore Con 9 guide per cavi LED Coperchio luce Unità LED Sopra Sotto 4 5 IT 3 Fonte di luce LED Dopo aver montato il LED, riposizionare il coperchio utilizzando la medesima procedura in senso inverso. Serrare le viti e verificare che il coperchio sia fissato saldamente. Attivare l'interruttore per controllare che si illumini. Pulizia del Lavandino Pulizia del lavandino ● Pulire il lavandino con un panno morbido inumidito con dell'acqua saponata o un detergente delicato per stoviglie. Quindi, pulire con un panno umido e asciugare utilizzando un panno pulito. ● Pulire le macchie d'olio ecc. con alcol etilico. ● Asciugando regolarmente l'acqua sulla superficie superiore del lavandino con un panno, è possibile assicurare al prodotto un aspetto sempre pulito. ● Se qualcosa ottura il filtro, sollevare ed estrarre il coperchio di scarico e rimuovere ciò che sta intasando lo scarico dell'acqua. Filtro Risoluzione dei problemi Si prega di leggere questo capitolo per ricercare le cause dei problemi prima di richiedere una riparazione. Qualora non si riesca risolvere il problema dopo aver letto il capitolo, contattare TOTO Europe GmbH (vedere i recapiti sul retrocopertina). Risoluzione dei problemi Problema Il lavandino non si illumina. Prove e risultati Soluzioni Il connettore del cavo di collegamento è inserito? ● Inserire il connettore del cavo di collegamento. È stato interrotto il cavo di luce? ● Verificare se il cavo di luce è stato interrotto. L'interruttore del circuito è attorcigliato? ● Verificare che l'interruttore del circuito non sia attorcigliato. Problema La luce del lavandino è fioca. Prove e risultati Soluzioni La luce del LED è fioca a causa del termine della durata di vita del ● Sostituire il LED con uno nuovo. prodotto? ►Vedere a pagina 3 (La durata del prodotto è di circa 25.000 ore, quindi la luminosità cala del 70%.) IT 4 Specifiche tecniche Voce Lavandino Luci LED Specifiche Denominazione Dimensioni 397 × 397 × 110 mm Peso 3.3 kg Materiale Resina epossidica Tensione in entrata 12 Vcc Intensità di corrente 4,3 A Tensione in entrata 100-240 Vca Frequenza 50/60 Hz Tensione in uscita 12 Vcc Accessorio opzionale Alimentatore IT 5