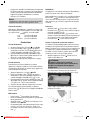
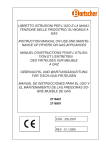
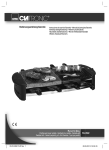
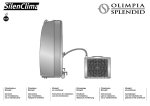
1
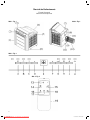
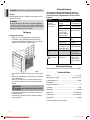
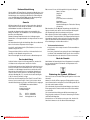
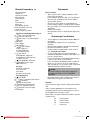
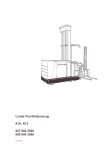
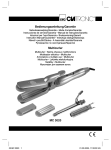
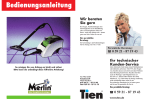
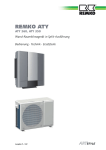
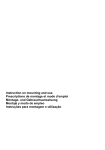
Bedienungsanleitung/Garantie
Istruzioni per l’uso/Garanzia
Instruction Manual/Guarantee
CL 3134
Downloaded
from AC-Manual.com Manuals
05-CL 3134 1
20.02.2007, 14:16:45 Uhr
DEUTSCH
DEUTSCH
Übersicht der Bedienelemente ................................... Seite
3
Bedienungsanleitung .................................................. Seite
4
Technische Daten ....................................................... Seite
8
Garantie....................................................................... Seite
9
ITALIANO
ITALIANO
Inhalt
Indice
Elementi di comando ............................................... Pagina
3
Istruzioni per l’uso .................................................... Pagina 10
Dati tecnici................................................................ Pagina 14
ENGLISH
ENGLISH
Garanzia................................................................... Pagina 15
Contents
Overview of the Components ..................................... Page
3
Instruction Manual....................................................... Page 16
Technical Data ............................................................ Page 20
Guarantee ................................................................... Page 20
2
Downloaded
from AC-Manual.com Manuals
05-CL 3134 2
20.02.2007, 14:16:46 Uhr
Übersicht der Bedienelemente
Elementi di comando
Overview of the Components
Abb. 1 / Fig. 1
Abb. 2 / Fig. 2
Abb. 3 / Fig. 2
Abb. 4 / Fig. 4
3
Downloaded
from AC-Manual.com Manuals
05-CL 3134 3
20.02.2007, 14:23:45 Uhr
DEUTSCH
Allgemeine Sicherheitshinweise
Lesen Sie vor Inbetriebnahme dieses Gerätes die Bedienungsanleitung sehr sorgfältig durch und bewahren Sie diese inkl.
Garantieschein, Kassenbon und nach Möglichkeit den Karton
mit Innenverpackung gut auf. Falls Sie das Gerät an Dritte
weitergeben, geben Sie auch die Bedienungsanleitung mit.
•
Benutzen Sie das Gerät ausschließlich für den privaten
und den dafür vorgesehenen Zweck. Dieses Gerät ist nicht
für den gewerblichen Gebrauch bestimmt. Benutzen Sie
es nicht im Freien (außer es ist für den bedingten Einsatz
im Freien vorgesehen). Halten Sie es vor Hitze, direkter
Sonneneinstrahlung, Feuchtigkeit (auf keinen Fall in Flüssigkeiten tauchen) und scharfen Kanten fern. Benutzen Sie
das Gerät nicht mit feuchten Händen. Bei feucht oder nass
gewordenem Gerät sofort den Netzstecker ziehen.
Schalten Sie das Gerät aus und ziehen Sie immer den
Stecker aus der Steckdose (ziehen Sie am Stecker, nicht
am Kabel) wenn Sie das Gerät nicht benutzen, Zubehörteile
anbringen, zur Reinigung oder bei Störung.
Betreiben Sie das Gerät nicht unbeaufsichtigt. Sollten Sie
den Arbeitsplatz verlassen, schalten Sie das Gerät bitte
immer aus, bzw. ziehen Sie den Stecker aus der Steckdose
(ziehen Sie am Stecker, nicht am Kabel).
Prüfen Sie Gerät und Kabel regelmäßig auf Schäden. Ein
beschädigtes Gerät bitte nicht in Betrieb nehmen.
Reparieren Sie das Gerät nicht selbst, sondern suchen Sie
bitte einen autorisierten Fachmann auf. Um Gefährdungen
zu vermeiden, ein defektes Netzkabel bitte nur vom Hersteller, unserem Kundendienst oder einer ähnlich qualifizierten
Person durch ein gleichwertiges Kabel ersetzen lassen.
Verwenden Sie nur Original-Zubehör.
Beachten Sie bitte die nachfolgenden „Speziellen Sicherheitshinweise“.
•
•
•
•
•
•
Kinder und gebrechliche Personen
•
Zur Sicherheit Ihrer Kinder lassen Sie keine Verpackungsteile (Plastikbeutel, Karton, Styropor, etc.) erreichbar liegen.
HINWEIS: Hebt Tipps und Informationen für Sie hervor.
Spezielle Sicherheitshinweise für dieses Gerät
•
•
•
•
•
•
•
•
•
•
•
•
•
•
Achtung! Lassen Sie kleine Kinder nicht mit Folie spielen.
Es besteht Erstickungsgefahr!
•
Um Kinder oder gebrechliche Personen vor den Gefahren
elektrischer Geräte zu schützen, beachten Sie, das dieses
Gerät nur unter Aufsicht verwendet wird. Dieses Gerät ist kein
Spielzeug. Lassen Sie kleine Kinder nicht damit spielen.
Symbole in dieser Bedienungsanleitung
Wichtige Hinweise für Ihre Sicherheit sind besonders gekennzeichnet. Beachten Sie diese Hinweise unbedingt, um Unfälle
und Schäden am Gerät zu vermeiden:
WARNUNG:
Warnt vor Gefahren für Ihre Gesundheit und zeigt mögliche
Verletzungsrisiken auf.
ACHTUNG:
Weist auf mögliche Gefährdungen für das Gerät oder andere
Gegenstände hin.
•
Bitte beachten Sie!
Lassen Sie das Gerät nicht über Stunden unbeaufsichtigt.
Verlassen Sie während des Betriebes nicht das Haus.
Beachten Sie die Gebrauchslage!
Stellen Sie das Gerät immer so auf, dass die Luft ungehindert ein- und ausströmen kann.
Stellen Sie das Gerät auf eine ebene Fläche.
Das Klimagerät darf nicht direkt unter einer Steckdose
betrieben werden.
Dieses Gerät wurde konstruiert, um Wohnräume zu klimatisieren und darf nicht für andere Zwecke eingesetzt werden.
Stecken Sie keine Gegenstände in Öffnungen des Gerätes.
Heben oder bewegen Sie das Gerät nicht an der Rückseite,
sondern immer an der Vorderseite. Greifen Sie in die
Griffmulden, wenn Sie es bewegen wollen.
WARNUNG:
Decken Sie das Gerät nicht ab, legen Sie keine Gegenstände auf das Gerät. Es besteht Überhitzungsgefahr!
Dieses Klimagerät nicht in unmittelbarer Nähe einer Badewanne, einer Dusche oder eines Schwimmbeckens benutzen.
Bedienen Sie das Gerät nicht aus einer solchen Örtlichkeit
heraus. Halten Sie einen Sicherheitsabstand von 1,25 m ein.
Das Klimagerät unter keinen Umständen in Räumen mit
explosiven Gas (z.B. Benzin) bzw. während der Arbeit mit
entflammbarem Klebstoff oder Lösungsmittel (z.B. beim
Verkleben oder Lackieren von Parkett, PVC usw.) benutzen.
Das Gerät nur in aufrechter Position benutzen.
Sollte das Klimagerät umfallen, den Stecker aus der
Steckdose ziehen und das Gerät abkühlen lassen, bevor es
wieder aufgerichtet wird.
Entleeren Sie vorher den Kondenswasserbehälter im Inneren des Gerätes, bevor Sie es verstellen oder wegräumen.
Als zusätzlicher Schutz wird die Installation einer Fehlerstrom-Schutzeinrichtung (RCD) mit einem Bemessungsauflagestrom von nicht mehr als 30 mA im BadezimmerStromkreis empfohlen. Lassen Sie sich bitte von einem
autorisierten Elektroinstallateur beraten.
Benutzen Sie keine Verlängerungsleitungen oder Mehrfachsteckdosen, da dieses Gerät zu leistungsstark ist.
Übersicht der Bedienelemente (Abb. 1+2)
1
2
3
4
5
6
7
8
9
10
11
12
Frontabdeckung
Luftauslass
Bedienfeld
Rückwandabdeckung
rechter Lufteinlass
Rollen
linker Lufteinlass
Kabelfach
Schlauchanschluss
Abluftschlauch
Verbindungsring
Wasserabfluss mit Gumminoppen
4
Downloaded
from AC-Manual.com Manuals
05-CL 3134 4
20.02.2007, 14:16:48 Uhr
Zubehör:
Verbindungsschlauch
Verbindungsring
Fernbedienung
Wasserauffangschale
Fernbedienung (Abb. 4)
13 „ “ Ein/Aus Taste
14 „ “ Betriebsarten – Einstellung der Betriebsarten
15 „
“ Ventilator –
Einstellung der Geschwindigkeiten
16 „ “ Temperaturregulierung
17 „ “ Timer - Einstellung der Uhrzeit
18 „ “ Luftauslass auf/ab Bewegung
19 Batteriefach
Fernbedienung
Batterien einlegen
•
•
•
•
Öffnen Sie den Batteriefachdeckel (19) auf der Rückseite
der Fernbedienung.
Legen Sie 2 Micro Batterien des Typs R03 „AAA“ 1,5 V ein.
Achten Sie auf die richtige Polarität (siehe Batteriefachboden)! Wird die Fernbedienung längere Zeit nicht benutzt,
entnehmen Sie bitte die Batterien, um ein „Auslaufen“ von
Batteriesäure zu vermeiden.
Schließen Sie das Batteriefach.
Ungleiche Batterietypen oder neue und gebrauchte Batterien dürfen nicht zusammen verwendet werden.
•
Durch einen Kurzschluss können sich Batterien stark
erhitzen oder evtl. sogar entzünden. Verbrennungen können
die Folge sein.
Zu Ihrer Sicherheit sollten die Batteriepole beim Transport
mit Klebestreifen überdeckt werden.
Falls eine Batterie ausläuft, die Flüssigkeit nicht in die
Augen oder Schleimhäute reiben. Bei Berührung die Hände
waschen, die Augen mit klarem Wasser spülen, und bei
anhaltenden Beschwerden einen Arzt aufsuchen.
•
•
•
WARNUNG:
Setzen Sie Batterien keiner hohen Wärme oder dem
direkten Sonnenlicht aus. Werfen Sie Batterien niemals
ins Feuer. Es besteht Explosionsgefahr!
Verbrauchte Batterien gehören nicht in den Hausmüll. Bringen Sie alte Batterien zu einer vorgesehenen Sammelstelle.
•
Deutschland:
Als Verbraucher sind Sie gesetzlich verpflichtet, gebrauchte
Batterien/Akkus zurückzugeben.
Sie können Ihre alten Batterien/Akkus überall dort unentgeltlich
abgeben, wo die Batterien/Akkus gekauft wurden, ebenso bei
den öffentlichen Sammelstellen in Ihrer Stadt oder Gemeinde.
Diese Zeichen finden Sie auf schadstoffhaltigen Batterien/Akkus:
Pb
Cd
Hg
Li
•
•
•
Halten Sie Batterien von Kindern fern. Sie sind kein Spielzeug!
Werfen Sie Batterien niemals ins Feuer, nicht in Wasser
tauchen.
Achten Sie beim Einlegen der Batterie auf die Polarität.
Öffnen Sie Batterien nicht gewaltsam.
Vermeiden Sie den Kontakt zu metallischen Gegenständen.
(Ringe, Nägel, Schrauben usw.) Es besteht Kurzschlussgefahr!
= enthält Blei
= enthält Cadmium
= enthält Quecksilber
= enthält Lithium
Anwendungshinweise
WARNUNG:
Bevor das Gerät in Gebrauch genommen wird, z.B. bei
der Erstinbetriebnahme, jeglicher Transport oder nach
einem Umzug, soll es mindestens für 3 Stunden in eine
gerade Position gebracht werden.
HINWEIS:
•
Hinweise zum Umgang mit Batterien
•
•
DEUTSCH
Bedienfeld/Kontrollleuchte (Abb. 3)
„ “ Luftauslass Taste (grüne LED)
„ “ Timer Taste (grüne LED)
„ “ Schlafmodus – ein-/ausschalten (grüne LED)
„왔“ verringern
Digitalanzeige
„왖“ erhöhen
“ Ventilator Taste
„
a schnell (rote LED)
b normal (grüne LED)
c langsam (orange LED)
H „ “ Betriebsarten -Taste
a Kühlung (grüne LED)
b Entfeuchten (orange LED)
c Ventilator (kein Licht)
J „ “ Ein/Aus Taste (ein = grüne LED)
K „ “ Wasser voll – Anzeige (rote LED)
A
B
C
D
E
F
G
•
•
Der flexible Abluftschlauch kann bei Montage von 50 auf
150 cm ausgedehnt werden. Diese Länge ist speziell für
die Besonderheiten des Klimagerätes entworfen worden.
Verwenden Sie keine Verlängerung oder ersetzen Sie
nicht den Schlauch durch einen anderen, da es zu
Störungen kommen könnte. Die ausströmende Luft muss
frei fließen können, jede Blockade kann zum Überhitzen
des Gerätes führen. Achten Sie darauf, dass der Abluftschlauch nicht geknickt oder verbogen wird.
Schließen Sie Fenster und Türen, damit keine Außenluft
in den Raum eindringen kann. Das Gerät arbeitet dadurch
effektiver.
Sorgen Sie bitte für ungehindertes Ansaugen und Abströmen der Luft. Entfernen Sie ggf. mobile Heizquellen aus
dem Raum.
5
Downloaded
from AC-Manual.com Manuals
05-CL 3134 5
20.02.2007, 14:16:52 Uhr
•
DEUTSCH
HINWEIS:
Einige Tasten finden Sie sowohl am Gerät als auch auf der
Fernbedienung. Gleichlautende Tasten bewirken die gleiche
Funktion.
Verwenden Sie niemals das Klimagerät ohne Schutzfilter.
Auspacken des Gerätes
•
Entnehmen Sie dem Karton das Gerät und alle darin
enthaltenen Zubehörteile.
Werfen Sie die Verpackung nicht sofort weg, sondern
verwahren Sie diese mit der Innenverpackung und den
Garantieunterlagen während der gesamten Garantiezeit auf.
Stellen Sie das Gerät auf eine glatte, ebene und standfeste
Arbeitsfläche.
Stecken Sie den Netzstecker des Geräts nicht in die
Steckdose, ohne alle notwendigen Zubehörteile installiert zu
haben.
•
•
•
Installation
Montage des Abluftschlauches
•
Stülpen Sie den Verbindungsring (11) über den Abluftschlauch (10). Drehen Sie den Verbindungsring mindestens
5mal im Uhrzeigersinn, bis er fest sitzt. Überprüfen Sie, ob
er nicht mehr abgezogen werden kann.
Schieben Sie den montierten Abluftschlauch, von rechts
nach links, über den Schlauchanschluss (9) auf der Rückseite. Führen Sie ihn in die Halterungen, bis er einrastet.
Um den Schlauch wieder zu lösen, drücken Sie die rechte
Arretierung ein und schieben den Schlauch nach rechts, aus
der Halterung heraus.
•
•
Ein- / Ausschalten
1. Sobald Sie den Stecker eingesteckt haben, leuchtet die
Netzkontrollleuchte (J) rot und signalisiert, dass das Gerät
an das Stromnetz angeschlossen ist.
2. Drücken Sie die „ “ Taste (J) (13 an der Fernbedienung),
um das Gerät einzuschalten, die Kontrollleuchte leuchtet
grün. Ein Signalton ertönt und die Digitalanzeige (E) zeigt
22 °C an. Das Gerät schaltet auf die höchste Geschwin“
digkeit und in die Betriebsart „Kühlung“ (die „
Kontrollleuchte leuchtet rot, die Kontrollleuchte „ “ leuchtet
grün). Der Luftauslass (2) öffnet sich. Das Gerät schaltet
nach einigen Sekunden selbstständig ein. Warten Sie bitte,
bis das Gerät den Betrieb aufgenommen hat.
Betriebsart
Drücken Sie die „ “ Taste (H/14) um die Betriebsart zwischen
“Kühlung” (grün), „Entfeuchter” (orange) und “Ventilator“ (kein
Licht) zu wählen.
HINWEIS:
Wechsel der Betriebsart
Beim Wechsel der Betriebsart bleibt der Verdichter (Kompressor)
für ca. 6 Minuten ausgeschaltet, bis sich der Kältekreislauf entspannt hat. Danach läuft der Verdichter selbstständig wieder an.
Kühlung
HINWEIS:
•
Zubehör für eine weitere Montage des Abluftschlauches
erhalten Sie über unsere Hotline.
•
Befindet sich das Gerät in der Betriebsart „Kühlung“ muss
das Ende des Abluftschlauches aus dem klimatisierten Raum
herausgeführt werden.
Aufwickelvorrichtung für Netzkabel
Öffnen Sie die Klappe des Kabelfaches (8) auf der Rückseite.
Bitte ziehen Sie das Netzkabel max. bis zum Anschlag. Ziehen
Sie das Kabel auf keinen Fall mit Gewalt nach, da das Gerät
Schaden nehmen kann. Solche Schäden fallen nicht in den
Garantieanspruch.
Aufwickeln
Wickeln Sie das Netzkabel spiralförmig im Kabelfach auf.
Inbetriebnahme
•
•
Schließen Sie das Gerät an eine vorschriftsmäßig installierte Schutzkontakt-Steckdose 230 V, 50 Hz an.
Achten Sie darauf, dass die Absicherung der Steckdose, an
der Sie das Gerät betreiben wollen, mindestens 10 Ampere
beträgt.
Stellen Sie das Gerät auf eine wärmebeständige, ebenen
Fläche. Achten Sie auf ungehinderten Luftein- und Austritt.
Der Abstand vom Lufteinlassgitter (5/7) bis zur nächsten Wand
sollte mindestens 20 cm betragen. Der Abstand vom Luftauslassgitter (2) zur nächsten Wand sollte mehr als 1m betragen.
•
Wenn Sie die Zimmertemperatur in der Betriebsart „Kühlung“ ändern möchten, drücken Sie die „왔“ oder „왖“ Taste
(D/F). Die Digitalanzeige (E) zeigt die Temperatur an (min.
18°C – max. 32°C). Die Temperatur erhöht bzw. verringert
sich mit jedem Druck auf die Taste um 1°C.
Mit der Fernbedienung schalten Sie, durch erneutes
Drücken der Taste „ “ (16), von 18, 19, 20.....32, von da an
geht sie wieder zurück auf 18, 19 usw.
Das Gerät kühlt den Raum auf die eingestellte Temperatur
herunter und behält diese bei. Liegt die eingestellte Temperatur oberhalb der aktuellen Raumtemperatur, schaltet das
Gerät die Kühlung aus und nur der Ventilator läuft weiter.
HINWEIS:
Das Erreichen der gewünschten Temperatur hängt von der
Raum- und Außentemperatur ab.
Geschwindigkeit des Ventilators
In der Betriebsart „Kühlung“ und „Ventilator“ haben Sie die
Möglichkeit, die Geschwindigkeit des Ventilators in 3 Stufen
“ Taste (G/15),
einzustellen. Mit jedem Tastendruck, „
ändert sich die Geschwindigkeit:
Rot
– für ein schnelles Tempo
Grün – für ein mittleres Tempo
Orange – für ein langsames Tempo
6
Downloaded
from AC-Manual.com Manuals
05-CL 3134 6
20.02.2007, 14:16:56 Uhr
Luftauslass
Ausschaltimer
•
1. Schalten Sie das Gerät mit der „ “ Taste (J/13) ein.
2. Drücken Sie kurz auf die „ “ Taste (B/17), um in die
Timereinstellung zuwechseln. Die Digitalanzeige auf dem
Bedienfeld blinkt und zeigt 00 an. Die Kontrollleuchte „ “
leuchtet grün.
3. Drücken Sie wiederholt auf die Taste, um den Timer zu
programmieren. Die Zeitdauer erhöht sich mit jedem
Tastendruck um 1 Stunde. (00, 01, 02.....24, dann wieder
von vorne).
4. Nach Ablauf der eingestellten Zeit, schaltet sich das Gerät
aus.
•
Einschalttimer
Bevor Sie den Einschalttimer nutzen können, schalten Sie
das Gerät ein und stellen Sie die Betriebsart, die Ventilatorgeschwindigkeit und die Temperatur ein. Das Gerät zeigt auf dem
Bedienfeld (Abb. 3) die gewählten Einstellungen an.
1. Schalten Sie das Gerät mit der „ “ Taste (J/13) aus.
2. Drücken die kurz auf die „ “ Taste (B/17), um in die Zeiteinstellung zu wechseln. Die Digitalanzeige auf dem Bedienfeld
blinkt und zeigt 00 an. Die Kontrollleuchte „ “ leuchtet grün.
3. Um den Timer zu programmieren, drücken Sie wiederholt
auf die „ “ Taste (B/17). Die Zeitdauer erhöht sich mit
jedem Tastendruck um 1 Stunde. (00, 01, 02.....24, dann
wieder von vorne).
4. Nach Ablauf der eingestellten Zeit, schaltet sich das Gerät
ein.
•
•
DEUTSCH
Timerfunktionen
Betätigen Sie die „ “ Taste (J/13), öffnet sich der Luftauslass.
Drücken Sie die „ “ Taste (A/18), und der Luftauslass
bewegt sich kontinuierlich auf und ab.
Mit dem wiederholten Drücken der „ “ Taste wird die
Bewegung gestoppt und der Luftschlitz bleibt in dieser
Position. Die Richtung des Luftzuges ist dann konstant.
Wenn die „ “ Taste gedrückt wurde, schließt sich der
Luftauslass.
Entleeren des Wasserbehälters
Unter hohen Feuchtigkeitsbedingungen dürfte es notwendig
werden den interne Kondenswasserbehälter zu entleeren. Wenn
der Wasserbehälter voll ist, ertönt ein Signalton 15mal. Das
Gerät schaltet sich automatisch ab und die Kontrollleuchte „ “
(K) leuchtet rot auf. Um den Wasserbehälter zuleeren, gehen
Sie wie folgt vor:
•
Schalten Sie das Gerät aus („ “ Kontrollleuchte leuchtet rot)
und ziehen Sie den Stecker aus der Steckdose.
ACHTUNG:
Bewegen Sie das Gerät nicht. Dies könnte das Auslaufen des Wassers verursachen, und den Boden den
Teppich oder das Gerät beschädigen.
•
Platzieren Sie die mitgelieferte Auffangschale auf dem
Boden unter dem Abfluss (12) des Gerätes (siehe Abb. 5).
Wollen Sie vor Ablauf der Timerzeit den Timer ausschalten,
drücken Sie so oft auf die „ “ Taste (B/17), bis die Digitalanzeige 00 anzeigt. Der Timer ist nun ausgeschaltet.
Schlafmodus
•
•
•
•
•
Drücken Sie die „ “ Taste (C), um den Schlafmodus einzuschalten.
Im Schlafmodus ist die Ventilationsgeschwindigkeit auf
niedrig (orange Leuchte) voreingestellt.
Durch Betätigen der Taste „
“ Taste (G/15) lässt sich
die Geschwindigkeit einstellen bzw. ändern.
Die zuvor gewählte Temperatur erhöht sich im Schlafmodus
nach 1 Stunde um 1°C und weiter um 1°C nach 2 Stunden.
Um den Schlafmodus wieder auszuschalten, drücken Sie
erneut die „ “ Taste.
•
Abb. 6
ACHTUNG:
Entfernen Sie sich während des Leerens nicht vom
Gerät! Da der interne Wasserbehälter bis zu 3 Liter
fassen kann, ist es notwendig den Abfluss zwischendurch
wieder zu verschließen und die Auffangschale zu leeren.
Wiederholen Sie ggf. den Vorgang, bis kein Wasser mehr
aus dem Gerät herausläuft.
Entfeuchten
Wenn das Gerät in der Betriebsart „Entfeuchten“ betrieben wird,
lassen Sie die Abluft in den Raum zurückströmen.
Beim Entfeuchten ist nur die niedrige Ventilatorgeschwindigkeit
möglich (Kontrollleuchte „
“ leuchtet orange). In dieser
Betriebart kann es öfters notwendig sein den Kondenswasserbehälter zu leeren (siehe Abschnitt „ Entleeren des Wasserbehälters).
Abb. 5
Entfernen Sie den Gummistopfen vom Abfluss und lassen
Sie das Wasser herauslaufen (Abb. 6).
•
Verschließen Sie den Abfluss mit den Gummistopfen
wieder. Stecken Sie den Stecker in die Steckdose und
schalten Sie das Gerät ein. Die rote Wasservollanzeige ist
ausgeschaltet.
7
Downloaded
from AC-Manual.com Manuals
05-CL 3134 7
20.02.2007, 14:17:00 Uhr
DEUTSCH
HINWEIS: Entleeren Sie regelmäßig den Wasserbehälter.
Luftfilter
Das Klimagerät ist mit zwei Schutzfiltern ausgestattet, um die
Raumluft zu reinigen.
HINWEIS:
Wenn das Gerät über 100 Stunden läuft, blinkt die Digitalanzeige (E), um Sie zu erinnern, dass der Filter gereinigt werden
soll. Drücken Sie gleichzeitig die „왔“ und „왖“ Tasten, um das
Blinken der Digitalanzeige auszuschalten.
Störungsbehebung
Versuchen Sie niemals die Klimaanlage zu reparieren
oder abzubauen. Inkompetente Reparaturen führen zum
Verlust der Garantie und gefährden den Besitzer und das
Eigentum.
Problem
Das Gerät funktioniert nicht
bzw. kühlt nicht
ausreichend
Reinigung
Reinigung der Luftfilter
•
•
Ziehen Sie vor der Reinigung immer den Netzstecker.
Die Luftfilter sollten regelmäßig durch das Ausspülen
unter laufendem Wasser gereinigt werden. Ziehen Sie die
Luftfilter, wie auf der Abb. 7 gezeigt, heraus.
Das Gerät ist zu
laut
Kontrollleuchte
„ “ (K) leuchtet
Ursache
Keine Energieversorgung
Timer-Funktion ist
aktiviert
Fenster oder Türen
sind offen, es sind
viele Personen
oder eine Wärmequelle im Raum
Schmutzige Filter
Lösung
Kontrollieren Sie
den Netzanschluss
Deaktivieren Sie
die Timer-Funktion
Schließen Sie die
Türen und Fenster
Reinigen Sie die
Filter
Luftzu- oder -aus- Beseitigung der
fluss blockiert
Blockade
Raumtemperatur
Ändern Sie die
ist niedriger als der Temperaturauswahl
eingegebene Wert
Gerät steht schief Platzieren Sie es
an einer ebenen,
soliden Oberfläche
Kondenswasserbe- Entleeren Sie den
hälter ist voll
Behälter (s. Abschnitt „Entleeren
des Wasserbehälters“)
Geräuschentwicklung
Der arbeitsplatzbezogene Emissionswert ist kleiner als 70 dB(A).
•
•
•
Abb. 7
Lassen Sie die Filter trocknen, bevor Sie sie wieder einsetzen.
Säubern Sie regelmäßig die Luftschlitze an den Seiten mit
einem Staubsauger.
Setzen Sie die Filter wieder ein. Achten Sie bitte darauf,
dass die Filter richtig in der Schienenführung eingesetzt
werden.
Technische Daten
Modell:.............................................................................. CL 3134
Spannungsversorgung:......................................220-240 V, 50 Hz
Leistungsaufnahme:............................................................ 800 W
Schutzklasse:............................................................................... Ι
Energieeffizienzklasse: ............................................................... A
•
•
ACHTUNG:
Der Schutzfilter muss während des Betriebs immer
eingesetzt sein.
Reinigen Sie das Gerät bzw. das Gehäuse nur mit einem
leicht feuchten Tuch.
Verwenden Sie zum Reinigen keine starken Reinigungsund Lösungsmittel.
Schutzart:............................................................................... IP20
Kühlleistung:......................................................................2050 W
Kältemittel: .............................................................. R410A (420g)
Luftzirkulation:........................................................bis zu 440m³/h
Nettogewicht: ......................................................................28,6kg
Technische Änderungen vorbehalten!
8
Downloaded
from AC-Manual.com Manuals
05-CL 3134 8
20.02.2007, 14:17:04 Uhr
Bitte nennen Sie uns im Störungsfall die folgenden Angaben:
Name, Vorname
Straße, Nr.
PLZ, Ort
Telefon
(Fax, Email, wenn vorhanden)
Hiermit erklärt die Firma Clatronic International GmbH, dass sich
das Gerät CL 3134 in Übereinstimmung mit den grundlegenden
Anforderungen, der europäischen Richtlinie für elektromagnetische Verträglichkeit (89/336/EWG) und der Niederspannungsrichtlinie (73/23/EWG und 93/68/EWG) befindet.
Kaufdatum
Name des Händler
Kurzbeschreibung des Fehlers/der Störung
(Stichworte)
Garantie
Wir übernehmen für das von uns an den stationären Handel in
Deutschland vertriebene Gerät eine Garantie von 24 Monaten
ab Kaufdatum innerhalb von Deutschland.
Innerhalb der Garantiezeit beseitigen wir unentgeltlich die
Mängel des Gerätes, die auf Material- oder Herstellungsfehler
beruhen, durch Reparatur.
Garantieleistungen bewirken weder eine Verlängerung der
Garantiefrist, noch beginnt dadurch ein Anspruch auf eine neue
Garantie.
Als Garantienachweis gilt der Kaufbeleg. Ohne diesen Nachweis
kann eine kostenlose Reparatur nicht erfolgen.
DEUTSCH
Konformitätserklärung
Bitte bewahren Sie die Original Verpackung einschließlich der
Styroporformteile auf, um bei einem eventuellem Störungsfall
die Verpackung für den Versand nutzen zu können.
Bitte verpacken Sie das Gerät sorgfältig, um Transportschäden
zu vermeiden. Transportschäden, die aufgrund unzureichender
Verpackung entstehen, gehen zu Lasten des Absenders. Bitte
legen Sie dem Gerät die Fehlerkurzbeschreibung, eine Kopie
Ihres Kaufbeleges und Ihren Absender bei.
*
Telekommunikationskosten:
Verschleiß- und Verbrauchsteile (Filter, Batterien) sind von der
Garantie ausgeschlossen.
Kostenlos bei einem entsprechenden Telekommunikationstarif (Flatrate).
Transportschäden, Brüche oder Risse in Kunststoffteilen sind
ebenfalls von der Garantie ausgeschlossen.
Ansonsten entstehen Ihnen geringe Kosten in Abhängigkeit
von Ihrem Telekommunikationstarif, da wir einen normalen
Festnetz–Anschluss der deutschen Telekom verwenden.
Durch Fremdeingriff erlischt der kostenlose Garantieanspruch.
Serviceabwicklung
Sollte Ihr Geräte einmal eine Störung aufweisen, wenden Sie
sich bitte an unsere Reparatur- und Service Hotline.
Im Störungsfall werden wir das Gerät bei Ihnen abholen lassen,
an unsere zentrale Service Werkstatt liefern, dort in der Regel
innerhalb von 3 Werktagen instand setzen und wieder an Ihre
Absenderanschrift zurück liefern. Innerhalb der Garantiezeit
ist dieser Service für Sie kostenlos. Die Abholung erfolgt am
nächsten Werktag (Mo.-Fr.), wenn die Serviceanforderung bis
11.00 Uhr in unserem Haus vorliegt.
Sie können den Störungsfall per Fax, Email, Post und Telefon
an unser Servicecenter melden. Unser Servicecenter nimmt
ebenfalls Bestellungen von Ersatz- und Zubehörteilen entgegen.
CLATRONIC International GmbH
Servicecenter
Industriering Ost 40
D-47906 Kempen
Tel.:
Fax:
Email:
0 21 52 – 20 06 888*
0 21 52 – 20 06 1597*
[email protected]
Nach der Garantie
Nach Ablauf der Garantiezeit können Reparaturen kostenpflichtig vom entsprechenden Fachhandel oder Reparaturservice
ausgeführt werden.
Bedeutung des Symbols „Mülltonne“
Schonen Sie unsere Umwelt, Elektrogeräte gehören nicht in den
Hausmüll.
Nutzen Sie die für die Entsorgung von Elektrogeräten vorgesehenen Sammelstellen und geben dort Ihre Elektrogeräte ab, die
Sie nicht mehr benutzen werden.
Sie helfen damit die potenziellen Auswirkungen, durch falsche
Entsorgung, auf die Umwelt und die menschliche Gesundheit
zu vermeiden.
Sie leisten damit Ihren Beitrag zur Wiederverwertung, zum
Recycling und zu anderen Formen der Verwertung von Elektround Elektronik-Altgeräten.
Informationen, wo die Geräte zu entsorgen sind, erhalten Sie
über Ihre Kommunen oder die Gemeindeverwaltungen.
9
Downloaded
from AC-Manual.com Manuals
05-CL 3134 9
20.02.2007, 14:17:07 Uhr
Norme di sicurezza generali
Prima di mettere in funzione questo apparecchio, leggere molto
attentamente le istruzioni per l’uso e conservarle con cura unitamente al certificato di garanzia, allo scontrino e, se possibile,
alla scatola di cartone con la confezione interna. Se passate
l‘apparecchio a terzi, consegnate anche le istruzioni per l‘uso.
•
ITALIANO
•
•
•
•
•
•
Utilizzare l’apparecchio esclusivamente per scopi privati
e conformemente al tipo di applicazione previsto. Questo
prodotto non è stato concepito ai fini di un impiego in ambito
industriale. Non utilizzarlo all’aperto (a meno che non sia
contemplato un particolare tipo di uso all’aperto nel rispetto
di specifiche condizioni). Proteggerlo dal calore, nonché
dall’esposizione diretta ai raggi solari e dall’umidità (non
immergerlo mai in sostanze liquide) e tenerlo a distanza
da oggetti con spigoli affilati. Non utilizzare l’apparecchio
con le mani umide. Nel caso in cui si bagni o si inumidisca
l’apparecchio, staccare immediatamente la spina.
Disattivare l’apparecchio e staccare sempre la spina dalla
relativa presa (si raccomanda di afferrare il connettore e
non il cavo quando si effettua questa operazione) allorché
non si utilizza l’apparecchio, quando si applicano degli
accessori oppure nel caso in cui lo si debba pulire o si siano
manifestate anomalie.
Non mettere in funzione l’ apparecchio senza sorveglianza.
Se si dovesse assentarsi dal posto di lavoro, spegnere e
disconnettere sempre l’ apparecchio, (prendendo in mano la
spina, non tirando il cavo).
Controllare periodicamente l’apparecchio per verificare che
non vi siano danni. Non mettere in funzione l’apparecchio
nel caso in cui sia guasto.
Non tentare di riparare l’apparecchio, bensì rivolgersi a un
tecnico autorizzato. Al fine di evitare l’insorgere di situazioni
di pericolo, si raccomanda di contattare il costruttore, il nostro servizio di assistenza tecnica o un tecnico ugualmente
qualificato per la sostituzione del cavo di alimentazione
difettoso con un cavo equivalente.
Utilizzare esclusivamente accessori originali.
Rispettare le seguenti “Speciali norme di sicurezza“.
Simboli per questo manuale di istruzioni per l’ uso
Le indicazioni importanti per la propria sicurezza sono indicati
appropriatamente. Osservare assolutamente queste indicazioni,
per evitare incidenti e danni all’ apparecchio:
AVVISO:
Previene i rischi della propria salute ed indica possibili rischi
di ferite.
ATTENZIONE:
Indica possibili pericoli per l’ apparecchio o altri oggetti.
NOTA: Mette in risalto consigli ed informazioni.
Avvertenze speciali di sicurezza
per questo apparecchio
•
•
•
•
•
•
•
•
•
Bambini e persone fragili
•
Per sicurezza tenere l’imballaggio (sacchetto di plastica,
scatola, polistirolo, ecc,) fuori dalla portata dei bambini.
Attenzione! Non lasciar giocare i bambini piccoli con la
pellicola. Pericolo di soffocamento!
•
Per proteggere i bambini o le persone con abilità ridotte dai
pericoli delle apparecchiature elettriche, fate in modo che
questo apparecchio venga impiegato solo sotto sorveglianza. Questo apparecchio non è un giocattolo. Non lasciate
che i bambini piccoli lo usino per giocare.
•
•
•
•
•
•
Nota!
Non lasciare l’ apparecchio senza vigilanza per ore. Non
andersene di casa quando l’ apparecchio è in funzione.
Osservare la posizione per l’ uso!
Mettere l’ apparecchio sempre in una tale posizione che l’
aria possa circolare senza impedimento.
Porre l’apparecchio su una base piana.
Il climatizzatore non deve essere azionato direttamente
sotto una presa.
Questo apparecchio è stato progettato per climatizzare
locali abitativi e non può essere utilizzato per altri scopi.
Non inserire oggetti nelle aperture dell’apparecchio.
Non sollevare né muovere l’apparecchio afferrandolo sul
retro, ma sempre sul lato anteriore. Se si desidera spostarlo,
afferrare le cavità di impugnatura.
AVVISO:
Non coprire l‘apparecchio né porvi sopra alcun oggetto.
Pericolo di surriscaldamento!
Non utilizzare il climatizzatore in prossimità di una vasca
da bagno, una doccia o una piscina. Non comandare
l’apparecchio dai punti summenzionati. Tenere una distanza
di sicurezza di 1,25 m.
Non utilizzare assolutamente il climatizzatore in locali con
gas esplosivi (p.es. benzina) o durante il lavoro con colle o
solventi infiammabili (p.es. per incollare o verniciare parquet,
PVC, eccetera).
Utilizzare l’apparecchio solo in posizione verticale.
Qualora il climatizzatore dovesse rovesciarsi, estrarre la spina dalla presa e lasciarlo raffreddare prima di raddrizzarlo.
Prima di spostare o riporre l’apparecchio, svuotare il recipiente di raccolta della condensa al suo interno.
Quale ulteriore protezione si consiglia di installare nel circuito elettrico della stanza da bagno un dispositivo di sicurezza
per correnti di guasto (RCD) con una corrente applicata di
misurazione non superiore a 30 mA. A questo scopo, si
raccomanda di consultare un installatore di impianti elettrici
autorizzato.
Non utilizzare prolunghe o prese multiple perché
questo apparecchio è troppo potente.
10
Downloaded
from AC-Manual.com Manuals
05-CL 3134 10
20.02.2007, 14:17:09 Uhr
Elementi di comando (fig. 1+2)
Copertura frontale
Scarico aria
Pannello di comando
Copertura retro
Presa d’aria ds.
Rulli
Presa d’aria sin.
Vano cavo
Collegamento flessibile
Tubo flessibile di scarico aria
Anello di raccordo
Scarico acqua con gommini.
Pannello di comando/Spia luminosa (fig. 3)
A „ “ Tasto scarico aria (LED verde)
B „ “ Tasto timer (LED verde)
C „ “ Modo notturno – accendere/spegnere
(LED verde)
D „왔“ ridurre
E Visore digitale
F „왖“ aumentare
G„
“ Tasto ventilatore
a rapido (LED rosso)
b normale (LED verde)
c lento (LED arancione)
H „ “ Tasto funzioni
a raffreddamento (LED verde)
b deumidificazione (LED arancione)
c ventilatore (no luce)
J „ “ Tasto On/Off (On = LED verde)
K „ “ Riempimento max. acqua –
Visore (LED rosso)
Accessori:
flessibile di collegamento
anello di raccordo
telecomando
bacinella di raccolta acqua
Telecomando (fig. 4)
13 „ “ Tasto On/Off
14 „ “ Funzioni – Impostazione delle funzioni
15 „
“ Ventilatore–
Impostazione delle velocità
16 „ “ Regolazione della temperatura
17 „ “ Timer – Regolazione dell‘ora
18 „ “ Movimento scarico aria su/giù
19 Vano batterie
Inserire le batterie
•
•
•
•
•
Aprire il coperchio dello scomparto portabatterie sul lato
posteriore del telecomando.
Inserire 2 batterie del tipo R03 „AAA“ 1,5 V. Fare attenzione
ad inserire i poli correttamente (fondo del vano batterie o
incisione sul lato esterno)!
Nel caso in cui il telecomando non venga utilizzato per
periodi di tempo prolungati, si consiglia di estrarre le batterie
allo scopo di evitare che si verifichi una fuoriuscita dell’acido
delle batterie.
Chiudere il vano batterie.
Non usare batterie nuove con quelle già usate oppure di un
altro tipo.
Avvertenze per l’uso di batterie
•
•
•
•
•
•
•
•
•
•
Tenere le batterie fuori della portata dei bambini. Non sono
un giocattolo!
Non buttare mai le batterie nel fuoco né immergerle
nell’acqua.
Nell’inserimento della batteria fare attenzione alla polarità.
Non aprire mai le batterie con la forza.
Evitare il contatto con oggetti metallici. (anelli, chiodi, viti
ecc.). Pericolo di corto circuito!
Un corto circuito può provocare un surriscaldamento o
eventualmente addirittura la combustione delle batterie. Ne
possono conseguire ustioni.
Per la vostra sicurezza i poli della batteria durante il trasporto devono essere coperti con strisce adesive.
In caso di ossidazione di una batteria evitare il contatto del
liquido con occhi o mucose. In caso di contatto lavare le
mani, sciacquare gli occhi con acqua corrente e in presenza
di disturbi permanenti consultare un medico.
ITALIANO
1
2
3
4
5
6
7
8
9
10
11
12
Telecomando
AVVISO:
Non esporre le batterie a calore oppure a raggi di sole.
Non buttare mai le batterie nel fuoco. Pericolo di
esplosione!
Non gettare le batterie usate nei rifiuti domestici. Portare le
batterie usate in un apposito centro di raccolta.
Germania:
l’utente è tenuto per legge a restituire le batterie/gli accumulatori
usati.
Potete consegnare gratuitamente le vostre batterie/i vostri
accumulatori usati dove li avete acquistati oppure nei centri di
raccolta pubblici nella vostra città o comune.
Questi simboli sono riportati su batterie/accumulatori contenenti
sostanze tossiche.
Pb
Cd
Hg
Li
= contiene piombo
= contiene cadmio
= contiene mercurio
= contiene litio
11
Downloaded
from AC-Manual.com Manuals
05-CL 3134 11
20.02.2007, 14:17:12 Uhr
Avvertenze per l‘uso
AVVISO:
Prima di metterlo in uso, p.es. alla prima messa in
funzione, prima di un qualsivoglia trasporto o dopo un
trasloco, l‘apparecchio deve rimanere per almeno 3 ore in
posizione verticale.
NOTA:
•
•
ITALIANO
•
Il tubo flessibile di scarico dell’aria può essere esteso
durante il montaggio da 50 a 150 cm. Questa lunghezza
è stata progettata appositamente per le particolarità del
climatizzatore. Non utilizzare prolunghe né sostituire il
flessibile con un altro perché potrebbero subentrare guasti. L’aria deve poter fuoriuscire liberamente, ogni blocco
può causare il surriscaldamento dell’apparecchio. Badare
che il flessibile di scarico dell’aria non venga piegato né
deformato.
Chiudere finestre e porte affinché nel locale non possa
penetrare aria dall’esterno. Così l’apparecchio funziona
con più efficacia.
Fare in modo che l’aria possa essere aspirata e scaricata
senza ostacoli. Rimuovere eventuali fonti di calore dal
locale.
Alcuni tasti si trovano sia sull‘apparecchio che sul telecomando. I tasti uguali attivano la stessa funzione.
Non usare mai il climatizzatore senza filtri di protezione.
Sballare l’apparecchio
Togliere l’apparecchio e tutti gli accessori dalla scatola.
Non buttare via subito la scatola ma conservarla con
l’imballo interno e i documenti di garanzia per tutta la durata
della garanzia.
Disporre l’apparecchio su una superficie di lavoro liscia,
piana e stabile.
Non inserire la spina dell’apparecchio nella presa senza
aver prima installato tutti gli accessori necessari.
•
•
Aprire lo sportello del vano del cavo (8) sul retro. Tirare il cavo
di alimentazione max. fino all’arresto. Non tirare mai il cavo con
forza perché l’apparecchio potrebbe riportare dei danni. Danni di
tal genere non sono coperti dalla garanzia.
Avvolgimento
Avvolgere il cavo di alimentazione a spirale nel vano del cavo.
NOTA:
•
•
Dispositivo di avvolgimento per il cavo di alimentazione
Messa in funzione
•
•
•
•
Interruttore On/Off
1. Appena inserita la spina, la spia (J) si accende diventando
rossa e segnala che l’apparecchio è allacciato alla rete
elettrica.
2. Premere il tasto „ “ (J) (13 sul telecomando) per accendere
l‘apparecchio, la spia diventa verde. Risuona un segnale
acustico e il visore digitale (E) indica 22°C. L’apparecchio
passa alla velocità massima e alla funzione “Raffreddamento” (la spia „
“ diventa rossa, la spia „ “ verde).
Lo scarico dell‘aria (2) si apre. L‘apparecchio si accende
autonomamente dopo alcuni secondi. Attendere finché
l‘apparecchio è entrato in funzione.
Funzioni
Premere il tasto „ “ (H/14) per scegliere tra le funzioni “Raffreddamento” (verde), „Deumidificatore“ (arancione) e “Ventilatore“
(nessuna luce).
Installazione
NOTA:
Cambio funzione
Cambiando la funzione il compressore rimane spento per
6 minuti ca. finché il circuito di raffreddamento è in equilibrio.
Poi il compressore si riavvia autonomamente.
Montaggio del flessibile di scarico dell’aria
•
Inserire l’anello di raccordo (11) direttamente sopra il
flessibile di scarico dell’aria (10). Girare l’anello di raccordo
per almeno 5 volte in senso orario finché è fisso. Accertarsi
che non possa più essere staccato.
Spingere il tubo flessibile montato di scarico dell’aria da
destra a sinistra attraverso il collegamento del flessibile (9)
sul retro. Inserirlo nei supporti fino al punto di arresto. Per
sbloccare di nuovo il flessibile premere l’arresto di destra e
spingere il flessibile verso destra estraendolo dal supporto.
•
NOTA:
Se l‘apparecchio si trova nella funzione „Raffreddamento“,
l‘estremità del flessibile di scarico dell‘aria deve essere posizionata all‘esterno del locale climatizzato.
Collegare l’apparecchio solo ad una presa regolarmente
installata da 230 V/50 Hz con contatto di terra.
Fare attenzione che la protezione della presa con cui
si desidera far funzionare l’apparecchio abbia almeno
10 ampere!
Appoggiare l’ attrezzo su un piano piatto e resistente al calore. Assicurare che la fuoriuscita per l’ aria non sia impedita.
La distanza dalla grata della presa d’aria (5/7) fino alla parete più vicina dovrebbe essere di almeno 20 cm. La distanza
dalla grata di scarico dell’aria (2) fino alla parete più vicina
dovrebbe essere di almeno 1m.
Raffreddamento
•
•
Se si desidera modificare la temperatura dell‘ambiente nella
funzione „Raffreddamento“, premere il tasto „왔“ o „왖“
(D/F). Il visore digitale (E) indica la temperatura (min. 18°C
– max. 32°C). Ogni volta che si preme il tasto la temperatura si alza o si abbassa di 1°C.
Con il telecomando si passa premendo ripetutamente il
tasto „ “ (16), da 18, 19, 20.....32, da qui in poi ritorna a 18,
19 eccetera.
12
Downloaded
from AC-Manual.com Manuals
05-CL 3134 12
20.02.2007, 14:17:15 Uhr
L‘apparecchio raffredda il locale abbassando la temperatura
fino al valore impostato e la mantiene. Se la temperatura impostata è superiore alla temperatura attuale dell‘ambiente,
l‘apparecchio spegne il raffreddamento e continua a
funzionare solo il ventilatore.
NOTA:
Il raggiungimento della temperatura desiderata dipende dalla
temperatura dell‘ambiente e dalla temperatura esterna.
Deumidificare
Se l’apparecchio viene azionato nella funzione “Deumidificare”,
lasciare che l’aria di scarico rifluisca nell’ambiente.
Nella deumidificazione è possibile solo la velocità di ventilazione
“ è arancione). In questa funzione può
bassa (la spia „
essere necessario svuotare più spesso il recipiente di raccolta
della condensa (v. cap. „Svuotare il recipiente di raccolta della
condensa).
Velocità del ventilatore
Scarico aria
Nella funzione „Raffreddamento“ e „Ventilatore“ si ha la possibilità di impostare la velocità del ventilatore su 3 livelli. Ogni volta
che si preme il tasto „
“ (G/15), la velocità cambia:
•
•
rosso
- per una velocità rapida
verde
- per una velocità media
arancione - per una velocità bassa
Funzioni timer
Timer di disattivazione
1. Accendere l‘apparecchio con il tasto „ “ (J/13) On/Off.
2. Premere per un attimo il tasto „ “ (B/17) per passare
all‘impostazione del timer. Il visore digitale sul pannello di
comando lampeggia e indica 00. La spia „ “ è verde.
3. Per programmare il timer premere ripetutamente il tasto.
Ogni volta che si preme il tasto la durata aumenta di 1 ora.
(00, 01, 02.....24, poi di nuovo dall‘inizio).
4. Al termine del tempo impostato, l‘apparecchio si spegne.
•
•
Svuotare il recipiente di raccolta della condensa
In condizioni di elevata umidità potrebbe rendersi necessario lo
svuotamento del recipiente interno di raccolta della condensa.
Quando il recipiente è pieno, risuona 15 volte un segnale acustico. L‘apparecchio si spegne automaticamente e la spia „ “
(K) diventa rossa. Per svuotare il recipiente di raccolta della
condensa, procedere come qui di seguito indicato:
•
•
1. Spegnere l’apparecchio con il tasto „ “ On/Off.
2. Premere per un attimo il tasto „ “ (B/17) per passare
all‘impostazione dell‘ora. Il visore digitale sul pannello di
comando lampeggia e indica 00. La spia „ “ è verde.
3. Per programmare il timer premere ripetutamente il tasto „ “
(B/17). Ogni volta che si preme il tasto la durata aumenta di
1 ora. (00, 01, 02.....24, poi di nuovo dall‘inizio).
4. Al termine del tempo impostato, l’apparecchio si accende.
Se si desidera spegnere il timer anzitempo, continuare a
premere il tasto „ “ (B/17) finché il visore digitale indica 00. Ora
il timer è spento.
Spegnere l’apparecchio (la spia „ “ diventa rossa) ed
estrarre la spina dalla presa.
ATTENZIONE:
Non muovere l’apparecchio. Il movimento
dell’apparecchio potrebbe causare una fuoriuscita
di acqua con conseguenti danni al tappeto o
all’apparecchio.
Timer di attivazione
Prima di poter usare il timer di attivazione, accendere
l’apparecchio e impostare la funzione, la velocità del ventilatore
e la temperatura. Sul pannello di comando (fig. 3) l’apparecchio
indica le impostazioni selezionate.
Azionando il tasto „ “ (J/13) si apre lo scarico dell‘aria.
Premendo il tasto „ “ (A/18) lo scarico dell‘aria esegue un
movimento continuato su e giù.
Premendo ripetutamente il tasto „ “ il movimento viene
arrestato e la feritoia di ventilazione rimane in questa posizione. La direzione della corrente d‘aria è quindi costante.
Premendo il tasto „ “ lo scarico dell‘aria si chiude.
ITALIANO
•
•
Porre la bacinella di raccolta acclusa alla fornitura sul
pavimento sotto lo scarico (12) dell‘apparecchio (v. fig. 5).
Fig. 5
Togliere il tappo di gomma dallo scarico e lasciare che
l’acqua fuoriesca (fig. 6).
Modo notturno
•
•
•
•
•
Premere il tasto „ “ (C) per attivare il modo notturno.
Nel modo notturno la velocità di ventilazione è preimpostata
bassa (spia arancione).
Azionando il tasto „
“ (G/15) si può impostare ovvero
modificare la velocità.
La temperatura prima selezionata aumenta nel modo notturno dopo 1 ora di 1°C e poi di nuovo di 1°C dopo 2 ore.
Per disattivare di nuovo il modo notturno premere ancora il
tasto „ “.
Fig. 6
13
Downloaded
from AC-Manual.com Manuals
05-CL 3134 13
20.02.2007, 14:17:18 Uhr
ATTENZIONE:
Non togliere nulla dall‘apparecchio mentre si sta
svuotando! Il contenitore interno di raccolta della condensa ha una capienza fino a 3 litri, quindi è necessario
a metà operazione richiudere lo scarico e svuotare
la bacinella di raccolta. Ripetere la procedura finché
dall’apparecchio non fuoriesce più acqua.
•
Richiudere lo scarico con il tappo di gomma. Infilare la
spina nella presa e accendere l’apparecchio. La spia rossa
indicante il livello di riempimento max. dell’acqua è spenta.
NOTA: Svuotare regolarmente il contenitore dell‘acqua.
Filtro dell‘aria
Il climatizzatore è dotato di due filtri di protezione per pulire l’aria
dell’ambiente.
ITALIANO
NOTA:
Quando l‘apparecchio è in funzione da oltre 100 ore, il visore
digitale (E) lampeggia per ricordare che il filtro deve essere
pulito. Premere contemporaneamente i tasti „왔“ e „왖“ per
spegnere il lampeggiamento del visore digitale.
Pulizia
Pulizia dei filtri dell’aria
•
•
Prima della pulizia staccare sempre la spina.
I filtri dell’aria dovrebbero essere puliti regolarmente risciacquandoli sotto l’acqua corrente. Estrarre i filtri dell’aria come
illustrato nella fig. 7.
•
•
Pulire l’apparecchio ovvero la scatola solo con un panno
leggermente inumidito.
Per la pulizia non usare detergenti abrasivi e solventi.
Rimozione guasti
Non tentare mai di riparare il climatizzatore direttamente
o smontarlo. Le riparazioni svolte senza competenza
comportano la perdita della garanzia e mettono a rischio il
possessore e la proprietà.
Problema
L‘apparecchio non
funziona ovvero
non raffredda a
sufficienza
Causa
Nessuna alimentazione
Soluzione
Controllare
l‘allacciamento alla
rete elettrica
La funzione timer è Disattivare la
attivata
funzione timer
Chiudere le porte e
Le finestre o le
porte sono aperte, le finestre
nel locale ci sono
molte persone o
una fonte di calore
Filtri sporchi
Pulire i filtri
Accesso o scarico Rimuovere
dell‘aria bloccati
l‘elemento bloccante
La temperatura
Cambiare la tempeambiente è più
ratura scelta
bassa del valore
immesso
L‘apparecchio è
L‘apparecchio è
Porlo su una
troppo rumoroso
inclinato
superficie piana e
solida.
Svuotare il
La spia „ “ (K) è Il recipiente di
raccolta della
contenitore (v. cap.
accesa
condensa è pieno „Svuotare il recipiente di raccolta
della condensa“)
Sviluppo di rumori
Il valore di emissione riferito alla postazione di lavoro è inferiore
a 70 dB(A).
Dati tecnici
Modello:............................................................................ CL 3134
Alimentazione rete: ...................................................230 V, 50 Hz
Fig. 7
•
•
•
Lasciare asciugare i filtri prima di reinserirli.
Pulire regolarmente la feritoia di ventilazione ai lati con un
aspirapolvere.
Reinserire i filtri. Badare che i filtri vengano inseriti correttamente nella guida.
ATTENZIONE:
Durante il funzionamento il filtro di protezione deve
essere sempre inserito.
Consumo di energia:........................................................... 800 W
Classe di protezione:.................................................................... Ι
Classe di efficienza energetica: .................................................. A
Tipo di protezione:.................................................................. IP20
Potenza frigorifera:............................................................2050 W
Refrigerante: ........................................................... R410A (420g)
Circolazione dell‘aria:............................................ fino a 440 m³/h
Peso netto: ........................................................................28,6 kg
14
Downloaded
from AC-Manual.com Manuals
05-CL 3134 14
20.02.2007, 14:17:21 Uhr
Questo apparecchio è stato controllato sulla base di tutte le
direttive CE attuali in vigore in questo settore, quali per esempio
la normativa in materia di compatibilità elettromagnetica e
la direttiva in materia di bassa tensione, ed è stato costruito
conformemente alle norme di sicurezza più moderne.
Con riserva di apportare modifiche tecniche.
Garanzia
Per l’apparecchio da noi messo in commercio ci assumiamo una
garanzia di 24 mesi dalla data di acquisto (scontrino).
Durante la garanzia noi ci impegniamo ad eliminare gratuitamente i guasti dell’apparecchio o degli accessori, dovuti a difetti
di materiale o di fabbricazione, riparandoli o, a nostra discrezione, sostituendoli. Le prestazioni in garanzia danno luogo a una
proroga della garanzia né danno diritto ad una nuova garanzia!
Per la garanzia è sufficiente lo scontrino di acquisto. Senza
questo scontrino non sussiste il diritto né ad una sostituzione né
ad una riparazione gratuita.
ITALIANO
Nel caso si ricorra alla garanzia, restituire al rivenditore
l’apparecchio completo in ogni sua parte, nell’imballaggio
originale unitamente allo scontrino.
La riparazione di pezzi d’uso ovvero soggetti a logoramento
come anche operazioni di pulizia e manutenzione o la sostituzione di pezzi soggetti a logoramento non rientrano nella garanzia
e quindi sono a pagamento!
La garanzia si annulla nel caso di intervento da parte di terzi.
Dopo la garanzia
Al termine della garanzia le riparazioni possono essere eseguite
dietro pagamento dal corrispettivo negozio specializzato o
servizio riparazioni.
Significato del simbolo „Eliminazione“
Salvaguardare l’ ambiente, gli elettrodomestici non vanno
eliminati come rifiuti domestici.
Per l’ eliminazione degli elettrodomestici, fare uso die posti di
raccolta previsti per questo tipo e porre quegli elettrodomestici
che non sono più in uso.
Si contribuisce così ad evitare un effetto potenziale sull’ ambiente e sulla salute, dovuto magari ad una eliminazione sbagliata.
Questo significa un contributo personale alla riutilizzazione, al
riciclaggio e altre forme di utilizzazione di elettrodomestici ed
apparecchi elettronici usati.
Si possono trovare le corrispondenti informazioni sugli appositi
luoghi di raccolta, nelle amministrazioni die comuni.
15
Downloaded
from AC-Manual.com Manuals
05-CL 3134 15
20.02.2007, 14:17:24 Uhr
General Safety Instructions
Read the operating instructions carefully before putting the
appliance into operation and keep the instructions including the
warranty, the receipt and, if possible, the box with the internal
packing. If you give this device to other people, please also pass
on the operating instructions.
•
The appliance is designed exclusively for private use
and for the envisaged purpose. This appliance is not fit
for commercial use. Do not use it outdoors (except if it is
designed to be used outdoors). Keep it away from sources
of heat, direct sunlight, humidity (never dip it into any liquid)
and sharp edges. Do not use the appliance with wet hands.
If the appliance is humid or wet, unplug it immediately.
When cleaning or putting it away, switch off the appliance
and always pull out the plug from the socket (pull on the
plug, not the cable) if the appliance is not being used and
remove the attached accessories.
Do not operate the machine without supervision. If you
should leave the workplace, always switch the machine off
or remove the plug from the socket (pull the plug itself, not
the lead).
Check the appliance and the cable for damage on a regular
basis. Do not use the appliance if it is damaged.
Do not try to repair the appliance on your own. Always
contact an authorized technician. To avoid the exposure
to danger, always have a faulty cable be replaced only by
the manufacturer, by our customer service or by a qualified
person and with a cable of the same type.
Use only original spare parts.
Pay careful attention to the following “Special Safety Instructions“.
•
•
•
•
•
•
Children and Frail Individuals
•
In order to ensure your children‘s safety, please keep all
packaging (plastic bags, boxes, polystyrene etc.) out of their
reach.
Caution! Do not allow small children to play with the foil as
there is a danger of suffocation!
ENGLISH
•
In order to protect children or frail individuals from the hazards of electrical equipment, please ensure that this device
is only used under supervision. This device is not a toy. Do
not allow small children to play with it.
Symbols in these Instructions for Use
Important information for your safety is specially marked. It is
essential to comply with these instructions in order to avoid
accidents and prevent damage to the machine:
WARNING:
This warns you of dangers to your health and indicates
possible injury risks.
CAUTION:
This refers to possible hazards to the machine or other
objects.
NOTE: This highlights tips and information.
Special safety notes for this unit
•
•
•
•
•
•
•
•
•
•
•
•
•
•
•
Please note!
Never leave the device unattended for several hours. Do not
leave the house if it is switched on.
Care when positioning the device!
Always position the device in such a way that air can enter
and leave without obstruction.
Place the device on a flat surface.
The air-conditioner must not be used directly under a socket.
This device was designed to air condition living space and
must not be used for other purposes.
Do not insert any objects into the openings in the device.
Do not lift or move the device at the rear, but always at the
front. Please use the recessed grips if you want to move it.
WARNING:
Do not cover the device or place any objects on it. There
is a danger of overheating!
You should not use this air-conditioner in the immediate
vicinity of a bath, shower or swimming pool. Do not operate
the device from such a location. Maintain a safety distance
of 1.25 m.
Under no circumstances should you use the air-conditioner
in rooms containing explosive gas (e.g. benzine) or when
working with inflammable adhesive or solvent (e.g. when
gluing or varnishing parquet, PVC etc.).
The device should only be used in an upright position.
If the air-conditioner should fall over, remove the plug from
the socket and allow the device to cool down before righting
it.
Empty the condensation container inside the device before
moving it or storing it away.
As additional protection we recommend the installation of a
fault current protection device (RCD) with a rated current of
not more than 30 mA in the wiring system of the bathroom.
Please contact an authorised electrician for advice.
Do not use any extension leads or multiple sockets, as
this device is too powerful.
Overview of the Components (Fig. 1+2)
1
2
3
4
5
6
7
8
9
10
11
12
Front cover
Air outlet
Control panel
Rear wall cover
Right-hand air inlet
Rollers
Left-hand air inlet
Cable compartment
Hose connection
Exhaust air hose
Connection ring
Water drain with rubber burls
16
Downloaded
from AC-Manual.com Manuals
05-CL 3134 16
20.02.2007, 14:17:25 Uhr
Accessories:
Connection hose
Connection ring
Remote control
Water collecting pan
Remote Control (Fig. 4)
13 „ “ on/off button
14 „ “ modes of operation –
adjusting the modes of operation
15 „
“ ventilator – adjusting the Speeds
16 „ “ temperature control
17 „ “ timer - setting the clock
18 „ “ air outlet up/down movement
19 Battery compartment
Remote Control
Inserting the Batteries
•
•
•
•
•
Open the lid of the battery compartment on the back of the
remote control.
Insert 2 batteries of type R03 „AAA“ 1.5 V. Please ensure
that the polarity is correct (see the floor of the battery
compartment or the inscription on the outside)!
If the remote control is not used for a prolonged period,
remove the batteries in order to prevent battery acid leaking.
Now close the battery compartment.
Different battery types or new and used batteries must not
be used together.
•
If a battery leaks do not rub the liquid into your eyes or
mucous membranes. If hands come into contact with the
liquid they should be washed thoroughly and eyes rinsed out
with clear water; if symptoms persist please consult a doctor.
•
WARNING:
Do not expose the batteries to high temperatures or direct
sunlight. Never throw batteries into the fire. There is a
danger of explosion!
Used batteries should not be disposed of in the normal domestic waste. Please return old batteries to an appropriate
connection point.
•
Germany:
As a consumer you are required by law to return used (rechargeable) batteries.
You can return your old (rechargeable) batteries free of charge
where they were bought, as well as at the local public collection
points in your town.
The following symbols are to be found on (rechargeable) batteries containing harmful substances:
Pb
Cd
Hg
Li
Instructions for Use
WARNING:
Before the device is put into operation, e.g. before being
used for the first time, whenever it is transported or after
being moved, it should be placed in a horizontal position
for at least 3 hours.
NOTE:
•
•
Notes on Handling Batteries
•
•
•
•
•
•
•
Keep batteries away from children. They are not a toy!
Never throw batteries into a fire or immerse in water.
When inserting a battery, ensure the correct polarity.
Do not open the batteries by force.
Avoid contact with metallic objects. (Rings, nails, screws et
cetera.) There is a danger of short-circuiting!
As a result of a short-circuit batteries may heat up considerably or even catch fire. This may result in burns.
For your own safety the battery poles should be covered
with adhesive strips during transport.
= contains lead
= contains cadmium
= contains mercury
= contains lithium
•
The flexible exhaust air hose can be extended from 50 to
150 cm during installation. This length has been especially
designed for the particular features of the air-conditioner.
You should not use any extension or replace the hose with
another one, as this may result in malfunctions. The air
must be allowed to flow freely out of the device, as any
blockage may cause it to overheat. Please ensure that the
exhaust air hose is not buckled or bent.
Close the windows and doors so that no air can enter
the room from outside. The device will then work more
effectively.
Please ensure that the air can be drawn in and can flow
out unhindered. Remove any mobile sources of heat from
the room if necessary.
ENGLISH
Control Panel /Control Lamp (Fig.3)
„ “ air outlet button (green LED)
„ “ timer button (green LED)
„ “ sleep mode – switching on/off (green LED)
„왔“ reduce
Digital display
„왖“ increase
“ ventilator button
„
a fast (red LED)
b normal (green LED)
c slow (orange LED)
H „ “ operating modes button
a cooling (green LED)
b dehumidify (orange LED)
c ventilator (no lamp)
J „ “ on/off button (on = green LED)
K „ “ water full display (red LED
A
B
C
D
E
F
G
NOTE:
Some buttons are to be found both on the device and on the
remote control. Buttons with the same designation have the
same function.
Never use the air-conditioner without protective filters.
17
Downloaded
from AC-Manual.com Manuals
05-CL 3134 17
20.02.2007, 14:17:28 Uhr
Unpacking the appliance
•
Remove the appliance from the box and all the enclosed
accessories.
Do not through the packaging away, but keep it together with
the inner packing and the warranty documents for the whole
life of the warranty.
Place the appliance on smooth, level and stable work
surface.
Do not insert the appliance plug without installing the
necessary attachments.
•
•
•
and the „ “ trol lamp in green). The air outlet (2) opens.
After a few seconds the device switches on automatically.
Please wait until the device has begun operation.
Mode of Operation
Press the „ “ button (H/14) to switch the mode of operation between “cooling” (green), „dehumidifier” (orange) and “ventilator“
(no lamp).
NOTE:
Changing the Mode of Operation
When the mode of operation is changed the compressor
remains switched off for approximately 6 minutes until the
pressure in the refrigeration circuit has eased.
Then the compressor switches on again automatically.
Installation
Installing the Exhaust Air Hose
•
Place the connection ring (11) over the exhaust air hose
(10). Turn the connection ring at least five times in a clockwise direction until it is tight. Check that it cannot be pulled off.
Push the assembled exhaust air hose from right to left
over the hose connection (9) on the back. Guide it into the
holders until it locks in place. In order to release the hose
again, press in the right-hand retainer and push the hose to
the right out of the holder.
•
NOTE:
•
•
If the device is in „cooling“ mode the end of the exhaust air
hose has to be led out of the air-conditioned room.
Mains Lead Take-up
Open the flap of the cable compartment (8) on the rear. The
mains lead should only be pulled as far as the stop. Under no
circumstances should you pull the lead any further with force,
as this may damage the device. Such damage is not covered by
the guarantee.
•
If you would like to change the room temperature using the
„cooling“ mode of operation, press the „왔“ or „왖“ button
(D/F). The digital display (E) shows the temperature (min.
18°C – max. 32°C). The temperature increases or reduces
by 1°C with each press of the button.
By repeatedly pressing the „ “ button (16) on the remote
control you can switch from 18, 19, 20.....32; from there it
returns to 18, 19 etc.
The device cools the room down to the set temperature,
which it then maintains. If the set temperature is above the
current room temperature, the device switches the cooling
off and only the ventilator continues running.
NOTE:
The rate at which the desired temperature is reached depends
on the temperature of the room and the outside temperature.
Winding up the Lead
Ventilator Speed
Wind up the mains lead in a spiral in the cable compartment.
In the „cooling“ and „ventilator“ modes it is possible to set 3 different levels for the speed of the ventilator. The speed changes
“ button (G/15):
with each press of the „
Initial Operation
•
•
ENGLISH
Cooling
•
•
Only connect the machine to a properly installed safety
socket, 230 V/50 Hz.
Make sure that the degree of protection of the socket to
which the device is connected is of at least 10 ampere!
Place the device on any heat-resistant flat surface. Ensure
that air can enter and leave unhindered.
The distance from the air inlet grille (5/7) to the nearest wall
should be at least 20 cm. The distance from the air outlet
grille (2) to the nearest wall should be more than 1m.
Switching on/off
1. As soon as you have inserted the plug the mains control
lamp (J) lights up in red and indicates that the device is
connected to the mains.
2. Press the „ “ button (J) (13 on the remote control) to switch
the device on - the control lamp lights up in green. An
acoustic signal is heard and the digital display (E) shows
22 °C. The device switches to the highest speed and the
„cooling“ mode (the „
“ control lamp lights up in red
Red – for a high speed
Green – for a medium speed
Orange – for a slow speed
Timer Functions
Switch-off Timer
1. Turn the device on with the „ “ button (J/13).
2. Briefly press the „ “ button (B/17) to change over to timer
adjustment. The digital display on the control panel flashes
and shows 00. The „ “ control lamp lights up in green.
3. Press the button repeatedly to programme the timer. The
length of time is increased with every press of the button by
1 hour (00, 01, 02.....24, then from the beginning again).
4. After the set time has expired the device switches off.
Switch-on Timer
Before you use the switch-on timer turn the device on and set
the mode of operation, the ventilator speed and temperature.
18
Downloaded
from AC-Manual.com Manuals
05-CL 3134 18
20.02.2007, 14:17:32 Uhr
The device displays the selected settings on the control panel
(Fig. 3).
1. Turn the device off with the „ “ button (J/13).
2. Briefly press the „ “ button (B/17) to change to the time
setting mode. The digital display on the control panel flashes
and shows 00. The „ “ control lamp lights up in green.
3. In order to programme the timer, press the „ “ button (B/17)
repeatedly. The length of time increases by 1 hour with
every press of the button (00, 01, 02.....24, then from the
beginning again).
4. After the set time has expired, the device switches on.
CAUTION:
Do not move the device, as otherwise this might
cause the water to leak out and damage the floor,
carpet or device.
•
If you would like to switch off the timer before the time has
expired, press the „ “ button (B/17) repeatedly until the digital
display shows 00. The timer is now switched off.
•
Sleep Mode
•
•
•
•
•
Press the „ “ button (C) to switch on the sleep mode.
In sleep mode the ventilation speed is preset to low (orange
lamp).
“
The speed can be set or changed by pressing the „
button (G/15).
In sleep mode the previously selected temperature increases by 1°C after 1 hour and by a further 1°C after 2 hours.
In order to switch sleep mode off again, press the „ “ button
once more.
Fig. 5
Remove the rubber bung from the outflow and allow the
water to drain out (Fig. 6).
Fig. 6
CAUTION:
Do not remove from the device during the emptying
process! As the internal water container can hold up to
3 litres it is necessary to close the outflow from time to
time and empty the collecting pan. Repeat the process if
necessary until no further water flows out of the device.
Dehumidifying
When the device is operated in the „dehumidify“ mode you
should allow the exhaust air to flow back into the room.
During dehumidification only the low ventilator speed is possible
(„
“ control lamp lights up in orange). In this mode of
operation it may be necessary to empty the condensation
container more frequently (see section on „Emptying the Water
Container“).
Place the collecting pan supplied on the floor under the
outlet (12) of the device (see Fig. 5).
•
Close the outflow again with the rubber bungs. Insert the
plug into the socket and switch the device on. The red water
full display is switched off.
NOTE: Empty the water container regularly.
Air Outlet
•
•
Press the „ “ button (J/13) to open the air outlet.
Press the „ “ on (A/18) and the air outlet moves continuously up and down.
The movement is stopped by repeatedly pressing the „ “
button and the air slit remains in this position. The direction
of the airflow is then constant.
Once the „ “ button has been pressed the air outlet closes.
Emptying the Water Container
Air Filters
The air conditioner is equipped with two protective filters in order
to clean the air in the room.
NOTE:
When the device has been running for more than 100 hours
the digital display (E) flashes to remind you that the filter
should be cleaned. Press the „왔“ and „왖“ buttons simultaneously to stop the digital display from flashing.
Under conditions of high humidity it may be necessary to empty
the internal condensation container. When the water container is
full, an acoustic signal is heard 15 times. The device switches off
automatically and the „ “ (K) control lamp lights up in red. In
order to empty the water container, please proceed as follows:
•
ENGLISH
•
•
Turn the device off („ “ control lamp lights up in red) and
remove the plug from the socket.
19
Downloaded
from AC-Manual.com Manuals
05-CL 3134 19
20.02.2007, 14:17:36 Uhr
Cleaning
Cleaning the Air Filters
•
•
Always remove the mains plug before cleaning the device.
The air filters should be cleaned regularly by rinsing out under
running water. Pull out the air filters as shown in Fig. 7.
The device is too
loud
Control lamp „ “
(K) lights up
It is not standing
upright
Condensation
container is full
Place it on a flat,
solid surface
Empty the container (see section
on „Emptying the
Water Container“)
Noise Emissions
The noise emission value in the workplace is less than 70 dB(A).
Technical Data
Model:............................................................................... CL 3134
Power supply:............................................................230 V, 50 Hz
Power consumption:............................................................ 800 W
Protection class:........................................................................... Ι
Energy efficiency class: .............................................................. A
Protection class:..................................................................... IP20
Fig. 7
Allow the filters to dry before you reinstall them.
Clean the air slits on the sides regularly with a vacuum
cleaner.
Reinstall the filters, ensuring that they are inserted correctly
into the slide mounting.
•
•
•
CAUTION:
The protective filter must always be inserted during
operation.
The device and housing should only be cleaned with a
slightly damp cloth.
Do not use any strong detergents or solvents for cleaning.
•
•
Troubleshooting
ENGLISH
You should not try to repair or dismantle the air-conditioner yourself. Improper repairs mean that the guarantee is
no longer valid and place the user and other property in
danger.
Problem
The device does
not work
or does not provide
sufficient cooling
Cause
No power supply
Solution
Check the mains
connection
Timer function is
Deactivate the
activated
timer function
Windows or doors Close the doors
are open, there are and windows
many people or a
source of heat in
the room
Dirty filters
Clean the filters
Air inflow or outflow Remove the
blocked
blockage
Room temperature Change the tempeis lower than the
rature selection
set value
Cooling capacity:...............................................................2050 W
Refrigerant: ............................................................. R410A (420g)
Air circulation:......................................................... up to 440 m³/h
Net weight: ........................................................................28,6 kg
This device has been tested according to all relevant current
CE guidelines, such as electromagnetic compatibility and low
voltage directives, and has been constructed in accordance with
the latest safety regulations.
Subject to technical changes without prior notice!
Guarantee
The device supplied by our Company is covered by a 24 month
guarantee starting on the date of purchase (receipt).
During the life of the guarantee any fault of the device or its
accessories ascribable to material or manufacturing defects will
be eliminated free of charge by repairing or, at our discretion, by
replacing it. The guarantee services do not entail an extension
of the life of the guarantee nor do they give rise to any right to a
new guarantee!
Proof of the guarantee is provided by the proof of purchase.
Without proof of purchase no free replacement or repair will be
carried out.
If you wish to make a claim under the guarantee please return
the entire machine in the original packaging to your dealer
together with the receipt.
Defects to consumables or parts subject to wearing as well as
cleaning, maintenance or the replacement of said parts are not
covered by the guarantee and hence are to be paid!
The guarantee lapses in case of unauthorized tampering.
20
Downloaded
from AC-Manual.com Manuals
05-CL 3134 20
20.02.2007, 14:17:39 Uhr
After the expiry of the guarantee
After the expiry of the guarantee repairs can be carried by the
competent dealer or repair service against the payment of the
ensuing costs.
Meaning of the “Dustbin” Symbol
Protect our environment: do not dispose of electrical equipment
in the domestic waste.
Please return any electrical equipment that you will no longer
use to the collection points provided for their disposal.
This helps avoid the potential effects of incorrect disposal on the
environment and human health.
This will contribute to the recycling and other forms of reutilisation of electrical and electronic equipment.
ENGLISH
Information concerning where the equipment can be disposed of
can be obtained from your local authority.
21
Downloaded
from AC-Manual.com Manuals
05-CL 3134 21
20.02.2007, 14:17:41 Uhr
Downloaded
from AC-Manual.com Manuals
05-CL 3134 22
Stünings Medien, Krefeld • 02/07
D-47906 Kempen/Germany · Industriering Ost 40
Internet: http://www.clatronic.de · email: [email protected]
20.02.2007, 14:17:42 Uhr