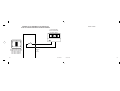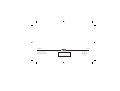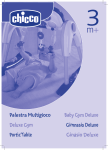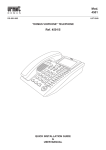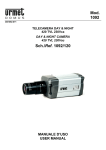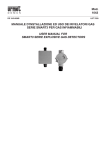
1
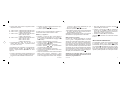
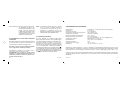
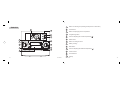
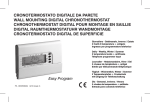
Mod.
1430
DS 1430-002
LBT 7280
MANUALE D’ISTRUZIONE DEL CRONOTERMOSTATO KLIMAT -pro7
KLIMAT-pro 7 CHRONO-THERMOSTAT INSTRUCTION MANUAL
Sch./Ref. 1430/2
1
2
3
4
5
6
7
24
21
IN
3
6
9
15
12
ITALIANO
13
24
21
IN
3
2
6
3
9
15
12
12
10
4
9
24
14
26
12
28
10
2
Pulsante di accensione/spegnimento
3
Pulsante per la visualizzazione dell’ora o della temperatura
4
Pulsante di programmazione
5
Manopola per la regolazione della temperatura Comfort (
6
Pulsante di Reset
7
Pulsante per la regolazione dell’orologio
8
Vano batterie
9
Pulsante indietro
)
18 20 22
18 20 22
16
Pulsante per la scelta della modalità di funzionamento (manuale oppure automatico)
1
1
2
3
4
5
6
7
11
1
30
16
OK
24
P 14
26
12
28
10
5
30
6
10 Manopola per la regolazione della temperatura Ridotta ( )
7
11 Pulsante conferma
8
12 Pulsante avanti
13 Display
2
DS1430-002
DS1430-002
3
Acceso/Spento
Inverno
Estate
Inversione
Comfort/Ridotta
Manuale
Funz. Vacanza
1
2
3
4
5
6
7
21
3
18
6
15
Indicazione giorno
GENERALITÀ
Il cronotermostato Klimat - pro7 utilizza una tecnologia costruttiva avanzata, mediante l’uso di un
microprocessore che garantisce elevata affidabilità e precisione. Nonostante ciò la sua principale
prerogativa è la facilità d’uso.
INSTALLAZIONE
Per poter assicurare il massimo Comfort, il cronotermostato necessita di informazioni affidabili, siccome misura e trasmette tutte le variazioni che si
4
IN
OUT
12
raggiamento solare o a correnti d’aria fredda e su
pareti interne attraversate da tubazioni dell’impianto
di riscaldamento e dell’acqua calda sanitaria.
Pile scariche
24
9
Temp. sonda int.
Ora/Temperatura
Temp. sonda est.
Regime Comfort ' '
o ridotto ' '
Indicazione fasce orarie
verificano in corrispondenza della sua ubicazione.
Pertanto deve essere installato nel locale di riferimento e in posizione da effettuare una misura reale
della temperatura senza che venga influenzato da
fattori estranei non solo come il calore generato
da fonti occasionali quali ferri da stiro, televisori
oppure cucine ma anche da fonti di freddo quale
può essere una parete esterna.
Per un’efficace funzionamento occorre che il cronotermostato venga installato su una parete interna
opposta ai corpi riscaldanti e ad una altezza da
terra di circa 1,5 metri ed è preferibile evitare l’installazione in prossimità di scaffali o nicchie, porte
o finestre, all’interno di pareti esterne esposte all’irDS1430-002
Dopo avere scelto la posizione del termostato procedete nel modo seguente per la sua installazione:
• Fissare la staffa di supporto su una scatola da
incasso (3 moduli oppure a 2 moduli) oppure direttamente sul muro (mediante due tasselli) e far passare i cavi di collegamento attraverso la feritoia.
Fori per fissaggio a muro o
alla scatola da incasso
2
3
4
5
6
7
CARICO
L
230V~
N
Comando da
remoto
Sonda
esterna
opzionale
• Appoggiare il cronotermostato alla staffa e spingerlo verso il basso per agganciarlo.
• Fissare il cronotermostato alla staffa con due viti
(3,5X6) attraverso i due fori presenti nel vano
batterie.
Vedere anche lo schema di collegamento con centralini PABX della serie Agorà (Sch. 1332/515,
1332/528 e 1332/512) riportato in fondo al presente manuale.
• Eseguire il collegamento secondo lo schema
sotto riportato.
DS1430-002
Il prodotto è coperto da garanzia se installato e
collegato correttamente.
5
INSERIMENTO E SOSTITUZIONE DELLE BATTERIE
PROGRAMMAZIONE DELL’OROLOGIO
Il cronotermostato funziona con 2 batterie da 1,5 V
del tipo LR6 (IEC) AA, per un corretto funzionamento
è necessario utilizzare solamente batterie alcaline
che garantiscono un’autonomia di circa due anni.
Per programmare l’orologio eseguire le seguenti
operazioni:
• Aprire lo sportellino frontale
• Premere e mantenere premuto il pulsante
per circa 2 secondi
• Impostare il giorno della settimana con i pulsanti
e
(1=Lunedì, 2=Martedì, 3=Mercoledì,
…, 7=Domenica)
• Confermare premendo OK
• Regolare l’ora con i pulsanti
e
• Confermare premendo OK
• Regolare i minuti con i pulsanti
e
• Confermare premendo OK
Per inserire le batterie procedete nel modo seguente:
• Aprire lo sportello.
• Rimuovere il coperchio di protezione delle batterie
• Inserire le batterie seguendo la polarità indicata
nel vano.
• Inserire il coperchio di protezione.
Se necessario eseguire un reset e/o la regolazione
dell’orologio.
Quando sul dispaly compare il simbolo
è
necessario sostituire le batterie, per la loro sostituzione seguire le indicazioni sopra riportate facendo
attenzione di inserire le batterie nuove entro 20
minuti dalla rimozione di quelle esaurite.
Le batterie sono elementi inquinanti,
non disperderle nell'ambiente.
Utilizzare gli appositi raccoglitori per
il loro smaltimento.
6
IMPOSTAZIONE ESTATE/INVERNO
Questa impostazione consente di invertire la modalità di funzionamento del relè a seconda che il
cronotermostato sia collegato ad un riscaldatore
oppure ad un refrigeratore.
Se il dispositivo è in modalità inverno e la temperatura ambiente rilevata è inferiore di quella impoDS1430-002
stata il relè si attiva e sul display compare il simbolo
ad indicarlo.
Se invece è in modalità estate e la temperatura
ambiente rilevata è superiore di quella impostata il
relè si attiva e sul display compare il simbolo
ad
indicarlo.
Impostazione modalità inverno:
• Premere e mantenere premuto il pulsante
per almeno 3 secondi
• Sul display lampeggerà il simbolo ad indicare
che la modalità è stata impostata
Impostazione modalità estate:
PROGRAMMAZIONE
La programmazione del cronotermostato avviene
per fasi successive, ed è possibile effettuare
seguenti impostazioni:
• Modo di funzionamento ovverosia come e in
quali giorni applicare le fasce orarie
uguali dal lunedì al
venerdì
6 7 differenti dalle precedenti
ma uguali per il sabato e
la domenica
b 1 2 3 4 5 6
uguali dal lunedì al sabato
7 differenti per la domenica
a 1 2 3 4 5
• Premere e mantenere premuto il pulsante
per almeno 3 secondi
• Sul display lampeggerà il simbolo
ad indicare
che la modalità è stata impostata
c 1 2 3 4 5 6 7 uguali dal lunedì alla
domenica
d
funzione vacanze
Nel caso sia stato eseguito un reset occorre riprogrammare la funzione estate/inverno.
e 1
differenti per ogni giorno
della settimana
2 3 4 5 6 7
DS1430-002
7
• Numero delle fasce orarie di regolazione della
temperatura Comfort
a 1 fascia oraria di default dalle 06:00 alle 23:00
b 2 fasce orarie di default dalle 06:00 alle 08:00
e dalle 17:00 alle 23:00
c 3 fasce orarie di default dalle 06:00 alle 08:00
dalle 11:00 alle 13:00
e dalle 17:00 alle 23:00
d 4 fasce orarie di default dalle 06:00 alle 08:00
dalle 11:00 alle 13:00
dalle 17:00 alle 19:00
e dalle 21:00 alle 23:00
• Personalizzazione degli orari di inizio e di
termine delle fasce orarie, è possibile variarli
con passi di 15 minuti.
L’impostazione del programma di funzionamento
avviene mediante i pulsanti
e
, OK e P, per
entrare in programmazione procedete nel modo
seguente:
• Premere e mantenere premuto il pulsante P (circa
2 secondi) fino a quando sul display inizia a lampeggiare una delle modalità di funzionamento.
8
• Scegliere uno dei 5 modi di funzionamento (a, b,
…,e) con i pulsanti
e .
• Premere il pulsante OK per confermare.
A questo punto la programmazione si differisce a
seconda del modo di funzionamento scelto.
Modo a, b, c oppure e:
• Scegliere il numero di fasce orarie relative ai
giorni indicati dal lampeggio con i pulsanti
e
(verranno evidenziate dal lampeggio delle
fasce stesse).
• Premere il pulsante OK per confermare
• Premere i pulsanti
e
per personalizzare
l’ora d’inizio della prima fascia
• Premere il pulsante OK per confermare
• Premere i pulsanti
e
per personalizzare
l’ora di fine della prima fascia
• Premere il pulsante OK per confermare
• Continuare a personalizzare tutte le fasce orarie
come sopra indicato
• Dopo aver confermato l’ora di termine dell’ultima
fascia oraria, verranno evidenziati i giorni
successivi a seconda del modo di funzionamento
scelto e lampeggeranno le fasce orarie. Scegliere
DS1430-002
il numero di fasce orarie desiderate per quei
giorni con i pulsanti
e
• Premere il pulsante OK per confermare
• Personalizzare le fasce orarie come sopra descritto
• Al termine dell’ultima fascia oraria premere il
pulsante OK per confermare
Sul display verrà evidenziato il giorno e l’ora corrente
ad indicare che la programmazione è terminata.
Modo d funzione vacanze:
nel caso che si desideri assentarsi per un periodo
di ore o giorni è consigliabile attivare la funzione
vacanze che vi permette di sospendere il modo di funzionamento che è attivo, spegnere il riscaldamento,
per un numero di ore (da 1 a 95) oppure di giorni (da 4
a 99) desiderato. Al termine del conteggio, ore oppure
giorni, il cronotermostato si riporterà nel modo di funzionamento che era attivo precedentemente all’attivazione della funzione vacanze, durante lo spegnimento
sarà comunque sempre attiva la funzione antigelo e
sul display viene visualizzato il simbolo .
• Dopo aver selezionato la funzione vacanze
premere OK per confermare.
• Premere i pulsanti
e
per impostare il
numero di ore, raggiunto il numero di ore massimo (h 95) il dispaly comincerà a contare automaticamente i giorni (massimo 99 d).
• Premere il pulsante OK per confermare.
Il simbolo
vi ricorderà che la funzione vacanze
è attiva.
IMPOSTAZIONE TEMPERATURE
La temperatura Comfort viene impostata mediante
la manopola indicata con il simbolo
, mentre
quella Ridotta viene impostata mediante la manopola
con il simbolo . Normalmente, per avere una riduzione notturna, la manopola di temperatura Ridotta
deve essere impostata ad una temperatura inferiore
rispetto a quella impostata con la manopola Comfort.
Attenzione nel conteggio delle ore o dei giorni
sono inclusi anche quelli del momento in cui si
effettua la programmazione.
DS1430-002
9
FUNZIONAMENTO MANUALE
INDICAZIONE ORA / TEMPERATURA
Con il pulsante , il cronotermostato può essere
forzato a funzionare in maniera indipendente dal
programma impostato.
si può visualizzare sul
Premendo il pulsante
display alternativamente l’ora corrente o la temperatura ambiente rilevata dal cronotermostato (indicazione IN sul display) oppure, se installata quella
rilevata dalla sonda esterna (indicazione OUT sul
display).
Premendo una prima volta il pulsante, si attiva un funzionamento manuale temporaneo che regola l’ambiente alla temperatura opposta a quella attualmente
stabilita dal programma fino al successivo intervento
del programma, viene cioè anticipato l’intervento successivo. Sul display verranno accesi i simboli e
e resteranno visibili le fasce orarie programmate.
Premendo ancora una volta il pulsante si forza
il funzionamento in manuale in maniera stabile alla
temperatura Comfort. Sul display verranno accesi
i simboli e .
Premendo una terza volta il pulsante si forza il
funzionamento in manuale in maniera stabile alla
temperatura Ridotta. Sul display verranno accesi i
simboli e .
Per tornare al funzionamento programmato premere nuovamente il pulsante .
10
OFF
ON
4 3 2 1
SPEGNIMENTO E FUNZIONE ANTIGELO
Per disattivare il cronotermostato premere il tasto
e sul display comparirà la temperatura antigelo
che può essere regolata da –5° C a 25° C mediante
i pulsanti
e
e il simbolo .
FUNZIONI AGGIUNTIVE
Sul fondo del cronotermostato è presente una feritoia che permette di accedere a 4 micro interruttori che permetto di modificare il funzionamento
del cronotermostato stesso.
DS1430-002
Funzione dei micro interruttori:
Micro interruttore 1: riservato, lasciare sempre in
ON.
Micro interruttore 2: funzione Advanced time (posizionato in OFF).
La funzione di Advanced time
consiste nella possibilità di attivare
il riscaldamento in anticipo rispetto
all’orario programmato, in modo
da ottenere all’orario programmato la temperatura impostata. In
questo modo il cronotermostato
calcola il tempo necessario per
DS1430-002
raggiungere la temperatura desiderata e, di conseguenza, anticipa l’accensione programmata
del tempo adeguato per raggiungere lo scopo. L’anticipo viene
calcolato in base al gradiente
medio delle ultime 24 ore con un
massimo di 60 minuti di anticipo.
Micro interruttore 3: funzionamento standard (posizionato in ON) o funzione STOP
and GO (posizionato in OFF). La
funzione STOP and GO imposta
bande e tempi di funzionamento
per il settore civile: il relé è attivato secondo la differenza fra
la temperatura imposta e quella
rilevata, per 3, 6, 9 oppure 12
minuti (più è grande la differenza
per più tempo è attivato il relé)
e disattivato per 3 minuti allo
scadere dei quali è effettuata la
nuova lettura della temperatura,
quindi il cronotermostato decide
per quanto tempo attivare nuovamente il relé.
11
Micro interruttore 4: Selezione sonda interna/ esterna.
Se posizionato in ON, il cronotermostato utilizzerà la sonda
interna, mentre se posizionato
in OFF verrà utilizzata la sonda
esterna (spostare questo micro
interruttore solamente se è stata
installata la sonda esterna).
NOTA: se si installa la sonda per esterno Sch. 1430/60
e non la si attiva è possibile utilizzare il
cronotermostato come termometro per poter
visualizzare la temperatura esterna. Per
effettuare la visualizzazione riferirsi al paragrafo
“INDICAZIONE ORA/TEMPERATURA”.
ATTIVAZIONE DA REMOTO
COLLEGAMENTO DI UNA SONDA ESTERNA
OPZIONALE
È possibile collegare una sonda di temperatura esterna
al cronotermostato in opzione di quella interna. La
sonda esterna deve essere del seguente tipo:
NTC 100KΩ ±2% a 25° C (Sch. 1430/50 per ambienti
interni, oppure Sch. 1430/60 per esterno)
Collegarla tra il morsetto 6 e il morsetto 7 e spostare il micro interruttore 4 verso l’alto.
ATTENZIONE: per collegare la sonda esterna
utilizzare un cavetto schermato bipolare con
calza libera di sezione minima di 1,5 mm2 e lunghezza massima di 25 m.
12
Se avete installato un centralino PABX Urmet
Domus modelli Sch.1332/515, Sch.1332/528 oppure
Sch.1332/512 potete collegare il relè attuatore a funzionamento bistabile ai morsetti 4 e 5 del cronotermostato, in questa maniera è possibile attivare
l’accensione del cronotermostato quando siete fuori
casa. Il cronotermostato si attiverà per regolare la
temperatura impostata con la manopola Comfort ( )
e la condizione di cronotermostato attivato a distanza
verrà segnalata dal display con il lampeggio del simbolo . Per le modalità di attivazione del relè seguire
il manuale di istruzioni del centralino stesso.
DS1430-002
CARATTERISTICHE TECNICHE
Alimentazione:
Autonomia:
Portata contatto relè:
Frequenza di rilevamento temperatura:
Temperature impostabili:
Campo di regolazione temperature:
Differenziale termico d’intervento:
Temperatura antigelo:
Umidità relativa:
Grado di protezione:
Temperatura di stoccaggio:
Dimensioni:
2 batterie da 1,5 V tipo IEC LR6 size AA (alcaline)
2 anni circa
5 (1)A a 250Vac
ogni 3 minuti circa
2 (Comfort e Ridotta)
10° C ~ 30° C
0,2° C asimmetrico
(-0,2 per riscaldamento, +0,2 per raffreddamento)
regolabile da -5° C a 25° C
10% ~ 90% non condensante
IP30
-10° C ~ 60° C
133 x 87 x 32 mm (L x A x P)
Apparecchio conforme all’articolo 7, comma 6, del DPR 412 del 26/08/1993 (Regolamento recante norme
per la progettazione, l’installazione, l’esercizio e la manutenzione degli impianti termici degli edifici ai fini del
contenimento dei consumi di energia, in attuazione dell’art. 4, comma 4, della legge 9 gennaio 1991, n. 10).
Prodotto conforme alla Direttiva 89/336/CEE relativa alla Compatibilità Elettromagnetica e alla Direttiva
73/23/CEE (Bassa Tensione) relativa alle norme di sicurezza e loro successiva modifica dalla Direttiva
93/68/CEE.
DS1430-002
13
1
Button for selecting the operating mode (manual or automatic)
2
On/off button
3
Button for displaying time or temperature
2
4
Programming button
3
5
Knob for adjusting the Comfort temperature (
6
Reset button
7
Button for setting the clock
8
Battery housing
9
Back button
10
Knob for adjusting the Reduced temperature (
11
Confirm button
12
Forward button
13
Display
ENGLISH
13
1
1
2
3
4
5
6
7
24
21
IN
3
6
9
15
12
4
11
10
12
10
9
18 20 22
18 20 22
16
14
24
16
P 14
26
28
30
OK
12
10
24
26
28
5
30
6
7
8
14
)
12
DS1430-002
DS1430-002
)
15
On/Off
Winter
Summer
Inversion
Comfort/Reduced
Manual
Vacation Func.
1
2
3
4
5
6
7
21
3
18
6
15
Day indication
GENERAL
The Klimat - pro7 chrono-thermostat used
advanced construction technology, by means of
the use of a microprocessor which guarantees
high reliability and precision. Despite this, its main
prerogative is its ease of use.
INSTALLATION
To ensure maximum comfort, the chronothermostat requires reliable information as it
measures and transmits all the variations which
16
IN
OUT
12
which hot water or central heating pipes pass. After
selecting the position of the thermostat, proceed
as follows to install it.
• Fix the support bracket on a flush mounting
box (3 modules or 2 modules) or directly on
the wall (by means of two plugs) and pass the
connection wires through the slit.
Batteries flat
24
9
Int. temp. probe
Time/Temperature
Ext. temp. probe
Comfort operation ' '
o reduced ' '
Hour band indication
2
3
4
5
6
7
LOAD
Holes for fixing to the wall
or flush mounting box
L
230V~
occur around its location. It must therefore be
installed in the reference room and in a position
where it carries out a real measurement of the
temperature without being influenced by external
factors such as heat generated by occasional
sources such as irons, television sets or cookers,
or by sources of cold such as external walls.
To work effectively, the chrono-thermostat must
be installed on an internal wall opposite heating
bodies and at a height of about 1.5 metres from
the ground and it is preferable not install it near
shelving or recesses, doors or windows, on the
inside of outer walls exposed to solar radiation
or cold air currents or on indoor walls through
DS1430-002
N
Remote controlled Probe
external
optional
• Place the thermostat on the bracket and press
downwards to couple it.
• Fix the thermostat to the bracket using two
screws (3,5 X 6) through the two holes in the
battery housing.
• Make the connections as in the plan below.
Also see the plan for connections with Agorà series
PABX exchanges (Ref. 1332/515,1332/528 and
1332/512) shown at the end of this manual.
The product is covered by guarantee if installed
and connected correctly.
DS1430-002
17
FITTING AND CHANGING THE BATTERIES
SETTING THE CLOCK
The chronothermostat runs on two 1.5V batteries,
type LR6 (IEC) AA. For correct operation you must
only use alkaline batteries which guarantee about
two years’ autonomy.
Proceed as follows to fit the batteries:
• Open the cover
• Remove the battery protection cover
• Put in the batteries following the polarity shown
inside the housing
• Put back the protective cover
Proceed as follows to set the clock:
• Open the front cover
• Press the button
and keep it pressed for
about 2 seconds.
• Set the day of the week using the buttons
and
(1=Monday, 2=Tuesday, 3=Wednesday,
…, 7=Sunday)
• Confirm by pressing OK
• Set the hour using the buttons
and
• Confirm by pressing OK
• Set the minutes using the buttons and
• Confirm by pressing OK
If necessary, reset and/or adjust the clock.
You must replace the batteries when the message
“BATT” appears on the display. To do so, follow the
instructions given above, making sure you insert
the new batteries within 20 minutes of removing
the flat ones.
The batteries are a cause of
pollution, and must not be thrown
away. Dispose of them in the
appropriate battery collection bins.
18
If, on the other hand, the device is in summer mode
and ambient temperature measured is above the
setting, the relay is activated and the symbol
appears on the display to indicate this.
Setting winter mode:
and keep it pressed for at
• Press the button
least 3 seconds.
• The symbol will blink on the display to indicate
that the mode has been set.
Setting summer mode:
and keep it pressed for at
• Press the button
least 3 seconds.
• The symbol
will blink on the display to
indicate that the mode has been set.
SETTING SUMMER/WINTER
This setting allows you to change the operating
mode of the relay depending on whether the
chrono-thermostat is connected to a heater or to
a refrigerator. If the device is in winter mode and
the ambient temperature measured is below the
setting, the relay is activated and the symbol
appears on the display to indicate this.
DS1430-002
If a reset has occurred it will be necessary to
reprogram the summer/winter function.
PROGRAMMING
The chronothermostat is programmed in successive
stages and it is possible to make the following
settings:
• Operating mode or how and on what days the
hour bands are applied.
a 1 2 3 4 5
means from Monday to
Friday
6 7 different from the previous
ones but equivalent to
Saturday and Sunday.
b 1 2 3 4 5 6
means from Monday to
Saturday
7 different for Sunday
c 1 2 3 4 5 6 7 means from Monday to
Sunday
d
vacation function
e 1
different for each day of
the week
2 3 4 5 6 7
DS1430-002
19
• Number of hour bands for adjusting the Comfort
temperature.
a 1 default hour band from 06:00 to 23:00
b 2 default hour bands from 06:00 to 08:00 and
from 17:00 to 23:00
c 3 default hour bands from 06:00 to 08:00,
from 11:00 to 13:00 and
from 17:00 to 23:00
d 4 default hour bands from 06:00 to 08:00
from 11:00 to 13:00
from 17:00 to 19:00 and
from 21:00 to 23:00
• Personalisation of the starting and finishing
times of the hour bands; they can be varied in
steps of 15 minutes.
The operating program is set by means of the
buttons
and
OK, P. To enter programming
mode, proceed as follows:
• Press the button P and keep it pressed (about 2
seconds) until one of the operating modes blinks
on the display.
20
• Select one of the 5 operating modes (a, b, …,e)
using the buttons
and .
• Press the OK button to confirm.
At this point, programming differs depending on
the operating mode selected.
Mode a, b, c or e:
• Select the number of hour bands for the days
indicated by the blinking using buttons
and
(these will be shown by the blinking of the
bands themselves).
• Press the OK button to confirm
• Press buttons
and
to personalise the hour
the first band starts
• Press the OK button to confirm
• Press buttons
and
to personalise the hour
the first band ends
• Press the OK button to confirm
• Continue to personalise all the hour bands as
indicated above
• After confirming the time the last band ends, the
next day will be indicated on the basis of the
operating mode selected and the hour bands will
blink. Select the number of hour bands desired
DS1430-002
for those days using buttons
and .
• Press the OK button to confirm.
• Personalise the hour bands as described above
• When you have programmed the last hour band,
press the OK button to confirm. The display will
show the current day and time to indicate that
programming is complete.
• After selecting the vacation function
, press
OK to confirm.
• Press the buttons
and
to set the number of
hours; when the maximum number of hours (95)
has been reached, the display will automatically
begin to count the days (maximum 99).
• Press the OK button to confirm.
Vacation operating mode:
You can use Vacation Mode when you intend to be
away for hours or days. This allows you to suspend
the active operating mode for the number of hours
(from 1 to 95) or days (from 4 to 99) desired. At
the end of the number of hours or days selected,
the chronothermostat will return to the operating
mode which was active before activation of the
vacation function; the antifreeze function remains
active during the switch-off period and the symbol
will appear on the display.
The symbol
will remind you that the vacation
function is on.
Attention: The count of the hours and days also
includes those at the moment programming is
carried out.
DS1430-002
SETTING THE TEMPERATURES
The Comfort temperature is set by means of
the knob indicated by the symbol
, while the
Reduced temperature is set by the knob with the
symbol. Normally, to obtain a reduction at night,
the Reduced temperature knob must be set at a
lower temperature compared with that set using
the Comfort knob.
21
MANUAL OPERATION
TIME/TEMPERATURE INDICATION
The chrono-thermostat can be made to operate
independently from the set program by means of
the button . When the button is pressed once,
temporary manual operation is activated to set the
environment to the temperature imposed instead
of that currently set by the program until the next
programmed intervention: that is, the next stage is
brought forward.
The symbols and will go on on the display and
the programmed hour bands will remain visible.
When you press the button
once more, the
system will operate in manual mode permanently
at the Comfort temperature. The symbols and
will appear on the display.
When you press the button a third time, the system
will operate in manual mode permanently at the
Reduced temperature. The symbols and
will
appear on the display.
To return to programmed operation, press the
button again.
You can show the current time or the ambient
temperature measured by the chrono-thermostat
(IN indication on the display) by pressing the button
, or if installed, the temperature measured by
the outdoor probe (OUT indication on the display).
22
OFF
ON
4 3 2 1
TURNING OFF AND ANTIFREEZE FUNCTION
To deactivate the chronothermostat press the
button
and the display will show the antifreeze
temperature which can be adjusted from -5°C to
25°C by mean so buttons
and
and the
symbol .
ADDITIONAL FUNCTIONS
There is a slit in the bottom of the chronothermostat
which allows you to access 4 microswitches so
that you can modify the operation of the chronothermostat itself.
DS1430-002
Microswitch functions:
Microswitch 1: reserved, always leave on ON.
Microswitch 2: Advanced time function (position on
OFF).
The Advanced time function makes it
possible to activate heating in advance
with respect to the programmed time
so as to obtain the set temperature
at the programmed time. In this way,
the chrono-thermostat calculates the
time needed to reach the desired
temperature and, as a result, brings
the programmed start forward by
DS1430-002
enough time to reach this aim. The
advance is calculated on the basis of
the average gradient in the last 24
hours with a maximum advance of 60
minutes.
Microswitch 3: standard operation (positioned on ON)
or STOP and GO function (positioned
on OFF). STOP and GO function sets
operating bands and times for the
civil sector: The relay is activated
depending on the different between the
set temperature and that measured,
for 3, 6, 9 or 12 minutes (the greater
the difference the longer the relay is
activated) and deactivated for 3 minutes
at the end of which a new temperature
reading is made, after which the chronothermostat decides for how long to
activate the relay again.
Microswitch 4: Indoor/outdoor probe selection. If
positioned on ON, the chronothermostat will use the indoor probe,
while if it is on OFF, the outdoor probe
will be used (only shift this microswitch
if the outdoor probe is installed).
23
CONNECTION OF AN OPTIONAL OUTDOOR
PROBE
It is possible to connect an external temperature
probe to the chrono-thermostat as an option instead
of the indoor one. The probe must be of the
following type:
NTC 100KW ±2% at 25° C (Ref. 1430/50 for indoor
environments or Ref. 1430/60 for outdoor ones)
Connect it between terminal 6 and terminal 7 and
shift the microswitch 4 upwards.
ATTENTION: to connect the outdoor probe, use
a two-pole shielded wire with free braiding with
a minimum section of 1.5 mm2 and maximum
length of 25 m.
REMOTE ACTIVATION
TECHNICAL SPECIFICATIONS
If you have installed an Urmet Domus PABX
exchange, model Ref. 1332/515, Ref. 1332/528 or
Ref. 1332/512, you can connect the actuator relay
to bistable operation at terminals 4 and 5 of the
chrono-thermostat; in this way you can turn on the
chrono-thermostat when you are out of the house.
The chrono-thermostat will come on to regulate
the temperature set by the Comfort knob ( ) and
the chrono-thermostat remote activated condition
will be signalled on the display by the symbol
blinking. See the instruction manual of the
exchange itself for the relay activation procedures.
Power supply:
Autonomy:
Relay contact capacity:
Temperature measurement frequency:
Temperature settings:
Temperature adjustment range:
Thermal intervention differential:
Antifreeze temperature:
Relative humidity:
Protection rating:
Storage temperature:
Dimensions:
Apparatus in compliance with article 7, par. 6, of DPR 412 of 26.08.93 (Regulations with standards for
the design, installation, running and maintenance of heating systems in buildings for the purpose of
containing energy consumption, implementing article 4, par. 4, of Act no. 10 of January 1991).
NOTE: if you install the outdoor probe 1430/60
and do not activate it, it is possible to use
the chrono-thermostat as a thermometer
to display the outdoor temperature. To
display it, see the paragraph “TIME/
TEMPERATURE INDICATION”
24
#2 1.5V batteries, type IEC LR6, size AA (alkaline)
about 2 years
5 (1)A at 250Vac
about every 3 minutes
2 (Comfort and Reduced)
10° C ~ 30° C
0,2° C asymmetrical (-0,2 for heating, +0,2 for cooling)
adjustable from -5°C to 25°C
10% ~ 90% non condensing
IP30
-10° C ~ 60° C
133 x 87 x 32 mm (L x H x D)
Product in compliance with EEC Directive 89/336 regarding to electromagnetic compatibility and EEC
Directive 73/23 (low voltage) regarding safety regulations and their subsequent amendment s in EEC
Directive 93/68.
DS1430-002
DS1430-002
25
NOTE / NOTE
SCHEMA DI COLLEGAMENTO CON CENTRALINI
PLAN OF CONNECTIONS WITH PHONE EXCHANGES
Cronotermostato
Chrono-thermostat
Sch./Ref. 1430/2
Centralini telefonici PABX
PABX phone exchanges
Sch./Ref. 1332/515
Sch./Ref. 1332/528
Sch./Ref. 1332/512
26
ATT 1
oppure
or
ATT 2
DS1430-002
DS1430-002
27
DS 1430-002
LBT 7280
FILIALI
STABILIMENTO
20151 MILANO - Via Gallarate 218
Tel. 02.380.111.75 - Fax 02.380.111.80
00043 CIAMPINO (ROMA) - Via L.Einaudi 17/19A
Tel. 06.791.07.30 - Fax 06.791.48.97
URMET DOMUS S.p.A.
10154 TORINO (ITALY)
VIA BOLOGNA 188/C
Telef. 011.24.00.000 (RIC. AUT.)
Fax 011.24.00.300
011.24.00.323
http://www.urmetdomus.com
e-mail:[email protected]