1
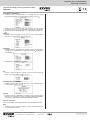
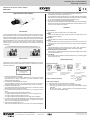
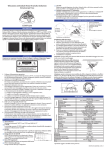
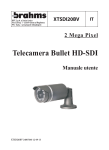
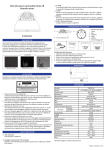
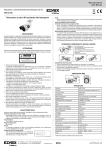
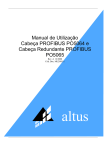
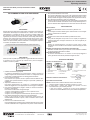
Istruzioni per il funzionamento
Operating Instruction
Telecamera box 700TVL passo CS, alimentazione a 230Vac
46633.220
TELECAMERA BOX AD ALTA RISOLUZIONE
7. Non puntare la telecamera verso il sole
Non puntare la telecamera verso il sole o altri oggetti estremamente brillanti
che possano far sembrare indifferente che la telecamera funzioni o meno.
Questo potrebbe danneggiare il CCD (Dispositivo di Accoppiamento di Carica).
8. Non collocare la telecamera in luoghi con interferenza.
Quando la telecamera è installata nei pressi di attrezzature come dispositivi
di comunicazione wireless che emettono un forte campo elettromagnetico, si
possono verificare delle irregolarità come rumore sullo schermo del monitor.
CARATTERISTICHE
DESCRIZIONE
Questa telecamera adotta la tecnologia SONY di ultimissima generazione per
l'elaborazione dell'immagine Enhanced Effio-E. È dotata di una risoluzione
orizzontale fino a un massimo di 700TVL così come di un DNR, D-WDR, HSBLC avanzato e ulteriori funzioni. Un potente menu OSD include le funzioni di
regolazione per luminosità, contrasto, saturazione; area multipla, bilanciamento
del bianco, AGC e altre funzioni per assicurare immagini nitide e chiare. Inoltre,
le funzioni di specchiamento, privacy e altre ancora supportate la rendono
adatta a vari tipi di ambienti particolari realizzando una sorveglianza semplice e
conveniente, ventiquattro ore su ventiquattro.
Tecnologia avanzata Effio-E per l'elaborazione dell'immagine; risoluzione elevata 700TVL
420 TV L
700 TV L
Alta risoluzione
Risoluzione orizzontale da 700TVL con CCD sony 960H da 1/3".
D-WDR
La tecnologia avanzata D-WDR migliora notevolmente la sua immagine
anche in condizioni di luce variabile.
Menu OSD
Il potente menu OSD consente svariate impostazioni di funzioni.
HS BLC
È in grado di distinguere forti punti di luce e di coprirli per migliorare la
definizione dell'intera immagine assicurando così una sorveglianza più
chiara ed efficace.
2D-DNR
Utilizza uno speciale algoritmo che riduce il rumore video e colore,
aumentando così la risoluzione e la chiarezza e creando immagini più nitide
e a fuoco.
Modalità di funzionamento commutazione automatica D/N
Modalità A COLORI durante il giorno quando c'è luce sufficiente e modalità
b/n di notte quando l'illuminazione è ridotta.
Mascheramento privacy
Si possono mascherare fino a un massimo di 4 aree per proteggere la
privacy personale nascondendo parti dell'immagine alla vista.
PRECAUZIONI
Grazie per aver acquistato questo prodotto. Leggere attentamente le istruzioni
e conservare con cura il manuale per l'utilizzo futuro, prima di collegare o
mettere in funzione il prodotto.
ISTRUZIONI COMPONENTI
Istruzioni sul funzionamento
Obiettivo DC Drive
1 Comando 2 Comando +
3 Drive +
4 Drive -
ATTENZIONE
PERICOLO DI SCOSSA
ELETTRICA, NON APRIRE
ATTENZIONE:
PER RIDURRE IL RISCHIO DI SCOSSA ELETTRICA,
NON RIMUOVERE LA COPERTURA (O LO SCHIENALE)
NON CONTIENE PARTI RIPARABILI DALL'UTENTE.
PER L'ASSISTENZA RIVOLGERSI A PERSONALE QUALIFICATO
1. Utilizzare alimentazione appropriata
La potenza di alimentazione per la telecamera è 230Vac. Accertarsi di
collegare l'apparecchio all'alimentazione corretta. Un collegamento errato
può causare un malfunzionamento e/o danneggiare la telecamera.
2. Non smontare la telecamera.
Non rimuovere viti o copertura, al fine di prevenire scariche elettriche. Non
contiene parti riparabili dall'utente. Rivolgersi a personale qualificato per
l'assistenza.
3. Adoperare la telecamera con cura.
Non esporre la telecamera a urti, scosse, ecc.. La telecamera potrebbe
essere danneggiata da un uso inappropriato o uno stoccaggio non adeguato.
4. Non esporre la telecamera a pioggia o umidità, né cercare di metterla in
funzione in aree bagnate.
Non collocare la telecamera nei seguenti luoghi:
1 luoghi in cui la temperatura è inferiore a -10°C o superiore a 50°C;
2 luoghi in cui l'umidità supera il 95%;
3 luoghi in cui vi sia una grande concentrazione di vapore acqueo e vapore.
5. Non utilizzare detergenti forti o abrasivi per pulire la telecamera.
Usare un panno asciutto per pulire la telecamera quando sporca. Se
risultasse difficile rimuovere lo sporco, usare un detersivo neutro e pulire
delicatamente.
6. Pulire con cura la mascherina del CCD.
Non usare detergenti forti o abrasivi per la pulizia del pannello sensore. Usare
un lembo di stoffa da lenti o un applicatore con la punta in cotone ed etanolo.
Via Pontarola, 14/a - 35011 Campodarsego PD
tel. +39 049 920 2511 - fax +39 049 920 2603
www.elvox.com
1. Anello adattatore lente CS
4. Pulsante menu
2. Vite fissaggio fuoco posteriore
5. Foro per vite staffa 7. Alimentazione LED 8. Alimentazione
3. Interfaccia automatica lente Auto Iris
6. Uscita video
Pulsante su
Definizione interfaccia automatica Iris
Pulsante destro
Pulsante sinistro
Pulsante menu
Pulsante giù
Impostazione funzione OSD:
ENTER: Pulsante menu, Seleziona elemento menu o Esci dal menu
Questo pulsante si utilizza per spostare il cursore in su o in giù.
Il tasto destro o sinistro sono utilizzati per spostare il cursore
orizzontalmente o per cambiare parametri.
Il retro con il simbolo
significa che ci sono ancora impostazioni
sottomenu subordinate. Premere menu per accedere all'impostazione.
S6I.46.633.220 RL. 00 13 03
ELVOX - Campodarsego - Italia
Istruzioni per il funzionamento
Operating Instruction
DIMENSIONI (MM)
LENS:
1.Spostare il cursore su LENS con i pulsante su e giù e quindi impostare
EXPOSURE con i pulsanti destro e sinistro: MANUALE; AUTOMATICO .
2.Quindi impostare la modalità AUTO coni pulsanti destro e sinistro:
AUTOMATICO; CHIUDI; APRI.
SPECIFICHE
Modello n.
46633.220
Sensore
CCD ad elevata sensibilità da 1/3” 960H
Sensore
Formato video
PAL/NTSC
Risoluzione
700TVL
Minima illuminazione
0,01Lux
Rapporto S/N
50dB (AGC OFF)
AGC
AUTOMATICO; MANUALE
BLC
ON; OFF; HLC
Diaframma elettronico/
Utilizza obiettivi Auto Iris DC Drive
1/60(1/50)-1/100.000 SECONDO
Comando diaframma
Menu Operatore (facoltativo)
Velocità otturatore
Bil. del
bianco
Modalità
MANUALE;ATW; UTENTE
Gamma
(ATW) 2200~10.000°K
Mirror
Privacy
Regolazione
Titolo
AUTOMATICO; A COLORI; B/N
ON/OFF (da 1 a 4 AREE)
ALTA LUMINANZA; BASSA LUMINANZA
ON/OFF (max. 15 caratteri)
2D-DNR
D-WDR
Sincronizzazione
Alimentazione
Voltaggio
Corrente
Montatura lente
Temp. di funzionamento
Dimensioni
Peso
3. Impostare la MANUAL MODE con il pulsante Invio:
ON/OFF
Day/Night: (Giorno/Notte)
Temp. di stoccaggio
OTTURATORE/CAG:
1.Spostare il cursore su SHUTTER/AGC con i pulsante su e giù e quindi
impostare SHUTTER/AGC con i pulsanti destro e sinistro: AUTOMATICO ;
MANUALE .
2.Impostare la AUTO MODE con il pulsante Invio, quindi impostare HIGH
LUMINANCE con i pulsanti destro e sinistro: OTTUR+AUTO DIAFRAMMA;
AUTO DIAFRAMMA. Impostare LOW LUMINANCE: AGC; OFF.
ON/OFF
(ATR)
ON/OFF
BILAN. DEL BIANCO:
1. Spostare il cursore su WHITE BAL con i pulsante su e giù e quindi impostare
WHITE BAL con i pulsanti destro e sinistro: ATW ; PUSH LOCK; MANUAL
; ANTICR; USER1; USER2. Impostare ora l'ATW:
INTERNA
CA110V~CA220V
<100mA
Montatura CS
2. Impostare MANUAL con il pulsante Invio:
-10°C~50°C
-20°C~50°C
136(L) * 56(H) * 70(W)
450 g
3. Impostare USER 1 e USER 2 con il pulsante invio:
*I dati tecnici possono cambiare senza previo avviso.
ISTRUZIONI D'USO MENU
BACKLIGHT (controluce):
1. Spostare il cursore su BACK LIGHT con i pulsante su e giù e quindi impostare
BACK LIGHT con i pulsanti destro e sinistro: OFF; BLC; HLC.
Premere il pulsante MENU per visualizzare IMPOSTAZIONE
REGOLAZ. IMMAGINE:
1. Spostare il cursore su PICT ADJUST con i pulsante su e giù e quindi impostare
PICT ADJUST con il pulsante Invio:
ATR:
1. Spostare il cursore su ATR con i pulsante su e giù e quindi impostare ATR con
i pulsanti destro e sinistro: OFF; ON :
2. Impostare LUMINANCE e CONTRAST con i pulsanti destro e sinistro: BASSO;
MEDIO; ELEVATO.
Via Pontarola, 14/a - 35011 Campodarsego PD
tel. +39 049 920 2511 - fax +39 049 920 2603
www.elvox.com
S6I.46.633.220 RL. 00 13 03
ELVOX - Campodarsego - Italia
Istruzioni per il funzionamento
Operating Instruction
Telecamera box 700TVL passo CS, alimentazione a 230Vac
46633.220
RILEVAMENTO MOVIMENTO:
1. Spostare il cursore su MOTION DEL con i pulsante su e giù e quindi
impostare MOTION DEL con i pulsanti destro e sinistro: OFF; ON .
2.Spostare il cursore su BLOCK DIST con i pulsante su e giù e quindi
impostare BLOCK DIST con i pulsanti destro e sinistro: OFF; ON; ABILITA.
3. Spostare il cursore su MONITOR AREA con i pulsanti destro e sinistro: OFF;
ON.
PRIVACY:
1. Spostare il cursore su PRIVACY con i pulsante su e giù e quindi impostare
PRIVACY con i pulsanti destro e sinistro: OFF; ON .
DAY/NIGHT:
1. Spostare il cursore su DAY/NIGHT con i pulsante su e giù e quindi impostare
DAY/NIGHT con i pulsanti destro e sinistro: A COLORI; B/N EXTIl; EXTI2;
AUTOMATICO .
2. Impostare b/n con i pulsanti destro e sinistro:
NR:
1. Spostare il cursore su NR con i pulsanti su e giù e quindi impostare NR
MODE con i pulsanti destro e sinistro: Y/C; C; Y
IDENTIFICATIVO TELECAMERA:
1. Spostare il cursore su NR con i pulsanti su e giù e quindi impostare NR con
i pulsanti destro e sinistro: OFF; ON
LINGUA:
1. Spostare il cursore su LANGUAGE con i pulsanti su e giù e quindi impostare
PRIVACY con i pulsanti destro e sinistro: CHINESE; ENGLISH; JAPANESE;
DEUTSCHE; FRANCAIS; RUSSIAN; PORTUGUESE; SPANISH.
Ripristino telecamera
Questo riporta tutte le funzioni della telecamera alle impostazioni di fabbrica.
EXIT:
1. Spostare il cursore su EXIT con i pulsanti su e giù e quindi impostare EXIT
con i pulsanti destro e sinistro.
Via Pontarola, 14/a - 35011 Campodarsego PD
tel. +39 049 920 2511 - fax +39 049 920 2603
www.elvox.com
S6I.46.633.220 RL. 00 13 03
ELVOX - Campodarsego - Italia
Istruzioni per il funzionamento
Operating Instruction
700TVL CS mount box camera, 230Vac
46633.220
High Resolution Box Camers
Use a piece of lens tissue or cotton tipped applicator and ethanol.
7. Do not attempt to aim the camera at the sun
Do not attempt to aim the camera at the sun or other extremely bright objects
that causes mear to appear irrespective of whether the camera is operating
or not. This can damage the CCD (Charge Coupled Device).
8. Do not put the camera in a place with interference.
When this camera is installed near the equipment like wireless communication
device which emits strong electromagnetic field, some irregularity such as
noise on monitor screen may happen.
FEATURES
DESCRIPTION
The camera adopts SONY newest generation image processing technologyEnhanced Effio-E. It has high horizontal resolution up to 700TVL as well as
advanced DNR, D-WDR, HS-BLC and other functions. Powerful OSD menu
(optional) includes Brightness, Contrast, Saturation adjusting functions; Multiarea, White Balance, AGC, and other functions ensure clear bright pictures.
Besides, Mirror, Privacy and other aided functions make it suitable for
various special environments and realize simple and convenient round-clock
surveillance.
Enhanced Effio-E Advanced Image processing Tecnology; 700TVL High Resolution
420 TV Line
700 TV Line
High resolution
700TVL horizontal resolution with 1/3" sony 960H CCD.
D-WDR
Advanced D-WDR technology greatly improves its image quality under
variable lighting conditions.
OSD Menu
Powerful OSD menu allows for various function settings.
HS BLC
It can distinguish strong strong light spots, and cover them to improve the
definition of the entire image and thus ensures clearer and more effective
surveillance.
2D-DNR
Use special algorithm, reduce video and color noises, which increases its
resolution and cleanliness and creates clearer and sharper images.
Auto D/N Swithover Operating Mode
COLOR mode in daytime when there is enough light and B/W mode at night
when the illumination is low.
Privacy Mask
Up to 4 areas can be masked to protect personal privacy by concealing parts
of the image from view.
PRECAUTIONS
PARTS INSTRUCTION
Thank you for your purchasing this product. Before attempting to connect or
operate this product, please read these instructions carefully and save this
manual for future use.
Function Instruction
DC Drive Lens
1 Control 2 Control +
3 Drive +
4 Drive -
CAUTION
RISK OF ELECTRIC
SHOCK DO NOT OPEN
CAUTION: TO REDUCE THE RISK OF ELECTRIC SHOCK,
DO NOT REMOVE COVER (OR BACK).
NO USER-SERVICEABLE PARTS INSIDE.
REFER SERVICING TO QUALIFIED SERVICE
PERSONNEL
1. Use the Appropriate Power Supply
The input power for the camera is 230Vac. Be sure to connect it to the
appropriate power. Wrong connection may cause malfunction and/or
damage to the video camera.
2. Do not attempt to disassemble the camera.
To prevent electric shock, do not remove screws or covers. There are no
user serviceable parts inside. Ask a qualified service person for servicing.
3. Handle the camera with care.
Do not abuse the camera. Avoid striking, shaking, etc. The camera could be
damaged by improper handling or storage.
4. Do not expose the camera to rain or moisture, or try to operate it in wet
areas.
Do not place the camera in the following locations:
1 Locations where temperature is lower than -10°C or higher than 50°C;
2 Locations where humidity is higher than 95%;
3 Locations where there are large amounts of water vapor and steam.
5. Do note use strong or abrasive detergents when cleaning the camera body.
Use a dry cloth to clean the camera when dirty. In case the dirt is hard to
remove. Use a mild detergent and wipe gently.
6. Clean the CCD faceplate with care.
When cleaning the CCD panel, do not use strong or abrasive detergents.
Via Pontarola, 14/a - 35011 Campodarsego PD
tel. +39 049 920 2511 - fax +39 049 920 2603
www.elvox.com
1. CS Lens Adapter Ring
4. Menu Button 2. Back Focus Fixed Screw
5. Bracket Screw Hole 7. Power LED 8. Power Input
3. Auto Iris Lens Interface
6. Video Output
Up Button
Left Button
Auto Iris Interface Definition
Right Button
Down Button
Menu Button
OSD Function Setting:
ENTER: Menu Button, Choose Menu Item or Exit Men
This button is used to move the cursor upward or downward.
This left or right button is used to move the cursor horizontally or change
parameter.
Its back with symbol
means there are still subordinate submenu
setups. Press menu to enter setting.
S6I.46.633.220 RL. 00 13 03
ELVOX - Campodarsego - Italia
Istruzioni per il funzionamento
Operating Instruction
DIMENSION(MM)
LENS:
1. Move the cursor to LENS by up and down buttons and set EXPOSURE by
left and right buttons: MANUAL; AUTO .
2. Then set the AUTO mode by left and right buttons: AUTO; CLOSE; OPEN.
SPECIFICATION
Model No
46633.220
Sensor
1/3” 960H High Sensitivity CCD
Sensor
Video Format
PAL/NTSC
Resolution
700TVL
Mini Illumination
0.01Lux
S/N Ratio
50dB (AGC OFF)
AGC
AUTO; MANUAL
BLC
ON; OFF; HLC
Iris Control
Electronic Iris/It uses lenses Iris DC Drive
Shutter Speed
Menu Oper (optional)
White Bal
SHUTTER/AGC:
1.Move the cursor to SHUTTER/AGC by up and down buttons and set
SHUTTER/AGC by left and right buttons: AUTO ; MANUAL .
2.Set the AUTO MODE by enter buttons, and set HIGH LUMINANCE
by left and right buttons: SHUT+AUTO IRIS; AUTO IRIS. Set the LOW
LUMINANCE: AGC; OFF.
3. Set the MANUAL MODE by enter buttons:
1/60(1/50)-1/100000 Second
Mode
MANUAL;ATW; USER
Range
(ATW) 2200~10000°K
Mirror
ON/OFF
Day/Night
AUTO; COLOR; B&W
Privacy
Adjustment
Title
ON/OFF(1-4 AREAS)
HIGH LUMINANCE; LOW LUMINANCE
ON/OFF (15 Characters Max)
2D-DNR
D-WDR
WHITE BALAN:
1. Move the cursor to WHITE BAL by up and down buttons and set WHITE
BAL by left and right buttons: ATW ; PUSH LOCK; MANUAL ; ANTICR;
USER1; USER2. Then set the ATW:
ON/OFF
(ATR)
ON/OFF
Syncronization
INTERNAL
Power
Voltage
AC110V~AC220V
Current
<100mA
Lens Mount
2. Set the MANUAL by enter buttons:
CS Mount
Operating Temp
-10°C~50°C
Storage Temp
3. Set the USER1 and USER2 by enter buttons:
-20°C~50°C
Dimension
136(L) * 56(H) * 70(W)
Weight
450g
*Specifications subject to change without notice.
BACKLIGHT:
1. Move the cursor to BACK LIGHT by up and down buttons and set BACK
LIGHT by left and right buttons: OFF; BLC; HLC.
MENU OPERATION INSTRUCTION
Press MENU button to display SETUP
PICT ADJUST:
1. Move the cursor to PICT ADJUST by up and down buttons and set PICT
ADJUST by enter buttons:
ATR:
1. Move the cursor to ATR by up and down buttons and set ATR by left and right
buttons: OFF; ON :
2. Set the LUMINANCE and CONTRAST by left and right buttons: LOW; MID;
HIGH.
Via Pontarola, 14/a - 35011 Campodarsego PD
tel. +39 049 920 2511 - fax +39 049 920 2603
www.elvox.com
S6I.46.633.220 RL. 00 13 03
ELVOX - Campodarsego - Italia
Istruzioni per il funzionamento
Operating Instruction
700TVL CS mount box camera, 230Vac
46633.220
MOTION DETECTION:
1. Move the cursor to MOTION DEL by up and down buttons and set MOTION
DET by left and right buttons: OFF; ON .
2. Move the cursor to BLOCK DIST by up and down buttons and set BLOCK
DISP by left and right buttons: OFF; ON; ENABLE.
3. Move the cursor to MONITOR AREA by left and right buttons: OFF; ON.
PRIVACY:
1. Move the cursor to PRIVACY by up and down buttons and set PRIVACY by
left and right buttons: OFF; ON .
DAY/NIGHT:
1. Move the cursor to DAY/NIGHT by up and down buttons and set DAY/NIGHT
by left and right buttons: COLOR; B/W EXTIl; EXTI2; AUTO .
2. Set B/W by left and right buttons:
NR:
1. Move the cursor to NR by up and down buttons and set NR MODE by left and
right buttons: Y/C; C; Y
CAMERA ID:
1. Move the cursor to NRby up and down buttons and setNRby left and right
buttons: OFF; ON
LANGUAGE:
1. Move the cursor to LANGUAGE by up and down buttons and set LANGUAGE
by left and right buttons: CHINESE; ENGLISH; JAPANESE; DEUTSCHE;
FRANCAIS; RUSSIAN; PORTUGUESE; SPANISH.
Camera reset
The camera each function returned to the factory Settings.
EXIT:
1. Move the cursor to EXIT by up and down buttons and set EXIT by left and
right buttons.
Via Pontarola, 14/a - 35011 Campodarsego PD
tel. +39 049 920 2511 - fax +39 049 920 2603
www.elvox.com
S6I.46.633.220 RL. 00 13 03
ELVOX - Campodarsego - Italia