1
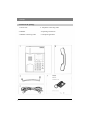
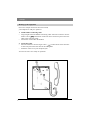
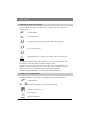
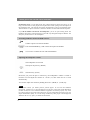
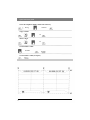
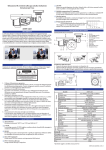
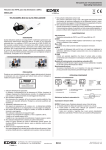
HA 8000 (22) P/T SD Illustration
Controls
1
2
3
4
5
6
7
8
9
10
11
12
13
Name keys
labeling card
Program key (SET)
R key
Last number redial key (REDIAL)
Micophone off key (MUTE)
Volume key (HIGH)
Volume key (LOW)
Handfree and all person listen key
Keypad
Handfree Micophone
In-Use LED indicator
Handfree LED indicator
Catalogue
Startup
Important Information …………………………………………………
Contents of the package ……………………………………………….
Hooking up the equipment …………………………………………….
Note on installing your equipment …………………………………….
2
3
4
5
Basic settings
Checking the signaling method set …………………………………….
Setting the signaling method …………………………………………..
Adjusting the ringer volume …………………………………………..
Setting the handset volume ……………………………………………
Adjusting the ringer tone sequence ……………………………………
Setting the tone ringing melody ……………………………………….
6
6
7
7
8
8
Dialing with the euroset 812
Dialing with the keypad ……………………………………………….
On-hook dialing ……………………………………………………….
Last number redial …………………………………………………….
Saved number redial (notepad) ………………………………………..
Retrieving a saved number (notepad) …………………………………
Dialing with the name keys ……………………………………………
Muting the microphone ………………………………………………..
Storing name keys ……………………………………………………..
Storing number in the name key while making phone calls……………
9
9
10
10
11
11
11
12
12
Making phone calls with and without the handset
Activating handsfree mode …………………………………………….
Adjusting the loudspeaker volume …………………………………….
Deactivating handsfree mode ………………………………………….
Allowing others to listen in on a call …………………………………..
13
13
14
14
Catalogue
Remote control, data transfer
Temporary swithover of the signaling method………………
15
Important information for users
Taking care of your telephone……………………………….. 16
If your telephone malfunctions………………………………. 16
Technical data………………………………………………... 16
Quick reference guide………………………………………... 17
Labels………………………………………………………… Back cover
Startup
Important information
Signaling method
Before using your telephone, you should check the signaling method and set the
correct method if necessary. HA 8000(22) P/T SD is set to dual-tone multi-frequency
signaling in home.
Signaling method setting
Pulse=Pulse dialing
DTMF=Dual-tone multi-frequency dialing
2
Startup
Contents of the package
3
1. euroset 812
4. Telephone connecting cable
2 .Handset
5.Operating instructions
3. Handset connecting cable
6. Telephone guarantee
Startup
Hooking up the equipment
Once a few simple connections have been made,
your telephone is ready for operation:
1. Coiled handset connecting cable
• Long straight end of the handset connecting cable: Insert the connector into the
smaller socket
on the bottom of the unit until it clicks into place. Place the
cable in the side cable guide.
• Connect the coiled end to the handset.
2. Connecting cable
• Insert the connector into the larger socket
on the bottom of the unit until
it clicks into place.Place the cable in the cable guide.
• Attach the connector to your telephone jack.
Your euroset 812 is now ready for operation.
4
Startup
Notes on installing your equipment:
We recommend placing the equipment on a non-slip surface.
In view of the wide range of varnishes and polishes used for furniture nowadays,
the possibility of the surface being marked as a result of contact with the
equipment cannot be completely ruled out.
Make sure that the equipment is not exposed to direct sunlight or to other sources
of heat.
To ensure good sound quality in handsfree mode, the telephone should be placed
on a smooth surface and the area to the right of the front of the telephone kept
clear.
Adequate lighting is necessary in order to read the display.
5
Basic settings
Checking signaling method set
Lift the handset ;you will hear a dial tone.
Dial any digit
e.g. 5
When you no longer hear a dial tone,
the signaling method is set correctly.
Go on to the next page.
If you still hear the dial tone, this means that you must set the
signaling method (see below)
Replace the handset.
Notes:
If the telephone is operated in a home telephone system (PABX), you may not
hear a dial tone when you lift the handset. In this case, dial the code of an
internal party. If you hear a ringing signal, the signaling method is set
correctly.
Setting the signaling method
If the signaling method is not set correctly, you must reset it:
Lift the handset.
Press the SET key and…
Then the # key,
Followed by 1 for pulse dialing or 2 for DTMF.
Press the SET key to save the value
Replace the handset.
6
Basic settings
Adjusting the ringer volume
The ringing signal is preset to the maximum volume (level 6)
Lift the handset or press the loudspeaker key.
Press the SET key.
Press key 5
The set ringing signal sounds so that you can check it.
Press key 1;the ringer is switched to low volume ( minimum).
The volume is set in the same manner for keys 2 through 5.
Press key 6;the ringer is set to high volume (maximum).
The selected volume is saved when you press the SET key.
When telephone ringing;
You can also hold down the
(HIGH) or
(LOW) key
instead of pressing digits 1-6.The volume increase or decreases
one level every 1/2 sec.Until the minimum or maximum volume
is reached.The value last set is saved.
Setting handset volume:
There are 3 handset volume settings (factory setting: level 1)
Lift the handset
Then start the function
Press the plus or minus key.
Or press 1 through 3,choose the handset volume.
Press the SET key
Replace the handset
7
Basic settings
Adjusting the ringer tone sequence
You can adjust the ringer tone sequence in 4 stages, the tone sequence is
preset to stage 4.
Lift the handset
Press the SET key
Then press key 6, the ringer sounds so that you can check it
E.g. if you press key 3
Press the SET key to confirm your setting. This saves the setting.
Notes:
All settings which are begun with the SET key must also be terminated with
the same key. Only then will the desired settings be stored.
Therefore, if you do not press SET key at the end of an adjustment, any
settings or changes made will not be saved. The original settings remain in
effect. You can abort a procedure simply by replacing the handset.
Instead of lifting the handset, you can also press the SPEAKER key.
Setting the tone ringing melody
10 different melodies can be set for tone ringing (factory setting: melody 0).
Lift the handset
Then start the function, you will hear the ringing
Press one of the key 0…9
Press SET key
Replace the handset
8
Dialing with the euroset 812
Dialing with the keypad
Lift the handset
Dial the desired call number
e.g. 412314
Now make the phone call and hang up at the end of the
conversation
Notes:
•
You can manually dial numbers of any length.
•
During dialing, you can insert 1-second pauses(P) by pressing the
REDIAL key (not in the 1st position) e.g.0 REDIAL 2368.
These pauses are then includes in the redial function.
On-hook dialing
Press the SPEAKER key until the display lights up.
Dial the call number: With the keypad, last number redial, saved
number redial and name keys.
Handsfree mode is now active.
See “Making phone calls with and without the handset”.
Press the SPEAKER key again to end the procedure.
9
Dialing with the euroset 812
Last number redial
Lift the handset
Press the REDIAL key.
The call number last entered is dialed automatically
( up to 32 digits)
Saved number redial
Lift the handset
Dial the desired call number with the keypad
( or by pressing the REDIAL key).
Nobody answers or you hear a busy signal.
Press SET key
Then press REDIAL key
The call number is saved in the notepad.
Notes:
Only a maximum of 32 digits are transferred to the memory.
If there are more than 32 digits, the memory is erased.
10
Dialing with the euroset 812
Saved number redial ( notepad )
Lift the handset
Press the SET key
Then press the REDIAL key
The call number is dialed from the notepad.
Notes:
The call number remains stored until a new call number is stored in the notepad.
Dialing with name keys
Lift the handset
Wang
Press the desired name key ( for one of the 10 destinations)
.
If a phone number has not been stored under the name key, follow the
procedure described in the section on “Storing and checking name
keys”( Page 12)
Muting the microphone during a call
Sometimes you want to temporarily prevent the other party from
listening in on a conversation in the room.
Make the phone call as usual.
Press the MUTE key. The microphone is deactivated. While you can
hear the other party, he cannot hear you. The status is indicated on the
display.
Press the MUTE key again to restore the old status.
11
Dialing with the euroset 812
Storing and checking name keys
Lift the handset
Press SET key
Wang
Press the desired name key for one of the 10 destination.
Enter the call number to be stored up to 32 digits; the old call
number is erased.
Press the SET key again. The new number is stored under the
name key. Write the name on the label.
You have called a party and would like to store this number under a name key.
Conduct a call…
Press the SET key
Wang
Then press the name key for one of the 10 destinations.
Press the REDIAL key.
The number is transferred from the REDIAL key and stored under
the selected name key.
Press the SET key again.
12
Making phone calls with and without the handset
In handsfree mode, you can make phone calls with the handset on-hook. This allows you to
keep your hands free. For this purpose, the telephone has a small opening with a microphone in
the right-hand corner. This opening must remain unobstructed in order to use handsfree mode.
There should be no objects in front of it, and there should be no tablecloth under the telephone.
If you lift the handset and activate the loudspeaker, you are in open listening mode. The
handsfree microphone is deactivated and you can talk only through the telephone handset. The
other party can be heard over the loudspeaker.
Activating handsfree mode-both hands are free
Conduct a phone call with the handset
Press the SPEAKER key, hold it down and replace the handset.
You can now continue the call with both handsfree.
Adjusting the loudspeaker volume
The loudspeaker is activated
Then press the plus key ( HIGH)
Or…
The minus key (LOW)
Each time you press the plus or minus key, the loudspeaker volume is raised or
lowered. You can adjust the volume on 7 levels (1-7).The value last set is saved
automatically.
You can also adjust the volume by holding down the (HIGH) or (LOW) key.
Notes:
For optimum results, you should position yourself approx. 50 cm from the handsfree
microphone. Volume level 7 is the maximum level in the case of calls with normal attenuation
(normal volume).The voice-controlled handsfree equipment can function properly only if the
two calling parties do not speak at the same time. Any line and ambient noise that occurs will
impair the handsfree quality, as will calls being conducted by other people in the background.
When the calls are very quiet, you should use the handset.
13
Making phone calls with and without the handset
Deactivating handsfree mode
You want to switch from handsfree mode to normal phone mode.
Lift the handset.
The loudspeaker and built-in microphone are deactivated automatically.
Allowing others to listen in on a call
Press the SPEAKER key
While conducting a call with the handset.
Other people can now listen to the call via the telephone loudspeaker.
You can then deactivate the loudspeaker by pressing SPEAKER again.
Notes:
Open listening is always active when the loudspeaker is on and the handset is offhook. The built-in microphone is deactivated.
Handsfree mode is always active via the built-in microphone when the loudspeaker
is on and the handset is on-hook.
14
Remote control, data transfer
Temporary swithover of the signaling method
If your telephone is connected to an exchange with pulse dialing (pulse), you
must temporarily swith your phone over to dual-tone multi-frequency
signaling (DTMF), as described below, in order to operate a device such as an
answering machine by remote control or to perform a data transfer.
Conduct a call…
Press the * key
You can now enter the appropriate numbers for the services.
At the end of the call,
the telephone switches back to pulse the dialing.
Notes:
You should not use the “switchover of the signaling method” procedure when
switching over to DTMF signaling temporarily. Since this will switch over the
signaling method permanently (see section on “Basic settings: Setting the
signaling method” on page 6).
Only the digits entered before switchover are dialed during last number redial.
15
Important information for users
Taking care of your telephone
Simply wipe the equipment with a damp or antistatic cloth.
Never use a dry cloth ( due to static charging)
If your telephone malfunctions
Not every malfunction means that your telephone has developed an actual fault, if it
is a simple one, you are likely to save both time and money if you can trace the
cause of it youeself.
•
No dial tone on lifting the handset, no display:
Is the connecting cord properly attached to the telephone and the telephone jack.
•
You cannot dial out
The connection is OK. You must set the correct signaling method.
•
Interference in handsfree mode, brief interruptions occur:
Avoid background noises, e.g. calls made by other people, music, etc.
Lower the loudspeaker volume. Move closer to the microphone.
If there is a great deal of interference: Conduct the call over the handset.
•
The other party cannot hear you
Is the mute key activated? Press the key again. Is the connector on the handset
cable attached properly?
• In conjunction with the PABX systems only:
No connection or wrong connection when dialing from the memory.
Program an exchange code.
Technical data
Pin assignments of the connecting cord socket on the bottom of the telephone set:
16
Quick reference guide
Store the telephone number under the name key.
Wang
Number
ringer volume
1-6
choose ringer
1-4
Saved number redial
Number
Saved number redial ( notepad )
17