1
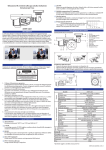
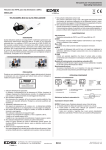
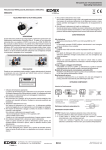
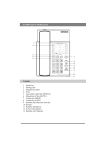
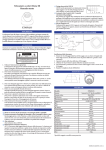
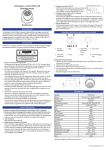
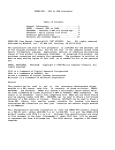
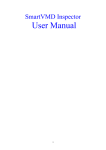
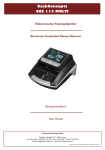
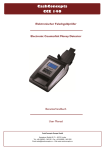
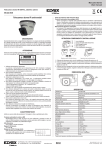
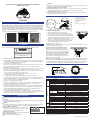
Telecamera antivandalo Dome IR ad alta risoluzione Istruzioni per l'uso 2D-DNR Sfrutta uno speciale algoritmo che riduce i disturbi video e del colore, aumenta la risoluzione e la pulizia e crea immagini più chiare e nitide. Modalità commutazione D/N automatica Modalità COLOR durante il giorno quando è presente luce a sufficienza e modalità B/W di notte quando l'illuminazione è scarsa con l'IR che si attiva automaticamente. Mascheramento per la privacy (optional) È possibile mascherare fino a 4 aree per proteggere la privacy personale nascondendo parti dell'immagine dalla visualizzazione. DESCRIZIONE DELLE PARTI E INSTALLAZIONE 1. 2. 3. 4. 5. 6. 7. XTMV1255 DESCRIZIONE La telecamera sfrutta la tecnologia di elaborazione immagini di nuova generazione Sony Enhanced Effio-E. Dispone di un'alta risoluzione orizzontale fino a 700TVL con DNR, D-WDR, HS-BLC e altre funzioni avanzate. Design elegante e professionale; resistenza all'acqua IP66. Il potente menu OSD include funzioni di regolazione di luminosità, contrasto, saturazione; multiarea, bilanciamento del bianco, AGC e altre funzioni che assicurano immagini nitide e brillanti. In aggiunta, le funzioni Mirror, Privacy e altre funzioni assistite la rendono adatta a vari ambienti specifici e consentono di realizzare una sorveglianza continua semplice e comoda. CONFRONTO Questa telecamera ATTENZIONE Grazie per aver acquistato il prodotto. Prima di collegare o utilizzare il dispositivo, leggere attentamente le istruzioni e conservare il presente manuale per riferimento futuro. ATTENZIONE NON APRIRE. RISCHIO DI SCOSSA ELETTRICA. ATTENZIONE: PER RIDURRE IL RISCHIO DI SCOSSE ELETTRICHE, NON RIMUOVERE IL COPERCHIO (O IL RETRO). IL DISPOSITIVO NON CONTIENE ALCUNA PARTE SULLA QUALE L'UTENTE PUÒ INTERVENIRE. PER L’ASSISTENZA CONTATTARE IL PERSONALE DI SERVIZIO QUALIFICATO. Installazione della telecamera: 1. Fissare l'adesivo di installazione alla parete; 2. Allineare i fori della base con i fori dell'adesivo sulla parete e utilizzare le viti per assicurare la base alla parete; 3. Se si desidera regolare l'obiettivo, è necessario allentare le viti del coperchio di vetro (quattro) ed estrarre la protezione del distanziatore dei LED IR, quindi regolare l'obiettivo. 4. Dopo aver completato la regolazione dell'obiettivo, applicare prima la protezione del distanziatore dei LED IR e successivamente installare la copertura sferica. 5. L'installazione è completata. Attenzione: Il segno della parte anteriore della telecamera sulla staffa di fissaggio deve essere rivolto verso l'area di monitoraggio. Regolazione della direzione della telecamera Quando la telecamera è fissata al soffitto, è possibile regolare la relativa staffa tridimensionale nell'angolo desiderato: X: ±175°, Y: 0-70°, Z: ±175°. Regolare l'obiettivo alla lunghezza focale necessaria e regolare nuovamente il focus per ottenere immagini nitide. Dopo la regolazione, inserire l'anello di gomma di isolamento infrarosso. Questo elemento si trova nel pacchetto accessori e viene fissato tra l'obiettivo e la scheda IR. Attenzione: quando la telecamera viene installata sul soffitto e l'angolo tra l'obiettivo e il soffitto è inferiore a 15°, alcuni dei LED IR saranno coperti dall'alloggiamento della telecamera Dome che produce un riflesso di luce che influenza l'immagine. Se il progetto necessita di questa angolazione, contattare il produttore. Nel frattempo, accertarsi che la fotoresistenza non sia coperta. X Y CARATTERISTICHE Sensibilità IR Alta risoluzione Risoluzione orizzontale 700TVL con CCD Sony 960H da 1/3". D-WDR La tecnologia avanzata D-WDR migliora considerevolmente la qualità delle immagini in condizioni di illuminazione variabili. HS BLC Può distinguere punti a elevata luminosità e coprirli per migliorare la definizione dell'intera immagine assicurando quindi una sorveglianza più chiara ed efficace. Design della sorgente luminosa IR durevole ed efficace Design durevole dei LED IR LED IR ad alte prestazioni la cui luminosità è diverse volte maggiore e la vita utile più lunga rispetto ai LED ordinari, con una portata di IR fino a 20 m. Menu OSD (opzionale) 1 a 2 aa 3 aa 4 aa Vita utile Potente menu OSD che consente varie impostazioni delle funzioni. IP-66 - Resistenza all'acqua Design resistente all'acqua e antipolvere. Altre marche Z DIMENSIONI (MM) SPECIFICHE Modello Sensore 1. Utilizzare l'alimentazione appropriata L'alimentazione di ingresso della telecamera è 12V DC. Accertarsi di collegare il dispositivo all'alimentazione appropriata. L'errato collegamento potrebbe causare il malfunzionamento e/o il danneggiamento della telecamera. 2. Non tentare di smontare la telecamera. Per evitare scosse elettriche, non rimuovere viti o coperchi. All'interno non sono presenti parti sulle quali l'utente può intervenire. Per assistenza, contattare un addetto. 3. Manovrare la telecamera con cura. Non utilizzare la telecamera in modo inappropriato. Evitare urti, scossoni, ecc. La telecamera potrebbe essere danneggiata se gestita o conservata in modo non corretto. 4. Non esporre la telecamera a pioggia o umidità e non provare a utilizzarla in zone bagnate. Non posizionare la telecamera nei seguenti luoghi: Luoghi in cui la temperatura è inferiore a -10°C o superiore a 50°C; Luoghi in cui l'umidità è superiore al 95%; Luoghi in cui è presente una grande quantità di vapore acqueo e vapore. 5. Non usare detergenti aggressivi o abrasivi per la pulizia del corpo della telecamera. Per la pulizia della telecamera usare un panno asciutto. Se lo sporco è difficile da rimuovere, usare un detergente delicato e strofinare delicatamente. 6. Pulire con cura il pannello frontale CCD. Nel pulire il pannello CCD, non usare detergenti aggressivi o abrasivi. Usare un pezzo di tessuto per la pulizia dell'ottica e un applicatore con punta in cotone ed etanolo. 7. Non provare a puntare la telecamera verso il sole Non provare a puntare la telecamera verso il sole o altri oggetti estremamente luminosi a prescindere dal fatto che la telecamera sia accesa o spenta per evitare l'insorgenza di macchie e il danneggiamento del CCD (Dispositivo ad accoppiamento di carica). 8. Non posizionare la telecamera in luoghi con interferenze. Se la telecamera viene installata vicino a un'apparecchiatura come un dispositivo di comunicazione wireless che emette un forte campo elettromagnetico, potrebbero verificarsi alcune irregolarità come il disturbo sullo schermo del monitor. Funz. menu Telecamera IR ordinaria Installazione corrispondente Alimentazione Telecamera ordinaria Posizione dei 4 punti di foratura Adesivo di installazione Vite coperchio vetro (quattro) Componenti copertura sferica Distanziatore LED IR Obiettivo Base Foro di fissaggio vite (quattro) Sensore Formato video Risoluzione Illuminazione minima Rapporto S/N AGC BLC Controllo Iris Velocità otturatore Modalità Bil. bianco Intervallo Mirror Giorno/Notte Privacy Regolazione Nome 2D-DNR D-WDR Sincronizzazione Tensione XTMV1255 CCD 960H da 1/3" ad alta sensibilità PAL/NTSC 700TVL 0Lux(IR ON) ≥50dB (AGC OFF) AUTO; MANUAL ON; OFF; HLC Lente elettronica Iris/Auto Iris 1/60(1/50)-1/100000 secondo MANUAL; ATW; USER (ATW) 2200~10000°K ON/OFF AUTO; COLOR; B&W ON/OFF (1-4 AREE) HIGH LUMINANCE; LOW LUMINANCE ON/OFF (Massimo 15 caratteri) ON/OFF ON/OFF INTERNA 12V DC Assorbimento Obiettivo Portata IR Temperatura di esercizio Temperatura di stoccaggio Dimensioni Peso <300mA 2,8-12 mm 20m -10°C ~ 50°C -20°C ~ 50°C 144 mm*(Φ)*99 mm (A) 930g *Specifiche soggette a modifica senza preavviso XTMV1255 24807840 12-09-13 ISTRUZIONI PER L'USO DEL MENU Premere il tasto MENU per visualizzare SETUP ATR: 1. Muovere il cursore su ATR con i tasti Su e Giù e impostare le relative opzioni con i tasti Sinistra e Destra: OFF; ON . 2. Impostare LUMINANCE e CONTRAST con i tasti Sinistra e Destra. LOW; MID; HIGH. RILEVAMENTO MOVIMENTO: 1. Muovere il cursore su MOTION DET con i tasti Su e Giù e impostare le relative opzioni con i tasti Sinistra e Destra: OFF; ON . LENS: 1. Muovere il cursore su LENS con i tasti Su e Giù e impostare EXPOSURE con i tasti Destra e Sinistra: MANUAL; AUTO . 2. Successivamente, impostare la modalità AUTO con i tasti Sinistra e Destra: AUTO; CLOSE; OPEN. 2. Muovere il cursore su BLOCK DIST con i tasti Su e Giù e impostare le relative opzioni con i tasti Sinistra e Destra: OFF; ON; ENABLE. 3. Muovere il cursore su MONITOR AREA con i tasti Sinistra e Destra: OFF, ON. PRIVACY: 1. Muovere il cursore su PRIVACY con i tasti Su e Giù e impostare le relative opzioni con i tasti Sinistra e Destra: OFF; ON . SHUTTER/AGC: 1. Muovere il cursore su SHUTTER/AGC con i tasti Su e Giù e impostare le relative opzioni con i tasti Sinistra e Destra: AUTO ; MANUAL . 2. Impostare AUTO MODE con il tasto Enter e HIGH LUMINANCE con i tasti Sinistra e Destra: SHUT+AUTO IRIS; AUTO IRIS. Impostare LOW LUMINANCE: AGC; OFF. DAY/NIGHT: 1. Muovere il cursore su DAY/NIGHT con i tasti Su e Giù e impostare le relative opzioni con i tasti Sinistra e Destra: COLOR, B/W , EXTI1; EXTI2; AUTO . 3. Impostare MANUAL MODE con il tasto Enter: 2. Impostare B/W con i tasti Sinistra e Destra. WHITE BALAN: 1. Muovere il cursore su WHITE BAL con i tasti Su e Giù e impostare le relative opzioni con i tasti Sinistra e Destra: ATW ; PUSH LOCK; MANUAL ; ANTICR; USER1; USER2. Successivamente impostare ATW. 2. Impostare MANUAL con il tasto Enter. 3. Impostare USER1 e USER2 con il tasto Enter. BACK LIGHT: 1. Muovere il cursore su BACK LIGHT con i tasti Su e Giù e impostare le relative opzioni con i tasti Sinistra e Destra: OFF; BLC; HLC. PICT ADJUST: 1. Muovere il cursore su PICT ADJUST con i tasti Su e Giù e impostare le relative opzioni con il tasto Enter. NR: 1. Muovere il cursore su NR con i tasti Su e Giù e impostare NR MODE con i tasti Sinistra e Destra: Y/C; C; Y. CAMERA ID: 1. Muovere il cursore su NR con i tasti Su e Giù e impostare le relative opzioni con i tasti Sinistra e Destra: OFF; ON . LANGUAGE: 1. Muovere il cursore su LANGUAGE con i tasti Su e Giù e impostare le relative opzioni con i tasti Sinistra e Destra: CHINESE; ENGLISH; JAPANESE; DEUTSCHE; FRANCAIS; RUSSIAN; PORTUGUESE; SPANISH. Reset della telecamera Ciascuna funzione della telecamera viene reimpostata alle impostazioni di fabbrica. EXIT: 1. Muovere il cursore su EXIT con i tasti Su e Giù e impostare le relative opzioni con i tasti Sinistra e Destra. XTMV1255 24807840 12-09-13 High Resolution Vandalproof IR Dome Camers Operating Instr uction Waterproof, dust prevention design. 2D-DNR Use special algorithm, reduce video and color noises, which increases its resolution and cleanliness and creates clearer and sharper images. Auto D/N Swithover Operating Mode COLOR mode in daytime when there is enough light and B/W mode at night when the illumination is low and IR turned on automatically. Privacy Masking (optional) Up to 4 areas can be masked to protect personal privacy by concealing parts of the image from view. PARTS INSTRUCTION AND INSTALLATION 1. 2. 3. 4. 5. 6. 7. XTMV1255 DESCRIPTION The camera adopts SONY newest generation image processing technology-Enhanced Effio-E. It has high horizontal resolution up to 700TVL as well as advanced DNR, D-WDR, HS-BLC and other functions. Fashionable and professional appearance design; Ip66 waterproof. Powerful OSD menu includes Brightness, Contrast, Saturation adjusting functions; Multi-area, White Balance, AGC , and other functions ensure clear bright pictures. Besides, Mirror, Privacy and other aided functions make it suitable for various special environments and realize simple and convenient round-clock surveillance. COMPARISION This camera ATTENTION Thank you for your purchasing this product. Before attempting to connect or operate this product, please read these instructions carefully and save this manual for future use. CAUTION RISK OF ELECTRIC SHOCK DO NOT OPEN CAUTION: TO REDUCE THE RISK OF ELECTRIC SHOCK, DO NOT REMOVE COVER (OR BACK). NO USER-SERVICEABLE PARTS INSIDE. REFER SERVICING TO QUALIFIED SERVICE PERSONNEL X Y FEATURES IR Sensnsivity High resolution 700TVL horizontal resolution with 1/3” sony 960H CCD. D-WDR Advanced D-WDR technology greatly improves its image quality under variable lighting conditions. HS BLC It can distinguish strong strong light spots, and cover them to improve the definition of the entire image and thus ensures clearer and more effective surveillance. Long-effective IR Light Source Design Long-life IR LEDS Design High-performance IR LED, whose brightness is several times higher and service life longer than an ordinary LED’s with 20m IR range. OSD Menu(optional) 1 yr 2 yr 3yr 4yr Service Life Powerful OSD menu allows for various function settings. IP-66 Waterproof Other brands DIMENSIONS (MM) SPECIFICATIONS Model Sensor 2. Use the Appropriate Power Supply The input power for the camera is DC12V. Be sure to connect it to the appropriate power. Wrong connection may cause malfunction and/or damage to the video camera. 3. Do not attempt to disassemble the camera. To prevent electric shock, do not remove screws or covers. There are no user serviceable parts inside. Ask a qualified service person for servicing. 4. Handle the camera with care. Do not abuse the camera. Avoid striking, shaking, etc. The camera could be damaged by improper handling or storage. 5. Do not expose the camera to rain or moisture, or try to operate it in wet areas. Do not place the camera in the following locations: Locations where temperature is lower than -10°C or higher than 50°C ; Locations where humidity is higher than 95%; Locations where there are large amounts of water vapor and steam. 6. Do note use strong or abrasive detergents when cleaning the camera body. Use a dry cloth to clean the camera when dirty. In case the dirt is hard to remove. Use a mild detergent and wipe gently. 7. Clean the CCD faceplate with care. When cleaning the CCD panel, do not use strong or abrasive detergents. Use a piece of lens tissue or cotton tipped applicator and ethanol. 8. Do not attempt to aim the camera at the sun Do not attempt to aim the camera at the sun or other extremely bright objects that causes mear to appear irrespective of whether the camera is operating or not. This can damage the CCD (Charge Coupled Device). 9. Do not put the camera in a place with interference. When this camera is installed near the equipment like wireless communication device which emits strong electromagnetic field, some irregularity such as noise on monitor screen may happen. Z Notice: when camera is installed to the ceiling and the angle between its lens and the ceiling is smaller than 15, some of the IR LEDs will be shaded by the dome housing, which will produce reflection of light and have an effect on the image. If your project needs this angle, please contact the manufacturer. Meanwhile, make sure the light dependent resistor will not be shaded. Menu Oper Ordinary IR Camera Corresponding installation Camera Installation: 1. Affix the Installation instructions sticker on the wall; 2. Let base holes align the holes (sticker on the wall), and use screws to secure the base on the wall; 3. If you want to adjust the lens, you need loosen the Glass cover screw (four), and strip away the protection of the IR leds spacer’s, then adjust the lens; 4. When you finished the lens adjustment, first affix the protective on the IR leds spacer, then install the Ball cover component. 5. Installation complete. Notice: Camera front-end mark on mounting bracket should face to the monitoring area. Adjust Camera Direction When camera is fixed on the ceiling, you can adjust its three-dimensional bracket to the angle you need: X: ±175°, Y: 0-70°, Z: ±175°. Adjust the lens to the focal length you need and adjust the focus again to get clear pictures. After adjustment, infrared isolation rubber ring this item is in the accessory package is fixed between lens and ir board. Power Ordinary Camera 4 Point Drilling Posizion Installation instructions sticker Glass cover screw (four) Ball cover components IR leds spacer Lens Base Install screws hole (four) Sensor Video format Resolution Minimal illumination S/N Ration AGC BLC Iris Control Shutter Speed Mode White Balance Range Mirror Day/Night Privacy Adjustment Title 2D-DNR D-WDR Sync Mode Power Current XTMV1255 1/3” 960H High Sensitivity CCD PAL/NTSC 700TVL 0Lux(IR ON) ≥50dB (AGC OFF) AUTO; MANUAL ON; OFF; HLC Electronic Iris/Auto Iris Lens 1/60(1/50)-1/100000 Second MANUAL; ATW; USER (ATW) 2200~10000°K ON/OFF AUTO; COLOR; B&W ON/OFF (1-4 AREAS) HIGH LUMINANCE; LOW LUMINANCE ON/OFF (15 Characters Max) ON/OFF ON/OFF INTERNAL DC12V <300mA Lens IR range Operate Temperature Storage Temperature Dimensions Weight 2.8-12mm 20m -10°C ~50°C -20°C ~50°C 144mm*(Φ)*99mm(H) 930g *Specifications subject to change without notice. XTMV1255 24807840 12-09-13 MENU OPERATION INSTRUCTION Press MENU button to display SETUP ATR: 1. Move the cursor to ATR by up and down buttons and setATR by left and right buttons: OFF; ON, : 2. Set the LUMINANCE and CONTRAST by left and right buttons: LOW; MID; HIGH. MOTION DETCTION: 1. Move the cursor to MOTION DEL by up and down buttons and set MOTION DET by left and right buttons: OFF; ON, . LENS: 1. Move the cursor to LENS by up and down buttons and set EXPOSURE by left and right buttons: MAUNAL; AUTO, . 2. Then set the AUTO mode by left and right buttons: AUTO; CLOSE; OPEN. 2. Move the cursor to BLOCK DIST by up and down buttons and set BLOCK DISP by left and right buttons: OFF; ON; ENABLE. 3. Move the cursor to MONITOR AREA by left and right buttons: OFF; ON. PRIVACY: 1. Move the cursor to PRIVACY by up and down buttons and set PRIVACY by left and right buttons: OFF; ON, . SHUTTER/AGC: 1. Move the cursor to SHUTTER/AGC by up and down buttons and set SHUTTER/AGC by left and right buttons: AUTO, ; MANUAL, . 2. Set the AUTO MODE by enter buttons, and set HIGH LUMINANCE by left and right buttons: SHUT+AUTO IRIS; AUTO IRIS. Set the LOW LUMINANCE: AGC; OFF. DAY/NIGHT: 1. Move the cursor to DAY/NIGHT by up and down buttons and set DAY/NIGHT by left and right buttons: COLOR; B/W, ; EXTIl; EXTI2; AUTO, . 3. Set the MANUAL MODE by enter buttons: 2. Set BIW by left and right buttons: WHITE BALAN: 1. Move the cursor to WHITE BAL by up and down buttons and set WHITE BAL by left and right buttons: ATW, ; PUSH LOCK; MANUAL, ; ANTICR; USER1 ; USER2. Then set the ATW: 2. Set the MANUAL by enter buttons: 3. Set the USERl and USER2 by enter buttons: BACK LIGHT: 1. Move the cursor to BACK LIGHT by up and down buttons and set BACK LIGHT by left and right buttons: OFF; BLC; HLC. PICT ADJUST: 1. Move the cursor to PICT ADJUST by up and down buttons and set PICT ADJUST by enter buttons: NR: 1. Move the cursor to NR by up and down buttons and set NR MODE by left and right buttons: Y/C; C; Y CAMERA ID: 1. Move the cursor to NR by up and down buttons and setNR by left and right buttons: OFF; ON, . LANGUAGE: 1. Move the cursor to LANGUAGE by up and down buttons and set LANGUAGE by left and right buttons: CHINESE; ENGLISH; JAPANESE; DEUTSCHE; FRANCAIS; RUSSIAN; PORTUGUESE; SPANISH. Camera reset The camera each function returned to the factory Settings. EXIT: 1. Move the cursor to EXIT by up and down buttons and set EXIT by left and right buttons. XTMV1255 24807840 12-09-13