1
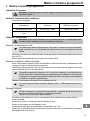
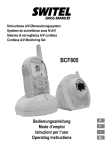
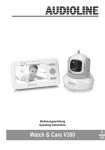
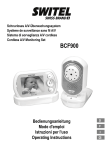
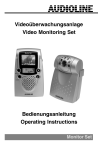
Schnurloses A/V−Überwachungssystem
Système de surveillance sans fil A/V
Sistema di sorveglianza A/V cordless
Cordless A/V Monitoring Set
BCF268
Bedienungsanleitung
Mode d’emploi
Istruzioni per l’uso
Operating Instructions
2
Bedienungsanleitung . . . . . . . . . . . . . . . . . . . 3
Mode d’emploi . . . . . . . . . . . . . . . . . . . . . . . 15
Istruzioni per l’uso . . . . . . . . . . . . . . . . . . . . . 27
Operating Instructions . . . . . . . . . . . . . . . . . . 39
Declaration of Conformity . . . . . . . . . . . . . . . 50
2
1
1
2
3
4
5
6
7
8
9
Sicherheitshinweise . . . . . . . . . . . . . .
Bedienelemente und Anzeigen . . . . . . .
Geräte in Betrieb nehmen . . . . . . . . . .
Wie bediene ich den Sender . . . . . . . . .
Wie bediene ich den Empfänger . . . . . .
Falls es Probleme gibt . . . . . . . . . . . . .
Technische Eigenschaften . . . . . . . . . .
Pflegehinweise / Garantie . . . . . . . . . .
Stichwortverzeichnis . . . . . . . . . . . . . .
Inhaltsverzeichnis
4
5
6
8
9
10
11
12
13
3
Sicherheitshinweise
1 Sicherheitshinweise
Lesen Sie diese Bedienungsanleitung sorgfältig durch.
Bestimmungsgemäße Verwendung
Das Monitor−Set wurde zur Überwachung von Räumen entwickelt. Der Sender übermittelt von seinem
Standort aus Stimmlaute und Bilder an den Empfänger. Jede andere Verwendung gilt als nicht bestimmungsgemäß.
Die Verwendung des Geräts ersetzt die persönliche Beaufsichtigung, z. B. eines Kindes,
nicht. Der Anwender wird nicht aus seiner persönlichen Haftung entlassen.
Eigenmächtige Veränderungen oder Umbauten sind nicht zulässig. Öffnen Sie das Gerät in
keinem Fall selbst und führen Sie keine eigenen Reparaturversuche durch.
Aufstellungsort und Sicherheitsinformationen
Legen Sie den Sender niemals in das Bett oder in den Laufstall eines Babys.
Vergewissern Sie sich, dass sich der Sender und das Netzkabel immer außerhalb der Reichweite von
Babys befinden, d. h. mindestens einen Meter entfernt.
Sorgen Sie während des Betriebs für eine ausreichende Belüftung aller Komponenten. Legen Sie
keine Kissen oder Handtücher auf die Geräte.
Die Geräte sind nicht für den medizinischen Einsatz geeignet. Warn− oder Signaltöne von Atmungs−
oder Herztonüberwachungsgeräten können nicht übertragen werden.
Der Aufstellort hat entscheidenden Einfluss auf den einwandfreien Betrieb. Halten Sie einen Abstand
von mindestens einem Meter zu elektronischen Geräten, wie z. B. Mikrowellen oder HIFI−Geräten ein,
da es sonst zu gegenseitiger Beeinflussung kommen kann.
Vermeiden Sie Belastungen durch Rauch, Staub, Erschütterungen, Chemikalien, Feuchtigkeit, Hitze
oder direkte Sonneneinstrahlung.
Verwenden Sie die Geräte nicht in explosionsgefährdeten Bereichen.
Netzteil
Achtung: Verwenden Sie nur die mitgelieferten Steckernetzteile, da andere Netzteile das
Monitor−Set beschädigen können. Sie dürfen den Zugang zum Steckernetzteil nicht durch
Möbel oder andere Gegenstände versperren.
Achten Sie beim Betrieb mit einem Netzteil auf den einwandfreien Zustand der Kabel und Stecker. Abgeknickte oder durchgescheuerte Kabel sind lebensgefährlich!
Aufladbare Akkus
Achtung: Werfen Sie Akkus nicht ins Feuer. Verwenden Sie nur Akkus des gleichen Typs!
Achten Sie auf die richtige Polung!
Stromausfall
Bei Stromausfall funktionieren die Geräte nur im Batteriebetrieb. Ziehen Sie die Netzadapterstecker
aus den Geräten heraus.
Medizinische Geräte
Achtung: Benutzen Sie die Geräte nicht in der Nähe von medizinischen Geräten. Eine Beeinflussung kann nicht völlig ausgeschlossen werden.
Entsorgung
Wollen Sie Ihr Gerät entsorgen, bringen Sie es zur Sammelstelle Ihres kommunalen
Entsorgungsträgers (z. B. Wertstoffhof). Das nebenstehende Symbol bedeutet, dass Sie das
Gerät auf keinen Fall in den Hausmüll werfen dürfen! Nach dem Elektro− und Elektronikgerätegesetz sind Besitzer von Altgeräten gesetzlich gehalten, alte Elektro− und Elektronikgeräte einer getrennten Abfallerfassung zuzuführen.
Akkus entsorgen Sie beim batterievertreibenden Handel sowie bei zuständigen Sammelstellen, die entsprechende Behälter bereitstellen.
Verpackungsmaterialien entsorgen Sie entsprechend den lokalen
Vorschriften.
4
Bedienelemente und Anzeigen
2 Bedienelemente und Anzeigen
Monitor−Einheit (Empfänger)
5
4
6
3
7(+)
8
2
9
7(−)
1
12
10
11
Kamera−Einheit (Sender)
13
18
14
19
15
21
16
17
1
2
3
4
5
6
7
8
9
10
11
12
13
14
15
16
17
18
19
20
21
22
20
22
Deutsch
TFT−LC−Display
Lautsprecher
Power−LED
Kanalwahl−Taste
Kanal−LED
Scan−LED
Helligkeit (+) (−)
Lautstärkeregler mit Ein−/ Ausschalter
LC−Display Ein/Aus
Stromversorgungsbuchse
Ausgang Audio/Video
Gürtelclip
Objektiv
Kanal−LED
Kanalwahl−Schalter
Wahlschalter CAMERA, AUTO, AV
Eingang Audio/Video
Lichtsensor für autom. Nachtüberwachung
Power Ein/Aus
Stromversorgungsbuchse
Power−LED
Mikrofon
5
Geräte in Betrieb nehmen
3 Geräte in Betrieb nehmen
Sicherheitshinweise
Achtung: Lesen Sie vor der Inbetriebnahme unbedingt die Sicherheitshinweise in Kapitel 1.
Verpackungsinhalt prüfen 2
Zum Lieferumfang gehören:
eine Kamera−Einheit
(Sender)
eine Monitor−Einheit
(Empfänger)
5 wiederaufladbare, spezielle
NiMH Akkus für den Empfänger
zwei Netzteile
ein Audio−/ Videokabel
ein Gürtelclip
eine Bedienungsanleitung
Sender anschließen
Achtung: Stellen Sie den Sender mit einem Mindestabstand von 1 m zu anderen elektronischen Geräten auf, da es sonst zu gegenseitigen Störungen kommen kann.
Betrieb mit Netzteil
Achten Sie auf die Verwendung des richtigen Netzteils. Der Sender darf nur mit dem kleineren
Netzteil betrieben werden, das eine Ausgangsleistung von 300mA hat.
Stecken Sie den Hohlstecker des Netzteils in die Stromversorgungsbuchse des Senders (9V DC)
Stecken Sie das Netzteil in eine Steckdose (230V).
Betrieb mit Batterien oder Akkus
Öffnen Sie das Batteriefach auf der Rückseite des Senders. Lösen Sie dazu die Schraube vollständig
und schieben den Batteriefachdeckel nach unten.
Setzen Sie die Akkus oder Batterien polungsrichtig ein. Folgen Sie dazu den Abbildungen im Batteriefach.
Der Sender kann mit 4 AA" Batterien (nicht im Lieferumfang enthalten) oder mit wiederaufladbaren Akkus des gleichen Typs betrieben werden. Bedenken Sie aber, dass mit dem mitgelieferten Netzadapter keine Aufladung der Akkus vorgenommen werden kann. Sie benötigen
ein zusätzliches Ladegerät.
Schließen Sie das Batteriefach und drehen die Schraube wieder fest.
Bei geringer Akku−/ Batterieleistung leuchtet die Power−LED orange.
Wandbefestigung
Bohren Sie nicht in Strom− oder Wasserleitungen! Stellen Sie sicher, dass am gewünschten
Anbringungsort keine Leitungen verlaufen!
Dübel und Schrauben sind nicht im Lieferumfang enthalten.
Bohren Sie zwei Löcher (Durchmesser 5 mm) im Abstand von 38 mm horizontal nebeneinander.
Stecken Sie in jedes Bohrloch einen Dübel (Durchmesser 5 mm).
Drehen Sie in jeden Dübel eine Schraube (Durchmesser 4 mm).
Der Abstand zwischen Schraubenkopf und Wand sollte ca. 3 mm betragen.
Schieben Sie den Sender mit den Aussparungen über die Schraubenköpfe und ziehen ihn leicht nach
unten.
6
Geräte in Betrieb nehmen
Empfänger anschließen
Achtung: Stellen Sie den Empfänger mit einem Mindestabstand von 1 m zu anderen elektronischen Geräten auf, da es sonst zu gegenseitigen Störungen kommen kann.
Betrieb mit Netzteil
Achten Sie auf die Verwendung des richtigen Netzteils. Der Empfänger darf nur mit dem größeren Netzteil betrieben werden, das eine Ausgangsleistung von 500mA hat.
Stecken Sie den Hohlstecker des Netzteils in die Stromversorgungsbuchse des Empfängers (9V DC).
Stecken Sie das Netzteil in eine Steckdose (230V).
Betrieb mit Batterien oder Akkus
Öffnen Sie das Batteriefach auf der Rückseite des Empfängers. Lösen Sie dazu die Schraube vollständig und schieben den Batteriefachdeckel nach unten.
Setzen Sie die Akkus oder Batterien polungsrichtig ein. Folgen Sie dazu den Abbildungen im Batteriefach.
Der Empfänger kann mit 5 AA" Batterien oder mit wiederaufladbaren Akkus des gleichen
Typs betrieben werden. Bedenken Sie aber, dass direkt im Empfänger keine Aufladung von
handelsüblichen Akkus vorgenommen werden kann. Für das Aufladen von handelsüblichen
Akkus benötigen Sie ein zusätzliches Ladegerät.
Es können nur spezielle Akkus direkt im Empfänger geladen werden. Diese sind im Lieferumfang enthalten. Bei weiteren Fragen wenden Sie sich an Ihren Fachhändler.
Schließen Sie das Batteriefach und drehen die Schraube wieder fest.
Bei geringer Akku−/ Batterieleistung leuchtet die Power−LED orange.
Gürtelclip / Wandhalterung montieren
Schieben Sie den Gürtelclip bis zum hörbaren Einrasten in die Aufnahme an der Rückseite des Empfängers nach unten. Zum Demontieren entriegeln Sie die Arretierung durch Heranziehen und schieben anschließend den Gürtelclip aus der Aufnahme nach oben heraus.
Wandbefestigung
Im Gürtelclip befindet sich eine Bohrung für die Wandmontage.
Bohren Sie nicht in Strom− oder Wasserleitungen! Stellen Sie sicher, dass am gewünschten
Anbringungsort keine Leitungen verlaufen!
Dübel und Schrauben sind nicht im Lieferumfang enthalten.
Bohren Sie ein Loch (Durchmesser 5 mm).
Stecken Sie einen Dübel (Durchmesser 5 mm) in das Bohrloch.
Drehen Sie eine Schraube (Durchmesser 4 mm) in den Dübel.
Der Abstand zwischen Schraubenkopf und Wand sollte ca. 3 mm betragen.
Schieben Sie den Empfänger mit der Aussparung über den Schraubenkopf und ziehen ihn leicht nach
unten.
7
Wie bediene ich den Sender
4 Wie bediene ich den Sender
Überprüfen Sie vor jedem Einsatz die einwandfreie Funktion von Sender und Empfänger.
Sender ein−/ ausschalten
1. Stellen Sie den Power Ein/Aus Schalter in die Position ON". Die Power−LED leuchtet grün. Der
Sender ist jetzt betriebsbereit.
Bei geringer Akku−/ Batterieleistung leuchtet die Power−LED orange.
2. Wählen Sie die Betriebsart CAMERA, AUTO oder AV, um die Geräusche und Bilder aus dem
Überwachungsbereich oder AV INPUT−Signale an den Empfänger zu senden.
3. Stellen Sie den Sender für die Monitorüberwachung an einem günstigen Ort auf und richten Sie
das Objektiv auf den Beobachtungsbereich ein.
4. Zum Ausschalten des Senders stellen Sie den Power Ein/Aus Schalter in die Position OFF".
Übertragungsmodus wählen
Wählen Sie am Wahlschalter die gewünschte Betriebsart aus:
CAMERA − Audio− und Videosignale des Überwachungsbereichs werden dauerhaft an den Empfänger gesendet.
AUTO − Nur wenn ein gewisser Geräuschpegel überschritten wird, werden Audio− und Videosignale
an den Empfänger übertragen.
AV − Der Sender überträgt die Audio− und Videosignale, die über die AV INPUT−Buchse eingespeist
werden. Das können Signale von DVD−Playern, Kameras u. s. w. sein. Stecken Sie den schwarzen
Klinkenstecker des Audio−/ Videokabels in die AV INPUT−Buchse und den gelben, den weißen und
den roten Cinch−Stecker in die farblich entsprechenden Buchsen an Ihrem Ausgabegerät. Weitere Informationen entnehmen Sie bitte der Bedienungsanleitung des jeweiligen Geräts.
Kanal auswählen
Drücken Sie die Kanalwahl−Taste, um den gewünschten Kanal A, B, C, oder D auszuwählen. Die entsprechende LED zeigt den aktuellen Kanal an.
Sender und Empfänger müssen auf denselben Kanal eingestellt sein.
Nachtsicht
Der Sender ist mit 10 Infrarot−Dioden ausgestattet. Dadurch ist die Bildübertragung aus unbeleuchteten Bereichen möglich. Die Nachtsichtfunktion wird automatisch aktiviert, wenn die Lichtverhältnisse
es erfordern.
Bei aktivierter Nachtsichtfunktion ist die Bildschirmdarstellung am Empfänger schwarz−weiß.
8
Wie bediene ich den Empfänger
5 Wie bediene ich den Empfänger
Überprüfen Sie vor jedem Einsatz die einwandfreie Funktion von Sender und Empfänger.
Empfänger ein−/ ausschalten und Lautstärke einstellen
Drehen Sie den Lautstärkeregler in Richtung ON". Die Power−LED leuchtet grün. Der Empfänger ist
jetzt betriebsbereit.
Stellen Sie mit dem Lautstärkeregler die gewünschte Lautstärke ein.
Bei geringer Akku−/ Batterieleistung leuchtet die Power−LED orange.
Kanal auswählen
Drücken Sie die Kanalwahl−Taste, um den gewünschten Kanal A, B, C, oder D auszuwählen. Die entsprechende LED zeigt den aktuellen Kanal an.
Sender und Empfänger müssen auf denselben Kanal eingestellt sein.
Kanäle scannen
Drücken Sie die Kanalwahl−Taste ggf. mehrfach, um SCAN auszuwählen. Die SCAN−LED leuchtet,
eine weitere LED zeigt den zurzeit aktuellen Kanal an. Der aktuelle Kanal wechselt alle 5 Sekunden
auf den nächsten. So können Sie mehrere Sender, die auf unterschiedlichen Kanälen eingestellt sind,
mit einem Empfänger überwachen.
Energiespar−Modus
Wählen Sie am LCD−Schalter die Stellung OFF". Es werden nur noch Audiosignale ausgegeben.
Das ausgeschaltete LCD ist bei Akku−/ Batteriebetrieb empfehlenswert.
Helligkeit regeln
Drücken Sie die Taste Helligkeit (BRIGHTNESS) + oder −, um die Helligkeit des LCDs Ihren Bedürfnissen anzupassen.
Betrieb am Fernsehgerät
Sie können die Bilder und Töne an einen Fernseher oder ein Aufnahmegerät weiterleiten.
Stecken Sie dazu den schwarzen Klinkenstecker des Audio−/ Videokabels in die AV OUTPUT−Buchse
und den gelben, den weißen und den roten Cinch−Stecker in die farblich entsprechenden Buchsen an
Ihrem Eingangsgerät. Weitere Informationen entnehmen Sie bitte der Bedienungsanleitung des jeweiligen Geräts.
9
Falls es Probleme gibt
6 Falls es Probleme gibt
Service−Hotline
Haben Sie Probleme mit Ihrem Überwachungsgerät, kontrollieren Sie zuerst die folgenden Hinweise.
Bei technischen Problemen können Sie sich an unsere Service−Hotline unter Tel. 0900 00 1675 innerhalb der Schweiz (Kosten Swisscom bei Drucklegung: CHF 2.00/min) wenden. Bei Garantieansprüchen wenden Sie sich an Ihren Fachhändler. Die Garantiezeit beträgt 2 Jahre.
Fragen und Antworten
10
Fragen
Antworten
Keine Funktion
− Sender und/oder Empfänger sind nicht eingeschaltet.
− Die Akkus/Batterien sind leer oder defekt.
− Netzadapter sind nicht kontaktiert.
Kein Empfang
− Sender und Empfänger sind nicht auf denselben Kanal eingestellt.
− Der Abstand des Senders, z. B. zum Baby, ist zu groß. Beachten
Sie aber den Mindestabstand von einem Meter.
− Der Abstand zwischen Empfänger und Sender ist zu groß.
− Die Lautstärke am Empfänger ist zu gering eingestellt.
Empfangsstörungen
−
−
−
−
Pfeifton (Rückkopplung)
− Vergrößern Sie die Entfernung zwischen Empfänger und Sender.
− Verringern Sie die Lautstärke am Empfänger.
Rauschen
− Die Akku−/ Batterieleistung ist zu gering.
− Der Sender und der Empfänger sind nicht auf denselben Kanal
eingestellt.
Fremd−Empfang
− Ein Gerät in Ihrer Nähe verwendet denselben Kanal. Weichen Sie
auf einen anderen Kanal aus.
Ton− aber keine Bildübertragung
− Der LCD−Schalter steht auf OFF.
− Die Akku−/ Batterieleistung ist zu gering.
Bild− aber keine Tonübertragung
− Die Lautstärke ist zu gering eingestellt.
Bild wird schwarz−weiß dargestellt
− Die Nachtsichtfunktion ist aktiv.
Die Akkus im Empfänger
werden nicht geladen
− Der Netzadapter ist nicht kontaktiert.
− Es werden handelsübliche Akkus verwendet. Diese können im
Empfänger nicht geladen werden. Es können nur spezielle Akkus
direkt im Empfänger geladen werden.
Der Abstand zwischen Empfänger und Sender ist zu groß.
Die Akku−/ Batterieleistung ist zu gering.
Wählen Sie einen anderen Kanal am Empfänger und Sender.
Andere elektronische Geräte stören das Übertragungsfeld.
Technische Eigenschaften
7 Technische Eigenschaften
Technische Daten
Merkmal
Wert
Kamera (Sender)
Schalter:
Schalter:
Buchse:
Buchse:
Sensor:
LEDs:
LEDs:
IR−Dioden:
Monitor (Empfänger)
2,5" Bildschirmdiagonale
Schalter: LCD ON/OFF
Schalter: Ein/Aus mit Lautstärkeregelung
Buchse:
AV Output
Buchse:
9 V DC
Taster:
Bildschirm hell (+) / dunkel (−)
Taster:
Kanalwahl−Taste
LEDs:
4 Kanäle
LEDs:
Power ON
LEDs:
Scan−LED
Stromversorgung (Empfänger)
Netzteil DC 9 V / 500 mA oder 5 x AA
Stromversorgung (Sender)
Netzteil DC 9 V / 300 mA oder 4 x AA
Reichweite
Bis zu 150 Metern unter optimalen
Bedingungen.
In Gebäuden wird die Reichweite durch Wände,
Türen usw. verringert.
Betriebs−Frequenz
Kanal 1 = 2.4 GHz
Kanal 2 = 2.4 GHz
Kanal 3 = 2.4 GHz
Kanal 4 = 2.4 GHz
Zulässige Umgebungstemperatur
10° C bis 30° C
Zulässige relative Luftfeuchtigkeit
20 % bis 75 %
Sendeleistung
<= 10 dBm(mW)
ON/OFF
AV/AUTO/CAMERA
AV Input
9 V DC
1 Nachtlichtsensor
4 Kanäle
Power ON
10
Konformitätserklärung
Dieses Gerät erfüllt die Anforderungen der EU−Richtlinie:
1999/5/EG Richtlinie über Funkanlagen und Telekommunikationsendeinrichtungen und die
gegenseitige Anerkennung ihrer Konformität. Die Konformität mit der o. a. Richtlinie wird
durch das CE−Zeichen bestätigt.
Die Konformitätserklärung finden Sie auf der Rückseite dieser Bedienungsanleitung.
11
Pflegehinweise / Garantie
8 Pflegehinweise / Garantie
Pflegehinweise
Reinigen Sie die Gehäuseoberflächen mit einem weichen und fusselfreien Tuch.
Verwenden Sie keine Reinigungsmittel oder Lösungsmittel.
Garantie
SWITEL − Geräte werden nach den modernsten Produktionsverfahren hergestellt und geprüft. Ausgesuchte Materialien und hoch entwickelte Technologien sorgen für einwandfreie Funktion und lange Lebensdauer. Die Garantie gilt nicht für die in den Produkten verwendeten Batterien, Akkus oder Akkupacks. Die Garantiezeit beträgt 24 Monate, gerechnet vom Tage des Kaufs.
Innerhalb der Garantiezeit werden alle Mängel, die auf Material− oder Herstellungsfehler zurückzuführen sind, kostenlos beseitigt. Der Garantieanspruch erlischt bei Eingriffen durch den Käufer oder durch
Dritte. Schäden, die durch unsachgemäße Behandlung oder Bedienung, natürliche Abnutzung, durch
falsches Aufstellen oder Aufbewahren, durch unsachgemäßen Anschluss oder Installation sowie
durch höhere Gewalt oder sonstige äußere Einflüsse entstehen, fallen nicht unter die Garantieleistung. Wir behalten uns vor, bei Reklamationen die defekten Teile auszubessern, zu ersetzen oder das
Gerät auszutauschen. Ausgetauschte Teile oder ausgetauschte Geräte gehen in unser Eigentum
über. Schadenersatzansprüche sind ausgeschlossen, soweit sie nicht auf Vorsatz oder grober Fahrlässigkeit des Herstellers beruhen.
Sollte Ihr Gerät dennoch einen Defekt innerhalb der Garantiezeit aufweisen, wenden Sie sich bitte unter Vorlage Ihrer Kaufquittung ausschließlich an das Geschäft, in dem Sie Ihr SWITEL − Gerät gekauft
haben. Alle Gewährleistungsansprüche nach diesen Bestimmungen sind ausschließlich gegenüber
Ihrem Fachhändler geltend zu machen. Nach Ablauf von zwei Jahren nach Kauf und Übergabe unserer Produkte können Gewährleistungsrechte nicht mehr geltend gemacht werden.
12
Stichwortverzeichnis
9 Stichwortverzeichnis
B
Bedienelemente, 5
Bedienung, 8, 9
Betrieb mit Batterien oder Akkus, 7
Betrieb mit Netzteil, 6, 7
E
Empfänger anschließen, 7
Empfänger ein−/ ausschalten, 9
F
Fehlerbehebung, 10
Fragen und Antworten, 10
G
Garantie, 12
Gürtelclip montieren, 7
H
Helligkeit regeln, 9
I
Inbetriebnahme, 6
K
Kanal auswählen, 8, 9
Kanäle scannen, 9
Konformitätserklärung, 11
L
Lautstärke einstellen, 9
N
Nachtsicht, 8
P
Pflegehinweise, 12
Probleme, 10
S
Sender anschließen, 6
Sender ein−/ ausschalten, 8
Service−Hotline, 10
Sicherheitshinweise, 4
T
Technische Daten, 11
U
Übertragungsmodus wählen, 8, 9
V
Verpackungsinhalt, 6
W
Wandbefestigung, 6, 7
13
14
3
1
2
3
4
5
6
7
8
9
Consignes de sécurité . . . . . . . . . . . . .
Éléments de manipulation et affichages .
Mettre les appareils en service . . . . . . .
Comment fonctionne mon émetteur . . .
Comment fonctionne mon récepteur . . .
En cas de problèmes . . . . . . . . . . . . . .
Caractéristiques techniques . . . . . . . . .
Remarques d’entretien / Garantie . . . . .
Index . . . . . . . . . . . . . . . . . . . . . . . . .
Table des matières
16
17
18
20
21
22
23
24
25
15
Consignes de sécurité
1 Consignes de sécurité
Lisez très attentivement ce mode d’emploi.
Utilisation conforme aux prescriptions
Le kit écran a été conçu pour la surveillance de pièces. Depuis sa position, l’émetteur transmet des voix et
des images au récepteur. Toute autre utilisation est considérée comme non conforme à l’usage.
L’utilisation de cet appareil ne remplace pas la surveillance personnelle, p. ex. d’un enfant.
L’utilisateur n’est pas dégagé de son obligation personnelle.
Des modifications ou changements effectués d’un propre gré ne sont pas autorisés. N’ouvrez
en aucun cas l’appareil et n’effectuez aucun essai de réparation vous−même.
Lieu d’installation et informations de sécurité
Ne déposez jamais l’émetteur dans le lit ou dans le parc d’un enfant.
Assurez−vous que cet émetteur et le câble de réseau ne se trouvent jamais à portée de bébé, c. à. d.
que vous devez respecter une distance d’au moins un mètre.
Pendant le fonctionnement de l’appareil, veillez à une aération suffisante de tous les composants. Ne
posez pas de coussins ou de serviettes éponge sur les appareils.
Ils ne conviennent pas pour une utilisation médicale. Des signaux d’avertissement et des signaux sonores d’appareils respiratoires ou de surveillance des bruits du coeur ne peuvent pas être transmis..
Le lieu d’installation a une influence décisive sur un fonctionnement irréprochable. Respectez une distance d’au moins un mètre par rapport à des appareils électroniques tels que microondes ou appareils
HIFI, les appareils pouvant avoir une interaction.
Evitez toute nuisance causée par la fumée, la poussière, les tremblements, les produits chimiques,
l’humidité, la grande chaleur ou l’ensoleillement direct.
N’utilisez pas les appareils dans des pièces exposées aux explosions.
Bloc secteur
Attention : N’utilisez que les blocs d’alimentation d’origine livrés avec les appareils, d’autres
blocs pouvant détruire le kit écran. Vous ne devez pas bloquer l’accès au bloc secteur par des
meubles ou d’autres objets.
Au fonctionnement avec un bloc d’alimentation, veiller à ce que l’état des câbles et des fiches soit irréprochable. Des câbles rompus par une pliure ou abimés présentent un danger de mort !
Piles rechargeables
Attention : Ne jetez jamais les piles rechargeables dans le feu. N’utilisez que des piles rechargeables du même type ! Observez une polarisation correcte !
Panne de courant
En cas de panne de courant, les appareils fonctionnent uniquement avec une alimentation par pile.
Retirez la fiche de l’adaptateur des appareils.
Appareils médicaux
Attention : N’utilisez pas les appareils à proximité d’appareils médicaux. Leur influence sur
ces appareils ne peut pas être entièrement exclue.
Elimination
Si vous ne voulez plus vous servir de votre appareil, veuillez l’apporter au centre de collecte
de l’organisme d’élimination des déchets de votre commune (par ex. centre de recyclage).
L’icône ci−contre signifie que vous ne devez en aucun cas jeter votre appareil dans les ordures ménagères! D’après la loi relative aux appareils électriques et électroniques, les propriétaires d’appareils usagés sont tenus de mettre tous les appareils électriques et électroniques usagés dans un collecteur séparé.
Éliminez les piles auprès d’un revendeur spécialisé ainsi que dans
des centres de collecte qui tiennent à votre disposition les collecteurs
appropriés correspondants.
Éliminez les matériaux d’emballage conformément au règlement local.
16
Éléments de manipulation et affichages
2 Éléments de manipulation et affichages
Unité écran (récepteur)
5
4
6
3
7+
8
2
9
7(−)
1
12
10
11
Unité caméra (émetteur)
13
18
14
19
15
21
16
17
1
2
3
4
5
6
7
8
9
10
11
12
13
14
15
16
17
18
19
20
21
22
20
22
Allemand
Écran TFT−LC
Haut−parleur
DEL Power
Touche sélection de canal
DEL canal
DEL Scan
Luminosité (+) (−)
Régulateur de volume avec interrupteur marche/arrêt
Écran LC activé/désactivé
Prise d’alimentation
Sortie Audio/Vidéo
Clip de ceinture
Objektif
DEL canal
Interrupteur sélection du canal
Interrupteur sélecteur CAMERA, AUTO, AV
Entrée Audio/Vidéo
Détecteur de lumière pour surveillance nocturne autom
Power Marche/Arrêt
Prise d’alimentation
DELPower
Microphone
17
Mettre les appareils en service
3 Mettre les appareils en service
Remarques concernant la sécurité
Attention : Avant de mettre votre appareil en service, lisez impérativement les consignes de
sécurité mentionnées au chapitre 1.
Vérifier le contenu de l’emballage 4
Les éléments suivants font partie de la livraison :
une unité caméra
(émetteur)
une unité écran
(récepteur)
5 piles rechargeables spéciales
NiMH pour le récepteur
deux blocs d’alimentation
un câble Audio/ Vidéo
un clip de ceinture
un mode d’emploi
Raccorder l’émetteur
Attention : Posez l’émetteur à une distance minimum d’un mètre par rapport aux autres appareils électroniques pour éviter d’éventuelles interactions.
Fonctionnement par le bloc d’alimentation
Veillez à utiliser le bloc d’alimentation correct. L’émetteur ne doit être alimenté que par le bloc
le plus petit qui a une puissance de sortie de 300mA.
Introduisez la fiche du bloc d’alimentation dans la prise d’alimentation de l’émetteur (9V CC)
Introduisez le bloc d’alimentation dans une prise de courant (230V).
Alimentation par piles ou piles rechargeables
Ouvrez le compartiment à piles situé sur le côté arrière de l’émetteur. Pour cela, desserrez complètement la vis et poussez le cache du compartiment vers le bas.
Veillez à la polarisation correcte des piles rechargeables ou piles. Suivre les croquis du compartiment
à piles.
L’émetteur peut être alimenté par 4 piles AA" (non contenues dans la livraison) ou par des
piles rechargeables du même type. Tenez compte cependant du fait que vous ne pouvez pas
charger les piles rechargeables avec l’adaptateur réseau fourni avec la livraison. Vous avez
besoin d’un chargeur supplémentaire.
Fermez le compartiment et serrez fortement la vis.
La DEL Power est orange lorsque la puissance des piles rechargeables/piles est faible.
Fixation murale
Ne percez pas dans des conduites de courant ou des conduites d’eau ! Veuillez vous assurer
qu’aucune conduite ne se trouve à l’endroit où vous voulez fixer votre appareil.
Les chevilles et les vis ne font partie du contenu de la livraison.
Percez horizontalement deux trous (diamètre 5 mm) d’une distance de 38 mm.
Introduisez une cheville dans chaque trou (diamètre 5 mm).
Vissez une vis dans chaque cheville (diamètre 4 mm).
La distance entre la tête de la vis et la paroi doit être de 3 mm.
Poussez l’émetteur avec ses encoches au−dessus des têtes de vis et tirez−le légèrement vers le bas.
18
Mettre les appareils en service
Raccorder le récepteur
Attention : Posez le récepteur à une distance minimum d’un mètre par rapport aux autres appareils électroniques pour éviter d’éventuelles interactions.
Fonctionnement par le bloc d’alimentation
Veillez à utiliser le bloc d’alimentation correct. Le récepteur ne doit être alimenté que par le
bloc le plus petit qui a une puissance de sortie de 500mA.
Introduisez la fiche du bloc d’alimentation dans la prise d’alimentation du récepteur (9V CC)
Introduisez le bloc d’alimentation dans une prise de courant (230V).
Alimentation par piles rechargeables ou piles
Ouvrez le compartiment à piles situés sur le côté arrière du récepteur. Pour cela, desserrez complètement la vis et poussez le cache du compartiment vers le bas.
Veillez à la polarisation correcte des piles rechargeables ou piles. Suivre les croquis du compartiment
à piles.
Le récepteur peut être alimenté par 5 piles AA" ou par des piles rechargeables du même type.
Veuillez observer que vous ne pouvez pas charger directement dans le récepteur des piles
rechargeables disponibles en magasin. Vous avez besoin d’un appareil supplémentaire.
Vous ne pouvez charger directement dans le récepteur que des piles rechargeables spéciales. Celles−ci font partie du contenu de la livraison. En cas de questions, adressez−vous à votre revendeur.
Fermez le compartiment et serrez fortement la vis.
La DEL Power est orange lorsque la puissance des piles rechargeables/piles est faible.
Clip de ceinture / Monter la fixation murale
Poussez vers le bas le clip de ceinture dans le logement situé au dos du récepteur jusqu’à ce qu’un
clic soit audible. Pour le démonter, déverrouillez le bouton d’arrêt en le tirant vers vous et retirez ensuite le clip de ceinture du logement.
Fixation murale
Un trou se trouve dans le clip de ceinture pour un montage mural.
Ne percez pas dans des conduites de courant ou des conduites d’eau ! Veuillez vous assurer
qu’aucune conduite ne se trouve à l’endroit où vous voulez fixer votre appareil.
Les chevilles et les vis ne font partie du contenu de la livraison.
Faîtes un trou (diamètre 5 mm).
Introduisez−y une cheville (diamètre 5 mm).
Vissez une vis dans la cheville (diamètre 4 mm).
La distance entre la tête de la vis et la paroi doit être de 3 mm.
Poussez le récepteur avec son encoche au−dessus de la tête de vis et tirez−le légèrement vers le bas.
19
Comment fonctionne mon émetteur
4 Comment fonctionne mon émetteur
Avant chaque utilisation, veuillez vous assurez que l’émetteur et le récepteur fonctionnent de
façon irréprochable.
Brancher/Débrancher l’émetteur
1. Placez l’interrupteur Power Marche/Arrêt à la position ON". La DEL Power devient verte.
L’émetteur est maintenant prêt à fonctionner.
La DEL Power est orange lorsque la puissance des piles rechargeables/piles est faible.
2. Sélectionnez le mode CAMERA, AUTO ou AV pour émettre au récepteur les bruits et les images
de l’espace de surveillance ou les signaux INPUT AV.
3. Placez l’émetteur pour la surveillance de l’écran à un endroit favorable et dirigez l’objectif sur
l’espace de surveillance.
4. Pour débrancher l’émetteur, placez l’interrupteur Power Marche/Arrêt à la positionOFF".
Sélectionner le mode de transmission
Sélectionnez le mode désiré sur le commutateur−sélecteur :
CAMERA − Les signaux Audio et Vidéo de l’espace de surveillance sont transmis de façon continue
au récepteur.
AUTO − Les signaux Audio et Vidéo ne sont transmis au récepteur que lorsqu’un certain niveau sonore est dépassé.
AV − L’émetteur transmet les signaux Audio et Vidéo qui sont alimentés via la prise INPUT AV. Ce
peuvent être des signaux de lecteurs DVD, caméras etc.... Introduisez la fiche à jack noir du câble Audio/Vidéo dans la prise INPUT AV et la fiche jaune, blanche et rouge Cinch dans les prises de couleur
correspondantes de votre appareil de sortie. Vous trouverez de plus amples informations dans le
mode d’emploi de chaque appareil.
Sélectionner le canal
Appuyez sur la touche de sélection du canal pour sélectionner le canal A, B, C, ou D. La DEL correspondante indique le canal sélectionné.
L’émetteur et le récepteur doivent être réglés sur le même canal.
Vue nocturne
L’émetteur est équipé de dix diodes infrarouge. Ainsi la transmission de l’image de zones non éclairées est−elle possible. La fonction vue nocturne est automatiquement activée si la luminosité le requiert.
Si la fonction vue nocturne est activée, la représentation sur l’écran du récepteur est en noir
et blanc.
20
Comment fonctionne mon récepteur
5 Comment fonctionne mon récepteur
Avant chaque utilisation, veuillez vous assurez que l’émetteur et le récepteur fonctionnent de
façon irréprochable.
Brancher/Débrancher le récepteur et régler le volume sonore
Tournez le régulateur de volume en direction ON". La DEL Power devient verte. Le récepteur est
maintenant prêt à fonctionner.
Réglez le volume sonore avec le régulateur.
La DEL Power est orange lorsque la puissance des piles rechargeables/piles est faible.
Sélectionner le canal
Appuyez sur la touche de sélection du canal pour sélectionner le canal A, B, C, ou D. La DEL correspondante indique le canal sélectionné.
L’émetteur et le récepteur doivent être réglés sur le même canal.
Balayer les canaux
Appuyez sur la touche de sélection du canal, plusieurs fois le cas échéant, pour sélectionner SCAN.
La DEL SCAN s’allume, une autre DEL indique le canal actuel. Le canal actuel passe toutes les 5 secondes au prochain. Ainsi vous pouvez surveiller avec un récepteur plusieurs émetteurs réglés sur
des canaux différents.
Mode économie d’énergie
Sélectionnez sur l’ interrupteur LCD la positionOFF". Seuls des signaux audio sont émis. Le LCD
débranché est recommandable avec une alimentation par piles rechargeables/piles.
Régler la luminosité
Appuyez sur la touche Luminosité (BRIGHTNESS) + ou − pour adapter la luminosité aux besoins du
LCD.
Fonctionnement sur le téléviseur
Vous pouvez transférer les images et sons à une télévision ou à un magnétoscope.
Introduisez la fiche à jack noir du câble Audio/Vidéo dans la prise INPUT AV et la fiche jaune, blanche
et rouge Cinch dans les prises de couleur correspondantes de votre appareil d’entrée. Vous trouverez
de plus amples informations dans le mode d’emploi de chaque appareil.
21
En cas de problèmes
6 En cas de problèmes
Hotline de service
Si vous avez des problèmes avec votre appareil de surveillance, contrôlez d’abord les remarques suivantes. En cas de problèmes techniques, vous pouvez vous adresser à notre hotline de service en
Suisse au numéro de téléphone 0900 00 1675 (frais Swisscom à la date d’impression de ce manuel :
CHF 2.00/min). Si vous avez des droits de garantie, adressez−vous à votre revendeur. La durée de la
garantie est de 2 ans.
Questions et réponses
Questions
Réponses
Pas de fonction
− Émetteur et/ou récepteur non branché.
− Les piles/piles rechargeables sont vides ou défectueuses.
− Les blocs d’alimentation ne sont pas contactés.
Pas de réception
− L’émetteur et le récepteur ne sont pas réglés sur le même canal.
− La distance de l’émetteur, par rapport au bébé p. ex., est trop
grande. Respectez au moins une distance minimum d’un mètre.
− La distance entre le récepteur et l’émetteur est trop grande.
− Le volume du récepteur est réglé trop faible.
Perturbations dans la récep- − La distance entre le récepteur et l’émetteur est trop grande.
tion
− La puissance des piles rechargeables/piles est trop faible.
− Sélectionnez un autre canal sur le récepteur et l’émetteur.
− D’autres appareils électroniques perturbent le champ de transmission.
22
Sifflement (rétroaction)
− Augmentez la distance entre le récepter et l’émetteur.
− Diminuez le volume de l’émetteur.
Grésillements
− La puissance des piles rechargeables/piles est trop faible.
− L’émetteur et le récepteur ne sont pas réglés sur le même canal.
Réception étrangère
− Un appareil dans votre entourage utilise le même canal. Choisissez un autre canal.
Transmission du son mais
pas de l’image
− L’interrupteur LCD se trouve sur OFF.
− La puissance des piles rechargeables/piles est trop faible.
Transmission de l’image
mais pas du son
− Le volume est réglé trop faible.
L’image est reproduite en
noir et blanc
− La fonction vue nocturne est active.
Les piles rechargeables
dans le récepteur ne sont
pas chargées
− L’adaptateur réseau n’est pas contacté.
− Vous utilisez des piles rechargeables disponibles en magasin.
Elles ne peuvent pas être chargées dans le récepteur. Vous ne
pouvez charger directement dans le récepteur que des piles rechargeables spéciales.
Caractéristiques techniques
7 Caractéristiques techniques
Données techniques
Caractéristique
Valeur
Caméra (émetteur)
Interrupteur :
Interrupteur :
Prise :
Prise :
Détecteur :
DELs :
DELs :
Diodes IR :
Écran (récepteur)
2,5" diagonale écran
Interrupteur :
LCD ON/OFF
Interrupteur :
Marche/Arrêt avec réglage du
volume
Prise :
AV Output
Prise :
9 V CC
Bouton−poussoir : Ecran clair (+) / foncé (−)
Bouton−poussoir : Touche de sélection du canal
DELs :
4 canaux
DELs :
Power ON
LEDs:
LED Scan
Alimentation en courant (récepteur)
Bloc d’alimentation CC 9 V / 500 mA ou 5 x AA
Alimentation en courant (émetteur)
Bloc d’alimentation CC 9 V / 300 mA ou 4 x AA
Hors portée
Jusqu’à 150 mètres dans des conditions optimales.
Dans des bâtiments, la portée est diminuée par
les parois, les portes, etc....
Fréquence de service
Canal 1 = 2.4 GHz
Canal 2 = 2.4 GHz
Canal 3 = 2.4 GHz
Canal 4 = 2.4 GHz
Température ambiante autorisée
10°C à 30°C
Humidité atmosphérique relative autorisée
20% à 75%
Puissance d’émission
<= 10 dBm(mW)
ON/OFF
AV/AUTO/CAMERA
AV Input
9 V CC
1 détecteur de lumière nocturne
4 canaux
Power ON
10
Déclaration de conformité
Cet appareil répond aux exigences des directives de l’union européenne (UE) :
1999/5/CE Directive sur les installations de radio et de télécommunication et la reconnaissance réciproque de leur conformité. La conformité avec la directive mentionnée ci−dessus
est confirmée par la marque CE.
Vous trouverez la déclaration de conformité au verso de ce mode d’emploi.
23
Remarques d’entretien / Garantie
8 Remarques d’entretien / Garantie
Remarques d’entretien
Nettoyez les surfaces du boîtier avec un chiffon doux et non pelucheux.
N’utilisez pas de produits d’entretien ou de solvants.
Garantie
Les appareils SWITEL sont fabriqués et contrôlés selon les procédés les plus modernes. Des matériels sélectionnés et des technologies de pointe ont pour effet un fonctionnement irréprochable et une
longue durée de vie. La garantie n’est pas valable pour les piles, piles rechargeables ou packs de piles utilisés dans le produits. La durée de la garantie est de 24 mois, à partir de la date d’achat.
Pendant la durée de la garantie, tous les défauts dus à des vices de matériel ou de fabrication seront
éliminés gratuitement. Le droit à la garantie expire en cas d’intervention de l’acheteur ou de tiers. Les
dommages provenant d’un maniement ou d’une manipulation incorrects, d’une usure naturelle, d’une
mauvaise mise en place ou d’une mauvaise conservation, d’un raccordement ou d’une installation incorrects ainsi que d’un cas de force majeure ou autres influences extérieures sont exclus de la garantie. Nous nous reservons le droit, en cas de réclamations, de réparer ou de remplacer les composants
défectueux ou d’échanger l’appareil. Les composants remplacés ou les appareils échangés deviennent notre propriété. Les demandes de dommages et intérêts sont exclues tant qu’elles ne reposent
pas sur l’intention ou une négligence grossière du fabricant.
Si votre appareil devait malgré tout présenter une défectuosité pendant la période de garantie, veuillez vous adressez, muni de la quittance d’achat, exclusivement au magasin où vous avez acheté votre
appareil SWITEL. Vous ne pouvez faire valoir vos droits à la garantie selon ces dispositions qu’exclusivement auprès de votre revendeur . Deux ans après l’achat et la remise de nos produits, il n’est plus
possible de faire valoir les droits à la garantie.
24
Index
9 Index
A
Alimentation par le bloc d’alimentation, 18, 19
Alimentation par piles rechargeables ou piles, 19
B
Balayer les canaux, 21
Brancher/Débrancher l’émetteur, 20
Brancher/Débrancher le récepteur, 21
C
Consignes de sécurité, 16
Contenu de l’emballage, 18
D
Déclaration de conformité, 23
Données techniques, 23
E
Éléments de manipulation, 17
F
Fixation murale, 18, 19
G
Garantie, 24
H
Hotline de service, 22
M
Manipulation, 20, 21
Mise en service, 18
Monter le clip de ceinture, 19
P
Problèmes, 22
Q
Questions et réponses, 22
R
Raccorder l’émetteur, 18
Raccorder le récepteur, 19
Régler la luminosité, 21
Régler le volume sonore, 21
Remarques d’entretien, 24
S
Sélectionner le canal, 20, 21
Sélectionner le mode de transmission, 20, 21
Suppression d’erreurs, 22
V
Vue nocturne, 20
25
26
5
Contenuto
1
2
3
4
5
6
7
8
9
Indicazioni di sicurezza . . . . . . . . . . . .
Elementi di comando e visualizzazioni .
Mettere in funzione gli apparecchi . . . . .
Come funziona il trasmettitore . . . . . . .
Come funziona il ricevitore . . . . . . . . . .
In presenza di problemi . . . . . . . . . . . .
Specifiche tecniche . . . . . . . . . . . . . . .
Consigli per la cura / Garanzia . . . . . . .
Indice alfabetico . . . . . . . . . . . . . . . . .
28
30
31
33
34
35
36
37
38
27
Indicazioni di sicurezza
1 Indicazioni di sicurezza
Leggere attentamente le presenti istruzioni per l’uso.
Utilizzo conforme alle disposizioni
Il dispositivo di monitoraggio è stato progettato per la sorveglianza di ambienti chiusi. Il trasmettitore è
in grado di inviare dal proprio punto di ubicazione segnali audio e video al ricevitore. Qualsiasi altro
impiego è considerato come non conforme agli usi previsti.
L’impiego di questo apparecchio non sostituisce la sorveglianza personale, ad es. di un bambino. L’utente non è in nessun modo liberato dalla propria responsabilità personale.
Non sono consentite modifiche o trasformazioni non autorizzate. Non aprire per nessuna ragione l’apparecchio autonomamente, né compiere riparazioni di propria iniziativa.
Luogo di installazione e informazioni di sicurezza
Non depositare mai il trasmettitore nel letto o nel box di un neonato.
Assicurarsi che il trasmettitore ed il cavo di allacciamento alla rete siano sempre fuori dalla portata dei
bambini, osservando in particolare una distanza minima di un metro.
Garantire durante il funzionamento una sufficiente ventilazione di tutti i componenti. Non appoggiare
cuscini o asciugamani sugli apparecchi.
Gli apparecchi non si prestano a scopi medici. Non è infatti possibile trasmettere segnali di allarme o
segnali acustici emessi da apparecchi per la respirazione o di monitoraggio cardiotocografico della
frequenza cardiaca.
Il luogo di installazione influenza decisamente il perfetto funzionamento dei dispositivi. Osservare pertanto una distanza minima di un metro da altri apparecchi elettronici come per es. forni a microonde o
impianti HIFI, condizione che può altrimenti causare un’interferenza reciproca.
Evitare l’esposizione a fumo, polvere, vibrazioni, sostanze chimiche, umidità, eccessivo calore o irradiazioni solari dirette.
Evitare l’uso di apparecchi in aree esposte al rischio di deflagrazione.
Alimentatore di rete
Attenzione: Utilizzare esclusivamente gli alimentatori a spina forniti in dotazione visto che
altri alimentatori di rete potrebbero addirittura danneggiare il set. Non ostacolare il libero accesso all’alimentatore a spina con mobili o altri oggetti simili.
Assicurarsi delle perfette condizioni di funzionamento di cavo e connettore operando con un alimentatore di rete. Cavi deviati o usurati costituiscono un pericolo di vita !
Batterie ricaricabili
Attenzione: Non gettare le batterie ricaricabili nel fuoco. Utilizzare solo batterie ricaricabili
dello stesso tipo! Osservare la corretta polarità!
Caduta di tensione
In caso di caduta di tensione gli apparecchi funzionano solo a batteria. Estrarre i connettori degli adattatori di corrente dagli apparecchi.
Apparecchiature mediche
Attenzione: Evitare di utilizzare i dispositivi nelle vicinanze di apparecchiature mediche. Non
è infatti possibile escludere il rischio di possibili interferenze.
Smaltimento
Procedere allo smaltimento dell’apparecchio esaurito consegnandolo presso uno dei punti di raccolta istituiti dalla propria società di smaltimento rifiuti comunale (per es. centro di riciclo materiali).
Il simbolo riportato qui a lato indica che non è assolutamente consentito smaltire l’apparecchio assieme ai normali rifiuti domestici! Secondo quanto previsto dalla legge sugli apparecchi elettrici ed
elettronici, i proprietari di apparecchi esauriti sono per legge tenuti alla consegna di tutti gli apparecchi elettrici ed elettronici presso un centro di rilievo rifiuti in raccolta differenziata.
Consegnare le batterie ricaricabili per lo smaltimento presso rivenditori al dettaglio di batterie o centri di raccolta che mettono a disposi28
Indicazioni di sicurezza
zione appositi contenitori.
Smaltire confezioni ed imballaggi in base a quanto indicato dalle
norme in vigore a livello locale.
29
Elementi di comando e visualizzazioni
2 Elementi di comando e visualizzazioni
Unità schermo (ricevitore)
5
4
6
3
7(+)
8
2
9
7(−)
1
12
10
11
Unità videocamera (trasmettitore)
13
18
14
19
15
21
16
17
1
2
3
4
5
6
7
8
9
10
11
12
13
14
15
16
17
18
19
20
21
22
30
20
22
Italiano
Display LC−TFT
Altoparlante
LED di power
Tasto di ricerca canale
LED di canale
LED di scansione
Luminosità (+) (−)
Regolatore di volume con tasto di ON/OFF
Display LC ON/OFF
Presa per alimentazione elettrica
Uscita audio/video
Gancio per cintura
Obiettivo
LED di canale
Interruttore di selezione canale
Selettore VIDEOCAMERA, AUTO, AV
Ingresso audio/video
Sensore luminoso per sorveglianza notturna autom.
Power ON/OFF
Presa per alimentazione elettrica
LED di power
Microfono
Mettere in funzione gli apparecchi
3 Mettere in funzione gli apparecchi
Indicazioni di sicurezza
Attenzione: Prima della messa in funzione, leggere attentamente le indicazioni di sicurezza
riportate al capitolo 1.
Verificare il contenuto della confezione 6
La confezione comprende:
un’unità videocamera
(trasmettitore)
un’unità schermo
(ricevitore)
5 batterie speciali ricaricabili
NiMH per il ricevitore
due alimentatori di rete
un cavo audio / video
un gancio per cintura
un manuale di istruzioni per
l’uso
Collegare il trasmettitore
Attenzione: Posizionare il trasmettitore con una distanza minima di 1 m da altre apparecchiature elettroniche considerato il rischio di interferenze reciproche.
Esercizio con alimentatore di rete
Fare attenzione a utilizzare l’alimentatore di rete corretto. La messa in funzione del trasmettitore è consentita solo con l’alimentatore di rete più piccolo con una potenza di uscita di
300mA.
Introdurre il connettore cavo dell’alimentatore di rete nella presa di alimentazione elettrica del trasmettitore (9V DC).
Inserire quindi l’alimentatore di rete in una presa di corrente (230V).
Esercizio con batterie o batterie ricaricabili
Aprire il vano batterie presente sul retro del trasmettitore. Allentare a tale scopo completamente la vite
e spingere il coperchio del vano batterie verso sotto.
Introdurre le batterie ricaricabili ovvero le batterie osservando la corretta polarità. Seguire a tale scopo
quanto raffigurato all’interno del vano batterie.
Il trasmettitore opera con 4 batterie tipo AA" (non fornite in dotazione) o con batterie ricaricabili dello stesso tipo. È importante tenere in considerazione che l’adattatore di corrente fornito
in dotazione non si presta al caricamento di batterie ricaricabili. In tal caso è invece necessario
ricorrere ad un caricatore supplementare.
Chiudere il vano batterie e stringere di nuovo saldamente la vite.
Se lo stato di carica di batterie ricaricabili / batterie è scarso, il LED di power arancione si accende.
Montaggio a parete
Evitare di compiere fori in prossimità di linee elettriche o condutture idriche! Assicurarsi che
simili linee non attraversino il luogo di installazione prescelto!
Tasselli e viti non fanno parte della confezione.
Prevedere due fori (diametro 5 mm) con una distanza di 38 mm disposti l’uno accanto all’altro in
senso orizzontale.
Introdurre un tassello in ciascuno dei due fori (diametro 5 mm).
Avvitare in ogni tassello una vite (diametro 4 mm).
La distanza tra testa della vite e parete deve corrispondere a ca. 3 mm.
Posizionare il trasmettitore facendo combaciare le apposite rientranze con le teste delle viti e spingendolo leggermente verso il basso.
31
Mettere in funzione gli apparecchi
Collegare il ricevitore
Attenzione: Posizionare il ricevitore con una distanza minima di 1 m da altre apparecchiature
elettroniche considerato il rischio di interferenze reciproche.
Esercizio con alimentatore di rete
Fare attenzione a utilizzare l’alimentatore di rete corretto. La messa in funzione del ricevitore
è consentita solo con l’alimentatore di rete più grande con una potenza di uscita di 500mA.
Introdurre il connettore cavo dell’alimentatore di rete nella presa di alimentazione elettrica del ricevitore (9V DC).
Inserire quindi l’alimentatore di rete in una presa di corrente (230V).
Esercizio con batterie o batterie ricaricabili
Aprire il vano batterie presente sul retro del ricevitore. Allentare a tale scopo completamente la vite e
spingere il coperchio del vano batterie verso sotto.
Introdurre le batterie ricaricabili ovvero le batterie osservando la corretta polarità. Seguire a tale scopo
quanto raffigurato all’interno del vano batterie.
Il ricevitore è in grado di funzionare con 5 batterie tipo AA" oppure con batterie ricaricabili
dello stesso tipo. È importante tenere in considerazione che il ricevitore non si presta al diretto
caricamento delle comuni batterie ricaricabili. Il caricamento delle batterie richiede l’impiego
di un caricatore supplementare.
A tale scopo di prestano solo speciali batterie ricaricate direttamente all’interno del ricevitore.
Queste non sono fornite in dotazione. Rivolgersi al rivenditore autorizzato in caso di ulteriori
domande.
Chiudere il vano batterie e stringere di nuovo saldamente la vite.
Se lo stato di carica delle batterie ricaricabili / batterie è scarso, il LED di power arancione si
accende.
Montare il gancio per cintura / il dispositivo di montaggio a parete
Introdurre il gancio per cintura nel supporto previsto sul retro del ricevitore e tirarlo in basso fino a farlo
scattare in posizione. Per rimuovere di nuovo il gancio per cintura, sbloccare il gancio estraendolo infine dal supporto tirando verso sopra.
Montaggio a parete
Nel gancio per cintura è prevista una foratura per il montaggio a parete.
Evitare di compiere fori in prossimità di linee elettriche o condutture idriche! Assicurarsi che
simili linee non attraversino il luogo di installazione prescelto!
Tasselli e viti non fanno parte della confezione.
Prevedere un foro (diametro 5 mm).
Introdurre un tassello (diametro 5 mm) nel foro.
Avvitare una vite (diametro 4 mm) nel tassello.
La distanza tra testa della vite e parete deve corrispondere a ca. 3 mm.
Posizionare il ricevitore facendo combaciare l’apposita rientranza con la testa della vite e spingendolo
leggermente verso il basso.
32
Come funziona il trasmettitore
4 Come funziona il trasmettitore
Verificare prima di ogni impiego il perfetto funzionamento di trasmettitore e ricevitore.
Attivare / Disattivare il trasmettitore
1. Spostare l’interruttore Power ON/OFF in posizione ON". Il LED di power segna verde. Il
trasmettitore è quindi pronto per l’uso.
Se lo stato di carica di batterie ricaricabili / batterie è scarso, il LED di power arancione si accende.
2. Scegliere la modalità di funzionamento VIDEOCAMERA, AUTO o AV, per trasmettere rumori ed
immagini dal settore sorvegliato ovvero segnali di INPUT AV al ricevitore.
3. Posizionare il trasmettitore per la sorveglianza video in un posto adatto e orientare l’obiettivo
verso il settore da sorvegliare.
4. Per disattivare il trasmettitore, spostare l’interruttore Power ON/OFF in posizione OFF".
Scegliere la modalità di trasmissione
Scegliere la modalità di funzionamento desiderata mediante selettore:
VIDEOCAMERA − Segnali audio e video sono trasmessi in maniera continuata dal settore sorvegliato
al ricevitore.
AUTO − La trasmissione di segnali audio e video al ricevitore avviene solo se si supera un determinato livello di rumorosità precedentemente definito.
AV − Il trasmettitore trasmette i segnali audio e video immessi attraverso la presa di INPUT AV. Si può
in tal caso trattare di segnali provenienti da un lettore DVD, da una videocamera e così via. Introdurre
la spina jack del cavo audio / video nella presa INPUT AV e le prese cinch gialla, bianca e rossa nelle
prese del dispositivo di output tenendo conto del rispettivo colore. Per ulteriori informazioni si prega di
consultare le istruzioni per l’uso dell’apparecchio impiegato.
Scegliere il canale
Premere il tasto di selezione canale per scegliere tra A, B, C o D il canale desiderato. Il rispettivo
LED indica il canale attualmente selezionato.
Trasmettitore e ricevitore devono essere impostati sullo stesso canale.
Modalità di visione notturna
Il trasmettitore è dotato di 10 diodi a infrarossi. Ciò consente la trasmissione di immagini anche da settori non illuminati. La funzione di visione notturna è attivata automaticamente non appena la visibilità
lo richieda.
Avendo attivato la funzione di visione notturna la visualizzazione sullo schermo del ricevitore
è in bianco/nero.
33
Come funziona il ricevitore
5 Come funziona il ricevitore
Verificare prima di ogni impiego il perfetto funzionamento di trasmettitore e ricevitore.
Attivare/Disattivare il ricevitore e impostare il volume
Girare il regolatore di volume su ON". Il LED di power segna verde. Il ricevitore è quindi pronto per
l’uso.
Impostare il volume desiderato servendosi del regolatore di volume.
Se lo stato di carica di batterie ricaricabili / batterie è scarso, il LED di power arancione si accende.
Scegliere il canale
Premere il tasto di selezione canale per scegliere tra A, B, C o D il canale desiderato. Il rispettivo
LED indica il canale attualmente selezionato.
Trasmettitore e ricevitore devono essere impostati sullo stesso canale.
Scansione dei canali
Premere il tasto di selezione canale più volte per impostare la funzione di SCAN. Il LED di scansione
si accende ed un ulteriore LED segnala il canale attualmente selezionato. Il canale attuale cambia
ogni 5 secondi passando a quello successivo. In questo modo è possibile sorvegliare con un unico ricevitore un maggior numero di trasmettitori impostati su canali differenti.
Modalità di risparmio energetico
Scegliere presso l’interruttore LCD la posizione OFF". Ciò determina l’emissione di soli segnali audio. In caso di esercizio mediante batterie ricaricabili/batterie si consiglia di spegnere lo schermo LCD
a scopo di risparmio energetico.
Regolare la luminosità
Premere il tasto Luminosità (BRIGHTNESS) + o − per adeguare la luminosità dello schermo LCD alle
proprie esigenze.
Esercizio con televisore
Le immagini video e i segnali audio possono essere trasferiti su un televisore o apparecchio di registrazione.
Introdurre la spina jack del cavo audio / video nella presa OUTPUT AV e le prese cinch gialla, bianca
e rossa nelle prese del dispositivo di input tenendo conto del rispettivo colore. Per ulteriori informazioni si prega di consultare le istruzioni per l’uso del rispettivo apparecchio impiegato.
34
In presenza di problemi
6 In presenza di problemi
Hotline di assistenza
In presenza di problemi con il dispositivo di sorveglianza, seguire le indicazioni riportate qui di seguito.
La nostra hotline di assistenza è a vostra disposizione in caso di problemi tecnici chiamando al numero telefonico 0900 00 1675 nell’ambito della Svizzera (costi da rete Swisscom in sede di stampa:
CHF 2.00/min). In caso di reclami entro il periodo di garanzia, rivolgersi al rivenditore autorizzato. Il
periodo di garanzia ricopre 2 anni.
Domande e risposte
Domande
Risposte
Nessuna funzione
− Trasmettitore e/o ricevitore non è attivato.
− Le batterie ricaricabili/batterie sono scariche o difettose.
− Assenza di contatto con gli adattatori di corrente.
Nessuna ricezione
− Trasmettitore e ricevitore non sono impostati sullo stesso canale.
− La distanza dal trasmettitore, per es. dal neonato, è troppo
grande. Osservare la distanza minima di un metro.
− La distanza tra ricevitore e trasmettitore è troppo grande.
− Il volume del ricevitore è troppo basso.
Disturbi di ricezione
−
−
−
−
Segnali acustici sotto forma
di fischio (retroazione)
− Aumentare la distanza tra ricevitore e trasmettitore.
− Ridurre il volume del ricevitore.
Segnali acustici sotto forma
di fruscio
− La potenza delle batterie ricaricabili/batterie è troppo scarsa.
− Trasmettitore e ricevitore non sono impostati sullo stesso canale.
Ricezione da altri apparecchi
− Un apparecchio presente nelle vicinanze utilizza lo stesso canale.
Impostare un altro canale.
Trasmissione di segnali audio ma non video
− L’interruttore LCD è in posizione di OFF.
− La potenza delle batterie ricaricabili/batterie è troppo scarsa.
Trasmissione di segnali video ma non audio
− Il volume è troppo basso.
Immagine appare in bianco
e nero
− La funzione di visione notturna è attiva.
La distanza tra ricevitore e trasmettitore è troppo grande.
La potenza delle batterie ricaricabili/batterie è troppo scarsa.
Impostare un altro canale per ricevitore e trasmettitore.
Altri dispositivi elettronici causano delle interferenze nell’area di
trasmissione.
Le batterie ricaricabili pre− Assenza di contatto con l’adattatore di corrente.
senti nel ricevitore non sono − Sono impiegate batterie ricaricabili comunemente reperibili sul
caricate
mercato. Queste non possono essere caricate all’interno del ricevitore. A tale scopo di prestano solo speciali batterie ricaricate
direttamente all’interno del ricevitore.
35
Specifiche tecniche
7 Specifiche tecniche
Specifiche tecniche
Caratteristica
Valore
Videocamera (trasmettitore)
Interruttore:
Interruttore:
Presa:
Presa:
Sensore:
LED:
LED:
Diodi IR:
Schermo (ricevitore)
Diagonale schermo da 2,5"
Interruttore: LCD ON/OFF
Interruttore: ON/OFF con regolazione del volume
Presa:
Output AV
Presa:
9 V DC
Tasto:
Schermo chiaro (+) / scuro (−)
Tasto:
Tasto di selezione canale
LED:
4 canali
LED:
Power ON
LED:
LED di scansione
Alimentazione elettrica (ricevitore)
Alimentatore di rete DC 9 V / 500 mA o 5 x AA
Alimentazione elettrica (trasmettitore)
Alimentatore di rete DC 9 V / 300 mA o 4 x AA
Portata
Fino a 150 metri in condizioni ottimali.
All’interno di edifici la portata si riduce per la
presenza di pareti, porte, ecc.
Frequenza di esercizio
Canale 1 = 2.4 GHz
Canale 2 = 2.4 GHz
Canale 3 = 2.4 GHz
Canale 4 = 2.4 GHz
Temperatura ambiente consentita
da 10°C a 30°C
Umidità relativa consentita
da 20% a 75%
Potenza di trasmissione
<= 10 dBm(mW)
ON/OFF
AV/AUTO/VIDEOCAMERA
Input AV
9 V DC
1 sensore di luce notturna
4 canali
Power ON
10
Dichiarazione di conformità
Questo apparecchio risponde a quanto disposto dalla Direttiva UE:
1999/5/CE Direttiva concernente le apparecchiature radio, le apparecchiature terminali di
telecomunicazioni e il reciproco riconoscimento della loro conformità. La conformità con la
direttiva di cui sopra viene confermata dal marchio CE.
La dichiarazione di conformità è riportata sul retro delle presenti istruzioni per l’uso.
36
Consigli per la cura / Garanzia
8 Consigli per la cura / Garanzia
Consigli per la cura
Pulire le superfici degli apparecchi con un panno morbido e antipilling.
Non utilizzare mai detergenti o solventi.
Garanzia
Gli apparecchi SWITEL sono costruiti e collaudati in osservanza dei processi di produzione più moderni. L’impiego di materiali selezionati e tecnologie altamente sviluppate sono garanti di una perfetta
funzionalità e lunga durata in vita. La garanzia non si estende a batterie, accumulatori o batterie ricaricabili utilizzati all’interno degli apparecchi. Il periodo di garanzia ricopre 24 mesi a partire dalla data di
acquisto.
Entro il periodo di garanzia si procederà all’eliminazione gratuita di tutti i guasti dovuti a difetti di materiale o produzione. Il diritto di garanzia cessa in caso di interventi da parte dell’acquirente o di terzi.
Danni derivanti da un impiego o esercizio non conforme agli usi previsti, a naturale usura, a errato
montaggio o errata conservazione, a collegamento o installazione impropri, dovuti a forza maggiore o
ad altri influssi esterni non sono coperti da garanzia. In qualità di produttore ci riserviamo il diritto, in
caso di reclami, di riparare o sostituire le parti difettose o di rimpiazzare l’apparecchio. Parti o apparecchi sostituiti passano di nostra proprietà. Sono esclusi diritti di risarcimento per danni qualora non
siano dovuti a intenzione o colpa grave del costruttore.
Nel caso in cui il presente apparecchio dovesse ciò nonostante presentare un difetto durante il periodo di garanzia, si prega di rivolgersi esclusivamente al negozio di rivendita dell’apparecchio
SWITEL assieme al relativo scontrino di acquisto. In base alle presenti disposizioni, tutti i diritti di garanzia dovranno essere fatti valere esclusivamente nei confronti del rivenditore autorizzato. Decorso il
termine di due anni dalla data di acquisto e consegna dei nostri prodotti non sarà più possibile fare valere alcun diritto di garanzia.
37
Indice alfabetico
9 Indice alfabetico
A
Attivare / Disattivare il trasmettitore, 33
Attivare/Disattivare il ricevitore, 34
C
Collegare il ricevitore, 32
Collegare il trasmettitore, 31
Consigli per la cura, 37
Contenuto della confezione, 31
D
Dichiarazione di conformità, 36
Domande e risposte, 35
E
Elementi di comando, 30
Eliminare guasti, 35
Esercizio, 33, 34
Esercizio con alimentatore di rete, 31, 32
Esercizio con batterie o batterie ricaricabili, 32
G
Garanzia, 37
H
Hotline di assistenza, 35
I
Impostare il volume, 34
Indicazioni di sicurezza, 28
M
Messa in funzione, 31
Modalità di visione notturna, 33
Montaggio a parete, 31, 32
Montare il gancio per cintura, 32
P
Problemi, 35
R
Regolare la luminosità, 34
S
Scansione dei canali, 34
Scegliere il canale, 33, 34
Scegliere la modalità di trasmissione, 33, 34
Specifiche tecniche, 36
38
7
Contents
1
2
3
4
5
6
7
8
9
Safety Information . . . . . . . . . . . . . . . .
Operating Elements and Indicators . . . .
Putting the Units into Operation . . . . . .
Operating the Transmitter . . . . . . . . . .
Operating the Receiver . . . . . . . . . . . .
In Case of Problems . . . . . . . . . . . . . .
Technical Properties . . . . . . . . . . . . . .
Maintenance / Guarantee . . . . . . . . . . .
Index . . . . . . . . . . . . . . . . . . . . . . . . .
40
41
42
44
45
46
47
48
49
39
Safety Information
1 Safety Information
Please read this operating instruction manual thoroughly.
Intended use
The monitoring set has been developed to monitor rooms. The transmitter sends acoustic and video
signals from its point of installation to the receiver. Any other use is considered unintended use.
The use of this equipment does not substitute personal supervision, e.g. of a child. Users are
not relieved of their personal liability.
Unauthorised modification or reconstruction is not permitted. Under no circumstances open
the devices or complete any repair work yourself.
Installation location and safety information
Never lay the transmitter in a baby’s bed or playpen.
Ensure that the transmitter and power cable are out of reach of the child, i.e. they are at least one
meter away.
Pay attention that the components are sufficiently well−ventilated when in operation. Do not lay a
cushion or towel over the devices.
The devices are not intended for medical purposes. Warning and signal tones from respiratory or
heartbeat monitoring equipment are not transmitted.
The installation location plays a decisive role in ensuring proper operation. Maintain a minimum distance of one meter to other electronic equipment, such as microwave ovens or hi−fi systems, since
they could cause mutual disturbance.
Prevent excessive exposure to smoke, dust, vibration, chemicals, moisture, heat and direct sunlight.
Do not use the equipment in potentially explosive areas.
Power adapter plug
Attention: Only use the power adapter plugs contained in the material supplied since other
power adapter plugs could damage the monitoring set. Ensure access to the power adapter
plugs is not obstructed by furniture or such.
When using the equipment with a power adapter plug, pay attention that the plug and cable are in perfect condition. Kinked or worn cable represents the risk of a fatal accident.
Rechargeable batteries
Attention: Never throw batteries into a fire. Only use batteries of the same type! Pay attention
to correct polarity.
Power failure
In the event of a power failure, the devices only operate through battery power. Disconnect the power
adapter plugs from the devices.
Medical equipment
Attention: Never use the devices in the vicinity of medical equipment. Effects on such equipment cannot be fully ruled out.
Disposal
In order to dispose of your device, bring it to a collection point provided by your local public
waste authorities (e.g. recycling centre). The adjacent symbol indicates that the device must
not be disposed of in normal domestic waste! According to laws on the disposal of electronic
and electrical devices, owners are obliged to dispose of old electronic and electrical devices
in a separate waste container.
Batteries must be disposed of at the point of sale or at the appropriate
collection points provided by the public waste authorities.
Packaging materials must be disposed of according to local regulations.
40
Operating Elements and Indicators
2 Operating Elements and Indicators
Monitor unit (receiver)
5
4
6
3
7(+)
8
2
9
7(−)
1
12
10
11
Camera unit (transmitter)
13
18
14
19
15
21
16
17
1
2
3
4
5
6
7
8
9
10
11
12
13
14
15
16
17
18
19
20
21
22
20
22
English
TFT LC display
Loudspeaker
Power LED
Channel selection button
Channel LED
Scan LED
Brightness control (+) (−)
Volume control with on/off switch
LC display on/off
Power supply socket
Audio/Video output
Belt clip
Lens
Channel LED
Channel selection switch
CAMERA, AUTO, AV selection switch
Audio/Video input
Light sensor for auto. night−time monitoring
Power on/off
Power supply socket
Power LED
Microphone
41
Putting the Units into Operation
3 Putting the Units into Operation
Safety information
Attention: It is essential to read the Safety Information in Chapter 1 before starting up.
Checking the package contents 8
The package contains:
one camera unit
(transmitter)
one monitor unit
(receiver)
5 rechargeable, special NiMH
batteries for the receiver
two power adapter plugs
one audio/video cable
one belt clip
an operating manual
Connecting the transmitter
Attention: Position the transmitter with a minimum distance of 1 m to other electronic devices,
otherwise there is a risk of mutual disturbance.
Operating with a power adapter plug
Ensure you use the correct power adapter plug. The transmitter must be connected by means
of the smaller power adapter plug which has an output power of 300 mA.
Connect the cylindrical plug on the power adapter plug to the transmitter’s power supply socket
(9 V DC).
Connect the power adapter plug to a power outlet (230 V).
Operation with batteries or rechargeable batteries
Open the battery compartment on the rear side of the transmitter. Loosen and remove the screw and
slide the battery compartment cover downwards.
Insert the battery pack or batteries, paying attention to correct polarity. Refer to the diagrams in the
battery compartment.
The transmitter can be operated with 4 AA" batteries (not contained in the material supplied)
or with rechargeable batteries of the same type. Please remember that the batteries cannot
be recharged using the power adapter plug supplied. A commercially available charging unit
is required.
Close the battery compartment, reinsert and retighten the screw.
The Power LED turns orange when the battery charge is too low.
Wall installation
Be careful not to drill into electrical lines or water pipes! Ensure that no lines or pipes are under
the required installation location!
Dowels and screws are not contained in the material supplied.
Drill two holes (5 mm diameter) 38 mm apart and horizontal to each other.
Insert a dowel (5 mm diameter) in each hole.
Insert a screw (4 mm diameter) in each dowel.
Leave approx. 3 mm from the head of the screw to the wall.
Guide the recesses in the transmitter over the screw heads and pull the unit down gently.
42
Putting the Units into Operation
Connecting the receiver
Attention: Position the receiver with a minimum distance of 1 m to other electronic devices,
otherwise there is a risk of mutual disturbance.
Operating with a power adapter plug
Ensure you use the correct power adapter plug. The receiver must be connected by means
of the larger power adapter plug which has an output power of 500 mA.
Connect the cylindrical plug on the power adapter plug cable to the receiver’s power supply socket
(9 V DC).
Connect the power adapter plug to a power outlet (230 V).
Operation with batteries or rechargeable batteries
Open the battery compartment on the rear side of the receiver. Loosen and remove the screw and
slide the battery compartment cover downwards.
Insert the battery pack or batteries paying attention to correct polarity. Refer to the diagrams in the battery compartment.
The receiver unit can be operated using 5 normal AA" batteries or rechargeable batteries of
the same type. Please remember that standard rechargeable batteries cannot be recharged
directly in the receiver. A commercially available charging unit is required to recharge batteries.
Only special batteries can be recharged directly in the receiver. They are contained in the material supplied. If you have any further queries, please contact your sales outlet.
Close the battery compartment, reinsert and retighten the screw.
The Power LED turns orange when the battery charge is too low.
Attaching the belt clip / wall mounting bracket
Slide the belt clip downwards on the back of the receiver until it audibly snaps into place. To remove it,
release the fit by pulling the belt clip out of the catch and sliding it upwards.
Wall installation
The belt clip is provided with a hole used for installing the unit on a wall.
Be careful not to drill into electrical lines or water pipes! Ensure that no lines or pipes are under
the required installation location!
Dowels and screws are not contained in the material supplied.
Drill a hole (diameter 5 mm) at the required position in the wall.
Insert a dowel (5 mm diameter) in the hole.
Insert a screw (4 mm diameter) in the dowel.
Leave approx. 3 mm from the head of the screw to the wall.
Guide the recess in the receiver over the screw head and pull the unit down gently.
43
Operating the Transmitter
4 Operating the Transmitter
Check the transmitter and receiver are working properly each time before the equipment is
put into operation.
Switching the transmitter on/off
1. Set the Power on/off switch to ON". The Power LED lights up green. The transmitter is now
ready to operate.
The power LED turns orange when the battery charge is too low.
2. Select CAMERA, AUTO or AV operating mode in order to transmit the noise and video signals
from the area being monitored or AV INPUT signals to the receiver.
3. Position the transmitter in a good position for the monitoring tasks required and align the lens to
the area to be monitored.
4. To switch the transmitter off, set the Power on/off switch to OFF".
Selecting the transmission mode
Select the operating mode required using the selection switch:
CAMERA − Audio and video signals from the area being monitored are transmitted continuously to the
receiver.
AUTO − Audio and video signals are only transmitted to the receiver when a specific noise level is exceeded.
AV − The transmitter transmits audio and video signals fed via the AV INPUT socket. These can be
signals from DVD players, cameras, etc. Plug the black jack plug on the audio/video cable in the AV
INPUT socket and the yellow, white and red phono plugs in the correspondingly coloured sockets in
the output unit. For further information, refer to the operating manual provided with the respective device.
Selecting a channel
Press the channel selection button to select the required channel A, B, C, or D. The channel currently selected is indicated by the corresponding LED.
The transmitter and receiver must be set to the same channel.
Night vision
The transmitter is equipped with 10 infra−red diodes. This enables the transmission of pictures from
areas which are not illuminated. The night vision function is activated automatically when the light
conditions make it necessary.
When the night vision function is activated, the screen display on the receiver turns to black
and white.
44
Operating the Receiver
5 Operating the Receiver
Check the transmitter and receiver are working properly each time before the equipment is
put into operation.
Switching the receiver on/off and setting the volume
Turn the volume control towards ON". The Power LED lights up green. The receiver is now ready to
operate.
Set the required volume using the volume control.
The Power LED turns orange when the battery charge becomes too low.
Selecting a channel
Press the channel selection button to select the required channel A, B, C, or D. The channel currently selected is indicated by the corresponding LED.
The transmitter and receiver must be set to the same channel.
Scanning channels
Press the channel selection button, several times if necessary, to select SCAN. The SCAN LED
lights up, another LED indicates the channel currently active. The current channel switches to the next
one every 5 seconds. In this way, you can monitor several transmitters, set to different channels, on
one receiver.
Save−energy mode
Set the LCD switch to OFF". Only audio signals are then transmitted. It is recommended to switch off
the LCD when operating with battery power.
Regulating the brightness
Press the Brightness + or − button to adjust the brightness of the LCD to your specific needs.
Operating on a television set
The audio and video signals can be transmitted to a television or video recorder.
Plug the black jack plug on the audio/video cable in the AV OUTPUT socket and the yellow, white and
red phono plugs in the correspondingly coloured sockets in the input unit. For further information, refer
to the operating manual provided with the respective device.
45
In Case of Problems
6 In Case of Problems
Service hotline
Should problems arise with the monitoring set, please refer to the following information first. In the
case of technical problems, please contact our hotline within Switzerland under tel. 0900 00 1675
(cost with Swisscom at time of going to print: CHF 2.00/min). In the case of claims under the terms of
guarantee, contact your sales outlet. There is a 2 year period of guarantee.
Problems and solutions
46
Problems
Solutions
Equipment does not
function
− The transmitter and/or receiver are not switched on.
− The batteries are empty or defective.
− The power adapter plugs are not plugged in properly.
No reception
− The transmitter and receiver are not switched to the same
channel.
− The transmitter is too far from object being monitored, e.g. baby.
Observe the minimum distance of one meter.
− The receiver and transmitter are too far apart.
− The volume setting of the receiver is too low.
Reception interference
−
−
−
−
Beeping noise (acoustic
feedback)
− Increase the distance between receiver and transmitter.
− Reduce the volume on the receiver.
Noise
− The battery power is too low.
− The transmitter and receiver are not switched to the same
channel.
Reception from external
devices
− A device nearby is using the same channel. Switch to another
channel.
There is audio but no video
transmission
− The LCD switch is set to OFF.
− The battery power is too low.
Picture but no sound transmission
− The volume setting is too low.
Picture is in black and white
− The night vision function is active.
The batteries in the receiver
have not been recharged
− The power adapter plugs are not plugged in properly.
− Standard rechargeable batteries are being used. These cannot be
recharged directly in the receiver. Only special batteries can be
recharged directly in the receiver.
The distance between the receiver and transmitter is too large.
The battery power is too low.
Select another channel on the receiver and transmitter.
Other electronic devices are causing interference in the field of
transmission.
Technical Properties
7 Technical Properties
Technical data
Feature
Value
Camera (transmitter)
Switch:
ON/OFF
Switch:
AV/AUTO/CAMERA
Socket:
AV input
Socket:
9 V DC
Sensor:
1 Night vision sensor
LEDs:
4 channels
LED:
Power ON
IR diodes: 10
Monitor (receiver)
2.5" screen diagonal
Switch:
LCD ON/OFF
Switch:
On/Off with volume control
Socket:
AV output
Socket:
9 V DC
Button:
Screen brighter (+) / darker (−)
Button:
Channel selection button
LEDs:
4 channels
LED:
Power ON
LED:
Scan−LED
Power supply (receiver)
Power adapter plug DC 9 V / 500 mA or 5 x AA
Power supply (transmitter)
Power adapter plug DC 9 V / 300 mA or 4 x AA
Range
Up to 150 meters under optimum conditions.
Range is reduced in buildings due to walls,
doors, etc.
Operating frequency
Channel 1 = 2.4 GHz
Channel 2 = 2.4 GHz
Channel 3 = 2.4 GHz
Channel 4 = 2.4 GHz
Permissible ambient temperature
10°C to 30°C
Permissible relative humidity
20% to 75%
Transmitting power
<= 10 dBm(mW)
Declaration of Conformity
This device fulfils the requirements stipulated in the EU directive:
1999/5/EU directive on radio equipment and telecommunications terminal equipment and
the mutual recognition of their conformity. Conformity with the above mentioned directive is
confirmed by the CE symbol.
The Declaration of Conformity is provided on the back cover of this operating manual.
47
Maintenance / Guarantee
8 Maintenance / Guarantee
Maintenance
Clean the housing surfaces with a soft, fluff−free cloth.
Never use cleaning agents or solvents.
Guarantee
SWITEL equipment is produced and tested according to the latest production methods. Carefully
selected materials and highly developed technology ensure perfect functioning and a long service life.
The terms of guarantee do not apply to the batteries or power packs used in the products. The period
of guarantee is 24 months from the date of purchase.
All deficiencies related to material or manufacturing errors within the period of guarantee will be redressed free of charge. Rights to claims under the terms of guarantee are annulled following tampering by the purchaser or third parties. Damage caused as the result of improper handling or operation,
normal wear and tear, incorrect positioning or storage, improper connection or installation or Acts of
God and other external influences are excluded from the terms of guarantee. In the case of complaints, we reserve the right to repair or replace defect parts or provide a replacement device.
Replaced parts or devices become our property. Rights to compensation in the case of damage are
excluded where there is no evidence of intent or gross negligence by the manufacturer.
If your device does show signs of a defect within the period of guarantee, please contact the sales
outlet where you purchased the SWITEL device, producing the purchase receipt as evidence. All
claims under the terms of guarantee in accordance with this agreement can only be asserted at the
sales outlet. No claims under the terms of guarantee can be asserted after a period of two years from
the date of purchase and hand−over of the product.
48
Index
9 Index
C
Channel selection, 44, 45
Connecting the receiver, 43
Connecting the transmitter, 42
D
Declaration of Conformity, 47
F
Fitting the belt clip, 43
G
Guarantee, 48
M
Maintenance , 48
N
Night vision, 44
O
Operating elements, 41
Operating with a power adapter plug, 42, 43
Operation, 44, 45
Operation with batteries or rechargeable batteries, 43
P
Package contents, 42
Problems, 46
Problems and solutions, 46
R
Regulating the brightness, 45
S
Safety information, 40
Scanning channels, 45
Selecting the transmission mode, 45
Selecting transmission mode, 44
Service hotline, 46
Setting the volume, 45
Starting up, 42
Switching the receiver on/off, 45
Switching the transmitter on/off, 44
T
Technical data, 47
Troubleshooting, 46
W
Wall installation, 42, 43
49
Declaration of conformity 9
WE
TELGO AG
OF
Route d’Englisberg 11
CH−1763 Granges−Paccot
Declare under our own responsibility that the product
MODEL:
BCF268
DESCRIPTION:
Wireless Baby Monitor
Is in conformity with directives: R&TTE Directive (1999/5/EC)
EN 60065:2002 Safety (R&TTE, Artivcle 3.1a), EN 301 489−3 V1.4.1 (2002−08)
EMC (R&TTE, Article 3.1.b, EN 300 440−2 V 1.1.2 (2004−07) Use of Spectrum
(R&TTE Article 3.2)
COMPLIANCE IS ACHIEVED BY CONFORMITY TO THE FOLLOWING:
RSZ05122001−1, RSZ05122001−2, RSZ05122001−3, RSZ06022306−1,
RSZ06022306−2, RSZ06022306−3;
AUTHORISED BY:
________________________
Signed:
Name (printed):
Selim Dusi
Position in company: Managing Director
Date of issue:
12. Oktober 2006
Copies of this document will be held on file for a period of 10 years after the last
production.
Supplier:
Product:
TELGO AG, Route d’Englisberg 11
CH−1763 Granges−Paccot
BCF268
Version 1.0 − 20.10.2006