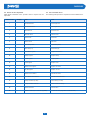
1
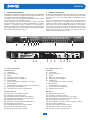
DAG9300
Generatore di toni d’allarme e registratore vocale
Alarm-tone generator and voice recorder
I
ISTRUZIONI PER L’USO
UK
INSTRUCTION MANUAL
INDICE DEI CONTENUTI
TABLE OF CONTENTS
1.
1.
Avvertenze..........................................................................2
1.1 Informazioni generali...................................................2
1.2 Alimentazione e messa a terra....................................2
1.3 Note di sicurezza.........................................................2
Warnings.............................................................................2
1.1 General information.....................................................2
1.2 Power supply and earthing..........................................2
1.3 Safety notes.................................................................2
2. Descrizione generale.........................................................2
2.1 Riferimenti numerati.....................................................2
2. General description...........................................................2
2.1 Numbered references..................................................2
3. Uso......................................................................................3
3.1 Impostazioni all’accensione.........................................3
3.2 Impostazioni e regolazioni...........................................3
3.3 Visualizzazione impostazioni.......................................3
3.4 Abbinamento toni d’allarme/tasti contatti.....................4
3.5 Registrazione messaggio............................................4
3.6 Riproduzione messaggio.............................................4
3.7 Riproduzione tono........................................................4
3.8 Contatto di priorità.......................................................4
3.9 Modalità “DELAY PLAY”..............................................4
3.10 Modalità “REC PLAY”..................................................5
3.10.1 Impostazione della base microfonica...............5
3.10.2 Registrazione di un messaggio........................5
3.10.3 Riproduzione di un messaggio........................5
3. Use.......................................................................................3
3.1 Settings upon switching on..........................................3
3.2 Settings and adjustments............................................3
3.3 Displaying the settings.................................................3
3.4 Association of alarm tones with contact keys..............4
3.5 Recording a message..................................................4
3.6 Playing out a message................................................4
3.7 Playing out a tone........................................................4
3.8 Priority contacts...........................................................4
3.9 “DELAY PLAY” mode...................................................4
3.10 “REC PLAY” mode.......................................................5
3.10.1 Setting the microphone base...........................5
3.10.2 Recording a message......................................5
3.10.3 Playing out a message....................................5
4. Tabelle di riferimento.........................................................6
4.1 Impostazioni di fabbrica...............................................6
4.2 Elenco dei toni disponibili............................................6
4. Reference tables................................................................6
4.1 Factory settings...........................................................6
4.2 List of available tones..................................................6
Caratteristiche tecniche............................................................7
Technical specifications...........................................................7
Nel ringraziarVi per aver scelto un prodotto PASO, vogliamo
ricordarVi che la nostra azienda opera con sistema di qualità
certificato. Tutti i nostri prodotti vengono pertanto controllati in
ogni fase della produzione per garantirVi la piena soddisfazione
del Vostro acquisto. Per ogni evenienza la garanzia coprirà,
nel periodo di validità, eventuali difetti di fabbricazione. Vi
raccomandiamo di leggere attentamente le seguenti istruzioni
d’uso per sfruttare appieno le prestazioni offerte da questo prodotto
e per evitare eventuali problemi.
While thanking you for having chosen a PASO product, we would
like to remind you that our company works according to a certified
Quality System. This means that all our products are checked during
every phase of manufacturing in order to ensure that you will be
fully satisfied with your purchase. In any case, the guarantee will
cover any manufacturing flaws during the guarantee period. We
recommend that you read the following instructions for use and
follow them carefully in order to exploit in full the performance of
this product and use it correctly.
DAG9300
1. AVVERTENZE
1.1 Informazioni generali
Tutti gli apparecchi PASO sono costruiti nel rispetto delle più severe
normative internazionali di sicurezza ed in ottemperanza ai requisiti della
Comunità Europea. Per un corretto ed efficace uso dell’apparecchio
è importante prendere conoscenza di tutte le caratteristiche
leggendo attentamente le presenti istruzioni ed in particolare
le note di sicurezza. Durante il funzionamento dell’apparecchio è
necessario assicurare un’adeguata ventilazione. Evitare di racchiudere
l’apparecchio in un mobile privo di aerazione o di tenerlo in prossimità
di sorgenti di calore.
1. WARNINGS
1.1 General information
All PASO equipment is built according to the strictest international
safety standards and complies with European Community requisites. In
order to use the equipment correctly and effectively, it is important
to be aware of all its features by reading these instructions and
in particular the notes on safety carefully. While the equipment is
working, it is necessary to ensure adequate ventilation. Avoid keeping
the equipment near a source of heat (radiator, heating systems and
so on).
1.2 Alimentazione e messa a terra
Questo apparecchio è predisposto per il funzionamento con tensione di
rete a 230 Vca ± 10% 50/60 Hz. L’interruttore di accensione (9) agisce
sulla tensione di rete. In dotazione all’apparecchio è fornito un cavo di
alimentazione con filo di terra; il terminale di terra della spina di rete
non deve essere rimosso in alcun caso. Collegare la spina di rete (10)
dell’apparecchio alla rete elettrica utilizzando l’apposito cavo fornito in
dotazione; assicurarsi che la presa di corrente sia dotata di collegamento
di terra a norma di legge. Il circuito di alimentazione del DAG9300 è
protetto da un fusibile situato sulla presa di rete dell’apparecchio.
1.2 Power supply and earthing
This equipment is designed to work with a direct voltage of 230 Vca ±
10% 50/60 Hz. In accordance with the safety regulations, the mains
switch (9) works only for the mains power supply.
The equipment is supplied with a power cable equipped with a ground
wire. The corresponding terminal on the mains plug must not be removed
under any circumstances. Connect the mains plug (10) to the equipment
by using the power cable supplied. Make sure that the power outlet has
a ground connection in accordance with the law. A fuse located on the
mains plug protects the power supply circuit of the DAG9300.
1.3 Note di sicurezza
Ogni intervento all’interno dell’apparecchio, quale operazioni di
manutenzione od altro, deve essere effettuato solo da personale
specializzato: la rimozione del coperchio rende accessibili parti con
rischio di scosse elettriche. Prima di rimuovere il coperchio accertarsi
sempre che il cavo di rete sia staccato. Nel caso di accidentale caduta
di liquidi sull’apparecchio, staccare immediatamente la spina di rete ed
interpellare il centro di assistenza PASO più vicino. La connessione
di telaio (11) consente di collegare altre apparecchiature per la sola
funzione di schermatura dei segnali a basso livello: questa presa non
deve essere utilizzata per il collegamento di sicurezza del telaio
alla terra.
1.3 Safety notes
Any work inside the equipment, such as selecting some of the modes
of operation or applying accessories may only be carried out by
specialised personnel. On removing the cover, parts entailing a
danger of electric shocks will be made accessible. Always make
sure that the mains cable of the power-supply module is disconnected
before removing the panels. If any liquid is accidentally spilt on the
equipment, disconnect the mains cable immediately and contact the
nearest PASO Service Centre. The frame ground connection (11) can
be used to connect other equipment for the sole purpose of shielding
low-level signals. This socket must never be used for the safety
connection of the frame to earth.
Avvertenze per lo smaltimento del prodotto ai sensi
della Direttiva Europea 2002/96/EC Alla fine della sua
vita utile il prodotto non deve essere smaltito insieme
ai rifiuti urbani, ma deve essere consegnato presso gli
appositi centri di raccolta differenziata predisposti dalle
amministrazioni comunali, oppure presso i rivenditori che
forniscono questo servizio. Smaltire separatamente un rifiuto elettrico
e/o elettronico (RAEE) consente di evitare possibili conseguenze
negative per l’ambiente e per la salute derivanti da un suo smaltimento
inadeguato e permette di recuperare i materiali di cui è composto al
fine di ottenere un importante risparmio di energia e di risorse. Su
ciascun prodotto è riportato a questo scopo il marchio del contenitore
di spazzatura barrato.
Important information for correct disposal of the
product in accordance with EC Directive 2002/96/EC
This product must not be disposed of as urban waste at
the end of its working life. It must be taken to a special
waste collection centre licensed by the local authorities
or to a dealer providing this service. Separate disposal
of electric and/or electronic equipment (WEEE) will avoid possible
negative consequences for the environment and for health resulting
from inappropriate disposal, and will enable the constituent materials
to be recovered, with significant savings in energy and resources. As
a reminder of the need to dispose of this equipment separately, the
product is marked with a crossed-out wheeled dustbin.
Questo prodotto è conforme alle Direttive della
Comunità Europea sotto le quali lo stesso ricade.
This product is in keeping with the
relevant European Community Directives.
DAG9300
2. DESCRIZIONE GENERALE
Il DAG9300 è un generatore di segnali d’allarme che offre la possibilità
di registrare e riprodurre 2 messaggi vocali. Gli allarmi generabili sono
12 (a scelta tra 20 diversi toni sintetizzati disponibili).
L’attivazione dei toni e dei messaggi pre-registrati può avvenire tramite
tasti frontali oppure tramite contatti posteriori.
Inoltre, collegando una postazione microfonica PASO Serie B711
all’ingresso di linea posteriore ed alla morsettiera BASE, è possibile
registrare un messaggio vocale e riprodurlo in modo ritardato al
termine della registrazione (modalità “DELAY PLAY”) oppure riprodurre
il messaggio registrato in precedenza attivandolo dal pulsante a bordo
della postazione (modalità “REC PLAY”).
2. GENERAL DESCRIPTION
The DAG9300 is an alarm signal generator enabling two voice messages
to be recorded and played out. The alarms that can be generated are
12 (to be chosen from among the 20 different synthesised tones at
disposal.
The tones and pre-recorded messages can be activated either by
means of front-panel keys or of rear-panel contacts. Furthermore, if
a PASO microphone station of the B711 range is connected to the
rear-panel line input and to the BASE terminal block, it is possible to
record a voice message and to play it out with a delay at the end of
the recording (“DELAY PLAY” mode). As an alternative, a pre-recorded
message can be played out by activating it by means of the pushbutton on the station (“REC PLAY” mode).
2.1 Riferimenti numerati
2.1 Numbered references
Pannello frontale
(1) Altoparlante.
(2) Microfono elettrete.
(3) Display.
(4) Tasto MSG 1 (invio messaggio 1).
(5) Tasto MSG 2 (invio messaggio 2).
(6) Tasto SET/REC
(modifica impostazioni / registrazione messaggi).
(7) Tasto VIS/STOP
(visualizzazione impostazioni / interruzione riproduzione).
(8) Tasti selezione tono (TONE 1÷C).
(9) Interruttore d’accensione con spia luminosa.
Front panel
(1) Loudspeaker.
(2) Electret microphone.
(3) Display.
(4) MSG 1 key (send message 1).
(5) MSG 2 key (send message 2).
(6) SET/REC key
(change settings / recording of messages).
(7) VIS/STOP key
(display settings / stop playing).
(8) Tone-selection keys (TONE 1÷C).
(9) ON/OFF switch with LED.
Pannello posteriore
(10) Spina di rete con fusibile incorporato.
(11) Morsetto per connessione telaio.
(12) Morsettiera per alimentazione esterna @24Vcc.
(13) Morsettiera per collegamento a contatti esterni.
(14) Morsettiera relè precedenza.
(15) Morsettiera per collegamento a postazioni B711.
(16) Regolazione frequenza tono.
(17) Prese RCA d’ingresso per sorgenti ausiliarie.
(18) Prese RCA per il segnale d’uscita.
(19) Regolazione livello ingressi ausiliari.
Rear panel
(10) Mains plug with built-in fuse.
(11) Terminal for connection of frame.
(12) Terminal block for external 24 VDC power supply.
(13) Terminal block for connection to external contacts.
(14) Terminal block for precedence relay.
(15) Terminal block for connection to B711 microphone stations.
(16) Tone-frequency adjustment.
(17) RCA input sockets for auxiliary sources.
(18) RCA input sockets for the output signal.
(19) Adjustment of level of auxiliary inputs.
DAG9300
3. USO
3.1 Configurazione
Durante la fase d’accensione dell’apparecchio, è possibile impostare
alcuni modi di funzionamento, di seguito descritti in dettaglio.
3. USE
3.1 Configuration
When switching on the equipment, it is possible to set several operating
modes, described in detail below.
•
Abilitazione dei tasti
Ad apparecchio spento, tenere premuto il tasto MSG 1. Accendere
l’apparecchio e rilasciare il tasto: sul display verrà visualizzato il
carattere “E” (enabled).
•
To enabling the keys
With the equipment switched off, hold down the MSG 1 key.
Switch on the equipment and then release the key: the letter “E”
(enabled) will appear on the display.
•
Disabilitazione dei tasti
Ad apparecchio spento, tenere premuto il tasto STOP. Accendere
l’apparecchio e rilasciare il tasto: sul display verrà visualizzato il
carattere “d” (disabled).
•
To disable the keys
With the equipment switched off, hold down the STOP key.
Switch on the equipment and then release the key: the letter “d”
(disabled) will appear on the display.
•
Ripristino impostazioni
Ad apparecchio spento, tenere premuto il tasto TONE A.
Accendere l’apparecchio e rilasciare il tasto: verranno ripristinate
le impostazioni di fabbrica (vedi par. 4.1, pag. 7).
•
To restore the settings
With the equipment switched off, hold down the TONE A key.
Switch on the equipment and release the key: the factory settings
will be restored (see point 4.1 on page 7).
•
Formattazione memoria
Ad apparecchio spento, tenere premuti contemporaneamente i
tasti TONE B e TONE C. Accendere l’apparecchio e rilasciare
i tasti: verrà riformattata tutta la memoria interna. Questa
operazione può rendersi necessaria in caso la memoria risulti
irrimediabilmente corrotta (ad esempio, in seguito ad un black-out
dell’energia elettrica durante la registrazione di un messaggio).
•
To format the memory
With the equipment switched off, hold down the TONE B and TONE
C keys at the same time. Switch on the equipment and release
the keys: the whole internal memory will be re-formatted. This
operation may become necessary if the memory is irretrievably
corrupt (e.g. following a power outage while a message is being
recorded).
3.2 Settings and adjustments
While the equipment is working normally, it is possible to set several
operating modes, described below:
3.2 Impostazioni e regolazioni
Durante il normale funzionamento dell’apparecchio, è possibile
impostare alcuni modi di funzionamento, di seguito descritti:
•
Volume altoparlante – / Volume OUT AUX –
Premere il tasto SET/REC e successivamente TONE 1/VOL–.
•
Loudspeaker volume – / OUT AUX volume –
Press the SET/REC key, then the TONE 1/VOL– key.
•
Volume altoparlante + / Volume OUT AUX +
Premere il tasto SET/REC e successivamente TONE 2/VOL+.
•
Loudspeaker +volume / OUT AUX volume +
Press the SET/REC key, then the TONE 2/VOL+ key.
•
Disabilitazione altoparlante
Premere il tasto SET/REC e successivamente TONE 3; il display
visualizza il carattere “o”.
•
Disabling the loudspeaker
Press the SET/REC key, then the TONE 3 key; the letter “o” will
appear on the display.
•
Abilitazione altoparlante
Premere il tasto SET/REC e successivamente TONE 4; il display
visualizza il carattere “F”.
•
Enabling the loudspeaker
Press the SET/REC key, then the TONE 4 key; the letter “F” will
appear on the display.
•
Modalità “REC PLAY”
Premere il tasto SET/REC e successivamente TONE 5; il display
visualizza il carattere “r”.
•
“REC PLAY” mode
Press the SET/REC key, then the TONE 5 key; the letter “r” will
appear on the display.
•
Modalità “DELAY PLAY”
Premere il tasto SET/REC e successivamente TONE 6; il display
visualizza il carattere “d”.
•
“DELAY PLAY” mode
Press the SET/REC key, then the TONE 6 key; the letter “d” will
appear on the display.
•
Qualità registrazione
> Normale: premere il tasto SET/REC e quindi TONE 7; il display visualizza il carattere “n”.
•
Quality of recording
> Normal: press the SET/REC key, then the TONE 7 key; the
letter “n” will appear on the display.
>
> High: press the SET/REC key, then the TONE 8 key; the
letter “H” will appear on the display.
•
Sorgente di registrazione
> MIC: premere il tasto SET/REC e quindi TONE 9; il display
visualizza il carattere “N”.
•
Source of recording
> MIC: press the SET/REC key, then the TONE 9 key; the letter
“N” will appear on the display.
> AUX: premere il tasto SET/REC e quindi TONE A; il display
visualizza il carattere “A”.
> AUX: press the SET/REC key, then the TONE A key; the
letter “A” will appear on the display.
•
Tone message time
> 1 min: premere il tasto SET/REC e quindi TONE B; il display visualizza il carattere “1”.
•
Tone message time
> 1 min: press the SET/REC key, then the TONE B key; the
number “1” will appear on the display.
>
> infinite: press the SET/REC key, then the TONE C key; the
number “8” will appear on the display.
Alta: premere il tasto SET/REC e quindi TONE 8; il display visualizza il carattere “H”.
infinito: premere il tasto SET/REC e quindi TONE C; il display visualizza il carattere “8”.
DAG9300
3.3 Visualizzazione impostazioni
In fase di funzionamento, è possibile visualizzare (senza modificarli)
i parametri sopra descritti eseguendo le medesime operazioni ma
sostituendo il tasto VIS/STOP (7) al tasto SET/REC.
3.3 Displaying the settings
During operation, it is possible to display the parameters described
above (without altering them), carrying out the same procedures but
replacing the VIS/STOP (7) key with the SET/REC key.
3.4 Abbinamento toni d’allarme/tasti contatti
I tasti TONE 1÷TONE C (8) permettono di riprodurre uno dei dodici
toni disponibili. Il tasto TONE 1 corrisponde, come selezione tono, al
contatto 1, il tasto TONE 2 al contatto 2 e così via sino al tasto TONE
C che corrisponde al contatto 12.
Il tasto MSG 1 corrisponde al contatto M1, il tasto MSG 2 corrisponde
al contatto M2.
E’ possibile abbinare ad ogni tasto TONE uno qualunque dei toni
disponibili (vedere la tabella di riferimento a pag. 8). Per effettuare
questo abbinamento procedere nel modo seguente:
3.4 Association of alarm tones/contact keys
The TONE 1 to TONE C keys (8) each enable one of the twelve
available tones to be reproduced. When selecting the tones, the TONE
1 key corresponds to contact 1, the TONE 2 key to contact 2 and so on
up to TONE C, which corresponds to contact 12.
The MSG 1 key corresponds to contact M1, the MSG 2 key to contact
M2.
It is possible to associate each TONE key with any one of the available
tones (see the reference table on page 8). To set these associations,
proceed as follows:
1) Abilitare l’altoparlante e regolarne il volume per permettere un
adeguato ascolto dei toni. Se il display mostra un carattere diverso
dal trattino (“-”) premere brevemente il tasto VIS/STOP (apparirà il
carattere “-”).
1) Enable the loudspeaker and adjust the loudspeaker volume to
enable the tones to be heard properly. If a character other than
a hyphen (“-”) is shown on the display, press the VIS/STOP key
briefly (the character “-” will appear).
2) Premere e mantenere premuto il tasto VIS/STOP (circa quattro
secondi) finché il trattino (carattere “-”) inizia a lampeggiare.
2) Press the VIS/STOP key and hold it down (for about four seconds)
until the hyphen sign ( “-”) starts to flash.
Premendo uno dei tasti TONE: verrà riprodotto il tono attualmente
abbinato al tasto stesso; per selezionare un nuovo tono, premere in
successione il tasto fino ad ottenere in altoparlante il tono desiderato.
Per memorizzare il nuovo abbinamento tasto/tono è sufficiente premere
il tasto SET/REC (6).
Qualora non si volesse memorizzare il nuovo abbinamento, sarà
sufficiente premere nuovamente il tasto VIS/STOP: in questo modo
verrà ripristinato l’abbinamento tasti/toni precedente.
When one of the TONE keys is pressed: the tone currently associated
with it will be played out. To select a new tone, press the key repeatedly
until the required tone is reproduced by the loudspeaker. To store this
new association between the key and the tone, simply press the SET/
REC key (6).
If you do not wish to store the new association, simply press the VIS/
STOP key again: this will cause the previous associations between the
keys and the tones to be restored.
3.5 Registrazione messaggio
Per effettuare la registrazione di un messaggio procedere così:
1) Premere e mantenere premuto il tasto SET/REC (6), quidi premere
il tasto MSG 1 (4) (MSG 2 per il messaggio 2); mantenere questa
situazione finchè sul display non apparirà il carattere “E” (erase)
che sta ad indicare l’inizio della cancellazione del messaggio
scelto. Una volta apparso il carattere “E” rilasciare entrambi i tasti
ed attendere che si illumini il punto decimale che sta ad indicare
l’inizio della registrazione.
2) Parlare ad una distanza di 10/20 centimetri dal microfono situato
sul frontale dell’apparecchio con volume di voce medio alto.
Una volta terminata la registrazione premere il tasto VIS/STOP.
Qualora la registrazione superi il tempo massimo disponibile, verrà interrotta automaticamente.
3) É possibile scegliere tra due qualità di registrazione, normale o alta
(vedi Par. 3.2 Impostazioni / regolazioni durante il funzionamento).
Con qualità di registrazione alta si ottiene una registrazione più
fedele a scapito però di una riduzione del tempo di registrazione
del 33% circa.
3.5 Recording a message
To record a message, proceed as follows:
1) Press the SET/REC key (6) and hold it down. Then press the MSG
1 key (4) (MSG 2 for message 2); retain this situation until the
letter “E” (Erase) appears on the display to indicate that the chosen
message has started to be deleted.
Once the letter “E” has appeared, release both keys and wait for
the decimal point to light up, showing that the recording has started..
É possibile registrare il messaggio anche dall’ingresso ausiliario: va
ripetuta la sequenza precedente dopo avere impostato ‘AUX’ come
sorgente di registrazione su (vedi Par. 3.2 Impostazioni e regolazioni).
In questo caso, andrà regolato - utilizzando il trimmer (17) - anche il
livello di ingresso AUX per ottenere un risultato ottimale.
It is also possible to record a message via the auxiliary input: repeat
the sequence indicated above after setting ‘AUX’ as the source of the
recording (see point 3.2 Settings and adjustments). In this case, it will
also be necessary to adjust the AUX input level – using the trimmer
(17) – so as to achieve the optimum result.
3.6 Riproduzione messaggio
Per riprodurre un messaggio registrato in precedenza è sufficiente, a
tasti abilitati, premere il relativo tasto (MSG 1 o MSG 2) oppure chiudere
il contatto relativo (contatto M1: MSG 1, contatto M2: MSG 2).
3.6 Playing out a message
To play out a message recorded earlier, simply press the associated
key (MSG 1 or MSG 2) (with the keys enabled) or close the appropriate
contact (contact M1: MSG 1, contact M2: MSG 2).
2) Speak at a distance of 10 to 20 centimetres from the microphone
on the front panel of the equipment, at a medium to high volume.
Once the recording has been completed, press the VIS/STOP key.
If the length of the recording exceeds the available time limit, it will
stop automatically.
3) It is possible to choose between two recording qualities: normal
and high (see point 3.2 Settings and adjustments). With a high
quality, the recording will be closer to the original, but penalising
the recording time by about 33%.
DAG9300
3.7 Riproduzione tono
Per riprodurre un tono è sufficiente, a tasti abilitati, premere il relativo
tasto TONE 1÷TONE C oppure chiudere il relativo contatto. Il tasti
TONE 1÷TONE C corrispondono ai contatti 1÷C.
3.7 Reproduction of a tone
To reproduce a tone, simply press the associated key TONE 1 to TONE
C (with the keys enabled) or close the appropriate contact. Keys TONE
1 to TONE C correspond to contacts 1 to C.
3.8 Contatto di priorità
Durante la riproduzione di un tono qualunque o di un messaggio viene
mantenuto chiuso il contatto pulito “PTY CONT” per eventuale priorità
verso apparecchiature esterne.
3.8 Priority contacts
While reproducing any tone or playing out any message, the clean
contact “PTY CONT” is kept closed, in order to be able to override
external equipment.
3.9 Modalità “DELAY PLAY”
La modalità “DELAY PLAY” è un’utile funzionalità che permette di
effettuare annunci vocali con diffusione ritardata nel tempo, in modo
da evitare l’innesco dell’Effetto Larsen* che si crea nei casi in cui il
microfono si trovi troppo vicino agli altoparlanti. L’apparecchio è
predisposto per un agevole funzionamento con le basi di chiamata
Serie B711, ma può essere utilizzato anche con altre apparecchiature,
ad esempio alcune interfacce telefoniche, purché queste ultime
dispongano di un’uscita audio a livello di linea e di un contatto pulito
che si chiuda in concomitanza con l’annuncio.
3.9 “DELAY PLAY” mode
The “DELAY PLAY” mode is a useful function for making voice
announcements to be broadcast at a later point in time, so as to avoid
triggering off acoustic feedback (the so-called Larsen effect*), which
is created when the microphone is too close to the loudspeakers. The
equipment has provisions for easy operation with the microphone
bases of the B711 range, although it can also be used with other
equipment, for instance some telephone interfaces, provided these
have an audio output at line level and a clean contact that closes at the
time of the announcement.
Per utilizzare questa modalità con una postazione B711, procedere
come segue:
1) collegare la base come illustrato in fig. 3.8.1;
2) impostare la modalità “DELAY PLAY” (vedi Par. 3.2, pag. 3);
3) premere il tasto PTT sulla postazione: partirà la registrazione,
parlare con un volume medio alto nel microfono.
Al rilascio del tasto PTT avverrà la riproduzione del messaggio
registrato in precedenza che, una volta riprodotto, verrà cancellato
per permettere una registrazione immediata quando verrà di nuovo
premuto.
To use this mode with a B711 microphone station, proceed as follows:.
* fischio acuto.
* screeching sound.
Nota: in questa modalità viene utilizzato il messaggio 2; il messaggio
1 rimane quindi a disposizione.
Note: In this mode, message 2 is used an message 1 remains on
stand-by.
“DELAY PLAY”
“REC PLAY”
Fig. 3.9.1
Fig. 3.10.1
1) Connect the base as illustrated in Fig. 3.8.1;
2) Set the “DELAY PLAY” mode (see point 3.2 on page 3);
3) Press the PTT key on the microphone station to start recording.
Speak into the microphone at a medium-to-high volume.
When the PTT key is released, the message that was recorded will
be played out, after which it will be deleted so as to enable immediate
recording of another message when the key is pressed again..
DAG9300
3.10 Modalità “REC PLAY”
In questa modalità è possibile, tramite una base di chiamata B711/6G, riprodurre un messaggio registrato precedentemente.
3.10 The “REC PLAY” mode
In this mode it is possible to use a B711/6-G microphone base to play
out a message recorded earlier.
3.10.1 Impostazione della base microfonica
Dopo aver collegato la base come indicato in figura 3.10.1, abilitare la
modalità “REC PLAY” (vedi Par. 3.2, pag. 3).
Sulla postazione andrà impostato, come tasto d’allarme, un tasto
di zona non utilizzato. Per impostare la modalità tasto invio allarme
abilitato sulla base, procedere come segue:
3.10.1 Setting the microphone base
After connecting the base as indicated in Figure 3.10.1, enable the
“REC PLAY” mode (see point 3.2 on page 3).
On the station, set a zone key that is not being used as an alarm
key. To set the key in the alarm-enabled mode, proceed as follows:.
1) Sulla base, premere contemporaneamente i tasti PTT e LOCK
e quindi alimentare la base inserendo il cavo alla presa AUDIO
OUT. Il led vicino al tasto PTT emetterà una sequenza di lampeggi..
1) On the base, press the PTT and LOCK keys both at the same time,
then power up the base by plugging the cable into the AUDIO OUT
socket. The LED close to the PTT key will produce a sequence of
flashes.
2) I led di zona/allarme daranno indicazione della funzionalità
correntemente impostata dei tasti a cui si riferiscono:
• Spento: tasto di chiamata zona.
• Acceso: tasto invio allarme abilitato.
• Lampeggiante: tasto invio allarme disabilitato.
2) The zone/alarm LED’s will indicate the functions set currently for
the keys to which they refer:
• OFF: zone-call key.
• ON: key enabled for sounding alarms.
• Flashing: key disabled for sounding alarms.
Per modificare la funzionalità dei tasti di zona premere il tasto di
zona desiderato fino a che il led abbinato al tasto di zona scielto per
effettuare la modalità “REC PLAY” rimanga acceso.
Per uscire, salvando le impostazioni, premere il tasto PTT; la postazione
è immediatamente pronta per l’uso.
To change the functions of the zone keys, press the required zone key
until the LED associated with the zone chosen for the “REC PLAY”
mode remains on.
To save the settings and exit, press the PTT key; the station will be
ready for immediate use.
3.10.2 Registrazione di un messaggio
Per effettuare la registrazione del messaggio in modalità “REC PLAY”
procedere come segue:
1) Premere il tasto in precedenza abilitato come tasto di allarme: il led
corrispondente inizierà a lampeggiare velocemente.
2) Premere nuovamente il tasto allarme, il led corrispondente inizierà
a lampeggiare lentamente.
3) Premere il tasto PTT, il messaggio presente verrà cancellato e
dopo circa un secondo inizierà la registrazione del messaggio. Per
terminare la registrazione rilasciare il tasto PTT.
4) Premere il tasto di allarme attivato in precedenza, il led relativo si
spegnerà.
3.10.2 Recording a message
To record messages in the “REC PLAY” mode, proceed as follows:.
1) Press the key previously enabled as an alarm key; the corresponding
LED will start to flash fast.
2) Press the alarm key again; the corresponding LED will start to flash
slowly.
3) Press the PTT key. The existing message will be erased and after
about one second recording of the new message will start. To end
the recording, release the PTT key.
4) Press the previously activated alarm key; the associated LED will
extinguish.
3.10.3 Riproduzione di un messaggio
Per riprodurre il messaggio registrato in precedenza:
1) Premere il tasto di allarme, il led corrispondente inizierà a
lampeggiare velocemente.
2) Premere di nuovo il tasto di allarme, inizierà la riproduzione del
messaggio pre registrato.
3) Premere nuovamente il tasto: il led si spegnerà.
3.10.3 Playing out a message
To play out a previously recorded message, proceed as follows:
1) Press the alarm key; the corresponding LED will start to flash fast.
2) Press the alarm key again; the pre-recorded message will start to
play out.
3) Press the key again: the LED will extinguish.
Nota:
Se nelle modalità “DELAY PLAY” e “REC PLAY” viene utilizzato il
messaggio 2, il messaggio 1 rimane a disposizione.
Nota:
If message 2 is used in the “DELAY PLAY” or “REC PLAY” modes,
message 1 remains on stand-by.
DAG9300
4.
4.
TABELLE DI RIFERIMENTO
REFERENCE TABLES
4.1 Factory settings
The following table contains a complete list of the parameters set at the
factory. The settings can be changed following the procedure indicated
under point 3.2 “Settings and adjustments” (page 3).
4.1 Impostazioni di fabbrica
Nella tabella sottostante viene riportato l’elenco completo dei parametri
impostati in fabbrica, modificabili seguendo le procedure indicate nel.
Par. 3.2 “Impostazioni e regolazioni” (pag. 3).
parametro
Parameter
Valore di fabbrica
Factory setting
Opzioni
Options
Volume altoparlante / AUX
Loudspeaker / AUX volume
6
Min: 1 ÷ Max: 8
Qualità di registrazione
Recording quality
Alta
High
Normale / Alta
Normal / High
Tempo riproduzione toni / messaggi
Tone / message playing time
Infinito
Infinite
Infinito / 1 minuto
Infinite / 1 minute
Sorgente di registrazione
Source of recording
Microfono elettrete interno.
Internal electret microphone
Microfono / AUX
Microphone / AUX
Operatività tasti
Operation of keys
Abilitati
Enabled
Abilitato / Disabilitato
Enabled / Disabled
Operatività altoparlante
Operation of loudspeaker
Abilitato
Enabled
Abilitato / Disabilitato
Enabled / Disabled
Tono
Tone
TONE 1
Monotonale lento
Slow single-tone
TONE 2
Monotonale veloce
Fast single-tone
TONE 3
Bitonale lento
Slow-two tone
TONE 4
Bitonale veloce
Fast two-tone
TONE 5
Sirena lenta
Slow siren
TONE 6
Sirena veloce
Fast siren
TONE 7
Slow whoop down
Slow whoop down
TONE 8
Slow whoop up
Slow whoop up
TONE 9
Whoop olandese (2 volte)
Dutch whoop (2 volte)
TONE A
Whoop olandese continuo
Dutch continuous whoop
TONE b
Allarme francese
French alarm
TONE C
Allarme continuo (tono continuo regolabile)
Continuous alarm (adjustable continuous tone)
Tasto / Key
DAG9300
4.2 Elenco dei toni disponibili
Nella tabella sottostante viene riportato l’elenco completo dei toni
disponibili.
Codice / Code
Display
4.2 List of available tones
The following table provides a complete list of the available tones.
Tono
Tone
1
Monotonale lento
Slow single-tone
2
Monotonale veloce
Fast single-tone
3
Bitonale lento
Slow-two tone
4
Bitonale veloce
Fast two-tone
5
Sirena lenta
Slow siren
6
Sirena veloce
Fast siren
7
Slow whoop down
Slow whoop down
8
Slow whoop up
Slow whoop up
9
Fine allarme inglese
English end-of-alarm
10
Whoop inglese
English whoop
11
Polizia inglese
English police
12
Crash inglese
English crash
13
Allarme fuoco inglese
English fire alarm
14
Air raid inglese
English air raid
15
Allarme fuoco tedesco
German fire alarm
16
Fine allarme fuoco tedesco
German end-of-fire-alarm
17
Whoop olandese (2 volte)
Dutch whoop (2 volte)
18
Whoop olandese continuo
Dutch continuous whoop
19
Allarme francese
French alarm
20
Allarme continuo (tono continuo regolabile)
Continuous alarm (adjustable continuous tone)
DAG9300
caratteristiche tecniche
Alimentazione da rete
dag9300
230 V ±10% 50/60 Hz 5W
Alimentazione esterna in corrente continua
24 V 140 mA
Numero allarmi / messaggi registrati
Tempo massimo di registrazione messaggio
technical specifications
External DC power supply
12 / 2
Number of alarms / messages recorded
norm
high
60 sec.
Durata riproduzione allarmi
40 sec.
60 sec. / continuo
Range frequenza allarme continuo
400 ÷ 900 Hz
Continuous alarm frequency range
Auxiliary input
Sensibilità / Impedenza
Sensitivity / Impedance
200 mV / 25 kW
Rapporto segnale/disturbo
75 dB
Risposta in frequenza
S/N Ratio
40 ÷ 20.000 Hz
Frequency response
Messaggio registrato
Recorded message
Rapporto segnale/disturbo
Livello d’uscita / Impedenza
Temperatura di funzionamento
Dimensioni
Peso
Maximum message recording time
Alarm playing time
Ingresso ausiliario
Risposta in frequenza
Mains power supply
50 dB
norm
S/N Ratio
high
50 ÷ 3.500 Hz
50 ÷ 5.500 Hz
1 V / 50 W
-10°C ÷ +45°C
482 x 44 x 135 mm
2,5 kg
10
Frequency response
Output level / Impedance
Operating temperature range
Dimensions
Weight
GARANZIA
Questo prodotto è garantito esente da difetti nelle sue materie prime
e nel suo montaggio; il periodo di garanzia è regolamentato dalle
norme vigenti. La Paso riparerà gratuitamente il prodotto difettoso qui
garantito se il difetto risulterà essersi verificato durante l’uso normale;
la garanzia non si estende quindi a prodotti usati ed installati in modo
errato, danneggiati meccanicamente, danneggiati da liquidi o da agenti
atmosferici. Il prodotto, risultato difettoso, dovrà essere inviato alla
Paso franco di spese di spedizione e ritorno. Questa garanzia non
ne comprende altre, esplicite od implicite, e non comprende danni o
incidenti conseguenti a persone o cose. Contattare i distributori PASO
della zona per maggiori informazioni sulla garanzia.
WARRANTY
This product is warranted to be free from defects in raw materials and
assembly. The warranty period is governed by the applicable provisions
of law. Paso will repair the product covered by this warranty free of
charge if it is faulty, provided the defect has occurred during normal
use. The warranty does not cover products that are improperly used
or installed, mechanically damaged or damaged by liquids or the
weather. If the product is found to be faulty, it must be sent to Paso
free of charges for shipment and return. This warranty does not include
any others, either explicit or implicit, and does not cover consequential
damage to property or personal injury. For further information
concerning the warranty contact your local PASO distributor.
Importante! L’utente ha la responsabilità di produrre una prova d’acquisto
(fattura o ricevuta) se vuole servirsi dell’assistenza coperta da garanzia.
Dovrà inoltre fornire data di acquisto, modello e numero di serie riportati
sull’apparecchio; a questo scopo, compilare come promemoria dei dati
richiesti lo spazio qui sotto.
Important! Should the user wish to avail himself of servicing under the
warranty, he must provide evidence of the purchase (invoice or receipt).
The user shall also indicate the date of purchase, model and serial number
indicated on the equipment. For this reason, you should complete the box
below as a reminder of the data required.
MODELLO / MODEL:..............................................................................................................................................................................................
NUMERO DI SERIE / SERIAL NUMBER:...............................................................................................................................................................
DATA D’ACQUISTO / PURCHASE DATE:..............................................................................................................................................................
Tutti gli apparecchi PASO sono costruiti nel rispetto delle più severe
normative internazionali di sicurezza ed in ottemperanza ai requisiti della
Comunità Europea. Per un corretto ed efficace uso dell’apparecchio è
importante prendere conoscenza di tutte le caratteristiche leggendo
attentamente le presenti istruzioni ed in particolare le note di sicurezza.
All PASO equipment is manufactured in accordance with the most
stringent international safety standards and in compliance with European
Community requisites. In order to use the equipment correctly and
effectively, it is important to be aware of all its characteristics by reading
these instructions and in particular the safety notes carefully.
S.p.A
Via Settembrini, 34 - 20020 Lainate (MI) - ITALIA
Tel. +39.0258077.1 Fax +39.0258077.277
http://www.paso.it E-mail: [email protected] • 11/13 • UDT - 11/709