1
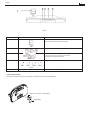
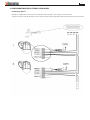
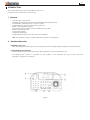
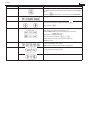
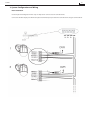
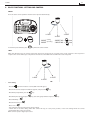
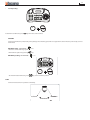
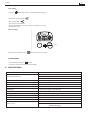
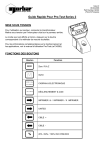
KEYBOARD
TASTIERA
4/8/16 CH H.264 Multiplex
DVR
Part.LE03094AB
LE03106AB
Part.
391856
MANUALEdiDI
Manuale
istruzioni
ISTRUZIONI
User manual
USER
MANUAL
391505/391506/391507
391856
2
INDICE
IT
INTRODUZIONE
1. Caratteristiche........................................................................................................................... 4
2. Descrizione hardware.............................................................................................................. 4
3. Configurazione del sistema e cablaggio.............................................................................. 7
INSTALLAZIONE DEL SISTEMA E APPLICAZIONI TIPICHE
1. Installazione del sistema......................................................................................................... 8
2. CONFIGURAZIONE PTZ ........................................................................................................... 8
3. CONFIGURAZIONE PRINCIPALE.............................................................................................. 9
4. TARATURA DEL JOYSTICK........................................................................................................ 10
5. CONTROLLI DI BASE................................................................................................................. 11
6. SCHEDA TECNICA...................................................................................................................... 13
Attenzione
- L’installazione e la taratura devono essere eseguite da personale qualificato.
- Non aprire esiste il rischio di scosse elettriche.
Utilizzare solo in condizioni di temperatura da (-10) a (+50) °C.
Non utilizzare con tensioni differenti da quelle specificate.
L’utilizzo di questo prodotto deve essere fatto nel rispetto delle norme vigenti, sia in materia di privacy (d.lgs.n.196/2003) sia di
tutela dei lavoratori (l.300/1970 Statuto dei lavoratori).
Istruzioni di sicurezza
Questo prodotto deve essere installato in conformità con le regole d’installazione e di preferenza da un elettricista qualificato. L’eventuale installazione e utilizzo improprio dello stesso possono comportare rischi
di shock elettrico o incendio.
Prima di procedere all’installazione, leggere attentamente le istruzioni associate e individuare un luogo di montaggio idoneo in funzione del prodotto.
Non aprire, smontare, alterare o modificare l’apparecchio eccetto speciale menzione indicata nel manuale. Tutti i prodotti Bticino devono essere esclusivamente aperti e riparati da personale adeguatamente
formato e autorizzato da Bticino. Qualsivoglia apertura o riparazione non autorizzata comporta l’esclusione di eventuali responsabilità, diritti alla sostituzione e garanzie.
Utilizzare esclusivamente accessori a marchio Bticino.
3
AVVERTENZE IMPORTANTI
1. LEGGERE E CONSERVARE LE ISTRUZIONI
Leggere il manuale di istruzioni prima di utilizzare
l’apparecchio.
Conservare il manuale per poterlo consultare in futuro.
9. PROTEZIONE CAVI E FILI
I fili e i cavi di alimentazione devono essere collocati in modo
tale da non essere calpestati o schiacciati da oggetti
sistemati sopra o contro di essi.
2. PULIZIA
Prima di procedere alla pulizia, spegnere l’apparecchio
e scollegarlo dalla presa di alimentazione elettrica.
Utilizzare un panno inumidito. Non utilizzare detergenti
aggressivi o spray.
10. FULMINI
Per garantire la protezione dell’apparecchio durante un
temporale o quando viene lasciato incustodito e
inutilizzato per lunghi periodi di tempo, si consiglia di staccare
la spina dalla presa e di scollegare eventuali antenne o
dispositivi collegati via cavo. Ciò previene eventuali danni a
causa di fulmini e sovraccarichi di voltaggio.
3. ACCESSORI
Non utilizzare apparecchi esterni non raccomandati
dal costruttore in quanto potrebbero compromettere la
funzionalità dell’unità e causare incendio, scosse elettriche
o lesioni.
4. UMIDITÀ
Non utilizzare l’apparecchio in prossimità di acqua o altri
liquidi.
5. SUPPORTI
L’apparecchio deve essere installato su una superficie fissa e
stabile. Qualsiasi accessorio di montaggio a parete o
scaffale dovrebbe essere installato attenendosi alle istruzioni
del costruttore. Maneggiare attrezzature pesanti con
attenzione. Arresti bruschi, pressioni eccessive e superfici
irregolari potrebbero provocare la caduta dell’apparecchio e
causare gravi danni a oggetti e persone.
6. VENTILAZIONE
Eventuali aperture presenti nell’apparecchio sono previste
per assicurare condizioni affidabili di funzionamento dell’unità
e proteggerla dal surriscaldamento.
Queste aperture non vanno assolutamente otturate o coperte.
7. FONTI DI ALIMENTAZIONE
L’apparecchio deve essere azionato soltanto con il tipo di
alimentazione riportato sulla targhetta di identificazione. Se
non si è certi del tipo di alimentazione di cui si dispone,
rivolgersi al rivenditore. Per apparecchi a batteria, consultare
le istruzioni per l’uso.
8. COLLEGAMENTO A TERRA O POLARIZZAZIONE
Gli apparecchi alimentati tramite una spina polarizzata (una
spina che presenta una lamella più grande dell’altra)
entreranno nella presa in un unico senso. Questa è una
funzione di sicurezza. Se non si riesce a infilare
completamente la spina, provare a capovolgerla. Non tentare
di disabilitare la funzione di sicurezza della presa polarizzata.
Corrente alternata: se l’apparecchio è alimentato tramite una
spina a tre poli con messa a terra, la spina potrà essere
inserita unicamente in una presa con messa a terra. Questa
è una funzione di sicurezza: non tentare di disabilitarla. Se
la presa non può accogliere il polo di messa a terra,
contattare un elettricista.
11. SOVRACCARICO
Non sovraccaricare le prese di corrente o le prolunghe poiché
ciò può causare incendio o scosse elettriche.
12. RIPARAZIONE
Non tentare di riparare il monitor video o l’apparecchio, in
quanto aprirlo o rimuovere i coperchi può causare tensioni
pericolose e altri rischi. Rivolgersi a personale qualificato.
13. DANNI CHE RICHIEDONO ASSISTENZA
Scollegare questo apparecchio dalla presa a muro e
rivolgersi a personale qualificato nelle seguenti situazioni:
A. Quando il cavo di alimentazione o l’alimentatore è
danneggiato.
B. Se sull‘apparecchio è stato versato del liquido o sono
caduti oggetti.
C. Se l’apparecchio è stato esposto a pioggia o acqua.
D. Se non funziona normalmente seguendo le istruzioni per
l’uso, operare unicamente sui comandi in esse descritti;
intervenire in modo scorretto su altri comandi potrebbe
danneggiare l’unità.
E. Se l’apparecchio è caduto o è stato danneggiato.
F. Quando l’ apparecchio mostra evidenti variazioni nelle
prestazioni.
14. RICAMBI
Quando se ne renda necessario l’uso, assicurarsi che il
Servizio Tecnico utilizzi parti di ricambio approvate dal
costruttore, o che abbiano le medesime caratteristiche del
pezzo originale. L’uso di componentistica non approvata
può causare incendio, scosse elettriche o altri pericoli.
15. CONTROLLO DI SICUREZZA
Al termine di ogni servizio di riparazione o assistenza tecnica
richiedere al servizio assistenza di effettuare tutti i controlli
necessari al fine di valutare se il prodotto sia in condizioni
operative adeguate.
16. INSTALLAZIONE IN LOCO
L’installazione dell’apparecchio deve essere realizzata a cura
di un tecnico qualificato conformemente a tutte le norme
locali.
391856
4
INTRODUZIONE
La tastiera è un accessorio per telecamere a cupola PTZ, etc.
Consente il controllo di 1-255 telecamere.
1. CARATTERISTICHE
•
•
•
•
•
•
•
•
•
•
Controlla da 1 a 255 telecamere.
Supporto multiprotocollo per ogni canale (CMT, WDS,WCY, CYN, WSL, Pelco).
Collegamento RS 485/RS-422 (Tx: porta 3, Trx: porta 1).
Preferenze utente programmabili (preimpostazioni, tour, sequenze programmate, etc.).
Joystick proporzionale a tre assi integrato.
Caricamento facilitato dei dati programmati tramite la porta di comunicazione seriale del PC.
Display LCD integrato da 2 righe di testo.
Supporto password utente.
Progettata per uso desktop.
Velocità di trasmissione programmabile per ogni ID (2,4~57,6 kbps).
Nota: le unità dovrebbero essere impostate sul protocollo di comunicazione e sulla stessa velocità di trasmissione.
2. DESCRIZIONE HARDWARE
Componentistica hardware
• La tastiera remota è dotata di tasti di comando di semplice utilizzo nella parte anteriore e di semplici connettori di entrata e uscita nella parte posteriore.
Tasti di comando e connessione
• L’unità è dotata di un’interfaccia utente principale. La maggior parte delle operazioni richiede soltanto una o due pressioni dei
tasti.
• La seguente tabella presenta una descrizione di ogni tasto e porta di connessione via cavo. Fare riferimento alla Figura 1 e alla
Figura 2.
Figura 1
5
Numero
Tasto
Descrizione
1
ESC / POWER
Premendo una volta il tasto ESC/POWER si accede alla funzione
accensione/spegnimento o al pulsante ESC. Led di stato attivato
a destra (rosso). Premendo un’altra volta si esce dalla modalità
POWER OFF (spento).
(Premere il tasto
OFF).
2
DISPLAY LCD
3
per circa 2~3 secondi e quindi POWER
Mostra ID telecamere, Protocollo, Stato Funzione, Stato generale,
etc.
Modifica il valore di impostazione ID telecamera, la configurazione
PTZ, (1+
),
Configurazione principale (2+
4
Controller
Tasti funzione
)
Hold: Blocco sistema (Sblocco: inserire password a 4 cifre ****)
SHIFT/TURBO: SHIFT - funzioni speciali (Personalizza)
TURBO - alta velocità
AUX : Attivazione/spegnimento apparecchi esterni
SET: Configurazione PTZ e principale (1 +
), (2+
CLOSE : Uscire da una funzione (tour, preset, pattern).
OPEN: Nessuna azione
5
6
Tasti funzione
)
F1 ~ MENU/AUTO: Tasti funzione
(Preset, Tour, Pattern, Scan, Auto).
MENU: Regolazione menu (Pan/Tilt) telecamera
Solo si la camera è configurata in manuale focus (non consigliato)
Comando zoom telecamera
391856
6
Figura 2
Numero
Tasto
Descrizione
1
Joystick
La telemetria del Joystick Blt consente un controllo preciso di Pan/
Tilt/Zoom (Rotazione/Inclinazione/Zoom).
2
Ingresso DV 12V
Ingresso DC 12V, 140mA
3
Porta USB, funzione mouse USB
(porta di connessione con apparecchi esterni)
Non utilizzato sulla gamma Bticino.
PORTA USB
4
Collegamento RS-485/RS-422 (Tx/Rx: porta 3, Trx: porta 1)
TRx
5
Tx3
Tx2
RS-485
Tx1
Program
Connettore di download (per aggiornamento programma)
Cambio della batteria
La batteria permette di salvare i prametri in caso di mancanza di alimentazione.
Batteria 9 V (non è in dotazione)
Coperchio
7
3. CONFIGURAZIONE DEL SISTEMA E CABLAGGIO
Installazione di base
Utilizzare la configurazione della tastiera solo quando le unità controllate sono collegate a un’unica tastiera.
Collegare la porta di uscita RS-485 della tastiera remota alla porta di ingresso RS-485 della prima unità tramite il blocco terminali.
391856
8
INSTALLAZIONE DEL SISTEMA E APPLICAZIONI TIPICHE
1. INSTALLAZIONE DEL SISTEMA
Installazione della tastiera
Prima di collegare la tastiera al sistema, assicurarsi che le unità da controllare siano completamente installate e funzionino
correttamente. Prima di utilizzare la tastiera, impostare il protocollo e la velocità di trasmissione (2,4~57,6kbps) in modalità PTZ
SETUP.
Seguire le fasi qui di seguito riportate per impostare il protocollo di comunicazione e la velocità di trasmissione.
2. CONFIGURAZIONE PTZ
Modalita PTZ
Selezionare 1+
, (2~3 secondi)
La schermata di configurazione consente di modificare ogni clausola programmabile.
CHANG.
DE NIV.eDE
MENU DE CONFIG.
Nota: la velocità di trasmissione deve essere la stessa per l’unità
controllata
la tastiera.
CONFIG. PZT
Ex_ cution de la commande
CONFIG.
[PTZ
SETUP PTZ 1]
PASSWORD
[****]
MOT DE PASSE
CONFIG.
[PTZ
SETUPPTZ 1]
1. ADDRESS
ADRESSE:
001
: 001
CONFIG.
[PTZ
SETUPPTZ 1]
2.
: PEL
2. MODEL
MODELE
: PEL
CONFIG.
PTZ 1]
[PTZ SETUP
3. PROTOCOL
PROTOCOLE:
PEL-D
3.
: PEL-D
: Inserimento
password
(configurazione
di fabbrica : “0000”)
SAISIE DU MOT
DE PASSE
(4 CHIFFRES)
: Modifica
indirizzo
(1 ~ 255 )(1-225)
+ ENT + ENT.
REGLAGE
DE L ADRESSE
’
: Modifica modello - Selezionare “CMT”
REGLAGE DU MODELE (WDS/WCY/CYN/WSL/Pelco)
: Modifica
protocollo
- Selezionare
“PEL -D”
REGLAGE
DU PROTOCOLE
(PEL-D/PEL-P/W-DRX)
CONFIG.
[PTZ
SETUPPTZ 1]
4. BAUDRATE
DEBIT: 2,4: K
4.
2,4 K
: Modifica velocità di trasmissione
REGLAGE “2,4KBPS”
DU DEBIT (2,4-57,6 KBPS)
Selezionare
CONFIG.
PTZ 1]
[PTZ SETUP
5.
PARITE:
NON
5. PARITY
: NONE
: Modifica
parità
REGLAGE DE LA PARITE (AUCUNE/PAIRE/IMPAIRE)
Selezionare “NONE”
CONFIG.
PTZ
[PTZ SETUP
6. PROP.
PROP:
ON
: ON
1]
CONFIG.
PTZ 1]
[PTZ SETUP
7.
SAUVEGARDE
7. SAVE
CONFIG. PTZ
[PTZ SETUP
8.
QUITTER
8. EXIT
1]
: Selezionare la velocità della camera
PTZ
lenta(ON/OFF)
=> PROP:: commande
ON
PROP.
de vitesse proportionnelle
PTZ veloce => PROP: OFF
Selezionare “ON”
SAUVEGARDE
DONNEES DE CONFIGURATION
: Salvataggio
datiDES
configurazione
: Uscita
dal menu
QUITTER LE MENU
9
3. CONFIGURAZIONE PRINCIPALE
Modalità Main Setup, selezionare 2+
(2~3 secondi).
La schermata di configurazione consente di modificare ogni clausola programmabile.
Nota: la velocità di trasmissione deve essere la stessa per l’unità controllata e la tastiera.
Inserimento password (configurazione di fabbrica : “0000”)
Mostra la versione del Software
: Cursor move
Mostra la data Software
: Character select
Inserice il nome della
camera
: ID No. 1 : No cambia
: 2.4 KBPS ~ 57.6 KBPS (Velocita di communicazione di DVR)
No cambia - Selezionare 9,6 K
: RS422 / RS485 (Comunicazione controlli)
No cambia - Selezionare RS485
[MAIN SETUP]
7. BACKLIGHT : AUTO
: OFF/ON/AUTO Retroilluminazione des schermo
- Auto : Si spegne dopo 30 sec
- ON
- OFF
[MAIN SETUP]
8. SLEEP : OFF
: OFF/1Min/5Min/10Min/30 Min/ 1 ora
Impostazione per rispamiare energia in modalità standby.
[MAIN SETUP]
9. BUZZER : ON
: ON/OFF
Selezionare il segnale acustico (ON/OFF)
391856
10
[MAIN SETUP]
10. TERMINATE : ON
: ON/OFF
Selezionare la fine
[MAIN SETUP]
11. JOYSTICK SPD
: Select joystick speed from 50MS ~ 300MS
Selezionare la velocità del joystick
[MAIN SETUP]
12. MOUSE SPD : HIG
: HIG/MID/LOW
Velocità di mouse (con DVR). No cambia.
Non utilizzato summa gamma Bticino
[MAIN SETUP]
13. PASSWORD: ****
Modifica della password
[MAIN SETUP]
14. FACTORY SET
Configurazione di fabbrica : NO/SI
(selezionare si e premere sul ENT).
[MAIN SETUP]
15. SAVE / EXIT
Selezionare “YES” per salvare
4. TARATURA DEL JOYSTICK
La tastiera permette di impostare lo spostamento massimo del joystick.
Fare solo si nota un problema. 3 +
3 secondi.
Guarda il centralizzato
Spostare il joystick al massimo a sinistra e premere sul ENT
Spostare il joystick al massimo a destro e premere sul ENT
Spostare il joystick al massimo verso l’alto e premere sul ENT
Spostare il joystick al massimo verso il basso e premere sul ENT
Girare la testa a joystick, l’importo massimo di orario,
e premere ENT
Girare la testa a joystick, l’importo massimo in senso antiorario, e
premere ENT
Selezionare SI o NO e premere ENT
11
5. CONTROLLI DI BASE
PRESET
Utente puo impostare la posizione della fotocamera dove vuole vedere.
1
1+PSET
+
1
PSET
F1
+
1
PSET
3+PSET
PSET
PRESET
F1
PRESET
Per uscire dalla funzione, premere
3+PSET
1+PSET
2+PSET
2+PSET
: PRESETimpostazione
NO. + F1 3sec
PRESET
: PRESET NO. +
: PRESETattivazione
NO. + F1 1sec
PRESET
: PRESET NO. +
PSET
F1
3sec
PSET
1sec
PSET
F1
quando la camera è fissa.
TOUR
Quanto la funzione Tour è attivata, la camera si muove dal preset assegnato come primo punto al assegnato preimpostato
come l’ultimo punto. La camera soggiorno per ogni punto, per un periodo regolabile (Dwell parametro).
1
•
1
+
1+PSET
TOUR
+
TOUR
3+PSET
1+PSET
2+PSET
2+PSET
F2
Tour impostazione
1
- Premere il tasto
TOUR
: TOUR NO. +
TOUR
3 sec. Menu apparirà
sullo schermo.
TOUR
: TOUR NO. +
TOUR
F2
TOUR
F2
TOUR
F2
.
3 sec
: TOUR NO. +
1sec
: TOUR NO. +
3+PSET
TOUR
F2
TOUR
F2
3 sec
1sec
- Vai al menu Dome Camera Setup, con il joystick, e premere il tasto
- Vai al menu Group Setup +
.
- Vai al opzione Group No. +
.
- Selezionare il gruppo numero +
- Vai al Edit Group +
- Vai al linea no action +
- Vai al linea 1 +
- Selezionare la prima azione (preset, swing, pattern).
- “Dwell” : è il periodo durante il quale la camera rimane in ogni posizione, o è il periodo durante il quale la camera
rimane fisso dopo il movimento (swing o pattern).
- OPT è la velocità della camera, in gradi per secondo.
391856
12
•
•
•
•
•
•
•
•
•
•
•
•
•
•
•
Tour attivazione :
Per uscire dalla funzione, premere
1
+
1+PSET
TOUR
3+PSET
2+PSET
F2
TOUR
TOUR
quando la camera è fissa.
PATTERN
Camera memorizza il percorso descritto dal joystick, e ripete continuamente.
PATTERN impostazione : PATTERN NO. +
- Spostare la camera con il joystick.
- Ricordo il percorso con il tasto
PATTERN attivazione : PATTERN NO. +
: TOUR NO. +
: TOUR NO. +
TOUR
F2
TOUR
3 sec
.
1 sec
90
90
1
3+PSET
+
F2
3 sec
1sec
PATT
1
PATTERN
PATTERN
F3
+
270
270
PATT
F3
: PATTERN
NO. PATTERN
+
3sec
PATTERN
: PATTERN NO.
+
1sec
PATT
F3
PATT
PATT
: PATTERN NO. +
: PATTERN NO. +
F3
PATT
F3
F3
PSET
NO. +
T NO. +
- Per uscire dalla funzione, premere
F1
3sec
PSET
1sec
F1
3sec
1se
al termine dell percorso.
SCAN
La camera si muove tra due posizioni, di continuo.
B
BPosizione
pointA point
A point
Posizione
A
1
+
SCAN
F4
1
SCAN
SCAN
+
B point
SCAN
F4
: SCAN NO. + F4 SCAN
3sec
SCAN
: SCAN NO. +
1sec
SCAN
SCAN
F4
SCAN
: SCAN NO. + F4 3sec
: SCAN NO. +
1sec
SCAN
F4
90
•
270
Scan impostazione :
1
+
PATT
PATTERN
F3
3 sec. Menu apparira
sullo schermo.
PATTERN
- Premere il tasto
- Vai al menu Dome Camera Setup +
- Vai al menu Swing Setup +
.
- Selezionare 2 posizioni.
- Scegliere la velocità tra due posizioni, in gradi per secondo.
- Uscire dal menu.
•
Scan attivazione :
+
3sec
1sec
F3
PATT
F3
.
B point
1 sec.
SCAN
SCAN
F4
Per uscire dalla funzione, premere
SCAN
: SCAN NO. + F4 3sec
SCAN
: SCAN NO. +
1sec
quando la
camera è fissa.
SYSTEM LOCKING
- Per bloccare la tastiera premere
(2s).
- Per sbloccare, inserire la password (di default 0000).
6. SCHEDA TECNICA
PATT
: PATTERN NO. +
: PATTERN NO. +
A point
1
13
SCAN
F4
MENU
Modello AUTO
391856
Interfaccia: RS-485 (Tx porta 3, Trx porta 1) P
Collegamento tastiera
Distanza operativa Pan/Tilt: 1029 m (4700 ft (piedi)) Cavo AWG 24
Protocollo: Multiplo (Pelco-d, etc.) (Velocità di trasmissione selezionabile)
Connettore
BLOCCO TERMINALI (8p)
Tastiera
Tasti in gomma
Tastierino numerico e tasto funzione telecamera
Joystick
3 assi, velocità variabile con zoom
Tensione di ingresso
12V DC o 9V batt (modalità batteria)
Consumo elettric
Max.140mA
Display LCD
Display grafico: display grafico 16 x 2
Temperatura di esercizio
0 - 45°C
Umidità
10% -70% non condensante
Peso e dimensioni
280(L) x 174(P) x 92(A), Netto: 0,7 Kg Lordo: 1,7Kg
TASTIERA, ADATTATORE
La confezione include
La confezione include: MANUALE,
BLOCCO TERMINALI (8p)
391856
14
15
TABLE OF CONTENTS
UK
INTRODUCTION
1. Features...................................................................................................................................... 17
2. Hardware Overview................................................................................................................. 17
3. System Configuration and Wiring......................................................................................... 20
SYSTEM INSTALLATION & TYPICAL APPLICATIONS
1. System Installation................................................................................................................... 21
2. PTZ SETUP.................................................................................................................................. 21
3. MAIN SETUP............................................................................................................................... 22
4. JOYSTICK CALIBRATION........................................................................................................... 23
5. BASIC FUNCTIONS : SETTING AND CONTROL..................................................................... 24
6. SPECIFICATIONS........................................................................................................................ 26
Warning
- The installation and calibration must be carried out by highly skilled personnel.
- Do not open there may be a risk of electric shock.
Use only for the following temperature conditions: from (-10) to (+50) °C.
Do not use with voltages different from the ones specified.
Safety instructions
This product should be installed in line with installation rules, preferably by a qualified electrician. Incorrect installation and use can lead to risk of electric shock or fire.
Before carrying out the installation, read the instructions and take account of the product’s specific mounting location.
Do not open up, dismantle, alter or modify the device except where specifically required to do so by the instructions. All Bticino products must be opened and repaired exclusively by personnel trained and
approved by Bticino. Any unauthorised opening or repair completely cancels all liabilities and the rights to replacement and guarantees.
Use only Bticino brand accessories.
391856
16
IMPORTANT SAFEGUARDS
1. READ AND RETAIN INSTRUCTIONS
Read the instruction manual before operating the
equipment.
Retain the manual for future reference.
9. CORD AND CABLE PROTECTION
Route power cords and cables in a manner to protect
them from damage by being walked on or pinched by
items places upon or against them.
2. CLEANING
Turn the unit off and unplug from the power outlet
before cleaning. Use a damp cloth for cleaning.
Do not use harsh cleansers or aerosol cleaners.
10. LIGHTNING
For protection of the equipment during a lightning storm
or when it is left unattended and unused for long
periods of time, unplug the unit from the wall outlet.
Disconnect any antennas or cable systems that may be
connected to the equipment. This willprevent damage
to the equipment due to lightning or power line surges.
3. ATTACHMENTS
Do not use attachments unless recommended by
manufactured as they may affect the functionality of the
unit and result in the risk of fire, electric shock or injury.
4. MOISTURE
Do not use equipment near water or other liquids.
5. ACCESSORIES
Equipment should be installed in a safe, stable location.
Any wall or shelf mounting accessory equipment should
be installed using the manufactures instructions. Care
should be used when moving heavy equipment. Quick
stops, excessive force, and uneven surfaces may
cause the equipment to fall causing serious injury to
persons and objects.
6. VENTILATION
Openings in the equipment, if any, are provided for
ventilation to ensure reliable operation of the unit and
to protect if from overheating. These openings must
not be blocked or covered
7. POWER SOURCES
The equipment should be operated only from the type
of power source indicated on the marking label.
If you are not sure of the type of power supplied at the
installation location, contact your dealer. For
equipment designed to operate from battery power,
refer to the operating instructions.
8. GROUNDING OR POLARIZATION
Equipment that is powered through a polarized plug
(a plug with one blade wider than the other) will fit
into the power outlet only one way. This is a safety
feature. If you are unable to insert the plug fully into
the outlet, try reversing the plug. Do not defeat the
safety purpose of the polarized plug.
Alternate Warning: If the equipment is powered
through a three way grounding type plug, a plug having
a third (grounding) pin, will only fit into a grounding-type
power outlet. This is a safety feature.
Do not defeat the safety purpose of the grounding type
plug. If your outlet does not have the grounding plug
receptacle, contact your local electrician.
11. OVERLOADING
Do not overload wall outlets and extension cords as
this can result in a risk of fire or electric shock.
12. SERVICING
Do not attempt to service the video monitor or
equipment yourself as opening or removing covers may
expose you to dangerous voltage or other hazards.
Refer all servicing to qualified service personnel.
13. DAMAGE REQUIRING SERVICE
Unplug the equipment from the wall outlet and refer
servicing to qualified service personnel under the
following conditions:
A. When the power supply cord or the plug has been
damaged.
B. If liquid has spilled or objects have fallen into
the unit.
C. If the equipment has been exposed to water or
other liquids.
D. If the equipment does not operate normally by
following the operating instructions, adjust only those
controls that are covered by the operating
instructions. Improper adjustment of other controls
may result in damage to the unit.
E. If the equipment has been dropped or the casing
damaged.
F. When the equipment exhibits a distinct change
in performance.
14. REPLACEMENT PARTS
When replacement parts are required, be sure the
service technician uses replacement parts specified by
the manufacturer or that have the same characteristics
as the original part. Unauthorized substitutions may
result in fire, electric shock, or other hazards.
15. SAFETY CHECK
Upon completion of any service or repairs to the
equipment, ask the service technician to perform safety
checks to verify that the equipment is in proper
operating condition.
16. FIELD INSTALLATION
The installation of equipment should be made by a
Qualified service person and should conform to all local
codes.
17
INTRODUCTION
This remote keyboard is an accessory for PTZ dome camera, etc
It allows the user to control from 1 to 255 cameras.
1. Features
•
•
•
•
•
•
•
•
•
•
Controls from 1 to 255 cameras.
Multiple protocol supported in each channel (CMT, WDS,WCY, CYN, WSL, Pelco).
RS 485/RS-422 communication (Tx : 3 port , Trx :1 port).
Programmable user preferences. (preset, tour, group, etc.).
Built-in 3-Axis proportional joystick
Easy upload programmed data via serial communication port of PC.
Built-in 2 lines character LCD.
User password support.
Designed for desktop use
Programmable transmission speed for each ID. (2.4~57.6kbps)
Note: units should be set to the communication protocol and the same baud rate.
2. Hardware Overview
Hardware Components
• This remote keyboard contains easy to use control keys on the front and simple input and output connectors on the back
Control buttons & connection
• The unit provides the primary operator interface. Most operations are one or two buttons presses.
• The following table contains a description for each buttons on the keyboard and port of cable connection.
Use Figure 1 and Figure 2 as a reference.
Figure 1
391856
18
Number
Button
Description
1
ESC / POWER
Pressing the ESC/POWER button enters the Power on/off or escape
key. Right description led on(red). Pressing it again exits the POWER
OFF.
(Push the
2
DISPLAY LCD
3
Number
Displays Camera ID, Protocol, Function status, General status, etc
Camera ID setting value change, PTZ setup(1+
Main setup(2+
4
Controller
Function keys
button (about 2~3 seconds) and then POWER OFF)
),
)
Hold: System locking
(Unlocking: Input the Pass word 4 digit ****)
SHIFT/TURBO: SHIFT-Key for special function (Customize) /
TURBO -High Speed
AUX: External equipment on/off
SET: PTZ and main setup (1 +
), (2+
)
CLOSE: Exit from tour, preset and pattern functions
OPEN: No action
5
6
Function keys
F1 ~ MENU/AUTO : Function Keys
(Preset, Tour, Pattern, Scan, Auto).
MENU: Used for Camera (Pan/Tilt) Menu adjustment.
Camera Focus control. Only if the speed dome is configured (not
recommended) in manual setting.
Camera Zoom control.
19
Figure 2
Number
Button
Description
1
Joystick
2
DV 12V Input
Telemetry Joystick allows precise control of Pan/Tilt/Zoom
DC 12V Input, 140mA
3
Universal Serial Bus Port, USB Mouse function
(External Equipment communication port)
Not used for Bticino range.
USB PORT
4
RS-485/RS-422 communications. (Tx/Rx : 3 port , Trx :1 port)
TRx
5
Tx3
Tx2
RS-485
Tx1
Program
Download connector (For Program Update)
Battery change’
Battery allows to save parameters in case of power supply failure.
9 V battery (not supplied)
Battery cover
391856
20
3. System Configuration and Wiring
Basic Installation
Use the Keyboard Configuration when only one keyboard is connected to the controlled units.
Connect the RS-485 output port of Remote keyboard to RS-485 input port of the first controlled unit using the terminal block
21
SYSTEM INSTALLATION & TYPICAL APPLICATIONS
1. System Installation
Keyboard Installation
Before you start connecting the keyboard equipment to your system, make sure the units to be controlled are completely
installed and everything is working correctly. Before use of this keyboard, you should set the protocol and baud rate (2.4~57.6kbps)
in the PTZ SETUP mode.
Use the following steps to set the communication protocol and baud rate.
2. PTZ SETUP
PTZ SETUP
PTZ Setup mode, select 1+
, (2~3 seconds) setup screen allows you to make change ench programmable clause.
Note: The baud rate must be the same between the controlled unit and the keyboard.
CHANG. DE NIV. DE MENU DE CONFIG.
PTZ SETUP
CONFIG. PZT
CONFIG.
[PTZ
SETUP PTZ 1]
PASSWORD
[****]
MOT DE PASSE
Ex_ cution de la commande
SAISIE
DU MOT
DE PASSE
CHIFFRES)
Input
password
(Factory
set : (4
0000)
CONFIG.
[PTZ
SETUPPTZ 1]
1. ADDRESS
ADRESSE:
001
: 001
REGLAGE
DEaddress
L ADRESSE
(1-225)
+ ENT.
: Input
camera
joystick
’ by using
(1~255) + ENT
CONFIG.
[PTZ
SETUPPTZ 1]
2.
: PEL
2. MODEL
MODELE
: PEL
REGLAGE
DU MODELE
(WDS/WCY/CYN/WSL/Pelco)
: Find
the camera
model which
user want to control by using joystick
Choose “CMT”
CONFIG.
PTZ 1]
[PTZ SETUP
3. PROTOCOL
PROTOCOLE:
PEL-D
3.
: PEL-D
REGLAGE DU PROTOCOLE (PEL-D/PEL-P/W-DRX)
: Set the protocol. Choose “PEL-D”
CONFIG.
[PTZ
SETUPPTZ 1]
4. BAUDRATE
DEBIT: 2,4: K
4.
2,4 K
REGLAGE
DU DEBIT
(2,4-57,6
KBPS)
: Set
the baudrate
(2,4KBPS
- 57,6KBPS)
Choose “2,4KBPS”
CONFIG.
PTZ 1]
[PTZ SETUP
5.
PARITE:
NON
5. PARITY
: NONE
: Set
the PARITY
REGLAGE
DE (NONE/EVEN/ODD)
LA PARITE (AUCUNE/PAIRE/IMPAIRE)
Choose “NONE”
CONFIG.
PTZ
[PTZ SETUP
6. PROP.
PROP:
ON
: ON
1]
CONFIG.
PTZ 1]
[PTZ SETUP
7.
SAUVEGARDE
7. SAVE
CONFIG. PTZ
[PTZ SETUP
8.
QUITTER
8. EXIT
1]
: Set the camera speed
PROP.
de vitesse proportionnelle
Slow
PTZ(ON/OFF)
=> PROP::commande
ON
Speed PTZ => PROP : OFF
Choose “ON”
SAUVEGARDE DES DONNEES DE CONFIGURATION
: Save the data
QUITTER LE MENU
: Exit
PTZ SETUP Menu
391856
22
3. MAIN SETUP
MAIN SETUP
Main Setup mode, select 2+
(2~3 seconds). Setup screen allows you to make change in each programmable clause.
Note: The baud rate must be the same between the controlled unit and the keyboard.
: Input password (Factory set : 0000)
: Shows software version
Shows software date
Title setting when power on
: ID No. 1 Do not change
: DVR Communication Speed setting
Select 9,6K
: Communication setting
Select RS485
[MAIN SETUP]
7. BACKLIGHT : AUTO
[MAIN SETUP]
8. SLEEP : OFF
[MAIN SETUP]
9. BUZZER : ON
: OFF/ON/AUTO BACKLIGHT setting fot LCD
- Auto : Automatically OFF after 30 sec
- ON
- OFF
: OFF/1 Min/5Min/10Min/30Min/1 (Hour)
Setting to save power in the standby mode
: OFF/ON
Select BUZZER ON/OFF
23
[MAIN SETUP]
10. TERMINATE : ON
: OFF/ON Select ON if there are more than 1 speed dome
(the last one has its terminal switch ON).
[MAIN SETUP]
11. JOYSTICK SPD
: Select the time between 2 orders when the keyboard has to repeat
one (300 ms).
[MAIN SETUP]
12. MOUSE SPD : HIG
: HIG/MID/LOW Mouse speed setting when operated with DVR
Not used for Bticino range.
[MAIN SETUP]
13. PASSWORD: ****
Password change (factory set : 0000)
[MAIN SETUP]
14. FACTORY SET
Factory set. All data will be changed to the factory set.
(Move to YES and press ENT)
[MAIN SETUP]
[MAIN SETUP]
15. SAVE / EXIT
15. SAVE/EXIT
Save the data or not for the changed setting value.
4. JOYSTICK CALIBRATION
This function is useful to set the maximum joystick movements. To be done only if you remark any problem.
If you press button 3 +
for 2~3 seconds), you can enter into the JOYSTICK CALIBRATION menu.
: Show the joystick center value
: Move the joystick to the maximum amount of left side and press
: Move the joystick to the maximum amount of right side and press
: Move the joystick to the maximum amount of upside and press
: Move the joystick to the maximum amount of downside and press
button
button
button
button
: Turn the joystick head to the maximum amount of counterclockwise (zoom) and
press
button
: Turn the joystick head to the maximum amount of clockwise (tele) and
press
button
: Select YES or NO and press
button
391856
24
5. BASIC FUNCTIONS : SETTING AND CONTROL
PRESET
User can set the camera positions that have to be repeated automatically.
1
1+PSET
+
1
PSET
+
1
F1
PSET
3+PSET
1+PSET
2+PSET
2+PSET
3+PSET
PSET
PRESET
F1
PRESET
: PRESETsetting
NO. +
PRESET
: PRESEToperating
NO. +
PRESET
3sec
: PRESET NO. +
1sec
F1
: PRESET NO. +
PSET
F1
F1
3sec
PSET
1sec
PSET
F1
TOUR
When Tour function runs, the camera moves from the preset assigned as the 1st point to the preset assigned as the last point in
sequence. The camera will stay to each point for the time set to the “dwell” time and will move to the next point.
To exit from preset function, press
key when the camera is fixed.
1
1
•
+
Tour setting
- Press the
1+PSET
TOUR
F2
1
+
TOUR
F2
3+PSET
1+PSET
2+PSET
2+PSET
TOUR
TOUR
: TOUR NO. +
TOUR
: TOUR NO. +
key for more than 3 seconds, OSD menu will appear.
TOUR
TOUR
F2
TOUR
F2
3 sec
: TOUR NO. +
1sec
: TOUR NO. +
3+PSET
TOUR
F2
TOUR
F2
3 sec
1sec
- Go to Dome Camera Setup menu with the joystick, and press the
- Go to Group Setup Menu, press the
- Go to Group No. option and press
- Go to Edit Group +
- Go to No Action Line +
- Go to 1 line +
- Select the first action (preset position, swing, pattern).
- “Dwell” time is the time during which the camera will stay on each preset position, or the time during which the camera
remains fixed after a swing or a pattern.
OPT is camera speed, in degree per second.
key.
key.
Key. Select the group number and press
key.
25
•
Tour Operating :
1
To exit from tour function, press
+
1+PSET
TOUR
3+PSET
2+PSET
F2
TOUR
TOUR
key when the camera is fixed.
: TOUR NO. +
: TOUR NO. +
TOUR
F2
TOUR
F2
3 sec
1sec
PATTERN
Camera memorizes the path (mostly curve path) by the controller joystick for an assigned time and revives the path exactly as it was memorized.
PATTERN setting : PATTERN NO. +
- Move the camera with the joystick.
3 sec
- Memorize the pattern by pressing
key.
PATTERN operating : PATTERN NO. +
1 sec
90
1
+
270
PATT
F3
3+PSET
90
PATTERN
PATTERN
- To exit from Pattern function, press
270
+
PATT
PATT
1: PATTERN NO. +
F3 +
: PATTERN NO.
F3
3sec
1sec PATTERN
PATTERN
PATT
F3
PATT
: PATTERN NO. +
: PATTERN NO. +
F3
3sec
1sec
PATT
key at the end of the pattern.
F3
PSET
NO. +
NO. +
3sec
SCAN
F1
PSET
F1
1sec
Camera moves between 2 positions continually.
Position
A
A point
1
3+PSET
+
SCAN
F4
SCAN
SCAN
BPosition
point B
+
A point
B point
SCAN
SCAN
1: SCAN NO. + F4 3sec
F4
: SCAN NO. +
1sec
SCAN
F4
SCAN
SCAN
SCAN
: SCAN NO. + F4 3sec
: SCAN NO. +
1sec
SCAN
F4
391856
90
•
Scan setting:
- Press the
+
270
key for more than 3 seconds, OSD menu will appear. PATT
1
3+PSET
- Go to Dome Camera Setup +
PATTERN
PATTERN
F3
PATT
: PATTERN NO. +
: PATTERN NO. +
F3
3sec
1sec
PATT
F3
.
PSET
O. +
F1
F1
O. +
+
+
26
PSET
- Go to Swing Setup +
3sec
.
- Select the 2 preset positions.
1sec
- Choose the speed between the 2 positions, in degree per second.
- Exit from the menu.
•
Scan operating :
A point
1
+
SCAN
F4
1 sec.
SCAN
SCAN
To exit from scan function, press
SYSTEM LOCKING
- To lock the key board, press
key (2s).
- To unlock it, enter the password (0000 by default).
3+PSET
TOUR
F2
TOUR
F2
B point
key when the camera is fixed.
3 sec
6. SPECIFICATIONS
1sec
MENU
AUTO
Model
391856
Interface: RS-485 (Tx 3 port, Trx 1 port) P
Keyboard Communication
Pan/Tilt operating distance :4700 ft (1029m) No 24 AWG wire
Protocol: Multiple (Pelco-d, etc. ) (Baud rate selectable)
Connector Type Date
TERMINAL BLOCK(8p)
Keyboard Keypad
Rubber button
Numeric keypad and camera function key
Joystick
Stick 3-axis, variable speed with zoom
Input Voltage
12VDC (power supply) o 9VDC (battery)
Power Consumption
Max.140mA
LCD Display
Graphic display : 16 * 2 Graphic display
Operating Temperature
0 to 45°C
Humidity
10% -70 % non-condensing
Dimension & Weight
280(W) x 174(D) x 92(H), Net : 0.7 Kg Gross: 1.7Kg
KEYBOARD, ADAPTOR
Packing include
Packing include : MANUAL,
TERMINAL BLOCK(8p)
SCAN
: SCAN NO. + F4 3sec
: SCAN NO. +
1sec
SCAN
F4
27