1
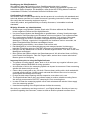
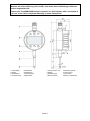
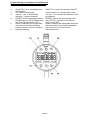
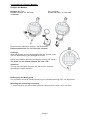
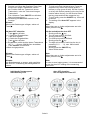
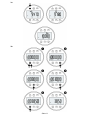
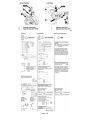
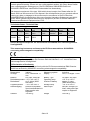
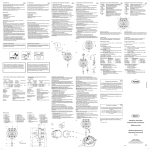
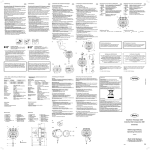
Bedienungsanleitung Operating Instructions Digitale Messuhr Digital Indicator MUM1086 W Diatest H. Költgen GmbH Schottener Weg 6 • D-6389 Darmstadt Telefon +49 6151 979 0 • Fax +49 6151 979 111 Einleitung Die digitale Messuhr MUM1086W (Auflösung 0,01) ist eine Spezialmessuhr, die bevorzugt in unseren IKT und AKT Messgeräten zum Einsatz kommt. Diese Messuhren erfüllen die Schutzart nach DIN EN 60529. IP42. Vor Inbetriebnahme der digitalen Messuhr empfehlen wir Ihnen, die Bedienungsanleitung aufmerksam zu lesen. Lieferumfang: – Digitale Messuhr MUM1086W – Batterie CR 2450 – Bedienungsanleitung Änderungen an unseren Erzeugnissen, besonders aufgrund technischer Verbesserungen und Weiterentwicklungen, müssen wir uns vorbehalten. Alle Abbildungen und Zahlenangaben usw. sind daher ohne Gewähr. Introduction The Digital Indicators MUM1086W (resolution 0,01) is a special indicating device to be used with our IKT and AKT gauges. The Digital Indicators fulfill the following protection classes in accordance to DIN EN 60529 - IP42. In order to achieve the best use of this Digital Indicator it is very important that you first read these operating instructions. Contents: – 1 Digital Indicator MUM1086W – Battery CR 2450 – Operating instructions We reserve the right to make changes to our products, especially due to technical improvements and further developments. All illustrations and technical data are therefore without guarantee. Ausgabe 11/11 Rev. 1 Bestätigung der Rückführbarkeit Wir erklären, dass das Produkt in seinen Qualitätsmerkmalen den in unseren Verkaufsunterlagen (Bedienungsanleitung, Prospekt, Katalog) angegebenen Normen und technischen Daten entspricht. Wir bestätigen, dass die bei der Prüfung dieses Produktes verwendeten Prüfmittel, auf nationale Normale rückführbar sind. Confirmation of traceability We declare under our sole responsibility that this product is in conformity with standards and technical data as specified in our sales documents (operating instructions, leaflet, catalogue). We certify that the measuring equipment used to check this product, and guaranteed by our Quality Assurance, is traceable to national standards. Wichtige Hinweise vor Inbetriebnahme Einwirkungen von Kühlmittel, Wasser, Staub oder Öl haben während des Einsatzes keinen negativen Einfluss auf die digital Messuhr. Um einen langen Nutzen des Messgeräts zu gewährleisten, müssen Verschmutzungen der Messuhr nach Beendigung des Einsatzes mit einem trockenen Tuch entfernt werden Ein verschmutztes Gehäuse mit einem trockenen, weichen Tuch reinigen. Bei starker Verschmutzung mit einem in neutralem Lösungsmittel leicht angefeuchteten Tuch abwischen. Flüchtige, organische Lösungsmittel wie Verdünner sind zu vermeiden, da diese Flüssigkeiten das Gehäuse beschädigen können. Datenausgang verschließen, wenn dieser nicht benützt wird. Das Messgerät ist in einer Messuhrhalterung oder entsprechenden Vorrichtung zu betreiben. Empfohlen wird eine DIATEST-Klemmung mit Aufnahmebohrung 8 H7 mm Reinigen Sie den Messbolzen mit einem in Alkohol angefeuchteten Tuch. Kein Öl auf dem Messbolzen aufbringen! Beim Öffnen des Gerätes erlischt der Garantieanspruch. Wir wünschen Ihnen viel Erfolg beim Einsatz Ihrer Messuhr. Falls Sie Fragen haben, stehen Ihnen unsere technischen Berater gerne zur Verfügung. Important hints prior to using the Digital Indicator The effects of cooling agents, water, dust or oil do not have any negative influence upon the Digital Indicator MUM1086 W during operation. Accumulation of dirt on the measuring spindle can impare its movement. Clean measuring spindle with clean cloth (do not oil). Clean a dirty housing with a dry, soft cloth. Remove heavy soiling with a cloth wetted with a neutral reacting solvent. Volatile organic solvents like thinners are not to be used, as these liquids can damage the housing. Protect the data output opening with the respective cover when not in use. The Digital Indicator has to be in an indicator stand or another suitable mounting fixture. We strongly recommend a DIATEST clamping 8 H7mm mounting bore. In order to clean the measuring spindle use a cloth moistened with alcohol. Never apply oil to the measuring spindle! Unauthorized opening of the Digital Indicator forfeits the warranty. We wish you a satisfactory and long service of your Digital Indicator. Should you have any questions regarding the instrument, contact us and we shall be pleased to answer them. Seite 2 Hinweis: Es handelt sich bei dem vorliegenden Modell der MUM1086W um eine Messuhr mit einer Auflösung von 0,01mm, auch wenn dies in Abbildungen teilweise anders dargestellt wird! Please note! The MUM1086W model in question is a dial indicator with a resolution of 0,01 mm, even if this is depicted differently in some illustrations! 1 Schutzkappe 2 Display 3 Bedientasten 4 Einspannschaft 5 Messbolzen 6 Messeinsatz 7 Datenausgang 8 Batteriefach 1 Lifter protection cap 2 Display 3 Operating keys 4 Mounting shank Seite 3 5 Measuring spindle 6 Contact point 7 Data output 8 Battery compartment Kennzeichnung und Funktion der Bedientasten Definition and Function of the operating keys 10 11 12 13 14 14 ON/OFF Ein- bzw. Ausschalten des Messgerätes <o> / Menu-Umschaltung TOL/SET TOL Toleranzmodus aktivieren, Toleranz einstellen PRESET/ Abrufen des gespeicherten Presetwerts bzw. SET PR-Aktivierung des Preset-Einstellmodus (SET) RESET Nullstellen der Anzeige ABS zeigt absolute Position des Messbolzens bezogen auf den Presetwert Datenübertragung ON/OFF To switch the instrument ON/OFF Switch between <o> and the Menu mode TOL/SET TOL Activates the tolerance mode, set tolerance PRESET/ Call up the stored preset value resp. SET PR - activation of the Presetsetting mode (SET) RESET Resetting the displayABS shows the absolute position of the measuring spindle with reference to the Preset value Data transmission Seite 4 Vorbereiten der digitalen Messuhr Einlegen der Batterie Hinweis: Nur Typ Renata CR 2450, 3V, 560 mAh verwenden Only use type Renata CR 2450, 3V, 560 mAh Einstellen des drehbaren Anzeige- und Bedienteils Gehäuseoberteil ist von -90° bis +180° drehbar. Achtung! Wird das Display über die Anschlagpunkte „A“ gedreht, kann dies zur Beschädigung des Messgeräts führen. Adjust the rotatable operating and display housing unit (bezel) The bezel can be rotated between -90° and +180°. Attention! Turning the bezel past the stops „A“ can lead to seriously damaging the digital indicator. Befestigung des Messgeräts Zur Aufnahme wird eine Diatest-Klemmung mit Aufnahmebohrung 8 H7 mm empfohlen. Mounting the measuring instrument To mount correctly we recommend a Diatest clamping device with a 8 H7 mm bore. Seite 5 1 Bedienung 1 Operating 1a) ON /OFF ON / Einschalten – Taste ON/OFF kurz drücken, bzw. Messbolzen bewegen Das Messgerät wird eingeschaltet (in der Anzeige erscheint die aktuelle Position). OFF / Ausschalten – Taste ON/OFF kurz drücken, bzw. nach Auto- OFF-Aktivierung Das Messgerät wird ausgeschaltet Hinweis: Einstellungen (TOL, MENU, mm/inch) und gespeicherte PRESETund TOL-Werte, sowie der Bezug zur gesetzten Referenz bleiben erhalten (Reference-System). 1a) ON /OFF ON / Switching on – Briefly press the ON/OFF key or move the measuring spindle The measuring instrument is activated (the act. Pos.will appear in the display). OFF / Switching off – Press and release the ON/OFF key or it Auto-OFF is active The measuring instrument is switched off Note: The settings (TOL, MENU, mm/inch) and the stored PRESET and TOL values,as well as the set reference are retained (Reference-System). 1b) DATA Die Datenübertragung erfolgt durch: – kurzen Druck der Taste DATA oder durch – kurzen Druck der DATA-Taste im Stecker des Datenkabels Symbol DATA erscheint kurz im Display und der angezeigte Messwert wird über die Schnittstelle übertragen. Siehe Punkt ??. 1b) DATA Data transmission through: – Press and release the DATA key or through – Press and release the DATA key. The DATA key is to be found on the interface of the data cable The symbol DATA will briefly appear in the display and the displayed value will be transmitted via the interface, see section ??. 2 Einstellfunktionen Hinweis: Das <-Menü kann jederzeit durch kurzen Druck auf die MENU-Taste verlassen werden; ausgenommen im Modus „Individuelle Tastatursperre“, dort nur durch kurzen Druck auf die ON/OFF-Taste. 2 Setting functions Note: The <-menu can be exited at any time, by shortly pressing the MENU key; excluded is the mode „Individual Key Lock“, were in order to exit the menu the ON/OFF key has to be briefly pressed. 2a) mm/inch / Umschaltung der Maßeinheit – Taste MENU lang drücken: Anzeige unit erscheint im Display – Taste kurz drücken: Symbol inch erscheint im Display Maßeinheit inch aktiv Gewünschte Maßeinheit auswählen – Weiter mit Taste 2a) mm/inch / Changing the unit of measurement – Press and hold MENU key: The symbol unit will appear in the display: – Briefly press the key: The symbol inch will appear in the display Unit of measurement is set to inch Select the required unit of measurement – Continue with the key 2b) / Messrichtungsumschaltung Symbol erscheint in der Anzeige. Positive Zählrichtung bei hineingehendem Tastbolzen – Taste kurz drücken Symbol erscheint in der Anzeige. Negative Zählrichtung bei hineingehendem Tastbolzen. – Weiter mit Taste 2b) / Changing the measuring direction The symbol appears in the display. Positive counting direction, value will increase when the spindle moves inwards – Briefly press the key The symbol appears in the display. Negative counting direction, value will decrease when the spindle moves inwards – Continue with the key Seite 6 1a 1b 2a 2b Seite 7 2c) Individuelle Tastatursperre – Sperren und Lösen der jeweiligen Taste über kurzen bzw. langen Tastendruck. Setzen der Funktion über der Taste durch kurzer Tastendruck, unter der Taste durch langen Tastendruck. – Zum Verlassen Taste ON/OFF kurz drücken. Wert wird gespeichert => Einstellung für Auto OFF erscheint in der Anzeige. Hinweis: Wenn keine Änderungen erfolgen, weiter mit Taste 2d) Auto OFF einstellen – Taste kurz drücken => 1. Stelle der Eingabe blinkt – Taste kurz drücken => 2. Stelle der Eingabe blinkt – Taste kurz drücken Eingabewert erhöht sich bei jedem Tastendruck (0.1.2 . . . . 9), max. 999 Minuten einstellbar – Taste ON/OFF kurz drücken Wert wird gespeichert 2c) Individual Key Lock – To lock and unlock individual keys. Press the respective key either with a short (press & release) or long (press & hold). Set the function on a key with a short pressing oy the key for the function above the key, for the function below the key press and hold the respective key. – To exit, briefly press the ON/OFF key. Value will be stored The setting of the Auto OFF appears in the display. Note: When there are no further adjustments are to be made, press the key Hinweis: Wenn keine Änderungen erfolgen, weiter mit Taste Hinweis: Um Batterieenergie zu sparen, wird empfohlen, die Auto OFF-Einstellung des Messgerätes zu nutzen. Note: When there are no further adjustments are to be made, press the key 2d) Set and adjust the Auto OFF – Shortly press the key The 1st input position will flash – Shortly press the key The 2nd input position will flash – Shortly press the key The digit will increase, each time the key is pressed (0.1.2 . . . . 9), max. 999 minutes selectable – Shortly press the ON/OFF key Value will be stored Note: In order to save battery power, it is recommanded to use the Auto OFF setting of the measuring instrument. Individuelle Tastatursperre Individual Key Lock Auto OFF einstellen Set and adjust the Auto OFF Seite 8 2e) Faktoreinstellung – Taste kurz drücken 1. Stelle der Eingabe blinkt – Taste kurz drücken Eingabewert erhöht sich bei jedem Tastendruck (0.1.2 . . . . 9 ) – Taste kurz drücken 2. Stelle der Eingabe blinkt – Taste ON/OFF kurz drücken Wert wird gespeichert. FA-SET erscheint im Display 2e) Factor Setting – Shortly press the key The 1st input position will flash – Shortly press the key The digit will increase, each time the key is pressed (0.1.2 . . . . 9 ) – Shortly press the key The 2nd input position will flash – Shortly press the ON/OFF key Value will be stored. FA-SET appears in the display. Hinweis: Wenn keine Änderungen erfolgen, weiter mit Taste 2f) Werkseinstellung – Taste kurz drücken FA-SET blinkt in der Anzeige max. 5 Sek. – innerhalb 5 Sek. Taste PRESET kurz drücken Rücksetzen auf Werkseinstellung, Einstellmenü wird verlassen. Note: When there are no further adjustments are to be made, press the key Hinweis: Wenn keine Änderungen erfolgen, weiter mit Taste bzw. mit kurzem Druck auf MENU-Taste das Menü verlassen. Note: When there are no further adjustments are to be made, press the key or press the MENU key. Übersetzungsverhältnis Ratio 2f) Factory Settings – Shortly press the key FA-SET flashes in the display for in max. 5 sec. – Within the 5 sec, shortly press the PRESET key Reset to the factory settings, The setting menu is exited. IKT/AKT 90° IKT/AKT 60° IKT/AKT 127° KT/KT-B 2,0000:1 1,1547:1 4,0114:1 1,4142:1 Faktoreinstellung Factor Setting Werkseinstellung Factory Settings Seite 9 3 Messfunktionen 3a) RESET/ABS Hinweis: ABSOLUT-RELATIV-Umschaltung Mit der Messuhr kann, je nach Messaufgabe, in zwei verschiedenen Betriebsarten gemessen werden: ABSOLUT- Messmodus (ABS) Dieser Messmodus bezieht sich immer auf den aktuellen PRESET-Wert. Vorteil der ABSOLUTMessung: In der Anzeige ist immer das Istmaß (ABSOLUT-Maß) sichtbar. In der Anzeige erscheint das Symbol „ABS“. RELATIV-Messmodus Die Ziffernanzeige kann in jeder beliebigen Messbolzenposition auf „0“ gesetzt werden (Relativ oder Vergleichsmessung). RESET – Taste RESET/ABS kurz drücken Ziffernanzeige wird auf „0“ gesetzt. Falls ein PRESET aktiviert ist (ABS-Modus) geht der Bezug zum aktuellen PRESET-Wert nicht verloren. ABS – Taste RESET/ABS kurz drücken Wechsel in Relativmodus – Taste RESET/ABS lang drücken Wechsel in den Absolutmodus^ 3 Measuring functions 3a) RESET/ABS Note: Switching between ABSOLUTE-RELATIVE With this digital indicator it is possible depending upon the measuring task to switch between both these operating modes. ABSOLUTE measuring mode (ABS) This measuring mode always refers to the actual PRESET value. Advantage of ABSOLUTE measurement: The actual value (ABSOLUTE dimension) is shown in the display. The „ABS“ symbol is appears in the display. RELATIVE measuring mode The display can be set to „0“ regardless of the position of the measuring spindle (Relative or Comparative measurement). RESET – Press and release the RESET/ABS key The display is set to „0“. If the digital indicator is in the PRESET function (ABS mode) the reference to the actual PRESET value will not be lost. ABS – Press and release the RESET/ABS key Changes to the Relative mode – Press and hold the RESET/ABS key Changes to the Absolute mode 3b) PRESET PRESET eingeben – Taste PRESET/SET lang drücken Symbol PRESET erscheint in der Anzeige, +/– blinkt. SET-Modus ist aktiviert – Taste- kurz drücken Vorzeichen (+...–) wechselt bzw. Anzeigestelle erhöht sich bei jedem Tastendruck (0.1.2...9) – Taste - kurz drücken Nächste Anzeigestelle blinkt – Zum Setzen der nächsten Anzeigestelle den Vorgang wiederholen. Taste RESET setzt angewählte Anzeigestelle auf „0“ – Taste PRESET kurz drücken Symbol PRESET wird ausgeblendet. Eingegebener PRESET-Wert wird gespeichert und gleichzeitig aktiviert Hinweis: PRESET-Wert bleibt auch beim Ausschalten erhalten. PRESET aktivieren – Taste PRESET kurz drücken Gespeicherter PRESET-Wert erscheint als aktueller Wert in der Anzeige. Gleichzeitig wird das ABS-Symbol aktiviert Hinweis: Achten Sie darauf, dass die Zählrichtung (2b) für Ihre Anwendung richtig gesetzt wurde. 3b) PRESET Enter PRESET – Press and hold the PRESET/SET key The symbol PRESET will appear in the display, the symbol + / – will also flash; indicating that the SET mode is activated – Press and release the -key The sign (+...–) changes, the digit changes each time the key is pressed (0,1,2,.....9) – Press and release the - key The next digit will start to flash – To set the next position repeat the procedure once again. Press the RESET key to set the position to „0“ – Press and release the PRESET key The PRESET symbol will disappear, the entered PRESET value is both stored and activated Note: The PRESET value remains even when switched off. Activate PRESET – Press and release the PRESET key The stored PRESET value will appear as the actual value in the display, simultaneously the ABS symbol is active Note: Please make sure that the counting direction is set correctly (see 2b). Seite 10 3a 3b Seite 11 3c) TOL/Toleranzüberwachung Toleranzeingabe – Taste SET TOL lang drücken Symbole SET, TOL, erscheinen in der Anzeige „+ / –“ blinkt SET-Modus für oberen Grenzwert ist aktiv. – Taste - kurz drücken Vorzeichen „+ / –“ wechselt bzw. Anzeigestelle erhöht sich bei jedem Tastendruck (0,1, 2 . . . 9) – Taste - kurz drücken Nächste Anzeigestelle blinkt – Vorgang wiederholen, um die nächste Anzeigestelle zu setzen. – Taste TOL/SET TOL kurz drücken Symbole SET, TOL, erscheinen in der Anzeige „+ / –“ blinkt. SET-Modus für unteren Grenzwert ist aktiv. – Taste - kurz drücken Vorzeichen (+...–) wechselt bzw. Anzeigestelle erhöht sich bei jedem Tastendruck (0,1, 2 . . . 9) – Taste - kurz drücken Nächste Anzeigestelle blinkt – Vorgang wiederholen, um die nächste Anzeigestelle zu setzen. – Taste TOL/SET TOL kurz drücken, Toleranzüberwachung ist aktiv. Hinweis: Toleranzwerte werden als Absolutwert eingegeben: z. B.: 8 ± 0.025 => Wert für Set, Tol, : 8.025 Wert für Set, Tol, : 7.975 Fehlermeldung „Err“ – Oberer Grenzwert darf nicht ≤ unterem Grenzwert sein. – Toleranzband >1,6 mm 3d) TOL: Toleranz aktivieren/deaktivieren – Taste TOL kurz drücken Die Toleranzüber- bzw. Unterschreitung wird durch Pfeile im Display angezeigt, TOL erscheint in der Anzeige. – Taste TOL nochmals kurz drücken Toleranzfunktion wird ausgeschaltet. 3c) TOL/Tolerance monitoring Tolerance setting – Press and hold the SET TOL key The symbols SET, TOL, will all appear in the display, the „+ / –“ sign will flash The SET mode for the upper tolerance limit value is thus active. – Press and release the - key The „+ / –“ sign changes and the digit will increase, each key press (0,1, 2 . . . 9) – Press and release the - key The next digit will begin to flash – Repeat the procedure to set the next digit. – Press and release TOL/SET TOL key The symbols SET, TOL, will all appear in the display, the „+ / –“ sign will flash The SET mode for the lower tolerance limit value is thus active. – Press and release the -key The „+ / –“ sign changes and the digit will increase, each key press (0,1, 2 . . . 9) – Press and release the - key The next digit will begin to flash – Repeat the procedure to set the next digit. – Press and release the TOL/SET TOL key The tolerance monitoring is active. Note: Tolerance values are entered as Absolute values: e. g.: 8 ± 0.025 => Value for Set, Tol, : 8.025 Value for Set, Tol, : 7.975 Error report „Err“ – The upper tolerance value may not be ≤ than the lower tolerance value. - Total tol. > 1,6mm 3d) TOL: Activate/deactivate Tolerance – Press and release the TOL key When out of tolerance an arrow will appear (below<-) or (above->) plus the symbol TOL will appear in the display. – Press and release the TOL key The tol. function is now switched off (deactivated) 4 Toleranzdarstellung <o> 4a) Toleranzanzeige in Verbindung mit Messwertanzeige – Taste TOL kurz drücken Die Toleranzüber- bzw. Unterschreitung wird durch Pfeile im Display angezeigt. Liegt der Messwert innerhalb der Toleranz, wird ein Kreissymbol gezeigt. 4b) Toleranzanzeige ohne Messwertanzeige – Taste <o> kurz drücken (bei aktivierter Toleranzfunktion). Die Toleranzüber- bzw. Unterschreitung wird ausschließlich über Symbole angezeigt. Hinweis: Folgende Funktionen sind gesperrt: ABS PRESET SET PR RESET ABS Der Messwert wird über die Schnittstelle übertragen. 4 Display of tolerance <o> 4a) Displaying tolerance as a displayed measuring value – Press and release the TOL key Out of tolerance whether above or below an arrow will be displayed. When the measured value is within the tolerance a circle will appear. 4b) Displaying tolerance without a measuring value – Press and release the <o> key (during active tolerance function). When out of tolerance whether above or below an symbol will appear. Note: The following functions are blocked: ABS PRESET SET PR RESET ABS The measured values will be transmitted via the data cable. Seite 12 3c 3d 4 Seite 13 5 Sperren von Bedienfunktionen Aktivieren Durch gleichzeitiges Betätigen der ON/OFF und der TOL-Taste werden alle Tasten außer der ON/OFFTaste gesperrt. Das -Symbol erscheint in der Anzeige. Deaktivieren Durch gleichzeitiges Betätigen der ON/OFF und der TOL-Taste wird die Tastensperre wieder aufgehoben. Hinweis: Wird eine gesperrte Taste betätigt, erscheint in der Ziffernanzeige Loc 5 Locking the operating functions Activate Simultaneously press the ON/OFF and the TOL keys to lock all keys except the ON/OFF key. The following symbol with appear in the display . 6. Displaymeldungen 6a „Err“-Fehlermeldung Toleranzeingabe nicht korrekt – Oberer Grenzwert darf nicht ≤ unterem Grenzwert sein. Toleranzgrenzen neu eingeben. 6b LOC / Bedientaste gesperrt – „LOC“-Symbol erscheint in der Anzeige“ Siehe Abschnitt 3.2c 6c F / Faktor ist eingegeben ggf. Faktor ändern oder zurücksetzen, sieh 2e 6e Batterie-Symbol – Batterie-Symbol erscheint in der Anzeige Batterie wechseln, siehe Seite 5 6. Display reports 6a Error message „Err“ Given tolerance (input) is incorrect – The upper tolerance limit may not be ≤ than the lower tolerance limit. Enter new tolerance limits. 6b LOC / operating keys are locked – „LOC“ symbol appears in the display See section 3.2c 6c F / Factor is entered Change or reset the factor, see 3.2e 6e Battery symbol – Battery symbol appears in the display Change the battery, see page 5 Deactivate To deactivate the key lock, simultaneously press the ON/OFF and the TOL keys. Note: When a locked key is pressed whilst this function is activated Loc with appear in the display. 5 6a 6b 6c Seite 14 6d Seite 15 Elektrische Altgeräte der Type 1086, die nach dem 23. März 2006 durch Diatest in den Verkehr gebracht werden, können an uns zurückgegeben werden. Wir führen diese Geräte einer umweltgerechten Entsorgung zu. Die EU-Richtlinien 2002/95/EG RoHS und 2002/96/EG WEEE bzw. das ElektroG finden dabei ihre Anwendung. Old electronic equipment of the type 1086 which where brought from Diatest after the 23. March 2006 can be returned to us for disposal. We will dispose/recycle our products without causing any harm or damage to the environment in accordance to the EU-Directives 2002/95/EC RoHS (the Restriction of the use of certain Hazardous Substances) and 2002/ 96/EC WEEE (Waste Electrical and Electronic Equipment) as well as German National Electrical and Electronic Equipment Act, FRG. Technische Daten - Technical Data Typ Type MUM1086W MessZiffernspanne schritt Range Resolution 12,5 0,01 mm .0005“ (.5“) Messkraft Measuringforce 0,65 – 0,9 N Fehlergrenze Error Limit 0,02mm Einspannschaft-ø Mounting shank-ø 8h6 Schutzklasse Protection class IP42 BestellNr. Order no. MUM 1086W Dieses Messgerät entspricht der EU-Richtlinie 89/336/EWG über elektromagnetische Verträglichkeit. This measuring instrument conforms to the EU-Recommendations 89/336/EWG concerning electromagnetic compatibility. EG-Konformitätserklärung Dieses Messgerät entspricht der EU-Richtlinie EMV-89/336/EWG i. d. F. 93/68/EWG über elektromagnetische Verträglichkeit. EC Declaration of Conformity This measuring instrument is in conformity with the EU-Recommendations EMV-Directive 89/336 as amended by 93/68/EEC concerning electromagnetic compatibility. Messsystem Anzeige induktiv LCD, Ziffernhöhe 11 mm Batterie CR 2450, 560 mAh Betriebstemperatur +10° C bis +40° C Betriebszeit ca. 3 Jahre (2000 Std./Jahr) Lagertemperatur –10° C bis +60° C Datenausgang RS232C kompatibel über Interfacekabel mit Opto-koppler oder Digimatic Gewicht 135-235 g Measuring system Display Inductive LCD, h. of digits 11 mm Battery Type Operating temp. Lifetime of battery CR 2450, 560 mAh +10° C to +40° C approx. 3 years (2000 hours/year) –10° C to +60° C RS232C compat. via interf. cable with Opto coupler or Digimatic Storage temp. Data output Weight Seite 16 135-235 g