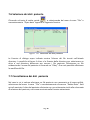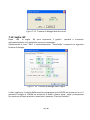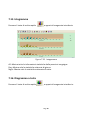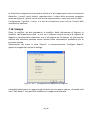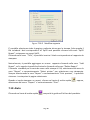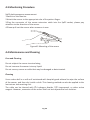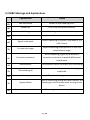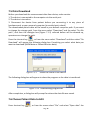
1
VITAL MONITOR Istruzioni per l’uso ITALIANO User guide ENGLISH 0MMPI0001 30.04.2013 INDICE Capitolo 1 Introduzione 1.1 Informazioni generali 1.2 Parametri principali 1.3 Funzione dei tasti 1.4 Interfacce 1.5 Accessori Capitolo 2 Preparazione 2.1 Apertura della confezione e verifica 2.2 Installazione della batteria 2.3 Accensione del monitor 2.4 Collegamento del sensore 2.5 Connessione del bracciale NIBP Capitolo 3 Funzioni interfaccia 3.1 Interfaccia principale 3.2 Menu di sistema 3.2.1 Impostazioni di sistema 3.2.2 Installazione BP 3.2.3 Installazione SpO2 3.2.4 Informazioni sul paziente 3.2.5 Tavola BP 3.2.6 Tavola SpO2 3.2.7 Andamenti Capitolo 4 Misurazione SpO2 4.1 Che cosa è il monitoraggio di SpO2 4.2 Precauzioni durante il monitoraggio di SpO2 4.3 Procedura di monitoraggio 4.4 Manutenzione e pulizia Capitolo 5 MonitoraggIo NIBP 5.1 Introduzione 5.2 Monitoraggio NIBP 5.3 Messaggi di errore NIBP e spiegazioni 5.4 Manutenzione e pulizia 5.5 Trasporto e stoccaggio 5.6 Legenda dei simboli Pag. 3 Capitolo 6 Installazione del software 6.1 Requisiti tecnici 6.2 Installazione del software Capitolo 7 Introduzione al software 7.1 Registrazione del nome utente 7.2 Interfaccia principale 7.3 Come indossare 7.4 Definire il piano di misurazione 7.5 Scaricare i dati 7.6 Selezione dei dati del paziente 7.7 Cancellazione dei dati paziente 7.8 Backup del file 7.9 Modifica dati pressione sanguina 7.10 Selezione dell’andamento 7.11 Visualizzazione delle informazioni statistiche 7.12 Modifica di una diagnosi 7.13 Modifica fase del sonno 7.14 Soglie BP 7.15 Istogramma 7.16 Diagramma a torta 7.17 Linea di correlazione 7.18 Stampa 7.19 Aiuto Capitolo 8 Guida alla risoluzione dei problemi APPENDICE Pag. 4 Capitolo 1 INTRODUZIONE • Per un’introduzione generale al monitor, fare riferimento alla sezione Informazioni generali. • Per un introduzione alle funzioni di base, fare riferimento alla sezione Funzioni dei tasti. • Per l’assegnazione dei connettori delle interfacce, fare riferimento alla sezione Interfacce. Possibile rischio di esplosione se utilizzato in presenza di anestetici infiammabili o alter sostanze infiammabili, in combinazione con aria, ambienti ricchi di ossigeno o ossido nitroso. Verificare se il dispositivo e i suoi accessori possono essere utilizzati in totale sicurezza prima di usarli. Assicurarsi che l’ambiente in cui verrà utilizzato il dispositivo non sia soggetto a nessuna sorgente di interferenza elettromagnetica, come ad esempio trasmittenti radio, telefoni cellulari, ecc. L’emissione di radiazioni elettromagnetiche di questi dispositivi può incidere sulle prestazioni dello strumento. Per la rottamazione di tutti i dispositivi e accessori (incluso batterie, borse di plastica, scatole di carta) si devono rispettare le regole locali. Si prega di scegliere gli accessori approvati o fabbricati dal produttore in quanto altro potrebbe danneggiare il dispositivo. Tenere lontano dalla portata dei bambini. Il monitor è da utilizzarsi su un paziente alla volta. Se il monitor è bagnato, interrompere l’utilizzo e contattare il fornitore. Un tester funzionale non può essere utilizzato per accertare l’accuratezza della sonda del saturimetro o dello schermo. Quando viene utilizzato con apparecchiature per elettrochirurgia, è necessario dare la massima priorità alla sicurezza del paziente. E’ raccomandabile controllare che non ci sia alcun danno al monitor così come agli accessori. Se si riscontrasse, smettere di utilizzare immediatamente l’apparecchio e contattare l’ingegnere biomedico dell’ospedale o la nostra assistenza cliente. Inoltre, il controllo complete del monitor, incluso il controllo sicurezza come la corrente di dispersione, dovrebbe essere eseguito da personale qualificato ogni 12 mesi. Pag. 5 Si prega di scegliere il computer che sia assicurato in conformità alle esigenze di IEC 60950 o altro potrebbe danneggiare il dispositivo. Il software è stato sviluppato per IEC60601‐1‐4. La possibilità di rischi insorgenti dagli errori nel programma del software è minimizzata. Il monitor del paziente dovrebbe coincidere con lo standard EN1060 Parte 1: Requisiti generali Parte 3: Altri requisiti per il sistema della rilevazione della pressione sanguina elettro‐medicale. 1.1 Informazioni generali Funzionamento Trasporto e immagazzinamento Temperatura 5~40 (˚C) ‐20~60 (˚C) Umidità ≤ 80 % ≤ 95 % Altitudine ‐500 a 4,600m ‐500 m a 13,100 m Alimentazione 3 (V) DC Pmax = 3 VA Sicurezza Questo apparecchio è a prova di defibrillatore. Non sono richiesti accorgimenti specifici durante la defibrillazione le cui scariche non hanno effetto sull’apparecchio. In caso risenta della defibrillazione sul paziente, l’apparecchio ricorre al tubo in silicone grigio per il passaggio dell’aria. Istruzioni generali Il monitor misura non solo la pressione sanguina ma anche i parametri di NIBP, Pulsazioni, battito e SpO2. Applicabile per gli adulti come pure in pediatria ed in neonatologia. Sono integrati i parametri della misurazione e le funzioni dello schermo. Questo rende l’apparecchio leggero e compatto. Il pulsante di accensione si trova sul pannello frontale. L’indicatore del funzionamento e dell’allarme lampeggia quando il monitor è acceso. Il pulsante dell’allarme lampeggia quando si accende l’allarme. Le prese del sensore si trovano in alto, la presa USB in basso del monitor. Il monitor è semplice nell’utilizzo grazie ai diversi pulsanti del panello frontale. Per dettagli, fare riferimento al tasto funzioni. Funzioni di misurazione della pressione sanguina In questa modalità, il monitor può funzionare per 24 ore continue. Il monitor ha la capacità di registrare 4800 misurazioni, che possono essere trasferite sul computer. Pag. 6 Modifica dei dati. Pubblicazione del corso dei grafici, statistica, di visualizzazione di informazioni. Pubblicazione delle informazioni diagnostiche, impostazione dei parametri e di stampa ecc. Tuttavia, il monitor non può trasmettere in tempo reale il processo di misurazione. Funzioni del monitor NIBP Da sinistra a destra: pressione sistolica, pressione MAP (pressione arteriosa media), pressione diastolica (unità: mmHg) SpO2 SpO2 (unità: %) Battito cardiaco (unità: battiti/minuto) (quando sono selezionati contemporaneamente). Modalità dell’allarme: L’utente può accendere manualmente l’allarme del monitor. Quando l’allarme è acceso, l’allarme SpO2 funziona in questo modo: saturazione dell’ossigeno e battito cardiaco vengono visualizzati per 5 volte in 1 sec. e nel contempo viene verificato se abbiano superato o meno i limiti. L’allarme della pressione sanguigna è il seguente: dopo aver finito il test, misurerà la pressione alta, la pressione minima e media ogni 4 secondi, fino alla fine del test. I campi riguardanti la pressione e SpO2 saranno gli stessi, l’unica differenza riguarderà l’intervallo di tempo. L’allarme acustico è accompagnato da un allarme visivo, il simbolo dello stato di allarme presente nell’interfaccia principale è rosso. Priorità dell’allarme: allarme problemi tecnici (batteria quasi scarica, sonda scollegata), allarme fisiologico (superamento dei limiti di pressione e SpO2). In questa modalità la durata del funzionamento continuo è impostata in base all’intervallo della misurazione che è selezionato dell’utente. E utile che il software sia nello stato di monitoraggio quando è impostato sulla misurazione ambulatoria della pressione sanguina. Riferirsi alle funzione del software. Pag. 7 1.2 Parametri principali A. Misurazione di SpO2 Campo di misurazione: 0%~100% Accuratezza: ±2% (nel campo di misurazione 70%~100%) non specificato (campo di misurazione <70%) B. Misurazione di battito cardiaco Campo di misurazione: 30bpm~250bpm Accuratezza: ±2bpm C. Misurazione della pressione sanguigna Campo di misurazione: ADULTO: SYS: 40‐270 mmHg MAP: 20‐235 mmHg DIA: 10‐215 mmHg PEDIATRICO: SYS: 40‐200 mmHg MAP: 20‐165 mmHg DIA: 10‐150 mmHg NEONATALE: SYS: 40‐135 mmHg MAP: 20‐110 mmHg DIA: 10‐100 mmHg Massimo errore di misurazione percepito: ± 5 mmHg Deviazione massima dallo standard in fase sperimentale : 8 mmHg D. Risoluzione SpO2: 1%, Battito cardiaco: 1bpm, pressione sanguina: 1mmHg Pag. 8 1.3 Funzioni dei tasti Tutte le operazioni del monitor avvengono tramite l’utilizzo dei tasti. Su ogni tasto è riportata la funzione. ACCENSIONE Per avviare premere il bottone per qualche secondo. In fase di accensione così come di spegnimento, la luce rossa e la luce verde lampeggiano una volta per segnalare che l’operazione è avvenuta con successo. Premere nuovamente il bottone per tornare all’interfaccia di avvio. Se il voltaggio è inferiore a 2,2 V lo strumento non si potrà accendere. Quando la batteria è scarsa, si accende l’allarme. Il contorno della batteria diventa rosso ed inizia a lampeggiare ininterrottamente. Il testo nel pulsante centrale dello schermo ne indica la specifica funzione Il testo nel pulsante sinistro dello schermo ne indica la specifica funzione. Il testo nel pulsante destro dello schermo ne indica la specifica funzione Premere questo pulsante per avviare la misurazione della pressione sanguigna. Durante la misurazione, premere questo pulsante per cancellare la misurazione e sgonfiare il bracciale. E la scritta CANCEL apparirà nell’interfaccia principale. Quando il segnale di alimentazione sul bordo della batteria è rosso, nell’interfaccia principale, la possibilità di premere il pulsante di misurazione viene disabilitata. In quel caso non si potrà nemmeno compiere un’auto‐misurazione. Collegare USB per continuare a caricare e scaricare dati quando si è senza batteria. Quando la parte superiore dello schermo visualizza il simbolo USB dimostra che lo strumento si connette con successo con il computer. Tasto NIBP è in validazione a presa USB inserita. Pag. 9 1.4 Interfacce Per semplificare l’esecuzione delle varie operazioni, le diverse interfacce si trovano in varie parte del monitor. In alto si trova la presa per il sensore SpO2 e quella per NIBP (Figura 1.4.1 ) 1 Presa per NIBP 2 Presa per il sensore SpO2 ② ① Figura 1.4.1 In basso si trova la porta USB. 1.5 Accessori A Bracciale per adulti B Cavo dati USB C Sonda per ossimetria D CD (PC software) E Borsa F Manuale d’uso Si prega di utilizzare gli accessori forniti dal produttore o sostituirli secondo le disposizioni del produttore per evitare danni ai pazienti. Pag. 10 Capitolo 2 PREPARAZIONE • Aprire la confezione e controllare il contenuto • Installare la batteria • Accendere lo strumento • Connettere i sensori paziente 2.1 Apertura e verifica della confezione Aprire il pacco ed estrarre il monitor e gli accessori con molta attenzione. Tenere l’imballo per eventuali futuri spostamenti del monitor. Controllare il materiale contenuto nella confezione confrontandolo con l’elenco della merce spedita. ‐ Eseguite un controllo per evitare qualsiasi danno meccanico ‐ Controllate tutti I cablaggi, moduli ed accessori Se vengono rilevati problemi contattare immediatamente il distributore. 2.2 Installazione della batteria a secco. Lo strumento viene fornito con 2 batterie Alcaline AA. Prima di utilizzare lo strumento, inserire le batterie nell’apposito vano, collocato sul retro del Monitor. Togliere la batteria quando l’apparecchio non viene utilizzato. Pag. 11 2.3 Accensione del monitor Premere per accendere il monitor. L’indicatore si accenderà, il sistema invierà il monitoraggio oppure ABPM, è possibile effettuare un monitoraggio normale. Riferirsi al System Menu per dettagli. Nel caso in cui venisse rivelato un danno o comparisse sul display un messaggio di errore, non utilizzare l’apparecchio con nessun paziente. Contattare immediatamente l’ingegnere biomedico in ospedale o il nostro centro assistenza Verificare tutte le funzioni che possono essere utilizzate con il monitor e assicurarsi dello stato del monitor. 2.4 Collegamento del sensore Per informazioni sulla connessione corretta, riferirsi alla figura 2.4.1. Figura 2.4.1 2.5 Connessione al bracciale NIBP Collegare NIBP tra il monitor e il paziente. Per informazioni sulla connessione corretta, riferirsi alla figura 2.5.1. Figura 2.5.1 Pag. 12 Capitolo 3 FUNZIONI INTERFACCIA • Interfaccia principale • Menu 3.1 Interfaccia principale Premere POWER per accendere il monitor. L’indicatore si accenderà e il sistema avvierà l’interfaccia principale. Nella schermata principale ABPM, se non viene premuto un pulsante entro il tempo impostato alla voce BACKLIGHT TIME, il monitor entrerà in standby. L’indicatore del funzionamento lampeggia ogni 2 sec quando il monitor è acceso. Modalità di monitoraggio: la voce BACKLIGHT TIME non ha effetti. La retroilluminazione è accesa tutto il tempo. Il simbolo rosso della batteria lampeggerà nell’interfaccia principale, quando la carica è bassa. L’interfaccia principale è presentata nelle seguenti schermate: Figura 3.1.1 ABPM schermata principale Figura 3.1.2 Monitoraggio menu principale Quando la memoria è piena un apposito simbolo apparirà in alto dello schermo. Le ultime note verranno cancellate. Pag. 13 3.2 SYSTEM MENU Premere il tasto MENU per visualizzare il menu SYSTEM MENU. Per scorrere le varie opzioni utilizzare i tasti UP e DOWN. Figura 3.2.0 Menu di sistema Le voci [PM BP SETUP], [PM SpO2 SETUP] e SpO2 TABLE] sono grigi nella modalità di ABPM. Non possono quindi essere impostati. Pag. 14 3.2.1 SYSTEM SETUP Selezionare SYSTEM SETUP elemento nel menu SYSTEM MENU. Apparirà il seguente menu: Figura 3.2.1 System setup L’utente può impostare l’ora selezionando la voce [TIME]. Nella voce [LANGUAGE], l’utente può selezionare la lingua in cinese o in inglese. Se seleziona [YES] nella voce [DEFAULT], il monitor tornerà alle impostazioni di fabbrica. Se l’utente seleziona [ON] nella voce [ALARM], si alzano gli altoparlanti nell’interfaccia principale. Se seleziona [OFF], I suoni si spengono . Nella voce [NEW PATIENT], se l’utente seleziona [YES], la voce “Clear the last value?” (cancellare l’ultimo valore) comparirà sullo schermo. Selezionando [YES] di nuovo, si cancellerà la misurazione salvata del pa‐ ziente. Dopo selezionare [NO] e tornare al menu [SYSTEM SETUP MENU]. Oppure, selezionando [NO] per primo, il monitor non fare nulla. Fare attenzione a questa funzione. L’utente può selezionare PM o ABPM nella voce [FUNCTION SELECT] e le misure corrispondenti saranno effettuate. Nella voce [BACKLIGHT TIME], l’utente può impostare il valore di retroilluminazione da 5 a 120 secondi in intervalli da 5 secondi. Questa funzione serve a controllare la retroilluminazione dell’interfaccia principale nel ABPM. Sotto l’ ABPM, [DEFAULT], [ALARM] e [NEW PATIENT] non possono essere impostate. 3.2.2 BP SETUP Pag. 15 Selezionare [PM BP SETUP nella voce [“SYSTEM MENU”]. Apparirà il seguente menu. Figura 3.2.2 BP setup Se l’utente seleziona la voce [ON] nella voce [AUTO MEASURE]. Il Monitor misurerà la pressione sanguigna secondo l’ora selezionata nella voce [INTERVAL]. Se è selezionata la voce [OFF], è necessaria una misurazione manuale. Simultaneamente, la voce [INTERVAL] diventa grigio e non può essere modificato. Il tempo di intervallo (Unit: minute) è impostato nella voce [INTERVAL] e può essere selezionato da queste opzioni: 5, 10, 15, 20, 30, 45, 60, 90. L’allarme è accesso oppure spento secondo i limiti bassi o altri che sono stati impostati. Quando la pressione è più alta del limite impostato oppure più bassa si verifica l’allarme. [SYS ALM], [MAP ALM] and [DIA ALM] possono essere processati separatamente. Qui sotto i campi regolabili dei limiti alti e bassi: SYS ALM: 40~270 mmHg DIA ALM: 10~215 mmHg MAP ALM: 20~235 mmHg. Pag. 16 3.2.3 SPO2 SETUP Selezionare [PM SPO2 SETUP] nella voce “SYSTEM MENU”. Il menu seguente apparirà. Figura 3.2.3 SPO2 SETUP Per la voce [PULSE SOUND], si può scegliere lo stato. Quando è su “ON”, I suoni del polso sono accesi mentre il monitor misura la pressione sanguina. Quando è su “OFF”, I suoni del polso non suonano durante la misurazione della pressione sanguina. Per la voce [SpO2 ALM HI/LO], può impostare [SpO2 ALM H] e [SpO2 ALM LO]. L’allarme si verifica quando i valori SpO2 sono superati. Per la voce [PR ALM HI/LO], può impostare [PRALM HI] e [SpO2 ALM LO]. L’allarme si verifica quando i valori SpO2 sono superati. SpO2 e analisi di PR ALARM: PARAMETRI Max. HI Min. LO Livello SpO2 100 0 1 PR 250 30 1 Pag. 17 3.2.4 Informazioni sul paziente Selezionare la voce [ABPM INF0] “SYSTEM MENU” per selezionare il menu seguente. Figura 3.2.4 ABPM Infor L’informazione in questa interfaccia può essere modificata finché sono reinstallati i parametri nel software. 3.2.5 NIBP TABLE Selezionare la voce [BP TABLE] nel “SYSTEM MENU” per richiamare il seguente menu. Figura 3.2.5 Tavola BP Pag. 18 Gli utenti possono premere I pulsanti SU e GIU per vedere i valori registrati. Premere il pulsante MENU per uscire. In caso di un gran numero di dati, premere a lungo i pulsanti SU e GIU per cambiare la pagina velocemente. In questo modo si potrà navigare attraverso tutti i dati. 3.2.6 Tavola SpO2 Selezionare la voce [SpO2 TABLE] “SYSTEM MENU” per fare apparire questo menu. Figura 3.2.6.1 Tavola SpO2 Gli utenti possono premere I pulsanti SU e GIU per vedere i valori registrati. Premere il pulsante MENU per uscire. Il valore di SpO2 viene rilevato una volta al secondo, ed il maggior numero di volte è 183.000 Premere a lungo i pulsanti SU e GIU per cambiare la pagina velocemente. In questo modo si potrà navigare attraverso tutti i dati. La velocità di scorrimento delle pagine è maggiore di quella effettuata durante i cambi di pagina nella sezione della pressione sanguigna. Pag. 19 3.2.7 Funzioni TREND Selezionare TREND per entrare nel menu TREND GRAPH, mostrato nell’immagine seguente: Figura 3.2.7.1 Tavola SpO2 Seleziona ABPM TREND per inserire la seguente interfaccia, la forma d'onda visualizzata è i dati di misurazione in modalità ABPM. Seleziona PM TREND per inserire la stessa interfaccia, la forma d'onda visualizzata sono i dati di misurazione in modalità AM. Il tempo sulla sinistra dell'asse orizzontale del lato superiore è l'ora di inizio della forma d'onda, il tempo sulla destra dell'asse orizzontale è l'ora di fine per la visualizzazione della forma d'onda. Tramite i pulsanti UP e DOWN, si può variare il segmento di misurazione del tempo BP sui dati della forma d'onda grafico. Selezionare DEMO per inserire la seguente interfaccia. Nella modalità Demo, premere il tasto MENU per uscire dalla modalità DEMO. Pag. 20 Verificare tutte le funzioni che possono essere utilizzate con il monitor e assicurarsi dello stato del monitor. Pag. 21 Capitolo 4 MISURAZIONE SpO2 4.1 Che cosa è il monitoraggio SpO2 La misurazione pletismografica SpO2 è impiegata per determinare la saturazione di ossigeno dell’emoglobina nel sangue arterioso. Se per esempio, il 97% delle molecole d’emoglobina presente nei globuli rossi del sangue arterioso si combina con l’ossigeno, allora la saturazione dell’ossigeno del sangue è del 97%. Il numero rappresentante il valore SpO2 sarà 97%. Il valore numerico SpO2 mostra la percentuale delle molecole D’EMOGLOBINA il quale è combinato con le molecole d’ossigeno per formare l’ossiemoglobina. Il valore SpO2/PLETH può anche fornire la frequenza cardiaca e l’andamento del pletismogramma. Come funziona il parametro SpO2 / PLETH • La saturazione d’ossigeno nell’arteria è misurata con un sistema chiamato pulsossimetro. Questo è un procedimento continuo e non invasivo basato su differente spettro d’assorbimento per la riduzione dell’emoglobina e dell’ ossiemoglobina Per la misurazione il pulsossimetro utilizza un ossiiemoglobinometro multi funzionale per trasmettere alcune bande luminose di spettri ristretti attraverso campioni di sangue e per misurare l’attenuazione dello spettro con differenti lunghezze d’onda. Le misurazioni effettuate con il sensore per la lunghezza d’onda sono normalmente 660nm per la luce ROSSA e 940nm per il LED ad infrarossi. La potenza ottica massima emessa dal LED è di 4mW. • La quantità di luce trasmessa dipende da diversi fattori, molti dei quali sono costanti. Tuttavia, uno di questi fattori, ovvero il flusso di sangue presente nell’arterie, varia col tempo, poiché fattore pulsante. Dalle misurazioni dell’assorbimento della luce durante una pulsazione, è possibile arrivare alla saturazione dell’ossigeno del sangue arterioso. Ottenuto il valore della pulsazione si otterrà un’onda PLETH ed il segnale della frequenza cardiaca. Pag. 22 • Il valore SpO2 e l’onda PLETH può essere mostrata sul display. • Il periodo di aggiornamento dei dati è inferiore a 5 secondi, il che è variabile in base alle diverse frequenze cardiache individuali. • Si prega di leggere il valore misurato quando la forma d'onda sullo schermo è la stessa e ha un andamento costante. Il valore misurato è il valore ottimale. E la forma d'onda in questo momento è quella standard. Il cavo ES (Elettrochirurgia) e SpO2 non devono essere aggrovigliati. Non collocare il sensore all’estremità di cateteri o flebo. Non effettuare misurazioni SpO2 e NIBP nello stesso momento, poiché una possibile ostruzione del flusso sanguigno durante l’analisi NIBP potrebbe alterare I risultati ottenuti durante l’analisi SpO2. 4.2 Precauzioni durante il monitoraggio di SpO2 • Assicurarsi che l’unghia copra il sensore fotoelettrico; • Il cavo dovrebbe essere posizionato sul dorso della mano. L’onda SpO2 non è proporzionale all’impulso volumetrico. Non usare il sensore SpO2 quando la confezione è danneggiata. Contattare il venditore per la restituzione. Monitoraggi prolungati e continui possono portare a casi di cambiamenti repentini nelle condizioni dell’epidermide (ad esempio un’eccessiva sensibilità, rossore, vesciche, putrescenze, e altro). E’ estremamente importante controllare attentamente la posizione del sensore per neonati e per adulti al fine di evitare una diminuzione della perfusione o un dermogramma immaturo dovuti a collimazioni di luce. Analizzare la posizione del sensore per 2/3 ore e rimuoverlo in caso di pelle deteriorata. Il numero di misurazioni varia a seconda del paziente. 4.3 Procedura di monitoraggio Misurazione del pletismogramma SpO2 1. Accendere il monitor. Pag. 23 2. Collegare il sensore al dito del paziente. 3. Collegare il connettore dl sensore nella presa di corrente SpO2, e fare molta attenzione alla direzione del sensore. 4. Rimuovere il sensore a misurazione terminata. Figura 4.3.1 Posizionamento del sensore 4.4 Manutenzione e pulizia Cura e pulizia Spegnere l’apparecchio durante la pulizia del monitor Non autoclavare il sensore. Non immergere il sensore in qualsiasi liquido. Non usare sensori o cavi deteriorati o danneggiati. Pulizia • Usare un batuffolo di cotone o un telo inumidito per pulire la superficie del sensore e successivamente asciugare con un panno asciutto. Questo metodo può essere applicato per la pulizia della fonte di luce e dell’unità ricevente. • Il cavo può essere pulito con il 3% di diossido d’idrogeno, il 70% di isopropanolo, o altri reagenti attivi. Tuttavia, il connettore del sensore non deve trovarsi a contatto con questi reagenti. Pag. 24 Capitolo 5 MONITORAGGIO NIBP 5.1 Introduzione • La modalità non invasiva di misurazione della pressione (NIBP) misura la pressione sanguigna utilizzando il metodo oscillometrico. • Sono disponibili due modalità di misurazione: manuale, automatica. Ogni modalità mostra la pressione sanguigna sistolica, diastolica, media e le pulsazioni. • Nel metodo MANUALE, verrà effettuata solo una misurazione alla volta. • Nell’ AUTOMATICA invece, la misurazione è ciclica; è possibile scegliere vari tipi di intervallo, da 5/10/15/20/30/45/60/90 minuti. Prolungate misurazioni non invasive in modalità AUTO possono creare casi di ischemia e neuropatia semplicemente indossando il bracciale. Quando viene monitorato un paziente si prega di verificare lo stato del braccio osservandone il colore, temperatura e sensibilità. Ogni volta che viene rilevata un’anormalità bloccare la misurazione. Non si deve eseguire la misurazione NIBP su pazienti affetti da anemia falciforme o in condizioni per cui la pelle possa risultare danneggiata o si possa presumere che lo sia. Per pazienti affetti da tromboastenia, è importante determinare se la misurazione della pressione sanguigna deve essere eseguita in modalità automatica. Tale scelta deve essere ponderata sulla base di valutazioni mediche. Pag. 25 5.2 Monitoraggio NIBP Non applicare il bracciale ad un arto che presenta una flebo o un catetere. Potrebbero verificarsi casi di danni ai tessuti intorno alla zona del catetere durante il rallentamento del flusso durante il gonfiaggio del bracciale. Fare attenzione che la connessione del condotto d’aria al bracciale non sia ostruita o aggrovigliata. Collegare il tubo flessibile e accendere l’apparecchio. Applicare il bracciale al braccio del paziente o alla gamba seguendo le istruzione indicate nella immagine 5.2.1. Assicurarsi che il bracciale sia completamente sgonfio. Applicare al paziente la misura appropriate del bracciale, e fare attenzione che la spia “Φ” sia spenta. Assicurarsi che il bracciale non sia troppo stretto intorno all’arto. Un bracciale troppo stretto può causare danni ed eventuali ischemie. Figura 5.2.1 Applicazione del bracciale Pag. 26 Non lasciare la pelle a contatto diretto con il bracciale, lo spessore dei vestiti non dev’essere superiore ai 3 cm. La larghezza del bracciale dev’essere pari al 40% della circonferenza dell’arto (50% per I neonati) o 2/3 superiore alla lunghezza del braccio. La parte gonfiabile del bracciale deve avere una lunghezza pari al 50‐80% della lunghezza dell’arto. Usando una misura sbagliata si potrebbe correre il rischio di misurazioni erronee e poco affidabili. In questo caso, utilizzare un bracciale più largo. Taglie del bracciale riutilizzabile per neonati/ragazzi/adulti Tipo paziente Perimetro arto Larghezza bracciale Tubo Adulto Adulto2 25 ~ 35 cm 33 ~ 47 cm 14 cm 17 cm Coscia 46 ~ 66 cm 21 cm 1.5 m o 3 m • Assicurarsi che il bordo del bracciale sia all’interno dei segni <‐>. In caso contrario, usare un bracciale più largo o più piccolo. 3. Connettere il bracciale al tubo flessibile. L’arto scelto per la misurazione deve trovarsi allo stesso livello del cuore del paziente. Se ciò non è possibile dovranno essere applicate le seguenti correzioni ai valori misurati: • Se il bracciale è posizionato troppo in alto rispetto il livello del cuore, aggiungere 0.75 mmHg (0.10 kPa) per ogni pollice di differenza. • Se il bracciale è al di sotto il livello del cuore, togliere 0.75 mmHg (0.10 kPa) per ogni pollice di differenza. 4. Schiacciare il bottone NIBP sul fronte del pannello per iniziare la misurazione. Pag. 27 5.3 Messaggi di errore NIBP e spiegazioni Spiegazione 02 Self‐test failure errore in autodiagnosi Causa Errore nella sonda o campionamento A/D Loose cuff bracciale non allacciato Il bracciale non è collegato correttamente 06 correttamente 07 Air leakage – perdita aria Perdita d’aria nella valvola o nel tubo d’aerazione Atmospheric pressure 08 error – errore nella pressione atmosferica La valvola non può essere aperta Signal is too weak segnale 09 troppo debole Il misuratore non riesce a rilevare la pressione o il bracciale non è allacciato bene 10 It is over the range sopra ai livelli 11 Excessive movement troppi movimenti Il misuratore rileva una pressione sopra ai livelli di range. Durante la misurazione, segnala un eccesso di movimenti o interferenza pseudo‐ differenziale 12 Overpressure Pressione elevata La pressione nel bracciale supera il limite, ADU 290 mmHg 13 Saturated signal segnale saturo Movimento o altri fattori causano un’ampiezza di segnala eccessiva 14 Air leakage dispersione d’aria System failure 15 guasto di sistema It spends too much time 19 impiega troppo tempo C’è una dispersione d’aria nel condotto Viene rilevato un problema con il modulo NIBP, campionamento A/D o di sistema all’accensione Adulti: quando la pressione del bracciale è di 200mmHg potrebbe impiegare 120s. Altrimenti potrebbe impiegare 90x Pag. 28 5.4 Mantenimento e pulizia • Non torcere il tubo di gomma del bracciale. • Evitare che la presa del connettore sulla parte anteriore dell’apparecchio entri in contatto con liquidi. • Non strofinare la parte interna del connettore mentre si pulisce l’apparecchio. Bracciale riutilizzabile Il bracciale può essere sterilizzato con autoclave, gas, sterilizzazione a radiazioni in forni ad aria calda o disinfettato immergendolo in soluzioni decontaminanti ma bisogna ricordare di togliere la sacca in gomma se si utilizza questo metodo. Il bracciale non può essere pulito a secco. Il bracciale può essere lavato in lavatrice o a mano, nel secondo caso si conserva meglio e si può utilizzare più a lungo. Prima di lavarlo, rimuovere la sacca in gomma, e se si utilizza una lavatrice, chiudere il velcro ben stretto. Prima di reinserire la sacca di gomma, lasciare che il bracciale si asciughi bene dappertutto dopo il lavaggio. Figura 5.4 Sostituzione sacca in gomma del bracciale Per sostituire la sacca in gomma del bracciale, prima posizionare la sacca in cima al bracciale in modo che i tubi di gomma siano in linea con l’apertura grande sul lato lungo del bracciale. Quindi arrotolare la sacca per il lungo e inserirla nell’apertura del bracciale. Tenere i tubi e il bracciale e scuotere il bracciale finché la sacca si trova in posizione. Infilare i tubi di gomma all’in‐ terno del bracciale verso l’esterno attraverso il piccolo foro sotto la piega interna. Pag. 29 Bracciali misurazione pressione monouso I bracciali monouso devono essere utilizzati da un unico paziente. Non si può utilizzare lo stesso bracciale su un altro paziente. Non sterilizzare o utilizzare autoclave su bracciali monouso. I bracciali monouso possono essere puliti con una soluzione detergente di sapone per prevenire infezioni. Per la protezione dell’ambiente, i bracciali monouso devono essere riciclati o smaltiti correttamente. 5.5 Trasporto e conservazione A. L’apparecchio imballato può essere trasportato con mezzi ordinari oppure secondo il contratto di trasporto. L’apparecchio non può essere trasportato con materiale corrosivo, nocivo o tossico. B. L’apparecchio imballato deve essere conservato in ambienti privi di gas corrosivi e ben ventilati. Temperatura: ‐20°C~60°C; Umidità: ≤95 Pag. 30 5.6 Legenda simboli Simbolo SYS MAP DIA %SpO2 PR Descrizione Attenzione – Vedere manuale d’istruzioni Pressione sistolica Pressione MAP (pressione arteriosa media) Pressione diastolica (%) saturazione dell’ossigeno Frequenza cardiaca (bpm) Disattiva indicazione segnale sonoro Attivare indicazione segnale sonoro Disattiva indicazione segnale sonoro RAEE (2002/96/EC) SN Parti in dotazione tipo BF a prova di defibrillatore Numero di serie IPX1 1. la sonda da dito non è inserita correttamente 2. errore sonda 3. indicazione potenza segnale inadeguato Indice ingresso liquidi Conforme alla direttiva 93/42/EEC del 14 Giugno, 1993. 0123 Pag. 31 Capitolo 6 INSTALLAZIONE DEL SOFTWARE 6.1 Requisiti tecnici Processore: Pentium IV 1.8G o superiore Sistema Operativo: Win2000/XP/Vista Capacità di memoria: 256M o superiore Hard Disk: 40G o superiore Display: 17 pollici o superiore CD‐ROM Risoluzione stampante: 300 DPI o superiore 6.2 Installazione del software 1 Inserire il CD‐ROM nell’apposito scomparto CD‐ROM del computer. 2 Se è abilitata la funzione “Auto Play” per i CD, inserire il CD nel lettore e seguire le istruzioni che appaiono sullo schermo; altrimenti seguire le seguenti istruzioni per l’installazione: Aprire Windows Explorer. Cliccare sul percorsi directory CD‐ROM. Cliccare due volte sul file Setup.exe. Seguire le istruzioni sullo schermo. Dopo aver installato Patient_Monitor_Setup, aprire lo strumento, collegare la porta USB, nel computer appare una finestra di dialogo, selezionare "Installa Auto", l'installazione è riuscita. Pag. 32 Capitolo 7 INTRODUZIONE AL SOFTWARE 7.1 Inserimento nome utente Ogni volta che si apre il software comparirà la seguente finestra di dialogo per l’inserimento del nome utente. Digitare il nome utente. Per cambiare il nome cliccare sulla voce ”Change User”. Questa funzione permette di memorizzare la propria configurazione. Figura 7.1.1 Inserimento nome utente Cliccando su “Delete” verranno cancellate le informazioni e la configurazione del nome utente corrente. Cliccando su “Delete all” verranno cancellate tutte le informazioni e configurazioni di tutti i nomi utente. In caso si debba aggiungere un nuovo utente, cliccare su “Okay” e comparirà la seguente finestra di dialogo. Figura 7.1.2 Scelta della directory di download “Patient File Path”: Scegliere il proprio percorso di download. Non appena i dati verranno caricati sul computer, il documento sarà salvato in questo percorso. Inoltre, flaggando la funzione “Always use default path”, le ricerche dei dati effettuate saranno memorizzate come precorso predefinito. In caso contrario, le informazioni ricercate saranno memorizzate come ultimo percorso utilizzato. Pag. 33 7.2 Interfaccia principale Quando le impostazioni dell’utente sono state configurate, si avvia l’interfaccia principale e si visualizza la seguente immagine: 1 2 3 4 Figura 7.2 interfaccia operativa principale 1. Barra del menù ‐ Il menu operativo principale di questo software 2. Barra degli strumenti ‐ Tasti scelta rapida per funzioni di uso frequente 3. Videata delle immagini grafiche ‐ Effettuata la scelta da editare, viene visualizzata la schermata dei grafici ed immagini relative. 4. Barra di stato ‐ Mostra il nome, ID, e le informazioni rilevate del paziente. 7.3 Indossare Cliccando il tasto di scelta rapida apparirà la finestra di dialogo: Pag. 34 Figura 7.3 Indossare Potete indossare l’apparecchio come da immagine Leggete le “Note” con attenzione prima dell’uso. Pag. 35 7.4 Definire il piano di misurazione Nota: Prima di caricare i parametri, accertarsi che: 1. Il dispositivo sia connesso al computer via porta seriale. 2. Il dispositivo sia acceso. Passaggi: 1. Cliccando sul tasto di scelta rapida , o selezionando dal menu la voce “Upload”, apparirà la seguente finestra di dialogo. Figura 7.4.1 Selezionare lo stato del dispositivo 2. Se si sceglie “ABPM” apparirà la seguente finestra di dialogo. Figura 7.4.2 Finestra impostazione parametri Nome Paziente, ID del Paziente: indicare il nome e ID del paziente. Tempo Corrente: Mostra il tempo trascorso dall’inizio della visita. Tempo inizio esame: Il valore è posticipato di cinque minuti rispetto al tempo corrente. Tasto Start: rilevazione manuale. Pag. 36 Definizione modalità tempi paziente: Awake di riferisce al paziente sveglio, Asleep si riferisce al paziente che dorme. Avvio Speciale e Fine Speciale sono funzioni opzionali. E’ possibile fissare il tempo per la raccolta dei dati. Le impostazioni d’intervallo fanno riferimento agli intervalli presenti nella raccolta dati. Per ridurre l’influenza della fase del sonno del paziente, le impostazioni generali di rilevazione sono impostate con tempi più lunghi. Come mostrato dalla foto sopra: il range del tempo paziente da sveglio è compreso tra le 7:00‐22:00, il tempo paziente nella fase del sonno è compreso tra le 22:00‐7:00, gli intervalli del tempo paziente da sveglio sono pari a 5 minuti, gli intervalli del paziente nella fase del sonno sono pari a 30 minuti. Il range dei tempi paziente da sveglio o nella fase del sonno solo illustrate da immagini presenti nel lato destro dello schermo. In questo modo l’impostazione dei parametri risulta molto semplice. Se si sceglie “Patient Monitor” apparirà la seguente finestra di dialogo: Figura 7.4.3 Caricamento parametri 3. Cliccando su “OK” apparirà la seguente finestra di dialogo che mostrerà il progresso dei dati trasferiti Figura 7.4.4 Barra di caricamento Pag. 37 7.5 Scaricare i dati Prima di scaricare i dati dal dispositivo, accertarsi che: 1. Il dispositivo sia connesso al computer tramite porta seriale. 2. Il dispositivo sia acceso. 3. Disconnettere il dispositivo dal paziente prima di collegarlo a qualunque parte dell’hardware come per esempio il personal computer (per evitare scosse elettriche). Le informazioni del paziente appena scaricate verranno poi salvate nel percorso del file prescelto. Se si desidera cambiare il percorso di archiviazione, selezionare dal menu la voce “Download” e cliccare su “Set file path”. La finestra di dialogo (Foto 7.1.2) sarà mostrata dando la possibilità all’utente di modificare il percorso. Cliccando sul tasto di scelta rapida , o selezionando dal menu la voce “Download” e successivamente “Do Download” apparirà la seguente finestra di dialogo che vi permetterà di selezionare quale dato si desidera scaricare. (dati ABPM o Patient Monitor). Figura 7.5.1 Selezionare lo stato del dispositivo Vi comparirà la seguente finestra di dialogo che mostrerà il progresso del trasferimento dei dati. Figura 7.5.2 Barra di trasferimento dati A trasferimento completato, una finestra di dialogo segnalerà dove verranno salvati i dati. Pag. 38 7.6 Selezione dei dati paziente Cliccando sul tasto di scelta rapida , o selezionando dal menu la voce “File” e successivamente “Open data” apparirà la seguente finestra: Figura 7.6 Selezione dei dati paziente La finestra di dialogo sopra indicata mostra l’elenco dei file trovati nell’attuale directory. è possibile utilizzare il drive e le finestre della directory per selezionare un drive o una directory differente per cercare i file paziente. Selezionare un file evidenziando il nome del paziente e cliccando su “Okay”. Ora sarà possibile effettuare la modifica del file. 7.7 Cancellazione dei dati paziente Nel caso in cui si volesse eliminare un file paziente non necessario o di scarsa utilità, selezionare dal menu la voce “File” e successivamente cliccare su “Delete Data”. Sarà quindi mostrato il dato del paziente eliminato con una schermata simile alla schermata di selezione del paziente, così come mostrato nella finestra sottostante: Pag. 39 Figura 7.7 Cancellazione file dati è possibile eliminare un solo file o più file nello stesso arco di tempo. Per eliminare più file insieme, bisogna cliccare contemporaneamente “Ctrl”, e il file che si vuole eliminare. Dopo di che, cliccare su “Okay”, e comparirà la finestra di dialogo “sure to delete “. Cliccare su “YES” per completare l’operazione. Se invece la si vuole annullare, cliccare su “NO”. 7.8 Backup di un file Talvolta, potrebbe essere necessario salvare una copia originale prima di modificare un file, in questo caso, si deve creare una copia di riserva dei dati del paziente. Il nostro programma dispone di questa funzione. Dal menu selezionare ”File” e quindi “Copy data”, apparirà la seguente finestra di dialogo che permette di selezionare quale file dati si desidera copiare. Figura 7.8.1 Copia file dati Selezionare o deselezionare le voci cliccando sulle righe utilizzando il mouse. A selezione avvenuta, cliccare su “Okay”. Apparirà la seguente finestra di dialogo che Pag. 40 permette di selezionare il disco fisso o la cartella dove copiare i dati. A questo punto cliccare “OK” per confermare l’operazione. Figura 7.8.2 Impostazione percorso Backup Dopo aver scelto il drive o la directory per il salvataggio del file cliccare su “Okay”. è possibile selezionare “Cancel” per terminare l’operazione senza aver copiato nessun dato paziente. 7.9 Modifica dati pressione sanguigna Premere il tasto di scelta rapida , oppure selezionare “Edit” dal menu e quindi “Bp Data”, apparirà la seguente finestra di dialogo. Figura 7.9 Pagina modifica dati Tutte le letture della pressione sanguigna vengono visualizzate come mostrato nella finestra di dialogo. Pag. 41 *=3/192(1.6%): 192 rappresenta la somma totale dei dati, 3 rappresenta il totale dati cancellati, 1.6% indica la percentuale di dati cancellati. Number: indica il numero di serie dei dati raccolti. Time: indica l’ora di rilevazione dati. Date: indica la data di rilevazione dati. BP: Il numero prima di “/” indica la pressione sanguigna massima, il numero dopo “/” indica la pressione sanguigna minima, l’unità di misura è mmHg. PR: battito cardiaco. MAP: pressione media, l’unità di misura è mmHg. PP: Differenza di pressione tra minima e massima. L’unità di misura è mmHg. TC: codice errore (vedere capitolo 7) Comment: note sui dati. 7.10 Selezione dell’andamento Selezione dell’andamento della pressione sanguigna (BP) Quando si seleziona il file, l’andamento del BP sarà mostrato automaticamente sullo schermo. Nelle altre interfacce è possibile cliccare sul tasto di scelta rapida ed entrare nell’interfaccia “BP trend”. L’interfaccia “Bp Trend” presenta due tipi di grafico: color filler type e dotted line type. è possibile passare da un tipo di grafico ad un altro grazie all’opzione “Graph Type”. Figura 7.10.1 Grafico BP Trend color filler type Pag. 42 Figura 7.10.2 Grafico BP Trend dotted line type Quando si muove il mouse nella parte superiore della zona d’andamento, verranno fornite varie informazioni, le quali comprendono: il numero seriale, tempo acquisizione e data acquisizione valore di alta/bassa pressione, frequenza cardiaca, commento, etc. Premendo il tasto sinistro del mouse sarà possibile cancellare o aggiungere dati. Se la distanza tra due o più dati è troppo breve da non consentire il movimento del mouse a uno dei punti, muovere il mouse nell’area dell’asse temporale, cliccare sul tasto sinistro del mouse, trascinandolo verso il lato destro di BP Trend. è possibile anche trascinare il mouse verso il lato sinistro di BP Trend. Quando si ridimensiona il grafico BP Trend, se l’area del grafico si estende oltre all’area visibile, si può visualizzare il resto del grafico trascinando l’apposita barra presente sotto al grafico. Figura 7.10.3 Grafico BP Trend Stretch (time axis) Pag. 43 Figura 7.10.4 Grafico BP Trend Shrink (time axis) Figura 7.10.5 Grafico BP Trend Stretch (y‐axis) Pag. 44 Figura 7.10.6 Grafico BP Trend Shrink BP (y‐axis) Modifica dell’andamento SpO2 Cliccando sul tasto di scelta rapida, apparirà l’interfaccia sull’andamento SpO2. Figura 7.10.7 Grafico Trend SpO2. Muovendo il mouse nell’area dello schermo, comparirà una linea gialla, e sulla parte superiore è presente la voce “Selected data info”, dove potrà essere visualizzato l’esatto livello di SpO2 ed il valore delle pulsazioni in base al tempo. Di conseguenza, muovendo il mouse il suddetto valore cambierà. Il valore SpO2 e delle pulsazioni è mostrato dalla linea orizzontale. É possible azzerare questa linea cliccando con il tasto destro del mouse nell’area “SpO2 ruler” o nell’area “Pulse ruler”. Pag. 45 Questi 4 tasti sono utilizzati per impostare la pagina “length”. Questa pagina regola la lunghezza massima dei dati visibili contemporanemente nella finestra. “1”: 1 minuto. “10”: 10 minuti. “60”: un’ora. : Manual Set, cliccando con il mouse su questa voce apparirà una finestra di dialogo, dando la possibilità di impostare la lunghezza desiderata. Questi 4 tasti invece sono usati per muovere “data offset”, questa è l’ora presente alla sinistra dello schermo. I pulsanti “<<” And “>>” muovono il valore “offset” Avanti e indietro in base alla lunghezza di pagina. Se si seleziona “1” come lunghezza di pagina, “>>” sposterà I dati avanti di un’ora. Il pulsante “<” And “>” sposta il valore “offset” Avanti e indietro in base alla lunghezza impostata. Se la lunghezza è più piccola della dimensione di pagina, la pagina 1 conterrà diverse selezioni, le selezioni sono indicata nell’area “time”, l’indicazione del tempo è indicata per ogni selezione. Cliccando con il mouse la voce “Parameters set” comparirà la seguente finestra di dialogo. Figura 7.10.8 Impostazione parametri d’analisi La finestra d’installazione indica: SpO2 (desaturazione): il valore SpO2 si riduce del 4% mentre il tempo è di almeno 10 secondi. Pag. 46 Pulse Rate: le pulsazioni hanno subito una variazione di almeno 6bpm mentre il tempo è di almeno 8 secondi. 7.11 Visualizzazione delle informazioni statistiche Cliccando il tasto di scelta rapida , o selezionando dal menu la voce “Report” e successivamente “View Statistics” comparirà la seguente finestra di dialogo. Figura 7.11 Informazioni statistiche BP 7.12 Modifica di una diagnosi. Le informazioni di una diagnosi comprendono le seguenti voci: Patient information, Interpretation, Current Medication and Physician information. Selezionando dal menu la voce “Edit” e successivamente “Patient Data” comparirà la seguente finestra di dialogo. Pag. 47 Figura 7.12.1 Edit patient’s information Cliccando sulla voce “Current Medications” è possibile visualizzare la relative interfaccia, poi sarà possibile modificare I dati inseriti. Cliccando sulla voce “Interpretation” è possibile visualizzare l’interfaccia d’interpretazione. Cliccando sula voce “Physician Info” è possibile visualizzare l’interfaccia riguardante le prescrizioni del medico. 7.13 Modifica fase del sonno Le impostazioni includono: ora di risveglio e fase del sonno. Quando si rilevano i parametri del paziente, non sempre il paziente si addormentano o svegliano aderendo strettamente ai dati di protocollo, quindi potrebbe essere necessario cambiare questi valori. Dopo l’impostazione della fase del sonno, il software calcolerà automaticamente i dati, aggiornerà il valore Trend BP e ricalcolerà i dati statistici. Pag. 48 Figura 7.13 Finestra di dialogo fase del sonno 7.14 Soglie BP Dopo che le soglie BP sono impostate, il grafico tenderà a rinnovarsi automaticamente, e le statistiche verranno ricalcolate. Selezionando la voce “Edit” e successivamente “Thresholds” comparirà la seguente finestra di dialogo. Figura 7.14 Finestra di dialogo valori soglia I valori soglia per il calcolo della pressione sanguigna sono 140/90 nei momenti in cui il paziente è sveglio e 120/80 nei momenti di sonno. Questi sono i valori preimpostati che saranno utilizzati quando si seleziona il pulsante “Factory Defaults”. Pag. 49 7.15 Istogramma Premere il tasto di scelta rapida e apparirà la seguente interfaccia: Figura 7.15 Istogramma All: Mostra tutte le informazioni statistiche delle pressioni sanguigne. Day: Mostra solo le statistiche ottenute di giorno. Night: Mostra solo le statistiche ottenute di notte. 7.16 Diagramma a torta Premere il tasto di scelta rapida , e apparirà la seguente interfaccia: Pag. 50 Figura 7.16 Diagramma a torta É possibile modificare le percentuali presenti sullo schermo superiori alla norma, nella norma, ed inferiori alla norma. Le statistiche verranno mostrate alla sinistra del display, come valore di pressione sanguigna (BP), battito del polso (PR) massimo, minimo, e valore medio, etc. All: Mostra tutte le informazioni statistiche della pressione sanguigna (BP). Day: Mostra solo le informazioni statistiche ottenute di giorno. Night: Mostra solo le informazioni statistiche ottenute di notte. 7.17 Linea di correlazione. Cliccando sul tasto di scelta rapida , comparirà la seguente finestra di dialogo: Figura 7.17 Linea di correlazione Pag. 51 La linea Rossa rappresenta la pressione sistolica; la blu rappresenta invece la pressione diastolica. I piccoli cerchi bianchi rappresentano il valore della pressione sanguigna ottenuta di giorno; i piccoli cerchi neri invece rappresentano i valori ottenuti di notte. L’istogramma, il grafico a torta e le line di correlazione sono utili per l’analisi delle informazioni ottenute. 7.18 Stampa Dopo la modifica dei dati precedenti, la modifica delle informazioni di diagnosi, la modifica dell’andamento trend, e così via, il software creerà una serie di rapporti di diagnosi e sarà possibile selezionare una o più pagine per la stampa. Le informazioni inerenti alla selezione possono essere salvate come impostazioni predefinite per la prossima stampa. Selezionando dal menu la voce “Report” e successivamente “Configure Report” apparirà la seguente finestra di dialogo Figura 7.18.1 Configurazione rapporto di diagnosi è possibile selezionare un rapporto già esistente per la stampa; oppure, cliccando sulla voce “Edit Report” sarà possibile modificare il rapporto selezionato. Pag. 52 Figura 7.18.2 Modifica rapporto E’ possibile selezionare tutte le pagine o soltanto alcune per la stampa. Solo quando il file includerà i dati corrispondenti all’ SpO2 sarà possibile cliccare sulla voce “SpO2 Report” e stampare un report SpO2. Cliccando sulla voce “Title”, è possibile inserire il titolo corrispondente al rapporto da stampare. Naturalmente, è possibile aggiungere un nuovo rapporto cliccando sulla voce “Add Report”, ed in seguito è possibile eliminarlo cliccando sulla voce “Delete Report”. Il formato standard per la carta da usare nella stampa è l’A4, selezionare dal menu la voce “Report” e successivamente “Select printer” per selezionare una stampante. Sempre selezionando la voce “Report” e successivamente “Print preview”, è possibile visionare in anteprima la pagina selezionata. Quando si vuole stampare un report, cliccare sul tasto di scelta rapida selezionare dal menu “Report” e successivamente “Print”. , oppure, 7.19 Aiuto Cliccando sul tasto di scelta rapida comparirà la guida sull’utilizzo del prodotto. Pag. 53 Capitolo 8 GUIDA ALLA RISOLUZIONE DEI PROBLEMI Cod Descrizione sul report Soluzione 1 Nessun segnale Controllare la posizione del bracciale e stringerlo 2 Eccessivo movimento Restare immobili durante la misurazione 4 Tempo misurazione scaduto Controllare il condotto dell’aria e assicurarsi che il bracciale sia stretto 85 Condotto d’aria ostruito Controllare il condotto dell’aria e assicurarsi che i tubi non siano annodati 86 Cancellazione misurazione Premere il tasto START/STOP per iniziare la lettura 87 Perdita nel bracciale Controllare bracciale e condotto d’aria 88 Pausa di sicurezza 89 Sovrapressione bracciale Ritentare la lettura, premere il tasto START/STOP. In caso di problemi portare l’apparecchio al servizio assistenza Controllare condotto aria se bloccato o 90 Batteria scarsa Sostituire le batterie, se il problema persiste, portare l’apparecchio al servizio assistenza 102 Auto‐diagnosi fallita Portare l’apparecchio al servizio assistenza 110 Fuori gamma Riprovare, se il problema persiste, portare l’apparecchio al servizio assistenza 115 Errore di sistema Portare l’apparecchio al servizio assistenza Pag. 54 Pag. 2 Chapter1 Introduction 1.1 General Information 1.2 Main Parameters 1.3 Button Functions 1.4 Interfaces 1.5 Accessories Chapter2 Getting Started 2.1 Open the Package and Check 2.2 Dry Battery Installation 2.3 Power on the Monitor 2.4 Connect Oximeter Probe 2.5 Connect NIBP Cuff Chapter3 Function Interface 3.1 Main Interface 3.2 SYSTEM MENU 3.2.1 System Setup 3.2.2 BP SETUP 3.2.3 SpO2 SETUP 3.2.4 Patient Information 3.2.5 BP TABLE 3.2.6 SpO2 TABLE 3.2.7 TREND Chapter4 SpO2 Monitoring 4.1 What is the SpO2 Monitoring 4.2 Precautions during SpO2/Pulse Monitoring 4.3 Monitoring Procedure 4.4 Maintenance and Cleaning Chapter5 NIBP Monitoring 5.1 Introduction 5.2 NIBP Monitoring 5.3 NIBP Message and Explanations 5.4 Maintenance and Cleaning 5.5 Transportation and Storage 5.6 Key of Symbols Chapter6 Installation of the software 6.1 Demand of Editor Pag. 3 6.2 Installation of Software Chapter7 Introduce the Software 7.1 User Register 7.2 The Main Interface 7.3 Wear 7.4 Design the Measurement Plan 7.5 Data Download 7.6 Choose Patient Data to Edit 7.7 Delete Data File 7.8 Data File Backup 7.9 Edit Blood Pressure Data 7.10 Trend Edit 7.11 Display the Statistics Information 7.12 Edit of Diagnose Information. 7.13 Sleep Period Change 7.14 BP Thresholds 7.15 Histogram 7.16 Pie Chart 7.17 Correlation Line 7.18 Print Report 7.19 Help Chapter8 Troubleshooting Guide Appendix Pag. 4 Chapter1 Introduction • For an overall introduction to the monitor, please refer to General Information. • For basic operating instructions, please refer to Button Function. • For allocation of interface sockets, please refer to Interfaces. Possible explosion hazard if used in the presence of flammable anesthetics or other flammable substance in combination with air, oxygen‐enriched environments, or nitrous oxide. You must verify if the device and accessories can function safely and normally before use. Ensure that the environment in which the device is operated is not subject to any sources of strong electromagnetic interference, such as radio transmitters, mobile telephones, etc. Keep them far away high level electromagnetic radiation emitted from such devices may greatly affect the monitor The disposal of scrap instrument and its accessories and packing (including battery, plastic bags, foams and paper boxes) should follow the local laws and regulations. Please choose the accessories and probe which are approved or manufactured by the manufacturer, or else it may damage the device. keep it out of children’s reach. The monitor is only use on one patient in same times. When the monitor is wetted, please stop using it and contact us. A functional tester cannot be used to assess the accuracy of a pulse oximeter probe or a pulse oximeter monitor. When used with Electro‐surgery equipment, you must give top priority to the patient safety. It is recommended that you check if there is any damage on the monitor or the accessories regularly, if you find any damage, stop using it, and contact the biomedical engineer of the hospital or our Customer Service immediately. In addition, the overall check of monitor, including the safety check such as the leakage current, should be only performed by qualified personnel once every 12 months. Please choose the computer which should be ensured compliance with the requirements of IEC60950, or else it may damage the device. Pag. 5 The software was developed per IEC60601‐1‐4. The possibility of hazards arising from errors in the software program is minimized. The Patient Monitor shall comply with the standard EN1060 series: Part 1: General requirements; Part 3: Supplementary requirements for electro‐ mechanical blood pressure measuring systems (in course of preparation). 1.1 General Information Working Transport and Storage Temperature 5~40 (˚C) ‐20~60 (˚C) Humidity ≤ 80 % ≤ 95 % Altitude ‐500 a 4,600m ‐500 m a 13,100 m Power Supply 3 (V) DC Pmax = 3 VA Safety This device is defibrillator protected. Note that no precautions specific to the device are required during defibrillation, and defibrillation discharge has no effect on the monitor. The equipment uses the gray silicone airway, in case of the effect to the equipment when defibrillation device was used on the patient. General instruction: The monitors not only measure the ambulatory blood pressure, but also monitor the parameters of NIBP, Pulse Rate and SpO2. it is applicable for adult, pediatric, and neonatal. It integrates parameter measuring modules function and display function in one device, featuring in compactness, lightweight. The POWER switch is on the front panel. The RUN indicator and the ALARM indicator flash one time when the device is powered on. The ALARM indicator flashes when alarm occurs. The sockets of the sensors are at the top. USB is at the bottom of monitor. This monitor is a user‐friendly device with operations conducted by a few buttons on the front panel. Refer to Button Functions for details. Measuring the ambulatory blood pressure function: In this mode, the monitor can work 24 hours continuously. The monitor have the capable of recording up to 4800 measurements, BP data trends chart. The stored readings in the monitor are downloaded into the computer to proceed the function including editing the data. Editing the trend graph, statistic, displaying the information. Editing the diagnostic information, setting the parameters and printing and so on. However, this monitor cannot transmit data real‐time in the process of measuring. Pag. 6 Monitoring function: NIBP — From left to right, there are Systolic pressure, MAP pressure and Diastolic pressure(unit: mmHg) SpO2 — SpO2(unit: %) — Pulse Rate(unit: beats/minute) the stored values of SpO2 in the monitor can be downloaded into the computer too. Alarm processing: The user may turn on the alarm monitor by hand. When alarm is on, SpO2 alarm is as follows: oxygen saturation and pulse rate displayed circularly for 5 times in 1scecond and tested the measured value whether it was exceeded or not at the same time; the blood pressure alarm is as follows: after the finish of the test, it will measure the high pressure, low pressure and the mean pressure every 4 second, until the end of the next test. The voices of the pressure and SpO2 are same the only difference between them is the interval. Audible alarm is accompanied by visual alarm and the symbol of the alarm condition in the main interface was red. Alarm priority: technical alarm such as low power, probe off > physiological alarm such as over the prescribed limit of the pressure and SpO2. In this mode, the length of working time continuously is decided by the interval of measurement set by the user. It is useful that the software at the state of monitoring as the ambulatory blood pressure. Refer to Software Functions for details. Pag. 7 1.2 Main Parameters A. Measurement of SpO2 Measuring range: 0%~100% Accuracy: when the SpO2 measuring range is 70%~100%, the permission of absolute error is ±2%; below70% unspecified B. Measurement of a pulse rate Measuring range: 30bpm~250bpm Accuracy: ±2bpm C. Measurement of blood pressure Measuring range: ADULT: SYS: 40‐270 mmHg MAP: 20‐235 mmHg DIA: 10‐215 mmHg PEDIATRIC: SYS: 40‐200 mmHg MAP: 20‐165 mmHg DIA: 10‐150 mmHg NEONATAL: SYS: 40‐135 mmHg MAP: 20‐110 mmHg DIA: 10‐100 mmHg Maximum mean error of measurement: ±5 mmHg. Maximum experimental standard deviation: 8 mmHg. D. Resolution SpO2: 1%, Pulse rate: 1bpm, blood pressure: 1mmHg Pag. 8 1.3 Button Functions All the operations to the monitor are through the buttons at the bottom of the panel. The names of the buttons are above them. TURN ON Press the button for a long time, then the system will start. When turning on and off the monitor, the red light and the green both flash once to prompt that the on or off operation is successful. Press the button for 3 second, the instrument turns off. If power is low than 2.2V, the instrument can not turn on. When the battery power is low, the alarm occurs. The battery's frame becomes red, and ceaseless flash. The text in the middle bottom of the screen indicate the function of this key. The text in the left bottom of the screen indicate the function of this key. The text in the right bottom of the screen indicate the function of this key. Press to inflate the cuff to start a blood pressure measurement, and display the main interface. When measuring, press this button to cancel the measurement, deflate the cuff and "CANCEL" will appear in the main interface. When the frame of battery power sign is red in the main interface, pressing measure button is disabled.Here, self‐motion measure can't be carried through too. Plug in USB to carry on upload and download data when no battery. That the topside of the screen displays USB symbol shows the instrument triumphantly connects with the computer. NIBP key is invalidation when plug in USB line. Pag. 9 1.4 Interfaces For the convenience of operation, the different kinds of interfaces are in different parts of the monitor. At the top is the Socket for SpO2 Sensor and socket for NIBP cuff (Figure 1.4.1) the Socket for NIBP cuff the Socket for SpO2 Sensor ② ① Figura 1.4.1 At the bottom is the socket for USB 1.5 Accessories A cuff for adult B a USB data line C an oximeter probe D a disk (PC software) E a pouch F a user manual Please use the accessories supplied by the manufacturer or replace the accessories according to the requirements of the manufacturer in order to avoid making harms to patients. Pag. 10 Chapter2 Getting Started ■ ■ ■ ■ Open the package and check Dry battery installation Power on the monitor Connect patient sensors 2.1 Open the Package and Check Open the package and take out the monitor and accessories carefully. Keep the package for possible future transportation or storage. Check the components according to the packing list. ■ Check for any mechanical damage. ■ Check all the cables, modules and accessories. If there is any problem, contact the distributor immediately. 2.2 Dry Battery Installation The monitor will be supplied with two 'AA' alkaline batteries or high capacity. Before using the monitor, you shall put the battery in the box of battery. When you don't use the monitor, you will take out the dry battery. Pag. 11 2.3 Power on the Monitor Press to power on the monitor. The indicator will flash, the system will enter monitoring screen of monitoring or ABPM, and you can perform normal monitoring now. Refer to System Menu for details. If any sign of damage is detected, or the monitor displays some error messages, do not use it on any patient. Contact biomedical engineer in the hospital or our Customer Service Center immediately. Check all the functions that may be used to monitor and make sure that the monitor is in good status. 2.4 Connect Oximeter Probe For information on correct connection, refer to Figure 2.4.1. Figure 2.4.1 2.5 Connect NIBP Cuff Connect NIBP extension conduit between the monitor and the patient. For information on correct connection, refer to Figure 2.5. Figure 2.5.1 Pag. 12 Chapter3 Function Interface ■ ■ Main Interface System Menu 3.1 Main Interface Press POWER to power on the monitor. The indicator will flash, the system will enter the main interface successfully. ABPM: If there is no key‐press operation within the time set in the BACKLIGHT TIME item, the monitor will enter standby mode. RUN indicator light flashes once every other 2seconds, indicating the monitor is under working mode. Monitoring mode: BACKLIGHT TIME item setup is of no effect. The backlight is bright all the time. The red symbol of battery will flash in the main interface when the power is low. The main interface is shown as the follow: Figure 3.1.1 Figure 3.1.2 ABPM main menu Monitoring main menu When the register is full will turn up at the top of the screen. The note of the last time needs to be cleared. Pag. 13 3.2 SYSTEM MENU Press the MENU button on the panel to call up the [SYSTEM MENU]. You can perform option operations by using UP and DOWN buttons. Figure 3.2.0 System menu [PM SpO2 SETUP] and [SpO2 TABLE] are gray in the mode of ABPM. They cannot be set up. Pag. 14 3.2.1 SYSTEM SETUP Select the SYSTEM SETUP item in the [SYSTEM MENU]. The following menu will pop up. Figure 3.2.1 System setup Users can set up the system time by selecting the [TIME] item. If users select [YES] in the [DEFAULT] item, the Monitor will come back to factory default. In the [LANGUAGE] item, users can select the words shown in Chinese or English in the screen. If users select [ON] in the [ALARM] item, the loudspeaker turns on. will turn up in the main interface. On the other hand, when users select [OFF], the loudspeaker turns off, will turns up. In the [NEW PATIENT] item, if users select [YES], the "Clear the last value ?" dialog box will appear. Select [YES] again will delete the measure record of the last patient. Then select [NO] back to the [SYSTEM SETUP ]. Else, selecting [NO] at first, the monitor will do nothing. Please pay attention to this function. Users can select PM or ABPM in the [FUNCTION SELECT] item and correspond measures will be taken. In the [BACKLIGHT TIME] item, users can make it from 5 to 120 seconds with 5 seconds per step. Its function is to control the backlight time of the main interface in ABPM. Under the ABPM, [DEFAULT]and [NEW PATIENT] cannot be set up. Pag. 15 3.2.2 BP SETUP Select [BP SETUP] in the ["SYSTEM MENU"]. The following menu will pop up. Figure 3.2.2 BP setup In PM mode, When users select [ON] in the [AUTO MEASURE] item, the Monitor will measure blood pressure according to the time selected in the [INTERVAL] item. In ABPM mode, [AUTO MEASURE] and INTERVAL can not be set up and become gray. The interval time (Unit: minute) setup in the [INTERVAL] item can be selected from the following options: 5, 10, 15, 20, 30, 45, 60, 90,120. The alarm is on or off according to the high and low limits which have been set up. When the pressure higher than the high limit or lower than the low limit, the alarm will occur. SYS ALMand DIA ALM can be processed separately. The adjustable ranges of the high and low limits of the alarm are as follows: SYS ALM: 40~270 mmHg DIA ALM: 10~215 mmHg MAP ALM: 20~235 mmHg. Pag. 16 3.2.3 SPO2 SETUP Select [PM SpO2 SETUP] in the "SYSTEM MENU". The following menu will pop up. Figure 3.2.3 SPO2 SETUP For the [PULSE SOUND] item, you can choose its state. When the switch turns on, plug in finger and hear Pulse sound in Monitor mode. There are not limit for silence and alarm pause state. For the [SpO2 ALM HI/LO] item, you can set up [SpO2 ALM HI] and [SpO2 ALM LO]. Alarm occurs when SpO2 value overflows. For the [PR ALM HI/LO] item, you can set up [PR ALM HI] and [SpO2 ALM LO]. Alarm occurs when PR value overflows. SpO2 and PR ALARM analysis alarm limits: PARAMETERS Max. HI Min. LO Step SpO2 100 0 1 PR 250 30 1 Pag. 17 3.2.4 Patient Information Pick the [ABPM INF0] item in the “SYSTEM MENU” to call up the following menu. Figure 3.2.4 ABPM Infor The information in this interface can't be changed until reinstall the parameter in software. 3.2.5 NIBP TABLE Pick the [BP TABLE] item in the “SYSTEM MENU” to call up the following menu. Figure 3.2.5 NIBP table Pag. 18 Users can press the UP and DOWN button to see the stored values. Press the MENU will exit. When data is much, long press UP key or DOWN key to appear to quickly turn over page, you can easily and quickly browse all datas. 3.2.6 SpO2 TABLE Pick the [SpO2 TABLE] item in the “SYSTEM MENU” to call up the following menu. Figure 3.2.6.1 SpO2 Table Users can press the UP and DOWN button to see the stored values. Press the MENU will be exit. The SpO2 is measured once per 1s, and the most number of times is 183000. Long press UP key or DOWN key, after a few second, will appear to quickly turn over page, you can easily see all records, the speed of turning over page is more quick than turning over blood pressure data. Pag. 19 3.2.7 TREND Select TREND to enter TREND GRAPH interface, as shown the following figure: Figure3.2.7.1 SpO2 table Select ABPM TREND to enter the following interface, display waveform is the measurement data in ABPM mode. Select PM TREND to enter the same interface, display waveform is the measurement data in PM mode. The time on the left of the horizontal axis topside is the start time for display waveform, the time on the right of the horizontal axis is the end time for display waveform. Via UP key and DOWN key, you can turn over different time segment measurement BP data waveform chart. Select DEMO to enter the following interface, in DEMO mode, press MENU key to exit DEMO mode. Pag. 20 Pag. 21 Chapter4 SpO2 Monitoring 4.1 What is the SpO2 Monitoring SpO2 Plethysmogram measurement is employed to determine the oxygen saturation of hemoglobin in the arterial blood. If, for example, 97% hemoglobin molecules in the red blood cells of the arterial blood combine with oxygen, then the blood has a SpO2 oxygen saturation of 97%. The SpO2 numeric on the monitor will read 97%. The SpO2 numeric shows the percentage of hemoglobin molecules which have combined with oxygen molecules to form oxyhemoglobin. The SpO2/PLETH parameter can also provide a pulse rate signal and a plethysmogram wave. How the SpO2/PLETH Parameter Works Arterial oxygen saturation is measured by a method called pulse oximeter. It is a continuous, non‐invasive method based on the different absorption spectra of reduced hemoglobin and oxyhemoglobin. It measures how much light, sent from light sources on one side of the sensor, is transmitted through patient tissue (such as a finger or an ear), to a receiver on the other side. The sensor measurement wavelengths are nominally 660nm for the Red LED and 940nm for Infrared LED. Maximum optical power output for LED is 4mW. The amount of light transmitted depends on many factors, most of which are constant. However, one of these factors, the blood flow in the arteries, varies with time, because it is pulsating. By measuring the light absorption during a pulsation, it is possible to derive the oxygen saturation of the arterial blood. Detecting the pulsation gives a PLETH waveform and pulse rate signal. Pag. 22 The SpO2 value and the PLETH waveform can be displayed in the main screen. The update period of data is less than 5 seconds, which is changeable according to different individual pulse rate. Please read the measured value when the waveform on screen is equably and steady‐ going. The measured value is optimal value. And the waveform at the moment is the standard one. ES (Electrosurgery) equipment wire and SpO2 cable must not be tangled up. Do not put the sensor on extremities with arterial catheter or venous syringe. Do not perform SpO2 measuring and NIBP measuring on same arm at one time, because obstruction of blood flow during NIBP measuring may adversely affect the reading of SpO2 value. 4.2 Precautions during SpO2/Pulse Monitoring Make sure the nail covers the light window; the wire should be on the backside of the hand. SpO2 waveform is not proportional to the pulse volume. Do not use the SpO2 sensor once the package or the sensor is found damaged. Instead, you shall return it to the vendor. Prolonged and continuous monitoring may increase jeopardy of unexpected change of dermal condition such as abnormal sensitivity, erubescence, vesicle, repressive putrescence, and so on. It is especially important to check the sensor placement of neonate and patient of poor perfusion or immature dermogram by light collimation and proper attaching strictly according to changes of the skin. Check per 2~3 hours the sensor placement and move it when the skin deteriorates. More frequent examinations may be required for different patients. Pag. 23 4.3 Monitoring Procedure SpO2 plethysmogram measurement 1.Switch on the monitor. 2.Attach the sensor to the appropriate site of the patient finger. 3.Plug the connector of the sensor extension cable into the SpO2 socket, please pay attention to the direction of the sensor. 4.Please pull out the sensor when measure is over. Figure4.3 Mounting of the sensor 4.4 Maintenance and Cleaning Care and Cleaning Do not subject the sensor to autoclaving. Do not immerse the sensor into any liquid. Do not use any sensor or cable that may be damaged or deteriorated. Cleaning Use a cotton ball or a soft mull moistened with hospital‐grade ethanol to wipe the surface of the sensor, and then dry it with a cloth. This cleaning method can also be applied to the luminotron and receiving unit. The cable can be cleaned with 3% hydrogen dioxide, 70% Isopropanol, or other active reagent. However, connector of the sensor shall not be subjected to such solution. Pag. 24 Chapter5 NIBP Monitoring 5.1 Introduction The Non‐invasive Blood Pressure (NIBP) module measures the blood pressure using the oscillometric method .It is that: using the blade to block artery blood, checking the oscillometric wave during degassing for sure that it was not affected by the operator’s subjective factors or the disruption of the environmental noise. There are two modes of measurement available: manual and automatic .Each mode displays the diastolic, systolic and MAP blood pressure. In the MANUAL mode, only one measurement is conducted for each time. In the AUTO mode, the measurement is cycled; you can set the interval time to 5/10/15/20/30/45/60/90 minutes. Prolonged non‐invasive blood pressure measurements in Auto mode may be associated with purport, ischemia and neuropathy in the limb wearing the cuff. When monitoring a patient, examine the extremities of the limb frequently for normal color, warmth and sensitivity. If any abnormality is observed, stop the blood pressure measurements. You must not perform NIBP measurements on patients with sickle‐cell disease or under any condition which the skin is damaged or expected to be damaged. For a thrombasthemia patient, it is important to determine whether measurement of the blood pressure shall be done automatically. The determination should be based on the clinical evaluation. Pag. 25 5.2 NIBP Monitoring Do not apply the cuff to a limb that has an intravenous infusion or catheter in place. This could cause tissue damage around the catheter when infusion is slowed or blocked during cuff inflation. Make sure that the air conduit connecting the blood pressure cuff and the monitor is neither blocked nor tangled. Plug in the air hose and switch on the system. Apply the blood pressure cuff to the patient's arm or leg following the instructions below (Figure 5.2). Ensure that the cuff is completely deflated. Apply the appropriate size cuff to the patient, and make sure that the symbol "Φ" is over the appropriate artery. Ensure that the cuff is not wrapped too tightly around the limb. Excessive tightness may cause discoloration and eventual ischemia of the extremities. Figure 5.2.1 Applying Cuff Pag. 26 Don't let the cuff contact with skin directly, but the thickness of clothes shouldn't be more than 3 cm. The width of the cuff should be either 40% of the limb circumference (50% for neonates) or 2/3 of the upper arm length. The inflatable part of the cuff should be long enough to encircle 50‐80% of the limb. The wrong size of cuff can cause erroneous readings. If the cuff size is in question, then use a larger cuff. Size of reusable cuff : Patient Type Limb Cuff width Hose Adult Child 25 ~ 35 cm 18 ~ 36 cm 14 cm 17 cm 1.5 m o 3 m Thigh 46 ~ 66 cm 21 cm Make sure that the cuff edge falls within the range of mark <‐>. If it does not, use a larger or smaller cuff that fits better. 1. Connect the cuff to the air hose. The limb chosen for taking the measurement should be placed at the same level as the patient's heart. If this is not possible you should apply the following corrections to the measured values: If the cuff is placed higher than the heart level, add 0.75 mmHg (0.10 kPa) for each inch of difference. If it is placed lower than the heart level, deduct 0.75 mmHg (0.10 kPa) for each inch of difference. 2. Press the NIBP button on the front panel to start a measurement. Pag. 27 5.3 NIBP Message and Explanations 02 06 07 08 09 10 11 12 13 14 15 19 Explanation Cause Self‐test failure Sensor or A/D sampling error. Loose cuff Cuff is not connected correctly. Air leakage Air leakage in the valve or airway. Atmospheric pressure error Valve cannot be open. Signal is too weak Object measuring the pulse is too weak or the cuff is loose. It is over the range Object measuring blood pressure is over the measurement range. Excessive movement When measuring, signal the presence of excessive movement or pseudo‐differential interference. Overpressure Cuff pressure is over the scope ,ADU 290 mmHg Saturated signal Movement or other factors lead to too big signal amplitude. Air leakage There is air leakage in the airway System failure There is something wrong with NIBP module, A/D sampling or soft of system after turning on the device. It spends too much time Measuring is over certain specified time Pag. 28 5.4 Maintenance and Cleaning Do not squeeze the rubber tube on the cuff. Do not allow liquid to enter the connector socket at the front of the monitor. Do not wipe the inner part of the connector socket when cleaning the monitor. Reusable Blood Pressure Cuff The cuff can be sterilized by means of conventional autoclaving, gas, or radiation sterilization in hot air ovens or disinfected by immersion in decontamination solutions, but remember to remove the rubber bag if you use this method. The cuff should not be dry‐ cleaned. The cuff can also be machine‐wash or hand‐wash, the latter method may prolong the service life of the cuff. Before washing, remove the latex rubber bag, and for machine‐ washing, close the Velcro fastening. Allow the cuff to dry thoroughly after washing, then, reinsert the rubber bag. Figure 5.4 Replace Rubber Bag in Cuff To replace the rubber bag in the cuff, first place the bag on top of the cuff so that the rubber tubes line up with the large opening on the long side of the cuff. Now roll the bag lengthwise and insert it into the opening on the long side of the cuff. Hold the tubes and the cuff and shake the complete cuff until the bag is in position. Thread the rubber tubes from inside the cuff, and out through the small hole under the internal flap. Pag. 29 Disposable Blood Pressure Cuffs Disposable cuffs are intended for one‐patient use only. Do not use the same cuff on any other patient. Do not sterilize or use autoclave on disposable cuffs. Disposable cuffs can be cleaned using soap solution to prevent infection. For protecting environment, the disposable blood pressure cuffs must be recycled or disposed properly. 5.5 Transportation and Storage A. The packed device can be transported by ordinary conveyance or according to transport contract. The device cannot be transported mixed with toxic, harmful, corrosive material. B. The packed device should be stored in room with no corrosive gases and good ventilation. Temperature: ‐20°C~60°C; Humidity: ≤95% Pag. 30 5.6 Key of Symbols Signal Description Warning – See User Manual SYS MAP DIA %SpO2 PR Systolic pressure MAP pressure Diastolic pressure The pulse oxygen saturation (%) Pulse rate (bpm) Close the sound Open the alarm sound indication Close the alarm sound indication RAEE (2002/96/EC) Type BF defibrillator proofed applied parts Serial number SN IPX1 1. the finger clip falls off ( no finger inserted)] 2. Probe error 3. Signal inadequacy indicator 0123 Pag. 31 Chapter6 Installation of the software 6.1 Demand of Editor Processor: Pentium IV 1.8G or more Operation System: Win2000/XP/Vista EMS memory: 256M and up Hard Disk: 40G or more Display: 17 inch or more CD‐ROM Resolution of printer: 300 DPI or more 6.2 Installation of Software 1. Place the CD‐ROM in the CD‐ROM compartment located on your computer. 2. If Auto Play for CDs is enabled, place CD in reader and follow instructions when they appear in the screen; otherwise follow install instructions below: Open Windows Explorer. Click on the root CD‐ROM directory. Double click file Patient_Monitor_Setup.exe. Follow the instructions in the screen. After installing Patient_Monitor_Setup, open the instrument, plug in USB, the computer pop up a dialog box, select "Auto install", the installation is successful, until drive installation finishes. Pag. 32 Chapter7 Introduce the Software 7.1 User Register Each time you open the software will appear the following dialog box for the user's name. Type in user's name. To change user go to "File" then click on "Change User". This feature is available to allow each user to store his or her configurations, such as thresholds. Figure 7.1.1 User Register Click "Delete" button will delete the current selected user info and configuration. Click "Delete all" Button will delete all users’ info and their configurations. If you are a new user, click "Okay" Button will appear the following dialog box. Figure 7.1.2 Set file path "Patient File Path": Choose the downloading route of your case. As soon as the data are downloaded in computer, the case document will save this path. If you check the "Always use default path" checkbox, then data searches will always begin at the default path. If the checkbox is not checked, then data searches will always begin at the last path used. 7.2 The Main Interface When the settings of the users configuration information are finished, the main interface is entered, as the following pictured displayed: Pag. 33 1 2 3 4 Figure 7.2 The main operating interface 1. Menu bar The main operating menu of this software 2. Tool bar Shortcut keys for functions of frequent use 3. Displaying areas of the trending pictures.After choosing the case which is edited, it is used for displaying the trending picture. 4. Status bar Display the name, ID, and the data collecting date of the patient. 7.3 Wear Press the shortcut key , will pop up the following dialog box: Figure 7.3 Wear You can wear the device according to the picture above. Please read the "Note" Carefully Pag. 34 before use. 7.4 Design the Measurement Plan Note: Before you upload the test parameters to the device, make certain: 1. The device is connected to the computer via the serial port. 2. The device is turned on. Steps: 1. Press the shortcut key will appear. , or from the menu select "Upload", the following dialog box Figure 7.4.1 Select the status of the device 2. If the item you choose is "ABPM" the following dialog box will appear. Figure 7.4.2 Upload test parameters Patient Name, Patient ID: mark the patient. Current Time: That is the time of beginning to collect the parameter. Study Start Time: Collecting start time. It defaulted in the 5 minutes after setting the Pag. 35 collecting parameter. Start Key: Whether supporting the manual collecting. Time Periods: Among that, Awake refers to the patient in the un‐sleeping situation, and Asleep refers to the sleeping situation. Special Start and Special End are optional items. You can set the fixed time to collect the data. Interval setting refers to the intervals of the collecting time. To reduce the impact of the patient’s sleep, settings of the general collecting intervals are longer. Take the above picture as an example: the range of un‐sleeping time is 7:00‐22:00, the range of sleeping time is 22:00‐7:00, the intervals of the un‐sleeping time are 5 minutes, and the intervals of the sleeping time are 30 minutes. The range of sleeping time, the range of un‐sleeping time, the range special testing time are displayed by the picture forms in the right corner of the screen. Thus, it is convenient to design the parameter. If the item you choose is "Patient Monitor" the following dialog box will appear. Figure 7.4.3 Upload test parameters 3. Select the "OK" button will appear the following dialog box show the progress as the data is transferred. Figure 7.4.4 Uploading progress bar Pag. 36 7.5 Data Download Before you download the measurement data from device, make certain: 1. The device is connected to the computer via the serial port. 2. The device is turned on. 3. Disconnect the device from patient before you connecting it to any piece of hardware such as your personal computer (to avoid electric shock) The downloaded patient data will be saved in your default computer path. If you want to change the storage path, from the menu select "Download" and the select "Set file path", and then the dialogue box (Figure 7.1.2) referred before will be showed up, operators can change the path. Press the shortcut key , or from the menu select "Download" and then select "Do Download" will appear the following dialog box. Permitting you select what data you want to download (ABPM data or Patient Monitor data). Figure 7.5.1 Select the status of the device The following dialog box will appear to show the progress as the data is transferred. Figure 7.5.2 Downloading progress bar After completion, a dialog box will prompt for where the data file was saved. 7.6 Choose Patient Data to Edit Press shortcut key , or from the menu select "File" and select "Open data" the Pag. 37 following dialog box will appear: Figure 7.6 Patient file select The above dialog box lists the data files found in your current directory. You may use the drive and directory boxes to select a different drive or directory to search for patient files. Select a data file by highlighting the patient's name, and then press the "Okay" button. You may now edit the data. 7.7 Delete Data File If you feel some patient data are not necessary, you can delete them. From menu select "File" and then select "Delete Data" to show patient data delete interface which is similar to patient data select interface, showed as below: Figure 7.7 Data file delete You are able to delete one single file or some files at the same time, to delete some files at the same time; you could push “Ctrl”, and click the file you want to delete at the Pag. 38 same time. After selection, click "Okay" button,the "sure to delete " Dialog will appear . Click "YES" to complete the delete operation. If you want to cancel, please click "NO". 7.8 Data File Backup Sometimes, you may want to save one original copy before you edit a file, under this situation, you should do patient data backup. From the menu select "File" and then select "Copy data", will appear the following dialog box, permitting you to select which data files to copy. Figure 7.8.1 Data file copy Select or deselect items by clicking on the rows using the mouse .When all desired selections have been made, select "Okay". The following dialog box will appear, permitting you to select the disk drive or directory to copy to. Figure 7.8.2 Backup path settings Once you have selected the destination drive or directory, select "Okay" .You may also Pag. 39 select "Cancel" to end the dialog without copying patient data. 7.9 Edit Blood Pressure Data Press the shortcut key , or from the menu select "Edit" and then select "Bp Data" the following dialog box will pop up. Figure 7.9 Data edit page All the BP readings are shown in the above dialog box. *=3/192(1.6%): 192 represents the total data sum, 3 represents the data amount deleted, 1.6% stands for data present deleted. Number: stands for data collection serial number. Time: stands for collection time. Date: stands for collection date. BP: number before "/" stands for high blood pressure, number back "/" stands for low blood pressure. PR: Pulse rate. MAP: Mean pressure. PP: Pressure difference between high and low blood pressure. TC: error code (refer to chapter 8) Comment: comment. 7.10 Trend Edit BP Trend Edit When you selected the data file, the BP trend will be shown in the screen automatically Pag. 40 .In other interfaces you can press shortcut key enter the "BP trend" interface .The "Bp Trend" has two graph types: color filler type, dotted line type. You can switch from one graph type to another by push the "Graph Type" button. Figure 7.10.1 Color filler type BP trend Figure 7.10.2 Dotted line type BP trend When you move the mouse on the trend area, on the top of the trend area the detail data information about the mouse points will show, including the data serial number, collection time and collection date, high/low blood pressure value, pulse rate, comment, etc. Press mouse’ left button to delete or add the data point to be shown. If the distance between the two data points is too short to move the mouse to one of the points, move the mouse to the time axis area, press the mouse’ left button down, Pag. 41 dragging the mouse to the right stretch the BP Trend. Of course you can also dragging the mouse to the left shrink the BP Trend. When you stretching the BP Trend, if the trend length beyond the trend show area will appear a horizontal scroll bar, you can see any part of the trend by changing the scroll bar's pos. Figure 7.10.3 Shrink BP Trend Stretch (time axis) Figure 7.10.4 Shrink BP Trend Shrink (time axis) Pag. 42 Figura 7.10.5 Shrink BP Trend Stretch (y‐axis) Figura 7.10.6 Shrink BP Trend Shrink BP (y‐axis) SpO2 Trend Edit Press the short cut key, will appear the SpO2 trend interface. Pag. 43 Figura 7.10.7 Shrink Trend SpO2. The following picture show different parts of the data area. Move the mouse in the data area, you will see a yellow line, and on top of the data area is the "Selected data info", where you will see the exact SpO2 and pulse value according to the time. Along with the mouse move, the value will change accordingly. The SpO2 and pulse ruler lines show the exact value of the horizontal lines. You can reset these lines by keeping the mouse right button clicked on the "SpO2 ruler" area or "Pulse ruler" area, and move the mouse. This 4 buttons are used to set the page length that is how long data will be visible at the same time in the window area from left to right. "1": 1 minute. "10": 10 minute. "60": one hour. : : Manual set, click this button will pop up a dialog box, and you can set the length you want. This 4 buttons are used to move the data offset, that is what time is at the left of the window. "<<" And ">>" buttons move the offset back or forth by page length. If you select "1" as the page length, ">>"will move data time forward by 1 hour. "<" And ">" buttons move the offset back or forth by step length. Step length is smaller than page size, 1 page often contains several steps, the steps are marked in the time area, and the time mark is marked each step length. Click the "Parameters set" button will appear the following dialog box. Pag. 44 Figure 7.10.8 Analysis parameters settings The setup in the dialog box above indicates: SpO2 (desideration) event: the SpO2 value reduces at least 4% while the time keeps at least 10 seconds. Pulse Rate event: the pulse rate fluctuates at least 6bpm while the time keeps at least 8 seconds. 7.11 Display the Statistics Information Press the shortcut key , or from the menu select "Report" and the select "View Statistics" will pop‐up the following dialog box. Pag. 45 Figure 7.11 BP statistics information 7.12 Edit of Diagnose Information Diagnose information including following items: Patient information, Interpretation, Current Medication and Physician information. From the menu select "Edit" and then select "Patient Data" will pop up the following dialog box. Figure 7.12.1 Edit patient’s information Pag. 46 Click "Current Medications" switch to Current Medications interface, then you can modify the medications for the patient. Click "Interpretation" switch to Interpretation interface. Click "Physician Info" switch to the page of doctor's advice. 7.13 Sleep Period Change Sleep period includes: wake time and sleep time. Because when collecting patient parameter, patient not always fall asleep and awake according to collection data protocol strictly, you may need change your sleep period. After setup of sleep period, the software will calculate the data automatically, update the BP Trend and recalculate. the statistic data. Figure 7.13 Sleep period dialog box 7.14 BP Thresholds After BP Thresholds being set up, the trend graph will renew automatically, statistic data will be recalculated. From the view select "Edit" and then select "Thresholds" will appear the following dialog box. Pag. 47 Figura 7.14 Thresholds dialog box The default recommended thresholds for calculating Blood Pressure Load are 140/90 for wake periods and 120/80 for sleep periods. These are the defaults used when you select the Factory Defaults button. Pag. 48 7.15 Istogramma Press the shortcut key , will appear the following interface: Figure 7.15 Histogram All: Show all BP data statistics. Day: Show only daytime statistics. Night: Show only nighttime statistics. 7.16 Pie Chart Press the shortcut key , will appear the following interface: Figure 7.16 Pie chart Pag. 49 You can adjust to show the percentage of above normal value, normal value and below normal value. On the left, some statistics can be displayed, such as BP value, PR maximum, minimum, and average value etc. All: Show all BP data statistics. Day: Show only daytime statistics. Night: Show only nighttime statistics. 7.17 Correlation Line. Press the shortcut key , will appear the following interface: Figure 7.17 Correlation line Red line represents systolic; blue line represents diastolic .White small circle represents day time BP value; black small circle represents night time BP value. Histogram, Pie chart and Correlation line are useful for your observation about the data. 7.18 Print Report After previous data edit, diagnose information edit, trend edit, and so on, the software will create a series of diagnose reports, you can select these pages or some of them for printing. The information of your selection can be saved as default print page for next time. From menu select "Report" and then select "Configure Report" Will appear the following dialog box: Pag. 50 Figure 7.18.1 Configure Report You can select an already exist report for print; you may also click "Edit Report" edit the selected report. Figure 7.18.2 Edit Report You can select all pages or some of them for printing. Only when the data file include SpO2 data and you checked the "SpO2 Report" could print SpO2 report. Of course you can also click "Add Report" adds a new report. If you don't need the current report, you can also click "Delete Report" to delete it. The default paper size is: A4. From the menu select "Report" and then select "Report", you can preview the page you selected. Pag. 51 When you sure you want to print the report, press shortcut key select "Report" and then select "Print". 7.19 Help Press shortcut key will pop up help document. Pag. 52 or from menu Capitolo Troubleshooting Guide Code Description in Report Editor Solution 1 No signal Check position of cuff, tighten cuff 2 Overreach movement Remain still during BP reading 4 Measurement timeout 85 Airway obstructed Check air hose connections and make certain cuff is tight Check air hose connections and make certain air tubing is not crimped. 86 Measurement cancelled Push START/STOP button to start reading. 87 Cuff leak Check air hose and cuff 89 cuff overpressure Check for blocked or kinked air hose. 102 Self‐check failed Return for servicing. 110 Out of range 115 System error Retry again, if problem persists return for servicing. Return for servicing. Code Description in Report Editor 1 No signal Solution Check position of cuff, tighten cuff Pag. 53 Appendix Guidance and manufacture’s declaration-electromagnetic emission For all EQUIPMENT and SYSTEMS Guidance and manufacture’s declaration – electromagnetic emission The Patient Monitor is intended for use in the electromagnetic environment specified below. The customer of the user of the Patient Monitor should assure that it is used in such and environment. Emission test RF emissions CISPR 11 Compliance Group 1 RF emission Class B CISPR 11 Harmonic emissions Not applicable IEC 61000-3-2 Voltage fluctuations/ flicker Not applicable emissions IEC 61000-3-3 Electromagnetic environment – guidance The Patient Monitor uses RF energy only for its internal function. Therefore, its RF emissions are very low and are not likely to cause any interference in nearby electronic equipment. The Patient Monitor is suitable for use in all establishments, including domestic establishments and those directly connected to the public low-voltage power supply network that supplies buildings used for domestic purposes. Guidance and manufacture’s declaration – electromagnetic immunity For EQUIPMENT and SYSTEMS that are not LIFE-SUPPORTING Guidance and manufacture’s declaration – electromagnetic immunity The Patient Monitor is intended for use in the electromagnetic environment specified below. The customer or the user of Patient Monitor should assure that it is used in such an environment. Compliance Immunity test IEC 60601 test level Electromagnetic environment - guidance level Portable and mobile RF communications equipment should be used no closer to any part of the Patient Monitor, including cables, than the recommended separation distance calculated from the equation applicable to the frequency of the transmitter. Recommended separation distance Conducted RF IEC 61000-4-6 3 Vrms 150 kHz to 80 MHz 3 Vrms Radiated RF IEC 61000-4-3 3 V/m 80 MHz to 2.5 GHz 3 V/m 3.5 d P E1 7 d P E1 80 MHz to 800 MHz 800 MHz to 2.5 GHz Where P is the maximum output power rating of the transmitter in watts (W) according to the transmitter manufacturer and d is the recommended separation distance in meters (m). Field strengths from fixed RF transmitters, as determined by an electromagnetic site survey ,a should be less than the compliance level in each frequency range .b Interference may occur in the vicinity of equipment marked with the following symbol: NOTE 1 At 80 MHz and 800 MHz, the higher frequency range applies. NOTE 2 These guidelines may not apply in all situations. Electromagnetic propagation is affected by absorption and reflection from structures, objects and people. A Field strengths from fixed transmitters, such as base stations for radio (cellular/cordless) telephones and land mobile radios, amateur radio, AM and FM radio broadcast and TV broadcast cannot be predicted theoretically with accuracy. To assess the electromagnetic environment due to fixed RF transmitters, an electromagnetic site survey should be considered. If the measured field strength in the location in which the Patient Monitor is used exceeds the applicable RF compliance level above, the Patient Monitor should be observed to verify normal operation. If abnormal performance is observed, additional measures may be necessary, such as reorienting or relocating the Patient Monitor. B Over the frequency range 150 kHz to 80 MHz, field strengths should be less than 3 V/m. Recommended separation distances between portable and mobile RF communications equipment and the EQUIPMENT or SYSTEM – For EQUIPMENT or SYSTEM that are not LIFE-SUPPORTING Recommended separation distances between portable and mobile RF communications equipment and the Patient Monitor The Patient Monitor is intended for use in an electromagnetic environment in which radiated RF disturbances are controlled. The customer or the user of the Patient Monitor can help prevent electromagnetic interference by maintaining a minimum distance between portable and mobile RF communications equipment (transmitters) and the Patient Monitor as recommended below, according to the maximum output power of the communications equipment. Separation distance according to frequency of transmitter Rated maximum output (m) power of transmitter 150 kHz to 80 MHz 80 MHz to 800 MHz 800 MHz to 2.5 GHz (W) 3.5 d P V1 3.5 d P E1 7 d P E1 0.01 0.117 0.117 0.233 0.1 0.369 0.369 0.738 1 1.167 1.167 2.333 10 3.689 3.689 7.379 100 11.67 11.67 23.33 For transmitters rated at a maximum output power not listed above, the recommended separation distance d in meters (m) can be estimated using the equation applicable to the frequency of the transmitter, where P is the maximum output power rating of the transmitter in watts (W) according to the transmitter manufacturer. NOTE 1 At 80 MHz and 800 MHz, the separation distance for the higher frequency range applies. NOTE 2 These guidelines may not apply in all situations. Electromagnetic propagation is affected by absorption and reflection from structures, objects and people. TECNO-GAZ S.p.A. Strada Cavalli N°4 43038 Sala Baganza Parma ITALIA Tel. +39 0521 83.80 Fax. +39 0521 83.33.91 www.tecnogaz.com MEDILINE ITALIA S.r.l. Via 8 Marzo N°4 42025 Corte Tegge Reggio Emilia ITALIA Tel. +39 0522 94.29.96 Fax. +39 0522 94.47.98 I Il presente manuale deve sempre accompagnare il prodotto, in adempimento alle Direttive Comunitarie Europee. TECNO-GAZ, si riserva il diritto di apporre modifiche al presente documento senza dare alcun pre-avviso. La ditta TECNO-GAZ si riserva la proprietà del presente documento e ne vieta l’utilizzo o la divulgazione a terzi senza il proprio benestare. EN This manual must always be kept with the product, in complying with the Directives of European Community. TECNO-GAZ reserves the right to modify the enclosed document without notice. TECNO-GAZ reserves the property of the document and forbids others to use it or spread it without its approval. F Ce manuel doit toujours accompagner l'appareil conformément aux Directives de la Communauté européenne. TECNO-GAZ se réserve le droit d'y apporter des modifications sans aucun préavis. TECNO-GAZ se réserve la propriété de ce manuel. Toute utilisation ou divulgation à des tiers est interdite sans son autorisation. E El presente manual siempre deberá acompañar el producto al cual pertenece, cumpliendo las Directivas Comunitarias Europeas. TECNOGAZ, reserva el derecho de aportar alteraciones al presente documento sin avisos previos. La empresa TECNO-GAZ reserva a si los derechos de propiedad del presente documento prohiebiendo su utilización o divulgación a terceros sin que haya expresado su consentimiento. D www.medilineitalia.com Diese Anleitung muss dem Gerät in Übereinstimmung mit den Richtlinien der Europäischen Gemeinschaft beigelegt werden. TECNO-GAZ behält sich dar Recht vor ohne Vorankündigung Änderungen in dieser Dokumentation vorzunehmen. Die Firma TECNO-GAZ ist Eigentümer der vorliegenden Dokumentation und verbietet die Nutzung von Drittenoder die Weitergabe an Dritte ohne entsprechende Genehmigung .