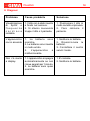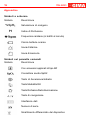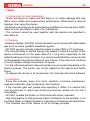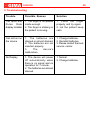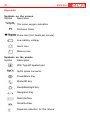
1
Gima S.p.A. - Via Marconi, 1 - 20060 Gessate (MI) Italy
Italia: tel. 199 400 401 - fax 199 400 403
Export: tel. +39 02 953854209/221/225 fax +39 02 95380056
[email protected] - [email protected]
www.gimaitaly.com
Saturimetro Oxy-100
Oxy-100 Pulse Oximeter
MANUALE D’USO E MANUTENZIONE
USE AND MAINTENANCE BOOK
M34342-M-Rev.1.05.12
ATTENZIONE: Gli operatori devono leggere e capire completamente
questo manuale prima di utilizzare il prodotto.
ATTENTION: The operators must carefully read and completely
understand the present manual before using the product.
0476
ITALIANO
2
1. Sicurezza
1.1 Istruzioni per un utilizzo sicuro
- Controllare l’unità principale e tutti gli accessori periodicamente per
assicurarsi che non vi siano danni visibili che possano alterare la sicurezza
del paziente e la correttezza della misurazione. Se si dovesse riscontrare un
qualsiasi tipo di danno, smettere di utilizzare il saturimetro.
- La manutenzione necessaria deve essere effettuata SOLO da personale
qualificato. L’utente non è autorizzato alla manutenzione.
- L’ossimetro non può essere utilizzato con macchinari non specificati nel
presente manuale.
1.2 Pericoli
- Pericolo di esplosione—NON utilizzare il saturimetro in ambienti con presenza
di gas infiammabili come alcuni agenti anestetici.
- NON utilizzare il saturimetro quando il paziente è sotto analisi MRI e CT
- Per lo smaltimento del prodotto si devono seguire le leggi locali.
- L’utilizzo continuo e prolungato del dispositivo nella medesima posizione
può causare sensazione di fastidio o dolore, specialmente per pazienti con
microcircolazione insufficiente. Si raccomanda di non applicare il sensore
nella stessa posizione per più di 2 ore. Se si riscontra una qualsiasi condizione
di anormalità, cambiare la posizione del sensore.
- In alcuni casi la scelta della posizione del sensore deve essere fatta con
prudenza. Il sensore, ad esempio, non deve essere applicato su edemi o
tessuti molli.
1.3 Punti importanti
- Tenere il saturimetro lontano da polvere, vibrazioni, sostanze corrosive,
materiali esplosivi, alte temperature e umidità.
- Se il saturimetro si dovesse bagnare, smettere di utilizzarlo. Quando viene
spostato da un ambiente freddo ad uno caldo e umido, non utilizzarlo
immediatamente.
- NON premere i tasti del pannello frontale con materiali appuntiti.
- NON è permesso disinfettare il saturimetro con vapore ad alta temperatura
e pressione. Fare riferimento al presente manuale per le istruzioni su pulizia
e disinfezione.
ITALIANO
3
2. Descrizione generale
2.1 come si presenta il prodotto
Interfaccia dati e porta
riservata
Display
Tasto di
accensione /
Indietro
Tasto di
navigazione
Modalità/OK
Richiamo /
Retroilluminazione
Connettore
sonda SpO2
Display: mostra i valori dei parametri e il grafico SpO2
Tasti di navigazione:
Alto/sinistra/aumenta: dalla schermata iniziale, premere questo
tasto per visualizzare la frequenza cardiaca (PR) o l’indice di
perfusione (PI). Quando ci si trova invece nella schermata di
impostazione del sistema, premere lo stesso tasto per muovere il
cursore verso l’alto o verso sinistra e regolare i valori dei parametri.
Basso/destra/diminuisci: il suo funzionamento è del tutto simile a
quello del tasto alto/sinistra/aumenta.
ITALIANO
4
Modalità/OK: premendo questo tasto si cambia la modalità di
visualizzazione e tenendolo premuto a lungo, appare la schermata
del menù. Dopo aver terminato l’impostazione dei parametri, premere
nuovamente questo tasto per confermare.
Interfaccia dati: viene utilizzata per aggiornare i dati.
Porta riservata: per un eventuale uso che dovesse rendersi
necessario.
Tasto di accensione/Indietro: premendo a lungo questo tasto si
accende o spegne il dispositivo, mentre premendolo solo un istante
si torna alla modalità precedente.
Richiamo/Retroilluminazione: premendo a lungo questo tasto si
richiama la schermata di SpO2, mentre premendolo per un solo istante
si attiva/disattiva la retroilluminazione del display.
SpO2: a questa porta si deve collegare il connettore SpO2
2.2 Struttura
Il dispositivo consiste del corpo principale e di un sensore fotoelettrico o di
una sonda SpO2.
2.3 Caratteristiche
- Molto leggero e di dimensioni contenute
- Display a colori OLED con differenti modalità e orientamento selezionabili
- Misura accuratamente SpO2, frequenza cardiaca e indice di perfusione
- Avvio automatico della misurazione dopo l’introduzione del dito
- Spegnimento automatico dopo 8 secondi senza segnale
- Allarmi visivi e audio
- Indicatore batteria in esaurimento
2.4 Principali applicazioni e scopo del prodotto
Il Saturimetro da dito è indicato sia per l’uso domestico che per l’uso ospedaliero.
E’ in grado di monitorare l’SpO2, la frequenza cardiaca e l’indice di perfusione.
ITALIANO
5
2.5 Caratteristiche ambientali
Temperatura di lavoro: 5°C~40°C
Umidità di lavoro: 30%~80%
Pressione di lavoro: 70kPa~106kPa
2.6 Installazione batterie e supporto
1. Aprire il pannello posteriore con una
moneta o con un cacciavite a taglio, come
mostrato in figura 1.
Figura 1
2. Prestando attenzione alla polarità, inserire
tre batterie AA nell’alloggiamento, come
mostrato in figura 2.
Figura 2
3. Chiudere il pannello e bloccarlo.
4. fissare il supporto
dell’apparecchio (figura 3 ).
sul
retro
Figura 3
ITALIANO
6
3. Connessione sonda SpO2
Collegare la sonda SpO2 al connettore sulla destra del pannello etichettato
con la scritta -SpO2-. Dopo aver acceso il dispositivo inserire un dito nella
sonda (indice, medio o anulare con unghie di lunghezza appropriata) come
mostrato nella figura seguente.
Figura 5 - Esempio di utilizzo sonda SpO2
Istruzioni per l’utilizzo
1. Il dito deve essere posizionato appropriatamente e correttamente.
2. Non agitare il dito e mantenerlo a riposo durante l’utilizzo.
3. Non inserire il dito bagnato direttamente nel sensore.
4. Evitare di posizionare il sensore sullo stesso braccio su cui è installato un
bracciale per la misurazione della pressione sanguigna o dove sia presente
un dispositivo per infusione venosa.
5. Non permettere che qualcosa possa bloccare la luce emessa dal sensore.
6. Azioni energiche del paziente o un’eccessiva interferenza elettrochirurgica
possono alterare la precisione della misurazione.
7. L’utilizzo di smalto o altri cosmetici sulle unghie può alterare il risultato della
misurazione.
ITALIANO
7
4. Utilizzo
4.1 Schermata iniziale
Tenere premuto il tasto di accensione “
” per 2 secondi per avviare
l’oximetro, quindi inserire il dito nella sede apposita. A questo punto sul display
appare la schermata iniziale c\ome mostrata in figura.
Figura 6 - Schermata iniziale
Descrizione schermata:
“%SpO2” “99”: valore di SpO2 dove “99” e il valore in percentuale;
“10:12:45”: ora corrente;
“PR 65”: valore della frequenza cardiaca (65bpm);
“
“
”: indicazione dello stato della batteria;
”: icona memoria dati. Quando i dati sullo schermo diventano stabili, il
dispositivo inizia a memorizzare automaticamente dati. Se l’icona non è
presente significa che non vengono memorizzati i dati;
“
“
”: icona dell’allarme;
”: grafico dell’intensità della pulsazione;
Nella parte sottostante appare invece il grafico.
ITALIANO
8
4.2 Schermata valore PI
Partendo dalla schermata iniziale, premere i tasti di navigazione
/
per
cambiare schermata e visualizzare quella con il valore PI, mostrata qui di
seguito.
Figura 7 - Schermata valore PI
4.3 Altre modalità di visualizzazione
Dalla schermata iniziale, premendo il tasto Modalità/OK
si accede alle
altre modalità di visualizzazione (come mostrato in figura 8A).
Tasti di navigazione
/
: servono a spostarsi dalla schermata di
osservazione PR (figura 8A) a quella di osservazione PI (figura 8B).
Tasto modalità/OK
: serve a spostarsi attraverso quattro schermate
(mostrate nelle figure 6, 7, 8A e 8B).
Figura 8A - Schermata osservazione PR
9
ITALIANO
Figura 8B - Schermata osservazione PI
4.4 Indicazione dell’assenza di segnale
Se appare a schermo il messaggio “no signal” (come mostrato in figura 9)
controllare se la sonda è collegata correttamente e se il dito è nella posizione
corretta.
Figura 9 - Nessun segnale dalla sonda
4.5 Menù di impostazione
Dalle schermate sopra menzionate, tenere premuto a lungo il tasto Modalità/OK
per accedere alla schermata del menù delle impostazioni (mostrato in figura 10).
Figura 10 - Schermata menù impostazioni
ITALIANO
10
Descrizione schermata:
“SETUP”: serve a impostare i valori dei parametri;
“UPLOAD DATA”: serve ad accedere allo stato di uploading.
4.5.1 SETUP
Dalla schermata del menù selezionare “SETUP” e premere il tasto OK
per accedere alla schermata di impostazione del sistema di seguito riportata.
Figura 11 - Schermata di Setup (A)
Figura 11 - Schermata di Setup (B)
Figura 11 - Schermata di Setup (C)
ITALIANO
11
Istruzioni per l’utilizzo
DATE: impostazione data
1. Quando il cursore si trova sul mese della data, premere il tasto OK
per attivare il mese e il cursore inizierà a lampeggiare;
2. Premere i tasti di navigazione
/
per impostare il mese;
3. Premere il tasto Accensione/Indietro
o Modalità/OK
per
confermare e uscire dall’impostazione della data.
4. La procedura per la regolazione di anno e giorno è identica a quella del
mese.
Il formato della data è il seguente: MM. dd. yy.
NOTA: Le operazioni di impostazione degli altri parametri (quali
l’ora, il contrasto, la suoneria d’allarme, ecc.) sono tutte uguali
a quella descritta per la data.
TIME: impostazione ora.
CONTRAST: impostazione del contrasto del display LCD.
ALARM SOUND: di default l’opzione si trova su ON e in tal caso il dispositivo
è in stato di preallarme e a display è presente l’icona corrispondente in alto a
destra.
ALARM SpO2: impostazione allarme SpO2 il cui valore di default è del 90%.
ALARM PR HI/LO: impostazione limiti superiore e inferiore della frequuenza
cardiaca. Il valore di default è di 120 per il limite superiore e 50 per quello
inferiore.
PULSE SOUND: pulsante per l’attivazione del beep della pulsazione.
REC INTERVAL: impostazione dell’intervallo di registrazione. Sono disponibili
cinque opzioni: 1s, 2s, 4s, 8s e OFF. Quando si seleziona OFF ilo dispositivo
non registra i dati della misurazione in tempo reale.
ITALIANO
12
4.5.2 UPLOAD DATA
Dalla schermata del menù, selezionare “Upload Data” e premere quindi il
tasto Modalità/OK per accedere alla modalità di connessione (come mostrato
in figura 12). Quando si trasmettono dati (valori SpO2 e PR) al proprio
computer, mettere l’oximetro in modalità connessione.
Figura 12 - Schermata stato connessione
4.6 Lista dati
Dalla schermata iniziale, premere a lungo il tasto Richiamo/Retroilluminazione
per accedere alla schermata della lista di richiamo dei dati.
Figura 13 - Lista dati da richiamare
4.6.1 Richiamo dati
Scegliere un elemento dalla lista di dati, quindi premere il tasto Modalità/OK
e apparirà a schermo il grafico corrispondente, come mostrato in figura
14A.
ITALIANO
13
Grafico SpO2
Grafico PR
Figura 14A - Grafico dei dati richiamati
Descrizione schermata:
“SpO2”: il valore a sinistra sulle ordinate è il valore %SpO2;
“12:50:35”: orario della misurazione;
“2s”: intervallo di registrazione (in questo caso 2s);
“PR”: il valore a destra sulle ordinate è il valore della frequenza cardiaca.
Istruzioni per l’utilizzo:
- Premere il tasto Modalità/OK
per spostarsi tra le differenti schermate
dati (vedi figure 14A, 14B, 14C).
Grafico SpO2
Figura 14B - Grafico dei dati richiamati
Grafico PR
Figura 14C - Grafico dei dati richiamati
ITALIANO
- Premer il tasti di navigazione
14
/
per vedere il grafico.
- Premere il tasto di Accensione/Indietro
per tornare alla lista dei dati.
4.6.2 Cancellazione dati
Scegliere un elemento dalla lista dei dati e tenere quindi premuto a lungo il
tasto Richiamo/Retroilluminazione
. Appare quindi un’icona “
“ alla fine
di questo elemento, come mostrato in figura 15.
Figura 15 - Selezione dati da cancellare
Dopo aver terminato la selezione dei record da eliminare, premere il tasto di
Accensione/Indietro
. A questo punto il dispositivo visualizza il messaggio
“Delete all the marked records?” (Cancellare tutti gli elementi selezionati?)
come mostrato in figura 16. Selezionare quindi “Yes” e premere il tasto OK
per cancellare tutti gli elementi selezionati.
Figura 16 - Cancellazione dati
15
ITALIANO
5. Specifiche tecniche
A. Modalità Display:
Display LCD monocromatico.
B. Alimentazione richiesta:
Voltaggio batterie: 3.6V~5.0V (3 batterie AA alcaline)
Corrente di alimentazione: <50mA
Tempo di lavoro continuo: >30 ore
C. Misurazione SpO2:
Intervallo di misurazione: 35% - 99%
Precisione ±2% (per valori tra 75% e 99%)
Precisione ±3% (per valori tra 50% e 74%)
Limite di allarme di default: 90%
D. Misurazione frequenza cardiaca:
Intervallo di misurazione: 30 bpm - 240 bpm
Precisione Frequenza cardiaca: ±2bpm o ±2%
Limiti di allarme di default: Superiore 120bpm, inferiore 50bpm.
E. Misurazione Indice di perfusione:
Intervallo di misurazione: 0% - 20%
F. Registrazione dati:
Registrazione dati una volta ogni 1/2/4/8 secondi fino a 70 ore di registrazione.
G. Tolleranza alle luci esterne: La differenza tra il valore misurato in
condizioni di luce naturale al chiuso e in una stanza buia è inferiore a ±1%.
H. Tolleranze alle interferenze esterne: I valori di SpO2 e della frequenza
cardiaca possono essere misurati accuratamente dal simulatore di pulsazione
dell’ossigeno.
I. Dimensioni: 145 mm (L) x 74 mm (W) x 29 mm (H) - Peso: 210 g (batterie
incluse)
J. Classificazioni:
Tipo di protezione contro shock elettrici: Dispositivo ad alimentazione interna
Grado di protezione contro shock elettrici: Apparecchio di tipo BF
Grado di protezione contro ingresso accidentale di liquidi : Apparecchio
senza protezione contro ingresso accidentale di liquidi
Compatibilità elettromagnetica: Gruppo I, Classe B
ITALIANO
16
6. Accessori
1. Una sonda
2. Un supporto
3. 3 batterie AA
4. Un manuale utente
5. Un certificato di qualità
6. Un cavo dati (optional)
7. Software Oximeter Data Manager (optional)
NOTA: Gli accessori potrebbero cambiare. Controllare
nell’imballaggio che siano presenti quelli riportati nella lista
dei componenti.
7. Riparazione e manutenzione
7.1 Manutenzione
La vita media di questo apparecchio è di circa 5 anni. Al fine di assicuragli la
vita utile più lunga possibile, seguire con scrupolo le seguenti istruzioni.
A. Sostituire le batterie quando l’indicatore di carica batterie in esaurimento
inizia a lampeggiare.
B. Se non si usa il saturimetro per un lungo periodo, rimuovere le batterie.
C. L’ambiente migliore per la conservazione dell’apparecchio è a una
temperatura compresa tra -20ºC e 60ºC e un’umidità relativa tra 10 e 95%.
7.2 Pulizia e disinfezione
A. Pulire la superficie del sensore con una garza soffice impregnata di una
soluzione di alcol isopropilico al 75%.
B. Sciacquare quindi con acqua pulita e asciugare con un panno morbido.
Non sterilizzare l’apparecchio con alta pressione!
Non immergere l’apparecchio in nessun tipo di liquido!
Smaltimento: Il prodotto non deve essere smaltito assieme
agli altri rifiuti domestici. Gli utenti devono provvedere allo
smaltimento delle apparecchiature da rottamare portandole al
luogo di raccolta indicato per il riciclaggio delle apparecchiature
elettriche ed elettroniche.
Per ulteriori informazioni sui luoghi di raccolta, contattare il
proprio comune di residenza, il servizio di smaltimento dei
17
ITALIANO
rifiuti locale o il negozio presso il quale è stato acquistato il
prodotto. In caso di smaltimento errato potrebbero venire
applicate delle penali, in base alle leggi nazionali.
CONDIZIONI DI GARANZIA GIMA
Ci congratuliamo con Voi per aver acquistato un nostro prodotto. Questo
prodotto risponde a standard qualitativi elevati sia nel materiale che nella
fabbricazione. La garanzia è valida per il tempo di 12 mesi dalla data di
fornitura GIMA. Durante il periodo di validità della garanzia si provvederà alla
riparazione e/o sostituzione gratuita di tutte le parti difettose per cause di
fabbricazione ben accertate, con esclusione delle spese di mano d’opera o
eventuali trasferte, trasporti e imballaggi. Sono esclusi dalla garanzia tutti i
componenti soggetti ad usura.
La sostituzione o riparazione effettuata durante il periodo di garanzia non
hanno l’effetto di prolungare la durata della garanzia. La garanzia non è
valida in caso di: riparazione effettuata da personale non autorizzato o con
pezzi di ricambio non originali, avarie o vizi causati da negligenza, urti o uso
improprio. GIMA non risponde di malfunzionamenti su apparecchiature
elettroniche o software derivati da agenti esterni quali: sbalzi di tensione,
campi elettromagnetici, interferenze radio, ecc.
La garanzia decade se non viene rispettato quanto sopra e se il numero di
matricola (se presente) risulti asportato, cancellato o alterato. I prodotti ritenuti
difettosi devono essere resi solo e soltanto al rivenditore presso il quale è
avvenuto l’acquisto. Spedizioni inviate direttamente a GIMA verranno respinte.
ITALIANO
18
8. Diagnosi
Problema
Causa probabile
Soluzione
Visualizzazione
di SpO2 e
frequenza
c a r d i a c a
instabile
1. Il dito non è stato inserito
a fondo nel sensore.
2. Si stanno muovendo
troppo il dito o il paziente.
1. Posizionare il dito in
modo corretto e riprovare.
2. Fare calmare il
paziente.
L’apparecchio
non si accende
1. Le batterie sono
scariche.
2. Le batterie sono inserite
in modo errato.
3.
L’apparecchio
è
malfunzionante.
1. Sostituire le batterie.
2. Riposizionare le
batterie.
3. Contattare il centro
servizi locale.
Non c’è niente
a display
1. L’apparecchio si spegne
automaticamente se non
riceve segnali per 1 minuto.
2. Le batterie sono quasi
scariche.
1. E’ normale.
2. Sostituire le batterie.
ITALIANO
19
Appendice
Simboli a schermo
Simbolo
Descrizione
Saturazione di ossigeno
Indice di Perfusione
Frequenza cardiaca (in battiti al minuto)
Carica batterie scarsa
Icona d’allarme
Icona di memoria
Simboli sul pannello comandi
Simbolo
Descrizione
Con accessori applicati di tipo BF
Connettore sonda SpO2
Tasto di Accensione/Indietro
Tasto Modalità/OK
Tasto Richiamo/Retroilluminazione
Tasto di navigazione
Interfaccia dati
Numero di serie
Smaltimento differenziato del dispositivo
ENGLISH
20
1. Safety
1.1 Instructions for Safe Operations
- Check the device to make sure that there is no visible damage that may
affect user’s safety and measurement performance. When there is obvious
damage, stop using the device.
- Necessary service must be performed by qualified service engineers ONLY.
Users are not permitted to repair it by themselves.
- The oximeter cannot be used together with the devices not specified in
User Manual.
1.2 Cautions
- Explosive hazard—DO NOT use the oximeter in environment with inflammable
gas such as some ignitable anesthetic agents.
- DO NOT use the oximeter while the testee is under MRI or CT scanning.
-The uncomfortable or painful feeling may appear if using the sensor of this
device continuously on the same place for a long time, especially for the
patients with poor microcirculation. It is recommended that the sensor should
not be applied to the same location for over 2 hours. If any abnormal condition
is found, please change the position of sensor.
- For the individual patients, there should be a more prudent inspecting in the
placing process. The sensor can not be clipped on the edema and tender
tissue.
- To dispose the device or its accessories, the local law should be followed.
1.3 Attentions
- Keep the oximeter away from dust, vibration, corrosive substances,
explosive materials, high temperature and moisture.
- If the oximeter gets wet, please stop operating it. When it is carried from
cold environment to warm and humid environment, please do not use it
immediately.
- DO NOT operate the button on front panel with sharp materials.
- High temperature or high pressure steam disinfection to the oximeter is not
permitted. Refer to related chapter for instructions of cleaning and disinfection.
- The intended use of this device is not for therapy purpose.
ENGLISH
21
2 Overview
2.1 Appearance
Data interface and
Reserved port
Display
Power / Back
Navigation key
Mode/OK
Recall / Backlight
SpO2 probe
connector
Display screen: display SpO2 plethysmogram and parameter values.
Navigation key:
Up/Left/Increase
Press this key, the default screen can be shifted to display pulse rate
(PR) or perfusion index (PI). When on the system setup screen,
press it to move the cursor upwards or to the left and adjust parameter
values.
Down/Right/Decrease
Its function is similar with the key: Up/Left/Increase”.
ENGLISH
22
Mode/OK: press this key, the screen can be shifted between default
screen and other screen layout; longtime press this key, the menu
screen will be displayed; when you finish parameter setting, press
this key to confirm.
Data interface: used for uploading data.
Reserved port: for future use.
Power/Back: Power on/off the device by longtime pressing; short
time press it to back to upper level operation.
Recall/Backlight: Longtime press it to enter SpO2 recall screen;
short time press it to turn on/off the backlight “SpO2”: SpO2 Probe
Connector.
2.2 Structure
It consists of the main unit and SpO2 probe.
2.3 Features
- It is light, small in size and easy to carry.
- High resolution LCD to display plethysmogram and measured data.
- Monitor SpO2 and PR parameters simultaneously;
- PI (Perfusion Index) display is available;
- Real-time store and recall SpO2 and Pulse Rate value.
- Audible & Visual alarm function;
- Power management function;
2.4 Scope of Application
Oxy-100 is applicable for monitoring SpO2 and PR.
2.5 Working Environment
Operating temperature: 5~40¡æ
Operating humidity: 30~80%
Atmospheric pressure: 70kPa~106kPa
23
ENGLISH
2.6 Installation of Battery and Holder
1. Open the rear panel with coin or an
ordinary flat screwdriver, as shown
in Figure 1.
Figure 1
2. According to the polarity mark, insert three
AA batteries into battery house, as shown
in Figure 2.
Figura 2
3. Close the battery cover and fasten it.
4. Fixing Holder (figure 3).
Figure 3
ENGLISH
24
3. SpO2 Probe Connection
Connect the SpO2 probe to the right panel’s connector labeled “SpO2”. After
starting the monitor insert one finger into the probe (index finger, middle
finger or ring finger with proper nail length) according to demonstration, as
shown in the following figure.
Figure 5
Instructions of Operation
1. The finger should be put properly and correctly.
2. Do not shake the finger and keep at ease during using.
3. Do not put wet finger directly into sensor.
4. Avoid placing the sensor on the same limb which is wrapped with a cuff
for blood pressure measurement or during venous infusion.
5. Do not let anything block the emitting light from the sensor.
6. Vigorous exercise and electrosurgical device interference may affect the
measuring accuracy.
7. Using enamel or other makeup on the nail may affect the measuring
accuracy.
ENGLISH
25
4. Operation
4.1 Default Screen
Press “
” power key for 2 seconds to start the Oximeter, then insert
finger into rubber cushions of the probe, the screen will display the default
screen, as shown in Figure.
Figure 6
Screen Description:
“%SpO2” “99”: SpO2 value; “99” is a percentage value;
“10:12:45”: Current time;
“PR 65”: Pulse rate value: 65bpm.
“
“
”: Battery indication;
”: Data memory icon; when the data on screen becomes stable, the
device will start to store data automatically. No icon means the current data
will not be stored. If the memory is full or the total number of the records is
256 pieces, the earliest records will be overwritten and the icon “ ” will
appear on the screen for prompt, as shown in the figure.
Note: It is suggested that the data shall be uploaded to computer for saving,
or the earliest records will be overwritten.
“
“
”: Alarm Icon
”: Pulse strength bar-graph
Lower part displays plethysmogram.
ENGLISH
26
4.2 Display Screen with PI Value
/
Navigation key to shift screens between
On the default screen, press
default screen and display screen with PI value. The display screen with PI
value is shown below.
Figure 7
4.3 Other Screen Layouts
On default screen, press “
” Mode/OK key to enter into other screen
layouts (as shown in Figure 8A).
/
(Navigation key): shift screens between PR observation screen
(Figure 8A) and PI observation screen (Figure 8B).
(Mode/OK key): shift screens among four screens (as shown in
Figure 6, Figure 7, Figure 8A and Figure 8B.)
Figure 8A PR Observation Screen
27
ENGLISH
Figure 8B PI Observation Screen
4.4 Indication for No Signal
If “No Signal” prompts on screen (as shown in Figure 9), pleasecheck whether
the probe connects well and whether the finger is in appropriate position.
Figure 9 Probe Off Screen
4.5 Menu Setup
On the above mentioned screens, longtime press “ ” key for entering into
menu screen (as shown in Figure 10).
Figure 10 Menu Screen
ENGLISH
28
Screen Description:
“SETUP”: set parameter values, refer to 4.5.1 for details.
“UPLOAD DATA”: enter into uploading status, refer to 4.5.2 for details.
4.5.1 SETUP
On the menu screen, select “SETUP” and then press “
” key for entering into
system setup screen. The setup screen is as shown in the following figures.
Figure 11 - System Setup Screen (A)
Figure 11 - System Setup Screen (B)
Figure 11 - System Setup Screen (C)
ENGLISH
29
Operation Instructions:
DATE: Date setting
1. When cursor stays on the Month of the date, press “
” (Mode/OK) key
to active Month option, the cursor flashes on the Month of the date;
2. Press
/
(Navigation key) to adjust month.
3. Press “
” (Power/back) key or “
” (Mode/OK) key to confirm and
exit from date setting.
4. The procedures of adjusting Day value and year value are the same with
Month adjustment.
Date Format: MM. dd, yy.
Note: The setting operations of other parameters (such as
TIME, CONTRAST, ALARM SOUND etc.) are the same with
date setting.
TIME: Time setting
CONTRAST: LCD contrast setting
ALARM SOUND: The factory default value is “ON”. When the set is “ON”, the
device stays in alarm status and the alarm icon displays on the upper right
display screen.
ALARM SpO2: SpO2 alarm setting; the factory default value: 90%.
ALARM PR HI/LO: Pulse rate: High/Low limit setting; the factory default
value: High limit: 120, Low limit: 50.
PULSE SOUND: Pulse beep sound switch.
REC INTERVAL: Record interval setting; five options: “1s, 2s, 4s, 8s” and
“OFF”; When the option is “OFF”, the device will not record real-time
measurement data.
Note: The length of data record is limited to 30 seconds at least,
and the maximal length for one record is also limited to one hour
(for one second interval) , 2hours(for 2 seconds interval) 4 hours
(for 4 seconds interval) or 8 hours (for 8 seconds interval).
ENGLISH
30
4.5.2 UPLOAD DATA
On the menu screen, select “UPLOAD DATA” and then press “ ” key for
entering into connecting status (as shown in Figure 12). When you transmit
data (SpO2 and PR values) to your computer, please let the oximeter stay in
connecting status.
Figure 12 Connecting Status Screen
4.6 Data Recall
On the default display screen, longtime press Recall/backlight key to enter
into recall list screen.
Figure 13 Recall List
4.6.1 Data Recall
Choose one record in the recall list, then press “
” key, the display
screen will display trend graph, as shown in Figure 14A.
ENGLISH
31
SpO2 Trend graph
PR Trend graph
Figure 14A Trend Graph Recall Screen
Screen description:
“SpO2”: The left ordinate value is %SpO2 value;
“12:50:35”: Measuring time;
“2s”: Record interval is 2 seconds.
“PR”: The right ordinate value is pulse rate value.
Operation Instructions:
- press “
” key to shift trend recall screens (as shown in Figure 14A
£¬Figure 14B and Figure 14C).
SpO2 Trend graph
Figure 14B - Trend Graph Recall Screen
PR Trend graph
Figure 14C -Trend Graph Recall Screen
ENGLISH
- Press “
- Press “
/
32
” key to view trend graph.
” key to return to recall list screen.
4.6.2 Data Deletion
Choose one record in the recall list, then longtime press “
“
” key, an icon
” will be displayed in the back of this record, as shown in Figure 15.
Figure 15
When finishing the selection of the records needed to be deleted, press
“
” key, then the screen will prompt that “Delete all the marked records?”
as shown in Figure 16, at this time select “Yes” and press “OK” key to delete
all the selected records.
Figure 16
33
ENGLISH
5 Technical Specifications
A. Display mode:
dot-matrix monochrome LCD;
B. Power supply requirement:
Supply voltage: 3.6V~5.0V (3 ×AA size) alkaline battery
Operating current: <50mA
Continuous working time: >30 hours
C. SpO2 Parameter Specifications
Measuring range: 35~99%
Accuracy: ±2% (during 75~99%)
±3% (during 50~74%)
Default alarm limit: 90%
D. Pulse Rate Parameter Specifications
Measuring range: 30bpm~240bpm
Accuracy: ±2bpm or ±2% (whichever is greater)
Default alarm limits: High: 120bpm Low: 50bpm
E. Perfusion Index Display
Range: 0~20%
F. Data Record
Record data once every 1/2/4/8seconds, up to 70–hour records.
G. Resistance to interference of surrounding light:
The difference between the value measured in the condition of indoor natural
light and that of darkroom is less than ±1%.
H. Resistance to interference of man-made light:
Values of SpO2 and Pulse Rate can be accurately measured by pulse oxygen
simulator.
I. Dimensions: 145 mm (L) × 74 mm (W) × 29 mm (H)
Net Weight: 210g (including batteries)
J. Classification
The type of protection against electric shock:
Internally powered equipment
The degree of protection against electric shock:
Type BF applied part.
The degree of protection against harmful ingress of liquids: Ordinary equipment
without protection against ingress of water. Electro-Magnetic Compatibility:
Group I, Class B
ENGLISH
34
6 Accessories
1. A probe
2. A holder
3. Battery£¨AA£©× 3
4. A User Manual
5. A Quality Certificate
6. A data cable (optional)
7. Oximeter Data Manager software (optional)
Note: The accessories are subject to change. See the Packing
List for detailed items and quantity.
7 Repair and Maintenance
7.1 Maintenance
The life of this device is 5 years. In order to ensure its long service life,
please pay attention to the use of maintenance. A. Please change the batteries
when the low-voltage indicator appears.
B. Please take out the batteries if the oximeter will not be used for a long
time.
C. The best storage environment of the device:
Ambient temperature: -20 to 60ºC
Relative humidity: 10~95%
7.2 Cleaning and Disinfecting Instruction
A. Surface-clean sensor with a soft gauze by saturating with a solution
such as 75% isopropyl alcohol.
B. Then Surface-clean with clean water and dry with a piece of cloth.
High-pressure sterilization cannot be used on the device.
Do not immerse the device in liquid.
Disposal: The product must not be disposed of along with
other domestic waste. The users must dispose of this equipment
by bringing it to a specific recycling point for electric and
electronic equipment.
For further information on recycling points contact the local
authorities, the local recycling center or the shop where the
product was purchased. If the equipment is not disposed of
35
ENGLISH
correctly, fines or penalties may be applied in accordance with
the national legislation and regulations.
GIMA WARRANTY CONDITIONS
Congratulations for purchasing a GIMA product.
This product meets high qualitative standards both as regards the material
and the production. The warranty is valid for 12 months from the date of
supply of GIMA.
During the period of validity of the warranty, GIMA will repair and/or replace
free of charge all the defected parts due to production reasons. Labor costs
and personnel traveling expenses and packaging not included. All components
subject to wear are not included in the warranty.
The repair or replacement performed during the warranty period shall not
extend the warranty.
The warranty is void in the following cases: repairs performed by
unauthorized personnel or with non-original spare parts, defects caused by
negligence or incorrect use.
GIMA cannot be held responsible for malfunctioning on electronic devices or
software due to outside agents such as: voltage changes, electro-magnetic
fields, radio interferences, etc.
The warranty is void if the above regulations are not observed and if the
serial code (if available) has been removed, cancelled or changed.
The defected products must be returned only to the dealer the product was
purchased from. Products sent to GIMA will be rejected.
ENGLISH
36
8 Troubleshooting
Trouble
Possible Reason
Solution
The SpO2 and
Pulse
Rate
display instable
1. The finger is not placed
inside enough.
2. The finger is shaking or
the patient is moving.
1. Place the finger
properly and try again.
2. Let the patient keep
calm
Can not turn on
the device
1. The batteries are
drained or almost drained.
2. The batteries are not
inserted properly.
3.
The
device’s
malfunction.
1. Change batteries.
2. Reinstall batteries.
3. Please contact the local
service center.
No Display
1. The device will power
off automatically when
there is no signal and no
operation for 1 minute.
2. The batteries are almost
drained.
1. Normal.
2. Change batteries.
ENGLISH
37
Appendix
Symbols on the screen
Symbol
Description
The pulse oxygen saturation
Perfusion Index
Pulse rate (Unit: beats per minute)
Low battery voltage
Alarm Icon
Memory Icon
Symbols on the panels
Symbol
Description
With Type BF applied part
SpO2 probe connector
Power/Back Key
Mode/OK Key
Recall/Backlight Key
Navigation Key
Data Interface
Serial Number
Separate collection for this device
38
39