1
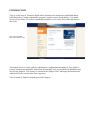
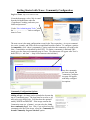
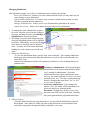
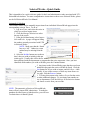
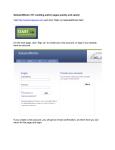
User Manual: Trace
Administrator Guide
Spring 2010
Tennessee Research and Creative Exchange
INTRODUCTION
Trace is a University of Tennessee digital archive that showcases and preserves published and unpublished works by faculty, departments, programs, research centers, and institutues. Free online
access to Trace makes UT research, scholarship and public service easily discoverable anywhere in
the world.
Trace can be found at:
http://trace.tennessee.edu/
This manual serves as a basic guide for administrative configuration and editing of Trace digital repository and the items submitted. Instructions for managing Trace are provided with illustration and
step-by-step guidance. This resource is current for the spring of 2010, and images and instructional
content refer to this version of the Trace repository.
Trace is hosted by Digital Commons, powered by bepress.
Getting Started with Trace: Community Configuration
Log it to Trace: http://trace.tennessee.edu/
-From the homepage, select ―My Account‖
from the left-hand menu under the
―Contributors‖ heading, and enter your
NetID and password.
-Under ―Site Administration Tools,‖ select
the ―trace.tennesse.edu‖ link to configure
items in Trace.
The next screen is the main configuration screen for the Trace repository. Access to communities, series, journals, and ETDs can be accomplished from this window. To configure a particular community, click ―show ir communitys‖ option, and select the community you with to edit.
Note: Communities are identified by their URL. To obtain a community‘s shortened URL,
simply go to the front-end community page in Trace. The short name will appear after Trace‘s
home URL (i.e. ‗utk-fami‘ — http://trace.tennessee.edu/utk-fami/)
Once the community
has been selected, the
Community Configuration page will appear,
with many configuration options.
Community Configuration Options
Adding a Logo: An image can be uploaded to decorate the
top of a community page. The logo must be saved as a .gif,
and can be only 640px wide. You then have the option to
modify WIDTH and HEIGHT. If the image contains the
Community name (ex. a banner), you can select the ‗Only
show community logo?‘ box. Also, if you wish to have the
community title above the image, select the ‗Community Title and Community Logo are stacked’ option.
Community Title: This field will set the title for this community. The title is used in the series
masthead, automated emails, sitemap links, etc.
Shortname: This field is used to enter a shortened name of the Community for use in the breadcrumb display. The breadcrumb navigation is located a the top of each Community, Series, or
Article page.
ex. Home>Engineering>Bioengineering>Faculty Publications and Other Works
Is this an Academic Department?: This setting can influence the sitemap displayed on the
communities.html page. The pages marked as an Academic Department may be aggregated on a
separate page.
Department/Program Webpage: This field can be used to provide an address to the Department or Program‘s official homepage. The link will appear in the left-hand sidebar.
Label for Webpage used in Sidebar: This will determine the label of the link provided above.
If no text is provided, the label will default to the Community Title or Shortname.
Department Chair: If the community has a department chair you can enter the name here for
display above the intro text on the Community page.
Custom Introductory Text
Introductory Text: This field allows for text
to be displayed under the title and logo on the
community page. Enter relevant text and information here.
NOTE: If there is more than one paragraph, or
stylized formatting is needed, HTML is required. For multiple paragraphs, insert <p> at
the beginning of each paragraph, and </p> to
signify the end of each paragraph. A list of other common HTML tags can be found at the end of
this guide.
-To make changes in Trace, select the Submit
Changes button at the top or bottom of the page.
-To make these changes visible in Trace, you
must also click the Update site option on the lefthand menu at the top of the screen.
-To preview what the changes will look like on
the community page, you can select the Preview
site option, and a new window will open to show
you the Trace page.
Series Configuration and Management
The Series are also listed on the main configuration page, below the Communities
listings. Click on the series you wish to
configure, and the page will be very similar
to the Communities Configuration page.
Series Configuration Options
Adding a Logo: An image can be uploaded to decorate the top of a community page. The logo
must be saved as a .gif, and can be only 640px wide. You then have the option to modify
WIDTH and HEIGHT. If the image contains the Community name (ex. a banner), you can select
the ‗Only show series logo?‘ box. Also, if you wish to have the community title above the image, select the ‗Series Title and Series Logo are stacked’ option.
Many of the same configuration options are available for the Series page. These include Series
Title, Abbreviation, External Link, External Link Label, and Introductory Text. For a more
complete discussion of these, see page 4 of this manual.
There are a number of additional options available from the main
configuration page for a series, though many of the default settings
will be sufficient for Trace and many are fairly explanatory. One
important option, though, is found under the ‗Submission‘ heading,
titled ‗Add SUBMIT link.‘ This allows you to determine whether
individuals can submit directly from the front end of Trace, or
whether they must first receive approval.
Management
The majority of work done with a series will be using two tools:
Upload and Manage Submissions
Uploading for an Author
To submit:
1.
Go to your My Account page and log in.
2.
From the Site Administration Tools section, choose the
community you wish to add to, and click Upload.
3. Fill in the values for the metadata and full text. The basic fields are described here, but it is
possible that your submission form may have different fields. These fields include:
Title: enter the title of the submission exactly as you would like it to appear.
Author: Enter the name(s) as it appears
on the publication.
Publication Date: If you know the year
of publication, you may enter it here. If
you series is sorted by publication date, t
his will affect where on the index page t
he document will show.
Abstract: Enter abstracts by pasting or
type them into the form. Make sure you
choose the appropriate option to describe
REQUIRED
the format of your abstract so that it will
display correctly in Trace. If there is
more than one paragraph, HTML tags
will be needed.
NOTE: Those fields designated with a Required
arrow must be filled out!
4. Upload the file or document. If you select
upload a file, you will be given a browse box
option to locate the file on your computer or
network. PDF is the default format for text
documents. If you select provide a link to the
full text on a remote site, you will be given a
box to paste the link into. When the document
is posted, the article page will display a link to
the URL you enter here.
5. Determine the publication status of the item, and use the yes/no buttons provided to
indicate whether the submission was published in a journal. If ―yes,‖ the system will automatically generate an OpenURL and post it on the article page. The OpenURL is helpful if a document is online (e.g, a publisher‘s website), and for copyright reasons, the author cannot upload
it to the repository.
6. If you have supplemental files to post, check the box next to Pleasecheck this if you would
like to add additional files. After submission, you will have the option to upload them.
7. After all the information has been entered, click Submit.
Note: If you selected the option to upload additional files you will be taken to a new
browse screen to locate and add descriptive text to each file. The descriptive text will be
published on the site along with the file. Once all files have been uploaded and labeled
click Continue.
Managing Submissions
After submitting a paper, you will see a confirmation screen, listing your options:
Revise your Submission: Returns you to the submission form where you may make any nec
essary changes to your submission.
Upload Another Submission: If you have more content to submit before posting, you may
click here to upload another submission.
Manage All Submissions: Allows you to view all submissions uploaded to the system.
Update Site (series): Allow you to update the series and post any submissions.
1. To manage the items submitted for a particular series, select the series from the configuration page, and then select the green Manage
Submissions tab from the top menu.
2. This brings you to the main submission page,
where the unpublished items will be displayed
by default. Additionally, you can use the drop
down boxes to search for specific submissions. You may also click on the underlined
headings for each column to reverse the sort
order.
3. Submission Details Page:
-To view the information about a specific item, click on the title. The resulting Submission
details page shows information about the submission, as well as links to download the electronic files, if any.
-Much of this information will be self-explanatory, but there are a few headings that are im
portant to note:
Waiting for Administrator: On the green Manage
Submissions tab, the system automatically displays
a red ―waiting for administrator‖ dot beside
submissions that may require administrator attention (e.g., the author uploaded a revision, a reviewer
posted a review, etc.). You may override that designation by changing the menu from ―Yes‖ to ―No,‖
or vice versa, at anytime.
Locked by Administrator: If you change this
menu to ―Yes,‖ the author will be immediately unable to use the Revise submission link.
Download: Clicking this will allow you to view
the most recent PDF version of the item, including
the system-generated title page and header/footer.
4. Sidebar Options:
-From the Submission Details page shown above, you may find the folling links in the lefthand sidebar. Some links are visible only after certain actions have been completed, and
some links correspond with optional features enabled for your series.
-The options include:
-Submissions: This link returns you to the main Manage Submissions
page.
-Preview Submission: This link displays the submission as it would appear in Trace.
-Revise Submission: To make a change to a submission, you may submit a revision by clicking this link. A new window will appear with all
of the fields that may be edited. Change the necessary elements on the
form and enter a brief description of the changes in the ―reason for update‖ field. When you are ready to make the updates visible in Trace,
click ‗Submit,‘ and then select the Update Site option on the left-hand
toolbar.
-View Revisions: The Revisions History
table is displayed when this link is selected,
and allows you to see who made the submission, as well as any subsequent revisions. It
also allows you to select which version will
be accessible in Trace by selecting the button
to the left of the file desired, and clicking the
‗Save Changes‘ button.
Remember:
ALWAYS
Update Site after making any
changes!
-Supplemental Content: You may submit these supplemental files at the time you make the original
submission or add them at a later date.
1. To upload a new file, click the Browse button to browse your hard drive or network.
Choose the file to upload and add a description (this description will be shown on the site).
2. To prevent access to a supplemental file, deselect the box in the Show column.
3. To revise, click the Browse link to the right of a saved file, and select a replacement file.
4. To change the description, edit the description box.
When the edits are complete, click the Save
Changes button to preserve your modifications.
Again, to reflect the changes in Trace, click the
‗Update Site‘ option on the left-hand toolbar.
-Register Decision: Click this to either
accept/reject/request revisions to a submission. Though an author may submit an
article, the article must then be approved
before it will be published in Trace. From
the drop-down menu, choose you option.
Choosing an option will prompt a preformatted Decision Letter to generate. Note:
It is optional to send the decision letter.
Select the Do not email the decision letter
box to the right of the drop-down menu.
The options include:
1. Accept: choose this letter for
submission you intend to publish
as-is.
2. Accept with Minor Revisions:
Choose this letter for submissions
you intend to publish but need some minor changes before you can do so.
3. Major Revisions Required for Acceptance: Choose this letter for submissions you are
considering but require significant changes.
4. Reject: Rejected submissions can be neither revised nor accepted afterwards so this deci
sion should be used with caution.
-Change any of the text as needed and click Register Decision on the right-hand side of the page to
send the letter. Remember: To make the changes visible on the site, always click ‗Update site‘ on
the left-hand menu!
-Remove Decision: This link allows you to withdraw an entire submission on behalf of an author.
This is helpful if the author has made duplicate submissions. Once removed, it cannot be posted, so
this option should be used with caution.
-Click the Remove submission link.
—Click Remove, no notification to confirm
your selection without sending the letter
suggested on the screen.
—Click the Remove button to confirm you
selection and to send the letter displayed to
the author.
-Click the Update link if you are removing a submission that has been posted. NOTE: Once the
series has been updated, the submission‘s metadata will still be present at its current URL, but the
link to download the file will be replaced by a notice that the document has been withdrawn.
-Delete Submission: This differs from the Remove Decision option in that it allows administrators
to permanently delete a submission. It will leave no record of the submission in the system and cannot be reversed.
1.
Click the Delete submission link
2.
Click the Delete submission button to confirm your selection. Immediately, the submission
will no longer be visible within the system, including the author‘s My Account page, and no
3.
notification email will be sent to the author.
Click the Update link, if you are deleting a submission that has been posted.
Once the series has been updated, the URL where the submission existed will show an
error message, as if the submission had not been posted.
Like the Community and Series configuration pages, the left hand menu also has the Preview
site and Update site options.
-Preview Site: Allows you to view the series homepage before changes are live.
-Update Site: If you have posted submissions, or submitted revisions to posted submissions,
use Update to have those changes carried through to the site. You will receive an email when
the update has completed.
Batch Upload via Excel
Digital Commons allows administrators to upload
multiple records at one time by using the Batch Upload option found on the Manage Submissions page
of a series. An Excel spreadsheet is downloaded that
can be used to enter multiple records‘ data and subsequently uploaded to the particular series in Trace.
To upload content using an Excel format:
1. Each series has a unique Excel spreadsheet. From the Manage Submissions page for any
series, click on the sidebar link ―Batch Upload Excel.‖
2. Click ―Download‖ to download the spreadsheet to your computer.
3. A spreadsheet with preconfigured fields will be downloaded, and will look similar to the
one below.
REQUIRED
4. Complete the spreadsheet, one record per row, with the metadata you with to upload. The
fields in red are required for each record. You can hover over the column headers for information on each field.
Common Fields for Batch Upload
-abstract: the abstract/description for the article.
-abstract_format: the default is One Paragraph (onep). The options are:
-cr– multiple paragraphs, as indicated by carriage returns
-onep– one paragraph
-blanks– multiple paragraphs, as indicated by blank lines
-html– paragraphs formatted with HTML tags
-author1_fname: first author/creator‘s first name
-author1_lname: first author/creator‘s last name
-author1_email: first author/creator‘s email address
-author1_institution: first author/creator‘s institution
NOTE: Additional author/creators can be entered as author2_fname, author2_lname, etc.
Four authors can be included.
-create_openurl: Default to FALSE which does not create an OpenURL for the article. To create an
OpenURL for an article, place TRUE in this section.
-custom_citation: used when the series needs a specific, custom citation rather than a default.
-document_type: the document type for each record.
-fulltext_url: The URL of the main document.
-publication_date: the publication date of the record.
Use MM/DD/YYYY format.
5. When you have completed the spreadsheet, save the
file, return to the ―Batch Upload Excel‖ screen, and
upload the file.
6. If the upload is successful, you will receive a confirmation email. If there were any problems, you
will get an error message with instructions for revising the spreadsheet.
7. To make the
items visible in Trace, return to the Manage Submissions screen,
change the status of the submissions to ―Posted‖, and click the Update site link on the left-hand menu. The items should now be
visible in the Trace series.
This will say
―Posted‖
To Revise:
1. Export the existing batch from Trace:
-Click the ―Batch revise Excel‖ sidebar
link on the Manage Submissions screen.
-Click ―Generate.‖ A spreadsheet of the
current metadata for the series will appear
at the top of the Spreadsheet History.
Download this file
2. Revise the batch and resubmit:
-Using the spreadsheet from your batch export, enter the
changes and new submissions.
-When you have finished, return to the ―Batch Revise Excel‖
in Step 1 of the instructions, and upload the revised file.
Journal Configuration and Management
The Journals are also listed on the main configuration page, below the Communities listings. Click
on the journal you wish to configure, and the page
will be very similar to the Communities/Series
Configuration pages.
Journal Configuration Options
Presentation: There are two options. The Show latest SPECIAL ISSUE link should only be used if you
have specifically created a ‗Special Issue.‘ This setting will create a link to the most recent special issue
in the sidebar. The Hide MOST POPULAR PAPERS link will disable the default setting that lists the ten
most popular papers for a journal, and will eliminate the option from the sidebar.
Submission: The Hide SUBMIT ARTICLE link
allows only administrators and editors of a journal
to submit papers to the journal. The Currently uploading BACK CONTENT option allows an editor
to enter a publication date for each individual article instead of by issue.
Peer Review: An administrator or editor has the
option to specify the number of reviewers per journal article and the number of days per review, if
desired.
Publication: The Document Format option allows
for uploading items saved in formats other than
PDFs. The Author Approval option requires that
the original article creator approve publication within Trace. The Publishing Articles option controls
the publication style of the journal. Selecting this box will require that articles be placed inside an issue
once they are ready, but will NOT be published to Trace until the entire issue has been closed. NOTE:
When an issue is closed, it cannot be revised or modified.
Custom Site Text: The fields for this section are very similar to those for the Commmunities and Series configuration pages. The Cover Text box allows you to enter text regarding the purpose of the journal that will appear on the Journal homepage above the article list. The About Page allows text that will
appear on a separate ‗About‘ page, and allows the entry of more in-depth information about the journal.
Policies Page: This section allows you to add supplemental information about a journal‘s policies, including the sections Philosophy Statement and Submission Rules.
Editors: The section will allow you to add or remove editors from the series by adding their email address and
Journal Editing and Management
This sections provides a brief overview of the basic options for a journal editor. For comprehensive instructions on the complete functionality of
journal management, please see the Journal Editor‘s User Guide.
Accessing Journal Editor’s Tools
-From Trace, select the My Account link on the
left-hand menu.
-Once logged in, your page will appear, and all
journals for which you are an editor will appear at
the bottom, under the EDITOR TOOLS heading.
-The tools listed will depend upon the authorities
for each individual journal, but will likely include:
Manage Submissions
Upload
Reports
Configuration
Managing Submissions
-Clicking on the Manage Submissions button on your ‗My Account‘ page will allow you to view and
revise all articles for the journal. It is configured almost exactly like a Series submission management
page, with all of the options found there.
-By selecting an article, you can revise the submission,
view any previous submissions, register a decision, or
withdraw the submission just as you would in a series (For
complete instructions on how to execute these tasks, please
see the Series Management section of the guide.
-Once a decision has been registered for a submission, you
must assign the article to an issue. To do this:
1. Click Issue Assignment on the left-hand toolbar.
If there is more than one issue open, you will be
given a choice of all open issues.
2. Select the correct volume and issue, and click
Assign.
3. The next screen will show you the current contents of the issue. If everything is correct, select the
Submit changes button.
4. As always, for changes to be seen in Trace,
click the Update site option on the left-hand toolbar!
Upload Articles
-Selecting the Upload option from your My Account page allows
you to submit work for an author or upload additional content to
be placed in an issue. To make a submission:
1. Go to My Account page, and from the Editor‘s Tools
section click Upload.
2. The submission instructions, and submission
agreement screens will be skipped. You will need to enter
the author information, the full text of the article (via PDF
file) and any other information pertinent to the
submission.
3. Select the Submit button at the bottom of the screen.
-From here, you may return to the Manage Submissions screen to
register a decision and assign the submission to an issue.
Usage Reports
-This option allows you to view various statistics on a journal, including which articles have been the
most popular and how many articles have been downloaded in a given time period. To see the information about how readers are accessing a given journal:
1. Click on the Reports link on your My Account page.
2. The Usage Reports screen will be displayed, and allows you to customize a report based
on various parameters. Additionally, if you wish to receive only usage statistics on a single
issue or article, use the links for the subsections at the top of the page.
3. Select the desired parameters and click the Email me the report button. An email will be
sent to the address ties to your account.
Configuration
-The Configuration option on the My Account page allows you to add volumes and issues to a journal. To do so:
1. Click the Configuration option. Using the link at the
top of the Configuration Tools screen, click the link for
the volume that needs a new issue.
2. Click the ―create new: issue‖ link to start a new is
sue. Verify the issue number, enter a title if desired, and
enter a date.
3. Click the button to create the issue, and remember to
click the Update site option on the left-hand toolbar to
make the changes visible in Trace.
Selected Works—Quick Guide
This is intended to be a quick reference guide for back-end administrative tasks associated with UT‘s
SelectedWorks Authors. For more comprehensive instructions on how to use Selected Works, please
see the full SelectedWorks User Manual.
Automatic Collection
-This feature can be used to manually import items from individual SelectedWorks pages into the
corresponding series in Trace. To do so:
1. Log in to Trace, and select the series in
which you wish to import items.
2. Click the Manage Submissions tab at
the top of the screen.
3. From the left-hand menu, select Import
SelectedWorks. A page will appear listing
the authors currently associated with UTK
in Selected Works.
NOTE: Make sure that the ‗Status‘
box says ―All.‖ Otherwise, some
authors may be missing from the
list.
4. Select the Include button next to the au
thor‘s that you wish to include in this par
ticular series. Usually this will be the au
thors affiliated with the department or program that the series represents. Once you have
identified all the authors you wish to include, press the Continue button.
5. Any items on the SelectedWorks pages that have not been
included in the particular series will then be listed. Click the
Post button for all you wish to import, and click Save. Additionally, if you wish to remove, or hide any items from a series page, click the Remove button.
6. You may then return to the Authors Screen for that series
to make additional changes. To post items from another series or department, Click the Manage All Submissions button
and choose a series from your account.
NOTE: The automatic collection of SelectedWorks
items will only import PDF submissions. To make the
metadata for other items or linked articles, you will have
To obtain these via Batch Upload.
Appendix
I. BePress/Trace Standards and Best Practices
-Why use standards?
Although much non-standard HTML will appear fine in a browser, using standard HTML formatting
will benefit Trace by:
-Ensuring that the site remain up-to-date and be easier to keep up-to-date in the future. This
ensures that the standard code used will be supported by future browsers.
-Making the site faster. The amount of actual code being sent to the visitor is significantly re
duced, making load time shorter for users.
-Making the site more versatile to work on non-traditional browsers like cell phones, mobile
handheld devices, and other portable technologies.
-Best Practices
Tag Structure
In XHTML every tag must be opened AND closed. This applies even to self-contained tags such as
line breaks, horizontal rules, and images. This is done by inserting a backslash in to the self-contained
tag itself. A few examples:
The line break tag should be written as:
<br />
The image tag should be written as:
<img />
All links and images should include a description. For links this would use the title property. For images this would use the alt property. This is important for accessibility standards as this will provide a
description for disabled users who use text-to-speech screen readers.
<a href=“http://www.youlinkhere.com/” title=“Link Description”>This is my link
text.</a>
<img href=“http://www.image_url.com/” alt=“Image Description” />
Text Formatting
All text must be formatted within an appropriate tag. For most text this would fall under paragraph
tags.
<p>This is a normal paragraph of text.</p>
The <b>, <i>, and <u> tags are deprecated as of HTML 4.01. In accordance with XHTML Standards, the following tags should be used in their place:
Bold text should be wrapped in <strong> tags.
<strong>This text would appear bold!</strong>
Italicized text should be wrapped in <em> tags.
<em>This text would appear italicized!</em>
As a general rule, underlined text should almost never be used. Most users confuse this text with a
hyperlink. In an underline is absolutely necessary, please apply a <style> tag as follows:
<style=“text-decoration:underline”>This text would appear underlined!</style>
-XHTML Examples
<p>This is the first paragraph</p>
<p>This is the second paragraph</p>
This is the first paragraph
This is the second paragraph
<p>This is a line of text with a linebreak
Here. <br /> This is the text after</p>
This is a line of text with a
linebreak here.
This is the text after
<strong>bold text</strong>
bold text
<em>italicized text</em>
italicized text
Text with <sub>subscript</sub>
Text with subscript
Text with <sup>superscript</sup>
Text with superscript